1
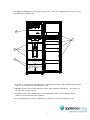
R E F R I G E R AT O R
USER'S OPERATION MANUAL
Model: WRO34U*
IMPORTANT: Before installing and operating the unit, please read,
understand and follow the Warnings and Instructions. Retain for future
reference.
1
TABLE OF CONTENTS
1. Description of your Whirlpool Refrigerator......................................... 3
2. Warning and Safety Precautions ....................................................... 5
3. Getting Started .................................................................................. 7
4. Operating your Whirlpool Refrigerator ............................................... 8
5. Care and Maintenance...................................................................... 9
6. Food Storage Tips ........................................................................... 11
7. Trouble shooting.............................................................................. 12
8. Reversing the door.......................................................................... 13
2
1. Description of your Whirlpool Refrigerator
1
2
3
4
5
6
7
8
9
10
15
11
12
13
16
14
1. Air Flow Cover
9. Lamp Cover
2. Ice Tray
10. Refrigerator Shelf B
3. Freezer Shelf
11. Side Plate
4. Freezer Temperature Controller
12. Crisper Cover
5. Controller
13. Crisper
6. Refrigerator Shelf A
14. Front Levelling Foot
7. Door Light Switch
15. Door Shelf
8. Temperature Adjustment Control
16. Front Levelling Foot
Note: Due to constant development, your refrigerator may be slightly different from the model illustrated in this
Instruction Manual. Please note the Instructions remain the same
3
Your Whirlpool refrigerator has two special storage zones.
temperature for a specific function.
Each one separately balanced at the correct
4
1
2
3
1. Door Shelves: There are three adjustable shelves suitable for the storage of eggs, bottled liquids, packaged
food, etc. Please lift the shelves vertically to remove.
2. Adjustable shelves: There are three adjustable shelves in the refrigerator compartment.
be easily taken out to be cleaned.
3. Vegetable Crispers: There are two crispers in the refrigeration chamber.
suitable for the storage of fruits and vegetables.
The shelves can
Each vegetable crisper is
4. Freezer Compartment: The freezer compartment is suitable for freezing and storing frozen foods.
4
2. Warning and Safety Precautions
Important: Please read, understand and follow the Instructions and Warnings.
Retain for future reference.
Your safety and the safety of others is very important.
We have provided many important Safety Warnings in this manual and on the appliance.
follow all Safety Warnings.
Always read and
This is a Safety Alert Symbol.
This symbol alerts you to hazards that can be fatal or hurt you and others.
All safety messages will be preceded by the safety alert symbol and the word
“DANGER” or “WARNING”.
These words mean:
You will be killed or seriously injured if you do not follow instructions
You can be killed or seriously injured if you do not follow instructions
All safety messages will identify the hazard, tell you how to reduce the chance of injury, and tell
you what can happen if the instructions are not followed.
Appliance Safety
R600a Refrigerant Warning
•
•
•
•
•
•
•
•
This appliance contains a small quantity of R600a refrigerant which is environmentally
friendly, but flammable. It does not damage the ozone layer, nor does it increase the
greenhouse effect.
During transportation and installation, ensure that the tubing of the refrigerant circuit is not
damaged.
Leaking refrigerant can ignite and may damage the eyes.
In the event any damage does occur, avoid exposure to open fires and any device which
creates a spark. Disconnect the appliance from the mains power.
Thoroughly ventilate the room in which the appliance is located for several minutes.
Notify Whirlpool Customer Service for necessary action and advice.
The room for installing the appliance must be at least 1 cubic metre per 8 grams of
refrigerant. The refrigerant quantity contained in this appliance is 45 grams; it is also noted
on the Rating Plate of the appliance.
It is hazardous for anyone other than an Authorised Service Person holding a Gas
Work Authorisation for hydrocarbon refrigerants, to carry out Servicing or repairs
which involve the removal of covers.
WARNING:
•
•
•
•
•
•
•
This appliance must be earthed.
Keep ventilation openings, in the appliance enclosure or in the built-in structure, clear of
obstruction.
Do not use mechanical devices or other means to accelerate the defrosting process, other
than those recommended by the manufacturer.
Do not damage the refrigerant circuit.
Do not use electrical appliances inside the food storage compartments of the appliance,
unless they are of the type recommended by the manufacturer.
This appliance is not intended for use by persons (including children) with reduced physical,
sensory or mental capabilities, or lack of experience and knowledge, unless they have been
given supervision or instruction concerning use of the appliance by a person responsible for
their safety.
Children should be supervised to ensure that they do not play with the appliance.
5
WARNING:
•
•
•
•
•
Do not store explosive material in the appliance or any other products containing
propellants such as spray cans, explosive liquids or flammable liquids. During
operation, thermostats produce sparks which could pose a fire hazard, as flammable
liquids could cause an explosion.
Do not use any electrical equipment within the appliance, such as ice cream makers,
due to the danger of sparking and explosion.
Do not use sharp edged objects to remove ice and frost, separate frozen food within the
appliance, which could cause damage to the evaporator and cause serious damage to
the appliance.
Do not use defrosting sprays as they could contain harmful substances which could
react and damage plastic parts.
Do not use steam cleaning devices to clean. Pressurised steam vapour could enter
electrical components, causing a short circuit.
Disposal of your appliance
•
•
•
•
•
•
•
•
Note:
Disconnect the appliance from the mains power.
Cut the power cable at the point where it exits the refrigerator and destroy the plug or render
it unusable to prevent misuse and not pose a hazard.
Remove the doors and the shelves so that children cannot easily climb inside, as they can
get trapped and suffocate.
Ensure that the appliance does not present any danger to children while being stored
temporarily for disposal.
Before and during transportation for disposal, ensure that the tubing of the refrigerant circuit
is not damaged.
Leaking refrigerant can damage the eyes.
This appliance contains insulation formed with flammable blowing gases. Avoid any safety
hazards by following appropriate disposal procedures noted above.
Ensure that the appliance is disposed of as per the appropriate local guidelines for
appliances containing hydrocarbon refrigerants.
The manufacturer is not responsible for any damage caused by non-compliance with
the Warning and Safety Instructions.
6
3. Getting Started
Getting Started
Installation
•
Unpack your refrigerator and select a dry well ventilated location close to an electrical point.
•
Allow sufficient clearance for dissipation of heat, a minimum of 50 mm at the back and 30
mm on the sides and top.
•
Keep the refrigerator away from direct sunlight and other high temperature sources like an
oven and a cooking range. Avoid damp, exposed locations.
•
Ensure that the electrical point is properly earthed.
•
Ensure that the power cable is not damaged during installation.
•
Power cable modification or replacement must only be carried out by qualified personnel.
•
Do not damage the tubing of the refrigerant circuit.
•
Keep ventilation openings, in the appliance enclosure or in the built-in structure, clear of
obstruction. Regularly keep the openings clean.
•
Avoid carpeted areas.
•
Shift the refrigerator into place by raising the front slightly and sliding it on the rear castors.
•
Rotate the two levelling feet, provided below your refrigerator at the front corners,
clockwise/anticlockwise to raise/lower the front. The front should be slightly raised above
the rear – so that the door shuts gently when left open.
Do not use extension cords.
A stable installation minimizes noise and prevents tilting.
Getting Connected
•
The refrigerator is only suitable for single-phase alternating current of 220-240V, (50±1) Hz.
•
Do not extend or fold the power cord.
•
Set the temperature controls in the refrigerator and freezer sections.
•
Run the refrigerator for 5 to 6 hours, to enable it to cool sufficiently before loading food inside.
Keep the power cord away from the compressor.
Warning
To avoid the risk of children becoming trapped and suffocating, do not allow them to play or hide
inside the appliance.
7
4. Operating your Whirlpool Refrigerator
Adjusting the temperature within the refrigerator compartment
The temperature regulator controls the thermostat of your refrigerator. A control knob is provided in
the refrigerator section. Adjust the knob according to the room temperature, frequency of door
opening and storage load. A gentle turn to the left or right enables you to change the temperature
of your refrigerator.
:
Adjusting the temperature within the freezer compartment
The temperature regulator allows you to regulate the temperature inside the Freezer. A slider control
is provided in the freezer section. Adjust the slider according to the room temperature, frequency
of door opening and storage load. Sliding the slider enables you to change the temperature of the
freezer.
MAX
MIN
Caution:
•
Do not keep hot (more than 60 °C) or heavy (more than 10 kg) objects on top of the
refrigerator.
•
Do not keep lit candles on top of the refrigerator as this can cause a fire.
•
Do not chill liquids and carbonated drinks in glass containers in the freezer compartment or
they will freeze and burst.
•
Do not keep glass bottles in the freezer for too long or they will freeze and burst.
•
Check local voltage before installation.
Ice tray
•
•
•
•
Your Whirlpool refrigerator comes with a twist ice function.
To make ice, pour water into the ice tray until it is 4/5 full.
Place ice trays in the ice making chamber for a minimum of 2 hours.
To use twist ice function, simply twist the ice tray.
8
5. Care and Maintenance
Cleaning your Whirlpool Refrigerator
•
•
•
•
•
•
•
•
•
•
•
Before cleaning, always switch-off the power supply and remove the plug from the
socket.
Remove all food items from the refrigerator.
Do not remove all the shelves at the same time to prevent children from easily climbing
inside. The same care should be followed when going on vacation.
To remove refrigerator shelves, gently push the rear of the shelf upwards and then pull out.
Remove the refrigerator and the freezer door bins by pushing upwards and pulling out.
Hold the vegetable crisper using the handle, raise the front slightly and pull out.
Use a soft cloth and mild detergent to clean the refrigerator thoroughly. Take care not to
damage the door seals.
Allow the refrigerator time to dry, by leaving the door open for some time.
Dry the parts and place them back in the refrigerator.
Plug the power cord in and switch the mains on. Allow the refrigerator time to cool before
placing food inside.
Keep the surrounding area around the appliance clean to prevent cockroaches or other
insects from entering the appliance. Damage caused by cockroaches or other insects
will not be covered by the Warranty.
Caution
• Do not splash water directly on the refrigerator.
• Do not work with flammable sprays or solvent based cleaners. The fumes could cause
fires or explosions.
• Be sure to check the voltage before inserting the power supply cord into the socket.
• Be sure not to re-insert the power supply socket within 5 minutes of removing it from the
socket.
• Ensure that water does not get into the light bulb socket or other electrical components of
your refrigerator.
• Do not allow water to collect at the bottom of the refrigerator.
• Do not store volatile chemicals such as ether and benzene in the refrigerator. The fumes,
besides damaging food, can build up and cause an explosion.
Going on vacation
Short vacation
During an average short length vacation, it is usually best to leave the refrigerator and freezer
in regular operation.
Long vacation
For a vacation of extended duration, perform the following steps:
•
Remove all food items from the refrigerator and freezer.
•
Switch-off the mains and disconnect the power cord from the socket.
•
Use a soft, damp cloth to wipe the refrigerator clean from the inside and outside.
•
Leave both doors open to prevent odours.
•
Do not allow children to play or hide inside the appliance due to the risk of them becoming
trapped and suffocating.
9
Moving your refrigerator
•
Switch-off the mains and disconnect the power cord from the socket.
•
Remove all food items from the refrigerator and freezer.
•
Use a soft, damp cloth to wipe the refrigerator from the inside and outside.
•
Fasten the doors and interior components by using tape to prevent them from moving or
opening during transportation.
•
Lift the refrigerator slightly from the front and slide using the castors at the rear.
Changing the light bulb
•
•
•
•
•
Before removing the light bulb, disconnect the refrigerator at the main power supply.
Failure to do so could result in electric shock or serious injury.
Use a Phillips head screwdriver to remove the screw of the light cover. Remove the light
cover by gently pushing upwards.
Unscrew the bulb.
Replace the bulb with a 10 Watt-refrigerator bulb that is of the same shape and size.
Replace the light cover and refit the screw.
10
6. Food Storage Tips
•
•
•
•
•
•
•
To avoid blocked airflow and minimise energy consumption, do not crowd the refrigerator
with too much food.
Use sealed containers and plastic bags to prevent food from drying or having a mixed taste
with other food in the refrigerator.
Please clean food, bottles and packed articles before storage.
Hot food should be cooled down to room temperature before storage to improve food
preservation and minimise energy consumption.
Do not re-freeze after defrosting.
Store liquids in the front of the refrigerator to avoid freezing.
Cut meat, fish, vegetables, etc. into small pieces before freezing.
Meat
Your Whirlpool freezer will keep meat fresh. You should always wrap meat completely and tightly
in plastic bags. Unwrapped meat quickly looses moisture and nutrients and causes your
refrigerator to smell.
Remove bones and surplus fat from meats.
roughly half as much freezer space.
Fat usually becomes rancid, and boneless meat needs
Bigger portions of meat must be thawed before cooking. If you have a microwave, you can thaw
meat in minutes. If you don’t have a microwave, move the quantity you want to use from the
freezer to the top of the vegetable crisper the night before.
Vegetables
Your Whirlpool refrigerator makes it possible for you to preserve your favourite fruits, vegetables or
meats for longer. Just follow the storage tips given here to keep your favourite food fresh for a long
time.
All vegetables should be blanched (quickly dipped in boiling water) before freezing. Blanching
destroys enzymes, preserves flavour, texture and vitamin content, and reduces micro-organisms.
After blanching, remove the vegetables and plunge them immediately into cold, icy water. Follow
these specific tips for the given vegetables to get maximum storage life out of them.
•
•
•
•
•
•
Beans: Wash thoroughly, trim ends and then blanch for 2 minutes.
Capsicum: Wash and remove all seeds and membranes. Blanch in halves or sliced. Put
in a box and freeze. Blanching time – 3 minutes.
Green Peas: Shell and blanch in a pan. Shake the pan periodically to heat evenly. Cool,
drain and pack – preferably in polybags or containers. Blanching time – 1 minute.
Tomatoes: These are best frozen as puree or juice. Skin and core them before storing.
Then simmer them in their own juices for 5 minutes. Once the tomatoes are soft, strain and
puree them. Pack them in polybags or containers and freeze.
Large Red Chillies: Remove the stems, cut in half and completely de-seed them. Put them
in polybags and freeze.
Carrots: Cut them in any shape. Blanch in hot water for 1 minute and then dip in ice cold
water. Drain in a sieve and pack in a polybag or container and freeze.
11
7. Trouble shooting
If there is something wrong with your refrigerator, please check the following points before you call
for service assistance.
Refrigerator does not work
Is the power cord plugged into the socket?
Is there a power outage?
Has the circuit breaker tripped?
Is there a loose connection?
Is the thermostat in the ‘off’ position?
Refrigerator attempts to start
but fails
Is the voltage low?
Ice formation is slow
Is the Airflow Control in ‘freezer max’ position?
Cooling in the refrigerator is
not enough
Is the Refrigerator Control set too low?
Is the air passage obstructed by food?
Is the refrigerator compartment overloaded?
Is the refrigerator door fully closed?
Are the doors being opened too frequently?
Are you storing hot food in the refrigerator?
Refrigerator runs non-stop
Are the Temperature Controls set too high?
Is the door left open for too long?
Refrigerator works, but inside
light does not
Check the light bulb.
Refrigerator side walls are hot
This is not a problem. The walls heat slightly during
normal operation.
Contact Whirlpool Customer Service.
Refrigerator gives a mild
shock
Refrigerator makes too much
noise
Is the refrigerator on a level surface?
Is the refrigerator too close to the wall?
Refrigerator compartment is
smelly
Has the refrigerator been cleaned recently?
Is there an object with a strong smell inside?
12
8. Reversing the door
The side at which the door opens can be changed from the right side (as supplied) to the left side, if
required.
Warning! When changing the side at which the door opens, the appliance must not be
connected to the mains power supply.
start the activity.
Remove the plug from the mains before you
Before you start, disconnect the appliance from the mains power supply. Lay the refrigerator on its back
in order to gain access to the base; place it on a suitable soft foam packaging or similar material to avoid
damaging the cooling pipes at the rear of the refrigerator.
1. Remove the top hinge cover and the top hinge bracket by unscrewing the three mounting screws.
2. Lift the upper door and place it on a suitable padded surface to prevent it being damaged. Remove
the blanking plugs, if fitted, to the left hand side holes, on the top and bottom sides of the door and fit
them to the holes on the right hand side.
3. Remove the centre hinge bracket from the centre rail, by removing the screws.
As illustrated below.
4. Lift the lower door and place it on a suitable padded surface to prevent it from being damaged.
Remove the blanking plugs, if fitted, to the left hand side holes, on the top and bottom sides of the
door and fit them to the holes on the right hand side.
13
5. On the centre rail, remove the blanking plugs from the left hand side holes, to be used for mounting the
centre hinge bracket and fit them to the right hand side holes. As illustrated below.
6. Remove both the levelling feet fitted to the base at the front corners.
bracket, by removing the mounting screws. As illustrated below.
Remove the bottom hinge
7. Position the lower door in the proper position. Insert the hinge pin of the bottom hinge bracket into
the bottom left hand side hole of the lower door. Position the bracket holes over the left hand side
mounting holes, fit and tighten the screws. Next, refit the levelling feet. As illustrated below.
14
8.
Reverse the direction of the centre hinge bracket and position it on the left hand side. Locate the top
left hand side hole of the lower door into the hinge pin of the center hinge bracket. Position the bracket
holes over the left hand side mounting holes, fit and tighten the screws. As illustrated below. Position
the freezer door in the proper position. Locate the bottom left hand side hole of the freezer door into the
hinge pin of the centre hinge bracket.
9.
Remove the blanking plug and plate from the left hand side holes of the refrigerator top, to be used for
mounting the top hinge bracket and fit them to the right hand side holes. Locate the hinge pin of the top
hinge bracket into the top left side hole of the freezer door. Position the bracket holes over the left hand
side mounting holes, fit and tighten the screws. As illustrated below.
10. Refit the top hinge cover. As illustrated below.
Position the refrigerator in the upright position and proceed as instructed in Section 3, Getting Started.
Ref.: WRO34U* - 19 08 2009
15