1
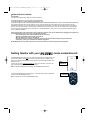
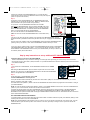
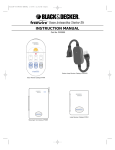
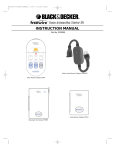
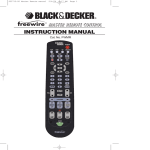
621530-00FW1000 FREEWIRE MANUAL
12/17/03
9:50 AM
Page 1
Home Automation Starter Kit
INSTRUCTION MANUAL
Cat. No. FW1000
Key Chain Remote Catalog # FWKR
Messenger Hub Catalog # FWMH
621530-00FW1000 FREEWIRE MANUAL
12/17/03
9:50 AM
Page 2
GENERAL SAFETY RULES
WARNING: Read and understand all instructions. Failure to follow all instructions listed below may result in electric shock, fire, property damage
and/or serious personal injury.
SAVE THESE INSTRUCTIONS
WARNING: Do not use any FREEWIRE product to control any device where unexpected or unattended turn on/off could cause
serious personal injury and/or property damage. Interference, interruptions, or surges in the electrical system, or malfunction may cause
unexpected turn on/off of plugged in devices.
WARNING: Do not use any FREEWIRE product to control any device where failure to operate could cause serious personal injury
and/or property damage. Interference, interruptions or surges in the electrical system, or malfunction may cause plugged in devices to fail to
operate as expected.
WARNING: Do not use any FREEWIRE product to control any medical device. Using any FREEWIRE product to control any type of
medical device could result in serious personal injury.
WARNING: Do not use any FREEWIRE product to control any device that exceeds the rating for that FREEWIRE product. Using a
FREEWIRE product to control a device that exceeds the rating for that product could result in serious personal injury and/or property damage.
The ratings for FREEWIRE products are as follows:
• BULB RECEIVER - 150 watts - incandescent bulbs only.
• LAMP RECEIVER - 300 watts - lamps with incandescent bulbs only.
• MESSENGER HUB - 500 watts - lamps with incandescent bulbs only.
• OUTDOOR LAMP RECEIVER - 500 watts - lamps with incandescent, fluorescent, halogen or low voltage bulbs only.
• APPLIANCE RECEIVER - 15 amp resistive load small appliances, 1/3HP motor load, 500 watts lamps with incandescent, fluorescent or halogen
bulbs only, 400 watts for television.
If the FREEWIRE product you intend to use is not listed here, consult the instruction manual for that FREEWIRE product or call 1-800-544-6986
to determine the applicable rating before plugging in or using that FREEWIRE product.
WARNING: To reduce the risk of electric shock or fire, do not expose any FREEWIRE product to rain or moisture. If a FREEWIRE
product is exposed to rain or moisture, immediately disconnect the FREEWIRE product from the AC outlet to reduce the risk of electric shock
or fire and consult authorized service personnel. NOTE: Outdoor Lamp Receiver may be used outdoors. Bulb Receiver may also be used
outdoors if mounted in correct orientation.
WARNING: To reduce the risk of electric shock, do not disassemble any FREEWIRE product. No user-serviceable parts are inside.
WARNING: To reduce the risk of electric shock, do not use any type of plug adaptor with this product.
WARNING: Do not use a Bulb Receiver, Lamp Receiver, Messenger Hub or Outdoor Lamp Receiver to control an appliance. Using a
Bulb Receiver, Lamp Receiver, Messenger Hub or Outdoor Lamp Receiver to control an appliance could damage the appliance or the receiver,
which could result in serious personal injury and/or property damage.
WARNING: Do not use a Bulb Receiver or Lamp Receiver to control a lamp or fixture that already has a dimmer on it. Using a Bulb
Receiver or Lamp Receiver to control a lamp or fixture that already has a dimmer on it could damage the lamp, fixture or receiver, which could
result in serious personal injury and/or property damage.
WARNING: Use only incandescent bulbs in lamps that are to be controlled by the Lamp Receivers. Using any other type bulbs could
damage bulbs and/or Lamp Receivers.
WARNING: Use only incandescent bulbs in Bulb Receivers. Using any other type bulbs could damage bulbs and/or Bulb Receivers.
WARNING: Do not use any intercom or monitoring system, including a baby monitor, that uses the house wiring to transmit signals
in permanent transmit (or talk) mode when using FREEWIRE products. Transmissions from an intercom or monitoring system that uses
the house wiring to transmit signals could interfere or block out FREEWIRE transmissions in permanent transmit (or talk) mode. It is also
possible that a neighbor's intercom or monitoring system could cause unexpected operation, including failure to operate, of your FREEWIRE
system, or that your FREEWIRE SYSTEM could cause unexpected operation, including failure to operate, of your neighbors intercom or
monitoring system.
WARNING: If unintended operation of any FREEWIRE product is observed, unplug all FREEWIRE products immediately until (1) the
source of the interference is identified and eliminated through selection of a different HOUSE CODE to ensure that neither system
causes unintended operation of the other system or (2) a blocking filter, Black and Decker Model number PZZ01, is installed. Call 1888-678-7278 to order. Professional installation recommended. If you cannot identify the source of interference by talking with neighbors
who are using a FREEWIRE or compatible system and you do not want to install a blocking filter, or if you have any questions about identifying
or eliminating interference, please call 1-800-544-6986 before plugging in or using any FREEWIRE product.
Remember to exercise good common sense when using your FREEWIRE system - especially when attaching unattended appliances
or devices to the system. There can be unexpected consequences if FREEWIRE products are not used with care. For example, an empty
coffee pot can be remotely turned on due to unintended operation or interference from a neighbor's FREEWIRE or compatible system. If that
should happen, your coffee pot could be damaged from overheating, which in turn could cause a fire or create a risk of electrical shock. As
another example, if an electric heater is turned on unexpectedly while clothing is draped over it, a fire could result. Accordingly, DO NOT USE
the FREEWIRE system for the control of medical devices, heating appliances, such as portable heaters, or any other appliance or device that
could cause physical injury or property damage if turned on or off while unattended. Similarly, DO NOT USE the FREEWIRE system for the
control of any appliance or device that could cause physical injury or property damage if it fails to operate as expected. Interference,
interruptions or surges in the electrical system, or malfunction may cause plugged in appliances or devices to fail to operate as expected. For
example, if a pipe heater controlled by a FREEWIRE system fails to operate as expected, the pipes could freeze and rupture. For these
reasons, it is important to read, understand and follow all instructions in this manual, and to consider carefully the potential consequences of
unattended or unexpected operation, or failure to operate, of an appliance or device before you attach it to a FREEWIRE system.
2
621530-00FW1000 FREEWIRE MANUAL
12/17/03
9:50 AM
Page 3
GENERAL SAFETY RULES (CONTINUED)
FCC CAUTION
THIS DEVICE COMPLIES WITH PART 15 OF THE FCC RULES.
OPERATION IS SUBJECT TO THE FOLLOWING TWO CONDITIONS:
(1) THIS DEVICE MAY NOT CAUSE HARMFUL INTERFERENCE, AND
(2) THIS DEVICE MUST ACCEPT ANY INTERFERENCE RECEIVED, INCLUDING INTERFERENCE THAT MAY CAUSE UNDESIRED OPERATION.
This equipment generates and uses radio frequency energy, and if not installed and used properly, that is, in strict accordance with the
manufacturers instructions, it may cause interference to radio and television reception. It has been type tested and found to comply with the
limits for remote control devices in accordance with the specifications in Sub Parts B and C of Part 15 of FCC Rules, which are designed to
provide reasonable protection against such interference in a residential installation. However, there is no guarantee that interference will not
occur in a particular installation.
If this equipment does cause interference to radio or television reception, which can be determined by unplugging the equipment, try
to correct the interference by one or more of the following measures.
• Reorient the antenna of the radio/TV experiencing the interference.
• Relocate the interference with respect to the radio/TV.
• Move the interference away from the radio/TV.
• Plug the interface into an outlet on a different electrical circuit from the radio/TV experiencing the interference.
• If necessary, consult your local Dealer for additional suggestions
NOTE: Modifications to any of the components in this kit will void the user’s authority to operate this equipment.
Getting familiar with your
home automation kit.
The MESSENGER HUB is the brain of the Freewiretm system. When it is plugged into an AC
outlet it has the ability to receive Radio Frequency (RF) signals from the remotes and the
ability to send messages through existing house wiring to all receivers that are dialed to the
same house code.
It is also used to control incandescent lamps only, rated up to 500 watts, connected to the
plug receptacle at the bottom of the MESSENGER HUB.
FWMHMESSENGER HUB
Note: For additional restrictions and instructions see MESSENGER HUB section.
The KEY CHAIN REMOTE can conveniently turn on and off a limited number of lights which
you select from the MESSENGER HUB.
Note: For instructions see KEY CHAIN REMOTE section,
3
FWKRKEY CHAIN REMOTE
621530-00FW1000 FREEWIRE MANUAL
12/17/03
9:50 AM
Page 4
DEFINITIONS OF TERMS USED IN THIS MANUAL
What is the UNIT CODE?
The unit code allows you to assign a number (1 - 16) to any Freewire unit in your home system. For example, if you assign the unit code
number 5 to a Lamp Receiver, the lamp will turn on and off when you activate the number 5 on your Freewire remote control. If you want a
multiple of Lamp Receivers to respond to a single number on your remote, there is no problem with setting them all to the same unit code
number.
What is the HOUSE CODE?
The house code prevents interference with other Freewire systems that may be in your neighborhood. When you set your house code to a
letter (A - P) you are choosing a distinct communication language between all parts of your Freewire system. It is essential that all units in your
Freewire system are set to the same house code letter for it to operate correctly.
What is the Remote Control SYNCHRONIZATION?
When you first install your Freewire units it is essential that your match up the wireless Remote Controls (Indoor Remote and Keychain
Remote) with the plugged in Receiver Hub. This will synchronize their wireless communication in a distinct way that prevents interference with
other Freewire systems that may be in your neighborhood.
Why are there COLOR SEGMENTS on the unit code wheels?
The six colors (or zones) help you to allocate unit codes to various parts of your house. For example, if you wanted to control three plug in
lamps in your living room you might allocate them the unit code numbers 5, 6 and 7 which are part of the green segment (green zone). Green
becomes a quick reference to controlling those lamps from your remote control.
What are GROUPS?
Groups are shortcut buttons to operating any combination of up to four receiver unit codes. For example, you may wish to create a 'welcome
home' group control. If you had your entrance light(s) set to 1, your hall lamp set to 5, your living room lamp set to 8 and your kitchen light set
to 11 they could all be turned on/off by a single group key. It is essential to first program the group with the Messenger Hub and Indoor Remote
before you can use this function.
What does the HOUSE button do?
When you press HOUSE ON all the Lamp Receivers and the Messenger Hub in your Freewire system will turn on (for safety reasons, it will
not turn on appliance receivers). When you press HOUSE OFF any unit in your Freewire system will turn off (both lamp and appliance
receivers) - this is fast way to turn off all your Freewire units.
PLEASE FOLLOW THE SEQUENCE LAID OUT IN THIS MANUAL TO AVOID CONFUSION
Step by step instructions to set up the MESSENGER HUB:
A Quick Note Before You Set Up The MESSENGER HUB:
WARNING: For indoor use only. If a FREEWIRE product is exposed to rain or moisture, immediately disconnect the FREEWIRE product
from the AC outlet to reduce the risk of electric shock or fire and consult authorized service personnel.
WARNING: Use only incandescent bulbs (up to 500 watts total) in lamps that are to be controlled by the Messenger Hub.
Each receiver has a specific address made up of a HOUSE CODE (bottom dial) and a UNIT CODE (upper dial) which is used to communicate
with the MESSENGER HUB.
The function of the HOUSE CODE is to prevent interference from another FREEWIRE or other compatible system. If you experience
interference with another system at any time, which may result in unexpected turn on/off of devices plugged into either system, unplug all
FREEWIRE devices immediately until (1) the source of the interference is identified and eliminated through selection of a different HOUSE
CODE to ensure that neither system causes unintended operation of the other system or (2) a blocking filter, Black and Decker Model number
PZZ01, is installed. Call 1-888-678-7278 to order. Professional installation recommended. If you cannot identify the source of interference by
talking with neighbors who are using a FREEWIRE or compatible system and you do not want to install a blocking filter, or if you have any
questions about identifying or eliminating interference, please call 1-800-544-6986 before plugging in or using any FREEWIRE device.
Step 1:
Plug the MESSENGER HUB into any operational AC outlet within your home. Rotate antenna to the upright position. Open the front door to
expose the control panel as shown in Figure 1. NOTE: Placing the MESSENGER HUB on the inside wall closest to driveway or entry
way, will often maximize range of the KEY CHAIN REMOTE.
Step 2:
Select a HOUSE CODE on the MESSENGER HUB, any letter A - P. (Note: The house code you select for the MESSENGER HUB will dictate
what letter you will select for all of the RECEIVERS you plan to control with this MESSENGER HUB.)
Step 3:
Select a UNIT CODE on the MESSENGER HUB, any number 1 - 16. The number and corresponding color you pick will control the lamp outlet
4
621530-00FW1000 FREEWIRE MANUAL
12/17/03
9:50 AM
Page 5
located on the underside of this MESSENGER HUB. (If you select the same
number and same house code for any additional receivers on this system they will
operate in conjunction with this hub.)
1
On/Off Button
Step 4:
Unit Code Dial
Synchronize your KEY CHAIN REMOTE with your MESSENGER HUB so they
understand how to communicate with each other. (Note: Any additional remote
that is introduced to the system must also be synchronized.)
House Code Dial
To synchronize, move the MESSENGER HUB slide switch to LEARN.
Run / Learn Slide Switch
While facing the MESSENGER HUB, press and hold the top “ON” button of the
KEY CHAIN REMOTE for 5 seconds - Figure 2. Be sure to see the green light
flash on the MESSENGER HUB. The flash will indicate that the MESSENGER
HUB is now synchronized with the KEY CHAIN REMOTE.
Now, move the slide switch on the MESSENGER HUB to RUN.
Plug Receptacle
(Note: Door cannot be closed while MESSENGER HUB is in the LEARN mode.)
Step 5:
Turn lamp on first, then plug into the receptacle on the underside of the MESSENGER HUB. Use only
incandescent bulbs up to 500W. Be sure the lamp has been turned on prior to plugging into MESSENGER
HUB.
2
Press the Local Lamp “ON/OFF” button on the MESSENGER HUB to check that the MESSENGER HUB is
operating correctly. You will hear a “click” when the MESSENGER HUB turns this lamp on and off.
You are now ready to operate the lamp connected to this MESSENGER HUB with the KEY CHAIN REMOTE.
If the MESSENGER HUB is set to UNIT CODE 1, you can use the top ON and OFF buttons on the KEY
CHAIN REMOTE. If the MESSENGER HUB is set to any other HOUSE CODE you will only be able to use
the “HOUSE” (bottom) ON and OFF buttons.
Step by step instructions to set up additional KEY CHAIN REMOTES
A Quick Note Before You Set Up the KEY CHAIN REMOTE:
The KEY CHAIN REMOTE is very convenient for switching on entrance lights while approaching your home. It lets you turn on and off the
Receivers that are set to UNIT CODE 1 (RED) and GROUP 1 on your INDOOR REMOTE and activate all Receivers (same as the House button
on the INDOOR REMOTE).
Step 1:
To synchronize KEY CHAIN REMOTE, set the MESSENGER HUB slide switch to LEARN.
Step 2:
While facing the MESSENGER HUB, press and hold the top ON button on the KEY CHAIN
REMOTE. The green light on the MESSENGER HUB flashes to indicate that the MESSENGER
HUB now recognizes the KEY CHAIN REMOTE.
Step 3:
Activates UNIT CODE
1 (RED) only
Activates
GROUP 1 only
Activates all
On or all Off
Set the slide switch on the MESSENGER HUB to RUN.
The KEY CHAIN REMOTE is now ready for use.
The top ON and OFF buttons will activate any Receivers set to UNIT CODE 1 (RED). For convenience we recommend that your entrance
lights be controlled by UNIT CODE 1 (RED).
The middle ON and OFF (GROUP 1) buttons of the KEY CHAIN REMOTE will activate all Receivers programmed on the GROUP 1 setting on
your INDOOR REMOTE.
NOTE: You must have already programmed the GROUP 1 setting on your INDOOR REMOTE for this function of the KEY CHAIN REMOTE to
operate. If you do not have an indoor remote these two buttons cannot be utilized.
The bottom ON and OFF buttons of the KEY CHAIN REMOTE perform the same function as the House button on the INDOOR REMOTE.
Pressing the INDOOR REMOTE HOUSE BUTTON “on” will activate the MESSENGER HUB and ALL the LAMP RECEIVERs / BULB
RECEIVERs set to the system’s HOUSE CODE. Pressing the INDOOR REMOTE HOUSE BUTTON “off” will deactivate the above receivers as
well as all APPLIANCE RECEIVERS.
KEY CHAIN REMOTE BATTERY REPLACEMENT
To change the battery, pry the two halves apart and fit two CR2016 Lithium 3V batteries. Observe the polarity of the batteries. (Writing on back
of battery must face back cover of KEY CHAIN REMOTE.
NOTE: If KEY CHAIN REMOTE is without battery power, for more than 3 hours, the remote’s internal security code must be reset. To do this,
install new batteries, press and hold any button on the remote for 5 seconds, repeat steps 1 through 3 above to synchronize remote with
MESSENGER HUB.
5
621530-00FW1000 FREEWIRE MANUAL
12/17/03
9:50 AM
Page 6
PROGRAMMING AND INFORMATION GUIDE
The HomeLink Wireless Control System is a factory installed feature packaged on many vehicle models. HomeLink is typically located in
either the sun visor, overhead console or rearview mirror. HomeLink provides a convenient way to replace up to three hand-held radiofrequency (RF) transmitters used to activate devices such as gate operators, garage door openers, entry door locks, security systems, and
home lighting. Additional HomeLink information can be found on the Internet at www.homelink.com or by calling 1-800-355-3515.
NOTE: Black and Decker Freewire products are compatible with select 2001 and newer HomeLink equipped vehicles. Please contact
HomeLink Customer Service at 1-800-355-3515 to check compatibility.
NOTE: Some vehicles may require the ignition switch to be turned "on" or to the second (“accessories”) position for programming and/or
operation of HomeLink.
If you already have HomeLink programmed to operate devices such as garage doors or gates, please skip to STEP 2. If you have not
programmed HomeLink to operate these devices, please start with STEP 1.
1. Press and hold the two outer HomeLink buttons in the vehicle (buttons one and three) - releasing only when the HomeLink indicator light begins
to flash (after 20 seconds). Do not hold the buttons for longer than 30 seconds and do not repeat STEP 1 to program a second and/or third handheld transmitter or Freewire Indoor Remote function to the remaining two HomeLink buttons.
2. Turn the dial on your Freewire INDOOR REMOTE to the ZONE and UNIT CODE that you would like to program into HomeLink.
The example depicts that the INDOOR REMOTE is set to Blue 12.
NOTE: You will have to program a separate HomeLink button for each ON and/or OFF function of your Freewire indoor remote
or key chain. For example the second Homelink button can be programmed to turn Blue 12 “On” and the third Homelink button
can be programmed to turn Blue 12 “Off”.
3. Position the end of your Freewire indoor remote 1-3 inches (5-14 cm) away from the HomeLink button you wish to program while keeping the
indicator light in view.
4. Simultaneously press and hold both the chosen HomeLink button and Freewire indoor remote button (ON or OFF). Do not release the buttons
until step 5 has been completed.
NOTE: It is recommended that you use your Freewire indoor remote to program HomeLink. If you are programming HomeLink with your Freewire
key chain remote, you will need to “cycle” the key chain remote button while programming HomeLink. To “cycle”: continue to press and hold the
HomeLink button while you press and release - every two seconds (“cycle”) the key chain remote ON button until the frequency signal has
successfully been accepted by HomeLink. (The indicator light will flash slowly and then rapidly.)
5. After the HomeLink indicator light changes from a slow to a rapidly blinking light, release both the HomeLink and Freewire indoor remote or key
chain button.
6. HomeLink is now programmed to operate your Freewire system. To operate HomeLink, simply press and release the programmed HomeLink
button to activate your Freewire system. You can also continue to use your INDOOR REMOTE to control Freewire.
REPROGRAMMING A SINGLE HOMELINK BUTTON
To program a device to HomeLink using a HomeLink button previously trained, follow these steps:
1. Press and hold the desired HomeLink button. Do NOT release until step 4 has been completed.
2. When the HomeLink indicator light begins to flash slowly (after 20 seconds), position the hand-held-transmitter or remote 1 to 3 inches away
from the HomeLink surface.
3. Press and hold the hand-held transmitter or remote button. The HomeLink indicator light will flash, first slowly and then rapidly.
4. When the HomeLink indicator light begins to flash rapidly, release both buttons.
The previous device has now been erased and the new device can be activated by pushing the HomeLink button that has just been
programmed. This procedure will not affect any other programmed HomeLink buttons.
For questions or comments, contact HomeLink at:www.homelink.com or 1-800-355-3515.
HomeLink and the HomeLink house are registered trademarks of Johnson Controls, Inc.
HOMELINK FAQS
Why does HomeLink only turn on (or off) the device I have programmed it to?
“ON” and “OFF” are two different functions and have to be programmed to HomeLink separately. For example, you would program one
HomeLink button for “ON” and a second HomeLink button for “OFF”.
How can I get HomeLink?
HomeLink is packaged as a standard feature, bundled within a specific trim level package or as an option on over 150 different vehicles. For a
list of these vehicles, visit www.homelink.com or call HomeLink Customer Service at 1-800-355-3515. HomeLink can also be purchased and
professionally installed in existing cars. Please visit www.homelink.com or call 1-800-355-3515 for further information.
Why can't I train HomeLink to my Freewire remote?
Freewire remotes are compatible with select 2001and newer HomeLink equipped vehicles. Please visit www.homelink.com or contact
HomeLink Customer Service at 1-800-355-3515 for compatibility.
6
621530-00FW1000 FREEWIRE MANUAL
12/17/03
9:50 AM
Page 7
TROUBLESHOOTING
DIFFICULTY PROGRAMMING RECEIVERS
If you are experiencing problems when programming the BULB RECEIVER or OUTDOOR LAMP RECEIVER, it may be due to electrical
interference on the power lines caused by large appliances such as refrigerators or TV’s. To avoid the interference, move the RECEIVER and
the MESSENGER HUB while it is being programmed to a different wall outlet that is further away from large appliances.
SOME RECEIVERS DON’T RESPOND
Most houses are fed from a 240 volt service which is then split into two phases of 120 volts each in the circuit breaker panel. The most
commonly encountered problem with systems which use the existing house wiring to transmit signals is that the signals are received by some
Receivers, but not by others. For example, the MESSENGER HUB controls some lights but not others or controls some lights intermittently.
This can happen sometimes when the Receiver to be controlled is on the opposite phase of the house wiring to the phase which the
MESSENGER HUB is connected to.
If some of the Receivers are not working it may be necessary to:
• move the Receiver to a different wall outlet to test that it works.If it still doesn’t work:
• move the Receiver to a different room. If it still doesn’t work:
• move the Receiver to the closest outlet that the MESSENGER HUB is plugged into or move the MESSENGER HUB to the closest
outlet to the Receiver that is not working.
RECEIVERS TURN ON BY THEMSELVES
If it is suspected that Receivers have turned on or off by themselves, it is possible that a neighbor has a FREEWIRE or compatible system,
which could result in unexpected operation of both systems. Unplug all FREEWIRE devices immediately until (1) the interference is identified
and eliminated through selection of a different HOUSE CODE to ensure that neither system causes unintended operation of the other system
or (2) a blocking filter, Black and Decker Model number PZZ01, is installed. Call 1-888-678-7278 to order. Professional installation
recommended. If you cannot identify the source of interference by talking with neighbors who are using a FREEWIRE or compatible system
and you do not want to install a blocking filter, or if you have any questions about identifying or eliminating interference, please call 1-800-5446986 before plugging in or using any FREEWIRE device.
THREE WAY BULBS
Three way bulbs may be used, however, only one level of brightness can be activated using the Freewire system. To change brightness level
you will need to turn the switch at the lamp to the desired level of brightness. NOTE: When using the BULB RECEIVER, you cannot control the
lamp by the lamp’s switch. Turning the lamp switch off and then sending a Freewire signal within 30 seconds of power being applied to the
lamp, will cause the BULB RECEIVER to go into program mode and will need to be reprogrammed. See BULB RECEIVER section / manual.
INTERCOM AND MONITORING SYSTEMS
Intercom and monitoring systems, including baby monitors, that use the house wiring to transmit signals can “block out” FREEWIRE
transmissions while the intercom or monitoring system is in “permanent transmit” or “talk” mode. It is NOT possible to have a wireless
intercom or monitoring system and a MESSENGER HUB operating in the same house. It is possible that a neighbor’s wireless intercom or
monitoring system could cause unexpected operation, including failure to operate, of your FREEWIRE system, or that your FREEWIRE
SYSTEM could cause unexpected operation, including failure to operate, of your neighbors intercom or monitoring system.
KEY CHAIN REMOTE RANGE OF USE
Placing the MESSENGER HUB on the inside wall closest to driveway or entry way, will often maximize range of KEY CHAIN REMOTE.
MAINTENANCE
Use only mild soap and damp cloth to clean the product. Never let any liquid get inside the product; never immerse any part of the product into
a liquid. Avoid using solvents when cleaning plastic parts. Most plastics are susceptible to various types of commercial solvents and may be
damaged by their use.
ACCESSORIES
Recommended accessories for use with your product are available from your local dealer or authorized service center. If you need assistance
regarding accessories, please call: 1-800-544-6986.
WARNING: The use of any accessory not recommended for use with this product could be hazardous.
SERVICE INFORMATION
Black & Decker offers a full network of company-owned and authorized service locations throughout North America. All Black & Decker Service
Centers are staffed with trained personnel to provide customers with efficient and reliable power tool service. Whether you need technical
advice, repair, or genuine factory replacement parts, contact the Black & Decker location nearest you. To find your local service location, refer
to the yellow page directory under "Tools—Electric" or call: 1-800-544-6986.
FULL TWO-YEAR HOME USE WARRANTY
Black & Decker (U.S.) Inc. warrants this product for two years against any defects in material or workmanship. The defective product will be
replaced or repaired at no charge in either of two ways.
The first, which will result in exchanges only, is to return the product to the retailer from whom it was purchased (provided that the store is a
participating retailer). Returns should be made within the time period of the retailer’s policy for exchanges (usually 30 to 90 days after the
sale). Proof of purchase may be required. Please check with the retailer for their specific return policy regarding returns that are beyond the
time set for exchanges.
The second option is to take or send the product (prepaid) to a Black & Decker owned or authorized Service Center for repair or replacement
at our option. Proof of purchase may be required. Black & Decker owned and authorized Service Centers are listed under "Tools-Electric" in
the yellow pages of the phone directory.
This warranty does not apply to accessories. This warranty gives you specific legal rights and you may have other rights which vary from
province to province. Should you have any questions, contact the manager of your nearest Black & Decker Service Center.
Black & Decker (U.S.) Inc.,
701 E. Joppa Rd.
Towson, MD 21286 U.S.A.
See ‘Tools-Electric’
– Yellow Pages –
for Service & Sales