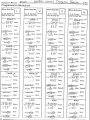
1
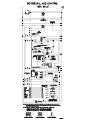
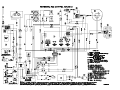
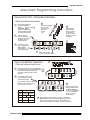
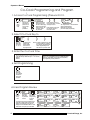
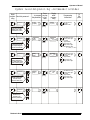
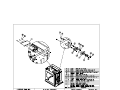
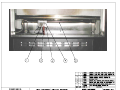
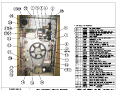
Cleveland Range, LLC
Ph: 1-216-481-4900
Fx: 1-216-481-3782
1333 East 179th St., Cleveland, Ohio, U.S.A. 44110
Visit our Web Site at www.clevelandrange.com
CLEVELAND RANGE
SEQUENCE OF OPERATIONS
CR-32 Rotisserie
(NCC Control)
When using these instructions refer to the CR-32 wiring schematic.
1. To turn the unit on, depress the red on/off rocker switch.
• 120 VAC is sent to red power indicator (switch).
• 120 VAC is sent to cooling fans.
• 120 VAC is sent to combustion blower fan
• The fan turns and the fan prover switch closes.
• 120 VAC sent to pins T1 and T3 on the J3 (3-pin quick-connect) to the Relay and
Motor Board.
• 120 VAC is sent from pin T1 on J3 (3-pin quick-connect) to the normally open
contacts of the K5 relay on the Relay and Motor Board.
• 120 VAC is sent from pin T1 on J3 (3 pin quick-connect) to the normally open
contacts of the K1 relay on the Relay and Motor Board
• 120 VAC is sent to the primary of the computer transformer.
• 24 VAC is sent from the secondary of the computer transformer to pins T2 and T3
on the J2 (12-pin quick-connect) to the Relay and Motor Board.
• Computer displays “SYSTEM INIT” for 5 seconds followed by
• 120 VAC is sent to the primary of the ignition transformer.
• 24 VAC is sent from the secondary of the ignition transformer to:
• Pin T1 on J2 (12-pin quick-connect) and the normally open K2 contacts on the
Relay and Motor Board.
• Pin T8 on J2 (12-pin quick-connect) and the normally open K4 contacts on the
Relay and Motor Board.
• Pin T5 on J2 (12-pin quick-connect) and the normally open K3 contacts on the
Relay and Motor Board.
2. Computer goes into the preheat mode (with the door closed) and displays “PREHEAT XXX”
(XXX is the oven temp)
• The K2 relay on the Relay and Motor Board closes and 24 VAC is sent from pin T9 on J2
(12-pin quick-connect) on the Relay and Motor Board to the vent solenoid closing it.
• The preheat program tells the Relay and Motor Board to send 85 VDC from pins T4 and
T7 on J2 (12-pin quick-connect) to the drive motor
• The motor turns the drive system at 3 RPM.
• The K3 relay on the Relay and Motor Board closes sending 24 VAC from pin T12 on
J2 (12-pin quick-connect) on the Relay and Motor Board to the ignition module.
• Ignition module sends spark to the igniter.
• Ignition module sends 24 VAC through the fan prover switch to the pilot coil and
gas is sent to the pilot.
•
•
•
•
Ignition module sends 24 VAC to the main (low) coil of the gas valve and gas
(2.2” W.C. natural gas, 4.0” W.C. L.P) is sent to the infrared burner.
• The spark ignites the gas.
• At least .5 micro amps D.C. is received at the module in 4 seconds or the ignition
module locks out and the alarm buzzer sounds.
The K4 relay on the Relay and Motor Board closes and 24 VAC is sent from pin T11
on J2 (12-pin quick-connect) on the Relay and Motor Board to the high coil of the gas
valve and the gas pressure is increased (3.2” W.C. natural and 10.0” W.C. LP) to the
infrared burner.
The K1 relay on the Relay and Motor Board closes after 5 second delay (allowing for
pilot ignition) sending 120 VAC from pin T6 on J2 (12-pin quick-connect) on the
Relay and Motor Board to the convection blowers.
The unit continues to heat until 10 degrees of the PREHEAT set point is reached.
• If the measured temperature does not increase by 6 degrees every 2 minutes the
display will show “SHORTED PROBE” or “FAULTY HEATER” and an alarm
will sound.
3. Computer displays “READY” and sounds a series of beeps after reaching 10 degrees of the
set point. Oven may now be loaded with product and appropriate cooking program initiated.
• When the door is open, breaking contact between pins 4 and 5 on the programmable
controller, the display will show “DOOR OPEN” and the burner, convection blower
motors, lights and rotisserie drive motor will not operate.
• The drive can be advanced only when the door is open by depressing the jog button
located on the front of the rotisserie, making contact between pins 6 and 7 on J1 (15pin quick-connect) on the programmable controller. The rotisserie will advance at 3
RPM.
4. With the door closed, the computer begins the cooking mode
• The cook program tells the Relay and Motor Board to close the K5 relay and 120VAC
is sent to the primary of the light transformer.
• The secondary of the transformer sends 22.8VAC to the light energizing it. The lights
do not energize in the preheat mode.
• The cook program tells the Relay and Motor Board to close the K2 relay and 24 VAC
is sent from pin T9 on J2 (12-pin quick-connect) on the Relay and Motor Board to the
vent solenoid closing it. The vent will stay closed until the programmed temperature
set point is reached. Then it will open and close within 2 degrees of set point. NOTE:
THE VENT IS THE PRIMARY TEMPERATURE CONTROL DEVICE IN THE
COOK CYCLE-NOT THE BURNER.
• The Relay and Motor Board sends the appropriate voltage to the motor as programmed
(1RPM = 30 VDC, 2RPM = 57 VDC, 3RPM= 85 VDC).
• The motor turns the drive system at the proper RPM.
• The K3 relay closes sending 24 VAC through pin T12 on J2 (12-pin quick-connect) on
the Relay and Motor Board to the ignition module.
• Ignition module sends spark to the igniter.
•
•
•
•
•
Ignition module sends 24 VAC through the fan prover switch to the pilot coil and
gas is sent to the pilot.
• Ignition module sends 24 VAC to the main (low) coil of the gas valve and gas
(2.2” W.C. natural gas, 4.0” W.C. L.P) is sent to the infrared burner.
• The spark ignites the gas.
• At least .5 micro amps D.C. is received at the module in 4 seconds or the ignition
module locks out and the alarm buzzer sounds.
If the burner setting is high, the K4 relay on the Relay and Motor Board closes. 24
VAC is sent from pin T11 on J2 (12-pin quick-connect) on the Relay and Motor Board
to the high coil of the gas valve and the gas pressure is increased (3.2” W.C. natural
and 10.0” W.C. LP) to the infrared burner.
The K3 relay on the Relay and Motor Board closes after 5 second delay (allowing for
pilot ignition) sending 120 VAC to the convection blowers.
The burner continues to heat 25 degrees above the set point, then it shuts down to begin
again at set point (NOTE: THIS IS THE SECONDARY TEMPERATURE
CONTROL).
This continues and changes only as the set points of the program change until the cook
program ends.
5. When the cooking cycle has timed out the computer will go into the hold mode and display
“HOLD”.
• The K3 relay opens and the burner circuit is de-energized.
• The K1 relay opens and the convection fan circuit is de-energized.
• The K2 relay opens and the vent closes.
• The signal is sent to the D.C. drive motor to drive at 1 RPM.
• When the temperature drops below the hold set point the burner and convection fan
circuits will start. NOTE: DURING THE HOLD CYCLE THE TEMPERATURE
CONTROL IS MAINTANED BY THE BURNER AND CONVECTION FAN
CIRCUITS.
6. To turn the unit off depress the on/off switch.
• 120 VAC is removed from red power indicator (switch).
• 120 VAC is removed from light switch.
• 120 VAC is removed from combustion blower fan.
• 120 VAC removed from the Relay Interface Board (RIB).
• 120 VAC is removed from the primary of the ignition transformer.
• 120 VAC is removed from the primary of the computer transformer.
• 24 VAC removed from the secondary of the computer transformer to the computer
the display is blank.
• 120 VAC is sent to terminals 3 and 2 on the 30-minute timer.
• For 30 minutes the cooling fans will be energized.
Operator’s Manual
Operator’s Daily Cleaning/Maintenance
The oven must be cleaned daily to maintain good
performance and appearance.
You will need the following items:
• A bucket of soapy water (non-chlorinated
soap)
• A spray bottle of floor and wall cleaner
• A spray bottle of food-safe sanitizer
• A spray bottle of Jef-Guard (or other foodsafe coating spray)
• A scrub pad
• A clean cloth
• A squeegee
• Safety goggles
• Oven cleaning gloves
• Razor blade scraper (for fireplace models
only)
1. After the last cooking cycle of the day, turn the
POWER switch OFF and allow at least 15
minutes for the oven to cool.
2. Drain the drip pan. Place an empty 5-gallon
bucket under the drain and open the drain
valve.
3. Remove the grate(s) covering the drip pan.
4. Squeegee up the grease in the pan and
remove.
5. Remove, by pulling toward you, the “jet plate”
covering the fans in the top of the oven, and
take it and the grate to a dishwashing area.
6. Remove the two convection fan blades and
clean them with spray cleaner and a scrub pad.
7. Spray the inside oven window(s) with floor and
wall cleaner and allow to sit for 5 minutes.
Wipe clean and repeat if necessary; never use
scouring pads or oven cleaner.
8. Clean the fireplace
glass, if applicable, with
non-chlorinated soap
and water; use razor
blade scraper if
necessary.
9. Wipe down the inside
walls of the oven with
the soapy water. Never
use a hose or water
jet.
9
10. Clean all parts of the rotisserie wheels using
spray cleaner. Pull the clevis pins and slide
the drums to the center. Clean the oven walls
behind the wheels and the backsides of the
wheels.
11. Wipe out any grease from the bottom of the
oven.
12. With a dry towel, wipe down all surfaces of the
oven
13. Spray rotisserie wheels with the sanitizer and
allow to air dry. Lift the burner protector shield,
in single-door models, it is the hinged plate
that hangs down at upper-rear of the oven.
(Two-door models are supplied with a loose
shield for this same purpose.) Taking care not
to spray the burner, the ignitor or the
temperature probe, spray the entire interior of
the oven with an oven sanitizer. Allow to airdry.
14. Again covering the burner, spray and wipe the
upper surfaces of the oven with Jef-Guard or
equivalent, taking the same precautions as
above.
15. Replace the grate(s) and spray all inside
surfaces (including backside of drums) with the
food-safe oven coating, taking care not to
spray the burner, the ignitor or the temperature
probe.
16. Spray both sides of the jet plate and both fan
blades with the food-safe coating and reinstall.
Note that the fan blades must be installed to
their original motors; they are not
interchangeable.
17. Preheat the oven for 5 minutes to seal the
food-safe coating, and shut off the oven.
18. Examine vent hood and fireplace flue (if
equipped) for signs
of sooting or
blockage. Call
hang front of Jet Plate
service if problems
into these corners
are suspected.
Jet Plate
hang rear of Jet Plate
on these two tabs
Cleveland Range, Inc.
Operator’s Manual
Programming,
Troubleshooting
& Technical
Information
Control Panel……………………………………..
Programmer’s Worksheet………………………
Programming Tips & Techniques…………….
Menu Item Programming……………………….
Co-Cook Programming……………………...…
System Programming…………………………..
Troubleshooting…………………………………
Error Messages………………………………….
Rotisserie Oven
11
13
14
15
17
18
19
20
10
Operator’s Manual
Rotisserie Control Panel
Control Panel – This is the interface
between the control system and the
operator. It consists of indicator
lights, a 2-line alphanumeric display,
and 21 control buttons (keys).
Status Indicators – These lights
show the state of four of the
controller’s outputs. When the
light is on, the associated output is
active.
The rotisserie oven is operated by a
computerized control system. The
system controls the time, temperature
circulating fans, vent, rotor speed, and
oven lamp.
VENT LOW
HIGH
FAN
UP and RIGHT Arrow Keys –
These are used during
programming to cycle through the
available parameters.
TEMP Key – During any cook
program, press this key to see the
oven temperature. (During cook,
the readout usually shows the
current stage and the total time
remaining.)
PROG Key – Use this key to start
any programming operation (for
example, entering cooking
programs and setting system-level
parameters.) You will need to
know passcodes to access the
programming function.
Menu Item Keys – These 16 keys
are used primarily to start cooking
programs. Use them also to
cancel cooking programs. (Some
keys, including 13, 14, 15, and 16,
have special functions, described
opposite.)
Menu Item Light – This light
flashes during a cooking program
to indicate which program is
active. It also flashes during
programming to indicate which
item is being programmed. During
a Co-Cook operation a second
light flashes more rapidly to
indicate that a second timing cycle
is running.
TEMP
PROG
PROG
REVIEW
Alphanumeric Display – The display
provides many functions during oven
operation. It displays the current
status of the oven, whether Preheat,
Ready, cooking State, Hold or
Standby. It also displays current
temperature and time (either time
remaining during cooking, or time
accumulating during Hold). During
programming, the display shows
current settings and available
choices. It also displays error
messages in case there is a problem
with the unit.
Audible Alarm – In conjunction with
the Control Panel’s visual indicators,
an alarm tone is sounded to attract
the operator’s attention during
normal operation. The alarm will
sound for 5 seconds when the oven
has changed status – for example,
when the oven is “Ready” or a cook
program is finished. The alarm will
also sound for 5 seconds when the
door is opened during cook. However,
the alarm will sound and remain on for
error conditions. When this
happens, observe the display and
refer to the Error Message section in
the back of this guide. To turn off the
alarm for most error conditions, just
press any button to confirm that the
alarm has been received.
Special Function Keys – Keys 13,
14, 15, and 16, normally Menu Item
keys, have dual functions.
Key 13 – Auto Hold: To cancel
current cooking cycle, press and hold
this button for at least 1 second, and
the oven will go into the Hold mode.
Key 14 – Add 5: After any cook
program goes into Hold, press this key
to add 5 minutes of cook time, (uses
the parameters of the cook program’s
last stage).
Key 15 – Add 10: Same as key 14,
but adds 10 minutes.
Key 16 – Fireplace: If unit has a
fireplace, this button will run the
fireplace only for 8 hours.
Co-Cook Function – All keys except 14, 15 and 16 can be programmed (at System Level) to provide a second cook
cycle while the first runs in the background. (Thus you can load and cook a second product while the first continues to
cook – but there must be enough time left in the first one or you can’t start the second.) All first item cook parameters
remain in effect in Co-Cook. The Co-Cook item light flashes at 3-times normal speed. The readout shows time
remaining in Co-cook until it ends. Then the alarm sounds, the light stops flashing, and the first item’s time remaining
is displayed. (To cancel a C-Cook program press and hold the button for 3 seconds.)
11
Cleveland Range, Inc.
Operator’s Manual
How the Rotisserie Oven Controller Operates
PREHEAT
COOK STAGES
HOLD
PREHEAT brings
oven temperature
to near-cooking
level (typically
300° F)
The number of stages,
hours, and temperatures
depends on how the
menu item key has been
programmed
After COOK ends,
heat is reduced –
HOLD stage keeps
product warm;
typically 2 hours at
175° F
or
Menu Item key press
begins cooking program
300
300
If cooking
is not started
in 20 minutes,
oven goes into
STANDBY
200
200
Standby
Standby
Powering-up
the oven starts the
PREHEAT process
100
F
Preheat / Ready
Rotisserie Oven
In STANDBY or HOLD, press a
menu item key to re-start
PREHEAT/READY
20 min.
Stage 1 Stage 2 Stage 3
Cooking Program
Hold
100
Standby
or Preheat
READY
STANDBY
(from Ready)
STANDBY
(from Hold)
READY holds oven
temperature at or
near cooking
setpoint, ready for
loading food. But,
if no menu item
key is pressed
after 20 minutes,
Standby is started
After oven goes
into Ready, if no
menu item key is
pressed within 20
minutes, then
oven goes into
STANDBY (200°
F) until a new key
is pressed
If menu item key is not
pressed within 20
minutes after Hold
ends, oven goes into
STANDBY – if menu
item is later pressed,
Preheat/Ready starts
12
Operator’s Manual
Programmer’s Worksheet
Menu Item No.
Menu Item No.
Menu Item No.
Menu Item No.
______________
______________
______________
______________
name of menu item
name of menu item
name of menu item
name of menu item
STAGE - 1
STAGE - 1
STAGE - 1
STAGE - 1
_ _ : _ _ : _ _ Hours
_ _ : _ _ : _ _ Hours
_ _ : _ _ : _ _ Hours
_ _ : _ _ : _ _ Hours
h h : mm : s s
h h : mm : s s
h h : mm : s s
h h : mm : s s
_ _ _°
Temp
___________ Vent
regulate / closed
_____ RPM Speed
1, 2, or 3
___________ Timer
standard / flex
___________ Heat
high / low
_ _ _°
Temp
___________ Vent
_ _ _°
Temp
___________ Vent
_ _ _°
Temp
___________ Vent
regulate / closed
regulate / closed
regulate / closed
_____ RPM Speed
_____ RPM Speed
_____ RPM Speed
1, 2, or 3
1, 2, or 3
___________ Timer
standard / flex
1, 2, or 3
___________ Timer
standard / flex
___________ Heat
high / low
___________ Timer
standard / flex
___________ Heat
high / low
___________ Heat
high / low
STAGE - 2
STAGE - 2
STAGE - 2
STAGE - 2
_ _ : _ _ : _ _ Hours
_ _ : _ _ : _ _ Hours
_ _ : _ _ : _ _ Hours
_ _ : _ _ : _ _ Hours
h h : mm : s s
h h : mm : s s
h h : mm : s s
h h : mm : s s
_ _ _°
Temp
___________ Vent
regulate / closed
_____ RPM Speed
1, 2, or 3
___________ Timer
standard / flex
___________ Heat
high / low
_ _ _°
Temp
___________ Vent
_ _ _°
Temp
___________ Vent
_ _ _°
Temp
___________ Vent
regulate / closed
regulate / closed
regulate / closed
_____ RPM Speed
_____ RPM Speed
_____ RPM Speed
1, 2, or 3
1, 2, or 3
___________ Timer
standard / flex
1, 2, or 3
___________ Timer
standard / flex
___________ Heat
high / low
___________ Timer
standard / flex
___________ Heat
high / low
___________ Heat
high / low
STAGE - 3
STAGE - 3
STAGE - 3
STAGE - 3
_ _ : _ _ : _ _ Hours
_ _ : _ _ : _ _ Hours
_ _ : _ _ : _ _ Hours
_ _ : _ _ : _ _ Hours
h h : mm : s s
h h : mm : s s
h h : mm : s s
h h : mm : s s
_ _ _°
Temp
___________ Vent
regulate / closed
_____ RPM Speed
1, 2, or 3
___________ Timer
standard / flex
___________ Heat
high / low
_ _ : _ _ : _ _ Hours
h h : mm : s s
Temp
___________ Vent
open / closed
___________ Fan
on/pulsed
13
Temp
___________ Vent
_ _ _°
Temp
___________ Vent
_ _ _°
Temp
___________ Vent
regulate / closed
regulate / closed
regulate / closed
_____ RPM Speed
_____ RPM Speed
_____ RPM Speed
1, 2, or 3
1, 2, or 3
___________ Timer
standard / flex
1, 2, or 3
___________ Timer
standard / flex
___________ Heat
high / low
___________ Timer
standard / flex
___________ Heat
high / low
HOLD
HOLD
_ _ _°
_ _ _°
___________ Heat
high / low
HOLD
HOLD
_ _ : _ _ : _ _ Hours
_ _ : _ _ : _ _ Hours
_ _ : _ _ : _ _ Hours
h h : mm : s s
h h : mm : s s
h h : mm : s s
_ _ _°
Temp
___________ Vent
open / closed
___________ Fan
on/pulsed
_ _ _°
Temp
___________ Vent
open / closed
___________ Fan
on/pulsed
_ _ _°
Temp
___________ Vent
open / closed
___________ Fan
on/pulsed
Cleveland Range, Inc.
Operator’s Manual
Programming Tips and Techniques
TYPE OF FOOD – Meats with large
bulk take longer to cook than meats
with less bulk (roasting chickens
versus spare ribs, for example).
NUMBER OF SPITS – An important
factor in setting up a cooking program.
A fully loaded oven (all spits fully
loaded) takes longer to cook than a
lightly loaded one with the same type
food. Separate keys must be
programmed for small and large loads.
Stage 1 is usually programmed at a
higher temperature and rotor speed
than stage 2. This brings the
product up to cooking temperature
faster and helps seal in juices.
Chicken
5/6 Spits
name of menu item 3
The example on this page shows a
typical program. Only minor alterations
in time and temperature are needed to
cover most cooking requirements.
HOURS – Determines the length of time per
stage.
STAGE - 1
0 0 : 4 5 : 0 0 Hours
h h : mm : s s
3 0 5° Temp
REGULATE
Vent
regulate / closed
3
Note: Typical TOTAL cooking time for most
meats cooked in the rotisserie oven ranges
between 1 and 1-1/2 hours.
RPM Speed
1, 2, or 3
STANDARD Timer
SPEED (OF ROTISSERIE ROTOR) – Three
rotor speeds are available, 1, 2 or 3 rpm. The
speed mainly affects the level of browning and
surface drying.
standard / flex
HIGH
TIMER – The STANDARD mode runs
the clock at normal rate. FLEX is a
special clock mode that can
compensate for extra heat
requirements by adding cooking time.
STANDARD is the default setting.
Heat
high / low
STAGE - 2
0 0 : 4 5 : 0 0 Hours
Note that during cooking, the “time
readout” on the controller panel is
the TOTAL TIME REMAINING
before the complete program is
finished, not the time remaining in
any specific stage.
h h : mm : s s
2 9 0° Temp
REGULATE
Vent
regulate / closed
2
RPM Speed
1, 2, or 3
STANDARD Timer
STAGES – Up to 3 stages can be
programmed – 1 stage must be
programmed and 2 are the most
common.
Note that if any stage is not
programmed (that is, the hours
show 00:00:00) then it is skipped by
the oven controller.
The values shown in Stage 3 at right
are the default values assigned by
the controller when any stage is not
programmed.
TEMP – Range is 140 to 400 deg. F. (or 22 to
204 deg. C.) System-level programming can be
used to select F or C.
standard / flex
LOW
Heat
VENT – The vent is at the top of the oven. In
the normal mode of operation it is set to
“regulate.” This means the burner is on
continuously and oven temp is regulated by
opening and closing the vent. This technique
helps control moisture.
high / low
STAGE - 3
0 0 : 0 0 : 0 0 Hours
h h : mm : s s
_ 3 2° Temp
REGULATE
Vent
regulate / closed
0
RPM Speed
1, 2, or 3
STANDARD Timer
HIGH HEAT vs. LOW HEAT - This
programming factor determines the heat input
to the gas burner (60,000 BTUH versus 48,000
BTUH).
Note that the HIGH or LOW HEAT parameter
describes the intensity of the heat, not the
temperature of the oven.
High heat intensity increases browning and
helps seal in juices.
standard / flex
LOW
Heat
high / low
HOLD – The HOLD values shown at
the right are the recommended settings
to keep the prepared food at optimum
conditions for serving. (These are the
default values and do not need to be
altered during programming, unless
desired.)
HOLD
0 2 : 0 0 : 0 0 Hours
h h : mm : s s
1 7 5°
CLOSED
Temp
Vent
open / closed
PULSED
VENT AND FAN DURING HOLD – the vent is
CLOSED and the circulation fans PULSED
during Hold. This technique keeps the product
from losing too much moisture. In Hold, oven
temperature is regulated by turning the gas
burner on and off.
Fan
on/pulsed
Rotisserie Oven
14
Operator’s Manual
M enu Item Program m ing -Rotisserie C ontroller
1.Access M enu Item Program m ing (Password 5-1-5-10)
Password
____
PROG
Only persons
who know the
password can
set or change
cooking
parameters
(In any
mode
except
cook)
Program
Item Version
CR xx.xx
Password
****
When you press the
password keys, the
2nd line of the display
shows star characters.
After the 4th key,
it checks the code.
If the password is correct,
the "Program Item" / "Version"
message is shown.
The "Program Item" / "Version Number"
message indicates that a
If the password is incorrect
Menu Item key should be
the controller returns to
pressed to begin programming.
the mode it was in.
2.SelectM enu Item Key to Program
Press
any
Menu
Item
key
The Menu Item's
indicator light
begins flashing
to show it is in
the program mode
NOTE: If during programming you don't
press any button for 5 minutes,
the controller will automatically
exit the programming mode
and return to its previous state
3.Step Through and Program Desired Param eters
How to Program the Param eters?
Every time you press the Menu Item key, the next parameter is displayed.
You can stop at any parameter and make changes. Moving on to the next
parameter causes the value in the current parameter to be stored
First, use the Programmer's Worksheet in this guide to prepare
a program's desired values and settings. Then, follow
the instructions on the next page to program the parameters.
S tage 1
hh:mm:ss
S tage 1
___ F
S tage 1
_ (vent) _
S tage 1
S peed _
S tage 1
____ Heat
S tage 2
hh:mm:ss
S tage 2
___ F
S tage 2
_ (vent) _
S tage 2
S peed _
S tage 2
____ Heat
S tage 3
hh:mm:ss
S tage 3
___ F
S tage 3
_ (vent) _
S tage 3
S peed _
S tage 3
____ Heat
Hold
hh:mm:ss
Hold
___ F
Hold
_ (vent) _
Hold
Fan _____
Pressing the Menu Item
key after the last Hold
parameter causes the
display to return to Stage 1
NOTE:
The controller is pre-programmed
at the factory with default settings.
Some Menu Items have typical
cooking programs, and some have
no time programmed, making them
"Unused."A system Level password
can be used to revert all settings
to default.
4.ExitProgram m ing M ode
PROG
Press the
PROG key.
The controller
will return to
its previous
operation
15
Cleveland Range, Inc.
Operator’s Manual
Menu Item Programming Instructions
How to Set the Time / Temperature Parameters
(follow the numbered steps below)
1
2
3
5
After selecting PROG and
entering the password,
press the
for example
MENU ITEM
you want to program. The
first two parameters will be
the stage's time and temp.
Press the UP-ARROW
button to scroll
through values -stop at the
desired
value
)
(
When you access
a time or temperature
setting, the current value
will display, with the
first digit flashing.
6
Keep pressing
RIGHT-ARROW
button to advance
to other digits in
the time (or temp)
parameter you want
to program
7
To activate any other
digit to program, press
RIGHT-ARROW
until the digit you
want begins flashing.
4
Advance until the digit
you want to change is flashing
How to Set All Other Parameters
3
(follow the numbered steps below)
1
After setting the Stage 1 time and temperature,
as described above, pressing the MENU ITEM
button again and again will bring up the
Vent setting, followed by Speed, Timer,
and Heat.
2
As you display each of these
oven parameters, the current
setting will be flashing.
(In the example at right, the VENT
parameter is shown, which can be
either "regulate" or "closed.")
4
When finished programming a parameter, press
the MENU ITEM button
to move to next parameter
-- use the UP ARROW
button to select the
desired setting.
CHOICES
VENT "regulate" "closed"
SPEED "1"
"2"
TIMER "standard"
"3"
"flex"
HEAT "highheat" "low heat"
Rotisserie Oven
5
After setting the "HEAT" parameter for Stage 1, pressing the
MENU ITEM button again and again brings up Stages 2 and 3.
(After the 3 cooking stages comes the "HOLD" parameters,
which generally shouldn't be changed - see text in the manual.)
16
Operator’s Manual
Co-Cook Programming and Program
i
1. Access Co-Cook Programming (Password 2-10PROG
(In any
mode
except
cook)
Password
____
Program
Item Version
CR xx.xx
Password
****
Only persons
who know the
password can
set or change
cooking
parameters
When you press the
password keys, the
2nd line of the display
shows star characters.
After the 4th key, the
controller checks
the password.
If the password is correct,
the "Program Item" / "Version"
message is shown.
The "Program Item" / "Version Number"
message indicates that a
If the password is incorrect Menu Item key should be
the controller returns to
pressed to begin programming.
the mode it was in.
2. Select Co-Cook Key to
Press any
Menu Item
key except
14, 15, 16
The Menu Item's
indicator light
begins flashing
to show it is in
the program mode
NOTE: If during programming you don't
press any button for 5 minutes,
the controller will automatically
exit the programming mode
and return to its previous state
3. Enter the Co-Cook Time
The only parameter that can be programmed for Co-Cook
is the time. Factory default for keys 1 - 13 is 0 (zero)
minutes.
minutes.
How to Program the Parameter?
Follow the instructions on the previous page regarding
the programming of time parameters.
4. Exit Programming
PROG
Press the
PROG key.
The controller
will return to
its previous
operatiom
Access Program Review
PROG
REVIEW
Can be
pressed
at any
time
Select
Item
Prompt for
Menu Item;
no password
needed
Press the Menu
Item button;
keep pressing
to view all
settings
If a stage has zero time programmed, that
stage will be skipped and the next will be
shown; if all stages have zero time, the
display will show "UNUSED ITEM." To view
another item at any time, press its button.
17
S tage 1
hh:mm:ss
S tage 1
___ F
S tage 1
_ (vent) _
S tage 1
Speed _
S tage 1
____ Heat
S tage 2
hh:mm:ss
S tage 2
___ F
Stage 2
_ (vent) _
S tage 2
Speed _
S tage 2
____ Heat
S tage 3
hh:mm:ss
S tage 3
___ F
Stage 3
_ (vent) _
S tage 3
Speed _
S tage 3
____ Heat
Hold
hh:mm:ss
Hold
___ F
Hold
_ (vent) _
Hold
Fan _____
Cleveland Range, Inc.
Operator’s Manual
System LevelProgram m ing -Rotisserie C ontroller
Press
Begin
. . . to program any key
program- Enter this password . . . this parameter to conming
tinue
PROG
Password
____
Te mp
D isplay
Password
____
Temp
O ffset
Offset (calibrate)
the temperature probe;
(as compared against
precision thermometer)
PROG
Password
____
Password
____
Change
Standby temperature
from the factory
default of 200F (93C)
PROG
Password
____
Reload factory
defaults for all
controller parameters
Rotisserie Oven
"Any
Key"
To
Exit,
press
T Disply
F (or C)
Use UP Arrow key
to toggle
between F and C
PROG
T Offset
___ F (or C)
Use RIGHT Arrow key
to select which digit
to change
(digit will flash)
(except
PROG )
Ready
Temp
"Any
Key"
(
except
PROG
Shift
Ready temperature
up or down from factory
default of 300F (149C)
PROG
Programming
Instructions
(except
PROG )
Select the controller's
display units, either
Fahrenheit or Celsius
PROG
"Any
Key"
Display
while
programming
PROG
Use UP Arrow key
change value of digit
Note: Range of offset
is +/-40 F (+/- 22 C)
Rdy Temp
+/- ___F/C
)
Use RIGHT Arrow key
to select which digit
to change
(digit will flash)
PROG
Use UP Arrow key
change value of digit
Standby
Temp
"Any
Key"
(except
PROG )
"Any
Key"
S tb Temp
___ F/C
Use RIGHT Arrow key
to select which digit
to change
(digit will flash)
PROG
Use UP Arrow key
change value of digit
PROG
(except
PROG )
18
Operator’s Manual
Troubleshooting (if these procedures do not find the problem,
call an authorized service agency)
Unit does not come on; there are
no lights on the panel.
1.
2.
Make sure power cord is plugged in.
Check circuit breaker for the outlet.
Unit comes on, but no burner and
no rotisserie drive.
1.
Make sure door is closed all the way; safety circuit prevents flame and rotation
with door open.
Display reads “READY” or
“SETBACK” or “HOLD”
1.
There is no problem; these are normal messages. Refer to operating procedures.
The oven light will not work.
1.
2.
Make sure the power switch is on.
Make sure a menu item program is active. Oven light will only come on when a
program is active.
If fireplace model, make sure light switch is on (auto).
3.
The fireplace burner will not light.
(Fireplace models only.)
1.
2.
3.
Make sure the power switch is on.
Make sure a menu item program is active. Fireplace will only come on when a
program is active.
Make sure fireplace switch is on (auto). Call service if problem persists.
The spits or baskets won’t fit in
the oven.
1.
Make sure both left and right rotisserie drum hubs are located in their proper
positions and are seated in the drive shaft roll pins. Look for bent hex drive or
debris in the hex socket.
The spits (“V” or basket) fall out.
1.
Make sure the spit or basket is installed properly. The spit spear end passes
through the hole in the left rotisserie drum and then the right side of the spit is
engaged into the drive socket in the right rotisserie drum. The spear end of the
spit must then rest in the hole in the left drum. Make sure only the small diameter
portion of the spear end is in the left drum.
The rotisserie burner ignites, but
no rotor rotation.
1.
Check the rotisserie drive motor circuit breaker. If the button is extended, reset it
by pushing it in. If not, call for service.
Rotor seems jerky, not smooth.
1.
Make sure both rotisserie drum hubs are located in their proper positions and are
locked by quick release pins.
Rotor moves at different speeds
at different times.
1.
There is no problem with the machine. The rotisserie motor has 3 different
speeds that can be programmed in different cooking cycles.
The product does not cook
evenly.
1.
Make sure the air baffle or “jet plate” is in place at the top of the oven. Check to
see if both convection fan blades are securely mounted in their proper place and
that they are both spinning when in operation.
The product is not done, or oven
does not come up to
temperature.
1.
Make sure the proper menu item for the product being cooked was initiated and
that the menu item’s programming is correct.
Check to see that the temperature controlled vent in the top of the oven is not
stuck in the open position.
The oven must be preheated before product is loaded.
The product must be loaded as quickly as possible so that the oven does not cool
down too much.
2.
3.
4.
The product is overdone, or oven
temperature exceeds the set
point.
1.
2.
3.
Make sure the proper menu item for the product being cooked was initiated and
that the menu item’s programming is correct.
Check to see that the thermostat controlled vent in the top of the oven is not stuck
shut.
Make sure that 3 gallons of water in the bottom of the oven have not evaporated.
The wrong program button was
pushed.
1.
To cancel a program, hold down the button of the cooking program for 5 seconds.
When the item light goes off, you can select another program
Burner lights, but turns off in a
few seconds or burner fails to
light. Buzzer sounds.
1.
2.
Check the “jet plate” position.
Reset the controller by turning the POWER switch to the OFF position for 5
minutes then back to ON. Call service if problem persists.
19
Cleveland Range, Inc.
Operator’s Manual
Error Messages
Display
Shorted
Probe
Or
Faulty
Heater
Cause
Remedy
This three-part message (plus alarm) is
displayed when the controller detects that
the oven temperature probe is shorted, or
that the oven temperature is not rising, or is
rising too slowly.
Open the door to check if there is any heat
at all. If there’s no heat, either the probe is
open and the burners are kept off by the
controller, or the gas supply is turned off,
which you should check. If there is some
heat check that the gas valve is fully open.
If the gas is OK, then the problem will
require service.
Turn off the alarm by pressing any button
on the control panel.
The controller has detected an overcurrent
condition in the rotisserie drive motor. The
alarm tone will sound continuously.
The only way to turn off the alarm is to turn
power off to the oven and turn it back on.
Check for some obstruction of the drive
system. Call service if the error does not
go away.
A power loss of more than 5 minutes will
sound the alarm tone and display this
message. Press any button to cancel the
alarm.
A power loss of 5 minutes or less will not
sound the alarm or show this message.
When power returns, the cooking cycle will
resume where it left off. A longer loss will
cause the oven to reset and enter the
Preheat/Ready mode.
Probe
Open
This message is displayed (with alarm) if
the oven temperature probe fails open. If
the open condition goes away before 20
seconds, the oven will return to its previous
state; however, the alarm must be turned off
by pressing the TEMP button
If the probe remains open, call for service.
Checksum
Error
This message is displayed upon power up if
the controller detects a fault within one of
the Menu Item programs, or if new controller
software has been installed. Press any
button to acknowledge the message.
Unused
Item
This is not an error message. It is displayed
when you are attempting to review a Menu
Item button which has not been
programmed.
Over
Current
Power
Loss
System
Init
System
Init
Version
CR xx.xx
New
Version
Rotisserie Oven
These are not error messages. They are
displayed upon power up of the oven,
when the software is initializing. The “New
Version” message is shown when new
software is detected for the first time.
20
CR-32 Fireplace Rotisserie Spare Parts List
part number
description
stock quantity
107494
108193
300142
108192
WR51047
20528
WR501060
105693
106719
105782
108591
105784
WR51051
19993
WR51026
WR50101
WR50102
110079
WR50199
WR50179
WR51058
102533
108593
110791
Main Burner Ignition Module
NCC Motor Control
Plug-in Relays for Motor Control
NCC Control Panel
Buzzer
24 VAC Transformer
30 Minute Timer
Fireplace Ignition Module
Fireplace Gas Valve Nat. Gas
Main Burner Gas Valve Nat. Gas
Temperature Probe
Pilot Assy Nat. Gas
Door Switch
Power Switch
Main Burner Ignitor Assy Nat. Gas
CCW Convection Fan Motor (R.H)
CW Convection Fan Motor (L.H.)
Skewer Gear Kit Assy
Damper Solenoid
Mushroom Head Button
Push Button
Contact Block
Ladder Diagram Lable
Kote Soil Shield
CR-32 recommended spare parts list.xls
1
1
2
1
1
1
1
1
1
1
1
1
2
1
1
1
1
8
1
1
1
1
1
Optional