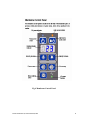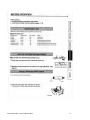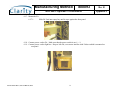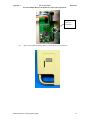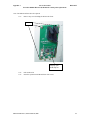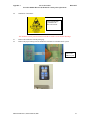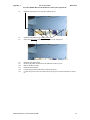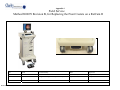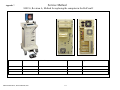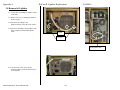
1
RetCam II Wide-Field Digital Imaging System Service Manual P/N 04-03-023 Rev A PN 04-03-016, Rev. D, 24 April 2006 Copyright © 2007 Clarity Medical Systems, Inc. All rights reserved. Trademarks All other trademarks used in this document are the property of their respective owners. Clarity Medical Systems, Inc. 5775 W. Las Positas Blvd. Pleasanton, CA 94588 USA Phone: (925) 463-7984 Fax: (925) 251-0078 Toll free: (800) 215-6005 www.retcam.com PN 04-03-023 Rev A, Service Manual, RCII 1 Contents_____________________________________________________ 1. Notices and Labels ...................................................................................................................4 1.1. Electrical Safety Notices ...................................................................................................4 1.2. Emissions Notice ...............................................................................................................5 1.3. FDA (USA) Notices ..........................................................................................................8 1.4. Important User Safety Notices ..........................................................................................9 1.5. Labels / Symbols .............................................................................................................10 2. Introduction ............................................................................................................................13 1.1. Storage and Transport…………………………………………………………………..13 1.2. System Description……………………………………………………………………..14 3. Maintenance ...........................................................................................................................20 3.1. Recommended Maintenance Schedule ...........................................................................20 3.2. Cleaning Procedures ......................................................................................................20 3.2.1. Lens Piece Cleaning…………………………………………………………….20 3.2.2. System Cleaning………………………………………………………………...21 3.2.3. AAO Bloodbourne Pathogen Information………………………………………23 3.3. Fluorescein Angiography Frequently Asked Questions ................................................31 3.4. Servicing the interior of the cart ......................................................................................32 4. Specifications ..........................................................................................................................33 5. Troubleshooting Guide………………………………………………………………………37 6. Block Diagrams ......................................................................................................................43 7. Replacement Parts ...................................................................................................................46 8. Technical Support……………………………………………………………………………47 9. License Agreements ................................................................................................................49 10. Appendix……………………………………………………………………………………..51 Appendix number Procedure number Revisio n 1 2 3 4 5 6 7 8 9 10 11 12 Vendor 800093 800096 800099 800111 800134 800136 30-000001 N/A N/A 800095 800138 N/A B B B A A A A N/A N/A B A PN 04-03-023 Rev A, Service Manual, RCII Document Name Mitsubishi Digital Color Printer CP900DW RetCam II Adding an Optional FA Light Source RetCam II Membrane Control Panel Replacement RetCam II Front Castor Replacement Procedure RetCam II Trackball Replacement Procedure RetCam II Trackball Cleaning RetCam II Replacing the Computer RetCam II Lightbox Replacement Fuse Replacement Changing the illumination bulb Keyboard Replacement RetCam Handpiece Focus 2 List of Figures Figure 1. RetCam II ………………………………………………………………….16 Figure 2. Handpiece and Lens Piece …………………………………………………17 Figure 3. Lens Piece Selection ……………………………………………………….18 Figure 4. Membrane Control Panel…………………………………………………………….19 Figure 5. Lens Tip Cleaning 21 1.0 Notices and Labels PN 04-03-023 Rev A, Service Manual, RCII 3 Electrical Safety Notices The RetCam II System has been designed, inspected and tested to comply with the safety requirements of IEC60601-1 with respect to fire, shock and mechanical hazards only if used as intended. Model: RetCam II Manufactured by Clarity Medical Systems, Inc. dba Massie Laboratories, Inc. Pleasanton, CA Made in USA Class I Type BF Electrical Equipment Rated for Continuous Operation IEC 60601-1:1988 + A1:1991 + A2:1995 Accessories equipment connected to the analog and digital interfaces must be certified to the respective IEC standards (i.e. IEC60950 for data processing equipment and IEC 60601-1-1 for medical equipment.) Furthermore all configurations shall comply with the system standard IEC 60601-1-1. Anyone who connects additional equipment to the signal input part or signal output part configures a medical system, and is therefore, responsible that the system complies with the requirements of the system standard IEC 60601-1-1. If in doubt, consult the technical services department or your local representative WARNING: This equipment should be connected using the power cord supplied by Clarity. WARNING: To avoid risk of electric shock, this equipment must be connected to a supply mains with protective earth. PN 04-03-023 Rev A, Service Manual, RCII 4 Electromagnetic Emissions Guidance and manufacturer’s declaration – electromagnetic emissions Emissions test RF emissions CISPR 11 RF emissions CISPR 11 Harmonic emissions IEC 61000-3-2 Voltage fluctuations/ Compliance Electromagnetic environment – guidance Group 1 The RetCam II uses RF energy only for its internal function. Therefore, its RF emissions are very low and are not likely to cause any interference in nearby electronic equipment. Class A Class A flicker emissions IEC 61000-3-3 Complies PN 04-03-023 Rev A, Service Manual, RCII The RetCam II is suitable for use in all establishments other than domestic, and may be used in domestic establishments and those directly connected to the public low-voltage power supply network that supplies buildings used for domestic purposes., provided the following warning is heeded: WARNING: This equipment/system is intended for use by healthcare professionals only. This equipment/system may cause radio interference or may disrupt the operation of nearby equipment. It may be necessary to take mitigation measures, such as re-orienting or relocating the RetCam II or shielding the location. 5 Electromagnetic Immunity Guidance and manufacturer’s declaration – electromagnetic immunity The RetCam II is intended for use in the electromagnetic environment specified below. The user should assure that it is used in such an environment. Immunity test Electrostatic discharge (ESD) IEC 61000-4-2 IEC 60601-1-2 test level ±6 kV contact ±8 kV air Compliance level ±6 kV contact ±8 kV air Electromagnetic environment – guidance Floors should be wood, concrete or ceramic tile. If floors are covered with synthetic material, the relative humidity should be at least 30% Electrical fast transient/burst IEC 61000-4-4 ±2 kV for power supply lines ±2 kV for power supply lines Not all of the required testing met the full limits of IEC61000-4-4. Refer to Important User Safety Notices on page 22 for further information. Surge IEC 61000-4-5 ±1 kV line(s) to line(s) ±2 kV line(s) to earth ±1 kV line(s) to line(s) ±2 kV line(s) to earth Mains power quality should be that of a typical commercial or hospital environment. Voltage dips, short interruptions and voltage variations on power supply input lines IEC 61000-4-11 >95%, 0.5 cycles 60%, 5 cycles 30%, 25 cycles >95%, 250 cycles >95%, 0.5 cycles 60%, 5 cycles 30%, 25 cycles >95%, 250 cycles Mains power quality should be that of a typical commercial or hospital environment. If the user of the RetCam II requires continued operation during power mains interruptions, it is recommended that the RetCam II be powered from an uninterruptible power supply (UPS). Power frequency (50/60 Hz) magnetic field IEC 61000-4-8 3 A/m 3 A/m Power frequency magnetic fields should be at levels characteristic of a typical location in a typical commercial or hospital environment. Conducted RF IEC 61000-4-6 0.15-80 MHz, 3 Vrms, 80% 1 KHz AM 0.15-80 MHz, 3 Vrms Radiated RF IEC 61000-4-3 80-2500 MHz, 3/m, 80% 1 KHz AM 3 V/m Portable and mobile RF communications equipment should be used no closer to any part of the RetCam II, including cables, than the recommended separation distance calculated from the equation applicable to the frequency of the transmitter. Recommended separation distance 150 kHz to 80 MHz 80 MHz to 800 MHz 800 MHz to 2.5 GHz where P is the maximum output power rating of the transmitter in watts (W) according to the transmitter manufacturer and d is the recommended separation distance in meters (m). Field strengths from fixed RF transmitters as determined by an electromagnetic site survey should be less than the compliance level in each frequency range. Note: These guidelines may not apply in all situations. Electromagnetic propagation is affected by absorption and reflection from structures, objects and people. PN 04-03-023 Rev A, Service Manual, RCII 6 PN 04-03-023 Rev A, Service Manual, RCII 7 FDA (USA) Notices This device is listed with the United States of America (USA) Food and Drug Administration (FDA) for commercial distribution. Device Trade Name Product Code Classification Name Classification Regulation Number Medical Device Classification PN 04-03-023 Rev A, Service Manual, RCII RetCam II 86 HKI Ophthalmic Camera 886.1120 Risk Class II 8 Important User Safety Notices 1. Remove the lens and store it in the lens box and secure the handpiece in its storage compartment inside the cart before moving the cart to a new site. 2. Carefully inspect and clean the lens piece before each use. DO NOT use if the front lens of the lens piece is nicked or scratched. 3. Never contact the front of the lens piece with hard or sharp objects. This could damage the precision optics and sealing. 4. Unauthorized modifications or additions to the software or hardware of the system will void the warranty and could adversely affect the system function. 5. DO NOT AUTOCLAVE any part of the device. Refer to the Chapter on Maintenance and Support for cleaning recommendations. 6. Do not use the white light source for longer than 5 cumulative minutes on the same eye during an exam. 7. Appropriately power down and unplug the unit and allow the light source bulb to cool before replacing it. Refer to the instructions to Replace Illumination Lamp as necessary. 8. Never connect the RetCam II to a network or any externally powered devices or peripherals during imaging. 9. Before using this equipment to acquire images from patient eyes, users must be trained in proper clinical technique by personnel authorized by Clarity. 10. The RetCam II is for use by or on the order of a health care professional. 11. It is possible that during Electrical Fast Transients from the AC line, the system’s display may scroll continuously. This is an indication that the source of AC power has electronic disturbance (transients). If this indication is present, imaging should not proceed until the disturbance has ceased: the AC plug is put into a different AC outlet: or RetCam II is run from the UPS. If the disturbance persists, an error message may be displayed, which then may require a system reset. Toe perform a system reset, press the (I/O) power switch on the control panel for approx 6 seconds until the system powers down, then press the (I/O) button again to power the system back on . THIS DOES NOT PRESENT A SAFETY RISK TO THE PATIENT, USER, OR ENVIRONMENT PN 04-03-023 Rev A, Service Manual, RCII 9 PN 04-03-023 Rev A, Service Manual, RCII 10 PN 04-03-023 Rev A, Service Manual, RCII 11 Type BF Equipment Do not use if dropped Clean lens piece after use Separate collection of waste at end-of-life as required by European directives. PN 04-03-023 Rev A, Service Manual, RCII 12 2.0 Introduction The RetCam II Wide Field Imaging System (system) is designed using state-of-the-art digital technology to allow the quick and easy capture of wide field, high resolution, fully digital images and videos of the eye. The system is designed for easy use and operation by either a physician or trained staff members. High resolution digital images and videos can be quickly captured, stored, displayed for review, transferred and/or printed by simply using the trackball to point and click. The system as delivered is intended for use indoors, at normal room temperatures (59º F to 95º F or 15º C to 35º C), non-condensing humidity range 25% to 93%, upright, on a level surface, with the front casters locked and the dust cover off for proper ventilation. This manual contains maintenance instructions, specifications and service instructions. Note: Only those modules identified within this service manual are “authorized” for repair by the customer. Any service outside the scope of this manual shall void the warranty and may compromise the safety/efficacy of the system. This manual is meant to be used in conjunction with the RetCam II User’s Manual. The supplier will make available on request, component part lists, descriptions, or other information which will assist the user's appropriately qualified technical personnel to repair those parts of the equipment which are designated by the manufacturer as repairable. CAUTION: Use of this manual is intended for qualified technical personnel only. If in doubt, please contact the manufacturer before proceeding. Storage and Transport Note: Always return the handpiece to the holster on the top surface when not imaging. The handpiece cable can be draped over the side support, but do not wrap it tightly or damage to the fiber optic may result. For storage of the system when not in use, disconnect the power cord and store it in the drawer. Remove all loose objects from the top surface. Fold the display down flat. Wipe down the surfaces with a soft cloth. Place the dust cover over the system. Lock the casters to keep it in place. PN 04-03-023 Rev A, Service Manual, RCII 13 The system is provided with the means to easily move it between operations or between beds in the NICU while it is running. To relocate the system while it is running, disconnect the power cord at both ends, release the front caster locks and gently roll the system to the new location. The internal power supply will keep the computer and monitor running for several minutes. Once in the new position, lock the casters, reconnect the power cord at both ends and continue with imaging. If the floor is uneven or tiled surface, move the system carefully to avoid damage from excessive vibration. The system is not intended to be transported outdoors from building to building. For information on how to safely transport the system out of doors or in anything but an upright position, please contact Customer Service. The RetCam II has been designed, inspected and tested to comply with the safety requirements of IEC60601-1 with respect to fire, shock and mechanical hazards only if used as intended. Inspection and testing of the system by a factorytrained technician after transport outdoors or in a non-upright configuration is necessary to insure continued compliance with all safety standards. System Description The RetCam II system consists of several modules mounted in a stable, high quality integrated mobile cart for easy, safe transportation from one location to another. The front pair of lockable casters allow for easy maneuverability and positioning, while the fixed rear wheels guide the unit in a straight line during transport. (Ref. Figures 1 and 2) 1) Display: A high resolution LCD flat panel display is standard with the system. 2) Control Panel: A membrane control panel turns the system on with one button, and has controls for illumination intensity, camera focus and snap (capture an image or start/stop video recording). 3) Handpiece: The handpiece contains the actual 3-chip CCD. It is light weight and easy to use. The front lens pieces are removable, and allow quick and easy exchange. 4) Interconnect Cable: The interconnect harness contains three separate cables, the fiber optic for transmission of illumination light, the camera cable, and the focus motor control cable. 5) Light Box: The light box contains a CCD camera control unit, a halogen illumination light, and the control circuitry for light intensity, focus, image capture and system logic. 6) Computer: The computer is controlled by a keyboard and trackball. It is a Pentium4 based system, running a specialized Embedded Windows XP, with two internal DVD storage drives and media and proprietary software. The system has an integrated network adapter, and USB hub. 7) Uninterruptible Power Supply (UPS): The computer, display and optional image printer are powered by an Uninterruptible Power Supply. The UPS helps to protect against accidental loss of images due to power surges or sudden power loss. PN 04-03-023 Rev A, Service Manual, RCII 14 The UPS can store enough energy to power the computer and display for several minutes allowing the system to be unplugged from the electrical outlet and moved from room to room or bed to bed without having to reboot the system. 8) Footswitch: The footswitch is a rocker style unit with a function switch on each side, and a push button in the middle. The pedal on the left side controls focusing. Rock this pedal to the left to focus closer, and to the right to focus more distant. The pedal on the right controls illumination light intensity. Rock this pedal to the left to decrease intensity and to the right to increase intensity. The push button in the middle is called the snap switch. An image is captured and stored each time the snap switch is depressed. In video mode, this switch can be used to alternately start and stop video recording. 9) Power Conditioner: The power conditioner isolates the RetCam system from power/line disturbance and meets medical electrical device safety requirements. 10) Storage Drawer(s): One storage drawer is supplied on all units for lens pieces, DVDRAM’s and accessories. Without the Fluorescein Angiography light source, an additional drawer is furnished for extra storage. 11) Report Printer (option): A high resolution inkjet printer can print reports on 8.5” x 11” paper. 12) Image Printer (option): The high quality Mitsubishi dye-sublimation printer can print single images of 3.75” x 4.75” or two images one above the other in a smaller size. 13) Fluorescein Angiography Source (option): A blue exciter light source is available complete with green barrier filter for the handpiece for doing F.A. digital photography with the RetCam II. PN 04-03-023 Rev A, Service Manual, RCII 15 Figure 1 RetCam II PN 04-03-023 Rev A, Service Manual, RCII 16 Fig 2 Handpiece and Lens PN 04-03-023 Rev A, Service Manual, RCII 17 Fig 3 Lens Piece Selection PN 04-03-023 Rev A, Service Manual, RCII 18 Fig 4 Membrane Control Panel PN 04-03-023 Rev A, Service Manual, RCII 19 3.0 Maintenance 3.1 Recommended Maintenance Schedule Between patients: clean and inspect lens piece. Daily: Back up data to a network Weekly: Wipe down the system. Monthly: Inspect cables and connections for wear. Annually: Vacuum the air inlet screens in the rear of the base Burned out bulb: Replace illumination bulb Blown fuse: Replace system fuses Continuously beeping UPS: Replace UPS 3.2 Cleaning Procedures For cleaning purposes, the RetCam II is divided into two categories: 1. The Lens Piece that contacts the patient 2. The rest of the system 3.2.1 The Lens Piece The Lens Piece should be cleaned thoroughly between patients to prevent the spread of infectious disease. As recommended by the American Academy of Ophthalmology, the cleaning liquid of choice is 70% isopropyl alcohol. Moisten a clean towelette with the solution and use a gentle wiping action across the front of the lens piece, being sure to pay special attention to the concave contact lens area. To prevent irritation to the next patient from residue left on the lens, rinse the tip of the lens piece thoroughly with disinfected distilled water. Warning: To avoid damage, do not autoclave any part of the RetCam II system. The American Academy of Ophthalmology also recommends disinfecting with 1:10 dilution of bleach for 5 minutes.(refer to page inserts following this page). . PN 04-03-023 Rev A, Service Manual, RCII 20 4mm (0.16”) Immersion to only 4 mm Fig 5 Lens Tip cleaning WARNING: To handle chemicals safely, consult Material Safety Data Sheets (MSDS) before using isopropyl alcohol or bleach. Note: If you disinfect with bleach, you must rinse the frontmost part of the lens piece with disinfected distilled water, and make sure the lens piece is wiped completely clean before using on a patient. Note: Never immerse the entire lens piece or handpiece in any liquid or solution. For disinfection purposes, you can Immerse no more than 4mm (about 1/16”) of the tip of the lens piece. In an inverted position. FOR NO MORE THAN 15 MINUTES. Immersing more or longer than this causes corrosion of the lens piece and voids the lens warranty. Use water, bleach, 3% hydrogen peroxide or isopropyl alcohol. Permissible immersion depth is illustrated in the Figure above. It is important not to immerse the join where the polished metal tip meets the painted housing, since it is susceptible to corrosion. 3.2.2 System Cleaning. As with any medical device, use good public health practices when handling the equipment, based on CDC guidelines. In addition, as with typical office equipment, a gentle wiping with a cloth moistened with mild soap and/or water is recommended. Do not spray cleaning solutions directly on the computer or other module, spray the cloth instead. The cart and side panels can be sprayed with a mild soap and/or water solution if care is taken not to introduce the mist into the modules. PN 04-03-023 Rev A, Service Manual, RCII 21 The lens piece should be checked before each use for damage to the front contact lens and surrounding surface. The interconnect cable and connectors should be checked for damage to the end connectors and protective covers. WARNING: Always inspect the lens before use for damage such as chips, cracks or roughness that could injure the patient’s eye. PN 04-03-023 Rev A, Service Manual, RCII 22 3.2.3 AAO Bloodborne Pathogen Information PN 04-03-023 Rev A, Service Manual, RCII 23 PN 04-03-023 Rev A, Service Manual, RCII 24 PN 04-03-023 Rev A, Service Manual, RCII 25 PN 04-03-023 Rev A, Service Manual, RCII 26 PN 04-03-023 Rev A, Service Manual, RCII 27 PN 04-03-023 Rev A, Service Manual, RCII 28 PN 04-03-023 Rev A, Service Manual, RCII 29 PN 04-03-023 Rev A, Service Manual, RCII 30 3.3 Fluorescein Angiography Frequently Asked Questions Q: Can the FA Light Source generate other colors and wavelengths of light? A: No, it is designed for 471 nanometer blue excitation exclusively. Q: How long does the Xenon bulb last? A: The bulb is a special order and extensive testing data does not exist. However, a guideline is that the intensity may reduce to one half the original value after 50 hours of use, and then continue to reduce slowly after that. Some users have been performing successful FA imaging up to 200 hours of lamp time. Q: Can the bulb be replaced in the field? A: It is not designed for field replacement. Return the unit to the factory if the output is reduced or the lamp will not illuminate. Call Customer Service for assistance. Q: How much does a replacement bulb cost? A: It depends on the circumstances and what else is out of specification at the time of service. You will be quoted the costs for repair of your FA Light Box before any work is begun. Q: Can I get a replacement barrier filter if mine is lost or broken? A: Yes, contact Customer Service for a quotation. Q: Can the FA Light Source be returned for service without returning the whole RetCam II? A: Yes, the FA Light Source is a module that is removable by a person with the skill level of a nominal biomedical technician. Be sure to package it as a sensitive medical instrument with at least 3” of padding on all sides in a sturdy box, sealed well, shipped insured for USD $20,000. NOTE: Clarity can send appropriate packaging material to you if needed. Q: My FA Light Source turns itself off. It comes back on in a few minutes, or if I turn the power off and back on. What’s wrong? A: The temperature sensing circuit is protecting the Xenon lamp. It may not be working properly. The FA Light Source may need repair and it may be a warranty issue regardless of the age of the unit. Contact Customer Service for advice on how to clear the condition or to schedule service. PN 04-03-023 Rev A, Service Manual, RCII 31 3.4 Servicing the Interior of the Cart WARNING: Removing the back panel should be done by qualified technical personnel only. Maintenance personnel should be familiar with the usual precautions regarding the service of electronic and electrical equipment. In addition, the RetCam II contains an uninterruptible power supply (UPS) that contains batteries. The UPS will NOT be disconnected when the main power plug is removed from the wall. Precautions must be taken to ensure that the UPS is not energized before performing maintenance inside the cart. The computer, Light Box, Fluorescein light source (option) and image printer (option) are modules that can be removed from the back of the cart if necessary. Make note of the cable connections before removing a module. Contact Customer Service for help troubleshooting problems to the module level before removing any modules. Many problems can be traced with the help of substitute harnesses and voltage measurements made in the cart without removing any modules. Service to the UPS requires removal of the image printer (if present), and disassembly of the base cover. Contact Customer Service for detailed instructions for removal and replacement of the UPS if service to the UPS is required. WARNING: When doing this level of service, Electrical Safety Retesting of the system is required to maintain compliance with IEC requirements. Contact Customer Service before beginning. PN 04-03-023 Rev A, Service Manual, RCII 32 4.0 Specifications Hardware Physical 24”(610 mm) wide x 27.4”(697 mm) deep x 47”(1193 mm) high, display folded down 61”(1546 mm) high, with display up Dual 5” front locking casters. Approximately 235 lbs. (107 Kg) basic unit Low center of gravity. Electrical Power consumption: 750 watts maximum with all options. North American version: 115 VAC, 60 Hz Detachable hospital grade power cord International version: 230 VAC, 50 Hz Cart Features Internal Medical Isolation Transformer satisfies IEC 60601-1 Internal Uninterruptible Power Supply. Membrane control panel with status LED’s. Waterproof keyboard and trackball. LCD flat panel display with <25 mS response. Custom display arm for angle and height adjustment. Integrated cooling ducts with quiet, forced-air cooling and filtered inlets. Dual 5” front locking casters 6” rear wheels Storage drawer Tri-function footswitch Camera cable hanger Dust cover Report Printer (Option) Custom Light Source Adjustable intensity iris Automatic black and white balance functions S-Video (NTSC) output Lens focus motor connector Custom fiber optic with interlock Automatic fan speed controller Easy-access bulb replacement Handheld Imager PN 04-03-023 Rev A, Service Manual, RCII 33 3-chip RGB CCD Full 24-bit color Quick-change front lens assemblies, 5 styles Embedded Computer Intel® Processor 1GB memory 120 GB storage Dual 9.4 GB Internal DVD-RAM Drives 4-port USB Hub Audio 10/100 Ethernet Adapter Graphics Accelerator Fluorescein Angiography light source (option) Continuous arc Xenon light source Narrow-line blue excitation filter (471 nm) Iris intensity control Fiber optic safety interlock Green emission (blocking) filter for handheld imager (510 nm) Dye-Sublimation Color Image Printer (option) Mitsubishi medical grade printer Easy access drawer for paper replacement Single or dual printouts with or without annotation Software MS Windows XP Embedded operating system Proprietary image acquisition, storage and processing Live color image display Integrated patient database. Still and 20-second video capture modes Review functions Compare functions Data export as XML, CSV or TXT with automatic patient organization Image export as bitmap, jpeg, or png Image annotation Fluorescein Angiography mode Monochrome image storage (green channel) Timed auto-save Time-stamped images Environmental Conditions The system as delivered is intended for use indoors, at normal room temperatures and humidity, upright, on a level surface, with the brakes applied to the front casters PN 04-03-023 Rev A, Service Manual, RCII 34 and the dust cover off for proper ventilation. Condition Operating Storage and Transport Temperature Relative Humidity Atmospheric Pressure 59º to 95º F (15º to 35º C) 10% to 93% non-condensing 20.7 to 31.3 inches Hg (70 to 106 kPa) -1255 to 9882 feet (-382 to 3012 meters) -4º to 122º F (-20º to 50º C) 10% to 85% non-condensing 14.7 to 31.3 inches Hg (50 to 106 kPa) -1255 to 18288 feet (-382 to 5574 meters) Altitude Note: Specifications subject to change without notice. PN 04-03-023 Rev A, Service Manual, RCII 35 Massie Imaging Device PN 04-03-023 Rev A, Service Manual, RCII 36 Section 5 RetCam II Troubleshooting Guide Issue: Troubleshooting recommendations: No power to Ret Cam II system. If the green light on the membrane control panel is not flashing then verify the power switch on the back of the system is turned on and the power cord is plugged into the appropriate outlet. If the system has not been plugged into the wall for at least 4 hours before the intended use, plug the system in to let the UPS battery charge then press the power button on the membrane control panel. If only the light from the handpiece is on when the power button is pressed it is possible the UPS has failed and will need to be replaced. Contact customer service at Clarity Medical Systems. Verify power cord connection. Verify power source is correct voltage for system and is functioning correctly. Verify the main power switch in the back of the RetCam system turned on. No Display The display will be dark initially while the program is loading. If the display is still dark after a few minutes then verify the monitor is turned on. Verify monitor power indicator light is on. Verify monitor cable and power cord are connected properly. Verify computer is on. Verify monitor functionality; monitor to alternate system. alternate monitor to system. • Connect • Connect Verify system Display settings are correct. PN 04-03-023 Rev A, Service Manual, RCII 37 No Operating System Restart the system. Verify system BIOS is loading and displaying on monitor. Verify if any error messages are displaying and obtain details. If there is an error message when the system is turned on that is not recoverable, record the error then reboot the system by pressing and holding the power button on the membrane control panel for 6 seconds. Wait 6 seconds before turning the system back on. No RetCam II program Restart the system. Verify RetCam splash screen displays. Verify error messages displayed. Obtain details. Verify if system is connected to network. If so, disconnect from network and restart the system. Verify RetCam program is present under. C:\Program Files\Massie Research Labs. No Camera Image Verify connections are properly connected. Verify the hand-piece camera cable is connected to the light-box. Verify the camera cable is inserted and threaded on. Verify there is an S-video connection in the front of the light-box. Can an image be seen when an auxiliary monitor is connected to the S-video connection? Unable to Save Image Verify destination location of file to be saved, (local, DVD, USB, network, etc.) Verify sufficient space at destination location. Verify any error messages displayed while saving. Obtain details. . PN 04-03-023 Rev A, Service Manual, RCII 38 Unable to Transfer an Image Verify file transfer destination location. Verify drive/device is resident in RetCam program. Verify drive/device is recognized in File Explorer. If failing network file transfer, • Verify you have successful connectivity to network Share directory. • Verify you are successfully logged on. • Verify network share file parameters. . Unable to Print Report or Image file Verify printer type, (image or report printer). Verify printer power indicator lights are on. Verify printer cable connections are properly connected. Verify if any printer error codes displaying. Verify printer media is properly installed. Verify correct printer driver is installed. . No Light from hand-piece Verify the fiber optic from the handpiece is inserted in the fiber optic port of the lightbox and the lamp button on the membrane control panel is turned on. Leave the lamp off for 10 minutes to allow the lamp to cool down and then turn it back on. If after these measures are taken the lamp does not turn on, then replace the illumination bulb. See the section in the User or Service manual for Changing the illumination bulb. Light intensity does not increase or decrease . Press the light intensity button on first the membrane control panel and then the light intensity peddle on the footswitch to change the intensity of light coming out of the handpiece. If the intensity does not change with either then contact customer service. If it is determined the lightbox needs to be replaced then upon receiving the part follow procedure 30-000001 for Lightbox Replacement. PN 04-03-023 Rev A, Service Manual, RCII 39 Live image problem If the color of the live image is not balanced perform the Automatic White Balance procedure in the User or Service manuals If there are color ‘streaks’ in the live image the handpiece will need to be sent in for service. Contact customer service at Clarity Medical Systems. Image does not focus . Verify the focus cable is connected to the lightbox. When the focus button is pressed verify the motor within the handpiece can be heard turning. o If the motor cannot be heard, then contact Clarity Medical Systems. o If the motor can be heard, see the following steps; Check for cleanliness of the lenspiece. See procedure 800138 on Hand-piece Focus Image capture is not working For further assistance please contact Clarity Service Dept. @ (800) 215-6005. If a live image can be taken using the software, verify that an image can also be captured using the membrane control panel button. If an image can be taken using the the membrane panel button then take an image using the snap button on the footswitch. If the image can be taken using the snap button on the footswitch, i but not the membrane panel, the membrane panel will need to be replaced. See procedure 800096 for Membrane Control Panel Replacement. PN 04-03-023 Rev A, Service Manual, RCII 40 Button on the membrane control panel is not working If it is determined the membrane control panel needs to be replaced then upon receiving the part follow procedure 800096 for Membrane Control Panel Replacement. . No numbers displayed on membrane panel for light intensity If the system is turned on and the RetCam program is displayed on the monitor but no numbers appear on the membrane control panel for light intensity then press the intensity button to turn the lamp on. USB stick is not recognized Since the operating system of the RetCam II is embedded not all USB sticks will be recognized. If the USB stick is not recognized in the Utilities screen then use the SanDisk USB stick provided by the company. Keyboard is not working If repairs to the computer have been performed recently then verify the keyboard cable is inserted into the keyboard connection at the computer. If it is determined the keyboard needs to be replaced then Contact customer service and upon receiving the keyboard follow procedure 800095 for Keyboard Removal/Replacement. The UPS beeps when the system is unplugged This is the normal part of the operation. See the section in the User Manual covering System Description for the Uninterruptible Power Supply (UPS). The UPS supplied power is intended only for relocation of the system and live imaging should not be done when the system is unplugged. The system turns off when it is unplugged and moved This can happen when the UPS battery is in a low charge condition. The normal time a system can be unplugged from the power source with the program running will range from 10 to 20 minutes on a fully charged battery. The RetCam II must be plugged in for live imagining. It is best to leave the RetCam II plugged in with the green light on the membrane control panel flashing when not in use. PN 04-03-023 Rev A, Service Manual, RCII 41 The trackball is dirty With the system turned off and unplugged, use an alcohol wipe to clean the trackball. If the trackball does not move smoothly see procedure 800134 for Trackball Cleaning. The trackball does not work If repairs to the computer have been performed recently then verify the trackball cable is inserted into the trackball connection at the computer. If the trackball needs to be replaced then refer to procedure 800111 for Trackball Replacement. No light from the FA Verify the fiber optic from the handpiece is fully inserted in the fiber port of the FA. If no blue light can be seen while the light switch on the front of the FA is turned on then the module will need to be returned to the factory for service. To reinstall the FA after service refer to procedure 800093 concerning the FA. Blue FA light stays on when system is turned off To turn off the FA light press the light switch on the front of the FA. There is no network connection Contact your Information Technology (IT) department. The front castors on the system need to be replaced See procedure 800099 on Front Castor Replacement. PN 04-03-023 Rev A, Service Manual, RCII 42 6.0 Block Diagrams RetCam II Internal Wiring BN Light Box BN COMM Computer Speaker COM 1 Trackball TRIGGER GAME FRAME GRABBER DC IN TELEPHONE JACK PWR Membrane Keyboard Footswitch Monitor PWR PARALLEL PORT US Mitsubishi Printer PWR LIN UP UP Report Printer PWR PWR UP UP UP UP Imaging Device Base PN 04-03-023 Rev A, Service Manual, RCII 43 RetCam II Base Low Voltage Wiring RJ-45 connector Protected Feedthrough Light Control Unit RJ-45 Receptacle 9-Pin D Connector Membrane PCB UPS 9-pin D communications port Connector Footswitch Cord Receptacle Attached Coiled Footswitch Cord Footswitch Protected Feedthrough Protected Feedthrough Footswitch Cord Round Connector Earth Ground PN 04-03-023 Rev A, Service Manual, RCII 44 RetCam II Base AC Wiring UPS Detachable Power Cord to LCU 2 Fans in Series L N IEC320 Socket L N G Attached Power Cord UPS Outlet Edison Socket Pigtail Edison Plug Pigtail L N G L N G Terminal Block L N Toroid Isolation Transformer Detachable Power Cord Fused 120/240 Power Entry Module PN 04-03-023 Rev A, Service Manual, RCII G Electrostatic shield Earth Ground IEC320 & Edison Sockets Detachable Power Cords to Computer, Monitor, Printers; & Power Supply to LCU 45 7.0 Replacement Parts Spare parts and supplies can be ordered by calling or faxing the part description and number to Customer Service. Consumables: Illumination Bulb (halogen) DVD-RAM Disc USB STICK Image Printer Paper & Ribbon Image Printer Paper & Ribbon 10-amp 125 volt fuses 5-amp 250 volt fuses (slo-blo) 02-04-501 03-12-028 03-12-025 03-12-004(Model No. CP770DW) 03-12-005(Model No. CP900DW) 02-04-037 02-04-038 Components: Flat Panel Display Computer Assembly UPS 620 C Footswitch Handpiece Lightbox Portrait Lens FA Filter FA install Kit (order with a new FA) FA Lightbox Image printer w/install kit PN 04-03-023 Rev A, Service Manual, RCII Contact Customer Service 03-00-016 04-04-020 12-00-065 01-00-201 13-00-000 01-00-017 09-00-015 04-00-910 09-00-001 04-00-067 46 8.0 Technical Support How to Get Support The User Manual and Service Manual have been written to answer the majority of questions that arise with the product. Please consult these manuals before calling for service. Clarity Medical Systems, Inc.’s (CMS) in-house technical staff is dedicated to helping our users with any specific problems and questions you may have with the RetCam II. Please have your serial number ready and include the serial number on all correspondence. The serial number is located on a sticker affixed to the base of the cart at the back just above the power cord connection. Please be as specific and give as much information as possible. If you encounter a system malfunction of any kind, please record the exact steps taken leading to the failure, so that our staff can replicate the problem. Off-shore customers, please contact your distributor. In the US, please call: Telephone Support: FAX Support: (800) 215-6005 (925) 251-0078 Telephone support is typically available between the hours of 9am and 5pm Pacific Time. or write to: Clarity Medical Systems, Inc. 5775 West Las Positas Blvd. Pleasanton, CA 94588 USA or email to: [email protected] Our technical support staff will respond to your questions as soon as a staff member is available. In most cases, you should receive an answer within 48 hours. Complex questions that require testing or special research may take longer. Note: Questions about products no longer under warranty and questions other than to explain ordinary use of the product may incur engineering charges. Please ask for an hourly quotation before incurring charges. Returning Parts for Repair If a part or component is defective or damaged and is to be returned to Clarity Medical Systems for repair or replacement a Return Materials Authorization Number (RMA #) must be issued by CMS. The RMA number must be noted on the return shipping documents so that the disposition of the part is known when it is received at CMS offices. Should your CMS product prove defective during the period covered by this warranty, please call, FAX or write to CMS at the numbers and address listed above for an RMA number. Each separate part must be securely packaged and returned to CMS in its original shipping container or an equivalent. Please clearly mark the outside of each returned package with the RMA number. CMS will, at its option, repair or replace any defective or damaged part or component. Determination regarding whether service and repairs are completed at the customer site or the defective or damaged part(s) are returned to PN 04-03-023 Rev A, Service Manual, RCII 47 CMS‘s facilities for repair shall be made by CMS on a case by case basis. Costs incurred to complete service or repair, including parts, labor, travel and shipping, not covered by warranty will be billed to the customer upon successful completion of the service or repair. PN 04-03-023 Rev A, Service Manual, RCII 48 9.0 License Agreements CMS Software Restricted Rights This Software and accompanying written materials are provided with Restricted Rights. Use, duplication, or disclosure by the U.S. Government is subject to restrictions applicable to commercial computer software (under FAR 52.227--19 and DFARS 25.227-7013). Contractor/manufacturer is Clarity Medical Systems, Inc., 5775 West Las Positas Blvd, Pleasanton, CA 94588. This Agreement is governed in and by the laws of the State of California, U.S.A. This statement gives you specific legal rights; you may have others which vary from state to state and from country to country. Clarity Medical Systems, Inc. reserves all rights not specifically granted in this statement. Any attempt to decompile, reverse engineer or otherwise copy this software shall be considered a breach of this agreement. PN 04-03-023 Rev A, Service Manual, RCII 49 RetCam II Software End User License Agreement You have acquired a RetCam II (“DEVICE”) that includes software licensed by Clarity Medical System, Inc. (“CMS, Inc.”) from Microsoft Licensing Inc. or its affiliates (“MS”). Those installed software products of MS origin, as well as associated media, printed materials, and “online” or electronic documentation (“SOFTWARE”) are protected by international intellectual property laws and treaties. The SOFTWARE is licensed, not sold. All rights reserved. IF YOU DO NOT AGREE TO THIS END USER LICENSE AGREEMENT (“EULA”), DO NOT USE THE DEVICE OR COPY THE SOFTWARE. INSTEAD, PROMPTLY CONTACT CMS, INC. FOR INSTRUCTIONS ON RETURN OF THE UNUSED DEVICE OR A REFUND. ANY USE OF THE SOFTWARE, INCLUDING BUT NOT LIMITED TO USE ON THE DEVICE WILL CONSTITUTE YOUR AGREEMENT TO THIS EULA (OR RATIFICATION OF ANY PREVIOUS CONSENT). GRANT OF SOFTWARE LICENSE. This EULA grants you the following license: ¾ You may use the SOFTWARE only on the DEVICE. ¾ NOT FAULT TOLERANT. The SOFTWARE IS NOT FAULT TOLERANT. CMS, INC. HAS INDEPENDENTLY DETERMINED HOW TO USE THE SOFTWARE IN THE DEVICE, AND MS HAS RELIED UPON CMS, INC. TO CONDUCT SUFFICIENT TESTING TO DETERMINE THAT THE SOFTWARE IS SUITABLE FOR SUCH USE. ¾ NO WARRANTIES FOR THE SOFTWARE. THE SOFTWARE is provided “AS IS” and with all faults. THE ENTIRE RISK AS TO SATISFACTORY QUALITY, PERFORMANCE, ACCURACY, AND EFFORT (INCLUDING LACK OF NEGLIGENCE) IS WITH YOU. ALSO, THERE IS NO WARRANTY AGAINST INTERFERENCE WITH YOUR ENJOYJENT OF THE SOFTWARE OR AGAINST INFRINGEMENT. IF YOU HAVE RECEIVED ANY WARRANTIES REGARDING THE DEVICE OR THE SOFTWARE, THOSE WARRANTIES DO NOT ORIGINATE FROM, AND ARE NOT BINDING ON, MS. ¾ Note on Java support. The SOFTWARE may contain support for programs written in Java. Java technology is not fault tolerant and is not designed, manufactured, or intended for use or resale as online control equipment in hazardous environments requiring fail-safe performance, such as in the operating of nuclear facilities, aircraft navigation or communications systems, air traffic control, direct life support machines, or weapons systems, in which the failure of Java technology could lead directly to death, personal injury, or severe physical or environmental damage. Sun Microsystems, Inc. has contractually obligated MS to make this disclaimer. ¾ No Liability for Certain Damages. EXCEPT AS PROHIBITED BY LAW, MS SHALL HAVE NO LIABILITY FOR ANY INDIRECT, SPECIAL, CONSEQUENTIAL OR INCIDENTAL DAMAGES ARISING FROM OR IN CONNECTION WITH THE USE OR PERFORMANCE OF THE SOFTWARE. THIS LIMITATION SHALL APPLY EVEN IF ANY REMEDY FAILS OF ITS ESSENTIAL PURPOSE. IN NO EVENT SHALL MS BE LIABLE FOR ANY AMOUNT IN EXCESS OF U.S. TWO HUNDRED FIFTY DOLLARS (U.S. $250.00). ¾ Limitations on Reverse Engineering, Decompilation, and Disassembly. You may not reverse engineer, decompile, or disassemble the SOFTWARE, except and only to the extent that such activity is expressly permitted by applicable law notwithstanding this limitation. ¾ SOFTWARE TRANSFER ALLOWED BUT WITH RESTRICTIONS. You may permanently transfer rights under this EULA only as part of a permanent sale or transfer of the DEVICE, and only if the recipient agrees to this EULA. If the SOFTWARE is an upgrade, any transfer must also include all prior versions of the SOFTWARE. ¾ EXPORT RESTRICTIONS. You acknowledge that SOFTWARE is subject to U.S. export jurisdiction. You agree to comply with all applicable international and national laws that apply to the SOFTWARE, including the U.S. Export Administration Regulations, as well as end-use and destination restrictions issued by U.S. and other governments. For additional information see http://www.microsoft.com/exporting/. PN 04-03-023 Rev A, Service Manual, RCII 50 10 Appendix Appendix Table Appendix number Procedure number Revisio n 1 2 3 4 5 6 7 8 9 10 11 12 Vendor 800093 800096 800099 800111 800134 800136 30-000001 N/A N/A 800095 800138 N/A B B B A A A A N/A N/A B A PN 04-03-023 Rev A, Service Manual, RCII Document Name Mitsubishi Digital Color Printer CP900DW RetCam II Adding an Optional FA Light Source RetCam II Membrane Control Panel Replacement RetCam II Front Castor Replacement Procedure RetCam II Trackball Replacement Procedure RetCam II Trackball Cleaning RetCam II Replacing the Computer RetCam II Lightbox Replacement Fuse Replacement Changing the illumination bulb Keyboard Replacement RetCam Handpiece Focus 51 Appendix 1 PN 04-03-023 Rev A, Service Manual, RCII 52 PN 04-03-023 Rev A, Service Manual, RCII 53 PN 04-03-023 Rev A, Service Manual, RCII 54 PN 04-03-023 Rev A, Service Manual, RCII 55 PN 04-03-023 Rev A, Service Manual, RCII 56 PN 04-03-023 Rev A, Service Manual, RCII 57 PN 04-03-023 Rev A, Service Manual, RCII 58 PN 04-03-023 Rev A, Service Manual, RCII 59 PN 04-03-023 Rev A, Service Manual, RCII 60 PN 04-03-023 Rev A, Service Manual, RCII 61 PN 04-03-023 Rev A, Service Manual, RCII 62 PN 04-03-023 Rev A, Service Manual, RCII 63 PN 04-03-023 Rev A, Service Manual, RCII 64 PN 04-03-023 Rev A, Service Manual, RCII 65 PN 04-03-023 Rev A, Service Manual, RCII 66 PN 04-03-023 Rev A, Service Manual, RCII 67 PN 04-03-023 Rev A, Service Manual, RCII 68 Manufacturing Method 800093 RetCam II Optional FA Installation Description: Appendix 2 FA Light Unit, Addition to RCII Cart 09-00-001 into 12-00-000 Part Number: Rev A B Rev B ECO 2814 Revision History Author Released Update to current format and build PN 04-03-023 Rev A, Service Manual, RCII H. Crean 69 Date 09/12/03 04/30/07 Manufacturing Method 800093 RetCam II Optional FA Installation 1.0 PURPOSE 1.1. 2.0 SCOPE 2.1. 3.0 4.0 To provide instructions on how to install an FA assembly as an option. This work instruction provides the step by step procedure to install the FA assembly. REFERENCE(S) 3.1. FA light unit, Main assembly 09-00-001 3.2. RCII Assembly Record Form 900300 3.3. FA Accessory Kit Form, RCII 900209 EQUIPMENT AND TOOLING 4.1. Required for Assembly 4.1.1. 4.1.2. 4.1.3. 5.0 9/64” Allen wrench 1/8” Allen wrench Wire cutters MATERIAL AND SUPPLIES PN 04-03-023 Rev A, Service Manual, RCII 70 Rev B Appendix 2 Manufacturing Method 800093 RetCam II Optional FA Installation 5.1. Two nylon tie wraps (optional) PN 04-03-023 Rev A, Service Manual, RCII 71 Rev B Appendix 2 Manufacturing Method 800093 RetCam II Optional FA Installation 6.0 ASSEMBLY PROCEDURE 6.1. Task No. 1 – Install FA option 6.1.1. Remove front drawer directly under the Light Box. To remover drawer: 6.1.1.1. Fully extend drawer. 6.1.1.2. Release and hold black detents on drawer slide. 6.1.1.2.1. One moves up and one moves down. 6.1.1.3. 6.1.1.2.2. Arrows on slides indicate direction. Pull drawer out. 6.1.1.3.1. PN 04-03-023 Rev A, Service Manual, RCII A slight resistance will be felt. 72 Rev B Appendix 2 Manufacturing Method 800093 RetCam II Optional FA Installation Rev B Appendix 2 6.1.2. Remove rear panel, 7 screws, using 1/8” Allen wrench. 6.1.3. Remove the light box retainer bracket by removing 2 screws using a 9/64” allen wrench. 6.1.3.1. The retainer bracket holds the light box module in position. 6.1.4. Unplug the light box power cord, and reroute the cord so that it does not block the path of the FA. PN 04-03-023 Rev A, Service Manual, RCII 73 Manufacturing Method 800093 RetCam II Optional FA Installation 6.1.5. Remove the drawer tray (4 screws) using a 9/64” allen wrench. 6.1.5.1. Tray can be removed with rails attached. 6.1.6. Use cutters to remove 2 nylon ties holding FA power cord (existing to frame. PN 04-03-023 Rev A, Service Manual, RCII 74 Rev B Appendix 2 Manufacturing Method 800093 RetCam II Optional FA Installation Rev B Appendix 2 6.1.7. Mount the FA 6.1.7.1. Slide FA Unit into empty bay until it stops against the front panel. 6.1.8. Connect power cord to FA. Make sure that the power switch in on (“—“). 6.1.9. Connect power cord to light box. Keep to left side, so as not to interfere with FA duct which is mounted on rear panel. PN 04-03-023 Rev A, Service Manual, RCII 75 Manufacturing Method 800093 RetCam II Optional FA Installation Rev B Appendix 2 6.1.10. Install FA retainer bracket (12-03-049) with 8-32 screws (07-00-106) and #8 washers (07-00-316) using 9/64” allen wrench. 6.1.11. Install rear panel, 7 screws, using 1/8” allen wrench. Note Check that no cords (specifically light box power and FA power) are interfering with duct on rear panel. Technician may need to tie wrap these 2 cords together. PN 04-03-023 Rev A, Service Manual, RCII 76 Appendix 3 Service Procedure Procedure 800096 Revision B, Membrane control panel replacement. RetCam II Rev ECO Revision History Date Approved A 2360 Release April 20, 2004 G. Sprehn B 2468 Changed to membrane panel without resistors and membrane PCB Rev. B with resistors October 6, 2004 beginning with RetCam II SN: 2072. Also added membrane panel adapter board PN 12-04-029 for use with Rev. A membrane PCB’s. Feb. 1, 2005 G. Sprehn PN 04-03-023 Rev A, Service Manual, RCII 77 Appendix 3 Service Procedure Procedure 800096 Revision B, Membrane control panel replacement. RetCam II Procedure: Replacement of the membrane control panel in the RetCam II imaging system. Contains: Listing of tools and supplies along with step by step instructions on the replacement of the membrane. Tools: Small slotted screwdriver or knife – for removal of membrane control panel. Hex wrenches – 3/32 and 5/64 inch Philips screwdriver - #2 Parts: Replacement membrane control panel PN 12-00-015. Membrane PCB PN 12-00-013 if needed. Membrane Panel Adapter PCB PN 12-04-029 if needed. Supplies: Drawer liners – in printer and front storage drawers. Electrical tape if needed. Outline: 1.0 Removal of membrane. 1.0A If membrane PCB needs to be replaced. 2.0 Installation of membrane. Notes: The dimensions of the membrane control panel were 2 ½ x 4 ¼ inches for RetCam II systems SN 2001 - 2010. The panel was resized to ~ 3 x 5 ¼ inches starting with SN 2011. The dimensions should be verified when ordering this part. PN 04-03-023 Rev A, Service Manual, RCII 78 Appendix 3 1.0 Service Procedure Procedure 800096 Revision B, Membrane control panel replacement. RetCam II Removal of membrane. 1.1 1.2 Disconnect the power cord at the back of the base. Open the printer drawer and disconnect the power and USB cables from the printer. 1.3 1.4 1.4.3 system. Lift the printer out of the drawer. Remove the printer drawer. 1.4.1 Extend the drawer fully open. 1.4.2 Locate the black locking tabs on both sides of the drawer gliders. Pull the left tab upward and the right tab downward as you pull the drawer out of the 1.5 Place drawer liners inside the RetCam II chassis to prevent screws removed from falling down. Use the liners from the printer and front storage drawers. 1.6 Remove the printer transformer from the underside of the top cover. PN 04-03-023 Rev A, Service Manual, RCII 79 Appendix 3 Service Procedure Procedure 800096 Revision B, Membrane control panel replacement. RetCam II 1.7 Remove the glider tracks from the inner panels on the system. 1.7.1 Extend the gliders as necessary to expose the screws. Using a 3/32 inch hex wrench remove 4 screws from each side. 1.8 Remove the upper screws securing the side panels to the front cover using a 5/64 inch hex wrench. There is one screw on each side Front access panel screw 1.9 1.10 Remove the side panel by removing the 4 philips head screws on the lower edge of the panel and any screws holding the side panel to the front panel. Pull out on the membrane cable to detach it. The membrane control panel and membrane PCB are sensitive to electrostatic discharge. Wear an ESD strap grounded to the RetCam II frame. Membrane cable 1.11 Push the membrane out of the top cover assembly. PN 04-03-023 Rev A, Service Manual, RCII 80 Appendix 3 Service Procedure Procedure 800096 Revision B, Membrane control panel replacement. RetCam II Screwdriver to push out membrane 1.12 Remove the membrane and any adhesive which may be left on the chassis. PN 04-03-023 Rev A, Service Manual, RCII 81 Appendix 3 Service Procedure Procedure 800096 Revision B, Membrane control panel replacement. RetCam II 1.0A If membrane PCB needs to be replaced. 1.1A Remove any screws holding the PCB to the frame. screws Snap-top pem. PCB snaps on. 1.2A 1.3A Pull out the PCB. Insert the replacement PCB and fasten with screws. PN 04-03-023 Rev A, Service Manual, RCII 82 Appendix 3 2.0 Service Procedure Procedure 800096 Revision B, Membrane control panel replacement. RetCam II Installation of membrane. Wear an ESD strap grounded to the RetCam II frame. The membrane control panel and membrane PCB are sensitive to electrostatic discharge. 2.1 2.2 Remove the membrane from the packaging. Remove the paper backing from the membrane and install it on the RetCam II system. remove the adhesive pad PN 04-03-023 Rev A, Service Manual, RCII 83 Appendix 3 2.3 Service Procedure Procedure 800096 Revision B, Membrane control panel replacement. RetCam II Connect the membrane cable to the PCB 2.3 A For Ver 1.4 Rev A PCB and Rev B membrane control panel use membrane panel adapter PN 12-04-029 Rev A PCB has White LED’s 2.3 B For Rev B PCB and Rev B membrane control panel 2.4 Reconnect the cables from the footswitch and lightbox. The cable design is dedicated to the connector so the cables can not be switched. PN 04-03-023 Rev A, Service Manual, RCII 84 Appendix 3 Service Procedure Procedure 800096 Revision B, Membrane control panel replacement. RetCam II 2.5 Install the front panel cover using the 2 philips screws. 2.6 2.7 Install the side panels using 4 philips screws each. Secure the 2 hex screws holding the side panels to the front panel. 2.8 2.9 2.10 2.11 2.12 2.13 Install the side glider tracks. Resecure the printer transformer to the underside of the top cover. Remove the drawer liners. Install the printer drawer. Connect the power and USB cables to the report printer. Connect the power cord to the system and verify the power switch on the base is turned on. PN 04-03-023 Rev A, Service Manual, RCII 85 Appendix 4 Field Service Method 800099 Revision B, for Replacing the Front Casters on a RetCam II Rev A ECO 2441 Revision History Release Date December 6, 2004 Approved G. Sprehn B 2539 Change header logo to Clarity Medical Systems September 28, 2005 G. Sprehn PN 04-03-023 Rev A, Service Manual, RCII 86 Appendix 4 Field Service Method 800099 Revision B, for Replacing the Front Casters on a RetCam II Procedure: Replacing the front caster on a RetCam II Outline: 1.0 Preparation 2.0 Replacing a front caster 3.0 Restore to the original condition. Supplies: Loctite 242 Caster PN 12-01-050 4 - Washers PN 07-00-235 .38 x .87 x .07T, ZN 4 - Screws PN 07-00-308 5/16-18 x .75L, SS Tools needed: for front wheel 3/16” Hex wrench PN 04-03-023 Rev A, Service Manual, RCII 87 Appendix 4 Field Service Method 800099 Revision B, for Replacing the Front Casters on a RetCam II 1.0 Preparation 1.1 Turn the system power off. 1.2 Unplug the system from the outlet. 1.3 Disconnect and remove the handpiece. 1.4Disconnect and remove the report Tighten Knobs Monitor Remove Handpiece printer. 1.5 Remove all items from the drawers. 1.6 Secure the monitor. RetCam II Cover or similar padding PN 04-03-023 Rev A, Service Manual, RCII 88 Appendix 4 Field Service Method 800099 Revision B, for Replacing the Front Casters on a RetCam II 2.0 Replacing a front wheel 2.1 With two people, slowly tilt back the system until it rests on its rear handle. 2.2 With the 3/16” hex wrench remove the four screws and washers holding the caster to the base and remove the caster. PN 04-03-023 Rev A, Service Manual, RCII 89 Appendix 4 Field Service Method 800099 Revision B, for Replacing the Front Casters on a RetCam II 2.3 Place a drop of Loctite 242 in each of the four threaded holes for the base wheel. 2.4 Install the replacement caster. Caster PN 12-01-050 2.5 Check that the caster is mounted securely by gripping the caster and trying to move it; it should not move. If the caster does move then tighten the screws. Also check for the wheel rolling and spinning and the ability to lock and unlock it. PN 04-03-023 Rev A, Service Manual, RCII 90 Appendix 4 Field Service Method 800099 Revision B, for Replacing the Front Casters on a RetCam II 3.0 Restore to the original condition. 3.1 With two people, upright the system. 3.2 Restore the monitor to its original position. 3.3 Install the handpiece. 3.4 Install the report printer. 3.5 Replace any items removed from the drawers. 3.6 Plug the system in. 3.7 Power the system on. PN 04-03-023 Rev A, Service Manual, RCII 91 Appendix 5 Service Procedure Procedure 800111 Revision A, Trackball replacement. Front view of installed trackball. RetCam II Rear view of trackball in packaging Rev. ECO Revision History Date Approved A 2456 Release Feb. 1, 2005 G. Sprehn Procedure: Replacement of the Trackball in the RetCam II imaging system. Contains: Listing of tools and supplies along with step by step instructions on the replacement of the Trackball. Tools: Hex wrenches – 3/32, 5/64 inch and 1.5 mm Philips screwdriver - #2 Sidecutters (wire cutters for wire ties) Supplies: Drawer liners – in printer and front storage drawers. Nylon cable ties – standard 4” or more length x .10” width Outline: 1.0 Removal of Trackball. 2.0 Installation of Trackball. PN 04-03-023 Rev A, Service Manual, RCII 92 Appendix 5 1.0 Service Procedure Procedure 800111 Revision A, Trackball replacement. RetCam II Removal of trackball. 1.1 1.2 Disconnect the power cord at the back of the base. Open the printer drawer and disconnect the power and USB cables from the printer. 1.3 1.4 1.4.3 system. 1.5 Lift the printer out of the drawer. Remove the printer drawer. 1.4.1 Extend the drawer fully open. 1.4.2 Locate the black locking tabs on both sides of the drawer gliders. Pull the left tab upward and the right tab downward as you pull the drawer out of the Place drawer liners inside the RetCam II chassis to prevent screws removed from falling down. Use the liners from the printer and front storage drawers. PN 04-03-023 Rev A, Service Manual, RCII 93 Appendix 5 Service Procedure Procedure 800111 Revision A, Trackball replacement. RetCam II 1.6 Remove the glider tracks from the inner panels on the system. 1.6.1 Extend the gliders as necessary to expose the screws. Using a 3/32 inch hex wrench remove 4 screws from each side. 1.7 Remove the upper screws securing the side panels to the front cover using a 5/64 inch hex wrench. There is one screw on each side Front cover panel screw 1.8 1.9 1.10 Remove the side panels by removing the 4 philips head screws on the lower edge of each panel. The panel on the left has cabling attached, lower this out of the way. Remove the front cover panel by removing the 2 philips screws located on the lower corners of the panel. The printer power transformer is attached to the underside of the top panel with thick tape. Gently pry this loose and set it aside. Printer Transformer PN 04-03-023 Rev A, Service Manual, RCII 94 Appendix 5 1.11 Service Procedure Procedure 800111 Revision A, Trackball replacement. RetCam II Using the 1.5 mm hex wrench, remove the 4 screws that fasten the trackball to the RetCam II chassis. The fourth screw is in the hidden corner. PN 04-03-023 Rev A, Service Manual, RCII 95 Appendix 5 Service Procedure Procedure 800111 Revision A, Trackball replacement. 1.12 1.13 Cut the wire ties holding the trackball cable to the RetCam II chassis. Disconnect the trackball cable from the computer. 1.14 Remove the screw and cable clip from the trackball. Keep the screw and cable clip for the trackball yet to install. PN 04-03-023 Rev A, Service Manual, RCII RetCam II 96 Appendix 5 2.0 Service Procedure Procedure 800111 Revision A, Trackball replacement. RetCam II Installation of Trackball. 2.1 2.2 Remove the trackball from the packaging. Insert the cable into the connector. 2.3 Secure the cable to the trackball mount with the screw and cable clip from the replaced trackball. PN 04-03-023 Rev A, Service Manual, RCII 97 Appendix 5 2.4 Service Procedure Procedure 800111 Revision A, Trackball replacement. RetCam II Mount the trackball to the chassis. 1.5 mm hex wrench 2.5 Route the trackball cable to the computer and connect it. PN 04-03-023 Rev A, Service Manual, RCII 98 Appendix 5 Service Procedure Procedure 800111 Revision A, Trackball replacement. RetCam II Trackball cable 2.6 2.7 2.8 Wire tie the trackball cable to the RetCam II chassis. Cut off the excess nylon tie. Install the front panel cover using the 2 philips screws. 2.9 2.10 Install the side panels using 4 philips screws each. Secure the 2 hex screws holding the side panels to the front panel. 2.11 2.12 2.13 2.14 2.15 2.16 Install the side glider tracks. Resecure the printer transformer to the underside of the top cover. Replace the drawer liners. Install the printer drawer. Connect the power and USB cables to the printer. Connect the power cord to the system and verify the power switch on the base is turned on. PN 04-03-023 Rev A, Service Manual, RCII 99 Appendix 6 Service Procedure Procedure 800134 Revision A, TRAXSYS Trackball cleaning. RetCam II Front view of installed trackball. Rev. ECO Revision History Date Approved A 2490 Release 08 Apr 05 G. Sprehn Procedure: Cleaning of the Trackball in the RetCam II imaging system. Contains: Listing of tools, equipment and supplies along with step by step instructions on the cleaning of the TRAXSYS Trackball. Tools: Hex wrenches – 3/32, 5/64 inch and 1.5 mm Philips screwdriver - #2 Sidecutters (wire cutters for wire ties) Equipment ESD (ElectroStatic Discharge) station Wriststrap with grounding cable Supplies: Drawer liners – in printer and front storage drawers. Nylon cable ties – standard 4” or more length x .10” width Isopropyl Alcohol is required – do not use other solvents. Double sided foam tape for printer transformer. Outline: 1.0 Removal and cleaning of the Trackball. 2.0 Reinstallation of the cleaned Trackball. PN 04-03-023 Rev A, Service Manual, RCII 100 Appendix 6 1.0 Service Procedure Procedure 800134 Revision A, TRAXSYS Trackball cleaning. RetCam II Removal and cleaning of the Trackball. 1.1 1.2 Disconnect the power cord at the back of the base. Open the printer drawer and disconnect the power and USB cables from the printer. 1.3 1.4 1.4.3 system. 1.5 Lift the printer out of the drawer. Remove the printer drawer. 1.4.1 Extend the drawer fully open. 1.4.2 Locate the black locking tabs on both sides of the drawer gliders. Pull the left tab upward and the right tab downward as you pull the drawer out of the Place drawer liners inside the RetCam II chassis to prevent screws removed from falling down. Use the liners from the printer and front storage drawers. PN 04-03-023 Rev A, Service Manual, RCII 101 Appendix 6 Service Procedure Procedure 800134 Revision A, TRAXSYS Trackball cleaning. RetCam II 1.6 Remove the glider tracks from the inner panels on the system. 1.6.1 Extend the gliders as necessary to expose the screws. Using a 3/32 inch hex wrench remove 4 screws from each side. 1.7 Remove the upper screws securing the side panels to the front cover using a 5/64 inch hex wrench. There is one screw on each side Front cover panel screw 1.8 1.9 1.10 Remove the side panels by removing the 4 philips head screws on the lower edge of each panel. The panel on the left has cabling attached, lower this out of the way. Remove the front cover panel by removing the 2 philips screws located on the lower corners of the panel. The printer power transformer is attached to the underside of the top panel with thick tape. Gently pry this loose and set it aside. Printer Transformer PN 04-03-023 Rev A, Service Manual, RCII 102 Appendix 6 1.11 1.12 Service Procedure Procedure 800134 Revision A, TRAXSYS Trackball cleaning. RetCam II Cut the first few wire ties holding the trackball cable to the RetCam II chassis. Using a wriststrap with a cable grounded to the system remove the screw, cable clip, and connector from the trackball. cable clip connector screw PN 04-03-023 Rev A, Service Manual, RCII 103 Appendix 6 1.13 Service Procedure Procedure 800134 Revision A, TRAXSYS Trackball cleaning. RetCam II Using the 1.5 mm hex wrench, remove the 4 screws that fasten the trackball to the RetCam II chassis. The fourth screw, which is not shown, is in the corner. 1.14 Remove the trackball from the top cover. PN 04-03-023 Rev A, Service Manual, RCII 104 Appendix 6 1.15 Service Procedure Procedure 800134 Revision A, TRAXSYS Trackball cleaning. RetCam II 1.16 The trackball assembly has a PCB (Printed Circuit Board) that is sensitive to static electricity. The cleaning should be done at an ESD station. Remove the four philips screws holding the PCB to the trackball assembly. 1.17 Separate the two halves. 1.18 PN 04-03-023 Rev A, Service Manual, RCII Clean the ball with Iso 105 Appendix 6 1.19 Service Procedure Procedure 800134 Revision A, TRAXSYS Trackball cleaning. RetCam II Clean the rollers with a cotton swab dipped in isopropyl alcohol 1.20 the two halves. PN 04-03-023 Rev A, Service Manual, RCII Reassembly 106 Appendix 6 2.0 Service Procedure Procedure 800134 Revision A, TRAXSYS Trackball cleaning. RetCam II Reinstallation of the cleaned Trackball. This is to be done utilizing ESD practices for static sensitive devices. 2.1 Insert the cleaned trackball into the top cover of the RetCam II system. Middle button on top 2.2 Mount the trackball to the chassis. 1.5 mm hex wrench The fourth screw, which is not shown, is in the corner. PN 04-03-023 Rev A, Service Manual, RCII 107 Appendix 6 Service Procedure Procedure 800134 Revision A, TRAXSYS Trackball cleaning. 2.3 Insert the cable into the connector. 2.4 Secure the cable to the trackball mount with the screw and cable clip. 2.5 Wire tie the trackball cable to the RetCam II chassis. PN 04-03-023 Rev A, Service Manual, RCII RetCam II 108 Appendix 6 Service Procedure Procedure 800134 Revision A, TRAXSYS Trackball cleaning. RetCam II 2.6 2.7 Cut off the excess nylon tie. Install the front panel cover using the 2 philips screws. 2.8 2.9 Install the side panels using 4 philips screws each. Secure the 2 hex screws holding the side panels to the front panel. 2.10 2.11 2.12 2.13 2.14 2.15 Install the side glider tracks. Resecure the printer transformer to the underside of the top cover. Replace the drawer liners. Install the printer drawer. Connect the power and USB cables to the printer. Connect the power cord to the system and verify the power switch on the base is turned on. PN 04-03-023 Rev A, Service Manual, RCII 109 Service Method Appendix 7 800136, Revision A, Method for replacing the computer in the RetCam II Rev ECO Revision History Date Approved A 2537 Release 8/22/05 G. Sprehn PN 04-03-023 Rev A, Service Manual, RCII 111 Service Method Appendix 7 800136, Revision A, Method for replacing the computer in the RetCam II Procedure: This is a procedure for replacing the computer in a RetCam II system. 2.0 Remove computer 3.0 Install replacement computer 4.0 Restore to the original condition. Supplies: Computer PN: 03-00-016 Tools needed: 1/8” Hex wrench 3/32” Hex wrench Philips screwdriver Outline: 1.0 Preparation PN 04-03-023 Rev A, Service Manual, RCII 112 Service Method Appendix 7 800136, Revision A, Method for replacing the computer in the RetCam II 1.0 Preparation 1.1 1.2 1.3 1.4 Turn the system power off. Unplug the system from the outlet. Lock the front casters. Remove the rear cover. There are 7 screws holding the back panel to the system. Using a 1/8” hex wrench, remove these screws. PN 04-03-023 Rev A, Service Manual, RCII 113 Service Method Appendix 7 800136, Revision A, Method for replacing the computer in the RetCam II RetCam II Computer (rear view) 2.0 Remove computer 2.1 Disconnect the following cables: Power to Computer Keyboard Trackball Report Printer USB cable USB extension cable Speaker cable RJ 45 Network cable (push in tab then pull out) 2.2 Unscrew and disconnect: Display data cable Framegrabber cable (Parallel Cable for optional Dye sub. printer) 2.3 Remove screws using a 3/32” hex wrench and disconnect: PC Com cable Gameport cable 2.4 Remove the PC Power cable: This is a BNC connecter; to remove this, turn the connector counter clockwise to disengage the locking pins and disconnect. Power to Computer Keyboard Parallel Cable for optional Dye sub. printer Trackball PC Com cable RJ 45 Network cable Display data cable Speaker cable, plug in middle receptacle. Report Printer USB cable USB extension cable Framegrabber cable PC Power Gameport cable PN 04-03-023 Rev A, Service Manual, RCII 114 Service Method Appendix 7 800136, Revision A, Method for replacing the computer in the RetCam II 2.5 Thread the Framegrabber cable and the PC Power cable through the chassis assembly as shown. 2.6 If the system has a dye sub. printer then thread the cable through the chassis assembly as shown. PN 04-03-023 Rev A, Service Manual, RCII 115 Service Method Appendix 7 800136, Revision A, Method for replacing the computer in the RetCam II 2.7 Remove the 2 screws holding on the bracket with the 3/32” hex wrench. 2.8 Tuck all other cables to the side and then pull out the computer. Tuck cables in here PN 04-03-023 Rev A, Service Manual, RCII 116 Service Method Appendix 7 800136, Revision A, Method for replacing the computer in the RetCam II 2.9 Remove computer. PN 04-03-023 Rev A, Service Manual, RCII 117 Service Method Appendix 7 800136, Revision A, Method for replacing the computer in the RetCam II 3.0 Install replacement computer 3.1 Slide the computer half-way into the chassis. PN 04-03-023 Rev A, Service Manual, RCII 118 Service Method Appendix 7 800136, Revision A, Method for replacing the computer in the RetCam II 3.2 From the front of the RetCam II system, inspect the left side of the computer and tuck in any cables sticking out. PN 04-03-023 Rev A, Service Manual, RCII 119 Service Method Appendix 7 800136, Revision A, Method for replacing the computer in the RetCam II 3.3 After the cables have been tucked in, slide the computer all the way into the chassis. 3.4 Secure the computer by attaching the bracket to hold it in place. PN 04-03-023 Rev A, Service Manual, RCII 120 Service Method Appendix 7 800136, Revision A, Method for replacing the computer in the RetCam II 3.5 Pull the cables out of the side of the system and fasten the Gameport cable to the computer. 3.6 Attach the framegrabber cable and the PC Power cable. Cables on the side. Framegrabber cable PC Power cable Gameport cable Screws for Gameport cable PN 04-03-023 Rev A, Service Manual, RCII 121 Service Method Appendix 7 800136, Revision A, Method for replacing the computer in the RetCam II 3.7 Plug in the cables as shown: Keyboard Trackball Dye Sub. printer cable (optional) PC Com (fasten with screws) Display USB printer USB external extension Speakers RJ 45 Network cable Computer – rear view PC Com cable Display USB printer Dye Sub. printer cable (optional) USB for external extension Speakers PN 04-03-023 Rev A, Service Manual, RCII 122 Service Method Appendix 7 800136, Revision A, Method for replacing the computer in the RetCam II Main Power 3.8 Plug in the main power to the computer. Power switch to the on ‘ | ‘ position. 3.9 Press the power switch to the on ‘ | ‘ position. PN 04-03-023 Rev A, Service Manual, RCII 123 Service Method Appendix 7 800136, Revision A, Method for replacing the computer in the RetCam II 4.0 Restore to the original condition. 4.1 Inspect workmanship and and verify cables will not be pinched when the rear panel is installed. 4.2 Fasten the rear panel to chassis. 4.3 Unlock the front casters. 4.4 Plug the system into the proper outlet. 4.5 Turn the system power on. PN 04-03-023 Rev A, Service Manual, RCII 124 Appendix 8 Rev A RetCam II Lightbox Replacement ECO 2659 PN 04-03-023 Rev A, Service Manual, RCII Revision History Initial Release 125 30-000001 Author Date Calvin Meister 08/02/06 Appendix 8 Method: Replacing the lightbox in a RetCam II RetCam II Lightbox Replacement Outline: 1. 2. 3. 4. 5. Preparation. Removal of Lightbox Install the Replacement Lightbox Restore to the original condition. Return replaced lightbox in original packing material. Equipment and Supplies: Lightbox (PN 13-00-000) Wire ties Tools needed: 1/8” Hex wrench 3/32” Hex wrench 9/64” Hex wrench Sidecutters (to cut the wire ties) PN 04-03-023 Rev A, Service Manual, RCII 30-000001 126 Appendix 8 RetCam II Lightbox Replacement 1.0 Preparation. 1.1 1.2 1.3 1.4 1.5 Turn the system power off. Unplug the system from the outlet. Lock the front casters. Remove the 3 handpiece cables from the front of the lightbox. The fiber optic cable pulls out. The focus cable has a sleeve, pull out on the sleeve to remove the cable. The handpiece cable has a sleeve that is threaded on the connector; unscrew the sleeve and then pull out the connector. Remove the rear cover. There are 7 screws holding the back panel to the system. Using a 1/8” hex wrench remove these screws. PN 04-03-023 Rev A, Service Manual, RCII 127 30-000001 Appendix 8 RetCam II Lightbox Replacement 30-000001 2.0 Removal of Lightbox 2.1 Cut the cable tie holding the lightbox cables to the frame. 2.2 Remove the 2 screws holding the lightbox bracket in place. 2.3 Disconnect the cabling to the lightbox and tuck in the side of the system. 2.4 Disconnect the lightbox framegrabber cable at the computer and thread through the frame. bracket 2 screws framegrabber cable 2.5 From the front of the system, gently push the lightbox out the back and remove it for transport. PN 04-03-023 Rev A, Service Manual, RCII 128 Appendix 8 RetCam II Lightbox Replacement 30-000001 3.0 Install the replacement Lightbox 3.1 Clear the cabling from the lightbox slot and insert the lightbox into the RetCam II system. 3.2 Thread the Framegrabber cable through the frame and attach it to the Framegrabber card in the computer. 3.3 Thread the PC Power cable through the frame and attach it to the lightbox BNC connection. Cable not cleared Cable cleared 3.4 Install the UPS Control connector. 3.5 Install the Gameport Trigger, PC Com X and Membrane harnesses and attach them to the connection standoffs with screw (PN 07-00-009). 3.6 Lift the power cord up through the frame and before inserting it into the receptacle install the bracket holding the lightbox in place. 3.7 Attach the bracket to the frame. 3.8 Insert the power cord into the receptacle. 3.9 Wire tie the Framegrabber and PC Power cables to the frame. PN 04-03-023 Rev A, Service Manual, RCII 129 Appendix 8 RetCam II Lightbox Replacement 4.0 Restore to the original condition. 4.5 Inspect workmanship and and verify cables will not be pinched when the back panel is installed. 4.2 Install the back panel and fasten with seven flathead screws, 10-32 x .38” (PN 07-00-203) 4.3 Reattach handpiece cables to lightbox. 4.4 Unlock the front casters. 4.5 Plug the system into the proper outlet. 4.6 Turn the system power on. PN 04-03-023 Rev A, Service Manual, RCII 130 30-000001 Appendix 8 RetCam II Lightbox Replacement 5.0 Return replaced lightbox in original packing material. PN 04-03-023 Rev A, Service Manual, RCII 131 30-000001 Appendix 9 Fuse Replacement Appendix 9 Fuse Replacement Locate the Power Entry Module on the rear side of the base console. Ensure the Power Cord is removed before proceeding any further. Power Entry Module Use a flat blade screwdriver to open the Fuse Drawer located at the top of the Power Entry Module. Opening Fuse Drawer PN 04-03-023 Rev A, Service Manual, RCII 132 Appendix 9 Fuse Replacement Remove the Fuse Drawer. Remove the damaged Fuse from the Fuse Drawer and replace it with a known good Fuse. Damaged Fuse Removed Removing Fuse Drawer PN 04-03-023 Rev A, Service Manual, RCII 133 Appendix 9 Re-insert Fuse Drawer into Power Entry Module. Observe the labeling on the front of the Fuse Drawer. The top and bottom of the fuse drawer are labeled with the proper input voltages for your System. Either (115 V) or (230 V). Insert the Fuse Drawer with the proper voltage being displayed at the top of the fuse drawer. After closing the door to the fuse drawer, the operating voltage should be visible through the window in the fuse drawer. Fuse Replacement Fuse Drawer Re-Inserted Operating Voltage Visible Through Window PN 04-03-023 Rev A, Service Manual, RCII 134 Appendix 10 Changing Illumnation Bulb CAUTION: Do not touch the bulb located in the center of the reflector, or the concave surface of the reflector. Skin oils will adhere to the outside of the bulb, reducing the cooling efficiency of the bulb, creating a hot-spot and subsequent premature burnout. Handle by the reflector only. Appendix 10 Changing the illumination bulb The illumination light bulb located in the Light Box will need periodic replacement. It is a 12 volt, 75 watt halogen bulb, industry type EKE. Replacement bulbs are available from Customer Service., 1) 2) 3) 4) 5) 6) 7) 8) 9) Shutdown the RetCam II according to the user manual, if it is not already turned off. Disconnect the main power cord from the wall. Unplug the fiber optical cable from the front of the Light Box. Remove the two screws from the small front panel. Grip the handle on the small panel. Pull the small front panel out slowly from the Light Box. Stop when the light bulb is fully exposed. Remove the illumination bulb from the socket and replace it with the new one. Check the position of the new bulb to make sure that the reflector of the bulb is located in the center of the lamp socket’s opening. Push the small front panel back into the Light Box slowly. Use caution to avoid pinching wires in the area. Replace the two screws on the small front panel. PN 04-03-023 Rev A, Service Manual, RCII 135 Appendix 11 Service Method Method 800095 Revision B, Keyboard replacement RetCam II Rev ECO Revision History Date Approved A 2356 Release, CTI keyboard 2004 G. Sprehn B 2532 Input Technologies keyboard 09/12/2005 G. Sprehn PN 04-03-023 Rev A, Service Manual, RCII 136 Appendix 11 Service Method Method 800095 Revision B, Keyboard replacement RetCam II Procedure: Replacement of keyboard in the RetCam II imaging system. Contains: Listing of tools and supplies along with step by step instructions on the replacement of the keyboard. Tools: Hex wrenches – 3/32 and 5/64 inch Philips screwdriver - #2 Ratchet and socket or nutdriver – 5/16 inch Sidecutters (wire cutters for cable ties) Supplies: Drawer liners – in printer and front storage drawers. Nylon cable ties – standard 4” or more length x .10” width PN 04-03-023 Rev A, Service Manual, RCII 137 Appendix 11 Outline: 1.0 1.0 Service Method Method 800095 Revision B, Keyboard replacement RetCam II Removal of keyboard. 2.0 Installation of keyboard. Removal of keyboard. 1.1 1.2 Disconnect the power cord at the back of the base. Open the printer drawer and disconnect the power and USB cables from the printer. 1.3 1.4 1.4.3 system. 1.5 Lift the printer out of the drawer. Remove the printer drawer. 1.4.1 Extend the drawer fully open. 1.4.2 Locate the black locking tabs on both sides of the drawer gliders. Pull the left tab upward and the right tab downward as you pull the drawer out of the Place drawer liners inside the RetCam II chassis to prevent screws removed from falling down. Use the liners from the printer and front storage drawers. PN 04-03-023 Rev A, Service Manual, RCII 138 Appendix 11 Service Method Method 800095 Revision B, Keyboard replacement RetCam II 1.6 Remove the glider tracks from the inner panels on the system. 1.6.1 Extend the gliders as necessary to expose the screws. Using a 3/32 inch hex wrench remove 4 screws from each side. 1.7 Remove the upper screws securing the side panels to the front cover using a 5/64 inch hex wrench. There is one screw on each side Front cover panel screw 1.8 1.9 1.10 Remove the side panels by removing the 4 philips head screws on the lower edge of each panel. The panel on the left has cabling attached, lower this out of the way. Remove the front cover panel by removing the 2 philips screws located on the lower corners of the panel. The printer power transformer is attached to the underside of the top panel with thick tape. Gently pry this loose and set it aside. Printer Transformer 1.11 Remove the nuts securing the keyboard frame to the chassis with the 5/16” nutdriver. PN 04-03-023 Rev A, Service Manual, RCII 139 Appendix 11 1.12 Service Method Method 800095 Revision B, Keyboard replacement RetCam II Cut the wire ties routing the keyboard cable and unplug the keyboard cable from the computer. PN 04-03-023 Rev A, Service Manual, RCII 140 Appendix 11 2.0 Service Method Method 800095 Revision B, Keyboard replacement RetCam II Installation of Keyboard. 2.1 2.2 Remove the keyboard from the packaging. Mount the frame around the keyboard and attach to the chassis. Slot in frame 2.3 2.4 2.5 Route the keyboard cable to the computer and connect it. Wire tie the keyboard cable to the RetCam II chassis. Install the front panel cover using the 2 philips screws. 2.6 Install the side panels using 4 philips screws each. PN 04-03-023 Rev A, Service Manual, RCII 141 Appendix 11 Service Method Method 800095 Revision B, Keyboard replacement RetCam II 2.7 Secure the 2 hex screws holding the side panels to the front panel. 2.8 2.9 2.10 2.11 2.12 2.13 Install the side glider tracks. Resecure the printer transformer to the underside of the top cover. Remove the drawer liners. Install the printer drawer. Connect the power and USB cables to the printer. Connect the power cord to the system and verify the power switch on the base is turned on. PN 04-03-023 Rev A, Service Manual, RCII 142 Field Service RetCam Handpiece Focus Method 800138, Revision A Appendix 12 Rev ECO Revision History Date Approved A 2549 Release October 5, 2005 G. Sprehn 1. This service method applies to RetCam 120 and RetCam II, all white handpieces. 2. If the handpiece doesn’t make a soft motor sound when the focus buttons are pressed, troubleshoot the electrical problem first. 3. The simplest way to troubleshoot a focus problem is to operate the handpiece without any lenses attached. 4. Pull the fiber optic cable only from the lightbox (focus to the room lighting). With a live image on the screen, find the distance at which a target (business card, zip disk, cotton swab, finger) is in focus. Measure or estimate the distance from the front surface of the camera. 5. The total range of focal distance is -0.15” (– 4 mm) which is just inside the front surface, to 3.3” (approximately 85 mm) from the front surface. On the RetCam II system To move the focal distance closer, press the left membrane ‘focus closer’ button. PN 04-03-023 Rev A, Service Manual, RCII To move the focal distance further, press the right membrane ‘focus further’ button. 143 Field Service RetCam Handpiece Focus Method 800138, Revision A Appendix 12 6. [For RetCam 120 only, press the rocker switch on the light box in the up position to focus closer, and the down position to focus further. It is preferred to use the rocker switch on the light box because the footswitch alternates direction.] 7. The focal distance in this configuration to preset for use with an ROP D1300 or Children’s B1200 lens used for imaging the retina is approximately 24 mm (1”). The focal distance to set for imaging the anterior segment is approximately 12 mm (0.5”). 8. It takes approximately 62 seconds for the focus motor to travel the full range. 9. It takes approximately 13 seconds to go from retinal to anterior imaging, holding the ‘focus closer’ button. Conversely, it is approximately 13 seconds holding the ‘focus further’ button to go from anterior segment back to retinal imaging. PN 04-03-023 Rev A, Service Manual, RCII 144