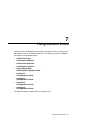
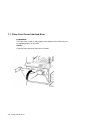
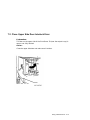
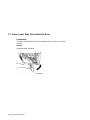
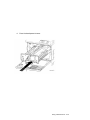
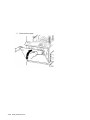
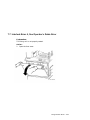
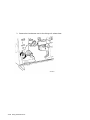
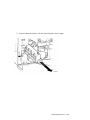
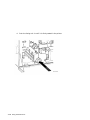
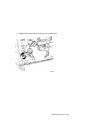
1
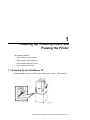
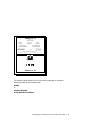
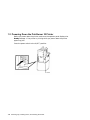
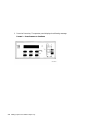
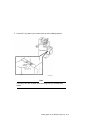
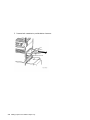
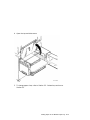
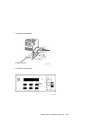
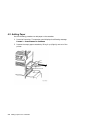
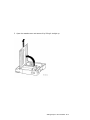
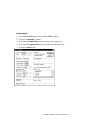
PrintServer 32 Printer
Operator’s Guide
Order Number: EK–LPS32–OG–001
Digital Equipment Corporation
Maynard, Massachusetts
First Printing, July 1992
The information in this document is subject to change without notice and should not be
construed as a commitment by Digital Equipment Corporation. Digital Equipment Corporation
assumes no responsibility for any errors that may appear in this document.
The software described in this document is furnished under a license and may be used or copied
only in accordance with the terms of such license.
No responsibility is assumed for the use or reliability of software on equipment that is not
supplied by Digital Equipment Corporation or its affiliated companies.
Restricted Rights: Use, duplication, or disclosure by the U.S. Government is subject to
restrictions as set forth in subparagraph (c)(1)(ii) of the Rights in Technical Data and Computer
Software clause at DFARS 252.227-7013.
© Digital Equipment Corporation 1992.
All Rights Reserved.
Printed in U.S.A.
The following are trademarks of Digital Equipment Corporation: A–to–Z, DECnet, DECprint,
DECwindows, DECwrite, Micro/VAX, MicroVMS, PrintServer, Scholar, TK, ULTRIX, VAX,
VAXcluster, VAX DOCUMENT, VAXstation, VMS, VT, and the DIGITAL logo.
PostScript is a registered trademark of Adobe Systems, Inc.
S1772
This document was prepared using VAX DOCUMENT, Version 2.0.
FCC NOTICE:
This equipment generates, uses, and may emit radio frequency. The equipment has been type
tested and found to comply with the limits for a Class A digital device pursuant to Part 15 of
FCC rules, which are designed to provide reasonable protection against such radio frequency
interference.
Operation of this equipment in a residential area may cause interference in which case the user
at his own expense will be required to take whatever measures may be required to correct the
interference.
This document was prepared using VAX DOCUMENT, Version 2.0.
Contents
Preface . . . . . . . . . . . . . . . . . . . . . . . . . . . . . . . . . . . . . . . . . . . . . . . . . . . . .
ix
1 Powering Up, Powering Down, and Pausing the Printer
1.1
1.2
1.3
Powering Up the PrintServer 32 . . . . . . . . . . . . . . . . . . . . . . . . .
Powering Down the PrintServer 32 Printer . . . . . . . . . . . . . . . .
Pausing the Printer . . . . . . . . . . . . . . . . . . . . . . . . . . . . . . . . . . .
1–1
1–4
1–5
2 Displaying Printer Status
2.1
2.2
2.3
2.4
Listing the Printers on Your Node . . . . . . . . . . . . .
Listing Your Print Jobs . . . . . . . . . . . . . . . . . . . . .
Displaying Print Job Status on the Operator Panel
Having the System Notify You About Job Status . .
.
.
.
.
.
.
.
.
.
.
.
.
.
.
.
.
.
.
.
.
.
.
.
.
.
.
.
.
.
.
.
.
.
.
.
.
.
.
.
.
.
.
.
.
2–1
2–2
2–2
2–3
When to Add Paper . . . . . . . . . . . . . . . . . . . . . . . . . . . . . . . . . . .
Changing Paper Sizes . . . . . . . . . . . . . . . . . . . . . . . . . . . . . . . . .
Adding Paper to the Bottom Paper Tray . . . . . . . . . . . . . . . . . . .
3–1
3–6
3–9
3 Adding Paper to the Bottom Paper Tray
3.1
3.2
3.3
4 Adding Paper to the Cassettes
4.1
4.2
4.3
When to Add Paper . . . . . . . . . . . . . . . . . . . . . . . . . . . . . . . . . . .
Adding Paper . . . . . . . . . . . . . . . . . . . . . . . . . . . . . . . . . . . . . . . .
Changing Paper Sizes . . . . . . . . . . . . . . . . . . . . . . . . . . . . . . . . .
4–1
4–2
4–6
v
5 Printing on Different Types of Media
5.1
5.2
5.3
Printing on Letterhead or Predrilled Paper . . . . . . . . . . . . . . . . .
Printing Labels . . . . . . . . . . . . . . . . . . . . . . . . . . . . . . . . . . . . . .
Printing on Transparencies . . . . . . . . . . . . . . . . . . . . . . . . . . . . .
5–1
5–3
5–6
6 Clearing Front Panel Messages
6.1
6.2
6.3
6.4
6.5
6.6
6.7
6.8
6.9
6.10
6.11
6.12
6.13
6.14
6.15
6.16
6.17
6.18
6.19
6.20
6.21
6.22
6.23
6.24
6.25
6.26
6.27
6.28
6.29
6.30
6.31
6.32
6.33
6.34
6.35
vi
Add Paper . . . . . . . . . . . . . . . . . . . . . . . . . . . . . . . .
Add Toner and Clean Components . . . . . . . . . . . . . .
Align Paper Flush Against Back of Tray . . . . . . . . .
Call Customer Services — Maintenance 1 Required
Call Customer Services — Maintenance 2 Required
Charge Wire Cleaning In Progress . . . . . . . . . . . . . .
Cleaning Unit Full, See Operator Guide . . . . . . . . .
Deleting Current Job . . . . . . . . . . . . . . . . . . . . . . . .
Fatal Software Error . . . . . . . . . . . . . . . . . . . . . . . .
Hardware Error xx — Call Customer Services . . . . .
Insert Paper Cassette . . . . . . . . . . . . . . . . . . . . . . .
Keypad is Disabled, Cleaning in Progress . . . . . . . .
No Active Job . . . . . . . . . . . . . . . . . . . . . . . . . . . . . .
No Supplies Needed . . . . . . . . . . . . . . . . . . . . . . . . .
One-Sided Test Page . . . . . . . . . . . . . . . . . . . . . . . .
Open Lower Side Door and Clear Paper . . . . . . . . .
Open Side Tray . . . . . . . . . . . . . . . . . . . . . . . . . . . .
Open Upper Side Door and Clear Paper . . . . . . . . .
Output Tray Full . . . . . . . . . . . . . . . . . . . . . . . . . . .
Paper Jam 1 — Open Front Cover and See Label . .
Paper Jam 2 — Open Front Cover and See Label . .
Paper Jam 4 — Open Cabinet Door and See Label .
Paper Jam 5 — See Label on Bottom Paper Tray . .
Paused — Press Resume to Continue . . . . . . . . . . .
Perform User Maintenance . . . . . . . . . . . . . . . . . . .
Please Wait... . . . . . . . . . . . . . . . . . . . . . . . . . . . . . .
Print Engine Is in Warmup State . . . . . . . . . . . . . .
Printing . . . . . . . . . . . . . . . . . . . . . . . . . . . . . . . . . .
Processing . . . . . . . . . . . . . . . . . . . . . . . . . . . . . . . .
Ready . . . . . . . . . . . . . . . . . . . . . . . . . . . . . . . . . . . .
Reboot or Cycle Power . . . . . . . . . . . . . . . . . . . . . . .
Reinsert Lower Cassette . . . . . . . . . . . . . . . . . . . . .
Reinsert Upper Cassette . . . . . . . . . . . . . . . . . . . . .
Set Paper Size Dial . . . . . . . . . . . . . . . . . . . . . . . . .
Single Job Mode — Press Resume to Continue . . . .
.
.
.
.
.
.
.
.
.
.
.
.
.
.
.
.
.
.
.
.
.
.
.
.
.
.
.
.
.
.
.
.
.
.
.
.
.
.
.
.
.
.
.
.
.
.
.
.
.
.
.
.
.
.
.
.
.
.
.
.
.
.
.
.
.
.
.
.
.
.
.
.
.
.
.
.
.
.
.
.
.
.
.
.
.
.
.
.
.
.
.
.
.
.
.
.
.
.
.
.
.
.
.
.
.
.
.
.
.
.
.
.
.
.
.
.
.
.
.
.
.
.
.
.
.
.
.
.
.
.
.
.
.
.
.
.
.
.
.
.
.
.
.
.
.
.
.
.
.
.
.
.
.
.
.
.
.
.
.
.
.
.
.
.
.
.
.
.
.
.
.
.
.
.
.
.
.
.
.
.
.
.
.
.
.
.
.
.
.
.
.
.
.
.
.
.
.
.
.
.
.
.
.
.
.
.
.
.
.
.
.
.
.
.
.
.
.
.
.
.
.
.
.
.
.
.
.
.
.
.
.
.
.
.
.
.
.
.
.
.
.
.
.
.
.
.
.
.
.
.
.
.
.
.
.
.
.
.
.
.
.
.
.
.
.
.
.
.
.
.
.
.
.
.
.
.
.
.
.
.
.
.
.
.
.
.
.
.
.
.
.
.
.
.
.
.
.
.
.
.
.
.
.
.
.
.
.
.
.
.
.
.
.
.
.
.
.
.
.
.
.
.
.
.
.
.
.
.
.
.
.
.
.
.
.
.
.
.
.
.
.
.
.
.
.
.
.
.
.
.
6–2
6–2
6–2
6–3
6–3
6–3
6–3
6–4
6–4
6–4
6–4
6–5
6–5
6–5
6–5
6–6
6–6
6–6
6–6
6–7
6–7
6–7
6–7
6–8
6–8
6–8
6–8
6–9
6–9
6–9
6–9
6–10
6–10
6–10
6–10
6.36
6.37
6.38
6.39
Two-Sided Test Page . . . . . . . . . . . .
Wrong Size Paper in Lower Cassette
Wrong Size Paper in Paper Tray . . .
Wrong Size Paper in Upper Cassette
.
.
.
.
.
.
.
.
.
.
.
.
.
.
.
.
.
.
.
.
.
.
.
.
.
.
.
.
.
.
.
.
.
.
.
.
.
.
.
.
.
.
.
.
.
.
.
.
.
.
.
.
.
.
.
.
.
.
.
.
.
.
.
.
.
.
.
.
.
.
.
.
.
.
.
.
.
.
.
.
.
.
.
.
.
.
.
.
6–11
6–11
6–11
6–11
Close Front Cover Interlock Error . . . . . . . . . . . . . . . . . . . . .
Close Upper Side Door Interlock Error . . . . . . . . . . . . . . . . .
Close Lower Side Door Interlock Error . . . . . . . . . . . . . . . . .
Close Paper Tray Door Interlock Error . . . . . . . . . . . . . . . . .
Open Cabinet Door, Raise Duplex Transport Guide Interlock
Error . . . . . . . . . . . . . . . . . . . . . . . . . . . . . . . . . . . . . . . . . . .
Interlock Error 1, 2, or 3, See Operator’s Guide Error . . . . . .
Interlock Error 4, See Operator’s Guide Error . . . . . . . . . . . .
.
.
.
.
.
.
.
.
.
.
.
.
7–2
7–3
7–4
7–5
...
...
...
7–6
7–7
7–11
7 Fixing Interlock Errors
7.1
7.2
7.3
7.4
7.5
7.6
7.7
8 Adjusting Print Quality
8.1
8.2
8.3
8.4
8.5
8.6
8.7
8.8
8.9
Printing a Test Page . . . .
Blank Pages . . . . . . . . . . .
Light Print . . . . . . . . . . . .
Print Background Is Dirty
Missing Images . . . . . . . .
Black Lines . . . . . . . . . . .
Black Pages . . . . . . . . . . .
Skewed Paper . . . . . . . . .
Smudged Print . . . . . . . . .
.
.
.
.
.
.
.
.
.
.
.
.
.
.
.
.
.
.
.
.
.
.
.
.
.
.
.
.
.
.
.
.
.
.
.
.
.
.
.
.
.
.
.
.
.
.
.
.
.
.
.
.
.
.
.
.
.
.
.
.
.
.
.
.
.
.
.
.
.
.
.
.
.
.
.
.
.
.
.
.
.
.
.
.
.
.
.
.
.
.
.
.
.
.
.
.
.
.
.
.
.
.
.
.
.
.
.
.
.
.
.
.
.
.
.
.
.
.
.
.
.
.
.
.
.
.
.
.
.
.
.
.
.
.
.
.
.
.
.
.
.
.
.
.
.
.
.
.
.
.
.
.
.
.
.
.
.
.
.
.
.
.
.
.
.
.
.
.
.
.
.
.
.
.
.
.
.
.
.
.
.
.
.
.
.
.
.
.
.
.
.
.
.
.
.
.
.
.
.
.
.
.
.
.
.
.
.
.
.
.
.
.
.
.
.
.
.
.
.
.
.
.
.
.
.
.
.
.
.
.
.
.
.
.
.
.
.
.
.
.
.
.
.
.
.
.
.
.
.
.
.
.
.
.
.
.
.
.
.
.
.
.
.
.
.
.
.
.
.
.
8–1
8–1
8–2
8–2
8–2
8–3
8–3
8–3
8–4
9 Checking the Printer Paths
10 Service
A Specifications
vii
B Accessories and Supplies
B.1
Ordering Information . . . . . . . . . . . . . . . . . . . . . . . . . . . . . . . . . .
B–3
Settings on the Paper Size Dial . . . . . . . . . . . . . . . . . . . .
Adding Letterhead and Predrilled Paper to the Cassettes
Using Test Set-Up Mode . . . . . . . . . . . . . . . . . . . . . . . . .
PrintServer 32 Printer Accessories and Supplies . . . . . . .
3–6
5–1
9–2
B–1
Index
Tables
3–1
5–1
9–1
B–1
viii
.
.
.
.
.
.
.
.
.
.
.
.
Preface
This guide explains how to operate the PrintServer 32 hardware, such as:
•
Powering on the printer
•
Adding paper and other media
•
Troubleshooting errors
Audience
This guide is for anyone who uses or cares for the PrintServer 32 printer.
Before using the PrintServer 32, read the procedures for operating the printer.
Digital recommends that each user also view the videotape that accompanies
the printer.
Note
Always keep this guide with the printer, so it is available to anyone
who is operating or maintaining the printer.
Document Structure
This guide is organized as follows:
This Chapter...
Explains How To...
Chapter 1
Power up, power down, and pause the printer
Chapter 2
Display printer status
Chapter 3
Add paper to the bottom paper tray
Chapter 4
Add paper to the cassettes
Chapter 5
Print on different types of media
ix
This Chapter...
Explains How To...
Chapter 6
Clear front panel messages
Chapter 7
Fix interlock errors
Chapter 8
Adjust print quality
Chapter 9
Check the printer paths
Associated Documents
This guide does not cover all areas of printer operation. It focuses on the
hardware operation of the PrintServer 32. Other manuals supplied with the
printer cover such topics as client software, host system software, and using
PostScript commands. See your system manager about the following manuals
if you need to refer to them:
x
•
DECprint Printing Services Software Installation Guide
•
DECprint Printing Services System Manager’s Guide
•
DECprint Printing Services System User’s Guide
•
PostScript Translators Reference Manual
•
DEC PrintServer Supporting Host for VMS Installation Guide
•
DEC PrintServer Supporting Host for VMS
Management Guide
•
DEC PrintServer Supporting Host for ULTRIX
Management Guide
•
DEC PrintServer Supporting Host for ULTRIX Installation Guide
Conventions
The following terms and conventions are used in this guide:
Term/Convention
Meaning
Note
Provides additional information.
Caution
Provides information for preventing equipment and
software damage.
Warning
Provides information for preventing personal injury.
Bold type
Indicates either DECwindows options or messages that
appear on the operator panel.
Typewriter text
Indicates user commands and system messages.
xi
Laser Safety
The PrintServer 32 printer complies with laser product performance standards
set by government agencies as a Class 1 Laser Product. The PrintServer
printer does not emit hazardous light, since the beam is enclosed during all
modes of customer operation and maintenance.
Warning
Use of controls or adjustment procedures other than those specified in
this guide may result in hazardous laser light exposure.
Ozone Safety
The PrintServer 32 printer uses an ozone filter to remove the ozone generated
by the printer. Be sure to replace the ozone filter each time user maintenance
is performed on the printer.
Warning
Do not operate the printer unless the ozone filter is installed. The filter
removes ozone that may cause eye or respiratory irritation.
xii
1
Powering Up, Powering Down, and
Pausing the Printer
This chapter explains:
•
How to power up the printer
•
What happens during power up
•
How to power down the printer
•
How to pause the printer
1.1 Powering Up the PrintServer 32
Press the power switch on the left side of the printer to the | (ON) position.
Powering Up, Powering Down, and Pausing the Printer 1–1
Note
Depending on your network activity, a successful power up may take
from 1 to 10 minutes to complete.
The lights on the front panel flash, and the operator panel displays the
following:
Display
Meaning
9,8,7,6,5,4,3,2,1,0
The printer is performing diagnostic self tests.
xx-xx-xx-xx-xx-xx
The Ethernet address.
2.0 1.2 1.1
The firmware versions of the controller, engine, and
table.
VAX ELN V4.x LPS32
The version of the VAXELN operating system.
Copyright 1992
Digital Equipment Corporation
The copyright notice.
Please wait...
Initializing...
The printer is initializing.
The printer initializes for 65 to 80 seconds or until it prints a PostScript
startup page like the following:
Note
The startup page is printed only if the printer is configured to generate
it.
1–2 Powering Up, Powering Down, and Pausing the Printer
PrintServer 32
Version 48.1-14
Defined Font Outlines
Times®-Roman
Times-Bold
Times-Italic
Times-BoldItalic
Helvetica ®
Helvetica-Bold
Helvetica-Oblique
Helvetica-BoldOblique
ITC Avant Garde®-Book
ITC Avant Garde-Demi
ITC Avant Garde Gothic-BoldOblique
ITC Avant Garde Gothic-DemiOblique
ITC Lubalin Graph®-Book
ITC Lubalin Graph-Demi
ITC Lubalin Graphi-BookOblique
ITC Lubalin Graph-DemiOblique
Courier
Courier-bold
Courier-Oblique
Couries-BoldOblique
New Century Schoolbook-Roman
New Century Schoolbook-Bold
New Century Schoolbook-Italic
New Century Schoolbook-BoldItalic
ITC Souvenir®-Light
ITC Souvenir-Demi
ITC Souvenir-LightItalic
ITC-Souvenir-DemiItalic
Symbols Set
Postscript is a registered trademark of Adobe Systems Incorporated.
Times and Helvetica are trademarks Linotype AG and/or it subsidiaries.
ITC Avand Garde Gothic, ITC Lubalin Graph, and ITC Souvenir are registered trademarks of international typeface corporation.
POSTSCRIPT®
Software From Adobe
PrintServer 32
MLO−008752S
The operator panel displays one of the following messages to indicate a
successful power up and software boot:
Ready
or
Single Job Mode Press Resume to continue
Powering Up, Powering Down, and Pausing the Printer 1–3
1.2 Powering Down the PrintServer 32 Printer
Before you power down the printer, make sure the operator panel displays the
Ready message. If the printer is printing while you power down the printer
paper may jam.
Press the power switch to the 0 (OFF) position.
1–4 Powering Up, Powering Down, and Pausing the Printer
1.3 Pausing the Printer
Before opening the printer’s doors or covers, pause the PrintServer 32 printer.
This keeps the printer powered up, but prevents jobs from printing.
Note
If you open doors or covers while the PrintServer 32 is printing, paper
may jam.
To pause the printer, press the pause key on the operator panel.
The following message is displayed:
Paused–
Press Resume to Continue
To enable printing functions after pausing the printer, press the Resume key
on the operator panel.
The following message is displayed:
Ready
Powering Up, Powering Down, and Pausing the Printer 1–5
2
Displaying Printer Status
This chapter explains how to:
•
Determine the printers on your node
•
Find the status of print jobs that are printing or waiting to be printed
•
Enable the system to notify you when a print job is complete or aborted
The following terms are used in this chapter:
Term
Meaning
Print queue
The list of print jobs scheduled to be printed
Pending
Waiting to print
2.1 Listing the Printers on Your Node
You can list information about the printers on your node by issuing various
commands.
VMS:
To Display This...
Issue This Command...
Available printers on your node
SHOW QUEUE/NOBATCH
SHOW QUEUE/ALL/NOBATCH
SHOW QUEUE/ALL queuename
Print jobs printing or pending on all the printers
Print jobs printing or pending on a specific
printer
Displaying Printer Status 2–1
ULTRIX:
To Display This...
Issue This Command...
Available printers on your node
cat /etc/printcap
lpq -Pqueuename
Print jobs printing or pending on a specific
printer
2.2 Listing Your Print Jobs
VMS:
To list your print jobs that are printing or pending, issue the following
command:
SHOW ENTRY
The following information is displayed:
Jobname
------NEW
Username
-------USER1 937
Entry Blocks Status
----- ------ -----154 Printing
On Printer queue LPS32$POST
ULTRIX:
To list your print jobs that are printing or pending on a specific print queue,
issue the lpq command followed by your user name and the queue name. For
example:
lpq user1 post
The following information is displayed:
Rank
Active
Owner
Root
Job
70
Files
.login
Total Size
22 bytes
2.3 Displaying Print Job Status on the Operator Panel
You can also use the operator panel on the PrintServer 32 printer to display
information about the job that is printing.
2–2 Displaying Printer Status
Press the Active Jobs key. The following information is displayed on the
operator panel:
Message
Meaning
NODE::USER1
The name and node of the person who submitted the print job
JOB 123
Started 8:30
The print job ID number and the time the job started printing
If no job is printing, the following message is displayed:
No Active Job
2.4 Having the System Notify You About Job Status
VMS:
The printer can broadcast messages about your print job, such as printing,
pending, aborting, or completing. To enable the printer to send you these
messages, use the /NOTIFY qualifier in your PRINT command line when you
submit a print job. For example:
PRINT/QUEUE=LPS32$POST/PARAM=DATA_TYPE=POST/NOTIFY NEW.PS
The following messages appear on your screen:
Job NEW (queue LPS32$POST, entry 910) started on LPS32$POST
%LPS-I-JOBSTART, Job NEW (queue LPS32$POST, entry 910) started on LPS32$POST
Job NEW (queue LPS32$POST, entry 910) completed
ULTRIX:
The printer can send you a mail message when your job completes. Issue the
following command to submit a print job and request mail notification:
lpr -m filename
Displaying Printer Status 2–3
DECwindows:
You can have DECwindows notify you when a job is completed.
1. From a DECwindows application, such as DECwrite, pull down the File
menu and choose the Print... option.
2. Click on the Options... button.
3. Click on the Notify when Done button.
4. Click on the OK button.
2–4 Displaying Printer Status
3
Adding Paper to the Bottom Paper Tray
This chapter explains how to add paper to the bottom paper tray of the
PrintServer 32 printer.
3.1 When to Add Paper
Add paper when:
•
The bottom paper tray is out of paper and the operator panel displays the
following message:
Add Paper
•
When the printer is not printing and the operator panel displays the
following message:
Ready
Adding Paper to the Bottom Paper Tray 3–1
1. Press the Pause key. The operator panel displays the following message:
Paused — Press Resume to Continue
3–2 Adding Paper to the Bottom Paper Tray
2. Press the Tray Down key to lower the tray to the loading position.
Note
If the tray runs out of paper while printing, the tray automatically
lowers.
Adding Paper to the Bottom Paper Tray 3–3
3. Remove both cassettes to provide better clearance.
3–4 Adding Paper to the Bottom Paper Tray
4. Open the top and side covers.
5. To change paper sizes, refer to Section 3.2. Otherwise, continue to
Section 3.3
Adding Paper to the Bottom Paper Tray 3–5
3.2 Changing Paper Sizes
To change paper sizes, use the following procedure:
1. Remove the paper and the base plate in the bottom paper tray.
2. Set the paper size dial. Table 3–1 lists the sizes and directions.
Table 3–1 Settings on the Paper Size Dial
To Add Paper Long Side First,
Use These Settings...
To Add Paper Short Side First,
Use These Settings...
11 x 8.5
8.5 x 11 R
A4
A4R
–
B4
B5
B5R
–
8.5 x 14
–
A5R
Note
Adding paper long side first results in faster print speeds.
3–6 Adding Paper to the Bottom Paper Tray
Adding Paper to the Bottom Paper Tray 3–7
3. Install the base plate, being sure the bottom paper tray pins come up
through the plate holes and the plate hooks in place.
Make sure the size of the base plate matches the size indicated on the
paper size dial.
3–8 Adding Paper to the Bottom Paper Tray
3.3 Adding Paper to the Bottom Paper Tray
Add paper, using the following procedure:
1. Add about a half ream of paper by bowing the paper slightly and inserting
it until the leading ege of the paper touches the back of the tray.
•
Use only recommended paper, as listed in Appendix B.
•
Do not add more than two reams of paper to the bottom paper tray.
Adding more paper or loading the paper unevenly puts stress on the
paper tray motor and causes paper jams.
Adding Paper to the Bottom Paper Tray 3–9
2. Close the tray’s top and side covers.
The paper tray automatically rises to the operating position and the Tray
Down indicator turns off.
3–10 Adding Paper to the Bottom Paper Tray
3. Reinsert the cassettes.
4. Press the Resume key.
Adding Paper to the Bottom Paper Tray 3–11
4
Adding Paper to the Cassettes
This chapter explains how to add paper to the cassettes of the PrintServer 32
printer.
4.1 When to Add Paper
Add paper when:
•
The cassette is out of paper and the operator panel displays the following
message:
Add Paper
•
The printer is not printing and the operator panel displays the following
message:
Ready
Adding Paper to the Cassettes 4–1
4.2 Adding Paper
Use the following procedure to add paper to the cassettes.
1. Press the Pause key. The operator panel displays the following message:
Paused — Press Resume to Continue
2. Remove the empty paper cassette by lifting it up (slightly) and out of the
printer.
4–2 Adding Paper to the Cassettes
3. Open the cassette cover and remove it by lifting it straight up.
Adding Paper to the Cassettes 4–3
4. Add paper to the cassette, being sure not to add it above the limit line.
Caution
Use only high-quality paper, as listed in Appendix B. Do not add paper
above the limit line on the paper guide (about 250 sheets of 20-lb.
paper). Adding paper above the limit line or loading paper unevenly
puts stress on the cassette motor and causes paper jams.
4–4 Adding Paper to the Cassettes
5. Place the cover back on the cassette and close the cover.
Adding Paper to the Cassettes 4–5
6. Insert the paper cassette by sliding it straight into the cassette slot until it
drops into position.
•
The cassette rises to the operating position, and the amber light on the
graphic display (indicating the selected cassette) changes to green.
7. Press the Resume key.
4.3 Changing Paper Sizes
The paper cassettes come assembled with sizes based on the country where
the printer is shipped. If you need to reconfigure the paper cassettes, use the
following procedure.
Caution
Frequent changing the paper cassettes sizes can damage the screw
holes. Use the bottom paper tray if you want to use various sizes of
paper.
4–6 Adding Paper to the Cassettes
1. Move the paper length guide to the desired position.
2. Move the right and left paper width guides to the desired position.
3. Insert the metal key that matches the paper size you selected.
Caution
If the paper size and metal key do not match, a printing error will
occur.
4. Attach the paper size labels to the side and front of the paper cassette.
Adding Paper to the Cassettes 4–7
5
Printing on Different Types of Media
The PrintServer 32 printer allows you to print on the following types of media:
•
Letterhead paper
•
Predrilled paper
•
Labels
•
Transparencies
The following sections explain how to load the media and print.
Use the Cassettes
Use the cassettes rather than the bottom paper tray when you print
on special media. The PrintServer 32 printer is a shared printer, and
other users will be using the bottom paper tray for their print jobs.
5.1 Printing on Letterhead or Predrilled Paper
Use the following procedure to print on letterhead or predrilled paper:
1. Insert letterhead or predrilled paper in the direction specified in Table 5–1.
Table 5–1 Adding Letterhead and Predrilled Paper to the Cassettes
To Print...
Place Letterhead
Paper...
Place Predrilled Paper
One-sided
Face up
With holes on the left side of the page
Two-sided
Face down
With holes on the right side of the page
Printing on Different Types of Media 5–1
2. Issue the PRINT command, specifying the input tray that holds the
predrilled or letterhead paper. For example:
VMS:
PRINT/QUEUE=queuename/PARAM=(INPUT_TRAY=TOP) filename
ULTRIX:
lpr -Pqueuename -Itop filename
DECwindows:
1. Pull down the File menu and choose the Print... option.
2. Click on the Options... button.
3. Pull down the Input Tray menu and select the top input tray.
4. Click on the OK button.
5–2 Printing on Different Types of Media
5.2 Printing Labels
This section explains how to print labels on the PrintServer 32 printer.
1. Insert the labels face up into the upper cassette.
2. Open the side output tray.
a. Pull out the side tray and let it down until it stops into its operating
position.
Printing on Different Types of Media 5–3
b. Pull out the tray extension.
5–4 Printing on Different Types of Media
3. Issue the PRINT command, specifying the input tray that holds the labels
and the side output tray. For example:
VMS:
PRINT/QUEUE=queuename/PARAM=(INPUT_TRAY=TOP, OUTPUT_TRAY=FACE_UP) filename
ULTRIX:
lpr -Pqueuename -Itop -oface-up filename
DECwindows:
1. Pull down the File menu and choose the Print... option.
2. Click on the Options... button.
3. Pull down the Input Tray menu and select the top input tray.
4. Pull down the Output Tray menu and select the Face Up output tray.
5. Click on the OK button.
Printing on Different Types of Media 5–5
5.3 Printing on Transparencies
This section explains how to print transparencies on the PrintServer 32
printer.
1. Insert the transparencies into the upper cassette.
2. Issue the PRINT command, specifying the upper cassette and the top
output tray. For example:
VMS:
PRINT/QUEUE=queuename/PARAM=(INPUT_TRAY=TOP, OUTPUT_TRAY=TOP) filename
ULTRIX:
lpr -Pqueuename -Itop -otop filename
5–6 Printing on Different Types of Media
DECwindows:
1. Pull down the File menu and choose the Print... option.
2. Click on the Options... button.
3. Pull down the Input Tray menu and select the top input tray.
4. Pull down the Output Tray menu and select the top output tray.
5. Click on the OK button.
Printing on Different Types of Media 5–7
6
Clearing Front Panel Messages
This chapter explains how to clear the following front panel messages:
Add Paper
Add Toner and Clean Components
Align Paper Flush Against Back of Tray
Call Customer Services Maintenance 1 Required
Call Customer Services Maintenance 2 Required
Charge Wire Cleaning In Progress
Cleaning Unit Full, See Operator Guide
Deleting Current Job
Fatal Software Error
Hardware Error xx Call Customer Services
Insert Paper Cassette
Keypad is Disabled Cleaning in Progress
No Active Job
No Supplies Needed
One−Sided Test Page
Open Lower Side Door and Clear Paper
Open Side Tray
Open Upper Side Door and Clear Paper
Output Tray Full
Paper Jam 1 − Open Front Cover and See Label
Paper Jam 2 − Open Front Cover and See Label
Paper Jam 4 Open Cabinet Door and See Label
Paper Jam 5 See Label on Bottom Paper Tray
Paused − Press Resume to Continue
Perform User Maintenance
Please Wait...
Print Engine Is in Warmup State
Printing
Processing
Ready
Reboot or Cycle Power
Reinsert Lower Cassette
Reinsert Upper Cassette
Set Paper Size Dial
Single Job Mode − Press Resume to Continue
Two−Sided Test Page
Wrong Size Paper in Lower Cassette
Wrong Size Paper in Paper Tray
Wrong Size Paper in Upper Cassette
Clearing Front Panel Messages 6–1
6.1 Add Paper
Explanation:
A paper cassette or the bottom paper tray is empty. An indicator on the
front panel graphic display or bottom paper tray indicates which tray needs
paper.
Action:
Add paper to the cassettes or bottom paper tray. See Chapter 3 or
Chapter 4 for instructions.
6.2 Add Toner and Clean Components
Explanation:
The PrintServer 32 printer is out of toner and needs various components
cleaned.
Action:
See the PrintServer 32 Printer Toner Kit Guide for instructions on adding
toner and cleaning the components.
6.3 Align Paper Flush Against Back of Tray
Explanation:
The paper does not touch the back of the bottom paper tray. The Paper
Mis-set indicator on the bottom paper tray lights.
Action:
Reload the paper so that it is flush against the back of the tray. For
instructions on adding paper to the bottom paper tray, see Chapter 3.
6–2 Clearing Front Panel Messages
6.4 Call Customer Services — Maintenance 1 Required
Explanation:
Customer Services needs to clean and replace various items in the
PrintServer 32 printer.
Action:
Call Customer Services and indicate that Maintenance 1 is needed. See
Chapter 10 for information about calling Customer Services.
6.5 Call Customer Services — Maintenance 2 Required
Explanation:
Customer Services needs to clean and replace various items in the
PrintServer 32 printer.
Action:
Call Customer Services and indicate that Maintenance 2 is needed. See
Chapter 10 for information about calling Customer Services.
6.6 Charge Wire Cleaning In Progress
Explanation:
The transfer/separation charger wire is being cleaned.
Action:
This is an informational message. No action is required. The printer will
resume printing when the cleaning is finished.
6.7 Cleaning Unit Full, See Operator Guide
Explanation:
The cleaning unit is full of toner and needs to be replaced.
Action:
Replace the cleaning unit, using the procedures in the PrintServer 32
Printer Cleaning Unit Kit Guide.
Clearing Front Panel Messages 6–3
6.8 Deleting Current Job
Explanation:
The entry that is printing on the printer has been deleted from the queue.
Action:
This is an informational message. No action is required.
6.9 Fatal Software Error
Explanation:
PostScript encountered an irrecoverable error.
Action:
Turn the printer off, and then on, to reboot the printer.
6.10 Hardware Error xx — Call Customer Services
Explanation:
The printer has a fatal hardware error.
Action:
Call Customer Services. See Chapter 10 for information about calling
Customer Services.
6.11 Insert Paper Cassette
Explanation:
One of the paper cassettes is missing or not properly installed.
Action:
Install the paper cassette. See Chapter 4.
6–4 Clearing Front Panel Messages
6.12 Keypad is Disabled, Cleaning in Progress
Explanation:
This message appears if you press any key on the operator panel while the
transfer/separation charge wire is being cleaned.
Action:
Wait for the cleaning to complete. The printer will resume normal
operation.
6.13 No Active Job
Explanation:
This message appears if you press the Active Jobs key and the printer does
not have any jobs in the queue.
Action:
This message is informational. No action is necessary.
6.14 No Supplies Needed
Explanation:
This message appears if you press the Supplies Needed key and the printer
does not need any supplies.
Action:
This message is informational. No action is necessary.
6.15 One-Sided Test Page
Explanation:
The printer is printing a one-sided test page.
Action:
This message is informational. No action is required.
Clearing Front Panel Messages 6–5
6.16 Open Lower Side Door and Clear Paper
Explanation:
The printer has a paper jam in the lower side door.
Action:
Open the lower side door (located next to the power switch) and remove the
paper.
6.17 Open Side Tray
Explanation:
The output tray located on the left side of the printer is closed, preventing
printed pages from exiting the printer.
Action:
Open the side output tray, as explained in Chapter 5.
6.18 Open Upper Side Door and Clear Paper
Explanation:
The printer has a paper jam in the upper side door.
Action:
Open the upper side door (located near the output trays) and remove the
paper.
6.19 Output Tray Full
Explanation:
The output tray is full.
Action:
Remove the paper in the output tray.
6–6 Clearing Front Panel Messages
6.20 Paper Jam 1 — Open Front Cover and See Label
Explanation:
The printer has a paper jam in the fusing unit area.
Action:
Follow the instructions on the label inside the front cover to clear the jam.
6.21 Paper Jam 2 — Open Front Cover and See Label
Explanation:
The printer has a paper jam in the registration roller area.
Action:
Follow the instructions on the label inside the front cover to clear the jam.
6.22 Paper Jam 4 — Open Cabinet Door and See Label
Explanation:
The printer has a paper jam in the duplex unit area.
Action:
Follow the instructions on the label inside the cabinet door to clear the
jam.
6.23 Paper Jam 5 — See Label on Bottom Paper Tray
Explanation:
The printer has a paper jam in the bottom paper tray.
Action:
Follow the instructions on the label on the bottom paper tray to clear the
jam.
Clearing Front Panel Messages 6–7
6.24 Paused — Press Resume to Continue
Explanation:
The printer is in the paused state, which causes the printer to stop
printing.
Action:
Press the Resume key to restart printing operations.
6.25 Perform User Maintenance
Explanation:
You need to clean and replace various components on the PrintServer 32
printer.
Action:
See the PrintServer 32 Printer Supplies Kit Guide for instructions on
performing user maintenance.
6.26 Please Wait...
Explanation:
The printer is busy with another task, such as initializing or clearing the
paper path.
Action:
The message is informational. No action is required.
6.27 Print Engine Is in Warmup State
Explanation:
The PrintServer 32 printer is powering up or getting ready to resume
operation.
Action:
This is an informational message. No action is necessary.
6–8 Clearing Front Panel Messages
6.28 Printing
Explanation:
The PrintServer 32 printer is printing a print job.
Action:
This is an informational message. No action is necessary.
6.29 Processing
Explanation:
The PrintServer 32 printer is processing the file’s data so that it can be
printed.
Action:
This is an informational message. No action is necessary.
6.30 Ready
Explanation:
The PrintServer 32 printer is ready to accept print jobs.
Action:
This is an informational message. No action is necessary.
6.31 Reboot or Cycle Power
Explanation:
The PrintServer 32 printer has encountered a software error from which it
could not recover.
Action:
Turn the printer off, and then on, to reboot the printer.
Clearing Front Panel Messages 6–9
6.32 Reinsert Lower Cassette
Explanation:
The lower paper cassette is missing or improperly installed.
Action:
Install the lower paper cassette. See Chapter 4.
6.33 Reinsert Upper Cassette
Explanation:
The upper paper cassette is missing or improperly installed.
Action:
Install the upper paper cassette. See Chapter 4.
6.34 Set Paper Size Dial
Explanation:
The paper size dial does not match the size of the paper in the bottom
paper tray.
Action:
Set the paper size dial to the correct setting. See Chapter 3.
6.35 Single Job Mode — Press Resume to Continue
Explanation:
The printer is waiting for the user to press the Resume key. This is a
security feature that allows users to prevent their jobs from printing until
they press the Resume key.
Action:
Press the Resume key to start the print job.
6–10 Clearing Front Panel Messages
6.36 Two-Sided Test Page
Explanation:
The printer is printing a two-sided test page.
Action:
This message is informational. No action is required.
6.37 Wrong Size Paper in Lower Cassette
Explanation:
The lower cassette cannot accommodate the paper loaded in it, or the key
on the paper cassette does not match the paper size in the tray.
Action:
Load paper that is the correct size for the cassette or insert the correct key.
6.38 Wrong Size Paper in Paper Tray
Explanation:
The paper size dial on the bottom paper tray is not set to the correct size.
Action:
Set the paper size dial to the correct setting. See Chapter 3.
6.39 Wrong Size Paper in Upper Cassette
Explanation:
The upper cassette cannot accommodate the paper loaded in the cassette,
or the key on the paper cassette does not match the paper size in the tray.
Action:
Load paper that is the correct size for the cassette or insert the correct key.
Clearing Front Panel Messages 6–11
7
Fixing Interlock Errors
Interlock errors are displayed on the front panel when a cover or component is
not present or not in its operating position. The following interlock messages
can appear on the operator panel:
•
Close Front Cover
•
Close Upper Side Door
•
Close Lower Side Door
•
Close Paper Tray Door
•
Open Cabinet Door
Raise Duplex Transport Guide
•
Interlock 1
See Operator’s Guide
•
Interlock 2
See Operator’s Guide
•
Interlock 3
See Operator’s Guide
•
Interlock 4
See Operator’s Guide
The following sections explain how to fix these errors.
Fixing Interlock Errors 7–1
7.1 Close Front Cover Interlock Error
Explanation:
The front cover is open or may appear to be closed, but the latch may not
be engaged properly on one side.
Action:
Close the front cover and make sure it latches.
7–2 Fixing Interlock Errors
7.2 Close Upper Side Door Interlock Error
Explanation:
The door on the upper side of the PrintServer 32 (near the output trays) is
open or not fully latched.
Action:
Close the upper side door and make sure it latches.
Fixing Interlock Errors 7–3
7.3 Close Lower Side Door Interlock Error
Explanation:
The lower left side door (next to the power switch) is open or not fully
latched.
Action:
Close the lower side door.
7–4 Fixing Interlock Errors
7.4 Close Paper Tray Door Interlock Error
Explanation:
The door on the bottom paper tray is open or not fully latched.
Action:
Close the bottom paper tray door.
Fixing Interlock Errors 7–5
7.5 Open Cabinet Door, Raise Duplex Transport Guide
Interlock Error
Explanation:
The duplex transport guide is unlatched.
Action:
Open the cabinet door and raise the duplex transport guide.
7–6 Fixing Interlock Errors
7.6 Interlock Error 1, 2, or 3, See Operator’s Guide Error
Explanation:
One of the following components is not seated properly or is missing:
Interlock Error
Component
1
Cleaning unit
2
OPC drum
3
Toner cartridge
Action:
1. Open the front cover.
Fixing Interlock Errors 7–7
2. Open the development drawer.
3. Make sure the cleaning unit, OPC drum, and toner cartridge are seated
correctly.
If a component is missing, install it, using the procedure in the
maintenance kit guides.
7–8 Fixing Interlock Errors
4. Close the development drawer.
Fixing Interlock Errors 7–9
5. Close the front cover.
7–10 Fixing Interlock Errors
7.7 Interlock Error 4, See Operator’s Guide Error
Explanation:
The fusing unit is not properly seated.
Action:
1. Open the front cover.
Fixing Interlock Errors 7–11
2. Remove the thumbscrew next to the fusing unit release lever.
7–12 Fixing Interlock Errors
3. Push the lever to the left. Pull out the fusing unit until it stops.
Fixing Interlock Errors 7–13
4. Push the fusing unit in until it is firmly seated in the printer.
7–14 Fixing Interlock Errors
5. Replace the screw next to the fusing unit release lever.
Fixing Interlock Errors 7–15
6. Close the front cover.
7–16 Fixing Interlock Errors
8
Adjusting Print Quality
This chapter explains how to fix various print quality problems. Before making
any adjustments, print a test page.
8.1 Printing a Test Page
Use the following procedure to print a test page:
1. Press the Pause key to place the printer off line. The following message is
displayed:
Paused–
Press Resume to Continue
2. Press the Test key to print the test page. The following message is
displayed:
Please wait . . .
While the test page is printing, the following message is displayed:
One-sided test page
or
Two-sided test page
After printing the test page, the printer returns to the paused state.
3. Press Resume to return the printer to its operating state.
8.2 Blank Pages
Explanation:
The printer produces blank pages.
Action:
Print a test page (see Section 8.1). If the test page prints correctly, check
your PRINT command or the printer’s Ethernet connections. If the test
page does not print, see your system manager or call Customer Services.
Adjusting Print Quality 8–1
8.3 Light Print
Explanation:
The print is too light.
Action:
1. Replace the transfer/separation charger. (See the PrintServer 32
Printer Supplies Kit Guide.)
2. Replace the OPC drum. (See the PrintServer 32 Printer Supplies Kit
Guide.)
8.4 Print Background Is Dirty
Explanation:
The print background is dirty.
Action:
1. Clean the quenching lamp. (See the PrintServer 32 Printer Toner Kit
Guide.)
2. Replace the main charger. (See the PrintServer 32 Printer Supplies Kit
Guide.)
3. Check for low toner. Add toner if necessary. (See the PrintServer 32
Printer Toner Kit Guide.)
8.5 Missing Images
Explanation:
The image is missing in the horizontal direction.
Action:
1. Replace the shield glass. (See the PrintServer 32 Printer Supplies Kit
Guide.)
2. Replace the transfer/separation charger. (See the PrintServer 32
Printer Supplies Kit Guide.)
8–2 Adjusting Print Quality
8.6 Black Lines
Explanation:
Black lines appear across the horizontal axis of the page.
Action:
1. Replace the main charger. (See the PrintServer 32 Printer Supplies Kit
Guide.)
2. Replace the cleaning unit. (See the PrintServer 32 Printer Cleaning
Unit Kit Guide.)
8.7 Black Pages
Explanation:
The printer produces black pages.
Action:
1. Make sure the main charger is seated correctly.
2. Replace the main charger. (See the PrintServer 32 Printer Supplies Kit
Guide.)
3. Print a test page (see Section 8.1). If the test page prints correctly,
check your PRINT command or the printer’s Ethernet connections. See
your system manager or call Customer Services.
8.8 Skewed Paper
Explanation:
The print is crooked on the page.
Action:
Make sure the paper is touching the back of the bottom paper tray or is
correctly inserted in the cassette trays. See Chapters 3 and 4.
Adjusting Print Quality 8–3
8.9 Smudged Print
Explanation:
The print is smudged or blurred.
Action:
Call Customer Services.
8–4 Adjusting Print Quality
9
Checking the Printer Paths
To make sure the printer paths are operating correctly, use Test Set-up mode.
This mode allows you to select the input and output trays, and print test
pages, using those trays.
Note
The keys on the operator panel take on numeric values in Test Set-up
mode. For example, the Pause key is also the 1 key.
Checking the Printer Paths 9–1
Table 9–1 Using Test Set-Up Mode
Step
Press This
Key...
1.
To Perform This Function...
The Following Is Displayed
Pause
Place the printer in a paused
state
Paused–
Press Resume to Continue
2.
Test Set-up
Select Test Set-up mode
One-sided test page
3.
1
Select a two-sided test page
Two-sided test page
4.
2
Select the input tray
The graphic display shows the
selected tray.
5.
3
Select the output tray
The graphic display shows the
selected tray.
6.
5
Print the test page
One-sided test page
or
Two-sided test page
7.
1
Print another test page
(Repeat steps 3 through 6)
One-sided test page
or
Two-sided test page
8.
6
Exit Test Set-up mode
Paused–
Press Resume to Continue
9.
Resume
Put the printer back on line
Ready
9–2 Checking the Printer Paths
10
Service
If you cannot correct a problem with the PrintServer 32 printer or the operator
panel instructs you to call Customer Services, the printer requires servicing by
a qualified Customer Services engineer.
Digital has a service center in your area to help keep your PrintServer 32
system running properly. Refer to the following table.
Before calling for service, check
the problem.
Refer to Chapter 6 and Chapter 7 to find solutions
to common problems.
Who should call for Service?
Typically, the system manager should place the call
to Customer Services.
What is the Service Center
number?
In North America:
On-site warranty service: 1–800–354-9000
Remote software and hardware support:
1–800–354–9000
Return to Digital service: 1–800–225–5385
Per call service: 1–800–354–9000
In Europe, call your local sales office for service.
Service 10–1
What information does the
Service Center need?
Note the following:
•
Serial and model numbers from the back of the
printer.
•
Serial and model numbers of the host system, if
available.
•
Page count. (Open the front cover and check
the maintenance counter.)
•
What the printer was doing when it failed.
•
Messages on the operator panel.
•
Strange noises.
If possible, stay by the printer/host system;
Customer Services may ask you to recreate the
problem.
10–2 Service
A
Specifications
This appendix lists the basic operating specifications for the PrintServer 32
printer.
Technology
Printing technique
Diode laser, electrophotographic, write black, nonmagnetic single-component toner
Resolution
300 x 300 dots per inch
Printing speed
Up to 32 images per minute in simplex mode or
duplex using Letter or A4-size paper
Input Paper
Cassettes/Trays
Capacities and Sizes
Small paper cassette
250-sheet capapcity
Letter (8.5 in. x 11 in.)
Executive (7.5 in. x 10.5 in.)
A4 (297 mm. x 210 mm.)
A5 (148 mm. x 210 mm.)
B5 (257 mm. x 182 mm.)
Large paper cassette
250-sheet capacity
Letter (8.5 in. x 11 in.)
Legal (8.5 in. x 14 in.)
B (11 in. x 17 in.)
A3 (297 mm. x 420 mm.)
A4 (210 mm. x 297 mm.)
B4 (257 mm. x 364 mm.)
B5 (257 mm. x 182 mm.)
Specifications A–1
Bottom paper tray
1000-sheet capacity
Letter (8.5 in. x 11 in.)
Legal (8.5 in. x 14 in.)
A4 (297 mm. x 210 mm.)
A5 (148 mm. x 210 mm.)
B4 (257 mm. x 364 mm.)
B5 (257 mm. x 182 mm.)
Output Paper Tray Capacities
2 top trays
500 - 750 sheets each
Face down offset stacking
1 side tray
100 sheets
Face up stacking
Recommended
paper weights
18 lb. to 24 lb. (68 g/
m
2
to 90 g/
m ) basic weight
2
Physical
Dimensions
Height...49.6 in. (1260 mm.)
Depth....27.2 in. (690 mm.)
Width....36.9 in. (937 mm.)
Installed weight
350 lb. (155 kg) without paper
Power
Power requirements
100/120V AC, 50/60 Hz, 12 amp maximum
220/240V AC, 50 Hz, 7 amp maximum
Power consumption
1400 watts maximum
Environmental
Operating temperature
50°F to 90°F (10°C to 32°C)
Operating humidity
20% to 80% relative humidity
Acoustic noise
Less than 65 dBA
A–2 Specifications
B
Accessories and Supplies
Table B–1 lists some of the accessories and supplies available for the
PrintServer 32 printer. Section B.1 provides information on how to order them.
Consult your local sales representative for a complete list with the latest
information.
Table B–1 PrintServer 32 Printer Accessories and Supplies
Part Number
Description
LPS3X–AA
The toner kit contains:
2 toner cartridges
1 toner kit guide
LPS3X–AC
The supplies kit contains:
1
1
1
1
1
1
LPSXX–AD
OPC (organic photo conductor) drum
transfer/separation charger
main charger
ozone filter
shield glass
OPC drum and supplies kit guide
The cleaning unit kit contains:
2 cleaning units
1 cleaning unit kit guide
LPS4X–BA
The small paper cassette can be configured to hold paper sizes
up to 8.5 in. x 11 in. The cassette capacity is 250 sheets of 20-lb.
paper.
(continued on next page)
Accessories and Supplies B–1
Table B–1 (Cont.) PrintServer 32 Printer Accessories and Supplies
Part Number
Description
LPS4X–BB
The long paper cassette can be configured to hold paper sizes up
to 11 in. x 14 in. The cassette capacity is 250 sheets of 20-lb.
paper.
LPS3X–DA
The duplexer assembly allows users to upgrade the printers to
print on both sides of the sheet.
LN01X–AB
Letter-size paper
8.5 in. x 11 in.
5000 sheets per box
LN01X–AD
A4-size paper
297 mm. x 210 mm.
5000 sheets per box
LN03X–AJ
Letter-size transparencies
8.5 in. x 11 in.
50 sheets per box
H9850–TA
Laser printer labels
8.5 in. x 11 in.
21 labels per sheet
100 sheets per box
H9850–TB
Laser printer labels
8.5 in. x 11 in.
30 labels per sheet
100 sheets per box
LN03X–AK
A4-size transparencies
297 mm. x 210 mm.
50 sheets per box
LN01X–AC
Legal-size paper
8.5 in. x 14 in.
5000 sheets per box
LPSXX–PA
Double letter-size paper
11 in. x 17 in.
5000 sheets per box
B–2 Accessories and Supplies
B.1 Ordering Information
CONTINENTAL U.S.A. AND PUERTO RICO
Telephone:
1–800–DIGITAL
(1–800–344–4825)
8:30 am to 8:00 pm EST
Mail:
Digital Equipment Corporation
PO Box CS2008
Nashua, New Hampshire 03061
ALASKA AND HAWAII
Telephone:
1–603–884–6660
OUTSIDE THE U.S.A.
In Canada
1–800–267–6215
In Australia from the Sydney
Metropolitan Area
412–7000
In Australia outside the Sydney
Metropolitan Area
008–226–363
In New Zealand (Auckland)
09–394–068
IN EUROPE:
Mail:
Digital Equipment Corporation
Attention: Accessories & Supplies Business Manager
c/o Local Subsidiary or Digital-Approved Distributor
Accessories and Supplies B–3
Index
A
capacity, A–2
Ozone filter, xii
Active Jobs key, 2–2
Add Paper message, 4–1
P
B
Bottom paper tray, 3–1
capacity, A–2
C
Cassettes, 4–1
adding paper to, 4–2
using with media, 5–1
R
L
Labels
adding,
printing
Letterhead
adding,
printing
Paper cassette
capacity, A–1
Physical specifications, A–1
Power switch, 1–1
Predrilled paper
adding, 5–1
printing on, 5–2
Print job status, displaying, 2–2
Printers, showing the availability of, 2–1
Printing speed, A–1
Ready message, 4–1
5–3
on, 5–5
paper
5–1
on, 5–2
O
Operator panel, 2–2
Output paper tray
S
Side tray, opening, 5–3
T
Transparencies
adding, 5–6
printing on, 5–6
Index–1