1
® ® The following are trademarks or registered trademarks of their respective owners. Other
product names mentioned in this manual may also be trademarks or registered
trademarks of their respective owners. Registered trademarks are registered in the
United States Patent and Trademark Office; some trademarks may also be registered in
other countries. QMS, and the QMS logo are registered trademarks of QMS, Inc.
TrueType/Apple Computer, Inc. Windows/Microsoft Corporation. Xerox/Xerox
Corporation. Hammermill/Hammermill. Avery/Avery. PrintMagic/Software 2000, Ltd.
Corporation.
The digitally encoded software included with your QMS magicolor 2 DeskLaser is
Copyrighted © 1999 by QMS, Inc. All Rights Reserved. This software may not be
reproduced, modified, displayed, transferred, or copied in any form or in any manner or
on any media, in whole or in par t, without the express written permission of QMS, Inc.
This manual is Copyrighted © 1999 by QMS, Inc., One Magnum Pass, Mobile, AL
36618. All Rights Reserved. This manual may not be copied in whole or in part, nor
transferred to any other media or language, without the express written permission of
QMS, Inc.
QMS, Inc. reserves the right to make changes to this manual and to the equipment
described herein without notice. Considerable effor t has been made to ensure that this
manual is free of inaccuracies and omissions. However, QMS, Inc. makes no warranty
of any kind including, but not limited to, any implied warranties of merchantability
and fitness for a particular purpose with regard to this manual. QMS, Inc. assumes
no responsibility for, or liability for, errors contained in this manual or for incidental,
special, or consequential damages arising out of the furnishing of this manual, or the
use of this manual in operating the equipment, or in connection with the performance of
the equipment when so operated.
About the Documentation ................................................. 1-2
About This Manual ............................................................. 1-3
Typographic Conventions ................................................. 1-5
Introduction ........................................................................ 2-2
Configuring the Windows 95/98 Printer Driver ............... 2-2
Setting the Printer Driver Defaults 2-2
Configuring the Printer Driver for the Current
Print Job 2-6
Configuring Windows 95/98 Options through the
Application ................................................................... 2-8
Configuring Paper Options 2-8
Configuring Quality Options 2-14
Configuring Image Settings Options 2-17
Configuring the Windows NT 4.0 Printer Driver ............ 2-21
Methods of Configuration 2-21
A Note About Default Settings 2-28
Configuring Windows NT 4.0 Options through the
Application ................................................................. 2-29
Configuring Paper Options 2-29
Configuring Quality Options 2-35
Configuring Image Settings Options 2-38
Sharing the Printer ........................................................... 2-42
Sharing Over a Parallel Connection ............................... 2-42
Windows 95/98 2-42
Windows NT 4.0 2-44
Sharing Someone Else's Printer 2-46
Removing Users from Sharing 2-47
Using the Printer Status Monitor .................................... 2-50
Windows 95/98 2-50
Windows NT 4.0 2-53
Using the QMS Network Print Monitor ........................... 2-56
Components 2-57
Introduction ........................................................................ 3-2
Loading the Media Cassette ............................................. 3-2
Paper Specifications 3-2
Prepare the Paper 3-3
’
Load the Cassette 3-4
Using Letterhead and Memo Media 3-5
Using Media Other than Plain Paper ................................ 3-6
Using Envelopes 3-6
Using Glossy Stock 3-9
Using Labels 3-10
Using Thick Stock 3-11
Using Transfer Media 3-12
Using Transparencies 3-12
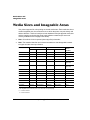
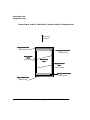
Media Sizes and Imageable Areas .................................. 3-14
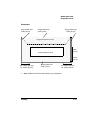
Working Within the Imageable Area 3-15
Page Margins 3-18
Image Alignment 3-18
Media Size versus Cassette Size 3-18
Storing Media ................................................................... 3-18
Using Toner Cartridges ................................................... 3-19
Toner Cartridge Life 3-19
Refilled Toner Cartridges 3-20
Ordering Toner Cartridges 3-20
Toner Cartridge Storage 3-20
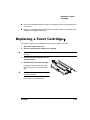
Replacing a Toner Cartridge ........................................... 3-21
Printing on Both Sides (Duplex Printing) ...................... 3-23
DeskLaser—Manual Duplexing 3-23
Duplex Model—Auto Duplexing 3-23
Continuous Printing ........................................................ 3-24
Media Types 3-24
Print Runs 3-24
Cancelling a Print Job ..................................................... 3-25
Cancelling from the Control Panel 3-25
Cancelling from the Computer 3-25
Introduction ........................................................................ 4-2
Message Window ............................................................... 4-2
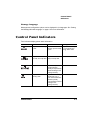
Control Panel Indicators ................................................... 4-3
Control Panel Keys ............................................................ 4-4
Online and Cancel Keys 4-4
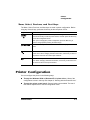
Menu, Select, Previous, and Next Keys 4-5
Printer Configuration ......................................................... 4-5
The Configuration Menu 4-6
Accessing the Configuration Menu 4-7
Selecting Configuration Menu Options 4-7
Setting Energy Conservation 4-8
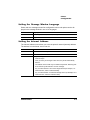
Setting the Message Window Language 4-9
Setting the Internet Address 4-9
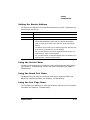
Setting the Subnet Mask 4-10
Setting the Router Address 4-11
Using the Service Menu 4-11
Using the Board Test Menu 4-11
Using the Test Page Menu 4-11
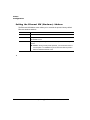
Setting the Ethernet HW (Hardware)
Address 4-12
Introduction ........................................................................ 5-2
Additional Media Cassettes .............................................. 5-3
Lower Input Feeder ........................................................... 5-3
What's in the Kit? 5-3
Unpacking the Lower Input Feeder 5-4
Installing the Lower Input Feeder 5-4
’
Single In-Line Memory Modules ....................................... 5-7
Antistatic Protection 5-8
How the Computer and Printer Use Memory 5-8
Installation Procedure 5-9
Updating System Software ............................................. 5-11
Updating the Printer Drivers ........................................... 5-12
Windows 95/98 Printer Driver 5-12
Windows NT 4.0 Printer Driver 5-14
Introduction ........................................................................ 6-2
Handling the Printer ........................................................... 6-2
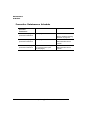
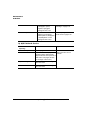
Maintenance Schedule ...................................................... 6-4
Cleaning Schedule 6-4
Preventive Maintenance Schedule 6-6
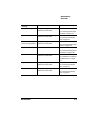
Replacement Schedule 6-7
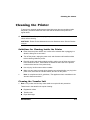
Cleaning the Printer ........................................................... 6-9
Guidelines for Cleaning Inside the Printer 6-9
Cleaning the Transfer Unit 6-9
Cleaning the Paper Exit Rollers 6-14
Cleaning the OPC Belt Cartridge 6-16
Cleaning the Laser Lens 6-21
Cleaning the Duplexer 6-24
Cleaning the Exterior of The Printer 6-30
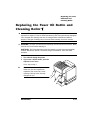
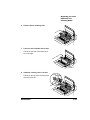
Replacing the Fuser Oil Bottle and Cleaning Roller ..... 6-31
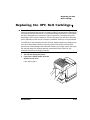
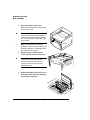
Replacing the OPC Belt Cartridge .................................. 6-35
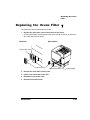
Replacing the Ozone Filter .............................................. 6-39
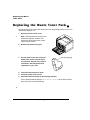
Replacing the Waste Toner Pack .................................. 6-40
!
"#
Introduction ........................................................................ 7-2
Preventing Media Jams .................................................... 7-2
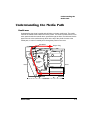
Understanding the Media Path ......................................... 7-3
DeskLaser 7-3
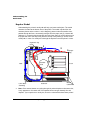
Duplex Model 7-4
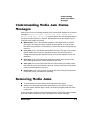
Understanding Media Jam Status Messages .................. 7-5
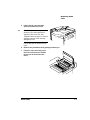
Removing Media Jams ...................................................... 7-5
Misfeed Jams 7-6
Inner Jams, Drum Jams, and Outer Jams 7-6
Duplexer Jams 7-9
Other Jams 7-13
$ %&
Introduction ........................................................................ 8-2
Status and Service Messages ........................................... 8-2
Status Messages 8-2
Service Messages 8-11
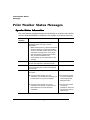
Print Monitor Status Messages ...................................... 8-14
Spooler Status Information 8-14
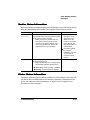
Monitor Status Information 8-15
Printer Status Information 8-15
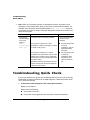
Troubleshooting Quick Check ........................................ 8-16
Printing a Test Page ........................................................ 8-17
Performing a Board Test ................................................. 8-18
Control Panel Problems .................................................. 8-19
Data Indicator Continues to Blink 8-19
’
Jam Message Stays On 8-19
Printing Message Stays On 8-20
Media/Paper Mismatch Message Stays On 8-20
Output Problems .............................................................. 8-20
Pages are Scaled 8-21
Only Partial Pages Print 8-21
Blank Pages “Print” 8-21
Not All Pages Print 8-22
Files Fail to Print 8-23
Fonts Don't Print Correctly 8-24
Frequent Media Jams 8-24
OPC Belt Cartridge Problems ......................................... 8-25
Duplexer Problems .......................................................... 8-26
Print Quality Problems .................................................... 8-28
General Print Quality Problems 8-28
Blurred or Lightly Stained Background 8-28
Colored Bands, Ribbing 8-29
Insufficient Gloss or Fusing 8-29
Irregular Print, Mottled Image 8-30
Missing Image at Edge 8-30
Mixed Color Image, Color Misregistration 8-31
Spotting 8-31
Too Dark 8-32
Too Light 8-32
Toner Smudges, Residual Images 8-33
Uneven Print Density 8-33
Vertical Streaking 8-34
Placing a Service Call ...................................................... 8-35
' (
Introduction ........................................................................ 9-2
What's Involved? 9-2
Remove Cables and Cassette(s) ...................................... 9-3
Remove the Toner Cartridges .......................................... 9-3
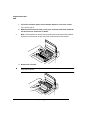
Remove the OPC Belt Cartridge ...................................... 9-3
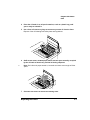
Prepare the Fuser Unit ..................................................... 9-5
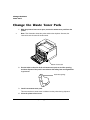
Change the Waste Toner Pack ....................................... 9-10
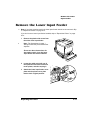
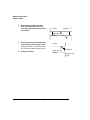
Remove the Lower Input Feeder .................................... 9-11
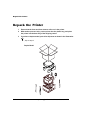
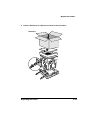
Repack the Printer ........................................................... 9-14
) * +#+
Sources of Support ........................................................... A-2
Your QMS Vendor A-2
Your Application Vendor A-2
Internet A-2
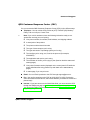
QMS Customer Response Center (CRC) A-3
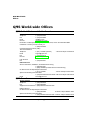
QMS World-wide Offices .................................................. A-4
QMS United States and Latin America A-4
QMS Canada A-4
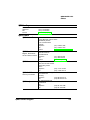
QMS in Japan A-5
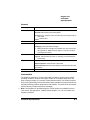
QMS EMEA A-5
, %
+
-
Engine and Controller Specifications ............................. B-2
Engine B-2
Controller B-4
’
Electrical B-5
Environmental B-6
Physical B-7
Print Media ........................................................................ B-7
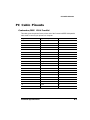
PC Cable Pinouts ............................................................. B-9
Centronics/IEEE 1284 Parallel B-9
Ethernet B-11
Regulatory ...................................................................... B-12
Warranty Considerations ............................................... B-13
Consumables and Your Warranty B-13
Electrostatic Discharge and Your Warranty B-14
%.
Introduction ....................................................................... C-2
Terminology ...................................................................... C-2
Subnetting ......................................................................... C-4
Subnet Masks C-4
Internet Routing ................................................................ C-5
Class A, B, and C Internet Addresses C-5
/
Manual Notice .................................................................... D-2
FCC Compliance Statement ............................................. D-2
Canadian Users Notice ..................................................... D-3
Laser Safety ....................................................................... D-3
International Notices ........................................................ D-4
Power Cord D-4
Colophon ........................................................................... D-4
0
’
%
1 1 1
“About the Documentation” on page 1-2
“About This Manual” on page 1-3
“Typographic Conventions” on page 1-5
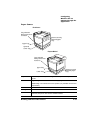
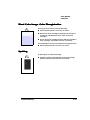
You received the following documentation with your QMS magicolor 2 DeskLaser:
QMS magicolor 2
DeskLaser
Installation Guide
(In hard copy and on
the QMS magicolor 2
DeskLaser Print System Documentation
and Software
CD-ROM.)
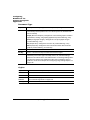
QMS
magicolor 2
DeskLaser
Setup Guide
This handout assists in getting the printer up and
running. It is to be used as a quick setup reference
only and should be used in conjunction with the full
Setup Guide and User’s Guide.
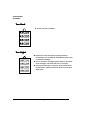
This manual contains detailed, illustrated
instructions to guide you as you unpack and set
up your printer, connect it to a computer via the
parallel or Ethernet interface, and install the
Windows 95/98 or Windows NT printer drivers.
(In hard copy and on
the QMS magicolor 2
DeskLaser Print
System
Documentation and
Software CD-ROM.)
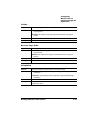
QMS
magicolor 2
DeskLaser
User’s Guide
You’re looking at this manual right now. The
following section, “About this Manual,” tells you
what’s included in this manual.
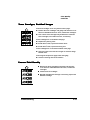
(On the QMS
magicolor 2
DeskLaser
Documentation and
Software CD-ROM.)
This manual guides you through the day-to-day operation of your printer and provides
troubleshooting information. It is organized as follows:
Introduction
Working with the Printer Explains how to configure the printer drivers,
share the printer, and use both the Status
Drivers
Monitor and the QMS Network Print Monitor.
Printing
Describes how to refill the media cassette,
print on different types of media, prevent
media jams, and cancel a print job, as well
as how to replace a toner cartridge.
Control Panel
Introduces the parts of the control panel and
discusses how to use the keys and the
configuration menu.
Printer Options
Explains how to install available options, and
how to update system software and printer
drivers.
Maintenance
Describes how to handle and clean your
printer.
Media Jams
Explains how to locate and clear media
jams.
Troubleshooting
Interprets printer and QMS Network Print
Monitor status messages, explains how to
remove a media jam, and discusses various
output problems.
Repacking the Printer
Describes how to repack the printer for
storage or shipment.
Presents an overview of this manual.
QMS Customer Support Provides product sales and support
Technical Specifications Provides print engine, controller,
TCP/IP Concepts
Defines TCP/IP terminology and then
discusses subnetting and Internet routing.
Notices
Lists manual and legal notices.
telephone numbers and describes how to
communicate with QMS through the
Internet.
environmental, print media, consumable,
and cabling specifications.
Index
!
"#$#
%&
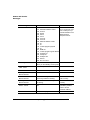
The following typographic conventions are used in this manual:
Mixed-Case
Courier
Text you type, and messages and information displayed on
the screen
Mixed-Case Italic
Courier
Variable text you type; replace the italicized word(s) with
information specific to your printer or computer
UPPERCASE COURIER Information displayed in the printer message window
lowercase italic
Variable information in text
UPPERCASE
File and utility names
↵
Press the Enter key (PC)
^
Press and hold down the Ctrl key (PC)
In Adobe Acrobat PDF versions of the manual, click to play
a QuickTime video clip of the procedure described in the
text.
»
Note: Notes contain tips, extra information, or important information that deserves
emphasis or reiteration.
Caution: Cautions present information that you need to know to avoid equipment
damage, process failure, or extreme annoyance.
WARNING! Warnings indicate the possibility of personal injury if a specific procedure
is not performed exactly as described in the manual.
ACHTUNG! Bitte halten Sie sich exakt an die im Handbuch beschriebene
Vorgehensweise, da sonst Verletzungsgefahr bestehen könnte.
'
%
1 1 1
“Configuring the Windows 95/98 Printer Driver” on page 2-2
“Configuring Windows 95/98 Options through the Application” on page 2-8
“Configuring the Windows NT 4.0 Printer Driver” on page 2-21
“Configuring Windows NT 4.0 Options through the Application” on page 2-29
“Sharing the Printer” on page 2-42
“Using the Printer Status Monitor” on page 2-50
“Using the QMS Network Print Monitor” on page 2-56
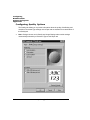
This chapter explains how to configure the QMS magicolor 2 DeskLaser printer drivers, share the printer, and use both the DeskLaser Printer Status Monitor and the
QMS Network Print Monitor.
!
"
This section explains how to configure the QMS magicolor 2 DeskLaser Windows 95/
98 printer driver. Online help is also available while you’re configuring the printer
driver. Just choose any Help button.
»
Note: If you’re using Windows NT, refer to “Configuring the Windows NT 4.0 Printer
Driver” on page 2-21.
»
Note: Changes you make here apply to all documents. However, most changes you
make through your application override these settings.
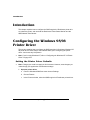
1
Open the printer driver.
a
From the Windows 95/98 Start menu choose Settings.
b
Choose Printers.
c
In the Printers window, select the QMS magicolor 2 DeskLaser printer driver.
%($$
)*+',+-
.&
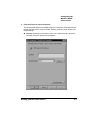
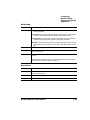
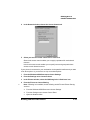
2
From the File menu choose Properties.
The following tabs appear in the QMS magicolor 2 DeskLaser Properties window
through the Start menu: General, Details, Sharing (optional), Paper, Quality, and
Image Settings.
General—Allows you to name the printer, use a separator page, and print a
test page. See your Windows documentation.
)$*.&
%($$
)*+',+-
.&
!
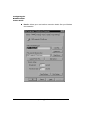
Details—Allows you to set interface connection details. See your Windows
documentation.
%($$
)*+',+-
.&
Sharing (optional)—Allows you to set up the printer so others on the network
can use it. See “Sharing the Printer” on page 2-42.
Note: The optional Sharing tab does not appear when you choose Properties
from the application.
»
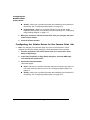
Paper—Allows you to provide information about the document type and location of the media you want to print on. See “Configuring Paper Options” on
page 2-8.
)$*.&
'
%($$
)*+',+-
.&
Quality—Allows you to provide information about halftoning and resolution of
the printing. See “Configuring Quality Options” on page 2-14.
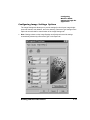
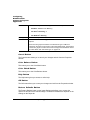
Image Settings—Allows you to provide settings for color format, image
brightness and contrast, color balance, and color matching. See “Configuring
Image Settings Options” on page 2-17.
3
Make your selections, and then choose OK to save your changes and return
to the Printers window.
4
Close the Printers window.
»
Note: Any changes you make here apply only to the current document. These
changes override most default settings you made through the Printers window.
1
From the application’s File menu choose Print (or, in some cases, Print
Setup or Page Setup).
2
In the Print, Print Setup, or Page Setup dialog box, select the QMS magicolor 2 DeskLaser printer driver.
3
Choose the Properties button.
Three tabs appear:
/
Paper—Allows you to provide information about the document type and location of the media you want to print on. See “Configuring Paper Options” on
page 2-8.
Quality—Allows you to provide information about halftoning and resolution of
the printing. See “Configuring Quality Options” on page 2-14.
%($$
)*+',+-
.&
Image Settings—Allows you to provide settings for color format, image
brightness and contrast, color balance, and color matching. See “Configuring
Image Settings Options” on page 2-17.
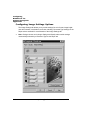
Windows 95/98 users can customize the image on the Image Settings tab:
Double-click on the image.
Browse to find the bitmap image file you want to use.
Double-click the bitmap image filename.
The new image now appears on the Image Settings tab.
To restore the original image on the Image Settings tab in Windows 95/98, the
file is named QMIMAGE.BMP and is stored in c:\windows\system after
the driver has been installed. To restore it, double-click on the image, point to
the directory, and select the file. If the file has been deleted, the driver has to
be reinstalled. The file is not stored by itself on the CD-ROM, but is embedded
within SETUP.EXE.
Note: General, Details, and Sharing tabs are not available. See “Setting the
Printer Driver Defaults” on page 2-2 for information.
»
4
Make your selections, and then choose the OK button to return to the Print,
Print Setup, or Page Setup dialog box.
5
Either print the file or close the dialog box.
)$*.&
0
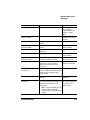
The Paper tab allows you to provide information about the type and location of the
media you want to print on. In addition, its Document Type settings are essential for
customization of the Quality and Image Settings tabs. The Document Type is Automatic Mode only if Auto is selected.
»
%
Note: Settings chosen on the Image Settings and Quality tabs override settings
automatically selected by a Document Type.
!"#$
%($$
)*+',+-
1#$
##
Purpose
Sets the media size.
Choices
Size
A4
B5 (ISO)
B5 (JIS)
Envelope #10
Envelope DL
Executive
Folio
Foolscap
Legal
Letter
SP Folio
Quarto
Default
Letter 8.5 x 11.0 in (215.9 x 279.4 mm)
Hot Key
ALT+P
Inches
8.27 x 11.7
6.9 x 9.8
7.2 x 10.1
4.125 x 9.5
4.3 x 8.7
7.25 x 10.5
8.5 x 13.0
8.0 x 13.0
8.5 x 14.0
8.5 x 11.0
8.5 x 12.4
8.0 x 10.0
Millimeters
210.0 x 297.0
176.0 x 250.0
182.0 x 257.0
105.0 x 241.3
110.0 x 220.0
184.0 x 267.0
215.9 x 330.2
203.2 x 330.2
215.9 x 355.6
215.9 x 279.4
215.9 x 315.0
203.2 x 254.0
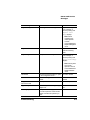
Purpose
Sets the type of media to be printed.
Choices
Standard [Plain Paper] mode—Long-grain paper (16–24 lb; 60–90 g/m²)
Transparency mode—Transparencies (24–41.75 lb; 90–157 g/m²)
Thick Stock mode—Long-grain thick stock (up to 60 lb [225.6 g/m²] cover,
glossy stock 80 lb book [118 g/m²], 90 lb index [163 g/m²]), envelopes, labels,
transfer media
Default
Standard
Hot Key
ALT+Y
Notes
Duplex Options are only available when Standard is the Paper Type.
)$*.&
+
%($$
)*+',+-
1#$
##
DeskLaser
Duplex Model
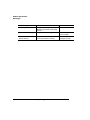
Purpose
Sets the input source (cassette/tray) from which print media is pulled into the
printer
Choices
Upper Tray—The cassette in the standard (upper) position.
Lower Tray—The cassette in the lower position (only available on printers
with the lower input feeder).
2
Default
None
Hot Key
ALT+S
Notes
When the printer is first turned on, the Upper Tray is selected.
After that, the printer uses the last cassette selected.
%($$
)*+',+-
1#$
##
!
Purpose
Allows you to identify the type of document you are printing.
Choices
Auto (Automatic Mode)—Coarse halftoning and color/monochrome settings
automatically selected (halftone and color format options are disabled when
Auto is selected)
Graph (Business Graphics)—Designed for color business graphics created in
spreadsheet, charting, and graphing applications (Coarse halftoning; color)
Photo (Photographic Images)—Designed for color photographic images
(Coarse halftoning; color)
Art (Graphic Arts)—Designed for color line art (coarse halftoning; color)
Mono (Grayscale)—Designed for monochrome documents with text and/or
graphics (Coarse halftoning; monochrome)
Default
Auto
Hot Key
ALT+T—Use the arrow keys to select other Document Types.
Notes
Settings on the Image Settings and Quality tabs override settings automatically
selected by a Document Type. The Graph, Photo, Art, and Mono settings
determine the choices for the Color Match section on the Image Settings tab. If
your business graphic uses neighboring (rather than contrasting) colors or
gradients, do not choose Graph. See “Configuring Image Settings Options” on
page 2-17.
Purpose
Sets the number of copies to be printed.
Choices
1-999
Default
1
Additional
Choices
See “Collate” on page 2-12
See “Reverse Page Order” on page 2-12
Hot Key
ALT+C
)$*.&
Purpose
Collates multiple copies of documents when enabled.
Choices
Enabled (selected)—All pages of the document are printed before the next
copy is printed.
Disabled—All copies of each page are printed before the next page is
printed.
Default
Disabled
Hot Key
ALT+E
Notes
If you are making multiple duplex copies of a job that has an uneven number
of pages, deselect collation in the application and then select Collate in the
driver on the Paper tab.
Purpose
Prints pages in reverse order when enabled.
Choices
Enabled (selected)—All pages of the document are printed before the next
copy is printed.
Disabled—All copies of each page are printed before the next page is
printed.
Default
Disabled
Hot Key
ALT+R
Purpose
Sets the orientation (printing direction) of the print media.
Choices
Portrait—Printing along the short edge of the page (vertical page
orientation)
Landscape—Printing along the long edge of the page (horizontal page
orientation)
%&
Default
Portrait
Hot Keys
Portrait—ALT+O
Landscape—ALT+L
!"#$
%($$
)*+',+-
1#$
##
%&!'(
Purpose
Allows you to specify whether and how your print job will be duplexed.
Duplexing is printing on both sides of each page.
Choices
None
Flip on Long Edge—Prints flipped horizontally on the long edge as in a
loose-leaf notebook.
Flip on Short Edge—Prints flipped vertically on the short edge as on a
clipboard.
Default
None
Hot Keys
ALT+X selects the Duplex options list. From there, use the ALT-down arrow or
ALT-up arrow keys to choose the required option.
Notes
Auto duplexing is supported only on the DeskLaser Duplex Model.
Duplex options are only available when Standard is the Paper Type.
)*+++%
The About... button displays the copyright and version number of the printer driver.
%
The Cancel button allows you to cancel your changes and exit from the Properties
window.
,%
The Help button gives you access to online help.
$-%
The OK button allows you to save your changes and exit from the Properties window.
"!.
%
The Restore Defaults button on the Paper tab allows you to restore all of the tabs to
their default settings (with the exception of the Resolution option on the Quality tab).
)$*.&
The Quality tab allows you to provide information about the quality of halftoning and
resolution. Document Type settings on the Paper tab are essential for customization of
the Quality tab.
»
%&'
Note: Settings chosen on the Quality and Image Settings tabs override settings
automatically selected by a Document Type on the Paper tab.
!"#$
%($$
)*+',+-
1#$
##
,
.
Purpose
Selects the style of halftoning to use.
Choices
Line art pattern—Provides a halftone designed specifically for printing
business graphics.
Fine pattern—Provides a higher line frequency halftone than Coarse pattern
for more detail in graphics and images but fewer shades of color.
Coarse pattern—Provides a general-purpose halftone with line frequency
suitable for printing most text, graphics, and images at 600 dpi.
Air Brush—Provides a high-speed error diffusion-type halftoning for printing
photographs or pictures that don’t have sharp, well-defined edges at 600
dpi.
Default
Coarse pattern
Hot Key
ALT+T—Use the arrow keys to select other radio buttons.
ALT+R—Resolution.
Notes
The image to the right of Halftoning radio buttons changes to reflect your
choice.
These choices are grayed out if Auto is the selected Document Type on the
Paper tab. See “Document Type” on page 2-11.
"
Purpose
Selects print resolution to use.
Choices
600 x 600 dots per inch
300 x 300 dots per inch
Default
600 x 600 dots per inch
Hot Key
ALT+R—Use the arrow keys to select another radio button.
)$*.&
'
%($$
)*+',+-
1#$
##
%
The Cancel button allows you to cancel your changes and exit from the Properties
window.
,%
The Help button gives you access to online help.
$-%
The OK button allows you to save your changes and exit from the Properties window.
"!.
%
The Restore Defaults button on the Quality tab allows you to restore the options on
this tab to their default settings.
/
The Image Settings tab allows you to provide settings for color format, image brightness and contrast, color balance, and color matching. Document Type settings on the
Paper tab are essential for customization of the Image Settings tab.
»
Note: Settings chosen on the Image Settings and Quality tabs override settings
automatically selected by a Document Type on the Paper tab.
!"
%($$
)*+',+-
1#$
##
/
Purpose
Selects color or monochrome printing.
Choices
Mono—Monochrome (black only)
CMYK—Full color (cyan, magenta, yellow, and black)
Default
CMYK
Hot Key
ALT+F
Notes
You must select a Document Type other than Auto on the Paper tab to
activate these settings.
This Mono setting is designed only for text. If your document also contains
graphics, choose the Mono Document Type on the Paper tab for grayscale
printing. See “Document Type” on page 2-11.
0
Purpose
Allows you to customize the brightness (lightness and darkness) and
contrast of an image.
Brightness—Increase for a lighter print; decrease for darker.
Contrast—Increase for higher contrast print; decrease for lower contrast.
-
Choices
-50% (darkest) to +50% (lightest)
Default
The center setting (0%) on each slider bar.
Hot Key
Brightness—ALT+I (capital i)
Contrast—ALT+O
Notes
The settings on the slider bars can be changed using the arrow keys on the
keyboard.
%($$
)*+',+-
1#$
##
%
Purpose
Allows you to customize the
Saturation
Red Strength
Green Strength, and
Blue Strength
of an image.
Choices
-50% (least) to +50% (most)
Default
The center setting (0%) on each slider bar.
Hot Key
ALT+C—This hot key takes you to the Saturation choice in Color Balance.
From there, use ALT+C again to tab down to choose the other sections such
as Red Strength.
Notes
The Color Match button toggles between Color Match and Color Balance
options.
These options are not available if Mono is selected in the Color Format
section of this tab or if Mono or Auto is selected in the Document Type
section of the Paper tab.
The settings on the slider bars can be changed using the arrow keys on the
keyboard.
Purpose
Selects the method for color matching.
Choices
Disabled
Use Windows’ matching—Used in Windows 95/98 and ICM-based
applications (for example, PhotoShop and CorelDRAW). The ICC profile is
located in the C:\WINDOWS\SYSTEM\COLOR directory under the name
of QMC2DL.ICM
Use Driver’s matching
If you choose either Use Driver’s matching or Use Windows’ matching, three
other selections are available:
Match for business graphics
Match for photo images
Match for computer art
)$*.&
+
%($$
)*+',+-
1#$
##
Default
Default defined by the Document Type selected on the Paper tab:
Disabled—Disables Color Matching
Use Driver’s matching, or
Use Windows’ matching
Hot Key
ALT+L—Takes you to the color matches
Notes
The Color Balance button toggles between Color Match and Color Balance
options.
All choices are grayed out if Mono is the Document Type or if Mono is
selected in the Color Format section of the Image Settings tab. The last three
choices are grayed out if Auto is the Document Type or if Disabled is chosen
for Color Match. See “Document Type” on page 2-32.
%
The Cancel button allows you to cancel your changes and exit from the Properties
window.
%
%
This returns you to the Color Match button.
%
This returns you to the Color Balance button.
,%
The Help button gives you access to online help.
$-%
The OK button allows you to save your changes and exit from the Properties window.
"!.
%
The Restore Defaults button on the Image Settings tab allows you to restore the
options on this tab to their default settings. The Restore Defaults also depends on the
settings on the Paper tab.
2
%($$
)*3!42
.&
#$%&
"
This section explains how to configure the QMS magicolor 2 DeskLaser Windows NT
4.0 printer driver. Context-sensitive Windows online help is also available while you’re
configuring the printer driver. Just choose any Help button.
»
Note: If you’re using Windows 95/98, refer to “Configuring the Windows 95/98 Printer
Driver” on page 2-2 for complete information.
There are three methods you can use to configure the printer driver. However, these
three methods don’t all have the same options.
This section explains how to use these three methods. The following sections explain
the options available through each configuration method.
!#
1
From the Windows NT Start menu choose Settings.
2
From the Settings menu choose Printers.
3
In the Printers window, select the QMS magicolor 2 DeskLaser printer icon.
)$*.&
%($$
)*3!42
.&
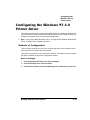
4
From the File menu choose Properties.
Five tabs appear in the QMS magicolor 2 DeskLaser Properties window through
the Start menu: General, Ports, Scheduling, Sharing, and Security.
General—Allows you to name the printer, specify a location, specify a driver
to be used, install a new or updated printer driver, use a separator page
between documents, specify a specialized print processor/data type, and print
a test page. See your Windows documentation.
%($$
)*3!42
.&
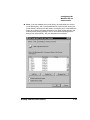
Ports—Lists the available ports (under Ports), the associated port monitor
(under Description), and a comma-delimited list of printers that use the port
(under Printer). Allows you to add, delete, or configure ports. It also allows the
printer to get setting and status information from other printing devices, and
enables printer pooling (printing to two or more identical printing devices
through one logical printer). See your Windows documentation.
)$*.&
%($$
)*3!42
.&
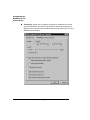
!
Scheduling—Allows you to configure the printer for availability and set the
spooling information. The slider bar specifies the default document priority
(higher-priority documents are put before lower-priority documents). See your
Windows documentation.
%($$
)*3!42
.&
Sharing—Allows you to share the printer and install alternate drivers. See
your Windows documentation.
)$*.&
'
%($$
)*3!42
.&
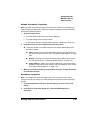
5
Security—Allows you to modify the permissions to limit access on the printer,
view or set auditing information, or view or take ownership of the selected
item(s). See your Windows documentation.
Make your option selections, and then choose OK.
Your changes are saved and you are returned to the Printers window.
/
%($$
)*3!42
.&
!.
!
»
Note: Changes you make here apply to all documents. However, any changes you
make through your application (Document Properties settings) override the Default
Document Properties settings.
1
2
Open the printer driver.
a
From the Windows NT Start menu choose Settings.
b
From the Settings menu choose Printers.
c
In the Printers window, select the QMS magicolor 2 DeskLaser printer icon.
From the File menu choose Default Document Properties.
3
Three tabs appear in the QMS magicolor 2 DeskLaser Default Document
Properties window:
Paper—Allows you to provide information about the type and location of
the media you want to print on. See “Configuring Paper Options” on page
2-29.
Quality—Allows you to provide information about halftoning and resolution of the printing. See “Configuring Quality Options” on page 2-35.
Image Settings—Allows you to provide settings for color format, image
brightness and contrast, color balance, and color matching. See “Configuring Image Settings Options” on page 2-38.
Make your selections, and then choose OK to save your changes and return
to the Printers window.
!
»
Note: Any changes you make here apply only to the current document. These
changes override any settings you made through the Default Document Properties
window.
1
From the application’s File menu choose Print (or, in some cases, Print
Setup).
2
In the Print or Print Setup dialog box, select the QMS magicolor 2
DeskLaser.
)$*.&
0
%($$
)*3!42
.&
3
Choose the Properties button.
Three tabs appear in the QMS magicolor 2 DeskLaser Document Properties
window:
4
Paper—Allows you to provide information about the type and location of the
media you want to print on. See “Configuring Paper Options” on page 2-29.
Quality—Allows you to provide information about halftoning and resolution of
the printing. See “Configuring Quality Options” on page 2-35.
Image Settings—Allows you to provide settings for color format, image
brightness and contrast, color balance, and color matching. See “Configuring
Image Settings Options” on page 2-38.
Make your selections, and then choose the OK button to return to the Print
or Print Setup dialog box.
Because Windows NT remembers the configuration changes you make to the driver,
reinstalling the driver does not restore the factory default configuration. Therefore, the
following configuration tables provide the factory defaults in case you need to reset
them manually.
-
The Paper tab allows you to provide information about the type and location of the
media you want to print on. In addition, its Document Type settings are essential for
customization of the Quality and Image Settings tabs. The Document Type is Automatic Mode only if Auto is selected.
»
Note: Settings chosen on the Image Settings and Quality tabs override settings
automatically selected by a Document Type.
! "
%($$
)*3!42
1#$
##
Purpose
Sets the media size.
Choices
Size
A4
B5 (ISO)
B5 (JIS)
Envelope #10
Envelope DL
Executive
Folio
Foolscap
Legal
Letter
SP Folio
Quarto
Default
Letter 8.5 x 11.0 in (215.9 x 279.4 mm)
Hot Key
ALT+P
Inches
8.27 x 11.7
6.9 x 9.8
7.2 x 10.1
4.125 x 9.5
4.3 x 8.7
7.25 x 10.5
8.5 x 13.0
8.0 x 13.0
8.5 x 14.0
8.5 x 11.0
8.5 x 12.4
8.0 x 10.0
Millimeters
210.0 x 297.0
176.0 x 250.0
182.0 x 257.0
105.0 x 241.3
110.0 x 220.0
184.0 x 267.0
215.9 x 330.2
203.2 x 330.2
215.9 x 355.6
215.9 x 279.4
215.9 x 315.0
203.2 x 254.0
Purpose
Sets the type of media to be printed.
Choices
Standard—Long-grain paper (16–24 lb; 60–90 g/m²)
Transparency—Transparencies (24–41.75 lb; 90–157 g/m²)
Thick stock—Long-grain thick stock cover (up to 60 lb [225.6 g/m²], glossy
stock 80 lb book [118 g/m²], 90 lb index [163 g/m²]), envelopes, labels,
transfer media
2
Default
Standard
Hot Key
ALT+Y
Notes
Duplex Options are only available when Standard is the Paper Type.
%($$
)*3!42
1#$
##
DeskLaser
Duplex Model
Purpose
Sets the input source (cassette/tray) from which print media is pulled into the
printer
Choices
Upper Tray—The cassette in the standard (upper) position.
Lower Tray—The cassette in the lower position (only available with the lower
input feeder).
Default
None
Hot Key
ALT+S
Notes
When the printer is first turned on, the Upper Tray is selected.
After that, the printer uses the last cassette selected.
)$*.&
%($$
)*3!42
1#$
##
!
Purpose
Allows you to identify the type of document you are printing.
Choices
Auto (Automatic Mode)—Coarse halftoning and color/monochrome settings
automatically selected (halftone and color format options are disabled when
Auto is selected)
Graph (Business Graphics)—Designed for color business graphics created in
spreadsheet, charting, and graphing applications (Coarse halftoning; color)
Photo (Photographic Images)—Designed for color photographic images
(Coarse halftoning; color)
Art (Graphic Arts)—Designed for color line art (coarse halftoning; color)
Mono (Grayscale)—Designed for monochrome documents with text and/or
graphics (Coarse halftoning; monochrome)
Default
Auto
Hot Key
ALT+T—Use the arrow keys to select other Document Types.
Notes
Settings on the Image Settings and Quality tabs override settings automatically
selected by a Document Type. The Graph, Photo, Art, and Mono settings
determine the choices for the Color Match section on the Image Settings tab. If
your business graphic uses neighboring (rather than contrasting) colors or
gradients, do not choose Graph. See “Configuring Image Settings Options” on
page 2-38.
Purpose
Sets the number of copies to be printed.
Choices
1-999
Default
1
Additional
Choices
See “Collate” on page 2-33
See “Reverse Page Order” on page 2-33
Hot Key
ALT+C
%($$
)*3!42
1#$
##
Purpose
Collates multiple copies of documents when enabled.
Choices
Enabled (selected)—All pages of the document are printed before the next
copy is printed.
Disabled—All copies of each page are printed before the next page is
printed.
Default
Disabled
Hot Key
ALT+E
"#
$
Purpose
Prints pages in reverse order when enabled.
Choices
Enabled (selected)—All pages of the document are printed before the next
copy is printed.
Disabled—All copies of each page are printed before the next page is
printed.
Default
Disabled
Hot Key
ALT+R
$
Purpose
Sets the orientation (printing direction) of the print media.
Choices
Portrait—Printing along the short edge of the page (vertical page
orientation)
Landscape—Printing along the long edge of the page (horizontal page
orientation)
Default
Portrait
Hot Keys
Portrait—ALT+O
Landscape—ALT+L
)$*.&
%($$
)*3!42
1#$
##
%&!'(
Purpose
Allows you to specify whether and how your print job will be duplexed.
Duplexing is printing on both sides of each page.
Choices
None
Flip on Long Edge—Prints flipped horizontally on the long edge as in a
loose-leaf notebook.
Flip on Short Edge—Prints flipped vertically on the short edge as in a
clipboard.
Default
None
Hot Keys
ALT+X selects the Duplex Options list. From there, use the ALT-down arrow
or ALT-up arrow keys to choose the required option.
Notes
Auto duplexing is supported only on the DeskLaser Duplex Model.
Duplex options are only available when Standard is the Paper Type.
)*+++%
The About... button displays the copyright and version number of the printer driver.
%
The Cancel button allows you to cancel your changes and exit from the Properties
window.
,%
The Help button gives you access to online help.
$-%
The OK button allows you to save your changes and exit from the Properties window.
"!.
%
The Restore Defaults button on the Paper tab allows you to restore all of the tabs to
their default settings (with the exception of the Resolution option on the Quality tab).
!
The Quality tab allows you to provide information about the quality of halftoning and
resolution. Document Type settings on the Paper tab are essential for customization of
the Quality tab.
»
Note: Settings chosen on the Quality and Image Settings tabs override settings
automatically selected by a Document Type on the Paper tab.
!"#
%($$
)*3!42
1#$
##
,
.
Purpose
Selects the style of halftoning to use.
Choices
Line art pattern—Provides a halftone designed specifically for printing
business graphics.
Fine pattern—Provides a higher line frequency halftone than Coarse pattern
for more detail in graphics and images but fewer shades of color.
Coarse pattern—Provides a general-purpose halftone with line frequency
suitable for printing most text, graphics, and images at 600 dpi.
Air Brush—Provides a high-speed error diffusion-type halftoning for printing
photographs or pictures that don’t have sharp, well-defined edges at 600
dpi.
Default
Coarse pattern
Hot Key
ALT+T—Use the arrow keys to select other radio buttons
ALT+R—Resolution
Notes
The image to the right of Halftoning radio buttons changes to reflect your
choice.
These choices are grayed out if Auto is the selected Document Type on the
Paper tab. See “Document Type” on page 2-32.
"
Purpose
Selects print resolution to use.
Choices
600 x 600 dots per inch
300 x 300 dots per inch
/
Default
600 x 600 dots per inch
Hot Key
ALT+R—Use the arrow key to select another radio button.
%($$
)*3!42
1#$
##
%
The Cancel button allows you to cancel your changes and exit from the Properties
window.
,%
The Help button gives you access to online help.
$-%
The OK button allows you to save your changes and exit from the Properties window.
"!.
%
The Restore Defaults button on the Quality tab allows you to restore the options on
this tab to their default settings.
)$*.&
0
The Image Settings tab allows you to provide settings for color format, image brightness and contrast, color balance, and color matching. Document Type settings on the
Paper tab are essential for customization of the Image Settings tab.
»
&'(
Note: Settings chosen on the Image Settings and Quality tabs override settings
automatically selected by a Document Type on the Paper tab.
!"#$%
%($$
)*3!42
1#$
##
/
Purpose
Selects color or monochrome printing.
Choices
Mono—Monochrome (black only)
CMYK—Full color (cyan, magenta, yellow, and black)
Default
CMYK
Hot Key
ALT+F
Notes
You must select a Document Type other than Auto on the Paper tab to
activate these settings.
This Mono setting is designed only for text. If your document also contains
graphics, choose the Mono Document Type on the Paper tab for grayscale
printing. See “Document Type” on page 2-32.
0
Purpose
Allows you to customize the brightness (lightness and darkness) and contrast of
an image.
Brightness—Increase for a lighter print; decrease for darker.
Contrast—Increase for higher contrast print; decrease for lower contrast.
Choices
-50% (darkest) to +50% (lightest)
Default
The center setting (0%) on each slider bar.
Hot Key
Brightness—ALT+I (capital i)
Contrast—ALT+O
Notes
The settings on the slider bars can be changed using the arrow keys on the
keyboard.
%
Purpose
Allows you to customize the
Saturation
Red Strength
Green Strength, and
Blue Strength
of an image.
Choices
-50% (least) to +50% (most)
)$*.&
+
%($$
)*3!42
1#$
##
Default
The center setting (0%) on each slider bar.
Hot Key
ALT+C—This hot key takes you to the Saturation choice in Color Balance.
From there, use ALT+C again to tab down to choose the other sections such
as Red Strength.
Notes
The Color Match button toggles between Color Match and Color Balance
options.
These options are not available if Mono is selected in the Color Format
section of this tab or if Mono or Auto is selected in the Document Type
section of the Paper tab.
The settings on the slider bars can be changed using the arrow keys on the
keyboard.
Purpose
Selects the method for color matching.
Choices
Disabled
Use Windows’ matching—Used in Windows 95/98 and ICM-based
applications (for example, PhotoShop and CorelDRAW). The ICC profile
is located in the C:\WINDOWS\SYSTEM\COLOR directory under the
name of QMC2DL.ICM
Use Driver’s matching
If you choose either Use Driver’s matching or Use Windows’ matching, three
other selections are available:
Match for business graphics
Match for photo images
Match for computer art
Default
Default defined by the Document Type selected on the Paper tab:
Disabled—Disables Color Matching
Use Driver’s matching, or
Use Windows’ matching
Hot Key
!2
ALT+L—Takes you to the color matches; there are no hot keys for the last
three selections
%($$
)*3!42
1#$
##
Notes
The Color Balance button toggles between Color Match and Color Balance
options.
All choices are grayed out if Mono is the Document Type or if Mono is
selected in the Color Format section of the Image Settings tab. The last three
choices are grayed out if Auto is the Document Type or if Disabled is chosen
for Color Match. See “Document Type” on page 2-32.
%
The Cancel button allows you to cancel your changes and exit from the Properties
window.
%
%
This returns you to the Color Match button.
%
This returns you to the Color Balance button.
,%
The Help button gives you access to online help.
$-%
The OK button allows you to save your changes and exit from the Properties window.
"!.
%
The Restore Defaults button on the Image Settings tab allows you to restore the
options on this tab to their default settings. The Restore Defaults also depends on the
settings on the Paper tab.
)$*.&
!
$.
'"
The QMS magicolor 2 DeskLaser allows printing via two communication protocols:
Ethernet
Users who intend to print over a network using TCP/IP need to install the QMS
Network Print Monitor. See “Install a Network Print Monitor” on page 35 in the
QMS magicolor 2 DeskLaser Setup Guide.
Parallel
See “Sharing Over a Parallel Connection” on page 2-42.
'("
!"#$"%
»
!
Note: This section explains how to configure the QMS magicolor 2 DeskLaser printer
driver in Windows 95/98 for sharing. If you’re using Windows NT 4.0, refer to
“Windows NT 4.0” on page 2-44.
1
From the Windows 95/98 Start menu choose Settings.
2
From the Settings menu choose Control Panel.
3
Double-click on the Network.
4
In the Network window, choose the Access Control tab.
5
Select your access control: share-level or user-level.
Share-level access control enables you to supply a password for each shared
resource.
User-level access control enables you to specify users and groups who have
access to each shared resource.
If your printer is connected to your workstation via the parallel interface and you want
to let others print to it, you have to set it up as a shared printer:
»
1
From the Windows 95/98 Start menu choose Settings.
2
From the Settings menu choose Printers.
3
In the Printers window, select the QMS magicolor 2 DeskLaser icon.
4
From the File menu choose Sharing.
Note: If Sharing isn’t available, do the following to add File and Printer Sharing
services:
a
From the Windows 95/98 Start menu choose Settings.
b
From the Settings menu choose Control Panel.
c
Open the Network folder.
$1&
.%
d
On the Configuration tab, choose the Add button.
e
In the Select Network Component Type window, select Service, and then
choose the Add button.
f
In the Select Network Service window, select Microsoft, and then select the
File and Print sharing entry that matches your network.
g
Choose the OK button, and follow the instructions.
h
Restart your computer for the changes to take effect.
5
On the Sharing tab, select the Shared As: radio button.
6
If you use
a
Share-level access control, you can enter a
Share name—a name for the printer.
You’ll use this name and the computer’s name to identify the printer.
Comment—a location or other description.
This is optional, but it will help others locate and identify your printer.
Password
b
7
User-level access control, you can choose the Add button and then select
specified users to share the printer.
Choose the OK button.
Verify that the listed users are correct.
8
Choose the OK button.
An outstretched hand is added to the bottom of the printer’s icon in the printer
folder to indicate that the printer can be shared.
!&'()
»
!!
Note: This section explains how to configure the QMS magicolor 2 DeskLaser printer
driver in Windows NT 4.0 for sharing. If you’re using Windows 95/98, refer to
“Windows 95/98” on page 2-42. Printer sharing can be used only with attached
computers that are running either Windows 95/98 or Windows NT 4.0.
$1&
.%
If your Windows NT 4.0 printer driver was not configured for sharing when originally
installed, use the following instructions to add sharing:
1
From the Windows NT Start menu choose Settings. Then choose Printers.
2
In the Printers window, select the QMS magicolor 2 DeskLaser icon.
3
From the File menu, choose Properties.
4
From the Properties dialog box, choose the Sharing tab.
5
After the Sharing tab displays, select Shared As.
6
In the Share Name edit box, type the name of the printer.
You’ll use this name and the computer’s name to identify the printer.
7
If you’re sharing your printer with a Windows NT 4.0 workstation, skip to
step 9 below.
8
If you’re sharing your printer with a Windows 95/98 workstation, perform
these steps:
a
In the Alternate Drivers list box, select the Windows 95/98 operating system
and choose OK.
b
If the operating system on your PC does not have the QMS magicolor 2
DeskLaser printer driver for Windows 95/98, you will be prompted to install it.
Insert the QMS magicolor 2 DeskLaser Documentation and Software
CD-ROM, and choose OK.
The required files are copied to the appropriate directory.
9
On the Security tab, select Permissions.
10 On the Printer Permissions window, select Add.
11 Select user(s) to add, and their type of access.
12 Choose OK to accept the changes.
Verify that the list is correct.
13 Choose OK to close Printer Permission.
14 Choose OK to close the Properties window.
)$*.&
!'
$1&
.%
*+
123453
Use the following instructions to print to a printer that someone else has already set
up as a shared printer:
1
From the Windows 95/98 Start menu, choose Settings.
2
From the Settings menu, choose Printers.
3
In the Printers window, select the printer driver you are using.
4
From the File menu, choose Properties.
5
From the Properties dialog box, choose Add Port.
From the Add Port window, make sure Network is selected.
6
Choose Browse.
7
In the Browse list, double-click on the computer that is sharing the printer.
Note: You also could click on the “+” to the left of the computer name.
»
8
Choose the printer you want to connect to.
9
Choose OK.
10 Choose OK on the Add Port window to select the new port.
11 Choose OK on the Details tab to save the changes.
12 Print to this printer just as if it were connected directly to your computer.
12+
Use the following instructions to print to a printer that someone else has already set
up as a shared printer:
!/
1
From the Windows NT Start menu, choose Settings.
2
From the Settings menu, choose Printers..
3
In the Printers window, select the printer driver you are using.
4
From the File menu, choose Properties.
5
On the Ports tab, choose Add Port.
$1&
.%
6
On the Printer Ports window, select Local Port from the list of available
ports.
7
Choose OK.
8
On the Port Name window, type the path to the shared printer using the convention
\\host-name\shared-printer-name
where host-name is the name of the computer where the driver is shared from
and the shared-printer-name is the name the driver is shared as.
9
Choose OK to accept the new port name.
10 Choose Close on the printer ports window to close the window.
11 Choose OK on the Properties window to save the changes.
12 Print to this printer just as if it were connected directly to your computer.
,-
You have two options for removing users from sharing: remove individual users from
sharing and cancel all sharing.
"#0#
.
123453
1
From the Windows 95/98 Start menu, choose Settings.
2
From the Settings menu, choose Printers.
3
In the Printers window, select the QMS magicolor 2 DeskLaser icon.
4
From the File menu choose Sharing.
Note: You may also right-click the icon to choose Sharing.
»
5
Select the user(s) to remove.
6
Choose the Remove button to remove the specified user(s).
Their access rights show as Deleted.
7
Choose the OK button to close the Properties window.
)$*.&
!0
$1&
.%
)
6123453
When you shut down the computer or restart, the printer will no longer be shared.
You may also cancel all sharing without having to restart.
1
From the Windows 95/98 Start menu, choose Settings.
2
From the Settings menu, choose Printers.
3
In the Printers window, select the QMS magicolor 2 DeskLaser icon.
4
From the File menu, choose Sharing.
5
On the Sharing tab, choose the Not Shared radio button.
6
Choose the OK button.
The outstretched hand is removed from the bottom of the printer’s icon in the
printer folder.
"#0#
.
12+
1
From the Windows NT 4.0 Start menu choose Settings.
2
From the Settings menu choose Printers.
3
In the Printers window, select the QMS magicolor 2 DeskLaser icon.
4
From the File menu, choose Properties.
Note: You may also right-click the icon to choose Properties.
»
!-
5
On the Security tab, choose the Privileges button.
6
Select the user(s) to remove.
7
Choose the Remove button to remove the specified user(s).
8
Choose the OK button to accept the changes.
9
Choose the OK button to close the Properties window.
$1&
.%
)
612+
When you shut down the computer or restart, the printer will no longer be shared.
You may also cancel all sharing without having to restart.
1
From the Windows NT 4.0 Start menu, choose Settings.
2
From the Settings menu, choose Printers.
3
In the Printers window, select the QMS magicolor 2 DeskLaser icon.
4
From the File menu, choose Sharing.
5
On the Sharing tab, choose the Not Shared radio button.
6
Choose the OK button.
The outstretched hand is removed from the bottom of the printer’s icon in the
printer folder.
)$*.&
!+
$.
)"'
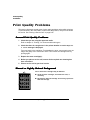
The QMS magicolor 2 DeskLaser printer Status Monitor displays a graphic with continuous detailed reporting of the status of your print job. This Status Monitor is also
referred to as the Despooler.
»
Note: The first time you use the QMS magicolor 2 DeskLaser printer, the printer
Status Monitor appears by default.
!"#$"%
7
The Status Monitor observes a printer which has bidirectional communication with a
computer.
If you prefer, you can use the QMS Network Print Monitor described in “Using the
QMS Network Print Monitor” on page 2-56.
You can run one or both monitors.
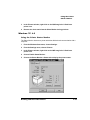
'2
1
From the Windows Start menu, choose Settings.
2
From the Settings menu, choose Printers.
3
In the Printers window, right-click on the QMS magicolor 2 DeskLaser
printer icon.
4
Make your option selection.
Run Status Monitor.
Show Monitor during print.
The printer Status Monitor window is shown below.
1
Choose the Cancel button to cancel printing.
The following screen appears:
$.
2
Choose the Pause button to pause printing.
Note: The button icon changes shape and functions as a Restart button.
»
3
To restart a paused job, use the Restart button.
Note: Requeue is available only for Windows 3.1.
»
4
Choose the About... button to display information about the Status Monitor
Despooler.
!
*123453
'
1
From the Windows Start menu, choose Settings.
2
From the Settings menu, choose Printers.
$.
3
In the Printers window, right-click on the QMS magicolor 2 DeskLaser
printer icon.
4
Remove the check mark from the Show Monitor during print box.
!&'()
7
The Status Monitor observes a printer which has bidirectional communication with a
computer.
1
From the Windows Start menu, choose Settings.
2
From the Settings menu, choose Printers.
3
In the Printers window, right-click on the QMS magicolor 2 DeskLaser
printer icon.
4
Choose Enable Status Monitor.
5
Choose the Status Monitor’s Status tab to display the printer status.
)$*.&
'
$.
If you choose the Pause Job button, it becomes Resume Job.
6
Choose the Status Monitor’s Options tab to select options:
a
'!
Select Start Minimized to display the minimized Status Monitor button in the
status area.
$.
b
Select AutoClose at End Job to close the Status Monitor at the end of a print
job.
c
Select Auto Run Status Monitor to run the Status Monitor automatically.
d
Choose the Version Details button to display version information for the
Despooler.
If you prefer, you can use the QMS Network Print Monitor described in “Using the
QMS Network Print Monitor” on page 2-56.
You can run one or both monitors.
!
*12+
1
From the Windows Start menu, choose Settings.
2
From the Settings menu, choose Printers.
3
In the Printers window, right-click on the QMS magicolor 2 DeskLaser
printer icon.
4
Uncheck the Enable Status Monitor.
5
From the Options tab, remove the check marks from the AutoClose at End
Job and the Auto Run Status Monitor boxes.
)$*.&
''
$
3*.
)*'#+"
The QMS Network Print Monitors (QMSMON) for Windows 95/98 and Windows NT
are designed specifically for QMS printers using TCP/IP protocol to transport print
jobs and Print Manager to access printer status information.
The Print Monitor’s Print Spooler (both workstation and server versions) controls the
printing environment for both local and remote print jobs submitted through shared
resources via TCP/IP. The Print Spooler “monitors” or “despoolers” are configured to
service print jobs in a particular queue.
!"
"# "
$
!"
$
Caution: When printing over the Ethernet interface, do not cancel a print job in the
QMS Print Monitor for Windows 95/98 while the job is paused.
'/
$
3*.
Status Component
This component obtains information from the printer, such as print job “go/nogo”
and error or warning conditions. Status information displays in Print Manager
through the print queue status dialog box. Status information comes from either
the Windows Print Spooler, the QMS Network Print Monitor, or the printer,
depending on where the job is in the printing process. See chapter 8,
“Troubleshooting,” for more information on status messages.
Send Component
Note: The QMS Network Print Monitor uses TCP/IP socket 35 for highperformance data transfer.
»
This component transports print jobs to a specific QMS print device. When a job is
sent to a print device by the QMS Network Print Monitor, it utilizes all allocated
Windows operating system resources to transport the job. If a connection is
broken while a job is being transported, the monitor gives control back to the Print
Monitor Print Spooler. Any job sent to the printer while it is recovering from the
break in communication is flushed from the Windows print queue.
Configuration Component
This component configures the port name, Internet address, time delays, and
problem sound alert. It consists of the Add QMS Port and Configure QMS Port
dialog boxes. All configuration changes made via this component are
automatically recorded in the Windows system registry.
See chapter 8, “Troubleshooting,” for more information on the status messages
that display.
12+
1
From the Start menu, choose Settings.
2
From the Settings menu, choose Printers.
)$*.&
'0
$
3*.
3
Double-click the printer icon.
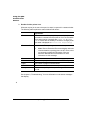
Whenever a print job is sent to that port, its status is reported in a status window:
The following table explains the status window field names:
Field Name
Status
Document Name
Explanation
The current state of the print job in process. A print job either
proceeds in a normal error-free state or it is in an error state.
Error states can be nonvolatile like PAPER OUT or PAPER
JAM or volatile like the inability to connect to a target printer
(this state is displayed as Printer Not Responding).
The document’s title (it may also be the filename).
»
Note: Remote Downlevel Document displays when the
client workstation, spooling jobs to an NT server, does
not transmit complete job information. See your
Microsoft Windows NT documentation for more
information on this message.
Owner
The document owner.
Printed at
The time the print job is submitted to the NT Print Spooler.
Pages
The number of pages in the document.
Size
The document size.
Priority
The document priority in the queue. Range of Priorities
is 1-99.
See chapter 8, “Troubleshooting,” for more information on the status messages
that display.
'-
%
1 1 1
“Loading the Media Cassette” on page 3-2
“Using Media Other than Plain Paper” on page 3-6
“Media Sizes and Imageable Areas” on page 3-14
“Storing Media” on page 3-18
“Using Toner Cartridges” on page 3-19
“Replacing a Toner Cartridge” on page 3-21
“Printing on Both Sides (Duplex Printing)” on page 3-23
“Cancelling a Print Job” on page 3-25
This chapter describes how to refill the media cassette, print on different types
of media, prevent media jams, and cancel a print job, as well as how to replace a toner
cartridge.
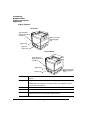
Two types of media cassettes are available for the magicolor 2 DeskLaser: the
standard letter/A4 cassette and the optional universal cassette. Both cassettes
work in either the upper or lower input feeder location. In addition, the printer processes media in one of three modes—Standard [Plain Paper], Thick Stock, and Transparency—to adjust for the fusing rate for envelopes, labels, glossy stock, thick stock,
transfer media, and transparency media.
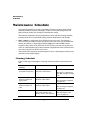
,
This section discusses loading the media cassette with paper. If you’re using
another type of media, refer to “Using Media Other than Plain Paper” on page 3-6
for information.
..
Input
Type
Cassette
Letter/A4 or universal
Location
Upper input feeder or optional lower input feeder for standard
(plain paper) media
Capacity
250 sheets of 20 lb (75 g/m 2) paper; capacity for other weights
varies accordingly
Any standard or recycled office paper suitable for plain-paper laser printers, such as
– Xerox 4024
– Hammermill Laser Print
Letterhead/memo paper
Weight
Long-grain plain paper, 16–24 lb bond (60–90 g/m2)
Print Mode
Standard (Plain Paper)
$
%
Duplexing
Supported up to 28 lb bond (105 g/m²). See “Printing on Both Sides
(Duplex Printing)” on page 3-23.
Notes
We do not recommend using perforated or prepunched paper.
You should test any stock thicker than 24 lb (90 g/m²) to ensure that its performance is acceptable.
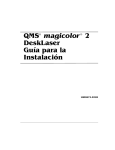
1
Take a stack of about 250 sheets (½ ream).
Note: Don’t unwrap the paper above the printer as this might cause paper
particles to fall into the printer.
»
2
Holding the stack with one hand, fan the paper with the other.
This gets air through the sheets and prevents static buildup.
3
Take off the top and bottom sheets.
Residual glue buildup on these sheets may cause media jams.
.$
$
%
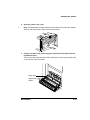
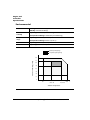
/
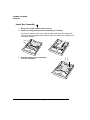
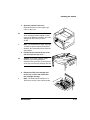
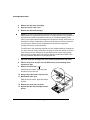
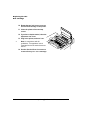
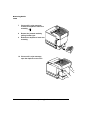
1
Remove the media cassette from the printer.
2
Adjust the media guides to fit the size media you’re loading.
Squeeze the retainers at the ends of the left width guide and/or the length guide,
move the guide to the appropriate media size (sizes are listed on the cassette), and
release the retainers.
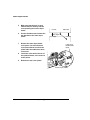
3
!
Push the media pressure plate down
to lock it in position.
$
%
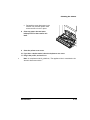
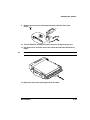
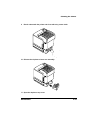
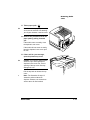
4
5
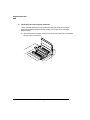
Load the media.
A fill limit mark is provided on the
inside left side of the cassette. The
media cassette holds 250 sheets of
20 lb bond (75g/m2) paper. (Paper
is packed in reams of 500 sheets.)
Do not overfill the cassette.
The printing side of the paper
should face up. An arrow on the
paper package label indicates the
face-up side of the paper.
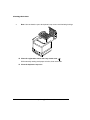
Slide the media cassette back into the printer.
-/
Formatting
Format letterhead or memo data within your application. Try printing your data
on a plain sheet of paper first to check placement.
Input
Cassette
Letter/A4 or universal
Location
Upper or lower input feeder
Capacity
Up to 250 sheets, depending on the thickness of the media
Type
See “Paper Specifications” on page 3-2.
Weight
See “Paper Specifications” on page 3-2.
Print Mode
Standard
Notes
Check your application documentation for other information about printing on
letterhead and memo media.
.$
'
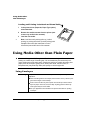
$1
..#
»
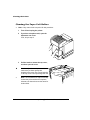
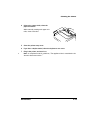
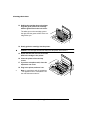
1
In the printer driver (Paper tab, Paper Type option),
select Standard.
2
Remove the media cassette from the printer (and
remove any media in the cassette).
3
Load the new media.
Note: Load the media printing-side up (1-sided
printing) or printing-side down (2-sided printing) with
the top of the media (the letterhead or memo
information) toward the back of the cassette.
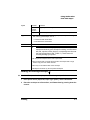
)(""
Caution: Although the QMS magicolor 2 DeskLaser was designed for occasional
printing on a wide range of media types, it is not intended to print exclusively on a
single media type except plain paper. Continuous printing on media other than plain
paper (such as envelopes, glossy stock, labels, thick stock, transfer media, or
transparencies) may adversely affect print quality or reduce engine life.
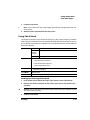
-*
Formatting
Your printer receives the instructions to print on envelopes from your
application.
When formatting data for envelopes, leave at least a 0.16" (4.06 mm) margin from the edges of the envelope.
Print on the front side only. Some parts of the envelope consist of three
layers of paper—the front, back, and flap. Anything printed in these layered regions may be lost or faded.
See your application documentation for specific information on printing
envelopes.
/
$1
..#
Input
Type
Cassette
Letter/A4
Recommended
Location
Upper input feeder only
Capacity
Up to 15, depending on the thickness of the envelopes
Use common office envelopes with diagonal joints, sharp folds and edges,
and ordinary gummed flaps, such as
– Commercial #10: Great White
– International DL: Great White
Print Mode
Notes
Thick Stock
Caution: Choose envelopes without fasteners, clasps,
transparent windows, peel-off strips for sealing, or material that
will melt, vaporize, offset, discolor, or emit dangerous fumes at
the fusing temperature (392° F/200° C). These items will
seriously damage your printer.
Do not print envelopes from the lower input feeder.
Use envelopes with a smooth exterior surface. Envelopes with a rough
surface may jam in the media cassette.
Print only on the address side of the envelope.
Envelopes should be dry. Do not preseal envelopes.
Caution: Envelopes should only be printed from the upper input feeder.
1
In the printer driver (Paper tab, Paper Type option), select Thick Stock.
2
Place the envelopes on a flat surface, and flatten them by pressing down the
corners.
.$
0
$1
..#
3
Flex the envelope stack (including the edges) to
remove any stiffness.
4
Correct any dog-eared corners, and then tap the
envelopes on a flat surface to align them.
5
Remove the media cassette from the printer (and remove any media in the
cassette).
6
Adjust the media guides to the length and width of the envelopes.
Squeeze the retainers at the ends of the left width guide and/or the length guide,
move the guide to the appropriate location (media sizes are listed on the cassette),
and release the retainers.
Note: Make sure the guides are snug enough to keep the envelopes straight, but
not so tight that they buckle the envelopes.
»
7
Place the envelope stack into the cassette with the printing-side up.
Note: Check your application documentation to determine if the flap should be
placed on the left or on the right. You can also print a single envelope to check the
orientation before printing multiple copies.
»
8
Insert the cassette into the printer.
The media cassette must be located in the upper input feeder.
-
$1
..#
9
Open the flap of each envelope immediately (before it cools) after the envelope is delivered to the output tray.
Note: Because the envelopes pass through heated rollers, the gummed area on
the flaps may seal. Using envelopes with emulsion-based glue avoids this
problem.
»
-0.1
Formatting
Format the information to be printed on the glossy (book) stock within your
application. Try printing your data on a plain sheet of paper first to check
placement.
Input
Cassette
Letter/A4 or universal
Recommended
Location
Upper input feeder
Capacity
Up to 50 sheets, depending on the thickness of the glossy stock
Type
We recommend
– Warren Spectratech Coated Lustro Laser Gloss
Weight
80 lb book (118 g/m2)
Print Mode
Thick Stock
1
In the printer driver (Paper tab, Paper Type option), select Thick Stock.
2
Remove the media cassette from the printer (and remove any media in the
cassette).
3
Load the new media.
4
Slide the media cassette back into the printer.
.$
+
$1
..#
Formatting
Format label data within your application. Try printing your data on a plain
sheet of paper first to check placement.
Input
Cassette
Letter/A4 or universal
Recommended
Location
Upper input feeder
Capacity
Up to 50, depending on the thickness of the labels
Type
Use only labels recommended for laser printers, such as
– Avery 5260
Weight
24–42 lb (90–157 g/m2)
Print Mode
Thick Stock
Notes
Adhesive label stock should have pressure-sensitive (peel and stick) adhesive backing.
Use only label stock in sizes letter or A4.
A label consists of a face sheet (the printing surface), adhesive, and a carrier sheet.
– The face sheet must adhere to the plain paper specifications listed in
“Paper Specifications” on page 3-2.
– The face sheet surface must cover the entire carrier sheet, and no adhesive should come through on the surface.
– The adhesive and carrier sheet must withstand the fusing temperature
(392° F/200° C).
Avoid using labels with exposed adhesive; it may stick to the toner cartridge or the fixing roller, causing labels to peel off and media jams to
occur.
Check your application documentation for other information on printing
labels.
2
1
In the printer driver (Paper tab, Paper Type option), select Thick Stock.
2
Remove the media cassette from the printer (and remove any media in the
cassette).
$1
..#
3
Load the new media.
Note: If your label stock has a top-of-page, place the top-of-page toward the rear
of the printer.
»
4
Slide the media cassette back into the printer.
The number of sheets of up to 43 lb bond (163 g/m²), 60 lb cover (162 g/m²), and 90 lb
index (163 g/m²) thick stock a media cassette can hold should be tested by the user to
ensure that its performance is acceptable. Do not exceed the fill level on the inside left
side of the cassette.
Input
Type
Cassette
Letter/A4 or universal
Recommended
Location
Upper input feeder
Capacity
Capacity varies according to media used
Thick stock, such as
– Weyerhaeuser Cover/Card
– Hammermill ColorCopyCover
– Warren Spectratech Index
Weight
Long-grain thick stock, up to 43 lb bond (163 g/m²)/60 lb cover (162 g/m²)/
90 lb index (163 g/m²)
Print Mode
Thick Stock
Notes
You should test any thick stock to ensure that its performance is acceptable.
1
In the printer driver (Paper tab, Paper Type option), select Thick Stock.
2
Remove the media cassette from the printer (and remove any media in the
cassette).
Caution: Do not mix thick stock with any other media in the same cassette, as this
will cause printer jamming.
3
Load the new media.
.$
$1
..#
-&
Formatting
Format the information to be printed on the transfer media within your
application. Try printing your data on a plain sheet of paper first to check
placement.
Input
Cassette
Letter/A4 or universal
Recommended
Location
Upper input feeder
Capacity
Up to 50 sheets, depending on the thickness of the transfer
media
Type
We recommend
– Conde Systems LaserMprints
Print Mode
Thick Stock
1
In the printer driver (Paper tab, Paper Type option), select Thick Stock.
2
Remove the media cassette from the printer (and remove any media in the
cassette).
3
Load the new media.
-&
.
Formatting
Format the information to be printed on the transparencies within your
application. Try printing your data on a plain sheet of paper first to check
placement.
Input
Cassette
Letter/A4 or universal
Recommended
Location
Upper input feeder
Capacity
Up to 50 sheets, depending on the thickness of the
transparencies
»
Note: If you have problems feeding 50 sheets, try loading
only 5 to 10 sheets at a time. Loading a large number of
transparencies at a time may cause static buildup, thus
causing feeding problems.
$1
..#
Type
Use any transparencies (also known as OHP film) that meet normal photocopier standards and that can withstand the fusing temperature (392° F/
200° C). We recommend
– Xerox 3R3117
– 3M CG3700
– 3M CG3710
Use only transparency sizes letter and A4.
Weight
24–41.75 lb (90–157 g/m2)
Print Mode
Transparency
Notes
Do not fan transparencies before printing.
Be sure to feed the striped edge as the trailing edge, although the transparency vendor may recommend that the striped edge is first into the
printer.
Keep the media path clean. Transparencies are especially sensitive to a
dirty media path. If there are shadows on either the top or the bottom of
the sheets, refer to chapter 6, “Maintenance,” for instructions on how to
clean the printer.
Check your application documentation for other information about printing
on transparencies.
Remove transparencies from the output tray immediately to avoid static
buildup.
1
In the printer driver (Paper tab, Paper Type option), select Transparency.
2
Remove the media cassette from the printer (and remove any media in the
cassette).
3
Load the new media.
.$
Your printer supports full-color printing on several media sizes. Each media size has a
certain imageable area, the maximum area on which the printer can print clearly and
without distortion. This area is subject to both hardware limits (the physical media size
and the margins required by the printer) and software constraints (the amount of
memory available for the full-page frame buffer).
»
Note: All media is fed in the portrait (short edge first) orientation.
»
Note: The standard letter/A4 and universal cassettes are interchangeable between
the upper and the lower input feeders.
Media
Media Size
Inches
Imageable Area*
Millimeters
Inches
Millimeters
Input
Source/
Location**
A4
8.2x11.7
210.0x297.0
7.87x11.30
200.0x287.0
L or U
A5
5.8x8.3
148.0x210.0
5.40x7.87
138.0x200.0
L or U
B5 (ISO)
6.9x9.8
176.0x250.0
6.50x9.45
166.0x240.0
L or U
B5 (JIS)
7.2x10.1
182.0x257.0
6.78x9.72
172.0x247.0
L or U
Com 10
4.1x9.5
105.0x241.3
3.74x9.11
95.0x231.3
L or U/
Upper only
DL Envelope
4.3x8.7
110.0x220.0
3.93x8.27
100.0x210.0
L or U/
Upper only
Executive
7.3x10.5
184.0x267.0
6.85x10.12
174.0x257.0
L or U
Folio
8.5x13.0
215.9x330.2
8.02x12.61
205.9x320.2
U
Foolscap
8.0x13.0
203.2x330.2
7.61x12.61
193.2x320.2
U
Legal
8.5x14.0
215.9x355.6
8.11x13.61
205.9x345.6
U
Letter
8.5x11.0
215.9x279.4
8.11x10.61
205.9x269.4
L or U
SP Folio
8.5x12.4
215.9x315.0
8.11x12.00
205.9x305.0
U
Statement
5.5x8.5
139.7x215.9
5.11x8.11
129.7x205.9
L or U
UK Quarto
8.0x10.0
203.2x254.0
7.60x9.61
193.0 x244.0
L or U
* The imageable area is reduced by 2mm for the front side of a duplexed page.
** L = Letter/A4 cassette
U = Universal cassette
»
Note: The nonguaranteed print areas are areas on which you can print, but image
quality in these areas is less than perfect.
!"
#$%&
$ !"
!"
!"
!"
#%
$
!"#
»
#%
!"#
Note: Media feed direction determined by your application.
$
Margins are set through your application. Some applications allow you to set custom
page sizes and margins while others have only standard page sizes and margins from
which to choose. If you choose a standard format, you may lose part of your image
(due to imageable area constraints). If you can custom-size your page, use those
sizes given for the imageable area for optimum results.
If for any reason, you need to change the image alignment, adjust the margins or page
size through your application.
2
2
Ensure that the media size matches the cassette size (for example, letter/A4 media
must be loaded only when the cassette is set to letter/A4 size). Since the cassette
sends a media size signal to the printer controller, using a wrong size media could
cause a media jam, incorrect positioning of the image, or a clipped image.
'
How you store paper and other media can make a big difference in print quality and
printer operation. Improperly stored media increases the chance of jams during printing and can drastically affect the appearance of your work. Keep media in good condition by storing it
-
In its wrapper
On a flat surface
In a closed cabinet
In a cool, dry area
Characters and images are created in your laser printer through a process that applies
toner (made of carbon particles) to the page in the printer’s fusing unit. When an
image is formed, a positive electrical charge is applied to transfer the image to the
page. The toner cartridge contains the toner and the photosensitive drum (which functions like photographic film) needed to operate the laser printer.
A toner cartridge contains enough toner to print the following number of letter/A4size pages:
Color
Black
Rated life @ normal 5% page* coverage
10,000 pages
Yellow
6,000 pages
Magenta
6,000 pages
Cyan
6,000 pages
When toner runs low in a cartridge, x toner Empty displays in the message window. It’s your option whether to continue printing; usually, parts of the page print
lighter.
* A plane is a single pass of the OPC belt (one toner color). For example, a one-color,
single-sided (simplex) print job makes one pass (one plane), and a two-color print job
makes two passes (two planes). A single-sided color page (also called a face) consists of
four passes (or planes) of the OPC belt, since most color print jobs use all four toner colors. A two-sided (also known as duplex or two-faced) color page may consist of up to
eight passes of the OPC belt, since most color print jobs use all four toner colors.
Consumable life is expressed in simplex pages (1 face). A duplex page (2 faces) is equivalent to two simplex pages.
Sometimes, you can increase the life of the toner cartridge by taking it out of the
printer and redistributing the toner—hold the cartridge with both hands and then gently rock it from side-to-side (as you do for a new cartridge) five or six times horizontally.
Caution: Do not hold the toner cartridge vertically.
If the x toner Empty message remains in the message window, you must replace
the toner cartridge.
The printer stops 330 pages after detecting that toner in a cartridge is low. x toner
Empty displays in the message window.
Refilled toner cartridges may produce variations in toner quality and reliability and
may reduce the print quality of your documents. In addition, toner leaks affect your
warranty.
Choosing the right consumables for your QMS magicolor 2 DeskLaser not only
increases its reliability and performance, but also minimizes the risk of damage. Only
QMS toner cartridges are designed to meet the exact specifications of your QMS
printer, guaranteeing maximum performance, efficiency, and long life.
In the US, call 1 (800) 523-2696 for information on ordering toner cartridges and other
consumables. In other countries, see appendix A, “QMS Customer Support,” for the
telephone number of the QMS office nearest you.
Keep toner cartridges in their packaging until you’re ready to install them.
Store toner cartridges in a cool, dry location away from sunlight (due to heat). The
maximum storage temperature is 95 ° F (35 ° C) and the maximum storage humidity is 80% without condensation.
Keep toner cartridges level during storage. Do not stand or store cartridge on their
ends, hold them vertically, or turn upside down; the toner inside the cartridges
may become caked or unequally distributed.
6#
$
%$
Keep toner cartridges away from salty air environments and corrosive gases such
as aerosols.
Keep toner cartridges away from disk drives and floppy disks. The magnets in the
cartridge can damage stored data.
.
Your printer uses four toner cartridges: black, yellow, magenta, and cyan.
1
Open the printer’s front cover.
2
Remove and discard the empty toner cartridge.
Caution: Put the old toner cartridge in a trash receptacle. Do not dispose of it by
burning.
3
Remove the toner cartridge from its
shipping carton.
4
Distribute the toner in the cartridge.
Holding a cartridge with both hands,
gently rock it five or six times horizontally.
Caution: Do not hold the toner
cartridge vertically.
Pull the tab to remove the tape.
.$
6#
$
%$
5
Remove the protective cover.
Caution: Each toner cartridge has a colored label that corresponds to a colored
label to the right of the cartridge slots. Always install the toner cartridge in the slot
with a label of the same color. If a toner cartridge doesn’t slide in easily, don’t
force it.
6
Install the toner cartridge.
Align the toner cartridge with the cartridge guides, and gently push the cartridge into the printer until you begin to
feel resistance. Then pull the cartridge
back about 1/4 inch.
»
Caution: Do not push the toner
cartridge in until you hear a click. If you
hear a click, you’ve locked in into place
against the OPC belt cartridge and your
prints may be smudged.
Note: While the cartridges may appear
not to be fully inserted, gently closing
the front cover will guide them to their
proper operating position.
#
&
.$7
8#9
.$:
7
Close the printer’s front cover.
8
Check the status message in the message window.
If it reads x toner Empty, use the Service/Clear care menu to remove it.
"/'01
"2
While the basic QMS magicolor 2 DeskLaser does not have a duplexing option, you
can duplex print manually: Print on one side of the paper, remove any curl from the
printed sheet(s), reinsert the printed sheet(s) into the media cassette (blank side up
and the top of the page toward the back of the printer), and then print the second side.
»
Note: Paper jams may occur if the printed sheet(s) reinserted in the media cassette
are not entirely flat.
Duplex printing can be done automatically with the duplex model printer. There is no
need to manually reinsert the paper.
Duplexing is supported for standard media up to 28 lb bond (105 g/m2). The duplexing
options are Flip on Long Edge (prints flipped horizontally as in a loose-leaf notebook)
or Flip on Short Edge (prints flipped vertically as on a clipboard), and are only available when Standard is the Paper Type.
In the printer driver (Paper tab, Duplex Options), select Flip on Long Edge or Flip on
Short Edge.
»
Note: Consumable life is expressed in simplex pages (1 face). A duplex page (2 faces)
is equivalent to two simplex pages.
.$
%.$
"
Caution: Although the QMS magicolor 2 DeskLaser was designed for occasional
printing on a wide range of media types, it is not intended to print exclusively on a
single media type except plain paper. Continuous printing on media other than plain
paper (such as envelopes, glossy stock, labels, thick stock, transfer media, or
transparencies) may adversely affect print quality or reduce engine life.
After 200 1-sided pages (or 100 2-sided pages) of a continuous print run of plain
paper, the magicolor 2 DeskLaser automatically pauses for 3 minutes to cool down the
engine. This occurs for monochrome or color printing.
After this initial cooldown pause, the printer automatically resumes its printing. From
that point forward while doing continuous printing, the 3-minute cooldown pause
occurs every 50 pages until the continuous printing stops.
After an extended idle period, this 50-page interval automatically resets to 200 pages.
This process is provided to maintain the rated duty cycle of the printer and to ensure
reliable printer operation with optimum output quality.
!
%
$.
;
"3
.
To cancel all pages currently received by the printer, press the Cancel key on the
printer control panel.
.
To cancel all pages of the print job not yet received by the printer, cancel the job at
your computer.
Caution: When printing over the Ethernet interface, do not cancel a print job in the
QMS Print Monitor for Windows 95/98 while the job is paused.
Cancelling a multipage print job through the print queue or the application Status Monitor dialog box will also cancel the next print job.
»
Note: Since all pages of a multipage print job may not have been received by the
printer at the time you’re trying to cancel the job, you may have to cancel the job both
at the printer and at your computer.
If you cancel a job and it has not completely spooled, pressing the Cancel key may
also cancel the next job in the queue.
.$
'
%
111
“Message Window” on page 4-2
“Control Panel Indicators” on page 4-3
“Control Panel Keys” on page 4-4
“Printer Configuration” on page 4-5
The control panel, located on the front of the printer, allows you to direct the printer’s
operation. In addition, it displays the current status of the printer, including any condition that needs your attention.
-2
3"+
&
3
(
0
0
(
'
(
-4
5
'4
0
»
Note: Media and Copy keys have no function on DeskLaser and DeskLaser duplex
models.
The message window has two functions:
!
It displays status and error information. See chapter 8, “Troubleshooting,” for an
annotated list of status and error messages.
It displays configuration options. Configuration is discussed later in this chapter.
%.
8
Messages and configuration options can be displayed in six languages. See “Setting
the Message Window Language” on page 4-9 for more information.
Four indicators display printer status information.
Indicator
Off
On
Blinking
The printer is not ready
to print.
The printer has finished The printer is warming
warming up and is ready up, or the printer is in
to print.
Energy Saver mode.
The printer is off line and The printer is on line and
not ready to accept data. ready to accept data.
%.
No problem.
The printer requires
operator attention
(usually accompanied by
a status message in the
message window).
The printer is not
receiving data.
The printer is receiving
data through one or
more of its simultaneous
interfaces (usually
accompanied by a status
message in the
message window).
!
%.<"
23
.3
These keys access frequently used printer functions. (Media and Copy keys have no
function on DeskLaser and DeskLaser duplex models.)
Key
Function
The Online key switches the printer between on-line and off-line status.
When off line, the printer continues printing until it has finished all jobs
received, but it doesn’t accept any new data. Although jobs continue to
compile and print using the data already received, a job may be interrupted,
causing it to wait for more incoming data before printing resumes. Press the
Online key once to put the printer back on line and ready to accept new print
jobs.
If the printer is on line, press the Cancel key to cancel the page currently
printing. To cancel the entire print job, use the printer driver.
If the printer is off line and you’re in the configuration menu, press the Cancel
key to exit from the configuration menu without saving any selections.
!!
.
%($
4.4
453
The Menu, Select, Previous, and Next keys are used in printer configuration. Before
using any of these keys, press the Online key to take the printer off line.
Key
Function
The Menu key provides access to the printer’s configuration menu. First
press the Online key to take the printer off line, and then press the Menu key
to enter the configuration menu.
When you’re changing the printer configuration, press the Menu key to
cancel a change (before pressing the Select keys).
Press the Select key to access a menu or to choose a displayed menu
option.
Press the Previous key to return to the previous selection or option for the
current menu. When changing character information, use this key to return to
the previous choice for the current input character.
Press the Next key to advance to the next selection or option in the current
menu. When changing character information, use this key to advance to the
next choice for the current input character.
-
You can configure the printer in the following ways:
Through the Windows 95/98 or Windows NT 4.0 printer driver—Most of the
configuration is done in this way. See chapter 2, “Working with the Printer Drivers.”
Through the printer control panel—Several options are available. The rest of
this section explains how to use the configuration menu.
%.
!'
.
%($
&
* 2
9
/
$
Idle
1 hr
2 hr
Off
15 min
30 min
45 min
Energy saver
*
English
German
French
Italian
Spanish
Dutch
Language
*
Internet address
*
Subnet mask
000.000.000.000
000.000.000.000
*
000.000.000.000
Router
Service
Pages #
*
xxxx
Clear care
*
Board test
Perform test
*
Test page
*
Ethernet
HW address
!/
Print test page
HW:080086 xxxxxx
HW address
.
%($
..
To access the configuration menu, make sure the printer is idle (Idle displays in the
message window), then press the Online key to take the printer off line (the Online
indicator is not lighted), and finally press the Menu key.
For example, the following table shows how to use control panel keys to access the
printer configuration menu. Press the control panel keys in the order shown. The
printer responds by displaying a status message or configuration menu in the message window.
»
Press this
key
to...
The message window
reads...
Online/
Offline
Turn off the Online indicator and ready the printer for Idle
configuration.
Menu
Access the configuration menu.
Energy saver
Note: The printer must be off line and idle before you can access the configuration
menu.
.
Once you access the configuration menu, you use the control panel keys to move
through the menu. Use the following keys:
Press this key...
to...
Menu
Advance through the available menus: Energy saver, Language,
Internet address, Subnet mask, Router, and Eth. HW address
(Ethernet Hardware address). (Service, Board Test, and Test Page
have different functions. They are explained in chapter 8,
“Troubleshooting.”)
Select
Save an option.
For example, the instructions below show how to change the Energy Saver time interval from 1 hour to 15 minutes.
Press this
key...
to...
Online/
Offline
Turn off the Online indicator and ready the printer Idle
for configuration.
%.
The message window
reads...
!0
.
%($
Menu
Access the Energy saver menu.
Energy saver
Select
Access the Energy saver menu options.
1 hr
Next
(3 times)
Advance through the Energy saver menu options 2 hr
to 15 min.
Off
15 min
Select
Select and save 15 min.
Selected*
Energy saver
* Selected displays for 1.5 seconds before the message window again reads Energy
saver.
*
The QMS magicolor 2 DeskLaser is Energy Star compliant. The Energy Saver menu
allows you to specify whether the printer changes to a low-power state (the engine
remains on, but the fuser turns off) after the printer is inactive for a specified length
of time. When a print job is received, the printer returns to normal power within 70
seconds.
!-
Menu
Energy saver
Choices
Off, 15 min, 30 min, 45 min, 1 hr, 2 hr
Default
1 hr
.
%($
!/
Status and error messages as well as configuration menus and options can be displayed in the message window in one of six languages.
Menu
Language
Choices
Dutch, English, French, German, Italian, Spanish
Default
English
The Internet Address menu allows you to set the printer’s network (Internet) address.
The address is in the format xxx.xxx.xxx.xxx.
Menu
Internet address
Choices
Each xxx.xxx.xxx.xxx triplet can have a value of 001–254.
Default
000.000.000.000
Notes
If you’re using the Ethernet interface, this address must be set, and it
must be unique.
Once you save your changes to this menu, the printer automatically
reboots.
The address must consist only of numbers and periods. Selecting a letter or another symbol results in an error message.
Any xxx value between 1 and 9 must begin with 00 (for example, 1 is
entered as 001, and 9 is entered as 009).
Any xxx value between 10 and 99 must begin with 0 (for example, 10 is
entered as 010, and 99 is entered as 099).
%.
!+
.
%($
1
The Subnet Mask menu allows you to set the printer’s subnet mask. The address is in
the format xxx.xxx.xxx.xxx.
Menu
Subnet mask
Choices
Each xxx.xxx.xxx.xxx triplet can have a value of 001–254.
Default
000.000.000.000
Notes
If subnets are not used with your network, the subnet mask should
remain 000.000.000.000. (Check with your network administrator.) This
allows the interface to provide automatic sensing of gateways. If you
identify a subnet mask, this automatic sensing is disabled.
Once you save your changes to this menu, the printer automatically
reboots.
The address must consist only of numbers and periods. Selecting a letter or another symbol results in an error message.
Any xxx value between 1 and 9 must begin with 00 (for example, 1 is
entered as 001, and 9 is entered as 009).
Any xxx value between 10 and 99 must begin with 0 (for example, 10 is
entered as 010, and 99 is entered as 099).
!2
.
%($
,
The Router menu allows you to set the Internet address of a router. The address is in
the format xxx.xxx.xxx.xxx.
Menu
Router
Choices
Each xxx.xxx.xxx.xxx triplet can have a value of 001–254.
Default
000.000.000.000
Notes
If gateways are not used with your network, the router address should
remain 000.000.000.000. (Check with your network administrator.)
Once you save your changes to this menu, the printer automatically
reboots.
The address must consist only of numbers and periods. Selecting a letter or another symbol results in an error message.
Any xxx value between 1 and 9 must begin with 00 (for example, 1 is
entered as 001, and 9 is entered as 009).
Any xxx value between 10 and 99 must begin with 0 (for example, 10 is
entered as 010, and 99 is entered as 099).
-
.
The Service menu allows you to identify the number of faces that have been printed
(see chapter 8, “Troubleshooting,”) and to clear service messages (see chapter 6,
“Maintenance”).
-6
&
The Board Test menu allows you to test the printer’s flash, Ethernet, ASICS, and
DRAM. For complete information, see chapter 8, “Troubleshooting.”
-&
The Test Page menu allows you to verify that the printer is able to print. For complete
information, see chapter 8, “Troubleshooting.”
%.
!
.
%($
*
7 87
!
9
The Ethernet HW Address menu allows you to override the printer’s factory-default
Ethernet hardware address.
Menu
Ethernet HW address
Choices
000000–EFFFFF
Default
The printer’s serial number in the form
HW:080086 xxxxxx
Notes
Once you save your changes to this menu, the printer automatically
reboots.
Caution: During normal printer operation, you should never have to
use this option. It is available only in the rare event that the printer’s
Ethernet hardware address is lost.
!
%
1 1 1
“Additional Media Cassettes” on page 5-3
“Lower Input Feeder” on page 5-3
“Single In-Line Memory Modules” on page 5-7
“Updating System Software” on page 5-11
“Updating the Printer Drivers” on page 5-12
The following options are available for your printer. Contact your local vendor for purchase information.
Media Cassettes
250-sheet letter/A4 standard media cassette
250-sheet universal cassette (for all supported media sizes)
Lower Feeder
Includes a 250-sheet standard media cassette.
»
Memory
Note: The lower input feeder is optional on the DeskLaser model
without the duplexer.
8, 16, 32 MB DRAM SIMMs
See FAQ 7191 for a list of each approved SIMM, its manufacturers and
part numbers, and the QMS products on which it can be used. You can
access QMS FAQs through the Internet at http://www.qms.com/support/
support_set.htm.
System Software
Updated system software with the latest printer enhancements.
Printer Drivers
Updated printer drivers that support the latest printer enhancements.
%
)
The standard printer configuration provides a 250-sheet letter/A4 standard cassette.
Additional media cassettes provide two main benefits:
Additional supported media sizes (universal cassette)
Expanded flexibility to switch media size, color and type without having to unload
and load media. Keep replacement cassettes close by, and you can easily change
media by slipping one cassette out and another in.
Increased media-feed capacity (requires installation of an optional lower feeder).
45
The lower input feeder increases your printer’s media feed capacity by 250 sheets for
a total of 500 sheets. In addition, the extra standard media cassette allows you to
change easily between different sizes (up to legal), colors, and types of media. The
lower input feeder is positioned under the printer, so no extra space is necessary.
If you have the QMS magicolor 2 CXE or GXE without a duplexer, follow the
instructions below to install the optional lower input feeder.
If you have a QMS magicolor 2 EXD, the lower input feeder is already installed.
+3:
»
Input feeder unit
Letter/A4 standard media cassette
Two small metal brackets with screws
Two plastic side covers (one left and one right)
Note: There may be other pieces shipped with the lower input feeder; however,
they are not required for this procedure.
If anything is missing, call your local vendor. See appendix A, “QMS Customer Support,” for locations and telephone numbers.
.1#
'
*#=
-.1/!
;
1
Remove the feeder from the shipping carton, and place it on a flat surface.
2
Remove any tape and packing material from the feeder.
Save the packing material in case you ever have to move or ship the feeder to a
new location.
/!
;
WARNING! Your printer weighs approximately 66 lbs (30 kg) without consumables.
Your printer plus duplexer weighs approximately 66 lbs (30 kg) without consumables.
Be sure to have help when lifting and moving it. If consumables are installed, be sure
to keep the printer level when moving it to prevent accidental spills.
ACHTUNG! Das Gewicht dieses Druckers beträgt ohne Verbrauchsmaterial
ca. 30 kg. Bitte versuchen Sie niemals, den Drucker alleine anzuheben oder zu
transportieren. Achten Sie bitte darauf, daß der Drucker mit eingebauten
Tonerkartuschen nur waagerecht transportiert wird.
1
Turn off the printer, and then disconnect the power cord and all interface
cables from the printer.
2
Move the input feeder to a table or flat surface near the printer.
WARNING! If consumables are installed, be sure to keep the printer level when
moving it to prevent accidental spills.
ACHTUNG! Achten Sie bitte darauf, das der Drucker mit eingebauten
Tonerkartuschen nur waagerecht transportiert wird.
'!
*#=
3
Set the printer on top of the input
feeder.
Be sure to align the printer and input
feeder as precisely as possible. This
makes the following steps easier.
4
Install the two metal brackets underneath the sides of the printer.
Holding the bracket at a slight angle,
slide it up into the hole underneath the
printer before setting it to vertical.
.1#
6
7
84
027
9
''
*#=
5
Make sure that the hole in each
metal bracket is lined up with the
corresponding hole on the input
feeder.
6
Use the thumbscrews to attach the
two brackets to the lower input
feeder.
7
Remove the lower input feeder
cover plate. You will switch this
cover plate with the one from the
printer after the cables have been
connected.
8
Locate the cable at the left rear of
the optional feeder, and connect it
to the printer.
9
Reinsert the two cover plates.
9
6
7
6
7
'/
$
"
10 Snap the plastic side covers onto
the appropriate sides of the input
feeder.
The input feeder is now installed.
»
Note: If you move the printer with the
lower input feeder attached, lift the unit
by the four bottom corners of the
feeder, not by the feeder's cassette slot
and not by the printer itself.
11 Plug in the printer and turn it on.
»
Note: In compliance with UL
guidelines, “The appliance inlet is
considered to be the main disconnect
device.”
+
64
#3 Single in-line memory modules (or SIMMs) are compact circuit boards with surface-mount memory chips. The QMS magicolor 2 DeskLaser comes with 8 MB RAM.
The QMS magicolor 2 DeskLaser duplex model comes with 32 MB RAM. However,
you can upgrade the printer to a maximum of 64 MB of RAM through the installation of
additional SIMMs. When upgrading, 8, 16, and 32 MB SIMMs with a refresh rate of
2 KHz must be used. Additional memory allows you to print complex images on large
page sizes.
.1#
'0
$
"
.
.
Caution: It's very important to protect the printer controller board and any associated
daughterboard or module from electrostatic damage while performing any task
involving the controller board.
If an antistatic wrist strap is provided in your printer option kit, attach one end of it
to your wrist and the other end to any convenient electrical ground (for example, the
bare metal chassis of equipment, as on the back of a computer, that is plugged in but
turned off). Never attach the wrist strap to any piece of equipment with an electrical
current present. Turn off all power switches first. Plastic, rubber, wood, painted metal
surfaces, and telephones are not acceptable grounding points. The printer isn't an
acceptable grounding point either because it must be unplugged before you perform
this task.
If you don't have an antistatic wrist strap, discharge your body's static electric
charge by touching a grounded surface before you handle any printer boards or
components and before removing the controller board. Also avoid walking around
after grounding yourself.
7!
-
When you print a file, the QMS magicolor 2 DeskLaser printer driver uses the computer’s memory to
1
Send data from the Windows display to the Spooler (a file on the disk) and
then
2
Compress the data and send it from the Spooler to the selected port, either
parallel or Ethernet.
Some applications use hard disk storage on the computer to render the image. However, in all Windows environments, if the computer runs out of memory, Windows
informs you. If this happens, you have the option of allowing the printer to start printing
the job while it is still being spooled rather than waiting for it to be completely spooled
before starting the print process. (See “Files Fail to Print” in chapter 8, “Troubleshooting” for more information.)
'-
$
"
Typically, most files print with the 8 MB of memory that comes standard on your QMS
magicolor 2 DeskLaser and 32 MB on the DeskLaser duplex model. However, some
files may exceed this amount. If the printer doesn’t have enough memory, a Printing need more memory message displays in the printer’s message window.
.
Caution: It's very important to protect the printer controller board and SIMM from
electrostatic damage. Before performing this procedure, review the antistatic caution
in “Antistatic Protection” on page 5-8.
Always handle circuit boards by the edges only.
1
Turn off the printer, and then disconnect the power cord and all interface
cables from the printer.
.1#
'+
$
"
2
Remove the printer’s controller board.
Loosen two screws, one on each end of the I/O connector panel, and, using the
tab on the lower side of the connector panel, pull the controller board from the
printer.
Note: This illustration shows the printer without the duplexer.
»
3
Position the controller board on a flat surface so the controller board lies
flat and the I/O connector panel is facing you.
4
If you need to remove a SIMM before installing one, remove it as follows;
otherwise skip to step 5.
Note: If all the SIMM connectors are filled and you want to install more memory,
you have to exchange one or more SIMMs for SIMMs with a greater memory
capacity.
»
5
'2
a
Using both thumbs, pull the latches (one on each side of the SIMM connector)
outward.
b
Tilt the SIMM backward to a 45° angle away from the SIMM connector.
c
Lift the SIMM out.
Remove the new SIMM from its antistatic bag.
#$"
(*
6
Insert the new SIMM into the SIMM connector.
a
Hold the SIMM at a 45° angle to the controller board, with the notch on the
right side and the bottom edge in the connector.
Note: You can insert a SIMM in any SIMM connector as long as DRAM and
the SIMM connector before the one you’re installing are occupied.
»
b
Tilt the SIMM up to a 90° angle until you feel it snap into place.
When seated, the SIMM stands upright, firmly in place. If you cannot snap the
SIMM into place, do not force it. Reposition it, making sure that the bottom of
the SIMM is seated completely in the connector.
7
Repeat steps 5–6 for each additional SIMM being installing.
8
Reinstall the controller board into the printer.
Gently slide the controller board into the printer until it is fully seated, and then
tighten the two screws.
9
Reconnect all interface cables.
10 Reconnect the power cord, and turn on the printer.
Note: In compliance with UL guidelines, “The appliance inlet is considered to be
the main disconnect device.”
»
7
+3#+-
The system software in your QMS magicolor 2 DeskLaser is stored in flash ROM,
read-only memory that can be erased and rewritten to “in a flash.” This allows you to
update the system software over the parallel interface without opening up the printer
and installing new PROMs. Updated system software allows you to take advantage of
future enhancements to the printer.
Use this procedure for both Windows 95/98 and Windows NT 4.0 systems:
1
Turn on the PC and the printer.
2
Insert the QMS magicolor 2 DeskLaser system software disk or CD-ROM in
the appropriate disk drive on your PC.
.1#
'
#$.
&
3
4
Access the Run... command:
Windows 95/98
From the Start menu choose Run...
Windows NT 4.0
From the Start menu choose Run...
With the printer on line and Idle, in the Run dialog box type
x:\copy /b wps.sum lptl↵
where x is the letter of the disk drive in which you inserted the system software
disk or CD-ROM.
The downloading process takes less than a minute. During the downloading process, the Disk light blinks, and the messages New kernel..., Erasing
flash, and Writing flash appear in the printer’s message window.
After the updated system software has been written to flash ROM, the printer
reboots (Booting...) with the new system image, and returns to Idle.
Note: As the printer reboots, watch the message window for a message verifying
the amount of memory currently installed in the printer and identifying the current
version number of the system software (for example, 8 Meg ver 2.01).
»
5
Remove the disk or CD-ROM from the PC, and store it in a safe place.
7
!"#$"%
»
'
Note: If you want to update the Windows NT printer driver, refer to “Windows NT 4.0
Printer Driver” on page 5-14.
1
Insert the QMS magicolor 2 DeskLaser printer drivers disk or CD-ROM in the
appropriate disk drive on your PC.
2
From the Windows 95/98 Start menu choose Settings.
3
From the Settings menu choose Printers.
4
If it’s already installed, select the QMS magicolor 2 DeskLaser printer driver
in the Printers window.
#$.
&
5
From the File menu choose Delete.
Select Yes when you’re asked if you’re sure you want to delete the printer.
Select Yes if you’re asked if you would like to delete extra files.
6
In the Printers window double-click the Add Printer icon.
The Add Printer Wizard opens.
7
Follow the instructions in the Add Printer Wizard.
8
When you’re prompted, select Local Printer to identify how the printer is
attached to your PC, and then choose Next.
This is the appropriate choice whether the printer is connected directly to your PC
via the parallel port or to a network via the Ethernet port (in which case you’ll
replace this choice through the QMS Network Print Monitor).
9
When you’re prompted to select a manufacturer and printer, choose Have
Disk...
10 In the Install From Disk dialog box, choose Browse...
11 Select the appropriate language directory for the Windows 95/98 driver.
OEMSETUP.INF displays in the File Name list.
12 Choose OK to return to the Install from Disk dialog box.
13 Choose OK again.
14 In the displayed list of printers, select the QMS magicolor 2 DeskLaser, and
then choose Next.
15 When prompted, select LPT1 as the port to use with the printer, and then
choose Next.
If the printer is connected to an Ethernet network, you’ll replace LPT1 with QMS
Port through the QMS Network Print Monitor.
16 Continue following the instructions in the Add Printer Wizard to complete
the installation.
17 When the installation is complete, exit from the Printers window.
18 Remove the disk or CD-ROM from the PC, and store it in a safe place.
.1#
'
#$.
&
!&'()
»
Note: If you want to update the Windows 95/98 printer driver, refer to “Windows 95/98
Printer Driver” on page 5-12.
1
Insert the QMS magicolor 2 DeskLaser printer drivers disk or CD-ROM in the
appropriate disk drive on your PC.
2
In the Windows NT Start menu choose Settings.
3
In the Settings menu choose Printers.
4
If it’s already installed, select the QMS magicolor 2 DeskLaser printer driver
in the Printers window.
5
From the File menu, choose Delete.
Select Yes when you’re asked if you’re sure you want to delete the printer.
Select Yes if you’re asked if you would like to delete extra files.
6
In the Printers window double-click the Add Printer icon.
The Add Printer Wizard opens.
7
When prompted, choose My Computer to identify how the printer is
attached to your workstation, and then choose Next.
My Computer means Local Printer. This is the appropriate choice whether you
are connecting the printer directly to your computer via the parallel port or to a
network via the Ethernet port (in which case you’ll replace LPT1 with QMS Port
when you install the QMS Network Print Monitor).
8
When prompted, select the appropriate port to use with the printer, and then
choose Next.
9
When prompted to select a manufacturer and model of printer, choose Have
Disk.
10 In the Install from Disk dialog box, choose Browse...
11 Select the appropriate language directory for the Windows NT driver.
OEMSETUP.INF displays in the File Name list box.
12 Choose OK to return to the Install From disk dialog box.
13 Choose OK again.
'!
#$.
&
14 In the displayed list of printers, select QMS magicolor 2 DeskLaser, and then
choose Next.
15 If you’re replacing an existing Windows NT 4.0 printer driver perform this
step; otherwise, go to step 16.
a
When prompted, choose Replace Existing Driver, and then choose Next.
b
When prompted for a printer name, either accept the displayed name or type
a new one, and then choose Next.
16 If you’re adding a new Windows NT 4.0 printer driver, perform this step; otherwise, go to step 17.
a
When prompted, choose not to replace the existing driver, and then choose
Next.
When you’ve finished the installation, a second QMS magicolor 2 DeskLaser
icon, named “Copy 2,” is displayed in the Printers window.
b
When prompted for a printer name, either accept the displayed name or type
a new one, and then choose Next.
17 When prompted for sharing information, choose either Shared or Not
Shared, and then choose Next.
If you chose Not Shared, skip to step 18.
If you chose Shared, provide the sharing information.
a
In the Share Name edit box, type the name of the printer.
This is the name displayed when your PC is connected to the printer.
b
If you’re sharing your printer with a Windows NT 4.0 workstation,
choose OK and go to step 18.
If you’re sharing your printer with a Windows 95/98 workstation, in
the Alternate Drivers list box, select the Windows 95/98 operating system,
and choose OK.
If the operating system on your PC does not have the QMS magicolor 2
DeskLaser printer driver for Windows 95/98, you’ll be prompted to install
it: Insert the QMS magicolor 2 DeskLaser printer driver disk or CD-ROM
and choose OK. The required files are copied to the appropriate directory.
.1#
''
#$.
&
18 When asked if you would like to print a test page, choose either Yes or No,
and then choose Finish.
The Windows NT 4.0 printer driver installs, and then the Windows desktop
appears.
19 Remove the disk or CD-ROM from the PC, and store it in a safe place.
'/
%
111
“Handling the Printer” on page 6-2
“Maintenance Schedule” on page 6-4
“Cleaning the Printer” on page 6-9
“Cleaning the Duplexer” on page 6-24
“Replacing the Fuser Oil Bottle and Cleaning Roller” on page 6-31
“Replacing the OPC Belt Cartridge” on page 6-35
“Replacing the Ozone Filter” on page 6-39
“Replacing the Waste Toner Pack” on page 6-40
This chapter describes how to handle and clean the QMS magicolor 2 DeskLaser.
Blurred or splotchy prints and paper jams can result from dusty printer parts. Regular
cleaning takes only a few minutes and helps ensure print quality. Printer parts that
require cleaning are the transfer unit, the paper discharger, and the outside surface of
the printer.
8
Handle the printer with care to preserve its life. Abuse may cause damage. Keep the
following guidelines in mind:
/
Don’t place anything on the top of the printer.
Avoid spraying cleaning solution directly on the printer’s surface; the spray could
penetrate through the air vents of the printer and damage the internal circuits.
Be careful when cleaning the inside or removing paper jams, as the fixing assembly and other internal parts become very hot. Leave the printer cover open before
handling the inside of the printer.
Don’t close the covers abruptly or expose the printer to vibrations.
Don’t cover the printer immediately after using it. Turn it off, and wait until it cools
down.
Don’t leave the printer open for any length of time, especially in well-lit places;
light may damage the toner cartridge and OPC belt.
Don’t open the printer during printing and do not tap paper stacks on the printer.
Don’t tilt, lubricate, or disassemble the printer.
Don’t touch the electrical contacts, gears, or laser beam devices. Doing so may
damage the printer and cause the print quality to deteriorate.
Keep media in the output tray at minimum level. If the media stacks too high, your
printer may experience media jams and excessive media curl.
>$.
If you have a duplex model, always make sure you have opened the duplexer’s
rear cover before opening the top of the printer. Forced opening of the top cover
first may damage the unit.
Lift the printer from the bottom only, using the grips. Make sure two people are
available to lift the printer when moving it.
WARNING! Remember that the media feeders on the bottom of the printer stack
are not attached to the printer. Make sure you lift the printer by the carrying grips
on the bottom-most unit in the stack. If the top unit is lifted alone, the bottom units
could fall off, causing bodily injury or damage to the printer. If you need to lift just
the top unit, use the grips and make sure it detaches completely from the cassette
below before moving it to the side.
ACHTUNG! Bitte beachten Sie, daß die Papierzuführungen unterhalb des
Druckers nicht fest mit dem Drucker verbunden sind. Wenn Sie das gasamte
Gerät hochheben wollen, greifen Sie deshalb in die Griffmulden der untersten
Papierzuführung. Wenn Sie nur den Drucker hochheben, kann es sein, daß die
Papierzuführung sich löst und herunterfällt. Dabei können Sie sich verletzen und
der Drucker kann beschädigt werden. Deshalb versichern Sie sich, daß die
Papierzuführung nicht mehr mit dem Drucker verbunden ist bevor Sie diesen
Drucker an einen anderen Platz stellen. Benutzen Sie unbedingt die Griffmulden
am Drucker, wenn Sie ihn transportieren wollen.
Keep the following in mind when storing the printer for an extended period:
-
Unplug the printer.
Note: In compliance with UL guidelines, “The appliance inlet is considered to
be the main disconnect device.”
»
-
Remove the toner cartridge from the printer and repack it in its aluminum bag
or wrap it in a thick cloth to protect it from direct sunlight and any other bright
light.
-
See the “Environmental Requirements” section of appendix B, “Technical
Specifications,” for storage specifications.
/
+
The stated life expectancy of each consumable is based on printing under specific
operating conditions, such as media type, number of color planes, page size, and
page coverage (usually 5% coverage of letter/A4-size media).
The actual life expectancy will vary depending on these and other printing variables,
including continuous or intermittent printing, ambient temperature, and humidity.
»
Note: A plane is a single pass of the OPC belt (one toner color). For example, a
one-color print job makes one pass (one plane), and a two-color print job makes two
passes (two planes). A single-sided (simplex) page (also called a face) usually
consists of four passes of the OPC belt, since most color print jobs use all four toner
colors. A 2-sided (duplex) page usually consists of eight passes of the OPC belt, since
most color print jobs use all four toner colors.
Consumable life is expressed in simplex pages (1 face). A duplex page (2 faces) is the
equivalent of two simplex pages.
.
Every 20,000 single-sided pages, a thorough cleaning should be performed by the
user.
/!
This item needs
cleaning...
After...
By...
Corona wire (also known
as the OPC charge wire)
Every 20,000 pages or 12 months
(whichever comes earlier.)
User
If you have the duplex
model, the duplex unit
paper guides
Every 20,000 pages, or 12 months, User
whichever comes earlier.
See “Cleaning the Duplexer”
on page 6-24.
If you have the duplex
model, the duplex unit
roller
Every 20,000 pages, or 12 months, User
whichever comes earlier.
See “Cleaning the Duplexer”
on page 6-24.
Laser lens
Only when you find vertical white or User
light-colored streaking in all
See “Cleaning the Laser
primary colors on your printouts.
Lens” on page 6-21.
See step 7 in “Cleaning the
OPC Belt Cartridge” on page
6-16.
This item needs
cleaning...
After...
By...
OPC belt cartridge
Every 20,000 pages, or 12 months, User
whichever comes earlier.
See “Cleaning the OPC Belt
Cartridge” on page 6-16.
Paper discharger
Every 20,000 pages, or 12 months, User
whichever comes earlier.
See “Cleaning the Transfer
Unit” on page 6-9.
Paper exit rollers (also
known as paper guides)
Every 20,000 pages, or 12 months, User
whichever comes earlier.
See “Cleaning the Paper Exit
Rollers” on page 6-14.
Printer exterior
As needed
User
See “Cleaning the Exterior of
The Printer” on page 6-30.
Printer interior
Every 20,000 pages, or 12 months, User
whichever comes earlier.
See “Guidelines for Cleaning
Inside the Printer” on page
6-9.
Registration roller
Every 20,000 pages, or 12 months, User
whichever comes earlier.
See “Cleaning the Transfer
Unit” on page 6-9.
Transfer roller
Every 20,000 pages, or 12 months, User
whichever comes earlier.
See “Cleaning the Transfer
Unit” on page 6-9.
/'
..
//
This item needs
preventive
maintenance...
After...
By...
Printer—20,000-page
preventive maintenance
20,000 pages.
User
Printer—60,000-page
preventive maintenance
60,000 pages.
QMS National Service or a
QMS-authorized service
provider
Printer—120,000-page
preventive maintenance
Replace 120K kit displays in
the message window (after
120,000 pages).
QMS National Service or a
QMS-authorized service
provider
See the standard “Cleaning
Schedule” on page 6-4.
,..
#$
This item needs replacing...
After...
For More Information...
Belt cartridge (with charger
unit)
50,000 planes or 12 months,
whichever comes earlier.
See “Replacing the OPC Belt
Cartridge” on page 6-35.
Cleaning roller
Check fuser cleaning
See “Replacing the Fuser Oil
rol[l]er or Replace
Bottle and Cleaning Roller” on
cleaning Roller displays page 6-31.
in the message window (after
12,000 pages at 5% coverage
of each color).
Fuser cleaning roller
12,000 pages.
See “Replacing the Fuser Oil
Bottle and Cleaning Roller” on
page 6-31.
Fuser oil bottle
Check fuser oil &
cleaning rol[l]er
displays in the message
window (after approximately
12,000 pages; however, fuser
oil bottle life is media
dependent—coarser paper
requires more oil).
See “Replacing the Fuser Oil
Bottle and Cleaning Roller” on
page 6-31.
OPC belt cartridge
Replace OPC displays in the See “Replacing the OPC Belt
message window (maximum
Cartridge” on page 6-35.
life—50,000 planes, usually
occurs with continuous use;
minimum life—20,000 planes,
usually occurs with intermittent
use although other factors also
affect cartridge life).
Ozone filter
60,000 planes or every 12
months, whichever comes
earlier.
See “Replacing the Ozone
Filter” on page 6-39.
/0
Toner
10,000 pages—black; after
6,000 pages—yellow,
magenta, cyan @ 5%
coverage of each color.
See “Replacing a Toner
Cartridge” on page 3-21.
Waste toner pack
Check waste Toner
See “Replacing the Waste
displays in the message
Toner Pack” on page 6-40.
window (after 12,000 pages—
or 24,000 planes—at 5%
coverage of each color).
This item needs
replacing...
After...
By...
Drum assembly
120,000 pages
Fuser unit
Replace fuser displays in the
message window (after 60,000
pages maximum at an equal mix of
black and 4-color pages, all with
5% coverage of each color)
QMS National Service or a
QMS-authorized service
provider
Paper discharger
120,000 pages at 5% coverage of
each toner color.
Transfer roller
120,000 pages at 5% coverage of
each toner color.
%$.
To prevent any potential problems associated with paper dust accumulating inside
the printer, you should clean both the inside and the outside of the printer on a
regular basis.
WARNING! Turn off the printer, unplug the power cord, and disconnect all interface
cables before cleaning.
ACHTUNG! Ziehen Sie den Netzstecker aus der Steckdose bevor Sie den Drucker
reinigen.
0
Either clean the printer before use, or allow a few minutes after unplugging it to
allow the fusing unit to cool down.
Turn off the printer, unplug the power cord, and disconnect all interface cables
before cleaning inside the printer.
Read all caution and warning labels carefully, making sure to follow any instructions contained in them. These labels are located on the inside of the printer’s
covers and the interior of the printer body.
Use only dry, lint-free cotton cloths or swabs.
Make sure any parts removed during cleaning are replaced before you plug in the
power cord, reconnect the interface cables, and turn on the printer.
Note: In compliance with UL guidelines, “The appliance inlet is considered to be
the main disconnect device.”
»
&
-
»
Note: A dry cotton cloth and dry cotton swab are required for this procedure.
These items in the transfer unit require cleaning:
Registration rollers
Transfer roller
Paper discharger
/+
%$.
1
Turn off and unplug the printer.
2
If you have a duplex model,
open the duplexer’s rear
cover.
If not, skip to step 4.
3
/2
Reach into the duplexer’s
rear cover to access the
printer’s rear cover.
%$.
4
Open the printer’s rear cover.
Note: The illustrations for steps 4 through 8 show the printer without the duplexer.
However, the instructions are the same for both models.
»
5
Using a dry cotton cloth, clean any paper dust and toner buildup from the
registration rollers.
You can manually rotate the rollers while cleaning them by turning the white gear
on the left end of the roller shaft.
:
)
0
/
%$.
6
Clean the transfer roller.
a
Remove the transfer roller unit by
lifting the lock lever at the right end of
the transfer roller unit until the unit is
freed, and then lifting the unit out.
b
Because you cannot see when the
unit is released, it’s best to lift the unit
and the lock lever at the same time.
Using a dry cotton cloth, clean any
paper dust and toner buildup from the
transfer roller.
Note: Manually rotate the roller while
cleaning it.
»
c
7
/
4
Reinstall the transfer roller in the
transfer unit.
Clean the paper discharger.
a
Remove the paper discharger by
pushing it to the right and then lifting it
up and out of the transfer unit. (It
comes out after the tabs on the
charger have cleared their retainers.)
b
Using a dry cotton cloth, clean any
paper dust and toner buildup from the
outside of the paper discharger.
c
Using a dry cotton swab, clean any
paper dust and toner buildup from the
interior of the paper discharger.
d
Using a dry cotton swab, clean the
paper discharger wire.
:
6
%$.
e
Reinstall the paper discharger in the
transfer unit, and then push it down
and to the left to lock it in place.
8
Clean any paper dust and toner
buildup found on the transfer unit
itself.
9
Close the printer’s rear cover.
10 If you have a duplex model, close the duplexer’s rear cover.
11 Plug in the printer, and turn it on.
»
Note: In compliance with UL guidelines, “The appliance inlet is considered to be
the main disconnect device.”
/
%$.
*5,
»
Note: A dry cotton cloth is required for this procedure.
1
Turn off and unplug the printer.
2
If you have a duplex model, open the
duplexer’s rear cover.
If not, skip to step 3.
3
Pull the latch to release the top cover,
and then open the cover.
Caution: If you have a duplex model,
make sure you have opened the
duplexer’s rear cover first. Forced opening
of the top cover first may damage the unit.
»
Note: The illustrations for step 3 and step
4 show the printer without the duplexer.
However, the instructions are the same for
both models.
/!
%$.
4
Using a dry cotton cloth, clean the
paper exit rollers.
While manually rotating each paper exit
roller, clean each roller.
»
5
Close the printer’s top cover.
6
If you have a duplex model, close the duplexer’s rear cover.
7
Plug in the printer, and turn it on.
Note: In compliance with UL guidelines, “The appliance inlet is considered to be
the main disconnect device.”
/'
%$.
6
Caution: The OPC belt is extremely sensitive to bright light and direct sunlight.
Always leave it in its protective bag until you are ready to install it. Any exposure to
light should be limited to less than two minutes, or permanent damage could result. If
you suspect the belt is damaged due to exposure to light, put the belt in a dark place
to recover. Depending on the amount of exposure, recovery may take up to two hours.
Recovery time is dependent on the amount of exposure sustained. Recovery is not
guaranteed.
The OPC belt is also extremely sensitive to touch. Always handle the cartridge so you
don’t touch the surface of the belt. Any body oil left on the surface of the belt will
prevent toner from adhering to the belt which results in poor image quality. Also, keep
the cartridge away from anything that may scratch the surface of the belt. Any
scratches will show in the image produced.
»
Note: A dry cotton cloth is required for this procedure.
1
Turn off and unplug the printer.
2
If you have a duplex model, open the
duplexer’s rear cover.
If not, skip to step 3.
//
%$.
3
Open the printer’s front cover.
Squeeze the latch near the upper-right
corner of the cover.
Caution: This is necessary, as it pulls the
toner cartridges forward slightly to make
room for the OPC belt cartridge. You could
damage the OPC belt if you don’t
do this.
»
Note: The illustrations for steps 3 through
16 show the printer without the duplexer.
However, the instructions are the same for
both models.
4
Caution: If you have a duplex model,
make sure you have opened the
duplexer’s rear cover first. Forced opening
of the top cover first may damage the unit.
5
»
Pull the latch to release the top cover,
and then open the top cover.
Release the OPC belt cartridge lock
levers (one on each side of the OPC
belt cartridge opening).
Note: The white powder lubricant on a
OPC belt is normal; it won’t affect quality.
/0
%$.
6
Remove the OPC belt cartridge.
Caution: Handle the cartridge carefully.
The belt is very sensitive to hand oils and
scratches, both of which reduce print
quality.
7
Using a dry cotton cloth, clean any
toner buildup from around the cleaning
blade.
08
Caution: Don’t touch the edge of the
cleaning blade or the OPC belt itself.
;
8
/-
Clean any paper dust and toner buildup found on the OPC cartridge.
%$.
9
Remove the corona wire cleaning brush from inside the front of the
printer.
10 Turn the OPC belt cartridge so that the handle is facing away from you.
11 Use the brush to clean the corona wire inside the end of the OPC belt cartridge.
Caution: The corona wire is very delicate. Do not press hard on the wire.
12 Return the corona wire cleaning brush to its holder.
/+
%$.
13 Holding the cartridge above the printer,
align the guide pins on the cartridge
with the guide slots in the lock levers.
The white gear on the cartridge goes to
the right, and the green surface of the cartridge faces you.
14 Gently guide the cartridge into the printer.
Caution: The cartridge should slide easily into the printer. Don’t force it.
15 Rotate the two lock levers to secure the
OPC belt cartridge in the printer.
16 Close the printer’s front and top
covers.
17 If you have a duplex model, close the
duplexer’s rear cover.
18 Plug in the printer, and turn it on.
»
/2
Note: In compliance with UL guidelines,
“The appliance inlet is considered to be
the main disconnect device.”
%$.
/
/
It’s necessary to clean the laser lens only when you find vertical white or light-color
streaking in all primary colors on your printouts.
»
Note: A dry cotton cloth and a clean piece of paper are required for this procedure.
1
Turn off and unplug the printer.
2
If you have a duplex model, open the
duplexer’s rear cover.
If not, skip to step 3.
Caution: If you have a duplex model,
make sure you have opened the
duplexer’s rear cover before opening the
printer’s top cover. Forced opening of the
top cover first may damage the unit.
3
Open the printer’s front cover.
Squeeze the latch near the upper-right
corner of the cover.
»
Caution: This is necessary, as it pulls the
toner cartridges forward slightly to make
room for the OPC belt cartridge. You could
damage the OPC belt if you don’t
do this.
Note: The illustrations for steps 3 through
8 show the printer without the duplexer.
However, the instructions are the same for
both models.
/
%$.
4
Remove the four toner cartridges.
5
Open the printer’s top cover.
6
Remove the OPC belt cartridge.
Caution: The OPC belt is extremely sensitive to bright light and direct sunlight.
Always leave it in its protective bag until you are ready to install it. Any exposure to
light should be limited to less than two minutes, or permanent damage could
result. If you suspect the belt is damaged due to exposure to light, put the belt in a
dark place to recover. Depending on the amount of exposure, recovery may take
up to two hours. Recovery time is dependent on the amount of exposure
sustained. Recovery is not guaranteed.
The OPC belt is also extremely sensitive to touch. Always handle the cartridge so
you don’t touch the surface of the belt. Any body oil left on the surface of the belt
will prevent toner from adhering to the belt which results in poor image quality.
Also, keep the cartridge away from anything that may scratch the surface of the
belt. Any scratches will show in the image produced.
7
Place the OPC belt cartridge on a clean surface with the black side down.
8
Place a clean piece of paper over the OPC belt to prevent damage from
exposure to light.
9
Remove the laser lens.
Carefully lift out at a 45° angle using the
two tabs on top of the lens.
10 Using a dry cotton cloth, wipe the lens.
11 Reinstall the laser lens.
Slide the lens in at a 45° angle and snap it
in place.
12 Remove the clean piece of paper.
13 Replace the OPC belt cartridge into the
printer.
/
%$.
14 Reinstall the OPC belt cartridge.
15 Rotate the two lock levers to secure the
OPC belt cartridge in the printer.
16 Reinstall the four toner cartridges.
17 Close the printer’s front and top covers.
18 If you have a duplex model, close the duplexer’s rear cover.
19 Plug in the printer, and turn it on.
»
Note: In compliance with UL guidelines, “The appliance inlet is considered to be
the main disconnect device.”
/
%$.
5
If you have a duplex model, you should clean the inside of the duplexer on a regular
basis.
»
Note: A dry cotton cloth is required for this procedure.
1
If you have a duplex model, follow steps 2 through 14.
If not, skip to “Cleaning the Paper Exit Rollers” on page 6-14.
2
Turn off and unplug the printer.
3
Open the duplexer’s rear cover.
Do not open the printer’s rear cover.
/!
%$.
4
Clean the duplexer with a dry cotton cloth.
5
Tilt the paper path toward the inside of the printer.
Caution: Hold the paper path unit by its corners to avoid the unit catching your
fingers between it and the cover.
/'
%$.
//
6
Clean the registration rollers with a dry cotton cloth.
7
Remove the duplexer’s lower rear assembly.
8
Clean the registration rollers with a dry cotton cloth.
%$.
9
Reach underneath the printer and clean with a dry cotton cloth.
10 Reinsert the duplexer’s lower rear assembly.
11 Open the duplexer’s top cover.
/0
%$.
»
Note: Use two hands to open the duplexer’s top cover to avoid twisting its hinge.
12 Clean the registration rollers with a dry cotton cloth.
While manually rotating each paper exit roller, clean each roller.
13 Close the duplexer’s top cover.
/-
%$.
»
Note: Even though this is the section about cleaning the duplexer, do not forget to
clean the printer’s paper exit rollers, too.
14 Pull the latch to release the top cover,
and then open the cover.
»
Note: The illustrations for steps 14 and 15
show the printer without the duplexer.
However, the instructions are the same for
both models.
Caution: If you have a duplex model,
make sure you have opened the
duplexer’s rear cover first. Forced opening
of the top cover first may damage the unit.
15 Using a dry cotton cloth, clean the
paper exit rollers.
While manually rotating each paper exit
roller, clean each roller.
16 Clean the registration rollers with a dry cotton cloth.
17 Close the printer’s top cover.
18 If you have a duplex model, close the duplexer’s rear cover.
19 Plug the printer in and turn it on.
»
Note: In compliance with UL guidelines: The appliance inlet is considered to be
the main disconnect device.
/+
%$.
*5
&
WARNING! Turn off the printer, unplug the power cord, and disconnect all interface
cables before cleaning. Do not spill water or detergent into the printer; otherwise the
printer will be damaged and an electric shock may occur.
ACHTUNG! Ziehen Sie den Netzstecker aus der Steckdose bevor Sie den Drucker
reinigen. Verschütten Sie kein Wasser oder andere Flüssigkeiten auf dem Drucker, da
das Gerät sonst beschädigt wird oder die Gefahr eines elektrischen Schlages besteht.
To protect your printer and maintain its appearance, clean the exterior regularly. Use
the following guidelines:
/ 2
Use only a dry or slightly damp, lint-free, soft cloth moistened only with water or
mild detergent.
Never use cleaning solutions that contain solvents, such as alcohol and benzene.
Solvents may damage the printer’s finish.
Always test any cleaning solution on a small area of your printer to check the solution's performance.
Never use sharp or rough implements, such as wire or plastic cleaning pads.
Never spray a cleaning solution directly on the printer as the cleaning solution will
penetrate to the interior of the printer and cause damage.
6#
$=
17
%$6
(
5
,
(
Caution: The fuser unit is an integral part of the imaging process and is also
expensive to replace. Fuser life will be shortened (or the fuser permanently damaged)
if the oil bottle and cleaning roller are not changed when needed and installed
properly. This type of damage is not covered under warranty or service contract.
WARNING! The fuser unit can become extremely hot and cause severe burns. Make
sure the unit is cool before handling it.
ACHTUNG! Die Fixiereinheit kann sehr heiß werden, so daß Verbrennungsgefahr
besteht. Bitte lassen Sie die Fixiereinheit einige Zeit abkühlen, bevor Sie diese
berühren.
1
Turn off and unplug the printer.
2
If you have a duplex model, open the
duplexer’s rear cover.
If not, skip to step 3.
Caution: If you have a duplex model,
make sure you have opened the
duplexer’s rear cover first. Forced
opening of the top cover first may
damage the unit.
/ 6#
$=
17
%$6
3
Note: The illustrations for step 3
through step 9 shows the printer
without the duplexer. However, the
instructions are the same for both
models.
»
/ Pull the latch to release the top
cover, and then open the top cover.
4
Open the two cleaning roller lock
levers.
5
Remove the old oil bottle.
Caution: Hold a sheet of paper under
the oil bottle while removing it, so oil
doesn’t drip into the printer.
6
Remove the old cleaning roller.
7
Lower the new oil bottle into its slot.
The tab on the side of the bottle must
be on the right.
8
Install the cleaning roller in its slot.
The tab on the top of the cleaning roller
must be on the left.
6#
$=
17
%$6
9
Close the two lock levers.
10 Close the printer’s top cover.
11 If you have a duplex model, close the
duplexer’s rear cover.
12 Plug in the printer, and turn it on.
»
Note: In compliance with UL guidelines,
“The appliance inlet is considered to be
the main disconnect device.”
13 Use the Service/Clear Care menu to
remove the Replace cleaning
Roller message.
/ !
6#
$1.%
7%$
(
,
Caution: The OPC belt is extremely sensitive to bright light and direct sunlight. Always
leave it in its protective bag until you are ready to install it. Any exposure to light should
be limited to less than two minutes, or permanent damage could result. If you suspect
the belt is damaged due to exposure to light, put the belt in a dark place to recover.
Depending on the amount of exposure, recovery may take up to two hours. Recovery
time is dependent on the amount of exposure sustained. Recovery is not guaranteed.
The OPC belt is also extremely sensitive to touch. Always handle the cartridge so you
don’t touch the surface of the belt. Any body oil left on the surface of the belt will
prevent toner from adhering to the belt which results in poor image quality. Also, keep
the cartridge away from anything that may scratch the surface of the belt. Any
scratches will show in the image produced.
1
Turn off and unplug the printer.
2
If you have a duplex model, open the
duplexer’s rear cover.
If not, skip to step 3.
/ '
6#
$1.%
7%$
3
Open the printer’s front cover.
Squeeze the latch near the upper-right
corner of the cover.
Caution: This is necessary, as it pulls
the toner cartridges forward slightly to
make room for the OPC belt cartridge.
You could damage the OPC belt if you
don’t do this.
»
Note: The illustrations for steps 3
through 11 show the printer without the
duplexer. However, the instructions are
the same for both models.
4
Pull the latch to release the top
cover, and then open the top cover.
Caution: If you have a duplex model,
make sure you have opened the
duplexer’s rear cover first. Forced
opening of the top cover first may
damage the unit.
5
/ /
Rotate up the two lock levers (one on
each side of the OPC belt cartridge)
to release the cartridge.
6#
$1.%
7%$
6
Pull the cartridge straight up and out
of the printer, and then discard it.
7
Remove the protective sheet from
the new cartridge, and then pull out
the two tension-release pins (one on
each side of the cartridge).
Caution: Don’t touch the green
material on the cartridge. It scratches
easily.
»
Note: The white powder lubricant on a
new OPC belt is normal; it won’t affect
quality.
8
Holding the cartridge above the
printer, align the guide pins on the
cartridge with the guide slots in the
lock levers.
The white gear on the cartridge goes to
the right.
9
Gently guide the cartridge into the
printer.
Caution: The cartridge should slide
easily into the printer. Don’t force it.
/ 0
6#
$1.%
7%$
10 Rotate the two lock levers to secure
the OPC belt cartridge in the printer.
11 Close the printer’s front and top
covers.
12 If you have a duplex model, close the
duplexer’s rear cover.
13 Plug in the printer, and turn it on.
»
Note: In compliance with UL
guidelines, “The appliance inlet is
considered to be the main disconnect
device.”
14 Use the Service/Clear Care menu to
remove the Replace belt message.
/ -
The ozone filter reduces exhausted ozone gas.
1
Remove the ozone filter case on the left rear of the printer.
On the Duplex Model, use the plastic ridge on the right of its case to pry the ozone
filter case away from the printer.
DeskLaser
Duplex Model
2
Remove the ozone filter from the case.
3
Install a new ozone filter in the case.
4
Reinstall the ozone filter case.
5
Discard the old ozone filter.
6#
$)
.
(
% The waste toner pack collects the waste toner from the printing process so you can
conveniently dispose of it.
1
Open the printer’s front cover.
Note: This illustration shows the printer
without the duplexer. However, the
waste toner pack instructions are the
same for both models.
»
2
Remove the waste toner pack.
3
Use the label on the side of the old
waste toner pack to seal the opening, and then dispose of the pack in
accordance with safety laws and
regulations in your area.
4
Insert the new waste toner pack.
5
Close the printer’s front cover.
6
Check the status message in the message window.
0
If the message window displays Check waste Toner, use the Service/Clear
Care menu to remove the message.
/!2
%
111
“Preventing Media Jams” on page 7-2
“Understanding the Media Path” on page 7-3
“Understanding Media Jam Status Messages” on page 7-5
“Removing Media Jams” on page 7-5
This chapter explains how to prevent media jam and then provides detailed information on how to find and remove media jams.
"#
There are several things you can do to reduce the occurrence of media jams.
Use media that matches the printer specifications.
Make sure the media is not folded, wrinkled, or excessively curled.
Do not overfill the media cassette. The cassette has a fill-limit mark on the inside
left side.
Note: Ensure that the media in the cassette is flat, especially on the leading edge.
»
Note: Do not fan transparencies since this causes static.
»
Remove transparencies from the output tray immediately to avoid static buildup.
Do not allow the output tray to overfill.
Note: The face-down output tray has a 250-sheet capacity. Jamming may occur if
you allow media to accumulate more than 250 sheets at a time.
»
0
If you have problems with double feeding, remove the media from the cassette
and fan the sheets. They may be sticking together.
Store media in a dry location away from moisture and humidity.
Make sure you’ve loaded the media printing-side up. Many manufacturers place
an arrow on the end of the wrapper to indicate the printing side. If you can’t determine which side of the media to print on, remove the media from the cassette,
rotate the stack a half-turn, turn the stack over, and then place it back in the
cassette.
Ensure that you have the correct media type selected if you’re printing on envelopes, glossy stock, labels, thick stock, transfer media, or transparencies.
Ensure that the printer is on a hard, flat, level surface.
Ensure that the cassette only contains one type of media at a time.
$
.
7
1/
Understanding the printer’s media path will help you locate media jams. The media
cassette is located at the bottom front of the printer. The media is picked from the cassette, passed under the transfer drum, passed through the fuser, and delivered via the
paper exit unit to the media exit tray, which is the top of the printer. Access to the
media path, in case of a media jam is through the printer’s rear cover.
>?
7
7
K
Y
(
M
C
7
4
=
9
;
0
$
.
5
Understanding the printer’s media path will help you locate media jams. The media
cassette is located at the bottom front of the printer. The media is picked from the
cassette (shown as the number 1 on the diagram), passed under the transfer drum,
passed through the fuser, momentarily emerges from the paper exit (2), reenters the
duplexer (3), cycles through the transfer drum and fuser again (4), and is delivered via
the paper exit unit to the output tray, which is the top of the printer (5). Access to the
media path, in case of a media jam is through the duplexer’s and the printer’s covers.
?
;
3
2
5 7
(
7
1
4
(
»
0!
9
=
Note: Since several sheets are cycling through the printer/duplexer at the same time,
it only appears as if the back side of a duplexed sheet emerges instantly from the
duplexer. If you experience a media jam, be sure to check which sheets have printed.
$
;
$
7
"#+
When a jam occurs, the message window on the control panel displays one of several
messages: Misfeed Jam, Inner Jam, Drum Jam, Outer Jam or Lower
Duplex Jam or Upper Duplex Jam. Frequent jams in any area indicate that area
should be checked, repaired, or cleaned. Repeated jams may also happen if you’re
using the wrong weight print media.
Misfeed jams occur in the standard cassette or lower input feeder. A misfeed
jam may be as simple as a sheet of media not being picked, or it may be that
the media was picked but not fed properly. Access to this area is through the cassette slot.
Inner jams occur in the transfer drum/transfer unit area. This type of jam means
that the media did not make it to the paper exit area. Access to this area is
through the printer’s (and/or duplexer’s) rear cover (and/or duplexer’s lower rear
assembly).
Drum jams occur if the media winds around the transfer drum. Access to this
area is through the printer’s (and/or duplexer’s) rear cover.
Outer jams occur in the fuser/media exit area. Jams of this type usually means
that media is stuck in the fuser/exit roller area. Access to this area is through the
printer’s (and/or duplexer’s) top cover.
Duplex jams occur in the duplexer. Access to this area is through the duplexer’s
top and rear covers, and lower rear assembly.
(#
"#
To avoid damage to rollers, always remove jammed media gently.
Always try to remove jammed media without tearing it. Any pieces of media
left in the printer, whether large or small, can obstruct the paper path and cause
further jams.
If, after clearing the media jam, the jam message in the control panel window persists,
open and close the printer’s top cover. This should clear the jam message.
;
0'
6&$
;
1
Remove the media cassette(s).
2
Pull out the jammed media.
3
Ensure that the media is lying flat in the cassette(s) and that it doesn’t
exceed the media limit mark.
4
Slide the cassette(s) back into the printer.
4
4
WARNING! The fuser unit is hot! Do not remove a jam in this area until the fuser unit
cools.
ACHTUNG! Die Fixiereinheit wird sehr heiß! Bitte achten Sie darauf, daß sie diese
einige Zeit abkühlen lassen, bevor Sie einen Papierstau beseitigen.
Caution: Media that hasn’t fully passed through the fuser contains unfused toner that
can dirty your hands, clothes, or any thing else it gets on. If you accidentally get toner
on your hands, wash them in cool water. If you accidentally get toner on your clothes,
lightly dust them off as much as possible. If some toner remains on your clothes, use
cool, not hot water, to rinse the toner off, provided your clothing is washable.
1
If you have a duplex model, see “Duplexer Jams” on page 7-9.
2
Open the rear cover of the printer.
Note: The illustrations for steps 2
through 12 show the printer without
the duplexer. However, the
instructions are the same for both
models.
»
0/
3
Remove the jammed media by
pulling it toward you.
4
Close the printer’s rear cover.
6&$
;
5
If there still is a jam message,
open the printer’s top cover.
Caution: If you have a duplex model,
make sure you have opened the
duplexer’s rear cover first. See
“Duplexer Jams” on page 7-9. Forced
opening of the top cover first may
damage the unit.
Pull the top latch to release the top
cover.
6
Remove the jammed media by pulling it toward you.
7
If it didn’t come out easily, open
the fuser roller pressure release
levers (one at each end of the
fuser).
;
00
6&$
;
8
Remove the jammed media by
pulling it from the bottom of the
fuser (through the printer’s [and/or
the duplexer’s] rear cover), not
from the top of the fuser.
This prevents any unfused toner from
dirtying the fuser rollers.
Caution: Be careful not to touch the
transfer drum while removing
jammed media.
9
Close the fuser roller pressure release levers (one at each end of the fuser).
10 Close the top cover of the printer.
11 Close the rear cover of the printer.
12 Slide the cassette(s) back into the printer.
0-
6&$
;
5
1
If you have a duplex model, open
the duplexer’s top cover.
If not, skip this section.
Note: Use two hands to open the
duplexer’s top cover to avoid twisting
its hinge.
»
2
Remove the jammed media by
pulling it toward you.
3
Close the duplexer’s top cover.
4
If there still is a jam message,
open the media cassette.
5
Remove the jammed media by
pulling it toward you.
6
Close the media cassette.
;
0+
6&$
;
7
If there still is a jam message,
remove the duplexer’s lower rear
assembly.
8
Remove the jammed media by
pulling it toward you.
9
Reinsert the duplexer’s lower rear
assembly.
10 If there still is a jam message,
open the duplexer’s rear cover.
02
6&$
;
11 Tilt the paper path.
Caution: Hold the paper path unit by
its corners to avoid the unit catching
your fingers between it and the cover.
12 Remove the jammed media in the
paper path by pulling it toward
you.
If the media came out easily, close
the duplexer’s rear cover.
If the media did not come out easily,
keep the duplexer’s rear cover open
for now.
13 If there still is a jam message,
open the printer’s top cover.
Caution: If you have a duplex model,
make sure you have opened the
duplexer’s rear cover first. Forced
opening of the top cover first may
damage the unit.
Pull the top latch to release the top
cover.
»
Note: The illustration for step 13
shows the printer without the
duplexer. However, the instructions
are the same for both models.
;
0
6&$
;
14 Remove the jammed media by
pulling it toward you.
15 If it didn’t come out easily, open
the fuser roller pressure release
levers (one at each end of the
fuser).
»
0
Note: The illustrations for steps 15
and 16 show the printer without the
duplexer. However, the instructions
are the same for both models.
6&$
;
16 Remove the jammed media by
pulling it from the bottom of the
fuser (through the printer’s [and/or
the duplexer’s] rear cover), not
from the top of the fuser.
Caution: Be careful not to touch the
transfer drum while removing
jammed media.
Removing the media from the bottom
prevents any unfused toner from
dirtying the fuser rollers.
17 Close the fuser roller pressure release levers (one at each end of the fuser).
18 Close the printer’s top cover.
19 Close the printer’s rear cover.
20 If you have a duplex model, close the duplexer’s rear cover.
Remove jammed media from the output tray by gently pulling it toward you.
;
0
%
1 1 1
“Status and Service Messages” on page 8-2
“Print Monitor Status Messages” on page 8-14
“Troubleshooting Quick Check” on page 8-16
“Performing a Board Test” on page 8-18
“Printing a Test Page” on page 8-17
“Control Panel Problems” on page 8-19
“OPC Belt Cartridge Problems” on page 8-25
“Output Problems” on page 8-20
“Duplexer Problems” on page 8-26
“Print Quality Problems” on page 8-28
“Placing a Service Call” on page 8-35
This chapter provides information to aid you in resolving printer problems: tables of
common status messages, a problem checklist, and descriptions of common print
quality problems with corresponding solutions. You’ll also find out what information
you’ll need to have before placing a service call if one becomes necessary.
++
Status and service messages are displayed in the control panel message window.
They provide information about your printer and help you locate many problems.
When the condition associated with a displayed message has changed, the message
is cleared from the window.
»
-
Note: Status messages are not displayed while the printer is off line.
This message...
indicates...
Do this...
Asic error
There is an application specific
integrated circuit (ASIC) problem.
Call for service.
Asic error 2
There is an application specific
integrated circuit (ASIC) problem.
Call for service.
Back panel
Misinstalled
The rear cover over the transfer unit is Close the rear cover.
not closed.
Bad entry
You have made an illegal entry in the
configuration menu.
Enter your information
again.
Belt cartridge
Misinstalled
The OPC belt cartridge is either
incorrectly installed or missing.
Install the OPC belt
cartridge correctly.
Black toner Empty
The black toner cartridge is empty.
Replace the black toner
cartridge.
Black toner
Misinstalled
The black toner cartridge is either
incorrectly installed or missing.
Install the toner
cartridge correctly.
Canceling jobs
All pages currently received by the
printer are being cancelled.
No action needed.
&
$
This message...
indicates...
Do this...
Check fuser
Cleaning roller
The cleaning roller is either
misinstalled or missing, or it is empty
and needs to be replaced.
Correctly install or
replace the cleaning
roller.
Check fuser oil &
cleaning roler
The fuser oil bottle and cleaning roller Correctly install or
are either misinstalled or missing, or replace the fuser oil
they need to be replaced.
bottle and cleaning
roller.
Check waste Toner
The waste toner pack is either
Correctly install or
misinstalled or missing, or it is full and replace the waste toner
needs to be replaced.
pack.
Cyan toner Empty
The cyan toner cartridge is empty.
Replace the cyan toner
cartridge.
Cyan toner
Misinstalled
The cyan toner cartridge is either
incorrectly installed or missing.
Install the toner
cartridge correctly.
Download error
Press cancel
An error has occurred in the system
software download procedure.
Press the Cancel key on
the printer control panel,
and restart the
download procedure.
If this error appears
again, call for
service.
Downloading
Test page
A test page is being printed.
No action needed.
Dram test error
There is a DRAM or controller board
problem.
Call for service.
Drum jam
Media has jammed in the drum area.
Locate and clear the
media jam.
Duplex panel
Misinstalled
The duplexer’s top cover is not closed. Close the duplexer’s top
cover.
Energy save mode On
Energy Saver mode is currently in
effect.
$
No action needed.
-
&
$
This message...
indicates...
Do this...
Ethernet error
An Ethernet error has occurred:
Record the error number, if one is given, and
then contact your system administrator or the
QMS Customer
Response Center.
101
103
104
105
106
107
108
109
110
111
112
113
114
115
124
125
126
241
242
-!
Hardware address conflict
mem err
appinit
net err
net err
event err
event err
Ethernet address conflict
err
err
couldn’t program physical
err
RARP err
couldn’t program logical address
snetopen err
netxopn err
makeport full
shift err
fifo count error
Erasing flash
The flash ROM is erasing the old ROM No action needed.
when you are installing a new system.
F# xxxxxxxx xxxx
i960 fault
There is a processor fault.
Call for service.
Flash error
There is a flash ROM problem.
Call for service.
Front panel
Misinstalled
The front cover is not closed.
Close the front cover.
Fuser c. roller
Misinstalled
The fuser cleaning roller is either
incorrectly installed or missing.
Install the fuser cleaning
roller correctly.
Fusing unit
Misinstalled
The fuser is either incorrectly installed Install the fuser
or missing.
correctly.
HW err 0
Press cancel
The Ethernet hardware address is not Use the Ethernet HW
set.
(Hardware) Address
menu to set the
hardware address.
Idle
No jobs are in progress.
No action needed.
&
$
This message...
indicates...
Do this...
Inner jam
Media has jammed.
Locate and remove the
jam. Check the
locations described in
chapter 7, “Media
Jams.”
IP err 0
Press cancel
The Internet address is incorrectly set. Use the Internet
Address menu to set it
correctly.
Key is not used
The Media key has been accidentally No action needed.
pressed.
Lower Cassette
Misinstalled
The lower input feeder cassette is not Close the lower input
closed.
feeder cassette.
Lower Duplex Jam
Media has jammed leaving the lower
duplex unit.
Magenta toner Empty
The magenta toner cartridge is empty. Replace the magenta
toner cartridge.
Magenta toner
Misinstalled
The magenta toner cartridge is either Install the toner
incorrectly installed or missing.
cartridge correctly.
Media mismatch
The type of media (paper or
transparency) in the cassette is
different from that chosen in the
printer driver.
x Meg
Version x.x
This indicates the total amount of
No action needed.
memory installed in the printer and the
kernel version. It displays during
printer startup.
Misfeed jam
Media has jammed leaving the media Locate and remove the
cassette.
media jam.
Need more memory Paper More memory is needed to print the
mismatch
job, and the media in the cassette is
different from that chosen in the
printer driver.
»
$
Locate and remove the
jam.
Put the correct type of
media in the cassette.
Add more memory, put
the correct media in the
cassette, and then
reprint the job.
Note: The image will still print, but
because there is insufficient
memory, parts of the image will be
clipped.
-'
&
$
This message...
indicates...
Do this...
Need new kernel
The kernel can’t be located by the
system software.
Download the kernel
again.
New kernel...
The kernel is being downloaded
during the system software
downloading process.
No action needed.
Output Bin Full
Media has filled up the output bin.
Remove media from the
output bin.
Outer jam
Media has jammed leaving the paper Locate and remove the
exit unit.
jam.
Paper out lower Tray
The indicated media cassette is empty Reload the cassette.
or the cassette is missing.
Paper out upper Tray
»
Printing
The printer is on line and printing.
Printing need
More memory
The printer is on line and printing, but Add more memory, and
it needs more memory to print the file. then reprint the job.
It will print as much of the page as it
can currently fit in memory.
»
-/
Note: Because the system code is
not updated until after the print job
finishes, this message may at
times seem incorrect. In other
words, if you print a job from the
lower cassette, then start printing
a job from upper cassette but run
out of media in the upper cassette
before the job finishes, the
message Paper out lower
Tray displays.
No action needed.
Note: Due to the lack of sufficient
memory, parts of the image may
be clipped off.
&
$
This message...
indicates...
Printing
Paper mismatch
The media size in the media cassette Put the correct size
is different from that chosen in the
media in the cassette,
printer driver.
and then reprint the job.
»
Do this...
Note: The job will print on the
installed media size. However, if
the installed media size is smaller
than that chosen in the printer
driver, parts of the image may be
clipped.
QMS magicolor 2
Board test
The printer is going through its initial
testing during startup.
No action needed.
Replace 120K kit
The printer is ready for its 120,000
page preventive maintenance.
Call for service.
Replace belt
The OPC belt cartridge needs to be
replaced.
Replace the OPC belt
cartridge.
»
Replace black Toner
The black toner cartridge is low.
Replace the black toner
cartridge, or continue
printing until Black
toner Empty displays.
»
$
Note: Reset the
OPC belt under
Operator Control/
Consumables/Item
Replaced/Belt.
Note: Reset black
toner under
Operator Control/
Consumables/Item
Replaced/Black
Toner.
-0
&
$
This message...
indicates...
Do this...
Replace cleaning
Roller
The fuser cleaning roller needs to be
replaced.
Replace the fuser
cleaning roller.
Also, this message
occurs when the user
replaces the fuser oil
bottle and cleaning
roller, but only resets
the fuser oil on the
control panel.
»
Replace cyan Toner
The cyan toner cartridge is low.
Replace the cyan toner
cartridge, or continue
printing until Cyan
toner Empty displays.
»
Replace fuser
The fuser needs to be replaced.
Note: Reset cyan
toner under
Operator Control/
Consumables/Item
Replaced/Cyan
Toner.
Replace the fuser.
»
--
Note: Reset the
fuser cleaner under
Operator Control/
Consumables/Item
Replaced/Cleaning
Roller.
Note: Reset the
fuser under
Operator Control/
Consumables/Item
Replaced/Fuser.
&
$
This message...
indicates...
Do this...
Replace magenta Toner
The magenta toner cartridge is low.
Replace the magenta
toner cartridge, or
continue printing until
Magenta toner
Empty displays.
»
Note: Reset
magenta toner
under Operator
Control/
Consumables/Item
Replaced/Magenta
Toner.
Replace oil and Pad
The fuser oil is low.
Replace the fuser oil
bottle and cleaning
roller.
Replace yellow Toner
The yellow toner cartridge is low.
Replace the yellow
toner cartridge, or
continue printing until
Yellow toner Empty
displays.
»
Note: Reset yellow
toner under
Operator Control/
Consumables/Item
Replaced/Yellow
Toner.
Selected
You have selected a setting or option
in the configuration menu.
No action needed.
Service mode
Service is being performed on the
printer.
No additional action
needed.
Top panel
Misinstalled
The top cover is not closed.
Close the top cover.
Upper Duplex Jam
Media has jammed leaving the upper Locate and remove the
duplex unit.
jam.
Warming up
The printer is warming up; the fuser is No action needed.
at a low temperature. Wait until the
printer has warmed up before you
print.
$
-+
&
$
-2
This message...
indicates...
Do this...
Writing flash
The system is being written to flash
ROM during software downloading
process.
No action needed.
Yellow toner Empty
The yellow toner cartridge is empty.
Replace the yellow
toner cartridge.
Yellow toner
Misinstalled
The yellow toner cartridge is either
incorrectly installed or missing.
Install the toner
cartridge correctly.
&
$
.
This service message...
Call for service
C3 NVRAM error
Call for service
C4 engine ctrl.
Call for service
C7 timing clock
Call for service
D1 YW clutch
Call for service
D2 MG clutch
Call for service
D3 CY clutch
Call for service
D4 BK clutch
Call for service
D5 YK solenoid
Call for service
D6 MC solenoid
means...
An error has been detected with the
item indicated in the service
message. Correction of these errors
is performed by qualified service
personnel only. Contact your local
vendor.
»
Note: A service message
sometimes occurs as a result of
an unusual combination of events,
not because of an actual problem.
When the printer stops and a
service message displays in the
message window, turn the printer
off and then back on. This often
clears the service message
indicator, and printer operation
resumes. Always try this before
making a service call.
Service calls should be placed to the
vendor from whom you purchased the
printer. If you cannot get service from
your vendor, see appendix A, “QMS
Customer Support,” for more
information.
Call for service E1
DE devlpr. motor
Call for service
E2 main motor
Call for service
E3 drum error
Call for service
E4 toner empty
Call for service
E5 roller solnd.
$
-
&
$
This service message...
Call for service
E6 clean solnd.
means...
See the information on page 8-11.
Call for service
E7 clean clutch
Call for service
E8 fuser clutch
Call for service
E9 belt marker
Call for service
EL erase LED
Call for service
F0 cooling fan
Call for service
F2 ozone fan
Call for service
F4 fuser fan
Call for service
F5 charge HV
Call for service
H0 fuser therml.
Call for service
H2 fuser temp 2
Call for service
H3 fuser temp 3
Call for service
H4 fuser temp 4
Call for service
L1 beam detector
Call for service
L2 scanner motor
-
&
$
This service message...
Call for service
LL laser power
means...
See the information on page 8-11.
Call for service
P1 Hardware err
Call for service
P2 Duplex NVRAM
Call for service
P4 Duplex motor
Call for service
P5 solenoid err
Call for service
P6 Duplex fan
$
-
.
$
+ One of the following messages displays via Print Manager in the printer status window
when the Windows 95/98/NT Print Spooler is the originator of the status information:
This
message...
indicates...
Spooling
The print job is being spooled from an
application either on a local or remote
workstation.
» Note: Windows NT only—Remote Downlevel
Document displays in the Document Name
column of the status window when the client
workstation, spooling jobs to an NT server,
does not transmit complete job information.
See your Microsoft Windows NT
documentation for more information on this
message.
Nothing
Printing
The spooler is ready to activate the designated
monitor and despool the submitted print job.
Nothing
Deleting
The spooler has finished submitting the print job
to the designated print monitor and is deleting
the spool file.
Nothing
Error
Do this...
The spooler is reporting an error received from
the monitor.
If the print job is spooled on a local
workstation, then a dialog box prompting you
to either delete or retry the job displays.
If the print job is spooled on a remote
workstation, then the job is retried until it is
either deleted or the printer becomes
unavailable.
-!
For print jobs spooled
on a local workstation,
click the appropriate
dialog box button.
For print jobs spooled
on a remote
workstation, either wait
until the error clears or
delete the job.
.
$
One of the following messages displays via Print Manager in the printer status window
when the QMS Network Print Monitor is the originator of the status information:
This message... indicates...
Printer not
responding
Do this...
The QMS Network Print Monitor can’t
If the print job is
spooled by a local
communicate with the printer. Either the printer
workstation, then
is off, or the connection is broken.
either turn on the
»
Note: If the job is in process, then it is
printer or reconnect it
terminated, removed from the queue,
to the network, and
reported to the Network Spooler and, if
then click the Retry or
you’re using Windows NT, listed in the
Cancel button.
Application Event Log (if enabled).
If the job is spooled
by a remote
workstation, then turn
on the printer or
reconnect it to the
network.
Printer Busy This message displays while the job is
None
transferred to the printer.
»
Note: Windows NT only—The flag next to
this message indicates spooling status:
Green Flag—Printer spooling is enabled.
Red Flag—Printer spooling is disabled.
This printer-dependent status information displays via Print Manager in the printer status window when the QMS Network Print Monitor is displaying a message from the
printer. See “Status and Service Messages” on page 8-2 for a complete list and
description of these messages.
$
-'
$
%
»
Note: When you’re printing remotely via the parallel interface, the range of error
messages is much smaller than when you’re printing via the Ethernet interface. For
example, when the printer status window displays Paper out x Tray, the printer
may actually be turned off. Status messages displayed for Ethernet connections are
much more accurate.
This message...
indicates...
Control panel
status messages,
such as the
following:
Idle
x toner empty
Outer jam
The printer has encountered a problem.
Do this...
Fix the printer problem
and then do the
following.
If the print job is spooled on a local
workstation, a dialog box prompts you either
to delete or retry the job.
For print jobs spooled
If the print job is spooled on a remote
workstation, the job is retried until it is either
deleted or the printer becomes unavailable
(for example, it is busy printing another job or
it is taken off line).
For print jobs spooled
Remember that if the send request timeout
expires, the print job will be terminated and
cleared from the system.
on a local
workstation, click the
appropriate dialog
box button.
on a remote
workstation, either
wait until the error
clears or delete the
job.
%&
*
If you’ve just installed your printer and are having problems, be sure you’ve correctly
followed the procedures explained in the QMS magicolor 2 DeskLaser Setup Guide.
Then, check the following:
1
Is the printer status displayed in the control panel window?
If yes, go to question 2.
If not, check the following:
-/
Is the printer turned on?
Is the power cord plugged into both the power outlet and the printer?
.$.$
2
Is the power outlet working?
Does the line voltage from the power outlet match the printer’s power requirements? See appendix B, “Technical Specifications.”
Is the printer receiving data from the computer?
Try printing a Microsoft test page:
a
From the Windows 95/98 or Windows NT Start menu choose Settings and
then Printers.
b
Select the printer, and from the File menu choose Properties.
c
On the General tab choose the Print Test Page button.
If the Ready indicator starts blinking, the printer is receiving the data.
If not, check the following:
3
Are the interface cables securely fastened?
Is the printer on line? The Ready indicator should be lit.
Is your application set up correctly for printing? Are the communication
parameters the same as those on your host and printer?
If you still can’t identify the problem, contact your local vendor.
Does your application require any additional printer setup?
If you’re experiencing printing problems not related to print quality, check the printing section of your application documentation to see if any additional printer setup
steps are required.
%
You can verify that the printer is able to print by using the Test Page menu:
1
Press the Online/Offline key to take the printer off line.
2
Press the Menu key until the Test Page menu displays.
3
Press the Select key to display the Print test page option.
$
-0
.($7
4
Press the Select key again to display the message
Selected
and print the test page.
-#
,%
You can test the printer components by using the Board Test menu.
Caution: Make sure the control panel message window reads IDLE before
performing this procedure.
1
Press the Online/Offline key to take the printer off line.
2
Press the Menu key until the Board Test menu displays.
3
Press the Select key to display the Perform test option.
4
Press the Select key again to display the message
Online, full test
and begin the test.
The following messages display in the message window several times:
Testing
Testing
Testing
Testing
Flash
Ethernet
Asics
DRAM
When the board test is finished, the message
Board OK
Select Cancel
displays in the message window.
--
%.
.
5
Press the Cancel key to reboot the printer.
The message window displays
Booting
as the printer restarts and then returns to
Idle
&#
.
61
Wait until Windows has completed sending the print job. Even though the printer
may have cancelled the job, until Windows has completed sending the job, the
Data indicator continues to blink.
If you’re printing via the parallel port, increase the timeouts. Refer to your Windows documentation for more information.
Test the printer:
1
In the application’s Print dialog box select Print to File to print the document to
a file.
2
When prompted, identify a filename and location for the “printed” file.
3
Access an MS-DOS prompt.
4
Change to the directory you identified in step 2.
5
Send the file to the printer by typing
copy /b filename lpt1↵
6
Report the problem to the QMS Customer Response Center. Refer to
appendix A, “QMS Customer Support.”
If a jam message stays on, open the printer and clear the jam (see chapter 7, “Media
Jams”). If the message remains, try opening and closing the top of the printer again.
$
-+
1#.
If a Printing message stays on after a file is printed, you can continue to print files.
However, to remove the message, try pressing the Online/Offline key to take the
printer off line and then put it back on line again. If that doesn’t remove the message,
turn the printer off and then on again to remove the message.
$
.
.
If a Paper mismatch message stays on after a file is printed, you can continue to
print files. However, to remove the message, try this:
Press the Cancel key.
Press the Online key to take the printer off line and then put it back on line again.
Turn the printer off and then on again.
Or, you can try this:
Remove the cassette.
Move the media guides back and forth a few times.
Refill and reinsert the cassette.
Does that work? If not, remove the cassette and media.
Move the back media guide while looking at the left-hand side of the cassette.
Does the size indicator move as you slide the back guide? If not, the cassette
needs to be replaced.
&#
»
Note: Because the QMS magicolor 2 DeskLaser uses various Microsoft printer drivers
and other resources, it works differently than a QMS Crown print system.
In general, if you’re having output problems, try the following:
-2
Ensure that your application is Microsoft Windows certified.
1#.
Ensure that you’re using the most current version of the application (such as
Microsoft Office 97) since Microsoft has fixed a number of problems related to
printing in these versions.
.
Ensure that the same size media is selected in both the application (page setup)
and the printer driver. If the media size selected in the application is larger than
that selected in the printer driver (and installed in the printer), the image is scaled
on the printed page.
Check the imageable areas for the size media you’re using (see chapter 3, “Printing”). Are you trying to print outside of the imageable area of the page? If so,
change to a larger size media, or adjust the margin(s) through your application.
The charger unit or various roller and plates may be dirty. See chapter 6, “Maintenance,” for instructions on how to clean these parts.
Check for a Printing need More memory error message in the message window. The job may have been too complex for the amount of memory currently
installed in the printer. If so, add more memory.
See “Single In-line Memory Modules (SIMMs)” in chapter 5, “Printer Options,” for
a discussion of how the PC and printer use memory.
61“
”
If one or more blank pages “print” during a print job, try the following:
1
Check for media jams.
Check the inside of the printer for media in the laser beam path.
2
Ensure that the transfer unit is closed.
3
Ensure that the printer’s covers are closed.
If you have a duplex model, ensure that the duplexer’s covers are closed.
4
Ensure that the toner cartridges are not empty.
$
-
1#.
5
Ensure that the orange protective cover has been removed from each toner
cartridge.
6
If the toner cartridges are not empty and the protective cover has been
removed, take the cartridges out, rock them gently from side to side five or
six times, and then reinstall them.
7
If these solutions don’t work, load new toner cartridges in the printer.
If the printer stops printing in the middle of your file, try the following:
1
Check your interface cable.
You could have the wrong kind of cable—check to see if you have the correct parallel or Ethernet interface cable.
2
Make sure no one pressed the Cancel key while your job was printing.
3
Check the message window to see if the cassette you’re using needs more
media.
4
Verify that the printer driver spool setting is QMJOURNAL.
If the spool setting is set to EMF (metafile) or RAW, use the following instructions
to set it to QMJOURNAL.
»
-
Note: EMF and RAW are defaults used by other vendors. The QMS magicolor 2
DeskLaser will work properly only with the QMJOURNAL format of sending data.
a
From the Windows Start menu choose Settings.
b
From the Settings menu choose Printers.
c
In the Printers dialog box select the QMS magicolor 2 DeskLaser printer icon,
and from the File menu choose Properties.
d
In the QMS magicolor 2 DeskLaser Properties dialog box, choose the Details
tab (Windows 95/98) or the Scheduling tab (Windows NT 4.0).
e
Choose the Spool Settings... button.
f
In the Spool Settings dialog box change the Spool Data Format to
QMJOURNAL or select Print Directly to the Printer.
1#.
g
Choose Enable bidirectional support for this printer.
h
Choose OK twice to return to the Printers dialog box, and then close the
Printers dialog box.
;
;
If files don’t print at all, try the following:
1
Check the printer cables to make sure they’re not loose or disconnected.
Loose or disconnected cables will cause a break in communication. Any job sent
to the printer while it’s recovering from a break in communication is flushed from
the Windows print queue.
2
3
Check to verify that you’re using the latest versions of the printer driver and
printer code as well as your application.
To check the version number of the printer driver, in the QMS magicolor 2
DeskLaser Properties window (Start > Settings > Printers > File/Properties)
choose the Paper tab and then the About... button. Contact your local vendor
to determine if this is the latest version of the printer driver.
To check the version number of the printer code, turn your printer off (if necessary), and then turn it back on. During the startup process the message window displays x Meg ver x.x. Contact your local vendor to determine if this
is the latest version of the printer code.
To check the version number of most Windows applications, from the Help
menu choose About Application. Contact your application vendor to determine if you’re using the latest version of the application.
Verify that the printer driver spool setting is QMJOURNAL.
If the spool setting is set to EMF or RAW, use the following instructions to set it to
QMJOURNAL.
»
Note: EMF and RAW are defaults used by other vendors. The QMS magicolor 2
DeskLaser will work properly only with the QMJOURNAL format of sending data.
a
From the Windows Start menu choose Settings.
b
From the Settings menu choose Printers.
c
In the Printers dialog box select the QMS magicolor 2 DeskLaser printer icon,
and from the File menu choose Properties.
$
-
1#.
4
d
In the QMS magicolor 2 DeskLaser Properties dialog box, choose the Details
tab (Windows 95/98) or the Scheduling tab (Windows NT 4.0).
e
Choose the Spool Settings... button.
f
In the Spool Settings dialog box change the Spool Data Format to
QMJOURNAL or select Print Directly to the Printer.
g
Choose Enable bidirectional support for this printer.
h
Choose OK twice to return to the Printers dialog box, and then close the
Printers dialog box.
Change the spooling time.
If changing the printer driver spool setting to QMJOURNAL doesn’t work, try the
following:
In the Spool Print Jobs So Program Finishes Printing Faster section of the dialog
box, choose the radio button for Start Printing After Last Page Is Spooled rather
than Start Printing After First Page Is Spooled.
5
Add more memory to the printer.
See “Single In-line Memory Modules (SIMMs)” in chapter 5, “Printer Options,” for
a discussion of how the PC and printer use memory and for information on installing SIMMs.
6
Reboot your printer.
;
+
+
+
.
.
If you’re not using TrueType fonts, change to TrueType fonts.
;
<
1
Check that the media does not exceed the media limit mark.
Make sure that the stack does not exceed the paper limit mark on the media
cassette.
2
Check that the paper stack is correctly aligned.
Make sure that the stack is correctly aligned in the media cassette.
-!
1.%7%$
.
3
Check that the correct paper type is used.
See appendix B, “Technical Specifications,” for media specifications.
4
Check the printer for residual jammed media.
5
Remove any jammed media remaining inside the printer by checking the
locations described in chapter 7, “Media Jams.”
6
Remove the media and load fresh media from an unopened package.
,
&#
Caution: The OPC belt is extremely sensitive to bright light and direct sunlight.
Always leave it in its protective bag until you are ready to install it. Any exposure to
light should be limited to less than two minutes or permanent damage could result. If
you suspect the belt is damaged due to exposure to light, put the belt in a dark place
to recover. Depending on the amount of exposure, recovery may take up to two hours.
Recovery time is dependent on the amount of exposure sustained, and recovery is not
guaranteed.
If you experience the following print quality problems, they may be pointing to the OPC
belt cartridge.
Lightly stained background
Edge of the image is missing
Partially uneven optical density image periodically
White or black vertical lines
Banding lines and uneven color density
White or black spots
Misregistration of color occurring between overlapped colors
Try the following:
1
Perform routine user cleaning on your OPC belt cartridge.
See “Cleaning the OPC Belt Cartridge” on page 6-16.
$
-'
#9.
2
Print a test page.
If you still have the problem, try steps 3 through 5 below.
3
Reinstall the OPC belt cartridge.
Print a test page after each step.
4
Replace the toner cartridges.
5
Replace the OPC belt cartridge.
See “Print Quality Problems” on page 8-28 for a further discussion of print quality
problems and possible solutions.
If you still can’t identify the problem, contact your local vendor.
0&#
Caution: Although the QMS magicolor 2 DeskLaser was designed for occasional
printing on a wide range of media types, it is not intended to print exclusively on a
single media type except plain paper. Continuous printing on media other than
plain paper (such as envelopes, glossy stock, labels, thick stock, transfer media, or
transparencies) may adversely affect print quality or reduce engine life.
After 200 1-sided pages (or 100 2-sided pages) of a continuous print run of plain
paper, the magicolor 2 DeskLaser automatically pauses for 3 minutes to cool
down the engine. This occurs for monochrome or color printing. After this initial
cooldown pause, the printer automatically resumes its printing. From that point
forward while doing continuous printing, the 3-minute cooldown pause occurs every
50 pages until the continuous printing stops. After an extended idle period, this
50-page interval automatically resets to 200 pages. This process is provided to
maintain the rated duty cycle of the printer and to ensure reliable printer operation with optimum output quality.
In general, if you’re having output problems with your duplexer, try the following:
1
Ensure that you are using correct media.
Do not duplex envelopes, labels, or transparencies.
-/
#9.
2
Ensure that you did not mix media types in your media cassette.
3
If you are using media that is heavier than 24 lbs (90 g/m²), ensure that you
have selected the Thick Stock mode.
Ensure that your media does not exceed 43 lbs (160 g/m²).
4
Ensure that your document has more than one page.
5
Go into the printer’s control panel and ensure that duplex is an available
option.
6
In the printer driver (Administration, Paper tab, Duplex Option), choose Flip
on Long Edge (as in a loose-leaf notebook) or Flip on Short Edge (as on a
clipboard).
7
Remove media that is still jammed.
Caution: Always open the duplexer’s rear cover before opening the printer’s or
duplexer’s top cover. Forced opening of the top cover first may damage the unit.
Check for media stuck in the paper guides in the duplexer’s top cover, rear cover,
and lower rear assembly.
8
If you removed jammed media from near the OPC belt, reset the OPC belt’s
locking levers.
9
Ensure that all of the covers are closed.
Caution: Always open the duplexer’s rear cover before opening the printer’s or
duplexer’s top cover. Forced opening of the top cover first may damage the unit.
Open and then close the covers to confirm that they are securely closed.
10 Ensure that the duplexer’s lower rear assembly is firmly seated in the
printer.
11 If you turned the printer off, ensure that you have turned the printer on again
and waited for it to warm up.
$
-0
."
.
*
3&#
This section discusses several types of print quality problems and possible solutions.
Try the solutions in the order listed. If none solves the problem, call your local vendor
for service. See “Placing a Service Call” on page 8-35.
0
1
Check that you are using the approved media.
Refer to chapter 3, “Printing,” for recommended media types.
2
Check that there is enough toner in the printer whether or not the Replace
x toner message is displayed.
Toner can settle in the cartridges. To redistribute the toner, remove each toner cartridge, and gently rock it from side to side. Then reinsert the cartridges and try
printing again.
3
Replace the toner cartridge(s).
4
Before you place a service call, ensure all the required user cleaning has
been conducted.
5
Place a service call to your local vendor.
6
/
6.1
One or more toner cartridges may be defective.
Check the toner cartridges, and install new ones, if
necessary.
Reinstall the OPC belt cartridge. If necessary, replace the
OPC belt cartridge.
--
."
.
64,
Check that the printer is on a hard, level surface.
Reinstall the OPC belt cartridge. If necessary, replace the
OPC belt cartridge.
One or more toner cartridges may be defective.
Check the toner cartridges, and install new ones, if
necessary.
If a wide horizontal white line appears,
Ensure that the transfer unit was closed.
Replace the transfer roller.
.
0
;
If there is insufficient gloss of the printed image,
Check the fuser oil condition.
If there is insufficient fusing and the image comes off when
the printed image is rubbed,
Check your media type—envelopes, glossy stock, labels,
transfer media, and thick stock have to be set in the thick
stock mode.
$
-+
."
.
,
The paper being used may have absorbed moisture (perhaps
due to high humidity or having water spilled on the paper
supply). Toner does not adhere well to paper where it has
become wet.
Replace the paper in the cassette with dry paper.
Confirm the proper installation of the transfer roller. If
necessary, replace the transfer roller.
*
If the edge of an image is missing or optical density declines
Check the toner cartridge in question, and install new
one, if necessary.
Check the OPC belt cartridges, and install new one, if
necessary.
- 2
."
.
5
4
If mixing of colors occurs in the printed image:
Ensure that the printer’s front cover is closed.
Remove the toner cartridges and gently rock them five or
six times to redistribute the toner. Then, reinstall the
cartridges.
One or more toner cartridges may be defective. Check the
toner cartridges, and install new ones, if necessary.
If misregistration of color occurs between overlapped colors:
Ensure that the printer’s front cover is closed.
If spots appear on the printed image:
Check the surface of the OPC belt, clean up the foreign
particle, and replace the OPC belt if necessary.
$
- ."
.
&
1
Install new toner cartridges.
&
/
Remove the toner cartridges and gently rock them
horizontally five or six times to redistribute the toner. Then,
reinstall the cartridges.
One or more toner cartridges may be defective. Check the
toner cartridges, and install new ones, if necessary.
Check your media type—envelopes, glossy stock, labels,
transfer media, and thick stock have to be set in the thick
stock mode.
- ."
.
&
4,
If the toner smudges are on only the front of the page:
Remove the toner cartridges and gently rock them five or six
times to redistribute the toner. Then, reinstall the cartridges.
One or more toner cartridges may be defective. Check the
toner cartridges, and install new ones, if necessary.
If toner smudges are on the back of the page:
Replace the cleaning roller.
If that doesn’t work, replace the transfer roller.
If that doesn’t work, replace the fusing unit.
If toner smudges are on the front and back of the page:
Open the printer once and close it again to clean the image
transfer roller.
If the image of the previous page comes out lightly,
Clean the cleaning roller and reinstall it.
-
Remove the toner cartridges and gently rock them five
or six times to redistribute the toner. Then, reinstall the
cartridges.
Install new toner cartridges.
Reinstall the OPC belt cartridge. If necessary, replace the
OPC belt cartridge.
$
-
."
.
=
.
1
1
The laser lens may be dirty. Clean the lens as described in
chapter 6, “Maintenance.”
The corona wire inside the OPC belt cartridge might be
dirty. Clean the corona wire as described in chapter 6,
“Maintenance.”
One or more toner cartridges may be defective. Check the
toner cartridges, and install new ones, if necessary.
Clean the developer roller.
Reinstall the OPC belt cartridge. If necessary, replace the
OPC belt cartridge.
If a wide vertical white band appears:
Check the transfer drum surface. If necessary, clean the oil
off the surface.
Ensure that the transfer unit is closed.
- !
.
$&
%
+
If you have a problem you can’t resolve, contact your local vendor. Your local
vendor is best equipped to immediately handle any problem you may encounter.
If you have technical questions your vendor is unable to answer, call or fax
your questions to the QMS Customer Response Center. (See appendix A, “QMS
Customer Support,” for contact information).
If you’ve determined your printer needs to be examined by an authorized
service technician, contact an authorized service provider for work inside the US
or one of the QMS international offices for work outside of the US. (National and
international contacts are listed in appendix A, “QMS Customer Support.”)
Before calling, be sure you have the answers to these questions handy to help our
technicians serve you more quickly:
1
What is your printer model and serial number?
2
What operating system do you have and what version?
3
What application(s) are you using?
4
What is the QMS magicolor 2 DeskLaser printer driver version?
Choose the About button on the printer driver’s Paper tab.
$
- '
%
111
“Remove Cables and Cassette(s)” on page 9-3
“Remove the Toner Cartridges” on page 9-3
“Remove the OPC Belt Cartridge” on page 9-3
“Prepare the Fuser Unit” on page 9-5
“Change the Waste Toner Pack” on page 9-10
“Remove the Lower Input Feeder” on page 9-11
“Repack the Printer” on page 9-14
If you need to relocate or ship your printer after it’s been installed, you must follow
the procedures in this chapter to prevent damage to the printer and to keep your warranty valid.
Caution: QMS strongly recommends that the printer be repackaged by a trained
QMS-Authorized Service Provider. QMS cannot be held responsible for damage to
your printer during shipment that results from the improper packaging of your printer.
You must use the instructions given in this section before repacking the printer in its
original shipping carton with the original packing materials.
If you need replacement packaging for the DeskLaser, in the US call QMS
at 1 (334) 633-4300 extension 2530 and request catalog number 2600439-200.
If you need replacement packaging for the duplex model, request catalog number
2600439-201.
If you need to return the printer for service, in the US call QMS Customer Service
at 1 (334) 633-4300 extension 1072 for an RMA (Return Merchandise Authorization)
number before shipping the printer. In other countries, refer to appendix A, “QMS
Customer Support,” in any QMS printer manual.
Repacking your printer for shipment involves the following steps. Each is described in
more detail in the following sections.
1
Remove the cables and media cassette(s).
2
Remove the toner cartridges.
3
Remove the OPC belt cartridge.
4
Prepare the fuser unit for shipment:
5
Change the waste toner pack.
6
Remove the lower input feeder (if one is attached to a DeskLaser without the
duplexer).
7
Pack the printer for shipment.
»
Note: If you’re returning the printer for service, you don’t need to return the power
cable, interface cables, or media cassette(s).
1
Turn off the printer.
2
Remove the power cable and all interface cables.
Note: In compliance with UL guidelines, “The appliance inlet is considered to be
the main disconnect device.”
»
3
Remove the media cassette(s) from the printer.
1
Open the printer’s front cover.
2
Remove the four toner cartridges, attach the protective shields over their
magnetic rollers, and repackage them in their original packaging.
Caution: The OPC belt is extremely sensitive to bright light and direct sunlight. Limit
exposure to less than two minutes or permanent damage could result. While the
printer is being moved, store the cartridge in its original shipping bag. If you don’t have
this bag, carefully wrap it in a piece of dark, heavy cloth, and place it where it will not
get scratched or damaged. If exposure exceeds two minutes, put the cartridge in a
dark place to recover before using it again. Depending on exposure, recovery may
take up to two hours. Recovery time is dependent on the amount of exposure
sustained, and recovery is not guaranteed.
Also, handle the OPC belt cartridge carefully. The belt is extremely sensitive to body
oils, moisture, solvents, corrosives, dust, and scratches, all of which will reduce print
quality.
6&1.%7
%$
1
If you have a duplex model, open the duplexer’s rear cover.
If not, skip to step 2.
»
+!
2
If it’s not already open, open the printer’s front cover.
3
Open the printer’s top cover.
4
Rotate up the lock levers at each end of the OPC belt cartridge slot, and lift
the cartridge out of the printer.
Note: The illustrations in this step show the printer without the duplexer. However,
the instructions for the OPC belt cartridge are the same for both models.
.#=
5
Replace the protective sheet around the OPC belt cartridge and the tension
release pin on each side.
Insert the pin until you feel some resistance, move it forward (toward the silver
corona unit), and then slide it in the rest of the way. The tension-release pins protect the belt and its cleaning blade by relieving tension during movement.
6
Repack the OPC belt cartridge in its original shipping bag.
If you don’t have this bag, carefully wrap the cartridge in a piece of dark, heavy
cloth. Store the cartridge where it will not get scratched or damaged.
7
Rotate down the lock levers at each end of the OPC belt cartridge slot.
57
WARNING! The fuser unit can become extremely hot and cause severe burns. Make
sure the unit is cool before handling it.
ACHTUNG! Die Fixiereinheit kann sehr heiß werden, so daß Verbrennungsgefahr
besteht. Bitte lassen Sie die Fixiereinheit einige Zeit abkühlen, bevor Sie diese
berühren.
6#
$.
+'
.#=
1
If you have a duplex model, ensure that the duplexer’s rear cover is open.
If not, skip to step 2.
2
Note: The illustrations in steps 2 through 8 show the printer without the duplexer.
However, the instructions for the fusing unit are the same for both models.
»
3
+/
With the printer’s front and top covers open, at the top of the fuser rotate the
two lock levers to release the oil bottle.
Remove the oil bottle.
Caution: Hold a sheet of paper under the oil bottle as you remove it, so no oil
drips into the printer.
.#=
4
Place the oil bottle in an oil-proof container, such as a plastic bag, until
you’re ready to reinstall it.
5
Use a fuser oil remover syringe to remove any excess oil from the fuser.
Dispose of the oil following local safety laws and regulations.
6
Stuff several clean, wadded paper towels into the space normally occupied
by the oil bottle to absorb any residual oil during shipment.
Note: Don’t force the paper towels in, but make sure there are enough to fill the
space.
»
7
Close the lock levers to secure the cleaning roller.
6#
$.
+0
8
Install the fuser roller shipping restraints.
These restraints protect the fuser rollers from damage during a move by removing the pressure between the two rollers. They must be removed again
before printing.
a
Open the pressure-release levers (one at each end of the fuser) to separate
the two rollers in the fuser.
.#=
b
Insert the fuser roller shipping restraints between the fuser rollers (one at
each end of the fuser).
Caution: Be sure to insert the shipping restraints at the ends of the rollers,
not in the middle. Inserting them in the middle will damage the rollers.
c
Close the pressure-release levers (one at each end of the fuser).
When correctly positioned, the fuser roller shipping restraints fit snugly
between the rollers.
9
Close the printer’s top cover.
10 If you have a duplex model, close the duplexer’s rear cover.
6#
$.
++
%$)
.
%
1
With the printer’s front cover open, remove the waste toner pack from the
printer.
Note: This illustration shows the printer without the duplexer. However, the
instructions are the same for both models.
»
:
4
2
Use the label on the side of the old waste toner pack to seal the opening,
and then dispose of the pack in accordance with safety laws and regulations
in your area.
0
3
Install a new waste toner pack.
This ensures that no waste toner is shaken into the printer during shipment.
4
+2
Close the printer’s front cover.
6&*
#=
(#45
»
Note: If you have a duplex model, the lower input feeder should not be removed. Skip
to “Repack the Printer” on page 9-14.
If you don’t have a lower input feeder installed, skip to “Repack the Printer” on page
9-14.
1
Remove the plastic side covers from
the sides of the input feeder.
Note: The illustrations for steps 1
through 5 show the printer without the
duplexer.
»
Do not use these instructions for
the duplex model, since the lower
input feeder will remain installed.
2
Locate the cable at the left rear of
the optional feeder that connects it
to the printer, and then unplug it.
3
Switch the lower input feeder cover
plate and the printer cover plate
back to their original position.
6#
$.
+
6&*
#=
4
Unscrew the thumbscrews that
attach the two brackets (one on
each side of the printer) to the lower
input feeder.
9
6
7
5
Remove the two metal brackets from
underneath the sides of the printer.
Angle the bracket out, and then, slide it
out of the hole underneath the printer.
6
+
Unplug the printer.
6
7
84
027
9
6&*
#=
7
With the help of another person, pick up the printer by its four corners, lift it
from the lower input feeder, and place the printer on a table.
WARNING! Your printer weighs approximately 66 lbs (30 kg) without
consumables. Your duplex model printer weighs approximately 93 lbs (42 kg)
without consumables. Be sure to have help when lifting and moving it.
ACHTUNG! Das Gewicht dieses Druckers beträgt ohne Verbrauchsmaterial ca.
30 kg. Das Gewicht dieses Druckers und Duplexer beträgt ohne
Verbrauchsmaterial ca. 42 kg. Bitte versuchen Sie niemals, den Drucker alleine
anzuheben oder zu transportieren.
DeskLaser
8
»
Repack the input feeder in its original shipping carton for storage or
shipment. See page 9-15.
Note: If you’re returning the DeskLaser for service, you don’t need to return the
optional lower input feeder. If you’re returning the duplex model for service, leave
the lower input feeder attached.
6#
$.
+
6#
.
(
1
Ensure that the fuser and fuser cleaner roller are in the printer.
2
With another person’s help, put the printer into the plastic bag, and place
the printer into the base tray of the shipping carton.
3
If you have a duplex model, pack it for shipment as shown in the illustration.
If not, skip to step 4.
Duplex Model
+!
6#
.
4
Pack the DeskLaser for shipment as shown in the illustration.
DeskLaser
6#
$.
+'
6#
.
5
If you’re also shipping the power cord and any manuals with the printer,
place them in the package.
Note: Don’t ship these items if you’re returning the printer for service.
»
6
Attach the shipping carton to its base tray with the four joints provided.
7
Ensure that the top of the carton is securely taped.
8
Put the shipping straps around the carton.
+/
!
1%%%
“Sources of Support” on page A-2
“QMS World-wide Offices” on page A-4
Several sources of help and information are available, depending on the type of help
you need.
Your local vendor (the one from whom you bought the printer) may be best equipped
to help you. Your vendor has specially trained service technicians available to answer
questions, and the equipment to analyze your printer problems.
Often, “printing” problems have more to do with the application being used than with
the printer. In this case, the application manufacturer is the best source of help.
You can view the QMS home page at http://www.qms.com. The QMS server provides
access to technical reports, new product announcements, a trade show schedule, and
other general information about QMS. The QMS ftp resource is ftp.qms.com.
The QMS Answer Base is a free interactive online technical support system for the
QMS magicolor 2 DeskLaser. It answers common questions and provides diagnostic
advice. To access the Answer Base, go to http://www.qms.com, select Support, and
then select Answer Base.
The Answer Base helps you locate the information you need by asking you questions.
In fact, it can provide results even when you don’t quite know what to ask for or how to
find it. Use the Answer Base before contacting technical support—you will likely find
the answer to your question. However, if the answer is not available, you will be provided with specific QMS contact information to help solve your problem.
You can access current FAQs (Frequently Asked Questions) about your print system
at http://www.qms.com/support/support_set.htm.
You can contact the QMS Customer Response Center (CRC) in four different ways:
Telephone—You can call the CRC toll-free at (877) 778-2687 (US) Monday–
Friday, 7:00 am–6:00 pm, Central Time.
Note: If you call for assistance, have the following information ready so our
technicians can help you more quickly:
»
Your phone number, fax number, Email address, and shipping address
A description of the problem
The printer model and serial number
The type of host computer you’re using
The type and version of operating system you’re using
The interface you’re using, and, if serial, the protocol (for example,
XON/XOFF)
The application and version you’re using
The emulation of the file you’re trying to print (listed on both the status and
startup pages)
Your printer firmware version (displayed on the control panel LCD while the
printer initializes after being powered up and listed on the status/startup
pages)
A status page, if you can print one
Email—You can Email questions to the CRC through [email protected].
Fax—You can fax questions to the CRC at (334) 633-3716 (US). Provide the
same information as listed above, and indicate whether you would like a faxed or a
phoned reply.
Internet—If you have access to the World Wide Web, you can access the CRC
through the QMS home page at http://www.qms.com/support/support_set.htm.
You can access FAQs (Frequently Asked Questions) at http://www.qms.com/
support/support_set.htm.
General Contact
Telephone
1 (334) 633-4300
Fax
1 (334) 633-4866
Email
[email protected]
Internet
http://www.qms.com
Information on QMS products, supplies, and accessories, and on the authorized QMS
remarketer or service provider nearest you
1 (800) 523-2696
Customer Response Center (CRC)
Technical Assistance
Telephone
1 (877) 778-2687 (toll-free)
Email
[email protected]
Fax
1 (334) 633-3716
Internet
http://www.qms.com
Latin America
Fax
7:00 am–6:00 pm Central Time
1 (334) 639-3347
National Service
Service Information, Installation, and Maintenance Pricing
1 (800) 858-1597
1 (800) 762-8894 (Custom Service Contracts Only)
On-Site Service and Depot Repair Information
1 (877) 778-2687
7:00 am–6:00 pm Central Time
Spare Parts Ordering and Information
1 (334) 633-4300 extension 2530 8:00 am–5:00 pm Central Time
Email
[email protected]
General Contact
Telephone
1 (905) 206-0848
Fax
1 (905) 206-0903
Supplies and Accessories 1 (800) 268-0343 extension 223
National Service
On-Site Service and Depot Repair Information
1 (800) 268-4969
8:30 am–5:00 pm Eastern Time
Spare Parts Ordering and Information
1 (905) 206-9234 extension 238 8:30 am–5:00 pm Eastern Time
)*
1((
'
General Contact
Telephone
Fax
Internet
(+81)-3 3779-9600
(+81)-3 3779-9650
http://www.qmsj.co.jp
((
%'
Anitech
Sydney Business & Tech. Centre
52/2 Railway Parade
2141 Lidcombe NSW
Australia
Telephone
(+61) 2–9901 3235
Fax
(+61) 2–9901 3273
Internet
http://www.qmsaus.com.au
%#'!
Planetenbaan 60 ‘Corner Plaza’
3606 AK Maarssen
Belgium, Netherlands,
The Netherlands
and all unlisted countries
Telephone
(+31) 346–551333
Fax
(+31) 346–550170
Internet
http://www.qms.nl
%(
Vélizy Plus
1 Bis, Rue du Petit Clamart
78142 Vélizy Cedex
France
Telephone
(+33) 1–410 79 393
Fax
(+33) 1–408 30 110
%)
Gustav Heinemann Ring 212
D-81739 Munich
Germany
Telephone
(+49) 89 63 02 67 0
Fax
(+49) 89 63 02 67 67
Germany and Austria
% %##
Via della Repubblica 56
43100 Parma
Italy
Telephone
Fax
(+39) 52–1231 998
(+39) 52–1232 902
'
)*
1((
%&
Arenavägen 41, 6th floor
121 77 Johanneshov
Sweden, Finland, Norway,
Sweden
and Denmark
Telephone
Fax
(+46) 8–600 01 30
(+46) 8–600 01 33
%'
Saskay House
Unit 24 Sunninghill Business Park
Peltier Road, Sunninghill, Johannesburg
Republic of South Africa
Telephone
(+27) 11–807 6957
Fax
(+27) 11–807 6960
%$*
United Kingdom and
Ireland
Old Bridge House, The Hythe
Staines, Middlesex TW18 3JF
United Kingdom
Telephone
(+44) 1784–442255
Fax
(+44) 1784–461641
/
%
111
“Engine and Controller Specifications” on page 1-2
“Print Media” on page 1-7
“PC Cable Pinouts” on page 1-9
“Regulatory” on page 1-12
“Warranty Considerations” on page 1-13
?$
%
#
(
<
+
-
»
Note: A plane is a single pass of the OPC belt (one toner color). For example, a
one-color, single-sided (simplex) print job makes one pass (one plane), and a
two-color print job makes two passes (two planes). A single-sided color page (also
called a face) consists of four passes (or planes) of the OPC belt, since most color
print jobs use all four toner colors. A two-sided (also known as duplex or two-faced)
color page may consist of up to eight passes of the OPC belt, since most color print
jobs use all four toner colors.
Consumable life is expressed in simplex pages (1 face). A duplex page (2 faces) is
equivalent to two simplex pages.
*
DeskLaser and Duplex Model
Engine
Single-sided duty
cycle*
Monochrome
4-Color
Pages/month**
20,000
5,000
Pages/day**
1,000
250
*This is the maximum duty cycle. The maximum duty cycle is 3 times the standard duty cycle.
Any increase in the standard cycle is associated with a corresponding decrease in years of
engine life.
**At 5% coverage.
&(
Page size
Media
Simplex pages per minute
Monochrome
Legal
Color
Monochrome
3.2
Color
Paper
8
16
4
8
2
Label
3
2
N/A
N/A
Thick Stock
3
2
1.3
1.9
Transparency 8
2
N/A
N/A
Letter/A4
4
Duplex pages per minute*
2
*Duplex model only. A duplex page consists of two faces (front and back).
7
?$
%
#
(
9
Printer type
Desktop, non-impact, 4-color printer
Print method
Scanner: Semiconductor laser with rotating mirror
Recorder: Black writing electrophotographic
Process: Cyan, magenta, yellow, and black dry toner image transfer to
print media
Fuser: Heated rollers
Resolution
Standard: 600x600 dpi
Toner
Type: Microfine, dry, single component
Packaging: User-replaceable cartridges
»
Warmup time
Note: Keyed toner cartridges are available from your local vendor.
See appendix A, “QMS Customer Support,” for a list of locations
and telephone numbers.
Maximum: 210 seconds
Typical: 180 seconds from power on, assuming normal temperature
and humidity
Input sources
Simplex Standard: 250-sheet cassette
Simplex Optional: 250-sheet lower input feeder
Duplex Standard: 500-sheet input capacity (comes standard with lower
input feeder)
Output
250-sheet output bin on top of printer
"'
The stated life expectancy of each consumable is based on printing under specific
operating conditions, such as media type, number of color planes, page size, and
page coverage (usually 5% coverage of letter/A4-size media). The actual life expectancy will vary depending on these and other printing variables, including continuous or
intermittent printing, ambient temperature, and humidity. The starter toner kit contains
half the capacity of replacement toner cartridges.
»
Note: Consumables for the QMS magicolor 2 Print System are available from your
local vendor. See appendix A, “QMS Customer Support,” for a list of locations and
telephone numbers.
#
(
7
?$
%
#
(
Toner cartridges
Black
10,000 pages per cartridge @ 5% coverage
Yellow
6,000 pages per cartridge @ 5% coverage
Magenta
6,000 pages per cartridge @ 5% coverage
Cyan
6,000 pages per cartridge @ 5% coverage
»
Note: The QMS magicolor 2 DeskLaser Print System accepts only
QMS toner cartridges.
The toner cartridges in many laser printers are sensitive to bright
light because they contain a light-sensitive print drum. The toner
cartridges in your QMS magicolor 2 DeskLaser do not contain a
print drum and, therefore, are not sensitive to light.
OPC belt cartridge
Maximum life—50,000 planes, usually occurs with continuous use;
minimum life—20,000 planes, usually occurs with intermittent use
although other factors also affect cartridge life.
Fuser cleaning
roller
12,000 pages at 5% coverage of each color
Fuser oil bottle
12,000 pages at 5% coverage of each color
Waste toner pack
12,000 pages at 5% coverage of each color
CPU
Intel i960SA RISC operating at 16 MHz
Fonts
Windows 95 TrueType
Windows 97 TrueType
Windows NT TrueType
Interfaces
Parallel—Centronics / IEEE 1284 bidirectional
Ethernet—TCP/IP, ftp, and telnet
Memory
CHECK
7!
Flash EPROM (system code)
8 MB RAM standard on DeskLaser, 32 MB RAM standard on the
duplex model, upgradable to 64 MB through 2 SIMM connectors.
Optional memory
32 MB RAM SIMMs
»
System software
Note: See FAQ 7191 for a list of approved SIMMs, their
manufacturers and part numbers, and the QMS products on which
they can be used. You can access QMS FAQs through the Internet
at http://www.qms.com/support/support_set.htm.
Softloadable; stored in Flash ROM
Voltage and
frequency
US: 110/120 volts ±10% at 60 Hz ±2 Hz
Japan: 100 volts ±10% at 50/60 Hz ±2 Hz
International: 220/240 volts ±10% at 50 Hz ±2 Hz
Phase
Single
Power
consumption
Mode
Certification
Operation
Standby
Power save (engine only)
Average
Maximum
450 watts
150 watts
25 watts
1000 watts
1000 watts
Energy Star compliant
Voltage
Mode
100 volts
Operation
Standby
Energy saver mode (engine
only)
4.5 amperes
1.5 amperes
0.25 amperes
10 amperes
10 amperes
110/120 volts
Operation
Standby
Energy saver mode (engine
only)
3.8 amperes
1.3 amperes
0.2 amperes
8.3 amperes
8.3 amperes
220/240 volts
Operation
Standby
Energy saver mode (engine
only)
2 amperes
0.7 amperes
0.1 amperes
4.5 amperes
4.5 amperes
Average
Maximum
?$
%
#
(
*
Noise level
Printing: Less than 55 dB (A)
Standby: Less than 48 dB (A)
Relative
humidity
Operating: 20-80% RH (noncondensing)
Temperature
range
Operating: 50-90.5° F (10-32.5° C)
Transportation/Storage: 10-80% RH (noncondensing)
Transportation/Storage: 32-95° F (0-35° C)
Altitude
Operating: 0-8202 ft (0-2500 m)
Inclination
Operating: Less than or equal to 1.5° from level
&
:
(;!:.
&
7/
!
"!
.
.
Dimensions
DeskLaser
Duplex Model
W: 19.7 in., 500 mm
W: 19.7 in., 500 mm
H: 15.3 in., 388 mm
H: 21.4 in., 543 mm
D: 19.3 in., 490 mm
D: 22.4 in., 570 mm
Weight
(including consumables)
Shipping: 90 lbs (41 kg)
Shipping: 106 lbs (xx kg)
Unpacked: 79 lbs (36 kg)
Unpacked: 110 lbs (50 kg)
Weight
(excluding consumables)
Unpacked: 66 lbs (30 kg)
Unpacked: 93 lbs (42 kg)
Delivery
Output tray: Face-down
Capacity: 250 sheets of 20 lb (75 g/m2) paper
Input sources
Standard cassette feeder: Letter/A4 or universal cassette
Lower input feeder: Letter/A4 or universal cassette
Cassettes
Standard cassette: Letter/A4
Optional cassette: Universal—up to legal
» Note: Standard and universal cassettes are interchangeable between
the standard and lower input feeder.
Cassette capacity
Loading height: 1.02 in. (26 mm)
2
Paper: About 250 sheets of 20 lb bond (75 g/m ) paper
Envelope: Up to 15, depending on the thickness of the envelopes
Glossy Stock: Depends on the thickness of the media
Label: Up to 50, depending on the thickness of the labels
Thick Stock: Up to 50, depending on the thickness of the media
Transfer Media: Up to 50, depending on the thickness of the media
Transparencies: Up to 50, depending on the thickness of the media
#
(
70
Media sizes
(See the chart on page 3-14, “Media Sizes and Imageable Areas”)
Media types, and
printing modes
(For complete
information, refer to
chapter 3, “Printing.”
Type: Cut-sheet
Grain: Long direction
Envelopes: Thick Stock mode
Glossy Stock: Thick Stock mode
Labels: Thick Stock mode
Paper: Standard office 16-24 lb bond (60-90 g/m2), Standard mode
»
Note: Do not print on perforated paper (including 3-hole-punched
paper).
2
Thick stock: Up to 43 lb bond (163 g/m²)/60 lb cover/90 lb index (163 g/m ),
Thick Stock mode
Transfer media: Thick Stock mode
Transparencies: Transparency mode
.%%.
&
.$***>?%'
This table gives the pinouts for the printer end of the Centronics/IEEE 1284 parallel
cable used to connect your printer to a computer.
Signal Pin No.
Signal Description
Direction
1
Strobe-
In
2
Data 1
InOut
3
Data 2
InOut
4
Data 3
InOut
5
Data 4
InOut
6
Data 5
InOut
7
Data 6
InOut
8
Data 7
InOut
9
Data 8
InOut
10
Acnlg-
Out
11
Busy+
Out
12
Pe+
Out
13
Select
Out
14
Autofeed
In
15
Reserved
-
16
Ground
-
17
Ground
-
18
Vcc Test
-
19-30
Ground
-
31
Iprime
In
32
Fault-
Out
#
(
7+
.%%.
Signal Pin No.
Signal Description
Direction
33
Reserved
-
34
Reserved
-
35
Reserved
-
36
Selectin
In
Notes to the Table
72
Direction refers to the direction of signal flow as viewed from the printer.
Return denotes “twisted-pair return” and is to be connected at signal-ground
level. When wiring the interface, be sure to use a twisted-pair cable for each signal and never fail to complete connection on the return side. To prevent noise
effectively, these cables should be shielded and connected to the chassis of the
system unit and printer, respectively.
All interface conditions are based on Transistor-Transistor Logic (TTL) level. Both
the rise and fall times of each signal must be less than 0.2 microseconds.
Data transfer must be carried out by recognizing the ACKNLG or BUSY signal.
The cable must have an overall braided shield, Belden 8345 or equivalent.
Connectors must have shielded housings. The overall shield must be bonded to
the shielded housings at both ends of the cable.
.%%.
*
The following table provides the pinouts for the 10BaseT RJ45 Ethernet interface:
Pin
Name
1
Transmit Data +
2
Transmit Data -
3
Receive Data +
4
No Contact
5
No Contact
6
Receive Data -
7
No Contact
8
No Contact
#
(
Pinout View from Printer Interface
7
6$"
(3
EMI
CE Marking
cTick Mark
Product Safety
FCC (USA)
Title 47 CFR Ch. I,
Part 15
Class B Digital Device
Industry Canada (Canada)
ICES-003 Issue 3
Class B Digital Device
International (EU)
EN 55022
Class B ITE
VCCI (Japan)
VCCI V-3/97.04
Class B ITE
International (EU)
EN 55022 Class B ITE
EN 60950
IEC 801-2
IEC 801-3
Emissions
Product Safety
ESD
Radiated Susceptibility
ACA (Australia)
AS/NZS 4251
Generic emissions standard
AS/NZS 3458
ITE
UL (USA)
CAN/CSA C22.2 No. 950-M90
cUL (Canada)
EN 60950:1992
UL 1950, third edition
International (EU)
Energy Saver
Energy Star (USA)
EPA Energy Star Compliant
Laser Safety
CDRH (USA)
Title 21 CFR Ch. I.,
Subchapter J
International (EU)
7
IEC 825 and/or EN 60825
)"
%
3
Various factors can affect a printer’s warranty. Two important ones are consumables
and electrostatic discharge. Read your printer warranty carefully, and then store it in a
safe place.
»
Note: Don’t return any merchandise to the manufacturer without calling for a return
merchandise authorization (RMA) number. See appendix A, “QMS Customer
Support,” for the QMS Customer Response Center (CRC) telephone number where
you can obtain an RMA number.
@
The use of non-QMS consumables and/or accessories alone does not affect either
your warranty or any maintenance contract you may have purchased. However, if
QMS printer failure or damage is found to be directly attributable to the use of
non-QMS consumables and/or accessories, QMS will not repair the printer free of
charge. In this case, standard time and material charges will be applied to service
your printer for that particular failure or damage. QMS recommends that you use
only QMS consumables and accessories to support your printer. For information on
ordeing QMS consumables and accessories in the US, call 1 (800) 523-2696. In all
other countries, check for the QMS office closest to you.
#
(
7
*.
..
@
It's very important to protect the printer controller board and other printer circuit boards
from electrostatic damage.
If an antistatic wrist strap is provided in your printer option kit, attach one end of it
to your wrist and the other end to any convenient electrical ground. The bare metal
chassis of equipment, such as on the back of a computer, is suitable if it is plugged in
but turned off. Never attach the wrist strap to any piece of equipment with an
electrical current present. Turn off all power switches first. Plastic, rubber, wood,
painted metal surfaces, and telephones are not acceptable grounding points. The
printer isn't an acceptable grounding point either because it must be unplugged before
you perform this task.
If you don't have an antistatic wrist strap, discharge your body's static electric
charge by touching a grounded surface before you handle any printer boards or
components and before removing the controller board cover. If you must walk around
before completing your task, discharge your body’s static electric charge again before
touching the printer controller board.
Incidental and consequential damages caused by not discharging electrostatic
buildup can affect your printer warranty.
%
)
0 1 1 1
“Terminology” on page C-2
“Subnetting” on page C-4
“Internet Routing” on page C-5
This chapter first provides defines and discusses several TCP/IP concepts, including
subnetting and subnet masks, internet routing and gateways, and Class A, B, and C,
Internet addresses.
%#
3
;
Ethernet is a linear local area network developed by Xerox in 1976. Presently an
industry standard, Ethernet operates on a bus topology and uses CSMA/CD (Carrier
Sense Multiple Access with Collision Detection) to regulate traffic. Each device, or
node, is connected by either thin or thick coaxial cable or twisted-pair wiring. Based on
the IEEE 802.3 standard, Ethernet operates at 10 megabits (10 million bits) or 100
megabits (100 million bits) per second.
;)
An Ethernet address is a unique address assigned to each device on an Ethernet network. If necessary, use the Eth. HW Address configuration menu to set your printer’s
Ethernet address.
9
2
A computer or other device that attaches to two or more dissimilar networks and
passes data from one to another is known as a gateway. Data is routed from gateway
to gateway until it can be delivered to its final destination directly across one physical
network. Each gateway has two addresses—one for each network that it connects.
0
The Internet is one or more networks connected by intelligent nodes, each of which is
referred to as an Internet routers (IR).
%
$"
0)
An Internet address is a 32-bit address assigned to hosts connected to a TCP/IP
network. It consists of a network part and a host part. While this address is expressed
to the network in binary form, it is usually written in decimal form. For example, the
binary Internet address
10000000 00001010 00000010 00011110
is written as follows in decimal form:
128.10.2.30
Use the Internet Address configuration to set your printer’s Internet address.
0&0(
Internet Protocol, the Internet standard protocol, defines the Internet datagram as the
unit of information passed across the Internet and provides the basis for connectionless, best-effort packet delivery service. The Internet protocol suite is often referred to
as TCP/IP because IP is one of the two most fundamental protocols.
"
A device that examines data addresses, determines the most efficient pathway to the
destination, and routes the data accordingly. Each router has two addresses—one for
each network that it connects.
Use the Router 1 and Router 2 configuration menus to set the Internet address for one
or two routers.
*
A subnet is one physical network segment within an Internet.
*)
A subnet address is the division of the Internet address's local part into a physical
network part and a host part in order for the site to use a single Internet address for
multiple physical networks or subnets. This division of the host part has no effect on
the Internet address when it goes outside of the site. The process of using subnet
addresses is known as subnet addressing, subnet routing, or subnetting.
%.,.%
#
%
$
50
Transmission Control Protocol/Internet Protocol, a suite of communication protocols,
allows networked computers to share files and system resources, such as hard disks
and printers.
+&
One of the ways a single network address can span multiple physical networks is
through subnetting, which divides the host part of an Internet address into a physical
network part and a host part. In other words, it creates a hierarchical address, which
identifies a subnet within an internet and then a host within a subnet.
The main advantage of subnetting is that it accommodates large growth since a given
gateway does not need to know as much detail about distant destinations as it does
about local ones.
1
»
Note: If the subnet mask remains set to the default (000.000.000.000) in the Subnet
Mask configuration menu, gateways are automatic sensed. If you identify a subnet
mask, this automatic sensing is disabled.
If a subnet address is used to identify a host, you must also designate a
corresponding 32-bit subnet mask. Like Internet and subnet addresses, the subnet
mask is written in binary form for the network. Bits are set to 1 if the network treats the
corresponding bit in the Internet address as part of the network address, and to 0 if it
treats the bit as part of the host identifier. For example, the binary subnet mask
11111111 11111111 11111111 00000000
specifies that the first three groups of eight digits in the Internet address identify the
network and subnet and that the fourth group identifies the host on that subnet. However, these numbers are more commonly written in decimal form. For example, the
binary subnet mask above would be written in decimal form as
255.255.255.0
%!
6$
(
Once the Internet address, subnet addresses, and subnet masks are in place, information can be sent, or routed, to any destination in the Internet. Both hosts and gateways participate in the routing process.
If information is sent between two devices on a single physical network, or subnet, no
gateways are involved. The sending device encapsulates the datagram in a physical
frame, binds the destination internet address to a physical hardware address, and
sends the resulting frame directly to the destination.
If the information is sent between two devices on two different physical networks, however, the internet gateways form a cooperative, interconnected structure. Datagrams
pass from gateway to gateway until they reach a gateway that can deliver them directly
to a device on that physical network.
464
TCP/IP defines a means for the network administrator to configure the network that
best suits the network environment at a site. One method is to define the 32-bit TCP/
IP network address in terms of the number of networks and the number of hosts at the
site. The network address is partitioned into a network part and a host part.
There are 3 common partitions—Class A, Class B, and Class C. The classification is
done by the highest order bits. For example, a 0 in the highest order bit of the 32-bit
address indicates that the address is Class A. Thus, the next 7 bits constitute the network address, and the last 24 bits form the host address. The high order bits also constitute the network mask for the Class A address.
The following table identifies the differences between Class A, B, and C addresses.
Class
A
Uses
Sites with few
networks and many
hosts
%.,.%
#
Highest
Order Bits
(Binary)
0
Network
Address
Size
7 bits
Host
Network Mask
AddressSiz (Hex)
e
24 bits
0xFF000000
%'
6$
B
C
Sites with some
networks and some
hosts
Sites with many
networks and few
hosts
10
14 bits
16 bits
0xFFFF0000
110
21 bits
8 bits
0xFFFFFF00
%/
!
%
1 1 1
“Manual Notice” on page D-2
“FCC Compliance Statement” on page D-2
“Canadian Users Notice” on page D-3
“Laser Safety” on page D-3
“International Notices” on page D-4
“Colophon” on page D-4
3
/
QMS, Inc. reserves the right to make changes to this manual and to the equipment
described herein without notice. Considerable effort has been made to ensure that
this manual is free of inaccuracies and omissions. However, QMS, Inc. makes no
warranty of any kind including, but not limited to, any implied warranties of merchantability and fitness for a particular purpose with regard to this manual.
QMS, Inc. assumes no responsibility for, or liability for, errors contained in this manual
or for incidental, special, or consequential damages arising out of the furnishing of this
manual, or the use of this manual in operating the equipment, or in connection with the
performance of the equipment when so operated.
5#
+#
This equipment has been tested and found to comply with the limits for a Class B digital device, pursuant to Part 15 of the FCC Rules. These limits are designed to provide
reasonable protection against harmful interference in a residential installation. This
equipment generates, uses, and can radiate radio frequency energy, and if not
installed and used in accordance with the instructions, may cause harmful interference to radio communications. However, there is no guarantee that interference will
not occur in a particular installation. If this equipment does cause harmful interference
to radio or television reception, which can be determined by turning the equipment off
and on, the user is encouraged to try to correct the interference by one or more of the
following measures:
»
Reorient or relocate the receiving antenna.
Increase the separation between the equipment and the receiver.
Connect the equipment into an outlet on a circuit different from that to which the
receiver is connected.
Consult the dealer or an experienced radio/TV technician for help.
Note: A shielded cable is required to comply with the limits for a Class B digital device,
pursuant to Part 15 of the FCC rules.
%
3
Caution: Any modifications or changes to this product not expressly approved in
writing by the manufacturer responsible for compliance to Federal Regulations could
void the user's authority to operate this product within the Laws and Regulations of the
Federal Communications Commission.
7/
This Class B digital apparatus complies with Canadian ICES-003.
Cet appareil numérique de la classe B est conforme à la norme NMB-003 du Canada.
4+-3
This printer is certified as a Class 1 laser product under the U.S. Department of Health
and Human Services (DHHS) Radiation Performance Standard according to the Radiation Control for Health and Safety Act of 1968. This means that the printer does not
produce hazardous laser radiation.
Since radiation emitted inside the printer is completely confined within protective
housings and external covers, the laser beam cannot escape from the machine during
any phase of user operation.
3
/
!
The following power cord requirements are in effect for the 220v QMS magicolor 2
DeskLaser Print System.
2
Minimum
0.75 mm
Minimum
H05 VV - F
The male plug is certified in the country in which the equipment is to
be installed, and the female plug is an IEC 320 connector.
This manual was written and formatted in FrameMaker. The illustrations were created
in Adobe Illustrator. Typefaces chosen are Benguiat, Courier, Tekton, and Helvetica.
!
"
1284, IEEE, cable pinouts B-9
2-sided (duplex) printing
Choosing 2-13, 2-34
2-sided printing 2-13, 2-34, 3-23
About button 2-13, 2-34
Accessing the Configuration Menu 4-7
Accessories
See Optional accessories
Address
Ethernet C-2
Ethernet Hardware 4-12
Internet 4-9, C-3
Router 4-11
Subnet C-3
Antistatic protection 5-8
Asic error message 8-2
Bad entry message 8-2
Belt cartridge
See OPC belt cartridge
Blurred background 8-28
Board test 4-11, 8-18
Board test menu 4-11
Buttons
About 2-13, 2-34
Cancel 2-13, 2-16, 2-20, 2-34, 2-37, 2-41
Help 2-13, 2-34
OK 2-13, 2-16, 2-20, 2-34, 2-37, 2-41
Restore Defaults 2-13, 2-16, 2-20, 2-34,
2-37, 2-41
ButtonsHelp 2-16, 2-20, 2-37, 2-41
Cable
Removing 9-3
Calling for service 8-35
Cancel button 2-13, 2-16, 2-20, 2-34, 2-37, 2-41
Cancel key 3-25
Cancelling a print job 3-25
Canceling jobs message 8-2
Cancelling a print job 3-25
Cartridge
See OPC belt cartridge or toner cartridge
Cassette
Dual 5-3
Media size and cassette size 3-18
Removing 9-3
Cassettes
Optional 5-3
Cleaning
Cleaning solutions 6-30
Exterior 6-30
Laser lens 6-21
Paper exit plates 6-30
Printer 6-2
Cleaning roller
Replacing 6-31
Collate
Choosing 2-12, 2-33
Colophon D-4
Color Format 2-18, 2-39
Configuration 2-8, 2-14, 2-17, 2-29, 2-35, 2-38
Menu 4-6
Menu options, selecting 4-7
Options
Quality tab 2-14, 2-35
Options, Image Settings tab 2-17, 2-38
Options, Paper tab 2-8, 2-29
Printer 4-5
Printer driver 2-8, 2-29
Printer driver, Windows 95/98 2-2
Printer driver, Windows NT 4.0 2-21
Configuration component 2-57
Configuration menu 4-6
Accessing 4-7
Energy Saver 4-8
Ethernet HW Address 4-12
Internet Address 4-9
Language 4-9
Options, selecting 4-7
Router 1 4-11
Router 2 4-11
Subnet Mask 4-10
Configuring Option
Configuration 2-8, 2-29
Consumables
Cleaning roller 6-31
Fuser oil bottle 6-31
OPC belt cartridge 6-35
Ozone filter 6-39
Warranty B-13
Waste toner pack 6-40
Control panel 4-2
Data indicator 4-3
Indicators 4-3
Language 4-9
Menu key 4-5
Message indicator 4-3
Message window 4-2, 4-9
Message window language 4-3
Next key 4-5
Online indicator 4-3
Previous key 4-5
Ready indicator 4-3
Select key 4-5
Control panel messages 8-2
Controller
Specifications B-4
Cooldown 3-24, 8-26
Cooldown pause 3-24, 8-26
Copies
Choosing number of, Windows 95/98 printer
driver 2-11, 2-32
Customer Response Center (CRC), QMS A-3
Customer support, QMS A-2
Dark image 8-32
Data indicator 4-3, 8-19
—9
Data LED
Troubleshooting 8-17
DeskLaser printer status monitor 2-50
Documentation
Overview of this manual 1-3
Download error press Cancel message 8-3
DRAM test error message 8-3
Driver, printer
See Windows 95/98 printer driver or Windows
NT printer driver
Drum 8-3
Drum jam message 7-5, 8-3
Duplex panel misinstalled message 8-3
Duplex printing 2-13, 2-34, 3-23
Duplexer jam message 7-5
Duplexer jams 7-9
Duplexer, lower rear cover 6-26
Duty cycle B-2
Electrical requirements B-5
Energy save mode on message 8-3
Energy Saver 4-8
Envelopes
Formatting 3-6
Loading 3-7
Printing 3-6, 3-7
Size, choosing 2-9, 2-30
Environmental requirements B-6
Error messages
See Status messages
Ethernet C-2
Address C-2
Hardware address 4-12
Ethernet error message 8-4
Ethernet HW Address 4-12
Exterior cleaning 6-30
F# xxxxxxxx xxx i960 fault message 8-4
FCC compliance D-2
Caution D-3
Feeder
Installing 5-4
Lower input 5-3
Unpacking 5-4
Flash error message 8-4
Flash ROM
System software, updating 5-11
Fonts
Troubleshooting 8-24
Fuser oil
Draining 9-7
Removing 9-5
Fuser oil bottle
Removing 9-5
Replacing 6-31
Fuser unit
Draining 9-7
Preparing for moving 9-5
Removing 9-5
Fusing Unit Misinstalled message 8-4
Gateway C-2
Help button 2-13, 2-16, 2-20, 2-34, 2-37, 2-41
HW err 0 cancel message 8-4
Idle message 8-4
IEEE 1284 cable pinouts B-9
Image
Alignment 3-18
Image defects 8-28
Imageable area
Margins 3-18
Troubleshooting 8-21
Working within 3-15
Imageable areas 3-14
—9
Indicators
Control panel 4-3
Data 8-19
Message 4-3
Online 4-3
Ready 4-3
Inner jam message 7-5, 8-5, 8-19
Installation
Feeder 5-4
Internet A-2, C-2
Address C-3
Address, classes A, B, C C-5
IP C-3
Routing C-5
Internet Address 4-9
Internet Protocol
See IP
Introduction 6-2
IP C-3
IP err 0 cancel message 8-5
Irregular print 8-30
Jam message, fuser roller, duplexer 7-12
Jam message, lower rear assembly,
duplexer 7-10
Jam message, media cassette, duplexer 7-9
Jams
Frequent 8-24
Jam message stays on 8-19
Locating 7-5
Media path 7-3
Messages 7-5
Preventing 3-18, 7-2
Removing 7-5
Status messages 7-5
Keypad Language menu 4-3
Keys
Menu 4-5
Next 4-5
Previous 4-5
Select 4-5
Kit
Lower input feeder 5-3
Labels
Loading 3-10
Printing 3-10
Landscape orientation
Choosing 2-12, 2-33
Language
Message window 4-9
Laser lens
Cleaning 6-21
Laser safety D-3
Light image 8-32
Long edge 3-23
Lower duplex jam message 8-5
Lower input feeder
Removing 9-11
Maintenance 6-1
Cleaning roller 6-31
Fuser oil bottle 6-31
Laser lens 6-21
OPC belt cartridge 6-35
Ozone filter 6-39
Printer 6-2
Schedule 6-4
Manual
Contents 1-3
Overview 1-3
Typographic conventions 1-5
Manual feed
Choosing 2-10, 2-31
Margins 3-15, 3-18
Mask, subnet 4-10
Media
Imageable areas 3-14
Jams, preventing 3-18
—9
Margins 3-15, 3-18
Path 7-3
Size and cassette size 3-18
Size, choosing 2-9, 2-30
Sizes 3-14
Source, choosing 2-10, 2-31
Sources 3-14
Specifications B-7
Storage 3-18
Media Jams 7-1
Media jams
Removing 7-5
Media path 7-3
Meg ver x.x message 8-5
Memory modules (SIMMs)
Single in-line 5-7
Menu key 4-5
Menus
Board Test 4-11, 8-18
Configuration 4-6
Service 4-11
Test Page 4-11, 8-17
Message indicator 4-3
Message window 4-2
Language, changing 4-3
Setting message window language 4-2
Messages 8-2
Paper Mismatch 8-20
Printing 8-20
See Status messages
Misfeed jam message 7-5, 8-5, 8-19
Moving, printer 5-4, 9-2, 9-13
Replacement packaging 9-2
Need more memory paper mismatch
message 8-5
Network
Ethernet C-2
Network printing
Windows 95/98 2-42, 2-46
Windows NT 4.0 2-44, 2-46
New Flash Image menu 5-11
New kernel message 8-3, 8-6
Next key 4-5
Oil bottle
See fuser oil bottle
OK button 2-13, 2-16, 2-20, 2-34, 2-37, 2-41
Online indicator 4-3
OPC belt cartridge
Problems 8-25
Removing 9-3
Replacing 6-35
Optional accessories
Cassettes 5-3
Media cassettes 5-3
System software 5-11
Options
See Optional accessories
Orientation
Choosing 2-12, 2-33
Outer jam message 7-5, 8-6, 8-19
Output
Problems, troubleshooting 8-20
Output Bin Full message 8-6
Output problems 8-20
Ozone filter
Replacing 6-39
Packaging, printer
Replacement 9-2
Page margins 3-18
Pages
Blank, troubleshooting 8-21
Printing, not all print 8-22
Paper
See also Media
Size, choosing 2-9, 2-30
Sizes 3-14
Source, choosing 2-10, 2-31
Type 3-2
—9
Paper exit roller 6-5
Paper guide 6-5
Paper Mismatch message 8-20
Paper out lower tray message 8-6
Paper out upper tray message 8-6
Parallel
IEEE 1284 cable pinouts B-9
Path, media 7-3
Pause, cooldown 3-24, 8-26
PC
System software, updating 5-11
Physical specifications B-7
Pinouts, cable
Centronics cable pinouts B-9
PLEASE WAIT ERASING FLASH 5-12
PLEASE WAIT WRITING FLASH 5-12
Portrait orientation
Choosing 2-12, 2-33
PostScript
Fonts, troubleshooting 8-24
Preventing paper jams 7-2
Previous key 4-5
Print job
Cancelling 3-25
Print media
See Media
Print Monitor
Configuration component 2-57
Monitor status information 8-15
Printer status information 8-15
Send component 2-57
Spooler status information 8-14
Status component 2-57
Status information 2-57
Print quality
Image defects 8-28
Print quality problems
Blurred background 8-28
Distortions 8-28
Irregular print 8-30
Printout too dark 8-32
Printout too light 8-32
Toner smudges 8-33
Uneven blacks 8-28
Uneven print density 8-33
White lines 8-28
Printer
Board test 8-18
Cleaning 6-2, 6-30
Cleaning, exterior 6-30
Handling 6-2
Lifting 6-3
Maintenance 6-2
Network printing, Windows 95/98 2-42, 2-46
Network printing, Windows NT 4.0 2-44, 2-46
Replacement packaging 9-2
See also Specifications
Sharing, Windows 95/98 2-42, 2-46
Sharing, Windows NT 4.0 2-44, 2-46
Speed B-2
Test page 8-17
Weight 9-13
Printer driver
About button 2-13, 2-34
Cancel button 2-13, 2-16, 2-20, 2-34, 2-37, 2-41
Help button 2-13, 2-16, 2-20, 2-34, 2-37, 2-41
OK button 2-13, 2-16, 2-20, 2-34, 2-37, 2-41
Restore Defaults button 2-13, 2-16, 2-20, 2-34,
2-37, 2-41
See Windows 95/98 printer driver or Windows
NT printer driver
Updating 5-12, 5-14
Printing
Cancelling a job 3-25
Configuration, Windows 95/98 printer driver 2-2
Configuration, Windows NT 4.0 printer
driver 2-21
Envelopes 3-7
Labels 3-10
Letterhead 3-6
Memo media 3-6
Method B-3
Network, Windows 95/98 2-42, 2-46
Network, Windows NT 4.0 2-44, 2-46
Printer driver, Windows 95/98 2-2
Printer driver, Windows NT 4.0 2-21
—9
Printing
Configuration 2-8, 2-29
Printing message stays on 8-20
Speed B-2
Transparencies 3-13
Printing message 8-6
Printing need more memory message 8-6, 8-21
Printing on both sides (duplex printing)
Choosing 2-13, 2-34
Printing Paper Mismatch message 8-7
Printout too dark 8-32
Printout too light 8-32
Protection
Antistatic 5-8
QMS
Customer Response Center (CRC) A-3
Service call, placing 8-35
World-wide offices A-4
QMS magicolor 2 board Test message 8-7
Radiation D-3
Ready indicator 4-3
Relocating, printer 9-2
Replacement packaging 9-2
Removing sharing 2-47
Repacking, printer 9-2, 9-14
Replacement packaging 9-2
Replacement packaging 9-2
Catalog number 9-2
RMA number 9-2
Replacing the OPC Belt Cartridge 6-35
Resolution B-3
Restore Defaults button 2-13, 2-16, 2-20, 2-34,
2-37, 2-41
Return Merchandise Authorization number 9-2
Returning, printer
RMA number 9-2
Reverse page order 2-12, 2-33
RMA number 9-2
Router C-3
Address 4-11
Router 1 4-11
Router 2 4-11
Select key 4-5
Selected message 8-9
Send component 2-57
Service 8-35
Printer 9-2
RMA number 9-2
United States A-3
Service menu 4-11
Shipping, printer 9-2
Replacement packaging 9-2
RMA number 9-2
Short edge 3-23
SIMM
Installation 5-9
SIMMs 5-7
Single in-line memory modules 5-7
SNMP
Definition C-2
Specifications
Consumables B-3
Controller B-2, B-4
Duty cycle B-2
Electrical B-5
Engine B-2
Environmental B-6
Fonts B-4
Input sources B-3
Media B-7
Output B-3
Physical B-7
Print method B-3
Print speed B-2
Resolution B-3
System software B-5
Temperature B-6
Toner B-3
—9
Toner cartridges B-3
Warm-up time B-3
Spotting 8-31
Status component 2-57
Status message
Drum jam 7-5
Duplexer jam 7-5
Inner jam 7-5
Misfeed jam 7-5
Outer jam 7-5
Status messages 8-2
Asic error 8-2
Bad entry 8-2
Canceling jobs 8-2
Download error press Cancel 8-3
DRAM test error 8-3
Drum jam 8-3
Drum jaml 8-3
Duplex panel misinsalled 8-3
Energy save mode on 8-3
Ethernet error 8-4
F# xxxxxxxx xxx i960 fault 8-4
Flash error 8-4
Fusing unit Misinstalled 8-4
HW err 0 cancel 8-4
Idle 8-4
Inner jam 8-5, 8-19
IP err 0 cancel 8-5
Lower duplex jam 8-5
Meg ver x.x 8-5
Misfeed jam 8-5, 8-19
Need more memory paper mismatch 8-5
New kernel 8-6
Outer jam 8-6, 8-19
Output Bin Full 8-6
Paper out lower tray 8-6
Paper out upper tray 8-6
Please Wait Erasing Flash 5-12
Please Wait Writing Flash 5-12
Printing 8-6
Printing need more memory 8-6, 8-21
Printing paper mismatch 8-7
QMS magicolor 2 board test 8-7
Selected 8-9
Troubleshooting 8-16
Upper duplex jam 8-9
Warming up 8-9
Status monitor, DeskLaser printer 2-50
Subnet C-3, C-4
Address C-3
Subnet mask 4-10, C-4
Support, QMS
Customer A-2
Internet A-2
Technical A-3
World-wide A-4
System software
Specifications B-5
Updating 5-11
TCP/IP C-4
Internet address classes C-5
Internet routing C-5
Subnet C-4
Subnet mask C-4
Technical support, QMS A-3
Temperature requirements B-6
Test page 4-11, 8-17
Test Page menu 4-11
Toner 9-10, B-3
Toner cartridge
Removing 9-3
Toner cartridges B-3
Toner smudges 8-33
Transmission Control Protocol/Internet
Protocol
See TCP/IP
Troubleshooting
Blank pages 8-21
Board test 8-18
Data indicator 8-19
Data LED 8-17
Fonts 8-24
Image defects 8-28
—9
Jam message 8-19
Jams, frequent 8-24
Miscellaneous problems 8-16
Output problems 8-20
Pages, not all print 8-22
Paper Mismatch message stays on 8-20
Partial page 8-21
Printing message stays on 8-20
Quick check 8-16
RMA number 9-2
Scaled page 8-21
See also Status messages
Service call, placing 8-35
Status message 8-16
Test page 8-17
TrueType fonts 8-24
Paper, choosing size 2-9, 2-30
Paper, choosing source 2-10, 2-31
Problems 8-20
Updating 5-12
Windows NT 4.0 2-57
Windows NT 4.0 printer driver
2-sided (duplex) printing, choosing 2-13, 2-34
Collate, choosing 2-12, 2-33
Configuration 2-21
Orientation, choosing 2-12, 2-33
Problems 8-20
Reverse page order, choosing 2-12, 2-33
Updating 5-14
Uneven print density 8-33
Unpacking
Feeder 5-4
Updating
Printer driver 5-12
System software 5-11
Updating printer driver 5-14
Upper duplex jam message 8-9
Using envelopes 3-6
Warming up message 8-9
Warm-up time B-3
Warranty B-13
Waste toner pack
Removing 9-10
Replacing 6-40, 9-10
Weight 9-13
White lines 8-33
Windows 95/98 printer driver
Configuration 2-2
Copies, choosing number of 2-11, 2-32
Manual feed, choosing 2-10, 2-31
Media, choosing size 2-9, 2-30
—9