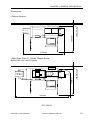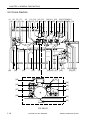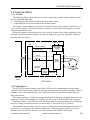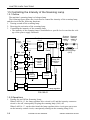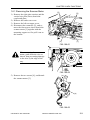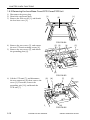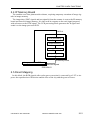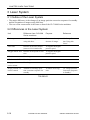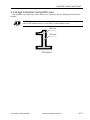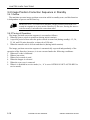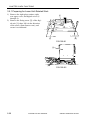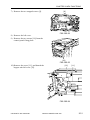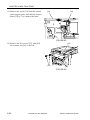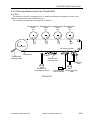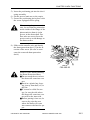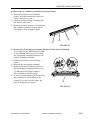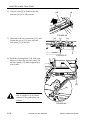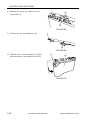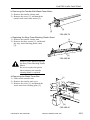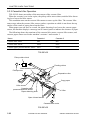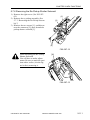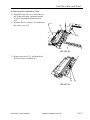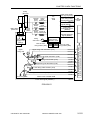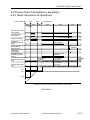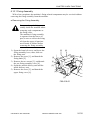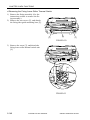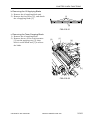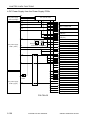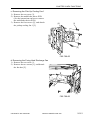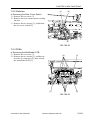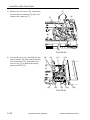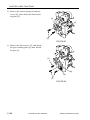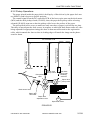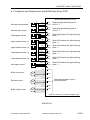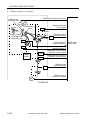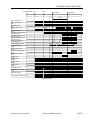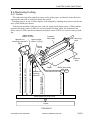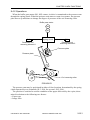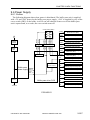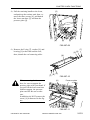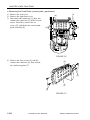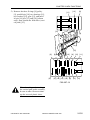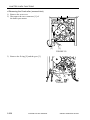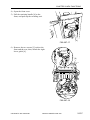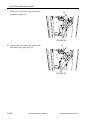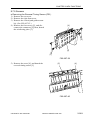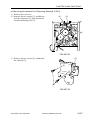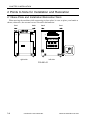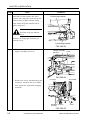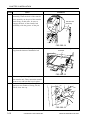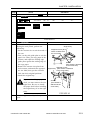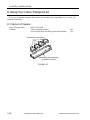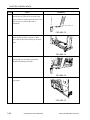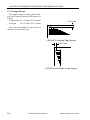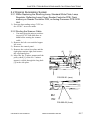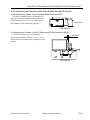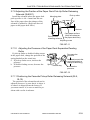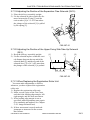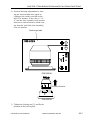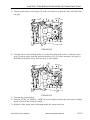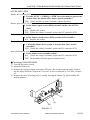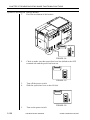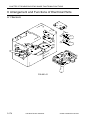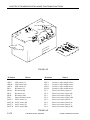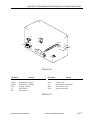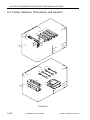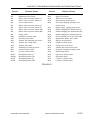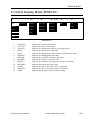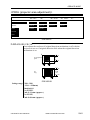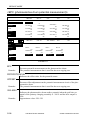
1
CLC5000 REVISION 0 JAN.2001 FY8-13GZ-000 COPYRIGHT© 2001 CANON INC. 2000 2000 20000 CANON CLC5000 REV.0 JAN. 2001 PRINTED IN JAPAN (IMPRIME AU JAPON) Application This manual has been issued by Canon Inc. for qualified persons to learn technical theory, installation, maintenance, and repair of products. This manual covers all localities where the products are sold. For this reason, there may be information in this manual that does not apply to your locality. Corrections This manual may contain technical inaccuracies or typographical errors due to improvements or changes in products. When changes occur in applicable products or in the contents of this manual, Canon will release technical information as the need arises. In the event of major changes in the contents of this manual over a long or short period, Canon will issue a new edition of this manual. The following paragraph does not apply to any countries where such provisions are inconsistent with local law. Trademarks The product names and company names used in this manual are the registered trademarks of the individual companies. Copyright This manual is copyrighted with all rights reserved. Under the copyright laws, this manual may not be copied, reproduced or translated into another language, in whole or in part, without the written consent of Canon Inc. COPYRIGHT © 2001 CANON INC. Printed in Japan Imprimé au Japon Caution Use of this manual should be strictly supervised to avoid disclosure of confidential information. COPYRIGHT© 2001 CANON INC. 2000 2000 2000 CANON CLC5000 REV.0 JAN. 2001 PRINTED IN JAPAN (IMPRIME AU JAPON) INTRODUCTION 1 Symbols Used This documentation uses the following symbols to indicate special information: Symbol Description Indicates an item of a non-specific nature, possibly classified as Note, Caution, or Warning. Indicates an item requiring care to avoid electric shocks. Indicates an item requiring care to avoid combustion (fire). Indicates an item prohibiting disassembly to avoid electric shocks or problems. Indicates an item requiring disconnection of the power plug from the electric outlet. Memo REF. Indicates an item intended to provide notes assisting the understanding of the topic in question. Indicates an item of reference assisting the understanding of the topic in question. Provides a description of a service mode. Provides a description of the nature of an error indication. Refers to the Copier Basics Series for a better understanding of the contents. COPYRIGHT © 2001 CANON INC. 2000 2000 2000 2000 CANON CLC5000 REV.0 JAN. 2001 i INTRODUCTION 2 Outline of the Manual This Service Manual contains basic facts and figures needed to service the machine, Paper Deck-J1/K1, Buffer Pass Unit-B1, conducted to ensure a high level of performance and expected functions. The following accessories come with separate service manuals or service informations; refer to them for details: 1. RDF-E3 2. Stapler Sorter-F2 3. Film Projector-E1 4. Editor-F1 5. ED Board-C1 6. Interface Board-E1 7. Preview Monitor Board * Refer to CLC1000 series service manual. This Service Manual is organized as follows; <Main body & Accessory> Chapter 1 Chapter 2 Features, specifications, how to operate Principle operations of each unit; timing of operations; how to disassemble and assemble (special information from CLC1000 series only) If necessary, refer CLC1000 series service manual. Chapter 3 Installation: Requirements on the site of installation, installation procedure Chapter 4 Maintenance And Inspection:Periodically replaced parts table, consumables and durables table, scheduled servicing chart, scheduled servicing table Chapter 5 Troubleshooting: Basic procedure for image adjustment, standards/adjustments, troubleshooting image faults, troubleshooting malfunctions Appendix: General timing chart, general circuit diagrams <Service Mode> <Error Codes> ii General Description: New Functions: COPYRIGHT © 2001 CANON INC. 2000 2000 2000 2000 CANON CLC5000 REV.0 JAN. 2001 INTRODUCTION The descriptions in this Service Manual are based on he following rules: 1. In each chapter, the uses of the function in question and its relationship to electrical and mechanical systems are discussed and the timing of operation of its associated parts is explained by means of outlines and diagrams. represents a mechanical path, while the symbol In the diagrams, the symbol with a name next to it indicates the flow of an electric signal. The expression “turn on the power” means turning on the power switch, closing the front cover, and closing the delivery cover so that the machine will be supplied with power. 2. In circuit diagrams (digital), a signal whose level is High is expressed as being ‘1’, while a single whose level is Low is expressed as being ‘0’; the level of voltage, however, varies from circuit to circuit. The machine uses CPUs, whose internal mechanisms cannot be checked in the field, and, therefore, are not explained. In addition, the machine’s PCBs are not intended for repairs at the user’s and, therefore, are explained by means of block diagrams: two types are used, i.e., between sensors and inputs of PCBs equipped with a control or drive function and between outputs equipped with a control or drive function and loads; in addition, functional block diagrams are used at times. Changes made to the machine for product improvement are communicated in the form of a Service Information bulletin as needed. All service persons are expected to go through all service documentation including the bulletins and be equipped to respond to the needs of the field (as by being able to identify possible causes of problems). COPYRIGHT © 2001 CANON INC. 2000 2000 2000 2000 CANON CLC5000 REV.0 JAN. 2001 iii INTRODUCTION System Configuration CLC5000 may be configured as follows: * Standard Film projector-E1 Copyboard cover* RDF-E3 Paper deck-J1 Editor-F1 Original tray* Main body Control card-V Paper deck-K1 Buffer pass unit-B1 Stapler sorter-F2 Accessary boards as follows: • ED board-C1 • Interface board-E1 • Preview monitor board iv COPYRIGHT © 2001 CANON INC. 2000 2000 2000 2000 CANON CLC5000 REV.0 JAN. 2001 Main Body & Accessory COPYRIGHT © 2001 CANON INC. 2000 2000 20000 CANON CLC5000 REV.0 JAN. 2001 CONTENTS Contents CHAPTER 1 GENERAL DESCRIPTION 1 Specifications ...................................... 1-1 1.1 Type ............................................ 1-1 1.2 Functions .................................... 1-2 1.3 Others ......................................... 1-4 1.3.1 Copier .................................. 1-4 1.4 Default Ratios ............................ 1-6 1.5 Copying Speed ........................... 1-7 2 Safety .................................................. 1-8 2.1 Safety of Laser Light ................. 1-8 2.2 CDRH Ordinance ....................... 1-9 2.3 Handling Parts Associated with the Laser Unit ................................ 1-10 3 Names of Parts .................................. 1-12 3.1 External View ........................... 1-12 3.2 Cross Section ........................... 1-14 4 Control Panel .................................... 1-16 4.1 Control Panel ........................... 1-16 4.1.1 Instructions to the User ...... 1-17 4.2 List of User Modes .................. 1-19 5 Routine Maintenance by the User .... 1-20 5.1 Cleaning the Outside ................ 1-20 5.2 Checking the Leakage Breaker 1-20 CHAPTER 2 NEW FUNCTIONS 1 Exposure System ................................ 2-1 1.1 Outline of the Original Exposure System ........................................ 2-1 1.2 Comparison of Exposure Systems ...................................... 2-2 1.3 Basic Sequence of Operations (exposure system) ...................... 2-3 1.3.1 Scanner Home Position Sensor and Operations ..................... 2-3 1.3.2 Sequence of Operations ....... 2-4 1.4 Scanner Motor ........................... 2-5 1.4.1 Outline ................................. 2-5 1.4.2 Operations ............................ 2-5 1.5 Controlling the Intensity of the Scanning Lamp .......................... 2-6 1.5.1 Outline ................................. 2-6 1.5.2 Operations ............................ 2-6 1.6 Disassembly/Assembly .............. 2-8 1.6.1 Removing the Scanner Motor ................................... 2-9 1.6.2 Removing the Lens Base Cover/ CCD Cover/CCD Unit ....... 2-10 1.6.3 Removing the Scanner Cover ................................. 2-11 2 Image Processing System ................. 2-12 2.1 Outline of the Image Processing System ...................................... 2-12 2.2 Differences in the Image Processing System ................... 2-13 2.3 Functional Blocks .................... 2-14 2.4 IP Memory Board .................... 2-15 2.5 Direct Mapping ........................ 2-15 3 Laser System ..................................... 2-16 3.1 Outline of the Laser System .... 2-16 3.2 Differences in the Laser System ...................................... 2-16 3.3 Image Formation Using 800 Lines ......................................... 2-17 3.4 Image Position Correction Sequence in Standby ................ 2-18 3.4.1 Outline ............................... 2-18 3.4.2 Timing of Operation .......... 2-18 3.5 Disassembly/Assembly ............ 2-19 3.5.1 Preparing for Laser Unit-Related Work ............. 2-20 3.5.2 Removing the Laser Unit Motor ................................. 2-23 COPYRIGHT © 2001 CANON INC. 2000 2000 2000 2000 CANON CLC5000 REV.0 JAN. 2001 vii CONTENTS 3.5.3 Removing the C Image Position 5.5 Duplex Unit .............................. 2-97 Correction Mirror Unit ...... 2-25 5.5.1 Outline ............................... 2-97 3.5.4 Mounting the C Image Position 5.5.2 Feeding in Duplex Mode ... 2-98 Correction Mirror Unit ...... 2-26 5.5.3 Sequence of Operations in 3.5.5 Removing the C Slant Duplex Mode (1st side) ... 2-100 Correction Motor ............... 2-27 5.5.4 Pickup from the Duplex 3.5.6 Removing the C Ratio Unit .................................. 2-101 Correction Motor ............... 2-28 5.6 Detecting Jams ....................... 2-103 3.5.7 Shifting the scanner Unit ... 2-29 5.6.1 Outline ............................. 2-103 4 Image Formation System .................. 2-34 5.6.2 Sequence of Jam 4.1 Outline of the Image Formation Detection .......................... 2-103 System ...................................... 2-34 5.7 Disassembly/Assembly .......... 2-104 4.2 Differences in the Image Formation 5.7.1 Removing the Multifeeder System ...................................... 2-35 Assembly ......................... 2-105 4.3 Auto Gradation Correction 5.7.2 Removing the Cassette Pickup (PASCAL) ................................ 2-37 Assembly ......................... 2-106 4.3.1 Outline ............................... 2-37 5.7.3 Removing the Re-Pickup 4.3.2 Operations Assembly ......................... 2-108 (full correction) .................. 2-37 5.7.4 Removing the Re-Pickup 4.3.3 Operations Motor ............................... 2-109 (quick correction) .............. 2-42 5.7.5 Removing the Re-Pickup Unit 4.4 Transfer Unit ............................ 2-44 Clutch .............................. 2-110 4.4.1 Outline ............................... 2-44 5.7.6 Removing the Re-Pickup 4.4.2 Cleaning Mechanism for Shutter Solenoid .............. 2-111 the Transfer Belt ................ 2-45 5.7.7 Removing the Duplex Unit 4.5 Disassembly/Assembly ............ 2-49 Feed roller ........................ 2-112 4.5.1 Charging System ............... 2-50 5.7.8 Removing the Pre-Fixing 4.5.2 Process Unit System .......... 2-54 Feeding Assembly ........... 2-112 4.5.3 Transfer Belt Unit .............. 2-66 5.7.9 Removing the Pre-Duplex 4.5.4 Transfer Belt Base ............. 2-82 Feeding Unit .................... 2-113 5 Pickup/Feed System ......................... 2-86 5.7.10 Delivery/Reversing 5.1 Outline of the Pickup/ Assembly ......................... 2-116 Feed System ............................. 2-86 6 Fixing System ................................. 2-120 5.2 Differences in the Pickup/ 6.1 Outline of the Fixing System . 2-120 Feed System ............................. 2-87 6.2 Outline of the Fixing System . 2-121 5.3 Cassette Pickup Assembly ....... 2-90 6.3 Outline of the Fixing/Delivery 5.3.1 Outline ............................... 2-90 Assembly ............................... 2-123 5.3.2 Cassette Lifter Operation ... 2-92 6.4 Controlling the Fixing Roller 5.3.3 Sequence of Operations Temperature ........................... 2-124 (pickup) .............................. 2-93 6.5 Controlling the Fixing Oil 5.4 Multifeeder Pickup Assembly .. 2-94 Temperature ........................... 2-126 5.4.1 Operations .......................... 2-94 6.6 Protective Mechanisms .......... 2-127 5.4.2 Sequence of Operations 6.6.1 Detecting Overheating (multifeeder pickup) .......... 2-95 (software) ......................... 2-127 5.4.3 Releasing the Registration Roller ................................. 2-96 COPYRIGHT © 2001 CANON INC. 2000 2000 2000 2000 CANON CLC5000 REV.0 JAN. 2001 viii CONTENTS 6.6.2 Detecting Overheating (hardware) ........................ 2-127 6.6.3 Detecting an Open Circuit in the Thermistor ............. 2-128 6.6.4 Detecting a Fault in the Triac ................................. 2-128 6.6.5 Detecting Overheating of Fixing Oil (software) ....... 2-128 6.6.6 Detecting Overheating of Fixing Oil (hardware) ...... 2-128 6.6.7 Detecting Low Temperature of Oil (software) ................... 2-129 6.6.8 Detecting Low Temperature of Oil (hardware) .................. 2-129 6.6.9 Operation of the Thermal Switch .............................. 2-129 6.7 Controlling the Fixing Speed . 2-130 6.8 Timing Chart (fixing/delivery assembly) ..... 2-131 6.8.1 Basic Sequence of Operations ........................ 2-131 6.8.2 Changing the Fixing Speed ............................... 2-132 6.9 Driving the Fixing Cleaning Web ........................................ 2-133 6.10 Disassembly/Assembly .......... 2-134 6.10.1 Fixing Assembly .............. 2-135 6.10.2 Upper Fixing Cleaner Assembly ......................... 2-141 6.10.3 Lower Fixing Cleaning Assembly ......................... 2-143 6.10.4 Fixing Oil Applying Unit 2-144 7 Externals and Controls ................... 2-150 7.1 Outline of the Externals and Controls .................................. 2-150 7.2 Differences in the Externals and Controls .................................. 2-150 7.3 Fans ........................................ 2-151 7.3.1 Arrangement of the Fans . 2-151 7.3.2 Types of Fans ................... 2-152 7.3.3 Sequence of Operations ... 2-153 7.4 Power Supply ......................... 2-154 7.5 Download ............................... 2-157 7.6 Disassembly/Assembly .......... 2-158 7.6.1 Fans and Filters ................ 2-159 7.6.2 Switches ........................... 2-169 7.6.3 PCBs ................................ 2-169 7.6.4 Drive System ................... 2-184 8 Paper Deck-J1/K1 ........................... 2-197 8.1 Outline ................................... 2-197 8.2 Differences in the Paper Deck-J1/K1 ............................ 2-197 8.3 Outline of Operations ............ 2-198 8.3.1 Outline ............................. 2-198 8.3.2 Pickup Operations ........... 2-199 8.3.3 Sequence of Operations (pickup from paper deck) 2-200 8.4 Disassembly/Assembly .......... 2-201 8.4.1 Removing the Pickup Roller ............................... 2-202 8.4.2 Removing the Pickup/Feed roller ................................ 2-203 8.4.3 Removing the Separation Roller ............................... 2-205 8.4.4 Removing the deck sensor ............................... 2-206 9 Buffer Pass Unit-B1 ........................ 2-207 9.1 Outline ................................... 2-207 9.1.1 Outline of the Electrical Circuitry ........................... 2-208 9.1.2 Inputs to and Outputs from the Buffer Pass Driver PCB ... 2-209 9.2 Differences in the Buffer Path Unit ........................................ 2-211 9.3 Feeding Operations ................ 2-212 9.3.1 Outline ............................. 2-212 9.3.2 Controlling the Feeding Speed ............................... 2-216 9.3.3 Controlling the Buffer Pass Motor ............................... 2-217 9.4 Removing Curling ................. 2-219 9.4.1 Outline ............................. 2-219 9.4.2 Operations ........................ 2-221 9.5 Detecting Jams ....................... 2-224 9.5.1 Outline ............................. 2-224 9.5.2 Delay Jam ........................ 2-225 9.5.3 Stationary Jam ................. 2-226 9.6 Power Supply ......................... 2-227 COPYRIGHT © 2001 CANON INC. 2000 2000 2000 2000 CANON CLC5000 REV.0 JAN. 2001 ix CONTENTS 9.6.1 Outline ................................... 2-227 9.7 Disassembly/Assembly .......... 2-228 9.7.1 External Covers ............... 2-229 9.7.2 Feeding System ............... 2-230 9.7.3 9.7.4 9.7.5 9.7.6 PCBs ................................ 2-244 Fans and Motors .............. 2-245 Sensors ............................. 2-249 Solenoids ......................... 2-253 CHAPTER 3 INSTALLATION 1 Selecting the Site ................................ 3-1 2 Points to Note for Installation and Relocation .................................................. 3-4 2.1 Base Plate and Installation/ Relocation Work ........................ 3-4 3 Installation .......................................... 3-5 3.1 Unpacking .................................. 3-5 3.2 Removing the Fixings, Supplying Fixing Oil, and Changing the Voltage Rating (240V North American Model) ........................................ 3-7 3.3 Supplying Toner ....................... 3-14 3.4 Supplying Starter ..................... 3-22 3.5 Checking Images and Operations ................................ 3-26 4 5 6 7 8 Relocating the Machine .................... 3-27 Installing the Original Tray .............. 3-29 Installing the Control Card V ........... 3-30 Installing the DA Unit-A1 ................ 3-34 Using the Crane Transport kit ........... 3-38 8.1 Items to Prepare ....................... 3-38 8.2 Procedure ................................. 3-39 8.2.1 Preventing Deformation of Externals ............................ 3-39 8.2.2 Mounting the Belt Retaining Members ............................ 3-40 8.2.3 Mounting the Developing Bias Assembly Protection Member .............................. 3-41 CHAPTER 4 MAINTENANCE AND SERVICING 1 Periodically Replaced Parts ................ 4-1 2 Consumables and Durables ................ 4-4 2.1 Copier ......................................... 4-4 2.1.1 By the Copier’s Hard Counter ................................ 4-4 2.1.2 By the Soft Counter in Service Mode (COUNTER) ............. 4-6 x 2.2 Buffer Pass Unit-B1 ................... 4-6 2.3 Paper Deck-K1/J1 ...................... 4-6 3 Scheduled Servicing Procedure .......... 4-7 4 Scheduled Maintenance Chart ............ 4-8 4.1 Copier ......................................... 4-8 4.2 Buffer Pass Unit - B1 ............... 4-12 4.3 Paper Deck - J1/K1 .................. 4-12 COPYRIGHT © 2001 CANON INC. 2000 2000 2000 2000 CANON CLC5000 REV.0 JAN. 2001 CONTENTS CHAPTER 5 TROUBLESHOOTING IMAGE FAULTS/ MALFUNCTIONS 1 Guide to Table ..................................... 5-1 1.1 Image Adjustment Basic Procedure ................................... 5-3 1.2 Points of the Scheduled Servicing .................................... 5-5 2 Standards and Adjustments ................. 5-7 2.1 Image-Related Parts ................... 5-7 2.1.1 Non-Image Width ................ 5-7 2.1.2 Image Margin ...................... 5-8 2.1.3 Checking and Adjusting the Non-Image Width and Margin ................................. 5-9 2.1.4 Image Positioning Correction ........................................... 5-16 2.2 Original Illuminating System .. 5-17 2.2.1 When Replacing the Scanning Lamp, Standard White Plate, Lamp Regulator, Reflecting Lamp Cover, Reader Controller PCB, Flash memory on Reader Controller PCB, or Analog Processor PCB CCD Unit ....... 5-17 2.2.2 Routing the Scanner Cable 5-17 2.3 Photosensitive Drum-Related Parts .......................................... 5-21 2.3.1 Removing the Photosensitive Drum .................................. 5-21 2.3.2 Points to Note When Installing the Photosensitive Drum .... 5-22 2.3.3 Points to Note When Fitting the Drum Drive Belt ................ 5-23 2.4 Charging Assembly-Related Parts .......................................... 5-23 2.4.1 Adjusting the Height of the Charging Wire .................... 5-23 2.4.2 Points to Note When Handling the Primary Grid Plate and the Primary Charging Wire ...... 5-24 2.5 Developing Assembly-Related Parts .......................................... 5-24 2.5.1 Replacing the Developer .... 5-24 2.5.2 When Replacing the Developing Assembly (CMYK) ...... 5-28 2.5.3 When Replacing the Photosensitive Drum .......... 5-29 2.5.4 When Supplying the Hopper with Toner .......................... 5-30 2.6 Transfer Belt Unit .................... 5-31 2.6.1 Points to Note When Replacing the Transfer Belt ................ 5-31 2.6.2 Initializing the Transfer Belt Swing Control Data ........... 5-32 2.6.3 Adjusting the Tension on the Drive Belt of the Transfer Belt Motor ................................. 5-32 2.6.4 Adjusting the Position of the Transfer Belt-Related Solenoid ............................. 5-33 2.7 When Replacing the Pick-Up/ Feeding-Related Parts .............. 5-34 2.7.1 Registering the Cassette/ Multifeeder Paper Width Basic Setting (under ‘FUNC’) ..... 5-34 2.7.2 Orientation of the Cassette Pickup Roller ..................... 5-36 2.7.3 Orientation of the Cassette Feed Roller ........................ 5-37 2.7.4 Orientation of the Cassette Separation Roller ............... 5-37 2.7.5 Adding the Pressure of the Cassette Separation Roller . 5-37 2.7.6 Orientation of the Paper Deck Pick-Up Roller ................... 5-38 2.7.7 Orientation of the Paper Deck Pick-Up/Feeding Roller ..... 5-38 2.7.8 Orientation of the Paper Deck Separation Roller ............... 5-38 2.7.9 Adjusting the Position of the Paper Deck Pick-Up Roller Releasing Solenoid (SL8001) ............................ 5-39 COPYRIGHT © 2001 CANON INC. 2000 2000 2000 2000 CANON CLC5000 REV.0 JAN. 2001 xi CONTENTS 2.7.10 Adjusting the Pressure of the Paper Deck Separation/Feeding Roller ................................. 5-39 2.7.11 Positioning the Cassette Pickup Roller Releasing Solenoid (SL9, SL10) ....................... 5-39 2.7.12 Adjusting the Pressure of the Multifeeder Separation Roller ................................. 5-40 2.7.13 Adjusting the Position of the Multifeeder Pick-Up Roller Releasing Solenoid (SL5) .................................. 5-40 2.7.14 Adjusting the Position of the Delivery Paper Deflecting Plate Solenoid (SL14) ................ 5-40 2.7.15 Adjusting the Position of the Duplexing Unit Paper Deflecting Plate Solenoid (SL11) ................................ 5-41 2.7.16 Adjusting the Position of the Duplexing Unit Stacking Assembly Paper Guide Plate ................................... 5-41 2.7.17 Adjusting the Position of the Duplexing Unit Feeding Roller Solenoid (SL13) ................ 5-42 2.7.18 Attaching the Timing Belt for the Duplexing Unit Stacking Assembly Paper Guide Plate ................................... 5-42 2.7.19 Adjusting the Position of the Separation Claw Solenoid (SL15) ................................ 5-43 2.7.20 Adjusting the Position of the Upper Fixing Web Take-Up Solenoid (SL3) .................. 5-43 2.7.21 When Replacing the Registration Roller Unit .... 5-43 2.7.22 Correcting Skew Movement(slope of the registration roller unit) ....... 5-44 2.8 Laser Exposure System ............ 5-45 2.8.1 When Replacing the Laser Unit .................................... 5-45 xii 2.8.2 When Replacing the Video Controller PCB ......................... 5-45 2.8.3 When Replacing the BD Unit .................................... 5-45 2.8.4 Adjusting the Laser Power 5-45 2.8.5 Adjusting the Laser Intensity ............................. 5-49 2.8.6 Laser Focus Adjustment .... 5-50 2.9 Fixing Assembly-Related Parts 5-52 2.9.1 Points to Note When Replacing the Fixing Heater ............... 5-52 2.9.2 Adjusting the Nip (fixing pressure adjusting nut) ............. 5-52 2.9.3 Adjusting the Mounting Position of the External Paper Delivery Unit ..................... 5-53 2.10 Electrical .................................. 5-54 2.10.1 When Replacing Major Parts ................................... 5-54 2.10.2 Checking the Environment Measurement PCB ............. 5-58 2.10.3 Checking the High Voltage Control System .................. 5-60 2.10.4 Checking the Photointerrupters ............... 5-61 3 Troubleshooting Image Problems ..... 5-66 3.1 Initial Checks ........................... 5-66 3.1.1 Checking the Site of Installation ......................... 5-66 3.1.2 Checking the Originals ...... 5-66 3.1.3 Checking the Copyboard Cover, Copyboard Glass, and Standard White Plate ......... 5-66 3.1.4 Checking the Charging Assemblies ......................... 5-66 3.1.5 Checking the Developing Assembly ........................... 5-66 3.1.6 Checking the Paper ............ 5-66 3.1.7 Checking the Periodically Replaced Parts ................... 5-67 3.1.8 Others ................................ 5-67 3.2 Standard Image ........................ 5-67 3.2.1 Gray Scale .......................... 5-67 3.2.2 Color Patches ..................... 5-67 3.2.3 Photo .................................. 5-67 COPYRIGHT © 2001 CANON INC. 2000 2000 2000 2000 CANON CLC5000 REV.0 JAN. 2001 CONTENTS 3.2.4 3-Color Gradation Scale .... 5-67 3.2.5 Halftone Band .................... 5-68 3.2.6 Fogging .............................. 5-68 3.3 Test Prints ................................ 5-70 3.3.1 Selecting a Test Pattern ...... 5-70 3.3.2 256-Color Test Print (PGTYPE=02) ................... 5-72 3.3.3 256-Gradation Test Print (PGTYPE=03) ................... 5-73 3.3.4 17-Gradation Test Print (PGTYPE=04) ................... 5-74 3.3.5 Halftone Test Print (PGTYPE=05) ................... 5-75 3.3.6 Grid Test Print (PGTYPE=06) ................... 5-77 3.3.7 Image Position Correction Pattern (PGTYPE=07) ....... 5-78 3.3.8 Horizontal Stripe (FF activation) Test Print (PGTYPE=10) ...... 5-79 3.3.9 Full Color 17-Gradation (YMCBk+RGB+gray) Test Print (PGTYPE=14) .......... 5-80 3.4 Troubleshooting Image Faults . 5-81 3.4.1 The image is too light (all colors). ......................... 5-81 3.4.2 The image is too light (specific color). .................. 5-81 3.4.3 The copy has uneven density (vertical). ............................ 5-81 3.4.4 The copy has uneven density (horizontal). ....................... 5-83 3.4.5 The copy has fogging. ....... 5-84 3.4.6 The copy has vertical streaks/vertical lines. ......... 5-84 3.4.7 The copy has white streaks/ white lines (vertical). ......... 5-87 3.4.8 The copy has horizontal streaks/ horizontal fogging. ............ 5-89 3.4.9 The copy has white spots (horizontal). ....................... 5-91 3.4.10 The copy has white spots. .. 5-92 3.4.11 The copy has white spots (trailing center). ................. 5-93 3.4.12 The copy has white spots (meandering). ..................... 5-94 3.4.13 The copy has a soiled image or soiled back. ........................ 5-94 3.4.14 The copy has poor fixing. .. 5-96 3.4.15 The copy has bleeding toner (during fixing). .................. 5-97 3.4.16 The copy is blank. ............. 5-98 3.4.17 The copy is solid black. ..... 5-99 3.4.18 The copy has color displacement. ................... 5-101 3.4.19 The copy has image blur .. 5-102 3.4.20 Adjust the Image Leading ............................ 5-103 4 Troubleshooting .............................. 5-104 4.1 Troubleshooting Malfunctions5-104 4.1.1 E000/E004 ....................... 5-104 4.1.2 E005 ................................. 5-109 4.1.3 E006 ................................. 5-109 4.1.4 E008 ................................. 5-110 4.1.5 E012 ................................. 5-111 4.1.6 E013 ................................. 5-112 4.1.7 E014 ................................. 5-114 4.1.8 E015 ................................. 5-114 4.1.9 E017 ................................. 5-115 4.1.10 E018 ................................. 5-115 4.1.11 E020 ................................. 5-116 4.1.12 E023 ................................. 5-120 4.1.13 E030 ................................. 5-120 4.1.14 E040 ................................. 5-121 4.1.15 E041 ................................. 5-123 4.1.16 E044 ................................. 5-124 4.1.17 E050 ................................. 5-125 4.1.18 E061 ................................. 5-125 4.1.19 E062 ................................. 5-127 4.1.20 E072 ................................. 5-128 4.1.21 E073 ................................. 5-128 4.1.22 E074 ................................. 5-129 4.1.23 E075 ................................. 5-130 4.1.24 E076 ................................. 5-135 4.1.25 E077 ................................. 5-135 4.1.26 E100 ................................. 5-136 4.1.27 E110 ................................. 5-138 4.1.28 E194 ................................. 5-138 4.1.29 E220 ................................. 5-141 4.1.30 E226 ................................. 5-141 4.1.31 E249 ................................. 5-141 COPYRIGHT © 2001 CANON INC. 2000 2000 2000 2000 CANON CLC5000 REV.0 JAN. 2001 xiii CONTENTS 4.1.32 4.1.33 4.1.34 4.1.35 4.1.36 4.1.37 4.1.38 4.1.39 4.1.40 4.1.41 4.1.42 4.1.43 4.1.44 4.1.45 4.1.46 4.1.47 E350 ................................. 5-142 5.1.5 Fixing/Delivery Assembly 5-170 E351 ................................. 5-142 5.1.6 Delivery Vertical Path, Duplexing E517 ................................. 5-143 Reversing Assembly, and Pre-duE620 ................................. 5-144 plex Feeding Assembly ....... 5-171 E700 ................................. 5-144 5.1.7 Duplex feeding Assembly/ E718 ................................. 5-145 Duplex Assembly ............. 5-172 E800 ................................. 5-146 5.2 Feeding Faults ........................ 5-173 E804 ................................. 5-146 5.2.1 Double Feeding ............... 5-173 E805 ................................. 5-146 5.2.2 Wrinkles .......................... 5-173 E807 ................................. 5-147 6 Arrangement and Functions of E822 ................................. 5-148 Electrical Parts ................................ 5-174 E824 ................................. 5-148 6.1 Sensors ................................... 5-174 E826 ................................. 5-149 6.2 “Lamps, Switches, Thermistors, AC power is absent. ......... 5-149 and Heaters” ........................... 5-178 DC power is absent. ......... 5-151 6.3 Clutches ................................. 5-182 The scanner fails to move 6.4 Solenoids ................................ 5-183 forward/in reverse. ........... 5-152 6.5 Fans ........................................ 5-184 4.1.48 The scanning lamp fails to 6.6 Motors .................................... 5-186 turn ON. ........................... 5-153 6.7 PCBs ...................................... 5-188 4.1.49 The lifter fails to move up 6.8 Variable Resistors (VR), Light(pick-up from the Emitting Diodes (LED), and Check cassette). .......................... 5-154 Pins by PCB ........................... 5-190 4.1.50 Pick-up fails (cassette 1). . 5-155 6.8.1 DC Controller PCB ......... 5-191 4.1.51 Pick-up fails (cassette 2). . 5-156 6.8.2 Video Controller PCB ...... 5-192 4.1.52 The multifeeder fails to 6.8.3 Reader Control PCB ........ 5-193 pick up paper. .................. 5-157 6.8.4 Image Processor PCB ...... 5-194 4.1.53 The registration roller fails to 6.8.5 IP Memory PCB .............. 5-195 rotate. ............................... 5-157 6.8.7 Transfer Belt Motor 4.1.54 Retention fails. ................. 5-158 Driver PCB ...................... 5-196 4.1.55 The pre-exposure lamp fails to 6.8.6 Analog Processor PCB .... 5-196 turn ON. ........................... 5-159 6.8.8 Laser Driver PCB ............ 5-197 4.1.56 The fixing heater fails to turn 6.8.9 Lamp Regulator PCB ...... 5-199 ON. .................................. 5-159 6.8.10 Enviroment Sensor PCB .. 5-200 4.1.57 The drum heater fails to 6.8.11 HVT1 ............................... 5-201 rotate. ............................... 5-161 6.8.12 HVT2 ............................... 5-202 4.1.58 The counter fails to operate. 5-162 6.8.13 HVT4 ............................... 5-204 4.1.59 The cassette heater fails to 6.8.14 HVT5 ............................... 5-204 operate. ............................ 5-163 6.8.15 ED board A1 .................... 5-205 4.1.60 Abnormal noise is heard. . 5-164 6.8.16 Interface board B1 ........... 5-206 5 Troubleshooting Feeding Problems 5-165 6.8.17 Preview monitor board .... 5-207 5.1 Jams ....................................... 5-165 6.9 Paper Deck-K1 ....................... 5-208 5.1.1 Pick-Up Assembly ........... 5-167 6.10 Paper Deck-J1 ......................... 5-209 5.1.2 Pick-up Feeding Assembly . 5-168 6.11 Buffer pass unit C1 ................. 5-210 5.1.3 Transfer Unit Assembly ... 5-169 7 Upgrading (download) .................... 5-212 5.1.4 Separation/Pre-Fixing 7.1 Items to Prepare ..................... 5-212 Feeding Assembly ........... 5-169 7.2 Preparing for the Work ........... 5-212 COPYRIGHT © 2001 CANON INC. 2000 2000 2000 2000 CANON CLC5000 REV.0 JAN. 2001 xiv CONTENTS 7.3 Making Connections .............. 5-212 7.4 Downloading .......................... 5-214 7.5 After the Work ....................... 5-215 APPENDIX 1 General Timing Chart ........................ A-1 2 General Circuit Diagram .................... A-3 3 Paper Deck J1/K1 General Timing Chart ........................ A-7 2 Buffer Pass Unit General Circuit Diagram .................... A-8 5 Special Tools ...................................... A-9 6 Solvents and Oils ............................. A-12 COPYRIGHT © 2001 CANON INC. 2000 2000 2000 2000 CANON CLC5000 REV.0 JAN. 2001 xv CHAPTER 1 GENERAL DESCRIPTION COPYRIGHT © 2001 CANON INC. 2000 2000 2000 2000 CANON CLC5000 REV.0 JAN. 2001 CHAPTER 1 GENERAL DESCRIPTION 1 Specifications 1.1 Type Body Console Copyboard Fixed Light source Halogen lamp Lens Fixed lens array Image reading Photocell (BGR 3-line CCD); scanning by mirror with CCD fixed in place Photosensitive medium OPC drum (60-mm dia.); 4 pc. Reproduction Indirect statophotographic Charging Corona Exposure Laser beam Contrast adjustment Auto Development Toner projection (CMYK) Toner supply Manual (YMC, 750 g; K, 6450 g) Paper source Special front cassette (2 pc.), paper deck, multifeeder Attraction Static electricity (simultaneously with cyan transfer) Transfer Blade (transfer belt) Separation Static electricity Photosensitive drum cleaning Blade Fixing Heat roller (upper, 800 W; lower, 600 W) T01-101-01 COPYRIGHT © 2001 CANON INC. 2000 2000 2000 2000 CANON CLC5000 REV.0 JAN. 2001 1-1 CHAPTER 1 GENERAL DESCRIPTION 1.2 Functions Type of original Maximum size of original Reproduction ratio auto ratio selection, zoom Wait time (20ºC) First copy time (A4/LTR) Continuous copying Copying speed Copy size Cassette Multifeeder Paper deck Type of copy paper Cassette Multifeeder Sheets, 3-D object (2 kg max.) A3 (297 x 420 mm)/11 x 17 (279 x 432 mm) Direct (±0.5%); default enlargement/reduction (±1.0%; see Table 1-201); zoom, 25% to 400% (±1.0%, in 1% increments); 9 min or less 12 sec or less (A4/LTR) 999 copies max. See T01-105-01. Maximum: A3 (297 x 420 mm)/11 x 17 (279 x 432 mm) Minimum: A5 (148 x 210 mm)/STMT (216 x 139.5 mm) Maximum: A3 extra length (305 x 457 mm) Minimum: Postcard (A6 non-default) A4 (210 x 297mm), LTR (216 x 279 mm), 11 x 17 (279 x 432 mm), A3 extra-length (305 x 457 mm), 12 x 18 (305 x 457 mm), B5 (182 x 257 mm), A3 (297 x 420 mm), B4 (257 x 364 mm) Plain paper (80 to 105 g/m2), transparency (special), thin paper (64 to 79 g/m2) Thin paper (64 to 79 g/m2), plain paper (80 to 163 g/m2), thick paper (106 to 163 g/m2; including cast coated paper and special postcard), extra-thick paper (164 to 253 g; including cast coated paper and postcard), special paper 1/2, transparency (special) Plain paper (80 to 105 g/m2), transparency (special), thin paper Paper deck (64 to 79 g/m2) Double-sided Plain paper (105 g/m2; auto double-sided and manual copy double-sided) Cassette w/o claw, center reference, 550 sheets (of 105 g/m2 paper; approx.) Multifeeder 250 sheets (of 81.4 g/m2 paper; approx.) Paper deck Stack height Paper Deck-J1 205 mm (2000 sheets of 81.4 g/m2 paper) Paper Deck-K1 410 mm (4000 sheets of 81.4 g/m2) 2 Delivery tray 250 sheets (of 81.4 g/m paper; approx.) Image margin Single-sided Double-sided Leading edge: 2.5±1.5 mm Leading edge: 2.5±2.0 mm Left/right: 2.0±1.5 mm Left/right: 2.0±1.5 mm Trailing edge: 2.5±1.5 mm Trailing edge: 2.5±2.0 mm Non-image width Single-sided Double-sided Leading edge: 2.5±1.5 mm Leading edge: 2.5±2.0 mm (in full image, 0.5±0.5 mm) (in full in full image, 0.5±0.5 mm) Let/right: 2.0±1.5 mm Left/right: 2.0±1.5 mm (in full image, 0±1.0 mm) (in full image, 0±1.0 mm) Reading resolution 400 dpi (main scanning direction) Reading resolution 400 dpi (main scanning direction) T01-102-01 1-2 COPYRIGHT © 2001 CANON INC. 2000 2000 2000 2000 CANON CLC5000 REV.0 JAN. 2001 CHAPTER 1 GENERAL DESCRIPTION Density adjustment Color mode Color adjustment Original mode map, second copy Original detection Cassette selection Page separation Auto double-sided Manual (9 steps), color AE, BE ACS, black, full color Color balance, registration, hue, chroma, density area Text/print photo, text/film photo, text, print photo, film photo, Size, position Auto paper selection, auto cassette selection Page separation, free division, enlargement separation, reduced page composition (requires RDF), double-sided separation (requires RDF) Single-sided to double-sided, double-sided to double-sided (requires RDF), double-sided to single-sided (requires RDF), page separation double-sided Yes (right/left bind, bind width, back only) Original, book, sheet Center shift, corner shift, free shift Yes Yes Yes Yes Yes Yes (2 min standard; may be changed or disabled in user mode) Yes (2 hr standard; may be changed or disabled in user mode) Yes Yes (requires ED Board-C1) Bind margin Frame erase Shift Transparency interleaf One-touch adjustment Interrupt ID mode Auto start Auto clear Auto power-off Pre-heat Area selection/Non-rectangle area selection Marker selection No Synthesis Yes (requires ED Board-C1) Image create Yes (some functions require ED Board-C1) Color create Use (some functions require ED Board-C1) User mode Settings selection Yes Standard mode change Registration/initialization Mode memory 9 modes: full set, 3; no area, 6 Timer Auto clear time, auto power-off time Density correction Yes Auto gradation correction Yes Background level adjustment Yes Text/photo level Text/photo separation level (7 steps) Zoom fine tuning Yes Cleaning Yes Transparency cassette selection Yes Thin paper cassette selection Use T01-102-02 COPYRIGHT © 2001 CANON INC. 2000 2000 2000 2000 CANON CLC5000 REV.0 JAN. 2001 1-3 CHAPTER 1 GENERAL DESCRIPTION 1.3 Others 1.3.1 Copier Operating environment Temperature: 15 to 27.5ºC Humidity: 25% to 75% Atm pressure: 810.6 hPa to 1013.3 hPa (0.8 to 1.0 atm) Power supply (rated voltage ±10%) Power supply 200V 208/240V 230V 230V 230V 230V 230V 230V 230V Serial No. LQZxxxxx NSXxxxxx (UL) PRXxxxxx (ITA) SCZxxxxx (FRN) TDLxxxxx (GER) UHBxxxxx (AMS) PRMxxxxx (general) QEBxxxxx (UK) PDQxxxxx (CA) Power consumption 3 KW or less (during copying, A4, full-color continuous) 0.62 KW (during standby; reference only) Noise 77 dB (during copying) 71 dB (during standby) ISO sound power level (1 m from machine) Ozone 0.02 ppm or less (upon installation) 0.05 ppm (100,000 copies or 1 yr) Consumables Paper Keep wrapped to protect against humidity. Toner Avoid direct sunlight, and keep it at 40ºC or lower. Fixing oil Avoid direct sunlight. Dimensions See F01-103-01. Weight 490.0 kg (body only) 3.7 kg (copyboard) 4.9 kg (editor) 28.5 kg (A4 paper deck) 39.4 kg (A3 paper deck) T01-103-01 1-4 COPYRIGHT © 2001 CANON INC. 2000 2000 2000 2000 CANON CLC5000 REV.0 JAN. 2001 CHAPTER 1 GENERAL DESCRIPTION Dimensions 100 mm min. 1565mm • Without Options 2106mm 100 mm min. 1565mm • With Paper Deck-J1, Feeder, Stapler Sorter, Buffer Path Unit, and Projector 3052mm F01-103-01 COPYRIGHT © 2001 CANON INC. 2000 2000 2000 2000 CANON CLC5000 REV.0 JAN. 2001 1-5 CHAPTER 1 GENERAL DESCRIPTION 1.4 Default Ratios Site Japan 6R5E North America 5R4E Europe 3R3E Others 5R5E Reduction Ratio Enlargement Ratio — 0.250 B4 to A3 B5R to A4R B5 to A4 1.153 A3 to A5 0.500 A4R to B4 A5 to B5 1.223 A3 to B5 0.611 A4R to B4 B5R to B4 1.414 A3 to A4R B4 to B5R 0.707 A5 to A3 2.000 B4 to A4R 0.815 — 4.000 A3 to B4 A4R to B5R 0.865 — — 0.250 LGL to 11x17 1.214 — 0.500 — 1.294 11x17 to LTRR 0.647 LTRR to 11x17 2.000 11x17 to LGL 0.733 MINIT to LTRR 4.000 LGL to LTRR 0.786 — — 0.250 A4R to A3 1.414 A3 to A5 0.500 A5 to A3 2.000 A3 to A4R 0.707 — 4.000 — 0.250 B4 to A3 B5R to A4R B5 to A4 1.153 A3 to A5 0.500 A4R to B4 A5 to B5 1.223 A3 to A4R B4 to B5R 0.707 A4R to A3 B5R to B4 1.414 B4 to A4R 0.815 A5 to A3 2.000 A3 to B4 A4R to B5R 0.865 4.000 T01-104-01 1-6 COPYRIGHT © 2001 CANON INC. 2000 2000 2000 2000 CANON CLC5000 REV.0 JAN. 2001 CHAPTER 1 GENERAL DESCRIPTION 1.5 Copying Speed Source Side Medium Cassette 1st Plain paper Copying speed A4/LTR A3/11x17 Transparency Paper deck 1st Plain paper 4R/B4 50 25 30 9 — 8 50 25 30 (B4) Duplex unit 2nd Plain paper 20 10 10 Multifeeder 1st Plain paper 35 18 22 2nd Thick paper 16 11 12 Extra-thick paper 13 8 9 9 7 8 Transparency T01-105-01 The above specifications are subject to change for product improvement. COPYRIGHT © 2001 CANON INC. 2000 2000 2000 2000 CANON CLC5000 REV.0 JAN. 2001 1-7 CHAPTER 1 GENERAL DESCRIPTION 2 Safety 2.1 Safety of Laser Light Laser light can be harmful to the human body. The machine’s laser unit is sealed in a protective housing and external covers to prevent escape of laser light to the outside of the machine, protecting the individuals around the machine from the harmful effects of laser light as long as the machine is used in normal ways. CLASS 1 LASER PRODUCT APPAREIL A RAYONNEMENT LASER DE CLASSE 1 LASER KLASSE 1 PRODUCTO LASER DE CLASE 1 APPARECCHIO LASER DI CLASSE 1 IN ACCORDO CON LA NORMA CEI 76-2 F01-201-01 1-8 COPYRIGHT © 2001 CANON INC. 2000 2000 2000 2000 CANON CLC5000 REV.0 JAN. 2001 CHAPTER 1 GENERAL DESCRIPTION 2.2 CDRH Ordinance The Center for Devices and Radiological Health of the US Food and Drug Administration put into effect an ordinance to govern laser products on August 2, 1976. The ordinance applied to laser products produced on August 1, 1976, and the sale of laser products is banned in the US without certification under the ordinance. The following is the label indicating compliance under the CDRH ordinance, and it must be attached to all laser products sold in the US. F01-202-01 A different description may be used for a different product. COPYRIGHT © 2001 CANON INC. 2000 2000 2000 2000 CANON CLC5000 REV.0 JAN. 2001 1-9 CHAPTER 1 GENERAL DESCRIPTION 2.3 Handling Parts Associated with the Laser Unit Do not introduce a screwdriver or the like (i.e., with a high degree of reflectance) into the laser path when servicing the areas around the laser unit. Also, remove watches, rings, and the like to prevent laser light from reflecting to your eyes. Extra attention is called for when servicing the inside of covers to which the following label is attached. The machine is equipped with a shutter to cut off the path of laser light. The shutter operates in conjunction with the hopper assembly, and remains open as long as the hopper is set in the machine, closing when the hopper assembly is slid to the front. It is even more important to heed the foregoing points when the hopper assembly is inside the machine or when a shutter opening tool is fitted (after sliding out the hopper assembly). F01-203-01 1-10 COPYRIGHT © 2001 CANON INC. 2000 2000 2000 2000 CANON CLC5000 REV.0 JAN. 2001 CHAPTER 1 GENERAL DESCRIPTION F01-203-02 COPYRIGHT © 2001 CANON INC. 2000 2000 2000 2000 CANON CLC5000 REV.0 JAN. 2001 1-11 CHAPTER 1 GENERAL DESCRIPTION 3 Names of Parts 3.1 External View [1] [2] [3] [4] [5] [12] [11] [6] [10] [1] [2] [3] [4] [5] [6] Copyboard Control panel Editor (accessory) Hopper lid (toner supply mouth) Multifeeder assembly Paper deck (accessory) [9] [7] [8] [9] [10] [11] [12] [8] [7] Control key/power switch Right front cover Cassette 1 Cassette 2 Left front cover Delivery tray F01-301-01 1-12 COPYRIGHT © 2001 CANON INC. 2000 2000 2000 2000 CANON CLC5000 REV.0 JAN. 2001 CHAPTER 1 GENERAL DESCRIPTION [1] [2] [3] [4] [5] [6] [11] [7] [10] [9] [1] [2] [3] [4] [5] [6] Fixing assembly knob Counter Front cover switch Hopper assembly Transfer unit Duplex unit [8] [12] [7] [8] [9] [10] [11] [12] Duplex front feedingassembly Waste toner box (for transfer belt) Fixing/delivery/reversal unit Fixing oil bottle Service book case Waste toner box (for process unit) F01-301-02 COPYRIGHT © 2001 CANON INC. 2000 2000 2000 2000 CANON CLC5000 REV.0 JAN. 2001 1-13 CHAPTER 1 GENERAL DESCRIPTION 3.2 Cross Section [9] [11] [13] [15] [17] [19] [21] [23] [25] [27] [29] [31] [1] [3] [5] [7] [2] [4] [6] [8] [10] [12] [14] [16] [18] [20] [22] [24] [26] [28] [30] [32] [33] [34] [36] [35] [37] [65] [38] [40] [41] [39] [42] [44] [46] [64] [49] [43] [45] [47] [48] [50] [52] [54] [51] [53] [55] [56] [59] [60] [57] [61] [58] [62] [63] F01-302-01 1-14 COPYRIGHT © 2001 CANON INC. 2000 2000 2000 2000 CANON CLC5000 REV.0 JAN. 2001 CHAPTER 1 GENERAL DESCRIPTION [1] [2] [3] [4] [5] [6] [7] [8] [9] [10] [11] [12] [13] [14] [15] [16] [17] [18] [19] [20] [21] [22] [23] [24] [25] [26] [27] [28] [29] [30] [31] [32] [33] External delivery roller Internal delivery roller No. 2 mirror base Fixing upper belt Scanning lamp Fixing upper roller Oil applying roller Fixing lower roller Pre-fixing feeding assembly Separation charging assembly Image position correction CCD unit Lens K BD sensor CCD K image position correction mirror K No. 3 mirror Y image position correction mirror Y BD sensor Y No. 3 mirror Internal static eliminating roller Polygon mirror/motor M No. 3 mirror M BD sensor M image position correction mirror C No. 3 mirror C image position correction mirror C BD sensor Registration roller Paper thickness detection roller Multifeeder feed roller Multifeeder pickup roller Multifeeder tray Delivery vertical path roller [34] [35] [36] [37] [38] [39] [40] [41] [42] [43] [44] [45] [46] [47] [48] [49] [50] [51] [52] [53] [54] [55] [56] [57] [58] [59] [60] [61] [62] [63] [64] [65] Duplex reversal inlet roller Fixing lower roller web Duplex reversal feed roller Duplex reversal outlet roller Waste toner box Transfer cleaning blade Pre-duplex feeding assembly Transfer belt Transfer belt cleaning web Cassette 2 Duplex unit Oil removing roller Polishing roller Cassette 1 Pickup roller Feed roller Separation roller Pickup vertical path roller Paper deck separation roller Paper deck feed roller Paper deck pickup roller Pre-exposure roller Pre-primary charging assembly Photosensitive drum cleaner SALT sensor Primary charging assembly Potential sensor Developing assembly Photosensitive drum Transfer blade Feeding roller Pre-fixing charging assembly COPYRIGHT © 2001 CANON INC. 2000 2000 2000 2000 CANON CLC5000 REV.0 JAN. 2001 1-15 CHAPTER 1 GENERAL DESCRIPTION 4 Control Panel 4.1 Control Panel [1] [2] Two-Sided Mode One Touch Color Colort Balance Zoom Functions Frame Erase Color Creation Two-page Sparation Sift Image Creation Additional Function Cover Mode [3] [4] [5] [6] Reset Standby Stop Start Area Designation Composition 1 2 3 4 5 6 7 8 9 0 ID Interrupt Clear Transparency Interleaving C Recall 123 [7] [1] [2] [3] [4] [5] [6] Extension Copy Mode key Message display Reset key Stop key Pre-Heat key Interrupt key [7] [8] [9] [10] [11] [8] [9] [10] [11] Start key Clear key ID key Call key Pilot lamp F01-401-01 1-16 COPYRIGHT © 2001 CANON INC. 2000 2000 2000 2000 CANON CLC5000 REV.0 JAN. 2001 CHAPTER 1 GENERAL DESCRIPTION 4.1.1 Instructions to the User Instruct the user on the following: 1. When making a double-sided copy in manual mode, correct the curling along the leading edge of the paper by bending in opposite direction. 2. Keep in mind that paper is classified into the following six: Plain: Most commonly used paper (80 to 105 g/m2) Thin paper: Paper thinner than plain paper (64 to 79 g/m2) Thick paper: Paper thicker than plain paper (106 to 163 g/m2) Extra-thick paper: Paper thicker than thick paper (164 to 253 g/m2) Transparency: Transparency film Special paper 1: Paper identified by the notation Special Paper 1 on wrappings Special paper 2: Paper identified by the notation Special Paper 2 on wrappings 3. About Transparencies • Do not touch the copying surface. Hold it by the edges. • Before placing transparencies in the cassette or in the multifeeder, fan them out to separate the sheets. • To prevent a jam, remove the processed transparency immediately upon delivery. • Keep all transparencies in its package, and store the package avoiding a high-temperature/humidity environment. 4. Orientation of Transparencies • In the Cassette Tray Vertical: Place it so that the triangle in a corner is to the left front. (1) Horizontal: Place it so that the triangle in a corner is to the right front. (2) (1) (2) F01-401-02 COPYRIGHT © 2001 CANON INC. 2000 2000 2000 2000 CANON CLC5000 REV.0 JAN. 2001 1-17 CHAPTER 1 GENERAL DESCRIPTION • In the Multifeeder/Paper deck Vertical: Place it so that the triangle in a corner is to the left front. (3) Horizontal: Place it so that the triangle in a corner is to the left front. (4) (3) (4) F01-401-03 5. Cassette Sheets In a high-humidity environment, paper tends to become moist, adversely affecting copying. As needed, place a cassette sheet on the bottom of the cassette tray before depositing paper. 1-18 COPYRIGHT © 2001 CANON INC. 2000 2000 2000 2000 CANON CLC5000 REV.0 JAN. 2001 CHAPTER 1 GENERAL DESCRIPTION 4.2 List of User Modes Item Description Key touch sound Error alert sound Auto cassette change Single original sort Trace width Outline position Shadow length Ratio in steps Density in steps Color sheet change Settings initialization Standard mode setting (ON*/OFF) (ON*/OFF) (ON*/OFF) (ON*/OFF) (1 to 4 mm; 1-mm increments; 4 mm*) (inside/outside*) (0.25 to 0.5 mm; 0.25 mm increments/1.5 mm*) (1% increments*/0.1% increments) (9 steps*/17 steps) (sheet A*/sheet B/sheet C/custom sheet: no color selection*) Mode memory Timer setting Monitor setting Density correction Auto gradation correction Background level adjustment Text/photo level Zoom fine-adjustment Cleaning Source of transparencies Source of thick paper Deck size change Auto vertical/horizontal rotation Print color processing *Factory default. Paper selection: auto*; Copy count: 1*; Ratio: Direct*; Zoom: 100% Original type: text/print photo*; Density: auto-OFF*; Density: median*; ACS: ON*; Original size auto detection: ON*; Center shift: ON* Auto clear time (1 to 9 min; in 1-min increments/2 min*) Auto power-off time (1 to 24 hr; in 1-hr increments/2 hr*) Quick correction Enables simple correction of halftone gradations (photo, images; test print read once) Full correction In addition to halftone (photo, image), gradation and density of text may be corrected (test print read 3 times) Background adjustment mode (A*/B) Color space adjustment (ON*/OFF) Auto vertical/horizontal rogation (ON*/OFF) Print color processing (ON*/OFF) T01-402-01 COPYRIGHT © 2001 CANON INC. 2000 2000 2000 2000 CANON CLC5000 REV.0 JAN. 2001 1-19 CHAPTER 1 GENERAL DESCRIPTION 5 Routine Maintenance by the User 5.1 Cleaning the Outside Advise the user to clean the surface of the copyboard glass, copyboard cover (editor), and touch panel once a week. 5.2 Checking the Leakage Breaker Check the leakage breaker once or twice a month, and record the results. Making a Check 1) Press the test button of the breaker. Test button F01-502-01 1-20 COPYRIGHT © 2001 CANON INC. 2000 2000 2000 2000 CANON CLC5000 REV.0 JAN. 2001 CHAPTER 1 GENERAL DESCRIPTION 2) Check to make sure that the open/close lever has shifted to the OFF terminal side and the power has been cut. F01-502-02 3) Turn off the main power switch. 4) Shift the open/close lever to the ON side. F01-502-03 5) Turn on the main power switch. COPYRIGHT © 2001 CANON INC. 2000 2000 2000 2000 CANON CLC5000 REV.0 JAN. 2001 1-21 CHAPTER 2 NEW FUNCTIONS COPYRIGHT © 2001 CANON INC. 2000 2000 2000 2000 CANON CLC5000 REV.0 JAN. 2001 CHAPTER 2 NEW FUNCTIONS 1 Exposure System 1.1 Outline of the Original Exposure System The machine’s exposure system is designed on the reader scanner of the CLC1100 Series machines. F02-101-01 shows a block diagram of the machine’s exposure system, and F02-101-02 shows its external view. Exposure system Scanning lamp No. 2 mirror CCD driver (forward) CCD No. 1 mirror Lens No. 3 mirror F02-101-01 Scanner motor (M29) Scanner thermal switch 1 (TP4) No. 1 mirror base No. 2 mirror base (forward) Scanner thermal switch 2 (TP5) Signal plate Scanner home position sensor F02-101-02 COPYRIGHT © 2001 CANON INC. 2000 2000 2000 2000 CANON CLC5000 REV.0 JAN. 2001 2-1 CHAPTER 2 NEW FUNCTIONS 1.2 Comparison of Exposure Systems Unit/Part Differences from CLC1000 Series machines Purpose Reference Scanner HP sensor Home position search To improve the accuracy of detection 1.3 “Basic Sequence of Operations (exposure system)” Scanner motor Drive voltage used for To support higher speed 1.4 “Scanner Motor” reverse movement (from 24 to 40 V) Scanning lamp intensity Number of scanner ther- To improve safety control mal switches (from 1 to 2) 1.5 “Controlling the Intensity of the Scanning Lamp” T02-102-01 2-2 COPYRIGHT © 2001 CANON INC. 2000 2000 2000 2000 CANON CLC5000 REV.0 JAN. 2001 CHAPTER 2 NEW FUNCTIONS 1.3 Basic Sequence of Operations (exposure system) 1.3.1 Scanner Home Position Sensor and Operations • • • • The scanner home position sensor (PS37) turns on as follows: When the power is turned on. When the Start key is pressed. When scanning of an original ends. When CCD is adjusted (in service mode). Original leading edge 14mm PS37 2mm Home position Start position Original 1. HP search at power-on 2. Shading correction 3. Original detection 4. Original scanning F02-103-01 COPYRIGHT © 2001 CANON INC. 2000 2000 2000 2000 CANON CLC5000 REV.0 JAN. 2001 2-3 CHAPTER 2 NEW FUNCTIONS 1.3.2 Sequence of Operations • Without Pre-Scanning (if original detection OFF, ACS off, APS OFF) Start key ON CNTR [C] [A] Scanning lamp Scanner motor (M29) Original scanner HP sensor (PS37) • With Pre-Scanning (single scan over original; standard mode) Start key ON CNTR [A] [B] [C] Scanning lamp Scanner motor (M29) Scanner HP sensor (PS37) reverse (scanner in reverse) high-speed rotation standard rotation [A]:shading corection. [B]:original position identification, black original identification, AE measurement [C]:original scan F02-103-02 2-4 COPYRIGHT © 2001 CANON INC. 2000 2000 2000 2000 CANON CLC5000 REV.0 JAN. 2001 CHAPTER 2 NEW FUNCTIONS 1.4 Scanner Motor 1.4.1 Outline The following figure shows the circuit used to control the scanner motor, and the circuit has the following functions: 1. Controlling the direction of rotation of the scanner motor 2. Controlling the speed of rotation of the scanner motor The scanner motor changes its direction of rotation to move the scanner forward or in reverse, and the speed of its rotation when the scanner is moved forward changes to suit the selected reproduction ratio. When the scanner is moved in reverse, the speed of rotation is the same regardless of the selected reproduction ratio, which is ten times as high as the speed at which the scanner is moved forward in Direct. +40V +8V IC8 Drive voltage switching circuit Voltage change HOLD-OFF 40 or 8 V A to E CPU A to E Current change 4 Reader controller PCB A B Motor driver circuit C D E Constant current control Current circuit detection Scanner motor (M29) Scanner driver PCB F02-104-01 1.4.2 Operations The CPU (IC8) on the scanner motor driver PCB receives instructions from the reader controller PCB on the mode, distance, and reproduction ratio selected for scanning. Then, in response to the start command, the CPU sends drive pulses to the scanner motor base on these instructions. The scanner motor is a 5-phase stepping motor, and its direction (scanning direction) and speed are switched by changing the sequence of drive pulses (A through E) and frequency. When the scanner is moved in reverse, the motor must be rotated at high speed, requiring the drive voltage switching circuit to switch from 8 V (forward) to 40 V (reverse). The constant current control circuit is used to control the current flowing to the motor to a specific level according to the rotation of the motor. When the motor is kept at rest (as in standby), the current to the motor is cut off by means of the HOLD-OFF signal. COPYRIGHT © 2001 CANON INC. 2000 2000 2000 2000 CANON CLC5000 REV.0 JAN. 2001 2-5 CHAPTER 2 NEW FUNCTIONS 1.5 Controlling the Intensity of the Scanning Lamp 1.5.1 Outline The machine’s scanning lamp is a halogen lamp. The following figure shows the circuit used to control the intensity of the scanning lamp, and the circuit has the following functions: 1. Turning on and off the scanning lamp 2. Detecting the activation of the scanning lamp 3. Controlling the intensity of the scanning lamp • The intensity of the scanning lamp is controlled to a specific level even when the voltage of the power supply fluctuates. AC power J9 supply FU1 Rectification circuit + 1 Switching circuit 4 Scanner Scanner thermal thermal switch 1 switch 2 (TP4) (TP5) 1 3 24V B2 LAON LACNTL 7 Lamp regulator drive circuit 10 9 24V Error latching circuit B7 B5 LAON-S* TIM-RST Timer circuit 4 6 Lamp ON detection circuit ON detection signal B1 LAERR Intensity control circuit Reader controller PCB J1306 J450 B4 Scanning lamp (LA1) PWM Lamp regulator F02-105-01 1.5.2 Operations 1. Turning On and Off the Scanning Lamp When LAON is ‘0’, the lamp regulator drive circuit is off, and the intensity connector circuit is also off, consequently keeping the scanning lamp (LA1) off. When LAON is ‘1’, on the other hand, the lamp regulator drive circuit goes on to turn on the intensity control circuit, consequently turning on the scanning lamp (LA1). 2-6 COPYRIGHT © 2001 CANON INC. 2000 2000 2000 2000 CANON CLC5000 REV.0 JAN. 2001 CHAPTER 2 NEW FUNCTIONS 2. Detecting the Activation of the Scanning Lamp As long as the scanning lamp (LA1) remains on, the lamp ON detection circuit also remains on to generate the ON detection signal to the timer circuit. If the scanning lamp remains on for about 60 sec for some reason (e.g., fault), the timer circuit turns on the error latching circuit to force the LAON signal to go ‘0’, thereby turning off the lamp. At the same time, the lamp error single (LAERR) is sent to the reader controller PCB; and, as a result, the machine will indicate ‘E220’ on its control panel and shut itself off. To reset the machine, remove the cause, and turn on the power switch. The machine is equipped with the following two protective mechanisms to prevent malfunction of the scanning lamp: • If the temperature inside the thermal switch exceeds 175ºC , one of two thermal switches will turn off to cut off the power to the scanning lamp. • If overcurrent flows because of a short circuit or the like around the scanning lamp, the fuse (FU1) turns off to cut off the power to the lamp regulator. The thermal switches 1 and 2 (TP4, TP5) are used on the DC line, subjecting the contacts to damage when they turn on. Do not use them once they have turned on to avoid unreliable operation after the machine has been reset. 3. Controlling the Intensity for the Scanning Lamp The intensity of the scanning lamp is determined by the value of the intensity adjustment signal (LACNTL) from the reader controller PCB. The intensity control circuit inside the lamp regulator sends pulse signals (PWM) to the switching circuit according to the level of the LACNTL signal; and the switching circuit repeats turning on and off at short intervals in response; these intervals are varied to control the current flowing to the scanning lamp (hence its intensity). The level LACNTL signal is determined when FUNC>CCD>AUTO-ADJ is executed in service mode; once determined, it remains the same. It is important to execute FUNC>CCD>AUTO-ADJ whenever you have replaced the reader controller PCB the standard white plate, the reader controller PCB flash memory, CCD unit, the analog processor PCB. COPYRIGHT © 2001 CANON INC. 2000 2000 2000 2000 CANON CLC5000 REV.0 JAN. 2001 2-7 CHAPTER 2 NEW FUNCTIONS 1.6 Disassembly/Assembly The machine has the mechanical features and operations as described herein, and may be disassembled or assembled as shown; be sure to observe the following whenever disassembling or assembling the machine: Disconnect the power plug for safety before the work. 1. 2. Unless otherwise noted, reverse the steps used to disassemble the machine for assembly. 3. Identify the screws by type (length, diameter) and location. 4. The screws used for the grounding wire, varistors, or the like are equipped with washers to ensure electrical continuity. Be sure to use these screws during assembly. 5. As a rule, do not operate the machine with any of its parts removed. Do not throw toner into fire to avoid explosion. 6. 2-8 COPYRIGHT © 2001 CANON INC. 2000 2000 2000 2000 CANON CLC5000 REV.0 JAN. 2001 CHAPTER 2 NEW FUNCTIONS 1.6.1 Removing the Scanner Motor [2] [2] 1) Remove the right glass retainer and the vertical size plate; then, detach the copyboard glass. 2) Remove the reader rear cover. 3) Remove the left rear upper cover. 4) Disconnect the connector [1], and remove the four screws; then, detach the scanner motor [3] together with the mounting support as if to pull it out to the bottom. [3] [1] F02-106-01 When removing the scanner motor, push down the wire as shown, thus preventing damage to the wire by the edge of the stay. F02-106-02 [4] 5) Remove the two screws [4], and detach the scanner motor [3]. [3] F02-106-03 COPYRIGHT © 2001 CANON INC. 2000 2000 2000 2000 CANON CLC5000 REV.0 JAN. 2001 2-9 CHAPTER 2 NEW FUNCTIONS 1.6.2 Removing the Lens Base Cover/CCD Cover/CCD Unit 1) Disconnect the power plug. 2) Detach the copyboard glass. 3) Remove the four screws [1], and detach the lens base cover [2]. [1] [1] [2] F02-106-04 4) Remove the two screws [3], and remove the two CCD unit retaining screws [4]. 5) Remove the two screws [5], and detach the grounding plate [6]. [5] [3] [3] [4] [6] F02-106-05 6) Lift the CCD unit [7], and disconnect the two connectors [8]; then, remove the screw [9]. Thereafter, remove the grounding wire [10], and detach the CCD unit [7]. [9] [8] [7] [8] [10] F02-106-06 2-10 COPYRIGHT © 2001 CANON INC. 2000 2000 2000 2000 CANON CLC5000 REV.0 JAN. 2001 CHAPTER 2 NEW FUNCTIONS 1.6.3 Removing the Scanner Cover 1) Remove the two screws [1], and detach the auxiliary cover [2]. 2) Remove the four screws [3], and detach the laser scanner cover [4]. Be sure to keep the mirror base fully to the left. In addition, take care not to damage the power cord [5] of the scanning lamp. Pay attention to the bend found at the front. [3] [3] [4] [1] [3] [5] [2] [1] [3] F02-106-07 COPYRIGHT © 2001 CANON INC. 2000 2000 2000 2000 CANON CLC5000 REV.0 JAN. 2001 2-11 CHAPTER 2 NEW FUNCTIONS 2 Image Processing System 2.1 Outline of the Image Processing System • The major changes include the elimination of the memory compression/de-compression function and the addition of the direct mapping function. • The rest of the image processing system are the same as those of the CLC1000 Series machines. The image processing system consists of the following: • CCD line sensor used to convert light reflected by the original into analog video signals. • analog processor PCB used to generate digital video signals from analog video signals. • PCBs (image processor PCB, IP memory board, ED board) used for various correction and processing on digital video signals. IP memory board ED board CCD line sensor Analog processor PCB Video controller PCB To laser exposure assembly Image processor PCB F02-201-01 2-12 COPYRIGHT © 2001 CANON INC. 2000 2000 2000 2000 CANON CLC5000 REV.0 JAN. 2001 CHAPTER 2 NEW FUNCTIONS 2.2 Differences in the Image Processing System Unit/part Differences for CLC1000 Series machines Purpose Reference IP memory board Elimination of memory compression/de-compression function • To reduce the cost of memory element • To enable high image quality 2.4 “IP Memory Board” Image processor PCB Addition of direct mapping function To improve reproduction 2.5 “Direct Mapping” of images T02-202-01 COPYRIGHT © 2001 CANON INC. 2000 2000 2000 2000 CANON CLC5000 REV.0 JAN. 2001 2-13 2-14 R.G.B. Color conversion R.G.B. Y.M.C.K. R.G.B. R.G.B. Y.M.C.K. Color editing Y.M.C.K. Bus selection Bitmap data Ratio processing Bitmap data Bitmap memory Filter processing Area data generation Area data Control panel/editor A Color space correction Interface board R.G.B. Controller 2.3 Functional Blocks R.G.B. F02-203-01 YMC conversion Direct mapping Background removal Color space correction Character detection Image integration Bus selector R.G.B. Input blanking R.G.B. Mirror image R.G.B. Original position check 3-line CCD positioning R.G.B. Shading correction R.G.B. Image processor PCB Analog processor PCB Y.M.C.K. Density correction Reduction Y.M.C.K. Moire removal Y.M.C.K. Filter processing Y.M.C.K. Bus selection R.G.B. Video controller Ratio (enlargement) Printer block to this point Image memory Output blanking UCR processing IP memory board CRT Preview monitor board R.G.B. Output processing R.G.B. RGB conversion Y.M.C.BK. A Y.M.C.K. CHAPTER 2 NEW FUNCTIONS COPYRIGHT © 2001 CANON INC. 2000 2000 2000 2000 CANON CLC5000 REV.0 JAN. 2001 CHAPTER 2 NEW FUNCTIONS 2.4 IP Memory Board The machine uses four photosensitive drums, requiring temporary retention of image signals in image memory. The image data (YMC signals and text signals) from the scanner is sent to the IP memory board and stored in image memory. It is then read in response to the read signal prepared with reference to the ITOP signal. The UCR processing block generates the K signal and sends it to the image processor PCB. Y.M.C.K. UCR processing Output blanking Image memory Ratio (enlargement) IP memory board Image processor PCB YMC/text signals F02-204-01 2.5 Direct Mapping In this block, the RGB signals (after color space correction) is corrected by a LUT to improve the reproduction of flesh tone and the blue of the sky and the green of leaves. COPYRIGHT © 2001 CANON INC. 2000 2000 2000 2000 CANON CLC5000 REV.0 JAN. 2001 2-15 CHAPTER 2 NEW FUNCTIONS 3 Laser System 3.1 Outline of the Laser System • The major difference is the change of an image position correction sequence for standby and the formation of images using 800 lines. • The rest of the construction is the same as that of the CLC1000 Series machines. 3.2 Differences in the Laser System Unit Difference from CLC1000 Series machines Purpose Reference Entire system Addition of image formation using 800 lines To increase the reproduction of images 3.3 “Image Formation Using 800 Lines” Laser unit Increase in the laser output (same as CLC1100 Series) To support the higher process speed Polygon mirror unit Increase in the speed of rotation To support the higher process speed BD mirror No change BD detection PCB No change Image position correction mirror No change Image position correction control Addition of an image position correction sequence for standby To reduce first copy time 3.4 “Image Position Correction Sequence in Standby” T02-302-01 2-16 COPYRIGHT © 2001 CANON INC. 2000 2000 2000 2000 CANON CLC5000 REV.0 JAN. 2001 CHAPTER 2 NEW FUNCTIONS 3.3 Image Formation Using 800 Lines The machine uses 800 lines as the outline of a character, thereby making each character sharper. REF. A CLC1000 Series machine uses 400 lines to form a character and 266 lines in YK halftone areas or 200 lines in CM halftone areas. 800 lines 400 lines F02-303-01 COPYRIGHT © 2001 CANON INC. 2000 2000 2000 2000 CANON CLC5000 REV.0 JAN. 2001 2-17 CHAPTER 2 NEW FUNCTIONS 3.4 Image Position Correction Sequence in Standby 3.4.1 Outline The machine executes image position correction while in standby state, and this function is independent of presses on the Start key. REF. In the case of a CLC1000 Series machine, image position correction is executed in response to a press on the Start key by the user, forcing the user to wait for nearly 1 min once the correction starts. 3.4.2 Timing of Operation The image position correction sequence is executed as follows: 1. When the power switch is turned on (during initial rotation) 2. A specific period of time after the power switch is turned on (during standby): 12, 20, 35, 60, and 120 min; thereafter, at intervals of 120 min 3. When the transfer unit is slid out and then in (during initial rotation) The image position correction sequence is automatically expected independently of the operation of the Start key; however, it is not executed under the following conditions: 1. When an E code is indicated 2. When a jam exists 3. When service mode is used 4. When the hopper is released 5. When the rear cover is removed 6. When it is disabled in service mode (i.e., ‘0’ is set to OPTION>P-OPT>AUTO-REG in service mode) 2-18 COPYRIGHT © 2001 CANON INC. 2000 2000 2000 2000 CANON CLC5000 REV.0 JAN. 2001 CHAPTER 2 NEW FUNCTIONS 3.5 Disassembly/Assembly The machine has the mechanical features and operations as described herein, and may be disassembled or assembled as shown; be sure to observe the following whenever disassembling or assembling the machine: Disconnect the power plug for safety before the work. 1. 2. Unless otherwise noted, reverse the steps used to disassemble the machine for assembly. 3. Identify the screws by type (length, diameter) and location. 4. The screws used for the grounding wire, varistors, or the like are equipped with washers to ensure electrical continuity. Be sure to use these screws during assembly. 5. As a rule, do not operate the machine with any of its parts removed. 6. Be sure to turn off the front cover switch or the power switch before sliding out the duplex unit or the fixing/feeding unit. 7. Do not throw toner into fire to avoid explosion. 8. For the following items, refer to CLC1000 series service manual. • Disassembly of the laser unit • Disassembly of the dust proof glass • Disassembly of the BD unit COPYRIGHT © 2001 CANON INC. 2000 2000 2000 2000 CANON CLC5000 REV.0 JAN. 2001 2-19 CHAPTER 2 NEW FUNCTIONS 3.5.1 Preparing for Laser Unit-Related Work 1) Remove the right glass retainer, right rear upper cover, and digital covers (1 through 4). 2) Remove the fixing screw [2] of the digital unit [1]; then, lift it in the direction of the arrow (from front to rear), and secure it as indicated. [1] [2] [2] F02-305-01 [1] F02-305-02 2-20 COPYRIGHT © 2001 CANON INC. 2000 2000 2000 2000 CANON CLC5000 REV.0 JAN. 2001 CHAPTER 2 NEW FUNCTIONS 3) Remove the two screws [3], and detach the analog processor PCB [4]; then, secure it on the hook hole [5] with a screw [6]. [4] [3] F02-305-03 [5] [6] F02-305-04 4) Remove the three screws [7], and detach the duct plate [8]. [7] [7] [8] F02-305-05 COPYRIGHT © 2001 CANON INC. 2000 2000 2000 2000 CANON CLC5000 REV.0 JAN. 2001 2-21 CHAPTER 2 NEW FUNCTIONS 5) Remove the duct [9]; then, disconnect the connector from the video controller PCB [10], and remove the 9 screws [11]. Detach the video controller PCB together with its support plate. [9] [11] [11] [10] [11] F02-305-06 2-22 COPYRIGHT © 2001 CANON INC. 2000 2000 2000 2000 CANON CLC5000 REV.0 JAN. 2001 CHAPTER 2 NEW FUNCTIONS 3.5.2 Removing the Laser Unit Motor 1) Perform laser unit-related preparatory work. (See the appropriate instructions.) 2) Disconnect the connector (J03) [1] from the laser scanner motor driver PCB, and remove the three screws [2] of the laser scanner motor assembly. [1] [2] F02-305-07 Do not remove the screw used to hold the lid in place. 3) Route the harness [3] of the connector removed in step 2) under the laser scanner motor bottom, and disconnect the connector [5] while lifting the laser scanner motor [4]. [5] [3] [4] F02-305-08 COPYRIGHT © 2001 CANON INC. 2000 2000 2000 2000 CANON CLC5000 REV.0 JAN. 2001 2-23 CHAPTER 2 NEW FUNCTIONS When removing the laser scanner motor, be sure to work while paying attention to the lenses found to the left and the right of the motor assembly and the dust-proofing glass of the motor assembly. When mounting the laser scanner motor, do not force the harness while connecting the connector to the laser scanner motor driver PCB to avoid disconnecting the connector. When mounting the laser scanner drive PCB, take care not to slant or peel the sticker [6] found on the back of the support plate. [6] F02-305-09 2-24 COPYRIGHT © 2001 CANON INC. 2000 2000 2000 2000 CANON CLC5000 REV.0 JAN. 2001 CHAPTER 2 NEW FUNCTIONS 3.5.3 Removing the C Image Position Correction Mirror Unit 1) Perform laser unit-related preparatory work. 2) Remove the two cable mounting screws [1] and the cable clamp [2]. Remove the two cover mounting screws [3], and disconnect the connector [4] from the video controller PCB; then, detach the image position correction mirror cover. [2] [4] [1] [2] [3] [1] [2] [5] [3] F02-305-10 3) Disconnect the two connectors [6], and remove the four screws [7]; then, detach the C image position correction mirror unit [8]. [6] [8] [7] [7] [7] F02-305-11 COPYRIGHT © 2001 CANON INC. 2000 2000 2000 2000 CANON CLC5000 REV.0 JAN. 2001 2-25 CHAPTER 2 NEW FUNCTIONS 3.5.4 Mounting the C Image Position Correction Mirror Unit 1) Force the C image position correction mirror assembly [1] accurately against the butting plate [2], and secure it in place. [1] [2] [3] [2] 02-305-12 Be sure to attach the weight [3] whenever replacing the mirror unit. 2-26 COPYRIGHT © 2001 CANON INC. 2000 2000 2000 2000 CANON CLC5000 REV.0 JAN. 2001 CHAPTER 2 NEW FUNCTIONS 3.5.5 Removing the C Slant Correction Motor 1) Remove the C image position correction mirror unit. (CLC1000 Chap. 4>VI.>B; however, keep in mind that the CLC1000 has different Cyan and Yellow positions) 2) Remove the wire saddle [1] and two screws [2]; then, detach the slant correction motor unit [3]. [3] [1] [2] F02-305-13 3) Remove the E-ring [4] and two screws [5]; then, detach the slant correction Motor [6]. [5] [6] [4] F02-305-14 COPYRIGHT © 2001 CANON INC. 2000 2000 2000 2000 CANON CLC5000 REV.0 JAN. 2001 2-27 CHAPTER 2 NEW FUNCTIONS 3.5.6 Removing the C Ratio Correction Motor 1) Remove the C image position correction mirror unit. 2) Disconnect the connector [1], and remove the spring [2]. 3) Remove the two screws [3], and detach the ratio correction motor unit [4]. [2] [1] [3] [4] [3] F02-305-15 4) Remove the E-ring [5] and two screws [76]; then, detach the ratio correction motor [7]. [6] [7] [5] [6] F02-305-16 2-28 COPYRIGHT © 2001 CANON INC. 2000 2000 2000 2000 CANON CLC5000 REV.0 JAN. 2001 CHAPTER 2 NEW FUNCTIONS Points to Note When Mounting the Slant Correction Motor 1) While moving the mirror assembly [1] in the direction of the arrow, force the motor unit [3] in the direction of tightening the screw [2]. 2) Attach the wire saddle [4], then attach the screw [5]. [3] [1] [2] [4] [5] F02-305-17 3.5.7 Shifting the scanner Unit 1) Remove the right glass retainer, right rear upper cover, and digital covers (1 through 4). 2) Secure the digital unit in place. (See F02-305-02.) 3) Disconnect the two connectors [1] from the analog processor PCB and the two screws; then, detach the analog processor PCB [3]. [1] [3] [2] F02-305-18 COPYRIGHT © 2001 CANON INC. 2000 2000 2000 2000 CANON CLC5000 REV.0 JAN. 2001 2-29 CHAPTER 2 NEW FUNCTIONS 4) Secure the analog processor PCB on the hook hole [4] with a screw. [4] [5] F02-305-19 5) Remove the three screws [6], and detach the duct panel [7]. [6] [6] [7] F02-305-20 6) Disconnect the four connectors [8]. [8] F02-305-21 2-30 COPYRIGHT © 2001 CANON INC. 2000 2000 2000 2000 CANON CLC5000 REV.0 JAN. 2001 CHAPTER 2 NEW FUNCTIONS 7) Remove the two stepped screws [9]. [9] F02-305-22 8) Remove the left cover. 9) Remove the two screws [10] from the control panel fixing plate. [10] F02-305-23 10) Remove the screw [11], and detach the hopper unit left cover [12]. [12] [11] F02-305-24 COPYRIGHT © 2001 CANON INC. 2000 2000 2000 2000 CANON CLC5000 REV.0 JAN. 2001 2-31 CHAPTER 2 NEW FUNCTIONS 11) Remove the screw [13] from the control panel support plate, and shift the control panel [14] by 7 to 8 mm to the front. [14] [13] F02-305-25 12) Remove the five screws [15], and shift the scanner unit [16] to the left. [16] [15] [15] F02-305-26 2-32 COPYRIGHT © 2001 CANON INC. 2000 2000 2000 2000 CANON CLC5000 REV.0 JAN. 2001 CHAPTER 2 NEW FUNCTIONS Blank page COPYRIGHT © 2001 CANON INC. 2000 2000 2000 2000 CANON CLC5000 REV.0 JAN. 2001 2-33 CHAPTER 2 NEW FUNCTIONS 4.1 Outline of the Image Formation System • The major differences include the sequence of image formation (to CMYK) and an increase in the process speed. • The rest of the image formation process are the same as those of the CLC1000 Series machines. • The following items found in the CLC1000 Series machines are not used in the machine: → Detection of home position for the transfer belt → Control of attraction position → Grounding roller 2-34 COPYRIGHT © 2001 CANON INC. 2000 2000 2000 2000 CANON CLC5000 REV.0 JAN. 2001 CHAPTER 2 NEW FUNCTIONS 4.2 Differences in the Image Formation System Unit/part Differences from CLC100 Series machines Purpose Entire system New sequence of image formation (from YMCK to CMYK) To improve the reproduction of images Photosensitive drum Increase in the effective image area To support extra-length paper Pre-exposure unit No change in intensity/control voltage — Auxiliary charging assembly No change in basic construction Reference — Addition of a function to change sequence in service mode To correct faulty images in a low humidity environment Primary charging assembly No change in control current, method of control, or basic construction — Potential sensor No change in the height of the charging wire — Developing assembly No change — Increase in the number of rotations of the developing cylinder To support the higher process speed Increase in the effective image area To support extra-length paper Use of toner of different material To support the higher process speed Use of a seamless transfer belt To decrease control mechanisms (e.g., detection of a seam), to increase life Different position of the transfer cleaning blade To prevent displacement of the transfer belt Eliminating the releasing mechanism of the transfer cleaning blade In relation to the use of a seamless belt Relocation of the oil removing roller and the polishing roller To improve polishing performance Use of a transfer cleaning web of a different material To use a conducing material for removal of charge from the transfer belt Drum cleaning Different blade material, different angle of contact To accommodate the change of the toner material Pre-fixing charging assembly Different position To improve charging performance Grounding roller Eliminated Owing to the use of a transfer cleaning web capable of removing charge SALT control No change — PASCAL control Addition of simpler PASCAL (quick correction) Transfer unit Remarks Uses common parts 4.4.2 “Cleaning Mechanism for the Transfer Belt” 4.4.2 “Cleaning Mechanism for the Transfer Belt” 4.3 “Auto Gradation Correction” (PASCAL) T02-402-01 COPYRIGHT © 2001 CANON INC. 2000 2000 2000 2000 CANON CLC5000 REV.0 JAN. 2001 2-35 CHAPTER 2 NEW FUNCTIONS Blank page 2-36 COPYRIGHT © 2001 CANON INC. 2000 2000 2000 2000 CANON CLC5000 REV.0 JAN. 2001 CHAPTER 2 NEW FUNCTIONS 4.3 Auto Gradation Correction (PASCAL) 4.3.1 Outline The machine uses the following two types of auto gradation correction: 1. Full Correction • Corrects the solid areas using test print 1. • Corrects the halftone areas (400 lines, 80 lines) using test print 2. • Corrects the halftone areas (200/266 lines) using test print 3. 2. Quick Correction • Corrects the gradation areas (200/266 lines, 400 lines) using test print 4 4.3.2 Operations (full correction) Full correction is executed under the following conditions: • For the high-density areas, if an appropriate level of density is not found. • For the halftone areas, they differ from the corresponding areas on the original. The sequence of operations is as follows: 1) Select the following in user mode: auto gradation correction>full correction. 2) Generate Test Print 1. 3) Check to make sure that the generated test print is free of image faults, and have it read by the machine. (If it has an image fault, perform the Basic Image Adjustment Procedure.) • Using the image data collected by reading the test print output, the machine finds the characteristics of the laser output and the image density (F02-403-01), and computes a correction value for the contrast potential so that the ideal solid density may be obtained. Relatively foggy: decrease the contrast potential. Optimum Max. (1.7) Image density Relatively low solid density: increase the contrast potential. 0 0 Laser output 255 F02-403-01 COPYRIGHT © 2001 CANON INC. 2000 2000 2000 2000 CANON CLC5000 REV.0 JAN. 2001 2-37 CHAPTER 2 NEW FUNCTIONS 4) Generate Test Print 2. Output of 400 lines for each color Output of 800 lines for each color F02-403-02 2-38 COPYRIGHT © 2001 CANON INC. 2000 2000 2000 2000 CANON CLC5000 REV.0 JAN. 2001 CHAPTER 2 NEW FUNCTIONS 5) Check to make sure that the test print output is free of image faults, and have it read by the machine. (If it has an image fault, perform the Basic Image Adjustment Procedure.) • Using the image data collected by reading the test print output, the machine finds the characteristics of the laser output and the image density (F02-403-03), and computes a correction value for 400-line/800-line image data to obtain the ideal gradation characteristics. Image characteristics by image data Image density Maximum (1.7) Ideal gradation characteristics 0 0 Laser output 25.5 F02-403-03 COPYRIGHT © 2001 CANON INC. 2000 2000 2000 2000 CANON CLC5000 REV.0 JAN. 2001 2-39 CHAPTER 2 NEW FUNCTIONS 6) Generate Test Print 3. K 800-line C 800-line output output Y 800-line M 800-line output output K 266-line C 200-line output output Y 266-line M 200-line output output F02-403-04 2-40 COPYRIGHT © 2001 CANON INC. 2000 2000 2000 2000 CANON CLC5000 REV.0 JAN. 2001 CHAPTER 2 NEW FUNCTIONS 7) Check to make sure that the generated test print is free of image faults, and have it read by the machine. (If it has an image fault, perform the Basic Image Adjustment Procedure.) • Using the image data collected by reading the test print output, the machine finds the characteristics of the laser output and the image density, and computes a correction value for 200-/266-line image data so that the ideal solid density may be obtained. COPYRIGHT © 2001 CANON INC. 2000 2000 2000 2000 CANON CLC5000 REV.0 JAN. 2001 2-41 CHAPTER 2 NEW FUNCTIONS 4.3.3 Operations (quick correction) The machine executes quick correction under the following condition: • For the high-density areas, if the density is appropriate but the gradation of the halftone areas is different from that of the original. The following sequence of operations is used: 1) In user mode, make the following selections: auto gradation correction>quick correction. 2) Generate a test print. K 400-line C 400-line output output Y 400-line M 400-line output output K 266-line C 200-line output output Y 266-line M 200-line output output F02-403-06 2-42 COPYRIGHT © 2001 CANON INC. 2000 2000 2000 2000 CANON CLC5000 REV.0 JAN. 2001 CHAPTER 2 NEW FUNCTIONS 3) Check to make sure that the generated test print is free of image faults, and have it read by the machine. (If it has an image fault, perform the Basic Image Adjustment Procedure.) • Using the image data collected by reading the test print output, the machine finds the characteristics of the laser output and the image density (F02-403-07), and computes a correction value for 400-line and 200-/266-line image data so that the ideal solid density may be obtained. Image characteristics by image data Image density Maximum (1.7) Ideal gradation characteristics 0 0 Laser output 25.5 F02-403-07 COPYRIGHT © 2001 CANON INC. 2000 2000 2000 2000 CANON CLC5000 REV.0 JAN. 2001 2-43 CHAPTER 2 NEW FUNCTIONS 4.4 Transfer Unit 4.4.1 Outline • • • • The machine’s transfer unit is constructed as shown in F02-404-01. The transfer unit has the following functions: Attracts copy paper from the registration roller to the transfer belt by means of the transfer blade (C). Transfers toner images from the C, M, Y, and K photosensitive drums. Separates the copy paper separated from the transfer belt to the pre-fixing feeding assembly. Cleans the surface of the transfer belt. Transfer belt Transfer blade (C) Transfer belt cleaning blade Oil removing roller Polishing roller Transfer belt cleaning belt F02-404-01 2-44 COPYRIGHT © 2001 CANON INC. 2000 2000 2000 2000 CANON CLC5000 REV.0 JAN. 2001 CHAPTER 2 NEW FUNCTIONS 4.4.2 Cleaning Mechanism for the Transfer Belt a. Outline The transfer belt unit is equipped with a cleaning mechanism designed to remove dirt from the transfer belt (toner and fixing oil). The cleaning mechanism is constructed as follows: Photosensitive Photosensitive Photosensitive Photosensitive drum drum drum drum (K) (Y) (M) (C) Drive roller Oil removing roller PS11 PS10 Transfer belt Transfer belt cleaning blade Transfer belt cleaning web Polishing roller M12 Transfer belt cleaning web motor M15 SL18 Oil removing Oil/oil removing roller roller solenoid F02-404-02 COPYRIGHT © 2001 CANON INC. 2000 2000 2000 2000 CANON CLC5000 REV.0 JAN. 2001 2-45 CHAPTER 2 NEW FUNCTIONS b. Transfer Cleaning Blade The transfer cleaning belt is used to remove toner deposited on the transfer belt as the result of image position correction or the like. The toner collected by the cleaning blade is moved to the waste toner bottle by the feedscrew that is operated the transfer belt waste toner motor (M31). The cleaning blade remains in contact with the transfer belt at all times. Toner Transfer belt Feedscrew Transfer belt waste toner motor M31 Transfer belt cleaning blade Waste toner bottle F02-404-03 2-46 COPYRIGHT © 2001 CANON INC. 2000 2000 2000 2000 CANON CLC5000 REV.0 JAN. 2001 CHAPTER 2 NEW FUNCTIONS c.Oil Removing Roller The oil removing roller is used to remove fixing oil from the transfer belt. REF. When a double-sided copy is made, the side with toner after fixing is placed on the transfer belt, causing the fixing oil to move to the transfer belt. If the transfer belt rotates as it is, the oil will move to the photosensitive drum, causing fogging or other adverse effects on the next copy image. When the polishing/oil removing motor (M15) rotates clockwise and the oil removing roller solenoid (SL18) turns on, the cam starts to rotate by the drive arriving by way of the control ring, operating the push-on spring and, consequently, bringing the oil removing roller into contact with the transfer belt. The oil removing roller remains pressed against the transfer belt; the solenoid remains off. When the solenoid turns off, the oil removing roller moves away from the transfer belt. If the rotation speed of the polishing/oil removing motor deviates for some reason, the control panel will indicate ‘E018’. Oil removing roller Transfer belt Oil removing roller solenoid (SL18) (direction of movement) Cam Controller Polishing/oil removing motor (M15) (front of machine) drive signal CW drive signal (M15CW) J2218A-9 Oil removing roller solenoid drive signal (SL18D*) J2218A-11 J2218B-10 DC controller PCB F02-404-04 COPYRIGHT © 2001 CANON INC. 2000 2000 2000 2000 CANON CLC5000 REV.0 JAN. 2001 2-47 CHAPTER 2 NEW FUNCTIONS d. Polishing Roller The polishing roller polishes the surface of the transfer belt to limit the friction against the cleaning blade, thereby preventing the otherwise possible bending of the blade. REF. As more and more images are formed, toner and paper lint tend to build up, increasing the friction against the cleaning blade. The polishing operation takes place at the end of image position correction for an equivalent of 2 rotations of the transfer belt. When the polishing/oil removing motor (M15) starts to rotate, the transfer belt rotates and moves against the transfer belt. The polishing roller is moved down when the transfer belt moves down (lifter operation), at the end of which it becomes released. Polishing roller DC controller PCB (direction of movement) J2218A-11 drive signal (M15 ON) CCW drive signal (M15 DIR) J2218A-9 Transfer belt (front of machine) Polishing/oil removing motor F02-404-05 2-48 COPYRIGHT © 2001 CANON INC. 2000 2000 2000 2000 CANON CLC5000 REV.0 JAN. 2001 CHAPTER 2 NEW FUNCTIONS 4.5 Disassembly/Assembly The machine has the mechanical features and operations as described herein, and may be disassembled or assembled as shown; be sure to observe the following whenever disassembling or assembling the machine: Disconnect the power plug for safety before the work. 1. 2. Unless otherwise noted, reverse the steps used to disassemble the machine for assembly. 3. Identify the screws by type (length, diameter) and location. 4. The screws used for the grounding wire, varistors, or the like are equipped with washers to ensure electrical continuity. Be sure to use these screws during assembly. 5. As a rule, do not operate the machine with any of its parts removed. Do not throw toner into fire to avoid explosion. 6. For the following items, refer to CLC1000 series service manual. 7. REF. • • • • • • • Removing the hopper assembly Removing the hoppers Removing the toner level sensor Removing the primary charging assembly cleaning pad Developing assembly Photosensitive drum SALT sensor COPYRIGHT © 2001 CANON INC. 2000 2000 2000 2000 CANON CLC5000 REV.0 JAN. 2001 2-49 CHAPTER 2 NEW FUNCTIONS 4.5.1 Charging System a. Removing the Primary Charging Assembly Motor [2] 1) Lift the hopper assembly. (See CLC 1000 Chap. VII. “Hopper System.”) 2) Pull out the primary charging assembly. 3) Remove the E-ring [1] and the bushing [2]. 4) Disconnect the connector [3], and remove the screw [4]; then, detach the primary charging assembly motor support [1] plate [5]. [5] [3] [4] F02-405-01 5) Remove the two screws [6], and detach the primary charging assembly motor [7]. [7] [6] b-1. Removing the Separation Charging Assembly 1) Open the front cover. 2) Remove the screw [1], and detach the hopper unit left cover [2]. F02-405-02 [2] [1] F02-405-03 2-50 COPYRIGHT © 2001 CANON INC. 2000 2000 2000 2000 CANON CLC5000 REV.0 JAN. 2001 CHAPTER 2 NEW FUNCTIONS 3) Remove the screw [3], and disconnect the connector [4]; then, detach the separation charging assembly [5]. [4] [3] [5] 02-405-04 b-2. Routing the Gut Wire 1) Route the gut wire as shown. F02-405-05 COPYRIGHT © 2001 CANON INC. 2000 2000 2000 2000 CANON CLC5000 REV.0 JAN. 2001 2-51 CHAPTER 2 NEW FUNCTIONS b-3. Removing the Separation Charging Assembly Motor 1) Remove the separation charging assembly. (See b-1. “Removing the Separation Charging Assembly.”) 2) Remove the two screws [1], and detach the motor mounting base [2]. [1] [2] F02-405-06 3) Remove the separation charging assembly motor [3]. (The motor is snapped in place.) [3] F02-405-07 c-1. Removing the Pre-Fixing Charging Assembly 1) Open the front cover. [2] 2) Remove the hopper unit left cover. 3) Pull out the pre-fixing duct. (See 7.6.1 j “Removing the Pre-Fixing Filter”.) 4) Remove the screw [1], and disconnect the connector [2]; then, detach the prefixing charging assembly [3]. Memo 2-52 To detach, pull it to the front slightly, and shift it to the left. [1] [3] F02-405-08 COPYRIGHT © 2001 CANON INC. 2000 2000 2000 2000 CANON CLC5000 REV.0 JAN. 2001 CHAPTER 2 NEW FUNCTIONS c-2. Removing the Gut Wire 1) Route the gut wire as shown. F02-405-09 c-3. Removing the Pre-Fixing Charging Assembly Motor 1) Remove the pre-fixing charging assembly. (See c-1. “Removing the Pre-Fixing Charging Assembly.”) 2) Remove the two screws [1], and detach the motor mounting base [2]. [2] [1] F02-405-10 3) Remove the motor [3]. (The motor is snapped in place.) [3] F02-405-11 COPYRIGHT © 2001 CANON INC. 2000 2000 2000 2000 CANON CLC5000 REV.0 JAN. 2001 2-53 CHAPTER 2 NEW FUNCTIONS 4.5.2 Process Unit System a. Sliding out the process unit case 1) Shift down the releasing lever [1] of the transfer unit to release the transfer belt from the photosensitive drum. [1] F02-405-12 2) Lift the hopper unit. 3) Remove the four primary charging assemblies [2]. [2] F02-405-13 Place the primary charging assembly so that the grid faces upward. 2-54 COPYRIGHT © 2001 CANON INC. 2000 2000 2000 2000 CANON CLC5000 REV.0 JAN. 2001 CHAPTER 2 NEW FUNCTIONS 4) Remove the four positioning knobs [3] of the photosensitive drum. (Turn the smaller knob in the middle counterclockwise.) [3] F02-405-14 5) Remove the two screws [5] of the process unit case [4]. [4] [5] [5] F02-405-15 COPYRIGHT © 2001 CANON INC. 2000 2000 2000 2000 CANON CLC5000 REV.0 JAN. 2001 2-55 CHAPTER 2 NEW FUNCTIONS 6) Install the two process unit grips [6]. [6] F02-405-16 7) Slide out the process unit case [7] fully to the front. [7] F02-405-17 2-56 COPYRIGHT © 2001 CANON INC. 2000 2000 2000 2000 CANON CLC5000 REV.0 JAN. 2001 CHAPTER 2 NEW FUNCTIONS b. Removing the Process Unit 1) Slide out the process unit case. 2) Remove the screw [1] equipped with a spring. [1] F02-405-18 3) Pull out the positioning pin [2]. [2] F02-405-19 4) Push the middle of the cleaning blade [3] with your finger, and move the pressure releasing pin [5] in the direction of the arrow while the area is away from the drum [4] to free the cleaning blade. [4] [5] [3] F02-405-20 COPYRIGHT © 2001 CANON INC. 2000 2000 2000 2000 CANON CLC5000 REV.0 JAN. 2001 2-57 CHAPTER 2 NEW FUNCTIONS 5) Holding the grips [8] with both your hands, lift the process unit [9] about 5 cm, and shift it to the rear to detach. [8] [9] F02-405-15 Points to Note When Removing the Process Unit ■ Lay paper where the unit will be placed. (Toner may fall out.) ■ Do not move the unit over other unit of different color toners. 2-58 COPYRIGHT © 2001 CANON INC. 2000 2000 2000 2000 CANON CLC5000 REV.0 JAN. 2001 CHAPTER 2 NEW FUNCTIONS c. Mounting the Process Unit 1) Remove all developing assemblies, and attach the drum protection sheet [1] to each photosensitive drum. [1] Photosensitive drum for M/Y/Bk [1] Photosensitive drum for C Plastic sheet Check to make sure that the edge of the white paper is found as shown by the naked eye. F02-405-22 ■ Do not touch the area where contact will be made with the drum. ■ Before putting it to use, be sure to dry wipe it with lint-free paper. COPYRIGHT © 2001 CANON INC. 2000 2000 2000 2000 CANON CLC5000 REV.0 JAN. 2001 2-59 CHAPTER 2 NEW FUNCTIONS 2) Set the process unit [2] to the process unit case. [2] F02-405-23 3) Shift the pressure releasing point of the cleaning blade back to its initial position. 4) Orient the two protrusions inside the flange shaft of the photosensitive drum to match the groove [4] of the drum shaft on the machine side. Match the positions for the protrusions and the groove. [4] [3] F02-405-24 When rotating the photosensitive drum, pull out the process unit, and lift the developing assembly so that it is away from the drum (to prevent damage to the drum). 2-60 COPYRIGHT © 2001 CANON INC. 2000 2000 2000 2000 CANON CLC5000 REV.0 JAN. 2001 CHAPTER 2 NEW FUNCTIONS 5) Insert the positioning pin into the developing assembly. 6) Set the process unit case to the copier. 7) Secure the positioning pin in place with the screw equipped with a spring. When setting the process unit case, be sure that the protrusion on the inside of the flange of the photosensitive drum is in the groove in the drum shaft. Further, take care not to force the process unit to avoid damage to the drum surface. 8) Slide out the transfer unit, and detach the drum protection sheet [5] in the direction of the arrow. (Be sure to store away the removed drum protection sheet.) [5] F02-405-25 Points to Note When Handling the Drum Protection Sheet ■ Do not touch the area where the drum will come into contact. ■ Put it in a plastic bag, keeping it away from dust, oil, or the like. ■ If it must be rolled for storage, be sure the side where the drum will come into contact will be the inner side. ■ Before putting it into use, be sure to dry wipe the area where the drum will come into contact with lint-free paper. COPYRIGHT © 2001 CANON INC. 2000 2000 2000 2000 CANON CLC5000 REV.0 JAN. 2001 2-61 CHAPTER 2 NEW FUNCTIONS d. Separating the Developing Assembly and the Drum Cleaner Unit 1) Remove the screw [1] from the front/ rear side plate of the process unit; then, shift the drum cleaner unit [2] to the rear, and turn it counterclockwise to detach. [2] [1] F02-405-26 [1] F02-405-27 e. Removing the Cleaning Blade Seal 1) Remove the process unit from the copier. (See the instructions on how to remove the process unit.) 2) Remove the screw [1], and remove the cleaning blade seal [2]. [1] [1] [2] [2] F02-405-28 2-62 COPYRIGHT © 2001 CANON INC. 2000 2000 2000 2000 CANON CLC5000 REV.0 JAN. 2001 CHAPTER 2 NEW FUNCTIONS REF. Points to Note When Removing the Cleaning Blade Seal ■ Turn the reciprocating gear [3], and shift the blade base so that a gap will show where the seal is attached at the edge of the cleaner to facilitate the work. [3] 0~0.5mm Points to Note When Mounting the Cleaning Blade Seal ■ Make sure that the gap between the blade and the cleaning blade seal is about 0.5 mm as shown. Try pushing the cleaning blade seal to be sure that it will not get trapped by the blade. 0~0.5mm F02-405-29 F02-405-30 COPYRIGHT © 2001 CANON INC. 2000 2000 2000 2000 CANON CLC5000 REV.0 JAN. 2001 2-63 CHAPTER 2 NEW FUNCTIONS f. Removing Seal from the Cleaner Edge 1) Remove the process unit from the copier. (See the instructions on how to remove the process unit.) 2) Remove the cleaning blade. 3) Remove the spacer [1] and the scraping sheet [2]. [1] [2] F02-405-31 4) Remove the screw [3] from the front and the rear, and remove the washer [4]; then, detach the cleaner edge seal [5]. [3] [4] [3] [4] [5] [5] F02-405-32 2-64 COPYRIGHT © 2001 CANON INC. 2000 2000 2000 2000 CANON CLC5000 REV.0 JAN. 2001 CHAPTER 2 NEW FUNCTIONS g. Removing the Cleaner Assembly Scoop-Up Sheet 1) Remove the process unit from the copier. (See the instructions on how to remove the process unit.) 2) Separate the developing assembly and the drum cleaner unit. 3) Remove the three screws [1], and detach the cleaner assembly scoop-up sheets [2] together with its support plate. [1] [2] [1] [1] F02-405-33 h. Cleaning the Developing Assembly Bottom Cover and the Bearing If you replaced the photosensitive drum or the cleaning blade, be sure to clean the developing assembly bottom cover and the bearing as follows: 1) Slide out the process unit from the copier. 2) Remove the developing assembly. 3) Remove the toner found in the area of the developing assembly bottom cover [2] [2] [1] indicated in the figure using a blower brush or lint-free paper. 4) If toner is found sticking to the developing assembly front side plate or the bearing [2] of the rear side plate, dry [1] wipe it using lint-free paper. F02-405-34 COPYRIGHT © 2001 CANON INC. 2000 2000 2000 2000 CANON CLC5000 REV.0 JAN. 2001 2-65 CHAPTER 2 NEW FUNCTIONS 4.5.3 Transfer Belt Unit a. Removing the Transfer Blade 1) Open the front cover, and slide out the transfer unit assembly to the front. 2) Remove the two screws [1], and detach the transfer unit cover [2]. [1] [1] [2] F02-405-35 3) While pulling the lever [3] found on the bottom of the transfer unit assembly, set the transfer assembly releasing lever [4]. [4] [3] F02-405-36 4) Turn the cam [5] by hand so that the belt unit [6] will be in UP position. [6] [5] F02-405-37 2-66 COPYRIGHT © 2001 CANON INC. 2000 2000 2000 2000 CANON CLC5000 REV.0 JAN. 2001 CHAPTER 2 NEW FUNCTIONS 5) Give the knob [7] a half clockwise turn, and pull out the transfer blade assembly [8]. [8] [7] F02-405-38 6) Give the knob a half counterclockwise turn to release the lock; then, remove the two screws [9], and detach the transfer blade [10]. [9] [10] [9] F02-405-39 COPYRIGHT © 2001 CANON INC. 2000 2000 2000 2000 CANON CLC5000 REV.0 JAN. 2001 2-67 CHAPTER 2 NEW FUNCTIONS b. Cleaning the Transfer Blade 1) After performing step 5) for removing the transfer blade, keep the transfer blade assembly [1] upright as shown; then, clean the blade [2] and the plastic sheet [3] with lint-free paper or a blower brush. (Be sure to keep the strokes in one direction only.) [3] [1] [2] F02-405-40 c. Opening the Transfer Belt Assembly 1) Remove the hopper left cover and the separation charging assembly; then, mount the transfer unit fixing [1] to the front side plate of the copier. [1] F02-405-41 2) Slide out the transfer unit. 3) Remove the two screws [2], and detach the pre-transfer cover [3]. [2] [2] [3] F02-405-42 2-68 COPYRIGHT © 2001 CANON INC. 2000 2000 2000 2000 CANON CLC5000 REV.0 JAN. 2001 CHAPTER 2 NEW FUNCTIONS 4) Disconnect the connector [4], and detach the separation guide [5]. [5] [4] F02-405-43 Points to Note When Mounting the Separation Guide When mounting the separation guide, be sure that the plastic sheet [6] is inside as shown, not hitting the transfer belt and bending. [6] F02-405-44 5) While pulling the lever [7] to the front, set the transfer releasing lever [8]. [8] [7] F02-405-45 COPYRIGHT © 2001 CANON INC. 2000 2000 2000 2000 CANON CLC5000 REV.0 JAN. 2001 2-69 CHAPTER 2 NEW FUNCTIONS 6) Turn the cam [9] by hand so that the belt unit [10] is in UP position. [9] [10] F02-405-46 7) Disconnect the two connectors [11], and loosen the screw [12]; then, shift the lock plate [13] to the left. [12] [11] [13] F02-405-47 8) Push the cleaning blade [14] with your finger to release the pressure; then, lift the inlet guide [15] while supporting it at its center. [15] [14] When lifting the inlet guide, be sure to support it at its center; otherwise, the guide plate can deform. F02-405-48 2-70 COPYRIGHT © 2001 CANON INC. 2000 2000 2000 2000 CANON CLC5000 REV.0 JAN. 2001 CHAPTER 2 NEW FUNCTIONS 9) As if to lift the transfer belt assembly [16] slightly, hook the pin of the transfer unit fixing [1] on the hole [18] of the transfer belt assembly [17]; at this time, be sure that the hole of the transfer belt assembly is securely engaged with the groove of the pin. [1] [16] [17] [18] F02-405-49 d-1. Removing the Transfer Belt (method 1) • While keeping the transfer unit inside the copier 1) Slide out the transfer unit assembly to the front, and detach the pre-transfer cover. (See F02-405-34.) 2) Shift up the separation guide [1], and shift it to the rear to detach. [1] F02-405-50 COPYRIGHT © 2001 CANON INC. 2000 2000 2000 2000 CANON CLC5000 REV.0 JAN. 2001 2-71 CHAPTER 2 NEW FUNCTIONS 3) Remove the screw [2] for the waste toner box relay. [2] F02-405-51 4) Remove the two fixing screws [4] of the transfer cleaner unit. [4] [3] F02-405-52 When removing the screw at the rear, be sure NOT to touch the screw [5] indicated in the drawing. (The screw is used to position the drive roller.) [5] F02-405-53 2-72 COPYRIGHT © 2001 CANON INC. 2000 2000 2000 2000 CANON CLC5000 REV.0 JAN. 2001 CHAPTER 2 NEW FUNCTIONS 5) Free the harness of the transfer cleaner motor [6] from the clamp [7], and disconnect the connector [8]. [7] [8] [6] F02-405-54 6) Move the transfer cleaner unit [3] to the left to detach. [3] F02-405-55 7) Open the transfer belt assembly. (See the instructions on how to open the transfer belt.) 8) Loosen the mounting screw [9] to free the sensor unit fixing plate [10]. [9] [10] F02-405-56 COPYRIGHT © 2001 CANON INC. 2000 2000 2000 2000 CANON CLC5000 REV.0 JAN. 2001 2-73 CHAPTER 2 NEW FUNCTIONS 9) Push down the sensor unit [11], and force the sensor unit fixing plate [10] in the direction of the arrow; then, tighten the screw [9] to secure the sensor unit [11] and the sensor unit fixing plate [10]. [9] [11] [10] F02-405-57 10) Remove the screw [12], and detach the transfer inlet paper guide [13]. [13] [12] F02-405-58 11) Remove the three screws [14], and detach the transfer frame front support plate [15]. [14] [15] [14] F02-405-59 2-74 COPYRIGHT © 2001 CANON INC. 2000 2000 2000 2000 CANON CLC5000 REV.0 JAN. 2001 CHAPTER 2 NEW FUNCTIONS 12) Push in the transfer unit assembly [16] to the rear until it comes lightly in contact with the motor [18]. [17] [16] F02-405-60 13) To protect the transfer belt [18], place a sheet of A3 paper [19] as shown. [18] [19] F02-405-61 14) Remove the two screws [20], and pull off the No. 2 back cleaning member [21] to the front. [20] [21] [20] F02-405-62 COPYRIGHT © 2001 CANON INC. 2000 2000 2000 2000 CANON CLC5000 REV.0 JAN. 2001 2-75 CHAPTER 2 NEW FUNCTIONS 15) Remove the screw [22], and pull out the fixing [23] at the front. [23] [22] F02-405-63 16) Remove the two screws [24]; then, while pulling the rear lever [25] in the direction of the arrow [A], bend the slave roller assembly [26] in the direction of the arrow [B]. [B] [26] [25] [24] [A] F02-405-64 17) Pull the transfer belt to the front to detach. During assembly after replacing the belt, be sure to fit the fixing while forcing the slave roller assembly in the direction of the arrow to eliminate any gap. F02-405-65 2-76 COPYRIGHT © 2001 CANON INC. 2000 2000 2000 2000 CANON CLC5000 REV.0 JAN. 2001 CHAPTER 2 NEW FUNCTIONS d-2. Removing the Transfer Belt (method 2) • After removing the transfer unit assembly from the copier 1) Remove the transfer belt assembly. 2) Place the transfer belt assembly as shown, and remove the two releasing lever fixing screws [1] at the rear. [1] [1] F02-405-66 3) Thereafter, place the transfer belt assembly as shown on the floor, remove the screw [2], and detach the transfer belt assembly inlet paper guide [3]. [2] [3] F02-405-67 COPYRIGHT © 2001 CANON INC. 2000 2000 2000 2000 CANON CLC5000 REV.0 JAN. 2001 2-77 CHAPTER 2 NEW FUNCTIONS 4) Remove the screw [4], and free the fixing (front) [5]. [4] [5] F02-405-68 5) Release the rear releasing lever [6]. [6] F02-405-69 6) Bend the slave roller assembly [7] in the direction shown, and detach the belt [8]. [7] [8] F02-405-70 2-78 COPYRIGHT © 2001 CANON INC. 2000 2000 2000 2000 CANON CLC5000 REV.0 JAN. 2001 CHAPTER 2 NEW FUNCTIONS e. Removing the Transfer Belt Motor 1) Slide out the transfer unit assembly to the front, and open the transfer belt assembly. (See the instructions on how to open the transfer belt.) 2) Disconnect the connector [1], and remove the three screws [2] and the adjusting screw [3]; then, detach the transfer belt motor [4]. [1] [3] [2] [2] [4] F02-405-71 f. Mounting the Transfer Belt Motor 1) Mount the motor by reversing the steps used to remove it. 2) Check to make sure that the gap of the adjusting screw [3] is 4.0 ±0.3 mm. [3] 4.0±0.3mm F02-405-72 COPYRIGHT © 2001 CANON INC. 2000 2000 2000 2000 CANON CLC5000 REV.0 JAN. 2001 2-79 CHAPTER 2 NEW FUNCTIONS g. Removing the Internal Static Eliminating Roller 1) Slide out the transfer belt assembly. 2) Remove the transfer unit cover. (Refer to F02-405-34) 3) Set the transfer assembly releasing lever. (Refer to F02-405-35) 4) Remove two screws [1], then detach the rear transfer assembly cover. [1] [2] F02-405-73 5) Disconnect the connector [3]. [3] F02-405-74 2-80 COPYRIGHT © 2001 CANON INC. 2000 2000 2000 2000 CANON CLC5000 REV.0 JAN. 2001 CHAPTER 2 NEW FUNCTIONS 6) Remove the screw [4], and pull out the internal static eliminating roller [5] as if to lift it. [5] [4] F02-405-75 Points to Note When Mounting • When removing the internal static eliminating roller, be user to force to n the front while connecting the connector [3]. • When mounting the transfer rear cover, be sure to take care not to trap the harness. [3] F02-405-76 COPYRIGHT © 2001 CANON INC. 2000 2000 2000 2000 CANON CLC5000 REV.0 JAN. 2001 2-81 CHAPTER 2 NEW FUNCTIONS 4.5.4 Transfer Belt Base a. Removing the Transfer Cleaning Blade 1) Remove the transfer cleaner unit. 2) Remove the two screws [1], and detach the scoop-up sheet [2]. [1] [2] F02-405-77 3) Remove the two screws [3], and detach the blade base [4]. [3] [4] F02-405-78 Points to Note When Mounting the Transfer Cleaning Blade Assembly 1. But the blade support plate against the bearing of the transfer belt shaft from the rear. 2. After mounting it, push it two to three times with your finger to eliminate the distortion at the tip of the blade. 2-82 COPYRIGHT © 2001 CANON INC. 2000 2000 2000 2000 CANON CLC5000 REV.0 JAN. 2001 CHAPTER 2 NEW FUNCTIONS b. Removing the Transfer Belt Waste Toner Motor 1) Remove the transfer cleaner unit. 2) Remove the screw [1], and detach the transfer belt waste toner motor [2]. [2] [1] F02-405-79 c. Replacing the Stray Toner Blocking Plastic Sheet 1) Remove the transfer cleaner unit. 2) Remove the three screws [1], and detach the stray toner blocking plastic sheet [2]. [1] [2] F02-405-80 Points to Note When Replacing the Stray Toner Blocking Plastic Sheets Be sure to replace the plastic sheet whenever the transfer cleaning blade is replaced. d. Removing the Waste Toner Box 1) Slide out the transfer unit. 2) Remove the transfer unit cover. 3) Remove the screw [1], and detach the waste toner box retaining plate [2]. [1] [2] F02-405-81 COPYRIGHT © 2001 CANON INC. 2000 2000 2000 2000 CANON CLC5000 REV.0 JAN. 2001 2-83 CHAPTER 2 NEW FUNCTIONS e. Removing the Transfer Cleaning Web 1) Disconnect the connector [1]; then, while pushing down the pressure arm [2], lift the web assembly [3] to detach. [2] [3] [1] F02-405-82 2) After removing the resinous e-ring [4] and the cleaner blade support shaft [5], detach the web fixing bushing [6]. [5] [4] [6] F02-405-83 3) Lift the cleaning belt detection lever [7] on the front side of the cleaning belt as shown in the figure. Then pull the transfer cleaning web [8] down to the point where the figure F02-405-85 indicates, and remove it upward. [7] F02-405-84 [8] F02-405-85 2-84 COPYRIGHT © 2001 CANON INC. 2000 2000 2000 2000 CANON CLC5000 REV.0 JAN. 2001 CHAPTER 2 NEW FUNCTIONS 4) When installing the transfer cleaning web [8], follow the guidance in the label [9] indicated in the figure F02-40586. The figure F02-405-87 shows the installation result. [9] F02-405-86 [8] F02-405-87 f. Removing the Polishing Roller 1) Remove the screw [1], fixing [2], and bushing [3]; then, detach the polishing roller [4]. [4] [3] [1] [2] F02-405-88 g. Removing the Oil Removing Roller 1) Remove the screw [1] and the roller support plate [2]; then, detach the oil removing roller [3]. [1] [2] [3] F02-405-89 COPYRIGHT © 2001 CANON INC. 2000 2000 2000 2000 CANON CLC5000 REV.0 JAN. 2001 2-85 CHAPTER 2 NEW FUNCTIONS 5 Pickup/Feed System 5.1 Outline of the Pickup/Feed System • The major difference is the higher copying speed (from 30 to 50 cpm; A4, Direct). • The pickup assembly is based on that of the CLC1100. The feed system, on the other hand, is identical to that of the CLC1000. The machine uses the center reference method, in which paper is moved in the middle of the pickup/ feed path. To accommodate the increase in the copying speed, the feed speed to the registration roller has been increased to 400 mm/sec (in relation to the process speed of 200 mm/sec). The pickup system consists of the following: cassette 1, cassette 2, multifeeder, and holding tray (duplex unit). (For the paper deck, see 8. “Paper Deck.”) The paper picked up from the cassette or the multifeeder is controlled so that the leading edge will match the leading edge of the image on the photosensitive drum, and is sent to the transfer belt. When the paper arrives at the transfer belt, the charge from the transfer blade causes it to be attracted to the transfer belt; transfer of the first color (cyan) takes place to coincide with static attraction. When all four colors have been transferred, the paper is then moved to the delivery tray through the separation, feeding, and fixing assemblies (F02-502-01). The CPU on the machine’s DC controller PCB generates the image leading edge signal (ITOP) as soon as the registration roller turns to initiate reading of image data from the IP memory PCB. 2-86 COPYRIGHT © 2001 CANON INC. 2000 2000 2000 2000 CANON CLC5000 REV.0 JAN. 2001 CHAPTER 2 NEW FUNCTIONS 5.2 Differences in the Pickup/Feed System Unit/part Difference from CLC1000 Series machines Purpose Remarks Reference Pickup/vertical path assembly Increase in the feed speed (400 mm/sec) in relation to the process speed of 200 mm/sec To enable high-speed operation Separate pickup units for cassettes 1 and 2 5.3 “Pickup Assembly” Use of a different material (urethane instead of silicone) for the separation roller (surface layer) To increase durability and strength against friction No change to the procedure used for roller replacement Registration roller assembly Use of an independent pulse motor to drive the registration roller (no To enable high-speed operation (to increase feeding registration clutch) speed) Pickup motor (cassette 1, 2), repickup motor, and registration motor are independent motors 5.4 “Multifeeder Pickup Assembly” Duplex unit Use of a no-stack duplex unit (to support A3 extra-length size) To increase productivity Re-pickup assembly is separate from the cassette pickup assembly 5.5 “Duplex Unit” No intermediate tray heater To enable stackless both-side Use of a different number of feed belts (from 2 to 4) To prevent feeding faults Pre-fixing feeding assembly To prevent jams cause by attachment of paper T02-502-01 COPYRIGHT © 2001 CANON INC. 2000 2000 2000 2000 CANON CLC5000 REV.0 JAN. 2001 2-87 CHAPTER 2 NEW FUNCTIONS Blank page 2-88 COPYRIGHT © 2001 CANON INC. 2000 2000 2000 2000 CANON CLC5000 REV.0 JAN. 2001 CHAPTER 2 NEW FUNCTIONS Paper thickness detecting roller Registration roller Multifeeder feeding roller Photosensitive Photosensitive drum Y drum C De-curling roller Photosensitive Multifeeder Photosensitive drum K pickup roller Delivery Fixing assembly drum M roller Pre-fixing feeding PS2 PS4,PS5 assembly PS3 PS34 PS35 PS14 PS15 Multifeeder tray PS1 PS38 Delivery vertical path roller Duplex reversal Transfer belt outlet roller Pre-duplexing Pre-duplexing PS32 feed roller 2 feed roller 3 Feeder roller PS33 PS9 PS8 Duplex reversal feeding roller PS30 PS21 PS29 Pre-duplexing feed roller 1 Duplex reversal inlet roller PS31 Cassette 1 pickup roller Cassette 1 Cassette 2 Registration paper sensor Multifeeder lifter sensor (upper) Multifeeder lifter sensor (lower) Multifeeder paper width sensor (front) Multifeeder paper width sensor (rear) Pre-duplexing feed sensor 1 Pre-duplexing feed sensor 2 Post-registration paper sensor Separation sensor Pickup vertical path 1 sensor Cassette 1 paper sensor Cassette 1 lifter sensor PS25 PS26 PS27 PS28 PS29 PS30 PS31 PS33 PS34 PS35 PS38 PS25 PS23,PS24 Cassette 2 pickup roller PS1 PS2 PS3 PS4 PS5 PS8 PS9 PS14 PS15 PS21 PS23 PS24 Multifeeder separation roller PS26 PS27,PS28 Pickup vertical path roller 1 Pickup vertical roller 2 Cassette 1 feeding roller Cassette 1 separation roller Pickup vertical path roller 3 Cassette 2 feed roller Cassette 2 separation roller Pickup vertical path 2 sensor Pickup vertical path 3 sensor Cassette 2 lifter sensor Cassette 2 paper sensor Duplex paper alignment guide home position sensor Duplexing paper sensor 1 Duplexing paper sensor 2 Duplex reversal sensor Delivery sensor Inside delivery sensor Delivery vertical path sensor 1 F02-502-01 COPYRIGHT © 2001 CANON INC. 2000 2000 2000 2000 CANON CLC5000 REV.0 JAN. 2001 2-89 CHAPTER 2 NEW FUNCTIONS 5.3 Cassette Pickup Assembly 5.3.1 Outline The machine’s pickup assembly is constructed as shown in T02-503-01 and F02-503-01. The paper inside the cassette is moved up by the work of a lifter, and remains in contact with the pickup roller. When the pickup roller clutch turns on, the pickup roller starts to rotate to pick up paper. Then, the pickup roller releasing solenoid turns on so that the pickup roller moves away from the surface of the stack of paper. The feed roller and the separation roller make sure that only one sheet of paper is forwarded to the feed path, in which the paper is moved by the pickup vertical path to the transfer belt by way of the registration roller. Item Description Feed reference Paper stack Paper size switch Related mechanical adjustments Center Cassette 1/2: 550 sheets each (of 81.4 g/m2 paper) Universal cassette (by user) Cassette horizontal registration T02-503-01 2-90 COPYRIGHT © 2001 CANON INC. 2000 2000 2000 2000 CANON CLC5000 REV.0 JAN. 2001 M39 M37 M38 M C COPYRIGHT © 2001 CANON INC. 2000 2000 2000 2000 CANON CLC5000 REV.0 JAN. 2001 SL5 Y SL16 M35 CL6 Photosensitive drum Pickup motor driver PCB CL7 Photosensitive drum Bk Photosensitive drum Photosensitive drum Multifeeder lifter motor drive signal (M1CW/M1CCW) Multifeeder pickup roller release signal(SL5D) Multifeeder pickup roller drive signal(CL6D) Paper thickness detecting roller drive signal(CL7D) Registration roller release signal(SL16D) Registration motor drive pluse(M35D) Re-pickup shutter drive signal(SL8D) Cassette 2 pickup roller release signal(SL9D) Re-pickup roller drive signal(CL10D) Cassette 1 pickup roller drive signal(CL12D) Cassette 2 pickup roller drive signal(CL14D) Re-pickup roller drive pulse(M37D) Cassette 2 pickup roller release signal(SL10D) Cassette 1 pickup roller drive pulse(M38D) Cassette 2 pickup roller drive pulse(M39D) Cassette 1 lifter motor drive signal(M16D) Cassette 2 lifter motor drive signal(M17D) CHAPTER 2 NEW FUNCTIONS DC controller PCB Multifeeder PCB M1 Transfer unit CL10 SL8 CL12 Duplex unit SL9 M16 Cassette 1 SL10 M17 Cassette 2 CL14 F02-503-01 2-91 CHAPTER 2 NEW FUNCTIONS 5.3.2 Cassette Lifter Operation T02-503-02 shows an outline of the movement of the cassette lifter. When the cassette is set in the copier, the pickup roller moves down, and the lifter detecting lever leaves the lifter sensor. This condition turns on the cassette lifter motor to move up the lifter. The cassette lifter motor stops when the cassette lifter sensor reaches a position at which it can detect the top surface of the stack of paper placed on the lifter. When paper runs out and, as a result, the paper detecting lever leaves the cassette paper sensor, the machine displays a message on its control panel to indicate the absence of paper. The following shows the notations of the cassette lifter motor, cassette lifter sensor, and cassette paper sensor used in the machine’s cassette 1 and cassette 2. Name Cassette 1 Cassette 2 Cassette lifter motor M16 M17 Cassette lifter sensor PS24 PS27 Cassette paper presence/absence sensor PS23 PS28 T02-503-02 Pickup roller clutch M CL Feeding rollers Lifter detecting lever Pickup motor Separation roller Pickup roller Copy paper Lifter sensor Cassette paper presence/absence sensor Paper detecting lever Lifter Open /closed sensor M Cassette lifter motor F02-503-02 2-92 COPYRIGHT © 2001 CANON INC. 2000 2000 2000 2000 CANON CLC5000 REV.0 JAN. 2001 CHAPTER 2 NEW FUNCTIONS 5.3.3 Sequence of Operations (pickup) • Cassette 1, A4/LTR, 2 Sheets, Continuous, 4 Colors, Direct Start key ON CNTR COPY Photosensitive drum motor (M21) Cassette 1 pickup motor (M38) Cassette 1 pickup roller clutch (CL12) Cassette 1 pickup roller releasing solenoid (SL9) Pickup vertical path 2 sensors (PS25) Re-pickup motor (M37) Pickup vertical path 1 sensor (PS21) Registration paper sensor (PS1) Transparency sensor (OHPS) Registration motor (M35) Post-registration paper sensor (PS14) F02-503-03 • Cassette 2, A4/LTR, 2 Sheets, Continuous, 4 Colors, Direct Start key ON CNTR COPY Photosensitive drum motor (M21) Cassette 2 pickup motor (M39) Cassette 2 pickup motor clutch (CL14) Cassette 2 pickup roller releasing solenoid (SL10) Pickup vertical path 3 sensor (PS26) Cassette 1 pickup motor (M38) Pickup vertical path 2 sensor (PS25) Re-pickup motor (M37) Pickup vertical path 1 sensor (PS21) Registration paper sensor (PS1) Transparency sensor (OHPS) Registration motor (M35) Post-registration sensor (PS14) F02-503-04 COPYRIGHT © 2001 CANON INC. 2000 2000 2000 2000 CANON CLC5000 REV.0 JAN. 2001 2-93 CHAPTER 2 NEW FUNCTIONS 5.4 Multifeeder Pickup Assembly 5.4.1 Operations The multifeeder pickup assembly is constructed as shown in F02-504-01. The multifeeder is a mechanism in which sheets are picked up from a stack placed on the tray for continuous feeding. As many as 250 sheets (81.4 g/m2 paper) may be placed on the tray. The paper on the tray is detected by the multifeeder paper width sensor (PS4, PS5). When the Start key is pressed, the stack of sheets is moved up as far as the pickup position by the work of the multifeeder lifter motor (M1). The pickup roller is rotated by the drive of the multifeeder pickup motor (M1) to pick up paper from the stack. When the multifeeder pickup roller releasing solenoid (SL5) turns on, the pickup roller moves away from the surface of the stack of paper; the feeding roller and the separation roller serve to make sure that only one sheet of paper is moved to the registration roller by way of the paper thickness detecting roller. Multifeeder pickup motor M10 Transparency sensor Registration roller releasing solenoid Paper thickness detecting roller CL6 CL7 Paper thickness detecting roller clutch Multifeeder pickup clutch Multifeeder pickup roller releasing solenoid Multifeeder SL5 feeding roller Multifeeder pickup roller SL16 M35 Multifeeder Sensor Registration separation roller lever motor Registration Registration paper sensor M1 roller (PS1) Multifeeder lifter motor F02-504-01 2-94 COPYRIGHT © 2001 CANON INC. 2000 2000 2000 2000 CANON CLC5000 REV.0 JAN. 2001 CHAPTER 2 NEW FUNCTIONS 5.4.2 Sequence of Operations (multifeeder pickup) Multifeeder, A4/LTR, 2 Sheets, Continuous, 4-Color, Direct Start key ON CNTR COPY Photosensitive drum motor (M21) Multifeeder pickup motor (M10) Multifeeder paper sensor (PS4/PS5) Multifeeder lifter motor (M1) Multifeeder lifter sensor (upper: PS2) Multifeeder pickup clutch (CL6) Multifeeder pickup roller releasing solenoid (SL5) Paper thickness detecting roller clutch (CL7) Registration paper sensor (PS1) Transparency sensor (OHPS) Registration motor (M35) Registration releasing solenoid (SL16) F02-504-02 COPYRIGHT © 2001 CANON INC. 2000 2000 2000 2000 CANON CLC5000 REV.0 JAN. 2001 2-95 CHAPTER 2 NEW FUNCTIONS 5.4.3 Releasing the Registration Roller The registration roller is released to make up for the minute discrepancy in speed between the registration roller and the transfer belt occurring when thick paper is moved, thereby preventing displacement of images during transfer. When the multifeeder is the source of paper, the registration roller releasing solenoid (SL16) turns on as the registration roller starts to rotate and the paper is attracted to the transfer belt. This causes the drive of the registration motor to be transmitted to the registration releasing arm by way of the spring clutch and the registration releasing cam, moving up the registration roller (upper) and releasing the registration roller as shown in the following figure (the registration releasing cam is turned halfway by the work of the spring clutch when the registration roller releasing solenoid turns on). The registration releasing solenoid (SL16) is also on in the presence of a jam. Registration motor M35 Registration releasing arm Registration roller (upper) Fulcrum Registration roller releasing solenoid Registration roller (lower) SL16 Spring clutch Registration releasing cam F02-504-03 2-96 COPYRIGHT © 2001 CANON INC. 2000 2000 2000 2000 CANON CLC5000 REV.0 JAN. 2001 CHAPTER 2 NEW FUNCTIONS 5.5 Duplex Unit 5.5.1 Outline When fixing ends, the paper is moved to the delivery vertical path assembly by the delivery paper deflecting plate. Then, the paper is turned over in the duplex reversing assembly, and is sent to the duplex feeding assembly inside the duplex unit. In the duplex feeding assembly, one of three paper paths is configured by the work of the paper deflecting plate, and the re-pickup roller performs pickup for the second side. F02-505-01 and F02-505-02 provide a block diagram of the duplex unit and an outline of its basic operations, respectively. Photosensitive Photosensitive drum drum Photosensitive Photosensitive drum Transfer belt drum Bk Delivery vertical path assembly Y C M Duplex pickup assembly Duplex unit Duplex reversing assembly Pre-duplex feeding assembly Duplex feeding assembly F02-505-01 Re-pickup motor M37 Delivery paper deflecting plate solenoid CL10 SL14 Re-pickup roller clutch PS35 Reversal drive clutch Duplex feed motor PS38 CL16 PS32 PS33 M20 M19 Waste toner feed motor PS8 PS9 Re-pickup shutter solenoid Paper feeding roller solenoid SL8 SL13 PS30 PS21 PS29 PS31 M28 Duplex reversal motor SL11L SL11M SL11S Duplex paper deflecting solenoids F02-505-02 COPYRIGHT © 2001 CANON INC. 2000 2000 2000 2000 CANON CLC5000 REV.0 JAN. 2001 2-97 CHAPTER 2 NEW FUNCTIONS 5.5.2 Feeding in Duplex Mode When fixing on the first side ends, the paper is moved to the duplex reversing assembly through the delivery vertical path assembly configured by the delivery paper deflecting plate driven by the delivery paper detecting plate solenoid (SL14). Then, a specific period of time after the trailing edge of the paper has moved past the delivery vertical path sensor (PS32), the duplex reversing assembly inlet roller starts to rotate in reverse, turning over the paper and moving it to the pre-duplexing feed assembly. The pre-duplexing feed assembly transmits the drive of the waste toner feed motor (M2) to each of the feeding rollers by way of the reversal drive clutch (CL16), thereby moving the paper to the duplex unit. When the paper is moved to the holding tray by the drive of the duplex feed motor (M19), the feeder roller moves down to butt the paper against the re-pickup shutter. At the appropriate timing, the re-pickup shutter solenoid (SL8) turns on to move up the re-pickup shutter. Then, the re-pickup roller starts pickup for the second side. F02-505-03 and F02-505-04 provide outlines of how paper is moved in duplex mode. If a fault occurs in the rotation of the duplex feed motor for some reason, the control panel indicates ‘E017’ in response. Delivery paper deflecting plate solenoid SL14 PS35 PS38 Reversal drive clutch CL16 PS32 PS33 Re-pickup shutter solenoid M20 Paper feed roller solenoid Waste toner feed motor PS9 PS8 Pre-duplexing feed assembly SL8 SL13 PS30 Duplex unit PS21 PS29 PS31 M28 Duplex reversal motor F02-505-03 2-98 COPYRIGHT © 2001 CANON INC. 2000 2000 2000 2000 CANON CLC5000 REV.0 JAN. 2001 CHAPTER 2 NEW FUNCTIONS Re-pickup Re-pickup motor roller clutch Reversal drive clutch CL16 M20 Duplex feed motor Waste toner feed motor M19 CL10 Re-pickup shutter solenoid SL8 Paper feed roller solenoid SL13 PS32 PS33 PS8 M37 PS9 PS30 PS21 PS29 PS31 M28 Duplex reversal motor SL11L SL11M SL11S Duplex paper deflecting plate solenoid F02-505-04 COPYRIGHT © 2001 CANON INC. 2000 2000 2000 2000 CANON CLC5000 REV.0 JAN. 2001 2-99 CHAPTER 2 NEW FUNCTIONS 5.5.3 Sequence of Operations in Duplex Mode (1st side) Duplex Copy (1st side), A4, 2 Copies, Continuous, 4-Color, Direct Start key ON Start key ON LSTR STBY Photosensitive drum motor (M21) Inside delivery sensor (PS35) Delivery paper deflecting plate solenoid (SL14) Waste toner motor (M20) Delivery vertical path sensor 1 (PS38) Duplex reversal motor (M28) Delivery vertical path sensor 2 (PS32) Duplex reversal sensor (PS33) Normal Reverse Duplex feed motor (M19) Pre-duplex feeding sensor 1 (PS8) Pre-duplex feeding sensor 2 (PS9) Duplex paper deflecting plate solenoid (SL11) Duplex paper sensor 1 (PS30) F02-505-05 2-100 COPYRIGHT © 2001 CANON INC. 2000 2000 2000 2000 CANON CLC5000 REV.0 JAN. 2001 CHAPTER 2 NEW FUNCTIONS 5.5.4 Pickup from the Duplex Unit 1. Outline When paper is butted against the re-pickup shutter, the re-pickup shutter solenoid (SL8) turns on to move up the re-pickup shutter. Then, when the feeder roller moves the paper as far as the re-pickup roller, the repickup roller clutch (CL10) turns on. As a result, the drive of the re-pickup motor (M37) is transmitted to the re-pickup roller to start pickup. The paper is then moved to the pickup vertical path assembly by the work of the feed roller and the separation roller. The following is an outline of pickup operation when the duplex unit is selected as the source of paper. Photosensitive Photosensitive drum drum Photosensitive Photosensitive drum drum Transfer belt K Y M C M37 Re-pickup roller clutch Re-pickup motor CL10 Re-pickup shutter solenoid SL8 F02-505-06 COPYRIGHT © 2001 CANON INC. 2000 2000 2000 2000 CANON CLC5000 REV.0 JAN. 2001 2-101 CHAPTER 2 NEW FUNCTIONS 2) Sequence of Operations Duplex Unit (2nd side), A4/LTR, 2 Copies, Continuous, 4-Color, Direct Start key ON (second page) CNTR COPY Photopositive drum motor (M21) Duplex paper sensor 2 (PS31) Feeding roller solenoid (SL13) Re-pickup shutter solenoid (SL8) Re-pickup motor (M37) Re-pickup clutch (CL10) Pickup vertical path 1 sensor (PS21) Registration paper sensor (PS1) Transparency sensor (OHPS) Registration motor (M35) F02-505-07 2-102 COPYRIGHT © 2001 CANON INC. 2000 2000 2000 2000 CANON CLC5000 REV.0 JAN. 2001 CHAPTER 2 NEW FUNCTIONS 5.6 Detecting Jams 5.6.1 Outline The machine’s jam detection sensors are constructed more or less in the same way as the CLC1000’s sensors; for the types and the location of each sensor, see the CLC1000 Service Manual. 5.6.2 Sequence of Jam Detection A4/LTR, 2 Copies, 4-Color, Direct, Cassette Start key ON STBY Cassette 1 pickup roller clutch (CL12) Pickup vertical path 2 sensors (PS25) Pickup vertical path 1 sensor (PS21) Registration paper sensor (PS1) Post registration paper sensor (PS14) Separation sensor (PS15) Inside delivery paper sensor (PS35) Delivery sensor (PS34) Delivery vertical path 1 sensor (PS38) Delivery vertical path 2 sensor(PS32) Duplex reversal motor (M28) Duplex reversal sensor (PS33) Pre-duplex feeding sensor (PS8) Pre-duplex feeding sensor (PS9) Duplex paper sensor 1 (PS30) Duplex paper sensor 2 (PS31): Note Cassette 2 pickup roller clutch (CL14) Pickup vertical path 3 sensor (PS26) CNTR (unit: sec) COPY LSTR STBY 0.7 1.1 2.1 0.1 3.8 5.7 1.6 6.0 6.0 0.9 7.0 CW CCW 0.5 1.7 2.7 1.1 0.5 1.1 0.7 : delay check (if paper is presence, normal) : stationary jam check (if paper is absence, normal) Note: If the duplexing paper sensor 2 (PS31) detects paper at such times as not stored in memory (timing), the Remove Paper message will be indicated on the control panel. F02-506-01 COPYRIGHT © 2001 CANON INC. 2000 2000 2000 2000 CANON CLC5000 REV.0 JAN. 2001 2-103 CHAPTER 2 NEW FUNCTIONS 5.7 Disassembly/Assembly The machine has the mechanical features and operations as described herein, and may be disassembled or assembled as shown; be sure to observe the following whenever disassembling or assembling the machine: Disconnect the power plug for safety before the work. 1. 2. Unless otherwise noted, reverse the steps used to disassemble the machine for assembly. 3. Identify the screws by type (length, diameter) and location. 4. The screws used for the grounding wire, varistors, or the like are equipped with washers to ensure electrical continuity. Be sure to use these screws during assembly. 5. As a rule, do not operate the machine with any of its parts removed. Do not throw toner into fire to avoid explosion. 6. 2-104 COPYRIGHT © 2001 CANON INC. 2000 2000 2000 2000 CANON CLC5000 REV.0 JAN. 2001 CHAPTER 2 NEW FUNCTIONS 5.7.1 Removing the Multifeeder Assembly 1) Remove the multifeeder tray assembly. 2) Disconnect the three connectors [1], and remove the three screws [2]; then, shift the multifeeder assembly [3] in the direction of the arrow to detach. [1] [2] [1] [3] [2] [2] F02-507-01 When Mounting the Multifeeder To mount it, match its hook against the hole in the stay, and slide it to the right. COPYRIGHT © 2001 CANON INC. 2000 2000 2000 2000 CANON CLC5000 REV.0 JAN. 2001 2-105 CHAPTER 2 NEW FUNCTIONS 5.7.2 Removing the Cassette Pickup Assembly 1) Remove the right front cover and the right rear cover. 2) Slide out the cassette 1/2 and the duplex unit to the front. 3) Remove the three screws [3] at the front and the three screws [4] at the rear; then, detach the right door unit [5]. [5] [3] F02-507-02 [5] [4] F02-507-03 2-106 COPYRIGHT © 2001 CANON INC. 2000 2000 2000 2000 CANON CLC5000 REV.0 JAN. 2001 CHAPTER 2 NEW FUNCTIONS 4) Remove the screw [6], and detach the connector cover [7]. [7] [6] F02-507-04 5) Disconnect the two connectors [8], and remove the two screws [9]; then, detach the cassette pickup unit [10]. [8] [10] [9] [8] [9] F02-507-05 COPYRIGHT © 2001 CANON INC. 2000 2000 2000 2000 CANON CLC5000 REV.0 JAN. 2001 2-107 CHAPTER 2 NEW FUNCTIONS 5.7.3 Removing the Re-Pickup Assembly 1) Remove the right cover. (See F02-50702.) 2) Remove the screw [1] at the rear, and detach the connector cover [2]. [2] [1] F02-507-06 3) Disconnect the two connectors [3], and remove the two screws [4] at the front and the two screws [5] at the rear; then, detach the re-pickup assembly [6]. [4] [6] [3] [5] [3] [4] [5] F02-507-07 2-108 COPYRIGHT © 2001 CANON INC. 2000 2000 2000 2000 CANON CLC5000 REV.0 JAN. 2001 CHAPTER 2 NEW FUNCTIONS 5.7.4 Removing the Re-Pickup Motor 1) Remove the right cover. (See F02-50702.) 2) Remove the re-pickup assembly. (See 5.7.3 “Removing the Re-Pickup Unit.”) 3) Remove the two screws [1] at the front and the screw [2] at the rear; then, detach the stay [3]. [3] [1] F02-507-08 [3] [2] F02-507-09 COPYRIGHT © 2001 CANON INC. 2000 2000 2000 2000 CANON CLC5000 REV.0 JAN. 2001 2-109 CHAPTER 2 NEW FUNCTIONS 4) Remove the two screws [4], and disconnect the connector [5]; then, detach the re-pickup motor [7]. [4] [6] [4] [5] F02-507-10 5.7.5 Removing the Re-Pickup Unit Clutch 1) Remove the right cover. (See F02-50702.) 2) Remove the re-pickup assembly. (See 5.7.3 “Removing the Re-Pickup Assembly.”) 3) Remove the grip ring [1], and disconnect the connector [2]; then, detach the re-pickup clutch [3]. [2] [3] [1] F02-507-11 2-110 COPYRIGHT © 2001 CANON INC. 2000 2000 2000 2000 CANON CLC5000 REV.0 JAN. 2001 CHAPTER 2 NEW FUNCTIONS 5.7.6 Removing the Re-Pickup Shutter Solenoid 1) Remove the right cover. (See F02-50702.) 2) Remove the re-pickup assembly. (See 5.7.3 “Removing the Re-Pickup Assembly.”) 3) Remove the two screws [1], and disconnect the connector [2]; then, detach the pickup shutter solenoid [3]. [3] [2] [1] F02-507-12 When Mounting the Re-Pickup Shutter Solenoid You will have to make adjustments. Be sure to mark the position with a scribe (A in the figure before) removing it. [A] F02-507-13 COPYRIGHT © 2001 CANON INC. 2000 2000 2000 2000 CANON CLC5000 REV.0 JAN. 2001 2-111 CHAPTER 2 NEW FUNCTIONS 5.7.7 Removing the Duplex Unit Feed roller 1) Remove the duplex unit. 2) Remove the two resin clamps [1], and detach the feed roller [3] from the feed roller shaft [2]. [3] [1] [2] [1] F02-507-14 5.7.8 Removing the Pre-Fixing Feeding Assembly 1) Remove the left cover. 2) Slide out the fixing unit and the transfer unit. 3) Remove the two screws [1]. [1] F02-507-15 2-112 COPYRIGHT © 2001 CANON INC. 2000 2000 2000 2000 CANON CLC5000 REV.0 JAN. 2001 CHAPTER 2 NEW FUNCTIONS 4) Disconnect the two connectors [2], and shift the pre-fixing feeding assembly [3] to the front, and pull it out from the delivery side. [3] [2] F02-507-16 5.7.9 Removing the Pre-Duplex Feeding Unit 1) Remove the left cover. 2) Open the front cover, and slide out the fixing unit and the transfer unit. 3) Slide out the pre-fixing feeding assembly. (See the instructions on how to remove the pre-fixing feeding assembly.) 4) Disconnect the connector [1], and remove the screw [2]; then, detach the connector support plate [3]. [2] [1] [3] F02-507-17 COPYRIGHT © 2001 CANON INC. 2000 2000 2000 2000 CANON CLC5000 REV.0 JAN. 2001 2-113 CHAPTER 2 NEW FUNCTIONS 5) Remove the two screws [4]; then, detach the grip [5] and the reinforcing plate [6] of the pre-duplexing feeding assembly. [4] [5] [6] F02-507-18 6) Lower the lifter plate [7] of the duplex feeding assembly, and hook it on the cut-off [8]. [7] [8] F02-507-19 7) Slide out the duplex unit, and remove the screw [9]. [9] F02-507-20 2-114 COPYRIGHT © 2001 CANON INC. 2000 2000 2000 2000 CANON CLC5000 REV.0 JAN. 2001 CHAPTER 2 NEW FUNCTIONS 8) Slide out the transfer unit, and remove the screw [10]. [10] F02-507-21 9) Move the pre-duplex feeding assembly to the front once; then, slide it back toward the delivery side to detach. When Removing When removing it, be sure to keep the duplex unit slid out. When Mounting When mounting it, be sure to hook the stepped screw [11] show in the figure on the groove [12] in the frail. [12] [11] F02-507-22 COPYRIGHT © 2001 CANON INC. 2000 2000 2000 2000 CANON CLC5000 REV.0 JAN. 2001 2-115 CHAPTER 2 NEW FUNCTIONS 5.7.10 Delivery/Reversing Assembly a. Removing the Delivery/Reversing Assembly 1) Open the front left cover, and detach the left cover. 2) Slide out the fixing unit. 3) Loosen the two screws [1]. [1] F02-507-23 4) Remove the four screws [2], and open the outside delivery unit and the inside delivery unit; then, disconnect the two connectors [3], and pull out the delivery/reversing assembly [4] to the left of the machine. [3] [2] [4] [2] F02-507-24 2-116 COPYRIGHT © 2001 CANON INC. 2000 2000 2000 2000 CANON CLC5000 REV.0 JAN. 2001 CHAPTER 2 NEW FUNCTIONS b. Removing the Separation Claw 1) Open the front left cover, and slide out the fixing unit; then, open the outside delivery unit and the inside delivery unit. 2) Remove the two screws [1], and detach the sensor cover [2]. [2] [1] F02-507-25 3) Remove the screw [3], and detach the delivery sensor assembly [4]. [3] [4] F02-507-26 COPYRIGHT © 2001 CANON INC. 2000 2000 2000 2000 CANON CLC5000 REV.0 JAN. 2001 2-117 CHAPTER 2 NEW FUNCTIONS 4) Remove the screw [5], and detach the positioning pin [6] of the separation claw unit; then, detach the separation claw unit [7]. [7] [6] [5] F02-507-27 5) Remove the spring [8], and detach the separation claw [9]. [9] [8] F02-507-28 2-118 COPYRIGHT © 2001 CANON INC. 2000 2000 2000 2000 CANON CLC5000 REV.0 JAN. 2001 CHAPTER 2 NEW FUNCTIONS Blank page COPYRIGHT © 2001 CANON INC. 2000 2000 2000 2000 CANON CLC5000 REV.0 JAN. 2001 2-119 CHAPTER 2 NEW FUNCTIONS 6 Fixing System 6.1 Outline of the Fixing System • The major differences are the addition of oil heater, higher fixing speed, and elimination of the gloss function. • The rest are more or less identical with CLC1000 Series machines. 2-120 COPYRIGHT © 2001 CANON INC. 2000 2000 2000 2000 CANON CLC5000 REV.0 JAN. 2001 CHAPTER 2 NEW FUNCTIONS 6.2 Outline of the Fixing System Unit/part Difference from CLC1000 Series machines Purpose Reference Fixing drive assembly Control of fixing speed (from 6 to 4 steps) To review speed in support of high-speed operation To eliminate the gloss selection function 6.3 “Outline of Fixing/Delivery Assembly” 6.8 “Timing Chart (fixing/delivery assembly)” Elimination of the gloss selection function To increase the latitude of fixing temperature control in accommodating higher speed of operation 6.7 “Controlling the Fixing Speed” Increase of nip pressure Different fixing speed: in the case of a transparency, 138 mm/sec until its leading edge reaches the nip; thereafter, 68 mm/sec To support higher speed of operation 6.7 “Controlling the Fixing Speed” Fixing heater Increase of power to the fixing heater (upper: from 650 W to 800 W; lower: from 550 W to 600 W) To support higher speed of operation 6.4 “Controlling the Fixing Roller Temperature” Thermistor Addition of sub thermistor (upper, lower) To increase the accuracy of error detection 6.4 “Controlling the Fixing Roller Temperature” Fixing roller temperature control mechanism Change in the fixing roller control temperature To review temprature in support of higher operation 6.4 “Controlling the Fixing Roller Temperature” 6.8 “Timing Chart (fixing/delivery assembly”) Fixing oil temperature control mechanism Addition of fixing oil temperature control Addition of an oil heater, heater thermistor, oil temperature thermistor, thermal switch To stabilize the viscosity of oil, thereby stabilizing the amount of application 6.5 “Controlling the fixing oil temperature” 6.8 “Timing Chart (fixing/delivery assembly)” Protective mechanism Addition of protective functions Addition of a sub thermistor Addition of a fixing oil heater 6.6 “Protective Mechanism” Oil applying assembly Addition of a scraper blade To scrape off offset toner, thereby stabilizing the amount of — oil application T02-602-01 COPYRIGHT © 2001 CANON INC. 2000 2000 2000 2000 CANON CLC5000 REV.0 JAN. 2001 2-121 CHAPTER 2 NEW FUNCTIONS Blank page 2-122 COPYRIGHT © 2001 CANON INC. 2000 2000 2000 2000 CANON CLC5000 REV.0 JAN. 2001 CHAPTER 2 NEW FUNCTIONS 6.3 Outline of the Fixing/Delivery Assembly The following are driven by the fixing motor (M9): • Fixing upper roller • Lower fixing roller • Delivery roller • Oil applying roller • Fixing upper web lock To ensure good fixing invariably in duplex, transparency, or normal mode, the machine changes its fixing speed among four levels. The upper roller and the lower roller are each provided with a fixing cleaning web. The fixing upper web is driven by the fixing upper web take-up solenoid (SL3), and the lower web is driven by the fixing web motor (M30). The fixing lower roller is also provided with a cleaning blade of a spring type. The separation claws used to prevent paper from wrapping around the fixing lower roller are made to move away from the fixing lower roller by the drive of the separation claw solenoid (SL15) to prevent scratches on the roller. M9 Fixing web take-up One-way solenoid clutch SL3 Fixing upper web Fixing motor Oil applying roller Oil level sensor (PS6) Web length sensor (PS36) SL4 Fixing upper web releasing solenoid Upper oil pan Fixing upper roller Fixing lower roller Oil removing blade M30 Fixing lower web Fixing web motor Lower oil pan F02-603-01 COPYRIGHT © 2001 CANON INC. 2000 2000 2000 2000 CANON CLC5000 REV.0 JAN. 2001 2-123 CHAPTER 2 NEW FUNCTIONS 6.4 Controlling the Fixing Roller Temperature The fixing upper roller and the fixing lower roller are each heated by a fixing heater (H1: 800 W; H2: 600 W). The surface temperature of the upper roller is monitored by the upper main thermistor (TH1), while that of the lower roller is monitored by the lower main thermistor (TH3). The CPU on the DC controller PCB uses the readings of these thermistors to control the fixing heaters by means of the upper fixing heater drive signal (UHON) and the lower fixing heater drive signal (LHON) so that the surface temperature of the upper and lower rollers remain at a specific level. • Upper Fixing Roller/Lower Fixing Roller (common) During copying: controlled to 175ºC (One-sided), controlled to 170ºC (Auto twosided mode) During STBY: controlled to 182ºC During pre-heat: controlled to 182ºC The upper sub thermistor (TH2) and the lower sub thermistor (TH4) are attached to the ends of the rollers for detection of errors. REF. 2-124 Shifting down the fixing assembly lever, as when drawing out the fixing assembly, will cut off the power to the fixing heater using the fixing lever switch (SW5). COPYRIGHT © 2001 CANON INC. 2000 2000 2000 2000 CANON CLC5000 REV.0 JAN. 2001 CHAPTER 2 NEW FUNCTIONS Relay (RL: NO) Upper fixing heater drive signal (UHON) AC driver PCB Thermal Upper switch fixing (TP1) heater (H1) J2241-14 Lower fixing heater drive signal (LHON) J2241-13 Oil heater drive signal (H9ON) Thermal Lower fixing switch (TP2) heater (H2) J2241-3 Fixing web motor drive signal (M3ON) Fixing lever Thermal switch switch Fixing oil (SW5: NO) (TP3) heater (H9) Main switch (SW2: NC) DC controller PCB J2241-9 CPU Triac fault detection signal (TERR*) +24V+24V M30 Triac short-circuit detection circuit Triac for lower fixing heater (TR1) J2241-12 Triac for upper fixing heater (TR2) Upper fixing main thermistor (TH1) Upper fixing web J2209A-13 J2209A-12 J2209B-11 Fixing oil heater thermistor (TH6) Upper fixing roller TP1 Lower fixing roller TP2 J2209B-10 Fixing oil thermistor (TH5) Upper fixing sub thermistor (TH2) J2209B-6 J2209B-5 J2209A-11 J2209A-10 Lower fixing sub thermistor (TH4) J2209B-4 J2209B-3 Lower fixing main thermistor (TH3) J2209B-2 J2209B-1 Lower fixing web Power to DC controller PCB Power OFF signal (PWOFF*) High-temperature detention circuit/open circuit detection circuit/low temperature detection circuit Fixing web motor DC power supply PCB (DCP1) J2233-4 J2233-5 F02-604-01 COPYRIGHT © 2001 CANON INC. 2000 2000 2000 2000 CANON CLC5000 REV.0 JAN. 2001 2-125 CHAPTER 2 NEW FUNCTIONS 6.5 Controlling the Fixing Oil Temperature To ensure that the upper fixing roller is provided with a specific level of oil at all items, the fixing oil in the upper oil pan is controlled to about 140°C by the oil heater (H9). The temperature of the fixing oil is monitored by the fixing oil thermistor (TH5), while that of the fixing oil heater is monitored by the fixing oil heater thermistor (TH6). The DC controller PCB uses the readings of these two thermistors to switch the fixing oil heater drive signal (H9_DRIVE), thereby controlling the fixing oil heater. The fixing oil heater is turned OFF while the paper is being led. Control start TH5 output < 140 Y N TH6 output < 200 N Y Fixing oil heater ON Fixing oil heater OFF F02-605-01 The fixing oil is likely to be very hot. Be sure that the oil has cooled before starting any work involving the fixing assembly. 2-126 COPYRIGHT © 2001 CANON INC. 2000 2000 2000 2000 CANON CLC5000 REV.0 JAN. 2001 CHAPTER 2 NEW FUNCTIONS 6.6 Protective Mechanisms The machine is equipped with the following nine types of protective mechanisms to prevent malfunction of the fixing heater and the oil heater. 6.6.1 Detecting Overheating (software) The CPU on the DC controller PCB monitors the voltage of the upper main thermistor (TH1), upper sub thermistor (TH2), lower main thermistor (TH3), and lower sub thermistor (TH4), and issues the following error codes when detecting an overheating condition: Thermistor Detection temperature Error code Upper thermistor (TH1) 215ºC E000-0102 Lower thermistor (TH3) 208ºC E000-0202 6.6.2 Detecting Overheating (hardware) When the overheating detection circuit on the DC controller PCB detects any of the following temperature readings, it issues the corresponding error codes; it will then cause the power OFF signal (PWOFF*) to go ‘0’ so as to turn off the power switch (SW2). Thermistor Detection temperature Error code Upper main thermistor (TH1) 230ºC E000-0101 Upper sub thermistor (TH2) 230ºC E000-0101 Lower main thermistor (TH3) 220ºC E000-0201 Lower sub thermistor (TH4) 230ºC E000-0201 COPYRIGHT © 2001 CANON INC. 2000 2000 2000 2000 CANON CLC5000 REV.0 JAN. 2001 2-127 CHAPTER 2 NEW FUNCTIONS 6.6.3 Detecting an Open Circuit in the Thermistor If the open-circuit detection circuit on the DC controller PCB detects a difference of 60°C or more in the readings of the main thermistor and the sub thermistor, the DC controller PCB will issue the following error codes: then, it will cause the power OFF signal (PWOFF*) to go ‘0’, thereby turning off the power switch (SW2). Upper main thermistor (TH1) and upper sub thermistor (TH2) E000-0105 Lower main thermistor (TH3) and lower sub thermistor (TH4) E000-0205 6.6.4 Detecting a Fault in the Triac The triac short-circuit detection circuit on the AC driver PCB monitors the drive of the fixing heater, and will issue the following error codes if the fixing heater is on when it is not expected to be on. Fault in triac (TR2) for upper fixing heater E004-0001 Fault in triac (TR1) for lower fixing heater E004-0001 6.6.5 Detecting Overheating of Fixing Oil (software) The CPU on the DC controller PCB monitors the voltage of the oil heater thermistor (TH5) and the oil thermistor (TH6), and will issue the following error codes in the presence of a fault: Thermistor Detection temperature Error code Oil thermistor (TH5) 180ºC E000-0061 Oil heater thermistor (TH6) 220ºC E000-0071 6.6.6 Detecting Overheating of Fixing Oil (hardware) If the overheating detection circuit on the DC controller PCB detects overheating, the DC controller PCB will issue the following error codes; then, it will cause the power OFF signal (PWOFF*) to go ‘0’, thereby turning off the power switch. Thermistor Detection temperature Error code Oil thermistor (TH5) 190ºC E000-0081 Oil heater thermistor (TH6) 230ºC E000-0081 2-128 COPYRIGHT © 2001 CANON INC. 2000 2000 2000 2000 CANON CLC5000 REV.0 JAN. 2001 CHAPTER 2 NEW FUNCTIONS 6.6.7 Detecting Low Temperature of Oil (software) The CPU on the DC controller PCB monitors the voltage of the oil thermistor (TH5) and the oil heater thermistor (TH6), and the DC control PCB will issue the following error codes in the presence of a fault and then cause the power OFF signal (PWOFF*) to go ‘0’, thereby turning off the power switch (SW2): Thermistor Condition Error code Oil thermistor (TH5) It does not reach 50ºC after the end E000-0062 of WAIT. Oil heater thermistor (TH6) It does not reach 50ºC after the end E000-0072 of WAIT. 6.6.8 Detecting Low Temperature of Oil (hardware) If the low temperature detention circuit on the DC controller PCB doesn’t detect 50ºC within 2 min after the oil heater turns on the following error code will be issued: Thermistor Error code Oil heater thermistor (TH6) E000-0082 6.6.9 Operation of the Thermal Switch If the temperature inside the thermal switch of the upper fixing heater, lower fixing heater, or oil heater exceeds 230ºC, the respective switch turns off to cut off the power to its heater. REF. The contact of the thermal switch (TP1, TP2, TP3) will not recover even when the temperature returns to normal. Do not use it once its contact has opened. Resetting E000 1) Remove the cause. 2) Start service mode, and make the following selections: FUNCTION>USER. 3) Press ‘E000-RLS’ so that the <P> notation will change as follows: ERROR → BUSY → ERROR. 4) Turn off and then on the power switch. COPYRIGHT © 2001 CANON INC. 2000 2000 2000 2000 CANON CLC5000 REV.0 JAN. 2001 2-129 CHAPTER 2 NEW FUNCTIONS 6.7 Controlling the Fixing Speed To ensure good fixing, the machine controls the speed of the fixing motor (M9), thereby switching the fixing speed among four settings: Thin paper (64 to 79 g/m2), plain paper (80 to 105 g/m2) Thick paper (106 to 163 g/m2) Extra-thick paper (164 to 253 g/m2) Transparency 204 mm/sec 138 mm/sec 90 mm/sec 138/68 mm/sec When a transparency is used, the fixing speed is switched as follows to enable smooth introduction of paper to the fixing nip: Immediately before the leading edge of the transparency leaves the separation sensor (PS15) and rushes into the fixing nip, the speed of the pre-fixing feed belt is switched from 338 to 68 mm/sec; thereafter, the previous speed is used immediately before the medium reaches the pre-fixing feeding assembly. 2-130 COPYRIGHT © 2001 CANON INC. 2000 2000 2000 2000 CANON CLC5000 REV.0 JAN. 2001 CHAPTER 2 NEW FUNCTIONS 6.8 Timing Chart (fixing/delivery assembly) 6.8.1 Basic Sequence of Operations Power switch ON 182˚C 165˚C WMUP INTR 204mm/s Start key ON CNTR STBY COPY LSTR STBY Photosensitive drum motor (M21) Pre-fixing feed motor (M11) 202mm/s Fixing motor (M9) 202 mm/s (standard) 204mm/s Fixing web releasing solenoid (SL4) Web released ON for each 8 sheets Fixing take-up solenoid (SL3) Fixing web motor (M30) Separation claw releasing solenoid (SL15) Upper fixing heater (H1) Separation claw released Controlled to 180˚C Controlled to 175˚C Controlled to 180˚C Controlled to 175˚C Lower fixing heater (H2) 182˚C 175˚C 165˚C A4/LTR, 2 Copies, 4-Color, Direct, Cassette 1, Plain paper F02-608-01 COPYRIGHT © 2001 CANON INC. 2000 2000 2000 2000 CANON CLC5000 REV.0 JAN. 2001 2-131 CHAPTER 2 NEW FUNCTIONS 6.8.2 Changing the Fixing Speed Start key ON Paper length Separation sensor (PS15) Inside delivery sensor (PS35) Pre-fixing feed motor (M11) Fixing motor (M9) Paper length 202mm/s 45mm/s *1 202mm/s 204mm/s *1: For feed speed, see “Controlling the Fixing Speed.” F02-608-02 Immediately before the leading edge of paper leaves the separation sensor (PS15) and its leading edge rushes into the fixing nip, the speed of the pre-fixing feed belt is changed; then, the previous speed is used before the next sheet reaches the pre-fixing feeding assembly. In the case of the fixing roller, the rotation starts at a speed of warm-up rotation after the start key is pressed, and the speed most suited to the transfer medium is used after the leading edge leaves the separation sensor. 2-132 COPYRIGHT © 2001 CANON INC. 2000 2000 2000 2000 CANON CLC5000 REV.0 JAN. 2001 CHAPTER 2 NEW FUNCTIONS 6.9 Driving the Fixing Cleaning Web a.Upper Fixing Web The upper fixing web used to clean the fixing roller is taken up 0.56 mm each time the upper fixing web take-up solenoid (SL3) turns on and off. The fixing web take-up solenoid turns on once for every 8 sheets of paper (small-size, smaller than A3). The end of the web is provided with a cut-off to enable detection of its length. When the web is taken up as far as the cut-off, the arm supported by the web falls through the cut-off, causing the web length sensor (PS36) to turn on; as a result, the control panel will indicate an alarm. The upper web moves away from the upper fixing roller when the upper fixing web releasing solenoid (SL4) turns on. b. Lower Fixing Web The lower fixing web is used to clean the lower fixing roller by the drive of the lower fixing web motor (M30). The lower fixing web motor is used to take up the lower fixing web 0.04 mm for each sheet of paper. Dirt left behind the web is scraped off by the lower fixing blade operated by the work of a spring. The lower fixing web is not equipped with a detection mechanism, and it must be replaced whenever the upper fixing web is replaced. (front of machine) Upper fixing web Sensor arm Web length sensor F02-609-01 1. ‘E005’ will be indicated when the upper fixing web take-up solenoid turns on and off about 270 times after the Replace Web message has been indicated on the control panel. 2. The web is 7.4 m long, and a cut-off is found 7.1 m from its lead edge. 3. After replacing the upper and lower fixing webs, be sure to execute the following in service mode and turn off and then on the power switch: FUNC>FUSER>E005-RLS. COPYRIGHT © 2001 CANON INC. 2000 2000 2000 2000 CANON CLC5000 REV.0 JAN. 2001 2-133 CHAPTER 2 NEW FUNCTIONS 6.10 Disassembly/Assembly The machine has the mechanical features and operations as described herein, and may be disassembled or assembled as shown; be sure to observe the following whenever disassembling or assembling the machine: Disconnect the power plug for safety before the work. 1. 2. Unless otherwise noted, reverse the steps used to disassemble the machine for assembly. 3. Identify the screws by type (length, diameter) and location. 4. The screws used for the grounding wire, varistors, or the like are equipped with washers to ensure electrical continuity. Be sure to use these screws during assembly. 5. As a rule, do not operate the machine with any of its parts removed. Do not throw toner into fire to avoid explosion. 6. 2-134 COPYRIGHT © 2001 CANON INC. 2000 2000 2000 2000 CANON CLC5000 REV.0 JAN. 2001 CHAPTER 2 NEW FUNCTIONS 6.10.1 Fixing Assembly With a few exceptions, the machine's fixing-related components may be serviced without removing the fixing assembly from the machine. a. Removing the Fixing Assembly Be sure to keep the fixing assembly inside the machine when removing such components as the fixing roller. The machine's fixing assembly is separate from the lower oil pan; be sure to collect the fixing oil from the upper oil pan into an oil bottle as follows before removing the fixing assembly. 1) Open the front left cover, and lower the fixing assembly lever; then, slide out the fixing unit. 2) Remove the screw [1], and detach the fixing knob [2]. 3) Remove the two screws [3], and detach the pre-fixing assembly cover [4]. 4) Open the outside delivery unit and the inside delivery unit. 5) Remove the screw [5], and detach the upper fixing cover [6]. [5] [6] [2] [1] [3] [4] [3] F02-610-01 COPYRIGHT © 2001 CANON INC. 2000 2000 2000 2000 CANON CLC5000 REV.0 JAN. 2001 2-135 CHAPTER 2 NEW FUNCTIONS 6) Remove the two screws [7], and open the upper fixing roller unit [8]. [7] [8] [7] F02-610-02 7) Remove the two screws [9] each at the front and the rear; then, shift the oil applying unit [10] in the direction of the arrow. [9] [9] [10] [9] F02-610-03 2-136 COPYRIGHT © 2001 CANON INC. 2000 2000 2000 2000 CANON CLC5000 REV.0 JAN. 2001 CHAPTER 2 NEW FUNCTIONS 8) Remove the screw [11] at the rear inside the upper oil pan, and wait until all fixing oil has been collected in the oil tank. [11] F02-610-04 9) Close the upper fixing roller unit. 10) Remove the two screws [12], and hold the grip [13] to detach the fixing assembly [14]. At this time, be sure to fit the screw [7] removed in step 6). [13] [14] [12] [13] [12] F02-610-05 Take care when lifting the fixing assembly. The oil filter may be sticking to the bottom of the fixing assembly. COPYRIGHT © 2001 CANON INC. 2000 2000 2000 2000 CANON CLC5000 REV.0 JAN. 2001 2-137 CHAPTER 2 NEW FUNCTIONS b. Removing the Fixing Main Thermistor (Upper) and Sub Thermistor (Upper) 1) Open the upper fixing roller unit. (See the instructions on how to open the upper fixing roller unit on the CLC1000 service manual chapter 4.) 2) Remove the two fixing main thermistor fixings [1]. 3) Free the thermistor cord from the cord [1] [2] retainer [2]; then, detach the fixing main [1] thermistor (upper) [3]. Note: The sub thermistor (upper) [4] may be removed in the same way. [4] [3] F02-610-06 c. Removing the Fixing Main Thermistor (Lower) and Sub Thermistor (Lower) 1) Open the front left cover, and shift [1] down the fixing lever; then, slide out the [2] fixing unit. [1] 2) Remove the two screws [1], and detach the fixing inlet guide mounting base [2]. F02-610-07 2-138 COPYRIGHT © 2001 CANON INC. 2000 2000 2000 2000 CANON CLC5000 REV.0 JAN. 2001 CHAPTER 2 NEW FUNCTIONS 3) Remove the two screws [3], and detach the fixing main thermistor (lower) mounting base [4]. [4] [3] F02-610-08 4) Remove the screw [5], and detach the fixing main thermistor (lower) [6]. [5] [6] [7] Note: The sub thermistor (lower) [7] may be removed in the same way. F02-610-09 COPYRIGHT © 2001 CANON INC. 2000 2000 2000 2000 CANON CLC5000 REV.0 JAN. 2001 2-139 CHAPTER 2 NEW FUNCTIONS d. Removing the Fixing Lower Roller Thermal Switch 1) Remove the fixing assembly. (See the instructions on how to remove the fixing assembly.) 2) Remove the two screws [1], and detach the fixing inlet guide mounting base [2]. [2] [1] [1] F02-610-10 3) Remove the screw [3], and detach the fixing lower roller thermal switch unit [4]. [4] [3] F02-610-11 2-140 COPYRIGHT © 2001 CANON INC. 2000 2000 2000 2000 CANON CLC5000 REV.0 JAN. 2001 CHAPTER 2 NEW FUNCTIONS 6.10.2 Upper Fixing Cleaner Assembly a. Removing the Upper Fixing Web 1) Open the front cover (left), and shift down the fixing assembly lever; then, slide out the fixing unit. 2) Remove the fixing assembly knob. 3) Remove the fixing front cover. 4) Open the outside delivery unit and the inside delivery unit. 5) Remove the screw [1], and detach the upper fixing cover [2]. [2] [1] F02-610-12 6) Remove the two screws [3], and detach the upper fixing web unit [4]. [3] [4] [3] F02-610-13 COPYRIGHT © 2001 CANON INC. 2000 2000 2000 2000 CANON CLC5000 REV.0 JAN. 2001 2-141 CHAPTER 2 NEW FUNCTIONS 7) Insert a metal ruler [5] along the stop plate [6] as shown, and release the web [7]. [6] [5] [7] F02-610-14 8) Remove the two screws [8] and the two bushings [9]; then, detach the fixing upper web [10]. [9] [10] [8] F02-610-15 b. Mounting the Upper Fixing Web 1. When mounting the web [1], be sure that the length detecting lever [2] is positioned as shown. [1] [2] F02-610-16 When mounting the upper fixing web, be sure to move the lever up and down to remove any slack. 2-142 COPYRIGHT © 2001 CANON INC. 2000 2000 2000 2000 CANON CLC5000 REV.0 JAN. 2001 CHAPTER 2 NEW FUNCTIONS 6.10.3 Lower Fixing Cleaning Assembly a. Removing the Lower Fixing Web/Lower Fixing Blade 1) Open the front cover (left), and shift down the fixing lever; then, slide out the fixing unit. 2) Remove the fixing assembly knob. 3) Remove the front fixing cover. 4) Open the outside delivery unit and the inside delivery unit. 5) Remove the two screws [1]; then, slide [1] the lower fixing web unit [2] to the front, and pull it out. [2] [1] F02-610-17 6) Remove the two screws [3] and the two bushings [4]; then, detach the web [5]. [5] [4] [3] [3] [4] F02-610-18 COPYRIGHT © 2001 CANON INC. 2000 2000 2000 2000 CANON CLC5000 REV.0 JAN. 2001 2-143 CHAPTER 2 NEW FUNCTIONS 7) Remove the four screws [7], and detach the lower fixing blade [7]. [6] [7] [6] F02-610-19 6.10.4 Fixing Oil Applying Unit a. Removing the Oil Applying Blade Unit 1) Open the upper fixing roller unit. (See Service Manual CLC1000, Chapter 4, the instructions on how to open the upper fixing roller unit.) 2) Shift down the oil applying blade unit [1] in the direction of the arrow; then, pull it up. [1] F02-610-20 When mounting the blade unit, be sure to return the blade unit to the point indicated in the figure to avoid damage to the fixing roller; in addition, be sure to mount the blade plate to the inside of the applying stay. 2-144 COPYRIGHT © 2001 CANON INC. 2000 2000 2000 2000 CANON CLC5000 REV.0 JAN. 2001 CHAPTER 2 NEW FUNCTIONS b. Removing the Oil Applying Blade 1) Remove the oil applying blade unit. 2) Remove the four screws [1], and detach the oil applying blade [2]. [1] [2] F02-610-21 c. Removing the Toner Scraping Blade 1) Remove the oil applying blade. 2) Remove the two cover switch actuator [1] into the applying stay [2]; then, hook it on the blade arm [3] to release the blade. [3] [1] [2] [1] [3] F02-610-22 COPYRIGHT © 2001 CANON INC. 2000 2000 2000 2000 CANON CLC5000 REV.0 JAN. 2001 2-145 CHAPTER 2 NEW FUNCTIONS 3) Pick the toner scraping blade [4] with small pliers, and lift it to the point indicated in the figure to detach it in the upward direction. [4] F02-610-23 [5] When mounting the toner scraping blade [4], be sure to mount the blade plate to the inside of the protrusion [5] of the bushing indicated in the figure. [4] F02-610-24 2-146 COPYRIGHT © 2001 CANON INC. 2000 2000 2000 2000 CANON CLC5000 REV.0 JAN. 2001 CHAPTER 2 NEW FUNCTIONS d. Removing the Oil Applying Roller 1) Remove the oil applying blade unit and the toner scraping blade. 2) Remove the two E-rings [1] (1 each at front and rear). 3) Remove the gear [2] and the two bushings [3] (1 each at front and rear). 4) Remove the oil applying roller [4]. [1] [4] [3] [3] [2] [1] F02-610-25 e. How to remove the oil heater 1) Open the front cover (left). 2) Pull out the fixing unit. 3) Remove the fixing knob. 4) Remove the fixing assembly front cover. 5) Open the upper fixing roller unit. 6) Remove the oil-applying blade unit. 7) Remove the toner-scraping blade. 8) Unscrew the two screws [1] each from the front and the rear and remove the two connectors [2]. [1] [1] F02-610-26 COPYRIGHT © 2001 CANON INC. 2000 2000 2000 2000 CANON CLC5000 REV.0 JAN. 2001 [1] 2-147 CHAPTER 2 NEW FUNCTIONS 9) Remove the oil-applying unit [3]. [2] [2] [3] F02-610-27 10) Unscrew the one screw [4] and remove the earth wire. [6] [5] [4] F02-610-28 When you unscrew the screw [4], be careful not to lose the toothed lock washer [6]. 2-148 COPYRIGHT © 2001 CANON INC. 2000 2000 2000 2000 CANON CLC5000 REV.0 JAN. 2001 CHAPTER 2 NEW FUNCTIONS 11) Remove the E-ring [7] at the rear and the bushing [8], and remove the oil heater [9]. [8] [7] [9] F02-610-29 COPYRIGHT © 2001 CANON INC. 2000 2000 2000 2000 CANON CLC5000 REV.0 JAN. 2001 2-149 CHAPTER 2 NEW FUNCTIONS 7 Externals and Controls 7.1 Outline of the Externals and Controls The major difference is the addition of various fans, fuse PCB, and download function. The rest are the same as the externals and controls of the CLC1000 Series machines. 7.2 Differences in the Externals and Controls Unit/location Fan Leakage breaker Holding tray heater Fixing oil heater Fuse PCB Download connector/ switch Differences from CLC1000 Series Addition of the following General exhaust fan (FM21, 22, 23) Laser scanner motor cooling fan (FM24) Pickup cooling fan (FM26, 32) Exhaust lower cooling fan (FM27) Reversing assembly exhaust fan (FM28, 29, 30, 33) Fixing heat exhaust fan (FM31) Delivery cooling fan (FM34) Pre-fixing exhaust fan (FM35, 36) Use of a leakage breaker Elimination of the holding tray heater Purpose Reference To review the flow of air to enable higher speed. 7.3 “Fans” To improve safety. To accommodate the use of a stackless duplex system. To ensure a specific Addition of a fixing oil heater amount of fixing oil. To improve the proAddition of a fuse PCB tection mechanism. Addition of a download function To accommodate Addition of a download connec- the use of a flash tor/switch memory for the DC controller PCB and the reader controller PCB. 7.4 “Power Supply” 7.4 “Power Supply” 7.4 “Power Supply” 7.4 “Power Supply” 7.5 “Downloading” T02-702-01 2-150 COPYRIGHT © 2001 CANON INC. 2000 2000 2000 2000 CANON CLC5000 REV.0 JAN. 2001 CHAPTER 2 NEW FUNCTIONS 7.3 Fans The machine is equipped with various fans for the discharge of ozone, suction of stray toner, and cooling of parts. 7.3.1 Arrangement of the Fans FM24 FM15 FM16 FM14 FM5 FM13 FM4 FM12 FM2 FM1 FM3 FM7 FM20 FM27 FM28 FM19 FM29 FM30 FM33 FM26 FM32 FM6 FM8 FM36 FM9 FM17 FM35 FM23 FM22 FM31 FM21 FM18 FM34 F02-703-01 COPYRIGHT © 2001 CANON INC. 2000 2000 2000 2000 CANON CLC5000 REV.0 JAN. 2001 2-151 CHAPTER 2 NEW FUNCTIONS 7.3.2 Types of Fans Nota- Name tion Function FM1 Delivery assembly exhaust fan 1 FM2 FM3 FM4 FM5 FM6 Delivery assembly exhaust fan 2 Delivery assembly exhaust fan 3 Laser cooling fan (front) Laser cooling fan (rear) Primary exhaust fan FM7 Pre-fixing feed fan FM8 Primary suction fan (left) Exhausts air around the delivery assembly Speed control 2-speed Filter Dust-proofing filter, ozone filter Cools the laser unit Fixed Dust-proofing filter Draws stray toner Fixed Draws paper to the feeding assembly Circulates air inside the machine Fixed Dust-proofing filter, ozone filter None Fixed Dust-proofing filter Fixed None Fixed Dust-proofing filter Fixed Dust-proofing filter, ozone filter Fixed Dust-proofing filter FM9 Primary suction fan (right) FM12 Reader assembly suction fan (front) Prevents overheating of the CCD and the copyboard glass caused by the scanning lamp FM13 Reader assembly suction fan (rear) Cools the digital unit FM14 Digital unit cooling fan 1 FM15 Digital unit cooling fan 2 FM16 Digital unit cooling fan 3 Exhausts air around the FM17 Power supply cooling fan 1 power unit FM18 Power supply cooling fan 2 FM19 Delivery lower cooling fan 1 Cools paper after fixing FM20 Delivery lower cooling fan 2 FM21 General exhaust fan 1 Exhausts air from around the printer FM22 General exhaust fan 2 FM23 General exhaust fan 3 FM24 Laser scanner motor cooling fan Cools the laser scanner motor Cools the pickup motor FM26 Pickup cooling fan 1 Cools paper after fixing FM27 Delivery lower cooling fan 3 FM28 Reversing assembly exhaust fan 1 Cools the reversing assemFM29 Reversing assembly exhaust fan 2 bly FM30 Reversing assembly exhaust fan 3 Exhaust heat form the fixFM31 Fixing heat discharge fan ing assembly Cools the pickup motor FM32 Pickup cooling fan 2 FM33 Reversing assembly exhaust fan 4 Cools paper after fixing Cools paper after fixing FM34 Delivery cooling fan Collects stray toner FM35 Pre-fixing exhaust fan 1 FM36 Pre-fixing exhaust fan 2 2-speed Dust-proofing filter, ozone filter Fixed Dust-proofing filter Fixed Fixed Fixed None Dust-proofing filter Ozone filter Fixed Fixed Fixed Fixed Fixed None Ozone filter None Ozone filter T02-703-01 2-152 COPYRIGHT © 2001 CANON INC. 2000 2000 2000 2000 CANON CLC5000 REV.0 JAN. 2001 CHAPTER 2 NEW FUNCTIONS 7.3.3 Sequence of Operations Power switch ON WMUP Delivery assembly exhaust fan (FM1/2/3) Half-speed Power switch OFF STBY INTR CNTR COPY LSTR STBY Full-speed 4 min Full-speed 4 min Full-speed 4 min Full-speed 4 min Full-speed 4 min Half-sped Laser cooling fan (FM4/FM5) Primary exhaust fan (FM6) Pre-fixing feeding fan (FM7) Primary suction fan (FM8/FM9) Reader assembly suction fan (FM12/FM13) Digital unit cooling fan (FM14/FM15/FM16) Power supply exhaust fan (FM17/FM18) General exhaust fan (FM19/FM20/FM27) Delivery lower cooling fan (FM21/FM22/FM23) Half-speed Half-sped Laser scanner motor cooling fan (FM24) Pickup cooling fan (FM26/FM32) Reversing assembly exhaust fan (FM28/FM29/FM30/FM33) Fixing heat discharge fan (FM31) Pre-fixing exhaust fan (FM35/FM36) F02-703-02 COPYRIGHT © 2001 CANON INC. 2000 2000 2000 2000 CANON CLC5000 REV.0 JAN. 2001 2-153 CHAPTER 2 NEW FUNCTIONS 7.4 Power Supply The machine’s DC power is supplied to its loads directly or by way of a respective controller PCB from three power supply PCBs: DC power supply PCB 1 (upper), DC power supply PCB 1 (lower), and DC power supply PCB 2. The DC power supply PCB 1 supplies DC voltage in sync with the power switch, while the DC power supply PCB 2 supplies DC voltage independently of the power switch. F02-704-01 shows how AC power is supplied to each power supply PCB, while F02-70402 shows the destinations of the voltage and the outputs of each power supply PCB. The machine is equipped with a power save switch (SW8) so that the cassette heater and the like may be supplied with power “at all times” or “only when the power switch is on.” The heaters that are subject the settings of the switch are shown in F02-704-01. The cassette heater may be operated in ways that are selected in service mode, and it is turned on according to the selected settings if the power save switch is on even when the power switch is off. When the machine’s power switch is turned off, the power to the loads other than the circuits around the CPU on the DC controller PCB or the reader controller PCB is cut off; to back up the data in RAMs on these PCBs, the machine is equipped with lithium batteries. Power switch (SW2) Power save switch (SW8) Cassette 1 heater Cassette 2 heater Paper deck heater ON ON OFF OF 1(ON) 0(OFF) 1(ON) 0(OFF) ON ON ON OFF C drum heater M drum heater Y drum heater K drum heater ON ON ON OFF T02-704-01 2-154 COPYRIGHT © 2001 CANON INC. 2000 2000 2000 2000 CANON CLC5000 REV.0 JAN. 2001 CHAPTER 2 NEW FUNCTIONS a. AC Power Supply to the Power Supply PCBs Leakage breaker CB1 Noise filter LF1 Fixing relay RL1 Lamp regulator Power switch SW2 Power save switch SW8 Upper fixing heater Lower fixing heater Fixing oil heater TP1 TP2 TP3 TP4 DC power supply PCB 1 (upper) TP5 DC power supply PCB 1 (lower) Scanning lamp LA1 DC power supply PCB 2 C drum heater M drum heater Fixing upper heater triac TR2 Fixing lower heater triac TR1 AC driver PCB Y drum heater Cassette 1 heater K drum heater Cassette 2 heater Fixing web drive motor M30 T1 AC25V Paper deck heater F02-704-01 COPYRIGHT © 2001 CANON INC. 2000 2000 2000 2000 CANON CLC5000 REV.0 JAN. 2001 2-155 CHAPTER 2 NEW FUNCTIONS b. DC Power Supply from the Power Supply PCBs DC power supply PCB 2 (all-night) +5V +24V +24V DC controller PCB +12V +40V Scanner motor drier PCB -12V Video controller PCB +15V Analog processor PCB Image position correction PCB (font) Image position correction PCB (rear) +24V Reader controller PCB AC driver PCB DC power supply PCB 1 (lower) +8V Fixing assembly knob switch Fixing relay Laser driver PCB (C, M) Laser driver PCB (Y, K) +35V Transfer belt relay connector Transfer unit relay connector Laser scanner motor +3.3V Image processor PCB ED board (accessory) IP memory PCB +5V IF mother PCB Editor Fixing motor Duplex feed motor Pick up motor driver PCB Multifeeder driver PCB Developing motor C/M/Y/k Front cover switch Drum motor Waste toner motor DC power supply PCB 1 (upper) +24V HV2 HV3B HV3A Pickup motor RDF relay connector F02-704-02 2-156 COPYRIGHT © 2001 CANON INC. 2000 2000 2000 2000 CANON CLC5000 REV.0 JAN. 2001 CHAPTER 2 NEW FUNCTIONS 7.5 Download The machine will provide the following functions when it is connected to a PC by a biCentronics interface. PCB DC controller PCB Reader controller PCB Element Flash memory Backup memory RAM Flash memory Backup Ram Download Yes Yes Yes Yes Upload No Yes No Yes T02-705-01 The machine is switched between copying mode and download/upload mode by the switch found behind its inside cover. DCON COPY LOAD Download switch (for DC controller PCB) RCON COPY LOAD Download switch (for reader controller PCB) F02-705-01 Switch position LOAD COPY Operation Downloading/uploading Copying Remarks Do not move for copying T02-705-02 COPYRIGHT © 2001 CANON INC. 2000 2000 2000 2000 CANON CLC5000 REV.0 JAN. 2001 2-157 CHAPTER 2 NEW FUNCTIONS 7.6 Disassembly/Assembly The machine has the mechanical features and operations as described herein, and may be disassembled or assembled as shown; be sure to observe the following whenever disassembling or assembling the machine: Disconnect the power plug for safety before the work. 1. 2. Unless otherwise noted, reverse the steps used to disassemble the machine for assembly. 3. Identify the screws by type (length, diameter) and location. 4. The screws used for the grounding wire, varistors, or the like are equipped with washers to ensure electrical continuity. Be sure to use these screws during assembly. 5. As a rule, do not operate the machine with any of its parts removed. Do not throw toner into fire to avoid explosion. 6. 2-158 COPYRIGHT © 2001 CANON INC. 2000 2000 2000 2000 CANON CLC5000 REV.0 JAN. 2001 CHAPTER 2 NEW FUNCTIONS 7.6.1 Fans and Filters a. Removing the Laser Scanner Motor Cooling Fan 1) Remove the rear cover (1). 2) Remove the filter [1]. [1] F02-706-01 3) Remove the two screws [2], and detach the filter mounting plate [3]. [2] [3] [2] F02-706-02 COPYRIGHT © 2001 CANON INC. 2000 2000 2000 2000 CANON CLC5000 REV.0 JAN. 2001 2-159 CHAPTER 2 NEW FUNCTIONS 4) Disconnect the connector [4], and remove the two screws [5]; then, detach the laser scanner motor cooling fan [6]. [5] [5] [6] [4] F02-706-03 b. Removing the Pick Up Cooling Fan 2 1) Remove the rear cover (2). 2) Remove the DC driver PCB. (See the instructions on how to remove the DC motor driver PCB.) 3) Remove the four screws [1], and detach the pick up cooling fan 2 [2]. [1] [1] [2] [1] F02-706-04 2-160 COPYRIGHT © 2001 CANON INC. 2000 2000 2000 2000 CANON CLC5000 REV.0 JAN. 2001 CHAPTER 2 NEW FUNCTIONS c. Removing the Pick Up Cooling Fan 1 1) Remove the rear cover (2). 2) Remove the multifeeder driver PCB. (See the instructions on how to remove the multifeeder driver PCB.) 3) Remove the four screws [1], and detach the pickup cooling fan 1 [2]. [1] [2] [1] [1] F02-706-05 d. Removing the Fixing Heat Discharge Fan 1) Remove the rear cover (1). 2) Remove the two screws [1], and detach the fan duct [2]. [1] [2] F02-706-06 COPYRIGHT © 2001 CANON INC. 2000 2000 2000 2000 CANON CLC5000 REV.0 JAN. 2001 2-161 CHAPTER 2 NEW FUNCTIONS 3) Remove the two screws [3], and disconnect the connector [4]; then, detach the fixing heat discharge fan [5]. [3] [5] [4] F02-706-07 e. Removing the Delivery Cooling Fan 1) Remove the left cover. 2) Remove the filter [1]. [1] F02-706-08 2-162 COPYRIGHT © 2001 CANON INC. 2000 2000 2000 2000 CANON CLC5000 REV.0 JAN. 2001 CHAPTER 2 NEW FUNCTIONS 3) Remove the two screws [2], and disconnect the connector [3]; then, detach the reversing assembly exhaust fan [4]. Memo The remaining three fans may be removed in the same way. f. Removing the Lower Delivery Cooling Fan 1) Remove the left cover. 2) Disconnect the connector [1], and remove the two screws [2]: then, detach the delivery lower cooling fan [3]. [4] [2] [3] [2] F02-706-09 [1] [3] [2] F02-706-10 Memo The remaining two fans may be removed in the same way. COPYRIGHT © 2001 CANON INC. 2000 2000 2000 2000 CANON CLC5000 REV.0 JAN. 2001 2-163 CHAPTER 2 NEW FUNCTIONS g. Removing the Delivery Cooling Fan 1) Remove the left cover. 2) Disconnect the connector [1], and remove the two screws [2]; then, detach the delivery cooling fan [3]. [2] [3] [2] [1] F02-706-11 h. Removing the Pre-Fixing Exhaust Fan 1) Open the front cover (left). 2) Remove the pre-fixing duct. (See the instructions on how to remove the prefixing filter.) 3) Remove the screw [1], and detach the front cover strap [2]; then, remove the screw [3], and detach the counter cover [4]. [2] [1] [4] [3] F02-706-12 2-164 COPYRIGHT © 2001 CANON INC. 2000 2000 2000 2000 CANON CLC5000 REV.0 JAN. 2001 CHAPTER 2 NEW FUNCTIONS 4) Remove the two screws [5], and disconnect the connector [7]; then, detach the fan mounting plate [7]. [5] [7] [6] F02-706-13 5) Remove the filter [8]. [8] F02-706-14 6) Remove the two screws [9], and disconnect the connector [10]; then, detach the pre-fixing exhaust fan [11]. [11] [10] [9] F02-706-15 COPYRIGHT © 2001 CANON INC. 2000 2000 2000 2000 CANON CLC5000 REV.0 JAN. 2001 2-165 CHAPTER 2 NEW FUNCTIONS i. Removing the General Exhaust Fan 1) Open the front cover (left). 2) Slide out the transfer unit. 3) Remove the four screws; then, detach the general exhaust fan cover [2] together with the download cover [3]. [1] [2] [1] [3] [1] F02-706-16 4) Remove the four screws [4], and disconnect the connector [5]; then, detach the general exhaust fan assembly [7]. [4] [5] [6] [4] [4] [4] F02-706-17 2-166 COPYRIGHT © 2001 CANON INC. 2000 2000 2000 2000 CANON CLC5000 REV.0 JAN. 2001 CHAPTER 2 NEW FUNCTIONS 5) Remove the dust-proofing filter [7] and the ozone filter [8]. [8] [7] F02-706-18 6) Disconnect the connector [9], and remove the four screws [10]; then, detach the general exhaust fan [11]. [9] [11] [10] F02-706-19 Note: The three fans may be removed in the same way. COPYRIGHT © 2001 CANON INC. 2000 2000 2000 2000 CANON CLC5000 REV.0 JAN. 2001 2-167 CHAPTER 2 NEW FUNCTIONS j. Removing the Pre-Fixing Filter 1) Open the front cover. 2) Remove the two screws [1], and pull put the pre-fixing duct [2]. [1] [2] F02-706-20 3) Remove the filter [3]. [3] F02-706-21 2-168 COPYRIGHT © 2001 CANON INC. 2000 2000 2000 2000 CANON CLC5000 REV.0 JAN. 2001 CHAPTER 2 NEW FUNCTIONS 7.6.2 Switches [1] [2] a. Removing the Rear Cover Switch 1) Remove the rear cover (2). 2) Remove the laser scanner motor cooling fan unit. 3) Remove the two screws [1], and detach the rear cover switch [2]. [1] F02-706-22 7.6.3 PCBs a. Removing the Multifeeder PCB 1) Remove the rear cover (2). 2) Remove the two screws [1], and disconnect the 10 connectors [2]; then, detach the multifeeder PCB [3]. [2] [2] [1] [1] [3] F02-706-23 COPYRIGHT © 2001 CANON INC. 2000 2000 2000 2000 CANON CLC5000 REV.0 JAN. 2001 2-169 CHAPTER 2 NEW FUNCTIONS b. Removing the DC Driver PCB 1) Removing the rear cover (2). 2) Remove three screws [1], and disconnect the five connectors [2]; then, detach the DC driver PCB unit [3]. [1] [1] [2] [1] [3] [2] F02-706-24 3) Remove the four screws [4], and detach the DC drive PCB [5]. [4] [5] [4] [4] [4] F02-706-25 2-170 COPYRIGHT © 2001 CANON INC. 2000 2000 2000 2000 CANON CLC5000 REV.0 JAN. 2001 CHAPTER 2 NEW FUNCTIONS c. Removing the Fuse PCB 1) Remove the rear cover (3) 2) Disconnect the connector from the PCB, and remove the four PCB retaining clips [1]; then, detach the fuse PCB [2]. [1] [2] [1] F02-706-26 d. Removing the Download PCB 1) Open the front cover (left). 2) Slide out the transfer unit. 3) Remove the four screws [1], and detach the general exhaust fan cover [2] together with the download cover [3]. [1] [2] [1] [1] [3] F02-706-27 COPYRIGHT © 2001 CANON INC. 2000 2000 2000 2000 CANON CLC5000 REV.0 JAN. 2001 2-171 CHAPTER 2 NEW FUNCTIONS 4) Disconnect the two connectors [4], and remove the four screws [5]; then, detach the download PCB [6]. [4] [5] [4] [6] [5] F02-706-28 e. Removing the DC Controller PCB 1) Remove the rear cover (1). 2) Remove the nine screws [1], and detach the shield plate [2]. [1] [2] [1] [1] [1] F02-706-29 2-172 COPYRIGHT © 2001 CANON INC. 2000 2000 2000 2000 CANON CLC5000 REV.0 JAN. 2001 CHAPTER 2 NEW FUNCTIONS 3) Disconnect all connectors and remove the six screws from the DC connectors PCB; then, detach the DC controller PCB [4]. [3] [4] [3] F02-706-30 COPYRIGHT © 2001 CANON INC. 2000 2000 2000 2000 CANON CLC5000 REV.0 JAN. 2001 2-173 CHAPTER 2 NEW FUNCTIONS f. Removing the AC Driver PCB 1) Remove the rear cover (3). 2) Disconnect the connectors from the PCB, and remove the four PCB retaining clips [1]; then, detach the AC driver PCB [2]. [1] [1] [2] [1] F02-706-31 g. Removing the Lamp Regulator 1) Remove the rear cover (1). 2) Disconnect the three connectors [1], and remove the three screws [2]; then, detach the lamp regulator [3]. [2] [3] [1] [2] [1] F02-706-32 2-174 COPYRIGHT © 2001 CANON INC. 2000 2000 2000 2000 CANON CLC5000 REV.0 JAN. 2001 CHAPTER 2 NEW FUNCTIONS h. Removing the Developing Bias High-Voltage Assembly (HVT3) 1) Remove the rear cover (2)/(3). [1] [2] 2) Disconnect the four connectors [1], and remove the four screws [2]; then, detach the power supply cooling fan unit [3]. [2] [2] [2] [3] F02-706-33 3) Disconnect the conductor [4] and remove the three screws [5] from the pickup drive PCB; then, detach the pickup driver unit [6]. [5] [4] [4] [6] [4] [5] [4] [5] [4] F02-706-34 COPYRIGHT © 2001 CANON INC. 2000 2000 2000 2000 CANON CLC5000 REV.0 JAN. 2001 2-175 CHAPTER 2 NEW FUNCTIONS 4) Remove the two screws [7], and disconnect the ten connectors [8]; then, detach the developing bias high-voltage assembly (HVT3) [9]. [7] [8] [8] [8] [8] F02-706-35 [9] [7] F02-706-36 2-176 COPYRIGHT © 2001 CANON INC. 2000 2000 2000 2000 CANON CLC5000 REV.0 JAN. 2001 CHAPTER 2 NEW FUNCTIONS i. Removing the Analog Processor PCB 1) Remove the fixing screw [1], and secure the digital unit [2] in the position indicated. [2] [1] [1] F02-706-37 F02-706-38 2) Remove the four screws [3], and detach the reader controller cover [4]. [3] [3] [4] [3] F02-706-39 COPYRIGHT © 2001 CANON INC. 2000 2000 2000 2000 CANON CLC5000 REV.0 JAN. 2001 2-177 CHAPTER 2 NEW FUNCTIONS 3) Remove the two screws [5], and detach the two harness retainers [6]; then, disconnect the connector [7]. [5] [6] [7] [6] F02-706-40 4) Loosen the screw [8], and shift the connector retainer [9]; then, disconnect the four connectors [10], and remove the two screws [11] to detach the analog processor PCB [12]. [8] [12] [9] [11] [10] [10] [11] [10] [10] F02-706-41 2-178 COPYRIGHT © 2001 CANON INC. 2000 2000 2000 2000 CANON CLC5000 REV.0 JAN. 2001 CHAPTER 2 NEW FUNCTIONS j. Removing the Video Controller PCB 1) Secure the digital unit [1] as indicated in the figure. (See the instructions on the preparatory work for the laser unit.) [1] F02-706-42 2) Remove the three screws [2], and detach the air duct plate [3]. [2] [2] [3] F02-706-43 3) Disconnect all connectors and remove the four mounting screws [4] from the video controller PCB; then, detach the video controller PCB [5]. [5] [4] F02-706-44 COPYRIGHT © 2001 CANON INC. 2000 2000 2000 2000 CANON CLC5000 REV.0 JAN. 2001 2-179 CHAPTER 2 NEW FUNCTIONS k. Removing the Image Position Correction CCD Unit 1) Remove the hopper assembly left cover. 2) Remove the separation charging assembly. 3) Remove the pre-fixing charging assembly. 4) Slide out the transfer unit. 5) Free the harness [2] from the wire saddle [1]. 6) Remove the screw [3], and detach the cable support plate [4]. [1] [2] [4] [2] [3] F02-706-45 7) Disconnect the two connectors [5] at the front. 8) Remove the unit fixing screw [6], and detach the image position correction CCD unit [7]. [7] [5] [6] [5] F02-706-46 2-180 COPYRIGHT © 2001 CANON INC. 2000 2000 2000 2000 CANON CLC5000 REV.0 JAN. 2001 CHAPTER 2 NEW FUNCTIONS 9) Remove the screw [8], and detach the cable fixing plate [9] at the rear. 10) Disconnect the two connectors [10] on the rear side. [10] [9] [8] F02-706-47 After mounting the image correction CCD unit, execute the following in service mode: FUCN>INSTALL (2nd sheet)>REG-PAPER (pattern read position auto adjustment); then, turn off and on the power to correct the image position. l. Removing the Transfer High-Voltage Transformer (HVT1) 1) Open the transfer unit. (See the instructions on how to open the transfer unit.) 2) Remove the screw [1], and detach the [1] insulating cover [2] for the transfer high-voltage transformer; then, removed [2] the two screws [3]. [3] F02-706-48 COPYRIGHT © 2001 CANON INC. 2000 2000 2000 2000 CANON CLC5000 REV.0 JAN. 2001 2-181 CHAPTER 2 NEW FUNCTIONS 3) Disconnect the five connectors from the transfer high-voltage transformer. [4] F02-706-49 4) Remove the two screws [5], and slide out the transfer high-voltage transformer [7] to the right. At this time, take care so that the transfer high-voltage transformer will not come into contact with the transfer belt. [5] [6] F02-706-50 5) Remove the screw [7] and the grounding wire [8]; then, disconnect the two connectors [9], and detach the transfer high-voltage transformer [6]. [6] [9] [7] [8] F02-706-51 2-182 COPYRIGHT © 2001 CANON INC. 2000 2000 2000 2000 CANON CLC5000 REV.0 JAN. 2001 CHAPTER 2 NEW FUNCTIONS m. Removing the Flicker Controller PCB 1) Remove the rear cover (3). 2) Disconnect the three connectors [1], and remove the four PCB retaining clips [2]; then, detach the flicker controller PCB [3]. [2] [1] [1] [3] [2] F02-706-52 COPYRIGHT © 2001 CANON INC. 2000 2000 2000 2000 CANON CLC5000 REV.0 JAN. 2001 2-183 CHAPTER 2 NEW FUNCTIONS 7.6.4 Drive System a. Removing the Registration Drive Assembly 1) Remove the rear cover (2). 2) Remove the manual feed unit. 3) Remove the DC motor driver PCB. 4) Disconnect the three connectors [1]. [1] F02-706-53 5) Remove the two screws [2], and detach the harness retainer [3]. [2] [3] F02-706-54 2-184 COPYRIGHT © 2001 CANON INC. 2000 2000 2000 2000 CANON CLC5000 REV.0 JAN. 2001 CHAPTER 2 NEW FUNCTIONS 6) Remove the seven screws [4], and detach the registration drive assembly [5]. [4] [5] [4] [4] F02-706-55 b. Removing the Deck Pickup Motor 1) Remove the rear cover (2). 2) Remove the right rear cover. 3) Remove the DC motor driver PCB. 4) Remove the two screws [1], and disconnect the connector [2]; then, detach the deck pickup motor [3]. [2] [1] [3] [1] F02-706-56 COPYRIGHT © 2001 CANON INC. 2000 2000 2000 2000 CANON CLC5000 REV.0 JAN. 2001 2-185 CHAPTER 2 NEW FUNCTIONS c. Removing the Registration Motor 1) Remove the rear cover (2). 2) Remove the right rear cover. 3) Remove the DC driver PCB. 4) Remove the two screws [1], and disconnect the connector [2]; then, detach the registration motor [3]. [2] [3] [1] [1] F02-706-57 d. Removing the Multifeeder Pickup Motor 1) Remove the rear cover (2). 2) Remove the manual feed unit. 3) Remove the registration drive assembly. 4) Remove the four screws [1], and detach the multifeeder pickup motor [2]. [2] [1] F02-706-58 2-186 COPYRIGHT © 2001 CANON INC. 2000 2000 2000 2000 CANON CLC5000 REV.0 JAN. 2001 CHAPTER 2 NEW FUNCTIONS e. Removing the Cassette Pickup Motor 1) Remove the rear cover (2). 2) Remove the pickup driver PCB. 3) Remove the two screws [1], and detach the cassette pickup motor [2]. [1] [2] [1] F02-706-59 Memo Both cassette 1/2 pickup motor may be removed in the same way. f. Removing the Transfer Lifter Clutch 1) Remove the rear over (2). 2) Remove the manual feed unit. 3) Remove the registration drive assembly. 4) Remove the five E-rings [1], four gears [2], and two parallel pins [3]. [1] [2] [1] [2] [1] [3] [3] [2] [1] [2] [1] F02-706-60 COPYRIGHT © 2001 CANON INC. 2000 2000 2000 2000 CANON CLC5000 REV.0 JAN. 2001 2-187 CHAPTER 2 NEW FUNCTIONS 5) Remove the tension spring [4] and two screws [5]; then, detach the shaft retaining plate [6]. [6] [4] [5] F02-706-61 6) Remove the three screws [7], and detach the gear retaining plate [8]; then, detach the gear [9]. [7] [8] [9] [7] F02-706-62 2-188 COPYRIGHT © 2001 CANON INC. 2000 2000 2000 2000 CANON CLC5000 REV.0 JAN. 2001 CHAPTER 2 NEW FUNCTIONS 7) Remove the E-ring [10]; then, remove the gear [11] and the parallel pin [12]. [10] [11] [12] F028-706-63 8) Remove the eight screws [13], and detach the registration drive support plate (upper) [14]. [14] [13] [13] F02-706-64 COPYRIGHT © 2001 CANON INC. 2000 2000 2000 2000 CANON CLC5000 REV.0 JAN. 2001 2-189 CHAPTER 2 NEW FUNCTIONS 9) Remove the clutch unit; then, remove the E-ring [15] and the set screw [16], and detach the clutch [17]. [16] [15] [17] F02-706-65 If you have removed the gears from around the transfer lifter clutch, take care not to confuse the gear mounting shafts (A, B). [A] [B] F02-706-66 2-190 COPYRIGHT © 2001 CANON INC. 2000 2000 2000 2000 CANON CLC5000 REV.0 JAN. 2001 CHAPTER 2 NEW FUNCTIONS g. Removing the Power Cord Base 1) Remove the rear cover (2). 2) Remove the pickup driver unit. 3) Remove the right rear cover. 4) Remove the screws [1], and detach the deck connector base [2]. [2] [1] [1] F02-706-67 5) Disconnect the six connectors [3]. [3] [3] [3] [3] [3] F02-706-68 COPYRIGHT © 2001 CANON INC. 2000 2000 2000 2000 CANON CLC5000 REV.0 JAN. 2001 2-191 CHAPTER 2 NEW FUNCTIONS 6) Remove the three screws [4], and detach the power cord base [5]. [4] [5] [4] F02-706-69 h. Removing the Noise Filter 1) Remove the rear cover (2). 2) Remove the right rear cover. 3) Remove the deck connector base. (See the instructions on how to remove the power cord base.) 4) Disconnect the two connectors [1] from the power cord base, and remove the two screws; then, detach the noise filter. [3] [2] [2] [1] F02-706-70 2-192 COPYRIGHT © 2001 CANON INC. 2000 2000 2000 2000 CANON CLC5000 REV.0 JAN. 2001 CHAPTER 2 NEW FUNCTIONS i. Removing the Fixing Relay 1) Remove the power cord base. (See the instructions on how to remove the power cord base.) 2) Remove the two screws [1], and detach the cover (1) [2]. [2] [1] F02-706-71 3) Using the tip of a flat-blade screwdriver, free the hook to detach the fixing relay [3]. [3] F02-706-72 COPYRIGHT © 2001 CANON INC. 2000 2000 2000 2000 CANON CLC5000 REV.0 JAN. 2001 2-193 CHAPTER 2 NEW FUNCTIONS j. Removing the Leakage Breaker 1) Remove the power cord base. 2) Remove the three screws [1], and detach the cover (2) [2]. [2] [1] F02-706-73 3) Remove the screw [3], and detach the terminal base [4]. [3] [4] F02-706-74 2-194 COPYRIGHT © 2001 CANON INC. 2000 2000 2000 2000 CANON CLC5000 REV.0 JAN. 2001 CHAPTER 2 NEW FUNCTIONS 4) Remove the two screws, and detach the breaker base [7]. [5] [5] [6] F02-706-75 5) Remove the four terminals [7], and removed the two screws [8]; then, detach the leakage breaker [9]. [7] [9] [8] [7] F02-706-76 When mounting the leakage breaker, take care not to confuse its top/bottom orientation. Fit the hook on the breaker mounting base in the hole of the breaker. COPYRIGHT © 2001 CANON INC. 2000 2000 2000 2000 CANON CLC5000 REV.0 JAN. 2001 2-195 CHAPTER 2 NEW FUNCTIONS k. Removing the Hater Triac (upper, lower) 1) Remove the rear cover (3). 2) Remove the two screws [1], and detach the heat triac (upper) [2]. [2] [1] [3] Note: The heater triac (lower) [3] may be removed in the same way. [1] F02-706-77 2-196 COPYRIGHT © 2001 CANON INC. 2000 2000 2000 2000 CANON CLC5000 REV.0 JAN. 2001 CHAPTER 2 NEW FUNCTIONS 8 Paper Deck-J1/K1 8.1 Outline The Paper Deck-J1 differs from the Paper Deck-H1 for the following two points: • Elimination of the pickup cutch (CL8001) The rest are the same as those of the Paper Deck-H1. In addition to the above, the Paper Deck-K1 is different from the paper deck designed for the CLC1000 for the following: • Addition of a deck sensor (PS8003) The following paper sizes may be used for the Paper Deck-J1/K1: Supported paper sizes (81.4 g/m2) Paper Deck-J1 (2000 sheets) Paper Deck-K1 (4000 sheets) A3 extra-length (305x457 mm), A3, A4, B5, LTR A4, B4, B5, LTR, 11x17 (279x432 mm) T02-801-01 REF. If you are installing a CLC1000 Paper Deck/Paper Deck-H1 to a CLC5000 Series machine, be sure to use the upgrade kit. 8.2 Differences in the Paper Deck-J1/K1 Unit/Location Differences from Paper Deck-H1 (CLC1000 paper deck) Remarks Deck pickup assembly Elimination of the pickup clutch (CL8001) Addition of a deck sensor (PS8003) : Paper deck-k1 only To obtain drive from the deck motor (M36) of the host T02-802-01 COPYRIGHT © 2001 CANON INC. 2000 2000 2000 2000 CANON CLC5000 REV.0 JAN. 2001 2-197 CHAPTER 2 NEW FUNCTIONS 8.3 Outline of Operations 8.3.1 Outline A paper deck enables accommodation of a large volume of paper (as many as 2,000 sheets in the Paper Deck-J1; 4,000 sheets in the Paper Deck-K1), and serves to feed sheets to its host copier in response to control signals from the DC controller PCB. Registration roller Photosensitive drum (M) Photosensitive drum (C) Transfer belt Holding tray Paper deck Cassette 1 Cassette 2 F02-803-01 2-198 COPYRIGHT © 2001 CANON INC. 2000 2000 2000 2000 CANON CLC5000 REV.0 JAN. 2001 CHAPTER 2 NEW FUNCTIONS 8.3.2 Pickup Operations The paper placed inside the paper deck is held up by a lifter driven by the paper deck motor (M8001), and is kept at a specific position. The control signal from the DC controller PCB of the host copier turns on the deck motor (M36) and the deck pickup clutch (CL8002); then, the paper deck pickup roller releasing solenoid (SL8001) turns on so that the pickup roller leaves the surface of the paper. The pickup/feed roller serves to make sure only one sheet of paper is picked up at a time. The sheet is moved past the deck sensor, in response to which the deck motor turns off; after being adjusted for appropriate timing, the sheet is then moved forward to the registration roller, which controls the sheet so that its leading edge will match the image on the photosensitive drum. DC controller PCB CL8002 Deck motor Pickup roller releasing solenoid drive signal Paper deck pickup clutch Pickup/feed roller SL8001 Deck pickup motor drive pulse (M36D) M36 J2223A -4 Paper deck motor drive signal J2223A -6 J2223A -13 Pickup/feeding roller drive signal J2213A -9 Paper deck pickup roller releasing solenoid Paper deck pickup roller Deck sensor lever Paper deck Paper deck feed roller Paper deck separation roller M8001 Paper deck motor F02-803-02 COPYRIGHT © 2001 CANON INC. 2000 2000 2000 2000 CANON CLC5000 REV.0 JAN. 2001 2-199 CHAPTER 2 NEW FUNCTIONS 8.3.3 Sequence of Operations (pickup from paper deck) • Paper deck, A4/LTR, 2 Copies, 4-Color, Direct Start Key ON Deck pickup start Stop at deck pre-registration point CNTR Start at deck pre-registration point COPY Photosensitive drum motor (M21) Deck pickup motor (M36) Paper deck pickup/ feed clutch (CL8002) Paper deck pickup roller releasing solenoid (SL8001) Deck sensor (PS8003) Registration paper sensor (PS1) Registration roller motor (M35) 2nd sheet start at pre-registration point 2nd sheet stop at pre-registration point 2nd sheet pickup start F02-803-03 2-200 COPYRIGHT © 2001 CANON INC. 2000 2000 2000 2000 CANON CLC5000 REV.0 JAN. 2001 CHAPTER 2 NEW FUNCTIONS 8.4 Disassembly/Assembly The machine has the mechanical features and operations as described herein, and may be disassembled or assembled as shown; be sure to observe the following whenever disassembling or assembling the machine: Disconnect the power plug for safety before the work. 1. 2. Unless otherwise noted, reverse the steps used to disassemble the machine for assembly. 3. Identify the screws by type (length, diameter) and location. 4. The screws used for the grounding wire, varistors, or the like are equipped with washers to ensure electrical continuity. Be sure to use these screws during assembly. 5. As a rule, do not operate the machine with any of its parts removed. Do not throw toner into fire to avoid explosion. 6. COPYRIGHT © 2001 CANON INC. 2000 2000 2000 2000 CANON CLC5000 REV.0 JAN. 2001 2-201 CHAPTER 2 NEW FUNCTIONS 8.4.1 Removing the Pickup Roller 1) Open the paper deck cover. 2) Remove the four screws [1], and disconnect the connector [2]; then, detach the paper deck heater [3]. [3] [2] [1] F02-804-01 3) Remove the resin clamp [4] at the front and the rear; then, detach the pickup roller [5]. [4] [5] [5] [4] F02-804-02 Take care not to drop the parallel pin from within the pickup roller shaft. 2-202 COPYRIGHT © 2001 CANON INC. 2000 2000 2000 2000 CANON CLC5000 REV.0 JAN. 2001 CHAPTER 2 NEW FUNCTIONS 8.4.2 Removing the Pickup/Feed roller 1) Remove the paper deck heater. (See F02-804-01.) 2) Remove the pickup roller at the front. (See F02-804-02.) 3) Pull off the bush lock used to secure the side guide plate (left, right) so as to free the side guide plate. 4) Insert a screwdriver into the hole for the bush lock that has been removed in step 3); then, remove the mounting screw [1], and detach the roller stopper plate [2]. F02-804-03 [2] [1] F02-804-04 COPYRIGHT © 2001 CANON INC. 2000 2000 2000 2000 CANON CLC5000 REV.0 JAN. 2001 2-203 CHAPTER 2 NEW FUNCTIONS 5) Remove the resinic E-ring [3] and bearing [4]; then, pull out the pickup roller shaft [5] to the rear. [3] [4] [5] F02-804-05 [7] 6) Remove the mounting screw [6], and detach the separation roller assembly cover [7]. [6] F02-804-06 7) Remove the resinic E-ring [8]; then, while pushing down the separation roller assembly [9], detach the timing belt [10], and detach the pickup/feed roller assembly [11]. [8] [11] [9] [10] F02-804-07 2-204 COPYRIGHT © 2001 CANON INC. 2000 2000 2000 2000 CANON CLC5000 REV.0 JAN. 2001 CHAPTER 2 NEW FUNCTIONS 8.4.3 Removing the Separation Roller [2] 1) Open the paper deck cover; then, remove the mounting screw [1], and detach the separation roller assembly cover [2]. [1] F02-804-08 2) Remove the mounting screw [3]; then, while pushing down the separation roller pressure member [4], detach the separation roller assembly [5] together with its support plate. [5] [3] [4] F02-804-09 3) Remove the resinic E-ring [6] and the bearing [8] at the front of the separation roller assembly; then, pull out the separation roller shaft [8], and detach the separation roller [9]. [9] [8] [6] [7] F02-804-10 COPYRIGHT © 2001 CANON INC. 2000 2000 2000 2000 CANON CLC5000 REV.0 JAN. 2001 2-205 CHAPTER 2 NEW FUNCTIONS 8.4.4 Removing the deck sensor 1) Detach the paper deck from the main body of copier with the connecting rail attached to the main body. 2) Remove the screw [1] (1 location), then remove the deck sensor mounting plate [2]. [1] [2] F04-804-11 3) Remove the connector [3] (1 location), then remove the deck sensor [4]. [4] [3] F04-804-12 2-206 COPYRIGHT © 2001 CANON INC. 2000 2000 2000 2000 CANON CLC5000 REV.0 JAN. 2001 CHAPTER 2 NEW FUNCTIONS 9 Buffer Pass Unit-B1 9.1 Outline The buffer pass unit has the following two functions: • Removes curl from paper delivered by the copier • Turns over paper delivered by the copier REF. Paper tends to curl when the toner on it is heated in the fixing assembly and then cooled. Curl on paper adversely affects its movement and alignment inside the sorter. The buffer pass unit is situated between the copier and the sorter to remove curl from paper delivered by the copier before forwarding it to the sorter. Sorter Buffer pass unit Copier Curl removing mechanism Reversing mechanism F02-901-01 COPYRIGHT © 2001 CANON INC. 2000 2000 2000 2000 CANON CLC5000 REV.0 JAN. 2001 2-207 CHAPTER 2 NEW FUNCTIONS 9.1.1 Outline of the Electrical Circuitry The electric mechanisms of the machine are controlled by its host copier (i.e., the machine is not equipped with controller PCB of its own). The signals from the copier are received by the buffer pass unit drive PCB to drive the motors, solenoids, and clutches. Sensor Solenoid • Reversal timing sensor • Reversal jam sensor • Delivery sensor • Upward curl phase sensor 1 • Upward curl phase sensor 2 • Downward curl phase sensor 1 • Downward curl phase sensor 2 • Inlet paper sensor • Flapper solenoid • Downward curl removing solenoid 1 • Downward curl removing solenoid 2 • Upward curl removing solenoid 1 • Upward curl removing solenoid 2 J201 Sorter Control signal Buffer pass driver PCB Copier J203 J202 • Buffer output motor • Reversal motor • Buffer input motor • • • • Serial signal Cooling fan 1 Cooling fan 2 Cooling fan 3 Cooling fan 4 Fan motor Motor F02-901-02 2-208 COPYRIGHT © 2001 CANON INC. 2000 2000 2000 2000 CANON CLC5000 REV.0 JAN. 2001 CHAPTER 2 NEW FUNCTIONS 9.1.2 Inputs to and Outputs from the Buffer Pass Driver PCB Buffer pass unit driver PCB J3A Reversal timing sensor Reversal jam sensor PS1 J205A-5 -4 -3 PS2 J205A-8 -7 -6 J5A J1A Outlet paper sensor PS3 J3A J204A-3 -2 -1 Upper phase sensor (1) PS4 J205B-5 -4 -3 Upper phase sensor (2) PS5 J205B-8 -7 -6 PS6 J205B-11 -10 -9 PS7 J205B-14 -13 -12 PS8 J205A-11 -10 -9 Lower phase sensor (1) Lower phase sensor (2) Inlet paper sensor Buffer inlet motor Reversal motor Buffer output motor M1 M2 M3 J101-2 -1 -3 -5 -4 -6 J102-2 -1 -3 -5 -4 -6 J103-2 -1 -3 -5 -4 -6 +5V REV TIM +5V REVJAM +5V EXITPA +5V UCUPH1 +5V UCUPH2 +5V LCUPH1 +5V LCUPH2 +5V ENTSEN When the light-blocking plate is at PS1, ‘1’. When the light-blocking plate is at PS2, ‘1’. When PS3 detects the light-blocking plate, ‘1’. When PS4 detects the light-blocking plate, ‘1’. When PS5 detects the light-blocking plate, ‘1’. When PS6 detects the light-blocking plate, ‘1’. When PS7 detects the light-blocking plate, ‘1’. When PS8 detects the light-blocking plate, ‘1’. +24V A A* +24V B B* +24V A A* +24V Alternates between ‘0’ and ‘1’ during operation. B B* +24V A A* +24V B B* Note: The asterisk (*) indicates negative logic. F02-901-03 COPYRIGHT © 2001 CANON INC. 2000 2000 2000 2000 CANON CLC5000 REV.0 JAN. 2001 2-209 CHAPTER 2 NEW FUNCTIONS J1 Flapper solenoid Downward curl removing solenoid 1 Downward curl removing solenoid 2 Upward curl removing solenoid 1 Upward curl removing solenoid 2 Cover switch SL1 J204A-5 -4 SL3 J204A-7 -4 SL4 J204A-9 -8 SL5 J204A-11 -10 SL6 J204A-13 -12 SW1 FT5 FT6 FT2 FT3 FT4 FT1 J532 J302-1 -2 -3 -4 J205B-2 -1 +24V FLPSL1 +24V LDCRSL1 +24V LDCRSL2 +24V UDCRSL1 +24V UDCRSL2 +24V +24V +24V +24V SW Buffer pass unit driver PCB When ‘0’, the flapper solenoid turns on. When ‘0’, the downward curl removing roller solenoid 1 turns on. When ‘0’, the downward curl removing roller solenoid 2 turns on. When ‘0’, the upward curl removing roller solenoid 1 turns on. When ‘0’, the upward curl removing roller solenoid 2 turns on. When the front cover is closed, ‘0’. J530 J509 Cooling fan 1 FM1 J510 J2 J204B-1 -3 -2 FM2 J204B-4 -6 -5 Cooling fan 3 FM3 J204B-7 -9 -8 Cooling fan 4 FM4 J204B-10 -12 -11 Cooling fan 2 +24V FAN1LOCK +24V FAN2LOCK When ‘1’, the cooling fan 1 does not rotate. When ‘1’, the cooling fan 2 does not rotate. +24V FAN3LOCK +24V FAN4LOCK When ‘1’, the cooling fan 3 does not rotate. When ‘1’, the cooling fan 4 does not rotate. To sorter To copier Note: The asterisk (*) indicates negative logic. F02-901-04 2-210 COPYRIGHT © 2001 CANON INC. 2000 2000 2000 2000 CANON CLC5000 REV.0 JAN. 2001 CHAPTER 2 NEW FUNCTIONS 9.2 Differences in the Buffer Path Unit Unit/Location Differences from CLC Buffer Pass-1 Remarks Vertical path guide (left/right) New addition To turn over the paper delivered by its host Reversal motor (M2) New addition To turn over the paper delivered by its host Cooling fan (FM1 through 4) New addition To cool the power supply, motor, and paper path. Curl removing unit Addition of a curl removnig roller, pressure roller To remove curl from the paper feed from the vertical path guide at time of reversal To switch the flapper to move paper to the vertical path guide at time of reversal To increase the power of the drive Addition of a flapper solenoid Addition of a buffer pass motor (M3) T02-902-01 COPYRIGHT © 2001 CANON INC. 2000 2000 2000 2000 CANON CLC5000 REV.0 JAN. 2001 2-211 CHAPTER 2 NEW FUNCTIONS 9.3 Feeding Operations 9.3.1 Outline The feeding operations consist of the following two: • Sending the paper coming from the copier to the sorter • Turning over the paper coming from the copier and then sending it to the sorter The feeder roller and the sponge roller are driven by the buffer pass motor (M1, M3). The sponge roller and the pressure roller pick paper and then flattens it out to remove curl. (The feeding speed is controlled by the buffer pass motor.) Paper inside the buffer pass unit is detected as follows: • If the paper is not to be turned over, the inlet paper sensor (PS8) is used to detect paper. • If the paper is to be turned over, reversal timing sensor (PS1) and the reversal jam sensor (PS2) are used to detect paper. When reversal does not take place, the flapper is always positioned for straight pickup. The sequence and outlines of oparation at time of reversal pickup and straight pickup are shown in following page. 1. When Not Turning Over the Paper Upward curl removing solenoid 1 drive signal SL5 Upward curl removing solenoid 2 drive signal SL6 M1 M3 Spring clutch Buffer pass motor drive signal Upward curl phase detection signal 1 PS4 Buffer pass driver PCB Upward curl phase detection signal 2 PS5 Upward curl removing roller Pressure roller Paper detection signal PS8 Feeding roller Pressure roller Downward curl removing roller Flapper F02-903-01 2-212 COPYRIGHT © 2001 CANON INC. 2000 2000 2000 2000 CANON CLC5000 REV.0 JAN. 2001 CHAPTER 2 NEW FUNCTIONS Power switch ON 110˚C Start 1st sheet 2nd sheet 1181ms Copier main motor Buffer input motor (M1) Reversal motor (M2) Buffer output motor (M3) Flapper solenoid (SL1) Downward curl removing solenoid 1 (SL3) Downward curl removing solenoid 2 (SL4) Upward curl removing solenoid 1 (SL5) Upward curl removing solenoid 2 (SL6) 100ms Copier delivery sensor Inlet paper sensor (PS8) Outlet paper sensor (PS3) Reversal timing sensor (PS1) Reversal jam sensor (PS2) Cooling fan 1 (FM1) Cooling fan 2 (FM2) Cooling fan 3 (FM3) Cooling fan 4 (FM4) Lower feed roller Downward curl reniving roller Upper feed roller Upward curl removing roller F02-903-02 COPYRIGHT © 2001 CANON INC. 2000 2000 2000 2000 CANON CLC5000 REV.0 JAN. 2001 2-213 CHAPTER 2 NEW FUNCTIONS 2. When Turning Over the Paper Buffer pass motor drive signal Upward curl removing roller M1 M3 Pressure roller Flapper solenoid drive signal SL1 Flapper Pressure roller Downward curl removing roller PS6 PS1 Reversal timing detection signal Downward curl detection signal 1 Buffer pass driver PCB Downward curl detection signal 2 PS7 Downward curl removing solenoid 1 drive signal SL3 Spring clutch Downward curl removing solenoid 2 drive signal SL4 PS2 Reversal jam detection signal Buffer reversal motor drive signal M2 F02-903-03 2-214 COPYRIGHT © 2001 CANON INC. 2000 2000 2000 2000 CANON CLC5000 REV.0 JAN. 2001 CHAPTER 2 NEW FUNCTIONS Power switch ON 110˚C Start 1st sheet 2nd sheet 1181ms Copier main motor Buffer input motor (M1) Reversal motor (M2) Buffer output motor (M3) Flapper solenoid (SL1) Downward curl removing solenoid 1 (SL3) Downward curl removing solenoid 2 (SL4) Upward curl removing solenoid 1 (SL5) Upward curl removing solenoid 2 (SL6) Doublespeed CW CCW CW CCW Doublespeed Copier delivery sensor Inlet paper sensor (PS8) Outlet paper sensor (PS3) Reversal timing sensor (PS1) Reversal jam sensor (PS2) Cooling fan 1 (FM1) Cooling fan 2 (FM2) Cooling fan 3 (FM3) Cooling fan 4 (FM4) Lower feed roller Downward curl reniving roller Upper feed roller Upward curl removing roller F02-903-04 COPYRIGHT © 2001 CANON INC. 2000 2000 2000 2000 CANON CLC5000 REV.0 JAN. 2001 2-215 CHAPTER 2 NEW FUNCTIONS 9.3.2 Controlling the Feeding Speed a. Outline The feeding speed is changed to suit the type of copy paper and whether the reversal unit is used or not; When the reversal unit is used, the feeding speed is doubled in consideration of the time between a press on the start key and delivery of the copy. The feeding speed is controlled as followes for each combination: Feeding Speed by Reversal Upper/Lower Moter Mode Speed (mm/sec) 204 408 138 276 90 180 67.5 Paper type Mode Cam switch Reversal Plain paper Plain paper Thick paper (157 g/m2) Thick paper (157 g/m2) Thick paper (253 g/m2), special paper Thick paper (253 g/m2), special paper Transparency Normal speed Double speed Normal speed Double speed Normal speed Yes Yes No No No No Yes No Yes No Double speed No Normal speed No Yes (w/ condition) No T02-903-01 2-216 COPYRIGHT © 2001 CANON INC. 2000 2000 2000 2000 CANON CLC5000 REV.0 JAN. 2001 CHAPTER 2 NEW FUNCTIONS 9.3.3 Controlling the Buffer Pass Motor a. Outline The buffer pass motor (M1, M3) is a 4-phase stepping motor. It is turned on/off or its speed of rotation is changed by controlling the rest signal (RESETB) and the output timing of the pulse signals A, A* , B, and B* b. Operations The following five types of signals are sent by the host copier to the buffer pass driver PCB to control the buffer pass motor (M1, M3): • Reset signal (RESETB) • Mode check signal (MODECH1, 2) • Motor rotation speed signal (CLK) • Vertical path switching signal (VLCNG) • Motor rotation enable signal (ENB) In response to these five types of signals, the motor clock generation circuit determines the speed of rotation, and sends control signals to the motor driver PCB. In turn, the motor drive PCB then drives the buffer pass motor according to the control signal it receives. COPYRIGHT © 2001 CANON INC. 2000 2000 2000 2000 CANON CLC5000 REV.0 JAN. 2001 2-217 CHAPTER 2 NEW FUNCTIONS +24V BFROUTMTRA RESETB Buffer pass inlet motor M1 BFROUTMTRA* MODECH1 Copier CLK IC102 VLCNG BFROUTMTRB ENB BFROUTMTRB* Buffer pass driver PCB +24V BFRINMTRA RESETB Buffer pass output motor M3 BFRINMTRA* MODECH2 CLK Copier IC104 VLCNG BFRINMTRB ENB BFRINMTRB* F02-903-05 2-218 COPYRIGHT © 2001 CANON INC. 2000 2000 2000 2000 CANON CLC5000 REV.0 JAN. 2001 CHAPTER 2 NEW FUNCTIONS 9.4 Removing Curling 9.4.1 Outline The curl removing roller and the pressure roller picks paper, and bend it in the direction opposite the direction in which the paper has curled. Bending may be in any of three degrees, and changed by rotating the pressure cam by the drive of the buffer pass motor. To detect the position of the pressure cam, the upward curl phase sensor 1 (PS4) and the upward curl phase sensor 2 (PS5) are used in normal feeding, while the downward curl phase sensor 1 (PS6) and the downward curl phase sensor 2 (PS7) are used in reversal feeding. Upper phase sensor 2 (PS5) Upward curl removing solenoid 2 (SL6) Pressure roller base Curl removing roller Upper phase sensor 1 (PS4) Pressure roller Buffer pass motor Buffer pass motor drive signal M1 M3 Upward curl removing solenoid 1 Curl removing solenoid drive signal 1 (UDCRSL1*) Phase sensor signal 1 (UCUPH1) Paper Phase sensor signal 2 (UCUPH2) Curl removing solenoid drive signal 2 (UDCRSL2*) Spring clutch Buffer pass unit driver PCB Copier F02-904-01 COPYRIGHT © 2001 CANON INC. 2000 2000 2000 2000 CANON CLC5000 REV.0 JAN. 2001 2-219 CHAPTER 2 NEW FUNCTIONS Buffer pass unit driver PCB Downward curl removing solenoid 2 (SL4) Curl removing roller Pressure roller Pressure roller base Buffer pass motor drive signal Phase sensor signal 1 (LCUPH1) Curl removing solenoid drive signal 1 (LDCRSL1*) Phase sensor signal 2 (LCUPH2) Curl removing solenid drive signal 2 (LDCRSL2*) Copier Paper Buffer pass motor M1 Spring clutch Downward curl removing solenoid 1 (SL3) Lower phase sensor 2 (PS7) M3 Lower phase sensor 1 (PS6) F02-904-02 2-220 COPYRIGHT © 2001 CANON INC. 2000 2000 2000 2000 CANON CLC5000 REV.0 JAN. 2001 CHAPTER 2 NEW FUNCTIONS 9.4.2 Operations When the buffer pass motor (M1, M3) rotates, its drive is transmitted to the pressure cam through the spring clutch. When the pressure cam starts to rotate in response, the pressure plate moves up and down to change the degree of pressure of the curl removing roller. Buffer pass motor M3 M1 SL3 Spring clutch SL4 Downward curl removing solenoid 2 Downward curl removing solenoid 1 Pressure plate Pressure plate Curl removing roller F02-904-03 The pressure cam may be positioned in either of four locations. determined by the spring clutch operated by two solenoids (SL3, SL4; for reversal, SL5, SL6). The position is switched to suit the condition of the paper delivered by the copier, determined in relation to the following two factors: • Paper type • Image ratio COPYRIGHT © 2001 CANON INC. 2000 2000 2000 2000 CANON CLC5000 REV.0 JAN. 2001 2-221 CHAPTER 2 NEW FUNCTIONS b. Spatial Relationship Between Curl removing Roller and the Pressure Roller in Relation to the Position of the Pressure cam Spatial relationPressure ship between curl Drive of pressure cam stop removing roller cam switching solenoid position and pressure roller (SL5, SL6) Spring 0˚ SL2 clutch Curl (home removing position) roller State of pressure cam home position sensor (PS4, PS5) PS2 PS1 0mm SL1 Pressure roller 90˚ SL6: ON SL2 Curl removing roller 0.7mm SL5: OFF Spring clutch PS5: OFF PS4: OFF PS2 PS1 SL1 Pressure roller 180˚ Curl removing roller 1.2mm Pressure roller 270˚ Curl removing roller 0.7mm SL6: OFF SL2 SL5: ON Spring clutch PS5: OFF PS4: ON PS2 PS1 SL1 SL6: ON SL2 SL5: ON Spring clutch PS5: ON PS4: ON PS2 PS1 SL1 Pressure roller Memo SL6: OFF SL5: OFF PS5: ON PS4: OFF The above table applies to straight pickup only. In the case of reversal pickup, the same operations is used but with the following change in sequence: SL3 instead of SL5; SL4 instead of SL6; PS6 instead of PS4; and PS7 instead of PS5. F02-904-04 2-222 COPYRIGHT © 2001 CANON INC. 2000 2000 2000 2000 CANON CLC5000 REV.0 JAN. 2001 CHAPTER 2 NEW FUNCTIONS The copier determines the position of the pressure roller based on the foregoing factors, and instructs the buffer pass unit accordingly; the signal indicating the position of the pressure roller is sent for each delivery made by the copier. The phase sensor 1 (PS4; for reverse, PS5) and the phase sensor 2 (PS6; for reverse, PS7) are used to detect the position for the pressure cam. As soon as the copier is turned on, a search is immediately executed to find the home position (where bending will be maximum) for the pressure cam. If the home position cannot be found within a specific period of time, an error code (E517) will be indicated on the copier’s control panel. In standby, the pressure cam is always at its home position, thereby preventing deformation (dents) of the curl removing roller. COPYRIGHT © 2001 CANON INC. 2000 2000 2000 2000 CANON CLC5000 REV.0 JAN. 2001 2-223 CHAPTER 2 NEW FUNCTIONS 9.5 Detecting Jams 9.5.1 Outline • • • • The machine is equipped with the following jam sensors: Inlet sensor (PS8) Delivery sensor (PSS3) Reversal jam sensor (PS2) Reversal timing sensor (PS1) PS8 PS3 PS1 PS2 F02-905-01 The presence/absence of paper or a jam is identified in relation to the presence/absence of paper over sensors in question at such times as stored in memory of the copier. The machine recognizes the following two types of jams: it also identifies a jam if paper exits over a sensor at time power on: 2-224 COPYRIGHT © 2001 CANON INC. 2000 2000 2000 2000 CANON CLC5000 REV.0 JAN. 2001 CHAPTER 2 NEW FUNCTIONS 9.5.2 Delay Jam After paper has reached the copier’s delivery sensor, the inlet sensor does not detect paper when period of time needed by paper to reach the machine’s inlet sensor (PS8) and a peried of time needed by paper to move distance of 60 mm have passed. In response, the buffer motor will be stopped, and the Jam indication will be made on the copier’s display. Jam message Copier delivery sensor (host machine) Jam check Normal Error Inlet paper sensor (PS8) Buffer pass motor (M1; M3) F02-905-02 PS1, PS2 and PS3 are also used to detect a delay jam REF. COPYRIGHT © 2001 CANON INC. 2000 2000 2000 2000 CANON CLC5000 REV.0 JAN. 2001 2-225 CHAPTER 2 NEW FUNCTIONS 9.5.3 Stationary Jam After paper has reached the delivery sensor (PS3), the inlet sensor remains ON when a specific period of time and the period of time needed by paper to move a distance of 60 mm have passed. In response, the buffer motor will be stopped, and the Jam indication will be made on the copier's display. Jam indication Delivery sensor (PS3) Normal Error Jam check Buffer pass motor (M1; M3) F02-905-03 2-226 COPYRIGHT © 2001 CANON INC. 2000 2000 2000 2000 CANON CLC5000 REV.0 JAN. 2001 CHAPTER 2 NEW FUNCTIONS 9.6 Power Supply 9.6.1 Outline The following diagram shows how power is distributed. The buffer pass unit is supplied with +5V and +24V power by the buffer pass power supply. +24 V is supplied by way of the cover switch (SW1) to the loads; it will be cut off when the front cover of the buffer pass unit is opened and, as a result, the cover switch turns off. Cover switch (SW1) +24VR J532-3 J532-2 J532-4 J302-4 J302-3 J532-1 J530-1 J205B-2 J302-2 J530-2 Noise filter +24VR J302-1 Leakage breaker J205B-1 +24VR Cover switch outlet REMON J303-2 +24V J301-1,3 Buffer pass driver PCB Flapper solenoid (SL1) Downward curl removing solenoid 1 (SL3) +24VR Downward curl removing solenoid 2 (SL4) +24VR Upward curl removing solenoid 1 (SL5) +24VR Upward curl removing solenoid 2 (SL6) +5V Buffer pass power supply Buffer pass motor (M1, M3) +24VR +5V 24V/5V DC/DC converter Reversal motor (M2) +5V Reversal timing sensor 1 (PS1) Reversal jam sensor 2 (PS2) Delivery paper sensor (PS3) +5V Upper phase sensor 1 (PS4) +5V Upper phase sensor 2 (PS5) +5V Lower phase sensor 1 (PS6) +5V Lower phase sensor 2 (PS7) +5V Inlet paper sensor (PS8) To sorter F02-906-01 COPYRIGHT © 2001 CANON INC. 2000 2000 2000 2000 CANON CLC5000 REV.0 JAN. 2001 2-227 CHAPTER 2 NEW FUNCTIONS 9.7 Disassembly/Assembly The machine has the mechanical features and operations as described herein, and may be disassembled or assembled as shown; be sure to observe the following whenever disassembling or assembling the machine: Disconnect the power plug for safety before the work. 1. 2. Unless otherwise noted, reverse the steps used to disassemble the machine for assembly. 3. Identify the screws by type (length, diameter) and location. 4. The screws used for the grounding wire, varistors, or the like are equipped with washers to ensure electrical continuity. Be sure to use these screws during assembly. 5. As a rule, do not operate the machine with any of its parts removed. Do not throw toner into fire to avoid explosion. 6. 2-228 COPYRIGHT © 2001 CANON INC. 2000 2000 2000 2000 CANON CLC5000 REV.0 JAN. 2001 CHAPTER 2 NEW FUNCTIONS 9.7.1 External Covers [6] [7] [1] [5] [1] [2] [3] [4] [5] [6] [7] [4] [2] [3] Upper cover (2) Front cover (2) Right front cover (2) Left front cover (5) Rear cover (3) Left cover (4) Delivery cover (4) Memo The left cover and the delivery cover are used when the buffer pass unit is installed on its own. F02-907-01 The number in parentheses indicates the number of mounting screws used. To remove the front cover, remove the mounting screws from the cover hinge. Mount the left cover and the Delivery cover if no sorter is installed. COPYRIGHT © 2001 CANON INC. 2000 2000 2000 2000 CANON CLC5000 REV.0 JAN. 2001 2-229 CHAPTER 2 NEW FUNCTIONS 9.7.2 Feeding System a. Removing the Upper Curl removing Roller 1) Open the front cover. 2) Remove the two screws [1], and detach the retainer handle [2] together with the handle support base [3]. [3] [2] [1] F02-907-02 When mounting the retaining handle, be sure to fit the pin [4] on the slide shaft with the cutoff in the handle. [4] F02-907-03 2-230 COPYRIGHT © 2001 CANON INC. 2000 2000 2000 2000 CANON CLC5000 REV.0 JAN. 2001 CHAPTER 2 NEW FUNCTIONS 3) Remove the screw [5], and detach the lower arm base [6]. [6] [5] F02-907-04 4) Remove the two pressure adjusting springs [7], and detach the pressure plate [8]. [7] [8] F02-907-05 Do not touch the screw [10] used to secure the pressure spacer [9] to the pressure plate. It has been adjusted at the factory. [10] [9] F02-907-06 COPYRIGHT © 2001 CANON INC. 2000 2000 2000 2000 CANON CLC5000 REV.0 JAN. 2001 2-231 CHAPTER 2 NEW FUNCTIONS 5) Remove the E-ring [11], washer [12], and bearing [13] at the front and the rear; then, detach the curl removing roller [14]. [13] [12] [11] [14] [11] [12] [13] F02-907-07 b. Removing the Lower Curl removing Roller 1) Open the front cover. 2) Remove the rear cover. 3) Remove the two screws [1] each at the [1] front and the rear; then, disconnect the connector [2], and detach the left stay [3]. [3] [1] [2] F02-907-08 2-232 COPYRIGHT © 2001 CANON INC. 2000 2000 2000 2000 CANON CLC5000 REV.0 JAN. 2001 CHAPTER 2 NEW FUNCTIONS 4) Pull the retaining handle to the from, and push up the retainer unit; then, remove the three screws [4], and detach the lower arm base [5] and then the pressure plate [6]. [5] [4] [4] [6] F02-907-09 6) Remove the E-ring [7], washer [8], and bearing [9] at the front and the rear; then, detach the curl removing roller. [9] [7] [10] [7] When removing the lower arm base, be sure to support the pressure plate with your hand. If you pull off the lower arm base without support, the pressure plate can fall. Be sure to take care. In addition, do NOT remove the screw [A] in detected in the figure. [8] [8] [9] F02-907-10 Pressure plate [A] F02-907-11 COPYRIGHT © 2001 CANON INC. 2000 2000 2000 2000 CANON CLC5000 REV.0 JAN. 2001 2-233 CHAPTER 2 NEW FUNCTIONS c. Removing the Feed Roller (vertical path; upper/lower) 1) Remove the rear cover. [4] 2) Remove the right front cover. 3) Disconnect the connector [1]; then, disconnect the connector [2] of the reversal motor. Thereafter, remove the six screws [3], and detach the vertical path [3] guide assembly [4]. [1] [3] [2] F02-907-12 4) Remove the four screws [5], and disconnect the connector [6]; then, detach the reinforcing plate [7]. [6] [5] [7] [5] F02-907-13 2-234 COPYRIGHT © 2001 CANON INC. 2000 2000 2000 2000 CANON CLC5000 REV.0 JAN. 2001 CHAPTER 2 NEW FUNCTIONS 5) Remove the three E-rings [8], pulley [9], parallel pin [10], two bearings [11], two washers [12], gear [13], and parallel pin [14] (for [13] and [14], bottom only); then, detach the feed roller (vertical path) [15]. [12] [11] [15] [11] [12] [8] [8] [15] [8] [8] [10] [9] [9] [10] [13] [14] [8] [8] [12] [11] [12] [11] F02-907-14 When detaching and attaching the vertical path guide assembly, be sure to take care not to damage the reversal plastic sheet. COPYRIGHT © 2001 CANON INC. 2000 2000 2000 2000 CANON CLC5000 REV.0 JAN. 2001 2-235 CHAPTER 2 NEW FUNCTIONS d. Removing the Feed roller (reversal inlet) 1) Remove the rear cover. 2) Disconnect the two connectors [1] of the buffer pass motor. [1] [1] F02-907-15 3) Remove the E-ring [2] and the gear [3]. [2] [3] F02-907-16 2-236 COPYRIGHT © 2001 CANON INC. 2000 2000 2000 2000 CANON CLC5000 REV.0 JAN. 2001 CHAPTER 2 NEW FUNCTIONS 4) Open the front cover. 5) Pull the retaining handle [4] to the front, and push up the retaining unit. [4] F02-907-17 6) Remove the two screws [5] each at the front and the rear; then, detach the right lower guide [6]. [6] [5] [5] [5] F02-907-18 COPYRIGHT © 2001 CANON INC. 2000 2000 2000 2000 CANON CLC5000 REV.0 JAN. 2001 2-237 CHAPTER 2 NEW FUNCTIONS 7) Pull out the jam removing tab [7]; then, remove the E-ring [8], washer [9], and bearing [10] at the front. [7] [8] [9] [10] F02-907-19 8) Remove the two E-rings [11], washer [12], and bearing [13] at the rear then, detach the feed roller (reversal inlet) [14]. [11] [12] [13] [14] F02-907-20 2-238 COPYRIGHT © 2001 CANON INC. 2000 2000 2000 2000 CANON CLC5000 REV.0 JAN. 2001 CHAPTER 2 NEW FUNCTIONS e. Removing the Feed roller (reversal confluence) 1) Remove the rear cover. [2] 2) Remove heater reversal inlet roller. (See d. above.) 3) Remove the tension spring [1], and remove the four screws [2]; then, detach the buffer pass motor [3] together with its mounting base. [3] [2] [1] F02-907-21 4) Open the front cover. 5) Pull the retaining handle to the front, and push up the retaining unit. (See F02-907-17.) 6) Remove the E-ring [4], washer [5], and bearing [6] at the front. [4] [5] [6] F02-907-22 COPYRIGHT © 2001 CANON INC. 2000 2000 2000 2000 CANON CLC5000 REV.0 JAN. 2001 2-239 CHAPTER 2 NEW FUNCTIONS 7) Remove the two E-rings [7], gear [8], washer [9], and bearing [10]; at the rear; then, detach the feed roller (reversal confluence) [11]. [11] [8] [10] [7] [9] [7] F02-907-23 2-240 COPYRIGHT © 2001 CANON INC. 2000 2000 2000 2000 CANON CLC5000 REV.0 JAN. 2001 CHAPTER 2 NEW FUNCTIONS f. Removing the Feed roller (upper guide) 1) Remove the rear cover. 2) Remove the buffer pass motor together with its mounting base. (See F02-90721.) 3) Remove the E-ring [11] and the gear [2]. [2] [1] F02-907-24 4) Open the front cover. 5) Pull the retaining handle to the front, and push up the retaining unit. (See F02-907-17.) 6) Remove the two screws [3] at the rear. [3] F02-907-25 COPYRIGHT © 2001 CANON INC. 2000 2000 2000 2000 CANON CLC5000 REV.0 JAN. 2001 2-241 CHAPTER 2 NEW FUNCTIONS 7) Remove the two screws [4], and detach the guide stopper [5]. [5] [4] F02-907-26 8) Remove the two screws [6] at the front, and detach the guide plate [7]. [7] [6] F02-907-27 2-242 COPYRIGHT © 2001 CANON INC. 2000 2000 2000 2000 CANON CLC5000 REV.0 JAN. 2001 CHAPTER 2 NEW FUNCTIONS [8] When mounting the guide plate [7], take care not to bend the plastic sheet [8] attached to the guide plate. [7] F02-907-28 9) Remove the E-ring [9], washer [10], ad bearing [11] at the front. [11] [10] [9] F02-907-29 COPYRIGHT © 2001 CANON INC. 2000 2000 2000 2000 CANON CLC5000 REV.0 JAN. 2001 2-243 CHAPTER 2 NEW FUNCTIONS 10) Remove the two E-rings [12], gear [13], washer [14], and bearing [15] at the rear; then, detach the feed roller (upper guide) [16]. [16] [13] [12] [15] [14] [12] F02-907-30 9.7.3 PCBs Removing the Buffer Pass Driver PCB 1) Remove the rear cover. 2) Remove the four screws [1], and disconnect the 11 connectors [2]; then, detach the buffer pass driver PCB [3]. [1] [2] [3] [1] [2] [1] [2] [1] F02-907-31 2-244 COPYRIGHT © 2001 CANON INC. 2000 2000 2000 2000 CANON CLC5000 REV.0 JAN. 2001 CHAPTER 2 NEW FUNCTIONS 9.7.4 Fans and Motors [3] a. Removing the Buffer Pass Motor (M1, M3) 1) Remove the rear cover. 2) Disconnect the two connectors [1], and remove the two screws [2]; then, detach the buffer pass motor [3]. [2] [2] [3] [1] F02-907-32 Memo The buffer pass input motor (M1) and the buffer pass output motor (M3) may be disassembled in the same way. b. Removing the Reversal Motor (M2) 1) Remove the rear cover. 2) Remove the right front cover. 3) Disconnect the connector of the reversal motor. 4) Remove the vertical path guide assembly. (See F02-907-12.) 5) Remove the two screws [1], and detach the reversal motor [2]. [2] [1] F02-907-33 COPYRIGHT © 2001 CANON INC. 2000 2000 2000 2000 CANON CLC5000 REV.0 JAN. 2001 2-245 CHAPTER 2 NEW FUNCTIONS c. Removing the Cooling Fan 1/2 (FM1/FM2) 1) Remove the upper cover. 2) Remove the two screws, and disconnect the connector [2]; then, detach the cooling fan [3]. [1] [3] [2] Memo 2-246 The cooling fans 1 and 2 may be removed in the same way. [3] F02-907-34 COPYRIGHT © 2001 CANON INC. 2000 2000 2000 2000 CANON CLC5000 REV.0 JAN. 2001 CHAPTER 2 NEW FUNCTIONS d. Removing the Cooling Fan 3 (FM3) 1) Remove the rear cover. 2) Remove the two screws [1], and disconnect the connector [2]; then, detach the cooling fan 3 [3] together with mounting base. [2] [3] [1] F02-907-35 3) Remove the four screws [4], and detach the cooling fan 3 [5]. [5] [4] [4] F02-907-36 COPYRIGHT © 2001 CANON INC. 2000 2000 2000 2000 CANON CLC5000 REV.0 JAN. 2001 2-247 CHAPTER 2 NEW FUNCTIONS e. Removing the Cooling Fan 4 (FM4) 1) Remove the rear cover. 2) Remove the two screws [1], and disconnect the connector [2]; then, detach the fan mounting base [3]. [1] [2] [3] F02-907-37 3) Remove the two screws [4], and detach the cooling fan 4 [5]. [4] [5] F02-907-38 When mounting the fan, take care so that the direction of air will be downward. 2-248 COPYRIGHT © 2001 CANON INC. 2000 2000 2000 2000 CANON CLC5000 REV.0 JAN. 2001 CHAPTER 2 NEW FUNCTIONS 9.7.5 Sensors a. Removing the Reversal Timing Sensor (PS1) 1) Remove the rear cover. 2) Remove the right front cover. 3) Remove the vertical path guide assembly. (See F02-907-12.) 4) Remove the four screws [1], and disconnect the connector [2]; then, detach the reinforcing plate [3]. [2] [1] [3] [1] F02-907-39 5) Remove the screw [4], and detach the reversal timing sensor [5]. [4] [5] F02-907-40 COPYRIGHT © 2001 CANON INC. 2000 2000 2000 2000 CANON CLC5000 REV.0 JAN. 2001 2-249 CHAPTER 2 NEW FUNCTIONS b. Removing the Reversal Jam Sensor (PS2) 1) Remove the rear cover. 2) Remove the right front cover. 3) Remove the vertical path guide assembly. (See F02-907-12.) 4) Disconnect the connector [1], and remove the screw [2]; then, detach the reversal jam sensors [3]. [1] [2] [3] F02-907-41 c. Removing the Delivery Sensor (PS3) 1) Remove the screw [1], and disconnect the connector [2]; then, detach the delivery sensor [3]. [2] [3] [1] 2-250 F02-907-42 COPYRIGHT © 2001 CANON INC. 2000 2000 2000 2000 CANON CLC5000 REV.0 JAN. 2001 CHAPTER 2 NEW FUNCTIONS d. Removing the Upper Phase Sensor 1/2 (PS4/5) 1) Remove the rear cover. 2) Disconnect the two connectors [1], and remove the screw [2]; then, detach the sensor mounting base [3], and detach the upper phase sensor [4]. [3] [2] [1] [4] F02-907-43 e. Removing the Lower Phase Sensor 1/2 (PS6/7) 1) Remove the rear cover. 2) Disconnect the two connectors [1], and remove the screw [2]; then, detach the sensor mounting base [3], and detach the lower phase sensor [4]. [4] [3] [1] [2] F02-907-44 COPYRIGHT © 2001 CANON INC. 2000 2000 2000 2000 CANON CLC5000 REV.0 JAN. 2001 2-251 CHAPTER 2 NEW FUNCTIONS f. Removing the Inlet Sensor (PS8) 1) Open the front cover. 2) Remove the retaining handle. (See F02907-02.) 3) Remove the screw [1], and detach the retaining guide bar [2]. [2] [1] F02-907-45 4) Remove the screw [3], and detach the inlet sensor base [4]; then, disconnect the connector [5], and detach the inlet sensor [6]. [A] [4] Do not remove the screw [A] indicated in the figure. [6] [3] [5] F02-907-46 2-252 COPYRIGHT © 2001 CANON INC. 2000 2000 2000 2000 CANON CLC5000 REV.0 JAN. 2001 CHAPTER 2 NEW FUNCTIONS 9.7.6 Solenoids a. Removing the Flapper Solenoid (SL1) 1) Remove the rear cover. 2) Remove the buffer pass motor. (See F02-907-21.) 3) Remove the two screws [1], and pull out the arm [2] of the flapper solenoid together with the core shaft. If you happen to have removed the screw [A] indicated in the figure, make adjustments so that the flapper is positioned at F02907-47a when the solenoid has turned on. [A] [1] [2] F02-907-47 F02-907-47a COPYRIGHT © 2001 CANON INC. 2000 2000 2000 2000 CANON CLC5000 REV.0 JAN. 2001 2-253 CHAPTER 2 NEW FUNCTIONS 4) Remove the two screws [3] from the inside of the rear side plate, and detach the flapper solenoid [4]. [4] [3] F02-907-48 b. Removing the Downward Curl Removing Solenoid 1 (SL3) 1) Remove the rear cover. 2) Remove the two screws [1], and disconnect the connector [2]; then, detach the solenoid mounting base [3]. [1] [3] [2] F02-907-49 2-254 COPYRIGHT © 2001 CANON INC. 2000 2000 2000 2000 CANON CLC5000 REV.0 JAN. 2001 CHAPTER 2 NEW FUNCTIONS 3) Remove the screw [4], and detach the solenoid [5]. [5] [4] F02-907-50 c. Removing the Downward Curl Removing Solenoid 2 (SL4) 1) Remove the rear cover. 2) Remove the two screws [1], and disconnect the connector [2]; then, detach the solenoid mounting base [3]. [3] [2] [1] F02-907-51 3) Remove the two screws [4], and detach the solenoid [5]. [5] [4] F02-907-52 COPYRIGHT © 2001 CANON INC. 2000 2000 2000 2000 CANON CLC5000 REV.0 JAN. 2001 2-255 CHAPTER 2 NEW FUNCTIONS d. Removing the Upward Curl Removing Soiling 1 (SL5) 1) Remove the rear cover. 2) Remove the two screws [1], and disconnect the connector [2]; then, detach the solenoid mounting base [3]. [1] [3] [2] F02-907-53 3) Remove the screw [4], and detach the solenoid [5]. [5] [4] F02-907-54 2-256 COPYRIGHT © 2001 CANON INC. 2000 2000 2000 2000 CANON CLC5000 REV.0 JAN. 2001 CHAPTER 2 NEW FUNCTIONS e. Removing the Upward Curl Removing Solenoid 2 (SL6) 1) Remove the rear cover. 2) Remove the two screws [1], and discon[2] nect the connector [2]; then, detach the solenoid mounting base [3]. [3] [1] F02-907-55 3) Remove the two screws [4], and detach the solenoid [5]. [5] [4] F02-907-56 COPYRIGHT © 2001 CANON INC. 2000 2000 2000 2000 CANON CLC5000 REV.0 JAN. 2001 2-257 CHAPTER 2 NEW FUNCTIONS f. Removing the Cover Switch 1) Remove the two screws [1] behind the buffer pass front side plate, and detach the cover switch mounting base [2]. [1] [2] F02-907-57 2) Remove the six terminals [3], and detach the cover switchs [4]. (The cover switch is snapped in place.) [4] [3] [3] F02-907-58 2-258 COPYRIGHT © 2001 CANON INC. 2000 2000 2000 2000 CANON CLC5000 REV.0 JAN. 2001 CHAPTER 2 NEW FUNCTIONS g. Removing the Spring Clutch 1) Remove the rear cover. 2) Remove the phase sensor together with its support plate. (See F02-907-43, -44.) 3) Remove the screw [1], and detach the sensor flag [2]; then, remove the stop screw [3], and detach the spring clutch [4]. [3] [4] [1] [2] F02-907-59 [4] [2] [1] [3] F02-907-60 Memo Both upper and lower spring clutches may be removed in the same way. COPYRIGHT © 2001 CANON INC. 2000 2000 2000 2000 CANON CLC5000 REV.0 JAN. 2001 2-259 CHAPTER 2 NEW FUNCTIONS h. Removing the Power Supply Assembly 1) Remove the rear cover. 2) Disconnect the two connectors [1], and remove the five screws [2]; then, detach the power supply PCB [3]. [2] [1] [1] [2] [2] [3] F02-907-61 i. Removing the Noise Filter 1) Remove the rear cover. 2) Remove the four screws [1], and detach the power supply mounting plate [2]. [1] [2] [1] [1] F02-907-62 2-260 COPYRIGHT © 2001 CANON INC. 2000 2000 2000 2000 CANON CLC5000 REV.0 JAN. 2001 CHAPTER 2 NEW FUNCTIONS 3) Remove the five terminals [3] and two screws [4]; then, detach the noise filter [5]. [4] [3] [3] [3] [3] [3] [4] [5] F02-907-63 j. Removing the Leakage Breaker 1) Remove the rear cover. 2) Remove the screw [1], and detach the rounding wire [2]. Thereafter, remove six terminals [3] and the two screws [4]; then, detach the leakage breaker [5]. [1] [3] [2] [3] [5] [3] [3] [3] [3] [4] F02-907-64 COPYRIGHT © 2001 CANON INC. 2000 2000 2000 2000 CANON CLC5000 REV.0 JAN. 2001 2-261 CHAPTER 3 INSTALLATION COPYRIGHT © 2001 CANON INC. 2000 2000 2000 2000 CANON CLC5000 REV.0 JAN. 2001 CHAPTER 3 INSTALLATION 1 Selecting the Site Select the site of installation with the following considerations in mind; if possible, pay a visit to the user’s before delivering the machine. 1. Make sure that the power supply enables exclusive connection to a receptacle rated as follows, and the appropriate terminal of the receptacle is properly grounded for safety: Model Voltage Amperage Receptacle 1North American 208/240 V*15 A NEMA 6-20R 2European 230 V 16 A DIN49440/49441 3UK 230 V 13 A BS1363 4Australian 230 V 15 A AS 2. The temperature and humidity requirements must be as shown in Figure F03100-01. Avoid areas near water faucets, water boilers, humidifiers, or refrigerators. Humidity (%) 90 80 75 70 60 50 40 30 25 20 10 27.5 0 5 10 15 20 25 ˚C 30 F03-100-01 COPYRIGHT © 2001 CANON INC. 2000 2000 2000 2000 CANON CLC5000 REV.0 JAN. 2001 3-1 CHAPTER 3 INSTALLATION 3. Avoid areas near sources of fire and areas subject to dust or ammonium gas. Avoid direct rays of the sun; as necessary, provide curtains. 4. The room must be well ventilated. The level of ozone emitted by the machine should not harm the health of those around the machine. However, some may find the level unpleasant if the machine is used for a long time in a poorly ventilated room. Make sure the room is ventilated often. 10 cm min. 50 cm min. 50 cm min. 5. The floor must be level so that all feet of the machine are in contact with the floor and the machine remains level. 6. The machine must be installed at least 10 cm away from all walls so as to allow machine operation and maintenance work. 50 cm min. F03-100-02 3-2 COPYRIGHT © 2001 CANON INC. 2000 2000 2000 2000 CANON CLC5000 REV.0 JAN. 2001 CHAPTER 3 INSTALLATION * Make the following spatial considerations for the machine: 100mm or more 1565mm without accessories 2106mm 100mm or more 1565mm with accessories 3052mm F03-100-03 COPYRIGHT © 2001 CANON INC. 2000 2000 2000 2000 CANON CLC5000 REV.0 JAN. 2001 3-3 CHAPTER 3 INSTALLATION 2 Points to Note for Installation and Relocation 2.1 Base Plate and Installation/Relocation Work When moving the machine while supporting its base plate, be sure to place your hands as shown; otherwise, the external covers can suffer deformation. front back back right side front left side F03-201-01 3-4 COPYRIGHT © 2001 CANON INC. 2000 2000 2000 2000 CANON CLC5000 REV.0 JAN. 2001 CHAPTER 3 INSTALLATION 3 Installation When a metal object is brought in from a cold to a warm place, droplets of water can develop on its surface. This phenomenon is known as condensation, and copiers subjected to condensation tend to generate faulty images. If the copier has been brought in from a cold place, leave it alone at the site of installation for at least one hour before starting the work. 3.1 Unpacking Step Work 1 Cut the two bands used to hold the shipping box, and free the shipping box. Remarks Bands Shipping box F03-301-01 2 3 Tear off and remove the plastic bag. Turn the nuts, and remove the metal fixings (2 each at front and rear) used to keep the skids. Nuts (front) Metal fixings Metal fixings (rear) Nuts F03-301-02 COPYRIGHT © 2001 CANON INC. 2000 2000 2000 2000 CANON CLC5000 REV.0 JAN. 2001 3-5 CHAPTER 3 INSTALLATION Step 4 Work Remarks Lift the machine using a fork lift operating from the rear to move it off the skids and onto the floor. Adjuster When sliding in the prongs of the fork lift, be sure that the forks stop before they come into contact with the adjusters. Prongs Adjuster F03-301-03 5 3-6 Move the machine to the site of installation. Open the cardboard box, and take out the parts and accessories. Check to make sure that none of the following is missing: • Copy tray • Control key (2 pcs.) • Operator's Manual • Fixing oil (2 bottles) • Toner (4 colors) • Starter (4 colors) • Oil nozzle • Hopper retaining fixing (2 pcs.) • Process unit grip (2 pcs.) • Laser shutter open tool (2 pcs.) • Starter collecting container (4 pcs.) • Drum protection sheet plastic bag • Transfer unit fixing tool • Storage box • Label for duplex unit • Cassette bottom film set (2 set) • Cassette size label • Label for the number of a pickup paper • Original holder COPYRIGHT © 2001 CANON INC. 2000 2000 2000 2000 CANON CLC5000 REV.0 JAN. 2001 CHAPTER 3 INSTALLATION 3.2 Removing the Fixings, Supplying Fixing Oil, and Changing the Voltage Rating (240V North American Model) Step Work 1 Take out the C, M, Y, and Bk starter bottles, and shake them well. Open the caps, peel off the seals, and keep them in a dust-free environment. Remove the strips of tape from the parts of the machine and the protection sheet used for the copyboard glass. Removing the Scanner Fixing Remove the tape from the scanner retaining fixing found on the outside of the left cover; then, slide the metal fixing from the rear to the front, and pull it to the left to remove. 2 3 Remarks The step on the left lets the starters become used to the environment of the site. Scanner fixing F03-302-01 Store away the fixing in the tool box for possible relocation of the machine. 4 Open the front covers (left, right), and remove the fixing screw from the transfer unit. Transfer unit Screw F03-302-02 5 6 Remove the tape and materials and sheets used to keep the lever and others in place. However, do NOT remove the seal from the toner supply mouth of the hopper assembly. (Otherwise, toner will be likely to leak during toner supply operation.) Remove the tape and fixing materials from inside the cassette. COPYRIGHT © 2001 CANON INC. 2000 2000 2000 2000 CANON CLC5000 REV.0 JAN. 2001 3-7 CHAPTER 3 INSTALLATION Step Work 7 Release the lever of the transfer unit, and slide out the transfer unit; then, remove the fixing tape used to keep the jam tweezers in place and the fixing tape used to keep the transfer belt in place at the rear. Remarks Cushioning material Do not remove the tag found at the front of the pre-transfer cover. Remove all fixing tape from the pretransfer cover. Cushioning material F03-302-03 8 • Remove the screw, and detach the hopper assembly left cover. Hopper assembly left cover screw F03-302-04 • Remove the screw, and disconnect the connector, and open the wire saddle; then, detach the separation charging assembly. Connector Separation charging assembly Wire saddle Screw F03-302-05 3-8 COPYRIGHT © 2001 CANON INC. 2000 2000 2000 2000 CANON CLC5000 REV.0 JAN. 2001 CHAPTER 3 INSTALLATION Step Work 9 After removing the hopper left cover and the separation charging assembly, mount the transfer unit fixing bracket to the front side plate of the machine. Remarks Transfer unit fixing bracket F03-302-06 10 Remove the two screws, and detach the pre-transfer cover. screw screw Transfer unit cover F03-302-07 COPYRIGHT © 2001 CANON INC. 2000 2000 2000 2000 CANON CLC5000 REV.0 JAN. 2001 3-9 CHAPTER 3 INSTALLATION Step 11 Work Remarks Disconnect the connector, and detach the separation guide. Separation guide connector F03-302-08 Plastic sheet Points to Note When Mouting the Separation Guide When mounting the separation guide,be sure that the plastic sheet is inside as shown,not hitting the transfer belt and bending. F03-302-09 12 While pulling the lever to the front, set the transfer releasing lever. Lever Lever F03-302-10 3-10 COPYRIGHT © 2001 CANON INC. 2000 2000 2000 2000 CANON CLC5000 REV.0 JAN. 2001 CHAPTER 3 INSTALLATION Step 13 Work Turn the cam by hand so that the belt unit is in UP position. Remarks Cam Belt unit F03-302-11 14 Disconnect the two connectors, and loosen the screw ; then, shift the locking plate to the left. 15 Push the cleaning blade to release the pressure, and lift the middle of the inlet guide. Screw connector Locking plate F03-302-12 When lifting the inlet guide, be sure to support at its middle to avoid deforming the guide. Inlet guide Cleaner blade F03-302-13 COPYRIGHT © 2001 CANON INC. 2000 2000 2000 2000 CANON CLC5000 REV.0 JAN. 2001 3-11 CHAPTER 3 INSTALLATION Step Work 16 As if to slightly lift the transfer belt assembly, hook the hole of the transfer belt assembly on the pin of the transfer unit fixing. At this time, be sure to engage the hole of the transfer belt assembly with the groove of the pin. Remarks Transfer belt assembly Transfer unit fixing Pin Hole F03-302-14 17 Remove the inside cushioning material (w/ tag) from the bottom of thetransfer belt. 18 Reverse steps 8) through 16) to assemble the transfer unit. Then, mount the transfer front cover, and lock the lever in place. Remove the cap from the fixing oil tank, and pour two bottles of fixing oil (2l). Then, close the cap. inside cushioning material F03-302-15 19 F03-302-16 3-12 COPYRIGHT © 2001 CANON INC. 2000 2000 2000 2000 CANON CLC5000 REV.0 JAN. 2001 CHAPTER 3 INSTALLATION Step 20 Work Slide out the fixing assembly, and remove the packing materials and taping. Remarks Packing materials Taping F03-302-17 21 Pull out the fixing pressure releasing spacer (2 pc.). Pressure releasing spacer F03-302-18 22 Set the fixing assembly. COPYRIGHT © 2001 CANON INC. 2000 2000 2000 2000 CANON CLC5000 REV.0 JAN. 2001 3-13 CHAPTER 3 INSTALLATION 3.3 Supplying Toner Step Work 1 As if to invert the top and the bottom, shake the C toner container 20 times or more. Remarks Do not perform this step until immediately before setting the bottle to the hopper. 2 Open the lid of the C toner hopper, and fit the C toner bottle in the opening of the hopper; hold the base of the bottle, and turn the bottle clockwise until it stops (about 10°). 3 Pull the slide shutter of the C toner bottle toward the front, and lightly tap on the bottom and the side of the bottle two to three times. • Take note of the time at which toner supply operation starts. • Check to make sure that the toner has poured into the hopper. F03-303-01 Slide shutter F03-303-02 4 3-14 Close the slide shutter of the C toner bottle, and turn the bottle counterclockwise (about 10°) to remove. Check to make sure no toner remains on the mesh over the inlet to the hopper; otherwise, tap on the hopper until all toner has fallen into the hopper. COPYRIGHT © 2001 CANON INC. 2000 2000 2000 2000 CANON CLC5000 REV.0 JAN. 2001 CHAPTER 3 INSTALLATION Step Work 5 Perform the same steps for the M, Y, and Bk toners as for the C toner. Remarks Do not dispose of the toner bottle in fire; it may tear open or explode. 6 7 Open the right cover, and remove the hopper assembly right cover (1 screw). Remove the two fixing screws from the hopper assembly. Screw Right cover Fixing screws F03-303-03 8 Holding both left and right grips, pull the hopper assembly to the front and then lift it. (It will be locked when lifted to the topmost position.) Grip Grip Check to make sure that the hopper assembly is securely locked in position by the naked eye. F03-303-04 9 • Shift down the lever of the transfer unit, and release the transfer belt from the photosensitive drum. Transfer unit Lever F03-303-05 COPYRIGHT © 2001 CANON INC. 2000 2000 2000 2000 CANON CLC5000 REV.0 JAN. 2001 3-15 CHAPTER 3 INSTALLATION Step 10 Work Remarks Remove the four primary charging assemblies. Primary charging assembly After removal, place each primary charging assembly so that its grid side faces up. F03-303-06 11 Remove the four photosensitive drum positioning knobs. The knobs have a two-layer construction. To remove, turn the small knob at the center counterclockwise. 12 Remove the two screws from the process unit mount. Positioning knob F03-303-07 Screw Process unit mount Screw F03-303-08 3-16 COPYRIGHT © 2001 CANON INC. 2000 2000 2000 2000 CANON CLC5000 REV.0 JAN. 2001 CHAPTER 3 INSTALLATION Step 13 Work Remarks Install the two process unit grips that come with the machine. Grip F03-303-09 14 Slide out the process unit mount. 15 Loosen the mounting screw of the C drum, and detach the photosensitive drum cleaner pressure releasing members (rear). Slide the pressure releasing member in an arrow [A]. Perform the same for M, Y, and Bk. Process unit mount F03-303-10 Push the center of the blade (indicated by an arrow [B] ) with a finger to release the pressure on the releasing member. Do not remove the protection sheet from the drum. Pressuer releasing member (rear) Fixing screw Drum [B] [A] Pressure releasing member (front) Blade F03-303-11 COPYRIGHT © 2001 CANON INC. 2000 2000 2000 2000 CANON CLC5000 REV.0 JAN. 2001 3-17 CHAPTER 3 INSTALLATION Step Work 16 Put the process unit back into the machine, and remove the grips. Install the two screws removed in step 12. Install the photosensitive drum positioning knob. Install the primary charging assembly. (Be sure to put each charging assembly back to its original location.) Slide out the transfer unit, and remove the drum protection sheet in the direction of the arrow. Store away the drum protection sheet. 17 18 19 20 Do not touch its areas that will come into contact with the drum. To store, put it in a plastic bag, and keep it protected from dust and oil. If it must be rolled, be sure that the side that will come into contact with the drum is inside. Remarks Drum protection sheet Drum protection sheet F03-203-12 21 22 23 24 3-18 Install the transfer unit cover, and put the transfer unit back into position; then, set (lock) the lever of the transfer unit. Release the lock to the lower left of the hopper; then, bring down the hopper assembly to the bottom to set it in position. Insert the cover switch actuator into the cover switch assembly. Check the power supply, and connect the power plug. Turn on the power switch, insert the control key, and turn it. COPYRIGHT © 2001 CANON INC. 2000 2000 2000 2000 CANON CLC5000 REV.0 JAN. 2001 CHAPTER 3 INSTALLATION Step Work 25 26 Start service mode, and press FUNC . Press INSTALL twice to select screen 2. Remarks <M> INSTALL DISP ADJUST COUNTER AUTO-REG 0 REG-APER <S> 2/4 <R> <P> <F> LSNS-KIL 0 FUNC OPTION TEST F03-303-13 27 28 Press LSNS-KIL to select ‘1’. Wait until warm-up ends. During the wait period, perform the Original tray following: Stepped screws (face • Set the cassette size to suit the needs of sticker is attached to the user. the screw hole • First, set the side guide plate to suit the paper size. Then, put copy paper in the cassette, and adjust the trailing edge guide plate against the trailing edge of Screws the copy paper. (face sticker is attached to the screw hole) • Remove the cassette size plate from Stepped screws each cassette, and attach the appropri- Original tray (face sticker is attached to the screw hole) ate size label; then, put the cassettes back into their original positions. • Install the original tray. If you are installing a paper deck, you must remove the rear right cover. Be sure to install the paper deck before installing the original tray (if on the right side). Screws (face sticker is attached to the screw hole) F03-303-14 29 Lift the hopper assembly as far up as it goes. COPYRIGHT © 2001 CANON INC. 2000 2000 2000 2000 CANON CLC5000 REV.0 JAN. 2001 3-19 CHAPTER 3 INSTALLATION Step Work 30 Install the hopper retaining fixing that comes with the machine (right). Remarks Hopper retaining fixing F03-303-15 31 32 Install the hopper retaining fixing that comes with the machine. (left) Release the lock of the hopper assembly, and lower the hopper assembly as far down as the metal fixing. F03-303-16 3-20 COPYRIGHT © 2001 CANON INC. 2000 2000 2000 2000 CANON CLC5000 REV.0 JAN. 2001 CHAPTER 3 INSTALLATION Step 33 Work Install the two laser shutter opening tools to the two laser shutters. Remarks Laser shutters (2 pcs.) F03-303-17 Laser Shutter opening tool Groove Laser shutter F03-303-18 Laser shutter opening tool Laser shutter F03-303-19 34 35 Lift the hopper assembly as far up as it moves, and manually engage the lock found in the lower left of the hopper assembly. Work as instructed under 3.4 “Supplying Starter.” COPYRIGHT © 2001 CANON INC. 2000 2000 2000 2000 CANON CLC5000 REV.0 JAN. 2001 3-21 CHAPTER 3 INSTALLATION 3.4 Supplying Starter Step 1 Work Remarks Return to the 1st screen (‘FUNC > INSTALL’ in service mode). Press SPLY-Y . <M> INSTALL DISP COUNTER INIT-C The screw of the C developing assembly starts to rotate. <S> INIT-M 0 ADJUST SINIT-C STIR-C STIR-Y SPLY-M 0 STIR-K SPLY-Y 0 STIR-4 0 SPLY-K 0 0 SINIT-4 0 0 0 INIT-7 0 SINIT-K 0 0 <F> INIT-3 0 SINIT-Y STIR-M SPLY-C <P> INIT-Y 0 0 OPTION <R> 0 SINIT-M 0 FUNC 1/4 0 SPLY-4 0 0 TEST F03-304-01 2 Using the funnel attached to the starter bottle, supply the starter through the toner supply mouth of the C developing assembly. You may tilt the bottle slightly to avoid leakage. Funnel F03-304-02 Starter F03-304-03 3 4 3-22 When done, press the Stop key to stop the operation of the developing assembly. Repeat steps 1 through 3 for M, Y, and Bk. (Press SPLY-M, SPLY-Y, or SPLY-K as necessary to suit each color.) COPYRIGHT © 2001 CANON INC. 2000 2000 2000 2000 CANON CLC5000 REV.0 JAN. 2001 CHAPTER 3 INSTALLATION Step Work 5 After supplying all developing assemblies with starters, check to make sure that 10 min or more has passed since the end of toner supply (to the hopper). Install the retaining fixing. Release the lock of the hopper assembly, and lower the hopper assembly as far down as the hopper assembly retaining fixing; then, remove the sheet from the toner supply mouth (for all colors). Pull it down at an angle to facilitate removal. 6 7 8 9 10 11 Remarks Sheet F03-304-04 Remove the two laser shutter opening tools installed in step 33. Holding the left and right grips, lift the hopper assembly while pulling it to the front. Remove the two hopper fixings, and check to make sure that the lock is released; then, set the hopper assembly into place. Thereafter, fix it in place with two fixing screws. Press STIR-4 . Wait until stirring ends. (about 1 min) <M> INSTALL DISP COUNTER INIT-C <S> INIT-M 0 ADJUST SINIT-C FUNC STIR-C 0 0 SPLY-Y 0 0 STIR-4 0 SPLY-K 0 0 SINIT-4 STIR-K 0 0 INIT-7 0 SINIT-K STIR-Y 0 <F> INIT-3 0 SINIT-Y SPLY-M 0 <P> INIT-Y STIR-M 0 SPLY-C <R> 0 SINIT-M 0 OPTION 1/4 0 SPLY-4 0 0 TEST F03-304-05 COPYRIGHT © 2001 CANON INC. 2000 2000 2000 2000 CANON CLC5000 REV.0 JAN. 2001 3-23 CHAPTER 3 INSTALLATION Step 12 Work Remarks Press INIT-7 . The initial ATR data will be read. Wait until the operation ends automatically. (about 1 min) <M> INSTALL DISP COUNTER INIT-C <S> 1/4 INIT-M SINIT-C FUNC STIR-C 0 SINIT-M 0 STIR-M 0 0 SPLY-C SPLY-M 0 0 SINIT-4 0 STIR-K 0 SPLY-Y 0 INIT-7 0 SINIT-K STIR-Y 0 <F> INIT-3 0 SINIT-Y 0 OPTION <P> INIT-Y 0 ADJUST <R> 0 STIR-4 0 SPLY-K 0 0 SPLY-4 0 0 TEST F03-304-06 13 The initial ATR-related readings will be indicated on the 3rd/4th screen under ‘INSTALL’. Record the readings on the service data sheet. (Press the key to scan through the screens.) The service data sheet is attached behind the document compartment of the front cover (left). <M> INSTALL <S> 3/4 <R> SGNL-C SGNL-M SGNL-Y ADJUST REF-C REF-M REF-Y FUNC SIGG-C SIGG-M SIGG-Y DISP COUNTER <P> <F> <P> <F> OPTION TEST <M> INSTALL <S> 4/4 <R> SGNL-S-C SGNL-S-M SGNL-S-Y SGNL-S-K ADJUST REF-S-C REF-S-M REF-S-Y REF-S-K FUNC SGNL-D-C SGNL-D-M SGNL-D-Y SGNL-D-K OPTION SIGG-D-C SIGG-D-M SIGG-D-Y SIGG-D-K DISP COUNTER TEST F03-304-07 3-24 COPYRIGHT © 2001 CANON INC. 2000 2000 2000 2000 CANON CLC5000 REV.0 JAN. 2001 CHAPTER 3 INSTALLATION Step 14 Work Press the Remarks key to bring up the 2nd screen of ‘INSTALL’. Press IMG-REG to select ‘1’. <M> INSTALL DISP ADJUST FUNC COUNTER IMG-REG 0 REG-APER 0 RECV-Y 0 <S> 2/4 <R> <P> <F> LSNS-KIL 1 RECV-M RECV-C 0 RECV-K 0 0 OPTION TEST F03-304-08 15 Press REG-APER to execute image position correction. Before executing ‘REGAPER’, check to make sure that the transfer unit is at locking position. 16 17 18 19 20 Press the Reset key twice to end service mode. Pull out the cover switch actuator, and close the front cover. Turn off and then on the power switch, and wait until warm-up ends. Select ‘ADJSUT > PASCAL’ in service mode; then, set PASCAL to ‘1’. Press the Reset key twice to end service mode. In user mode, execute the following: auto gradation correction > full correction. (Pick-up must be from an A3 or B4 cassette; otherwise, feed A3/B4 paper using the multifeeder.) COPYRIGHT © 2001 CANON INC. 2000 2000 2000 2000 CANON CLC5000 REV.0 JAN. 2001 3-25 CHAPTER 3 INSTALLATION 3.5 Checking Images and Operations Step Work 1 Press a key on the control panel (other than the Copy Start key) to make sure that operation is normal. Set the CA-1 Test Chart on the copyboard, and make a copy to check the image. 2 3 4 5 6 7 8 3-26 Remarks • Make sure there is no abnormal noise. • Check the copy image for each default ratio. • Make sure that the specified number of copies are made normally. • Try each cassette, paper deck, and multifeeder. • If the image is not normal, make adjustments according to the “Basic Image Adjustment Procedure.” If you have made adjustments, select ‘ADJSUT > PASCAL’ in service mode, and check that ‘PASCAL’ is set to ‘1’. Otherwise, set it to ‘1’. Press the Reset key to end service mode. If you have made adjustment, execute “Auto Graduation Correction > full correction” in user mode. (Paper need to be fed from A3 or B4 cassette. If not set, feed A3/B4 paper from multifeeder). Check the external covers for damage and deformation. Clean up the area around the machine. Fill out the service sheet. COPYRIGHT © 2001 CANON INC. 2000 2000 2000 2000 CANON CLC5000 REV.0 JAN. 2001 CHAPTER 3 INSTALLATION 4 Relocating the Machine Step Work 1 Tape the cover of the toner hopper in place. • Install the scanner metal fixing. Insert the metal fixing through the louver on the delivery side, and slide it to the rear to fix the scanner mirror mount in position. Tape the metal fixing in place. Remarks Scanner metal fixing F03-400-01 2 3 4 5 Open the copier’s front cover. Release the lever of the fixing unit, and slide out the fixing unit. Open the external delivery unit and the internal delivery unit; remove the fixing assembly lever (2 screws), fixing assembly knob (1 screw), and fixing assembly front cover (2 screws); then, remove the fixing assembly front cover. Loosen the two screws, and open the fixing assembly. Fixing assembly upper cover Screw Screw Knob Screw Screw Fixing assembly front cover Fixing assembly Screw lever Screws F03-400-02 6 Remove the two screws, and open the fixing assembly. 7 Remove the screw from the rear of the upper oil pan; then, wait until all fixing oil has collected in the oil tank. Screw Fixing assembly Screw F03-400-03 COPYRIGHT © 2001 CANON INC. 2000 2000 2000 2000 CANON CLC5000 REV.0 JAN. 2001 3-27 CHAPTER 3 INSTALLATION Step Work 8 Remove the two screws, and remove the fixing assembly. Remarks Fixing assembly Be sure to fit the two screws removed in step 6 in advance of this step. Screw Screw F03-400-04 9 Remove the two screws, and remove the fixing assembly mount (front, rear); then, remove the oil receptacle. Fixing assembly (rear) Screw Oil receptacle Fixing assembly mount (front) At this time, take care not to drop the hose attached to the oil receptacle. Screw F03-400-05 10 Remove the screw, and remove the oil tank; then, draw out the fixing oil from the oil tank. Screw Oil tank F03-400-06 11 Return the fixing unit to its initial position. If the route of relocation is not flat and the copier is likely to be subjected to vibration for several minutes, remove the hopper assembly to avoid caking of toner and take precautions to keep the hopper assembly free of vibration. 3-28 COPYRIGHT © 2001 CANON INC. 2000 2000 2000 2000 CANON CLC5000 REV.0 JAN. 2001 CHAPTER 3 INSTALLATION 5 Installing the Original Tray ■ Installing on the Right Step 1 2 Work Peel the four face stickers from the copier’s right side, and fit the two stepped screws. Fit the original tray over the stepped screws; then, fix the tray in position with two screws. Remarks Original tray Stepped screws Screws F03-500-01 ■ Installing on the Left Step 1 2 Work Peel the four face stickers from the copier’s right side, and fit the two stepped screws. Fit the original tray over the stepped screws; then, fix the tray in position with two screws. Remarks Original tray Stepped screws Screws F03-500-02 COPYRIGHT © 2001 CANON INC. 2000 2000 2000 2000 CANON CLC5000 REV.0 JAN. 2001 3-29 CHAPTER 3 INSTALLATION 6 Installing the Control Card V Be sure to disconnect the power plug before starting the work. Step Work 1 2 Open the copier’s front cover (left, right). Remove the screw, and remove the hopper assembly right cover. Remove the screw, and remove the hopper assembly left cover. Remove the two fixing screws from the hopper assembly. 3 4 Remarks Left cover Screw Screw Right cover Fixing screws F03-600-01 5 Holding the right and left grips, pull out the hopper assembly to the front. 6 Remove the copier’s left side plate, and remove the three screws used to fix the control panel in place. Hopper assembly Grip Grip F03-600-02 Screws F03-600-03 3-30 COPYRIGHT © 2001 CANON INC. 2000 2000 2000 2000 CANON CLC5000 REV.0 JAN. 2001 CHAPTER 3 INSTALLATION Step Work 7 Remove the control panel relay connector and the two control card connectors; free the harness for the control card from the wire saddles behind the control panel; then, turn over the control panel. Remarks Control card connector Wire saddles Control panel relay connector F03-600-04 8 Remove the 13 screws, and remove the control panel back cover. Screws Screws Screws Screws F03-600-05 9 Remove the mounting screw from the face plate; then, disengage the claw to remove the face plate from the card slot. Claws Face plate F03-600-06 10 11 Install the insulating sheet over the display window for the control card on the control panel. Peel the protection sheet from the control card. COPYRIGHT © 2001 CANON INC. 2000 2000 2000 2000 CANON CLC5000 REV.0 JAN. 2001 3-31 CHAPTER 3 INSTALLATION Step Work 12 Fix the control card to the control panel using four self-tapping screws. At this time, slide in and out a card, and fix the control card where the card slides in and out easily. Further, check that the printer connector is centered over the hole. Remarks Screws Control Card V Screw Screw F03-600-07 13 Fix the grounding wire of the control card to the control panel. Screw Grounding wire F03-600-08 14 Disconnect the short connector for the control card behind the control panel; then, connect the connector (4P) of the control card. Control panel back cover Short connector F03-600-09 Control panel back cover Control card connector F03-600-10 3-32 COPYRIGHT © 2001 CANON INC. 2000 2000 2000 2000 CANON CLC5000 REV.0 JAN. 2001 CHAPTER 3 INSTALLATION Step Work 15 Peel the protective sheet from the control panel ratings plate of the control card. Attach the control panel ratings plate of the control card to the control panel. Fix the back cover to the control panel with 13 screws; then, connect the control relay connector to the control panel. Fix the control panel relay harness and the relay harness for the control panel in place with the wire saddles on the control panel back cover; then, install the control panel by reversing the steps used to remove it. Return the hopper assembly back to its original position, and fix it in place; then, install the left and right covers of the hopper assembly, and close the front covers. Turn on the copier’s power switch, and check the operation of the control card. 16 17 18 19 20 Remarks COPYRIGHT © 2001 CANON INC. 2000 2000 2000 2000 CANON CLC5000 REV.0 JAN. 2001 3-33 CHAPTER 3 INSTALLATION 7 Installing the DA Unit-A1 Be sure to observe the following when installing the DA unit to its host copier: 1. Check to make sure that the copier has properly been installed. Discon nect all power plugs. 2. Identify the screws by type (length, diameter) and location. 3. Store the settings data of the DA unit to the PC at the service station in advance. Likewise, store the settings data to the control server. Step 1 Work Remarks Remove the four screws [2], and detach the face plate [1] from the copier’s rear cover. [1] [2] [2] [2] [2] F03-700-01 2 If a Card Reader-A1 is to be installed, connect the relay cable [3] (9-pin; included with the card reader) to the connector J7 [4] of the DA unit. [4] [3] F03-700-02 3-34 COPYRIGHT © 2001 CANON INC. 2000 2000 2000 2000 CANON CLC5000 REV.0 JAN. 2001 CHAPTER 3 INSTALLATION Step 3 Work Remarks Connect the communication cable [5] to the connector J9 [6] of the DA unit. [6] [5] F03-700-03a (when using a card reader) [6] [5] F03-700-03b (when not using a card reader) COPYRIGHT © 2001 CANON INC. 2000 2000 2000 2000 CANON CLC5000 REV.0 JAN. 2001 3-35 CHAPTER 3 INSTALLATION Step 4 Work Remarks If a Card Reader-A1 is to be installed, connect the relay cable [3] connected in step 2) to the host copier. [3] F03-700-04a Connect the communication cable [5] to the host copier. [5] F03-700-04b 5 Bundle the communication cable with the cable clamp [6], and fix the clamp in place behind the DA unit. [6] F03-700-04c 3-36 COPYRIGHT © 2001 CANON INC. 2000 2000 2000 2000 CANON CLC5000 REV.0 JAN. 2001 CHAPTER 3 INSTALLATION Step Work Remarks Be sure to fix the clamp in place where it will not get in the way. 6 Secure the DA unit to the rear cover of the host copier with four screws (M4x4) [7]. (Use the screws that come with the DA unit.) [7] F03-700-05 7 For checks on operation and how to mount the cover for the DA unit, see the DA Unit-A1 Installation Procedure. COPYRIGHT © 2001 CANON INC. 2000 2000 2000 2000 CANON CLC5000 REV.0 JAN. 2001 3-37 CHAPTER 3 INSTALLATION 8 Using the Crane Transport kit If you are using the transport kit to move the machine by suspending it on a crane, perform the following: 8.1 Items to Prepare Crane Transport Kit Contents (FG6-1585-000) • Belt retaining member • Developing bias assembly protection member 4pc. 1pc. belt retaining members Developing bias assembly protection member F03-801-01 3-38 COPYRIGHT © 2001 CANON INC. 2000 2000 2000 2000 CANON CLC5000 REV.0 JAN. 2001 CHAPTER 3 INSTALLATION 8.2 Procedure 8.2.1 Preventing Deformation of Externals Step Work 1 To protect the externals from deformation, remove the upper cassette, lower cassette, waste toner cover, right front cover, and front lower cover. Remarks waste toner cover upper cassette right front cover lower cassette front lower cover F03-802-01 2 Detach the right lower cover. Screw Right lower cover F03-802-02 3 Remove the harness base (cassette lower) secured to the base plate with three screws, and attach it temporarily to the cassette holder by means of duct tape or the like. 4 Detach the rear cover1, 2, 3 cover. F03-802-03 rear cover 1 rear cover 3 rear cover 2 F03-802-04 COPYRIGHT © 2001 CANON INC. 2000 2000 2000 2000 CANON CLC5000 REV.0 JAN. 2001 3-39 CHAPTER 3 INSTALLATION 8.2.2 Mounting the Belt Retaining Members Step 1 Work Remarks Fit the protrusion of the top of the belt retaining member into the T-shaped opening in the bottom plate of the machine. protrusion Belt retaining member protrusion F03-802-05 2 Slide the belt retaining member toward the center of the machine so that the 6mm dia. hole of the belt retaining member and its corresponding 4-mm dia. hole in the bottom plate match. 3 Using the M4x8 screws used to keep the externals, secure the belt retaining member to the base plate.Be sure to tighten the screws while butting the belt retaining member upward and toward the center of the machine. 4 Likewise, mount the belt retaining member to the right front, right rear, and left rear. F03-802-06 F03-802-07 3-40 COPYRIGHT © 2001 CANON INC. 2000 2000 2000 2000 CANON CLC5000 REV.0 JAN. 2001 CHAPTER 3 INSTALLATION 8.2.3 Mounting the Developing Bias Assembly Protection Member Step 1 Work Remarks Remove the M4x8 screw used to secure the power cord base in place. screw F03-802-08 2 3 Secure the developing bias protection member(left side in the illsutration) to the power cord base using the M4x8mm screw removed in step1 as shown. Using the M4x8mm screw used to hold the rear cover, secure the developing bias assembly protection member to the rear of the base plate. Hole Hole Developing bias assembly protection member F03-802-09 Lead the belt through the gap of the belt retaining member. Before suspending the machine, apply light tension, and check to make sure that the belt is in contact with the top surface of the retaining member at four points. F03-802-10 F03-802-11 COPYRIGHT © 2001 CANON INC. 2000 2000 2000 2000 CANON CLC5000 REV.0 JAN. 2001 3-41 CHAPTER 3 INSTALLATION Step Work 4 On the left side, put the belt directly to the left cover. (The left cover will warp when tension is imposed on the belt, but it will recover as soon as the belt is detached.) Remarks F03-802-12 5 On the right side, secure the harness base removed previously by means of duct tape, and put the belt directly on the base plate. 6 At the right rear, put the belt over the developing bias assembly protection member mounted previously. 7 At the left rear, put the belt directly on the base plate. F03-802-13 F03-802-14 F03-802-15 3-42 COPYRIGHT © 2001 CANON INC. 2000 2000 2000 2000 CANON CLC5000 REV.0 JAN. 2001 CHAPTER 3 INSTALLATION Step Work 8 Be sure to use soft cloth or cushioning material to prevent damage where the belt comes into contact with the machine. Be sure to attach a horizontal belt as shown to keep the machine level and also to prevent the machine from slipping. Remarks Suspension vertical belt Horizontal belt to prevent slippage Secure where two belts cross F03-802-16 COPYRIGHT © 2001 CANON INC. 2000 2000 2000 2000 CANON CLC5000 REV.0 JAN. 2001 3-43 CHAPTER 4 MAINTENANCE AND SERVICING COPYRIGHT © 2001 CANON INC. 2000 2000 2000 2000 CANON CLC5000 REV.0 JAN. 2001 CHAPTER 4 MAINTENANCE AND SERVICING 1 Periodically Replaced Parts As of Dec 2000 No. Parts name 1 Ozone filter 1 (primary charging assembly) Ozone filter 2 (delivery assembly, general exhaust) Ozone filter 3 (power supply assembly, prefixing exhaust) FB2-3702-000 1 FB5-8775-000 2 FB2-3704-000 4 4 Ozone filter 4 (reversing assembly exhaust) FB5-8428-000 1 5 Dust-proofing filter 1 (laser unit, cooling, primary charging assembly, pre-fixing exhaust filter) Dust-proofing filter 3 (digital unit suction filter) Dust-proofing filter 4 (primary suction filter) FA6-4538-000 7 FB2-3955-000 3 FB3-5608-020 2 Dust-proofing filter 6 (delivery assembly, general exhaust) 9 Dust-proofing filter 7 (Laser scanner cooling) 10 Toner filter (primary charging assembly) 11 Pre-fixing duct filter (Pre-fixing duct) FB3-6320-020 2 FB5-6264-000 1 FB2-4383-000 1 FF6-1117-000 1 2 3 6 7 8 Memo Parts number Q’ty Life Remarks 100,000 Or 1 yr. (FM6: primary charging assembly fan) 100,000 Or 1 yr. (FM1/2/3: delivery assembly exhaust fan FM21/ 22/23: general exhaust) 100,000 Or 1 yr. (FM17/18: power supply assembly exhaust fan; FM35/36: pre-fixing exhaust fan) 100,000 Or 1 yr. (FM28/29/30/33: reversing assembly exhaust fan) 100,000 Or 1 yr. (FM4/5/6/17/18/ 35/36) 100,000 Or 1 yr. (FM14/15/16: digital unit cooling fan) 100,000 Or 1 yr. (FM8/9: primary charging assembly suction fan) 100,000 Or 1 yr. (FM1/2/3: delivery assembly exhaust fan; FM21/ 22/23: general exhaust) 100,000 Or 1 yr. (FM24: laser scanner motor cooling fan) 100,000 Or 1 yr. (FM6: primary exhaust fan) 50,000 Or 1 yr. (FM35/36: prefixing exhaust fan) The above values are estimates only and are subject to change based on future data. The parts numbers are subject to change according to engineering revisions. T04-100-01 COPYRIGHT © 2001 CANON INC. 2000 2000 2000 2000 CANON CLC5000 REV.0 JAN. 2001 4-1 CHAPTER 4 MAINTENANCE AND SERVICING Dust-proofing filter [4] [6] [9] Ozone filter [6] Toner filter [4] [8] [11] [2] [3] [4] [4] [2] [8] [10] [5] [5] [7] [1] [3] F04-100-01 4-2 COPYRIGHT © 2001 CANON INC. 2000 2000 2000 2000 CANON CLC5000 REV.0 JAN. 2001 CHAPTER 4 MAINTENANCE AND SERVICING As of Jan 2001 No. Parts name 12 Transfer blade 13 Primary grid 14 Primary/pre-transfer charging wire 15 Primary charging wire cleaning pad (lower) Primary charging wire cleaning pad (upper) 16 Separation/pre-fixing charging wire 17 Separation/pre-fixing charging wire cleaning pad 18 Separation/pre-fixing charging assembly gut wire 19 Cleaning blade (photosensitive drum cleaner) 20 Scoop-up sheet (photosensitive drum cleaner) 21 No. 2 scoop-up sheet (SALT sensor) 22 Cleaner side seal (front; photosensitive drum cleaner) 23 Cleaner side seal (rear; photosensitive drum cleaner) 24 Cleaner end seal(front; photosensitive drum cleaner) 25 Cleaner end seal (rear; photosensitive drum cleaner) 26 Transfer web plate 27 Polishing roller backup Memo Parts number Q’ty FF6-0542-000 FB2-2958-000 FY3-0030-000 FY3-0040-000 FF2-3551-000 Life Remarks 4 100,000 4 50,000 AR 50,000 200V AR 50,000 230V 4 50,000 FF2-3552-000 4 50,000 FY3-0030-000 FY3-0040-000 FF5-5517-000 AR 100,000 200V AR 100,000 230V 2 100,000 FA5-1876-000 AR 100,000 FB5-9745-000 4 80,000 FB2-2901-000 4 80,000 FB2-2924-000 4 80,000 FF6-4166-000 4 80,000 FF6-4167-000 4 80,000 FF6-1105-000 4 80,000 FF6-1106-000 4 80,000 FF6-0518-000 FF6-1348-000 1 1 100,000 100,000 When replacing ing blade When replacing ing blade When replacing ing blade When replacing ing blade When replacing ing blade When replacing ing blade the cleanthe cleanthe cleanthe cleanthe cleanthe clean- The above values are estimates only and subject to change based on future data. Likewise, the parts numbers are subject to change to accommodate engineering revisions. T04-100-02 COPYRIGHT © 2001 CANON INC. 2000 2000 2000 2000 CANON CLC5000 REV.0 JAN. 2001 4-3 CHAPTER 4 MAINTENANCE AND SERVICING 2 Consumables and Durables 2.1 Copier 2.1.1 By the Copier’s Hard Counter As of Jan 2001 No. Parts name Parts number Q’ty Life 40,000 2 LT (1 L/bottle); as a rule, by the user. 50,000 To be purchased by the user. 50,000 To be purchased by the user. 50,000 To be purchased by the user. 50,000 To be purchased by the user. 50,000 50,000 50,000 1 Fixing oil FG5-3918-050 2 2 3 4 5 6 7 8 Starter developer (Y) Starter developer (M) Starter developer (C) Starter developer (Bk) Upper fixing roller Lower fixing roller Oil removing roller (transfer belt assembly) Transfer belt cleaning belt Transfer belt Transfer belt cleaning blade Upper fixing cleaning belt Lower fixing cleaning belt Oil applying blade (Fixing assembly) Oil applying roller (fixing assembly) Oil filter (fixing assembly) Oil applying cleaning blade (fixing assembly) Curl removing roller (lower) Belt guide Pape dust removing plastic sheet Fixing heater (upper) F42-5032 F42-5022 F42-5012 F42-5002 FB5-6459-000 FB5-6461-000 FB3-3228-010 1 1 1 1 1 1 1 FB5-8704-000 FB5-6369-000 FB5-6342-000 FB3-9463-000 FB3-7088-000 FB2-6467-000 1 1 1 1 1 1 50,000 300,000 100,000 100,000 100,000 100,000 FG6-6427-000 1 100,000 FB2-4114-000 FB3-9466-000 1 1 100,000 100,000 FG5-8277-000 FB5-8705-000 FF6-1589-000 1 1 1 150,000 300,000 500,000 FH7-4678-000 FH7-4680-000 FH7-4679-000 FH7-4681-000 1 1 1 1 200,000 200,000 200,000 200,000 9 10 11 12 13 14 15 16 17 18 19 20 21 22 23 Fixing heater (lower) 24 Memo Remarks 200 V 230 V 200 V 230 V The above values are estimates only and are subject to change based on future data. The parts numbers are subject to change to reflect engineering revisions. T04-201-01 4-4 COPYRIGHT © 2001 CANON INC. 2000 2000 2000 2000 CANON CLC5000 REV.0 JAN. 2001 CHAPTER 4 MAINTENANCE AND SERVICING As of Jan 2001 No. Parts name 25 Oil removing blade (fixing assembly) 26 Delivery separation claw 27 Polishing roller (transfer belt assembly) 28 Primary charging assembly 29 Developing assembly (C, M, Y) 30 Developing assembly (Bk) Memo Parts number Q’ty Life Remarks FB3-2047-000 1 200,000 FB3-3215-000 FB6-0699-000 4 1 FG6-6269-020 FG6-6276-000 4 3 200,000 300,000 50,000 in case of only twosided copy. 250,000 500,000 FG6-6277-000 1 500,000 The above values are estimates only and are subject to change based on future data. The parts numbers are subject to change to reflect engineering revisions. T04-201-02 COPYRIGHT © 2001 CANON INC. 2000 2000 2000 2000 CANON CLC5000 REV.0 JAN. 2001 4-5 CHAPTER 4 MAINTENANCE AND SERVICING 2.1.2 By the Soft Counter in Service Mode (COUNTER) As of Jan 2001 No. 1 2 3 4 5 6 7 8 9 10 11 12 13 Parts name Feeding roller (duplexing unit) Pick-up roller (front; cassette 1, 2) Pick-up roller (rear; cassette 1, 2) Feeding roller (cassette 1, 2) Separation roller (cassette 1, 2) Pick-up roller (paper deck) Feeding roller (paper deck) Separation roller (paper deck) Pick-up roller (multifeeder) Feeding roller (multifeeder) Separation roller (multifeeder) Belt guide Scanning lamp Memo Q’ty Parts number 2 2 2 4 2 2 1 1 2 1 1 4 1 FF-5743-000 FB4-2033-000 FB4-2033-000 FB4-2034-000 FB5-6586-020 FF2-5674-020 FF2-4785-020 FF2-6312-020 FF5-4327-000 FF5-4331-000 FF2-4710-000 FB5-8705-000 FH7-3349-000 Life Remarks 100,000 250,000 250,000 250,000 250,000 100,000 100,000 100,000 50,000 50,000 50,000 150,000 100,000 • Cassette • Multifeeder • Duplexing unit Paperdeck For each pick-up holder, the actual number of copies made (reading of software counter). Number of scans by original scanner The above values are estimates only and are subject to change based on future data. The parts numbers are subject to change to reflect engineering revisions. T04-201-03 2.2 Buffer Pass Unit-B1 As of Jan 2001 No. 1 2 Parts name Curl removing roller Static eliminating brush Q’ty Parts number 2 1 FB5-8928-000 FA3-3129-000 Life Remarks 200,000 1,000,000 T04-202-01 2.3 Paper Deck-K1/J1 As of Jan 2001 No. 1 2 3 Parts name Pickup roller Feed roller Separation roller Q’ty Parts number 2 1 1 FF2-5674-020 FF2-4785-020 FF2-6312-020 Life Remarks 100,000 100,000 100,000 T04-203-01 4-6 COPYRIGHT © 2001 CANON INC. 2000 2000 2000 2000 CANON CLC5000 REV.0 JAN. 2001 CHAPTER 4 MAINTENANCE AND SERVICING 3 Scheduled Servicing Procedure 1. As a rule, provide scheduled servicing every 50,000 copies. 2. Before setting out for a visit, check the service record, and take parts expected for replacement. Step. Work 1 2 3 Meet the person in charge. Record the counter reading. Make test copies in Direct, Reduce, and Enlarge. 4 5 6 7 8 9 10 11 12 Checks Check the general condition. Check the faulty copies. a. Image density b. Soiling of white background c. Character clarity d. Leading edge margin e. Left/right margin f. Fixing/registration error; soiled back g. Abnormal noise h. Counter operation Provide scheduled servicing (Scheduled servicing chart) according to the number of copies made. Check the waste toner, transfer cleaner waste toner and fixing oil. Remarks Standard:2.5 ±1.5 mm (Direct) Standard:2.0 ±1.0 mm (Direct) Exercise care when sliding out the waste toner box. Excess impact can cause the toner to fly astray inside the machine. If toner flew astray, check the holding tray, pre-holding tray feeding assembly, and pre-fixing assembly feeding assembly for soiling. Clean soiled areas inside the machine. Make sample copies. Execute automatic gradation correction control in user mode. Make sample copies. Arrange the sample copies, and clean up the area around the machine. Record the latest counter reading. Fill out the Service Sheet, and report to the person in charge. T04-300-01 COPYRIGHT © 2001 CANON INC. 2000 2000 2000 2000 CANON CLC5000 REV.0 JAN. 2001 4-7 CHAPTER 4 MAINTENANCE AND SERVICING 4 Scheduled Maintenance Chart Do not use solvents or oils other than those indicated. : Replace × : Lubricate : Clean : Adjust 4.1 Copier Unit External control Scanner system Original exposure system Part Maintenance every every every every others 50,000 80,000 100,000 150,000 Copyboard glass Copyboard sheet Ozone filter Dust-proofing filter Toner filter Pre-fixing duct filter Scanner rail × Dust-proofing glass Scanner mirror (Nos. 1 through 3) Reflecting shade Standard white plate Charging Primary/pre-primary system charging wire, grid Primary charging wire cleaning pad (upper/lower) Primary, pre-charging assembly Separation, pre-fixing charging assembly Separation/Pre-fixing charging wire cleaning pad Separation/Pre-fixing charging gut wire Separation/Pre-fixing charging assembly Photosensi- Scoop-up sheet tive drum cleaner No. 2 scoop-up sheet (SALT sensor) Cleaner side seal Remarks Or 1 yr. Or 1 yr. Or 1 yr. Or 1 yr. When replacing the lamp. When replacing the drum. When replacing the lamp. When replacing the lamp. When replacing the lamp. When replacing ing blade When replacing ing blade When replacing ing blade When replacing ing blade Cleaner end seal the cleanthe cleanthe cleanthe clean- Cleaning blade T04-401-01 4-8 COPYRIGHT © 2001 CANON INC. 2000 2000 2000 2000 CANON CLC5000 REV.0 JAN. 2001 CHAPTER 4 MAINTENANCE AND SERVICING Unit Part Maintenance every every every others 50,000 100,000 150,000 Developing system Developing assembly upper cover (*1) Developing assembly lower cover (*2) Developing assembly casing (*2) Bearing (*2) Transfer system Transfer blade Transfer belt drive roller Transfer belt sub roller Transfer belt swing roller Internal stack removing roller Transfer web board Remarks When replacing the cleaner blade or the drum. When replacing the transfer belt. When replacing the trandfer belt. When replacing the transfer belt. Belt back surface cleaning member F04-401-01 Fixing assembly Polishing roller backup Inlet guide plate Delivery separation claw Thermistor upper When replacing the upper/ lower fixing roller. When replacing the upper/ lower fixing roller. Thermistor lower Oil applying blade (*1) For details on cleaning instructions, see CLC1000 Service Manual “Chapter 4 Mechanical System”. (*2) For details on cleaning instructions, see “Chapter 2 New Function”. T04-401-02 COPYRIGHT © 2001 CANON INC. 2000 2000 2000 2000 CANON CLC5000 REV.0 JAN. 2001 4-9 CHAPTER 4 MAINTENANCE AND SERVICING Unit Fixing assembly Part Maintenance every every every others 50,000 100,000 150,000 Toner scraping blade Remarks Caution : Remove the cushion rubber piece (*3) indicated in the drowing whenever you are removing the toner scraping blade. Cushion rubber Toner scraping blade F04-401-02 Oil removing blade Upper cleaning belt spring clutch When replacing the lower fixing roller. × Fixing assembly Upper web spring clutch F04-401-03 (*3) Cushion rubber is used as the member which prevent the fixing roller from hurting when the copier is transported. T04-401-03 4-10 COPYRIGHT © 2001 CANON INC. 2000 2000 2000 2000 CANON CLC5000 REV.0 JAN. 2001 CHAPTER 4 MAINTENANCE AND SERVICING Unit Part Maintenance every every every others 50,000 100,000 150,000 Pick-up/feeding Pick-up roller Feeding roller system Separation roller Pre-fixing feeding (top face/belt) Transfer separation guide Registration roller releasing spring clutch × Remarks Every 500,000 copies. Multifeeder assembly Registration roller replacing spring clutch F04-401-04 Others Waste toner box SALT sensor/shutter* Collect waste toner At time of replacing drum/ developer SALT sensor lower plastic sheet* Auto gradation correction Image position correction CCD unit (shutter assembly/LED assembly)* Developing assembly lower plastic sheet Pre-holding tray feeding assembly At time of replacing drum/ developer At time of replacing drum/ developer Holding tray pre-feeding assembly F04-401-05 *For details on cleaning, instructions, see CLC1000, Service Manual “Chapter 4 Mechanical System”. T04-401-04 COPYRIGHT © 2001 CANON INC. 2000 2000 2000 2000 CANON CLC5000 REV.0 JAN. 2001 4-11 CHAPTER 4 MAINTENANCE AND SERVICING Unit Others Location Maintenance every every every others 50,000 100,000 150,000 Duplexing unit (inside) SALT sensor plastic sheet* Remarks SALT sensor SALT sensor plastic sheet F04-401-06 Transfer belt plastic sheet Transfer unit cover/ transfer belt plastic sheet (front) F04-401-07 Collect waste toner Transfer cleaner waste toner box *For details on cleaning, instructions, see CLC1000, Service Manual “Chapter 4 Mechanical System”. T04-401-05 4.2 Buffer Pass Unit - B1 Unit Location Guide Spring clutch Maintenance every every every others 50,000 100,000 150,000 × Remarks Use special oil T04-402-01 4.3 Paper Deck - J1/K1 Unit Location Maintenance every every every others 50,000 100,000 150,000 Remarks Pickup roller Feed roller Separation roller T04-403-01 4-12 COPYRIGHT © 2001 CANON INC. 2000 2000 2000 2000 CANON CLC5000 REV.0 JAN. 2001 CHAPTER 5 TROUBLESHOOTING IMAGE FAULTS/ MALFUNCTIONS COPYRIGHT © 2001 CANON INC. 2000 2000 2000 2000 CANON CLC5000 REV.0 JAN. 2001 CHAPTER 5 TROUBLESHOOTING IMAGE FAULTS/MALFUNCTIONS 1 Guide to Table In this Service Manual, work procedures are given in the form of tables instead of flow charts used generally. Familiarize yourself by studying the example below. EX. AC power is absent. Cause Power plug Step 1 Covers 2 Power sourse 3 4 Checks Is the power plug connected to the power outlet? Are the front cover and delivery cover closed properly? Is the rated voltage present at the power outlet? Yes/No NO Is the rated voltage present between J1-1 and -2 (near cord plate)? Action Connect the power plug NO Close the cover NO The problem is not of the copier. Advise the customer as such. Go to step 6. YES ■ To find out the cause (problem part) of a single problem, refer to the item under "Cause." For "AC power is absent," the cause may be the power plug, covers, power source, or others. ■ To find out the checks to make or remedies to provide for a single problem, refer to the "Checks" and "Action"; make checks, answer to the questions YES or NO, and provide remedies accordingly. If the answer is otherwise, proceed to the next step. <Step> <Checks> <Yes/No> 1 Is the power plug connected to the power outlet? NO <Action> Connect the power plug. YES 2 Are the front cover and delivery cover closed properly? NO Close the cover. YES 3 Is the rated voltage present at the power outlet? NO The problem is not of the copier. Advise the customer as such. YES ■ Checks on the voltage using a tester; the description "Check the voltage between J1091(+) and J109-2(-) on the DC controller PCB" means that the positive probe of the meter should be placed on J109-1(+) and the negative probe, on J109-2(-). COPYRIGHT © 2001 CANON INC. 2000 2000 2000 2000 CANON CLC5000 REV.0 JAN. 2001 5-1 CHAPTER 5 TROUBLESHOOTING IMAGE FAULTS/MALFUNCTIONS Blank page 5-2 COPYRIGHT © 2001 CANON INC. 2000 2000 2000 2000 CANON CLC5000 REV.0 JAN. 2001 CHAPTER 5 TROUBLESHOOTING IMAGE FAULTS/MALFUNCTIONS 1.1 Image Adjustment Basic Procedure Are there wavy lines on the copies? START NO Set 'PASCAL' to '0' under 'ADJUST'. NO NO Check the height of each charging wire, and clean each wire. 1. Check the separation charging assembly for dirt. 2. Check the separation charging assembly for leakage. Are there toner splashes on the copies? Execute service mode at 'TEST->PG=05 (halftone), A4, and copy count 15'. Is there an appreciable difference in copy density between the 1st copy and the 15th copy? YES YES 1. 1.Set to 'DNES-Y/M/C/K =20'; then, generate 20 copies at 'PG=05 (halftone)'. 2. Check the internal static eliminator roller. 3. Check the internal static eliminator high-voltage system. Is there a difference in density between left and right on copies made at PG=04 (17 gradations) ? NO YES YES 1. Check the high-voltage system for separation charging. 2. Check the high-voltage system for pre-fixing charging. 3. Check the environment sensor. YES Execute 'INSTALL->STIR-Y/ M/C/K' (for the problem color). YES Set 'PASCAL' to '1' under 'ADJUST' in service mode. YES Is the image darker at the rear? Check the latent image formation system (b of next page). Is the problem corrected after performing the instructions? NO YES Make several copies using the CA-1 Chart. Check the transfer system (a of next page). Is the problem corrected after performing the instructions? NO NO Check to see if the grid plate is mounted properly. Clean the dust-proofing glass. Is a specific color suffering from an image fault (density difference, fogging, low density)? Check the developing system (c of next page). Is the problem corrected after performing the instructions? NO Excute auto gradation correction (full correction). NO YES Make the following copies under 'TEST' in service mode. Select M in user mode, and at PG=04 (17 gradations). Select C in user mode, and at PG=04 (17 gradations). Select Y in user mode, and at PG=04 (17 gradations). Select K in user mode, and at PG=04 (17 gradations). Turn the charging wire height adjusting screw at the front of the primary charging assembly for the problem color clockwise. At PG=05 (halftone), DNES-M=48, DNES-C/Y/K=0 At PG=05 (halftone), DNES-C=48, DNES-M/Y/K=0 At PG=05 (halftone), DNES-Y=48, DNES-M/C/K=0 At PG=05 (halftone), DNES-K=48, DNES-M/C/Y=0 At PG=14 (full color, 17 gradations), TXPH=0, THRU=1 Turn the charging wire height adjusting screw at the front of the primary charging assembly for the problem color counterclockwise. 3/4 turn Is the color balance normal? YES NO YES 3/4 turn NO Execute 'FUNC->EPC-> in service mode. Generate Test Print TYPE=4. Execute auto gradation correction (full correction) in user mode. Checking the Original Exposure System Is the image fault (difference in density between front and rear, fogging, uneven density) on the copies of the CA-1 Chart only? NO 1. Check the mounting position of the copyboard glass, standard white plate, scanning lamp reflecting shade, and No. 1/2/3 mirror.If dirt is found, clean the part. 2. Check to see if the No. 1 mirror mount or the No. 2 mirror mount should have ridden over the rail. 3. Check to see if the values in service mode are as indicated on the service label. YES YES Check the original exposure system. Execute 'FUNC->CCD-> AUTOADJ' in service mode. Is the problem corrected? Is the color balance normal? NO If there is no problem after the above checks and cleaning, execute 'FUNC->CCD->AUTOADJ' in service mode. Adjust 'COL-ADJ' in user mode. END F05-101-01 COPYRIGHT © 2001 CANON INC. 2000 2000 2000 2000 CANON CLC5000 REV.0 JAN. 2001 5-3 CHAPTER 5 TROUBLESHOOTING IMAGE FAULTS/MALFUNCTINS a. Checking the Transfer System b. Checking the Latent Static Image Formation System START Is the test print considerably light? NO START YES Is the locking/releasing operation of the transfer blade normal? Check HVT-1. NO Check the drive system of the transfer blade. Is uneven density or white spots noted on TYPE=4 Test Prints? NO Check the latent static image formation system. START YES Is the setting for a specific color for 'V00' of 'EPOT' under 'DISPLAY' in service mode within the optimum range? Check the preexposure lamp and the activation circuit system. YES NO Check the transfer blade. Check the transfer belt. Check the environment sensor. Is the setting for a specific color for 'DENS', 'SGNL', and 'REF' of 'DENS' under 'DISPLAY' in service mode within the optimum range? NO Is the pre-exposure lamp ON? YES c. Checking the Developing System Is the setting for a specific color for 'VFF' of 'EPOT' under 'DISPLAY' in service mode within the optimum range? YES YES NO Optimum range • Check the primary output system. • Check the potential control system. NO VOO-Y VOO-M VOO-C VOO-K 350~800 350~800 350~800 350~800 VFF-Y VFF-M VFF-C VFF-K 50~300 50~800 50~800 50~800 Is the setting for a specific color for P-SGNL' and 'P-REF' of 'PATCH' under 'DISPLAY' in service mode within the optimum range? YES • Check the laser output system. • Check the potential control system. Check the developing system. NO Optimum range SGNL-Y SGNL-M DENS-C REF-Y REF-M REF-C 700~912 700~912 700~912 377~848 377~848 377~848 For Y/M/C, check • developing high-voltage system • toner supply system • color toner density sensor NO Optimum range SGNL-S-Y SGNL-S-M SGNL-S-C SGNL-S-K REF-S-Y REF-S-M REF-S-C REF-S-K SGNL-D-Y SGNL-D-M SGNL-D-C SGNL-D-K SIGG-S-Y SIGG-S-M SIGG-S-C SIGG-S-K 640~850 640~850 640~850 192~389 464~544 464~544 464~544 464~544 380~900 380~900 380~900 300~720 50~250 50~250 50~250 50~250 For Y/M/C, check • developing high-voltage system • toner supply system • SALT sensor Check the connection of a connector on HVT3(A/B) PCB. F05-101-02 5-4 COPYRIGHT © 2001 CANON INC. 2000 2000 2000 2000 CANON CLC5000 REV.0 JAN. 2001 CHAPTER 5 TROUBLESHOOTING IMAGE FAULTS/MALFUNCTIONS 1.2 Points of the Scheduled Servicing Pattern reading unit (LED/shutter) Separation/Pre-fixing charging assembly Scanner rail Standard white plate Lint-free paper Blower brush Alcohol Lint-free paper Alcohol Cleaning (Note 1) Alcohol Lint-free paper Cleaning (Note 4) Blower brush Cleaning (Note 2) (Note 4) No. 1 through No. 3 mirror Reflecting shade Parts Oil applying blade Thermistor (upper / lower) Upper separation claw Parts Tools/solvents Alcohol Lint-free paper Solvent Lint-free paper Solvent Lint-free paper Tools/solvents Cleaning Cleaning (Note 4) Parts Dust-proofing glass Pick-up/feeding/separation roller Tools/solvents Lint-free paper Blower brush Alcohol Lint-free paper Work/remarks Cleaning (Note 3) Cleaning Work/remarks Cleaning Cleaning Cleaning Note 1: Take care not to apply force to the LED or to keep the CCD free of dust. Note 2: Take care not to touch the mirror or the lens and to keep the CCD free of dust. Note 3: Perform when performing the photosensitive drum. Note 4: At time of replacing the scanning lamp. Work/remarks Oil removing blade Alcohol Lint-free paper Cleaning Inlet guide plate Solvent Cleaning Transfer blade Lint-free paper Cotton swab Cleaning Waste toner box Collecting the box Transfer belt waste toner box Collecting the box Parts Primary/pre-primary charging assembly Tools/solvents Work/remarks Alcohol Lint-free paper Cleaning Blower brush Cleaning (Note 3) Lint-free paper Blower brush Lint-free paper Blower brush Lint-free paper Blower brush Cleaning (Note 3) Cleaner side seal Cleaner end seal Scoop-up sheet No. 2 scoop-up sheet SALT sensor/Shutter Cleaning (Note 3) Dry-wiping; do not use solvent. F05-102-01 COPYRIGHT © 2001 CANON INC. 2000 2000 2000 2000 CANON CLC5000 REV.0 JAN. 2001 5-5 CHAPTER 5 TROUBLESHOOTING IMAGE FAULTS/MALFUNCTIONS 2 Standards and Adjustments 2.1 Image-Related Parts 2.1.1 Non-Image Width The non-image width on copies made in Direct with original detection OFF must be as follows: Leading edge: 2.5 ±1.5 mm (2.5 ±2.0 mm) Left/right: 2.0 ±1.5 mm (2.0 ±1.5 mm) 2.5±1.5mm The value in parentheses refers to the second side of a two-sided copy. 0 2 4 6 8 10 12 14 16 18 20 F05-201-01 Leading Edge Non-Image Width 2.0±1.5mm 0 2 4 6 8 10 F05-201-02 Left/Right Non-Image Width COPYRIGHT © 2001 CANON INC. 2000 2000 2000 2000 CANON CLC5000 REV.0 JAN. 2001 5-7 CHAPTER 5 TROUBLESHOOTING IMAGE FAULTS/MALFUNCTIONS 2.1.2 Image Margin The image margin on copies made in Direct with original detection OFF must be as follows: Leading edge: 2.5 ±1.5 mm (2.5 ±2.0 mm) Left/right: 2.0 ±1.5 mm (2.0 ±1.5 mm) 2.5±1.5mm The value in parentheses refers to the second side of a two-sided copy. 0 2 4 6 8 10 12 14 16 18 20 F05-201-03 Leading Edge Margin 2.0±1.5mm 0 2 4 6 8 10 F05-201-04 Left/Right Image Margin 5-8 COPYRIGHT © 2001 CANON INC. 2000 2000 2000 2000 CANON CLC5000 REV.0 JAN. 2001 CHAPTER 5 TROUBLESHOOTING IMAGE FAULTS/MALFUNCTIONS 2.1.3 Checking and Adjusting the Non-Image Width and Margin Make adjustments in the following order: • Left-right registration • Image margin • Image reading start position (ADJ-XY) • Image margin (check) a. Adjusting the Left/Right Registration 1) Make 10 copies each using all cassettes, multifeeder, duplexing unit, and paper deck, and check the left/right margin. 2) If the margin is not as indicated, perform the following: • Standard Registration 3) Select ‘FUNC > ATTRACT’. 4) Using ‘ATT-SLCT’, select the pick-up assembly which is outside the specification. 5) Press ‘ATT-ON’. (Paper will be picked up automatically and stopped retained on the transfer belt.) 6) Make adjustments so that the distance L between the front edge of paper [1] and the front side plate [3] of the transfer unit [2] is 74.7 ±0.5 mm (reference). (In the case of LTR, 83.7 ±0.5 mm.) [1] [2] L [3] F05-201-05 Standard Registration • 1) 2) 3) Using the Cassette as the source of Paper Slide out the cassette from the machine. Remove the cassette front cover. Turn the adjusting screw [1] to adjust the position of the horizontal registration plate. • To increase the registration at the front, turn the adjusting screw to the left. • To increase the registration at the rear, turn the adjusting screw to the right. 4) After the adjustment, be sure to execute ‘paper width basic value registration’. [1] F05-201-06 (top view of cassette stay) COPYRIGHT © 2001 CANON INC. 2000 2000 2000 2000 CANON CLC5000 REV.0 JAN. 2001 5-9 CHAPTER 5 TROUBLESHOOTING IMAGE FAULTS/MALFUNCTIONS • Using the Multifeeder as the source of Paper Turn the screw [1] to move the tray position so that the standard value is attained. [1] F05-201-07 • Using the Two-Sided Copies as the source of Paper Loosen the screw [1], and adjust the position of the paper guide plate so that the standard value is attained. [1] F05-201-08 • Using the Paper Deck as the source of Paper 1) To move the paper [1] in the direction of ‘a’, turn the front adjuster [2] so that it will move down. (A full turn causes a shift of about 1 mm.) If the displacement is excessive, turn the rear adjuster so that it will move up. [1] Transfer belt b a L Transfer unit front side plate F05-201-09 5-10 COPYRIGHT © 2001 CANON INC. 2000 2000 2000 2000 CANON CLC5000 REV.0 JAN. 2001 CHAPTER 5 TROUBLESHOOTING IMAGE FAULTS/MALFUNCTIONS [3] [2] F05-201-10 2) To move the paper in the direction of ‘b’, turn the rear adjuster [3] so that it will move down. If the displacement is excessive, turn the front adjuster [2] so that it will move up. ■ If the left/right registration fails to be as indicated using the adjusters 3) Start the copier’s service mode, and make the following selections: ‘ADJUST>FEED-ADJ’. 4) With the ‘FEED-ADJ’ screen on the display, press the Start key. 5) Check the left/right registration, and adjust the image write start position in main scanning direction using ‘DECKADJ’, and then adjust the image write start position in sub scanning direction using ‘VSYC-ADJ’. ■ If the left right registration fails to be as indicated in service mode. 6) Check to make user that the copier’s left/ right registration is correct. COPYRIGHT © 2001 CANON INC. 2000 2000 2000 2000 CANON CLC5000 REV.0 JAN. 2001 5-11 CHAPTER 5 TROUBLESHOOTING IMAGE FAULTS/MALFUNCTIONS 7) Remove the four screws [1], and disconnect the connector [2]; then, remove the paper deck heater [3]. [2] [3] [1] F05-201-11 8) Loosen the two screws [1] (rear, front; 1 each) on the upper mounting plate of the side guide plate, and make adjustments. [1] [1] F05-201-12 • Do not change the paper width. • Limit the adjustment to ± 1.0 mm to prevent interference between the side guide plate and the lifter plate. 9) After adjusting the left/right registration, mount the side guide plate and the deck heater. 5-12 COPYRIGHT © 2001 CANON INC. 2000 2000 2000 2000 CANON CLC5000 REV.0 JAN. 2001 CHAPTER 5 TROUBLESHOOTING IMAGE FAULTS/MALFUNCTIONS b. Adjusting the Image Margin <M> FEED-ADJ <S> DISP ADJUST FUNC OPTION COUNTER UP-ADJ xxx REFE-ADJ xxx VSYC-ADJ xxx MARGN-L xxx <R> <P> LOW-ADJ xxx MULT-ADJ xxx DECK-ADJ xxx MARGN-R xxx MARGN-T xxx MARGN-B xxx <F> TEST F05-201-13 1) Start service mode, and select ‘ADJUST > FEED-ADJ’. 2) While the ‘FEED-ADJ’ screen is on, press the Start key. 3) If the image margin is not as indicated, adjust the image writing start position in the main scanning direction using ‘UPADJ’, ‘LOW-ADJ’, ‘MULT-ADJ’, ‘DECK-ADJ’, and ‘REFE-ADJ’ and using ‘VSYC-ADJ’ in the sub scanning direction. Then, adjust the non-image width using ‘MARGIN-L, -R, -T, -B’. (For details, see. “SERVICE MODE.”) COPYRIGHT © 2001 CANON INC. 2000 2000 2000 2000 CANON CLC5000 REV.0 JAN. 2001 5-13 CHAPTER 5 TROUBLESHOOTING IMAGE FAULTS/MALFUNCTIONS c. Adjusting the Image Reading Start Position (ADJ-XY) <M> ADJ-XY DISP COUNTER <S> <R>READY <P>READY <F> ADJ-X xxx ADJUST ADJ-Y FUNC ADJ-S xxx xxx OPTION ADJ-J xxx TEST F05-201-14 ADJ-X 20 20 ADJ-Y 1) Start service mode, and select ‘ADJUST > ADJ-XY’. 2) While the ‘ADJ-XY’ screen is on, press the Start key. • The appropriate copying mode will be set automatically, and a copy is made with a shift of about 20 mm as shown in F05-201-15. 3) If a portion of the image is missing, decrease the setting of ‘ADJ-X’ and ‘ADJ-Y’. 4) If an area outside the image area is copied, increase the setting of ‘ADJ-X’ and ‘ADJ-Y’. 5) Press the Start key once again, and check the output. 6) Press the Reset key. F05-201-15 5-14 COPYRIGHT © 2001 CANON INC. 2000 2000 2000 2000 CANON CLC5000 REV.0 JAN. 2001 CHAPTER 5 TROUBLESHOOTING IMAGE FAULTS/MALFUNCTIONS d. Adjusting the Pick-Up Timing (paper deck) If a discrepancy is found in the image leading edge margin on ‘LTR’ copies made using the paper deck, correct the problem by performing the following steps: 1) Place three or more sheets of ‘LTR’ paper in the paper deck. 2) Start service mode, and select ‘FUNC>P-UP-TMG’. 3) Execute ‘PK-ADJ-D’. • The machine picks up a single sheet of paper. 4) Execute ‘AK-ADJ-D’ for a total of three times to pick up three sheets of paper. 5) When pick-up has ended, press ‘DSEND-D’. COPYRIGHT © 2001 CANON INC. 2000 2000 2000 2000 CANON CLC5000 REV.0 JAN. 2001 5-15 CHAPTER 5 TROUBLESHOOTING IMAGE FAULTS/MALFUNCTIONS 2.1.4 Image Positioning Correction 1) 2) 3) 4) 5) • In case image position shifts in every color as well as the image positioning correction (Service Mode ‘FUNC>IMG-REG>AUTO-ADJ’) did not provide any effects on the image shift problem, follow the below procedures for adjustments. Select the service mode ‘TEST>PG>TYPE’. Set to “6 (lattice pattern)” and press the start button. (A test print will be printed out.) Select the service mode ‘OPTION>P-OPT>REG-DISP’. Set to “1” and then press the OK key. Press the reset key twice to exit from the service mode. Press the user mode key to enter the user mode. Select “Image Positioning Correction.” (The display indicates as below.) C AUTO ADJUSTMENT Y REG-H 124 REG-HS 3 REG-V 113 C 150 3 128 ACS FULL COLOR BLACK MANUAL ADJUSTMENT ORIGINAL RECOGNITION BK 154 0 113 OK CENTER SHIFT F05-201-16 6) Select “Manual Correction” key. 7) On the test print already made, on the basis of magenta color, measure how mm other three colors are shifting from the magenta. 8) In terms of any shifts in main scanning direction, make an adjustment by changing values of REG-H(rough adjustment) / REG-HS (fine adjustment). REG-H: In case the numerical value is increased by “+16,” the position will shift to the rear side by 1 mm. REG-HS: In case the numerical value is increased by “+32,” the position will shift to the rear side by 0.5mm. 9) In terms of any shifts in sub-scanning direction, make an adjustment by changing the REG-V value. REG-V: In case the numerical value is increased by “+16,” the position will shift to the trailing edge by 1mm. 10) Select “Auto Correction” key. 11) Press the OK button to exit from the user mode. 12) On the lattice-patterned test print, check if the image is normal. * In case the image position is not good, re-adjust the image. * In case the image position is good, go to the next step. 13) Select the service mode ‘OPTION>P-OPT>REG-DISP’. Set to “0” and press the OK key. 14) Press the reset key twice to exit from the service mode. 5-16 COPYRIGHT © 2001 CANON INC. 2000 2000 2000 2000 CANON CLC5000 REV.0 JAN. 2001 CHAPTER 5 TROUBLESHOOTING IMAGE FAULTS/MALFUNCTIONS 2.2 Original Illuminating System 2.2.1 When Replacing the Scanning Lamp, Standard White Plate, Lamp Regulator, Reflecting Lamp Cover, Reader Controller PCB, Flash memory on Reader Controller PCB, or Analog Processor PCB CCD Unit 1) Execute data reading using ‘CCD’ under ‘FUNC’ in service mode. 2.2.2 Routing the Scanner Cable • 1) 2) 3) 4) You must keep the mirror positioning tool (FY9-3040-000) near at hand before routing the scanner cable. Remove the left cover and the hopper left cover. Remove the control panel. Remove the vertical size plate and the right glass retainer right, and remove the copyboard glass. Move the No. 2 mirror mount until the pulley shaft [1] of the No. 2 mirror mount is visible through the long hole [2] in the side plate. [2] [1] F05-202-01 (rear) [1] [2] F05-202-02 (front) COPYRIGHT © 2001 CANON INC. 2000 2000 2000 2000 CANON CLC5000 REV.0 JAN. 2001 5-17 CHAPTER 5 TROUBLESHOOTING IMAGE FAULTS/MALFUNCTIONS 5) Fit a binding screw (M4 × 8mm) [3] to the pulley shaft [4] to fix the front and rear of the pulley temporarily to the side plate [5], thereby temporarily fixing the No. 2 mirror mount in place. [3] [4] [5] [5] [4] [3] F05-202-03 6) Fit the scanner cable on the pulley and the hook as indicated in F05-202-04. 1 2 3 5,7 [6] 4 6 [6] F05-202-04 • Take care not to damage the wire by the edge of the metal plate. • Be sure to keep the four screws [6] loose during the work. 5-18 COPYRIGHT © 2001 CANON INC. 2000 2000 2000 2000 CANON CLC5000 REV.0 JAN. 2001 CHAPTER 5 TROUBLESHOOTING IMAGE FAULTS/MALFUNCTIONS 7) Remove the screw [3] used in step 5. 8) Loosen the screw on the mirror positioning tool (FY9-3040-000), and extend the arm [7] fully. [7] F05-202-05 9) Set the mirror positioning tool [8] between the No. 1 mirror mount and the No. 2 mirror mount; then, insert the pin [9] that comes with the mirror positioning tool. [8] [9] F05-202-06 [8] [9] F05-202-07 COPYRIGHT © 2001 CANON INC. 2000 2000 2000 2000 CANON CLC5000 REV.0 JAN. 2001 5-19 CHAPTER 5 TROUBLESHOOTING IMAGE FAULTS/MALFUNCTIONS 10) Using two screws [10], fit the metal fixing [10] of the scanner cable to the No. 1 mirror mount through the angular hole in the side plate. [10] [11] F05-202-08 [11] [10] F05-202-09 11) Remove the mirror positioning tool. 12) Fully tighten the four screws [7] loosened in step 6. REF. You need not adjust the cable tension. 1. Check to make sure that the scanner cable is not twisted or has not ridden over the pulley. 2. Move the No. 1 mirror mount and the No. 2 mirror mount by hand to make sure that they move smoothly; at this time, take care not to touch the reflecting plate. 5-20 COPYRIGHT © 2001 CANON INC. 2000 2000 2000 2000 CANON CLC5000 REV.0 JAN. 2001 CHAPTER 5 TROUBLESHOOTING IMAGE FAULTS/MALFUNCTIONS 2.3 Photosensitive Drum-Related Parts 2.3.1 Removing the Photosensitive Drum 1) Draw out the process unit mount from the copier, and remove the process unit. Points to Note When Removing the Process Unit If you have to remove the process unit, perform the following to release the cleaning blade; otherwise, the plastic sheets found inside the unit can deform. [2] 2) Push the middle of the cleaning blade [1] with your finger to keep it away from the drum [2]; then, move the pressure releasing pin [3] in the direction of the arrow to free the cleaning blade. [3] [1] F05-203-01 3) Holding both ends of the drum [2], lift the drum to remove. [2] Take out the photosensitive drum, being careful not to damage it. F05-203-02 COPYRIGHT © 2001 CANON INC. 2000 2000 2000 2000 CANON CLC5000 REV.0 JAN. 2001 5-21 CHAPTER 5 TROUBLESHOOTING IMAGE FAULTS/MALFUNCTIONS 2.3.2 Points to Note When Installing the Photosensitive Drum • Make sure that the direction of the two bosses [1] on the flange shaft of the photosensitive drum and the direction of the slits [2] in the drum shaft match. To rotate the photosensitive drum, be sure to do so while lifting the process unit so that it is away from the drum. (to avoid damage to the drum) Match the slit and the protrusion. [2] Slit in the drum shaft [1] Boss on the photosensitive drum F05-203-03 F05-203-04 [2] When rotating the photosensitive drum, be sure to hold up the developing assembly so that it is away from the drum to prevent damage. 5-22 COPYRIGHT © 2001 CANON INC. 2000 2000 2000 2000 CANON CLC5000 REV.0 JAN. 2001 CHAPTER 5 TROUBLESHOOTING IMAGE FAULTS/MALFUNCTIONS 2.3.3 Points to Note When Fitting the Drum Drive Belt Fit the drum drive belt [2] so that all the markings [1] on the drum drive pulleys face the same direction. [1] [2] F05-203-05 2.4 Charging Assembly-Related Parts 2.4.1 Adjusting the Height of the Charging Wire Charging assembly Height of charging wire (mm) Primary charging assembly 4 mm (approx.) 10.5±0.2 4 mm (approx.) Separation charging assembly Pre-fixing charging assembly Variable width 16.5±0.3 4 mm (approx.) 17± 0.2 T05-204-01 REF. The height (position) of the charging wire may be adjusted by turning the screw found behind the corona assembly. (The height of the charging wire for the primary charging assembly, however, cannot be adjusted.) A full turn of the screw changes the position of the charging wire by about 0. 7 mm. COPYRIGHT © 2001 CANON INC. 2000 2000 2000 2000 CANON CLC5000 REV.0 JAN. 2001 5-23 CHAPTER 5 TROUBLESHOOTING IMAGE FAULTS/MALFUNCTIONS 2.4.2 Points to Note When Handling the Primary Grid Plate and the Primary Charging Wire Do not clean the primary grid plate or the primary charging wire. If image faults (uneven density) occurs, replace the part. 2.5 Developing Assembly-Related Parts 2.5.1 Replacing the Developer 1) Insert the door switch actuator into the door switch assembly. 2) Turn on the power, and insert and turn the control key. 3) Start service mode, and select ‘FUNC > IN-STALL’. 4) Select the 2nd screen, and set ‘LSNSKIL’ to ‘1’. 5) Select ‘0’ by executing ‘ADJSUT > PASCAL > PASCAL’. 6) Wait until warm-up ends. 7) Lift the hopper assembly to the topmost position. (At this time, the locking mechanism will turn on automatically. Make a visual check of the hopper assembly to make sure that the hopper assembly is locked.) 8) Install the hopper retaining fixings (left, right). 9) Release the hopper assembly, and move the assembly down to where the retaining fixings are located. Hopper assembly Hopper retaining fixing Lock F05-205-01 5-24 COPYRIGHT © 2001 CANON INC. 2000 2000 2000 2000 CANON CLC5000 REV.0 JAN. 2001 CHAPTER 5 TROUBLESHOOTING IMAGE FAULTS/MALFUNCTIONS 10) Install the laser shutter opening tool. Laser shutter Shutter pushing member Groove Laser shutter Laser shutter pushing member Laser shutter F05-205-02 11) Raise the hopper assembly as far as it moves, and operate the locking mechanism by hand; then, remove the hopper metal fixings (left, right). 12) Slide out the transfer assembly. 13) Place the collecting container as shown. Location indicating mark Collecting container F05-205-03 COPYRIGHT © 2001 CANON INC. 2000 2000 2000 2000 CANON CLC5000 REV.0 JAN. 2001 5-25 CHAPTER 5 TROUBLESHOOTING IMAGE FAULTS/MALFUNCTIONS 14) Remove the screw, and pull out the collecting container shutter. (At this time, check to make sure that the collecting container opening is open.) Fixing screw Collecting container shutter F05-205-04 15) Select the 2nd screen of ‘FUNC > INSTALL’ in service mode. 16) To collect all four developers, press ‘RECV-4’; for each, press ‘RECV-C, M, -Y, -K’. (The developer will be discharged into the collecting container; the operation will stop in about 2 min.) 17) When done, close the collecting container shutter, and fit and tighten the screw. 18) Remove the collecting container. 19) Close the transfer unit. 20) Press ‘SPLY-C, -M, -Y, -K’ as appropriate for the color to replace on the service mode screen [1]. 21) Check to make sure that the screw inside the developing assembly has started to rotate. 22) Fit the funnel that comes with the starter in the supply mouth of the developing assembly. Funnel F05-205-05 5-26 COPYRIGHT © 2001 CANON INC. 2000 2000 2000 2000 CANON CLC5000 REV.0 JAN. 2001 CHAPTER 5 TROUBLESHOOTING IMAGE FAULTS/MALFUNCTIONS 23) Pour developer into the developing assembly. • Tilt the container while turning it to avoid spilling the developer. Starter F05-205-06 24) When done, press the Stop key to stop the operation of the developing assembly. 25) Install the hopper metal fixings (left, right), and release the locking mechanism of the hopper assembly; then, lower the hopper as far as the metal fixings. 26) Remove the laser shutter opening tool. 27) Lift the hopper assembly to the topmost position. (At this time, the locking mechanism will not work; lock it by hand.) 28) Clean the SALT sensor of the color in question. 29) Remove the hopper retaining fixing (left, right). 30) Release the hopper assembly, and move it down to its specific position. 31) Select the 1st screen of ‘FUNC IN > STALL’ in service mode. ■ Replacement for All Colors 32) Execute ‘STIR-4’. (about 4 min) 33) Execute ‘INIT-7’. (about 2 min) 34) Execute ‘WINCLR4’. 35) Record the results on the service label. 36) Execute ‘ADJUST > PASCAL > PASCAL’ to select ‘1’. 37) Turn off and on the power switch. 38) Execute ‘auto gradation correction’ in user mode. COPYRIGHT © 2001 CANON INC. 2000 2000 2000 2000 CANON CLC5000 REV.0 JAN. 2001 5-27 CHAPTER 5 TROUBLESHOOTING IMAGE FAULTS/MALFUNCTIONS ■ Replacement for C/M/Y 32) Execute ‘STIR-C/M/Y’ as necessary. (about 1 min) 33) Execute ‘INIT-C/M/Y’ as necessary. (about 1 min) 34) Execute ‘SINIT-C/M/Y’ as necessary. (about 1 min) 35) Execute ‘WINCLR-C, M, or -Y’. 36) Select ‘1’ by executing ‘ADJUST > PASCAL > PASCAL’. 37) Record the result on the service label. 38) Turn off and then on the power switch. 39) Execute ‘auto gradation correction (full correction)’ in user mode. ■ Replacement for Bk Only 32) Execute ‘STIR-K’. (about 1 min) 33) Execute ‘SINIT-K’. (about 1 min) 34) Execute ‘WINCLR-K’. 35) Record the result on service mode. 36) Select ‘1’ by executing ‘ADJSUT > PASCAL > PASCAL’. 37) Turn off and then on the power switch. 38) Execute ‘auto gradation correction (full correction)’ in user mode. 2.5.2 When Replacing the Developing Assembly (CMYK) 1) Using ‘FUNC > INSTALL’ in service mode, set ‘IMNG-REG’ to ‘0’. 2) Replace the developing assembly. 3) Replace the developer of the color in guestion. 4) Using ‘FUNC > INSTALL’ in service mode, set ‘IMG-REG’ to ‘1’. 5-28 COPYRIGHT © 2001 CANON INC. 2000 2000 2000 2000 CANON CLC5000 REV.0 JAN. 2001 CHAPTER 5 TROUBLESHOOTING IMAGE FAULTS/MALFUNCTIONS 2.5.3 When Replacing the Photosensitive Drum [1] 1) After replacing the cleaning blade, apply lubricant. 2) Clean the plastic film [1] under the process unit mount with lint-free paper. [1] F05-205-07 3) Install the photosensitive drum. 4) Install the drum protection sheet. 5) Install the process unit, and install the process unit mount. 6) Ready the copier, and turn on the power switch. 7) Execute ‘auto gradation correction (full correction)’ in user mode. COPYRIGHT © 2001 CANON INC. 2000 2000 2000 2000 CANON CLC5000 REV.0 JAN. 2001 5-29 CHAPTER 5 TROUBLESHOOTING IMAGE FAULTS/MALFUNCTIONS 2.5.4 When Supplying the Hopper with Toner Perform the following steps when supplying a new hopper or the existing hopper with little toner (after replacing the toner level sensor, for example) with toner so as to prevent leakage of toner from the hopper: 1) Install the hopper position metal fixings (left, right) to the copier. 2) Fix the hopper assembly to the hopper position metal fixings. 3) Push the shutters at the bottom of the hopper in the direction of the arrow, making sure that the shutters are securely closed. [1] F05-205-08 4) Start supplying toner to the hopper. 5) After a minimum of 5 min, lower the hopper. 5-30 COPYRIGHT © 2001 CANON INC. 2000 2000 2000 2000 CANON CLC5000 REV.0 JAN. 2001 CHAPTER 5 TROUBLESHOOTING IMAGE FAULTS/MALFUNCTIONS 2.6 Transfer Belt Unit 2.6.1 Points to Note When Replacing the Transfer Belt • Avoid touching the surface of the transfer belt (particularly, the area coming into contact with paper). If the transfer belt is soiled, wipe it with a moist cloth (or a cloth moistened with alcohol). Be sure that the belt is completely dry before installing it to the machine. • If you have removed the transfer belt or replaced it, be sure to initialize the transfer belt swing data after the work by executing ‘FUNC>MISCp>E075RLS’ in service mode. For instructions, see 2.6.2 Initializing the Transfer Belt Swing Controller Data. • When installing the transfer unit, check to make sure that the bearing is securely in the transfer assembly frame rear support plate. [10] [9] F05-206-01 COPYRIGHT © 2001 CANON INC. 2000 2000 2000 2000 CANON CLC5000 REV.0 JAN. 2001 5-31 CHAPTER 5 TROUBLESHOOTING IMAGE FAULTS/MALFUNCTIONS 2.6.2 Initializing the Transfer Belt Swing Control Data When the transfer belt is swung, the swing data is recorded for use during swinging operation. You must initialize the transfer belt swing control data using ‘FUNC > F-MISCp > E075-RLS’ in service mode whenever you have done the following: • If you have removed the transfer belt (including replacement). • If you have replaced the transfer belt swing motor. • Memo • • Check to make sure that the transfer belt is not in contact with the end sensor. Make sure that the transfer belt unit is drawn out. (Insert the cover switch key to start service mode; ‘E075’ will be indicated, and the machine will enter service mode.) After executing ‘E075RLS’, turn off and then on the power switch. 2.6.3 Adjusting the Tension on the Drive Belt of the Transfer Belt Motor 1) Make adjustments so that the gap of the adjusting screw [1] of the transfer belt motor is 3.5 ±0.3 mm. [1] 3.5±0.3mm F05-206-02 5-32 COPYRIGHT © 2001 CANON INC. 2000 2000 2000 2000 CANON CLC5000 REV.0 JAN. 2001 CHAPTER 5 TROUBLESHOOTING IMAGE FAULTS/MALFUNCTIONS 2.6.4 Adjusting the Position of the Transfer Belt-Related Solenoid a Adjusting the Position of the Transfer Blade Solenoid (SL7) Fix the solenoid in place so that the distance between the solenoid arm and the solenoid mount base is 17.8 ±0.3 mm when the plunger of the solenoid is pulled. 17.8±0.3mm F05-206-03 b. Adjusting the Position of the Oil Removing Roller Solenoid (SL18) Fix the solenoid in place so that the 2.5±0.3mm stroke indicated in F05-207-12 is 2.5 ±0.3 mm when the solenoid arm is pulled by the spring. F05-206-04 COPYRIGHT © 2001 CANON INC. 2000 2000 2000 2000 CANON CLC5000 REV.0 JAN. 2001 5-33 CHAPTER 5 TROUBLESHOOTING IMAGE FAULTS/MALFUNCTIONS 2.7 When Replacing the Pick-Up/Feeding-Related Parts 2.7.1 Registering the Cassette/Multifeeder Paper Width Basic Setting (under ‘FUNC’) You must register the paper width basic setting if you have • Replaced the paper width VR of the copier (including the multifeeder). • Adjusted the front/rear registration for the cassette. For the cassette, you must register the setting for ‘STMTR’ and ‘A4R’; for the multifeeder, you must register the setting for ‘A6R’, ‘A4R’, and ‘A4’. a. Cassette 1 or 2 1) Slide out the cassette you want to register the setting for, and set the paper width guide plate inside the cassette to A4R. 2) Set the cassette in the copier. 3) Check that the basic setting is indicated on the CST-AD screen of ‘FUNC’ in service mode on the control panel. 4) Select the size of the cassette for which you want to register the basic setting: UP-A4R (cassette 1) LOW-A4R (cassette 2) 5) Note that basic setting 1 has been registered. 6) Slide out the cassette you want to register the setting for, and set the paper width guide plate inside the cassette to STMTR. 7) Set the cassette in the copier. 8) Check that the basic setting is indicated on the CST-AD screen of ‘FUNC’ in service mode on the control panel. 9) Select the size of the cassette for which you want to register the basic setting: UP-STMTR LOW-STMTR 10) Note that basic setting 2 has been registered. 5-34 COPYRIGHT © 2001 CANON INC. 2000 2000 2000 2000 CANON CLC5000 REV.0 JAN. 2001 CHAPTER 5 TROUBLESHOOTING IMAGE FAULTS/MALFUNCTIONS b. Multifeeder 1) Set the paper guide plate of the Guide (front) multifeeder to A4R (210 mm). 2) Note that the basic setting is indicated on the CST-AD screen for ‘FUNC’ in service mode on the control panel. 3) Select the size for which you want to register the basic setting. MF-A4R 4) Note that basic setting 1 has been registered. 5) Set the paper guide plate of the multifeeder to A6R (105 mm). Paper (A6R) Guide (rear) 105mm F05-207-01 6) Check that the basic setting is indicated on the CST-AD screen under ‘FUNC’ in service mode on the control panel. 7) Select the size for which you want to register the basic setting. MF-A6R 8) Note that basic setting 2 has been registered. 9) Set the paper guide plate of the multifeeder to A4 (297 mm). 10) The basic setting is indicated on the CST-AD screen under ‘FUNC’ in service mode on the control panel. 11) Select the size for which you want to register the basic setting. MF-A4 12) Note that basic setting 3 has been registered. If you have registered basic settings, record the settings on the service label. If you have replaced the DC controller PCB, enter the settings recorded on the service label using ‘DC-CON’ under ‘FUNC’ in service mode. COPYRIGHT © 2001 CANON INC. 2000 2000 2000 2000 CANON CLC5000 REV.0 JAN. 2001 5-35 CHAPTER 5 TROUBLESHOOTING IMAGE FAULTS/MALFUNCTIONS Variable resistor output A4/A3 A4R STMT-R STMT-R A4R (139.7mm) (210mm) Paper width A4 (297mm) F05-207-02 2.7.2 Orientation of the Cassette Pickup Roller When mounting the pickup roller [1] to the pickup assembly, be sure that the round marking [2] on the rubber portion is to the front of the machine. The pickup roller is identified as follows by the color of its collar: front : gold color rear : silver color Be sure to use the appropriate roller. Note) Color of roller : gray Color [1] [2] Front of the machine F05-207-03 5-36 COPYRIGHT © 2001 CANON INC. 2000 2000 2000 2000 CANON CLC5000 REV.0 JAN. 2001 CHAPTER 5 TROUBLESHOOTING IMAGE FAULTS/MALFUNCTIONS 2.7.3 Orientation of the Cassette Feed Roller When mounting the feed roller [1] to the pickup assembly, be sure that the gear [2] mounted to the feed roller is to the front of the machine. Note) Color of roller : gray [2] [1] Front of the machine F05-207-04 2.7.4 Orientation of the Cassette Separation Roller When mounting the separation roller [1] to the pickup assembly, be sure that the narrow groove [2] for the parallel pin found in the collar is toward the rear of the machine. [2] Note) Color of roller : gray Rear of the machine [1] F05-207-05 2.7.5 Adding the Pressure of the Cassette Separation Roller If double-feeding or pickup failure occurs during pickup operation, change the position of the pressure spring of the separation roller: a. If double-feeding occurs, move the hook of the spring in the direction of [A]. b. If pickup failure occurs, move the hook of the spring in the direction of [B]. [A] [B] F05-207-06 COPYRIGHT © 2001 CANON INC. 2000 2000 2000 2000 CANON CLC5000 REV.0 JAN. 2001 5-37 CHAPTER 5 TROUBLESHOOTING IMAGE FAULTS/MALFUNCTIONS 2.7.6 Orientation of the Paper Deck Pick-Up Roller When installing the pick-up roller to the pick-up roller shaft, make sure that the marking is to the rear. Marking Pick-up roller Front F05-207-07 2.7.7 Orientation of the Paper Deck Pick-Up/Feeding Roller When installing the pick-up/feeding roller, make sure that the marking is to the rear. Markings Bearing (one-way) Rear F05-207-08 2.7.8 Orientation of the Paper Deck Separation Roller 1) When installing the separation rubber roller, make sure that the marking is to the rear (coupling side). Markings Coupling F05-207-09 2) When installing the separation roller, make sure that the orientation identification rib on the roller collar is to the front. E-ring Bearing Identification rib Pin Front Roller collar F05-207-10 5-38 COPYRIGHT © 2001 CANON INC. 2000 2000 2000 2000 CANON CLC5000 REV.0 JAN. 2001 CHAPTER 5 TROUBLESHOOTING IMAGE FAULTS/MALFUNCTIONS 2.7.9 Adjusting the Position of the Paper Deck Pick-Up Roller Releasing Solenoid (SL8001) Install the solenoid where the paper deck pick-up roller is 4.0 ±1 mm from the surface of the paper when the plunger of the solenoid is pushed in. (Keep one sheet of paper on the paper deck lifter.) Mounting plate Pick-up roller 4.0±1mm Copy paper surface (keep one sheet on Pick-up roller the paper deck lifter) releasing solenoid Adjusting screw F05-207-11 2.7.10 Adjusting the Pressure of the Paper Deck Separation/Feeding Roller If pick-up faults or double-feeding occurs in the paper deck, change the position of the spring hooked on the retard stay. a. If pick-up faults occur, increase the pressure. b. If double-feeding occurs, decrease the pressure. Decrease the pressure. Standard (move to the next hole results in a change of about 50 g.) Spring Retard stay Increase the pressure. F05-207-12 2.7.11 Positioning the Cassette Pickup Roller Releasing Solenoid (SL9, SL10) The position of the solenoid needs not be adjusted; however, be sure that it is where it is when it is shipped from the factory. If you must remove it, be sure to mark its position with a scribe in advance. COPYRIGHT © 2001 CANON INC. 2000 2000 2000 2000 CANON CLC5000 REV.0 JAN. 2001 5-39 CHAPTER 5 TROUBLESHOOTING IMAGE FAULTS/MALFUNCTIONS 2.7.12 Adjusting the Pressure of the Multifeeder Separation Roller If double-feeding or pick-up faults occur during pick-up operation, change the position of the pressure spring [2] of the separation roller [1]. a. If double-feeding occurs, hook the pressure spring on the direction of A. b. If pick-up faults occur, hook the pressure spring on the direction of B. [1] [2] A B F05-207-13 2.7.13 Adjusting the Position of the Multifeeder Pick-Up Roller Releasing Solenoid (SL5) Install the solenoid so that the distance between the solenoid arm [2] and the rear side plate [3] is 3.5 ±0.2 mm when the plunger of the solenoid [1] is pushed in. [2] 3.5±0.2mm [1] [3] F05-207-14 (rear) 2.7.14 Adjusting the Position of the Delivery Paper Deflecting Plate Solenoid (SL14) 1) Place the delivery assembly upright on a flat surface. 2) Fix the solenoid in position where the arm [2] hits the stepped screw [3] and stops with the arm lifted and the plunger of the solenoid [1] pushed in. [1] [2] [3] F05-207-15 (rear) 5-40 COPYRIGHT © 2001 CANON INC. 2000 2000 2000 2000 CANON CLC5000 REV.0 JAN. 2001 CHAPTER 5 TROUBLESHOOTING IMAGE FAULTS/MALFUNCTIONS 2.7.15 Adjusting the Position of the Duplexing Unit Paper Deflecting Plate Solenoid (SL11) 1) Remove the duplexing unit. 2) Fix the solenoid in place with a mounting screw [3] after moving the solenoid to the delivery direction while the plunger [2] of the solenoid [1] is pushed in. [1] [2] [3] F05-207-16 (rear) 2.7.16 Adjusting the Position of the Duplexing Unit Stacking Assembly Paper Guide Plate 1) Select A3 or 11x17, and copy on the first side of a two-sided copy. 2) Slide out the duplexing unit to the front. 3) Measure the distance L of the paper guide plate [1]. A3 : L = 297.5 ±0.5 mm 11x17 : L = 297.5 ±0.5 mm L [1] [1] F05-207-17 4) If the measurement is outside the standards, remove the duplexing unit front cover. 5) Loosen the screw [2], and turn the adjusting screw [3]; then, adjust the position of the paper guide plate home position sensor. [2] [3] F05-207-18 COPYRIGHT © 2001 CANON INC. 2000 2000 2000 2000 CANON CLC5000 REV.0 JAN. 2001 5-41 CHAPTER 5 TROUBLESHOOTING IMAGE FAULTS/MALFUNCTIONS 2.7.17 Adjusting the Position of the Duplexing Unit Feeding Roller Solenoid (SL13) Let the feeding roller drop to the bottom of the duplex feeding assembly on its own weight. At this time, fix the solenoid [3] so that the end-to-end distance between the lever [1] and the arm [2] is 1.5 ±0.5 mm when the plunger of the solenoid is pushed. [2] 1.5±0.5mm [1] [3] F05-207-19 2.7.18 Attaching the Timing Belt for the Duplexing Unit Stacking Assembly Paper Guide Plate [3] Install the gear [1] with the paper guide plate fully open. Install the timing belt [3] to the gear 1 and the pulley [2]. [1] [2] F05-207-20 5-42 COPYRIGHT © 2001 CANON INC. 2000 2000 2000 2000 CANON CLC5000 REV.0 JAN. 2001 CHAPTER 5 TROUBLESHOOTING IMAGE FAULTS/MALFUNCTIONS 2.7.19 Adjusting the Position of the Separation Claw Solenoid (SL15) 1) Place the delivery assembly upright. 2) Fix the solenoid in place where the distance between the E-ring [3] and the resin washer [4] is 3.5 ±0.5 mm when the plunger of the solenoid [1] is pulled by the spring [2]. [2] [4] [3] [1] m .5m ±0 3.5 F05-207-21 2.7.20 Adjusting the Position of the Upper Fixing Web Take-Up Solenoid (SL3) [1] [2] F05-207-22 [3] 20.5±0.2mm 1) Keep the delivery assembly upright. 2) Fix the solenoid in place so that the vertical distance between the top end of the solenoid shaft [2] and the top end of the solenoid lever [3] is 16.3 ±0.2 mm when the plunger of the solenoid [1] is pushed. 2.7.21 When Replacing the Registration Roller Unit You must make adjustments as follows whenever you have replaced the registration roller unit: 1) Replace the registration roller unit. 2) Make several copies of the Test Chart, and check the leading edge margin, left/ right margin, and for skew movement. 3) If the leading edge margin is not as specified, make adjustments once again. (For standards and method, See Chapter 5>2.1 Image-Related Parts) 4) If skew movement is noted, make adjustments as instructed in the section that follows. COPYRIGHT © 2001 CANON INC. 2000 2000 2000 2000 CANON CLC5000 REV.0 JAN. 2001 5-43 CHAPTER 5 TROUBLESHOOTING IMAGE FAULTS/MALFUNCTIONS 2.7.22 Correcting Skew Movement(slope of the registration roller unit) If you must correct skew movement after replacing the registration roller unit, perform the following: 1) Remove the transfer right cover and the front right cover.(CLC1000 Service Manual>Chap 4>I. “External Control System”) 2) Loosen the two mounting screws [1] on the registration roller unit. [1] F05-207-23 3) Adjust the screw [2] used to position the fixing plate. • The leading edge of paper will be toward the front in relation to the movement of feeding (CW). [2] F05-207-24 Registration roller unit Conceptual diagram cw ccw cw ccw Transfer belt Paper Screw 2 F05-207-25 4) After making adjustments, fully tighten the screw loosened in step 2). 5-44 COPYRIGHT © 2001 CANON INC. 2000 2000 2000 2000 CANON CLC5000 REV.0 JAN. 2001 CHAPTER 5 TROUBLESHOOTING IMAGE FAULTS/MALFUNCTIONS 2.8 Laser Exposure System 2.8.1 When Replacing the Laser Unit 1) Perform laser focus adjustment. 2) Perform laser power adjustment. 3) Perform laser intensity adjustment. 2.8.2 When Replacing the Video Controller PCB Nothing in particular. 2.8.3 When Replacing the BD Unit Before removing the BD unit, be sure to mark its position with a scriber. 1) Using ‘FUNC>INSTALL’, set ‘IMG-REG’ to ‘0’. 2) Turn off the power switch, and replace the BD unit. 3) After replacement, execute ‘FUNC>INSTALL>REG-APER’ in service mode. (If a BD error ‘E100’ occurs, check the position of the unit, and execute ‘REG-APER’ once again.) 4) Execute ‘FUNC>IMG-REG>AUTO-ADJ’ in service mode. 5) Using ‘FUNC>INSTALL’ in service mode, set ‘IMG-REG’ to ‘1’. 2.8.4 Adjusting the Laser Power You must always adjust the laser power whenever you have replaced the laser unit. a. Required Tools • Laser Power Checker (FY9-4013) • Digital Multimeter (CK-0436) The output of the Laser Power Checker may change over time; have it calibrated once a year at the service station using a special calibration tool. COPYRIGHT © 2001 CANON INC. 2000 2000 2000 2000 CANON CLC5000 REV.0 JAN. 2001 5-45 CHAPTER 5 TROUBLESHOOTING IMAGE FAULTS/MALFUNCTIONS 1) If you have replaced the laser unit for C/Bk, position the analog processor PCB as indicated in F05-208-01. Analog processor PCB Screw Claw Copyboard glass F05-208-01 2) Turn on the power switch. 3) Open the laser power checker inlet cover. M nit ru Y laser power checker inlet cover Y las er e las un it M laser power checker inlet cover Analog processor PCB Bk laser power checker inlet cover Bk laser unit C laser unit C laser power checker inlet cover F05-208-02 5-46 COPYRIGHT © 2001 CANON INC. 2000 2000 2000 2000 CANON CLC5000 REV.0 JAN. 2001 CHAPTER 5 TROUBLESHOOTING IMAGE FAULTS/MALFUNCTIONS 4) Set the laser power checker switch to ‘2’. 5) Insert the laser power checker with its light-receiving face oriented as indicated in F05208-03. Y e las ru nit M las er un it Lightreceiving face Lightreceiving face Laser power checker Lightreceiving face C laser unit Bk laser unit Lightreceiving face F05-208-03 6) Insert the lead wire of the laser power checker into the Digital Multimeter, and set it to the 200 mV range. 7) Start service mode, and execute ‘POWER’ and ‘1/2 POWER’ of ‘6 LASER’ under ‘FUNC’. 8) Check to make sure that the reading of the Digital Multimeter is ‘POWER: 44.8 ±0.4 mV, 1/2 POWER: 20.0 ±0.2 mV’. If the readings are not as specified, make the following adjustments: COPYRIGHT © 2001 CANON INC. 2000 2000 2000 2000 CANON CLC5000 REV.0 JAN. 2001 5-47 CHAPTER 5 TROUBLESHOOTING IMAGE FAULTS/MALFUNCTIONS Making Adjustments 1) Turn the volumes VR1 through VR8 on the laser unit fully clockwise. VR1 : 1/2 Power VR2 : Power VR3 : 800-P00 VR4 : 800-PFF VR5 : 400-P00 VR6 : 400-PFF VR7 : 200-P00 266-P00 VR8 : 200-PFF 266-PFF VR8 VR6 VR4 VR2 VR5 VR3 VR1 VR7 F05-208-04 Y/Bk Laser Unit VR2 VR4 VR6 VR8 VR1 VR3 VR5 VR7 F05-208-05 C/M Laser Unitm 5-48 COPYRIGHT © 2001 CANON INC. 2000 2000 2000 2000 CANON CLC5000 REV.0 JAN. 2001 CHAPTER 5 TROUBLESHOOTING IMAGE FAULTS/MALFUNCTIONS 2) Start service mode, and execute ‘1/2 POWER’ of ‘LASER’ under ‘FUNC’. 3) Turn VR1 counterclockwise so that the reading of the Digital Multimeter is ‘20.0 ±0.2 mV’. (Take care not to turn too fast; the reading will increase abruptly at a certain point.) 4) Press the Stop key to stop the laser output. 5) Execute ‘POWER’ of ‘6 LASER’ under ‘FUNC’. 6) Turn VR2 counterclockwise so that the reading of the Digital Multimeter is ‘44.8 ±0.4 mV’. (Take care not to turn too fast; the reading will increase abruptly at a certain point.) 7) Take notes of the reading of ‘POWER’ after adjustment. 8) Press the Stop key to stop the laser output. 9) Perform laser intensity adjustment. • • • When turning the VR, turn it slowly while referring to the reading of the Digital Multimeter; do not increase the power excessively. Turning the VR clockwise decreases the laser output. Do not exceed the setting recorded on the label; otherwise, the laser diode may become damaged. 2.8.5 Adjusting the Laser Intensity Be sure to adjust the laser power before making the following adjustments: 1) 2) 3) 4) Start service mode, and execute ‘FUNC > 6 LASER > BIAS’. Take notes of the reading of the Digital Multimeter. Press the Stop key to stop the laser output. Compute the target value according to the following formula: Formula Results P00 target: (POWER–BIAS)×0.008+BIAS= PFF target: (POWER–BIAS)×0.9+BIAS= T05-208-01 5) Execute ‘FUNC > 6 LASER > 800-P00’ 6) Turn VR3 counterclockwise so that the reading of the Digital Multimeter is the P00 target value. 7) Press the Stop key to stop the laser output. 8) Execute ‘FUNC > 6 LASER > 800-PFF’ 9) Turn VR4 counterclockwise so that the reading of the Digital Multimeter is the PFF target value. 10) Press the Stop key to stop the laser output. COPYRIGHT © 2001 CANON INC. 2000 2000 2000 2000 CANON CLC5000 REV.0 JAN. 2001 5-49 CHAPTER 5 TROUBLESHOOTING IMAGE FAULTS/MALFUNCTIONS 11) Likewise, adjust the following volumes: • Execute the following in service mode, and use VR5: ‘FUNCTION>LASER>400-P00’ • Execute the following in service mode, and use6: ‘FUNCTION>LASER>400-PFF’ 12) Likewise, adjust the following volumes: • For Bk/Y laser unit, Execute the following in service mode, and use VR7: ‘FUNC>LASER>266-P00’ Execute the following in service mode, and use VR8: ‘FUNC>LASER> 266-PFF’ • For C/M laser unit, Execute the following in service mode, and use VR7: ‘FUNC>LASER>200-P00’ Execute the following in service mode, and use VR8: ‘FUNC>LASER>200-PFF’ 13) Press the Reset key to end service mode. 14) Turn off the power switch. 15) Remove the laser power checker, and install the inlet cover. 2.8.6 Laser Focus Adjustment 1) Check to make sure that the marking [1] on the lens assembly matches the marking [2] on the lens mount (standard position). [1] [2] If the unit is not in standard position, loosen the locking nut [3], and turn the lens assembly until the distance to the end [4] of the lens assembly is 27.3 ±0.2 mm, i.e., where the markings match. 27.3±0.2mm F05-208-06 [4] [3] F05-208-07 5-50 COPYRIGHT © 2001 CANON INC. 2000 2000 2000 2000 CANON CLC5000 REV.0 JAN. 2001 CHAPTER 5 TROUBLESHOOTING IMAGE FAULTS/MALFUNCTIONS 2) Perform focusing adjustments by turning the lens assembly once again according to the values recorded on the label. For instance, if the value is “+2/ 8,” turn the lens assembly in the positive direction (counterclockwise when viewing from the end of the lens assembly) over two notches. Feed length label 8 R FS6-8028 F05-208-08 Positive direction F05-208-09 3) Tighten the locking nut [3], and fix the position of the lens in place. COPYRIGHT © 2001 CANON INC. 2000 2000 2000 2000 CANON CLC5000 REV.0 JAN. 2001 5-51 CHAPTER 5 TROUBLESHOOTING IMAGE FAULTS/MALFUNCTIONS 2.9 Fixing Assembly-Related Parts 2.9.1 Points to Note When Replacing the Fixing Heater • Do not touch the surface of the heater. REF. Neither fixing heater (upper/ lower) has any specific front/ rear orientation. 2.9.2 Adjusting the Nip (fixing pressure adjusting nut) Check to make sure that the nip width is as indicated in T04-209-01. If not, turn the adjusting screw to adjust. Feeding direction b a A3 • Center of copy paper c F05-209-01 a and c represent points 10 to 15 mm from the edges. Dimension Measurements* a | b-c | b-a c-a 7.5 ±0.5 mm 0.5 mm or less 0.5 mm or less 0.5 mm or less * Taken when the upper and lower rollers are sufficiently heated. T05-209-01 Measuring the Nip Width If the fixing rollers are cool, wait until the standby period is over, wait an additional 15 min, and make 30 copies before taking measurements. 5-52 COPYRIGHT © 2001 CANON INC. 2000 2000 2000 2000 CANON CLC5000 REV.0 JAN. 2001 CHAPTER 5 TROUBLESHOOTING IMAGE FAULTS/MALFUNCTIONS Taking Measurements 1) Start service mode. 2) Select ‘NIP-CHK’ of ‘FUSER’ under ‘FUNC’. 3) Select ‘NIP-CHK=1’. 4) Press the Start key to execute. (The operation will stop automatically.) 5) Measure the dimensions indicated in F04-203-02 as a, b, and c. 2.9.3 Adjusting the Mounting Position of the External Paper Delivery Unit Guide Plate 1) Remove the left cover. 2) Open the front cover. 3) Pull out the fixing unit mount to the position where the front side plate of the external delivery paper unit and the section A of the guide plate [1] overlap each other. View [3] [A] [1] [2] View F05-209-02 4) Loosen a screw [2] for the guide plate. The guide plate [1] should be pushed in while it is being pushed to the front side plate of the external delivery unit [3]. 5) Tighten the screw [2] for the guide plate. COPYRIGHT © 2001 CANON INC. 2000 2000 2000 2000 CANON CLC5000 REV.0 JAN. 2001 5-53 CHAPTER 5 TROUBLESHOOTING IMAGE FAULTS/MALFUNCTIONS 2.10 Electrical 2.10.1 When Replacing Major Parts a. When Replacing the ROM on the DC Controller PCB or the Reader Controller PCB (The term “reader controller” or the “DC controller” within parentheses indicates work unique to the respective PCB.) 1) Turn on the power switch. 2) Record the settings of the user mode. (reader controller) 3) Set ‘IMG-REG’ on the second page of the INSTALLL screen under ‘FUNC’ in service mode from ‘1’ to ‘0’. (DC controller) 4) Turn off the power switch. 5) Disconnect the power plug from the power outlet. (DC controller) You must always disconnect the power plug from the outlet; merely turning off the power switch will not cut the power to the DC controller. 6) Replace the ROM of the DC controller and the ROM of the reader controller. 7) Connect the power plug to the power outlet, and turn on the power switch. 8) Execute ‘FUNC > R-CON > RAM-CLR’ in service mode. (the power switch will automatically be off : reader controller) 9) Turn on the power switch. (‘E350’ will be indicated : reader controller) 10) Execute ‘FUNC > CCD > AUTO-ADJ’ in service mode. (about 8 min; reader controller) 11) If a projector is installed, execute ‘FUNC > PROJ-ADJ > PROJ-CCD’ in service mode. (reader controller) 12) Compare the value in A of the service label and the service mode value; if different, or if you replaced the DC controller PCB as a whole, perform the steps for initializing the RAM on the DC controller PCB shown below. (DC controller) If you are not clearing the RAM of the DC controller PCB, be sure to check the setting of the following: ‘ADJUST>HV-TR-Y>TR-#’; then, if ‘-3’ is indicated, set it to ‘0’. (Be sure to do the same for zones A, B, and C.) 13) Set ‘IMG-REG’ on the panel of ‘INSTALL2’ under ‘FUNC’ in service mode from ‘0’ to ‘1’. (DC controller) 14) Enter new user mode settings and the value of B of service label. (reader controller) (If any of the service mode settings relating to the reader controller other than the items under B of the service label has been changed, be sure also to change such settings.) 15) Turn off and on the power switch. 16) Execute auto gradation correction, after setting ‘ADJUST > PASCAL’ in service mode to ‘1’. 5-54 COPYRIGHT © 2001 CANON INC. 2000 2000 2000 2000 CANON CLC5000 REV.0 JAN. 2001 CHAPTER 5 TROUBLESHOOTING IMAGE FAULTS/MALFUNCTIONS b. When Replacing the Reader Controller PCB 1) Initialize the RAM on the reader controller PCB. (See the appropriate instructions.) 2) Turn off and on the power switch. c. When Replacing the DC Controller PCB 1) Start service mode, and check to make sure that ‘DISP > BLT-DRFT > BELT-POS’ is ‘CENTER’; if not, move the transfer belt to the center. 2) Turn off the power switch. 3) Disconnect the power plug from the power outlet. Be sure to disconnect the power plug from the power outlet. Merely turning off the power switch will not cut the power. 4) 5) 6) 7) Replace the DC controller PCB. Turn on the power switch. Initialize the RAM on the DC controller PCB. (See the appropriate instructions.) Turn on and then off the power switch. d. Initializing the RAM on the DC controller PCB 1) Record the setting of ‘OFFSET-C/M/Y/K’ found in the second row of page 2 on the EPC screen of ‘FUCNT’ in service mode. 2) Start service mode, and check to make sure that ‘BELT-POS’ of ‘BLT-DRFT’ under ‘DISP’ is ‘CENTER’; if not, move the transfer belt to the center. 3) Execute ‘FUNC>DC-CON>RAM-LR’ in service mode. 4) Turn off the power switch, and disconnect and then connect the power plug (so that the RAM will be cleared). 5) Turn on the power switch. 6) If you have replaced the DC controller PCB, replace the developer according to the instructions on 2.5.1 Replacing the Developer. 7) Enter the value of A recorded on the service label. (If you have changed other service mode settings related to the DC controller, enter such settings as well.) 8) Execute ‘REG-APER’ of ‘INSTALL2’ under ‘FUNC’ in service mode. 9) Enter the setting of ‘OFFSET- C/M/Y/K’ recorded in step 1) to the following: ‘FUNC>DC-CON>POTOFST-C/M/Y/K’. COPYRIGHT © 2001 CANON INC. 2000 2000 2000 2000 CANON CLC5000 REV.0 JAN. 2001 5-55 CHAPTER 5 TROUBLESHOOTING IMAGE FAULTS/MALFUNCTIONS The settings on the screens of service mode are cleared when the RAM on the reader controller PCB is initialized. ADJUST OPTION Settings on ADJ-XY screen Settings on DOC-REC screen Settings on PROJ screen Settings on ED/RF screen Settings on COL-ADJ screen Settings on ADJ-MISC screen Settings on PRJ-ADJ screen Settings on P-OPT screen Settings on ON-SET on P-OPT screen Settings on REMOTE screen Settings on DECK screen The settings on the screens of service mode are cleared when the RAM on the DC controller PCB is initialized. ADJUST FUNC OPTION Settings on PASCAL screen Settings on FEED-ADJ screen Settings on ENV-SET screen Settings on HV-TR C/M/Y/K screen Settings on HV-SP screen Settings on HV-FS screen Settings on HV-EL screen Settings on DC-CON screen Settings on P-UP-TMG screen Settings on P-THICK screen Settings on IMG-REG screen Settings on FUSER screen Settings on P-OPT screen (except ON-SET) Service Mode Settings Related to the DC Controller PCB ADJUST FUNC OPTION 5-56 Settings on PASCAL screen Settings on FEED-ADJ screen Settings on ENV-SET screen Settings on HV-TR C/M/Y/K screen Settings on HV-SP screen Settings on HV-FS screen Settings on HV-EL screen Settings on DC-CON screen Settings on P-UP-TMG screen Settings on P-THICK screen Settings on IMG-REG screen Settings on FUSER screen Settings on P-OPT screen (except ON-SET) COPYRIGHT © 2001 CANON INC. 2000 2000 2000 2000 CANON CLC5000 REV.0 JAN. 2001 CHAPTER 5 TROUBLESHOOTING IMAGE FAULTS/MALFUNCTIONS e. Initializing the RAM on the Reader Controller PCB 1) Record the settings of user mode. 2) Execute ‘FUNC>R-CON>RAM-CLR’ in service mode. (The power switch will automatically turn off.) 3) Turn on the power switch. 4) Execute ‘FUNC>CCD>AUTO-ADJ’ in service mode. (about 8 min) 5) If a projector is installed, execute ‘FUNC>PROJ-ADJ>PROJ-CCD’ in service mode. 6) Enter any new user mode settings and the settings recorded in B of the service label. (If you have changed any other service mode settings related to the reader controller, enter such settings.) Service Mode Settings Related to the Reader Controller ADJUST OPTION Settings on ADJ-XY screen Settings on DOC-REC screen Settings on PROJ screen Settings on ED/RF screen Settings on COL-ADJ screen Settings on ADJ-MIS screen Settings on PRJ-ADJ screen Settings on R-OPT screen Settings on ON-SET on R-OPT screen Settings on REMOTE screen Settings on DECK screen The above service mode settings are cleared when the RAM on the reader controller is initialized. f. When Replacing the Image Position Correction CCD Unit 1) After replacing the image position correction CCD unit, execute ‘FUNC>INSTALL (2nd screen)>REG-APER’ in service mode. Thereafter, be sure to turn off and on the power switch to correct the image position. g. When Replacing the Paper Thickness Sensor 1) Check the settings (A through E) recorded on the label attached to the paper thickness sensor you are replacing, and record them under ‘SNSR-RNK’ on the service label. At this time, you need not perform step 3) and the subsequent steps if the settings are the same as the settings under ‘FUNC>P-THICK>SNSR-RNK’ of service mode. 2) Replace the power thickness sensor. 3) Enter the settings you recorded on the service label in step 1) under ‘FUNC>PTHICK>SNSR-RNK’ in service mode. (Each press on ‘SNSR-RNK’ toggles the settings A through E.) 4) Check to make sure that the values of ‘P-TH-1’ and ‘P-TH-2’ are identical to the values recorded on the service label; if different, enter the correct values using ‘FUNCDC-CON (5/5)>P-TH-1/2’ in service mode. 5) End service mode. COPYRIGHT © 2001 CANON INC. 2000 2000 2000 2000 CANON CLC5000 REV.0 JAN. 2001 5-57 CHAPTER 5 TROUBLESHOOTING IMAGE FAULTS/MALFUNCTIONS h. After Replacing the Pick-Up Motor/Pick-Up Unit 1) Place three or more A4 or LTR sheets of paper in the cassette (upper, lower). 2) Select ‘FUNC > P-UP-TMG’ in service mode. 3) Execute ‘PK-ADJ-U’ three times. • A value near ‘186’ will be indicated under ‘DATA-A’ and ‘PUDT-U’. 4) Press ‘D-SEND-U’ to write the adjustment data in RAM. 5) Execute ‘PK-ADJ-L’ three times. • A value near ‘104’ will be indicated under ‘DATA-L’ and ‘PUDT-L’. 6) Press ‘D-SEND-L’ to write the adjustment data in RAM. 7) Write the value of ‘PUDT-U/L’ on the service label. 8) End service mode. 2.10.2 Checking the Environment Measurement PCB The condition of the environment measurement PCB and the environment sensor is checked using the environment measurement checking tool (TKN-0457) and the sensor for the environment checking sensor (TKN-0456). a. Checking the Environment Measurement PCB 1) Turn off the power switch. 2) Remove the multitray covers 1 and 2. 3) Remove the environment sensor from the environment measurement PCB, and insert the sensor for the environment measurement checking sensor (TKN-0457) in its place. 4) Turn on the power switch. 5) Set the meter to the 30 VDC range, and check to make sure that the voltage of J1-1 (+) and J1-2 (–) on the environment measurement PCB is 24 V ±2.4V. If not, check the DC power supply PCB (DCP1). 6) Start service mode, and select ‘DISPLAY’. 7) Check the temperature and humidity on the ANALOG screen. BODY °C ....... 5 ±5 BODY % ........ 40 ±10 8) Check to make sure that the reading is within specification. If not, go to step 9). If the reading is as indicated, go to step 14). 9) Press the Reset key, and turn off the power switch. 10) Disconnect J1 of the environment measurement PCB. 11) Turn on the power switch; start service mode, and select ‘DISPLAY’. 12) Check the temperature and humidity on the ANALOG screen. BODY °C ....... 25 ±5 BODY % ........ 26 ±10 13) Check to make sure that the reading is as indicated. If the reading is not as indicated, suspect a fault in the DC controller. REF. 5-58 COPYRIGHT © 2001 CANON INC. 2000 2000 2000 2000 CANON CLC5000 REV.0 JAN. 2001 CHAPTER 5 TROUBLESHOOTING IMAGE FAULTS/MALFUNCTIONS 14) Press the Reset key. 15) Turn off the power switch. 16) Connect J1 of the environment measurement PCB. 17) Remove the environment measurement sensor from the environment measurement PCB, and insert the environment sensor. 18) Install all covers. b. Checking the Environment Sensor 1) Check the environment PCB. 2) Turn on the power switch, and leave it on for 5 min. 3) Start service mode, and select ‘DISPLAY’. 4) Check the temperature and humidity on the ANALOG screen. BODY °C ....... data A1 BODY % ........ data A2 5) Press the Reset key, and turn off the power switch. 6) Remove the environment sensor from the environment measurement PCB, and insert the sensor for the environment sensor (TKN-0456) in its place. 7) Turn on the service switch, and leave it on for 5 min. 8) Start service mode, and select ‘DISPLAY’. 9) Check the temperature and humidity on the ANALOG screen. (data B) BODY °C ....... data B1 BODY % ........ data B2 10) Compare data A and data B • The difference between data A1 and data B1 is 0 ±5. • The difference between data A and data B is 0 ±20. If the difference is outside the specification, replace the environment sensor. 11) Press the Reset key, and turn off the power switch. 12) Remove the sensor for the environment sensor from the environment measurement PCB, and insert the environment sensor. 13) Install all covers. The sensor for the environment sensor (TKN-0456) is adjusted with high precision at the factory. Keep it in a sealed case with a drying agent. COPYRIGHT © 2001 CANON INC. 2000 2000 2000 2000 CANON CLC5000 REV.0 JAN. 2001 5-59 CHAPTER 5 TROUBLESHOOTING IMAGE FAULTS/MALFUNCTIONS 2.10.3 Checking the High Voltage Control System a. Outline If an image fault occurs, you must first determine whether the cause is the latent static formation block which includes the photosensitive drum and the potential control system or the developing/transfer system. The CLC5000’s high-voltage is controlled to a specific level using the environment sensor and the potential sensor. Sensor Environment sensor Environment sensor Primary grid bias Transfer blade bias Separation charging bias Primary grid bias Developing bias Potential sensor b. Target Contrast Potential The primary grid bias or the developing bias control mechanism may be checked by canceling the auto setting mechanism by the environment sensor for target contrast potential. 1) Select ‘VCONT’ of ‘ADJ-MISC’ under ‘ADJUST’ in service mode. 2) Select an appropriate value from the target contrast voltage levels in the following table, and enter it. 0 1 2 3 4 5 6 7 8 C M Y K Auto 370.00 370.00 370.00 355.00 335.00 315.00 290.00 225.00 Auto 365.00 365.00 365.00 345.00 325.00 295.00 275.00 225.00 Auto 390.00 390.00 390.00 370.00 340.00 310.00 295.00 245.00 Auto 420.00 420.00 420.00 410.00 390.00 380.00 370.00 330.00 3) Execute ‘FUNC > EPC’ in service mode. 4) Make copies, and check the images. • If the image is better, suspect a fault in the environment sensor or the environment measurement PCB. 5) Return the setting of ‘VONT’ of ‘ADJ-MISC’ under ‘ADJUST’ in service mode to ‘0’. 5-60 COPYRIGHT © 2001 CANON INC. 2000 2000 2000 2000 CANON CLC5000 REV.0 JAN. 2001 CHAPTER 5 TROUBLESHOOTING IMAGE FAULTS/MALFUNCTIONS 2.10.4 Checking the Photointerrupters The CLC1000 allows you to use a conventional meter or service mode when checking its photointerrupters. a. Using a Meter 1) Set the meter to the 30VDC range. 2) Connect the – probe of the meter to J101-7 (GND) of the DC control PCB. 3) Connect the + probe to the terminals (on the DC controller PCB or the deck controller PCB) shown on the pages that follow. 4) Make checks according to the instructions given. b. Using Service Mode 1) Start service mode. 2) Press ‘DISP’. 3) Press ‘SENSOR’. 4) Make checks as indicated. <M> SENSOR <S> <R>READY <P>READY <F> FUNC 800000H 800001H 800002H 800003H xxxxxxxx xxxxxxxx xxxxxxxx xxxxxxxx 801000H 801001H 801002H 801003H xxxxxxxx xxxxxxxx xxxxxxxx xxxxxxxx 802000H 802001H 802002H 802003H xxxxxxxx xxxxxxxx xxxxxxxx xxxxxxxx OPTION 800004H 800005H xxxxxxxx xxxxxxxx 801004H 801005H xxxxxxxx xxxxxxxx 802004H 802005H xxxxxxxx xxxxxxxx DISP ADJUST COUNTER TEST Address bit 7 bit 0 F05-210-01 COPYRIGHT © 2001 CANON INC. 2000 2000 2000 2000 CANON CLC5000 REV.0 JAN. 2001 5-61 CHAPTER 5 TROUBLESHOOTING IMAGE FAULTS/MALFUNCTIONS 4) Set the laser power checker switch to ‘2’. Sensor PS 1 PS 2 PS 3 PS 4 PS 5 PS 6 Name Service mode Registration paper sensor 800006 bit 0 Multifeeder lifter sensor (upper) 80000A bit 2 Multifeeder lifter sensor (lower) 80000A bit 3 Multifeeder paper width sensor (front) 80000B bit 0 Multifeeder paper width sensor (rear) 80000B bit 1 Oil level sensor 80000E bit 2 800007 bit 6 800007 bit 7 80000F bit 7 80000E bit 0 PS 8 Pre-duplex feeding sensor 1 PS 9 Pre-duplex feeding sensor 2 PS 10 Transfer belt cleaning web rotation sensor PS 11 Transfer belt cleaning web length sensor 5-62 Checks During copying, • ‘1’ if paper is present over the registration paper sensor. • ‘0’ if absent. After the multifeeder has been selected and the Start key has been pressed, • ‘1’ when the lifter of the multifeeder moves up. During standby, • ‘1’ if the lifter of the multifeeder is down. During standby, • ‘1’ when paper is set in the multifeeder. During standby, • ‘1’ when paper is set in the multifeeder. • ‘1’ if the arm is over the sensor. • ‘0’ otherwise. • ‘1’ if paper is present over the pre-duplex feeding sensor. • ‘0’ if absent. • ‘0’ if paper is present over the pre-duplex feeding sensor 2. • ‘1’ if absent. Slide out the transfer unit, and open the transfer belt assembly. Close the transfer belt assembly by blocking the light of PS10 by paper; and set the transfer unit to the copier. • ‘1’ when the power is ON. • ‘0’ when the light is not blocked. Slide out the transfer unit, and open the transfer belt assembly. Close the transfer belt assembly by blocking the light of PS11 by paper; and set the transfer unit to the copier. • ‘1’ when the power is ON. • ‘0’ when the light is not blocked. COPYRIGHT © 2001 CANON INC. 2000 2000 2000 2000 CANON CLC5000 REV.0 JAN. 2001 CHAPTER 5 TROUBLESHOOTING IMAGE FAULTS/MALFUNCTIONS Sensor PS 12 PS 13 PS 14 PS 15 PS 17 PS 18 PS 19 PS 20 PS 21 PS 22 Name Service mode Checks • Transfer belt lifter sensor 1 80000 bit 0 Transfer belt lifter sensor 2 80000F bit1 Post registration paper sensor 800007 bit 0 Separation sensor 800007 bit 1 Transfer belt edge sensor 1 80000F bit 2 Transfer belt edge sensor 2 80000F bit 3 Transfer belt edge sensor 3 80000F bit 4 Transfer belt edge sensor 4 80000F bit 5 Pick-up vertical path 1 sensor 800006 bit 1 Paper deck connection bit 4 800005 ‘1’ when the transfer belt is moved down under ‘FUNC’ in service mode. • ‘0’ when moved up. • ‘0’ when the transfer belt is moved down under ‘FUNC’ in service mode. • ‘1’ when moved up. During copying, • ‘1’ when paper is present over the post registration paper sensor. • ‘0’ when absent. • ‘1’ when paper is present over the separation sensor. • ‘0’ when absent. During standby, • ‘1’ when the detecting lever is present over PS17. • ‘0’ when absent. During standby, • ‘1’ when the detecting lever is present over PS19. • ‘0’ when absent. During standby, • ‘1’ when the detecting lever is present over PS19. • ‘0’ when absent. During standby, • ‘1’ when the detecting lever is present over PS20. • ‘0’ when absent. • ‘1’ when paper is present over the pick-up vertical path 1 sensor. • ‘0’ when absent. • ‘0’ when the paper deck is set in the copier. COPYRIGHT © 2001 CANON INC. 2000 2000 2000 2000 CANON CLC5000 REV.0 JAN. 2001 5-63 CHAPTER 5 TROUBLESHOOTING IMAGE FAULTS/MALFUNCTIONS Sensor PS 23 PS 24 PS 25 PS 26 PS 27 PS 28 PS 29 PS 30 PS 31 PS 32 5-64 Name Service mode Cassette 1 paper sensor 80000B bit 4 Cassette 1 lifter sensor 80000A bit 0 Pick-up vertical path 2 sensor 800006 bit 2 Pick-up vertical path 3 sensor 800006 bit 3 Cassette 2 lifter sensor 80000A bit 1 Cassette 2 paper sensor 80000B bit 5 80000A bit 6 800008 bit 0 Duplex paper sensor 80000B 2 bit 7 Delivery vertical path sensor 2 bit 4 Duplex paper jogging guide home position sensor Duplex sensor 1 800007 Checks During standby, slide out the cassette 1. • ‘1’ when the cassette is slid in with paper. • ‘0’ when the cassette is slid in without paper. During standby, slide out the cassette 1. • ‘0’ when the cassette is slid out. • ‘1’ when the cassette is slid in. • ‘1’ when paper is present over the pick-up vertical path 2 sensor. • ‘0’ when absent. • ‘1’ when paper is present over the pick-up vertical path 3 sensor. • ‘0’ when absent. During standby, • ‘1’ when the cassette 2 is slid out. • ‘0’ when the cassette 2 is slid in. During standby, • ‘1’ when the cassette is slid in with paper. • ‘0’ when the cassette is slid in without paper. During standby, slide out the duplexing unit, and remove the front cover. • ‘1’ when the duplexing unit is slid in and the light-blocking plate is over the sensor. • ‘0’ otherwise. During standby, • ‘1’ when paper is put over the duplex sensor 1. • ‘0’ otherwise. During standby, • ‘1’ when paper is put over the duplex paper sensor 2. • ‘0’ otherwise. • ‘1’ when paper is present over the delivery vertical path sensor 2. • ‘0’ when absent. COPYRIGHT © 2001 CANON INC. 2000 2000 2000 2000 CANON CLC5000 REV.0 JAN. 2001 CHAPTER 5 TROUBLESHOOTING IMAGE FAULTS/MALFUNCTIONS Sensor PS 33 PS 34 PS 35 PS36 PS 37 PS38 PS 39 PS40 PS 41 PS 42 PS 8001 Name Service mode Duplex reversal sensor 800007 Checks ‘1’ when paper is present in the duplexing reversing assembly. • ‘0’ when absent. Delivery sensor • ‘1’ when paper is put over the delivery 800007 bit3 sensor. • ‘0’ otherwise. Internal delivery • ‘1’ when paper is put over the internal sensor 800007 bit 2 delivery sensor. • ‘0’ otherwise. Upper web length During standby, sensor 80000E bit 3 • ‘1’ when the detecting lever is put over the sensor. • ‘0’ otherwise. Scanner home posi- Reader unit controller During standby, remove the copyboard tion sensor glass. • ‘1’ when the light-blocking plate is put over PS37. Delivery vertical • ‘1’ when paper is put over the delivery path sensor 1 800008 bit 3 vertical path sensor 1. • ‘0’ otherwise. Shutter closed senExecute ‘FUNC > F-MISCp > MTR’ in sor 802011 bit 6 service mode to operate the shutter. PS39: ‘1’ at first; ‘0’ when operation starts; then, ‘1’ in about 10 sec. Shutter open sensor 802011 bit 7 PS40: ‘0’ at first; ‘1’ about 5 sec after operation; then, ‘0’ once again. Cassette 1 800003 bit 6 • ‘1’ if paper is present in the cassette. open/close sensor • ‘0’ when absent. Cassette 2 800003 bit 5 • ‘1’ if paper is present in the cassette. open/close sensor • ‘0’ when absent. 80000B bit 6 • ‘1’ if paper is present in the paper deck. Paper deck paper absent sensor • ‘0’ when absent. bit 5 COPYRIGHT © 2001 CANON INC. 2000 2000 2000 2000 CANON CLC5000 REV.0 JAN. 2001 5-65 CHAPTER 5 TROUBLESHOOTING IMAGE FAULTS/MALFUNCTIONS 3 Troubleshooting Image Problems 3.1 Initial Checks 3.1.1 Checking the Site of Installation a. Make sure that the voltage at the power source is as rated (±10%). b. Make sure that the site is not subject to high temperature/humidity (near a water faucet, water boiler, humidifier) and is not cold, not close to a source of fire, and not subject to dust. c. Make sure that the site is not subject to ammonium gas. d. Make sure that the site is free of direct rays of the sun; otherwise, curtains are provided. e. Make sure that the room is well ventilated. f. Make sure that the machine is kept level. Make the above checks to see if the site meets the requirements. 3.1.2 Checking the Originals Try to find out whether the problem is due to the type of original used or to the machine. a. Check the density of the originals; a diazo copy original or an original with transparency can produce copies that tend to be mistaken for “foggy copies”; and originals prepared in light pencil tend to produce copies that tend to be mistaken for “light image copies.” 3.1.3 Checking the Copyboard Cover, Copyboard Glass, and Standard White Plate Check the copyboard cover, copyboard glass, and standard white plate for dirt. Clean the part if soiled, and replace the part if damage is found. 3.1.4 Checking the Charging Assemblies a. Check each of the charging assemblies for dirt. Check the charging wire/grid plate for a fault (damage, deformation). b. Check shield plate of each charging assembly. (If necessary, dry wipe the part with lintfree paper; then, use alcohol. If the dirt cannot be removed, replace the part.) c. Check the height of each charging wire. d. Make sure that each charging assembly is properly set. e. Check the charging spring (especially of the separation charging assembly) for rusting. 3.1.5 Checking the Developing Assembly a. Check to make sure that the surface of the developing cylinder is covered with a uniform coating of toner. 3.1.6 Checking the Paper a. Check if the paper is of a type recommended by Canon. b. Check if the paper is moist. Try making copies using fresh paper. 5-66 COPYRIGHT © 2001 CANON INC. 2000 2000 2000 2000 CANON CLC5000 REV.0 JAN. 2001 CHAPTER 5 TROUBLESHOOTING IMAGE FAULTS/MALFUNCTIONS 3.1.7 Checking the Periodically Replaced Parts a. Check the periodically replaced parts against the Scheduled Servicing Chart, and replace those that reached the end of their lives. 3.1.8 Others When a machine is brought from a cold to a warm place in winter, its inside can start to develop condensation, leading to various problems. a. Condensation on the original illuminating system or the laser exposure system (glass, mirror, lens) causes light or dark images. b. Condensation in the charging system can cause leakage. c. Condensation in the pick-up system or on the feeding guide plate can cause feeding problems. If condensation is noted, dry wipe the part or leave the machine powered for 10 to 20 minutes. If uneven density (difference in density between front and rear), light images, or fogging is noted, perform the “Image Adjustment Basic Procedure” first. 3.2 Standard Image What is referred to as a “standard image” is an image in which the gray scale, color patches, and 3-color gradation scale are as follows when the Canon CA-1 Test Sheet is copied in four full colors. 3.2.1 Gray Scale No. 1 (dark area) is more or less black and the density grows lighter with No. 8 (light) area being barely visible and No. 9 being white. The color of the halftone area is more or less gray but is not appreciably yellowish or bluish. 3.2.2 Color Patches Each color can be distinguished and is not appreciably different from its original color (Test Sheet). 3.2.3 Photo The color balance is not appreciably different from the original. 3.2.4 3-Color Gradation Scale No. 8 is barely visible with No. 9 being white. COPYRIGHT © 2001 CANON INC. 2000 2000 2000 2000 CANON CLC5000 REV.0 JAN 2001 5-67 CHAPTER 5 TROUBLESHOOTING IMAGE FAULTS/MALFUNCTIONS 3.2.5 Halftone Band The color is not appreciably different from the original (Test Sheet). Further, the band as a whole is not appreciably uneven*, and the color does not differ appreciably between left and right. *Moire, if found, may be ignored. 3.2.6 Fogging The white area must not be foggy. Gray scale No. 1 through No. 3: dark area No. 4 through No. 6: halftone area No. 7 through No. 9: light area Color patch Halftone band Photo Gradation scale No. 1 through No. 3: dark area No. 4 through No. 6: halftone area No. 7 through No. 9: light area F05-302-01 5-68 COPYRIGHT © 2001 CANON INC. 2000 2000 2000 2000 CANON CLC5000 REV.0 JAN. 2001 CHAPTER 5 TROUBLESHOOTING IMAGE FAULTS/MALFUNCTIONS F05-302-02 Standard Image Sample COPYRIGHT © 2001 CANON INC. 2000 2000 2000 2000 CANON CLC5000 REV.0 JAN 2001 5-69 CHAPTER 5 TROUBLESHOOTING IMAGE FAULTS/MALFUNCTIONS 3.3 Test Prints The CLC1000 possesses nine types of test print patterns, enabling identification of an error in reference to each test print pattern. If a fault on a copy made normally does not appear on a test print, you may suspect the original exposure system, CCD, analog processor, or image processor. 3.3.1 Selecting a Test Pattern 1) 2) 3) 4) 5) 6) Set the copy count and copy size. Start service mode. (asterisk key * → ‘2’ ,‘8’ → asterisk key *) Press ‘TEST’. Select ‘PG → TYPE’. Enter the appropriate PG number using the keypad. Set the color mode. • ‘COLOR-Y/M/C/K=1’ selects a color. *Effective when ‘PGTYPE=2, 3, 4, 5, or 6. 7) Set the density of the test print*. • Set the density using the ‘DENS-Y/M/C/K’ key. *Effective when ‘PGTYPE=5’. 8) Press the Start key. Be sure to return the setting of ‘PGTYPE’ to ‘0’ when you have finished checks using test prints. 5-70 COPYRIGHT © 2001 CANON INC. 2000 2000 2000 2000 CANON CLC5000 REV.0 JAN. 2001 CHAPTER 5 TROUBLESHOOTING IMAGE FAULTS/MALFUNCTIONS PGTYPE 0 1 2 3 4 5 6 7 8 9 10 11 12 13 14 15 16 17 18 19 20 21 22 Description Image from CCD (regular copying) For R&D 256 colors 256 gradations 17 gradations Total halftone page Grid For image position correction For R&D For R&D MCYBk horizontal stripe (laser FF activation) For R&D For R&D For R&D Full color in 17 gradations Not used Not used For R&D For R&D For R&D For R&D For R&D For R&D T05-303-01 COPYRIGHT © 2001 CANON INC. 2000 2000 2000 2000 CANON CLC5000 REV.0 JAN 2001 5-71 CHAPTER 5 TROUBLESHOOTING IMAGE FAULTS/MALFUNCTIONS 3.3.2 256-Color Test Print (PGTYPE=02) Use the 256-color test print to check the hues. For the 256-color test print, the 16×16 frames from the leading edge of the copy paper represent 256 colors; all frames that follow are repetitions of the first set. a. Hues of the 256 Colors The print must show the hues shown in F05-303-01. If the hues are different, suspect deterioration of the developer, deterioration of the photosensitive drum, and mixing of developers. 16 frames 16 frames F05-303-01 5-72 COPYRIGHT © 2001 CANON INC. 2000 2000 2000 2000 CANON CLC5000 REV.0 JAN. 2001 CHAPTER 5 TROUBLESHOOTING IMAGE FAULTS/MALFUNCTIONS 3.3.3 256-Gradation Test Print (PGTYPE=03) Use the 256-gradation test print to check gradation and balance between colors. a. Gradation You may check the gradation of all densities from density 0 to density 255. b. Balance between Colors (3-color copying) Select 3-color mode, and generate a test print to check the gray balance of all densities from density 0 to density 255. Memo Use Service mode ‘TEST>PG>COLOR-C/M/Y/K’ to make a mono or 3color selection. 16 frames 16 frames F05-303-02 COPYRIGHT © 2001 CANON INC. 2000 2000 2000 2000 CANON CLC5000 REV.0 JAN 2001 5-73 CHAPTER 5 TROUBLESHOOTING IMAGE FAULTS/MALFUNCTIONS 3.3.4 17-Gradation Test Print (PGTYPE=04) Use the 17-gradation test print to check gradation, fogging, white lines, uneven density between left and right, and balance between colors. a. Gradation If the gradation of density is not as shown in F05-303-03, suspect a fault in the developing assembly or the laser system. b. Fogging If fogging is over the section of 00 activation in F05-303-03, suspect a fault in the developing system or the photosensitive drum; or, the laser may not be adjusted correctly. c. White Lines If white lines are noted on the image, suspect a fault in the developing assembly. d. Balance between Colors (3-color copying) Select 3-color mode to generate a test print to check the gray balance at each density. 00 activation 16-gradation Memo Use Service mode ‘TEST>PG>COLOR-C/M/Y/K’ to make a mono or 3color selection. F05-303-03 5-74 COPYRIGHT © 2001 CANON INC. 2000 2000 2000 2000 CANON CLC5000 REV.0 JAN. 2001 CHAPTER 5 TROUBLESHOOTING IMAGE FAULTS/MALFUNCTIONS 3.3.5 Halftone Test Print (PGTYPE=05) Use the halftone test print to check transfer faults (failure), black lines, white lines, and uneven intervals. a. Transfer Faults (failure) If a transfer fault is noted, suspect a fault in the transfer belt or the static eliminating assembly. b. Black Lines If black lines are noted, suspect scratches on the photosensitive drum or dirt on the primary charging wire. c. White Lines If white lines are noted at the same location for all colors, suspect a fault on the transfer belt. If they occur at different locations, or if they occur in one color only, suspect a fault in the developing assembly. d. Uneven Intervals If uneven intervals occur, suspect the following: • If at intervals of about 0.5 mm, suspect the scanner*. • If at intervals of about 38 mm, suspect the developing cylinder. • If at intervals of about 1.6 mm, suspect the drive gear. *Will not occur on test prints. Memo Use Service mode ‘TEST>PG>COLOR-C/M/Y/K’ to make a mono or 3color selection. COPYRIGHT © 2001 CANON INC. 2000 2000 2000 2000 CANON CLC5000 REV.0 JAN 2001 5-75 CHAPTER 5 TROUBLESHOOTING IMAGE FAULTS/MALFUNCTIONS F05-303-04 5-76 COPYRIGHT © 2001 CANON INC. 2000 2000 2000 2000 CANON CLC5000 REV.0 JAN. 2001 CHAPTER 5 TROUBLESHOOTING IMAGE FAULTS/MALFUNCTIONS 3.3.6 Grid Test Print (PGTYPE=06) Use the grid test print to check color displacement, right angles, and straight lines. a. Color Displacement If color displacement is noted, suspect a fault in the transfer belt. Color displacement on this test print does not necessarily mean color displacement on regular copies because of black text processing. The mechanisms are normal as long as color displacement is not noted on regular copies. (Use this test to find out the location of displacement and the color if color displacement is noted on regular copies.) b. Right Angles/Straight Lines If a fault is noted in relation to right angles or straight lines, suspect a displaced laser beam or a fault in the beam detection mechanism. Memo Use Service mode ‘TEST>PG>COLOR-C/M/Y/K’ to make a mono or 3color selection. F05-303-05 COPYRIGHT © 2001 CANON INC. 2000 2000 2000 2000 CANON CLC5000 REV.0 JAN 2001 5-77 CHAPTER 5 TROUBLESHOOTING IMAGE FAULTS/MALFUNCTIONS 3.3.7 Image Position Correction Pattern (PGTYPE=07) Use this test print to check whether the image position correction pattern is normal or otherwise. C pattern M pattern Y pattern Bkpattern F05-303-06 5-78 COPYRIGHT © 2001 CANON INC. 2000 2000 2000 2000 CANON CLC5000 REV.0 JAN. 2001 CHAPTER 5 TROUBLESHOOTING IMAGE FAULTS/MALFUNCTIONS 3.3.8 Horizontal Stripe (FF activation) Test Print (PGTYPE=10) Use the horizontal stripe test print to check the dark area density of each color, balance between colors, and white lines (development). a. Dark Area Density of Each Color and Balance between Colors The density must not be appreciably light. If a mono color copy is light, suspect a fault in the developer or the transfer blade. If the density is light for all colors, suspect a fault in the up/down movement of the transfer belt. b. White Lines (development) For instance, if white lines are noted in the cyan area of the copied image, suspect a fault in the developing assembly for cyan. c. Uneven Density between Left and Right If uneven density occurs between left and right for all colors, suspect dirt on the butting block, and a fault in the height of the primary charging wire. d. Image Position (left/right) If the position of the cassette holder or the setting of ‘REG-X, Y’ is wrong, the registration between the copy paper and the image (left/right) will have a discrepancy, eliminating the non-image width, possibly causing stray toner and soiling the inside of the machine. 2.5±1.5 mm F05-303-07 COPYRIGHT © 2001 CANON INC. 2000 2000 2000 2000 CANON CLC5000 REV.0 JAN 2001 2.0±1.0 mm 5-79 CHAPTER 5 TROUBLESHOOTING IMAGE FAULTS/MALFUNCTIONS 3.3.9 Full Color 17-Gradation (YMCBk+RGB+gray) Test Print (PGTYPE=14) Use the full-color 17-gradation test print to check gray balance, gradation of CMYBk, and gradation of RGB mono, and fogging. a. Gray Balance Check to make sure that each color is reproduced at an even density over the gray scale. To make adjustments, use the contrast potential. b. Gradation Check gradation of CMYBk and RGB mono and difference in density. c. Fogging If fogging is noted in the white area, suspect a fault in the developing assembly or the photosensitive drum; or, the laser may not be adjusted correctly. C, M, Y gray scale C, M, Y, Bk gray scale C M R G B 00 activation 16-gradation Y Gradatoin of Bk (gray scale) F05-303-08 5-80 COPYRIGHT © 2001 CANON INC. 2000 2000 2000 2000 CANON CLC5000 REV.0 JAN. 2001 CHAPTER 5 TROUBLESHOOTING IMAGE FAULTS/MALFUNCTIONS 3.4 Troubleshooting Image Faults 1 2 3 4 5 6 Too light (all colors) Too light (specific color) Uneven density (vertical) Uneven density (horizontal) Fogging Vertical lines/ horizontal lines 7 8 9 10 11 12 White lines/white lines (vertical) 13 Horizontal lines/horizontal fogging 14 White spots (horizontal) 15 White spots 16 White spots (trailing center) 17 White spots (wavy lines) 18 Soiled image/soiled back Fixing fault Toner smear (fixing) Blank Solid black Color displacement 3.4.1 The image is too light (all colors). Perform the Image Adjustment Basic Procedure. 3.4.2 The image is too light (specific color). Perform the Image Adjustment Basic Procedure. 3.4.3 The copy has uneven density (vertical). 1) Clean the primary charging assembly, dust-proofing glass, reflecting mirror, and lens. Is the problem corrected? YES: End. 2) Is the output image of the halftone test print (PGTYPE=5) normal? NO: Go to step 12. Moire 3) Is the image uneven because of moire*? * Pattern interference that can occur when copying originals printed in dots. YES: Decrease ‘Photo Sharpness’, and store the setting in standard mode. • If excessively decreased, copies of photos will have little contrast. Scanner 4) Clean the standard white plate, scanning lamp, and reflecting lamp cover. Is the problem corrected? YES: End. 5) Is there a gap under the standard white plate or the copyboard glass? YES: Install them so that the part will be in even contact. 6) Is the scanning lamp blackened? YES: Replace it. COPYRIGHT © 2001 CANON INC. 2000 2000 2000 2000 CANON CLC5000 REV.0 JAN 2001 5-81 CHAPTER 5 TROUBLESHOOTING IMAGE FAULTS/MALFUNCTIONS Service mode 7) Are the settings of ‘CCD’ in service mode as indicated on the service label? NO: Enter the correct settings. 8) Execute ‘FUNC > CCD > AUTO-ADJ’. Is the problem corrected? NO: Try replacing the image processor and the analog processor. Developing assembly 9) Is uneven density noted in all colors? NO: Check the developing assembly and the developing cylinder for which uneven density is noted; if a fault is found, clean or replace it. Grid wire (primary charging assembly) 10) Is the grid plate of the primary charging wire normal? NO: Replace the grid plate. Pre-exposure lamp 11) Does the pre-exposure lamp turn ON during copying operation? NO: Check the contact of J2239 on the DC controller PCB and the wiring from J2239 to connector on the pre-exposure lamp PCB; if normal, replace the pre-exposure lamp PCB. Transfer/static eliminating system 12) • Is the transfer blade locking mechanism of the transfer unit normal? • Are there scratches or a fault on the transfer blade? • Operate the transfer blade using ‘BLADE’ under ‘FUNC’ in service mode to check the locking of the transfer blade. At this time, is the transfer blade subject to warping or other fault? YES: Check the transfer blade locking mechanism; if normal, replace the transfer blade. Fixing unit 13) Are there scratches or dents in the peripheral direction of the fixing roller (upper, lower)? YES: Replace the fixing roller. 14) Is there a fault in the fixing oil applying roller, oil applying blade, toner removing blade, oil hose, oil tank, fixing oil pump drive solenoid (SL2), or oil removing blade? YES: Remove the cause of the fault, and replace the part. 5-82 COPYRIGHT © 2001 CANON INC. 2000 2000 2000 2000 CANON CLC5000 REV.0 JAN. 2001 CHAPTER 5 TROUBLESHOOTING IMAGE FAULTS/MALFUNCTIONS 3.4.4 The copy has uneven density (horizontal). 1) Clean the primary charging assembly, dust-proofing glass, reflecting mirror, and lens. Is the problem corrected? YES: End. 2) Is the output image of the halftone print (PGYTPE=5) normal? YES: Go to step 11. Moire 3) Is the image uneven because of moire*? * Pattern interference that occurs when copying originals printed in dots. YES: Decrease ‘Photo Sharpness’, and store the setting in standard mode. • If excessively decreased, copies of photos will have little contrast. Service mode (CCD) 4) Are the settings of ‘CCD’ as indicated on the service label? NO: Enter the correct settings. 5) Execute ‘FUNC > CCD > AUTO-ADJ’ in service mode. Is the problem corrected? NO: Replace the image processor or the analog processor. Transfer/static eliminating system 6) • Is the transfer blade locking mechanism of the transfer unit normal? • Are there scratches or a fault on the transfer blade? • Operate the transfer blade using ‘BLADE’ under ‘FUNC’ in service mode to check the locking of the transfer blade. At this time, is the transfer blade subject to warping or other fault? YES: Check the transfer blade locking mechanism; if normal, replace the transfer blade. Fixing unit 7) Are there scratches or dents in the peripheral direction of the fixing roller (upper, lower)? YES: Replace the fixing roller. 8) Is there a fault on the fixing oil applying roller, oil hose, oil tank, oil pump driver solenoid or oil removing blade? YES: Remove the cause of the fault, and replace the part. COPYRIGHT © 2001 CANON INC. 2000 2000 2000 2000 CANON CLC5000 REV.0 JAN 2001 5-83 CHAPTER 5 TROUBLESHOOTING IMAGE FAULTS/MALFUNCTIONS 3.4.5 The copy has fogging. Perform the Image Adjustment Basic Procedure. If fogging occurs in K at the 100th to 5000th copy after the replacement of developer in a low humidity environment, perform any of the following: 1. Decrease the setting of the following: ‘ADJUST>ADJ-MISC>K-DOFST’ Make five copies of the Test Print (type 5, DENS-K=255, COLOR-K=1, COLOR-Y/M/ C=0; copy count=1). Then, check to make sure that the setting of PASCAL is ‘1’, and execute auto gradation correction. 2. Check the following: ‘DISPLAY>ANALOG>BODY’ If it is ‘500 g’ or lower, replace the K developer, and execute the following: ‘FUNCTION>INSTALL>NLSET-K’ (about 2 min 30 sec) Then, check to make sure that the setting of ‘PASCAL’ is ‘1’, and execute auto gradation correction. 3.4.6 The copy has vertical streaks/vertical lines (the main scanning direction). 1) Generate a halftone test print (PGTYPE=5). Are vertical streaks/ vertical lines noted? If the problem is noted in all colors, go to step 12. If the problem is noted in a specific color, go to the next step. NO: Go to step 16. Primary charging assembly cleaner 2) Does the cleaner of the primary charging assembly stop in the middle? NO: Check the motor of the cleaner. Primary charging wire, Pre-primary charging wire 3) Clean the primary charging wire and the pre-primary charging wire. Is the problem corrected? YES: End. Grid plate 4) Are there scratches or dirt on the grid plate? YES: Replace the grid plate. Photosensitive drum 5) Are there scratches in the peripheral direction of the photosensitive drum? YES: Replace the photosensitive drum. If scratches are found, remove the cause. Further, keep in mind that scratches on the photosensitive drum can damage the cleaning blade; if such is the case, replace the cleaning blade also. 5-84 COPYRIGHT © 2001 CANON INC. 2000 2000 2000 2000 CANON CLC5000 REV.0 JAN. 2001 CHAPTER 5 TROUBLESHOOTING IMAGE FAULTS/MALFUNCTIONS Photosensitive drum cleaner (poor cleaning) 6) Is there paper or foreign matter on the cleaning blade of the photosensitive drum cleaner assembly? YES: Remove the foreign matter, and clean the cleaning blade and the outside of the cleaner assembly. 7) Is there deformation or damage on the edge of the cleaning blade? Feel the edge of the cleaning blade with a finger to check. NO: If deformation or damage is found, remove the cause, and replace the cleaning blade. See the description given for the photosensitive drum and the cleaning blade. 8) Are the vertical streaks rather wide and fuzzy? Does the waste toner screw rotate? Is there a collection of waste toner in the cleaning assembly? YES: Apply grease on the cleaner drive shaft of the photosensitive drum cleaner assembly, and remove the waste toner. Transfer blade 9) Does the transfer blade have warping, bending, or a fault? YES: Replace the transfer blade; if it is soiled with toner, clean it. Developing assembly 10) Check the developing assembly and the developing cylinder for which the problem is noted. Is there a fault? YES: Clean or replace it. SALT sensor scoop-up sheet 11) Does the SALT sensor scoop-up sheet have deformation or a fault? YES: Replace it. Fixing assembly 12) Are there scratches in the peripheral direction of the upper fixing roller? YES: • Replace the upper fixing roller. • Check if the web is taken up properly. • Check the fixing separation claw and the separation guide. 13) Are there scratches or dents in the axial direction of the fixing roller (upper, lower)? YES: Check the fixing assembly inlet for dirt. If the problem is on the trailing edge only, try replacing the fixing roller. Replace the fixing roller. Fixing assembly 14) Is there a fault on the oil applying roller, oil applying blade, toner removing blade oil hose, oil tank, oil pump driver solenoid, or oil removing blade? YES: Remove the cause of the fault, and replace the part. COPYRIGHT © 2001 CANON INC. 2000 2000 2000 2000 CANON CLC5000 REV.0 JAN 2001 5-85 CHAPTER 5 TROUBLESHOOTING IMAGE FAULTS/MALFUNCTIONS Optical path 15) Clean the standard white plate, scanning lamp, and reflecting lamp cover mirror. Is the problem corrected? YES: End. 16) Remove the CCD cover, and clean the surface of the CCD with a blower brush. Is the problem corrected? YES: End. NO: Replace the CCD unit. Pre-exposure lamp, Optical path (dirt) 17) Does the pre-exposure lamp have a fault? YES: Remove the cause, and replace the part. NO: Clean the bending mirror and the folding mirror. Work on the Photosensitive Drum and Cleaning Blade • Clean the photosensitive drum with a flannel cloth coated with toner. You need not replace the photosensitive drum if it is free of toner cake and its surface is free of scratches. • Clean the cleaning blade with lint-free paper. You need not replace it if its edge is free of scratches. Thereafter, put lubricant on lint-free paper, and coat the edge of the cleaning blade evenly with lubricant. Memo If the lubricant is not even, the copies may carry white, vertical lines. • Limit the application to the edge of the blade, i.e., where it will come into contact with the drum. • Do not rub the edge with force. Tap lightly over the edge to avoid damage. • Start from the top to the edge face as if to let the lubricant collect along the line that will come into contact with the drum. F05-304-01 5-86 COPYRIGHT © 2001 CANON INC. 2000 2000 2000 2000 CANON CLC5000 REV.0 JAN. 2001 CHAPTER 5 TROUBLESHOOTING IMAGE FAULTS/MALFUNCTIONS 3.4.7 The copy has white streaks/white lines (vertical : the sub scanning direction). 1) Generate a halftone test print (PGTYPE=5). Are there vertical white streaks/white lines? If in all colors, go to step 11. If in a specific color, go to the next step. NO: Go to step 13. Developing assembly 2) Check the cylinder of the developing assembly for which white streaks/white lines are noted. Are there white streaks or other fault? YES: Check the inside of the developing assembly for foreign matter. Laser optical path 3) Clean the dust-proofing glass of the laser exposure system. Is the problem corrected? YES: End. 4) Clean the lens with a blower brush. Is the problem corrected? YES: End. Photosensitive drum 5) Are there scratches in the peripheral direction of the photosensitive drum? YES: Clean the photosensitive drum with a cloth coated with toner; if the scratches are not eliminated, replace the photosensitive drum. Fixing unit 6) Clean the fixing assembly inlet guide (upper, lower). Is the problem corrected? YES: End. 7) Are there scratches or dents in the axial direction of the fixing roller (upper, lower)? YES: Remove the cause of the scratches, and replace the fixing roller. 8) Is there a fault in the take-up mechanism of the web and cleaning operation? YES: Remove the cause of the fault, and replace the part. 9) Check the fixing assembly separation claw or the separation guide for an error. YES: Clean or replace it. 10) Are there scratches or dents on the oil removing blade? YES: Clean or replace it. Cleaner lubricant 11) Does the problem occur during installation of the machine or replacement of the photosensitive drum? YES: Suspect uneven cleaner lubricant. See the notes on using the cleaner lubricant. COPYRIGHT © 2001 CANON INC. 2000 2000 2000 2000 CANON CLC5000 REV.0 JAN 2001 5-87 CHAPTER 5 TROUBLESHOOTING IMAGE FAULTS/MALFUNCTIONS Transfer unit 12) Are there scratches or fault on the transfer belt? YES: Replace the transfer belt. If soiled with toner, clean it. 13) Are there scratches or fault on the transfer blade? YES: Replace the transfer blade. Separation assembly 14) Clean the separation assembly. Is the problem corrected? YES: End. Optical path CCD, Standard white plate (dirt, scratches) 15) Clean the standard white plate, scanning lamp, reflecting lamp cover, mirror, reflecting mirror, and lens. Is the problem corrected? YES: End. NO: Try the following: • Change the setting of ‘ADJUST-S’ under ‘ADJUST’ in service mode to change the shading position. • Replace the standard white plate. • Replace the CCD unit. Caution on Using the Cleaner Lubricant You must shake the container well before removing its cap. When applying to the cleaning blade, be sure the application is uniform; uneven application will allow the lubricating ingredients to slide over the cleaning blade and adhere to the photosensitive drum, causing vertical white lines on the copies. If such a problem is noted, 1) Using the color for which vertical white streaks are noted, make 10 solid copies in continuous mode. • This step may correct the problem. 2) Remove the photosensitive drum, and using a cloth coated with the color in question, wipe the surface of the drum; then, install the photo sensitive drum. • Remove the lubricant adhering to the photosensitive drum as indi cated. 5-88 COPYRIGHT © 2001 CANON INC. 2000 2000 2000 2000 CANON CLC5000 REV.0 JAN. 2001 CHAPTER 5 TROUBLESHOOTING IMAGE FAULTS/MALFUNCTIONS 3.4.8 The copy has horizontal streaks/horizontal fogging (the main scanning direction). 1) Generate a halftone test print (PGTYPE=5). Are there vertical white streaks/white lines? If in all colors, go to step 6. If in a specific color, go to the next step. NO: Go to step 4. Photosensitive drum 2) Are there scratches or dirt in the peripheral direction of the axis of the photosensitive drum? YES: Replace the photosensitive drum. Paper lint collecting plastic sheet 3) Is the symptom a black line noted 188mm from the leading edge of the image? YES: Replace the paper lint collecting plastic sheet located in the registration roller assembly. Power supply voltage, Scanning lamp, Lamp regulator Original exposure system, CCD 4) Does the scanning lamp flicker? YES: 1. Check the voltage of the power supply for fluctuations. Use an exclusive power outlet. 2. Check the scanning lamp and the lamp regulator. NO: Check the No. 1/No. 2 mirror mount for wobbling. Check the contact between the CCD and the CCD driver. COPYRIGHT © 2001 CANON INC. 2000 2000 2000 2000 CANON CLC5000 REV.0 JAN 2001 5-89 CHAPTER 5 TROUBLESHOOTING IMAGE FAULTS/MALFUNCTIONS ■ Horizontal Streaks No. Color/location (A3) 1 Specific color (dark, horizontal lines). Specific color (light, horizontal lines). Drum 3 All colors 4 Specific color; leading edge (black lines as if made by rubbing). 5 Specific color 30 mm Dirt exists on the (approx.) decurling roller (upper). The trailing edge of curled paper touched the separation charging assembly. Random The output of the developing bias is faulty. 2 5-90 Interval (mm) Cause Action A transfer memory exists on the drum. Traces of contact with the developing cylinder exist on the drum. Generate 20 test prints (PG=05, halftone) continuously. (Try five times or so while checking the images.) If the problem is not corrected, replace the drum. Clean the roller. Remove the curling from the paper. Check the wiring; if normal, replace the developing bias unit (HVT3-A/B). COPYRIGHT © 2001 CANON INC. 2000 2000 2000 2000 CANON CLC5000 REV.0 JAN. 2001 CHAPTER 5 TROUBLESHOOTING IMAGE FAULTS/MALFUNCTIONS 3.4.9 The copy has white spots (horizontal : the main scanning direction). Rail on mirror mount, Cable of original exposure system 1) Generate a halftone test print (PG-TYPE=5). Is the problem noted? If all colors, go to step 6. If a specific color, go to the next step. NO: • Clean the rail of the mirror mount. • Check the cable of the scanning system. Developing assembly 2) Check the developing cylinder. Is it normal? NO: Replace the developing assembly. Transfer unit 3) Is the locking mechanism for the transfer blade normal? NO: Remove the cause. 4) Does the transfer blade have warping, bending, or a fault? YES: Replace the transfer blade. 5) Does the transfer belt have scratches, bending, or a fault? YES: Replace the transfer belt. Fixing roller Copy paper 6) Is offset noted on the surface of the fixing roller? YES: Check the fixing roller (upper, lower) for deformation. NO: Is the copy paper moist? Try different paper; advise the user on the correct method of storing paper. COPYRIGHT © 2001 CANON INC. 2000 2000 2000 2000 CANON CLC5000 REV.0 JAN 2001 5-91 CHAPTER 5 TROUBLESHOOTING IMAGE FAULTS/MALFUNCTIONS 3.4.10 The copy has white spots. 1) Is there a small lump of toner in the middle of a spot? YES: Go to step 6. Developing assembly 2) Generate a halftone test print (PGTYPE=5). Is the problem noted? If all colors, go to step 4. If a specific color, go to the next step. NO: Check the developing assembly and the developing cylinder for which the problem is noted; if a fault is found, clean or replace it. Photosensitive drum, Transfer belt 3) • Check the photosensitive drum and the transfer belt for scratches. • Check the transfer belt for scratches and deformation. YES: Replace the photosensitive drum or the transfer drum belt. Fixing roller 4) Is the problem noted at intervals of about 180 mm? YES: Check the fixing roller for scratches and deformation. Transfer current 5) Execute the following: • Check to find out the present zone by referring to the absolute value of the machine inside temperature (‘DISP>ANALOG’ in service mode). 0 ~ 580 g: zone A 581 ~ 1800 g: zone B 1801g go or more: zone C • Check to find out the type of paper used and whether single-sided or double-sided is used. • Select the following in service mode: ‘ADJUST>HV-TR’ • Decrease the setting value of the transfer current corresponding to the conditions of occurrence (zone, paper type, single-sided/ double-sided) to ‘3’ for al colors. • If the symptoms are not corrected, reduce the value by another ‘3’. Waste toner (caking) Developer (caking) 6) Check to find out whether the lump of toner is of waste toner or developer. Is it of waste toner? • Waste toner: gray (mixed colors) • Developer: C, M, Y, or Bk YES: Check the end seal of the photosensitive drum cleaner blade. Check the end of the cylinder of the developing assembly for dirt. NO: • Replace the developer. • Replace the developing assembly. 5-92 COPYRIGHT © 2001 CANON INC. 2000 2000 2000 2000 CANON CLC5000 REV.0 JAN. 2001 CHAPTER 5 TROUBLESHOOTING IMAGE FAULTS/MALFUNCTIONS 3.4.11 The copy has white spots (trailing center). A trailing center white spot is a type of transfer failure and is found at the center of the trailing edge of a copy. Trailing center spot Copy paper F05-304-02 ■ Trailing Center White Spot A trailing center white spot is caused by warping of paper. The leading edge of such paper is retained on the transfer belt without uniform contact, causing its trailing edge to warp. This problem tends to occur particularly when copying on the second side of a two-sided copy in a high humidity environment. 1) Does the problem occur only when copying on special paper or thick paper? YES: Go to step 3. 2) Is the copy paper wavy because of humidity? NO: Replace the paper. Cassette heater Transfer belt 3) Is the cassette heater operating normally? NO: See “The cassette heater fails to operate.” YES: Check the transfer belt; replace it if dents exist in the surface. COPYRIGHT © 2001 CANON INC. 2000 2000 2000 2000 CANON CLC5000 REV.0 JAN 2001 5-93 CHAPTER 5 TROUBLESHOOTING IMAGE FAULTS/MALFUNCTIONS 3.4.12 The copy has white spots (meandering). Separation charging wire 1) Clean the separation charging wire. Is the problem corrected? YES: End. Separation charging assembly 2) Is leakage, poor contact, or wrong charging wire height noted for the separation charging assembly? YES: Remove the fault. Environment sensor 3) Check the machine inside temperature using ‘ANALOG’ under ‘DISP’ in service mode. Is the reading proper? YES: Replace the environment sensor. NO: Check the separation charging wire, signal line of the pre-fixing charging system, and wiring. 3.4.13 The copy has a soiled image or soiled back. 1) Is a soiled image noted only on a copy made after making a twosided copy? YES: Go to step 11. Image margin 2) Is the image margin within specification? NO: Make adjustments as instructed under 2. “Standards and Adjustments.” Primary charging assembly, Developing bias laser power 3) Is fogging noted in the image margin? YES: Check the primary charging assembly for dirt, and check the developing bias and laser power. 5-94 COPYRIGHT © 2001 CANON INC. 2000 2000 2000 2000 CANON CLC5000 REV.0 JAN. 2001 CHAPTER 5 TROUBLESHOOTING IMAGE FAULTS/MALFUNCTIONS Cleaning fault 4) Is the cleaning blade of the photosensitive drum locked? NO: Lock and fix in position the cleaning blade of the cleaning assembly. 5) Is foreign matter found on the cleaning blade of the photosensitive drum cleaning assembly? YES: Remove the foreign matter, and clean the cleaning blade and the cleaner assembly externals. 6) Is deformation or scratches noted on the edge of the cleaning blade? Feel the cleaning blade with a finger to check for deformation and scratches. YES: If deformation or scratches are noted, remove the cause, and replace the cleaning blade. 7) Is there a collection of waste toner under the scoop-up sheet? YES: Clean it. 8) Is the scoop-up sheet of the photosensitive drum cleaning blade bent or faulty? YES: Replace the scoop-up sheet. Side scraper 9) Are the edges soiled when on the photosensitive drum? YES: Replace the side scraper. Cleaning assembly (developing assembly) 10) Is the transfer belt soiled with toner or fixing oil? YES: 1. Check to see if toner is leaking from the photosensitive drum cleaning assembly or the No. 2 cleaning assembly (end). 2. Check the oil removing roller to see if it is operating correctly. Fixing assembly 11) Is the take-up mechanism of the web of the fixing assembly normal? Is the upper/lower roller cleaned normally? NO: 1. Check the take-up mechanism of the web. 2. Clean the upper/lower roller. 3. Clean the oil blade. 4. Clean the contact face of the oil applying roller. 5. Clean the fixing assembly guide. 6. Clean the oil removing blade. Delivery assembly, External static eliminating/separation charging assembly 12) Clean the delivery roller, separation claw, external static eliminating/separation charging assembly. Is the problem corrected? YES: End. COPYRIGHT © 2001 CANON INC. 2000 2000 2000 2000 CANON CLC5000 REV.0 JAN 2001 5-95 CHAPTER 5 TROUBLESHOOTING IMAGE FAULTS/MALFUNCTIONS 3.4.14 The copy has poor fixing. Upper roller, Lower roller 1) Is the problem in the same direction as the feeding direction of the copy? YES: 1. Check the upper/lower roller of the fixing assembly for scratches. 2. Check the separation claw to see if it is positioned correctly. Heater 2) Does the heater (H1, H2) turn ON at power-on? NO: See “The fixing heater fails to operate.” Oil application 3) Is oil applied evenly over the upper roller of the fixing assembly? NO: • Check the oil application assembly. • Check the oil supply from the oil case. Insulating bush, Bearing 4) Are the insulating bush and the bearing installed properly? NO: Re-install them. Nip, Thermistor 5) Is the nip between the upper roller and the lower roller of the fixing assembly within specification? NO: Adjust the nip. YES: Check the thermistor for a fault. 5-96 COPYRIGHT © 2001 CANON INC. 2000 2000 2000 2000 CANON CLC5000 REV.0 JAN. 2001 CHAPTER 5 TROUBLESHOOTING IMAGE FAULTS/MALFUNCTIONS 3.4.15 The copy has bleeding toner (during fixing). The term bleeding toner refers to spreading of toner immediately following (in relation to feeding direction) a high-density area of a copy. High-density area Feeding direction Bleeding toner F05-304-03 Separation charging wire, Pre-fixing charging wire Clean the separation charging wire and the pre-fixing charging wire. Is the problem corrected? YES: End. Separation charging assembly, Pre-fixing charging assembly Is leakage, poor contact, or wrong charging wire height noted for the separation charging assembly or the pre-charging assembly? YES: Remove the fault. Service mode (‘HV-SP’ under ‘ADJUST’) 1) Decrease the setting of ‘SS-xx’ corresponding to the mode and paper type using ‘HV-SP’ under ‘ADJUST’ in service mode. Is the problem corrected? For a description of SP-xx and adjustments, see the descriptions given for service mode. YES: End. Service mode (‘HV-OFST’ under ‘ADJUST’) 2) Increase the setting of ‘SP-OFST’ for ‘HV-OFT’ under ‘ADJUST’ in service mode. Is the problem corrected? YES: End. For the range of settings, see the descriptions on service mode. Toner (excessive) 3) Check the latent image formation system and the developing system. Is there a fault? YES: Correct it. NO: Lower the copy density by changing the F value. COPYRIGHT © 2001 CANON INC. 2000 2000 2000 2000 CANON CLC5000 REV.0 JAN 2001 5-97 CHAPTER 5 TROUBLESHOOTING IMAGE FAULTS/MALFUNCTIONS 3.4.16 The copy is blank. 1) Generate a horizontal test print (PG-TYPE=10). Is the image normal? YES: Check the wiring of the following PCBs; if normal, replace it. • Analog processor PCB • Video controller PCB • Image processor PCB • CCD unit Potential control fault 2) Execute ‘FUNC > EPC’ in service mode. Is the copy image generated immediately after the execution normal? YES: End. Transfer unit 3) Is a fault noted on the transfer blade? YES: Replace it. Developing motor 4) Is the developing cylinder rotating during development? NO: Check the developing motor. Transfer high voltage 5) Turn off the power switch during development. Lower the transfer unit, and release the transfer unit and the photosensitive drum by hand; then, lift the hopper to remove the photosensitive drum unit. Is the image on the drum normal? YES: • Check the transfer high-voltage system. • Check the high-voltage cable from the HVT PCB to the transfer unit; if normal, replace the HVT PCB. • Check the internal static eliminating high-voltage system. NO: • Check the developing bias system. 5-98 COPYRIGHT © 2001 CANON INC. 2000 2000 2000 2000 CANON CLC5000 REV.0 JAN. 2001 CHAPTER 5 TROUBLESHOOTING IMAGE FAULTS/MALFUNCTIONS 3.4.17 The copy is solid black. 1) Generate a horizontal stripe test print (PGTYPE=10). Is the image normal? YES: Go to step 6. Potential control fault 2) Execute ‘EPC’ under ‘FUNC’ in service mode. Is the copy image immediately after the execution normal? YES: End. Primary charging unit 3) Is the primary charging unit installed properly? NO: Replace the high-voltage cord. Primary charging, Grid bias (output system) 4) Is there electrical continuity between both connectors of the highvoltage cord connected to the primary charging assembly? NO: Replace the high-voltage cord. YES: • Check the primary charging system and the grid bias output system. • Try replacing the HVT PCB. 5) Does the scanning lamp turn ON? NO: See “The scanning lamp fails to turn ON.” Connector, Wiring 6) Are the connectors and wiring between the following PCBs normal? Image processor PCB Analog processor PCB CCD unit NO: Re-connect them. COPYRIGHT © 2001 CANON INC. 2000 2000 2000 2000 CANON CLC5000 REV.0 JAN 2001 5-99 CHAPTER 5 TROUBLESHOOTING IMAGE FAULTS/MALFUNCTIONS DC power supply CCD unit, Analog processor PCB, Image processor PCB 9) Is DC power present between the following terminals of the analog processor? J2504-7 (+) — 8 (–): +5V J2504-5 (+) — 4 (–): +8V J2504-3 (+) — 4 (–): +8V J2504-1 (+) — 2 (–): +15V NO: See “The DC power is absent.” YES: Try replacing the following parts: • CCD unit • Analog processor PCB • Image processor PCB ■ Checking the Original Exposure System 1) Check to find out if the copyboard glass has ridden over an obstacle. 2) Clean the scanning lamp, reflecting plate, No. 1/2/3 mirror, standard white plate, and copyboard glass, and execute ‘AUTO-ADJ’ for ‘CCD’ under ‘FUNC’ in service mode. Is the problem corrected? 5-100 COPYRIGHT © 2001 CANON INC. 2000 2000 2000 2000 CANON CLC5000 REV.0 JAN. 2001 CHAPTER 5 TROUBLESHOOTING IMAGE FAULTS/MALFUNCTIONS 3.4.18 The copy has color displacement. 1) Set ‘FUNC > IMG-REG > AUTO-ADJ’ in service mode to ‘ON’. Is the problem corrected? YES: End. Transfer belt 2) Does the transfer belt have dents or deformation? YES: Replace it. Retention 3) Does the C transfer blade have dents or deformation? YES: Replace it. 4) Is the operation of the locking mechanism of the C transfer blade normal? NO: Remove the cause of the fault. Drum drive system 5) Is the gear of the photosensitive drum worn or loose? YES: Replace the gear. 6) Does the flywheel wobble? YES: Tighten the mounting screw. 7) Clean the ends of the photosensitive drum and the spacer rubber. Is the problem corrected? YES: End. NO: Check the developing drive system for wobbling and other faults. COPYRIGHT © 2001 CANON INC. 2000 2000 2000 2000 CANON CLC5000 REV.0 JAN 2001 5-101 CHAPTER 5 TROUBLESHOOTING IMAGE FAULTS/MALFUNCTIONS 3.4.19 The copy has image blur 1) Generate a test print (PGTYPE-10). Is the image normal? YES: Go to step 3. Drive on Printer side 2) Check the following • Is the photosensitive drum drive gear worn? • Does the flywheel wobble? • Does the transfer belt have dents or deformation? Drive on Reader 3) Set ‘OPT > R-OPT > SCAN-DWN’ in service mode. Is the problem corrected after the value is set below ‘1’ ? NO: Check the following. • Clean the rail of mirror mount. • Clean the wire of mirror mount. 5-102 COPYRIGHT © 2001 CANON INC. 2000 2000 2000 2000 CANON CLC5000 REV.0 JAN. 2001 CHAPTER 5 TROUBLESHOOTING IMAGE FAULTS/MALFUNCTIONS 3.4.20 Adjusting the Image Leading Laser write start position transfer high voltage application timing 1) Generate a test print (PGTYPE-10). Is the image normal? YES: Go to step 3. Original read start position 2) Adjust the setting in service mode, i.e., use a lower setting: ‘ADJUST>FEED-ADJ>VSYC-ADJ’. Is the problem corrected? YES: End. 3) Execute image read position adjustment (ADJ-Y). (Refer to 2.1.3.c “Adjusting the Image Red Position” in this chapter.) COPYRIGHT © 2001 CANON INC. 2000 2000 2000 2000 CANON CLC5000 REV.0 JAN 2001 5-103 CHAPTER 5 TROUBLESHOOTING IMAGE FAULTS/MALFUNCTIONS 4 Troubleshooting 4.1 Troubleshooting Malfunctions 4.1.1 E000/E004 • Check the detail code of ‘E000/E004’ using ‘DISPLAY > JAM/ERR’ in service mode. a. E000–XX01, XX02 (high-order 2 digits representing type as XX=01 indicating upper heater and 02, lower heater) and E004=0001 1) Clear ‘E000’. *1 Is ‘E000’ indicated immediately after the power switch is turned ON? • Be sure to turn OFF the power switch immediately after the check. NO: Go to step 3. Fixing thermistor (open circuit) DC controller PCB 2) Turn OFF the power switch, and disconnect J6020 from the connector J2209 on the DC controller PCB. As indicated by the detail code, measure the resistance between a and b in the following table. Ω or less? Is it 1kΩ Code a b 0101/0102 J6019A-12 J6019A-13 0101/0202 J6019B-1 J6019B-2 YES: Check the wiring from J2209 to the fixing thermistor; if normal, replace the fixing thermistor. NO: Replace the DC controller PCB. Triac (open circuit) 3) Replace the triac. Is the problem corrected? YES: End. AC driver PCB DC controller PCB 4) Replace the AC driver PCB. Is the problem corrected? YES: End. NO: Replace the DC controller PCB. Note 1: 5-104 To clear ‘E000’, 1) Start service mode. (asterisk key * → ‘2’, ‘8’ → asterisk key * ) 2) Press ‘FUNC > FUSER > E000-RLS’ in order. 3) Check to make sure that the indication for ‘P’ at the top of the Service Mode screen changes from ‘ERROR’, ‘SERVICE’ and ‘ERROR’. 4) Turn OFF and ON the power switch. COPYRIGHT © 2001 CANON INC. 2000 2000 2000 2000 CANON CLC5000 REV.0 JAN. 2001 CHAPTER 5 TROUBLESHOOTING IMAGE FAULTS/MALFUNCTIONS b. E000–XX05 (upper order 2 digits indicate the top/bottom; XX=01: upper heater; 02: lower heater) 1) Clear ‘E000’. Is ‘E000’ indicated immediately after the power switch is turned on? •Be sure to turn off the power switch as soon as you have made the check. Thermistor 2) Is the thermistor in even contact with the upper/lower fixing roller? NO: Mount it correctly. Thermistor (open circuit) 3) Turn off the power switch; then, open the front cover and the delivery assembly to cool the fixing roller. Then, turn on the power switch; does the voltage between the following connectors gradually lower from about 5 V? (Be sure to turn off the power switch as soon as you have made the check.) Main thermistor, upper (TH1) : J2209-A13 (TH1), J2209-A12 (GND) Sub thermistor, upper (TH2) : J2209-A11 (TH2), J2209-A10 (GND) Main thermistor, lower (TH3) : J22-9-B2 (TH3), J2209-B1 (GND) Sub thermistor, lower (TH4) : J2209-B4 (TH4), J2209-B3 (GND) NO: Check the wiring from the thermistor to the DC controller PCB; if normal, replace the thermistor. YES: Replace the DC controller PCB. COPYRIGHT © 2001 CANON INC. 2000 2000 2000 2000 CANON CLC5000 REV.0 JAN. 2001 5-105 CHAPTER 5 TROUBLESHOOTING IMAGE FAULTS/MALFUNCTIONS c. E000–XX20, XX30, XX40, XX50 (high-order 2 digits representing type as XX=01 indicating upper heater and 02, lower heater) 1) Clear ‘E000’ (*), and turn ON the power switch. Does the fixing heater turn ON? • Check by the eye. Be sure to turn OFF the power switch immediately after the check. NO: See “The fixing heater fails to turn on.” YES: Go to step 7. Fixing thermistor (open circuit) 2) Open the front cover and the delivery assembly to cool the fixing roller. Close the delivery assembly and the front cover; then, set the meter to the 5VDC range, and measure the voltage between J2209A-13 (+: FRST) and J2209A-12 (–; GND). Likewise, measure the voltage between J2209B-12 (+; FRST) and J2209B-1 (–; GND). Does the voltage decrease from about 5 V gradually when the power switch is turned ON? • Turn OFF the power switch immediately after the check. NO: Check the wiring from J2209 to the fixing thermistor; if normal, replace the fixing thermistor. Thermistor 3) Is the fixing oil thermistor upper, lower (THM1, THM2) in even contact with the upper/lower fixing roller? NO: Re-install it. Environment 4) Does the problem occur only when the machine is turned on for the first time in the morning? YES: • Advise the user that the operating environment is outside the specification. • Advise the user not to turn on the power while the room is cold. Thermistor switch (activation) 5) Is there electrical continuity in the thermal switch (TP1, TP2)? NO: Replace the thermal switch. Main thermistor DC controller 6) Replace the thermistor (upper/lower). Is the problem corrected? YES: End. NO: Replace the DC controller. 5-106 COPYRIGHT © 2001 CANON INC. 2000 2000 2000 2000 CANON CLC5000 REV.0 JAN. 2001 CHAPTER 5 TROUBLESHOOTING IMAGE FAULTS/MALFUNCTIONS d. E000–0061, 0071, 0081 1) Clear ‘E000’. Is ‘E000’ indicated immediately after the power switch is turned on? • Be sure to turn off the power switch as soon as you have made the check. NO: Go to step 3. Oil thermistor (TH5), Oil heater thermistor (TH6; short circuit), DC controller PCB 2) Turn off the power switch, and disconnect J6019 from J2209 on the DC controller PCB. Measure the resistance between a and b of the Ω? following table in reference to the detail code; is it 1 KΩ Code a b 0061/0081 J6019-B5 J6019-B6 0071/0081 J6019-B10 J6019-B11 AC driver PCB DC controller PCB 3) Replace the AC driver PCB. Is the problem corrected? YES: End. NO: Replace the DC controller PCB. COPYRIGHT © 2001 CANON INC. 2000 2000 2000 2000 CANON CLC5000 REV.0 JAN. 2001 5-107 CHAPTER 5 TROUBLESHOOTING IMAGE FAULTS/MALFUNCTIONS e. E000–0062, 0072, 0082 1) Clear ‘E000’. Is ‘E000’ indicated immediately after the power switch is turned on? • Be sure to turn off the power switch as soon as you have made the check. NO: Go to step 3. Thermistor (open circuit) 2) Open the front cover and the delivery assembly to cool the fixing oil. Close the delivery assembly and the front cover, and set the meter to the 5 VDC range; then, measure the voltage between J2209-B6 (+: FRST) and J2209-B5 (GND). Likewise, measure the voltage between J2209B-1 (+: FRST) and J2209-B10 (GND). Turn on the power switch; does the voltage gradually lower from +5V? • Be sure to turn off the power switch as soon as you have made the check. NO: Check the wiring from J12209B to the oil thermistor or the oil heater thermistor; if normal, replace the thermistor. Thermistor(setting) 3) Is thermistor(TH5/6) in even contact with the oil heater and upper oil pan? NO: Reset the thermistor. Thermal switch 4) Is there electrical continuity in the thermal switch (TP3)? NO: Replace the thermal switch. Thermistor 5) Replace the thermistor. Is the problem corrected? YES: End. AC drive PCB DC controller PCB 6) Replace the AC driver PCB. Is the problem corrected? YES: End. NO: Replace the DC controller PCB. f. E000–0002 Triac (short circuit) DC controller PCB 1) Replace the triac. Is the problem corrected? YES: End. NO: Replace the DC controller PCB. 5-108 COPYRIGHT © 2001 CANON INC. 2000 2000 2000 2000 CANON CLC5000 REV.0 JAN. 2001 CHAPTER 5 TROUBLESHOOTING IMAGE FAULTS/MALFUNCTIONS 4.1.2 E005 Cleaning web 1) Is the cleaning web more or less used up? YES: Replace the cleaning web. Counter 2) After replacing the cleaning web, has ‘FUNC > FUSER > E005RLS’ in service mode been executed? NO: Execute ‘FUNC > FUSER > E005-RLS’ in service mode. Detecting lever (position) 3) Is the detecting lever of the web length sensor on the web? NO: Re-mount it. Web length sensor (PS36) DC controller PCB 4) Is the web length sensor (PS36) normal? NO: Replace the web length sensor. YES: Replace the DC controller PCB. You cannot clear ‘E005’ by executing ‘E005-RLS’ without replacing the web. Replace the web first. 4.1.3 E006 Fixing drawer connector DC controller PCB 1) Is there a fault in the fixing drawer connector? YES: Replace the drawer connector. NO: Check the wiring from J22098A on the DC controller PCB to the fixing drawer connector J601; if normal, replace the DC controller PCB. COPYRIGHT © 2001 CANON INC. 2000 2000 2000 2000 CANON CLC5000 REV.0 JAN. 2001 5-109 CHAPTER 5 TROUBLESHOOTING IMAGE FAULTS/MALFUNCTIONS 4.1.4 E008 Fixing oil 1) Does the oil case have an adequate amount of fixing oil? NO: Supply oil. Fixing oil supply route 2) Is the hose from the oil case to the upper oil pan clogged with dust? YES: Remove the clogging; or, replace the part. Fixing oil level detect sensor (PS6) 3) Is the fixing oil level detect sensor (PS6) normal? (Check as when checking a photointerrupter.) NO: Check the wiring from the DC controller PCB to the sensor; if normal, replace the fixing oil level detect sensor (PS6). Fixing oil pump drive solenoid (SL2) 4) Operate the fixing oil pump drive solenoid using ‘IO-ON’ of ‘FMISCp’ under ‘FUNC’ in service mode. Does it operate normally? NO: Check the wiring from the DC controller PCB to the fixing oil pump drive solenoid; if normal, replace the fixing oil pump drive solenoid. DC controller PCB 5) Operate the solenoid using ‘IO-ON’ of ‘FMISCp’ under ‘FUNC’ in service mode. At this time, does the voltage between J2209A-4 and J2209A-5 on the DC controller PCB change from 24 V to 0 V? NO: Replace the DC controller PCB. 5-110 COPYRIGHT © 2001 CANON INC. 2000 2000 2000 2000 CANON CLC5000 REV.0 JAN. 2001 CHAPTER 5 TROUBLESHOOTING IMAGE FAULTS/MALFUNCTIONS 4.1.5 E012 1) Does the photosensitive drum motor (M21) rotate during initial rotation? YES: Go to step 4. Excess load 2) Slide out the primary charging assembly, and check the condition of the cleaning blade by the naked eye. (Do not slide out the process unit.) Is the cleaning blade bent? YES: Put a finger through the primary charging assembly slot, and push the blade support plate to correct the bend; then, slide out the process unit. Check if the photosensitive drum should be subject to excess load. Replace the cleaning blade as necessary. Photosensitive drum motor (M21) DC controller PCB 3) Set the meter to the 5VDC range, and measure the voltage between J2225B-2 (+; M210N) and J2225B-3 (–; GND) on the DC controller PCB. Turn OFF and then ON the power switch. Does the voltage change from about 5 V to about 0 V when the main motor starts to rotate? YES: Replace the photosensitive drum motor (M21). NO: Check the wiring from J2225B to the drum motor; if normal, replace the DC controller PCB. DC controller PCB Photosensitive drum motor (M21) 4) Set the meter to the 5VDC range, and measure the voltage between J2226A-12 (+; M21PLL*) and J2226A-14 (–; GND) on the DC controller PCB. Turn OFF and then ON the power switch. Does the voltage change from about 3 V to about 0 V when the main motor starts to rotate? YES: Replace the DC controller PCB. NO: Check the wiring from J2225B to the photosensitive drum motor; if normal, replace the photsensitive drum motor. COPYRIGHT © 2001 CANON INC. 2000 2000 2000 2000 CANON CLC5000 REV.0 JAN. 2001 5-111 CHAPTER 5 TROUBLESHOOTING IMAGE FAULTS/MALFUNCTIONS 4.1.6 E013 • Check the detail code of ‘E013’ using ‘DISPLAY > JAM/ERR’ in service mode. Waste toner feeding screw 1) Is ‘0002’ indicated? YES: The waste toner case is full, imposing excess load on the waste toner feeding screw. Remove the waste toner as shown under “F013-0002.” Waste toner feeding motor (M20) DC controller PCB 2) Set the meter to the 12VDC range. Does the voltage between J2226A-5 (+) and J2226A-6 (–) on the DC controller PCB change from 5 to 0 V when the Start key is pressed after turning off and then on the power? YES: Check the wiring; if normal, replace the waste toner feeding motor. NO: Replace the DC controller PCB. Waste toner lock detecting switch (SW4) DC controller PCB 3) Is the voltage between J2223B-4 (+) and J2223B-5 (–) on the DC controller PCB 0 V when the waste toner lock detecting switch is pressed and 5 V when released? NO: Replace the waste toner lock detecting switch. YES: Replace the DC controller PCB. ■ E013-0002 1) Turn off the power switch. 2) Apply vibration to area A of the waste toner box [1] so that the toner moves from the rear to the front. A [1] F05-401-01 5-112 COPYRIGHT © 2001 CANON INC. 2000 2000 2000 2000 CANON CLC5000 REV.0 JAN. 2001 CHAPTER 5 TROUBLESHOOTING IMAGE FAULTS/MALFUNCTIONS 3) Tap the waste toner vertical pipe [2] with a screwdriver so that the toner will fall from the pipe. [2] F05-401-02 4) Turn the waste toner feeding motor [3] in the direction of the arrow so that the screw gear [5] moves away from the microswitch lever [4]. (If it does not move, the pipe is still filled with waste toner. Perform step 3) once again.) [4] [5] [3] F05-401-03 5) Turn on the power switch. 6) Execute ‘FUNC > F-MISCp > MTR’ in service mode to rotate the waste toner feeding motor. Check if the rotation is stable. 7) Dispose of the waste toner collecting inside the waste toner box. COPYRIGHT © 2001 CANON INC. 2000 2000 2000 2000 CANON CLC5000 REV.0 JAN. 2001 5-113 CHAPTER 5 TROUBLESHOOTING IMAGE FAULTS/MALFUNCTIONS 4.1.7 E014 Fixing roller drive assembly, Fixing oil applying roller drive assembly, Feeding drive assembly 1) Is there a fault on the fixing roller (upper, lower), fixing oil applying roller, or the drive assembly of the feeding assembly? Or, is any of them subjected to excess load? YES: Replace any faulty part, and remove the cause of the fault. Fixing motor (M9) DC controller PCB 2) Set the meter to the 12VDC range. Does the voltage between J2214A-12 (+; M9D*) and J2214A-13 (–; GND) on the DC controller PCB change from 5 V to 0 V after the power has been turned on, WMUP has ended, and INTR begins (i.e., when the temperature of the fixing roller reaches 110°C)? YES: Replace the fixing motor unit. NO: Check the wiring from J6070 on the fixing motor driver PCB to J2214A on the DC controller PCB; if normal, replace the DC controller PCB. 4.1.8 E015 Multifeeder pick-up roller drive assembly, Paper thickness detecting roller drive assembly, Hopper drive assembly 1) Is there a fault in multifeeder pick-up roller drive assembly, paper thickness detecting roller drive assembly or hopper drive assembly? Or, is any of them subjected to an excess load? YES: Remove the cause of the fault. Replace the faulty part. Moreover, remove the cause of the fault. Pick-up motor (M10) DC controller PCB 2) Set the meter to the 24VDC range. When the Start key is pressed, does the voltage between J2214B-3 (+; M10D*) and J2214B-4 (–; GND) on the DC controller PCB change from 5 V to 0 V? YES: Replace the multifeeder pick-up motor. NO: Check the wiring from J6071 on the multifeeder pick-up motor to J2214B on the DC controller; if normal, replace the DC controller PCB. 5-114 COPYRIGHT © 2001 CANON INC. 2000 2000 2000 2000 CANON CLC5000 REV.0 JAN. 2001 CHAPTER 5 TROUBLESHOOTING IMAGE FAULTS/MALFUNCTIONS 4.1.9 E017 Duplexing feeding drive assembly 1) Is there a fault (e.g., excess load) in the roller drive assembly driven by the duplexing unit feeding motor? YES: Remove the cause of the fault. Duplex feed motor (M19) DC controller PCB 2) Set the meter to the 24VDC range. Select two-sided mode, and press the Start key; does the voltage between J2223B-8 (+) and J2223B-9 (–) on the DC controller PCB change from 5 V to 0 V? YES: Check the wiring from the DC controller to the duplex feed motor; if normal, replace the duplex feeding motor. NO: Replace the DC controller PCB. 4.1.10 E018 Polishing/Oil removing motor drive system 1) Push the one-way clutch lever to rotate the oil removing roller. Is there any fault (e.g., excess load)? YES: Remove the cause of the fault. Polishing/Oil removing motor (M15) DC controller PCB 2) Set the meter to the 24VDC range, and select automatic two-sided mode. When the Start key is pressed, does the voltage between J2218A-11 (reversal signal) and J2218A-12 on the DC controller PCB change from 7 V to 0 V? YES: Check the wiring from the DC controller to the polishing/oil removing motor; if normal, replace the polishing/oil removing motor. NO: Replace the DC controller PCB. COPYRIGHT © 2001 CANON INC. 2000 2000 2000 2000 CANON CLC5000 REV.0 JAN. 2001 5-115 CHAPTER 5 TROUBLESHOOTING IMAGE FAULTS/MALFUNCTIONS 4.1.11 E020 • Check the detail code of ‘E020’ using ‘JAM/ERR’ under ‘DISPLAY’ in service mode. a. E020=XX30, XX31, XX35, XX36, XX3A, XX3B, XX40, XX41, XX42, XX43, XX45, XX46, XX47, XX48, XX50, XX55, XXA0, XXA1, XXA5, XXA6, XXAA, XXB0, XXB1, XXB2, XXB5, XXB6, XXB7 XXBF (high-order 2 digits representing the color as XX=00 indicating all colors; 01, C; 02, M; 03, Y; and 04, Bk.) Initial value setting 1) Execute ‘FUNC > INSTALL > INIT-C/M/Y’ and ‘SINIT-C/M/Y/K’ in service mode once again for the color for which ‘E020’ is indicated. Is the problem corrected? YES: End. Developing assembly (uneven toner density) 2) Execute ‘STIR’ for the color for which ‘E020’ is indicated for ‘INSTALL’ under ‘FUNC’ in service mode. Is the problem corrected? YES: End. Developing assembly 3) Replace the developer of the color for which ‘E020’ is indicated, and execute ‘FUNC > INSTALL > INIT’. Is the problem corrected? YES: End. Connector, Wiring 4) Are the connectors and wiring of the following connectors normal? SALT sensor in every color ⇔ DC controller (J2228) NO: Re-connect them. Toner density sensor DC controller PCB 5) Replace the toner density sensor of the color for which ‘E020’ is indicated. Is the problem corrected? YES: End. • Be sure to replace the developer after replacing the toner density sensor. NO: Replace the DC controller PCB. SALT sensor 6) Is the front door open while the transfer frame front cover is removed (i.e., is the SALT sensor subject to stray light)? YES: Install the transfer frame front cover. NO: Replace the SALT sensor. • Be sure to replace the developer after replacing the toner density sensor. Photosensitive drum 7) Replace the photosensitive drum. Is the problem corrected? YES: End. NO: Replace the DC controller PCB. 5-116 COPYRIGHT © 2001 CANON INC. 2000 2000 2000 2000 CANON CLC5000 REV.0 JAN. 2001 CHAPTER 5 TROUBLESHOOTING IMAGE FAULTS/MALFUNCTIONS b. E020–XX60, XX70 Photosensitive drum 1) Is the photosensitive drum soiled? YES: Replace the cleaning blade. Be sure to clean the SALT sensor as well. SALT sensor 2) Clean the window of the SALT sensor. Is the problem corrected? YES: End. NO: Check the wiring from the DC controller PCB to the SALT sensor; if normal, replace the SALT sensor. c. E020–XX80, XX81, XX82, XX85, XX86, XX87, XX8F, XXC0, XXC1, XXC2, XXC5, XXC67, XXC7 Backup data 1) ‘FUNC > INSTALL’ in service mode, is the value on the 3rd, 4th page the same as that indicated on the service label? NO: Enter the value of ‘DC-CON’ under ‘FUNC’ in service mode. DC controller PCB 2) Replace the DC controller PCB. Is the problem corrected? YES: End. Perform the steps indicated for replacing the DC controller PCB. d. E020–XX90, XX91 SALT sensor (dirt) 1) Is the window of the SALT sensor soiled with toner? YES: Clean it. SALT sensor shutter Shutter open/close solenoid 2) Is the opening/closing operation of the SALT sensor shutter normal? NO: Check the shutter for deformation. Clean the inside by referring to 3. “Disassembling and Cleaning the Inside of the SALT Sensor” under E. (SALT Sensor” in Chapter 2 “Mechanical System.” YES: Check the wiring from the DC controller 2 to the solenoid; if normal, replace the solenoid. COPYRIGHT © 2001 CANON INC. 2000 2000 2000 2000 CANON CLC5000 REV.0 JAN. 2001 5-117 CHAPTER 5 TROUBLESHOOTING IMAGE FAULTS/MALFUNCTIONS e. E020–XX4A, XX4B, XX4C, XX4D, XXBA, XXBB, XXBC, XXBD, XXD0, XXE0 1) Perform “Checking E020” on the next page. Is ‘E020’ still indicated? NO: End. Developing assembly (uneven toner density) 2) Execute ‘FUNC > INSTALL > STIR-C/M/Y/K’ in service mode for the color in question. Is the problem corrected? YES: End. Developer 3) Replace the developer of the color for which ‘E020’ is indicated, and execute ‘FUNC > INSTALL > INIT’. Is the problem corrected? YES: End. • Check the counter. If the developers of other colors are near the ends of their lives, replace all developers. Color toner density sensor 4) Replace the toner density sensor of the color for which ‘E020’ is indicated. Is the problem corrected? YES: End. NO: Go to step 8. SALT sensor 5) Replace the Bk SALT sensor. Is the problem corrected? YES: End. NO: Go to the next step. Photosensitive drum 6) Replace the photosensitive drum. Is the problem corrected? YES: End. Developing cylinder 7) Does the developing cylinder of the color for which ‘E020’ is indicated rotating? NO: Check the developing cylinder drive system. Toner level sensor 8) Is toner present inside the hopper? (Is the level of toner inside the hopper for which ‘E020’ is indicated above the toner sensor?) NO: Check the toner level sensor inside the hopper. Hopper 9) Replace the toner level sensor. Is the problem corrected? (To supply toner, follow the instructions on Service Handbook of CLC1000 > Chapter 2 > E. Developing Assembly-Related Parts > 1. Replacing the Developer.) YES: End. NO: Replace the hopper. (To supply toner, see Service Handbook of CLC1000 > Chapter 2 > E. Developing Assembly-Related Parts > 1. Replacing the Developer.) 5-118 COPYRIGHT © 2001 CANON INC. 2000 2000 2000 2000 CANON CLC5000 REV.0 JAN. 2001 CHAPTER 5 TROUBLESHOOTING IMAGE FAULTS/MALFUNCTIONS f. E020/XXF1, 04F2 1) Is the detailed code ’04F2'? YES: Go to step 4. CMY hopper 2) Is the level of toner inside the hopper for which ‘E020’ is indicated above the toner sensor? YES: Replace the hopper. (To supply toner, see Service Handbook of CLC1000 > Chapter 2 > E. Developing Assembly-Related Parts > 1. Replacing the Developer.) CMY error sensor 3) Disconnect the connector of the toner level sensor (front of toner). Replace the error sensor (hopper rear). After replacement, is the Add Toner message indicated? YES: Connect the connector of the toner level sensor, and supply the hopper with toner. (To supply toner, see Service Handbook of CLC1000 > Chapter 2 > E. Developing Assembly-Related Parts > 1. Replacing the Developer.) NO: Replace the hopper. (To supply toner, see Service Handbook of CLC1000 > Chapter 2 > E. Developing Assembly-Related Parts > 1. Replacing the Developer.) Bk hopper 4) Is the level of toner inside the Bk hopper above the toner sensor? YES: Replace the hopper. (To supply toner, see Service Handbook of CLC1000>Chater 2> E. Developing Assembly-Ralated Parts>1. Replacing the Developer.) SALT sensor 5) Replace the Bk toner level sensor (upper). Is the Add Toner message indicated? NO: Replace the hopper. (To supply toner, see Service Handbook of CLC1000 > Chapter 2 > E. Developing Assembly-Related Parts > 1. Replacing the Developer.) YES: End. (To supply toner, see Service Handbook of CLC1000 > Chapter 2 > E. Developing Assembly-Related Parts > 1. Replacing the Developer.) ■ Checking E020 1) Identify the color for which ‘E020’ has been indicated using ‘DISPLAY > JAM/ERR’. 2) Turn OFF and then ON the power switch, and select the following mode: • A3/11 × 17 • 21 copies • mono copy of the color for which ‘E020’ has been indicated. 3) Start service mode, and select ‘DISPLAY > DENS/VCONT’. 4) Place a stack consisting of several A3/11 × 17 sheets of paper on the copyboard glass, and press the Start key. 5) Check the following two points: • Normal if the value of ‘DENS’ for the color for which ‘E020’ is indicated approaches ‘0’. • Is ‘E020’ indicated after copying? COPYRIGHT © 2001 CANON INC. 2000 2000 2000 2000 CANON CLC5000 REV.0 JAN. 2001 5-119 CHAPTER 5 TROUBLESHOOTING IMAGE FAULTS/MALFUNCTIONS 4.1.12 E023 1) Check the detail code of E023 using ‘DISPLAY > JAM/ERR’ in service mode. Developing assembly 2) Remove the developing assembly for which ‘E023’ is indicated. Turn the cylinder gear in its normal direction (Counter clockwise). Does it turn smoothly? NO: Check the inside of the developing assembly for foreign matter. Check the drive system for damage to gear. Developing motor drive system 3) Do the belt and the pulley rotate smoothly? NO: Check the gears of the drive system for damage and fault. Developing motor for Y (M18C) for M (M18M) for C (M18Y) for Bk (M18K) DC controller PCB 4) Set the meter to the 12VDC range. When the Start key is pressed, does the voltage between the following terminals on the DC controller PCB change from 5 V to 0 V? for C J2226A-2 (+) — J2226A-3 (–) for M J2226A-12 (+) — J2226A-13 (–) for Y J2223B-7 (+) — J2223B-8 (–) for Bk J2223B-13 (+) — J2223B-6 (–) YES: Replace the developing motor. NO: Replace the DC controller PCB. 4.1.13 E030 DC controller PCB 1) Does the total copy counter operate normally? NO: See “The counter fails to operate.” YES: Replace the DC controller PCB. 5-120 COPYRIGHT © 2001 CANON INC. 2000 2000 2000 2000 CANON CLC5000 REV.0 JAN. 2001 CHAPTER 5 TROUBLESHOOTING IMAGE FAULTS/MALFUNCTIONS 4.1.14 E040 • Check the detail code of ‘E040’ using ‘DISPLAY > JAM/ERR’ in service mode. a. E040-0001, 0002 Cassette size detecting switch 1) Is the size of the cassette indicated on the message display? NO: Check the cassette size detecting switch. Gear, Lever 2) Slide out the cassette, and move the lifter up by hand. Does it move smoothly? NO: Remove the pick-up assembly, and check the gear and lever. Cassette (latch) 3) Is the movement of the latch assembly of the grip on the cassette normal? NO: Re-install it. Spring, Lever 4) Push up the pick-up roller releasing lever by a finger. Does the pickup roller move down? NO: Remove the pick-up assembly, and check the spring and the lever. Cassette lifter position sensor 5) Is the cassette lifter sensor (PS24, PS27) normal? (See the instructions on how to check photointerrupters.) NO: Check the lever and the wiring; if normal, replace the sensor. Cassette 1 lifter motor (M16) Cassette 2 lifter motor (M17) 6) Turn OFF the power switch, and disconnect the connector J2222 Ω range, and from the DC controller PCB. Set the meter to the ×100Ω measure the resistance between the following terminals on the moΩ? tor side. Is it about 60Ω M16: J2239A-1 and J2239A-2 M17: J2239A-3 and J2239A-4 NO: Check the wiring from the connector to the motor; if normal, replace the motor. Cassette lifter motor DC controller PCB 7) Connect the connector, and turn ON the power switch. Set the meter to the 30VDC range, and connect the – probe to GND and the + probe to the following. Does the reading of the meter change from about 0 V to about 24 V when the cassette is slid in? M16: J2222A-1 M17: J2222A-3 YES: Remove the pick-up assembly, and check the gear; if normal, replace the motor. NO: Replace the DC controller PCB. COPYRIGHT © 2001 CANON INC. 2000 2000 2000 2000 CANON CLC5000 REV.0 JAN. 2001 5-121 CHAPTER 5 TROUBLESHOOTING IMAGE FAULTS/MALFUNCTIONS b. E040–0101, 0102 Drive gear Lever 1) Is the up/down movement of the lifter of the multifeeder smooth? (See the descriptions on how to release the lifter.) NO: Check the drive gear and the lever. Lifter sensor (PS2, PS3) 2) Is the lifter sensor (PS2, PS3) normal? (See the instructions on how to check photointerrupters.) NO: Check the lever and the wiring; if normal, replace the sensor. Multi feed lifter motor (M1) DC controller PCB 3) Turn OFF the power switch, and disconnect the connector J2239 Ω range, and from the DC controller PCB. Set the meter to the ×100Ω measure the resistance between the following terminals on the moΩ? tor side. Is it about 60Ω J2229B-1 and J2229B-2 NO: Check the wiring from the connector to the motor; if normal, replace the motor. YES: Replace the DC controller PCB. 5-122 COPYRIGHT © 2001 CANON INC. 2000 2000 2000 2000 CANON CLC5000 REV.0 JAN. 2001 CHAPTER 5 TROUBLESHOOTING IMAGE FAULTS/MALFUNCTIONS 4.1.15 E041 • • Take note of the position of the lifter when ‘E041’ is indicated. Check the detail code of ‘E041’ using ‘DISPLAY > JAM/ERR’ in service mode. a. E041-0001, 0003 1) Has the lifter moved up to push the switch when ‘E041’ is indicated? NO: Go to step 3. Lifter upper limit switch (SW8001) 2) Turn OFF and ON the power switch to clear ‘E041’. Does bit 4 of address 801004 under ‘DISPLAY/SENSOR’ in service mode change when the lifter upper switch (SW8001) is pressed by a finger? NO: Check the wiring from the switch to the DC controller PCB; if normal, replace the sensor. YES: Replace the DC controller PCB. Paper deck motor (M8001) DC controller PCB 3) Turn OFF and ON the power switch, and open the paper deck cover. Does the voltage between J2223A-3 (+) and J2223A-5 (–) on the DC controller change from 0 V to 24 V? YES: Check the drive system and wiring from the motor; if normal, replace the motor. NO: Replace the DC controller PCB. COPYRIGHT © 2001 CANON INC. 2000 2000 2000 2000 CANON CLC5000 REV.0 JAN. 2001 5-123 CHAPTER 5 TROUBLESHOOTING IMAGE FAULTS/MALFUNCTIONS b. E041–0002, 0003 1) Is the lifter down and pushing the switch when ‘E041’ is indicated? NO: Go to step 3. Lifter lower limit switch (SW8002) 2) Turn OFF and ON the power switch to clear ‘E041’. Does bit 5 of address 801004 under ‘DISPLAY > SENSOR’ in service mode change when the lifter lower limit switch (SW8002) is pressed by a finger? NO: Check the wiring from the switch to the DC controller PCB; if normal, replace the sensor. YES: Replace the DC controller PCB. Paper deck motor (M8001) DC controller PCB 3) Turn OFF and ON the power switch. Does the voltage between J2223-A-5 (+) and J2223A-3 on the DC controller change from 0 V to 24 V? YES: Check the drive system and wiring from the motor; if normal, replace the motor. NO: Replace the DC controller PCB. 4.1.16 E044 Paper width reference value data (faulty) 1) Enter the values recorded on the service label to the following under ‘ADJUST > DC-CON’ in service mode: UP-A4R, UP-STMR, LOW-A4R, LOW-STMR, MF-A4R, MF-A6R, MF-A4. Doe the error disappear? YES: End. Paper width reference value 2) Using ‘FUNC > CST-AD’ in service mode, set the paper width reference value once again. Is the problem corrected? YES: End. Variable resistor 3) Shift the paper guide for the paper width direction. Does the resistance of the variable resistor change? NO: Replace the variable resistor. YES: Replace the DC controller PCB. 5-124 COPYRIGHT © 2001 CANON INC. 2000 2000 2000 2000 CANON CLC5000 REV.0 JAN. 2001 CHAPTER 5 TROUBLESHOOTING IMAGE FAULTS/MALFUNCTIONS 4.1.17 E050 Duplexing paper jogging guide home position sensor (PS29) 1) Is the sensor normal? (See the instructions on how to check photointerrupters.) NO: Replace the sensor. Operation (faulty) 2) Is there any obstacle in the operation path of the duplexing unit stacking guide? YES: Remove it. Duplexing paper jogging guide motor (M23) DC controller PCB 3) Replace the motor. Is the problem corrected? YES: End. NO: Replace the DC controller PCB. 4.1.18 E061 1) Is the value of ‘ADJUST > VCCRT (MCYK)’ in service mode the same as that recorded on the service label? NO: Enter the value recorded in the service label. 2) Check the detail code of ‘E061’ in ‘DISPLAY > JAM/ERR’ in service mode. Make the appropriate checks prescribed for each detail code. Laser exposure system 3) Is the operation of the laser shutter normal? NO: Check the shutter assembly. 4) Is the laser power normal? NO: Adjust it. If output is absent, replace the laser unit. Video controller PCB 5) Is the connection of each connector on the video controller PCB normal? YES: Replace the PCB. COPYRIGHT © 2001 CANON INC. 2000 2000 2000 2000 CANON CLC5000 REV.0 JAN. 2001 5-125 CHAPTER 5 TROUBLESHOOTING IMAGE FAULTS/MALFUNCTIONS Primary charging assembly 6) Is the primary charging assembly inserted properly? NO: Re-install it. 7) Are the charging wires of the primary charging assembly and the pre-primary charging assembly broken? YES: Re-install the charging wire. 8) Are the charging wires of the primary charging assembly and the pre-primary charging assembly soiled? YES: Clean them or re-install them. 9) Is there electrical continuity between charging wire, grid, and shielding plate? Further, is there a trace of leakage on the primary charging assembly or the pre-primary charging assembly? NO: Replace the primary charging assembly. 10) Is the grid broken, slack, or soiled? NO: Replace the grid. HVT2 PCB 11) Is the high-voltage output from the HVT2 PCB normal? Is the connection of each connector on the HVT2 PCB normal? YES: Check the connectors on the HVT2 PCB and the high-voltage cable; if normal, replace the HVT2 PCB. Pre-exposure lamp 12) Is the pre-exposure lamp normal? Turn on the pre-exposure lamp using ‘FUNC > F-MISCp > I/O’ in service mode. Is it normal? NO: Check the wiring from the DC controller PCB to the pre-exposure lamp; if normal, replace the pre-exposure lamp. Photosensitive drum 13) Is the photosensitive drum grounded? NO: Ground it. YES: Replace the photosensitive drum. Potential sensor 14) Clean the potential sensor. Is the problem corrected? YES: End. Check the wiring from the DC controller PCB to the potential sensor; if normal, replace the potential sensor unit. Environment sensor 15) Check the temperature and humidity using ‘DISPLAY > ANALOG’ in service mode. Is the environment sensor normal? NO: Check the wiring from the DC controller PCB to the environment sensor; if normal, replace the environment sensor. YES: Replace the DC controller PCB. 5-126 COPYRIGHT © 2001 CANON INC. 2000 2000 2000 2000 CANON CLC5000 REV.0 JAN. 2001 CHAPTER 5 TROUBLESHOOTING IMAGE FAULTS/MALFUNCTIONS 4.1.19 E062 • Check the detail code of ‘E062’ using ‘DISPLAY > JAM/ERR’ in service mode. a. XX01 AC driver PCB 1) Turn OFF and ON the power. Is ‘E062’ indicated? NO: End. DC controller PCB 2) Replace the AC driver PCB. Is the problem corrected? YES: End. NO: Replace the DC controller PCB. b. XX02 1) Turn OFF and ON the power switch. Is ‘E062’ indicated? NO: End. Drum heater 2) Measure the resistance between the following terminals on the AC driver PCB for the color for which ‘E062’ is indicated: for Y: J2805-1 and -7 for M: J2805-2 and -8 for C: J2805-3 and -9 for Bk:J2805-4 and -10 Is the reading of the meter ‘OL’? YES: Check the wiring from the AC driver PCB and the drum heater; if normal, replace the drum heater. NO: See “The drum heater fails to turn ON.” c. 0010 Drum thermistor DC controller PCB 1) Disconnect J2216A from the DC controller PCB, and measure the resistance of the terminals on the harness side: for Y: J2216A-4 and J2216A-5 for M: J2216A-9 and J2216A-10 for C: J2216B-4 and J2216B-5 for Bk:J2216B-9 and J2216B-10 Is the resistance 10 kWor more? NO: Check the wiring up to the drum thermistor; if normal, replace the drum thermistor. YES: Replace the DC controller PCB. COPYRIGHT © 2001 CANON INC. 2000 2000 2000 2000 CANON CLC5000 REV.0 JAN. 2001 5-127 CHAPTER 5 TROUBLESHOOTING IMAGE FAULTS/MALFUNCTIONS 4.1.20 E072 Transfer belt cleaning web rotation sensor (PS10) 1) Is the sensor normal? (Check the instructions on how to check photointerrupters.) NO: Replace the sensor. Operation (faulty) 2) Turn the web drive shaft by a finger. Does it turn smoothly? NO: Remove the cause of poor rotation. Transfer belt cleaning web motor (M12) DC controller PCB 3) Turn OFF and ON the power switch; then, select two-sided copying mode, and press the Start key. Does the voltage at J2218A-4 on the DC controller PCB change from 0 V to 24 V? YES: Check the wiring from the DC controller PCB to the transfer belt cleaning web motor; if normal, replace the transfer belt cleaning web motor. NO: Replace the DC controller PCB. 4.1.21 E073 Transfer frame drawer connector DC controller PCB 1) Is the transfer frame drawer connector soiled with toner or damaged? YES: Clean the drawer connector. NO: Check the wiring from J2218 on the DC controller PCB to the transfer frame drawer connector J6122; if normal, replace the DC controller PCB. 5-128 COPYRIGHT © 2001 CANON INC. 2000 2000 2000 2000 CANON CLC5000 REV.0 JAN. 2001 CHAPTER 5 TROUBLESHOOTING IMAGE FAULTS/MALFUNCTIONS 4.1.22 E074 Transfer belt lifter sensor 1 (PS12), 2 (PS13) 1) Is the sensor normal? (See the instructions on how to check photointerrupters.) NO: Replace the sensor. Operation (faulty) 2) Turn the transfer belt lifter drive shaft by a finger. Does it turn smoothly? NO: Remove the cause of the faulty rotation. Sensor (position) 3) Turn OFF and ON the power switch to clear ‘E074’. Press the Start key, and check the operation of the lifter of the transfer belt by the eye. Does the transfer belt move up and down? YES: Check the position of the sensor; if normal, replace the DC controller PCB. Multifeeder pick-up motor 4) Turn OFF and ON the power switch once again, and press the Start key. Does the multifeeder pick-up motor rotate? NO: Check the wiring; if normal, replace the multifeeder pick-up motor. Transfer belt lifter clutch (CL17) DC controller PCB 5) Turn OFF and ON the power switch once again, and press the Start key. Does the voltage between J2208A-14 and J2208A-15 on the DC controller PCB change from 0 V to 24 V? YES: Check the wiring from the clutch to the DC controller PCB; if normal, replace the clutch. NO: Replace the DC controller PCB. COPYRIGHT © 2001 CANON INC. 2000 2000 2000 2000 CANON CLC5000 REV.0 JAN. 2001 5-129 CHAPTER 5 TROUBLESHOOTING IMAGE FAULTS/MALFUNCTIONS 4.1.23 E075 • Check the detail code of ‘E075’ using ‘DISPLAY > JAM/ERR’ in service mode. a. E075–0001, 0002, 0003, 0004 Transfer belt edge sensor (PS17, PS18, PS19, PS20) 1) Is the sensor represented by the detail code in question normal? (See the instructions on how to check photointerrupters.) NO: Check the operation; if normal; replace the sensor. Transfer belt unit (connector) 2) Is the connector of the transfer belt unit connected securely? NO: Connect it securely. Slave roller (fixing screw) 3) Is the fixing screw of the slave roller assembly loose? When the slave roller assembly [1] is bent, the fixing screw [2] at the rear is loosened; be sure to tighten the fixing screw after the work. Otherwise, the slave roller assembly will wobble, causing the transfer belt to become displaced (leading to ‘E075’). NO: Tighten it fully. [1] [2] F05-401-04 5-130 COPYRIGHT © 2001 CANON INC. 2000 2000 2000 2000 CANON CLC5000 REV.0 JAN. 2001 CHAPTER 5 TROUBLESHOOTING IMAGE FAULTS/MALFUNCTIONS Transfer belt cleaning web 4) Is the web shaft of the transfer belt cleaning web fitted correctly in the bushing? If the web shaft [2] is not correctly fitted to the bushing when the cleaning belt web [1] is mounted, the web will come into uneven contact with the transfer belt, causing the transfer belt to malfunction (‘E075’). NO: Mount the web shaft correctly. [1] [2] F05-401-05 Oil removing roller 5) Is the oil removing roller mounted correctly? If the oil removing roller [1] is fixed in position overriding the emboss [2] next to the fixing screw, the roller will come into uneven contact with the transfer belt, causing the transfer belt to malfunction (‘E075’). NO: Mount the oil removing roller correctly. 6) Is the surface of the roller peeling? YES: Replace the oil removing roller. [1] [2] F05-401-06 COPYRIGHT © 2001 CANON INC. 2000 2000 2000 2000 CANON CLC5000 REV.0 JAN. 2001 5-131 CHAPTER 5 TROUBLESHOOTING IMAGE FAULTS/MALFUNCTIONS Polishing roller 7) Is the polishing roller mounted normally? If the polishing roller [1] is fixed in position overriding the emboss [2] next to the fixing screw, the roller will come into uneven contact with the transfer belt, causing the transfer belt to malfunction (‘E075’). NO: Mount the polishing roller correctly. [2] [1] F05-401-07 Transfer belt 8) Is the transfer belt overriding the edge sensor? Take care not to mount the transfer belt [1] overriding the edge sensor [2]; otherwise, the transfer belt can malfunction (‘E075’). YES: Mount the transfer belt correctly. [2] [1] F05-401-08 5-132 COPYRIGHT © 2001 CANON INC. 2000 2000 2000 2000 CANON CLC5000 REV.0 JAN. 2001 CHAPTER 5 TROUBLESHOOTING IMAGE FAULTS/MALFUNCTIONS Internal static eliminating roller 9) Is the internal static eliminating roller mounted correctly? If the internal static eliminating roller [1] is secured in position with the push-on spring [2] detached, the roller will come into uneven contact with the transfer belt, causing the transfer belt to malfunction (‘E075’). NO: Mount the internal static eliminating roller correctly. [1] [2] F05-401-09 Transfer belt back cleaning member 10) Is the transfer belt back cleaning member mounted correctly? If the transfer belt back cleaning member [1] is secured in place overriding the emboss [2] next to the fixing screw, the contact with the transfer belt will be uneven, causing the transfer belt to malfunction (‘E075’). NO: Mount the transfer belt face cleaning member correctly. [1] [2] F05-401-10 COPYRIGHT © 2001 CANON INC. 2000 2000 2000 2000 CANON CLC5000 REV.0 JAN. 2001 5-133 CHAPTER 5 TROUBLESHOOTING IMAGE FAULTS/MALFUNCTIONS Transfer assembly (releasing) 11) Was the transfer assembly released while the transfer belt was rotating during servicing work? If the transfer assembly releasing lever is freed before the transfer belt stops to rotate after service work conducted with the help of the cover switch actuator, ‘E073’ or ‘E075’ will occur when the transfer unit is slid out. YES: Check to make sure that the machine has stopped operating before sliding out the transfer unit. Transfer belt drive roller 12) Is there shavings of the belt on the surface of the roller? YES: Clean the surface of the roller with alcohol. Transfer blade 13) Is there shavings of the belt on the surface of the blade? YES: Clean the surface of the blade with lint-free paper. DC controller PCB 14) Operate the transfer belt shifting motor in service mode. Is operation noise heard? YES: Check the drive system and the wiring; if normal, replace the DC controller PCB. Transfer belt shifting motor (M12) DC controller PCB 15) Replace the motor. Is the problem corrected? YES: End. NO: Replace the DC controller PCB. b. E075–0005, 0006, 0007, 0008 Transfer belt edge sensor (PS17, PS18, PS19, PS20; flag operation) 1) Is the sensor represented by the detail code in question normal? (See the instructions on how to check photointerrupters.) NO: Check the movement of flag, and remove the cause. Transfer belt edge sensor DC controller PCB 2) Is the sensor normal? (See the instructions on how to check photointerrupters.) NO: Check the wiring from the DC controller PCB to the sensor; if normal, replace the sensor. YES: Replace the DC controller PCB. 5-134 COPYRIGHT © 2001 CANON INC. 2000 2000 2000 2000 CANON CLC5000 REV.0 JAN. 2001 CHAPTER 5 TROUBLESHOOTING IMAGE FAULTS/MALFUNCTIONS 4.1.24 E076 1) Execute ‘FUNC>F-MISCP>MTR>13’ in service mode to rotate the transfer cleaner web motor (M12). Does the motor rotate? YES: Go to step 3. Overload 2) Turn the transfer cleaner web by hand. Is the rotation heavy? NO: Check the transfer cleaner web drive system. Transfer cleaner web motor (M12) DC controller PCB 3) Set the meter to the 5VDC range, and measure the voltage between J2218-A1 (+: M12ON) and J2218-A4 (-: GND). Does it change from about 5 V to about 0 V when the motor is rotated in service mode? YES: Replace the transfer cleaner web motor (M12). NO: Check the wiring from J2218A to the transfer cleaner web motor (M12); if normal, replace the DC controller PCB. 4.1.25 E077 1) Make copies. Does the transfer belt waste toner motor (M31) rotate? YES: Go to step 3. Overload 2) Turn the transfer cleaner waste toner feeding screw by hand. Is the rotation heavy? NO: Check the transfer cleaner waste toner feeding screw drive system. Transfer belt waste toner motor (M31) DC controller PCB 3) Set the meter to the 24VDC range, and measure the voltage between J218-B12 (+: M3ON) and J2218-B3 (-: GND). Make copies; does it change from about 24 V to about 0 V when the motor rotates? YES: Replace the transfer belt waste toner motor (M31). NO: Check the wiring from J2218B to the transfer belt waste toner motor (M31); if normal, replace the DC controller PCB. COPYRIGHT © 2001 CANON INC. 2000 2000 2000 2000 CANON CLC5000 REV.0 JAN. 2001 5-135 CHAPTER 5 TROUBLESHOOTING IMAGE FAULTS/MALFUNCTIONS 4.1.26 E100 a. E100-xx01 Laser shutter 1) Is the operation of the laser shutter normal? NO: Replace the faulty part. DC power supply PCB 1 (lower) 2) Is power present at J2101 on the DC controller PCB? J2101-1 (+) — J2101-4 (–): 5V J2101-8 (+) — J2101-9 (–): 8V J2101-7 (+) — J2101-8 (–): –12V NO: Check the wiring; if normal, replace the DC power supply PCB 1 (lower). Video controller PCB Laser driver PCB 3) Is there a fault in the connection between the video controller PCB and the laser driver PCB of the every color? C J2106 — J3002C J2107 — J3001C M J2108 — J3002M J2109 — J3001M Y J2110 — J3002Y J2111 — J3001Y Bk J2112 — J3002K J2113 — J3001K YES: Re-connect it. Laser exposure system 4) Is the laser power normal? NO: Adjust it. If output is absent, replace the laser unit. BD unit Laser driver PCB 5) Clean the light-receiving face of the BD unit. Is the problem corrected? YES: End. NO: Replace the following parts in the order indicated: • BD unit • Video controller PCB Memo 5-136 You can find out whether the cause of ‘E100’ has been removed or not by executing ‘FUNC > EPC > EPC’. COPYRIGHT © 2001 CANON INC. 2000 2000 2000 2000 CANON CLC5000 REV.0 JAN. 2001 CHAPTER 5 TROUBLESHOOTING IMAGE FAULTS/MALFUNCTIONS b. E100–xx02 DC power supply PCB 1 (lower) 1) Is power present at J2101 on the video controller PCB? J2101-1 (+) — J2101-4 (–): 5 V J2101-8 (+) — J2101-9 (–): 8 V J2101-7 (+) — J2101-8 (–): -12 V NO: Check the wiring; if normal, replace the DC power supply PCB (lower). Video controller PCB Laser diver PCB 2) Is there a fault in the connection between the video controller PCB and the laser drive PCB of the color for which ‘E100’ is indicated? C J2106 — J3002C J2107 — J3001C M J2108 — J3002M J2109 — J3001M Y J2110 — J3002Y J2111 — J3001Y Bk J2112 — J3002K J2113 — J3001K YES: Re-connect it. Laser exposure system Laser unit, Video controller PCB DC controller PCB 3) Is the laser power normal? (See “Adjusting the Laser Power.” NO: Make adjustments. If output is absent, replace the laser unit. YES: Try replacing the following parts in sequence: • Laser unit • Video controller PCB • DC controller PCB COPYRIGHT © 2001 CANON INC. 2000 2000 2000 2000 CANON CLC5000 REV.0 JAN. 2001 5-137 CHAPTER 5 TROUBLESHOOTING IMAGE FAULTS/MALFUNCTIONS 4.1.27 E110 DC power supply PCB 1 (upper) 1) Is power present at J6297 on the laser scanner motor driver PCB? J6297-3 (+) — J6297-1 (–): 35V J6297-4 (+) — J6297-2 (–): 35V NO: Check the wiring: if normal, replace the DC power supply PCB 1 (upper). Laser scanner motor driver PCB DC controller PCB 2) Is there a fault in the connection between the laser scanner motor and J4081 on the laser scanner motor driver PCB? Is there a fault in the connection between J2208B on the DC controller PCB and J6037 on the laser scanner motor driver PCB? YES: Re-connect it. NO: Replace the following parts in the order indicated: • DC controller PCB • Laser scanner motor unit • Laser scanner motor driver 4.1.28 E194 a. E194–xx01, xx02, xx03 1) Execute ‘FUNC > INSTALL > REG-APER’ in service mode. Is the execution normal? YES: Go to step 4). Transfer belt 2) Generate a test pattern (PG=07). Is the image position correction pattern normal? NO: Check the transfer belt where the image position correction pattern is formed; if there are scratches, replace the transfer belt. Otherwise, perform the instructions given for image adjustments. DC controller PCB 3) Replace the image position correction CCD unit. Is the problem corrected? NO: Replace the DC controller PCB. Pattern position 4) Generate a test pattern (PG=06, grid). Is the discrepancy from the M pattern in main scanning direction? YES: Adjust the position using ‘FUNC > IMG-REG > C/Y/K-REG-H’ and ‘C/Y/K-REG-HS’ in service mode Thereafter, be sure to execute ‘FUNC > INSTALL > REG-APER’. NO: Adjust the position using ‘FUNC > IMG-REG-V’ in service mode. Thereafter, be sure to execute ‘FUNC > INSTALL > REG-APER’. 5-138 COPYRIGHT © 2001 CANON INC. 2000 2000 2000 2000 CANON CLC5000 REV.0 JAN. 2001 CHAPTER 5 TROUBLESHOOTING IMAGE FAULTS/MALFUNCTIONS b. E194–0001, 0002 Shutter drive motor (M25) 1) Execute ‘FUNC > F-MISCp > MTR’ in service mode to operate the shutter. Does the shutter drive motor operate normally? YES: Check the drive system; if normal, replace the motor. Shutter open sensor (PS40) 2) Is the shutter open sensor (PS40) normal? (in the case of E1940001) NO: Replace the sensor. YES: Check the wiring; if normal, replace the DC controller PCB. Shutter closed sensor (PS39) 3) Is the shutter closed sensor (PS39) normal (if E194=0002)? NO: Replace the sensor. Shutter drive system 4) Check the shutter drive system as shown below. Does it move smoothly? YES: Check the wiring; if normal, replace the DC controller PCB. Parts (deformation, dirt) 5) Is the shutter screw assembly soiled? NO: Check the wiring; if normal, replace the DC controller PCB. YES: Disassembly/clean the parts as shown below. ■ Correcting E194-0001/0002 1) Turn off the power switch. 2) Open the front cover. 3) Remove the image position correction CCD unit. (See the descriptions under “Removing the Image Position Correction CCD Unit” in Service Manual of CLC1000, Chapter 4.) 4) Remove the drive releasing pin [1], and dry moving the shutter [3] while holding the mobile member. [1] [2] [3] F05-401-11 COPYRIGHT © 2001 CANON INC. 2000 2000 2000 2000 CANON CLC5000 REV.0 JAN. 2001 5-139 CHAPTER 5 TROUBLESHOOTING IMAGE FAULTS/MALFUNCTIONS ■ Correcting E194-0001/0002 1) Turn off the power switch. 2) Open the front cover. 3) Remove the image position correction CCD unit. (See the descriptions under “Removing the Image Position Correction CCD Unit” in Service Manual of CLC1000,Chapter 4.) 4) Remove the screw [2], and remove the support plate (front) [1]. 5) Remove the screw [4], and remove the shutter [3]. (At this time, take care not to deform the grounding plate [5]. Take care also not to lose the screw [4]; it is a special screw.) 6) With lint-free paper, dry wipe the top and bottom faces of the shutter [3], top and bottom faces of the support plate (front) [1], and top and bottom faces of the support plate (rear) [6]. [2] [5] [1] [3] [4] [6] F05-401-12 7) Dry wipe the LED [7]. At this time, do not apply excess force on the LED. [7] F05-401-13 8) Install the shutter with a screw. (At this time, take care not to deform the grounding plate.) 9) Install the support plate (front) with a screw. 5-140 COPYRIGHT © 2001 CANON INC. 2000 2000 2000 2000 CANON CLC5000 REV.0 JAN. 2001 CHAPTER 5 TROUBLESHOOTING IMAGE FAULTS/MALFUNCTIONS 4.1.29 E220 1) Does the scanning lamp turn ON? NO: See “The scanning lamp fails to turn ON.” Lamp regulator PCB Reader unit controller PCB 2) Is there a fault in the connection between J1306B on the reader unit controller PCB and J450 on the lamp regulator PCB? YES: Re-connect it. NO: Replace the following parts in the order indicated: • Lamp regulator PCB • Reader unit controller PCB 4.1.30 E226 Reader assembly suction fan (FM12/13) Reader controller PCB 1) Try replacing the reader assembly suction fan (FM12/13). Is the problem corrected? YES: End. NO: Check the wiring from the reader assembly suction fan (FM12/13) to J1311B of the reader controller PCB; if normal, replace the reader controller PCB. 4.1.31 E249 a. E249-0001 Image memory on the IP memory board 1) Remove the image memory from the IP memory board once; and then mount it back again. Is the problem corrected? YES: End NO: Check the connectors on the IP memory board for connection; if normal, replace the image memory. b. E249-0002 Image memory on the EDC board 1) Remove the image memory from the ED board once, and then mount it back again. Is the problem corrected? YES: End NO: Check the connectors on the ED board for conection; if normal, replace the image memory. COPYRIGHT © 2001 CANON INC. 2000 2000 2000 2000 CANON CLC5000 REV.0 JAN. 2001 5-141 CHAPTER 5 TROUBLESHOOTING IMAGE FAULTS/MALFUNCTIONS 4.1.32 E350 Connector 1) Is the connection between the reader controller PCB and the ECOID PCB normal? NO: Connect the PCBs correctly. ECO-PCB Reader controller PCB 2) Replace the ECO-ID PCB. Is the problem corrected? YES: End. NO: Replace the reader controller PCB. 4.1.33 E351 Connector 1) Is the connection between the analog processor PCB and the image processor PCB normal? NO: Connect the PCBs correctly. 2) Is the connection between the reader contoroller PCB and the image processor PCB normal? NO: Connect the PCBs correctly. 3) Try replacing the image processor PCB. Is the problem corrected? YES: End. NO: Replace the analog processor PCB or the reader controller PCB. 5-142 COPYRIGHT © 2001 CANON INC. 2000 2000 2000 2000 CANON CLC5000 REV.0 JAN. 2001 CHAPTER 5 TROUBLESHOOTING IMAGE FAULTS/MALFUNCTIONS 4.1.34 E517 a. E517-0001 through -0005 Solenoid 1) Disconnect the connector of the upward curl removing solenoid (SL5/6), and the solenoid side for electrical continuity. Is there continuity? YES: Go to step 2. NO: Replace the solenoid without electrical continuity. Sensor 2) Try replacing the upper phase sensor (PS4/5). Does the error disappear? NO: Replace the buffer pass driver PCB. b.E517-0006 through -0009 Cable 1) Are the connectors (J101 through 103; 201 through 205; 301 through 303) on the buffer pass driver PCB connected correctly? NO: Connect them correctly. 2) Disconnect the connector of the sorter. Doe the error disappear? YES: Check the cable between the sorter and the buffer pass. NO: Go to step 3. 3) Try replacing the buffer pass drive PCB. Is the problem corrected? YES: Replace the buffer pass drive PCB. NO: Check the cable between the buffer pass and the copier. 4) Is the cable between the buffer pass driver PCB and the following sensors connected correctly: inlet sensor (PS8), reversal timing sensor (PS1), reversal jam sensor (PS2), upper phase sensor (PS4/5), and lower phase sensor (PS6/7)? NO: Connect it correctly. c. E517-0011 through -0015 1) Disconnect the connector of the downward curl removing solenoid (SL7/8), and check the solenoid side for electrical continuity. Is there continuity? YES: Go to step 2. NO: Replace the solenoid without continuity. 2) Try replacing the lower phase sensor (PS7/7). Doe the error disappear? NO: Replace the buffer pass driver PCB. COPYRIGHT © 2001 CANON INC. 2000 2000 2000 2000 CANON CLC5000 REV.0 JAN. 2001 5-143 CHAPTER 5 TROUBLESHOOTING IMAGE FAULTS/MALFUNCTIONS 4.1.35 E620 Connector wiring 1) Is there a fault in the connection of the ED PCB, memory PCB, or image processor PCB? NO: Re-connect it. YES: Replace the following parts in the order indicated: • ED PCB • Memory PCB • Image processor PCB 4.1.36 E700 Malfunction 1) Turn off and then on the power switch. Is the problem corrected? YES: End. Connector Wiring 2) Are the wiring and the connection of the following connectors normal? Reader controller PCB: J1310 DC controller PCB: J2206 NO: Connect the connector correctly. Reader controller PCB 3) Are all the connectors on the reader controller PCB connected securely? NO: Connect the connectors. YES: Check all connectors on the DC controller PCB for connection. 5-144 COPYRIGHT © 2001 CANON INC. 2000 2000 2000 2000 CANON CLC5000 REV.0 JAN. 2001 CHAPTER 5 TROUBLESHOOTING IMAGE FAULTS/MALFUNCTIONS 4.1.37 E718 Connector, Wiring 1) Are the connection and the wiring of the following connector normal? Projector Controller PCB: J103 NO: Re-connect it. Projector controller PCB 2) Set the meter to the 12VDC range, and measure the voltage between J107-1 (+; 5 V) and J107-2 (–; GND) on the projector controller PCB. Does it change from about 0 V to about 5 V when projector mode starts? YES: Go to step 8. Connector, Wiring 3) Are the connection and wiring between the following connectors normal? J107 on the projector controller PC and J203 on the DC power supply J102 on the projector controller PCB and SSR1 NO: Re-connect it. DC power supply 4) Set the meter to the 300VAC range, and measure the voltage between J201-1 and -3 of the DC power supply. Is the rated AC voltage present when projector mode starts? YES: Replace the DC power supply. Overcurrent 5) Press the circuit breaker. Is it reset? YES: Be sure to find out the cause of the overcurrent. Reader unit controller PCB 6) Set the meter to the 30VDC range, and measure the voltage between J103-5 (+; 5 V) and J103-6 (–; POWON*) on the projector controller PCB. Does it change from about 0 V to about 5 V when projector mode starts? NO: Replace the reader unit controller PCB. SSR1 Projector controller PCB 7) As in step 6, measure the voltage between J102-1 (+; 5 V) and J1022 (–; POWON*). Does it change from about 0 V to about 5 V? YES: Replace SSR1. NO: Replace the projector controller PCB. COPYRIGHT © 2001 CANON INC. 2000 2000 2000 2000 CANON CLC5000 REV.0 JAN. 2001 5-145 CHAPTER 5 TROUBLESHOOTING IMAGE FAULTS/MALFUNCTIONS Projector controller PCB Reader unit controller PCB 8) Replace the projector controller PCB. Is the problem corrected? YES: End. NO: Replace the reader controller PCB. 4.1.38 E800 Malfunction 1) Turn OFF and ON the power switch. Is the problem corrected? YES: End Power switch (SW2) DC controller PCB 2) Try replacing the power switch (SW2). Is the problem corrected? YES: End NO: Check the wiring and electrical continuity from the DC controller PCB to the power switch (SW2); if normal, replace the DC controller PCB. 4.1.39 E804 Power supply cooling fan (FM17/18) DC controller PCB 1) Try replacing the power supply cooling fan (FM17/18). Is the problem corrected? YES: End. NO: Check the wiring from the power supply cooling fan (FM17/18) to J2234A of the DC controller PCB; if normal, replace the DC controller PCB. 4.1.40 E805 Delivery assembly exhaust fan (FM1/2/3) DC controller PCB 1) Try replacing the delivery assembly exhaust fan (FM1/2/3). Is the problem corrected? YES: End. NO: Check the wiring from the delivery assembly exhaust fan (FM1/2/ 3) to J2212B of the DC controller PCB; if normal, replace the DC controller PCB. 5-146 COPYRIGHT © 2001 CANON INC. 2000 2000 2000 2000 CANON CLC5000 REV.0 JAN. 2001 CHAPTER 5 TROUBLESHOOTING IMAGE FAULTS/MALFUNCTIONS 4.1.41 E807 Fan DC controller PCB Reader controller PCB 1) Try replacing the fan identified by the detail code. Is the problem corrected? Detail code Fan 0001 laser cooling fan(FM4/5) 0002 laser scanner motor cooling fan(FM24) 0003 digital unit cooling fan(FM16) 0004 digital unit cooling fan(FM14/15) YES: End NO: Check the wiring from the fan identified by the detail code to connector of the DC controller PCB; if normal, replace the DC controller PCB. Detail code Fan 0001 laser cooling fan(FM4/5) 0002 laser scanner motor cooling fan(FM24) 0003 digital unit cooling fan (FM16) 0004 digital unit cooling fan (FM14/15) PCB DC controller PCB Connector J2208B J2208B J1311A Reader controller PCB J1311A COPYRIGHT © 2001 CANON INC. 2000 2000 2000 2000 CANON CLC5000 REV.0 JAN. 2001 5-147 CHAPTER 5 TROUBLESHOOTING IMAGE FAULTS/MALFUNCTIONS 4.1.42 E822 Fan DC controller PCB 1) Try the fan identified by the detail code. Is the problem corrected? Detail code Fan 0001 pre-fixing feed fan(FM7) 0002 delivery lower cooling fan(FM19/20/27) 0003 reversing assembly exhaust fan(FM28/29/30/33) 0004 delivery cooling fan(FM34) 0005 pre-fixing exhaust fan(FM35/36) YES: End NO: Check the wiring the fan identified by the detail code to connector of the DC controller PCB; if normal, replace the DC controller PCB. Detail code 0001 0002 0003 0004 0005 Fan pre-fixing feed fan(FM7) delivery lower cooling fan(FM19/20/27) reversing assembly exhaust fan (FM28/29/30/33) delivery cooling fan(FM34) pre-fixing exhaust fan(FM35/36) Connector J2214A J2213B J2240B J1311A J2228A 4.1.43 E824 Fan DC controller PCB 1) Try replacing the fan identified by the detail code. Is the problem corrected? Detail code Fan 0001 primary cooling fan (FM6) 0002 primary suction fan (FM8/9) YES: End. NO: Check the wiring from the fan identified by the detail code to the connector on the deck controller PCB; if normal, replace the DC controller PCB. Detail code Fan Connector 0001 primary cooling fan (FM6) J2213 0002 primary suction fan (FM8/9) J2215B 5-148 COPYRIGHT © 2001 CANON INC. 2000 2000 2000 2000 CANON CLC5000 REV.0 JAN. 2001 CHAPTER 5 TROUBLESHOOTING IMAGE FAULTS/MALFUNCTIONS 4.1.44 E826 Pickup cooling fan(FM26/32) DC controller PCB 1) Try replacing pickup cooling fan(FM26/32). Is the problem corrected? YES: End. NO: Check the wiring from the fan identified by the detail code to the connector on the deck controller PCB; if normal, replace the DC controller PCB. Fan Connector FM26 J5706 FM32 J2226A 4.1.45 AC power is absent. Power plug 1) Is the power plug connected to the power outlet? NO: Connect the power plug. Power source 2) Is the rated AC voltage present at the power outlet? NO: The problem is not of the copier. Advise the user. 3) Is the rated voltage present between F3 and F4 of RL1? YES: Go to step 5. Leakage breaker (CB1; faulty or OFF) Power cord Noise filter (LF1) 4) Is the open/close lever of the leakage breaker (CB1) on the ON side? NO: Check the operation, if not normal, replace the leakage breaker (CB1). YES: Check or replace the power cord and the noise filter (LF1). COPYRIGHT © 2001 CANON INC. 2000 2000 2000 2000 CANON CLC5000 REV.0 JAN. 2001 5-149 CHAPTER 5 TROUBLESHOOTING IMAGE FAULTS/MALFUNCTIONS System of checking the Leakage Breaker 1. Press the test button of the breaker. Test button 2. F05-401-14 Check to make sure that open/close lever has shifted to the OFF terminal side and the power has been cut. 3. 4. F05-401-15 Turn off the power switch. Shift the open/close lever to the ON side. 5. Turn on the power switch. F05-401-16 5-150 COPYRIGHT © 2001 CANON INC. 2000 2000 2000 2000 CANON CLC5000 REV.0 JAN. 2001 CHAPTER 5 TROUBLESHOOTING IMAGE FAULTS/MALFUNCTIONS Power switch (SW2) faulty Wiring 5) Connect the probes of the meter to both terminals of the power Ω when the switch is turned ON, and ∞Ω when switch (SW2). Is it 0Ω the switch is turned OFF? NO: Replace SW2. YES: Check the wiring of the AC power line and connector for poor contact. 4.1.46 DC power is absent. AC power supply 1) Is AC power present between the following terminals? J5327M-1 and J5327M-4 on the DC power supply PCB 1 (upper) J5301M-1 and J5301M-3 on the DC power supply PCB 1 (lower) J5337-1 and J5337-3 on the DC power supply PCB NO: See “AC power is absent.” Right cover switch (SW1) 2) Disconnect the power plug, and check the front cover (right) switch for electrical continuity. Is it normal? NO: Replace the front cover (right) switch. Wiring DC power supply DC load 3) Disconnect all connectors except for the following: J5327M on the DC power supply PCB 1 (upper) J5301M on the DC power supply PCB 1 (lower) J5337 on the DC power supply PCB 2 Connect the power plug, and turn ON the power switch. Is the DC power supply output of the above connectors on the DC power supply normal? Caution 1: Be careful to avoid shorting the connectors. Keep in mind that +24VU and +214VR are not generated. YES: Turn OFF the power switch, and connect one of the disconnected connectors; then, turn ON the power. Repeat this for all connectors to find out which connector activates the protection circuit. Check the wiring from that connector to the DC load. NO: Replace the faulty DC power supply PCB. COPYRIGHT © 2001 CANON INC. 2000 2000 2000 2000 CANON CLC5000 REV.0 JAN. 2001 5-151 CHAPTER 5 TROUBLESHOOTING IMAGE FAULTS/MALFUNCTIONS 4.1.47 The scanner fails to move forward/in reverse. Cable (broken, displaced) 1) Is the drive cable routed correctly? NO: Re-route the cable. Obstacle in path 2) Is the rail free of dirt? Does the mirror mount move smoothly when pushed by hand? NO: Check the rail for dirt or foreign object; as necessary, clean or lubricate. REF. If the surface of the rail is soiled, use alcohol to clean it; then, apply a small amount of silicone oil available for the fixing roller. Scanner home position sensor (PS37) 3) Is the scanner home position sensor (PS37) normal? (See the instructions on how to check photointerrupters.) NO: Check the wiring and light-blocking plate; if normal, replace the sensor. Connector Wiring 4) Are the connection of the following connectors and the wiring between the connectors normal? J602 on the scanner motor driver PCB J1306 on the reader unit controller PCB NO: Re-connect it. DC power supply 5) Set the meter to the 50VDC range, and measure the voltage between the following terminals on the scanner motor driver. Is it normal? J601-2 (+) and –1 (–):about 5 V J601-4 (+) and –3 (–):about 8 V J601-6 (+) and –5 (–):about 24 V NO: See “DC power is absent.” Scanner motor driver Scanner motor (M29) 6) Replace the scanner motor driver. Is the problem corrected? YES: End. NO: Replace the scanner motor. 5-152 COPYRIGHT © 2001 CANON INC. 2000 2000 2000 2000 CANON CLC5000 REV.0 JAN. 2001 CHAPTER 5 TROUBLESHOOTING IMAGE FAULTS/MALFUNCTIONS 4.1.48 The scanning lamp fails to turn ON. Lamp 1) Turn OFF the power switch, and disconnect the power plug. Is the lamp installed properly? NO: Re-install the lamp. Thermal switch 2) Check both terminals of the thermal switch (TP4/5) for electrical continuity using the meter. Is there continuity? NO: Replace the thermal switch. • The lamp may have turned on wrongly, the thermal switch may have been mounted wrongly, or the cooling fan may have failed to operate. Make checks. Lamp (open circuit) 3) Disconnect J10 (3P) on the lamp regulator, and set the meter to the 1kW range. Does the index of the meter swing when the probe is connected to the connector on the harness side? NO: Check the wiring from J10 to the lamp; if normal, replace the lamp. Lamp regulator overcurrent 4) Is there electrical continuity on the fuse on the lamp regulator? NO: Replace the lamp regulator. • Check the lamp and the harness for a short circuit. AC power supply 5) Connect J10, and disconnect J9 (4P). Connect the power plug, and turn ON the power switch. Set the meter to the 300VAC range, and measure the voltage between J9-1 and 4 on the harness side. Is the rated voltage present? NO: See “AC power is absent.” DC power supply PCB 6) Turn OFF the power switch, and connect J9. Set the meter to the 50VEDC range, and turn ON the power switch. Is 24 VDC present between J450-2 (+; 24 V) and J450-1 ( –; GND)? NO: See “DC power is absent.” Lamp regulator PCB Reader unit controller PCB 7) Set the meter to the 50VDC range, and connect the probes to J45010 (+; LAON*) and J450-8 (–; GND) on the lamp regulator PCB. Does the voltage change from about 24 V to about 0 V when the Start key is pressed? YES: Replace the lamp regulator PCB. NO: Check the wiring from J450 to J1306B on the reader unit controller PCB; if normal, replac e the image processor PCB. COPYRIGHT © 2001 CANON INC. 2000 2000 2000 2000 CANON CLC5000 REV.0 JAN. 2001 5-153 CHAPTER 5 TROUBLESHOOTING IMAGE FAULTS/MALFUNCTIONS 4.1.49 The lifter fails to move up (pick-up from the cassette). Cassette 1) Slide out the cassette, and lift the holding plate inside the cassette. Does it move smoothly? NO: Check the inside of the cassette for foreign matter. Latch (cassette) 2) Is the movement of the latch assembly of the cassette grip normal? NO: Re-install it. Spring Lever 3) Push up the pick-up roller releasing lever by a finger. Does the pickup roller move down? NO: Remove the pick-up assembly, and check the spring and lever. Lifter position sensor 4) Is the lifter position sensor normal? NO: Check the lever and wiring; if normal, replace the sensor. Cassette 1 lifter motor (M16) Cassette 2 lifter motor (M17) DC controller PCB 5) Set the tester to the 30VDC range, and insert the cassette. Does the voltage between the following terminals change from about 0 V to about 24 V? M16: J2239A-1 (+), 2 M17: J2239A-3 (+), 4 YES: Check the wiring from the connector to the motor; if normal, replace the motor. NO: Replace the DC controller PCB. 5-154 COPYRIGHT © 2001 CANON INC. 2000 2000 2000 2000 CANON CLC5000 REV.0 JAN. 2001 CHAPTER 5 TROUBLESHOOTING IMAGE FAULTS/MALFUNCTIONS 4.1.50 Pick-up fails (cassette 1). 1) Does the “ADD PAPER” message remain ON? YES: See “The ‘ADD PAPER’ message fails to turn OFF.” 2) Slide out and then in the cassette. Are the sounds of lifter lowering and of the lifter motor turning heard? NO: See “The lifter fails to rotate.” Drive belt (displacement) 3) Is the drive belt attached properly? NO: Re-attach it. Gear 4) Is the drive from the pick-up motor transmitted to the cassette holder through the gears? NO: Check the gears. Pick-up/separation/feeding roller 5) Does the pick-up/separation/feeding roller rotate? YES: • Check the pick-up/separation/feeding roller. • Check the guide plate for deformation and obstacles. Drive clutch, Solenoid DC controller PCB 6) Does the voltage between the following terminals on the DC controller PCB change at the pick-up timing after the start key has been pressed? • Cassette 1 Pick-Up Roller Releasing Solenoid (SL9) J5503A-16 and J5503A-15 • Cassette 1 Pick-Up Roller Drive Clutch (CL2) J5503A-8 and J5503A-7 YES: Check the wiring; if normal, replace the solenoid and clutch. NO: Replace the DC controller PCB. COPYRIGHT © 2001 CANON INC. 2000 2000 2000 2000 CANON CLC5000 REV.0 JAN. 2001 5-155 CHAPTER 5 TROUBLESHOOTING IMAGE FAULTS/MALFUNCTIONS 4.1.51 Pick-up fails (cassette 2). 1) Does the “ADD PAPER” message remain ON? YES: See “The ‘ADD PAPER’ message fails to turn OFF.” 2) Slide out and then in the cassette. Are the sounds of the lifter lowering and of the lifter motor turning heard? NO: See “The lifter fails to move up.” Drive belt (displacement) 3) Is the belt for drive attached properly? NO: Re-attach the belt. Gear 4) Is the drive of the pick-up motor transmitted to the cassette holder through the gears? NO: Check the gears. Pick-up/separation/feeding roller 5) Does the pick-up/separation/feeding roller rotate? YES: • Check the pick-up/separation/feeding roller. • Check the guide plate for deformation and foreign objects. Drive clutch, Solenoid DC controller PCB 6) Does the “ADD PAPER” message remain ON even after the Start key has been pressed? After the Start key has been pressed, does the voltage between the following terminals on the DC controller PCB change at the pickup timing? • Cassette 2 Pick-Up Roller Releasing Solenoid (SL10) J5503B-16 and J5503B-15 • Cassette 2 Pick-Up Clutch (CL14) J5503B-8 and J5503B-7 YES: Check the wiring; if normal, replace the solenoid and clutch. NO: Replace the DC controller PCB. 5-156 COPYRIGHT © 2001 CANON INC. 2000 2000 2000 2000 CANON CLC5000 REV.0 JAN. 2001 CHAPTER 5 TROUBLESHOOTING IMAGE FAULTS/MALFUNCTIONS 4.1.52 The multifeeder fails to pick up paper. Multifeeder pick-up clutch (CL6) 1) Select multifeeder pick-up, and press the Start key. Does the multifeeder pick-up roller rotate? NO: Check the wiring; if normal, replace CL6. Multifeeder pick-up roller 2) Is paper fed properly by the pick-up roller? YES: Replace the pick-up roller. Lifter plate 3) Press the Start key. Does the lifter plate move up? NO: Check the lifter plate drive system. As necessary, adjust or replace it. Paper thickness roller clutch (CL7) 4) Press the Start key. Does the roller rotate? NO: Check the wiring; if normal, replace the clutch. Multifeeder pick-up roller releasing solenoid (SL5) DC controller PCB 5) Connect the + probe of the meter to J5704A-2 on the DC controller PCB. Does the voltage change from about 24 V to about 0 V? YES: Check the wiring; if normal, replace SL5. NO: Replace the DC controller PCB. 4.1.53 The registration roller fails to rotate. Connector 1) Is the connection of the following connectors normal? • from registration motor to manual feed drive PCB: J5709 • from manual feed drive PCB to DC controller PCB: J5703/J2240 NO: Connect the connector correctly. Gear 1) Is the drive of the registration motor normally transmitted to the registration roller through gears? NO: Remove the cause of the overload. YES: Try replacing the following in sequence: manual feed driver PCB, registration motor, DC controller PCB COPYRIGHT © 2001 CANON INC. 2000 2000 2000 2000 CANON CLC5000 REV.0 JAN. 2001 5-157 CHAPTER 5 TROUBLESHOOTING IMAGE FAULTS/MALFUNCTIONS 4.1.54 Retention fails. C transfer blade 1) Is the C transfer blade locked in position properly? NO: Check the locking mechanism for the transfer blade. High-voltage cable 2) Is the connection of the high-voltage cable for C transfer charging proper? NO: Re-connect it. Transfer belt 3) Is there a scratch or a dent in the transfer belt? YES: Replace the belt. Paper 4) Is paper curled or wavy? YES: Replace the paper. Advise the user on the correct method of storing paper. 5) Try fresh paper. Is the problem corrected? YES: End. 6) Try Canon-recommended paper. Is the problem corrected? YES: Advise the user to use recommended paper. 7) Is the problem noted on paper other than plain paper? YES: Advise the user to use recommended paper. 5-158 COPYRIGHT © 2001 CANON INC. 2000 2000 2000 2000 CANON CLC5000 REV.0 JAN. 2001 CHAPTER 5 TROUBLESHOOTING IMAGE FAULTS/MALFUNCTIONS 4.1.55 The pre-exposure lamp fails to turn ON. Pre-exposure lamp (LA2) 1) Turn ON the power switch, and disconnect the connector J2239 Ω range, and from the DC controller PCB. Set the meter to the ×100Ω measure the resistance between the following terminals on the harΩ? ness side. Is it about 20Ω for C, J2239A-5 and -6 for M, J2239A-7 and -8 for Y, J2239A-9 and -10 for Bk, J2239A-11 and -12 NO: Check the wiring from J2209 to the pre-exposure lamp; if normal, replace the exposure lamp. Pre-exposure lamp (LA2 to LA5) DC controller PCB 2) Connect J2239, and turn ON the power switch. Set the meter to the 30VDC range, and measure the voltage between the following terminals on the DC controller PCB. Does the voltage change from about 0 V to about 24 V? for C, J2239A-5 and -6 for M, J2239A-7 and -8 for Y, J2239A-9 and -10 for Bk, J2239A-11 and -12 YES: Replace the pre-exposure lamp. NO: Replace the DC controller PCB. 4.1.56 The fixing heater fails to turn ON. Connector 1) Are the fixing drawer connectors J6410 and J6019 and the connectors J2804 and J2808 on the AC driver PCB connected? NO: Connect them. Ω range. Does 2) Draw out the fixing unit, and set the meter to the ×1Ω the index of the meter swing when the probe of the meter is connected to the terminal of the following connectors of the fixing drawer connector (J6410)? J6410-1 and -2 J6410-3 and -4 YES: Go to step 8. Thermal switch (TP1, TP2) 3) Is there electrical continuity in the thermal switch? NO: Replace the thermal switch. COPYRIGHT © 2001 CANON INC. 2000 2000 2000 2000 CANON CLC5000 REV.0 JAN. 2001 5-159 CHAPTER 5 TROUBLESHOOTING IMAGE FAULTS/MALFUNCTIONS Thermistor (TH1, TH3) Ω range. Does the index of the meter swing 4) Set the meter to the ×1Ω when the probe of the meter is connected to the following connector of the fixing drawer connector (J6019)? J6019A12 and 13 J6019B-1 and 2 YES: Replace the thermistor. Upper heater (H1) 5) Does the index of the meter swing when the probe of the meter is connected to both terminals of the upper heater? NO: Check the installation of the heater; if normal, replace the upper heater. Lower heater (H2) AC harness 6) Does the index of the meter swing when the probes are connected to both ends of the lower heater? NO: Check the installation of the heater; if normal, replace the lower heater. YES: Check the AC harness inside the fixing assembly. AC power supply 7) Push in the fixing unit, and turn ON the power switch; then, set the meter to the 250VA range. Does the index of the meter swing when the probes of the meter are connected to the following terminals of the faston of RL1? FT35 and FT40 NO: Check the power switch and the relay (RL1); if normal, see “AC power is absent.” Triac DC controller 8) Set the meter to the 10VDC range, and connect the probes of the meter to the terminals of the following connectors of the DC controller PCB. Does the index of the meter indicate ‘+5 V’? J2241-14 and GND J2241-13 and GND YES: Check the wiring from relay (RL1) to AC driver PCB and from the triac to the fixing assembly drawer connector; if normal, replace the triac. NO: Replace the DC controller PCB. 5-160 COPYRIGHT © 2001 CANON INC. 2000 2000 2000 2000 CANON CLC5000 REV.0 JAN. 2001 CHAPTER 5 TROUBLESHOOTING IMAGE FAULTS/MALFUNCTIONS 4.1.57 The drum heater fails to rotate. Drum heater (H3, H4, H5, H6) Ω range, and connect the probes of the 1) Set the meter to the ×100Ω meter to the terminals of the heater. Does the index of the meter swing? NO: Replace the drum heater. Thermistor (TH8,9,10,11) Ω range, and connect the probes of the 2) Set the meter to the ×1000Ω meter to the following terminals. Does the index of the meter swing? TH8 (for C): J2216A-4 and 5 TH9 (for M): J2216A-9 and 10 TH10 (for Y): J2216B-1 and 2 TH11 (for Bk): J2216B-6 and 7 NO: Replace the thermistor. Connector, Wiring 3) Are the connection and wiring normal? Drum heater ⇔ AC driver : J6305, J2805 AC driver ⇔ Drum heater : J2806, J6412 NO: Re-connect them. Drum heater brush 4) Disconnect the power outlet, and remove the drum heater brush cover. Is the contact of the drum heater brush normal? NO: • Re-install the brush. • Replace the brush. DC controller PCB 5) Install the drum heater brush cover, and connect the power plug. Set the meter to the 12VDC range, and measure the voltage on the DC controller PCB. Is it about 5 V? Drum heater (Bk) J2241-5 (+5V), J2241-2 (GNDAN) Drum heater (Y) J2241-6 (+5V), J2241-2 (GNDAN) Drum heater (M) J2241-7 (+5V), J2241-2 (GNDAN) Drum heater (C) J2241-8 (+5V), J2241-2 (GNDAN) YES: Replace the drum heater. NO: Replace the DC controller PCB. COPYRIGHT © 2001 CANON INC. 2000 2000 2000 2000 CANON CLC5000 REV.0 JAN. 2001 5-161 CHAPTER 5 TROUBLESHOOTING IMAGE FAULTS/MALFUNCTIONS 4.1.58 The counter fails to operate. Counter 1) Turn OFF the power switch, and disconnect the connector J2216 Ω range, and meafrom the DC controller. Set the meter to the ×KΩ sure the resistance of the following counters: Counter + – CNT1 J2216B-9 J2216B-8 CNT2 J2216B-10 J2216B-8 CNT3 J2216B-11 J2216B-8 CNT4 J2216B-12 J2216B-8 CNT5 J2216B-13 J2216B-8 CNT6 J2216B-14 J2216B-8 NO: Check the wiring from J2216 to the counter; if normal, replace the counter. DC controller PCB Counter 2) Connect the connector J2216, and set the meter to the 24VDC range. Does the voltage of the following connectors on the DC controller PCB change from about 24 V to about 0 V and then to 24 V when the Start key is pressed? Be sure to select a copying mode appropriate to the counter operation: Counter + – CNT1 J2216B-9 J2216B-8 CNT2 J2216B-10 J2216B-8 CNT3 J2216B-11 J2216B-8 CNT4 J2216B-12 J2216B-8 CNT5 J2216B-13 J2216B-8 CNT6 J2216B-14 J2216B-8 NO: Replace the DC controller PCB. YES: Replace the counter. 5-162 COPYRIGHT © 2001 CANON INC. 2000 2000 2000 2000 CANON CLC5000 REV.0 JAN. 2001 CHAPTER 5 TROUBLESHOOTING IMAGE FAULTS/MALFUNCTIONS 4.1.59 The cassette heater fails to operate. Environment sensor 1) Is there a significant discrepancy between the temperature/humidity indicated under ‘DISP > ANALOG’ in service mode and the readings of a thermometer/hygrometer in the room? NO: Replace the sensor. 2) Make the following sections in service mode: DISP > SENSOR. Is the following indication ‘1’? 802009 00100000 3rd bit NO: Go to step 4. Cassette heater (H7, H8) 3) Turn OFF the power switch, and disconnect the connector J6. Set Ω range. Does the index of the meter swing when the meter to the ×1Ω the probe of the meter is connected to the terminals of the following connectors? Upper Cassette Heater J6417-1 and J6417-3 Lower Cassette Heater J6418-1 and J6418-3 NO: Replace the cassette heater. Connector Wiring 4) Are the connection and the wiring between the following connectors normal? J61, J62, power-saving switch, J6, J37 Set the meter to the 12VDC range. NO: Re-connect them. YES: Check the wiring from the relay RL1 to the power saving switch and AC driver PCB; if normal, replace AC driver PCB. COPYRIGHT © 2001 CANON INC. 2000 2000 2000 2000 CANON CLC5000 REV.0 JAN. 2001 5-163 CHAPTER 5 TROUBLESHOOTING IMAGE FAULTS/MALFUNCTIONS 4.1.60 Abnormal noise is heard. Scanner system 1) Is the noise from the scanning system? YES: Check the scanner motor, belt, cable, pulley, and rail. Check the mirror mount for an object that may come into contact. Drum motor drive system 2) Is the noise from the drum unit? YES: Check the drum motor drive system (drum motor, gear, photosensitive drum, flywheel). Fan 3) Is the noise from the fan? YES: Check the fan. Developing motor drive system 4) Is the noise heard when only the developing motor is rotating? *1 YES: Check the developing motor drive system. Check the reciprocating operation of the developing assembly, cleaning screw, and cleaning blade. Pick-up motor drive system 5) Is the noise heard when paper is picked up? YES: Check the pick-up motor (Multifeeder, Cassette 1/2) system and the hopper motor drive system. Fixing motor drive system 6) Is it from the fixing assembly? YES: Check the fixing motor drive system. Transfer unit drive system 7) Is it from the transfer unit? YES: Check the transfer unit drive system. Waste toner feeding drive system 8) Is it from the waste toner feeding system? YES: Check the waste toner feeding system. Duplexing unit drive system 9) Is it from the duplexing unit unit? YES: Check the duplexing unit drive system. Note1: 5-164 • If the problem is the cleaning blade, it is not clear which station is suffering from a temperature error. Make 10 solid copies using each color. If the problem is not corrected, dispose of the waste toner, and put 5 g of drum cleaner lubricating agent (FG2-1694) into the cleaning assembly. • If the problem is the side scraper, replace the side scraper, and put a small amount of drum cleaning lubricant to the tip of the side scraper. • If the problem is the side seal, clean the felt surface, and remove the drum cleaner. COPYRIGHT © 2001 CANON INC. 2000 2000 2000 2000 CANON CLC5000 REV.0 JAN. 2001 CHAPTER 5 TROUBLESHOOTING IMAGE FAULTS/MALFUNCTIONS 5 Troubleshooting Feeding Problems 5.1 Jams The CLC1000 may be divided into the following blocks in terms of where copies tend to jam. [1] Pick-up assembly [2] Pick-up feeding assembly [3] Transfer unit assembly [4] Separation/pre-fixing feeding assembly [5] Fixing/delivery assembly [6] Delivery vertical path assembly, duplexing reversing assembly, pre-holding tray feeding assembly [7] Re-pick-up assembly [4] [5] [3] [2] [1] [6] [7] F05-501-01 COPYRIGHT © 2001 CANON INC. 2000 2000 2000 2000 CANON CLC5000 REV.0 JAN. 2001 5-165 CHAPTER 5 TROUBLESHOOTING IMAGE FAULTS/MALFUNCTIONS Use the CLC1000’s service mode (control display mode) to check the location and the type of jam. The CLC1000 keeps records of jams by code and displays the result starting with the most frequent jam: ■ Display X X X X X X X X X X X Number of jams Sensor location (T05-501-01) Jam cause (T05-501-01) Jam location (copier=0, RDF=1, sorter=2) Order (cumulative) Cause code 01× × 02× × 10× × 11× × Type Delay jam Stationary jam Jam at power-on or when the front cover/ pick-up cover/delivery door is opened/closed Jam when the front door/pick-up cover/ delivery cover is opened/closed during copying operation Sensor code × ×01 × ×02 × ×03 × ×04 × ×31 × ×32 × ×33 × ×34 × ×61 × ×62 × ×63 × ×64 × ×65 × ×66 × ×67 Sensor name Registration paper sensor Pick-up vertical path 1 sensor Pick-up vertical path 2 sensor Pick-up vertical path 3 sensor Post registration paper sensor Separation sensor Internal delivery sensor Delivery sensor Delivery vertical path sensor 1 Delivery vertical path sensor 2 Duplexing unit reversal sensor Pre-duplex feeding sensor 1 Pre-duplex feeding sensor 2 Dupler paper sensor 1 Dupler paper sensor 2 T05-501-01 5-166 COPYRIGHT © 2001 CANON INC. 2000 2000 2000 2000 CANON CLC5000 REV.0 JAN. 2001 CHAPTER 5 TROUBLESHOOTING IMAGE FAULTS/MALFUNCTIONS 5.1.1 Pick-Up Assembly 1) Was the paper picked up from the cassette? NO: Go to step 11. Cassette 2) Is the cassette properly set in the cassette? NO: Set the cassette properly, and check the inside of the cassette for foreign matter. Paper 3) Is the paper curled or wavy? YES: Replace the paper, and advise the user on the correct method of storing paper. 4) Try paper recommended by Canon. Is the problem corrected? YES: Advise the user to use recommended paper. Transparency 5) Is the transparency of the specified type, and is it oriented correctly? NO: Advise the user to use transparencies of the specified type and to place them correctly. DC controller PCB, Pick-up clutch 6) Does the pick-up roller of the selected cassette pick-up assembly rotate during copying? NO: See IV. “Pick-up fails.” Pick-up roller 7) Is the pick-up roller deformed or worn? YES: Replace the pick-up roller. Separation roller 8) Is the separation roller of the selected cassette pick-up assembly deformed or worn? YES: Replace the separation roller. Feeding roller 9) Is the feeding roller of the selected cassette pick-up assembly deformed or worn? YES: Replace the feeding roller. Pick-up vertical path 1, 2, 3 sensor 10) Is each of the sensors (P21, PS25, PS26) of the pick-up assembly normal? YES: Check each guide for foreign matter and deformation. NO: Check the lever and wiring; if normal, replace the sensor. COPYRIGHT © 2001 CANON INC. 2000 2000 2000 2000 CANON CLC5000 REV.0 JAN. 2001 5-167 CHAPTER 5 TROUBLESHOOTING IMAGE FAULTS/MALFUNCTIONS 11) Paper is fed through the multifeeder. Do the multifeeder pick-up roller and the paper thickness detecting roller rotate? NO: See “Multifeeder pick-up fails.” Paper 12) Try Canon-recommended paper. Is the problem corrected? YES: Advise the user to use recommended paper. Transparency 13) Is the transparency of the specified type, and is it oriented correctly? NO: Advise the user to use transparencies of the specified type and to place them correctly. Multifeeder pick-up roller 14) Is the multifeeder pick-up roller deformed or worn? YES: Replace the multifeeder pick-up roller. Multifeeder pick-up sensor 15) Is the operation of the multifeeder paper width sensor (PS4, PS5) normal? YES: Check the placement of the paper. Check each guide for foreign matter and deformation. NO: Check the wiring to the sensor; if normal, replace the sensor. 5.1.2 Pick-up Feeding Assembly Paper 1): Is the paper curled or wavy? YES: Replace the paper. Advise the user on the correct method of storing paper. 2): Try paper recommended by Canon. Is the problem corrected? YES: Advise the user to use recommended paper. Transparency 3): Is the transparency of the specified type, and is it oriented correctly? NO: Advise the user to use transparencies of the specified type and to place them correctly. Registration roller Registration roller drive assembly 4): Does the registration roller/registration roller drive assembly operate normally? NO: See 4.1.52 “The registration roller fails to rotate.” 5-168 COPYRIGHT © 2001 CANON INC. 2000 2000 2000 2000 CANON CLC5000 REV.0 JAN. 2001 CHAPTER 5 TROUBLESHOOTING IMAGE FAULTS/MALFUNCTIONS Registration roller 5): Is the registration roller deformed or worn? YES: Replace the registration roller. OHP sensor, Registration paper sensor, Post-registration paper sensor 6): Is the operation of each sensor (OHPS, PS1, PS14) of the pick-up feeding assembly normal? YES: Check each guide plate for foreign matter and deformation. NO: Check the lever and wiring; if normal, clean/replace the part. 5.1.3 Transfer Unit Assembly Transfer belt 1) Is the transfer belt soiled or deformed? YES: Replace the transfer belt. Transfer belt motor 2) Is the transfer belt rotating normally? NO: Replace the transfer belt motor. Retention 3) Is the jam paper retained on the transfer belt? NO: See “Retention fails.” Internal/external static eliminating roller 4) Is the internal/external static eliminating roller operating normally? NO: Replace the faulty parts. Further, remove the cause. Transfer belt cleaner assembly 5) Is there a fault in the transfer belt cleaner assembly? Further, is it subject to excessive load? YES: Replace the problem part; in addition, remove the cause of the fault. NO: Replace the DC controller PCB. 5.1.4 Separation/Pre-Fixing Feeding Assembly Separation charging assembly 1) Is the separation charging assembly operating normally? NO: Check the separation charging assembly. Separation claw 2) Is the separation claw worn or deformed? YES: 1. Replace the separation claw. 2. If soiled, clean with solvent. COPYRIGHT © 2001 CANON INC. 2000 2000 2000 2000 CANON CLC5000 REV.0 JAN. 2001 5-169 CHAPTER 5 TROUBLESHOOTING IMAGE FAULTS/MALFUNCTIONS Separation sensor 3) Is the separation sensor (PS15) operating normally? NO: Check the lever and the wiring; if normal, replace the sensor. Feeding belt 4) Is the feeding belt operating normally? NO: Check the pre-fixing feeding motor. YES: Check the feeding belt; if wear or scraches are found, replace the belt. 5.1.5 Fixing/Delivery Assembly Separation claw 1) Is the separation claw soiled? YES: Clean it with solvent. Fixing roller drive assembly 2) Does the fixing roller rotate smoothly? NO: Check the fixing roller drive assembly. Upper/lower roller 3) Is there deformation or scratches on the upper/lower roller? YES: Replace the roller. Paper guide plate 4) Is the paper guide soiled with toner? YES: Clean it with solvent. Nip 5) Is the lower roller pressure (nip) within specification? NO: Adjust it. Web 6) Is the web taken up properly? NO: Check the fixing assembly cleaner assembly. Upper/lower thermistor 7) Is the surface of the thermistor soiled? YES: Clean it with solvent. Delivery sensor lever 8) Does the delivery sensor lever operate smoothly? NO: Adjust it so that it operates smoothly. Internal delivery/delivery sensor 9) Does the inside delivery/delivery sensor (PS35, PS34) operate normally? NO: Replace the sensor. Internal/external delivery roller drive assembly 10) Does the internal/external delivery roller rotate smoothly? NO: Check the delivery roller drive assembly. 5-170 COPYRIGHT © 2001 CANON INC. 2000 2000 2000 2000 CANON CLC5000 REV.0 JAN. 2001 CHAPTER 5 TROUBLESHOOTING IMAGE FAULTS/MALFUNCTIONS Delivery paper deflecting plate Oil applying assembly 11) Does the delivery paper deflecting plate operate normally? NO: Check the delivery paper deflecting plate solenoid (SL14). YES: 1. Check the oil applying roller drive assembly. 2. Check the level of the silicone oil. 5.1.6 Delivery Vertical Path, Duplexing Reversing Assembly, and Pre-duplex Feeding Assembly Delivery paper deflecting plate 1) Does the delivery paper deflecting plate operate normally? NO: Check the delivery paper deflecting solenoid (SL14). Delivery vertical path roller 2) Does the delivery vertical path roller operate normally? NO: Check the duplex reversal motor drive assembly. Pick-up vertical path 1 sensor (PS21) Pick-up vertical path 2 sensor (PS25) 3) Does each sensor operate normally? NO: Check the lever and the wiring; if normal, replace the sensor. Inlet roller 4) Does the inlet roller operate normally? NO: Check the duplexing unit reversing motor drive assembly. Feeding roller, Outlet roller 5) Does the feeding/outlet roller operate normally? NO: Check the waste toner feeding motor drive assembly; if normal, check the reversing roller drive clutch (CL16). Duplexing unit reversal sensor 6) Does the duplex reversal sensor (PS33) operate normally? NO: Check the lever and the wiring; if normal, replace the sensor. Feeding drive assembly 7) Does the feeding assembly operate normally? NO: Check the duplexing feeding motor drive assembly. Duplexing paper deflecting plate 8) Is the duplexing paper deflecting plate operating normally? NO: Check the duplex paper deflecting plate solenoid (SL11). Pre-duplex feeding sensor 1, 2 9) Does the pre-duplex feeding sensor (PS8, PS9) operate normally? YES: Check the guide plates, the duplex unit feeding assembly and preduplex unit feeding for foreign matter and deformation. NO: Check the lever and the wiring; if normal, replace the sensor. COPYRIGHT © 2001 CANON INC. 2000 2000 2000 2000 CANON CLC5000 REV.0 JAN. 2001 5-171 CHAPTER 5 TROUBLESHOOTING IMAGE FAULTS/MALFUNCTIONS 5.1.7 Duplex feeding Assembly/Duplex Assembly Duplexing unit 1) Is the duplex feeding assembly properly installed in the copier? NO: Install it properly, and check the inside of the unit for foreign matter. Paper 2) Try Canon-recommended paper. Is the problem corrected? YES: Advise the user to use recommended paper. Feeding roller 3) Does the feeding roller operate normally? NO: Check the paper feed roller solenoid (SL13). 4) Is there deformation or dirt on the feeding roller? YES: Replace the feeding roller. Holding tray paper sensor 1, 2 5) Does the duplex paper sensor (PS30, PS31) operate normally? NO: Check the lever and the wiring; if normal, replace the sensor. Paper jogging guide plate 6) Does the paper jogging guide plate operate normally? NO: Check the duplex paper jogging guide motor (M23); if normal, replace the duplex paper jogging guide home position sensor (PS29). DC controller PCB Pick-up clutch 7) Does the separation roller, feeding roller of the duplex pickup assembly rotate while copying on the 2nd side of a two-sided copy? NO: See IV. “Pick-up from the duplexing unit fails.” Separation roller 8) Is the separation roller of the duplex pickup assembly deformed or worn? YES: Replace the separation roller. Re-pickup roller 9) Is the re-pickup of the duplex pick up assembly deformed or worn? YES: Replace the feeding roller. NO: Check the guide plates and the stacking assembly for foreign matter and deformation. Re-pickup shutter 10) Does the re-pickup shutter operate normally? NO: Check the re-pickup shutter solenoid (SL8). 5-172 COPYRIGHT © 2001 CANON INC. 2000 2000 2000 2000 CANON CLC5000 REV.0 JAN. 2001 CHAPTER 5 TROUBLESHOOTING IMAGE FAULTS/MALFUNCTIONS 5.2 Feeding Faults 5.2.1 Double Feeding Separation roller Pressure spring 1) Is the separation roller deformed or worn? YES: Replace the separation roller. NO: Adjust the position of the pressure spring. Replace the pressure spring of the separation roller. 5.2.2 Wrinkles Cassette pick-up assembly Duplexing unit 1) Turn off the power while paper is moving through the pick-up vertical path assembly/pick-up feeding assembly. Is the paper wrinkled at this time? Is it moving askew? YES: Check the pick-up assembly. Check the registration roller. Paper 2) Try fresh paper. Is the problem corrected? YES: The paper may be moist. Advise the user on the correct method of storing paper. 3) Try Canon-recommended paper. Is the problem corrected? YES: Advise the user to use recommended paper. NO: Check the heater of each pick-up assembly to see if it is operating normally. a. Fixing assembly Paper guide plate 4) Is the paper guide plate soiled with toner or the like? YES: Clean it with solvent. Lower roller pressure Upper/lower roller 5) Is the lower roller pressure (nip) within specification? NO: Adjust it. YES: Try replacing the upper and then the lower roller. COPYRIGHT © 2001 CANON INC. 2000 2000 2000 2000 CANON CLC5000 REV.0 JAN. 2001 5-173 CHAPTER 5 TROUBLESHOOTING IMAGE FAULTS/MALFUNCTIONS 6 Arrangement and Functions of Electrical Parts 6.1 Sensors PS5 PS4 PS3 PS2 PS25 PS24 PS1 PS23 PS41 PS22 PS21 PS26 PS27 PS37 PS31 PS39 PS36 PS30 PS40 PS38 PS34 PS33 PS8 PS28 PS42 PS29 PS9 PS12 PS35 PS6 PS18 PS32 PS20 PS15 PS13 PS14 PS17 PS19 PS11 PS10 F05-601-01 5-174 COPYRIGHT © 2001 CANON INC. 2000 2000 2000 2000 CANON CLC5000 REV.0 JAN. 2001 CHAPTER 5 TROUBLESHOOTING IMAGE FAULTS/MALFUNCTIONS Sensor PS 1 PS 2 PS 3 PS 4 PS 5 PS 6 PS 8 PS 9 PS 10 PS 11 PS 12 PS 13 PS 14 PS 15 PS 17 PS 18 PS 19 PS 20 PS 21 Notation Name Sensor Registration paper sensor Multifeeder lifter sensor (upper) Multifeeder lifter sensor (lower) Multifeeder paper width sensor (front) Multifeeder paper width sensor (rear) Fixing oil level sensor Pre-duplex tray feed sensor 1 Pre-duplex tray feed sensor 2 Transfer belt cleaning web rotation sensor Transfer belt cleaning web length sensor Transfer belt lifter sensor 1 Transfer belt lifter sensor 2 Post-registration sensor Separation sensor Transfer belt edge sensor 1 Transfer belt edge sensor 2 Transfer belt edge sensor 3 Transfer belt edge sensor 4 Pickup vertical path 1 sensor PS 22 PS 23 PS 24 PS 25 PS 26 PS 27 PS 28 PS 29 PS 30 PS 31 PS 32 PS 33 PS 34 PS 35 PS 36 PS 37 PS 38 PS 39 PS 40 PS 41 PS 42 Notation Name Paper deck connection (pickup cover) sensor Cassette 1 paper sensor Cassette 1 lifter sensor Pickup vertical path 2 sensor Pickup vertical path 3 sensor Cassette 2 lifter sensor Cassette 2 paper sensor Duplex paper jogging guide home position sensor Duplex paper sensor 1 Duplex paper sensor 2 Delivery vertical path sensor 2 Duplex reversal sensor Delivery sensor Inside delivery sensor Fixing web length sensor Original scanner home position sensor Delivery vertical path sensor 1 Shutter closed sensor Shutter open sensor Cassette 1 open/closed sensor Cassette 2 open/closed sensor T05-601-01 COPYRIGHT © 2001 CANON INC. 2000 2000 2000 2000 CANON CLC5000 REV.0 JAN. 2001 5-175 CHAPTER 5 TROUBLESHOOTING IMAGE FAULTS/MALFUNCTIONS [OHP SENSOR] PTS1 [OHP LED] [BD C] [BD Y] [BD M] [BD K] SVR1 TS3 SEU1 SEU2 TS1 TS2 TS4 SVR2 TS5 TS6 TS7 TS8 SALT C SALT M ATR C ATR M SALT Y SALT K ATR Y F05-601-02 Notation ATR C ATR M ATR Y BD C BD M BD Y BD K PTS 1 SALT C SALT M SALT Y SALT K Name ATR sensor (C) ATR sensor (M) ATR sensor (Y) BD sensor (C) BD sensor(M) BD sensor (Y) BD sensor (Bk) Paper thickness sensor SALT sensor (C) SALT sensor (M) SALT sensor (Y) SALT sensor (Bk) Notation SEU 1 SEU 2 SVR 1 SVR 2 TS 1 TS 2 TS 3 TS 4 TS 5 TS 6 TS 7 TS 8 Name Cassette 1 paper length sensor Cassette 2 paper length sensor Cassette 1 paper width sensor Cassette 2 paper width sensor Toner level sensor (upper) C Toner level sensor (upper) M Toner level sensor (upper) Y Toner level sensor (upper) Bk Toner level sensor (lower) C Toner level sensor (lower) M Toner level sensor (lower) Y Toner level sensor (lower) Bk T05-601-02 5-176 COPYRIGHT © 2001 CANON INC. 2000 2000 2000 2000 CANON CLC5000 REV.0 JAN. 2001 CHAPTER 5 TROUBLESHOOTING IMAGE FAULTS/MALFUNCTIONS LF1 L1 COB2 COB1 CB1 RL1 T1 TR1 TR2 F05-601-03 Notation COB 1 COB 2 CB 1 L1 LF 1 Name Terminal base (large) Terminal base (small) Leakage breaker Noise filter 1 Noise filter 2 Notation RL 1 T1 TR 1 TR 2 Name Fixing relay Deck heater transformer Lower heater triac Upper heater triac T05-601-03 COPYRIGHT © 2001 CANON INC. 2000 2000 2000 2000 CANON CLC5000 REV.0 JAN. 2001 5-177 CHAPTER 5 TROUBLESHOOTING IMAGE FAULTS/MALFUNCTIONS 6.2 “Lamps, Switches, Thermistors, and Heaters” LA2 LA3 LA4 LA5 LED2 LA1 CNT4 CNT5 CNT6 CNT1 CNT2 CNT3 LED1 H3 H4 H5 H6 H9 H7 H1 H2 H8 F05-602-01 5-178 COPYRIGHT © 2001 CANON INC. 2000 2000 2000 2000 CANON CLC5000 REV.0 JAN. 2001 CHAPTER 5 TROUBLESHOOTING IMAGE FAULTS/MALFUNCTIONS Sensor LA1 LA2 LA3 LA4 LA5 LED1 LED2 CNT1 CNT2 CNT3 CNT4 Notation Name Sensor Scanning lamp Pre-scanning lamp (C) Pre-scanning lamp (M) Pre-scanning lamp (Y) Pre-scanning lamp (Bk) Image position correction LED (front) Image position correction LED (rear) Counter1 Counter2 Counter3 Counter4 CNT5 CNT6 H1 H2 H3 H4 H5 H6 H7 H8 H9 Notation Name Counter5 Counter6 Fixing uppper heater Fixing lower heater Drum heater (C) Drum heater (M) Drum heater (Y) Drum heater (Bk) Cassette 1 heater Cassette 2 heater Fixing oil heater T05-602-01 COPYRIGHT © 2001 CANON INC. 2000 2000 2000 2000 CANON CLC5000 REV.0 JAN. 2001 5-179 CHAPTER 5 TROUBLESHOOTING IMAGE FAULTS/MALFUNCTIONS TH7 TH8 TH9 TH10 TH11 TP5 TP4 TP3 TH5 TH2 TH4 TH12 TH6 TP1 TH1 TH3 TP2 SW9 SW6 SW2 SW4 SW3 SW1 SW5 SW8 F05-602-02 5-180 COPYRIGHT © 2001 CANON INC. 2000 2000 2000 2000 CANON CLC5000 REV.0 JAN. 2001 CHAPTER 5 TROUBLESHOOTING IMAGE FAULTS/MALFUNCTIONS Sensor TH1 TH2 TH3 TH4 TH5 TH6 TH7 TH8 TH9 TH10 TH11 TH12 TP1 TP2 TP3 TP4 TP5 Notation Name Sensor Fixing upper thermistor (main) Fixing upper thermsitor (sub) Fixing lower thermistor (main) Fixing lower thermistor (sub) Fixing oil thermsitor Fixing oil heater thermistor Scanner base thermistor Drum thermistor (C) Drum thermistor (M) Drum thermistor (Y) Drum thermistor (Bk) Environment sensor Fixing upper roller thermal switch Fixing lower roller thermal switch Fixing oil heat thermal switch Scanning lamp thermal switch 1 Scanning lamp thermal switch 2 SW1 SW2 SW3 SW4 SW5 SW6 SW8 SW9 Notation Name Front cover switch Power switch Control key switch Waste toner lock switch Fixing lever switch Multifeeder pickup cover open/ closed switch Power save switch Rear cover open/close switch T05-602-02 COPYRIGHT © 2001 CANON INC. 2000 2000 2000 2000 CANON CLC5000 REV.0 JAN. 2001 5-181 CHAPTER 5 TROUBLESHOOTING IMAGE FAULTS/MALFUNCTIONS 6.3 Clutches CL6 CL7 CL17 CL10 CL12 CL14 CL16 CL1 CL4 CL2 CL3 CL5 F05-603-01 Notation CL 1 CL 2 CL 3 CL 4 CL 5 CL 6 Name Notation Toner supply clutch (C) Toner supply clutch (M) Toner supply clutch (Y) Toner supply (upper) clutch (Bk) Toner supply (lower) clutch (Bk) Multifeeder pickup roller clutch CL 7 CL 10 CL 12 CL 14 CL 16 CL 17 Name Paper thickness detection roller clutch Re-pickup roller clutch Cassette 1 pickup roller clutch Cassette 2 pickup roller clutch Reversing roller drive clutch Transfer belt lifter clutch T05-603-01 5-182 COPYRIGHT © 2001 CANON INC. 2000 2000 2000 2000 CANON CLC5000 REV.0 JAN. 2001 CHAPTER 5 TROUBLESHOOTING IMAGE FAULTS/MALFUNCTIONS 6.4 Solenoids SL5 SL16 SL9 SL8 SL10 SL13 SL11S SL11M SL11L SL4 SL14 SL3 SL15 SL2 SL17C SL17M SL17Y SL17K SL18 SL7C SL7M SL7Y SL7K F05-604-01 Notation SL2 SL3 SL4 SL5 SL7C SL7M SL7Y SL7K SL8 SL9 SL10 SL11S Name Notation Fixing oil pump drive solenoid Fixing web take-up solenoid Fixing web releasing solenoid Multifeeder pickup roller releasing solenoid Transfer blade solenoid (C) Transfer blade solenoid (M) Transfer blade solenoid (Y) Transfer blade solenoid (Bk) Re-pickup shutter solenoid Cassette 1 pickup roller releasin solenoid Cassette 2 pickup roller releasing solenoid Duplex paper deflecting plate solenoid (S) SL11M SL11L SL13 SL14 SL15 SL16 SL17C SL17M SL17Y SL17K SL18 Name Duplex paper deflecting plate solenoid (M) Duplex paper deflecting plate solenoid (L) Paper feed roller solenoid Delivery paper deflecting solenoid Separation claw releasing solenoid Registration roller releasing solenoid SALT sensor shutter open/closed solenoid (C) SALT sensor shutter open/closed solenoid (M) SALT sensor shutter open/closed solenoid (Y) SALT sensor shutter open/closed solenoid (Bk) Polishing roller solenoid T05-604-01 COPYRIGHT © 2001 CANON INC. 2000 2000 2000 2000 CANON CLC5000 REV.0 JAN. 2001 5-183 CHAPTER 5 TROUBLESHOOTING IMAGE FAULTS/MALFUNCTIONS 6.5 Fans FM15 FM16 FM14 FM5 FM13 FM31 FM4 FM12 FM1 FM2 FM3 FM34 FM27 FM19 FM20 FM7 FM28 FM29 FM30 FM33 FM37 FM38 FM24 FM6 FM8 FM32 FM26 FM9 FM18 FM17 FM36 FM35 FM23 FM22 FM21 F05-605-01 5-184 COPYRIGHT © 2001 CANON INC. 2000 2000 2000 2000 CANON CLC5000 REV.0 JAN. 2001 CHAPTER 5 TROUBLESHOOTING IMAGE FAULTS/MALFUNCTIONS Sensor FM1 FM2 FM3 FM4 FM5 FM6 FM7 FM8 FM9 FM12 FM13 FM14 FM15 FM16 FM17 FM18 FM19 FM20 Notation Name Sensor Delivery assembly exhaust fan 1 Delivery assembly exhaust fan 2 Delivery assembly exhaust fan 3 Laser cooling fan (front) Laser cooling fan (rear) Primary exhaust fan Rre-fixing feed fan Primary suction fan (left) Primary suction fan (right) Reader assembly cooling fan (front) Reader assembly cooling fan (rear) Digital unit cooling fan 1 Digital unit cooling fan 2 Digital unit cooling fan 3 Power supply cooling fan 1 Power supply cooling fan 2 Delivery lower cooling fan 1 Delivery lower cooling fan 2 FM21 FM22 FM23 FM24 FM26 FM27 FM28 FM29 FM30 FM31 FM32 FM33 FM34 FM35 FM36 FM37 FM38 Notation Name General exhaust fan 1 General exhaust fan 2 General exhaust fan 3 Laser scanner moter cooling fan Pickup cooling fan 1 Delivery lower cooling fan 3 Reversing assembly exhaust fan 1 Reversing assembly exhaust fan 2 Reversing assembly exhaust fan 3 Fixing heat discharge fan Pickup cooling fan 2 Reversing assembly exhaust fan 4 Delivery cooling fan Rre-fixing exhaust fan 1 Rre-fixing exhaust fan 2 Power supply cooling fan 3 Power supply cooling fan 4 T05-605-01 COPYRIGHT © 2001 CANON INC. 2000 2000 2000 2000 CANON CLC5000 REV.0 JAN. 2001 5-185 CHAPTER 5 TROUBLESHOOTING IMAGE FAULTS/MALFUNCTIONS 6.6 Motors M2 M4 M3 M6 M29 M5 M37 M8 M7 M15 M13 M24C M24M M24Y M14 M24K M31 M16 M12 M22 M32 M11 M23 M17 M25 M30 M28 M1 M10 M35 M36 M18C M18M M38 M18Y M9 M39 M21 M19 M18K M20 F05-606-01 5-186 COPYRIGHT © 2001 CANON INC. 2000 2000 2000 2000 CANON CLC5000 REV.0 JAN. 2001 CHAPTER 5 TROUBLESHOOTING IMAGE FAULTS/MALFUNCTIONS Sensor M1 M2 M3 M4 M5 M6 M7 M8 M9 M10 M11 M12 M13 M14 M15 M16 M17 M18C M18M M18Y M18K Notation Name Sensor Multifeeder lifter motor Mirror slant correction motor (C) Mirror ratio correction motor (C) Laser scanner motor Mirror slant correction motor (Y) Mirror ratio correction motor (Y) Mirror slant correction motor (Bk) Mirror ratio correction motor (Bk) Fixing motor Multifeeder pickup motor Per-fixing feed motor Transfer belt cleaning web motor Transfer belt swing motor Transfer belt motor Polishing/oil removing motor Cassette 1 lifter motor Cassette 2 lifter motor Developing motor (C) Developing motor (M) Developing motor (Y) Developing motor (Bk) M19 M20 M21 M22 M23 M24 M24 M24 M24 M25 M28 M29 M30 M31 M32 M35 M36 M37 M38 M39 Notation Name Duplex feed motor Waste toner feed motor Photosensitive drum motor Pre-fixing charging assembly wire cleaner motor Duplex paper jogging guide motor Primare charging wire cleaner motor (C) Primare charging wire cleaner motor (M) Primare charging wire cleaner motor (Y) Primare charging wire cleaner motor (Bk) Registration shutter drive motor Duplex reversal motor Original scanner motor Fixing lower web motor Transfer belt waste toner motor Separatio charging assembly motor Registration motor Paper deck pickup motor Re-pickup motor Cassette 1 pickup motor Cassette 2 pickup motor T05-606-01 COPYRIGHT © 2001 CANON INC. 2000 2000 2000 2000 CANON CLC5000 REV.0 JAN. 2001 5-187 CHAPTER 5 TROUBLESHOOTING IMAGE FAULTS/MALFUNCTIONS 6.7 PCBs [27] [32] [13] [15] [37] [26] [24] [52] [33] [21] [78] [44] [80] [74] [18] [45] [79] [25] [46] [20] [47] [77] [78] [55] [19] [56] [75] [4] [1] [2] [36] [53] [6] [48] [57] [22] [49] [11] [79] [14] [16] [10] [59] [58] [23] [5] [60] [3] [77] [34] [76] [8] [9] [17] [7] [35] [12] [61] F05-607-01 5-188 COPYRIGHT © 2001 CANON INC. 2000 2000 2000 2000 CANON CLC5000 REV.0 JAN. 2001 CHAPTER 5 TROUBLESHOOTING IMAGE FAULTS/MALFUNCTIONS Sensor 1 2 3 4 5 6 7 8 9 10 11 12 13 14 15 16 17 18 19 20 21 22 23 24 25 26 27 32 33 34 Notation Name Sensor AC drive PCB Ficker controller PCB DC power supply PCB 2 DC power supply PCB 1 Lamp regulator Multifeeder PCB HVT3-A Pickup motor drive PCB HVT3-B HVT2-R NVT2-L DC controller PCB ED board Interface controller motor PCB Reader controller PCB Original scanner motor PCB HVT4 Laser drive PCB (C) Laser drive PCB (Bk) Laser drive PCB (Y) Laser drive PCB (M) Image position correction PCB (front) Image position correction PCB (rear) Analog Processor PCB Video controlleer PCB Image processer PCB IP memory PCB IP motor PCB CCD drive PCB Pre-view monitor PCB 35 36 37 44 45 46 47 48 49 52 53 55 56 57 58 59 60 61 74 75 76 77 78 79 80 81 Notation Name Monitor I/F PCB Download PCB ECo-ID PCB Primary wire relay PCB (C) Primary wire relay PCB (M) Primary wire relay PCB (Y) Primary wire relay PCB (Bk) Image position correction CCD PCB (front) Image position correction CCD PCB (rear) Environment measurement PCB Multifeeder paper width detection PCB HVT1 Transfer belt motor drive PCB Potential measurement PCB (C) Potential measurement PCB (M) Potential measurement PCB (Y) Potential measurement PCB (Bk) HVT5 Hopper relay PCB Fuse PCB Interfasce board Fixing motor drive PCB Laser scanner motor drive PCB DC drive PCB Contrpl paner family PCB Contrpl paner PCB T05-607-01 COPYRIGHT © 2001 CANON INC. 2000 2000 2000 2000 CANON CLC5000 REV.0 JAN. 2001 5-189 CHAPTER 5 TROUBLESHOOTING IMAGE FAULTS/MALFUNCTIONS 6.8 Variable Resistors (VR), Light-Emitting Diodes (LED), and Check Pins by PCB Of the variable resistors (VR), light-emitting diodes (LED), and check pins used in the CLC1000, those that are needed when servicing the machine in the field are discussed. 1 Do not touch the VRs and check pins that are not mentioned herein; they are for factory use only and require special instruments and high precision for adjustment. 2 Some LEDs emit light because of leakage current; this is a normal condition and must be kept in mind. 3 VRs that may be used in the field ... VRs that must not be used in the field ... 5-190 COPYRIGHT © 2001 CANON INC. 2000 2000 2000 2000 CANON CLC5000 REV.0 JAN. 2001 CHAPTER 5 TROUBLESHOOTING IMAGE FAULTS/MALFUNCTIONS 6.8.1 DC Controller PCB J2210 J2209 J2208 J2213 J2207 J2240 J2223 J2229 J2206 J2239 B13 B1 B12 B1 B13 B1 B15 B1 B12 B1 B16 B1 B15 B1 B19 B1 B18 B1 B10 B1 A12 A13 A1 A12 A1 A13 A1 A15 A1 A12 A1 A16 A1 A15 A1 A19 A1 A18 A1 A10 VR2203 VR2204 A14 A1 A13 A1 LED2207 LED2206 A1 A2 B1 B2 LED 2211 LED 2210 LED 2209 LED 2208 A39 A40 B39 B40 J2231 A8 A1 A1 J2235 1 9 LED2212 J2222 J2223 J2224 J2226 J2225 J2242 J2234 J2211 B1 B11 B1 B20 B1 B15 B1 B14 B1 B15 B1 B14 B1 B20 B1 B15 8 A11 A1 A20 A1 A15 A1 A14 A1 A15 A1 A14 A1 A20 A1 A15 J2201 B19 B11 J2202 B1 B20 6 1 A19 A11 A20 A1 J2230 6 1 12 B2 B1 A2 A1 B1 J2203 B2 A1 A2 J2220 J2236 J2204 LED2205 B34 B33 A34 A33 B25 B26 A25 A26 A12 A1 11 VR2201 VR2202 J2221 1 B1 B2 A1 A2 J2223 1 5 J2227 1 1 B49 B50 A49 A50 A14 A1 J2205 A16 A1 B1 B2 A1 A2 J2214 J2212 J2219 J2218 J2217 J2216 J2215 B8 B1 B13 B1 B12 B1 B14 B1 B14 B1 B16 B1 B12 B1 A1 A1 15 J2241 1 F05-608-01 COPYRIGHT © 2001 CANON INC. 2000 2000 2000 2000 CANON CLC5000 REV.0 JAN. 2001 5-191 CHAPTER 5 TROUBLESHOOTING IMAGE FAULTS/MALFUNCTIONS 6.8.2 Video Controller PCB 1 0 11 1 8 J2 10 J2113 35 1 J2107 35 1 J2106 35 1 35 1 J2112 1 J2103 7 1 B30 B29 A30 A29 J2102 J2115 50 49 100 6 99 B2 B1 A2 A1 7 J2114 J2105 1 6 2 1 52 51 J2104 1 3 1 5 9 J2 10 11 J2 5 13 5 J2101 13 1 J2 35 8 F05-608-02 5-192 COPYRIGHT © 2001 CANON INC. 2000 2000 2000 2000 CANON CLC5000 REV.0 JAN. 2001 CHAPTER 5 TROUBLESHOOTING IMAGE FAULTS/MALFUNCTIONS 6.8.3 Reader Control PCB 52 51 2 1 A34 A33 B34 B33 A2 A1 B2 B1 B2 B1 A2 A1 J1314 J1303 B2 B1 A2 A1 J1313 J1308 A2 A1 B2 B1 100 99 50 49 J1302 A8 J1309 A1 A14 J1307 A1 A11 J1306 A1 J1304 4 B1 B10 B1 B9 B1 B14 B1 LED LED 1301 1302 J1301 1 1 6 B11 A40 A39 B40 B39 A10 J1310 A1 FLASH ROM B34 B33 A34 A33 B34 B33 A34 A33 LED1303 F05-608-03 LED LED1301: LED1302: LED1303: Function ON while all-night power supply 5 V is being supplied. ON when + VU power is being supplied. ON when the CPU is in operation (flashes for 3 sec only at power-on). T05-608-01 COPYRIGHT © 2001 CANON INC. 2000 2000 2000 2000 CANON CLC5000 REV.0 JAN. 2001 5-193 CHAPTER 5 TROUBLESHOOTING IMAGE FAULTS/MALFUNCTIONS 6.8.4 Image Processor PCB 240 239 120 119 240 122 239 121 120 2 119 1 J206 122 121 2 1 J205 LED2 LED1 J204 1 12 1 2 51 52 J203 49 50 99 100 1 2 41 42 J202 39 40 79 80 40 39 80 79 J201 2 1 42 41 F05-608-04 LED LED1: LED2: Function ON while +3.3 V power is being supplied. ON while +5 V power is being supplied. T05-608-02 5-194 COPYRIGHT © 2001 CANON INC. 2000 2000 2000 2000 CANON CLC5000 REV.0 JAN. 2001 CHAPTER 5 TROUBLESHOOTING IMAGE FAULTS/MALFUNCTIONS 6.8.5 IP Memory PCB 42 100 41 99 2 50 1 49 80 79 40 39 J804 52 51 2 13 1 J803 2 1 2 1 2 1 2 1 1 3 101 102 J802 97 99 199 200 1 J801 J15 J13 J11 J9 144 2 143 1 144 2 143 1 144 2 143 1 144 2 143 1 J7 J5 J3 J1 144 143 144 143 144 143 144 143 F05-608-05 COPYRIGHT © 2001 CANON INC. 2000 2000 2000 2000 CANON CLC5000 REV.0 JAN. 2001 5-195 CHAPTER 5 TROUBLESHOOTING IMAGE FAULTS/MALFUNCTIONS J2100 1 B2 B1 A2 A1 J2101 B24 B25 A24 A25 6.8.6 Analog Processor PCB 7 J2102 J2103 1 11 1 13 F05-608-06 6.8.7 Transfer Belt Motor Driver PCB 4 1 1 J3202 4 VR3201 J3201 J3203 5 1 F05-608-07 LED VR3201 : Function for factory adjustment (Do not touch.) T05-608-03 5-196 COPYRIGHT © 2001 CANON INC. 2000 2000 2000 2000 CANON CLC5000 REV.0 JAN. 2001 CHAPTER 5 TROUBLESHOOTING IMAGE FAULTS/MALFUNCTIONS 6.8.8 Laser Driver PCB ■ For C/Bk VR3001 VR3003 VR3005 VR3007 VR3009 35 1 35 J3002 1 J3001 VR3002 VR3004 VR3006 VR3008 VR3010 F05-608-08 COPYRIGHT © 2001 CANON INC. 2000 2000 2000 2000 CANON CLC5000 REV.0 JAN. 2001 5-197 CHAPTER 5 TROUBLESHOOTING IMAGE FAULTS/MALFUNCTIONS ■ For Y/M VR3009 VR3007 VR3005 VR3003 VR3001 25 1 1 VR3008 VR3006 VR3004 VR3002 J3001 25 J3002 VR3010 F05-608-09 VR Function VR3001: VR3002: VR3003: VR3004: VR3005: VR3006 : VR3007: VR3008: VR3009: VR3010: Use it to set the laser power minimum level (at time of replacing the laser unit). Use it to set the laser power maximum level (at time of replacing the laser unit). Use it to adjust the laser power or the laser intensity (at time of replacing the laser unit). for factory adjustment (Do not touch.) T05-608-04 5-198 COPYRIGHT © 2001 CANON INC. 2000 2000 2000 2000 CANON CLC5000 REV.0 JAN. 2001 CHAPTER 5 TROUBLESHOOTING IMAGE FAULTS/MALFUNCTIONS 6.8.9 Lamp Regulator PCB VR1 1 J9 4 J4-2 8 1 J4-1 8 1 3 J10 1 VR2 F05-608-10 LED VR1: VR2: Function for factory adjustment (Do not touch.) T05-608-05 COPYRIGHT © 2001 CANON INC. 2000 2000 2000 2000 CANON CLC5000 REV.0 JAN. 2001 5-199 CHAPTER 5 TROUBLESHOOTING IMAGE FAULTS/MALFUNCTIONS 6.8.10 Enviroment Sensor PCB 6 J1 1 VR1 VR2 J2 1 4 F05-608-11 LED VR1: VR2: Function for factory adjustment (Do not touch.) T05-608-06 5-200 COPYRIGHT © 2001 CANON INC. 2000 2000 2000 2000 CANON CLC5000 REV.0 JAN. 2001 CHAPTER 5 TROUBLESHOOTING IMAGE FAULTS/MALFUNCTIONS J4101 J4102 1 8 2 1 6.8.11 HVT1 VR4101 I K C M Y F05-608-12 LED VR4101: Function for factory adjustment (Do not touch.) T05-608-07 COPYRIGHT © 2001 CANON INC. 2000 2000 2000 2000 CANON CLC5000 REV.0 JAN. 2001 5-201 CHAPTER 5 TROUBLESHOOTING IMAGE FAULTS/MALFUNCTIONS 6.8.12 HVT2 ■ HVT2-1 J4603 J4605 1 J4601 4 1 AUX 2 P LED4602 LED4601 J4607 W4601-1 1 8 F05-608-13 LED LED4601: LED4602: Function ON while (Y) Pre-primary charging high voltage is being generated. (Y)/(C) ON in response to primary charging output. T05-608-08 5-202 COPYRIGHT © 2001 CANON INC. 2000 2000 2000 2000 CANON CLC5000 REV.0 JAN. 2001 CHAPTER 5 TROUBLESHOOTING IMAGE FAULTS/MALFUNCTIONS ■ HVT2-2 1 8 W4601-2 LED4604 3 AUX LED4603 P 8 1 1 J4602 J4604 J4606 F05-608-14 LED LED4603: LED4604: Function ON while (Y) Pre-primary charging high voltage is being generated. ON while (Y) primary charging high voltage is being generated T05-608-09 COPYRIGHT © 2001 CANON INC. 2000 2000 2000 2000 CANON CLC5000 REV.0 JAN. 2001 5-203 CHAPTER 5 TROUBLESHOOTING IMAGE FAULTS/MALFUNCTIONS 7 7 1 W5101-2 J5103 VR5101 2 J5101 1 1 J5102 5 1 J5104 W5101-1 5 1 6.8.13 HVT4 F05-608-15 Function LED VR5101: for factory adjustment (Do not touch.) T05-608-10 6.8.14 HVT5 J5201 4 1 F05-608-16 5-204 COPYRIGHT © 2001 CANON INC. 2000 2000 2000 2000 CANON CLC5000 REV.0 JAN. 2001 CHAPTER 5 TROUBLESHOOTING IMAGE FAULTS/MALFUNCTIONS 6.8.15 ED board A1 J1502 LED2 LED1 J1501 1 14 1 2 41 42 J1504 40 39 39 40 80 79 79 80 122 121 2 1 J1503 1 2 42 41 F05-608-17 LED LED1: LED2: Function ON while +3.3 V power is being supplied. ON while +5 V power is being supplied. T05-608-11 COPYRIGHT © 2001 CANON INC. 2000 2000 2000 2000 CANON CLC5000 REV.0 JAN. 2001 5-205 CHAPTER 5 TROUBLESHOOTING IMAGE FAULTS/MALFUNCTIONS 6.8.16 Interface board B1 B2 B1 A2 A1 C32 B32 A32 J1801 C1 B1 A1 B54 B55 A54 A55 J1802 C32 B32 A32 J1806 C1 B1 A1 F05-608-18 5-206 COPYRIGHT © 2001 CANON INC. 2000 2000 2000 2000 CANON CLC5000 REV.0 JAN. 2001 CHAPTER 5 TROUBLESHOOTING IMAGE FAULTS/MALFUNCTIONS 6.8.17 Preview monitor board 8 J3702 1 9 B2 B1 A2 A1 16 C32 B32 A32 J3703 J3704 B12 B13 A12 A13 27 26 2 1 49 50 24 25 J3701 C1 B1 A1 F05-608-19 COPYRIGHT © 2001 CANON INC. 2000 2000 2000 2000 CANON CLC5000 REV.0 JAN. 2001 5-207 CHAPTER 5 TROUBLESHOOTING IMAGE FAULTS/MALFUNCTIONS 6.9 Paper Deck-K1 CL8002 SL8001 PS8002 SW8001 PS8001 PS8003 H8001 SW8002 M8001 SW8003 F05-609-01 Notation M8001 Name Notation Paper deck lifter motor SW8001 Lifter upper limit switch SW8002 Lifter lower limit switch SW8003 Cover open/closed detecting switch PS8001 PS8002 PS8003 Name CL8002 Pickup clutch SL8001 Pickup roller releasing solenoid H8001 Paper deck heater (1) Lifter sensor (lower) Lifter sensor (upper) Deck sensor T05-609-01 5-208 COPYRIGHT © 2001 CANON INC. 2000 2000 2000 2000 CANON CLC5000 REV.0 JAN. 2001 CHAPTER 5 TROUBLESHOOTING IMAGE FAULTS/MALFUNCTIONS 6.10 Paper Deck-J1 CL8002 PS8002 SW8001 PS8001 SL8001 PS8003 H8001 H8002 SW8002 M8001 SW8003 F05-610-01 Notation M8001 Name Notation Paper deck lifter motor Name PS8003 Deck sensor SW8001 Lifter upper limit switch SW8002 Lifter lower limit switch SW8003 Cover open/closed detecting switch CL8002 Pickup clutch SL8001 Pickup roller releasing solenoid PS8001 PS8002 H8001 H8002 Paper deck heater (1) Paper deck heater (2) Lifter sensor (lower) Lifter sensor (upper) T05-610-01 COPYRIGHT © 2001 CANON INC. 2000 2000 2000 2000 CANON CLC5000 REV.0 JAN. 2001 5-209 CHAPTER 5 TROUBLESHOOTING IMAGE FAULTS/MALFUNCTIONS 6.11 Buffer pass unit C1 FM1 FM2 FM3 PS4 PS8 PS1 PS5 PS3 PS6 FM4 PS2 PS7 CB1 NF1 SL1 SL6 M2 M1 SL5 SL3 SL4 M3 SW1 F05-611-01 5-210 COPYRIGHT © 2001 CANON INC. 2000 2000 2000 2000 CANON CLC5000 REV.0 JAN. 2001 CHAPTER 5 TROUBLESHOOTING IMAGE FAULTS/MALFUNCTIONS Sensor Notation Name FM1 FM2 FM3 FM4 Cooling Cooling Cooling Cooling fan fan fan fan 1 2 3 4 PS1 PS2 PS3 PS4 PS5 PS6 PS7 PS8 Reversal timing sensor Reversal jam sensor Delivery sensor Upper phase sensor 1 Upper phase sensor 2 Lower phase sensor 1 Lower phase sensor 2 Inlet paper sensor Sensor Notation Name SL1 SL3 SL4 SL5 SL6 Flapper solenoid Downward curl removing solenoid 1 Downward curl removing solenoid 2 Upward curl removing solenoid 1 Upward curl removing solenoid 2 M1 M2 M3 Buffer input motor Reversal motor Buffer output motor SW1 Cover switch CB1 Circuit breaker NF1 Noise filter T05-611-01 COPYRIGHT © 2001 CANON INC. 2000 2000 2000 2000 CANON CLC5000 REV.0 JAN. 2001 5-211 CHAPTER 5 TROUBLESHOOTING IMAGE FAULTS/MALFUNCTIONS 7 Upgrading (download) 7.1 Items to Prepare • • PC (to which the copier Service Support Tool has been installed) Bi-Centronics cable (w/ IEEE 1284Std-complaint notation) 7.2 Preparing for the Work 1) Turn on the power switch. 2) Record the settings of the user mode (if you are upgrading the reader controller PCB). 3) Change ‘1’ to ‘0’ for ‘IMG-REG’ on the 2nd page on the INSTALL screen of ‘FUNC’ in service mode (if you are upgrading the DC controller PCB). 4) Turn off the power switch. 7.3 Making Connections 1) Disconnect the power plug from the outlet. 2) Open the front cover, and insert the cover switch actuator. 3) Loosen the two screws at the left bottom and open the face cover. Face plate ?????????? Screw F05-703-01 4) Connect the download connector on the download PCB and the PC with a bi-Centronics cable. • Keep the PCB OFF. • Connect the 25-pin connector of the bi-Centronics cable to the PC, and the 36-pin connector to the copier. 5-212 COPYRIGHT © 2001 CANON INC. 2000 2000 2000 2000 CANON CLC5000 REV.0 JAN. 2001 CHAPTER 5 TROUBLESHOOTING IMAGE FAULTS/MALFUNCTIONS 5) Slide the download switch on the download PCB to the LOAD position. DCON COPY LOAD RCON COPY LOAD Down load Connector Down load Connector (For DC Conntroller PCB) (For Reader Conntroller PCB) Down load Switch Down load Switch (For DC Conntroller PCB) (For Reader Conntroller PCB) F05-703-02 6) Turn on the PC, and start the Copier Service Support Tool. 7) Connect the power plug to the outlet, and turn on the power switch. COPYRIGHT © 2001 CANON INC. 2000 2000 2000 2000 CANON CLC5000 REV.0 JAN. 2001 5-213 CHAPTER 5 TROUBLESHOOTING IMAGE FAULTS/MALFUNCTIONS 7.4 Downloading 1) Select ‘main menu’ on the start-up message of the Copier Service Support Tool. 2) Select ‘next’ under ‘download/upload’. 3) Select the appropriate type and PCB, and press ‘start connection’. Type : CLC5000 PCB : RCON (reader controller PCB) DCN (DC controller PCB) 4) Operate as instructed on the PC screen to download the flash ROM program. Do not turn off the PC or the copier while downloading takes place; otherwise, the DIMM can go out of order, not allowing reuse. 5) When downloading is done, turn of the PC as follows: OK>return to main menu>end copier support tool>end 5-214 COPYRIGHT © 2001 CANON INC. 2000 2000 2000 2000 CANON CLC5000 REV.0 JAN. 2001 CHAPTER 5 TROUBLESHOOTING IMAGE FAULTS/MALFUNCTIONS 7.5 After the Work 1) 2) 3) 4) 5) Turn off the power switch, and disconnect the power plug. Disconnect the bi-Centronics cable. Slide the download switch to the COPY position. Connect the power plug, and turn on the power switch. ON the VERSION screen under ‘DISP’ in service mode, check the version of ‘R-CON’ or ‘DC-CON’. 6) Remove the cover switch actuator; then, secure the face cover, and close the front cover. 7) Execute ‘RAM-CLR’ under ‘R-CON’ of ‘FUNC’ in service mode. • The power switch will automatically turn off. If you are upgrading the reader controller PCB, 8) Turn on the power switch. • E350' (error code) will be indicated. If you are upgrading the reader controller PCB, 9) Execute ‘AUTO-ADJ’ of ‘CCD’ under ‘FUNC’ in service mode. (about 8 min) If your are upgrading the reader controller PCB, 10) If a film projector is installed, execute ‘PROJ-CCD’ of ‘PROJ-ADJ’ under ‘FUNC’ in service mode. If you are upgrading the reader controller PCB, 11) Compare the value of A on the service label and the service mode setting; if different, clear the RAM on the DC controller PCB. (For details, see the instructions on how to clear the RAM on the DC controller PCB under 2.10.d. of Chapter 5.) If you are not clearing the RAM on the DC controller PCB, check the setting of ‘TR-#’ of ‘HV-TR-Y’ under ‘ADJUST’; if ‘3’ is indicated, change it to ‘0’. (Be sure to do the same for zones A, B, and C.) If your are upgrading the DC controller PCB, 12) Change ‘0’ to ‘1’ for ‘IMG-REG’ on the 2nd page on the INSTALL screen of ‘FUNC’ in service mode. If you are upgrading the DC controller PCB, 13) Enter the settings of user mode and the value of B indicated on the service label; if any of the settings of the items of B on the service label relating to the reader controller has been changed, also enter such settings.) If you are upgrading the reader controller PCB, 14) Turn off and then on the power switch. 15) Set ‘1’ to ‘PASCAL’ of ‘ADJUST’ in service mode, and execute auto gradation correction. COPYRIGHT © 2001 CANON INC. 2000 2000 2000 2000 CANON CLC5000 REV.0 JAN. 2001 5-215 CHAPTER 5 TROUBLESHOOTING IMAGE FAULTS/MALFUNCTIONS Blank page 5-216 COPYRIGHT © 2001 CANON INC. 2000 2000 2000 2000 CANON CLC5000 REV.0 JAN. 2001 APPENDIX COPYRIGHT © 2001 CANON INC. 2000 2000 2000 2000 CANON CLC5000 REV.0 JAN. 2001 APPENDIX 1 General Timing Chart Copy Start key ON STBY COPY CNTR LSTR STBY 1 sec Photosensitive drum motor (M21) Scanner motor (M29) Scanner home position sensor (PS37) Scanning lamp (LA1) Pre-exposure lamp (LA1/2/3/4) Primary charging assembly (high-voltage) Pre-primary charging assembly (high-voltage) Developing motor (C; M18C) Developing motor (M; M18M) Developing motor (Y; M18Y) Developing motor (Bk/ M18Bk) Developing bias (C; high-voltage) Developing bias (M; high-voltage) Developing bias (Y; high-voltage) Developing bias (Bk; high-voltage) Anti stray toner electrode (high-voltage) Laser (C) Laser (M) Laser (Y) Laser (Bk) Transfer belt motor (M14) Transfer belt home position sensor (PS16) Transfer belt lifter clutch(CL17) Transfer belt lifter sensor (PS12) Transfer belt lifter sensor 2 (PS13) Transfer blade solenoid(C; SL7C) Transfer blade solenoid (M; SL7M) Transfer blade solenoid (Y; SL7Y) Transfer blade solenoid (Bk; SL7Bk) Transfer charging assembly (C; high-voltage) Transfer charging assembly (M; high-voltage) Transfer charging assembly (Y; high-voltage) Transfer charging assembly (Bk; high-voltage) Internal static eliminator roller (high-voltage) Oil removing roller solenoid (SL18) Polishing/oil removing motor (M15) Transfer belt C web motor (M12) Transfer belt C web rotation sensor (PS10) Cassette 1 pick-up motor (M38) Pre-fixing feeding motor (M11) Cassette 1 pick-up roller clutch (CL12) Cassette 1 pick-u roller releasing solenoid (SL9) Vertical path roller 2 clutch (CL13) Vertical path roller 1 clutch (CL11) Registration releasing solenoid (SL16) Registration paper sensor (PS1) Registration rear paper sensor (PS14) Pick-up vertical path 1 sensor (PS21) Pick-up vertical path 2 sensor (PS25) Separation sensor (PS15) Internal delivery sensor (PS35) Delivery sensor (PS34) Separation charging assembly (high-voltage) Pre-fixing charging assembly (high-voltage) Upper fixing heater (H1) Lower fixing heater (H2) Fixing motor (M9) Fixing web releasing solenoid (SL4) On Fixing web take-up solenoid (SL3) Counter Potential sensor (CT-C/M/Y/Bk) Reverse High-speed Standard speed AC+DC DC 00 activation PWM activation 00 PWm activation 00 activation After transfer belt rotates 750 se (cumulative) from 1 to 0; or from 0 to 1 Controlled to 180 C Controlled to 180 C 204mm/s Off On Once every 8 copies Simultaneous for 4 colors; 5 times each COPYRIGHT© 2001 CANON INC. 2000 CANON CLC5000 REV.0 JAN. 2001 A-1 APPENDIX Power Switch ON 10 sec 1 sec Photosensitive drum motor (M21) Scanner motor (M29) Scanner home position sensor (PS37) Scanning lamp (LA1) Pre-exposure lamp (LA1/2/3/4) Primary charging assembly (high-voltage) Pre-primary charging assembly (high-voltage) Developing motor (C; M18C) Developing motor (M; M18M) Developing motor (Y; M18Y) Developing motor (Bk/ M18Bk) Developing bias (C; high-voltage) Developing bias (M; high-voltage) Developing bias (Y; high-voltage) Developing bias (Bk; high-voltage) Anti stray toner electrode (high-voltage) Laser (C) Laser (M) Laser (Y) Laser (Bk) Transfer belt motor (M14) Transfer belt home position sensor (PS16) Transfer belt lifter clutch(CL17) Transfer belt lifter sensor (PS12) Transfer belt lifter sensor 2 (PS13) Transfer blade solenoid(C; SL7C) Transfer blade solenoid (M; SL7M) Transfer blade solenoid (Y; SL7Y) Transfer blade solenoid (Bk; SL7Bk) Transfer charging assembly (C; high-voltage) Transfer charging assembly (M; high-voltage) Transfer charging assembly (Y; high-voltage) Transfer charging assembly (Bk; high-voltage) Internal static eliminator roller (high-voltage) Oil removing roller solenoid (SL18) Polishing/oil removing motor (M15) Transfer belt C web motor (M12) Transfer belt C web rotation sensor (PS10) Cassette 1 pick-up motor (M38) Pre-fixing feeding motor (M11) Cassette 1 pick-up roller clutch (CL12) Cassette 1 pick-u roller releasing solenoid (SL9) Vertical path roller 2 clutch (CL13) Vertical path roller 1 clutch (CL11) Registration roller clutch (CL8) Registration paper sensor (PS1) Registration rear paper sensor (PS14) Pick-up vertical path 1 sensor (PS21) Pick-up vertical path 2 sensor (PS25) Separation sensor (PS15) Internal delivery sensor (PS35) Delivery sensor (PS34) Separation charging assembly (high-voltage) Pre-fixing charging assembly (high-voltage) Upper fixing heater (H1) Lower fixing heater (H2) Fixing motor (M9) Fixing web releasing solenoid (SL4) Fixing web take-up solenoid (SL3) Counter Potential sensor (CT-C/M/Y/Bk) A-2 165 C 110 C WMUP INTR HPS 180 C STBY IMG REG -200V -500V FF Output for image position correction pattern formation 00 45mm/s COPYRIGHT© 2001 CANON INC. 2000 CANON CLC5000 REV.0 JAN. 2001 2 General Circuit Diagram (1/3) B18 10 9 8 7 6 5 4 3 2 1 J2229B GND RCPRDY* GND PSTS2* GND PCMD2* GND PSTS1* GND PCMD1* 1 2 3 4 J6406H 4 3 2 1 J6406B CNT2 Counter Counter Counter 6 4 2 Potential sensor (Bk) Potential sensor (Y) Potential sensor (M) Potential sensor (C) 1 2 3 4 J6358 J6350F M18Y Developing cylinder J6357KM (Y/M) J6215F 12 Reversing roller drive clutch J6356F Developing motor (Y) Waste toner lock sensor switch Separation corona assembly J6355M J6353M 28 J1513H M18C J1513A A20 B20 J1513B 1 2 3 J6166A 3 2 1 J6166B M +24V SEU2 J6161U J6161L J6160U J6160L 3 2 1 3 2 1 4 3 2 1 4 3 2 1 J6164A 1 2 3 J6164B 3 2 1 J6164H J6165A 1 2 3 J6165B 3 2 1 J6165H Pickup cooling fan 2 J6145M 1 2 3 4 4 3 2 1 J6162A J6162B J6162H 1 2 3 4 J6387DH 4 3 2 1 SL9 SL13 PS31 1 2 3 J6173 J6172 2 1 1 2 J6175 3 2 1 J6176A J6176B J6176H J6216A J6216B J6216BH 1 2 3 1 2 3 J6127 J6126 1 2 PS25 J6163A J6163B J6163H J3781F SL10 1 2 1 2 3 J6128 J6137H 1 2 3 J6320A J6320AH J6320B 8 7 6 5 4 3 2 1 1 2 3 4 5 6 7 8 PS28 1 2 3 7 6 9 8 PS42 11 13 15 17 19 21 23 25 27 29 31 33 35 37 39 10 12 14 16 18 20 22 24 26 28 30 32 34 36 38 40 1 3 2 5 4 7 6 9 8 11 13 15 17 19 21 23 25 27 29 31 33 35 37 39 41 43 45 47 49 51 10 12 14 16 18 20 22 24 26 28 30 32 34 36 38 40 42 44 46 48 50 52 J2203 PS21 PS26 B20 10 9 8 7 6 5 4 3 2 1 1 2 3 4 5 6 7 8 9 10 J6322A J6322AH J6322B 1 2 3 J6124 1 2 3 J6129 8 7 6 5 4 3 2 1 1 2 3 4 5 6 7 8 J6323A J6323AH J6323B DZ_TxD* GND DZ_RxD* GND DZ_REQ* GND DZ_ACK GND DZ_CNCT* GND 6 5 4 3 2 1 J6272 J6271 Number keys PCB J6252 J6256 12 20 FM13D* GND FM13ER 10 11 12 J1308 J6250M 1 2 3 4 J6257F 1 2 3 4 J6257F 1 2 3 4 20 J6283 1 2 3 4 J6260 14 13 12 11 10 9 8 7 6 5 4 3 2 1 12 J6282 1 2 3 4 1 2 3 4 J6286 J6284 LCD/touch panel 1 2 3 J6125 CCD driver PCB SL8 J2002 121110 9 8 7 6 5 4 3 2 1 CCT SL 1 2 1 2 J6455B J6132 J6132H 1 2 3 4 5 6 7 8 9 10 J6456A J6456AH J6456B 140 68 J1805 J1257 100 J1802 J2001 1110 9 8 7 6 5 4 3 2 1 J1803 80 J1806 J1255 J1801 J1254 Interface board Interface mother PCB 40 100 J1804 1 2 3 4 5 6 7 8 9 10 11 J1258 J2102A Analog processor PCB J1253 J1252 J1256 50 100 J2101A 50 J2963B<1..16> J2224B<14..1> J5502A<1..20> J5502B<1..20> Monitor I/F PCB J2 A8 A8 B8 B8 J1H Pre-view monitor PCB J3702H J3702B J1B 15 M M M37 Re-pickup motor CRT M M38 M39 Cassette 1 pickup motor Cassette 2 pickup motor B20 J2222B 50 100 40 J1453 J1451 J1454 J1431 J2222H J2224H J2226H J5507 1 2 3 4 5 6 J3704 J6452M 1 2 3 4 5 6 J2222B<1..20> J2222A A20 A14 J2224A J5506 1 2 3 4 5 6 50 J3702A J6457F 1 2 3 4 5 6 J6457M 1 2 3 4 5 6 1 2 3 4 5 6 7 8 9 10 11 12 13 14 15 16 17 18 19 20 J2222A<1..20> J2224A<14..1> J2224B B14 J1A J5505 B20 J5502B J6179A J6179B J3701 J5504 Pickup motor driver PCB J2225B IP mother PCB J1452 J1441 120 B12 J2212A A12 J2228B B16 J2214B B16 J2228A A16 J2211H A16 J2214A J2211B B11 J2207H J2240H A11 J2211A J2240B B15 A15 J2207B J2240A B16 A16 J2205 J2207A J1421 J802 J1502 SL 6 5 4 3 2 1 J6099Y SALT SL17Y SALT sensor (Y) sensor shutter open/closed solenoid (Y) SL 6 5 4 3 2 1 J6099C SALT SL17C SALT sensor (C) sensor shutter open/closed solenoid (C) 16 15 14 13 12 11 10 9 8 7 6 5 4 3 2 1 16 15 14 13 12 11 10 9 8 7 6 5 4 3 2 1 15 14 13 12 11 10 9 8 7 6 5 4 3 2 1 1 2 3 ET19 J6210B 1 2 3 4 5 6 7 8 9 10 11 1213 14 15 10 9 8 7 6 5 4 3 2 1 J6210A 15 14 13 12 11 10 9 8 7 6 5 4 3 2 1 PS8 A11 PS38 1 2 3 Inside delivery sensor J6204H J6204B 1 2 3 4 5 6 7 J6204A 7 6 5 4 3 2 1 J6203 1 2 3 J6202 1 2 3 PS34 PS33 B11 A11 J6396B B11 A11 J6206H SL SL J6206 SL15 SL14 J6201 1 2 3 PS32 J6200 1 2 3 4 5 6 M J6134H 1 2 J6134A 2 1 FT8 J6063 1 2 3 4 5 6 1 2 3 4 5 6 7 8 9 10 11 12 FM26D GND FM26ER GNDR MPWDH REF GND MPRSEN +5V GND MPLSEN +5V +5V MPLDSE GND J5708 J202 J203 80 100 J5704 J2102 J2107 33 33 33 33 J2103 J2108 J2109 33 33 33 33 J2104 J2110 J2111 33 33 33 33 J2105 J2112 J2113 33 33 33 33 8 7 6 5 4 3 2 1 4 3 2 1 A12 B12 J6395 A12 B12 J6395H J6396A J3251C J6059B 1 2 3 4 5 6 J6059A 6 5 4 3 2 1 J6058H J6061H J6061B 1 2 J6058B 1 2 3 J6061A 2 1 J6058A 3 2 1 J6060 1 2 J6062 1 2 3 J6057 1 2 3 1 2 3 4 5 6 7 M M35 M36 1 2 3 J6056 EV1 1 2 3 4 J6054H PTS1 J6051H 1 2 J6051 SL Paper thickness sensor Paper deck pickup motor J6054B 1 2 J6054A 2 1 J6050H J6050 SW6 PS1 Registration Multifeeder paper sensor Environment pickup cover measurement open/closed OHP sensor PCB Multifeeder lifter sensor sensor OHP sensor (upper) Laser driver PCB (M) J3251K J3002K J3001K J3002Y J3001Y Beam detection PCB (Y) Laser driver PCB (Y) Beam detection PCB (Bk) Laser driver PCB (Bk) 1 2 J6049H 1 2 3 J6049 CL CL SL5 CL6 Multifeeder pickup roller releasing solenoid CL7 Paper thickness detection roller clutch J6156H J6156B 1 2 J6156A 2 1 J6067 PS2 Laser driver PCB (C) J3251Y J3002M J3001M Beam detection PCB (M) 1211 10 9 8 7 6 5 4 3 2 1 J6069A J6055 J6451 M Registration motor FT7 Beam detection PCB (C) J6069H 1 2 3 4 5 6 7 8 9 10 1112 J6069B 1 2 3 4 5 6 J3251M J3002C J3001C J6396A<11..1> J6134B M28 Delivery vertical path Duplex reversal Duplex reversal sensor 2 motor sensor Delivery sensor 1 2 2 1 J5710 1 2 3 4 5 6 7 J6450 1 2 3 PS35 Derivery vertical path sensor 1 J6208 J5709 1 2 3 4 5 6 J6396H J6200H J6207 1 2 3 PS2ON PS3ON GND PS4ON PS5ON REF MFPWSE GNDF +24VF EVTMP EVHUM EVSEL FM26D FM26ER GND J5705A J6205H J6273 1 2 3 4 5 6 7 8 9 10 11 12 13 14 15 16 1 2 3 4 5 6 7 8 9 10 11 12 13 14 15 16 GND DFPCC DFPCN DFPOTB* DFPOTB DFPOTA* DFPOTA GND RGPCC RGPCN RGPOTB* RGPOTB RGPOTA* RGPOTA GND B11 FM28 J6059H 3 2 1 J201 Video controller PCB J2106 BD GND +5V GND -5V GND FM29 J6210H 1 2 3 4 5 6 7 8 9 10 J6211A J6205A 80 12 11 10 9 8 7 6 5 4 3 2 1 FM30 Reversing Reversing assembly assembly exhaust fan exhaust fan Reversing Reversing 3 1 assembly assembly exhaust fan exhaust fan 4 2 J6396B<11..1> J6211B J6205B J1503 80 +24V CL7D* ET20 ET21 Pre-duplexing feed sensor 2 Pre-duplexing feed sensor 1 120 J2115 J5705 +5VR PTHDT1 PTHLED GNDR FM33 J6076 80 Multifeeder PCB J6431H J6431 +24V CL6D* 1 2 3 J6432H J6432 +24V SL16D* FM7 Pre-fixing feed fan 1 2 3 1 2 3 4 5 6 7 8 9 10 11 12 M11 J6433H J6433 100 J2114 J6212 J6073 J6073H Pre-fixing feed motor J6434H 1 2 3 J6434 J5705B J6429H J6429A J6429B J1504 80 BD GND +5V GND -5V GND 1 2 3 J6211H J6077 1 2 3 CL6D CL7D GND SL5D SL16D +24VR GNDR PTSD GNDR PTHLED PS1ON OHPSE OHPLED GND SOIPOT PS5ON FM28D GND FM28ER FM29D GND FM29ER FM30D GND FM30ER FM33D GND FM33ER PS34DT PS33DT PS32DT M28-B* M28-B +24V +24V M28-A* M28-A GND +5V J6012AU J5707 J5706 J5703A DFPOTA +24V DFPOTA* DFPOTB +24V DFPOTB* 1 2 3 A11 A16 6 5 4 3 2 1 J6074 J6074H B11 12 11 10 9 8 7 6 5 4 3 2 1 J804 100 J5703A<16..1> B16 +24V SL5D* J6180A +5V PS38DT GND SL15D* PS35DT SL14D* GND +5V +24V 3 2 1 J6012AH J6212BU 3 2 1 J803 FF3-0574 +5V GND OHPSDT +5V PS1DT GND 6 5 4 3 2 1 J6078A J6212BH A11 11 10 9 OHPLED 8 +5V 7 J6078B J5703B J6212H B11 1 2 3 J5703H 2 1 1 2 3 4 5 6 J5703B<16..1> 1 2 3 4 5 6 7 8 9 10 11 12 13 14 15 RGPOTA +24V RGPOTA* RGPOTB +24V RGPOTB* J6180B 12 11 10 9 8 7 6 5 4 3 2 1 J5702 1 2 3 M J6180H J6439A Separation claw releasing solenoid Delivery paper deflecting solenoid COPYRIGHT© 2001 CANON INC. 2000 CANON CLC5000 REV.0 JAN. 2001 15 14 13 12 11 10 9 8 7 6 5 4 3 2 1 11 10 9 8 7 6 5 4 3 2 1 11 10 9 8 7 6 5 4 3 2 1 16 15 14 13 12 11 10 9 8 7 6 5 4 3 2 1 +5V PS9DT GND -5V PS8DT GND M11-B* +24V M11-B M11-A* +24V M11-A FM7D* GND FM7D Fixing heat discharge fan PS9 J6310H 3 2 1 J6310 J6078H 1 2 3 4 5 6 6 5 4 3 2 1 J6099M 1 2 3 4 5 6 15 14 13 12 11 10 9 8 7 6 5 4 3 2 1 J6405H J6405B 2 1 J6405A 1 2 SW9 6 5 4 3 2 1 J6075A Multifeeder pickup motor 1 2 3 FM31 J6213A M10 Fixing motor J6435 J6435H 1 2 3 4 5 6 7 8 9 10 11 12 13 14 15 J206 J6053H 1 2 J6053 SL SL16 Multifeeder pickup clutch Registration roller releasing solenoid 1 2 3 J6066 3 2 1 PS5 J6065 3 2 1 PS4 +5V PS3DT GND 3 2 1 M9 J6075B J6437 GND PS4DT +5V J6312 M J205 Image processor PCB ED board IP memory PCB GND PS5DT +5V J6312H SL M Rear cover open/close switch SALT SL17M SALT sensor (M) sensor shutter open/closed solenoid (M) Pickup cooling fan 1 J2207A<16..1> GNDR MFPW +5V +24V SL17CDO* SL17CDC* J6182H 6 5 4 3 2 1 J6182B J6182A 1 2 3 4 5 6 Pre-fixing FM35 exhaust fan 2 Pre-fixing exhaust fan 1 11 10 9 8 7 6 5 4 3 2 1 1 2 3 4 5 6 7 8 9 10 11 13 12 11 10 9 8 7 6 5 4 3 2 1 40 39 38 37 24 23 22 21 20 19 18 17 16 15 14 J6311 SALT SL17K SALT sensor (Bk) sensor shutter open/closed solenoid (Bk) J6459 J6459H J6214A 12 11 10 9 8 7 6 5 4 3 2 1 J6075H J6071 MFDDC* GND SL J6311H 3 2 1 1 2 3 4 5 4 3 J6313 6 5 4 3 2 1 J6099K 6 5 4 3 2 1 1 2 3 4 5 6 J2240A<15..1> +5V PS2DT GND J6313H 3 2 1 J6181H J6181B J6181A 6 5 4 3 2 1 1 2 3 4 5 6 J6184M 4 3 2 1 Fixing motor driver PCB 1 2 3 1 2 3 1 2 3 4 5 6 7 8 9 10 11 12 1 2 3 4 5 6 7 8 9 10 11 J6458B J6439BH J6439B 1 2 3 4 5 6 7 8 9 10 11 6 5 4 3 2 1 J6213B GNDF 11 +24VF 10 EVTEMP 9 EVHUM 8 GNDR 7 EVRMT 6 J6183H J6183B J6183A J6184F J2207B<16..1> J6437H J6213H 1 2 3 4 5 6 7 8 9 10 1112 10 7 8 9 11 Delivery assembly Delivery assembly exhaust fan exhaust fan 3 1 Delivery assembly exhaust fan 2 40 40 J2240B<15..1> 1 2 3 4 5 6 7 8 9 10 11 J6214B J6070 1 2 3 4 5 6 FM1 27 26 25 6 5 4 3 2 1 40 39 38 37 FM2 +24V SL17YDO* SL17YDC* SALLON-Y* SALREF-Y SALSG-Y -9VR GNDR +9VR Front cover switch FM3 J2211A<11..1> J6214H 1 2 3 4 5 6 7 FM36 SALLON-M* SALREF-M SALSG-M -9VR GNDR +9VR SW1 1 2 34 Separation charging assembly motor Pre-fixing charging assembly wire cleaner motor 30 29 28 12 11 10 9 8 7 FT1 1 2 3 4 J6005H J6004H 1 2 34 J6005 J6004 J6460 J6460H GND M10D* M10PLL* +5V GND M9D* M9PLL GND M9PLS M9CLK M9CD J6458A FM7D* +24V FM7D J6185A 1 2 3 4 5 6 M11-B* +24V M11-B M11-A* +24V M11-A J6185B +5V PS8DT GND 13 12 11 10 9 8 7 6 5 4 3 2 1 6 5 6 5 4 3 2 1 PFXFER GND PRFXFN PFXFER GND PRFXFN M M32 13 12 11 10 9 8 7 19 18 17 16 15 14 13 12 11 10 9 8 7 +9V SALLON-M* SALREF-M SALSG-M -9VR GNDR +9VR SALLON-Y* SALREF-Y SALSG-Y -9VR GNDR +9VR M M22 J2211B<11..1> FM26 J6185H 1 2 3 4 5 6 7 8 9 10 11 12 13 J6402 16 15 14 2 1 J6402H 12 J6371 J2214A<16..1> +5V PS9DT GND 11 10 9 8 7 6 5 4 3 2 1 J2214B<16..1> J2228A<16..1> M32RV M32FW 16 15 14 13 12 11 10 9 8 7 6 5 SALLON-K* SALREF-K SALSG-K -9VR GNDR +9VR SALLON-C* SALREF-C SALSG-C -9VR GNDR J6186A 4 3 12 11 10 9 8 7 6 5 4 3 2 1 +24V SL17KDO* SL17KDC* +24V SL17CDO* SL17CDC* +24V SL17MDO* SL17MDC* +24V SL17YDO* SL17YDC* J6314A 12 +24V SL17MDO* SL17MDC* FT2 FT3 3 2 1 12 11 10 9 8 7 6 5 4 3 2 1 J6371H 1 2 3 4 5 6 7 8 9 10 11 SALLON-K* SALREF-K SALSG-K -9VR GNDR +9VR FT4 J6002M J6186B 36 35 34 24 23 22 21 20 19 J6006H J6006 3 2 1 J6186H J6314B 36 35 34 33 32 31 30 29 28 27 26 25 J6003F 3 2 1 J6314H 1 2 3 4 5 6 7 8 9 101112 M22RV M22FW 4 3 2 1 FM1ERR FM1SPD GND EXFAN1 8 7 6 5 FM2ERR FM2SPD GND EXFN2 12 11 10 9 FM3ERR FM3SPD GND EXFN3 15 14 GND FRDC* J6003M 2 1 J6001M J2228B<16..1> J6458H 2 1 J6001F J2212A<12..1> J1402 100 2 1 J2212B<12..1> J1401 BD GND +5V GND -5V GND J2212B J2232 J2214H J2228H BD GND +5V GND -5V GND J2212H +24V SL17KDO* SL17KDC* B14 J1304 J6264F J6259 1 2 3 4 5 6 7 8 9 10 11 12 13 14 Sub keytop PCB J2225H A14 1 2 3 4 5 6 7 8 9 41 42 43 44 45 46 47 48 49 50 51 52 53 54 55 56 57 58 59 60 61 62 63 64 65 66 67 68 69 70 71 72 73 74 75 76 77 78 79 80 +5V +5V +5V RxD GND BUZZER GND N.C N.C GND N.C GND N.C GND CFLCONT GND LCD_DOFF LCD_D3 LCD_D2 LCD_D1 GND LCD_D0 LCD_CP LCD_LP LCDZ_FRAM GND LED00 LED01 LDE02 S0 S1 S2 S3 S4 S5 S6 GND GND GND GND 41 42 43 44 45 46 47 48 49 50 51 52 53 54 55 56 57 58 59 60 61 62 63 64 65 66 67 68 69 70 71 72 73 74 75 76 77 78 79 80 10 9 8 7 6 5 4 3 2 1 CL10 10 9 8 7 6 5 4 3 2 1 B16 J5503B 20 19 18 17 16 15 14 13 12 11 10 9 8 7 6 5 4 3 2 1 1 2 3 4 5 6 7 8 9 10 11 12 13 14 14 13 12 11 10 9 8 7 6 5 4 3 2 1 J6179H J2226B<15..1> J2242H 1 2 3 4 5 6 J6262 J6455H GND SL9ON PS23ON PS24ON CL12D GND PS41ON PS25ON SL10D PS28ON GND PS27ON CL14D PS42ON PS26ON GND PS21ON PS22ON CL10D SL8ON 1514 13 12 11 10 9 8 7 6 5 4 3 2 1 B14 J2226B J2226A A14 J2242B 1 2 3 4 5 6 7 8 9 10 7 6 5 4 3 2 1 J6141H 1 2 3 4 5 6 7 8 9 10 11 12 13 14 15 16 17 18 19 20 1 2 3 A20 J2242A PS22 1 2 3 4 5 6 7 J6387LB J2204 1 2 3 4 5 6 7 J6261 CL 1 2 3 J6138 1 2 J6141 20 19 18 17 16 15 14 13 12 11 10 9 8 7 6 5 4 3 2 1 B20 J2226A<15..1> 5 4 1 2 3 J6130 J6131 J5503H SL13D* +24V A20 J1305 J6264M 1 2 3 4 J6255 Paper deck connection (pickup cover) Re-pickup Pickup sensor roller releasing vertical path 1 Re-pickup solenoid sensor roller clutch CL J6140 J6140H J5502A A20 GMD +5V PS30DT GND +5V PS31DT GND J6387DWH 10 12 14 16 18 20 22 24 26 28 30 32 34 36 38 40 11 13 15 17 19 21 23 25 27 29 31 33 35 37 39 J6387LH 3 CL14 PS27 J6321A J6321AH J6321B J5503A A16 2 3 4 5 6 7 8 9 10 11 12 13 14 1 9 J6387LA 1 1 2 3 4 5 6 7 8 9 10 11 12 13 14 15 J6178B SL11SD* SL11RD* SL11LD* +24V 8 J1306B J1306H 2 1 J5502H M23-A M23-A* +24V +24V M23-B M23-B* +5V PS29DT GND 7 B11 J6257M 1 2 3 4 J6251 J6254 J2103A 32 31 30 29 28 27 26 25 24 23 22 21 20 19 18 17 16 1514 13 12 11 10 9 8 7 6 5 4 3 2 1 1 2 3 4 5 6 7 8 9 10 11 12 13 14 6 J1311H J1309H 68 J6258 1 2 3 4 5 6 7 8 9 10 11 12 32 31 30 29 28 27 26 25 24 23 22 21 20 19 18 17 16 1514 13 12 11 10 9 8 7 6 5 4 3 2 1 J6178A C1SZ0 C1SZ1 GND +5V C2SZ0 C2SZ1 GND +5V 5 J1308B<11..1> J1306A A11 B12 J1311B 10 9 8 7 6 5 4 3 2 1 J3781M 8 9 10 11 12 13 14 15 4 GNDE C2PW +5VR 3 5 6 7 2 GNDE C1PW +5VR 1 J1311A A12 J1309B J6281 J2851R 10 12 14 16 18 20 22 24 26 28 30 32 34 36 38 40 11 13 15 17 19 21 23 25 27 29 31 33 35 37 39 1 2 3 4 9 14 15 8 M18MPLL* M18MON GND 7 10 11 12 13 6 FMCF2 GND FMFER2 5 J808 J1303 1110 9 8 7 6 5 4 3 2 1 J6440A J6440AH J6440B 3 2 1 J6178H 7 8 9 4 M20PLL* M20ON GND 3 4 5 6 2 B9 1 2 3 4 1 2 3 4 5 6 7 8 9 10 11 SL 1 2 3 J6134 J6137 1 2 3 4 5 6 7 8 9 10 3 2 1 M18YPLL* M18YON GND J2851F 1 B20 ECO-ID PCB 10 9 8 7 6 5 4 3 2 1 1 2 CL J6136 J6136H J6175H PS41 CL12 PS24 SL SL 1 2 3 PS23 10 9 8 7 6 5 4 3 2 1 J6387DB A20 J1312H Control panel PCB FM32 J6387DA A9 80 J6253 M38DA M38DA* M38DB M38DB* M38DCU* M38DCC* GND M39DA M39DA* M39DB M39DB* M39DCU* M39DCC* GND M37DA M37DA* M37DB M37DB* M37DCU M37DCC Image position correction PCB (rear) J1309A J1302 Primary Primary corona corona assembly assembly (C) (Bk) J2963A<1..16> 3 2 1 J2854R SEU1 1 2 3 4 5 6 7 8 J6427H Reader controller PCB J6263 Primary Primary corona corona assembly assembly (M) (Y) MT13 M 3 2 1 1 2 3 J2853R J2854F SVR2 J1312B J6246B J6427B J1310B HVSUBK NVGRK HVPRK HVSUBC HVGRC HVPRC 1 2 3 +150V -15V +15V FM9 1 2 3 4 10 11 12 FM8 M18M J6166H J6145C SVR1 B19 TSW00 TSW01 TSW02 TSW03 TSW04 TSW05 TSW06 TSW07 TSW08 TSW09 TSW10 TSW11 TSW12 TSW13 TSW14 TSW15 TSW16 TSW17 TSW18 TSW19 SW00 SW01 SW02 GND GND 7 8 9 10 11 12 13 14 HVPPRC HVGRC HVPRC HVPPRK NVGRK HVPRK +24V GNDR J6222 3 2 1 J6222H +150V -15V +15V J6221 3 2 1 J6221H M37DA +24V M37DA* M37DB +24V M37DB* 3 2 1 J2901R 1 2 3 J2853F Download PCB J2951R LMPCNT LMPCNT +24V 3 2 1 J2901F Image position correction LED (rear) Developing motor (M) J6155 A19 8 7 6 5 4 3 2 1 J1308A<11..1> J1312A B10 M39DA +24V M39DA* M39DB +24V M39DB* M 3 2 1 5 4 3 2 1 J6386H J6246A J6246H J6251<80..1> J4604R Cassette 1 Cassette 2 Cassette 1 pickup roller pickup roller Cassette 1 Cassette 2 open/closed Cassette 2 releasing releasing Pickup lifter sensor lifter sensor sensor open/closed Pickup Cassette 1 solenoid Cassette 1 Cassette 2 vertical path 2 solenoid Cassette 2 sensor vertical path 3 pickup clutch paper sensor paper sensor pickup clutch sensor sensor Paper feed roller solenoid SL 2 1 1 2 3 1 2 3 4 5 B19 J6251A 12 J6251B J6251H A12 J6427A J1310A M38DA +24V M38DA* M38DB +24V M38DB* M20 PS30 ET18 Cassette 1 paper length sensor Cassette 2 Cassette 2 paper length paper width sensor sensor A19 1 2 3 4 5 6 HVT2-2R J4603R 7 8 9 1 2 3 SL9D +24V +5V PS23D GND +5V PS24D GND CL12D +24V Cassette 1 paper width sensor Waste toner feed motor SL11L J6171 J6171H J6386B B14 J1307B +5V PS21D GND +5V PS22D GND CL10D +24V SL8D +24V SL J6170 2 1 J6170H J6169H J6386A 1 2 3 4 5 6 7 8 9 10 11 12 13 14 15 16 17 18 19 20 21 22 23 24 25 26 27 28 29 30 31 32 33 34 35 36 37 38 39 40 4 5 6 FNLEF GND FNERR J6079H 3 2 1 J6080H 3 2 1 J6079A 1 2 3 J6080A 1 2 3 J6079B J6080B +5V PS42D GND +5V PS26D GND SL 1 2 3 J6169 2 1 J6240H 1 2 3 4 5 6 7 8 9 10 10 9 8 7 6 5 4 3 2 1 6 5 4 3 2 1 J6168 B19 J6299A J6299B J6299H 1 2 3 4 5 6 7 8 9 10 J4606 T4606 J4602 T4605 T4603 16 SL10D 15 +24V 14 +5V 13 PS28D 12 GND 11 +5V 10 PS27D 9 GND 8 CL14D 7 +24V 8 28 27 26 25 24 23 22 21 20 19 18 17 16 15 14 13 12 11 10 9 7 6 5 4 3 2 1 M 1 2 3 4 5 6 SL11M SL11S PS29 A19 B9 6 5 4 3 2 1 Pilot lamp PCB Duplex paper Duplex paper Duplexing jogging guide deflecting plate paper home position solenoid (M) sensor 1 sensor Duplex paper Duplex paper Duplex paper Duplexing jogging guide deflecting plate deflecting plate paper motor solenoid (S) solenoid (L) sensor 2 M23 J6144A A9 J1307H Toner shutter proof terminal 1 2 3 4 5 6 7 8 9 101112 13 14 15 J6144B CCX PCB J6292H 1 2 3 4 5 6 7 8 J6240B +5V +5V +5V SCAN00 SCAN01 SCAN02 SCAN03 SCAN04 SCAN05 SCAN06 SCAN07 SCAN08 SCAN09 SCAN10 SCAN11 1 2 3 FNLFT GND FNERR 1 2 3 4 +150V -15V +15V J4604L J6354F Developing cylinder (Bk/C) J6351M J814 J6292 J1307B<14..1> J1307A A14 Primary Primary suction fan suction fan (left) (right) Pre-Fixing corona assembly 3 2 1 J6240A J6385H B19 1 2 3 4 5 6 7 8 9 10 11 12 13 14 15 16 17 18 19 20 21 22 23 24 25 26 27 28 29 30 31 32 33 34 35 36 37 38 39 40 1 2 3 4 5 6 7 8 J4603L 4 5 6 HVPPRM HVGRM HVPRM HVT3-A 4 3 2 1 B9 80 1 2 3 4 5 6 7 8 9 J4702 J5003 HVT3-B A9 J3604<80..1> 8 7 6 5 4 3 2 1 J4602R HVT2-2L A19 J6233H J1307A<14..1> 1 2 3 4 5 6 7 8 9 10 GND DPORT2* GND RPORT2* GND DPORT1* GND RPORT1* GND DCPRTY* J6293H J813 J6385B 1 2 3 4 5 6 7 8 9 10 MT8 1 2 3 J6293 J6294H J6385A LAON LACNTL GND LAERR TIM-RST GND LAON-S* GND +24V GND J6233B +5V SCAN05 SCAN04 SCAN03 SW01 SCAN00 SCAN01 SCAN02 SW00 SW02 S1 CTC J6352F Image position correction CCD PCB (rear) FM12D* GND FM12ER J6231H J450 10 9 8 7 6 5 4 3 2 1 GND +5V CNTP TxD RxD GND +24V GND J6233A 10 9 8 7 6 5 4 3 2 1 CVR FM16 GND +5V CNTP TxD RxD GND +24V GND J6231B 1 2 3 4 5 6 7 8 9 11 10 9 8 7 6 5 4 3 2 1 1 2 3 4 5 6 7 8 J5103 J5005 CTM J6215M 12 J2951F +5V BKTEP-L* GND J6248B B19 9 8 7 6 5 4 3 2 1 J6242B GND J5201 1 2 3 4 5 6 J5001 J6406A Image position correction LED (front) 10 11 12 5 6 A19 J6242A J6242H 9 8 7 6 5 4 3 2 1 1 2 3 J6294 DZ_TxD* 1 GND 2 DZ_RxD* 3 GND 5 DZ_REQ* 6 GND 7 DZ_ACK 8 GND 9 DZ_CNCT* 10 GND 11 1 2 3 4 J2215A<14..1> HVSUBM HVGRM HVPRM HVSUBY NVGRY HVPRY +24V GNDR 13 12 11 10 9 GNDR +24VR HVSPDC HVSPAC HVSPEN* HVT4 HVT5 6 5 4 3 2 1 1 2 3 4 5 6 J6225C CTY SW4 Image position correction CCD PCB (front) +5V BKTEP-U* GND J6231A J1310H 10 9 8 7 6 5 4 3 2 1 J2215B 8 7 6 5 4 3 2 1 J4602L +150V -15V +15V 9 8 7 6 5 4 3 2 1 14 1 2 3 4 1 2 3 4 5 6 7 8 9 1 2 3 4 5 6 J6370A J6370B J6370H 1 2 3 4 5 6 7 8 J5002 Drum thermistor (C) 5 4 3 2 1 J5102 1 2 3 J6360A 4 3 2 1 J5201 T4605 J4606 T4606 T4602 J4605 T4603 HVPPRY NVGRY HVPRY J6361A AVPRF HVPRF 24VR GNDR J6360B J4705 TH8 12 GNDR +24VR 11 10 HVAC-Y 9 HVDC-Y HVDCEN-Y 8 7 HVAC-K 6 HVDC-K 5 HVDCEN-K 4 3 2 1 2 3 EPC-Y GNDR GNDR +24VR HVSRD HVACEN 8 7 6 5 4 3 2 1 J6219C 3 2 1 5 4 3 2 1 3 2 1 1 2 3 4 5 6 J6225M 12 GNDR 11 +24VR 10 HVAC-C 9 HVDC-C HVDCEN-C 8 7 HVAC-M 6 HVDC-M HVDCEN-M 5 1 +24VR 7 8 EPC-M GNDR 5 4 6 +24VR 10 9 GNDR TH9 EPC-C 12 GNDR 13 14 +24VR 11 2 1 4 5 EPC-K GNDR GNDR TH10 3 GNDR TH8 J6223C J6081 CTK Developing motor (C) 7 8 9 8 7 6 5 4 3 2 1 HVSP CNT4 TH9 Drum thermistor (M) 1 2 3 4 5 6 J6225Y 3 2 1 J6219M 3 2 1 J6360H HVPRF CNT6 J6223M 5 4 3 2 1 3 2 1 J6361H J6361B 1 2 3 4 5 6 7 8 J2215B<14..1> HvDevY CNT2 3 2 1 J6083 Potential measurement PCB (C) J2217A<12..1> 12 13 J6248A A10 B10 FM15 1 2 3 4 5 6 7 8 9 +5V GND J6145Y CNT4 +5V CTEP-L* GND 2 1 1 2 3 4 5 6 7 8 9 10 FM14 J602B<9..1> J602A<9..1> 9 8 7 6 5 4 3 2 1 J6275B GND +5V CCD* CCDT* A15 A14 J6232 6 5 4 3 J2206H J2215H J2215A J2217B B12 J1511B J602B J6275A J6275H GND CNECT GND DOUT* DiN* GND SK* CS* GND +5V J2229B<18..1> +5V PS41D GND +5V PS25D GND 1 2 3 4 A12 HvDevK J6407B CNT6 Drum thermistor (Y) 1 2 3 4 5 6 J6225K J2208H B12 J2208B J6249 MT9 J6218B J6218H J6248H A18 B19 B9 1 2 3 4 5 6 8 9 7 4 1 2 3 4 5 6 7 8 9 10 11 12 1314 J6218A 14 13 12 11 10 9 8 7 6 5 4 3 2 1 J6356M J6357F J6354F J6355F A19 A9 J602A 14 13 12 11 10 9 8 7 6 5 4 3 2 1 J6352M J6353F 6 5 4 3 2 1 1 2 3 3 2 1 PRJTxD GND PRJRxD GND +5V SSRON FNERR1 FNERR2 J6350F J6351F J6142A J6142B J6142H 1 2 14 13 12 11 10 9 8 7 6 5 4 3 2 1 1 2 3 4 5 6 MT7 1 2 3 4 +5V GND 6 5 4 3 2 1 J6197A J6197B J6197H J2229A HvDevC 4 3 2 1 E17 CNT1 CNT1 TH10 4 5 6 J1511A 2 1 1 2 3 4 5 6 J6192A J6192B J6192H J2239B HvDevM J6407H CNT3 CNT3 J6219Y 3 2 1 5 4 3 2 1 3 2 1 +5V CTEP-U* GND 12 11 10 J6217BH J602H J1511H +5V B13 +15V -15V +150 J2810 J2811 1 2 3 4 Drum thermistor Counter Counter Counter (Bk) 5 3 1 CNT5 CNT5 J6223Y J6085 +15V -15V +150 1 2 3 4 5 J2809 1 2 3 3 2 1 5 4 3 2 1 TH11 ET1 4 3 2 1 M CL16 M19 AC Driver PCB 3 2 1 J6219K 3 2 1 3 2 1 25 12 11 10 9 FM14 8 GND 7 FM14D 6 FM15ER 5 GND 4 FM15D 3 FM16ER 2 GND 1 FM16D B7 A7 2 1 J6028 J6028H 6 5 4 3 2 1 110 J6223K 5 4 3 2 1 3 2 1 J6082M 9 Digital unit cooling fan Digital unit 2 Digital unit cooling fan cooling fan 1 3 1 2 3 4 5 6 7 8 9 J6217AH TxD GND RxD GND +24V LA5ON* 11 12 13 1 2 3 4 5 6 J6189A J6189B J6189H 3 2 1 3 2 1 J6087 3 2 1 Potential measurement PCB (M) J6084M 12 M J2229A<18..1> 6 5 4 3 2 1 J6220C J6082F 1 2 3 4 J6224C 3 2 1 Potential measurement PCB (Y) J6086M 6 5 4 3 2 1 J6220M J6234F J603 1 2 3 4 5 6 7 8 9 J6209F J2239B<13..1> J2217B<12..1> J6084F J6233 1 2 3 4 5 J604 RxD1 TxD1 GND RxD2 ITxD2 GND RxD3 TxD3 GND 10 M 3 2 1 Download PCB To Editor To Projector J6247 J6217H 7 6 5 4 3 2 1 7 6 5 4 3 2 1 2 1 J6026 J6026H J2217H +15V -15V +150 8 7 6 5 4 3 2 1 3 2 1 FT9 110 J2208A A12 10 11 12 +5V SCHP GND J6196F To RDF J6217BU J6241 1 2 3 4 5 6 7 8 9 M29 9 8 7 6 5 4 3 2 1 10 B7 J6239 J6239H CCX Original scanner motor 1 2 3 4 5 6 7 8 9 J6191F A7 J6217AU 6 5 4 3 +24V LA4ON* 9 10 J6025H J2217A 1 2 3 4 J6224M J6000M Potential measurement PCB (Bk) 3 2 1 OPTION 1 2 3 4 5 6 7 8 9 10 1 2 3 4 5 6 7 +24V +24V CLID* CL2D* CL3D* CL4D* CL5D* +5V GND CTEP MTEP YTEP BKTEP TSSLCT J6199H J2216A A14 +15V -15V +150 8 7 6 5 4 3 2 1 J6088M J6238 3 2 1 J6238H J6235 1 2 3 J6217U Multifeeder lifter motor J6209M 1 6 2 7 3 8 4 10 9 5 J6199A 3 2 1 J6199B J6198H J2216A<10..1> 1 2 3 4 J6224Y J6000F FM13 J602B<12..1> IFOPA IFOPB GND MPULS OM-INT GND RESET GND J6188F 16 15 14 13 12 11 10 9 8 7 FT10 CL B14 6 5 4 3 2 1 J6220Y J6086F FM12 PS37 1 6 2 7 3 8 4 10 9 5 10 Reader assembly cooling fan (rear) 1 2 3 4 5 6 7 8 9 10 11 SpreadDcK HvDevcK SpreadDcY HvDevcY 1 6 2 7 3 8 4 10 9 5 J6196M 1 6 2 7 3 8 4 10 9 5 1 2 3 J6198A 3 2 1 J6198B J6025B 2 1 J6024H +24V LA3ON* +24V LA2ON* 1 2 J6024B Original scanner home position sensor J3401B B12 J3401H 1 2 2 1 J6023H A12 9 8 7 6 5 4 3 2 1 10 KEYSW* GND J6023B 2 1 5 6 M17D GND 3 4 1 2 1 2 J3401B<12..1> J3401A<12..1> J2229H 6 5 4 3 2 1 J6220K 1 2 3 J6337H +5V MTEP-L* GND J6337 J6336H +5V MTEP-U* GND J6336 J6335H 7 8 9 J6335 J6334H +5V YTEP-L* GND J6334 J6333H 4 5 6 +5V YTEP-U* GND +24V CL5D* 9 10 J6333 J6332H 1 2 3 CL4D* +24V 7 8 J6332 J6331H J2239H E17 7 J6407A SALLON-C* SALREF-C SALSG-C -9VR GNDR +9VR J6325B J6325AH J6331 J6330H J3401A M1 12 13 J6022B 6 5 4 2 1 33 32 31 18 17 16 15 14 13 J6325A J6330 FG LCD_VD LCDVEF GND LCD_VDD LCD_D3 LCD_D2 LCD_D1 LCD_D0 LCD_D0FF LCD_CP LCD_LP (N>C) LCD_FRAM P18 J6025A A13 9 8 7 1 2 J6149A J6143F J6152H J6152B J6011H LCD <20..1> P17 M24KFW M24KRV 1 2 J6024A J2239A J6088F Reader assembly cooling fan (front) J3403 10 10 +9VR GNDR -9VR ATRSG-Y ATRREF-Y ATRLON-Y* 1 2 3 J6194A J6194B J6194H 3 2 1 M24CFW M24CRV J6023A J6167 J6167H J2225A J6153B 3 2 1 Hopper relay PCB 13 14 15 16 17 18 1 2 3 J6193A J6193B J6193H 3 2 1 J6021K 1 2 3 J6022A J2219B CL17D 15 +24V 14 14 13 12 11 10 9 8 7 6 5 4 3 2 1 3 2 1 14 15 16 17 18 19 20 21 22 23 24 25 P16 P15 SpreadK SpreadY SpreadM SpreadC M J6149B 6 5 4 3 2 1 SOUT GND SCLK BFRMON RVMTCC RVMTCU GND RVMTD RVMTCL GND BFMTCC BFMTCU BFMTPL 3 2 1 6 5 4 3 2 1 J6191M 1 6 2 7 3 8 4 10 9 5 3 2 1 J2239A<13..1> 24VR J6420A J6420B J6420H J2802 Flicker controller PCB 4 3 2 1 J2225B<14..1> J6153A 1 2 3 4 5 6 7 8 9 10 11 12 13 14 3 2 1 1 2 3 4 5 6 10 10 +9VR GNDR -9VR ATRSG-M ATRREF-M ATRLON-M* J6021Y J6408M J2225A<14..1> 1 2 3 4 5 6 7 8 3 2 1 J3402 <10..1> +9VR GNDR -9VR ATRSG-Y ATRREF-Y ATRLON-Y* SpreadDcM SpreadDcC HvDevcM J6195A J6195B J6195H 10 J6188M +9VR GNDR -9VR ATRSG-C ATRREF-C ATRLON-C* 3 2 1 J6021M J6022H M16D GND PS17DT PS18DT M14D M14PLS GND PS19DT PS20DT 3 2 1 J6021C 1 2 3 4 5 6 7 8 14 13 12 11 10 9 8 1 2 3 4 5 6 7 8 9 10 11 12 13 14 15 J717 1 2 3 M Developing motor (Bk) J6153H 8 7 6 5 4 3 2 1 CL3D* +24V CL2D* +24V 3 4 1 2 3 4 5 6 10 10 Control key switch 1 2 3 4 5 6 3 2 1 2 1 J2216B<10..1> DKRG.SE DKUSEN STFCD* STPCD* +24V STDO LFLM LTP STPE PRSD* STMDN +12V STMUP* GND +24V GND M18CON M18CPLL* GND WTBDT* CL16D* +24V GND M19ON M19PLL* J6148H J6148 1 2 J6146 1 2 3 4 6 5 11 10 9 8 7 6 5 4 5 6 CLID* +24V 1 2 1 2 3 4 5 6 +9VR GNDR -9VR ATRSG-M ATRREF-M ATRLON-M* J3402 1 6 2 7 3 8 4 10 9 5 Primary wire relay PCB (Bk) J6139H J6121M 1 2 3 4 5 6 J2216B CNT6* CNT5* CNT4* CNT3* CNT2* CNT1* +24V 15 14 13 12 11 10 9 8 7 6 5 4 3 2 1 J2223A<15..1> 3 2 1 5 4 7 6 10 9 8 15 14 13 12 11 9 8 7 RXD3 GND TXD3 GND BFSEN BFDRSW SIN GND 3 2 1 15 14 13 12 11 10 9 8 7 6 5 4 3 2 1 J2233 J6145K J2208A<12..1> J6158Y 7 8 9 10 11 12 1 2 3 J6139 1 2 J2241 J2223A A15 COP/RD FHUP2 FHUP1 FHUNCT DHUNCT GNDR M30D H3ON H4ON H5ON H6ON CSHEAT H9ON GNDAN RLYON B15 J6149H 12 11 10 GND DRMTR DRMTPL 3 2 1 9 10 11 12 1 2 3 4 5 6 7 8 21 29 32 P14 P13 J6159K Primary wire relay PCB (Y) 1 6 2 7 3 8 4 10 9 5 M 2 1 J2219H 1 2 3 4 5 6 7 8 9 10 11 12 13 14 15 15 14 13 14 13 12 3 2 1 J6010H DC controller PCB J2223B<15..1> J6032B J6032H J6032A 1 2 3 2 1 J6011 3 2 1 A10 J6029 J6029H 2 1 TS8 SW3 7 8 20 22 23 24 25 26 30 31 10 11 12 13 14 15 18 19 B8 TS4 3 4 5 6 7 8 9 10 11 12 13 14 15 16 GND +24V GND +5V 16 17 27 28 18 19 30 31 28 1 2 3 4 5 6 7 8 9 10 11 12 13 14 15 A8 TS7 J2206A 2 J6152A J2219A TS3 J2206B 5 4 3 2 1 M3-B* 12 +24V 11 M3-B 10 M3-A* 9 +24V 8 M3-A 7 1 2 3 4 5 6 7 J6158M J6190A 6 5 4 3 2 1 J6190B J6190H 1 2 3 4 5 6 J6187A 6 5 4 3 2 1 J6187B 1 2 3 4 5 6 J6187H LA5 LA4 J2219B<8..1> J2218H J2213H M 10 MT14 1 2 3 MT 6 J2219A<8..1> J6009H TS6 16 15 14 13 12 11 10 9 8 7 6 5 4 3 2 1 MT4 J6150F J2220 J2218B Image position correction PCB (front) J3701 J3701H CL J6150M J6008H J6010 2 1 TS2 TSW <12..1> B13 M24K M J2216H J2208B<0..12> J6037 Laser scanner motor driver PCB J4081 J6031 J6031H GND SMON* SMRDY* SMRSC 1 2 3 4 M2-B* +24V M2-B M2-A* +24V M2-A 1 2 8 SL18D* GNDR +24VR HVTR-C HVTR-M HVTR-Y HVTR-K HVEL HVEN GND M15ON M15PLL M15DIR 21 22 23 24 25 26 27 29 15 14 13 12 PS15DT TRSENS GNDR +24VR HVTR-C HVTR-M HVTR-Y HVTR-K HVEL SL18D* HVEN* M31D SOPCT A13 J2218A J2213B J6007H J6009 2 1 TS5 SCAN10 LED00 SW00 S6 SCAN09 S5 B12 J6008 2 1 TS1 GND EX_F1* EX_FR EX_FCP EX_FSH GND +5V GND GND +9V +9V J2209H A12 J6038 J6038H J4080 M3 M M M2 J2218B<13..1> 15 14 13 12 11 10 9 8 7 6 5 4 3 2 1 7 6 5 4 3 2 1 14 13 12 11 10 9 8 7 6 5 4 3 2 1 1 2 LA3 Primary wire relay PCB (M) P12 J6144H 1 2 3 4 5 6 19 18 17 16 15 14 13 12 11 10 9 5 6 7 LA2 M17 P11 4 3 2 1 1 2 3 4 5 6 28 1 2 CL SCAN08 S4 SCAN07 LED01 SW01 S3 SCAN06 S2 LED02 SW02 J2213A Duplex feed motor GND THM3 12 11 10 9 8 7 6 5 4 3 2 1 12 11 10 9 8 7 6 5 4 3 2 1 J6324 CL5 CL GND RxD BUZER LED01 LED02 S0 LED00 B13 J2209B J6380B J6380H J6380A LSFN1 GND LSFN1ER M16 M 12 11 10 1 2 3 FT14 SW5 1 2 CL4 CL GND EXW3_BEiN GND EXW3_BEiN GND EXW2_GEiN GND EXW2_GOiN GND EXW1_REiN GND EXW1_ROiN J2210B J2209A A13 MT5 CL17 17 +24V 19 18 9 M30D +5V GNDR GND PS12DT PS13DT PS10DT PS11DT M15DIR M15PLL M15ON GNDR PS14DT 1 2 3 4 5 6 7 8 9 10 11 12 13 DLFN DLFNER GND J2218A<13..1> J2213B<12..1> J716 3 2 1 J6157 M 10 11 12 DLFN2 GND DLFNER 7 8 9 DLFN3 GND DLFNER 1 2 3 1 2 3 4 5 6 7 8 9 10 11 12 GND PC ACDET S-OPND S-CLSD GND S-CLS +5V GND S-OPN +5V J6388H GND M18BkON M18BkPLL* 1 2 3 MT2 J6135H 1 2 3 4 5 6 7 8 9 J6119A 9 8 7 6 5 4 3 2 1 J6119B J6119H J6118A J6118B J6118H FT13 FT12 Primary wire relay PCB (C) Pre-scanning Pre-scanning Cassette Cassette lamp 1 2 Pre-scanning (M) Pre-scanning lamp (Bk) lifter lifter lamp lamp motor motor (C) (Y) TH12 J6120 1 2 CL3 CL 32 J6154M 1 2 3 4 5 6 7 8 8 7 6 5 4 3 2 1 FT11 CL2 CL Toner level Toner level Toner level Toner level sensor sensor sensor sensor (upper) Toner level (upper) Toner level (upper) Toner level (upper) Toner level sensor sensor sensor sensor C M Y Bk (lower) (lower) (lower) (lower) C M Y Bk J2210H A12 LSFN2 GND LSFN2ER 3 2 1 J6117M 1 2 3 4 5 6 7 8 J6117F 1 2 3 4 5 6 7 8 15 14 13 12 11 10 9 8 7 6 5 4 3 2 1 FM24D GND FM24ER J6381A J6384A 1 2 3 4 1 2 4 3 2 1 1413 121110 9 8 7 6 5 4 3 2 1 J2223H FM6D* +24VAN J6381B J6381H J6040 J6040H J6039 J6039H FM4 1 2 3 Mirror ratio Mirror slant correction correction motor motor Transefer belt (C) (C) lifter clutch M21 J6388B 4 3 2 1 3 2 1 M13A +24V M13A* M13B +24V M13B* +5V GND 7 6 5 J6384B J6384H J6068 FM24 FM5 1 2 3 TH7 Scanner base thermistor M M4 Laser scanner motor Photosensitive drum motor J6388A 10 11 12 13 J6115A J6115B J6115H Toner supply (lower) clutch (Bk) 1 2 3 4 5 6 7 2 1 J6135 1 2 3 4 5 6 7 8 9 1011 1213 14 1 2 3 4 5 6 7 8 9 1011 1213 J6114A 13 121110 9 8 7 6 5 4 3 2 1 J6114B J6114H J6041 4 3 2 1 1 2 3 28 27 26 25 24 23 21 20 22 J6151F MT3 J2223B J6027 3 2 1 3 2 1 Toner supply (upper) clutch (Bk) CL1 ATR sensor (Y) J2210A J2210A<12..1> J6044A 7 8 9 10 9 8 J6044B J6044H J6043 J6043H SW2 12 11 10 9 8 7 6 5 4 3 2 1 J6397 J6397H 1 2 3 4 5 6 7 8 32 13 12 11 2 1 FM6 Primary exhaust fan Laser scanner motor cooling fan Laser cooling fan (rear) Laser cooling fan (front) M6-B* +24V M6-B M6-A* +24V M6-A M5-B* +24V M5-B M5-A* +24V M5-A 3 2 1 M24Y J6159Y J6159M J6159C 1 2 3 4 5 6 7 8 9 10 11 12 A12 J6045 J6045H M M6 M5 1 2 3 4 5 6 13 1 12 2 11 3 10 4 9 5 8 6 7 7 6 8 5 9 4 10 3 11 2 12 1 13 Power switch M Mirror ratio correction motor (Y) Mirror slant correction motor (Y) 1 2 3 4 5 6 4 5 6 M18K 28 To Buffer pass 1 2 3 J6376B J2213A<12..1> J2210B<12..1> J6047A 12 11 10 9 8 7 6 5 4 3 2 1 J6047B J6047H 1 2 3 4 5 6 M8-B* +24V M8-B M8-A* +24V M8-A M7-B* +24V M7-B M7-A* +24V M7-A J6373 J6373H J6376A J6376H 12 1 11 2 10 3 9 4 8 5 7 6 6 7 5 8 4 9 3 10 2 11 1 12 3 2 1 J6372 J6372H DLFN1 GND DLFNER 8 7 6 5 4 3 2 1 3 2 1 4 5 6 1 2 3 4 5 6 7 8 J6046 J6046H M M8 M7 Mirror ratio correction motor (Bk) M Mirror slant correction motor (Bk) J6048 J6048H J6374 J6374H Environment Fixing lever sensor switch 32 J6377H 1 2 3 4 5 6 8 FM34 2 3 4 5 6 7 8 9 FM20 J6123F 32 SL7CDS* SL7CDR* SL7MDS* SL7MDR* SL7YDS* SL7YDR* SL7KDS* SL7KDR* OPTTHM GND FXKBSE GND FM19 1 2 3 4 5 6 7 8 9 10 11 12 13 J6377 FM27 3 2 1 J6379 J6122F 32 J6123M 32 2 3 M 2 1 J6122M M M J3201 1 2 3 4 J3202 1 2 3 4 32 32 MT1 19 20 21 22 23 24 25 26 27 28 29 30 31 PS40 MT21 M24M M24C Transfer belt motor driver PCB 32 Delivery lower Delivery lower cooling fan 3 cooling fan 2 Delivery Delivery lower cooling cooling fan 1 fan J5340 3 2 1 4 5 6 7 8 9 10 11 12 13 14 15 16 M25 Shutter open sensor 1 16 17 GNDR TH3ON GNDR TH4ON GNDR TH5ON GND PS6ON +5V GNDR TH6ON FSRSEN GND 1 2 3 4 5 6 7 8 9 10 11 12 13 2 1 GND +24V GND PS36ON +5V +24V SL2ON +24V SL3ON +24V SL4ON GNDR TH2ON GNDR TH1ON J6012BH 1 2 3 4 5 6 7 8 9 10 11 12 13 J6020BH 7 PS39 Registration shutter J6378 3 drive motor 11 J6012B 10 J6012A 14 13 12 11 10 9 8 7 6 5 4 3 2 1 20 6 5 7 4 1 2 3 4 5 6 7 8 9 10 11 12 13 14 13 12 11 10 9 8 7 6 5 4 3 2 1 1 2 3 1 2 3 4 5 6 7 8 9 10 11 12 13 J6020B J3203 1 2 3 4 5 16 GND 13 12 11 10 9 8 7 6 5 4 3 2 1 13 12 11 10 9 8 7 6 5 4 3 2 1 1 2 3 4 5 6 7 8 9 10 111213 14 15 ET12 DC power supply 2 (All night) J6158C HvDevcC J6106F J6106M ATR sensor (M) +9VR GNDR -9VR ATRSG-C ATRREF-C ATRLON-C* 1 2 3 4 5 6 7 8 9 10 111213 14 15 ATR sensor (C) 1 2 3 4 5 6 10 11 HvTK 1 2 ET14 J6113F J6113M 1 2 3 4 5 6 7 8 9 10 111213 14 15 J6316A J6316B J6316H 7 Shutter closed sensor Primary Primary charging wire charging wire Primary cleaner motor Primary cleaner motor (M) (Bk) charging wire charging wire cleaner motor cleaner motor (C) (Y) 1 6 2 7 3 8 4 10 9 5 1 2 3 4 5 6 7 8 9 10 111213 14 15 M 2 1 Toner supply clutch (Y) J6112F ET16 6 M24YFW M24YRV HvTM HvTE1 J6100 6 5 4 3 2 1 ET11 J6020A 1 2 3 4 5 ET15 6 7 8 9 SL18 SL 1 2 J6315 ET55 ET13 M M24MFW M24MRV J6098A 8 7 6 5 4 3 2 1 J6098B 1 2 3 4 5 6 7 8 J6098H M14 M31 M J4102 1 2 3 4 5 6 7 8 J6019H Transfer belt motor 4 5 6 GND MI2D* HvTC HVT1 Developing assembly (Bk) 1 2 3 Fai1 Fai2 Fai3 Fai4 Fai5 B13 J6019FB 1 2 3 1 2 3 24 M14D 25 M14PLS 26 GND A13 5 Polishing /oil removing Polishing Transfer belt motor waste toner roller motor M15 solenoid T4105 T4101 T4103 T4102 T4104 3 2 1 J6340A J6340B J6340H J6105 J6105H ET17 1 2 3 21 29 J6019FA 1 2 3 M 1 16 17 27 28 32 B13 J6019MB 1 2 3 1 2 3 M13 1 2 3 4 5 6 +35V GND +24V GND +5V A13 1 2 3 Developing assembly (Y) Toner supply clutch (M) J6007 30 31 J6019MA +5V PS10DT GND J6092 J6091 J6091H 12 13 10 11 7 8 9 5 6 3 4 1 2 12 13 10 11 8 9 4 5 6 7 J6019BU<0..13> J6019AU<0..13> 1 2 3 1 2 3 1 2 3 Developing assembly (M) Toner supply clutch (C) 2 1 J6111 PS15 PS14 M Developing assembly (C) PS20 J6110 PS13 SL 1 2 3 PS19 +5V PS20DT GND PS12 2 1 2 1 1 2 3 PS11 SL 1 2 3 PS18 J6109 PS10 SL 1 2 3 PS17 +5V PS19DT GND M12 SL 1 2 3 Transfer belt swing motor J6108 1 2 SL7BK +5V PS18DT GND J6036 3 2 1 J6036H HvTY 2 1 J6018 3 2 1 2 1 SL7Y 1 2 3 4 J6224K J6042A J6042AH J6042B 1 2 J6035 2 1 2 1 J4101 J6030A J6030AH J6030B J6034 J6034H SL7M +5V PS17DT GND J6015H J6017 2 1 J6016 3 2 1 J6017H J6016H SL7C Transfer belt edge sensor 4 Transfer belt Transfer belt edge sensor edge sensor 1 3 22 23 J6033 2 1 J6033H 2 1 Transfer belt cleaning web length sensor Transfer belt cleaning web motor Transfer blade 6 7 J6015 Post-registration sensor Transfer belt lifter Separation sensor 2 sensor TH6 GNDR TH11 1 2 PS6 TH5 M13-A +24V M13-A* M13-B +24V M13-B* SL TH4 Transfer belt edge sensor 2 +38V SL7KDS* SL7KDR* J6104 SL TH3 TH1 +38V SL7YDS* SL7YDR* J6103 SL TH2 +38V SL7MDS* SL7MDR* J6102 SL4 +5V PS15DT GND J6097 J6014 SL3 +5V PS14DT GND J6096 J6013 3 2 1 SL2 Transfer Transfer blade blade solenoid solenoid Transfer (M) Transfer (Bk) blade blade solenoid solenoid (C) (Y) Static eliminator roller (inner) Transfer belt cleaning web Transfer belt rotation lifter sensor sensor 1 +5V PS13DT GND J6095 PS36 Fixing oil heater thermistor +5V PS12DT GND J6094 Fixing web length sensor Fixing oil level sensor +38V SL7CDS* SL7CDR* J6101 Fixing web Fixing Fixing releasing lower upper Fixing thermistor Fixing solenoid thermistor lower upper Fixing web (sub) Fixing oil (main) thermistor thermistor take-up thermistor (main) (sub) solenoid +5V PS11DT GND J6093 Fixing oil pump drive solenoid J6064 1 2 3 PS3 Multifeeder Multifeeder paper width lifter sensor sensor (lower) (rear) Multifeeder Multifeeder paper width paper width detection PCB sensor (front) A-3P Blank page A-4 COPYRIGHT © 2001 CANON INC. 2000 CANON CLC5000 REV.0 JAN. 2001 J6422F 1 2 1 2 3 1 2 3 1 2 J6421F J6421M J6422M 2 General Circuit Diagram (2/3) J6408F 18Bk 18Bk 4 3 2 Fixing upper roller thermal switch 1 Fixing relay 18W 18Bk 3 1 J6365M J6340M 2 2 J6341F 1 2 J6344M 6 7 8 9 J5337 DC power supply PCB 2 1 J6412F 1 2 3 4 5 6 7 8 9 10 11 J6412M 1 2 3 4 5 6 7 8 9 10 11 12 13 14 15 ET58 ET59 2 3 3 J51 5 Flicker controller PCB 18BK 18W 3 2 2 3 20W 3 4 1 1 18WBk 6 7 8 FT49 L1 Noise filter 1 18BK 18W 18W 18BK FT50 16BK 16W 18BK 18W 18BK 18W 2 3 4 5 6 7 8 9 10 11 12 13 J2803 J2805 2 Power save switch J6707F 1 2 3 4 J6707M 1 2 3 4 J6417M FT48 J6417F 1 2 3 1 1 J6306F 1 2 3 J6306M 1 2 3 20BK FT47 FT46 2 1 9 2 3 4 5 6 7 8 9 10 ET41 20W FT45 18BK 18W 5 J6304 AC driver PCB ET42 4 4 J2807 J6317M 4 3 J6303 H9 Fixing oil heater J2808 J2806 5 J6317F 3 2 FT103 7 2 3 1 10 11 6 1 2 9 Upper heater triac 4 J6367M 2 8 TR2 M 3 12 13 14 15 J6367F 1 7 J2804 2 1 6 Fixing lower heater 2 1 J6368F 5 FT78 1 ET40 ET39 J6368M 4 FT74 20BK 20BK 20BK 20BK 5 2 FT96 H2 TR1 Fixing lower web motor Fixing oil heat Lower heater thermal switch triac TP3 J6416 MT38 MT39 20W 20W 20W 20W 4 18W 18Bk 3 18BK 18W 2 1 22W 22Bk ET61 FT94 M30 FT104 FT106 2 FT105 ET60 1 4 1 1 18W 18W 3 18W 18Bk 2 To DC rear cable (lower) 18Bk 20Bk 20W 18W 18W 1 1 1 18Bk 2 J6415 18Bk 18W 1 J6291F J6019F J6019M 18W 6 MT15 MT16 18WBk 6 5 FT76 FT77 FT95 Fixing lower roller thermal switch J6419F 1 5 4 TP2 FT88 2 4 3 J6419M 2 FT87 3 3 2 4 4 2 1 3 4 FT75 18W Deck heater transformer T1 22Y 1 J6411M 22Y J6411F 3 3 DH2 16Bk 16W 2 2 H1 FT72 FT73 FT93 18Bk 18W RLD1 18W 18W 18W 16W 18Bk 1 Fixing upper heater 3 18Bk 16Bk 4 2 Noise filter 2 3 4 AC25V FT31 FT32 FT33 FT34 14W FT27 FT28 FT29 FT30 3 18W 1 1 LF1 2 2 TP1 FT71 18Bk FT44 FT39 Leakage breaker ET44 1 2 FT18 ET43 J6409M 1 1 Terminal base (large) J6409F FT40 FT41 FT42 FT43 J6410M 1 RL1 FT35 FT36 FT37 FT38 2 FT24 FT25 FT26 18W FT23 18W FT19 FT20 FT21 FT22 J6410F 18W 14Bk 20BK CB1 FT17 1 2 3 1 2 3 J6418M J6418F 1 2 3 1 2 3 4 1 2 3 4 5 6 7 8 9 J6305M 1 2 3 4 5 6 7 8 9 J6305F FT79 H3 FT80 Drum heater (C) FT81 H4 FT82 Drum heater (M) FT83 H5 FT84 Drum heater (Y) FT85 H6 FT86 Drum heater (Bk) J9F J10 FT62 FT61 FT60 FT59 Lamp regulator 1 2 3 J11M 1 2 3 J11F 1 2 3 H8 Terminal base (small) Cassette 2 heater H7 Cassette 1 heater J6414F 1 2 3 4 5 6 J6414M 1 2 3 4 5 6 LA1 FT66 FT65 FT64 FT63 Scanning lamp FT67 FT69 16W 16Bk 16W J5327M FT53 FT54 FT70 FT90 TP5 FT89 Scanning lamp thermal switch 2 J5301M 1 FT55 FT56 FT57 FT58 TP4 Scanning lamp thermal switch 1 16Bk SW2 FT68 2 3 4 5 6 DC power supply PCB 1 (upper) 1 2 3 4 DC power supply PCB 1 (lower) Power switch COPYRIGHT© 2001 CANON INC. 2000 CANON CLC5000 REV.0 JAN. 2001 A-5 A-6 1 2 3 J3004C Laser driver PCB (C) 1 2 3 J3004K Laser driver PCB (Bk) 1 2 3 J3103CF 1 2 3 J3103KF 1 2 3 J3103YF 1 2 3 J3103MF J3103CM 1 2 3 J3103KM 1 2 3 J3103YM 1 2 3 J3103MM 1 1 1 2 2 2 3 J3004Y J3004M Laser driver PCB (Y) Laser driver PCB (M) 3 3 3 J6307F 1 2 3 4 5 6 7 8 9 J6307M 1 2 3 4 5 6 7 8 9 10 11 12 13 14 15 4 5 1 4 2 5 Image processor PCB 3 J204 6 7 8 6 9 10 7 J2852F Image position correction PCB (front) 11 12 1 2 3 13 14 4 1 5 2 ED board 6 3 J1507 4 7 J2852R Image position correction PCB (rear) 5 6 7 8 1 9 2 10 3 4 5 6 J801 11 12 13 IP memory PCB Analog processor PCB 1 2 3 4 5 6 J1251 7 Interface board 8 J6302M 1 2 3 4 5 6 7 8 9 J6302F 1 2 3 4 5 6 7 8 9 5 6 1 2 3 4 7 J380 1 2 7 1 2 3 4 To Editor FM23 General exhaust fan 3 3 POWER1 J6232F 1 Original scanner motor PCB 1 J6425 J6425H 8 10 11 12 13 14 15 2 3 4 5 6 7 8 9 10 11 12 12 11 10 9 8 7 6 5 4 3 2 2 3 4 5 6 7 8 9 10 11 12 12 11 10 9 8 7 6 5 4 3 2 1 2 3 2 J5311 1 J6296H 1 1 FM22 2 4J6424 1 2 3 J6424H 2 36 1 3 3 4 1 1 4 13 FM18 14 FM17 34 Power supply cooling fan 2 15 3 Power supply cooling fan 1 35 J6296 29 33 DC controller PCB 1 J5304 5 2 9 10 +24V GND +24V GND 8 4 24 7 3 75 J5616 6 J2201 3 J2801 2 2 4 3 6 PWFNER2 2 +5V GND +24VAR GND 2 1 5 GND 1 11 4 PWFN2 1 3 PWFNER1 J6154F 2 GND J2227 5 71 J5314 1 PWFN1 Fixing lever switch 107 103 23 28 12 18 14 52 51 50 49 13 FNERR2 14 24UREM 15 OH24VU 48 47 46 45 44 43 42 41 12 GND 11 OH24VR 111 112 GND 114 FANERR1113 10 OHSDV 9 8 7 +5VA +5VA GNDA GNDA +5V GND GND -12V +12V GNDR +24VAR GNDA GNDA +24VA +24VA GNDF +24VF +24v +24v +24v +24v GND GND GND GND 27 32 117 116 110 106 25 27 24 21 23 22 20 19 14 12 8 7 4 14 13 12 3 11 10 9 8 7 6 5 4 3 2 1 9 FRONT DOOR SW 10 1 2 5 6 13 11 +5V GND +24V GNDR +5V GND +24V +24V GND GND GNDA GNDA +24VF GNDF +24VA +24VA +24VA +24VA +5VA +5VA GNDA GNDA GNDA GNDA 8 6 5 9 10 7 7 4 8 6 8 3 7 5 9 2 9 10 6 4 10 1 8 5 3 11 9 10 7 12 J5621 6 4 2 114 8 3 1 113 J2221 10 112 111 7 GND 122 GND 123 GND 124 GND 125 J6290F J6290M 2 9 EXTFNI GND EXFNS1 EXFNER1 EXTFN2 GND EXFNS2 EXFNER2 EXTFN3 GND EXFNS3 EXFNER3 OH24VR OH5VR FNERR1 GND 6 1 8 76 5 72 4 8 7 +5V GND J5615 5 6 117 3 4 5 110 2 3 4 109 J5620 2 39 1 3 108 J5610 107 6 7 116 5 6 2 40 4 5 11 GNDR 97 102 36 35 26 28 8 11 7 10 2 5 1 4 1 121 3 120 2 J6002F GND +40V 1 R+ R- +24VA GNDA +24VR +35V GND +24V GND +5V GND +24V 121 125 120 124 119 123 118 122 15 18 29 31 2 106 118 1 119 6 4 105 8 +5V +5V +5V +5V 5 +5V +5V +5V +5V +5V GND GND GND GND GND 4 3 104 48 3 2 103 9 2 2 102 45 3 101 8 1 100 7 7 99 6 98 6 47 J6121F 97 5 5 3 13 2 4 46 30 32 1 2 1 3 4 96 2 44 2 95 J5619 3 +5V +5V +5V +5V +5V GND GND GND GND GND 1 43 2 94 9 2 93 1 92 4 91 J5612 90 HVT3-B 42 J5001 HVT3-A 89 J4701 4 7 8 J5701 93 7 3 41 GND +24V To Transfer assembly 98 J5303 40 53 54 9 12 GND +24V GND +5V GND +24V GND +5V GND +24V GND +5V GND +24V GND +5V GND +24V GND +24V GND +24V 6 GND +5V GND +8V GND 6 39 1 88 8 1 3 52 40 87 GND 7 1 2 51 5 2 +24V +24V +24V +24V GND GND GND GND 37 2 86 6 38 J6369F 1 46 4 1 +5V +5V +5V +5V GND GND GND GND 5 85 4 +24V +24V GND GND J6369M 6 45 3 4 5 68 39 J5611 4 67 J5302 +40V 3 84 J5618 36 2 3 64 2 3 83 2 35 2 63 1 2 82 1 38 1 37 7 81 J5609 80 1 36 GND +24V 1 +5V +5V GND GND +3.3V +3.3V GND GND 9 10 1 +35V GND GND J6229W 34 33 Waste toner motor driver PCB 79 +24V +24V GND GND 2 35 8 34 +5V +5V +5V +5V GND GND GND GND 6 78 77 54 J6362F 60 8 33 7 +35V +35V 76 6 32 J6362M 2 59 7 32 GND +24V 2 1 58 6 31 53 30 29 1 J6364F 57 5 31 +24V +24V +24V GND GND GND J6364M 56 4 5 5 55 3 4 4 54 J5307 3 3 53 2 2 GND GND 1 2 75 J5617 74 8 1 30 J5608 66 1 7 73 1 65 9 10 11 12 6 72 5 29 4 62 61 J6229T Duplex feed motor 71 J6301 Drum motor driver PCB 28 14 17 Developing motor (Bk) 27 +5V +5V +5V +5V GND GND GND GND J6306 Pickup motor driver PCB 70 7 69 4 18 GND +24V GND 109 +5V 105 3 6 38 37 40 39 13 16 Developing motor (Y) 26 6 28 27 15 26 25 J6300 Fixing motor driver PCB 25 3 24 23 +24V +24V +24V GND GND GND 24 23 22 21 20 19 GND +24V 1 +24VR +24VR GND GND +24VR +24VR 5 68 4 67 66 J5607 +5V +5V GND GND +3.3V +3.3V +3.3V +3.3V GND GND GND GND 8 65 3 2 50 115 2 1 49 7 64 6 44 6 63 62 +5V +5V +5V +5V GND GND GND GND 1 22 61 9 10 11 21 20 Fuse PCB 43 5 5 92 4 GND GND GND GND +24V +24V +24V GND GND GND 17 16 GND GND +24V +24V GND +24V GND 108 +5V 104 Developing motor (M) 5 94 2 19 18 GND GND 14 13 12 11 10 9 8 7 6 5 4 3 2 1 J6120F 4 99 1 3 4 91 2 3 90 J5308 89 1 17 60 59 8 2 3 4 3 GND +5V 11 12 16 15 J5613 1 88 6 7 6 87 5 5 86 +15V +15V +15V -12V -12V GND GND GND GND J5606 2 3 2 3 10 6 85 4 5 58 57 +24V +24V +24V +24V +24V GND GND GND +24V +24V +24V GND GND GND J6298K 1 8 9 J6298Y 2 15 8 4 4 1 2 20 7 56 55 54 +3.3V +3.3V +3.3V +3.3V J5614 3 +5V +5V +5V +5V GND GND GND GND +3.3V +3.3V GND GND 3 2 48 2 14 13 12 53 1 1 1 GND +15V GND +8V 6 3 47 J5305 J6298M +24VR GNDR 5 2 42 1 GND GND 11 1 41 +12V +12V 52 51 9 10 11 12 84 9 10 11 6 2 +5V GND +15V GND 4 5 4 22 Video controller PCB 3 1 3 17 2 4 2 101 J2101 4 1 96 1 3 83 8 10 J5605 4 31 8 50 49 8 2 82 7 9 48 47 7 1 81 6 6 80 5 8 6 79 4 7 46 5 5 78 J5309 6 J5604 3 3 26 7 45 4 Developing motor (C) 2 21 6 5 J5603 4 2 1 ET53 ET54 5 3 3 1 4 +24VR GNDR 4 2 2 4 3 16 3 3 3 77 1 44 1 J6298C 100 2 HVT4 2 95 J6297 43 J5601 +5V +5V +5V +5V GND GND GND GND +3.3V +3.3V GND GND 8 2 4 1 3 6 2 1 +5V GND +15V GND 1 +3.3V +3.3V +3.3V +3.3V +3.3V +3.3V GND GND GND GND GND GND 4 1 2 GND +8V Laser scanner motor driver PCB 7 J5101 ET31 4 6 8 42 DC power supply PCB 1 30 5 7 1 25 4 6 2 115 3 5 41 J5315 19 2 4 2 1 HVT2-L 6 J5310 3 +8V +8V +8V +8V +8V GND GND GND GND GND 3 52 GND HVT2-R 1 J5602 51 FNERR2 1 74 1 2 2 73 4 50 24UREM J4601L 5 3 1 10 2 6 ET32 1 1 2 70 4 69 3 5 +5V +5V GND GND +8V GND -12V GND 3 5 ET28 4 49 OH24VU J5313 4 9 2 4 J4601R GND +8V ET29 1 2 3 16BL 16BL 16BR 16BR 16BL 16BL 16BR 16BR 1 2 3 GND GND +5V +5V GND GND +5V +5V 1 2 34 1 33 16BL 16BL 16R 16BL 16R 16R 2 38 32 GND GND +24V GND +24V +24V 1 GND +8V GND +8V GND GND +35V +35V 16BL 16PK 16BL 16PK J5501 1 ET35 ET36 2 1 2 1 Multifeeder PCB 3 Pickup motor driver PCB 4 J5338 5 GND +3.3V GND +3.3V 2 General Circuit Diagram (3/3) DC power supply PCB 2 J5339 9 6 J2234H J2234B B15 A15 J2234A J6295 J6291F J6295H AC driver PCB To RDF J6249F Reader controller PCB J1301 4 DC power supply PCB 2 J6426A J6426B J6426H J6428A J6428B J6428H J6423 J2100 J6423H General exhaust fan 2 FM21 COPYRIGHT © 2001 CANON INC. 2000 CANON CLC5000 REV.0 JAN. 2001 General exhaust fan 1 3 Paper Deck J1/K1 General Circuit Diagram Lifter sensor (lower) Pickup roller releasing solenoid M8001 SL8001 M SL Lifter upper limit switch Lifter sensor (upper) PS8001 SW8001 PS8002 Cover open/closed detecting switch Lifter lower limit switch SW8002 Deck sensor SW8003 CL 1 2 3 GND FT8006 FT8007 ET8002 1 2 3 4 J8012A 3 2 1 J8012B 1 2 3 1 2 3 4 5 6 7 GND J8012H +12V ET8001 Paper deck heater(1) 1 2 3 J8008H J8008B 1 2 3 1 2 3 J8014F 1 2 3 J8014M 1 2 3 ET8008 28 1 2 3 J8015F 1 2 3 28 J8015M 26 17 18 19 20 21 22 23 24 25 27 STMUP 4 STMDN 5 1 +24V 6 PRSD 3 GND 15 GND 2 +12V 7 STPE 9 LTP 10 LFLM 11 STDO 12 +24V 13 14 STPCD 16 DKREG 8 J8013F J8013M 1 2 3 4 5 6 7 8 9 10 11 12 13 14 15 ET8007 COPYRIGHT© 2001 CANON INC. 2000 CANON CLC5000 REV.0 JAN. 2001 1 2 3 15 14 13 12 11 10 9 8 7 6 5 4 3 2 1 N.C. J8008A Paper deck heater(2) J8011F J8009F MT8001 1 2 3 J8010 FT8008 +24V FT8005 GND FT8004 STDO FT8003 LFLM 1 2 3 LTP PRSD J8003 GND 1 2 3 +12V J8002 GND FT8002 +24V FT8001 +12V STPE 1 2 STMUP STMDN J8001F Pickup clutch CL8002 PS8003 STPCD Paper deck lifter motor Paper deck-J1 only J6143M A-7 4 Buffer Pass Unit General Circuit Diagram Cover switch FT1 FT4 SW1 J5B J5H 3 2 1 J507H J508H J509A 1 2 3 J510A 1 2 3 J509B 3 2 1 J510B 3 2 1 J510H J509H J520 Cooling fan 4 FM4 3 2 1 J515 J553 1 2 3 4 5 6 J101 1 2 3 4 5 6 J102 1 2 3 4 5 6 7 8 J103 +24V GND FAN4ER +24V GND FAN1ER +24V GND FAN2ER +24V GND FAN3ER 13 12 11 10 9 8 7 6 5 4 3 2 1 N.C. J1B J1H J3A 1 2 3 4 5 6 7 8 9 J2A 1 2 3 4 5 6 7 8 9 10 11 12 13 J2B 9 8 7 6 5 4 3 2 1 J2H J204A A13 B13 1 2 3 4 5 6 7 8 9 10 11 J3B 11 10 9 8 7 6 5 4 3 2 1 J3H 1 2 3 4 5 6 7 8 1 2 3 4 5 6 7 8 J1A 13 J561 1 2 3 4 5 6 7 8 10 11 12 J560 1 2 3 4 5 6 7 8 9 REVMT_A +24V REVMT_A* REVMT_B +24V REVMT_B* BFDTMT_A +24V BFDTMT_A* BFDTMT_B +24V BFDTMT_B* 1 2 3 4 5 6 1 2 3 4 5 6 7 8 9 10 11 12 13 J501 GND EXPRSE +5V FLAPSL +24V LDECSL1 +24V LDECSL2 +24V UDECSL1 +24V UDECSL2 +24V BFINMTA_A +24V BFINMTA_A* BFINMTB_B +24V BFINMTB_B* 1 2 3 4 5 6 J521 J562A J562B J562H 1 2 3 J564A 3 2 1 J564B J564H 3 2 1 5 6 1B FT5 2B 3B FT6 3 2 1 3 2 1 J532F 4 3 2 1 4 3 2 1 1 2 3 J563A 3 2 1 J563B J563H J532M 1 2 3 4 5 6 7 8 9 10 11 12 J205A(1..14) J204B 3 2 1 J525 M J506H 4 GND LCUPH2 +5V M 1 2 3 J505H 1 2 3 3 2 1 J524 M J503H J5A 3 2 1 GND LCUPH1 +5V Buffer output motor M3 2 1 SW GND Reversal motor M2 2 1 3 Upper phase Upper phase Lower phase Lower phase sensor 1 sensor 2 sensor 1 sensor 2 PS4 PS5 PS6 PS7 1 2 Buffer input motor M1 3 2 1 J508 J507 2 1 J527 N.C. 2 1 2 1 PS2 J551 GND REVTIM +5V J506 J505 J503 PS1 J530B J530H J523 3 2 1 2 1 3 2 1 GND UCUPH2 +5V J513 3 2 1 J511 Reversal jam sensor J530A GND UCUPH1 +5V Reversal timing sensor 3 2 1 1 2 J4B J4H J205B(1..14) A14 J205A J4A 12 11 10 9 8 7 6 5 4 3 2 1 3 4 5 6 7 8 9 10 11 12 13 14 FM1 PS8 SL 3A FT3 Inlet paper sensor Cooling fan 3 FM3 12 13 14 SL Cooling fan 2 FM2 GND ENTSEN +5V SL Cooling fan 1 9 10 11 J522 3 2 1 2A GND REVJAM +5V PS3 1A FT2 2 J526 Downward curl Upward curl removing removing solenoid 1 solenoid 1 Upward curl SL3 Downward curl SL5 Flapper removing removing solenoid solenoid 2 SL SL solenoid 2 SL1 SL4 SL6 Delivery sensor 1 B14 J205B J205H J204H Buffer pass driver PCB J201H J303 1 2 GND BFRMON J543A 4 3 2 1 J543B 1 2 3 4 CB1 J542A 4 3 2 1 J541B J541H J542B J542H 1 2 3 4 NF1 FT15 FT17 H 1 2 3 2 1 J3502 FT19 1 4 1 2 3 4 J3504 FT10 FT20 2 1 J541A 9 8 7 6 5 4 3 2 1 J540B J540H FT13 5 N J3501 PL1 J540A 10 9 8 7 6 5 4 3 2 1 1 2 3 4 5 6 7 8 9 1 2 3 4 J543H FT10 1 2 3 4 5 6 7 8 9 10 J302 J301 1 2 3 4 5 N.C J203 1 2 3 4 N.C N.C SCLK* GND SUOT OEM* GND SIN BFDRSW BFRSR RVTMSR J202 1 2 3 4 5 +24V GND +24V GND J201B GND TXD3* GND RXD3* B10 BFMTCC 1 BFMTCU 2 BFMTPL 3 GND 4 RVMTPL 5 RVMTDR 6 GND 7 RVMTCU 8 RVMTCC 9 BFRMON 10 J201A 1 2 3 4 5 6 7 8 9 10 A10 Power supply PCB FT12 FT14 FT16 FT21 FT18 2 3 FT11 Noise filter Leakage breaker 25 26 27 28 8 1 2 3 4 5 6 7 9 10 11 12 13 14 15 16 17 18 19 20 21 23 24 22 MT1 MT3 MT4 FT22 REVERSE BUFFER CABLE OUT1 GND TXD* GND RXD* J401M 28 MT2 FT24 1 2 3 4 5 6 7 8 9 10 11 12 13 14 15 16 17 18 19 20 21 22 23 24 +24VR J402F A-8 +24VR +24V +24V 28 MT5 COPYRIGHT © 2001 CANON INC. 2000 CANON CLC5000 REV.0 JAN. 2001 APPENDIX 5 Special Tools You will need the following special tools in addition to the standard tools set to service the machine. No. Rank* Remarks 1 Laser power checker FY9-4013 Tool Name Tool No. Shape A Use it when adjusting the intensity of the laser from the laser unit; to be use in combination with a digital multimeter. 2 Digital multimeter CK-0436 A 3 Cover switch TKN-0093 A Use it when adjusting the intensity of the laser from the laser unit; to be use in combination with the laser power checker to adjust the intensity of the laser from the laser unit. Do not remove the transfer assembly frame while the cover switch is on. 4 Stop ring pliers end replacement CK-0426 B Use it when removing the grip stop ring; 4 to 9 mm. 5 Environment sensor checker TKN-0456 B Use it when checking the environment sensor. TA-300-01 COPYRIGHT © 2001 CANON INC. 2000 2000 2000 2000 CANON CLC5000 REV.0 JAN. 2001 A-9 APPENDIX No. Tool Name Tool No. Rank* Remarks 6 Environment sensor checker TKN-0457 Shape B Use it when checking the environment PCB. 7 Potential sensor checker (terminal) TKN-0197 B Use it when making a zero-level check on the surface potential sensor. 8 CA-1 test sheet FY9-9030020 A Use it when adjusting or checking images. 9 Mirror positioning tool (front, rear) FY9-3002000 B 10 Tospearl FY9-6007(lubricant for photo- 000 sensitive drum cleaning blade) B Use it when adjusting the position of No. 1/ No. 2 mirrors; to be used in combination with the mirror positioning tool (rear). Use it for preventing detachment of the drum cleaning blade. 11 S-B gap adjusting tool B g o n o t FY9-3024000 Use it when adjusting gap between developing cylinder and blade. TA-300-02 A-10 COPYRIGHT © 2001 CANON INC. 2000 2000 2000 2000 CANON CLC5000 REV.0 JAN. 2001 APPENDIX No. Tool Name 12 Crane transport Kit Tool No. Shape Rank* Remarks C Use it when transferring main body using crane FG6-1585000 TA-300-03 REF. *Rank A: Must be kept by each service person. B: Must be kept by each group of about five service persona. C: Must be kept by each workshop. COPYRIGHT © 2001 CANON INC. 2000 2000 2000 2000 CANON CLC5000 REV.0 JAN. 2001 A-11 APPENDIX 6 SOLVENTS AND OILS No. 1 2 3 4 5 6 Item Use Ethyl alcohol Cleaning: (Ethanol) copyboard, glass, mirror, etc. Isopropyl alcohol (Isopropanol) MEK Removing toner or oil stains Heat-resistant Lubricating the grease drive mechanisms; e.g., fixing drive gear, fixing ass’y, etc. Lubricating Spring cluch oil Lubricating oil Lubricating oil Scanner rail Chemiccal formula, mixture ratio, etc. C2H5OH Use Local (CH3)2CHOH CH3-CO-C2-H5 Methylethy ketone Mineral oil (paraffin family) Mineral oil (paraffin family) Silicon oil Remarks Take care in handling. All are flammable. Use in a well-ventilated area. Avoid breathing vapor. Local Do not use for cleaning the drum, plastic molded parts, or corona wires. Use in a wellventilated area and avoid breathing vapor. Avoid contact with eyes or with skin. CANON Tool No.: CK-0427 (500 g/ can; equivalent grease may be used if able to withstand 200ºC for extended periods of time.) CANON Super lube oil. Tool No.: FY6006(7g) Local • Uniway 220 (Nihon Sekiyu) • Tool No.: CK-0524 (100 cc) • Alternative Cosmo Dynaway 220 (Cosmo Oil) • Silicon oil S-20 Local KF96SS 300CS • Tool No.: FY9-6011(50cc) TA-400-01 REF. A-12 Solvents listed are not toxic, but they may produce minor, temporary effects if breathed in a high concentration, or if let to remain on the skin for a period of time. Any effects are temporary, but exercise reasonable caution nevertheless. COPYRIGHT © 2001 CANON INC. 2000 2000 2000 2000 CANON CLC5000 REV.0 JAN. 2001 Service Mode COPYRIGHT© 2001 CANON INC. 2000 CANON CLC5000 REV.0 JAN. 2001 CONTENTS Contents 1 Outline ................................................ S-1 1.1 Construction of Service Mode ... S-1 1.2 Starting Service Mode and Making Selection ....................... S-1 1.3 Ending Service Mode ................ S-1 1.4 RAM Backup ............................. S-2 1.5 Basic Operations ........................ S-4 2 Control Display Mode (DISPLAY) .... S-5 3 ADJUST (adjustment) ...................... S-39 4. FUNCTION (function/inspection) ... S-78 5 OPTION (options mode) ................ S-120 6. TEST (test print) ............................. S-129 7. COUNTER (counter) ...................... S-131 COPYRIGHT© 2001 CANON INC. 2000 CANON CLC5000 REV.0 JAN. 2001 i CONTENTS Blank page ii COPYRIGHT© 2001 CANON INC. 2000 CANON C2050/2020, C2100/2100S REV.0 JAN. 2001 SERVICE MODE 1 Outline 1.1 Construction of Service Mode The CLC5000’s service mode is divided into the following six: No. Notation Description 1 2 3 4 5 6 DISPLAY ADJUST FUNC OPTION TEST COUNTER Control display mode Adjustment mode Function/inspection mode Options mode Test print mode Counter mode T00-100-01 <M> DISP <S> <R> <P> <F> COUNTER ADJUST FUNC OPTION TEST F00-101-01 1.2 Starting Service Mode and Making Selections 1) Press the ‘*’ key on the control panel. 2) Press ‘2’ and ‘8’ on the keypad at the same time. 3) Press the ‘*’ key. •The screen in the above figure will appear. 4) Select an item on the touch panel. •The respective screen will appear. • Once you have turned on the power switch, do not start service mode until the machine is in standby state (the CPUs may have established communications). • You cannot start service mode while the machine is making copies. 1.3 Ending Service Mode Press the Reset key. COPYRIGHT © 2001 CANON INC. 2000 2000 2000 2000 CANON CLC5000 REV.0 JAN. 2001 S-1 SERVICE MODE 1.4 RAM Backup F00-104-01 shows the label attached to the inside of the cover of the service document compartment found on the front left cover. Each machine is adjusted at the factory, and the adjustment values are recorded on the label. Be sure to record any new values on the label if you executed service mode and changed values after replacing a part. S-2 COPYRIGHT © 2001 CANON INC. 2000 2000 2000 2000 CANON CLC5000 REV.0 JAN. 2001 SERVICE MODE B A FUNC DC-CON TYP 447 62 429 41 516 51 889 804 798 803 819 818 818 181 194 157 687 746 756 318 514 515 515 513 599 600 599 499 132 133 137 111 -2 184 102 3199 2408 E UP-A4R UP-STMR LOW-A4R LOW-STMR MF-A4R MF-A6R MF-A4 SGNL-Y SGNL-M SGNL-C REF-Y REF-M REF-C SIGG-Y SIGG-M SIGG-C SGNL-S-Y SGNL-S-M SGNL-S-C SGNL-S-K REF-S-Y REF-S-M REF-S-C REF-S-K SGNL-D-Y SGNL-D-M SGNL-D-C SGNL-D-K SIGG-S-Y SIGG-S-M SIGG-S-C SIGG-S-K PT-OFST-K PUDT-U PUDT-L P-TH-1 P-TH-2 SNSR-RNK ADJUST PASCAL P-OFST-Y P-OFST-M P-OFST-C P-OFST-K 10 6 2 4 FUNC IMG -REG Y-REG-H Y-REG-V C-REG-H C-REG-V K-REG-H K-REG-V 136 124 140 130 145 127 ADJUST FEED -ADJ UP-ADJ LOW-ADJ MULT-ADJ DECK-ADJ REFE-ADJ VSYC-ADJ MRGN-L MRGN-R MRGN-T MRGN-B 115 112 128 128 128 180 32 32 40 40 FUNC FUSER UPPER-CR LOWER-CR 0 0 TYP ADJUST ADJ-XY ADJ-X ADJ-Y ADJ-S ADJ-J ADJUST DOC-REC DA-XS DA-XE DA-YS DA-YE DS-DOC DS-PRJ DS-OHP C TR-BELT LOT NO. SERIAL NO. FB3-7172 BODY No. #83 F00-104-01 COPYRIGHT © 2001 CANON INC. 2000 2000 2000 2000 CANON CLC5000 REV.0 JAN. 2001 S-3 SERVICE MODE 1.5 Basic Operations Selecting Items Items may be Level 1, Level 2, or Level 3. The Level 1 items remain on the screen throughout service mode. • To select an item, press the highlighted notation on the touch panel. • Display (e.g., ADJUST>ADJ-XY>MRK-MB) • Indicates the state of the reader unit. READY: Ready to accept a command for copying operation. BUSY: Executing service mode; not ready to accept a command for copying operation. Indicates the state of the printer unit. READY: Ready to accept a command for copying operation. SERVICE: Executing service mode; not ready to accept a command for copying operation. WAITING: Executing an operation (initial rotation, etc.). COPYING: Executing copying operation ERROR: Service error. DOOR: Cover open. JAM: Paper jam. Indentifies the current screen if multiple screens exist for the selected item. Indicates the selected Level 2 item. Switches among screens if multiple screens exist for the selected Level 3 item. <M> ADJ-XY DISP ADJUST COUNTER <R> READY ED-MODE x EDADJ-X xxxx FUNC OPTION <S> 1/2 EDADJ-Y xxx <TEMP-X> xxx xxx mm <ED-X> xxx xxx mm <TEMP-Y> xxx xxx mm <ED-Y> xxx xxx mm <P> READY LOOP-MB xxx LOOP-TH xxx MAK-MB xxx MAK-MB xxx TEST Level 1 items: Indicated at all times. The current mode is indicated normally and the rest is highlighted. Level 3 items: Data display items are indicated normally. Selection by touching will not highlight any items. Switches between+and-. <F> + OK Increases the current input when entering a numeric value. Stores the entered value. The value returns to the previous value unless OK is pressed. Level 2 items: Value input items are highlighted. Selecting (by touching) an item causes the item to be indicated normally, ready to accept an input. F00-105-01 ■ Keys on the Control Panel 0 to 9 Press an appropriate number (0 through 9) when entering a value. Reset Press it to end service mode (not valid for LCD-CHECK or KEY-CHECK). Clear Press it to return any input to 0. Stop Press it to stop various operations. Start Press it to start copying operation. S-4 COPYRIGHT © 2001 CANON INC. 2000 2000 2000 2000 CANON CLC5000 REV.0 JAN. 2001 SERVICE MODE 2 Control Display Mode (DISPLAY) <M> DISP <S> <R> READY VERSION ACC-STS ANALOG ADJUST SHD/BOF SENSOR JAM/ERR FUNC RF-INF SORT-INF BLT-DRFT OPTION USER COUNTER <P> <F> DENS EPOT PRJ-INF TEST F00-200-01 1 2 3 4 5 6 7 8 9 10 11 12 13 VERSION ACC-STS ANALOG DENS EPOT SHD/BOF SENSOR JAM/ERR PRJ-INF BLT-DRFT RF-INF SORT-INF USER Indicates the version of the ROM. Indicates the status of the option. Indicates the measurement taken by the analog sensor. Indicates the density of the developer. Indicates the photosensitive drum surface potential control data. Indicates the shading/black offset data. Indicates the sensor/DC controller input port. Indicates the presence of a jam/E code. Indicates the condition of the projector. (Only if connected) Indicates the transfer belt swing data. Indicates the state of the RDF. (Only if connected) Indicates the state of the sorter. (Only if connected) Making settings related to the operation display. COPYRIGHT © 2001 CANON INC. 2000 2000 2000 2000 CANON CLC5000 REV.0 JAN. 2001 S-5 SERVICE MODE <Version (ROM version)> <M> VERSION <S> DISP COUNTER ADJUST FUNC OPTION TEST R-CON DC-CON SCANNER ECO IPU SERIAL NO. CNT-MODE RF SORTER <R> <P> <F> xx.xx xx.xx xx xx xx xx xx.xx xxxxxxxxxx xx xxxx.xx.xx. xxxx.xx.xx. F00-200-02 R-CON Indicates the version of the ROM on the reader controller PCB. DC-CON Remarks Indicates the version of the ROM on the DC controller PCB. XX.XX R&D control No. ROM version No. SCANNER Indicates the version of the ROM on the original scanner motor driver PCB. ECO Indicates the version of the ROM on the IP-ECO PCB. IPU Indicates the version of the ROM of the external controller. (See the table that follows.) SERIAL No. Remarks Indicates the serial number. For factory. CNT-MODE Indicates the type of count control of the copy counter. (See the table that follows.) S-6 COPYRIGHT © 2001 CANON INC. 2000 2000 2000 2000 CANON CLC5000 REV.0 JAN. 2001 SERVICE MODE RF Indicates the version of the ROM on the RDF controller PCB. (only if connected) SORTER Remarks Indicates the version of the ROM on the sorter controller PCB. (only if connected) XXXX.XX.XX R&D number ROM version Not used COPYRIGHT © 2001 CANON INC. 2000 2000 2000 2000 CANON CLC5000 REV.0 JAN. 2001 S-7 SERVICE MODE ■ Details of CNT-MODE Display Counter 1 Counter 2 7 Total counter 5 Total counter 3 Total counter 4 Total copy counter Full color copy counter Full color copy counter (large size) Full color print + full color copy counter (large size) Full color copy counter (large size) Counter 1 Counter 4 Counter 2 Counter 5 Counter 3 Counter 6 S-8 Counter 3 Counter 4 Counter 5 Counter 6 Retention counter Color print counter (large size) Bk print + Bk copy counter (large size) Bk print + Bk copy counter Bk print + Bk copy counter Full color print counter Full color copy (small size) Full color print + full color copy (small size) Two-sided copy counter Full color print (small size) Bk print + Bk copy counter (small size) Total print counter Bk print + Bk Full color copy counter copy counter (small size) Small size total counter Counter control type 7 5 3 4 Mono color counter Product notation F14-0411(JPN) F14-0431(USA)/0441(EUR) F14-0431(AUS)/0481(DTL) F14-0491(AMS)/0451(UK) F14-0471(FRN) not used COPYRIGHT © 2001 CANON INC. 2000 2000 2000 2000 CANON CLC5000 REV.0 JAN. 2001 SERVICE MODE <ACC-STS (status of option)> <M> ACC-STS DISP COUNTER ADJUST FUNC OPTION TEST EDITOR PROJECTOR IPU/PS CCV DECK RF STS ED ASSIST CCX <S> <R> <P> <F> x x x x x x x x x x F00-200-03 EDITOR Indicates the state (connection) of the editor. EDITOR= 0: Editor absent. 1: Editor present. PROJECTOR Indicates the status (connection) of the projector. Projector Power supply for projector PROJECTOR= 0 Absent Absent 1 Absent Present 2 Present Absent 3 Present Present IPU/PS Indicates the state of connection of the IF board/external controller. IPU/PS= 0: IF board absent 1: not used 2: IF board present (An external controller may be connected, but is not powered.) 3: IF board present (A communication is under way with the external controller.) CCV Indicates the status (connection) of the Control Card V. CCV= 0: CCV absent. 1: CCV present. DECK Indicates the status (connection) of the paper deck. DECK= 0: Paper deck absent. 1: Paper deck absent. COPYRIGHT © 2001 CANON INC. 2000 2000 2000 2000 CANON CLC5000 REV.0 JAN. 2001 S-9 SERVICE MODE RF Indicates connection of the RF. RF= 0: RF absent. 1: RF present. STS Indicates the status (connection) of the STS. STS= 0: STS absent. 1: STS present. ED Indicates the status (connection) of the ED board. ED= 0: ED absent. 1: ED present. ASSIST Indicates the status (connection) of the Copy data controller-A1/DA unit-A1. ASSIST= 0: Connection absent. 1: Connection present. CCX Indicates the status (connection) of the Card reader-A1. CCX= 0: Connection absent. 1: Connection present. S-10 COPYRIGHT © 2001 CANON INC. 2000 2000 2000 2000 CANON CLC5000 REV.0 JAN. 2001 SERVICE MODE <ANALOG (measurement by analog sensor)> <M> ANALOG DISP COUNTER ADJUST FUNC OPTION TEST BODY BODY BODY FUSER-U FUSER-L EPOT-C EPOT-M EPOT-Y EPOT-K OPTICS <S> 1/2 xxx xxx xxx xxx xxx xxx xxx xxx xxx xxx ˚C % g ˚C ˚C V V V V ˚C <R> xxx xxx xxx xxx xxx xxx xxx xxx xxx xxx <P> DRUM-T-C DRUM-T-M DRUM-T-Y DRUM-T-K WIDTH-MF WIDTH-1 WIDTH-2 xxx xxx xxx xxx xxx xxx xxx <F> ˚C ˚C ˚C ˚C mm mm mm xxx xxx xxx xxx xxx xxx xxx F00-200-04 BODY(°C) Indicates the machine inside temperature measured by the environment sensor. BODY XXX°C XXX Environment sensor output value (0 to 1023) Environment sensor output conversion value (°C) BODY(%) Indicates the machine inside humidity measured by the environment sensor. BODY XXX% XXX Environment sensor output value (0 to 1023) Environment sensor output conversion value (%) BODY(g) Indicates the machine internal absolute humidity (g) obtained from the measurements collected by the environment sensor. BODY XXX% XXX Computed value Converted value FUSER-U Indicates the upper fixing roller temperature (output of thermistor TH1). FUSER-U XXX°C XXX THM1 output value (0 to 1023) THM1 output conversion value (°C) FUSER-L Indicates the lower fixing roller temperature (output of thermistor TH3). FUSER-L XXX°C XXX THM2 output value (0 to 1023) THM2 output conversion value (°C) COPYRIGHT © 2001 CANON INC. 2000 2000 2000 2000 CANON CLC5000 REV.0 JAN. 2001 S-11 SERVICE MODE EPOT-Y/M/C/K Indicates the drum surface potential measured by the potential sensor. EPOT XXX V XXX Potential sensor output value (0 to 1023) Potential sensor output conversion value (V) OPTICS Indicates the temperature of the laser scanner assembly (thermistor TH7). DRUM-T/M/C/K Indicates the drum heater temperature (thermistor TH8/9/10/11). DRUM-T-Y XXX°C XXX THM4 output value (0 to 1023) THM4 output conversion value (°C) WIDTH-MF/1/2 Indicates the paper width conversion value (mm) of the multifeeder, paper deck, and each cassette. WIDTH XXX mm XXX Output value (0 to 1023) of MFSVR/SVR1/SVR2 Output converted value (mm) S-12 COPYRIGHT © 2001 CANON INC. 2000 2000 2000 2000 CANON CLC5000 REV.0 JAN. 2001 SERVICE MODE <M> ANALOG <S> 2/2 <R> READY OIL-TMP ºC XXX ADJUST OILH-TMP ºC XXX FUNC FIX-U-SB ºC XXX OPTION FIX-L-SB ºC XXX DISP COUNTER <P> TONNER-K <F> USER TEST F00-200-05 OIL-TMP Indicates the temperature of the fixing oil. (Output from the fixing oil thermistor TH5) OILT-TMP Indicates the temperature of the fixing oil heater. (Output from the fixing oil thermistor TH6) FIX-U-SB Indicates the temperature of the fixing upper roller end. (Output from the fixing upper thermistor TH2) FIX-L-SB Indicates the temperature of the fixing lower roller end. (Output from the fixing lower thermistor TH4) COPYRIGHT © 2001 CANON INC. 2000 2000 2000 2000 CANON CLC5000 REV.0 JAN. 2001 S-13 SERVICE MODE <DENS (developer density)> <M> DENS DISP COUNTER ADJUST FUNC DENS-C xxxx SGNL-C xxxx REF--C xxxx <S> 1/3 DENS-M xxxx SGNL-M xxxx REF--M xxxx <R> <P> <F> DENS-Y xxxx SGNL-Y xxxx REF--Y xxxx OPTION TEST F00-200-06 DENS-C/M/Y Remarks Indicates the discrepancy of the density of the developer on the developing cylinder (each color) in reference to the target value in %. +: Darker than target value. –: Lighter than target value. The value is the result of computations based on SGNL and REF stored under ATR-INIT and SGNL and REF on the screen. Unit: 0.1% Normal if between -20 and + 20. SGNL-C/M/Y Remarks Indicates the measurement (AD conversion) of the current density of the developer (each color). Measurements are taken for each copy run. Normal if between 700 and 912. REF-C/M/Y Remarks S-14 Indicates the measurement (AD conversion) of the reference signal (each color). Measurements are taken for each copy run. Normal if between 377 and 848. COPYRIGHT © 2001 CANON INC. 2000 2000 2000 2000 CANON CLC5000 REV.0 JAN. 2001 SERVICE MODE <M> DENS DISP COUNTER ADJUST FUNC OPTION DENS-S-C xxxx SGNL-S-C xxxx REF-S-C xxxx SGNL-D-C xxxx <S> 2/3 DENS-S-M xxxx SGNL-S-M xxxx REF-S-M xxxx SGNL-D-M xxxx <R> DENS-S-Y xxxx SGNL-S-Y xxxx REF-S-Y xxxx SGNL-D-Y xxxx <P> <F> DENS-S-K xxxx SGNL-S-K xxxx REF-S-K xxxx SGNL-D-K xxxx TEST F00-200-07 DENS-S-C/M/Y/K Remarks Indicates the density of the pattern on the drum (each color) in reference to the target value. Normal if between -40 and +40. SGNL-S-C/M/Y/K Remarks Indicates the measurement (AD conversion value) of the density of the toner on the drum (each color). Measurements are taken for each copying run. For C, M, and Y, normal if between 640 and 850 (CMY). For K, normal if between 192 and 389. REF-S-C/M/Y/K Remarks Indicates the measurement (AD conversion value) of the SALT reference signal (each color). Measurements are taken for each copying run. For all colors, normal if between 464 and 544. SGNL-D-C/M/Y/K Remarks Indicates the measurement of the light reflected by the photosensitive drum. For C, M, and Y, normal if between 380 and 900. For K, normal if between 300 and 720. COPYRIGHT © 2001 CANON INC. 2000 2000 2000 2000 CANON CLC5000 REV.0 JAN. 2001 S-15 SERVICE MODE <M> DENS DISP COUNTER WINDOW-C xxxx <S> 3/3 WINDOW-M xxxx <R> WINDOW-Y xxxx <P> <F> WINDOW-K xxxx ADJUST FUNC OPTION TEST F00-200-08 WINDOW Remarks S-16 Indicates the window soiling correction coefficient. The value decreases when the SALT sensor becomes soiled. Normal if between 60 and 140. COPYRIGHT © 2001 CANON INC. 2000 2000 2000 2000 CANON CLC5000 REV.0 JAN. 2001 SERVICE MODE <EPOT (photosensitive drum surface potential control data)> <M> EPOT DISP COUNTER V00-C <S> FUNC OPTION <P> xxx xxx xxx <F> V00-K V00-Y V00-M xxx ADJUST <R> VFF-C VFF-M VFF-Y VFF-K xxxxx VDC-C xxx VG-C xxxxx xxxxx VDC-M xxx VG-M xxxxx xxxxx VDC-Y xxx VG-Y xxxxx xxxxx VDC-K xxx VG-K xxxxx TEST F00-200-09 VOO-C/M/Y/K Remarks Indicates the target value for VD (with laser output at 00). Indicates the optimum value computed by potential control. Unit: V Optimum value: 350 to 800 VFF-C/M/Y/K Remarks Indicates the target value for VL (with laser output at off). Indicates the optimum value computed by potential control. Unit: V Optimum value: 50 to 300 VDC-C/M/Y/K Remarks Indicates the target value for Vdc (developing bias DC component). Indicates the optimum value computed by potential control. Unit: V Optimum value: 200 to 650 VG-C/M/Y/K Remarks Indicates the target value for Vg (grid bias). Indicates the optimum value computed by potential control. Unit: V Optimum value: 300 to 800 The measurements of VOO and VFF may be checked by ‘EPC’ under ‘FUNC’. COPYRIGHT © 2001 CANON INC. 2000 2000 2000 2000 CANON CLC5000 REV.0 JAN. 2001 S-17 SERVICE MODE <SHD/BOF (shading/black offset data)> <M> SHD/BOF DISP COUNTER ADJUST FUNC BAR-CODE xxxxxxxxxxxx <S> <R> READY BOARD-B xxx TARGET-B xxx BOF-B xx xx <P> READY BOARD-G xxx TARGET-G xxx BOF-G xx xx <F> BOARD-R xxx TARGET-R xxx BOF-R xx xx OPTION TEST F00-200-10 BAR-CODE Remarks Indicates the bar code value of the standard white plate. The value is indicated only after executing ‘FUNC > CCD > AUTO > ADJ’. (Thereafter, the value will not be indicated at power on/off.) BOARD-B/G/R Remarks Indicates the output of each CCD when the standard white plate is read. (output value after A/D conversion) Initial value: 211 TARGET-B/G/R Remarks Indicates the shading target value. Initial value: 233 BOF-B/G/R Indicates the output of each CCD when the scanning lamp is off. (odd bit/ even bit) S-18 COPYRIGHT © 2001 CANON INC. 2000 2000 2000 2000 CANON CLC5000 REV.0 JAN. 2001 SERVICE MODE <SENSOR (sensor/DC controller input port)> <M> SENSOR DISP ADJUST FUNC OPTION TEST COUNTER <S> 800000H 800001H 800002H 800003H 800004H 800005H xxxxxxxx xxxxxxxx xxxxxxxx xxxxxxxx xxxxxxxx xxxxxxxx 80000DH xxxxxxxx 80000EH xxxxxxxx 80000FH xxxxxxxx <R> READY 801000H 801001H 801002H 801003H 801004H 801005H <P> READY xxxxxxxx xxxxxxxx xxxxxxxx xxxxxxxx xxxxxxxx xxxxxxxx <F> 802000H 802001H 802002H 802003H 802004H 802005H xxxxxxxx xxxxxxxx xxxxxxxx xxxxxxxx xxxxxxxx xxxxxxxx F00-200-11 800000H ~ 808004H Indicates the input ports of the DC controller PCB. (800000H through 804010H) COPYRIGHT © 2001 CANON INC. 2000 2000 2000 2000 CANON CLC5000 REV.0 JAN. 2001 S-19 SERVICE MODE Address 800000 800001 800002 800003 800004 S-20 Connector Description Remarks 0 1 2 3 4 5 6 7 0 SW2 – TH6 FM35,36 H1,2 H3,4,5,6 TH1,2,3,4 TH8,9,10,11 – power switch AC input fixing oil/oil heater thermistor error detection pre-fixing exhaust fan error detection fixing heater power error detection drum heater power error detection fixing thermistor error detection drum thermistor error detection counter error detection ON:1 OFF:0 AC input present: 0 ready: 0; error: 1 ready: 0; error: 1 error: 0 error: 0 ready: 0; error: 1 ready: 0; error: 1 error 1/ counter OFF: 1 error 1/ port OFF: 1 ready: 1; error: 0 ready: 1; error: 0 ready: 0; error: 1 ready: 0; error: 1 ready: 0; error: 1 ready: 0; error: 1 1 2 3 4 5 6 7 – – – – – – FM17,18 0 1 2 3 4 5 6 7 0 1 2 3 4 5 6 7 0 1 2 3 4 5 6 7 M10 M21 M29 M9 M20 M19 M15 – M18 C M18 M M18 Y M18 K PS41 PS42 FM4,5 FM12,13 SW6 SW1 SW3 SW8003 SW1 FM8,9 TH6 TP3 auto shut-off open circuit detection 5V U error detection 24V U error detection overheat 5 V U detection overheat 24R detection overheat 24V U detection power supply cooling fan 1/2 operation error detection multifeeder pickup motor PLL error detection ready: 0; error: 1 photosensitive drum motor PLL error detection ready: 0; error: 1 scanner motor PLL error detection ready: 0; error: 1 fixing motor PLL error detection ready: 0; error: 1 waste toner feed motor PLL error detection ready: 0; error: 1 duplex feed motor PLL error detection ready: 0; error: 1 polishing/oil removal motor PLL error detection ready: 0; error: 1 not used – C developing motor PLL error detection ready: 0; error: 1 M developing motor PLL error detection ready: 0; error: 1 Y developing motor PLL error detection ready: 0; error: 1 Bk developing motor PLL error detection ready: 0; error: 1 cassette 1 open/closed detection connected: 1 cassette 2 open/closed detection connected: 1 laser cooling fan error detection ready: 0; error: 1 scanner cooling fan error detention ready: 0; error: 1 multifeeder pickup cover open/closed detection open: 0; closed: 1 front cover open/closed detection open: 1; closed: 0 control key detection ON:1 OFF:0 paper deck cover open/closed detection open: 1; closed: 0 buffer cover connection detection open: 1; closed: 0 primary suction fan error detection ready: 0; error: 1 oil thermistor open detection error: 0 oil system overheat detection error: 0 COPYRIGHT © 2001 CANON INC. 2000 2000 2000 2000 CANON CLC5000 REV.0 JAN. 2001 SERVICE MODE Address 800005 800006 800007 800008 800009 Connector 0 1 2 3 4 5 6 7 0 1 2 3 4 5 6 7 0 1 2 3 4 5 6 7 0 1 2 3 4 5 6 7 0 – – – – PS22 – FM6 FM7 PS1 PS21 PS25 PS26 OHP sensor FM32 FM31 FM20,27 PS14 PS15 PS35 PS34 PS32 PS33 PS8 PS9 PS30 – FM34 PS34 TH1,2 TH3,4 TP1 TP2 SEU1 1 SVR1 2 SEU2 3 SVR2 4 5 6 7 M16 M17 M8001 M1 Description Remarks fixing unit connection detention fixing assembly knob connection detection holding tray unit connection detection transfer unit connection detection paper deck connection detection buffer unit connection detection primary exhaust fan error detection pre-fixing feeding fan error detection registration paper sensor pickup vertical path 1 sensor pickup vertical path 2 sensor pickup vertical path 3 sensor transparency sensor pickup cooling fan 2 error detection fixing heat exhaust fan error detection delivery lower cooling fan 2/3 error detection post-registration sensor jam detection separation sensor jam detection inside delivery sensor jam detection delivery sensor jam detection delivery vertical path sensor duplex reversal sensor holding tray pre-feeding sensor 1 holding tray pre-feeding sensor 2 holding tray flapper assembly jam detection not used delivery cooling fan error detection delivery sensor upper fixing thermistor open detection lower fixing thermistor open detection fixing assembly (upper) overheat detection fixing assembly (lower) overheat detection cassette paper length sensor 1 connected: 0 connected: 0 connected: 0 connected: 0 connected: 0 connected: 0 ready: 0; error: 1 ready: 0; error: 1 paper present: 1 paper present: 1 paper present: 1 paper present: 1 paper present: 1 ready: 0; error: 1 ready: 0; error: 1 ready: 0; error: 1 paper present: 1 paper present: 1 paper present: 0 paper present: 1 paper present: 1 paper present: 0 paper present: 1 paper present: 0 paper present: 0 – error: 0 paper present: 0 error: 0 error: 0 error: 0 error: 0 The paper length is detected cassette 1 paper length sensor 2 by the combination of signals cassette 2 paper length sensor 1 The paper length is detected cassette 2 paper length sensor 2 by the combination of signals cassette 1 lifter motor overcurrent detection error: 1 cassette 2 lifter motor overcurrent detection error: 1 paper deck lifter motor overcurrent detection error: 1 multifeeder lifter motor overcurrent detection error: 0 COPYRIGHT © 2001 CANON INC. 2000 2000 2000 2000 CANON CLC5000 REV.0 JAN. 2001 S-21 SERVICE MODE Address Connector 80000A 0 1 2 3 4 5 6 7 PS24 PS27 PS2 PS3 SW8002 SW8002 PS29 M31 80000B 0 1 2 3 4 5 6 7 0 1 2 3 4 5 6 7 0 1 2 3 4 5 6 7 0 1 2 3 4 PS4 PS5 SW6 PS8003 PS23 PS28 SW8001 PS31 – – – – – – – – TS1,5 TS2,6 TS3,7 TS4,8 FM34 FM20 FM32 FM33 PS11 SW4 PS6 PS36 M12 5 6 7 FM37 FM21,22,23 SW9 80000C 80000D 80000E S-22 Description cassette 1 lifter sensor cassette 2 lifter sensor multifeeder lifter sensor (upper) multifeeder lifter sensor (lower) paper deck lifter upper limit detection paper deck lifter lower limit detection duplex paper guide home position sensor transfer belt waste toner motor overcurrent detection multifeeder paper sensor (front) multifeeder paper sensor (rear) multifeeder pickup cover open/closed detection paper deck registration sensor cassette 1 paper sensor cassette 2 paper sensor paper deck detection sensor holding tray paper sensor for factory adjustment for factory adjustment for factory adjustment for factory adjustment memory read delay (C) memory read delay (M) memory read delay (Y) memory read delay (Bk) toner level sensor (C) toner level sensor (M) toner level sensor (Y) toner level sensor (Bk) delivery cooling fan error detection delivery lower cooling fan 1 error detection pickup cooling fan error detection reversal assembly exhaust fan error detection transfer belt cleaning web level sensor waste toner lock detection switch fixing oil level sensor fixing web length sensor transfer belt cleaning web motor overcurrent detection power supply cooling fan error detection general exhaust fan error detection rear cover open detection Remarks lifter up: 1 lifter down: 0 detected: 0 detected: 1 detected: 1 detected: 0 detected: 1 error: 0 paper present: 0 paper present: 0 detected:1 paper present: 1 paper present: 1 paper present: 1 paper present: 1 paper present: 1 – – – – H: enable H: enable H: enable H: enable below level: 1 below level: 1 below level: 1 below level: 1 ready: 0; error: 1 ready: 0; error: 1 ready: 0; error: 1 ready: 0; error: 1 web absent: 1 lock error: 0 oil prevent: 1 web absent: 1 error: 1 ready: 0; error: 1 ready: 0; error: 1 ready: 0; error: 1 COPYRIGHT © 2001 CANON INC. 2000 2000 2000 2000 CANON CLC5000 REV.0 JAN. 2001 SERVICE MODE Address Connector 80000F 0 1 2 3 4 5 6 7 PS12 PS13 PS17 PS18 PS19 PS20 – PS10 800010 0 1 2 3 4 5 6 7 0 1 2 3 4 5 6 7 0 1 2 3 4 5 6 7 0 1 2 3 4 5 6 7 M35 M13 M23 – – – – – – – – – – – – – – – – – – – – – – – – – – TH12 – – 800011 802000 802001 Description Remarks transfer belt lifter sensor 1 transfer belt lifter sensor 2 transfer belt front end sensor 1 transfer belt rear end sensor 2 transfer belt front end sensor 3 transfer belt rear end sensor 4 not used transfer belt cleaning web rotation sensor UP:01 DOWN:10 detected: 0 detected: 0 detected: 1 detected: 1 – repeat 1 and 0 as rotating registration motor pulse count count end: 1 transfer belt swing motor pulse count count end: 1 duplex paper guide motor pulse count count end: 1 not used – for factory adjustment – for factory adjustment – image position correction CCD shutter (front) open: 1 image position correction CCD shutter (rear) open: 1 for factory adjustment 00;GDD for factory adjustment 01;GDE not used – not used – not used – not used – not used – not used – CPU leading edge signal ON:1 for factory adjustment – for factory adjustment – for factory adjustment – auto shut-off ON:1 external PCB rest rest: 0 24 VDC remote ON:1 phsync enable enable: 1 for factory adjustment – for factory adjustment – for factory adjustment – for factory adjustment – all-night power supply switch after power SW-ON: 1 environment sensor low humidity: 0 buffer unit power supply remote ON;G0 flicker PCB control signal ON;G0 COPYRIGHT © 2001 CANON INC. 2000 2000 2000 2000 CANON CLC5000 REV.0 JAN. 2001 S-23 SERVICE MODE Address 802002 802003 802004 802005 802006 S-24 Connector 0 1 2 3 4 5 6 7 0 1 2 3 4 5 6 7 0 1 2 3 4 5 6 7 0 1 2 3 4 5 6 7 0 1 2 3 4 5 6 7 M9 M9 – M10 M21 M29 M14 M20 M18 C M18 M M18 Y M18 K LA2 LA3 LA4 LA5 FM7 – M15 M15 CL17 M12 SL18 M31 SL7 C SL7 C SL7 M SL7 M SL7 Y SL7 Y SL7 K SL7 K M24 C M24 C M24 M M24 M M24 Y M24 Y M24 K M24 K Description fixing motor ON fixing motor speed switch not used multifeeder pickup motor ON photosensitive drum motor ON scanner motor ON transfer belt motor ON waste toner feeder motor ON developing motor (C) ON developing motor (M) ON developing motor (Y) ON developing motor (Bk) ON exposure lamp (C) ON exposure lamp M) ON exposure lamp (Y) ON exposure lamp (Bk) ON pre-rising feeding fan not used polishing/oil removing motor ON polishing/oil removing motor rotation direction transfer belt lifter clutch ON transfer belt cleaning web motor ON polishing roller solenoid ON transfer belt waste toner motor transfer blade solenoid (C) in contact transfer blade solenoid (C) off contact transfer blade solenoid (M) in contract transfer blade solenoid (M) off contact transfer blade solenoid (Y) in contact transfer blade solenoid (Y) off contact transfer blade solenoid (Bk) in contact transfer blade solenoid (Bk) off contact primary wire cleaner motor (C) primary wire cleaner motor (C) primary wire cleaner motor (M) primary wire cleaner motor (M) primary wire cleaner motor (Y) primary wire cleaner motor (Y) primary wire cleaner motor (Bk) primary wire cleaner motor (Bk) Remarks ON:1 ON:1 – ON:1 ON:1 ON:1 ON:1 ON:1 ON:1 ON:1 ON:1 ON:1 ON:1 ON:1 ON:1 ON:1 ON:1 – ON:1 CW*/CCW ON:1 ON:1 ON:1 ON:1 DOWN:01 UP:10 DOWN:01 UP:10 DOWN:01 UP:10 DOWN:01 UP:10 rear: 01 front: 10 rear: 01 front: 10 rear: 01 front: 10 rear: 01 front: 10 COPYRIGHT © 2001 CANON INC. 2000 2000 2000 2000 CANON CLC5000 REV.0 JAN. 2001 SERVICE MODE Address 802007 802008 802009 80200A 80200B Connector 0 1 2 3 4 5 6 7 0 1 2 3 4 5 6 7 0 1 2 3 4 5 6 7 0 1 2 3 4 5 6 7 0 1 2 3 4 5 6 7 Description Remarks CL1 CL2 CL3 CL4 CL5 – M32 M32 SL3 SL4 M30 SL2 SL15 M22 M22 M4 toner supply clutch (C) ON:1 toner supply clutch (M) ON:1 toner supply clutch (Y) ON:1 toner supply clutch (Bk) upper ON:1 toner supply clutch (Bk) lower ON:1 hopper sensor select ON:1 separation wire cleaner motor ON:1 separation wire cleaner motor ON:1 fixing take-up solenoid ON ON:1 fixing web releasing solenoid ON ON:1 fixing lower web motor ON ON:1 fixing oil pump drive solenoid ON ON:1 separation claw releasing solenoid ON ON:1 pre-fixing charging assembly wire cleaner motor ON:1 pre-fixing charging assembly wire cleaner motor ON:1 laser scanner motor speed switch full speed: 0; half-speed: 1 H1 fixing upper heater ON ON:1 H2 fixing lower heater ON ON:1 H7,8 cassette heater ON ON:1 H9 fixing oil heater ON ON:1 H3 drum heater (C) ON:1 H4 drum heater (M) ON:1 H5 drum heater (Y) ON:1 H6 drum heater (Bk) ON:1 SALT C SALT sensor LED (C) ON ON:1 SALT M SALT sensor LED (M) ON ON:1 SALT Y SALT sensor LED (Y) ON ON:1 SALT K SALT sensor LED (Bk) ON ON:1 ATR C,M,Y toner concentration sensor LED ON ON:1 LED1,2 pattern read LED ON ON:1 SL17 C,M,Y,K SLT sensor shutter solenoid (CM YBk) open ON:1 SL17 C,M,Y,K SLT sensor shutter solenoid (CMYBk) closed ON:1 FM4,5 laser cooling fan ON:1 FM8,9 primary suction fan ON ON:1 FM6 primary exhaust fan ON ON:1 FM7 pre-fixing feeding fan ON ON:1 FM19,20,27 delivery cooling fan ON ON:1 FM34 delivery lower fan ON ON:1 FM7 pre-fixing feeding fan speed switch 1: full speed; 0: half-speed FM1,2,3 delivery assembly exhaust fan speed switch 0: full speed; 1: half-speed COPYRIGHT © 2001 CANON INC. 2000 2000 2000 2000 CANON CLC5000 REV.0 JAN. 2001 S-25 SERVICE MODE Address 80200C 80200D 80200E 80200F 802010 S-26 Connector 0 1 2 3 4 5 6 7 0 1 2 3 4 5 6 7 0 1 2 3 4 5 6 7 0 1 2 3 4 5 6 7 SL9 SL10 SL5 SL8001 SL8 SL13 FM24 FM26 CL12 CL14 CL7 CL6 CL8002 – CL10 FM28,29,30 SL16 OHP sensor PTS1 FM17,18 FM31 FM32 FM20,C27 – M16 M17 M1 M1 M8001 M8001 M21,22,23 M21,22,23 0 FM34 1 FM34 2 3 4 5 6 7 CL16 M19 SL14 SL11 L SL11 M SL11 S Description Remarks cassette 1 pickup roller releasing solenoid ON UP:1 cassette 2 pickup roller releasing solenoid ON UP:1 multifeeder pickup roller releasing solenoid ON UP:1 paper deck pickup roller releasing solenoid ON UP:1 duplex pickup roller releasing solenoid ON UP:1 paper feed roller solenoid ON UP:1 laser scanner motor cooling fan ON:1 pickup cooling fan ON:1 cassette 1 pickup cutch ON ON:1 cassette 2 pickup clutch ON ON:1 pper thickness detecting roller clutch ON:1 multifeeder pickup clutch ON ON:1 paper deck pickup clutch ON ON:1 not used – duplex pickup clutch ON ON:1 reversal assembly exhaust fan 1, 2, 3 ON;1 registration roller releasing solenoid ON ON:1 transparency sensor LED ON ON:1 paper thickness sensor LED ON ON:1 power supply exhaust fan 1, 2 ON:1 fixing heat discharge fan ON:1 pickup cooling an 2 ON:1 delivery lower cooling fan 2, 3 ON:1 not used – cassette 1 lifter motor ON ON:1 cassette 2 lifter motor ON ON:1 multifeeder lifter motor (up) UP:01 multifeeder lifter motor (down) DOWN:10 paper deck lifter motor (up) UP:01 paper deck liter motor (down) DOWN:11 general exhaust fan (IPU) ON:1 general exhaust fan speed 0: full speed; 1: half-speed delivery cooling fan half-speed “bit 0, 1=1, 0 half-speed” delivery cooling fan full-speed “bit 0, 1=1, 1 full-speed” reversal assembly dive clutch ON ON:1 duplex feeding motor ON ON:1 delivery paper deflecting plate solenoid ON ON:1 duplex paper deflecting plate solenoid (L) ON ON:1 duplex paper deflecting solenoid (M) ON ON:1 duplex paper deflecting plate solenoid (S) ON ON:1 COPYRIGHT © 2001 CANON INC. 2000 2000 2000 2000 CANON CLC5000 REV.0 JAN. 2001 SERVICE MODE Address 802011 804000 804002 804004 804006 Connector 0 M2 1 M3 2 M5 3 M6 4 M7 5 M8 6 7 0 1 2 3 4 5 6 7 0 1 2 3 4 5 6 7 0 1 2 3 4 5 6 7 0 1 2 3 4 5 6 7 PS39 PS40 CNT1 CNT2 CNT3 CNT4 CNT5 CNT6 – – – – – – – – – – – – – – – – – – – – – – – – – – Description image position correction mirror slant correction motor (Y) image correction mirror ratio correction motor (Y) image position correction mirror slat correction motor (C) image position correction mirror ratio correction motor (C) image correction mirror slant correction motor (Bk) image position correction mirror ratio correction motor (Bk) pattern read CCD shutter (closed -> open) pattern read CCD shutter (open -> closed) total copy counter 1 total copy counter 2 total copy counter 3 total copy counter 4 total copy counter 5 total copy counter 6 for factory adjustment for factory adjustment for factory adjustment for factory adjustment for factory adjustment for factory adjustment for factory adjustment for factory adjustment for factory adjustment for factory adjustment for factory adjustment for factory adjustment for factory adjustment not used for factory adjustment for factory adjustment for factory adjustment for factory adjustment for factory adjustment for factory adjustment for factory adjustment for factory adjustment for factory adjustment for factory adjustment for factory adjustment for factory adjustment COPYRIGHT © 2001 CANON INC. 2000 2000 2000 2000 CANON CLC5000 REV.0 JAN. 2001 Remarks select: 0 select: 0 select: 0 select: 0 select: 0 select: 0 ON:1 ON:1 ON:1 ON:1 ON:1 ON:1 ON:1 ON:1 – – – – – – – – – – – – – – – – – – – – – – – – – – S-27 SERVICE MODE Address 804008 80400A 80400C 80400E 804010 S-28 Connector 0 1 2 3 4 5 6 7 0 1 2 3 4 5 6 7 0 1 2 3 4 5 6 7 0 1 2 3 4 5 6 7 0 1 2 3 4 5 6 7 – – – – – – – – – – – – – – – – – – – – – – – – – – – – – – – – – – – – – – – – Description for factory adjustment for factory adjustment for factory adjustment for factory adjustment for factory adjustment for factory adjustment for factory adjustment for factory adjustment for factory adjustment for factory adjustment for factory adjustment for factory adjustment for factory adjustment for factory adjustment for factory adjustment for factory adjustment transfer current (C) ON transfer current (C) UP transfer current (M) ON transfer current (M) UP transfer current (Y) ON transfer current (Y) UP transfer current (Bk) ON transfer current (Bk) UP primary bias (C) ON) primary bias (M) ON primary bias (Y) ON primary bias (Bk) ON separation AC bias ON blank pulse enable stray toner blocking high-voltage ON transfer,separation,pre-fixing enable developing bias AC (C) ON developing bias AC (M) ON developing bias AC (Y) ON developing bias AC (Bk) ON developing bias DC (C) ON developing bias DC (M) ON developing bias DC (Y) ON developing bias DC (Bk) ON Remarks – – – – – – – – – – – – – – – – ON:1 UP:1 ON:1 UP:1 ON:1 UP:1 ON:1 UP:1 ON:1 ON:1 ON:1 ON:1 ON:1 ON:1 ON:1 ON:1 ON:1 ON:1 ON:1 ON:1 ON:1 ON:1 ON:1 ON:1 COPYRIGHT © 2001 CANON INC. 2000 2000 2000 2000 CANON CLC5000 REV.0 JAN. 2001 SERVICE MODE <Jam/ERR> The 1st through 4th screens show the most recent 40 jams (location and type). The 5th and 6th screens provide histories of errors. ■ 1st through 4 th Screes (Jam code) <M> JAM/ERR DISP COUNTER ADJUST FUNC OPTION TEST 01 02 03 04 05 06 07 08 09 10 A -- -- -- --- -- -- --- -- -- --- -- -- --- -- -- --- -- -- --- -- -- --- -- -- --- -- -- --- -- -- -- <S> 1/6 -- -- -- --- -- -- --- -- -- --- -- -- --- -- -- --- -- -- --- -- -- --- -- -- --- -- -- --- -- -- -- -- -- -- --- -- -- --- -- -- --- -- -- --- -- -- --- -- -- --- -- -- --- -- -- --- -- -- --- -- -- -- Not used. <R> READY <P> READY x x x x x x x x x x xxxx xxxx xxxx xxxx xxxx xxxx xxxx xxxx xxxx xxxx x x x x x x x x x x xxxxxxx xxxxxxx xxxxxxx xxxxxxx xxxxxxx x xxxxxxx xxxxxxx xxxxxxx xxxxxxx xxxxx xxxxx xxxxx xxxxx xxxxx x xxxxx xxxxx xxxxx xxxxx B C D E F <F> JAM-CLR F00-200-12 A B C D E F Jam history number (01 through 40; a higher number represents an older history) Jam location (See Table B on the next page.) Jam code (See Table C on the next page.) Pick-up location (See Table D on the next page.) Pick-up soft counter (by pick-up assembly) Paper Size JAM-CLR Clear all jam histories COPYRIGHT © 2001 CANON INC. 2000 2000 2000 2000 CANON CLC5000 REV.0 JAN. 2001 S-29 SERVICE MODE Table A Jam Location 0 Body 1 2 RDF Sorter Table B Jam Code (high-order 2 digits) 00 01 02 10 11 Jam at accessory Delay jam Stationary jam Jam at power-on or when the front cover, pick-up cover, or delivery cover is opened/closed. Jam when the front cover, pick-up assembly cover, or delivery cover is opened/closed during copying operation. Table C Jam Code (low-order 2 digits) 01 02 03 04 05 31 32 33 34 35 36 37 38 39 61 62 63 64 65 66 67 Registration paper sensor Pick-up vertical path 1 sensor Pick-up vertical path 2 sensor Pick-up vertical path 3 sensor Deck sensor Registration rear sensor Separation sensor Internal delivery sensor Delivery sensor Buffer pass inlet paper sensor Sorter Buffer pass delivery sensor Buffer pass reversal timing sensor Buffer pass reversal jam sensor Delivery vertical path sensor Delivery vertical path sensor 2 Duplexing unit reversal sensor Pre-duplex feeding sensor 1 Pre-duplex feeding sensor 2 Duplex paper sensor 1 Duplex paper sensor 2 PS1 PS21 PS25 PS26 PS8003 PS14 PS15 PS35 PS34 PS8 (in Buffer Unit) PI3/4/7 (in Sorter) PS3 (in Buffer Unit) PS1 (in Buffer Unit) PS2 (in Buffer Unit) PS38 PS32 PS33 PS8 PS9 PS30 PS31 Table D Pick-Up Location 1 2 3 8 9 S-30 Upper cassette Lower cassette Paper deck Multifeeder Duplexing unit COPYRIGHT © 2001 CANON INC. 2000 2000 2000 2000 CANON CLC5000 REV.0 JAN. 2001 SERVICE MODE <M> JAM/ERR DISP COUNTER <S> 3/4 <R> READY <P> READY <F> ERROR ADJUST <HIST-0> Exxx FUNC <HIST-5> Exxx <HIST-1> Exxx <HIST-6> Exxx <HIST-2> Exxx <HIST-3> Exxx <HIST-4> Exxx <HIST-7> Exxx <HIST-8> Exxx <HIST-9> Exxx OPTION TEST ERA-CLR ■ 5th/6th Screen (E code) F00-200-13 <CODE> Indicates the appropriate error code (E) for the results of self diagnosis. <E000> Indicates detail codes for each error code. (See the descriptions on self diagnosis.) <E012> <E020> <E030> <E040> <E061> <E072> <E073> ~ <HIST-0> <HIST-9> Indicates a history of error codes (E). • HIST-0 is the most recent. ERA-CLR Clears all error code histories. COPYRIGHT © 2001 CANON INC. 2000 2000 2000 2000 CANON CLC5000 REV.0 JAN. 2001 S-31 SERVICE MODE <PRJ-INF (state of the projector)> <M> PRJ-INF DISP COUNTER CHANGER <S> TRAY 0 ADJUST <R> READY T-MOVE T-KIND 0 FUNC T-HP-ERR 0 L-MOVE M-EXCT LAMP-ERR 0 0 T-L-MOVE 0 0 OPTION <F> T-SET 0 0 T-M-ERR <P> READY T-POS 0 0 L-POS 0 INITIAL 0 LOCAL 0 R/L 0 0 TEST F00-200-14 CHANGER State Indicates the presence/absence of a rotary changer. 1: Present TRAY State Indicates the presence/absence of a slide tray. 1: Present T-KIND State Indicates the type of tray. 1: 140 0: 80 T-SET State Indicates if a slide is set. 1: Set T-MOVE State Indicates that the tray is moving. 1: Moving T-M-ERR State Indicates an error in the mechanism that moves the tray. 1: Error T-HP-ERR State Indicates a tray home position error. 1: Error T-L-MOVE State S-32 Indicates that the tray is moving (local). 1: Moving COPYRIGHT © 2001 CANON INC. 2000 2000 2000 2000 CANON CLC5000 REV.0 JAN. 2001 SERVICE MODE T-POS State Indicates the position of the tray. 0: Home position 1: Increases by 1 L-MOVE State Indicates that the lens is moving. 1: Moving M-EXCT State Indicates the state of motor excitation. 1: Excited L-POS State Indicates the position of the lens. 0: Home position LAMP-ERR State Indicates an open circuit in the lamp. 1: Open circuit INITIAL State Indicates that initialization is under way. 1: Processing LOCAL State Indicates local movement. 1: Operating R/L State Indicates remote/local mode. 0: Remote 1: Local COPYRIGHT © 2001 CANON INC. 2000 2000 2000 2000 CANON CLC5000 REV.0 JAN. 2001 S-33 SERVICE MODE <RF-INF (RDF state)> <M> RF-INF DISP COUNTER ADJUST <S> <P> READY STATUS-1 xx STATUS-2 xx STATUS-3 xx STATUS-4 xx DOC-1 DOC-2 DOC-3 DOC-4 xx xx ERROR FUNC <R> READY xx <F> USER xx JAM xx xx OPTION TEST F00-200-15 STATUS-1/2/3/4 For R&D DOC-1/2/3/4 For R&D ERROR Indicates the error code sent by the RDF controller PCB. 01H:equivalent of E401 02H:equivalent of E402 03H:equivalent of E403 04H:equivalent of E404 05H:equivalent of E405 06H:no corresponding error 07H:equivalent of E411 11H:equivalent of E411 21H:equivalent of E400 JAM Indicates the jam code sent by the RDF controller PCB. See the details section in service manual of RDF. ALARM Indicates the alarm code sent by the RDF controller PCB. 01H:re-circulating bar idle rotation 02H:not used 03H:separation failure 04H:separation skew 05H:not used S-34 COPYRIGHT © 2001 CANON INC. 2000 2000 2000 2000 CANON CLC5000 REV.0 JAN. 2001 SERVICE MODE <SORT-INF (SORT state)> <M> SORT-INF <S> DISP COUNTER ADJUST STATUS-1 xx STATUS-2 xx ERROR JAM xxxx ALARM-1 FUNC <R> READY STATUS-3 xx STATUS-4 xx ALARM-3 ALARM-4 <F> USER xx ALARM-2 xx <P> READY xx xx xx OPTION TEST F00-200-16 STATUS-1/2/3/4 For R&D ERROR For R&D JAM Indicates the jam code sent by the sorter controller PCB. 03H:feeding delay jam 02H:feeding stationary jam 03H:staple jam 04H:power-on jam 08H:cover open jam (during feeding) 09H:cover open jam (other than during feeding) ALARM-1/2/3/4 Indicates the alarm code sent by the sorter controller PCB. ALARM-1 02H:overstacking ALARM-2 02H:staple jam 03H:stapler safety mechanism activation 04H:stapler overstacking 05H:mixed paper sizes (horizontal) 07H:stapler unit absent 08H:separation failure 0AH:staple absent ALARM-3/4 for future use COPYRIGHT © 2001 CANON INC. 2000 2000 2000 2000 CANON CLC5000 REV.0 JAN. 2001 S-35 SERVICE MODE <BLT-DRFT (belt swing data display)> <M> BLT-DRFT <S> DISP COUNTER <R> <P> <F> ADJUST DIR B -- > F FST BELT -- POS CENTER XXXX XXXX XXXX F TO B C. Time XXXX XXXX FUNC F TO B XXXX XXXX XXXX B TO F C. Time XXXX XXXX OPTION BST XXXX XXXX XXXX TOTAL XXXX XXXX TEST B TO F XXXX XXXX XXXX F00-200-17 DIR State Indicates the present swing condition (direction) of the transfer belt. DIR B→F: moving (swinging) from rear to front F→B: moving (swinging) from front to rear Unit: 0.1 sec BELT--POS Indicates the present condition (position) of the transfer belt. BELT_POS FRONT: near front CENTER: near center BACK: near rear FST State Indicates the time required by the transfer belt between when it reaches the transfer belt edge sensor (PS17, front) and when it leaves the sensor. FST XXXX XXXX XXXX Most recent data Second most recent data Third most recent data Unit: 0.1 sec F TO B State S-36 Indicates the time required by the transfer belt between when it reaches the transfer belt edge sensor (PS17, front) and when it reaches the end sensor 2 (PS18, rear). XXXX XXXX XXXX F TO B Most recent data Second most recent data Third most recent data Unit: 0.1 sec COPYRIGHT © 2001 CANON INC. 2000 2000 2000 2000 CANON CLC5000 REV.0 JAN. 2001 SERVICE MODE BST State Indicates the time required by the transfer belt between when it reaches the transfer belt edge sensor 1 (PS18, rear) and when it leaves the sensor. BST XXXX XXXX XXXX Most recent data Second most recent data Third most recent data Unit: 0.1 sec B TO F State Indicates the time required by the transfer belt between when it reaches the transfer belt edge sensor 2 (PS18, rear) and when it reaches the end sensor 1 (PS17, front). XXXX XXXX XXXX B TO F Most recent data Second most recent data Third most recent data Unit: 0.1 sec F TO B C.Time State Indicates data (F TO B data minus FST data); time taken by the belt to move from front to back. XXXX XXXX F TO B C. Time second most recent third most recent Unit: 0.1 sec B TO F C.Time State Indicates data (B TO F data minus BST data); time taken by the belt to move from back to front. B TO F C. Time XXXX XXXX second most recent third most recent Unit: 0.1 sec TOTAL State indicates data (F TO B data plus B TO F data); time taken by the belt to make a round trip. Unit: 0.1 sec COPYRIGHT © 2001 CANON INC. 2000 2000 2000 2000 CANON CLC5000 REV.0 JAN. 2001 S-37 SERVICE MODE <USER (settings related to the indications on the screen of control panel)> LANGUAGE Language used/destination of shipment. example: <LANGUAGE XX.YY.ZZ.aa> XX: country YY: language ZZ: 00=CANON, 01=others aa : 00:AB series, 01=Inch series, 02=A series, 03=all sizes S-38 COPYRIGHT © 2001 CANON INC. 2000 2000 2000 2000 CANON CLC5000 REV.0 JAN. 2001 SERVICE MODE 3 ADJUST (adjustment) <M> DISP COUNTER <S> <R> <P> <F> ADJ-XY DOC-REC PROJ ED/RF ADJUST V-CONT COL-ADJ PASCAL ADJ-MISC FUNC FEED-ADJ REG-OFS OPTION TEST EC-ADJ ENV-SET HV-TR-C HV-TR-M HV-TR-Y HV-TR-K HV-SP HV-FS HV-EL DTMP-ADJ F00-300-01 1 ADJ-XY Adjusts the image read start position. 2 DOC-REC Adjusts the original detection area/slide level. 3 PROJ Adjusts the projector area. (only if the projector connected) 4 ED/RF Adjusts the editor. 5 V-CONT Adjusts the photosensitive drum surface potential contrast. 6 COL-ADJ Corrects the color balance (for user). 7 PASCAL Determines whether to use or not data obtained by auto gradation correction control and display of data related to auto gradation correction control. 8 ADJ-MISC ADJ-MNISC (adjustments other than above) 9 FEED-ADJ Adjusts the feeding position. 10 REG-OFS For R & D 11 ENV-SET Use it to set cassette heater operation conditions. 12 HV-TR C/M/Y/K Fine-adjusts transfer high-voltage output by condition. 13 HV-SP Fine-adjusts separation high-voltage output by condition. 14 HV-FS Use it to make fine-adjustments for the pre-fixing high-voltage output according to conditions. 15 HV-EL Use it to make fine-adjustments for the internal static eliminator highvoltage output according to conditions. 16 EC-ADJ Use it to correct the rate of transmission of the EC coat glass. 17 DTMP-ADJ Reserved for future. COPYRIGHT © 2001 CANON INC. 2000 2000 2000 2000 CANON CLC5000 REV.0 JAN. 2001 S-39 SERVICE MODE <ADJ-XY (image read start position adjustment)> <M> ADJ-XY DISP COUNTER <S> <R> READY <P> READY <F> ADJ-X xxxx ADJUST ADJ-Y FUNC ADJ-S OPTION ADJ-J xxxx xxxx xxxx TEST F00-300-02 ADJ-X *1 Use it to make adjustments so that the image read start position (X direction, sub scanning direction) matches the reference point on the copyboard glass. Fine-adjusts the distance from the original scanner home position sensor to the read start position. Unit: Number of steps of the stepping motor. • Follow the instructions on the next page. Settings range 0~+400 (–3.9~+3.9mm) Unit: 0.11 mm (approx.) ADJ-Y *1 Use it to make adjustments so that the image read start position (Y direction, main scanning direction) matches the reference point on the copyboard glass. Unit: Pixel • Follow the instructions on the next page. Settings range –100~+100 (–2.5~+2.5mm) Unit: 0.06mm (approx.) S-40 COPYRIGHT © 2001 CANON INC. 2000 2000 2000 2000 CANON CLC5000 REV.0 JAN. 2001 SERVICE MODE ADJ-S *1 Use it to fine-adjust the point at which the standard white plate is measured for shading correction data. • Unit: Number of steps of the stepping motor. • Scratches or dirt, if any, on the standard white plate can cause conspicuous vertical white lines on copies. If such is noted, shift the point of measurement using ‘ADJ-S’. + (forward) Point of measurement Standard white plate F00-300-03 Settings range 0~45 (0~4.8mm) Unit: 0.11mm (approx.) ADJ-J *1 Adjusts the preparatory time for the scanner motor. Settings range 450~550 Unit: 0.1msec (approx.) Note 1: You must enter the appropriate value whenever you have replaced a PCB or initialized a RAM; record any new values on the service label for this purpose. COPYRIGHT © 2001 CANON INC. 2000 2000 2000 2000 CANON CLC5000 REV.0 JAN. 2001 S-41 SERVICE MODE ■ Adjusting the Image Read Start Position You must check the point of retention (‘FUNC → ATTRACT’) before making the following adjustments: 1) Before starting service mode, turn OFF the original detection mechanism. 2) Select the <ADJ-XY> screen, and press the Start key. • The appropriate copying modes will be set automatically, and a copy will be made with a shift of about 20 mm as shown in following. 3) If any part of the image is missing, decrease the values of ‘ADJ-X’ and ‘ADJ-Y’. 4) If an area outside the image is copied, increase the values of ‘ADJ-X’ and ‘ADJ-Y’. ADJ-Y 20 20 ADJ-X F00-300-04 S-42 COPYRIGHT © 2001 CANON INC. 2000 2000 2000 2000 CANON CLC5000 REV.0 JAN. 2001 SERVICE MODE <DOC-REC (original detection area/slice level)> <M> DOC-REC <S> DISP COUNTER DA-XE DA-XS DS-DOC <F> xx xx DS-OHP DS-PRJ xx <P> READY DA-YE DA-YS xx xx ADJUST <R> READY xx xx FUNC OPTION TEST F00-300-05 DA-XS *1 DA-XE DA-YS DA-YE Fine-adjusts the original detection area. The original must be placed correctly on the copyboard glass in original detection mode; if placed at an angle, the copies will have a black frame. To prevent the problem, set a value by which such frames will be erased. DAYS DAYE DAXS DAXE F00-300-06 Any changes to the value will affect the frame erasing width in original detection mode when the projector is used. Settings range –99~99 (0~6.3mm) Standard: XS=16 XE=16 YS=16 YE=16 Unit=0.06mm (approx.) COPYRIGHT © 2001 CANON INC. 2000 2000 2000 2000 CANON CLC5000 REV.0 JAN. 2001 S-43 SERVICE MODE DS-DOC *1 DS-PRJ DS-OHP Adjusts the slice level for original detection. You may enter any value as the slice level for original detection. A higher value increases detection capability but tends to lead to wrong detection. DS-DOC:When detecting ordinary originals, DS-PRJ:When detecting the projection area with the projector in use, DS-OHP:When detecting film (6x6, 8x10) placed on the copyboard glass with the projector in use from the position of the reference sheet. Settings range 0~31 (Density level 0~248) Standard: DS-DOC=20 PRJ=28 OHP=22 Note 1: S-44 The value will return to the standard value when the RAM is initialized, requiring re-input. Be sure to record any new value on the service label. COPYRIGHT © 2001 CANON INC. 2000 2000 2000 2000 CANON CLC5000 REV.0 JAN. 2001 SERVICE MODE <PROJ (projector area adjustment)> <M> PROJ DISP ADJUST FUNC COUNTER PJRD-XS xxxx PJDA-XS xxxx PJCAR-X xxxx <S> <R> READY PJRD-XE xxxx PJDA-XE xxxx PJCAR-Y xxxx PJRD-YS xxxx PJDA-YS xxxx <P> READY <F> PJRD-YE xxxx PJDA-YE xxxx OPTION TEST F00-300-07 PJRD-XS/-XE/-YS/-YE Fine-adjusts the read area if original detection mechanism is off with the projector in use or if original detection fails when the original detection mechanism is on. – YS + On copyboard glass – YE + – + XS – + XE + – YE On copy + YS – – + XE – + XS F00-300-08 Settings range –300~+300 (–19.0~+19.0mm) Standard=0 For XS/XE, Unit: 0.11 mm (approx.) For YS/YE, Unit: 0.06 mm (approx.) COPYRIGHT © 2001 CANON INC. 2000 2000 2000 2000 CANON CLC5000 REV.0 JAN. 2001 S-45 SERVICE MODE PJDA-XS/-XE/-YS/-YE Fine-adjusts the area from which measurements are taken for original detection when the original detection mechanism is on with the projector in use. • Use it also for the read area when the original detection mechanism is off in copyboard mode. • The area for the standard value (0) is 5 mm inside the Fresnel lens. Settings range –99~+99 YS, YE (–6.3~+6.3mm) Unit: 0.06mm (approx.) XS, XE (–10.9~+10.9mm) Unit: 0.11mm (approx.) Standard: 0 (on copyboard glass) PJCAR-X/-Y Use it to adjust the film reading range when the original detection mechanism is off with the auto changer in use. Settings range –100~100 Standard: 0 REF. S-46 PJDA affects the area from which measurements are taken not the area from which measurements have been taken. To erase the black frames on copies or decrease the width of such frames, adjust YE of DA-XS under DOC-REC. COPYRIGHT © 2001 CANON INC. 2000 2000 2000 2000 CANON CLC5000 REV.0 JAN. 2001 SERVICE MODE <ED/RF (editor/RF adjustment)> <M> ED/RF DISP COUNTER <S> 1/2 <R> READY ED-MODE x ADJUST EDADJ-X xxx <TEMP-X> <ED-X> xxx xxx xxx mm xxx mm EDADJ-Y xxx <TEMP-Y> <ED-Y> xxx xxx xxx mm xxx mm FUNC OPTION TEST <P> READY <F> LOOP-MB xxx LOOP-TH xxx F00-300-09 ED-MODE *1 Settings Switches editor operation mode. 0: Normal operation 1: 1-point input check 2: Continuous input check Standard: 0 EDADJ-X *1 <TEMP-X> <ED-X> EDADJ-Y <TEMP-Y> <ED-Y> EDADJ-X xxx <TEMP-X> <ED-X> xxx xxx xxx mm xxx mm Input coordinate present values, mm converted values Post-correction computed values, mm converted value Input coordinate adjustment value for sub scanning direction (X direction) from the Editor EDADJ-X + EDADJ-Y + F00-300-10 Settings range –99~+99 (–12.6~+12.6mm) Unit: 0.13mm (approx.) Standard: 0 COPYRIGHT © 2001 CANON INC. 2000 2000 2000 2000 CANON CLC5000 REV.0 JAN. 2001 S-47 SERVICE MODE LOOP-MB *1 Changes the processing method used to read images into memory for coloring in area specification/color creation. If the value is increased, filling gaps will be easier; too high a value, however, will result in bleeding. Settings range 0~3 (Standard: 0) LOOP-TH *1 If the slice level adjustment value is increased for binarization used for reading images into memory for area specification/color creation, finer lines may be read. Settings range 0~255 (Standard: 0) Note 1: S-48 You must enter the appropriate value whenever you have replaced a PCB or initialized a RAM; record any new values on the service label for this purpose. COPYRIGHT © 2001 CANON INC. 2000 2000 2000 2000 CANON CLC5000 REV.0 JAN. 2001 SERVICE MODE <M> ED/RF DISP COUNTER <S> 2/2 <R> <P> <F> RFADJ-RX ADJUST RFADJ-RY FUNC RFADJ-DX OPTION RFADJ-DY x x.x mm x x.x mm x x.x mm x x.x mm TEST F00-300-11 RFADJ-RX RFADJ-RY RFADJ-DX RFADJ-DY Adjusts registration (with RF in use). Corrects registration when originals are picked up from the RF. Corrects in relation to main scanning direction →CCD read start position. Corrects in relation to sub scanning direction →original read start timing. RX → For correction in sub scanning direction when pick-up is from the RDF tray. *1 RY → For correction in main scanning direction when pick-up is from the RDF tray. If RY=0 (initial value), the CCD starts reading at a point 2 mm away from the index for A4 and 11 mm away from the index for LTR. DX → For correction in sub scanning direction when pick-up is from the manual feeding tray (feeding assembly). DY → For correction in main scanning direction when pick-up is from the manual feeding tray (feeding assembly). Copyboard glass Original 0~99 RY, DY RX, DX 0~99 F00-300-12 COPYRIGHT © 2001 CANON INC. 2000 2000 2000 2000 CANON CLC5000 REV.0 JAN. 2001 S-49 SERVICE MODE Settings range 0~99 Unit:RX, DX=0.11mm (approx.) RY, DY=0.06mm (approx.) (Standard: RX, DX=0 RY, DY=0) remarks For this mode, you must have finished: 1. Adjusting the original stop position and 2. Adjusting the horizontal registration. Note 1: You must enter the appropriate value whenever you have replaced a PCB or initialized a RAM; record any new values on the service label for this purpose. <V-CONT (photosensitive drum surface potential contrast adjustment)> <M> V-CONT DISP COUNTER <S> <R> READY <P> READY VCONT-C xxxx VCONT-M xxxx VCONT-Y xxxx VCONT-K xxxx VBACK-C xxxx VBACK-M xxxx VBACK-Y xxxx VBACK-K xxxx <F> ADJUST FUNC OPTION TEST F00-300-13 VCONT-C/M/Y/K Indicates the present value of the target contrast potential. VBACK-C/M/Y/K Indicates the present value of de-fogging potential. S-50 COPYRIGHT © 2001 CANON INC. 2000 2000 2000 2000 CANON CLC5000 REV.0 JAN. 2001 SERVICE MODE <COL-ADJ (user color balance adjustment correction)> <M> COL-ADJ DISP COUNTER <S> ADJ-M ADJ-Y x ADJUST ADJ-C OFST-M OFST-Y <P> READY OFST-C x OFST-K x x <F> ADJ-K x x x FUNC <R> READY x MASK-M x OPTION TEST P-TBL-M P-TBL-Y x P-TBL-C x P-TBL-K x x F00-300-14 ADJ-C/M/Y/K *1 Corrects user color balance adjustment. • Be sure to set the setting for user color balance adjustment to 0 before using this mode. • Follow the image adjustment basic procedure. Settings range –8~+8 Standard: 0 +: Darker –: Lighter OFST-C/M/Y/K *1 Adjusts light area density and color balance. • Follow the image adjustment basic procedure. • If fogging is noted, decrease the value. • To increase reproducibility of images with extremely low density, increase the setting. Settings range –16 ~ +16 (Standard: Y=0 M=2 C=0 K=0) MASK-M Use it to adjust the hue of magenta. • Increase the setting if the gray area is greenish or bluish. • Decrease the setting if the gray area is reddish. Settings range -6 ~ +6 (standard: 4) Remarks • It hardly affects areas other than the gray area. • Its effects are felt only in print/photo mode or text print/photo mode. COPYRIGHT © 2001 CANON INC. 2000 2000 2000 2000 CANON CLC5000 REV.0 JAN. 2001 S-51 SERVICE MODE P-TBL-C/M/Y/K Use it to make fine adjustments so that the hues will be closer to the hues of offset printing. After comparing M/C/Y/K outputs against professionally (offset) printed material, if the print-out is lighter, increase the setting of ‘P-TBL-M/C/Y/K’. If the print-out is darker, decrease the setting of ‘P-TBL-M/C/Y/K’. Settings range –3 ~ + 3 (Standard: 0) See the descriptions under ‘OPTION > R-OPT > MANAGE’. P-TBL-C Settings range –3 ~ + 3 (Standard: 0) See the descriptions under ‘OPTION > R-OPT > MANAGE’. P-TBL-Y Settings range –3 ~ + 3 (Standard: 0) See the descriptions under ‘OPTION > R-OPT > MANAGE’. P-TBL-K Settings range –3 ~ + 3 (Standard: 0) See the descriptions under ‘OPTION > R-OPT > MANAGE’. Note 1: S-52 You must enter the appropriate value whenever you have replaced a PCB or initialized a RAM; record any new values on the service label for this purpose. COPYRIGHT © 2001 CANON INC. 2000 2000 2000 2000 CANON CLC5000 REV.0 JAN. 2001 SERVICE MODE <PASCAL (auto gradation correction control)> <M> PASCAL DISP COUNTER PASCAL 1 ADJUST FUNC OPTION <S> 1/2 <R> C-DMAX xxxx C-VRATE xxxx DMXCT-C 1 LUTCT-C 1 <P> M-DMAX xxxx M-VRATE xxxx DMXCT-M 1 LUTCT-M 1 <F> Y-DMAX xxxx Y-VRATE xxxx DMXCT-Y 1 LUTCT-Y 1 K-DMAX xxxx K-VRATE xxxx LUTCT-K 1 TEST <M> PASCAL DISP COUNTER P-OFST-C <S> 2/2 <R> P-OFST-M 0 <P> P-OFST-Y 0 <F> P-OFST-K 0 0 ADJUST FUNC OPTION TEST F00-300-15 PASCAL Determines whether to use or not data on gradation correction and contrast potential obtained by auto gradation correction control. Settings range Set it to 0 when adjusting images; otherwise, be sure to set it to 1. Standard: 1 C/M/Y/K-VRATE Indicates the offset value used to determine contrast potential. DMXCT-C/M/Y Settings Use it to specify whether to use the solid density control data for each color obtained (auto gradation correction control). 0: Do not use. 1: Use. Standard value: 1 COPYRIGHT © 2001 CANON INC. 2000 2000 2000 2000 CANON CLC5000 REV.0 JAN. 2001 S-53 SERVICE MODE LUTCT-C/M/Y/K Settings Use it to specify whether to use the gradation correction control data of each color (auto gradation correction control). 0: Do not use. 1: Use. Standard value: 1 P-OFST-C/M/Y/K Use it to set data for correction of the target value for high-density areas in auto gradation correction mode (i.e., to correct variation of CCD readings). You must enter the value recorded on the service label once again if you have initialized the RAM on the DC controller PCB, since initialization returns it to the standard value. Set to optimum value at time of shipment. Settings range -20 to +20 (Standard: 0) +: Darker –: Lighter REF. • If the value of C-, M-, Y-, or K-DMAX is lower than 75, a fault may be assumed in the development of the color in question. • If all values of C-, M-, Y-, and K-DMAX are lower than 75, a fault may be assumed in transfer or fixing. • If the value of C-, M-, Y-, or K-DMAX is 120 or higher and copies have fogging, a fault is assumed in ATR of the color in question. If you have changed the setting of ‘PASCAL’, ‘DMXCT-C/M/Y’, ‘LUTCTC/M/Y/K’, or ‘P-OFST-C/M/Y/K’, be sure to execute auto gradation in user mode. S-54 COPYRIGHT © 2001 CANON INC. 2000 2000 2000 2000 CANON CLC5000 REV.0 JAN. 2001 SERVICE MODE <ADJ-MISC> <M> ADJ-MISC <S> DISP COUNTER <R> READY <P> READY <F> VCONT 0 ADJUST SEG-ADJ BC-ADJ 0 FUNC K-DOFST 0 ACS-ADJ x 0 OPTION TEST F00-300-16 VCONT Settings Remarks Switches between auto and manual for target contrast potential (VG, VDC). 0: Auto (set by auto gradation correction control) 1~8: Manual C Vcount M Vcount Y Vcount K Vcount 1 370.00 365.000 390.00 420.00 2 370.00 365.00 390.00 420.00 3 370.00 365.00 390.00 420.00 4 355.00 345.00 370.00 410.00 5 335.00 325.00 340.00 390.00 6 315.00 295.00 310.00 380.00 7 290.00 275.00 295.00 370.00 8 225.00 225.00 245.00 330.00 9 xxxV xxxV xxxV xxxV 10 xxxV xxxV xxxV xxxV 11 xxxV xxxV xxxV xxxV 12 xxxV xxxV xxxV xxxV 1~8 used for checks; normally, set it to 0 after a check. 9~12 not used. (for factory) SEG-ADJ Fine-adjusts the separation level between text and photo in text/photo mode or text/halide mode. +: Identifies photos better. –: Identifies text better. This mode corrects text/photo setting of user mode. *1 Settings range –3~+3 (Standard: 0) COPYRIGHT © 2001 CANON INC. 2000 2000 2000 2000 CANON CLC5000 REV.0 JAN. 2001 S-55 SERVICE MODE BC-ADJ Use it to adjust the color space area identified as black text in black text processing. Settings range -3 ~ +3 (standard: 0) A higher setting will increase the color space area within which an original is identified as being a black text original. ACS-ADJ Use it to adjust the color space area identified as chromatic in ACS evaluation. Use it to make adjustments if a black-and-white copy is made as the result of ACS evaluation when copying an obviously chromatic original. Settings range -6 ~ + 6 (standard: -2) A higher setting will increase the color space area within which an original is identified as being chromatic. K-DOFST Use it to correct the target value of the SALT signal. If fogging is noted only for Bk, increase the setting to suppress. *1 Settings range –4 ~ +4 (standard: 0) Note 1: S-56 The value will return to the standard value when the RAM is initialized, requiring re-input. Be sure to record any new value on the service label. COPYRIGHT © 2001 CANON INC. 2000 2000 2000 2000 CANON CLC5000 REV.0 JAN. 2001 SERVICE MODE <FEED-ADJ (image position adjustment)> <M> FEED-ADJ <S> DISP COUNTER UP-ADJ LOW-ADJ 0 ADJUST REFE-ADJ FUNC VSYC-ADJ <R> READY MULT-ADJ 0 <P> READY <F> DECK-ADJ 0 0 0 0 OPTION TEST 1REG-LP 0 F00-300-17 UP-ADJ Adjusts the image write start position in main scanning direction when pick-up is from the upper cassette. Be sure to select the upper cassette on the User screen in advance. Settings range 0 ~ 255 (standard: 128) A higher value leads to a movement to the rear. Rear (unit: about 0.06mm) Image Feeding direction Front F00-300-18 LOW-ADJ Adjusts the image write start position in main scanning direction when pick-up is from the lower cassette. Be sure to select the upper cassette on the User screen in advance. Settings range 0 ~ 255 (standard: 128) A higher value leads to a movement to the rear. Rear (unit: about 0.06mm) Image Feeding direction Front F00-300-19 COPYRIGHT © 2001 CANON INC. 2000 2000 2000 2000 CANON CLC5000 REV.0 JAN. 2001 S-57 SERVICE MODE MULT-ADJ Adjusts the image write position in main scanning direction when pick-up is from the multifeeder. Be sure to select the upper cassette on the User screen in advance. Rear Settings range 0 ~ 255 (standard: 128) A higher value leads to a movement to the rear. Image (unit: about 0.06mm) Feeding direction Front F00-300-20 DECK-ADJ (only if deck is connected) Adjusts the image write start position in main scanning direction when pick-up is from the paper deck. Be sure to select the upper cassette on the User screen in advance. Settings range 0 ~ 255 (standard: 128) A higher value leads to a movement to the rear. Rear (unit: about 0.06mm) Image Feeding direction Front F00-300-21 Remarks Indicated only when a deck is connected. REFE-ADJ Adjusts the image write start position in main scanning direction for re-pick up operation. Settings range 0 ~ 255 (standard: 128) A higher value leads to a movement to the rear. Rear (unit: about 0.06mm) Image Feeding direction Front F00-300-22 VSYC-ADJ Adjusts the image write start position in sub scanning direction. Settings range 0 ~ 255 (standard: 128) A higher setting will cause a shift toward the rear. (unit: about 0.11mm) Image Feeding direction F00-300-23 S-58 COPYRIGHT © 2001 CANON INC. 2000 2000 2000 2000 CANON CLC5000 REV.0 JAN. 2001 SERVICE MODE 1REG-LP Use it to adjust the degree of arching copy paper at the rear of the registration roller (paper stop timing). • A higher setting will increase the arching. • Too low a setting can cause skew movement. Settings range -6 ~ +6 (standard: 0) <EC-ADJ (correction of rate of transmission of EC coat glass)> EC-R/G/B Enter the transmission rate correction value of EC coat glass; then, enter the OK key to set the input data. Enter the value indicated on the label attached to the EC coat glass. Settings range 0 ~ 99 (standard: R = 48, G = 53, B = 70) COPYRIGHT © 2001 CANON INC. 2000 2000 2000 2000 CANON CLC5000 REV.0 JAN. 2001 S-59 SERVICE MODE <ENV-SET (setting operation conditions for the cassette)> heater <M> ENV-SET DISP COUNTER ADJUST FUNC OPTION BODY BODY BODY <S> 27 ˚C 28 % 624 g <R> READY ENV-A ENV-B > ENV-C ENV-D ENV-E ENV-F ENV-G OFF <P> READY 0g 290g 580g 1050g 1500g 1800g 2160g to to to to to to to <F> USER 290g 580g 1050g 1500g 1800g 2160g OFF OFF OFF OFF ON ON ON TEST F00-300-24 BODY °C Remarks Indicates the machine internal temperature measured by the environment sensor. Same as the reading under ‘DISPLAY > ANALOG’ BODY % Remarks Indicates the machine internal humidity measured by the environment sensor. Same as the reading under ‘DISPLAY > ANALOG’ BODY g Remarks Indicates the machine internal humidity absolute value (g) measured by the environment sensor. Same as the reading under ‘DISPLAY > ANALOG’ > Indicates the present environment. ENV-A~G Remarks Sets ON/OFF of the cassette heater. The heater will turn on if the internal humidity absolute value exceeds the setting. OFF Sets to OFF for all environment. REF. S-60 The settings of ‘ENV-SET’ are stored as soon as the CPU on the DC controller PCB is supplied with power (i.e., when the power plug is conected to the power outlet), and will be renewed every 8 hr. COPYRIGHT © 2001 CANON INC. 2000 2000 2000 2000 CANON CLC5000 REV.0 JAN. 2001 SERVICE MODE <HV-TR (transfer high-voltage output adjustment by condition)> <M> HV-TR-Y DISP COUNTER ADJUST FUNC BODY BODY BODY <S> 1/4 xxx xxx xxx <R> READY ˚C % g ZONE A ZONE B ZONE C <P> READY <F> 0.0g to 580g see 580g to 1800g see 1800g to -----g see 2/4 3/4 4/4 TR-OFS-Y xxxx OPTION TEST F00-300-25 BODY °C Remarks Indicates the machine internal temperature measured by the environment sensor. Same as the reading under ‘DISPLAY > ANALOG’ BODY % Remarks Indicates the machine internal humidity measured by the environment sensor. Same as the reading under ‘DISPLAY > ANALOG’ BODY g Remarks Indicates the machine internal humidity absolute value (g) measured by the environment sensor. Same as the reading under ‘DISPLAY > ANALOG’ TRY-OFS-Y/M/C/K Adjusts the transfer high-voltage output. Settings range -5 ~ +5 (standard: 0) Unit: 1.0 µA If you have changed the settings of ‘TRY-OFS-C/M/Y/K’, check to make sure that the value of ‘TR-#’ for each zone is ‘0’; otherwise, enter ‘0’. ZONE-A/B/C Indicates the machine internal humidity absolute value (g) in the three ranges of A through C. Note 1: The setting of this item will return to the default value when the PCB is replaced or the RAM is cleared, requiring input once again. Be sure to record any new setting you have made on the service label. COPYRIGHT © 2001 CANON INC. 2000 2000 2000 2000 CANON CLC5000 REV.0 JAN. 2001 S-61 SERVICE MODE <M> HV-TR-Y <S> 2/4 <R> ADJUST BODY BODY BODY FUNC <<<<<<< ZONE A >>>>>>> TR-UT1 OPTION TR-N1 TR-UT2 TEST TR-N2 DISP COUNTER ˚C % g xxx xxx xxx <P> TR-T1 xxxx TR-T2 xxxx xxxx xxxx xxxx TR-OHP xxxx TR-# xxxx xxxx TR-S1-1 xxxx <F> TR-S1-2 xxxx TR-S2-1 xxxx TR-S2-2 xxxx TR-S3-1 xxxx TR-S3-2 xxxx F00-300-26 BODY °C Remarks Indicates the machine internal temperature measured by the environment sensor. Same as the reading under ‘DISPLAY > ANALOG’ BODY % Remarks Indicates the machine internal humidity measured by the environment sensor. Same as the reading under ‘DISPLAY > ANALOG’ BODY g Remarks Indicates the machine internal humidity absolute value (g) measured by the environment sensor. Same as the reading under ‘DISPLAY > ANALOG’ <<<ZONE-A>>> Indicates the zone in which the setting shown is effective. TR-N1 Effective in plain paper mode and, in addition, when copying on a onesided copy or on the 1st side of a two-sided copy. Settings range –5 ~ +5 (Standard: 0) Unit: 1.0 µA TR-N2 Effective in plain paper mode and, in addition, when copying on the 2nd side of a two-sided copy. Settings range –5 ~ +5 (Standard: 0) Unit: 1.0 µA TR-OHP Effective in OHP mode. Settings range –5 ~ +5 (Standard: 0) Unit: 1.0 µA S-62 COPYRIGHT © 2001 CANON INC. 2000 2000 2000 2000 CANON CLC5000 REV.0 JAN. 2001 SERVICE MODE TR-# Effective during image position correction control. Settings range –5 ~ +5 (Standard: 0) Unit: 1.0 µA TR-T1 Effective in thick paper mode and, in addition, copying on a one-sided copy or on the 1st side of a two-sided copy. Settings range –5 ~ +5 (Standard: 0) Unit: 1.0 µA TR-T2 Effective in thick paper mode and, in addition, copying on the 2nd side of a two-sided copy. Settings range –5 ~ +5 (Standard: 0) Unit: 1.0 µA TR-UT1 Effective in ultra thick paper mode and, in addition, when copying on the 1st side of a two-sided copy. Settings range –5 ~ +5 (Standard: 0) Unit: 1.0 µA TR-UT2 Effective in ultra thick paper mode and, in addition, when copying on the 2nd side of a two-sided copy. Settings range –5 ~ +5 (Standard: 0) Unit: 1.0 µA TR-S1-1 Effective in special paper 1 mode and, in addition, when copying on a onesided copy or on the 1st side of a two-sided copy. Settings range –5 ~ +5 (Standard: 0) Unit: 1.0 µA TR-S1-2 Effective in special paper 1 mode and, in addition, when copying on the 2nd side of a two-sided copy. Settings range –5 ~ +5 (Standard: 0) Unit: 1.0 µA TR-S2-1 Effective in special paper 2 mode and, in addition, when copying on a onesided copy. Settings range –5 ~ +5 (Standard: 0) Unit: 1.0 µA COPYRIGHT © 2001 CANON INC. 2000 2000 2000 2000 CANON CLC5000 REV.0 JAN. 2001 S-63 SERVICE MODE TR-S2-2 Effective in special paper 2 mode and, in addition, when copying on the 2nd side of a two-sided copy. Settings range –5 ~ +5 (Standard: 0) Unit: 1.0 µA TR-S3-1 Effective in special paper 3 mode and, in addition, when copying on a onesided copy or on the 1st side of a two-sided copy. Settings range –5 ~ +5 (Standard: 0) Unit: 1.0 µA TR-S3-2 In special paper 3 mode and, in addition, when copying on the 2nd side of a two-sided copy. Settings range –5 ~ +5 (Standard: 0) Unit: 1.0 µA The setting of this item will return to the default value when the PCB is replaced or the RAM is cleared, requiring input once again. Be sure to record any new setting you have made on the service label. REF. S-64 This mode will prove effective when correcting transfer faults under each item in question. COPYRIGHT © 2001 CANON INC. 2000 2000 2000 2000 CANON CLC5000 REV.0 JAN. 2001 SERVICE MODE <HV-SP (separation high-voltage output fine-adjustment by condition)> <M> HV-SP DISP COUNTER ADJUST FUNC BODY BODY BODY <S> 1/4 xxx xxx xxx <R> READY ˚C % g ZONE A ZONE B ZONE C <P> READY <F> 0.0g to 580g see 580g to 1800g see 1800g to -----g see 2/4 3/4 4/4 SP-OFST xxxx OPTION TEST F00-300-27 BODY °C Remarks Indicates the machine internal temperature measured by the environment sensor. Same as the reading under ‘DISPLAY > ANALOG’ BODY % Remarks Indicates the machine internal humidity measured by the environment sensor. Same as the reading under ‘DISPLAY > ANALOG’ BODY g Remarks Indicates the machine internal humidity absolute value (g) measured by the environment sensor. Same as the reading under ‘DISPLAY > ANALOG’ SP-OFST Adjusts the transfer high-voltage output. Settings range –5 ~ +5 (Standard: 0) Unit: 25 µA ZONE-A/B/C Indicates the machine internal humidity absolute value (g) in the three ranges of A through C. Note 1: The setting of this item will return to the default value when the PCB is replaced or the RAM is cleared, requiring input once again. Be sure to record any new setting you have made on the service label. COPYRIGHT © 2001 CANON INC. 2000 2000 2000 2000 CANON CLC5000 REV.0 JAN. 2001 S-65 SERVICE MODE <M> HV-SP <S> 2/4 <R> ADJUST BODY BODY BODY FUNC <<<<<<< ZONE A >>>>>>> SP-UT1 OPTION SP-N1 SP-UT2 TEST SP-N2 DISP COUNTER xxx ˚C xxx % xxx g <P> SP-T1 xxxx SP-T2 xxxx xxxx xxxx xxxx SP-OHP xxxx SP-# xxxx xxxx SP-S1-1 xxxx <F> SP-S1-2 xxxx SP-S2-1 xxxx SP-S2-2 xxxx SP-S3-1 xxxx SP-S3-2 xxxx F00-300-28 BODY °C Remarks Indicates the machine internal temperature measured by the environment sensor. Same as the reading under ‘DISPLAY > ANALOG’ BODY % Remarks Indicates the machine internal humidity measured by the environment sensor. Same as the reading under ‘DISPLAY > ANALOG’ BODY g Remarks Indicates the machine internal humidity absolute value (g) measured by the environment sensor. Same as the reading under ‘DISPLAY > ANALOG’ <<<ZONE-A>>> Indicates the zone in which the setting shown is effective. SP-N1 Effective in plain paper mode and, in addition, when copying on a onesided copy or on the 1st side of a two-sided copy. Settings range –5 ~ +5 (Standard: 0) Unit: 25 µA SP-N2 Effective in plain paper mode and, in addition, when copying on the 2nd side of a two-sided copy. Settings range –5 ~ +5 (Standard: 0) Unit: 25 µA S-66 COPYRIGHT © 2001 CANON INC. 2000 2000 2000 2000 CANON CLC5000 REV.0 JAN. 2001 SERVICE MODE SP-OHP Effective in OHP mode. Settings range –5 ~ +5 (Standard: 0) Unit: 25 µA SP-# Effective during image position correction control. Settings range –5 ~ +5 (Standard: 0) Unit: 25 µA SP-T1 Effective in thick paper mode and, in addition, copying on a one-sided copy or on the 1st side of a two-sided copy. Settings range –5 ~ +5 (Standard: 0) Unit: 25 µA SP-T2 Effective in thick paper mode and, in addition, copying on the 2nd side of a two-sided copy. Settings range –5 ~ +5 (Standard: 0) Unit: 25 µA SP-UT1 Effective in ultra thick paper mode and, in addition, when copying on the 1st side of a two-sided copy. Settings range –5 ~ +5 (Standard: 0) Unit: 25 µA SP-UT2 Effective in ultra thick paper mode and, in addition, when copying on the 2nd side of a two-sided copy. Settings range –5 ~ +5 (Standard: 0) Unit: 25 µA SP-S1-1 Effective in special paper 1 mode and, in addition, when copying on a onesided copy or on the 1st side of a two-sided copy. Settings range –5 ~ +5 (Standard: 0) Unit: 25 µA SP-S1-2 Effective in special paper 1 mode and, in addition, when copying on the 2nd side of a two-sided copy. Settings range –5 ~ +5 (Standard: 0) Unit: 25 µA COPYRIGHT © 2001 CANON INC. 2000 2000 2000 2000 CANON CLC5000 REV.0 JAN. 2001 S-67 SERVICE MODE SP-S2-1 Effective in special paper 2 mode and, in addition, when copying on a onesided copy. Settings range –5 ~ +5 (Standard: 0) Unit: 25 µA SP-S2-2 Effective in special paper 2 mode and, in addition, when copying on the 2nd side of a two-sided copy. Settings range –5 ~ +5 (Standard: 0) Unit: 25 µA SP-S3-1 Effective in special paper 3 mode and, in addition, when copying on a onesided copy or on the 1st side of a two-sided copy. Settings range –5 ~ +5 (Standard: 0) Unit: 25 µA SP-S3-2 In special paper 3 mode and, in addition, when copying on the 2nd side of a two-sided copy. Settings range –5 ~ +5 (Standard: 0) Unit: 25 µA The setting of this item will return to the default value when the PCB is replaced or the RAM is cleared, requiring input once again. Be sure to record any new setting you have made on the service label. REF. S-68 This mode will prove effective when correcting image distortion, separation faults, or feeding faults under each item in question. COPYRIGHT © 2001 CANON INC. 2000 2000 2000 2000 CANON CLC5000 REV.0 JAN. 2001 SERVICE MODE <HV-FS (fine-adjustment for pre-fixing high-voltage output according to conditions)> <M> HV-FS DISP COUNTER ADJUST FUNC BODY BODY BODY <S> 1/4 xxx xxx xxx <R> READY ˚C % g ZONE A ZONE B ZONE C <P> READY <F> 0.0g to 580g see 580g to 1800g see 1800g to -----g see 2/4 3/4 4/4 FS-OFST xxxx OPTION TEST F00-300-29 BODY °C Remarks Indicates the machine internal temperature measured by the environment sensor. Same as the reading under ‘DISPLAY > ANALOG’ BODY % Remarks Indicates the machine internal humidity measured by the environment sensor. Same as the reading under ‘DISPLAY > ANALOG’ BODY g Remarks Indicates the machine internal humidity absolute value (g) measured by the environment sensor. Same as the reading under ‘DISPLAY > ANALOG’ FS-OFST *1 Adjusts the transfer high-voltage output. Settings range –5 ~ +5 (Standard: 0) Unit: 25 µA ZONE-A/B/C Indicates the machine internal humidity absolute value (g) in the three ranges of A through C. STMT-MD *1 Adjust the high-voltage output for size of STMT Settings range –1 ~ +9 (Standard: 0) COPYRIGHT © 2001 CANON INC. 2000 2000 2000 2000 CANON CLC5000 REV.0 JAN. 2001 S-69 SERVICE MODE REF. Note 1: S-70 If stray toner occurs for STMT size images before fixing, increase the setting (so that the high-voltage output will increase) to limit the problem. However, keep in mind that too high a setting will cause the paper to stick to the guide before fixing, turning into a jam. The setting of this item will return to the default value when the PCB is replaced or the RAM is cleared, requiring input once again. Be sure to record any new setting you have made on the service label. COPYRIGHT © 2001 CANON INC. 2000 2000 2000 2000 CANON CLC5000 REV.0 JAN. 2001 SERVICE MODE <M> HV-FS <S> 2/4 <R> ADJUST BODY BODY BODY FUNC <<<<<<< ZONE A >>>>>>> FS-UT1 OPTION FS-N1 FS-UT2 TEST FS-N2 DISP COUNTER xxx xxx xxx ˚C % g <P> FS-T1 xxxx FS-T2 xxxx xxxx xxxx xxxx FS-OHP xxxx FS-# xxxx xxxx FS-S1-1 xxxx <F> FS-S1-2 xxxx FS-S2-1 xxxx FS-S2-2 xxxx FS-S3-1 xxxx FS-S3-2 xxxx F00-300-30 BODY °C Remarks Indicates the machine internal temperature measured by the environment sensor. Same as the reading under ‘DISPLAY > ANALOG’ BODY % Remarks Indicates the machine internal humidity measured by the environment sensor. Same as the reading under ‘DISPLAY > ANALOG’ BODY g Remarks Indicates the machine internal humidity absolute value (g) measured by the environment sensor. Same as the reading under ‘DISPLAY > ANALOG’ <<<ZONE-A>>> Indicates the zone in which the setting shown is effective. FS-N1 Effective in plain paper mode and, in addition, when copying on a onesided copy or on the 1st side of a two-sided copy. Settings range –5 ~ +5 (Standard: 0) Unit: 25 µA FS-N2 Effective in plain paper mode and, in addition, when copying on the 2nd side of a two-sided copy. Settings range –5 ~ +5 (Standard: 0) Unit: 25 µA FS-OHP Effective in OHP mode. Settings range –5 ~ +5 (Standard: 0) Unit: 25 µA COPYRIGHT © 2001 CANON INC. 2000 2000 2000 2000 CANON CLC5000 REV.0 JAN. 2001 S-71 SERVICE MODE FS-# Effective during image position correction control. Settings range –5 ~ +5 (Standard: 0) Unit: 25 µA FS-T1 Effective in thick paper mode and, in addition, copying on a one-sided copy or on the 1st side of a two-sided copy. Settings range –5 ~ +5 (Standard: 0) Unit: 25 µA FS-T2 Effective in thick paper mode and, in addition, copying on the 2nd side of a two-sided copy. Settings range –5 ~ +5 (Standard: 0) Unit: 25 µA FS-UT1 Effective in ultra thick paper mode and, in addition, when copying on the 1st side of a two-sided copy. Settings range –5 ~ +5 (Standard: 0) Unit: 25 µA FS-UT2 Effective in ultra thick paper mode and, in addition, when copying on the 2nd side of a two-sided copy. Settings range –5 ~ +5 (Standard: 0) Unit: 25 µA FS-S1-1 Effective in special paper 1 mode and, in addition, when copying on a onesided copy or on the 1st side of a two-sided copy. Settings range –5 ~ +5 (Standard: 0) Unit: 25 µA FS-S1-2 Effective in special paper 1 mode and, in addition, when copying on the 2nd side of a two-sided copy. Settings range –5 ~ +5 (Standard: 0) Unit: 25 µA S-72 COPYRIGHT © 2001 CANON INC. 2000 2000 2000 2000 CANON CLC5000 REV.0 JAN. 2001 SERVICE MODE FS-S2-1 Effective in special paper 2 mode and, in addition, when copying on a onesided copy. Settings range –5 ~ +5 (Standard: 0) Unit: 25 µA FS-S2-2 Effective in special paper 2 mode and, in addition, when copying on the 2nd side of a two-sided copy. Settings range –5 ~ +5 (Standard: 0) Unit: 25 µA FS-S3-1 Effective in special paper 3 mode and, in addition, when copying on a onesided copy or on the 1st side of a two-sided copy. Settings range –5 ~ +5 (Standard: 0) Unit: 25 µA FS-S3-2 In special paper 3 mode and, in addition, when copying on the 2nd side of a two-sided copy. Settings range –5 ~ +5 (Standard: 0) Unit: 25 µA The setting of this item will return to the default value when the PCB is replaced or the RAM is cleared, requiring input once again. Be sure to record any new setting you have made on the service label. REF. This mode will prove effective when correcting image distortion under each item in question. COPYRIGHT © 2001 CANON INC. 2000 2000 2000 2000 CANON CLC5000 REV.0 JAN. 2001 S-73 SERVICE MODE <HV-EL (fine-adjustment for internal static eliminator high-voltage output according to conditions)> <M> HV-EL DISP COUNTER ADJUST FUNC BODY BODY BODY <S> 1/4 xxx xxx xxx <R> READY ˚C % g ZONE A ZONE B ZONE C <P> READY <F> 0.0g to 580g see 580g to 1800g see 1800g to -----g see 2/4 3/4 4/4 EL-OFST xxxx OPTION TEST F00-300-31 BODY °C Remarks Indicates the machine internal temperature measured by the environment sensor. Same as the reading under ‘DISPLAY > ANALOG’ BODY % Remarks Indicates the machine internal humidity measured by the environment sensor. Same as the reading under ‘DISPLAY > ANALOG’ BODY g Remarks Indicates the machine internal humidity absolute value (g) measured by the environment sensor. Same as the reading under ‘DISPLAY > ANALOG’ EL-OFST Adjusts the transfer high-voltage output. Settings range –5 ~ +1 (Standard: -2) Unit: 0.5 kV ZONE A/B/C Indicates the machine internal humidity absolute value (g) in the three ranges of A through C. Note 1: S-74 The setting of this item will return to the default value when the PCB is replaced or the RAM is cleared, requiring input once again. Be sure to record any new setting you have made on the service label. COPYRIGHT © 2001 CANON INC. 2000 2000 2000 2000 CANON CLC5000 REV.0 JAN. 2001 SERVICE MODE <M> HV-EL <S> 2/4 <R> ADJUST BODY BODY BODY FUNC <<<<<<< ZONE A >>>>>>> EL-UT1 OPTION EL-N1 EL-UT2 TEST EL-N2 DISP COUNTER xxx xxx xxx ˚C % g <P> EL-T1 EL-S1-2 xxxx EL-T2 xxxx EL-S2-1 xxxx xxxx EL-S2-2 xxxx xxxx xxxx EL-OHP xxxx EL-# xxxx <F> xxxx EL-S3-1 xxxx EL-S1-1 xxxx EL-S3-2 xxxx xxxx F00-300-32 BODY °C Remarks Indicates the machine internal temperature measured by the environment sensor. Same as the reading under ‘DISPLAY > ANALOG’ BODY % Remarks Indicates the machine internal humidity measured by the environment sensor. Same as the reading under ‘DISPLAY > ANALOG’ BODY g Remarks Indicates the machine internal humidity absolute value (g) measured by the environment sensor. Same as the reading under ‘DISPLAY > ANALOG’ <<<ZONE-A>>> Indicates the zone in which the setting shown is effective. EL-N1 Effective in plain paper mode and, in addition, when copying on a onesided copy or on the 1st side of a two-sided copy. Settings range –5 ~ +1 (Standard: -2) Unit: 0.5 kV EL-N2 Effective in plain paper mode and, in addition, when copying on the 2nd side of a two-sided copy. Settings range –5 ~ +1 (Standard: -2) Unit: 0.5 kV EL-OHP Effective in OHP mode. Settings range –5 ~ +1 (Standard: -2) Unit: 0.5 kV COPYRIGHT © 2001 CANON INC. 2000 2000 2000 2000 CANON CLC5000 REV.0 JAN. 2001 S-75 SERVICE MODE EL-# Effective during image position correction control. Settings range –5 ~ +1 (Standard: -2) Unit: 0.5 kV EL-T1 Effective in thick paper mode and, in addition, copying on a one-sided copy or on the 1st side of a two-sided copy. Settings range –5 ~ +1 (Standard: -2) Unit: 0.5 kV EL-T2 Effective in thick paper mode and, in addition, copying on the 2nd side of a two-sided copy. Settings range –5 ~ +1 (Standard: -2) Unit: 0.5 kV EL-UT1 Effective in ultra thick paper mode and, in addition, when copying on the 1st side of a two-sided copy. Settings range –5 ~ +1 (Standard: -2) Unit: 0.5 kV EL-UT2 Effective in ultra thick paper mode and, in addition, when copying on the 2nd side of a two-sided copy. Settings range –5 ~ +1 (Standard: -2) Unit: 0.5 kV EL-S1-1 Effective in special paper 1 mode and, in addition, when copying on a onesided copy or on the 1st side of a two-sided copy. Settings range –5 ~ +1 (Standard: -2) Unit: 0.5 kV EL-S1-2 Effective in special paper 1 mode and, in addition, when copying on the 2nd side of a two-sided copy. Settings range –5 ~ +1 (Standard: -2) Unit: 0.5 kV EL-S2-1 Effective in special paper 2 mode and, in addition, when copying on a onesided copy. Settings range –5 ~ +1 (Standard: -2) Unit: 0.5 kV S-76 COPYRIGHT © 2001 CANON INC. 2000 2000 2000 2000 CANON CLC5000 REV.0 JAN. 2001 SERVICE MODE EL-S2-2 Effective in special paper 2 mode and, in addition, when copying on the 2nd side of a two-sided copy. Settings range –5 ~ +1 (Standard: -2) Unit: 0.5 kV EL-S3-1 Effective in special paper 3 mode and, in addition, when copying on a onesided copy or on the 1st side of a two-sided copy. Settings range –5 ~ +1 (Standard: -2) Unit: 0.5 kV EL-S3-2 In special paper 3 mode and, in addition, when copying on the 2nd side of a two-sided copy. Settings range –5 ~ +1 (Standard: -2) Unit: 0.5 kV The setting of this item will return to the default value when the PCB is replaced or the RAM is cleared, requiring input once again. Be sure to record any new setting you have made on the service label. REF. This mode will prove effective when correcting transfer faults or soiling on the back of copies under each item in question. COPYRIGHT © 2001 CANON INC. 2000 2000 2000 2000 CANON CLC5000 REV.0 JAN. 2001 S-77 SERVICE MODE 4.FUNCTION (function/inspection) <M> <S> <R> INSTALL R-CON DC-CON CCD ADJUST LASER P-UP-TMG ATTRACT EPC FUNC BLADE FUSER CST-AD F-MISCs TCLN P-THICK IMG-REG DISP COUNTER OPTION <P> <F> PRJ-ADJ F-MISCp TEST F00-400-01 1 2 3 4 5 6 7 8 9 10 11 12 13 14 15 16 17 S-78 INSTALL R-CON DC-CON CCD PRJ-ADJ LASER P-UP-TMG ATTRACT EPC BLADE FUSER CST-AD F-MISCs F-MISCp TCLN P-THICK IMG-REG INSTALL for installation Reader controller PCB-related adjustment DC controller PCB-related adjustment CCD-related adjustment Projector-related adjustment Laser adjustment Pick-up timing adjustment Retention point adjustment Photosensitive drum potential measurement Transfer blade/transfer belt cleaning blade operation Fixing assembly-related adjustment Cassette paper width adjustment Reader-related operation/inspection Printer-related operation/inspection Polishing roller/oil removing roller operation Paper sensor adjustment Image position correction control operation/inspection COPYRIGHT © 2001 CANON INC. 2000 2000 2000 2000 CANON CLC5000 REV.0 JAN. 2001 SERVICE MODE <INSTALL (at time of installation)> <M> INSTALL DISP COUNTER INIT-C <S> 1/4 SINIT-C FUNC STIR-C OPTION SPLY-C TEST WINCLR-C SINIT-Y 0 SPLY-Y 0 WINCLR-M WINCLR-Y DISP COUNTER IMG-REG <S> 2/4 LSNS-KIL ADJUST 0 REG-APER FUNC RECV-C 0 STIR-4 0 0 SPLY-K 0 WINCLR-K 0 <R> WINCLR-4 0 <P> BODY 0 <F> 505g NLSET-K 0 RECV-Y RECV-M 0 0 0 0 0 SINIT-4 STIR-K 0 0 SPLY-M 0 <M> INSTALL SINIT-K STIR-Y 0 INIT-7 0 0 0 STIR-M <F> INIT-3 0 0 SINIT-M 0 <P> INIT-Y INIT-M 0 ADJUST <R> 0 RECV-K 0 RECV-4 0 0 OPTION TEST F00-400-02 INIT-C/M/Y Use it to read in the initial value of the toner density signal (SGNL, REF) of the specified color. • The value will be indicated on screen 3/4. Record it to the service label. INIT-3 Reads the initial value of the toner density signal (SGNL, REF) of three colors (C, M, Y) in sequence. • The value will be indicated on screen 3/4. Record it to the service label. INIT-7 Reads the initial value of the toner density signal (SGNL, REF) of the ATR and SALT sensors in sequence. • The value will be indicated on screens 3/4 and 4/4. Record it to the service label. COPYRIGHT © 2001 CANON INC. 2000 2000 2000 2000 CANON CLC5000 REV.0 JAN. 2001 S-79 SERVICE MODE SINIT-C/M/Y/K Reads the initial value of the SALT signal (SGNL, REF) of the specified color. • The value will be indicated on screen 4/4. Record it to the service label. SINIT-4 Reads the initial value of the SALT signal (SGNL, REF) of four colors (C, M, Y, K) in sequence. • The value will be indicated on screen 4/4. Record it to the service label. STIR-C/M/Y/K Stirs the starter of the specified color. STIR-4 Stirs the starters of the four colors. SPLY-C/M/Y/K Rotates the cylinder of the developing assembly to supply starter of the specified color. IMG-REG Turns on or off the image position auto correction function. 0: OFF 1: ON LSNS-KIL Remarks S-80 Turns on or off the toner sensor output mode for moving up/down the hopper. 0: OFF 1: ON Initial: 0 Used only at time of installation. COPYRIGHT © 2001 CANON INC. 2000 2000 2000 2000 CANON CLC5000 REV.0 JAN. 2001 SERVICE MODE NLSET-K Use it to suppress fogging of Bk, if noted in a low-humidity environment, as follows: 1. In the environment in question, check to make sure that the moisture content is 5 g (indicated as ‘500 g’ on the screen) or less. 2. Replace the Bk developer. (See the descriptions of ‘replacing the developer’ in chapter 2. CLC1000 Service Handbook however, do not execute auto gradation correction as yet.) 3. Execute ‘FUNC>INSTALL (2nd page)>NLSET-K’ in service mode. (about 1 min) 4. Check to make sure that ‘PASCAL’ in ‘ADJUST>PASCAL’ in service mode is ‘1’. 5. Execute auto gradation correction in user mode. REG-APER Executes auto correction of the read-in coordinates of the image position correction pattern. RECV-C/M/Y/K Rotates the cylinder of the developing assembly to draw developer out of the developing assembly of the specified color. • Be sure to place the developer collecting container under the developer before opening of the developer supply mouth. This mode is NOT to be executed at time of installation. RECV-4 Rotates the cylinders of the developing assemblies to draw the developers out of the developing assemblies for four colors. WINCLR-C/M/Y/K Use it to read in the initial value of the window soiling correction coefficient of a specific color. WINCLR-4 Use it to read in the initial value of the window soiling correction coefficient of the four colors. COPYRIGHT © 2001 CANON INC. 2000 2000 2000 2000 CANON CLC5000 REV.0 JAN. 2001 S-81 SERVICE MODE <M> INSTALL DISP COUNTER SGNL-C <S> SGNL-M xxx ADJUST REF-C FUNC SIGG-C 3/4 <F> xxx REF-Y xxx xxx <P> SGNL-Y xxx REF-M SIGG-M xxx <R> xxx SIGG-Y xxx xxx OPTION TEST F00-400-03 SGNL-C/M/Y Remarks Indicates the value of the toner density signal when INIT is executed as ATR control. Be sure to record the reading on the label. For SGNL-C, SGNL-M, and SGNL-Y, normally, 818 ±41. REF-C/M/Y Indicates the value of the toner density reference signal when INIT is executed as ATR control. Be sure to record the reading on the label. SIGG-C/M/Y Indicates the gain value (gain value used to set SGNL-C/SGNL-M/SGNLY to 818) for the toner density signal during ATR control. Be sure to record the reading on the label. S-82 COPYRIGHT © 2001 CANON INC. 2000 2000 2000 2000 CANON CLC5000 REV.0 JAN. 2001 SERVICE MODE <M> INSTALL <S> 4/4 <R> <P> ADJUST SGNL-S-C xxx REF-S-C SGNL-S-M xxx REF-S-M SGNL-S-Y xxx REF-S-Y SGNL-S-K xxx REF-S-K FUNC xxx SGNL-D-C xxx SGNL-D-M xxx SGNL-D-K xxx SIGG-S-C xxx xxx SIGG-S-M xxx xxx SGNL-D-Y xxx SIGG-S-Y xxx DISP COUNTER OPTION <F> xxx SIGG-S-K xxx TEST F00-400-04 SGNL-S-C/M/Y/K Indicates the value of the SALT signal. Be sure to record the reading on the label. REF-S-C/M/Y/K Indicates the value of the SALT reference signal. Be sure to record the reading. SGNL-D-C/M/Y/K Indicates the value of the light reflected by the photosensitive drum. Be sure to record the reading. SIGG-S-C/M/Y/K Indicates the value of the gain for the SALT signal. Be sure to record the reading. COPYRIGHT © 2001 CANON INC. 2000 2000 2000 2000 CANON CLC5000 REV.0 JAN. 2001 S-83 SERVICE MODE <R-CON (reader controller PCB-related adjustment)> <M> R-CON DISP COUNTER ADJUST RAM-CLR <S> 1/2 <R> READY <P> <F> CHK-SUM RCON xxxx FUNC OPTION TEST F00-400-05 RAM-CLR Remarks Clears the all data of RAM on the reader controller PCB and sets the standard value. The power switch will automatically turn off when ‘RAM-CLR’ is executed. The contents of the RAM are replaced with the initial settings when the power switch is turned on thereafter. CHK-SUM Remarks Starts a check of the DIMM ROM on the reader controller PCB, i.e., totals the RAM data. During operation, ‘<R>READY->BUSY’. RCON Remarks S-84 Indicates the check sum value of DIMM ROM on the reader controller PCB. Indicates only when ‘CHK-SUM’ is executed. COPYRIGHT © 2001 CANON INC. 2000 2000 2000 2000 CANON CLC5000 REV.0 JAN. 2001 SERVICE MODE <DC-CON (DC controller PCB-related adjustment)> <M> DC-CON DISP <R> READY <P> CHK-SUM COUNTER ADJUST <S> 1/5 <F> RAM-CLR DCCON xxxx FUNC OPTION TEST F00-400-06 RAM-CLR Remarks Clears the all data of RAM on the DC controller PCB and sets the standard value. The contents of the RAM will not be replaced with the initial settings until the CPU on the DC controller PCB is powered, requiring you to turn off the power switch and disconnect and then connect the power plug after executing ‘RAM-CLR’. CHK-SUM Starts a check of the ROM on the DC controller PCB, i.e., totals the data in RAM. DCCON Remarks Indicates the check sum value of DIMM ROM on the DC controller PCB. Indicates only when ‘CHK-SUM’ is executed. COPYRIGHT © 2001 CANON INC. 2000 2000 2000 2000 CANON CLC5000 REV.0 JAN. 2001 S-85 SERVICE MODE <M> DC-CON DISP COUNTER ADJUST FUNC UP-A4R xxxx LOW-A4R xxxx MF-A4R xxxx <S> 2/5 UP-STMR xxxx LOW-STMR xxxx MF-A6R xxxx <R> READY <P> <F> MF-A4 xxxx OPTION TEST F00-400-07 ■ Entering Backup Data If you have executed ‘RAM-CLR’ for the DC controller PCB, use this screen to enter the data recorded on the service label. UP-A4R Enters the adjustment value for paper width detection reference point 1 for cassette 1. UP-STMR Enters the adjustment value for paper width detection reference point 2 for cassette 1. LOW-A4R Enters the adjustment value for paper width detection reference point 1 for cassette 2. LOW-STMR Enters the adjustment value for paper width detection reference point 2 for cassette 2. MF-A4R Enters the adjustment value for paper width detection reference point 1 for the multifeeder. MF-A6R Enters the adjustment value for paper width detection reference point 2 for the multifeeder. MF-A4 Enters the adjustment value for paper width detection reference point 3 for the multifeeder. S-86 COPYRIGHT © 2001 CANON INC. 2000 2000 2000 2000 CANON CLC5000 REV.0 JAN. 2001 SERVICE MODE <M> DC-CON DISP COUNTER ADJUST FUNC SGNL-C xxxx REF-C xxxx SIGG-C xxxx <S> 3/5 SGNL-M xxxx REF-M xxxx SIGG-M xxxx <R> READY <P> <F> SGNL-Y xxxx REF-Y xxxx SIGG-Y xxxx OPTION TEST F00-400-08 ■ Entering Backup Data If you have executed ‘RAM-CLR’ for the DC controller PCB, use this screen to enter the data recorded on the service label. SGNL-C/M/Y Enters the value of the toner density signal when INIT is executed as ATR control. REF-C/M/Y Enters the value of the toner density reference signal when INIT is executed as ATR control. SIGG-C/M/Y Enters the value of the gain for the toner density signal during ATR control (gain used to set SGNL-C, SGNL-M, and SGNL-Y to 818). COPYRIGHT © 2001 CANON INC. 2000 2000 2000 2000 CANON CLC5000 REV.0 JAN. 2001 S-87 SERVICE MODE <M> DC-CON DISP COUNTER ADJUST FUNC OPTION SGNL-S-C xxxx REF-S-C xxxx SGNL-D-C xxxx SIGG-S-C xxxx TEST <S> 4/5 SGNL-S-M xxxx REF-S-M xxxx SGNL-D-M xxxx SIGG-S-M xxxx PUDT-L xxxx <R> READY SGNL-S-Y xxxx REF-S-Y xxxx SGNL-D-Y xxxx SIGG-S-Y xxxx PUDT-U xxxx <P> <F> SGNL-S-K xxxx REF-S-K xxxx SGNL-D-K xxxx SIGG-S-K xxxx PTOFST-K xxxx F00-400-09 ■ Entering Backup Data If you have executed ‘RAM-CLR’ for the DC controller PCB, use this screen to enter the data recorded on the service label. SGNL-S-C/M/Y/K Use it to enter the value of the SALT signal. REF-S-C/M/Y/K Use it to enter the value of the SALT reference signal. SGNL-D-C/M/Y/K Use it to enter the value of the signal representing the intensity of light reflected by the photosensitive drum. SIGG-S-C/M/Y/K Use it to enter the value of the gain for the SALT signal. PT-OFST-K Use it to enter the adjustment value of the density pattern for SALT. PUDT-U/L Use it to enter the adjustment value for pick-up timing adjustment (P-UPTMG). S-88 COPYRIGHT © 2001 CANON INC. 2000 2000 2000 2000 CANON CLC5000 REV.0 JAN. 2001 SERVICE MODE <M> DC-CON DISP COUNTER ADJUST <S> 5/5 P-TH-1 XXXX C-OFST X P-TH-2 XXXX Y-OFST X POTOFSTC XX POTOFSTM XX <R> READY <P> <F> SNSR-RNK A K-OFST X FUNC OPTION POTOFSTY XX POTOFSTK XX TEST F00-400-10 ■ Entering Backup Data If you have executed ‘RAM-CLR’ for the DC controller PCB, use this screen to enter the data recorded on the service label. P-TH-1/2 Enters the output characteristics of the paper thickness sensor set at time of shipment from the factory. SNSR-RNK Remarks Enters the characteristics of the paper thickness sensor to be installed newly. The values A through E change by toggle operation. C/Y/K-OFST Use it to enter the offset value for the image position correction pattern. Do not enter any values other than those on the service data sheet. POTOFSTC/M/Y/K Use it to enter the offset value for the potential sensor. COPYRIGHT © 2001 CANON INC. 2000 2000 2000 2000 CANON CLC5000 REV.0 JAN. 2001 S-89 SERVICE MODE <CCD (CCD-related adjustment)> <M> CCD DISP COUNTER <S> 1/2 <R> READY <P> <F> AP-TYPE xxxx AUTO-ADJ LAMP ADJUST xxxx FUNC OPTION CCD-MODE 0 TEST CCD-DISP 0 <M> CCD DISP COUNTER GAIN-UP <S> 2/2 BLUE <R> READY GREEN xxxx ADJUST OFST-O BLUE FUNC OFST-E BLUE OPTION GAIN-O BLUE TEST GAIN-E BLUE <P> RED xxxx GREEN xxxx xxxx RED xxxx GREEN xxxx RED xxxx xxxx xxxx RED GREEN xxxx xxxx GREEN xxxx <F> xxxx RED xxxx xxxx F00-400-11 AUTO-ADJ Remarks Use it to specify the start of auto adjustment.The bar code data recorded on the standard white plate is read, and offset adjustment, intensity adjustment for the scanning lamp, and gain adjustment are executed in sequence. The display changes as follows: <R>RADY → Bar code → OeAdj → Offdj → LampAdj → GainAdj → OeAdj → InitBAdj → Gz-bar. Adjustments are made so that the value of point A is identical to the setting obtained from the bar code data recorded on the standard white plate. LAMP Use it to indicate the level adjustment value of the scanning lamp. CCD-MODE Use it to indicate whether the mode selected in user mode is normal mode or precious metal mode. 0: normal mode 1: precious metal mode S-90 COPYRIGHT © 2001 CANON INC. 2000 2000 2000 2000 CANON CLC5000 REV.0 JAN. 2001 SERVICE MODE CCD-DISP Use it to switch the display data for the following in service mode: ‘FUNC>CCD’ 0: indicate display in normal mode (default) 1: indicate data in precious metal mode TARGET Use it to display the shading adjustment correction value (target value of point B). BLUE Use it to indicate the data of BLUE. GREEN Use it to indicate the data of GREEN. RED Use it to indicate the data of RED. GAIN-UP Remarks Use it to indicate the setting of the gain-up mode (precious metal mode) for the analog processor PCB 0: normal mode 255: precious metal mode OFFST Indicates the value for offset level adjustment of the odd bits of the CCD. BLUE Indicates the data for blue of the offset level. GREEN Indicates the data for green of the offset level. RED Indicates the data for red of the offset level. BALANCE Indicates the value for balance level adjustment of the even and odd bits of the CCD. BLUE Indicates the data for blue of the balance level. GREEN Indicates the data for green of the balance level. RED Indicates the data for red of the balance level. GAIN Indicates the value for gain level adjustment of the CCD. BLUE Indicates the data for blue of the gain level. GREEN Indicates the data for green of the gain level. RED Indicates the data for red of the gain level. Scaning lamp CCD LAMP AMP A/D OFST BALANCE GAIN GAIN-UP Shading correction Point A B (TARGET) F00-400-12 COPYRIGHT © 2001 CANON INC. 2000 2000 2000 2000 CANON CLC5000 REV.0 JAN. 2001 S-91 SERVICE MODE <PRJ-ADJ (projector adjustment)> <M> PRJ-ADJ DISP COUNTER ADJUST FUNC PRJ-LAMP NEGA-B xxxx POSI-B xxxx <S> PRJ-CCD xxxx NEGA-G xxxx POSI-G xxxx <R> READY <P> <F> NEGA-R xxxx POSI-R xxxx OPTION TEST F00-400-13 PRJ-LAMP Keeps the lamp of the film projector ON for 1 min. (A press on the PRJLAMP key turns it off.) PRJ-CCD Adjusts the gain for the CCD and reads the appropriate data for installation work. NEGA-B *1 NEGA-G NEGA-R Adjusts the target value for shading when making copies of negative film using the film projector. • A higher value will make the images darker. B→Y G→M R→C Settings range –100~+100 S-92 COPYRIGHT © 2001 CANON INC. 2000 2000 2000 2000 CANON CLC5000 REV.0 JAN. 2001 SERVICE MODE POSI-B *1 POSI-G POSI-R Adjusts the target value for shading correction when making copies of positive film using the film projector. • A lower value will make the images darker. B→Y G→M R→C Settings range –100~+100 Note 1: You must enter the appropriate value whenever you have replaced the reader controller PCB or initialized a RAM; record any new values on the service label for this purpose. COPYRIGHT © 2001 CANON INC. 2000 2000 2000 2000 CANON CLC5000 REV.0 JAN. 2001 S-93 SERVICE MODE <LASER (laser adjustment)> Screen for Y <M> LASER-Y DISP COUNTER 1/2POWER 0 <S> 3/4 <R> READY POWER <P> BIAS-Y 0 0 ADJUST 400-P00 FUNC 800-P00 400-PFF 0 266-P00 266-PFF 0 <F> 0 800-PFF 0 0 0 OPTION TEST Screen for M/C (screen for M is shown) <M> LASER-M DISP COUNTER ADJUST 1/2POWER 0 200-P00 0 <S> 2/4 <R> POWER <P> <F> BIAS-M 0 200-PFF 0 400-P00 0 FUNC 400-PFF 0 0 800-PFF 800-P00 0 0 OPTION TEST Screen for Bk <M> LASER-K DISP COUNTER 1/2POWER 0 <S> 4/4 <R> POWER <P> BIAS-K 0 ADJUST 0 400-P00 400-PFF 0 FUNC 266-P00 266-PFF 0 <F> 800-P00 0 0 800-PFF 0 0 OPTION TEST F00-400-14 S-94 COPYRIGHT © 2001 CANON INC. 2000 2000 2000 2000 CANON CLC5000 REV.0 JAN. 2001 SERVICE MODE 1/2POWER Remarks Turns ON the laser output for laser power minimum value adjustment. A press on the Stop key will turn off the laser output. POWER Remarks Turns ON the laser output for laser power maximum value adjustment. A press on the Stop key will turn off the laser output. BIAS-(C, M, Y, K) Remarks Turns ON the laser output for laser power bias value adjustment. A press on the Stop key will turn off the laser output. 400-P00-(C, M, Y, K) 800-P00-(C, M, Y, K) Remarks Turns ON the laser output corresponding to V00 to check V00 in text mode. A press on the Stop key will turn off the laser output. 200-P00-(M, C) 266-P00-(Y, K) Remarks Turns ON the laser output corresponding to V00 to check V00 in photo mode. A press on the Stop key will turn off the laser output. 400-PFF-(C, M, Y, K) 800-PFF-(C, M, Y, K) Remarks Turns ON the laser output corresponding to V00 to check VFF in text mode. A press on the Stop key will turn off the laser output. 200-PFF-(M, C) 266-PFF-(Y, K) Remarks Turns ON the laser output corresponding to V00 to check VFF in photo mode. A press on the Stop key will turn off the laser output. COPYRIGHT © 2001 CANON INC. 2000 2000 2000 2000 CANON CLC5000 REV.0 JAN. 2001 S-95 SERVICE MODE <P-UP-TMG (pick-up timing adjustment)> <M> P-UP-TMG <S> DISP COUNTER DATA-U PK-ADJ-U PK-ADJ-L FUNC PK-ADJ-D OPTION MF-SKEW DATA-L 0 0 0 D-SEND-L 0 0 D-SEND-D PUDT-D 0 <F> D-SEND-U 0 PUDT-L DATA-D 0 <P> PUDT-U 0 0 ADJUST <R> 0 0 0 TEST F00-400-15 PK-ADJ-U/L Use it to execute automatic pick-up from the upper/lower cassette, thereby obtaining the pick-up timing adjustment value. Be sure to place A4 or LTR paper in the upper and lower cassettes before executing the operation. DATA-U/L/D Use it to indicate the data obtained by ‘PK-ADJ-U/L/D’. PUDT-U/L/D Use it to indicate the maximum value of the data obtained by ‘PK-AJD-U/ L/D’. D-SEND-U/L/D Use it to write the obtained data into memory. MF-SKEW Settings Use it to execute skew removing operation twice when pick-up is from the multifeeder tray (effective only when the paper type is set to ‘thickest’). 0: Remove skew by registration roller 1: Remove skew by registration roller and feeding roller Use it if thick paper tends to move askew. PK-ADJ-D Settings S-96 Use it to start automatic pick-up from the paper deck and to obtain the pickup timing adjustment value. This mode is an adjustment mode for LTR paper. As such, be sure to deposit LTR paper in the paper deck in advance. Use the mode if a discrepancy is noted along the leading edges of LTR copies. COPYRIGHT © 2001 CANON INC. 2000 2000 2000 2000 CANON CLC5000 REV.0 JAN. 2001 SERVICE MODE <ATTRACT (retention position adjustment)> <M> ATTRACT <S> DISP COUNTER <R> <P> <F> ATT-SLCT 0 ADJUST ATT-ON 0 FUNC OPTION TEST F00-400-16 ATT-SLCT Selects the source of paper for checking the point of retention. Source of paper 1 Upper cassette 2 Lower cassette 3 Paper deck 4 Multifeeder 5 Duplexing pick-up assembly Use A4/LTR paper for the mode. ATT-ON Starts operations according to the settings under ATT-SLCT, and stops automatically with paper retained on the transfer belt. Use A4/LTR paper for the mode. COPYRIGHT © 2001 CANON INC. 2000 2000 2000 2000 CANON CLC5000 REV.0 JAN. 2001 S-97 SERVICE MODE <EPC (photosensitive drum potential measurement)> <M> EPC DISP COUNTER <S> 1/2 <R> <P> <F> EPC V V00-300V-C XX VFF-300V-C XX V00-700V-C XX VFF-700V-C XX ADJUST FUNC OPTION TEST <M> EPC DISP V00-300V-Y XX VFF-300V-Y XX V00-700V-Y XX VFF-700V-Y XX V00-300V-M XX VFF-300V-M XX V00-700V-M XX VFF-700V-M XX <S> 2/2 <R> READY V00-300V-K XX VFF-300V-K XX V00-700V-K XX VFF-700V-K XX <P> <F> COUNTER ADJUST EPC-C EPC-M EPC-Y EPC-K FUNC xxx POTOFSTC xxx xxx POTOFSTM xxx xxx POTOFSTY xxx xxx POTOFSTK xxx OFFSET-C xx OFFSET-M xx OFFSET-Y xx OFFSET-K xx OPTION TEST F00-400-17 EPC Remarks Executes potential measurement on the photosensitive drum. The potential measurement data is used for the next copying run. POTOFSTC/M/Y/K Indicates the offset value for the potential sensor. OFFSET Remarks Executes offset adjustment on the potential measurement circuit of the photosensitive drum. The potential measurement data is used for the next copying run. V00-300V Remarks S-98 Indicates the photosensitive drum surface potential when the grid bias potential of the primary charging assembly is –300 V and the laser output is V00. Approximate value: 250~350 COPYRIGHT © 2001 CANON INC. 2000 2000 2000 2000 CANON CLC5000 REV.0 JAN. 2001 SERVICE MODE V00-700V Remarks Indicates the photosensitive drum surface potential when the grid bias potential of the primary charging assembly is –700 V and the laser output is V00. Approximate value: 650~750 VFF-300V Remarks Indicates the photosensitive drum surface potential when the grid bias potential of the primary charging assembly is –300 V and the laser output is VFF. Approximate value: 10~150 VFF-700V Remarks Indicates the photosensitive drum surface potential when the grid bias potential of the primary charging assembly is –700 V and the laser output is VFF. Approximate value: 50~250 COPYRIGHT © 2001 CANON INC. 2000 2000 2000 2000 CANON CLC5000 REV.0 JAN. 2001 S-99 SERVICE MODE <BLADE (transfer blade/transfer belt cleaning blade operation)> <M> DISP COUNTER <S> BLD-SLCT <R> <P> <F> BLD-ON 0 0 ADJUST FUNC OPTION TEST F00-400-18 BLD-SLCT Use it to determine the combination of ways to operate the transfer blade and the transfer belt cleaning blade. • Press ‘BLD-SLCT’, enter a number on the keypad, and press the ‘OK’ key. Transfer blade Transfer cleaning blade 1 In contact Off contact 2 Off contact In contact 3 In contact In contact BLD-ON Starts operation according to the settings under BLD-SLCT. In 10 sec, the blade will take off-contact position. S-100 COPYRIGHT © 2001 CANON INC. 2000 2000 2000 2000 CANON CLC5000 REV.0 JAN. 2001 SERVICE MODE <FUSER (fixing assembly-related adjustment)> <M> FUSER <S> NIP-CHK UPPER-CR ADJUST E000-RLS LOWER-CR FUNC E005-RLS DISP COUNTER <R> READY <P> <F> OPTION TEST F00-400-19 NIP-CHK Remarks Measures the fixing assembly nip. Paper is stopped once at the point of fixing and then delivered. Sine the operation uses cassette 1 as the source of paper, ‘NO PAPER’ will be indicated over ‘P’ if no paper exists in cassette 1. The notation changes to ‘READY’ when paper is supplied. Press NIP-CHK to execute. The notation over ‘P’ changes from READY to SERVICE and then to READY to end the execution. E000-RLS Remarks Clears E000. Be sure to turn off and then on the power switch after execution. The notation over ‘P’ changes from ERROR to BUSY and then to ERROR. Turn off and on the power switch to clear. E005-RLS Remarks Clears E005. Be sure to turn off and then on the power switch after execution. The notation over ‘P’ changes from ERROR to BUSY and then to ERROR. Turn off and on the power switch to clear. UPPER-CR Use it to adjust the fixing temperature value (upper roller). If you have replaced the fixing assembly, enter the value recorded on the label attached to the fixing assembly. Thereafter, be sure to turn off and then on the power switch. COPYRIGHT © 2001 CANON INC. 2000 2000 2000 2000 CANON CLC5000 REV.0 JAN. 2001 S-101 SERVICE MODE LOWER-CR Use it to adjust the fixing temperature value (lower roller). If you have replaced the fixing assembly, enter the value recorded on the label attached to the fixing assembly. Thereafter, be sure to turn off and then on the power switch. Settings range –3 ~ +3 (At time of shipment: 0) Do not enter a value other than the one indicated on the label. S-102 COPYRIGHT © 2001 CANON INC. 2000 2000 2000 2000 CANON CLC5000 REV.0 JAN. 2001 SERVICE MODE <CST-AD (cassette paper width adjustment)> <M> CST-AD DISP COUNTER ADJUST FUNC UP-A4R xxxx LOW-A4R xxxx MF-A4R xxxx <S> UP-STMR xxxx LOW-STMR xxxx MF-A6R xxxx <R> READY <P> <F> xxxx xxxx MF-A4 xxxx xxxx OPTION TEST F00-400-20 UP-A4R Executes automatic adjustment of paper width detection reference point 1 for cassette 1. UP-STMR Executes automatic adjustment of paper width detection reference point 2 for cassette 1. LOW-A4R Executes automatic adjustment of paper width detection reference point 1 for cassette 2. LOW-STMR Executes automatic adjustment of paper width detection reference point 2 for cassette 2. MF-A4R Executes automatic adjustment of paper width detection reference point 1 for the multifeeder. MF-A6R Executes automatic adjustment of paper width detection reference point 2 for the multifeeder. MF-A4 Executes automatic adjustment of paper width detection reference point 3 for the multifeeder. COPYRIGHT © 2001 CANON INC. 2000 2000 2000 2000 CANON CLC5000 REV.0 JAN. 2001 S-103 SERVICE MODE <F-MISCs (reader-related operation/inspection)> <M> F-MISCs <S> <R> READY LED-CHK LED-OFF ADJUST LCD-CHK PRESS STOP KEY FUNC KEY-CHK DISP COUNTER KEY-OFF SC-MOVE 0/4 LAMP-ON 0 TEST <F> RESERVE1 0 RESERVE2 0 RESERVE3 0 RESERVE4 0 0 OPTION <P> FILT-IMG DEMO 0 F00-400-21 LED-CHK Starts an activation check on the LED. LED-OFF Starts an activation check on the LED. LCD-CHK Remarks Starts an activation check on the LCD. (The notation becomes highlighted.) A press on the Stop key ends the check. KEY-CHK Remarks Starts an input check on the key. (See the detail for KEY-CHK.) Indicates the number/name of the input key in question. ■ Details of KEY-CHK Key 0 to 9 Reset Stop Two-Sided One-Touch Adjust Color Adjust Extended Zoom Frame Erase Color Create Page Separate Shift Image Create Area Select Synthesize S-104 Key name 0~9 RESET STOP A B C D E F G H I K L COPYRIGHT © 2001 CANON INC. 2000 2000 2000 2000 CANON CLC5000 REV.0 JAN. 2001 SERVICE MODE User Mode Cover Transparency Insert Start Pre-Heat Interrupt Clear ID Call M N O START STAND BY INTERRUPT CLEAR ID CALL KEY-OFF Ends the input check on the key. SC-MOVE Starts a check on the scanner. Each press on SC-MOVED changes the notation and the operation as follows: Notation 0/4 1/4 2/4 3/4 Operation HP A→B B→C C→HP T00-400-05 HP A B C F00-400-22 LAMP-ON Remarks Starts a check on the scanning lamp. Each press on LAMP-ON changes the notation and the operation as follows: Notation Operation 0→1 ON when intensity data 80 (light) 1→0 ON when Intensity data 00 (dark) Each press on the key switches between ‘00’ and ‘80’ for the intensity data. • ‘00’ represents OFF. DEMO Reserved. RESERVE1/2/3/4 Reserved. COPYRIGHT © 2001 CANON INC. 2000 2000 2000 2000 CANON CLC5000 REV.0 JAN. 2001 S-105 SERVICE MODE <F-MISCp (printer-related operation/inspection)> <M> F-MISCp DISP COUNTER IO <S> 1/2 <R> READY <P> <F> IO-ON 1 SHV ADJUST SHV-ON MTR 1 FUNC FAN MTR-ON DRM-ROT 1 FAN-ON 1 OPTION TEST <M> F-MISCp DISP COUNTER <S> 2/2 E075-RLS <R> <P> <F> SHUT-OFF ADJUST FUNC OPTION TEST F00-400-23 IO Use it to select the type of IO (input/output) check. See the details section. IO-ON Use it to start an IO (input/output) check. SHV Use it to select the type of check on the high-voltage output. Enter a number on the keypad, and press the OK key. See the details section in SHV. SHV-ON Use it to start a check on the high-voltage output. Press the Stop key to stop operation. MTR Use it to select the type of check on the motor. Enter a number on the keypad, and press the OK key. See the details section in MTR. S-106 COPYRIGHT © 2001 CANON INC. 2000 2000 2000 2000 CANON CLC5000 REV.0 JAN. 2001 SERVICE MODE MRT-ON Use it to start a check on the motor. Press the Stop key to stop the operation. FAN Remarks Use it to select the type of check on the fan. Enter a number on the keypad, and press the OK key. See the details section in FAN. FAN-ON Use it to start a check on the fan. Press the Stop key to stop the operation. DRM-ROT Use it to cause the drum to rotate idly for 10 min. Press the Stop key to stop. Be sure to release the transfer belt before execution. E075/RLS Use it to clear ‘E075’. After execution, check to make sure that the transfer belt is at the correct position; then, turn off and then on the power switch. SHUT-OFF Use it to check the operation of the auto power-off mechanism. COPYRIGHT © 2001 CANON INC. 2000 2000 2000 2000 CANON CLC5000 REV.0 JAN. 2001 S-107 SERVICE MODE ■ Details of IO No. 1 2 3 4 5 6 7 8 9 10 11 12 13 14 15 16 17 18 19 20 21 22 23 24 25 S-108 Parts name not used Transfer belt lifter clutch (CL17) Polishing roller solenoid (SL18) Y transfer blade solenoid (SL7Y) M transfer blade solenoid (SL7M) C transfer blade solenoid (SL7C) K transfer blade solenoid (SL7Bk) C toner supply clutch (CL1) M toner supply clutch (CL2) Y toner supply clutch (CL3) Bk toner (upper) supply clutch (CL4) Bk toner (lower) supply clutch (CL5) Fixing web take up solenoid (SL3) Fixing web releasing solenoid (SL4) Fixing oil pump drive solenoid (SL2) Separation claw releasing solenoid (SL15) SALT sensor shutter (SL17Y, M, C, Bk) Cassette 1 pickup roller releasing solenoid (SL9) Cassette 2 pickup roller releasing solenoid (SL10) Multifeeder pickup roller releasing solenoid (SL5) Paper deck pickup roller releasing solenoid (SL8001) not used Paper feed roller solenoid (SL13) Cassette 1 pickup clutch (CL12) Cassette 2 pickup clutch (CL14) No. 26 27 28 29 30 31 32 33 34 35 36 37 38 39 40 41 42 43 44 45 46 47 48 49 50 51 Parts name Multifeeder pickup clutch (CL6) Multifeeder feeding clutch (CL7) not used Paper deck pickup clutch (CL8002) Duplex pickup roller clutch (CL10) Registration roller releasing solenoid (SL16) not used not used not used not used not used Reversing roller drive clutch (CL16) Delivery paper deflecting solenoid (SL14) Duplexing unit paper deflecting plate solenoid (L; SL11L) uplexing unit paper deflecting plate solenoid (M; SL11M) Duplexing unit paper deflecting plate solenoid (S; SL11S) not used not used not used Pre-exposure lamp Fixing motor (138 mm/s) ATR LED SALT-Y LED SALT-M LED SALT-C LED SALT-K LED COPYRIGHT © 2001 CANON INC. 2000 2000 2000 2000 CANON CLC5000 REV.0 JAN. 2001 SERVICE MODE ■ Details of SHV No. High-voltage output Control 1 Primary C charging assembly, grid C output, auxiliary high-voltage Y (–350 µA), developing bias CDC (–370 V) output Transfer lifter DOWN, photosensitive drum motor ON, pre-exposure ON, primary C output, grid C output (500 V), auxiliary highvoltage output C (–350 µA), developing bias CDC (–370 V) output IB (Waits for a stop command, or 60 sec.) Primary C output, grid C output (500 V), auxiliary high-voltage output C (–350 µA), developing bias CDC (–370 V) output OFF, preexposure OFF, photosensitive drum motor OFF 2 Primary M charging assembly, grid M output, Transfer lifter DOWN, photosensitive drum auxiliary high-voltage Y (–350 µA), develop- motor ON, pre-exposure ON, primary M outing bias MDC (–370 V) output put, grid M output (500 V), auxiliary highvoltage output M (–350 µA), developing bias MDC (–370 V) output IB (Waits for a stop command, or 60 sec.) Primary M output, grid M output (500 V), auxiliary high-voltage output M (–350 µA), developing bias MDC (–370 V) output OFF, pre-exposure OFF, photosensitive drum motor OFF 3 Primary Y charging assembly, grid Y output, auxiliary high-voltage Y (–350 µA), developing bias YDC (–370 V) output Transfer lifter DOWN, photosensitive drum motor ON, pre-exposure ON, primary Y output, grid Y output (500 V), auxiliary highvoltage output Y (–350 µA), developing bias YDC (–370 V) output IB (Waits for a stop command, or 60 sec.) Primary Y output, grid Y output (500 V), auxiliary high-voltage output Y (–350 µA), developing bias YDC (–370 V) output OFF, preexposure OFF, photosensitive drum motor OFF 4 Primary K charging assembly, grid K output, auxiliary high-voltage Y (–350 µA), developing bias KDC (–370 V) output Transfer lifter DOWN, photosensitive drum motor ON, pre-exposure ON, primary K output, grid K output (500 V), auxiliary highvoltage output K (–350 µA), developing bias KDC (–370 V) output IB (Waits for a stop command, or 60 sec.) Primary K output, grid K output (500 V), auxiliary high-voltage output K (–350 µA), developing bias KDC (–370 V) output OFF, pre-exposure OFF, photosensitive drum motor OFF COPYRIGHT © 2001 CANON INC. 2000 2000 2000 2000 CANON CLC5000 REV.0 JAN. 2001 S-109 SERVICE MODE No. High-voltage output Control 5 Primary Y/M/C/K primary charging assembly, C/M/Y/K grid output, C/M/Y/K transfer high-voltage, developing bias C/M/Y/K-DC (–370 V) output, internal static eliminator assembly, separation charging assembly output Transfer lifter UP, photosensitive drum motor ON, pre-exposure ON, belt motor ON, transfer blade ON 6 Developing bias C-AC/DC output, anti-stray toner high-voltage output Developing bias C-AC/DC output, anti-stray toner high-voltage output ON (Waits for a stop command, or 60 sec.) Developing bias C-AC/DC output, anti-stray toner high-voltage output OFF 7 Developing bias M-AC/DC output, anti-stray toner high-voltage output Developing bias M-AC/DC output, anti-stray toner high-voltage output ON (Waits for a stop command, or 60 sec.) Developing bias M-AC/DC output, anti-stray toner high-voltage output OFF 8 Developing bias Y-AC/DC output, anti-stray toner high-voltage output Developing bias Y-AC/DC output, anti-stray toner high-voltage output ON (Waits for a stop command, or 60 sec.) Developing bias Y-AC/DC output, anti-stray toner high-voltage output OFF 9 Developing bias K-AC/DC output, anti-stray toner high-voltage output Developing bias K-AC/DC output, anti-stray toner high-voltage output ON (Waits for a stop command, or 60 sec.) Developing bias K-AC/DC output, anti-stray toner high-voltage output OFF S-110 C/M/Y/K primary output, grid output (500 V), developing bias DC (-370 V) output, internal static eliminator assembly output, separation charging output, transfer charging output ON (Waits for a stop command while the transfer belt makes 10 rotations.) Transfer charging output, internal static eliminator assembly output, separation charging output OFF, transfer blade OFF, post rotation sequence COPYRIGHT © 2001 CANON INC. 2000 2000 2000 2000 CANON CLC5000 REV.0 JAN. 2001 SERVICE MODE ■ Details of MTR No. Motor Control 1 M10 (Multifeeder pickup motor) *1 Operates for 10 sec, stops for 3 sec, and then operates for 10 sec and stops. 2 M21 (photosensitive drum motor) *1 Operates for 10 sec, stops for 3 sec, and then operates for 10 sec and stops. 3 M4 (laser scanner motor) *1 Operates for 10 sec, stops for 3 sec, and then operates for 10 sec and stops. 4 M20 (waste toner feed motor) *1 Operates for 10 sec, stops for 3 sec, and then operates for 10 sec and stops. 5 M18C, M18M, M18Y, M18Bk (C/M/Y/K developing motor) *1 Operates for 10 sec, stops for 3 sec, and then operates for 10 sec and stops. 6 M9 (fixing motor) *1 Rotates for 10 sec at standard speed (138 mm/sec) for plain paper (64 to 104 g), for 10 sec at standard speed (90 mm/sec) for thick paper (157 g), for 10 sec at standard speed (68 mm/sec) for ultra thick paper (209 g), for 10 sec at gloss speed (45 mm/sec) for ultra thick paper (209 g), and stops for 3 sec. 7 M14 (transfer belt motor) *1 Operates for an equivalent of 2 rotations of the belt and stops for 3 sec; then, operates for an equivalent of 2 rotations, and stops. 8 M11 (pre-fixing feed motor) *1 Rotates for 10 sec at standard speed (138 mm/sec) for plain paper (64 to 104 g), for 10 sec at standard speed (90 mm/sec) for thick paper (157 g), for 10 sec at standard speed (68 mm/sec) for ultra thick paper (209 g), for 10 sec at gloss speed (45 mm/sec) for ultra thick paper (209 g), and stops for 3 sec. 9 Buffer pass unit motor *1 Rotates for 10 sec at standard speed (138 mm/sec) for plain paper (64 to 104 g), for 10 sec at standard speed (90 mm/sec) for thick paper (157 g), for 10 sec at standard speed (68 mm/sec) for ultra thick paper (209 g), for 10 sec at gloss speed (45 mm/sec) for ultra thick paper (209 g), and stops for 3 sec. 10 M19 (duplex feed motor) 11 M15 (polishing/oil removing motor) 12 M24Y, M24M, M24C, M24Bk (primary charging wire cleaner motor) Cleans by a single back-and-forth trip. 13 Fixing web motor Operates for 5 sec and then stops. Note 1: *1 Operates for 10 sec, stops for 3 sec, and then operates for 10 sec and stops. *1 Rotates CCW/CW for 10 sec, stops for 3 sec, rotates CCW for 10, and then stops. Its operation stops in response to a press on the Stop key. COPYRIGHT © 2001 CANON INC. 2000 2000 2000 2000 CANON CLC5000 REV.0 JAN. 2001 S-111 SERVICE MODE No. Motor 14 15 M12 (Transfer belt cleaning motor) M2 (mirror slant correction motor for Y) 16 M3 (mirror ratio correction motor for Y) 17 M5 (mirror slant correction motor for C) 18 M6 (mirror ratio correction motor for C) 19 M7 (mirror slant correction motor for Bk) 20 M8 (mirror ratio correction motor for Bk) 21 M13 (transfer belt swing motor) 22 M23 (duplexing paper jogging guide motor) 23 M28 (duplex reversal motor) 24 M16 (cassette1 lifter motor) 25 M17 (cassette2 lifter motor) 26 M1 (multifeeder lifter motor) 27 M8001 (paper deck motor) 28 Registration shutter motor 29 Y/C/Bk image correction mirror Ratio correction motor (M3, M6, M8) Y/C/Bk image correction mirror Slant correction motor (M2, M5, M7) 30 S-112 Control Operates for 1 sec and then stops. Rotates CW for a single full turn, rotates CCW for a single turn, and then stops. Rotates CW for a single full turn, rotates CCW for a single turn, and then stops. Rotates CW for a single full turn, rotates CCW for a single turn, and then stops. Rotates CW for a single full turn, rotates CCW for a single turn, and then stops. Rotates CW for a single full turn, rotates CCW for a single turn, and then stops. Rotates CW for a single full turn, rotates CCW for a single turn, and then stops. Rotates CW for a single full turn, rotates CCW for a single turn, and then stops. Executes home position detection, stops for 3 sec, moves to A4 position, stops for 3 sec, moves to B4 position, stops for 3 sec, moves to A4R position, stops for 3 sec, moves to B5R position, stops for 3 sec, and then moves to home position. Rotates for draw-in operation for 3 sec, rotates for feed-out operation for 3 sec, stops for 1 sec, rotates for draw-in for 3 sec, rotates for feed-out for 3 sec, and then stops. Rotates for lifter-up operation for 3 sec, and then stops. (Return the lifter by hand.) Rotates for lifter-up operation for 3 sec, and then stops. (Return the lifter by hand.) Rotates for lifter-up operation for 3 sec, stops for 3 sec, rotates for lifter-down operation for 3 sec, and then stops. Rotates for lifter-down operation for 10 sec, rotates for lifter-up operation for 10 sec, and then stops. Executes a single registration shutter open/ close operation. Operates the image correction mirror, and generates a test pattern (PG=06, grid); then, returns the mirror to original position. (Each motor may be assumed to be operating normally if a discrepancy exists between the M grid and the grid of each color.) Pick-up will be from the cassette 1; be sure to put A4/LTR paper in the cassette in advance. COPYRIGHT © 2001 CANON INC. 2000 2000 2000 2000 CANON CLC5000 REV.0 JAN. 2001 SERVICE MODE No. Motor 31 M38(cassette1 pickup motor) 32 M39(cassette2 pickup motor) 33 M37(re-pickup motor) 34 M36(paper deck pickup motor) 35 M35(registration motor) 36 M2(buffer unit reversal motor) Control Operates for 10sec,stops for 3sec,and operates for 10 sec and stops Operates for 10sec,stops for 3sec,and operates for 10 sec and stops Operates for 10sec,stops for 3sec,and operates for 10 sec and stops Operates for 10sec,stops for 3sec,and operates for 10 sec and stops Operates for 10sec,stops for 3sec,and operates for 10 sec and stops Operates for 10sec,stops for 3sec,and operates for 10 sec and stops COPYRIGHT © 2001 CANON INC. 2000 2000 2000 2000 CANON CLC5000 REV.0 JAN. 2001 then then then then then then S-113 SERVICE MODE ■ Details of FAN Type Fan 1 Laser cooling fan (FM4, front; FM5, rear) 2 Primary suction fan (FM8, left; FM9, right) 3 Primary exhaust fan (FM6) 4 Pre-fixing feeding fan (FM7) 5 9 Pre-fixing feeding fan (FM7) low-speed rotation Delivery assembly exhaust fan 1 (FM1), 2 (FM2), 3 (FM3) high-speed rotation Delivery assembly exhaust fan 1 (FM1), 2 (FM2), 3 (FM3) low-speed rotation Delivery lower cooling fan1 (FM19) Delivery lower cooling fan2 (FM20) Delivery lower cooling fan3 (FM27) Delivery colling fan (FM34) 10 All fans 6 7 8 Control On for 5 sec, off for 5 sec; then, remains on continuously. ON for 5 sec, off for 5 sec; then, on for 5 sec and stops. On for 5 sec, off for 5 sec; then, on for 5 sec and stops. Rotates at high-speed for 10sec, then, rotates at low-speed for 10sec, and stops. On for 5 sec, off for 5 sec; then, operates continuously. FM27 rotates for 10sec, thereafter, FM19/20 rotates for 10sec and then stops. Rotates at high-speed for 10sec;then, rotates at low-speed for 10sec, and stops. The cooling fan rotates at high-speed for 5 sec and then at low-speed for 5 sec: • Delivery assembly exhaust fan 1 (FM1) • Delivery assembly exhaust fan 2 (FM2) • Delivery assembly exhaust fan 3 (FM3) • Pre-fixing feed fan (FM7) • General delivery fan 1 (FM21) • General exhaust fan 2 (FM22) • General exhaust fan 3 (FM 23) • Delivery cooling fan (FM34) To stop the operation, turn off the power switch. Press the Stop key to stop the operation, thereby returning to normal state. REF. S-114 COPYRIGHT © 2001 CANON INC. 2000 2000 2000 2000 CANON CLC5000 REV.0 JAN. 2001 SERVICE MODE <TCLN (polishing roller/oil removing roller operation)> <M> TCLN DISP ADJUST COUNTER <S> <R> READY <P> READY <F> KCLN OCLN FUNC OPTION TEST F00-400-24 KCLN Remarks Use it to bring the polishing roller in contact while moving the transfer belt. The operation will stop after last rotating sequence. (for about 30 sec). During operation, the notation is ‘P’ SERVICE. Stops automatically after operating for a specific period of time. OCLN Remarks Butts the oil removing roller against the transfer belt, and rotates both the transfer belt and the oil removing roller (for about 30 sec). During operation, the notation is ‘P’ SERVICE. Stops automatically after operating for a specific period of time. COPYRIGHT © 2001 CANON INC. 2000 2000 2000 2000 CANON CLC5000 REV.0 JAN. 2001 S-115 SERVICE MODE <P-THICK (paper thickness sensor adjustment)> <M> P-THICK DISP COUNTER ADJUST <S> <R> READY P-TH-1 XXXX P-TH-2 XXXX <P> <F> P-TH-DATA XXXX FUNC OPTION SNSR-RNK A TEST F00-400-25 P-TH-1/2 Indicates the output characteristics of the paper thickness sensor set at time of shipment from the factory. SNSR-RNK Remarks Enters the characteristics (A through E) of the paper thickness sensor to be installed newly. Values A through E change by toggle operation. P-TH-DATA Indicates the data on paper that has been fed. S-116 COPYRIGHT © 2001 CANON INC. 2000 2000 2000 2000 CANON CLC5000 REV.0 JAN. 2001 SERVICE MODE <IMG-REG (image position correction control)> <M> IMG-REG DISP COUNTER <S> 1/2 <R> READY <P> <F> AUTO-ADJ 0 ADJUST FUNC M-READ XXX M-WR-F XXX M-WR-R XXX OPTION TEST C-REG-H XXX Y-REG-H XXX K-REG-H XXX C-REG-HS X Y-REG-HS X K-REG-HS X C-REG-V XXX Y-REG-V XXX K-REG-V XXX F00-400-26 AUTO-ADJ Remarks Use it to execute the series of operations for image position correction control. <P>READY→SERVICE→READY 1 min (approx.) M-READ Use it to indicate the start position of reading the pattern for M. M-W-F M-W-R Use it to indicate the start position of writing the pattern for M. F: Front. R: Rear. Y/C/K-REG-H Use it to correct the write start position of the pattern for Y/C/K. (rough adjustment in main scanning direction) Do not use this item unless ‘E194’ is indicated (error that disables image position correction) Remarks A higher setting shifts the pattern to the rear. Rear Front Feeding direction F00-400-27 Settings range 0 ~ 255 Standard: Unit: 128 1 pixel (63.5µm) COPYRIGHT © 2001 CANON INC. 2000 2000 2000 2000 CANON CLC5000 REV.0 JAN. 2001 S-117 SERVICE MODE Y/C/K-REG-HS Use it to correct the write start position of the pattern for Y/C/K. (fine adjusment in main scanning divection) Do not use this item unless ‘E194’ is indicated (error that disables image position correction). Settings range 0 ~ 3 Standard: Unit: 0 1/4 pixel Y/C/K-REG-V Use it to correct the write start position of the pattern for Y/C/K. (fine adjustment in main scanning direction) Use it to correct the write start position of the pattern for Y/C/K. (sub scanning direction) Do not use this item unless ‘E194’ is indicated (error that disables image position correction). Remarks A higher setting will shift the pattern to the trailing edge. Leading edge Trailing edge Feeding direction F00-400-28 Settings range 0 ~ 255 Standard: Unit: S-118 128 1 pixel (63.5µm) COPYRIGHT © 2001 CANON INC. 2000 2000 2000 2000 CANON CLC5000 REV.0 JAN. 2001 SERVICE MODE <M> IMG-REG DISP COUNTER REG-ERR-FLG <S> 2/2 0: 0000 4: 0000 <R> READY 1: 0000 5: 0000 2: 0000 6: 0000 <P> <F> 3: 0000 7: 0000 ADJUST FUNC OPTION TEST F00-400-29 REG-ERR-FLG Indicates how the image position correction pattern is read. 0:0000 through 7:0000 corresponds to 8 sets of patterns. (‘0000’ indicates the absence of an error; if an error is found in all 8 sets, ‘E194’ will be indicated. If any of the sets is ‘0000’, its data will be used for correction.) 0:016A set 1 through set 8 Y pattern M pattern C pattern Bk pattern 4-bit data is assigned to each color data, and a ‘1’ is assigned where an error exists. 0:016A 0110 front main scanning front sub scanning rear main scanning rear sub scanning In the case of the above, an error exists on the pattern for C of set 1 at front in sub scanning direction and at rear in main scanning direction. COPYRIGHT © 2001 CANON INC. 2000 2000 2000 2000 CANON CLC5000 REV.0 JAN. 2001 S-119 SERVICE MODE 5 OPTION (options mode) <M> DISP COUNTER <S> <R> READY <P> READY <F> R-OPT ADJUST P-OPT REMOTE FUNC DECK DATA-CON OPTION TEST F00-500-01 1 2 3 4 5 S-120 R-OPT P-OPT REMOTE DECK DATA-CON Selects reader-related machine settings. Adjusts the cleaning mode transfer drum stop position. Sets conditions for connection with an external controller. Sets conditions for connection with a paper deck. Use it to disconnect the copy Data Controller-A1 DA unit-A1. COPYRIGHT © 2001 CANON INC. 2000 2000 2000 2000 CANON CLC5000 REV.0 JAN. 2001 SERVICE MODE <R-OPT (reader-related machine settings)> <M> R-OPT DISP COUNTER P-SIZE <S> <R> READY <F> THIN-APS MANAGE 0 <P> READY 0 0 ADJUST FUNC METAL 0 OPTION CONTROL 0 OHP-MODE 0 SMP-NUM 0 TEST F00-500-02 P-SIZE*1 Settings Identifies the size of paper and transparency film of the copier. 0: AB-configuration 1: Inch-configuration 2: A-configuration 3: All METAL*1 Settings Determines whether to use or not metal mode in user mode. 0: Not available 1: Available (Standard: 0) CONTROL*1 Settings Remarks Use it to enable copying, printing, and scanning in the absence of the following input: • control key inserted • card inserted (with Control Card-IV/Card Reader-B1 connected) • ID number entered (when pre-set) 0 to 44 (default: 0) (Each digit may be between 0 and 4; if set to ‘0’, conditional operation is not enabled.) Value of Each Digit and Enabled Operations 1st digit: operation settings when control key is turned off 2nd digit: operation setting when card is not inserted 3rd digit: operation setting when ID No. is not entered Value of digit BW copy Color copy BW print 0 × × × 1 × × × 2 × × 3 × × 4 × ° ° ° ° : enabled Color print × × °× °×: disabled ° COPYRIGHT © 2001 CANON INC. 2000 2000 2000 2000 CANON CLC5000 REV.0 JAN. 2001 Scan × × × × × S-121 SERVICE MODE Caution EX 1 If the setting is ‘2’, When the control key is turned off, black-and-white printing/color printing is enabled. When the control card is not inserted, none is enabled. When the ID No. is not entered, none is enabled. EX 2 If the setting is ‘431’, When the control key is turned off, none is enabled. When the card is not inserted, black-and-white copying is enabled. When the ID No. is not entered, black-and-white copying/black-andwhite printing/color printing is enabled. <Count for Conditional Operation> Counter Counter on user mode screen Card counter ID No. counter Control key turned off Card not inserted ° ° ° ° ° ID number not entered ° ° × : increment : increment as needed ×: do not increment — Guide to the Table — a. Counter on the User Mode Screen • The count is incremented regardless of the settings for conditional operation. b. Card Counter If the Control Card-IV is connected, • If the setting for the absence of a card (2nd digit) is ‘3’ or ‘4’, the count is not incremented regardless of the presence/absence of a card in black-andwhite copying mode. • If the setting or the absence of a card (2nd digit) is ‘2’ or ‘4’, the counter is not incremented regardless of the presence/absence of a card in blackand-white printing/color printing mode. If the Card Reader-B1 is connected, • If the setting for the absence of a card (2nd digit) is ‘3’ or ‘4’, the counter is not incremented in the absence of a card in black-and-white copying mode. • In black-and-white printing/color printing mode, the counter is not incremented regardless of the setting for conditional operation. However, the OA counter of the Copy Data Controller-A1 is incremented regardless of the setting for unconditional operation. c. ID No. Counter • If the setting for the absence of an ID No. (3rd digital) is ‘3’ or ‘4’, the counter is not incremented regardless of an ID No. input in black-andwhite copying mode. • If the setting for the absence of an ID No. (3rd digit) is ‘2’ or ‘4’, the counter is not incremented regardless of an ID No. input in black-andwhite printing/color printing mode. S-122 COPYRIGHT © 2001 CANON INC. 2000 2000 2000 2000 CANON CLC5000 REV.0 JAN. 2001 SERVICE MODE MANAGE Settings Use it to bring the hues closer to those of professional printing. If ‘MANAGE’ is set to ‘1’, the Pro Print key will be indicated on the user mode screen. 0: Standard 1: Professional printing (standard: 1) For fine-adjustment, see the descriptions for ‘AJDUST>COL-ADJ>PTBL-M/C/Y/K’ OHP-MODE Settings Select the maximum density when making a copy outo a transparencies. 0~2 (Standard: 0) If the value is increased, the density becomes darker. SMP-NUM Settings Remarks Use it to change the range of sampling of the data representing the color selected on an original for color conversion. 0: sample selected color in area of 2x2 (standard) 1: sample selected color in area of 4x4 In the case of an original composed of dots, correct color identification may not be identified; if such is the case, set it to ‘1’ to increase the number of samplings. THIN-APS *1 Settings Remarks Use it to enable auto paper selection for thin paper. 0: disable auto paper selection (standard) 1: enable auto paper selection Thin paper will not be selected if of the following modes is selected: • sort, group, staple • double-sided SCAN-DWN *1 Settings Use it to reduce the acceleration speed of the scanner. 0: standard speed. (default) 1: acceleration speed reduced from standard. REF. Note 1: REF. If the image along the leading edge of copies is blurred, the acceleration speed of the scanner may be reduced to eliminate the problem. You must enter the appropriate value whenever you have replaced reader controller PCB or initialized a RAM; record any new values on the service label for this purpose. Overhead projectors may be either a reflecting type or a transmitting type. It is best to lower the copy image maximum density for a transmitting type projector. Change the value according to the type of projector used by the user. COPYRIGHT © 2001 CANON INC. 2000 2000 2000 2000 CANON CLC5000 REV.0 JAN. 2001 S-123 SERVICE MODE <P-OPT (Making settings Retated to the Printer unit)> <M> P-OPT DISP COUNTER ADJUST FUNC T-WEB 0 F-WEB-MD 0 PSTCL-ON 0 <S> <R> READY TBLT-POS 0 <P> READY <F> AUTO-REG 0 F-WEB 0 REG-NEXT 0 OPTION TEST F0-500-03 T-WEB *1 Changes the frequency at which the transfer belt cleaning web turns on. Settings range 1~5 (Standard: 3) TBLT-POS *1 Changes the stop position of the transfer belt. Settings range –2~2 Unit: 2 mm (Standard: 0) F-WEB-MD Settings Changes the ON/OFF sequence of the web solenoid when the fixing web solenoid is turned on. At present, the setting is always ‘1’. Standard: 1 F-WEB *1 Changes the frequency at which the fixing web solenoid turns on. Settings range 1~255 (Standard: 8) PSTCL-ON Setting S-124 Enabling or disabling the charging mechanism after display cleaning turn it on or off as needed if memory of the edge of a sheet occurs in a low-temperature environment or cyan or black dots occur in the images. 0: Normal 1: All environment ON COPYRIGHT © 2001 CANON INC. 2000 2000 2000 2000 CANON CLC5000 REV.0 JAN. 2001 SERVICE MODE REG-NEXT Settings Remarks Use it to delay the timing at which the first sheet of paper is picked up to prevent lines in main scanning direction near 188 mm from the leading edge of paper. 0: normal operation 1: delay pickup timing (standard: 0) The potential on the transfer belt is not stable when the first copy is made, with the photosensitive drum at times developing paper traces (drum memory) caused by the leading edge of paper. The traces will collect toner, and a line will occur on the next copy near 188 mm from its leading edge. AUTO-REG *1 Settings Note 1: Turn off the interlock between the image position correction and the start key. 0: Turn on the interlock with a start key. 1: Turn off the interlock with a start key. The value will return to the standard value when the RAM is initialized, requiring re-input. Be sure to record any new value on the service label. COPYRIGHT © 2001 CANON INC. 2000 2000 2000 2000 CANON CLC5000 REV.0 JAN. 2001 S-125 SERVICE MODE <REMOTE (making settings for use of extemal controller)> <M> REMOTE DISP COUNTER <S> <R> READY <P> READY <F> REMOTE 0 ADJUST P-PRT-MF 0 FUNC OPTION TEST F00-500-04 REMOTE Settings Use it to set priorities on parameters selected by the controller. 0: Use only the settings made on the copier’s control panel. For the items that can be selected only on the controller, the factory settings will be used. 1: Use the settings of the items that can be selected on the controller; for the rest of the items, use those selected on the copier. 2: Use the settings of the items that can be selected on the controller; for the rest of the items, use the factory settings. P-RPT-MF *1 Settings Note 1: S-126 Use it to set priorities on multifeeder setting data in case the mult: feeding is selected from the control panel. 0: Use only the settings made on the copier’s control panel. For the items that can be selected only on the controller, the factory settings will be used. 1: Use the settings of the items that can be selected on the controller; for the rest of the items, use those selected on the copier. 2: Use the settings of the items that can be selected on the controller; for the rest of the items, use the factory settings. You must enter the appropriate value whenever you have replaced the reader controller PCB or initialized a RAM; record any new values on the service label for this purpose. COPYRIGHT © 2001 CANON INC. 2000 2000 2000 2000 CANON CLC5000 REV.0 JAN. 2001 SERVICE MODE <Deck (Settings for the Paper Deck)> <M> DECK DISP COUNTER DECK-SET <S> <R> READY <P> READY <F> DECK-P 1 A4 ADJUST FUNC OPTION TEST F00-500-05 DECK-SET *1 Settings Specifies the presence/absence of a paper deck. 0: Absent 1: A4PD 2: A3PD Standard: 1 DECK-P *1 Settings Note 1: Selects the size of paper used in the paper deck. Each press on the key scans through the sizes. (Standard: A4) You must enter the appropriate value whenever you have replaced the reader controller PCB or initialized a RAM; record any new values on the service label for this purpose. COPYRIGHT © 2001 CANON INC. 2000 2000 2000 2000 CANON CLC5000 REV.0 JAN. 2001 S-127 SERVICE MODE <DATA-CON (disconnecting the Copy Data Controller-A1/DA unit -A1)> <M> DATA-CON <S> DISP COUNTER <R> READY <P> READY <F> USER B-CLR 0 ADJUST FUNC OPTION TEST F00-500-06 B-CLR Remarks S-128 Connecting the Copy Data Controller-A1/DA unit-A1 will automatically sets it to ‘1’. Be sure to set it to ‘0’ when temporarily separating the Copy Data Controller-A1/DA unit-A1 during service work. ‘E717’ will be indicated if you separate the Copy Data Controller-A1/DA unit-A1 without setting it to ‘0’.rating the Copy Data Controller-A1/DA unit-A1 during service work. COPYRIGHT © 2001 CANON INC. 2000 2000 2000 2000 CANON CLC5000 REV.0 JAN. 2001 SERVICE MODE 6.TEST (test print) <M> DISP COUNTER <S> <R> READY <P> READY <F> <P> READY <F> PG ADJUST FUNC OPTION TEST F00-600-01 <PG (Generates test prints)> <M> PG DISP COUNTER <S> TXPH <R> READY THRU TYPE 0 ADJUST DENS-C 0 DENS-M xxx 0 DENS-Y xxx DENS-K xxx xxx FUNC OPTION COLOR-C COLOR-M 0 COLOR-Y 0 COLOR-K 0 0 TEST F00-600-02 TXPH Operation Switches between text mode and photo mode. 04: 400-lines text mode 14: 200-lines photo mode 24: 800-lines 34: Auto switching Not valid if TYPE is set to 6 (grid). Each press causes the following sequential change. →04→14→24→34 THRU Operation Switches the gate array of the laser controller PCB. Not valid if TYPE is set to 5 (halftone). 0: Use gate array 1: Do not use gate array Each press causes the setting to alternate between ‘0’ and ‘1’. COPYRIGHT © 2001 CANON INC. 2000 2000 2000 2000 CANON CLC5000 REV.0 JAN. 2001 S-129 SERVICE MODE TYPE Remarks Selects the type of test print. PGTYPE Descriptionm 0 Image from CCD (normal copying) 1 For R&D 2 256 colors 3 256 gradations 4 17 gradations 5 Full face halftone 6 Grid 7 Image position correction control pattern 8 For R& D 9 For R&D 10 MCYK horizontal stripe 11 For R&D 12 For R&D 13 For R&D 14 Full color 17 gradations 15 For R&D 16 Not used 17 For R&D 18 For R&D 19 For R&D 20 For R&D 21 For R&D 22 For R&D Enter the appropriate number (1 through 16) using the keypad, and press the Start key to generate test prints. In the case of 3, 4, 5, or 6, the color may be selected in color mode (user mode). • Be sure to return the setting to 0 after generating the test print. DENS-C/M/Y/K Selects the density of each color for full face halftone for PGTYPE=5. Settings range 0~255 Standard: 128 COLOR-C/M/Y/K Use it to select the color to generate for each PG. 1: Generate. 0: Do not generate. Standard value: 1 Be sure to set TYPE back to 0 when leaving test print mode. S-130 COPYRIGHT © 2001 CANON INC. 2000 2000 2000 2000 CANON CLC5000 REV.0 JAN. 2001 SERVICE MODE 7.COUNTER (counter) <Total (Itemized counter list)> <M> DISP ADJUST FUNC OPTION TEST COUNTER <S> <R> READY <P> READY <001> <011> <021> <002> <003> <004> <005> <006> <007> <008> <009> <010> <012> <013> <022> <014> <015> <016> <017> <018> <019> <020> <023> <024> <025> <026> <027> <028> <029> <030> <F> <031> <032> <033> <034> <035> <036> <037> <038> <039> <040> F00-700-01 • • • After 999999, the reading returns to 000000. When a Level 3 item (except 038, 039, 040) is pressed and the Clear key is pressed after the item has been highlighted, the counter reading of the item will return to 00000. Check the value of Level 3 item 038 whenever you have replaced the cleaning web of the fixing assembly. If not 0, press E005-RLS under FUSER of FUNC to clear the counter reading. In addition, executing RAM-CLR for the reader controller PCB will reset all readings of the Level 3 items to 000000 (except 038, 039, 040). COPYRIGHT © 2001 CANON INC. 2000 2000 2000 2000 CANON CLC5000 REV.0 JAN. 2001 S-131 SERVICE MODE Item Description Item Description 001 Indicates the number of times the Y developing assembly has been used. Indicates the number of times the M developing assembly has been used. Indicates the number of times the C developing assembly has been used. Indicates the number of times the Bk developing assembly has been used. Indicates the number of Y-mono copies. Indicates the number of M-mono copies. Indicates the number of C-mono copies. Indicates the number of Bk-mono copies. Indicates the number of 3-color copies. Indicates the number of 4-color copies. Indicates the total number of copies. Indicates the total number or printouts. Indicates the number of sheets generated using the synthesis function. Indicates the total number of sheets (copies + printouts + synthesized printouts). Indicates the number of sheets picked up from cassette 1. Indicates the number of sheets picked up from cassette 2. Indicates the number of sheets picked up from Paper deck. Indicates the number of sheets picked up from the multifeeder. Indicates the number of sheets picked up from the duplexing unit. Indicates the number of scans made by the scanner. Indicates the number of copies made using the film projector. (reserved) 022 Indicates the number of pick-ups from the RF. Reserved Reserved Reserved Reserved Reserved Reserved Reserved Reserved Reserved Reserved Reserved Reserved Reserved Reserved Reserved Indicates the number of times the solenoid has turned ON from when the absence of web has been detected until E005 is indicated.(initially, ‘270’; incremented by 1 for each activation) Indicates the number of copies to be made until the next time the primary charging wire automatic cleaning mechanism turns on. (initially, ‘5000’; count down by 1 per copy) Indicates the number of copies to be made until the next time the polishing roller cleaning mechanism turns on.(initially, ‘5000’; count down by 1 per copy) 002 003 004 005 006 007 008 009 010 011 012 013 014 015 016 017 018 019 020 021 S-132 023 024 025 026 027 028 029 030 031 032 033 034 035 036 037 038 039 040 COPYRIGHT © 2001 CANON INC. 2000 2000 2000 2000 CANON CLC5000 REV.0 JAN. 2001 SERVICE MODE <DRBL-1 (Consumables Counter of Copier)> <M>DRBL-1 DISP COUNTER ADJUST FUNC OPTION SCN-LMP PR-CLN-U PR-CLN-L TR-BLD-C TR-BLD-M TR-BLD-Y TR-BLD-K TR-BLT <S>1/6 0 0 0 0 0 0 0 0 <R> READY / / / / / / / / 0 0 0 0 0 0 0 0 <P> READY <F>USER 0% 0% 0% 0% 0% 0% 0% 0% TEST F00-700-02 The machine is equipped with corsumables counters (DRBL-1/DRBL-2/PRDC-1), proriding references for parts replaced on a periodical basis or parts requiring replacement. EX. C1-PU-RL / 00098400 / 0120000 / 82% [1] [2] [3] [4] !! [5] 000027 [6] [1] Indicates the name of the part. In the case of the example, the primary charging wire. [2] Indicates the counter reading (number of actual sheets handled) ; clear it by pressing the clear key after replacing the part. [3] Indicates the limit setting (guide to replacement) ; the setting may be changed by selecting the image and using the keypad. [4] Indicates the ratio of counter readings to limt levels. [5] A single exclamation mark (!) will be indicated between 90% and 100% ; two marks at 100% or higher. [6] Indicates an estimated number of days to replacement ; in the case of the example, 27 days. SCN-LMP PR-CLN-U PR-CLN-L TR-BLD-C TR-BLD-M TR-BLD-Y TR-BLD-K TR-BLT PT-DRM-C the time for lighting of scanning lamp(LA1) primary charging wire cleaning pad (upper) primary charging wire cleaning pad (lower) the number of copies passed through the transfer blade unit(C) the number of copies passed through the transfer blade unit(M) the number of copies passed through the transfer blade unit(Y) the number of copies passed through the transfer blade unit(K) the number of copies passed through thetransfer belt the number of copies passed through the drum(C) count two per one large size copy count two per one large size copy count two per one large size copy count two per one large size copy count two per one large size copy COPYRIGHT © 2001 CANON INC. 2000 2000 2000 2000 CANON CLC5000 REV.0 JAN. 2001 [unit:sec] [unit:copy] [unit:copy] [unit:copy] [unit:copy] [unit:copy] [unit:copy] [unit:copy] [unit:copy] S-133 SERVICE MODE PT-DRM-M PT-DRM-Y PT-DRM-K CLN-BLD the number of copies passed through the drum(M) the number of copies passed through the drum(Y) the number of copies passed through the drum(K) the number of copies passed through the transfer cleaning blade DV-UNT-C the number of copies passed through the developing cylinder(C) DV-UNT-M the number of copies passed through the developing cylinder(M) DV-UNT-Y the number of copies passed through the developing cylinder(Y) DV-UNT-K the number of copies passed through the developing cylinder(K) C1-PU-RL the number of copies passed through the pickup roller(cassette1) C1-SP-RL the number of copies passed through the separation roller(cassette1) C1-FD-RL the number of copies passed through the pickup roller(cassette1) C2-PU-RL the number of copies passed through the pickup roller(cassette2) C2-SP-RL the number of copies passed through the separation roller(cassette2) C2-FD-RL the number of copies passed through the pickup roller(cassette2) M-PU-RL the number of copies passed through the multifeeder pickup roller M-SP-RL the number of copies passed through the multifeeder separation roller M-FD-RL the number of copies passed through the multifeeder pickup roller count two per one large FX-UP-RL the number of copies passed through the upper size copy fixing roller count two per one large FX-LW-RL the number of copies passed through the lower size copy fixing roller count two per one large FHTR-U the number of copies passed through the upper size copy fixing heater count two per one large the number of copies passed through the lower FHTR-L size copy fixing heater the limit of FX-WEB is FX-WEB-U the number of copies passed through the upper set to 186,000 fixing web the limit of FX-WEB is FX-WEB-L the number of copies passed through the lower set to 186,000 fixing web OIL-APBL the number of copies passed through the oil applying brade count two per one large WST-TNR the number of copies passed through the waste size copy toner box PRM-GR-C the number of copies passed through the primary grid wire(C) S-134 [unit:copy] [unit:copy] [unit:copy] [unit:copy] [unit:copy] [unit:copy] [unit:copy] [unit:copy] [unit:copy] [unit:copy] [unit:copy] [unit:copy] [unit:copy] [unit:copy] [unit:copy] [unit:copy] [unit:copy] [unit:copy] [unit:copy] [unit:copy] [unit:copy] [unit:time] [unit:time] [unit:copy] [unit:copy] [unit;copy] COPYRIGHT © 2001 CANON INC. 2000 2000 2000 2000 CANON CLC5000 REV.0 JAN. 2001 SERVICE MODE PRM-GR-M the number of copies passed through the primary grid wire(M) PRM-GR-Y the number of copies passed through the primary grid wire(Y) PRM-GR-K the number of copies passed through the primary grid wire(K) PRM-UT-C the number of copies passed through the primary charging assembly(C) PRM-UT-M the number of copies passed through the primary charging assembly(M) PRM-UT-Y the number of copies passed through the primary charging assembly(Y) PRM-UT-K the number of copies passed through the primary charging assembly(K) PRM-WR-C the number of copies passed through the primary charging wire(C) PRM-WR-M the number of copies passed through the primary charging wire(M) PRM-WR-Y the number of copies passed through the primary charging wire(Y) PRM-WR-K the number of copies passed through the primary charging wire(K) TR-WEB the number of copies passed through the transfer belt web D-CLNB-C the number of copies passed through the drum cleaning blade(C) D-CLNB-M the number of copies passed through the drum cleaning blade(M) D-CLNB-Y the number of copies passed through the drum cleaning blade(Y) D-CLNB-K the number of copies passed through the drum cleaning blade(K) [unit:copy] [unit:copy] [unit:copy] [unit:copy] [unit:copy] [unit:copy] [unit:copy] [unit:copy] [unit:copy] [unit:copy] [unit:copy] [unit:copy] [unit:copy] [unit:copy] [unit:copy] [unit:copy] <DRBL-2 (Consumables Counter of Accessory)> PD-PU-RL PD-FD-RL PD-SP-RL [unit:copy] the number of copies passed through the paper the number of copies picked up from paper deck deck pickup roller [unit:copy] the number of copies passed through the paper the number of copies picked up from paper deck deck separation roller [unit:copy] the number of copies passed through the paper the number of copies picked up from paper deck deck feeding roller COPYRIGHT © 2001 CANON INC. 2000 2000 2000 2000 CANON CLC5000 REV.0 JAN. 2001 S-135 Error Code COPYRIGHT©2001CANONINC.2000CANONCLC5000REV.0JAN.2001 CONTENTS Contents Self Diagnosis ........................................ E-1 RDF ..................................................... E-20 Sorter ................................................... E-22 Projector .............................................. E-25 Fan Error .............................................. E-26 COPYRIGHT© 2001 CANON INC. 2000 CANON CLC5000 REV.0 JAN. 2001 i CONTENTS Blank page ii COPYRIGHT© 2001 CANON INC. 2000 CANON CLC5000 REV.0 JAN. 2001 ERROR CODE Self Diagnosis CPU on the CLC5000’s image processor and DC controller PCB is equipped with a mechanism to check the condition of the machine (sensors, in particular). The mechanism runs a check as necessary and indicates the presence of an error upon detection. See the tables that follow for descriptions of codes; you may check these codes using ‘JAM/ERROR’ under ‘DISPLAY’ in service mode. ‘0001’ will be used for the detailed code column of errors without a detailed code. E000 Cause Description Cause See the descriptions that follow. “xx” represents the heater. xx=01: upper heater xx=02: lower heater Fixing thermistor (short circuit) Triac (short circuit) DC controller PCB (faulty) Description Cause xx01 The overheating detection circuit on the DC controller PCB has detected an overheating condition (upper heater : 230°C lower heater : 220°C or more). xx02 The main thermistor has detected overheating condition (upper heater : 215°C lower heater : 208°C or more). Fixing thermistor (poor contact, open circuit) Fixing heater (open circuit) Triac (faulty) DC controller PCB (faulty) Description xx05 A difference of 60°C or higher is detected between the reading of the main thermistor and that of the sub thermistor. xx20 When control is to 160°C or less, a rise in temperature of 10°C or more does not occur within 4 min. xx40 The temperature drops to 140°C or less during temperature control for standby. xx50 The temperature drops to 140°C or less during temperature control for printing. COPYRIGHT © 2001 CANON INC. 2000 2000 2000 2000 CANON CLC5000 REV.0 JAN. 2001 E-1 ERROR CODE Cause The oil heater thermistor or the oil thermistor has a short circuit; the AC driver PCB is faulty; or the DC controller PCB is faulty. Description Cause 0061 The oil thermistor has detected overheating (180°C). 0071 The oil thermistor has detected overheating (220°C). 0081 The high-temperature detection circuit on the DC controller PCB has detected overheating (190°C for the oil thermistor output; 230°C for the oil heater thermistor). The oil heater thermistor or the oil thermistor has an open circuit; the AC driver PCB is faulty; or the DC controller PCB is faulty. Description 0062 At the end of the WAIT period, the output of the oil thermistor does not reach 50°C. 0072 At the end of the WAIT period, the oil heater thermistor does not reach 50°C. 0082 The output of the oil heater thermistor does not reach 50ºC within 2min after the oil heater has gone ON; as detedted by the lowtemperature detection circuit on the DC controller PCB (after the oil temperature has reached a specific level). E004 Cause Description Triac (short circuit) 0001 The triac is ON after the CPU on the DC controller PCB has turned ON the fixing heater triac drive signal. 0002 The triac is ON after the CPU on the DC controller PCB has turned OFF the triac drive signal for the drum heater. E005 Cause • • • Cleaning web (inside fixing assembly; taken up) Web length sensor (PS36; faulty) DC controller PCB (faulty) Description The cleaning web solenoid has turned ON 270 times after the web length sensor detected the lever. E-2 COPYRIGHT © 2001 CANON INC. 2000 2000 2000 2000 CANON CLC5000 REV.0 JAN. 2001 ERROR CODE E006 Cause • • • Fixing drawer connector (fault) Fixing lever switch (SW5; fault) DC controller PCB (fault) Description 0001 The fixing drawer connector connection signal CONNECT goes ‘0’ when the front cover is closed (i.e., the cover connector is disconnected). 0002 The fixing lever switch signal F-KBLK goes ‘1’ when the front cover is closed (i.e., the releasing lever is not set). E012 Cause • • • Drum drive system (overload) Drum motor (M21; error) DC controller PCB (faulty) Description 0001 The rotation speed of the motor has deviated from a specific value for 0.1 sec or more. E013 Cause • • • Waste toner feeding motor (faulty) Waste toner feeding screw (rotation fault) DC controller PCB (faulty) Description 0001 The rotation speed of the waste toner feeding motor has deviated from a specific value for 0.1 sec or more (PLL signal ‘0’). 0002 The waste toner lock detection switch (SW4) has been pressed for 0.1 sec or more. E014 Cause • • Fixing motor (M9; error) DC controller PCB (faulty) Description The rotation speed of the motor has deviated from a specific value for 0.1 sec or more. E015 Cause • • Multifeeder pickup motor (M10; faulty) DC controller PCB (faulty) • • The clock pulses of the pick-up motor cannot be detected. The rotation speed of the motor has deviated from a specific speed for 0.1 sec or more. Description COPYRIGHT © 2001 CANON INC. 2000 2000 2000 2000 CANON CLC5000 REV.0 JAN. 2001 E-3 ERROR CODE E017 Cause • • Duplex feeding motor (M19; faulty) DC controller PCB (faulty) Description The rotation speed of the duplex feeding motor has deviated from a specific value for 0.1 sec or more (PLL signal ‘0’). E018 Cause • • Polishing/oil removing motor (M15; faulty) DC controller PCB (faulty) Description The rotation speed of the polishing/oil removing motor has deviated from a specific value for 0.1 sec or more. E020 Cause Description Cause The descriptions are by detail Code. Toner Density Fault xx represents the color for the developing assembly. xx=01: C xx=02: M xx=03: Y xx=04: Bk The notations in the descriptions are as follows: SGNL, toner density signal; REF, reference signal. • Photosensitive drum (deterioration) • SALT sensor (faulty) • Stirring (developer inside developing assembly; faulty) • Stray light (to sensor; no cover, front door open) Description Cause xx3A The variation of the following is 47 or more for 5 samplings of the density data when sampling during copying sequence: SGNL-S-C, SGNL-S-M, SGNL-S-Y, SGNL-S-K • SALT sensor (faulty) • Stirring (developer inside developing assembly; faulty) • Stray light (to sensor; no cover, front door open) • Photosensitive drum (deterioration) • SALT sensor (soiled window, damage) • Photosensitive drum (dirt; cleaning failure) Description xx3B The variation of the following is 47 or more for 5 samplings of the density data when sampling during copying sequence: REF-S-C, REF-S-M, REF-S-Y, REF-S-K E-4 COPYRIGHT © 2001 CANON INC. 2000 2000 2000 2000 CANON CLC5000 REV.0 JAN. 2001 ERROR CODE E020 Cause xx40 When setting initial data (upon installation, for example), the average value after sampling of the following values is 848 or higher: SGNL-S-C, SGNL-S-M, SGNL-S-Y, SGNL-S-K; or, the value of SGNL-S-K is 352 or higher. xx41 When setting initial data (upon installation, for example), the average value after sampling of the following values is 848 or higher: REF-S-C, REF-S-M, REF-S-Y, REF-S-K; or, the value of REF-S-K is 544 or higher. xx42 When setting initial data (upon installation, for example), the value of the following is 255: SIGG-S-C, SIGG-S-M, SIGG-S-Y, SIGG-S-K xx43 When setting initial data (upon installation, for example), the gain of the SALT reference signal for each color is 255. xx45 When setting initial data (upon installation, for example), the average value after sampling of the following values is 512 or higher: SGNL-S-C, SGNL-S-M, SGNL-S-Y; or, the value of SGNL-S-K is 144 or lower. xx46 When setting initial data (upon installation, for example), the average value after sampling of the following values is 336 or less: REF-S-C, REF-S-M, REF-S-Y; or, the value of REF-S-K is 464 or lower. xx47 When setting initial data (upon installation, for example), the average value after sampling of the following values is 0: SIGG-S-C, SIGG-S-M, SIGG-S-Y, SIGG-S-K. xx48 When setting initial data (upon installation, for example), the average gain after sampling of the SALT reference signal for each color is 0. Back-up data (DC controller PCB; error) Be sure to execute RAM clear, and enter the value recorded on the service label. (Or, initial settings may be missing.) Description xx4A During copying sequence, the average value after sampling of the following values is 848 or higher: SGNL-S-C, SGNL-S-M, SGNL-S-Y; or, the value of SGNL-S-K is 445 or higher. xx4B During copying sequence, the average value after sampling of the following values is 848 or higher: SGNL-S-C, SGNL-S-M, SGNL-S-Y; or, the value of REF-S-K is 544 or higher. xx4C During copying sequence, the average value after sampling of the following values is 512 or lower: SGNL-S-C, SGNL-S-M, SGNL-S-Y; or, the value of SGNL-S-K is 102 or lower. COPYRIGHT © 2001 CANON INC. 2000 2000 2000 2000 CANON CLC5000 REV.0 JAN. 2001 E-5 ERROR CODE E020 Cause Description Cause xx4D During copying sequence, the average value after sampling of the following values is 336 or lower: REF-S-C, REF-S-M, REF-S-Y; or, the value of REF-S-K is 464 or lower. SALT sensor (fault) xx4F The value of ‘SGNL-S-C/M/Y/K’, which has been obtained by averaging samplings during copying sequence is 1008 or more. • SALT sensor (faulty) • Stirring (developer inside developing assembly; faulty) • Stray light (to sensor; no cover, front cover open) • Photosensitive drum (deterioration) Description Cause xx50 When setting initial data (upon installation, for example), the gain cannot be set (i.e., no change is noted in the value of SGNL between GAIN: 20H and GAIN: E0). 0455 An appropriate patch cannot be obtained when setting initial data (e.g., at time of installation). • SALT sensor (dirt on window, damage) • Photosensitive drum (dirt; cleaning failure) Description Cause xx60 During multiple initial rotation (at power-on, for example), the window cleaning correction value is 60% or lower. xx70 During multiple initial rotation (at power-on, for example), the window cleaning correction value is 140% or lower. Back-up data (DC controller PCB; error) Be sure to execute RAM clear, and enter the value recorded on the service label. (Or, initial settings may be missing.) Description xx80 During copying sequence, the initial setting for the following is 848 or higher because of an error in the memory back-up data: SGNL-S-C, SGNL-S-M, SGNL-S-Y; or, the value of SGNL-S-K is 352 or higher. xx81 During copying sequence, the initial setting for the following is 848 or higher because of an error in the memory back-up data: REF-S-C, REF-S-M, REF-S-Y; or, the value of REF-S-K is 544 or higher. xx82 During copying sequence, the value of the following is 255 because of an error in the memory back-up data: SIGG-S-C, SIGG-S-M, SIGG-S-Y, SIGG-S-K E-6 COPYRIGHT © 2001 CANON INC. 2000 2000 2000 2000 CANON CLC5000 REV.0 JAN. 2001 ERROR CODE E020 Cause Description Cause xx85 During copying sequence, the initial setting for the following is 512 or lower because of an error in the memory back-up data: SGNL-S-C, SGNL-S-M, SGNL-S-Y; or, the value of SGNL-S-K is 144 or lower. xx86 During copying sequence, the initial setting of the following is 336 or lower because of an error in the memory back-up data: REF-S-C, REF-S-M, REF-S-Y; or the value of REF-S-K is 464 or lower. xx87 During copying sequence, the value of the following is 0 because of an error in the memory back-up data: SIGG-S-C, SIGG-S-M, SIGG-S-Y, SIGG-S-K. xx88 During copying sequence, the data on the light (in the absence of toner) reflected by each photosensitive drum is 16 or lower because of an error in the memory back-up data. xx89 During copying sequence, the data for window soiling correction is 16 or lower because of an error in the memory backup data. xx8A The value of ‘;REF-S-C/M/Y/K’ which has been obtained by averaging samplings setting initial data is 16 or less. xx8F During copying sequence, the gain of the SALT reference signal for each color is NOT 128 because of an error in the memory backup data. SALT sensor shutter (fault) xx90 Extreme changes have occurred in the window soiling correction value 10 times or more. xx91 An error has occurred in the data 10 times or more as a result of window soiling correction. • Developer (deterioration) • Developing cylinder (rotation failure) • Developing assembly (locking failure) • Toner density sensor (faulty) • Developer (inside developing assembly; stirring failure) • Toner level sensor (faulty) Description xxAA During copying sequence, the variation in 5 samplings of the following values is 47 or higher: SGNL-C, SGNL-M, SGNL-Y xxAB During copying sequence, the variation in 5 samplings of the following values is 47 or higher: REF-C, REF-M, REF-Y xxB0 When setting initial data, the average after sampling of the following values is 859 or higher: SGNL-C, SGNL-M, SGNL-Y COPYRIGHT © 2001 CANON INC. 2000 2000 2000 2000 CANON CLC5000 REV.0 JAN. 2001 E-7 ERROR CODE E020 Cause xxB1 When setting initial data, the average after sampling of the following values is 859 or higher: REF-C, REF-M, REF-Y xxB2 When setting initial data, the average after sampling of the following values is 255. SIGG-C, SIGG-M, SIGG-Y xxB5 When setting initial data, the average after sampling of the following values is 777 or lower: SGNL-C, SGNL-M, SGNL-Y xxB6 When setting initial data, the average of the following values after sampling is 205 or lower: REF-C, REF-M, REF-Y xxB7 When setting initial data, the average of the following values after sampling is 0: SIGG-C, SIGG-M, SIGG-Y xxBA During copying sequence, the average of the following values after sampling is 1013 or higher: SGNL-C, SGNL-M, SGNL-Y • Developing assembly (deterioration) • Developing cylinder (rotation failure) • Developing assembly (locking failure) • Toner density sensor (faulty) • Developer (inside developing assembly; stirring fault) • Toner level sensor (faulty) Description Cause xxBB During copying sequence, the value of the following is 30% or more higher than the initial setting: REF-C, REF-M, REF-Y xxBC During copying sequence, the average of the following values after sampling is 306 or higher: SGNL-C, SGNL-M, SGNL-Y xxBD During copying sequence, the value of the following is 30% or more lower than the initial setting: REF-C, REF-M, REF-Y xxBF When setting initial data, the values of the following cannot be set: SIGG-C, SIGG-M, SIGG-Y • Toner sensor (faulty) • Toner stirring screw (faulty) Description xxF1 The C/M/Y hopper error sensor has detected the absence of toner. 04F2 The Bk hopper error sensor has detected the absence of toner 10 times or more continuously. E-8 COPYRIGHT © 2001 CANON INC. 2000 2000 2000 2000 CANON CLC5000 REV.0 JAN. 2001 ERROR CODE E020 Cause • • • • • Developer (deterioration) Developing cylinder (rotation failure) Toner density sensor (faulty) Developer (inside developing assembly; stirring fault) Toner level sensor (faulty) Description xxD0 The value of the toner supply time correction data based on ‘SGNL-C/M/Y’ is 141 or more for 20 copies or more during copying sequence. xxE0 The value of the toner supply time correction data based on ‘SGNL-C/M/Y’ is -188 or less for 20 copies or more during copying sequence. E023 Cause • • • Developing motor (faulty) DC controller PCB (faulty) Developing cylinder (rotation failure) Description 0101 The rotation speed of the C developing motor (M18C) has deviated from a specific value for 0.1 sec or more (PLL signal ‘0’). 0201 The rotation speed of the M developing assembly (M18M) has deviated from a specific value for 0.1 sec or more (PLL signal ‘0’). 0301 The rotation speed of the Y developing motor (M18Y) has deviated from a specific value for 0.1 sec or more (PLL signal ‘0’). 0401 The rotation speed of the Bk developing motor (M18Bk) has deviated from a specific speed for 0.1 sec or more (PLL signal ‘0’). E030 Cause • • Counter (open circuit) DC controller PCB (faulty) Description Check immediately before the counter turns ON and OFF. (Normal if the counter drive signal is ‘0’ when the counter turns ON; normal if the counter drive signal is ‘1’ when the counter turns OFF.) E032 Cause Description Data communication (error between Copy Data Controller-A1 and copier) After the copier has generated the copy start signal, count pulses have not been detected by the data Controller-A1 within a specific period of time. COPYRIGHT © 2001 CANON INC. 2000 2000 2000 2000 CANON CLC5000 REV.0 JAN. 2001 E-9 ERROR CODE E040 Cause Description Cause The cassette lifter motor is faulty, or the DC controller PCB is faulty. 0001 The error detection circuit on the DC controller PCB has detected overcurrent in the upper cassette lifter motor drive circuit. 0002 The error detection circuit on the DC controller PCB has detected overcurrent in the lower cassette lifter motor drive circuit. • Multifeeder lifter motor (M1; faulty) • DC controller PCB (faulty) Description 0101 The upper lifter sensor (PS2) does not turn ON within 6 sec after the multifeeder lifter motor (M1) has turned ON. 0102 The lower lifter sensor (PS3) does not turn ON within 6 sec after the multifeeder lifter motor (M1) has turned ON. 0103 The error detection circuit of the DC controller PCB detects overcurrent in the multifeeder lifter drive circuit. E041 Cause • • • • Paper deck motor (M8001; faulty) Paper deck lifter upper switch (SW8001; faulty) Paper deck lifter lower limit switch (SW8002; faulty) DC controller PCB (faulty) Description 0001 The paper deck lifter upper limit switch (SW8001) does not turn on within 40 sec after the paper deck motor (M8001) has turned ON. 0002 The paper deck lifter lower switch (SW8002) does not turn on within 40 sec after the paper deck motor (M8001) has turned ON. 0003 The error detection circuit on the DC controller PCB has detected overcurrent in the deck lifter motor drive circuit. E044 Cause The paper width set for the cassette or the multifeeder is wrong, or the slide resistor is faulty. Description 0001 Wrong paper width for multifeeder 0002 Wrong paper width for upper cassette 0003 Wrong paper width for lower cassette E-10 COPYRIGHT © 2001 CANON INC. 2000 2000 2000 2000 CANON CLC5000 REV.0 JAN. 2001 ERROR CODE E050 Cause • • • Duplex paper jogging guide motor (M23; faulty) Duplex paper jogging guide home position sensor (PS29; faulty) DC controller PCB (faulty) Description 0001 The duplexing unit stacking guide home position sensor (PS29) does not turn ON within 4 sec after the duplex paper jogging guide motor (M23) has turned ON. 0002 The duplex paper jogging guide home position sensor (PS29) remains ON for 1 sec or more after the duplexing unit stacking guide motor (M23) has turned ON. E061 Cause Description Cause Potential Control Fault high-order 2 digits xx=00: common error xx=01: C xx=02: M xx=03: Y xx=04: Bk • Potential measurement unit (faulty) • DC controller PCB (faulty) • Pre-exposure lamp (fault) Description Cause xx01 The difference between VD1 measured during the 1st rotation and VD1 measured during the 2nd rotation is 30 V or more. xx02 The difference between VD2 measured during the 1st rotation and VD2 measured during the 2nd rotation is 30 V or more. xx03 The difference between VL1 measured during the 1st rotation and VL1 measured during the 2nd rotation is 30 V or more. xx04 The difference between VL2 measured during the 1st rotation and VL2 measured during the 2nd rotation is 30 V or more. • Primary/Pre-primary charging assembly (faulty) • HVDC (faulty) • Pre-exposure lamp (faulty) Description xx10 The measurement of VD1 is 500 V or higher and, in addition, the measurement of VD2 is 900 V or higher. COPYRIGHT © 2001 CANON INC. 2000 2000 2000 2000 CANON CLC5000 REV.0 JAN. 2001 E-11 ERROR CODE E061 Cause • • Primary charging assembly (faulty) HVDC (faulty) Description Cause xx11 The measurement of VD1 is 900 V or higher and, in addition, the measurement of VD2 is 900 V or higher. • Video controller PCB (faulty) • Laser unit (faulty) Description Cause xx12 The measurement of VD1 is 200 V or lower and, in addition, the measurement of VD2 is 600 V or lower. xx13 The measurement of VD1 is 150 V or lower and, in addition, the measurement of VD2 is 300 V or lower. • Primary charging assembly (faulty) • HVDC (faulty) Description Cause xx14 The measurement of VD1 is 150 V or lower and, in addition, the measurement of VD2 is 150 v or lower. • Potential measurement unit (faulty) • DC controller PCB (faulty) Description Cause • • • xx15 The measurement of VD1, VD2, VL1, or VL2 is 10 V or lower. Video controller PCB (faulty) Laser unit (faulty) Scanner (faulty) Description xx16 The difference between VD1 and VL1 measurements is 20 V or less and, in addition, the measurement of VD1 is 200 V or more. Cause • • • The difference between VD2 and VL2 measurements is 200 V or less and, in addition, the VD2 measurement is 600 V or higher. Video controller PCB (faulty) Laser intensity (poor adjustment) Laser unit (faulty) Description xx17 The VL1 measurement is 200 V or higher and, in addition, the VL2 measurement is 400 V or higher. E-12 COPYRIGHT © 2001 CANON INC. 2000 2000 2000 2000 CANON CLC5000 REV.0 JAN. 2001 ERROR CODE E061 Cause • • • • • • Laser unit (faulty) Laser shutter (faulty) Photosensitive drum (faulty) Scanner (faulty) Video controller PCB (faulty) Laser intensity (adjustment faulty) Description Cause xx20 The computation value of V00 is the upper limit value (800 V) or higher. xx21 The computation value (750 V) of Vdc is the upper limit value (750 V) or higher. xx22 The computation value of Vg is the upper limit value (950 V) or higher. xx23 The computation value of V00 is the upper limit value (950 V) or higher. • Potential measurement unit (faulty) • HVDC (faulty) • Laser unit (faulty) • Video controller PCB (faulty) • Laser intensity (adjustment fault) Description Cause xx24 The computation value of Vdc is the lower limit value (200 V) or lower. xx25 The computation value of V00 is the lower limit value (325 V) or lower. xx26 The computation value of Vg is the lower limit value (250 V) or lower. xx27 The computation value of VFF is the lower limit value (700 V) or lower. xx28 The computation value of VFF is the lower limit value (0 V) or lower. • Video controller PCB (faulty) • Laser unit (faulty) • Laser intensity (adjustment fault) • Photosensitive drum (faulty) • Scanner (faulty) • Potential measurement unit (faulty) • HVDC (faulty) COPYRIGHT © 2001 CANON INC. 2000 2000 2000 2000 CANON CLC5000 REV.0 JAN. 2001 E-13 ERROR CODE E061 Description Cause xx30 The measurement of VD1 is 400 V or higher. xx31 The measurement of VD1 is 200 V or lower. xx32 The measurement of VD2 is 800 V or higher. xx33 The measurement of VD2 is 500 V or lower. xx34 The measurement of VL1 is 200 V or higher. xx35 The measurement of VL2 is 400 V or more. xx36 The measurement of VL2 is 0 V or lower. • Potential measurement unit (faulty) • DC controller PCB (faulty) Description Cause xx50 The difference between the computation value of Vdc measured previously and the computation value of Vdc measured currently is 30 V or more. xx51 The difference between the computation value of Vg measured previously and the computation value of Vg measured currently is 30 V or more. • Potential measurement unit (faulty) • HVDC (faulty) • Video controller PCB (faulty) • Laser unit (faulty) • Laser shutter (faulty) • Scanner (faulty) • Environment sensor (faulty) • Photosensitive drum (faulty) • Photosensitive drum (poor grounding) Description xx52 The computation value of V00 is the upper limit value (325 V) or higher. xx53 The computation value of V00 is the lower limit value (325 V) or lower. E-14 COPYRIGHT © 2001 CANON INC. 2000 2000 2000 2000 CANON CLC5000 REV.0 JAN. 2001 ERROR CODE E062 Cause Description Cause Drum Temperature Control Fault xx=00: common error xx=01: C xx=02: M xx=03: Y xx=04: Bk • DC controller PCB (faulty) • AC driver (faulty) Description Cause Description xx01 The drum temperature is 57°C or more for 0.5 sec or more. xx02 The drum temperature has dropped below 15°C or less after it has reached a specific temperature. Drum thermistor (faulty) 0010 The drum thermistor has an open circuit or a short circuit. E072 Cause • • • Belt cleaner drive motor Transfer belt unit DC controller Description The sensor output does not change after a specific period of time (6 sec). E073 Cause • • • Transfer drawer connector (fault) DC controller PCB (fault) Transfer belt edge sensor (fault) Description 0001 The connect signal CONNECT of the transfer assembly frame goes ‘0’ when the front cover is closed. 0002 The transfer belt edge sensor 4 (PS20) and the transfer belt edge sensor 1 (PS17) detected the belt at the same time. 0003 The transfer belt edge sensor 3 (PS19) and the transfer belt edge sensor 2 (PS18) detected the belt at the same time. 0004 The transfer belt edge sensor 3 (PS19) and the transfer belt edge sensor 4 (PS20) detected the belt at the same time. 0005 The transfer belt edge sensor 1 (PS17) and the transfer belt edge sensor 2 (PS18) detected the belt at the same time. COPYRIGHT © 2001 CANON INC. 2000 2000 2000 2000 CANON CLC5000 REV.0 JAN. 2001 E-15 ERROR CODE E074 Cause • • • Transfer belt lifter sensor 1 (PS12), 2 (PS13) Transfer belt lifter clutch (CL17; faulty) DC controller PCB (faulty) Description The transfer belt lifter sensor 1 (PS12) or 2 (PS13) does not go ‘1’ (ON) within a specific period of time after the transfer belt lifter clutch (CL17) has turned ON. E075 Cause • • • • • • Transfer belt edge sensor 1 (PS17; fault) Transfer belt edge sensor 2 (PS18; fault) Transfer belt edge sensor 1 (PS19; fault) Transfer belt edge sensor 2 (PS20; fault) Transfer belt swing motor (M13; fault) DC controller PCB (fault) Description 0001 The transfer belt edge sensor 1 (PS17) does not turn off 200 sec after it has detected the belt. 0002 The transfer belt edge sensor 2 (PS18) does not turn off 200 sec after it has detected the belt. 0003 The transfer belt edge sensor 3 (PS19) detected the transfer belt. 0004 The transfer belt edge sensor 4 (PS20) detected the transfer belt. E076 Cause The transfer belt cleaner belt motor is faulty; the connection between the motor and the DC controller PCB is faulty; or the DC controller PCB is faulty. Description Cause 0001 The error detection circuit on the DC controller PCB has detected overcurrent in the transfer belt waste toner motor drive circuit. The transfer belt cleaner web has been taken up; the web length sensor is faulty; or the DC controller PCB is faulty. Description 0002 An excess load is imposed on the transfer belt cleaning web motor (M12) because of the shortage of the web, causing the cleaning web rotation sensor (PS10) to detect faulty rotation. E-16 COPYRIGHT © 2001 CANON INC. 2000 2000 2000 2000 CANON CLC5000 REV.0 JAN. 2001 ERROR CODE E077 Cause The transfer belt waste toner motor is faulty; the connection between the moor and the DC controller PCB is faulty; or the DC controller PCB is faulty. Description 0001 The error detection circuit on the DC controller PCB has detected overcurrent in the transfer belt waste toner motor drive circuit. E100 Cause • • • Laser unit (faulty) Laser driver PCB (faulty) Image processor PCB (faulty) Description xx01 At the start of potential control, the BD signal is not detected for 1 sec or more. xx02 The operation ON current used to obtain optimum intensity is larger than a specific value. E110 Cause • • • Laser scanner drive system (overload) Laser scanner motor (M4; faulty) DC controller PCB (faulty) Description The rotation speed of the motor has deviated from a specific value for 0.1 sec or more. E194 Cause • CCD unit for pattern reading (faulty) • PCB for pattern reading (faulty) • DC controller PCB (faulty) In addition, a fault in the primary charging assembly or the transfer belt may have prevented the formation of a pattern. Description xx01 The center of a pattern cannot be determined. xx02 The center position (difference) in relation to the M pattern is 61 or more in main scanning direction. xx03 The center position (difference) in relation to the M pattern is 113 or more for C and Bk and 141 or more for Y in sub scanning direction. 0001 After the shutter motor has started to rotate, the shutter open sensor does not turn on after a specific period of time. 0002 After the shutter motor has started to rotate, the shutter closed sensor does not turn on after a specific period of time. COPYRIGHT © 2001 CANON INC. 2000 2000 2000 2000 CANON CLC5000 REV.0 JAN. 2001 E-17 ERROR CODE E220 Cause The scanning lamp has deteriorated or has an open circuit; the lamp regulator PCB is faulty; or the reader controller PCB is faulty. Description The lamp does not turn on 500 msec after the scanning lamp ON signal has been generated. Or, the lamp fails to turn off 500 msec after the scan ning lamp OFF signal has been generated. E226 Cause Description The reader suction fan (FM12/13) is faulty. The reader suction fan (FM12/13) has stopped to rotate. E249 Cause The memory elements on the PCB are not connected, have poor contact, or are faulty. Description 0001 An error has occurred in the course of a read/write check of the memory on the IP memory PCB. 0002 An error has occurred in the course of a read/write check of the memory on the ED board. E260 Cause • • • DC power supply PCB unit (faulty) DC controller PCB (faulty) DC power supply cooling fan (faulty) Description 0001 When the power switch is turned ON, 5V is not present on the DC controller PCB. 0002 When the power switch is turned on with the front cover closed, 24 V is not present on the DC controller PCB. 0003 The thermal switch has detected overheating of the 5V system on the DC power supply PCB. 0004 The thermal switch has detected overheating in the 24VR system on the DC power supply PCB. 0005 The thermal switch has detected overheating in the 24VU system on the DC power supply PCB. 0006 The DC power supply cooling fan is not rotating normally. E-18 COPYRIGHT © 2001 CANON INC. 2000 2000 2000 2000 CANON CLC5000 REV.0 JAN. 2001 ERROR CODE E350 Cause Description ECO-ID PCB (faulty) • The ECO-ID PCB is not mounted. • The connection between ECO-ID PCB and reader controller PCB is faulty. During the power switch has been turned ON, the communication between ECO-ID PCB and the reader controller is not normal. E351 Cause Description Image processor PCB (faulty) The communication within the image processor PCB is faulty. E620 Cause • • IP-MAIN PCB (faulty) IP-ED PCB (faulty) Description The communication between the IP-ED PCB and the IP-MAIN PCB is interrupted for 5 sec or more. E700 Cause • • • DC controller PCB (faulty) Reader unit controller PCB (faulty) Power supply PCB (faulty) Description The communication between the DC controller PCB and the reader unit controller PCB is disrupted for 5 sec or more. COPYRIGHT © 2001 CANON INC. 2000 2000 2000 2000 CANON CLC5000 REV.0 JAN. 2001 E-19 ERROR CODE RDF The CPU on the RDF controller PCB is equipped with a mechanism to check the condition of the machine (sensors, in particular). The mechanism runs a check as necessary and indicates on the copier’s control panel the presence of an error upon detection. E400 Cause Description Data communication with copier (faulty) Communication with the copier is monitored at all times. The communication is disrupted for 5 sec or more. E401 Cause • • Pick-up motor (M1; faulty) Pick-up roller home position sensor 1 (S8; faulty) Description The sensor state does not change even after the pick-up motor has been driven for more than 2 sec. E402 Cause • • Belt motor (M3; faulty) Belt motor clock sensor (S11; faulty) Description The number of belt motor clock pulses is less than a specific value for 100 ms. E403 Cause • • Reversing motor (M2; faulty) Slip sensor (S10; faulty) Description The number of slip clock pulses is below a specific value for 100 ms. E404 Cause • • Delivery motor (M5; faulty) Delivery motor clock sensor (S12; faulty) Description The number of delivery motor clock pulses is below a specific value for 200 ms. E-20 COPYRIGHT © 2001 CANON INC. 2000 2000 2000 2000 CANON CLC5000 REV.0 JAN. 2001 ERROR CODE E405 Cause • • Pick-up motor (M1; faulty) Pick-up motor clock sensor (S12; faulty) Description The number of pick-up motor clock pulses is below a specific value for 200 ms. E407 Cause • • Pick-up motor (M6; faulty) Tray position sensor (S25; faulty) Description The sensor state does not change even the tray ascent motor is driven for 2 sec or more. E408 Cause • • Feeding motor (M8; faulty) Feeding motor clock sensor (S22; faulty) Description The number of feeding motor clock pulses is below a specific value for 100 ms. E411 Cause • • • • • Registration sensor 1 (S3; faulty) Skew sensor 1 (S4; faulty) Manual feed registration sensor (S19; faulty) Image leading edge sensor (S20; faulty) Original sensor 1 (S7; faulty) Description The output of each sensor in the absence of paper is higher than a specific value. COPYRIGHT © 2001 CANON INC. 2000 2000 2000 2000 CANON CLC5000 REV.0 JAN. 2001 E-21 ERROR CODE Sorter E510 Cause There is no clock signal from the clock sensor (P15) of the feeding motor for 250 ms or more. Description There is no clock signal from the clock sensor (P15) of the feeding motor fopr 250 ms or more. E516 Cause Description Low-speed feeding motor (M10; rotation failure) There is no clock signal from the clock sensor (P123) of the feeding motor for 250 ms or more. E517 Cause The locking cam home position for the buffer pass unit cannot be de tected. Description 0001 The upper cam solenoid 1 is damaged, the upper cam sensor 1 is damaged, or the position of the upper cam sensor light-blocking plate is faulty. 0002 The upper cam solenoid 2 is damaged, the upper cam sensor 2 is damaged, or the position of the upper cam sensor light-blocking plate is faulty. 0003 The upper cam solenoid 1 or 2 is damaged, both upper cam sensor 1 and 2 are damaged, or the position of the upper cam sensor lightblocking plate is wrong. 0004 Either or both of the upper cam solenoids are damaged, or the position of the upper cam sensor light-blocking plate is faulty. 0005 The upper cam solenoid or the sensor is damaged. 0006 A serial port communication sensor read attempt has failed (mismatch in echo back). 0007 A serial port communication unit read attempt has failed (mismatch in echo back). 0008 A serial port communication unit write attempt has failed (mismatch in echo back). 0009 A serial port communication unit write attempt has failed (mismatch in write execution echo back). 0011 The lower cam solenoid 1 is damaged, the lower cam sensor 1 is damaged, or the position of the lower cam sensor light-blocking plate is faulty. E-22 COPYRIGHT © 2001 CANON INC. 2000 2000 2000 2000 CANON CLC5000 REV.0 JAN. 2001 ERROR CODE 0012 The lower cam solenoid 2 is damaged, the lower cam sensor 2 is damaged, or the position of the lower cam sensor light-blocking plate is faulty. 0013 Either lower cam solenoid 1 or 2 is damaged , both lower cam sensors 1 and 2 are damaged, or the position of the lower cam sensor light-blocking plate is faulty. 0014 Either or both of the upper cam solenoids are damaged, or the position of the lower cam sensors light-blocking plate is faulty. 0015 Either the lower cam solenoid or the sensor is damaged. E522 Cause Description Push bar motor (M7; rotation failure) The operation does not end within 2000 ms after the motor drive signal has been generated. E523 Cause Description Reference wall motor (M6; rotation failure) The operation does not end within 2000 ms after the motor drive signal has been generated. E524 Cause Description Multi guide motor (M5; rotation failure) The operation does not end within 2000 ms after the motor drive signal has been generated. E525 Cause Description Bin paper sensor 1 (S3, S4; auto adjustment fault) Auto adjustment of the bin paper sensor 1 (S3, S4) cannot be executed; or, an error has occurred in the auto adjustment value. E526 Cause Description Bin paper sensor 2 (S6, S7; auto adjustment) Auto adjustment of the bin paper sensor (S6, S7) cannot be executed; or, an error has occurred in the auto adjustment value. E530 Cause Description Guide bar motor (M8 rotation failure) The operation does not end within a specific time after the motor drive signal has been generated: 5000 ms if front retrieval, and 2000 ms otherwise. COPYRIGHT © 2001 CANON INC. 2000 2000 2000 2000 CANON CLC5000 REV.0 JAN. 2001 E-23 ERROR CODE E531 Cause Description Stapler unit drive motor (M4; rotation failure) • The operation does not end within 2000 ms after the motor drive signal has been generated. • There is no clock signal from the clock sensor (P18) of the motor for 250 ms or more. • The input signal from the shifting home position sensor (P19) for 1000 ms or more. E532 Cause Description Stapler unit shift motor (M3; rotation failure) The operation does not end within 5000 ms after the motor drive signal has been generated. E533 Cause Description Stapler paper sensor auto adjustment (faulty) Auto adjustment of the stapler paper sensor cannot be executed; or, an error has occurred in the auto adjustment value. E540 Cause Description Bin shift motor (M9; rotation failure) • The operation does not end within a specific period of time after the motor drive signal has been generated: 20000 ms during initialization, and 2000 ms otherwise. • There is no clock signal from the clock plate sensor of the motor for 250 ms or more. • The input signal from the lead cam position sensor (P120) does not change for 2000 ms or more. E599 Cause Description DC output (from sorter controller; faulty) An error has occurred in the DC output (24 VL, 24 VP) from the sorter controller PCB. E-24 COPYRIGHT © 2001 CANON INC. 2000 2000 2000 2000 CANON CLC5000 REV.0 JAN. 2001 ERROR CODE Projector E634 Cause Description Film projector lamp (faulty) See the Service Manual for the film projector. E718 Cause • • IP-MAIN PCB (faulty) Film projector controller PCB (faulty) Description The communication between the IP-MAIN PCB and the film projector is interrupted for 5 sec or more. E800 Cause • • • Power switch DC controller PCB DC harness Description An interruption in the auto shut-off signal is detected for 1 sec or more. COPYRIGHT © 2001 CANON INC. 2000 2000 2000 2000 CANON CLC5000 REV.0 JAN. 2001 E-25 ERROR CODE Fan Error E804 Cause Description Power supply unit (DCP1) cooling fan FM 17/18 (error) 0001 The rotation of the cooling fan for the power supply unit (DCP1) has stopped. E805 Cause Description Cause Description The delivery assembly exhaust fan (FM1/2/3) is faulty. 0001 The delivery assembly exhaust fan (FM1/2/3) has stopped to rotate. The general exhaust fan (FM21/22/23) is faulty. 0001 The general exhaust fan (FM21/22/23) has stopped to rotate. E807 Cause Description Cause Description Cause Description Cause Description The laser cooling fan (FM4/5) is faulty. 0001 The laser cooling fan (FM4/5) has stopped to rotate. The laser scanner motor cooling fan (FM24) is faulty. 0002 The laser scanner motor cooling fan (FM24) has stopped to rate. The digital unit cooling fan 3 (FM16) is faulty. 0003 The digital unit cooling fan 3 (FM16) has stopped to rotate. The digital unit cooling fan 1/2 (FM14/15) is faulty. 0004 The digital unit cooling fan 1/2 (FM14/15) has stopped to rotate. E822 Cause Description Cause Description Cause Description The pre-fixing feed fan (FM7) is faulty. 0001 The pre-fixing feed fan (FM7) has stopped to rotate. The delivery lower cooling fan (FM19/20/27) is faulty. 0002 The delivery lower cooling fan (FM19/20/27) has stopped to ro tate. The reversing assembly exhaust fan (FM28/29/30/33) is faulty. 0003 The reversing assembly exhaust fan (FM28/29/30/33) has stopped to rotate. E-26 COPYRIGHT © 2001 CANON INC. 2000 2000 2000 2000 CANON CLC5000 REV.0 JAN. 2001 ERROR CODE Cause Description Cause Description Cause Description The fixing heat discharge fan (FM31) is faulty. 0004 The fixing heat discharge fan (FM31) is faulty. The delivery cooling fan (FM34) is faulty. 0005 The delivery cooling fan (FM34) has stopped to rotate. The pre-fixing exhaust fan (FM35/36) is faulty. 0006 The pre-fixing exhaust fan (FM35/36) has stopped to rotate. E824 Cause Description Cause Description The primary exhaust fan (FM6) is faulty. 0001 The primary exhaust fan (FM6) has stopped to rotate. The primary suction fan (FM8/9) is faulty. 0002 The primary suction fan (FM8/9) has stopped to rotate. E826 Cause Description The pickup cooling fan (FM26/32) is fault. 0001 The pickup cooling fan (FM26/32) has stopped to rotate. 1. If the self diagnosis mechanism has been activated, you can reset the machine by turning its power switch off and then on. This, however, does not apply to ‘E000’; if allowed with the thermistor out of order, such would heat and damage the fixing roller. 2. If ‘E005’ (ADD CLEANING BELT) is indicated, replace the cleaning web and execute ‘E005-RLS’ of ‘FUSER’ under ‘FUNC’ in service mode. 3. Even after clearing the E indication by turning off the power switch, a description of the last E indication may be checked using ‘JAM/ERROR’ under ‘DISPLAY’ in service mode. COPYRIGHT © 2001 CANON INC. 2000 2000 2000 2000 CANON CLC5000 REV.0 JAN. 2001 E-27 ERROR CODE • Clearing E000 1) Start service mode, and select ‘FUSER’ under ‘FUNC’. 2) Press ‘E000-RLS’. 3) Turn off and then on the power switch. • Clearing E005 1) Start service mode, and select ‘FUSER’ under ‘FUNC’. 2) Press ‘E005-RLS’. 3) Turn off and then on the power switch. • Clearing E075 1) Start service mode, and select ‘F-MISCp’ under ‘FUNC’. 2) Press ‘E075-RLS’. 3) Turn off and then on the power switch. • Clearing ‘E004’ 1) Turn off the power switch. 2) Disconnect and connect the power plug from and to to the power outlet. 3) Turn on the power switch. E-28 COPYRIGHT © 2001 CANON INC. 2000 2000 2000 2000 CANON CLC5000 REV.0 JAN. 2001 Prepared by Office Imaging Products Quality Assurance Center CANON INC. Printed in Japan REVISION 0 (JAN. 2001) (23715/26168/36086/36850) 5-1, Hakusan 7-chome, Toride-shi, Ibaraki 302-8501 Japan COPYRIGHT© 2001 CANON INC. 2000 20000 2000 CANON CLC5000 REV.0 JAN. 2001 PRINTED IN JAPAN (IMPRIME AU JAPON) This publication is printed on 100% reprocessed paper. PRINTED IN JAPAN (IMPRIME AU JAPON) 0200GR1.00-2