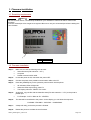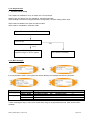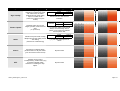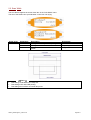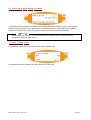
1
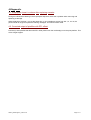
TECHNICAL INFORMATION BULLETIN
Release date: February 26, 2007
Bulletin N° 2007/219
FOR:
FROM:
MUTOH AUTHORIZED RESELLERS ONLY
MUTOH service & support department.
Falcon II Outdoor and Rockhopper II
New Firmware rh3.00
Dear Customer, with this new firmware we would like to introduce to you a
new Firmware for the Rockhopper II series printer.
Thanks to this new firmware, one can effortlessly increase overall printing quality
and enlarge its colour gamut. These advantages are induced by the new feature
of “I²” (Intelligent interweaving print technology)
Please read this bulletin thoroughly to know how to update the printer,
the compatibility, new features and bug fixes.
•
Notes
This new firmware is downloadable from Mutoh Firmware download site
Link:
ftp://[email protected]/firmware_download
User account:
firmware
Password:
download
TIB219_Rockhopper II_FW rh3.00
Page 1/11
Table of contents
1. Firmware installation .....................................................................................................3
1.1. Smartchip requirements.........................................................................................3
1.2. Firmware installation..............................................................................................3
2. New features ..................................................................................................................4
2.1. Intelligent Interweaving (I² - I square) ....................................................................4
2.2. Scan Width ............................................................................................................8
2.3. Start printing while waiting for heaters ...................................................................9
2.4. Utility Æ Slant check ..............................................................................................9
3. Changed features ........................................................................................................10
3.1. WiperClean ..........................................................................................................10
3.2. Automatic inkload at start-up ...............................................................................10
3.3. Changed default value: Autocleaning IDLE .........................................................10
3.4. Changed default parameter: inkparam. ...............................................................10
3.5. Improvement: Ecoprepare sometimes stops unexpectedly during inkload ..........10
3.6. Changed default value for HeadHeight to middle ................................................10
3.7. Smartchip writing improvements..........................................................................10
3.8. Manual tubingflush double pumping time ............................................................10
3.9. Updated versioncheck menu ...............................................................................10
4. Bug fixes.......................................................................................................................11
4.1. Ecoprepare doesn’t continue after replacing cassette .........................................11
4.2. Corrected output of printfiles with RTL offset. ......................................................11
TIB219_Rockhopper II_FW rh3.00
Page 2/11
1. Firmware installation
1.1. Smartchip requirements
Notes
Be sure to have version 1.0 smartchips installed on your cassettes in order to be able to use this new
firmware.
Previous smartchips will no longer be recognized. Be sure to use your old smartchips before installing this
new firmware.
No
1
Version 1.0
1.2. Firmware installation
Step 1 :
→
→
→
Make sure to have the following tools at hand :
Latest firmware (File extension “*.JFL”)
Computer
Parallel communication cable.
Step 2 :
In case the power is ON, first switch the power OFF.
Step 3 :
Connect the printer via a parallel communication cable to the PC.
Step 4 :
Press the [POWER] key on the operation panel to switch ON the printer.
→
→
→
Step 5 :
→
Step 6 :
All indication LEDs will light ON.
When the LEDs stop burning, press F2.
The Display will show: “READY TO LOAD”.
At this time, copy the file with the latest firmware (File with extension “*.JFL”) to the printer’s
parallel port.
For Example: “COPY / RH3.00.JFL” <ENTER>
The data will be transferred to the printer. On the display you can follow the sequence:
LOADING - ERASING – COPYING – COMPARING.
Step 7 :
A beep will notify you that the process is finished.
Step 8 :
Restart the printer to activate the new firmware.
TIB219_Rockhopper II_FW rh3.00
Page 3/11
2. New features
2.1. Intelligent Interweaving (I² - I square)
On a traditional printer, the image is completed (formed) by printing a series of complementary rectangular
shaped stripes (bands, swaths, passes). Inherent to classic inkjet printing is that ink drying effects, stepping
mismatch, miss firing nozzles show up in the printed image via ink bleeding and various types of banding. By
switching on one of Mutoh’s proprietary weave patterns you will give the traditional rectangular print swaths a
wave-shaped look that will save you time and boost your output quality. Difficult images will print smoother,
banding will be suppressed (neutralized) and you will have to spend less time fine-tuning your printer to
create great looking output.
Moreover, when using wave-tuned profiles, you will be able to boost your printer’s colour gamut as the i²
technology allows depositing more ink, helping you to achieve higher colour densities.
2.1.1. Advantages
•
Smoother images
I² keeps the bleed between the passes under control and makes colour banding less obvious. Small
misalignments of the heads are becoming less critical. Misfiring / missing nozzles are less visible in
the output.
•
Image printability
Images are easier to print with less signs of banding / bleeding. Some images can be printed at
higher speeds, without quality loss. Some difficult images become printable at faster speeds.
Especially sign-images have a much smoother surface.
•
Rockhopper II = easier to use
The step-adjust is becoming less critical, making it a lot easier for the user to have a good quality
output.
Because of the previous benefits, we clearly see a colour gamut boost by using the Intelligent Interweaving
technique.
TIB219_Rockhopper II_FW rh3.00
Page 4/11
2.1.2. Requirements
•
2x4 and 1x6 ink setup
The i²-feature is available for ‘2x4’ ink setups and ‘1x6’ ink setups.
Weaving sign and picture are only available in 720x720 printmodes.
When sending a file with an unsupported weave configuration, the stitch setting will be used.
Stitch mode is available in all 1pass and 2pass modes.
Stitch mode is unavailable in all 4pass modes.
Sign or Picture weave selected
720x720 dpi
NO
YES
Uses specifically designed and
optimized Sign or Weave pattern
Uses Stitch if available
2.1.3. Menu Changes
►
It is now possible to select more options than before. Namely the intelligent interweaving functions.
Setup items
Weaving (1/2)
Weaving (2/2)
Parameters
Sign / Quality
Picture / Speed
Stitch
Classic
OFF
Description
For Sign printing
OR
Quality Printing
(*)
For Picture printing
OR
Speed Printing
(*)
In previous firmware called “Stitch A”
In previous firmware called “Default”
Switches off any of these settings (not advised to run production)
* When selecting the Sign or the Picture weave while using an unsupported printmode, Stitch will be used if
available.
TIB219_Rockhopper II_FW rh3.00
Page 5/11
2.1.4. Questions and answers regarding the intelligent interweaving functions
Q1: Does the step-adjust without interweaving remains useful with interweaving on?
Yes, but it is recommended to disable the weaving when printing this pattern.
Q2: How to perform step-adjustment when weaving is switched on?
Step-adjustment is preferably done with weaving disabled. The Step-adjust file will be adapted to
automatically switch OFF the weaving feature when the file is sent to the printer.
Q3: Does the use of weaving require re-profiling?
No. But a profile made with the weaving feature put ON, is probably putting too much ink onto the media to
use without the weaving feature.
Q4: Can weaving be used in all print modes?
Weaving is currently available for the following print modes: 720x720
Other applications will be investigated and may be released in future firmware releases.
Q5: Can weaving be switched ON on-the-fly?
No.
Q6: Is weaving controlled from the RIP software?
At launch, RIP software does not control the weaving. The weaving mode is selected from the printer’s
control panel. RIP-manufacturers are working on a solution to control the weaving from the RIP.
Q7: Where is the weaving mode selected?
To select the weaving, use the [▲/▼] arrow keys to navigate to “PrintMode”. Then select PrintMode1. In
Menu (2/2), select Weaving (previously called “Overlap”). You have access to 5 options, 2 of which are new:
Sign/Quality, Picture/Speed, Classic, OFF and Stitch.
Q8: Which weave mode should I select?
Please refer to the table below for tips, supported print modes and speeds and example pictures.
TIB219_Rockhopper II_FW rh3.00
Page 6/11
Weaving method
User Tip
Sign / Quality
Preferred setting for signage/poster
applications containing big areas
with solid colours or critical
gradients and for photo quality
output on coated media.
(small loss of speed in 2 pass
modes)
Print Modes Supported
720x720
Picture / Speed
2 pass
4 pass
11 m²/h
6 m²/h
13 m²/h
6 m²/h*
(*) 4-pass is a quality mode and will
always use a tuned sign weave
pattern, even if picture is selected
from the panel / RIP.
720x720
2 pass
4 pass
Stitch
Creates a fine print swath overlap.
Mildly improves print quality versus
“Off” setting.
(lowest level of interweaving)
Classic
Use classic to maintain classic
printer behaviour in all print modes.
(prior to firmware version rh3.00)
All print modes
OFF
Switches off any kind of
overlap/weaving. Useful when trying
to inspect individual nozzle
behaviour or checking the stepadjust.
All print modes
TIB219_Rockhopper II_FW rh3.00
4 pass
Default selection after firmware
installation
720x720
Preferred setting for non-sign
images, pictures, continuous tone
data.
(no speed loss)
2 pass
4 pass
2 pass
13 m²/h
6 m²/h*
(*) 4 pass data will be printed as
classic
Page 7/11
2.2. Scan Width
This new feature appears as a new menu item in the “Print Mode” menu.
The aim of this feature is to provide better control over ink drying.
Setup items
ScanWidth
•
•
•
Parameters
DataWidth
MediaWidth
FullWidth
Description
Carriage moves only over the printing area
Carriage moves to the end of the media
Carriage moves over the full width of the
printer
Drying time
Short
Depending on MediaWidth
Long
Notes
This setting is indicated on the setup list.
This setting works with HDD printing.
This setting has no effect on internal test prints.
TIB219_Rockhopper II_FW rh3.00
Page 8/11
2.3. Start printing while waiting for heaters
A new option called "PrintStart" is available in the Heater status menu while the printer is waiting for the
heaters to warm up before printing starts. When you choose this option, printing will start immediately.
However, the heaters will continue to warm up in order to reach the requested temperature.
•
Notes
For the best printing output it is recommended to let your heaters warm up to the requested
temperature before you start printing.
2.4. Utility Æ Slant check
It is possible to switch slant check detection ON or OFF (default: ON)
The Slantcheck setting is added to the utility section of the setup list.
TIB219_Rockhopper II_FW rh3.00
Page 9/11
3. Changed features
3.1. WiperClean
When selecting “Wiperclean”: the carriage will now move to the manual maintenance station at the left side
of the machine.
3.2. Automatic inkload at start-up
Before an automatic inkload starts, a new message will appear.
While this message is displayed, it is possible to perform a normal power down operation.
Emptying (removing and placing back) the wastetank will start the inkload.
3.3. Changed default value: Autocleaning IDLE
The default value for Autocleaning Idle has been changed from 6h Normal to OFF.
3.4. Changed default parameter: inkparam.
The default value of diagnostic’s inkparam parameter has been changed to ‘reset’ instead of ‘set’.
As a result, when a machine loses its parameters it will not start with an automatic inkload.
3.5. Improvement: Ecoprepare sometimes stops unexpectedly during inkload
An inkload could sometimes stop unexpectedly due to a slight smartchip position inaccuracy.
The smartchip was recognized when inserting the cassette, but during the inkload process, the cartridge
position could change slightly, resulting in an error that halted the inkload process.
To avoid ecoprepare annoyances, this smartchip check has been removed. So when this problem occurs,
the sequence will continue, but the value on the smartchip will be incorrect.
3.6. Changed default value for HeadHeight to middle
The default value for the head height setting has been changed from low to middle.
3.7. Smartchip writing improvements
The routines for writing smartchips have been made more robust, so there is less chance of damaging a chip
when an error (e.g. read error due to bad contact) occurs.
3.8. Manual tubingflush double pumping time
Number of pumping steps for manual tubingflush has been doubled.
3.9. Updated versioncheck menu
On the bottom line of the versioncheck menu: “i2 print technology” is displayed.
TIB219_Rockhopper II_FW rh3.00
Page 10/11
4.Diagnostic
4.1. Ecoprepare doesn’t continue after replacing cassette
During the inkload with cleaning in the ecoprepare sequence, there was a problem when removing and
replacing a cartridge.
When replacing more than 1 cart. at the same time, or one cartridge at a time from slot 1, 2, 5 or 6, the
printer would no longer accepted the cleaning cartridges. This has now been fixed.
4.2. Corrected output of printfiles with RTL offset.
Previously it was possible that files with RTL offset printed over the media edge, onto the print platform. This
will no longer happen.
TIB219_Rockhopper II_FW rh3.00
Page 11/11