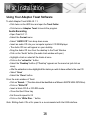
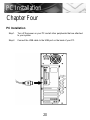
1
Technical Support
QPS Technical Support
Our Customer Support staff are ready to assist you with any problem you may have
with your QPS Product.
There are many ways to contact QPS Technical Support.
E-Mail:
[email protected]
World Wide Web:
http://www.qps-inc.com
Technical Support:
(949) 595-2184
Technical FAX:
(714) 692-5516
Copyright Statement
Copyright © 1999-2000 QPS Professional Solutions. All rights reserved. No part of
this publication may be reproduced or transmitted in any form by any means for any
purpose without the prior written permission of QPS Inc.
Windows is a trademark of Microsoft Corporation.
Apple, Mac OS are trademarks of Apple Computer Inc.
All other brand and product names are trademarks or
registered trademarks of their respective owners.
Copyright Protection Notice
Duplicating copyrighted material without the permission of the publisher may be
unlawful. QPS does not condone, support, or encourage the violation of copyright
laws. Please obtain proper authorization prior to duplicating copyright protected material.
Table of Contents
Thank You for Choosing QPS......................................................................................2
Chapter 1
Welcome to the CD-Recording World..........................................................................4
What Can the Que! USB Drive Do for Me? ................................................................4
Chapter 2
Getting Started ............................................................................................................6
What You Should Have! ..............................................................................................7
Package List ................................................................................................................8
What About Software? ................................................................................................9
Chapter 3
Macintosh Installation: Getting Plugged In................................................................12
Getting It All Set Up ..................................................................................................13
And Now for the Software..........................................................................................15
Chapter 4
PC Installation............................................................................................................20
And Now for the Software..........................................................................................22
Chapter 5
Handling Guidelines ..................................................................................................26
Media Insertion and Removal....................................................................................26
Chapter 6
Troubleshooting Guidelines ......................................................................................30
Mac Troubleshooting ................................................................................................32
PC Troubleshooting ..................................................................................................44
Appendix A
Glossary of Terms......................................................................................................50
Appendix B
FCC Compliance........................................................................................................53
Appendix C
Limited Warranty................................
1
Congratulations!
Thank You
for Choosing QPS!
Congratulations on your purchase of the Que! CD-ReWritable Drive.
In this manual, you’ll find information designed to help you understand
the capability of your New Drive as well as a step-by-step explanation
of how to install your hardware and software.
2
Chapter
One
Welcome to the CD
Recording World
Welcome!
Chapter One
Welcome to the CD-Recording World!
If you’re new to CD-Recording, don’t worry; it’s easy to learn. The Que! USB Drive
allows you to store massive amounts of data on one CD. You can fit as much data
found on 450 floppies on one CD-R or CD-RW media. Plus, it allows you to record
audio, and audio/video applications.
In this chapter, we’ll tell you more about the features and uses of CD-Recording
technology.
What Can the Que! USB Drive Do for Me?
With the Que! USB Drive, you have lots of flexibility and a multitude of options. For
instance, you can:
1. Store up to 450 times the volume of a floppy disk onto one removable
inexpensive piece of media that can be used over and over again.
2. Read data and play audio CDs.
3. Use the Que! USB Drive to create your own audio CDs, and rearrange or
combine tracks from different artists or labels onto your own CD.
4. Copy or create data CDs that can be read on any CD-ROM or DVD-ROM
Drive.
5. Use the Que! USB Drive as a superior alternative to tape for backup or
disaster recovery.
4
Chapter
Two
Getting Started
Getting Started
Chapter Two
Getting Started!
Before you start using your Que! USB Drive, you'll want to make sure you have everything you need. In this chapter, we'll tell you what comes in the package, so you can
make sure it's all there.
In this chapter we'll tell you about the minimum requirements your system needs to
support the Que! USB Drive.
Once you are sure you have everything you need, you can proceed to the next chapter,
where we'll show you how to install your hardware and software. The section on hardware
installation explains how to connect the Que! CD-ReWritable/Recordable Drive to your
computer. The software installation section briefly discusses the proceduresfor installing
each of the software applications that were provided with your drive.
As with anything you buy, there are always a few simple guidelines to observe when
using the product. With CD-Recording products, this primarily involves the care and
handling of media. These guidelines are provided in the chapter following installation.
The last chapter, Troubleshooting Guideline, is provided for the few folks who want to
know more about how the Que! USB Drive works, or who had difficulty with installation.
Refer to this chapter before contacting Technical Support — the answer to your
questions just might be here!
6
Getting Started
What You Should Have!
• What’s in the package
Refer to the provided package list on following page and verify that you have received
all of the appropriate parts.
Okay, if all the right parts were in the package, then you just need to make sure your
system will support the Que! USB Drive. Here's what you'll need.
For Mac Users — iMac or G3/G4 Users:
Minimum system requirements:
• 233 MHz PowerPC G3 Processor or better
• Mac OS 8.5.1 or higher
• Mac USB Driver version 1.1 or higher
• 64MB RAM
• CD-ROM Drive
• 50MB free hard disk space for software
• 700MB free hard disk space for CD image creation
• USB Interface
For PC Users:
Minimum system requirements:
• Pentium 133 MHz Intel-compatible processor or better
• Windows 98
• 32MB RAM
• CD-ROM drive
• 540MB free hard disk space for software installation
• 700MB free hard disk space
• USB Interface
7
Package List
Carrying Bag &
Strap
Installation
Manual
Drive
Universal Power
Supply Adapter
Power Cable
USB Cable
Software
CD-R & CD-RW
Media
8
Getting Started
What About Software?
The Que! USB Drive comes with a variety of software applications that will help you
get the most from your drive.
iMac and G3/G4 users should install the following applications:
• Toast software for Macintosh by Adaptec. With this CD mastering software,
you'll be able to make your own CDs in standard formats, so they can
be used on most CD-ROM and DVD-ROM drives.
PC users should install the following applications:
• Easy CD Creator by Adaptec
Make CDs Right on Your Desktop. Using Adaptec’s Easy CD Creator software,
you can copy files from your computer to a recordable compact disc.
Using a special write-once media, Adaptec Easy CD-Creator allows you to
permanently store data in format that is readable on virtually all CD-R and
CD-ROM drives. In addition, the audio CDs you create with your CD
recorder are readable in your home or car CD player. Your Que! CD-RW
CD-ReWritable drive, also has the option of using a special erasable media
that allows you to rewrite information on a CD.
Using Easy CD Creator you can:
• Compile CDs of your favorite music
• Archive data
• Back up a hard drive
• Disseminate information to field offices
• Distribute databases
• Create a test copy of a multimedia CD
• Duplicate CDs
• Erase and rewrite the contents on a CD
• Make a custom jewel case insert, and more!
• Direct CD by Adaptec
This utility software provides drive letter access, which allows you to drag and
drop files between media just as you would for a floppy disk. Because it's so
easy to use, it's ideal for archiving data.
9
Notes
10
Chapter
Three
Mac Installation
Mac Installation
Chapter Three
Macintosh Installation: Getting Plugged In
Now that you know you have everything you need, you're ready to install your Que!
USB Drive hardware and software. This chapter will show you how.
The figure below shows the front panel controls and indicators for the Que! USB Drive.
12
Mac Installation
Getting It All Set Up
Step 1.
iMac & G3/G4 Desktop Computers: Attach the USB cable to either
of the two USB connectors on the back or the side of the
iMac or G3/G4 computer. (Refer to your Mac user manual).
iMac installation
G3/G4 installation
13
Mac Installation
Step 2.
Attach the other end of the USB interface cable to the USB port on
the back of the Que! USB Drive.
Step 3.
Attach the power adapter to the back of the Que! USB Drive. Plug one
end of power cable to the back of the power adapter and the other
end to the grounded power outlet.
Step 4.
Do not turn on the power to the Que! USB Drive unitl you have installed
the Adaptec Toast software.
Note:
The Que! USB Drive will not mount itself on the desktop until you have
finished installing the software and restart your system.
Step 5.
Congratulations! Now refer to your
software installation procedures on the
following page.
Note:
Your Que! USB Drive will not be able to
eject until you have installed the Adaptec
Toast mastering software and restart your
Mac.
14
Mac Installation
And Now for the Software
In this section, we'll explain how to install the recording software packages that came
with your Que! USB Drive.
Step 1
Install the Adaptec Toast software
• Insert the Installation CD into the CD-ROM drive
• Close any open folders or applications before proceeding
• Double click on the install “Que! Installtion CD” icon that appeares on
the desktop
• Double click on the “Adaptec Toast” folder
• Select the preferred language folder (Engilsh, Spanish etc.) and double
click on it
• Select “Toast installer” and follow the software instructions
• When you are prompted to install on a “680”, “PowerPC” or Universal”;
select “Universal”
Step 2
• After the installation is complete restart your system
• After your system is booted up power on the Que! USB Drive
• To start using Toast go to the next page for basic instructionsor use the
online help
Note:
Direct CD does not support USB devices on the Mac platform
15
Mac Installation
Using Your Adaptec Toast Software
To start Adaptec Toast USB 4.0.1.1:
• Click twice on the HDD icon and open the Toast Folder
• Click twice on Adaptec Toast to launch the program
Audio Recording
• Open Toast 4.0.1.1.
• Select the Format menu
• Select “AUDIO CD” from drop down menu
• Insert an audio CD into your computer systems’ CD ROM player
• The Audio CD icon will appear on your desktop
• Drag the Audio CD icon from the desktop to the Toast Window
• Click on the “Audio” button (the audio track window will open)
• Highlight a track or select all the tracks at once
• Click on the “extract to.” button
• Select the “Desktop” buttton (If “Desktop” appears on the menu bar just click on
save)
• After the extraction is done highlight all the tracks you wish to have written to the new CD
• Select “Save”
• Select the “Done” button
From the main window of Toast:
• Click on “Search...” (The drive should be identified as a Mitsumi 4804TE USB: QPS Drive)
• Click on “Write CD”
• Insert a blank CD-R or CD-RW media
• Close the Que! Drive tray
• Set the write speed to 2X
• Click on the “Write Disc...” button
Note: Writing Audio CDs at 2x speed is a recommended with the USB interface.
16
Mac Installation
Recording Data
• Select the FORMAT menu and select the format you want to use.
For example, you can select “Mac files & folders”.
NOTE: If you are not sure of the format to use, drag and drop the files onto the main
Toast screen and Toast will automatically select the format.
• From the main Toast screen click on the “Data” button.
• At the next screen click on the “Add” button.
• Then at the third window, select Mac HDD or desktop and work your way
down the directory structure.
• Click on the files or folders you want to select and click on “Add”.
• Then click on “Done”.
• From the Data screen click “Done”.
You are now back at the Toast 4.0.1.1 main screen.
• Click on “Search” to detect your Que! Drive “Mitsumi 4804TE USB:
QPS Drive”.
• Click on Write CD (disc tray will open, insert a blank disc).
You are now at the Write Disc screen.
• Select Speed: 1x, 2x or 4x speed
• Select Write session to allow for more data at a later time.
• Select “Write Disc” to close and finalize the disc. (This is what you should
select if you plan to send the CD you made elsewhere).
NOTE: Write at 4x speed with 4X certified media.
Enable Simulation only to test your Que! Drive.
Click on Write Session to keep the disc open for additional data.
Click on Write to Disc to close the disc.
Your Que! Drive’s LED will turn red when it is starting to write.
17
Notes
18
Chapter
Four
PC Installation
PC Installation
Chapter Four
PC Installation
Step 1.
Turn off the power on your PC and all other peripherals that are attached
to your system.
Step 2.
Connect the USB cable to the USB port on the back of your PC.
20
PC Installation
Step 3.
Attach the other end of the USB interface cable to the USB port on the
back of the Que! USB Drive.
Step 4.
Attach the power adapter to the back of the Que! USB Drive. Plug one
end of power cable to the back of the power adapter and the other end to
the grounded power outlet.
Step 5.
Congratulations! To continue, refer to
your software installation procedures
on the following page.
21
PC Installation
And Now for the Software
In this section, we'll explain how to install the recording software packages that came
with your Que! USB Drive.
Part 1. Installing the Easy CD-Creator
Step 1. Insert the installation CD in your computer’s CD-ROM drive.
The installation wizard “Master Setup” will start up
automatically
Step 2. Select “Easy CD Creator” to start installing the program.
When you do that the Adaptec Easy CD Creator window will
pop up. Choose “Next”
Step 3.
At the software livense agreement screen choose “yes”
Step 4.
The next screen is the “Choose Destination Location” screen,
if you want to load the software in the default directory press
the “Next” button.Now the Easy CD Creator will be loaded
onto your system
Step 5. When the Easy CD Creator software has been loaded you will
be returned to the “Master Setup” screen
Part 2. Installing the Direct CD
Step 1. From the “masyter Setup” screen select “DirectCD” to begin
the DirectCD installation wizard
Step 2.
At the next screens choose “Next”, “Yes” and “Next”. Then the
software will begin to load into your system
Step 3.
After the DirectCD software is loaded onto your system you
will be returned to the “Master Setup” window
22
PC Installation
Part 3. Installing the UDF Reader
Step 1. Select UDF Reader. When you do this “Adaptec Setup
Wizard dialogue box will pop-up and display the follwing
questions:
“This Setup wizard installs the Adaptec Direct CD (UDF) Reader for
window 95/ Window NT. Do you wish to continue?”
Set 2.
Select “Yes” to install the UDF raeder software
Set 3.
At the next screen choose the language you prefer and then
choose the “Next>” button
Set 4.
Now click on the “Install” button to load the software
Set 5.
Then click on “Exit” at the “Master Setup” window
Set 6.
The “Setup Complete” window pops up and asks if you wish
to restart your system now; the default is yes
Set 7.
Choose the “Finish” button to exit the setup wizard
Part 4. Installing the USB drivers
Step 1. Power up your PC and verify that the system has booted up
and the Windows Operating System Desktop is loaded.
Step 2. Switch the power on at the rear of the Que! USB Drive. When
you do this the operating system should detect the Que! USB
Drive and start the “Add New Hardware Wizard”.
Step 3. Insert the Que! installation CD in your system’s CD-ROM drive.
Step 4. Immediately after you power on your Que! USB Drive
Windows 98 will display the “New Hardware Found” window
and then automatically display the “Add New Hardware
Wizard” window.
Step 5. Press the “Next>” button.
23
PC Installation
Step 5. Press the “Next>” button.
Step 6. At the next screen you will be prompted with the following
question, “What do you want Windows to do?”. Of the two
choices pick the first choice which is “Search for the best driver
for your device. (Recommended)”.
Step 7. Press the “Next>” button.
Step 8. The next screen will have four choices for you to select a
device driver from. Select the last choice “Specify a
location:” by checking the adjacent box.
Step 9. Select the “Browse” button and find your sytem's CD-ROM
drive (it should be titled “Adaptec CD”) then double click on
the Adaptec CD and select the “QUEUSB~1 folder. After
selecting the QUEUSB~1 folder click the OK button.
Click on the “Next>” button at the next three screens.
Step 10. You should now be at the same screen you were at at the
end of step 4.
Step 11. Press the “Next>” button.
Step 12. Repeat step 6.
Step 13. At the next screen press the “Next>” button.
Step 14. You should now be at the final Add New Hardware Wizard
screen that displays “USB Bridge Module” and “Windows
has finished installing the software that your new hardware
device requires.” Now click on the “Finish” button.
Step 15. Now restart your system
NOTE: At this point the operating system now recognizes the Que! USB Drive
as a CD-ROM drive. Now you need to install the Adaptec software to
write to the device.
24
Chapter
Five
Handling
Handling
Chapter Five
Handling Guidelines
Media Insertion and Removal
1. To insert the CD-ROM, CD-R or CD-RW disc, press the EJECT button.
2. Once the disc tray has fully extended, place the CD-ROM, CD-R or CD-RW disc
disc into the center of the tray.
Note: The disc surface must be clean and the label should be facing upward.
3. Press the eject button to have the drive accept the CD-ROM, CD-R or CD-RW disc.
26
Handling
4. The busy lamp will light for a few seconds to indicate that a disc has been loaded
and the drive has accepted the disc.
5. To eject and insert the disc, press the EJECT button.
NOTE: Some software prohibits the use of the EJECT button, so a disc cannot be
ejected in this way. Please refer to the instructions supplied with your software.
6. Once it has been ejected, remove the disc by hand and return it to its jewel case.
NOTE: The disc cannot be ejected while the drive is reading or writing a disc.
27
Handling
The NUMBER ONE cause of premature disc failure with recordable CDs is contamination
of the recording surface before recording is completed. To minimize disc failure, use
the following disc-handling guidelines.
• Keep the media in its sealed package until you are
ready to record.
• Keep the disc as clean and dust-free as possible.
DO NOT touch the recording surface, and do not
expose the disc to dust or dirt.
• DO NOT BLOW ON THE DISC to remove dust or
dirt. To remove dust from the recording surface use
a camera lens cleaner, a lint free cloth or use
compressed air. Wipe the disc from the center to
the outer edge. NEVER wipe the disc in a circular
motion.
• Always record in a dust-free environment. If the disc
is to be removed from the CD-RW drive, store the
disc in a clean, dust-free environment.
• Never bend or flex the disc. This may warp the disc
and leave it unusable.
• Never scratch off the reflective top surface of a
CD-R or CD-RW disc. Without the reflective surface
the disc is completely unusable.
• If you must write on the CD-R disc surfaced, read
the back of the CD-R jewel case for instructions.
28
Chapter
Six
Troubleshooting
Troubleshooting
Chapter Six
Troubleshooting Guidelines
Having trouble with your Que! USB Drive. Want to know more about how it works?
Check the list of common questions provided in this chapter; you may find the
answers you need. If you don’t, or if a problem persists, contact QPS Technical
Support.
Calling QPS for Assistance
If you need to get in touch with the QPS Technical Support Department, please have
the following information on hand when you call:
• Your name, address, and phone number (so we can register you)
or your customer ID if you have called before.
• Your operating system: Windows 98, or Mac OS and Version.
• Your Computer’s CPU and RAM.
• A description of your problem and the exact error message.
• Which QPS model number and the serial number you have.
• For more information go to our website at http://www.qps-inc.com.
or call us at (949) 595-2184.
30
Macintosh
Troubleshooting
Mac Troubleshooting
Important Information About Your iMac & G3/G4 Memory
Settings
This document contains important late-breaking information about setting-up your
iMac or G3/G4 computer memory for optimum performance with the QUE! USB 4x
CD-RW Drive.
Setting up your iMac & G3/G4 Memory
• After starting up your iMac or G3/G4:
• Select the Apple icon located on the top left corner of the screen
• Choose “Control Panels” and then “Memory”
• Set the “Disk Cache” to the default setting
• Set the “Virtual Memory” option to OFF
• Set the “RAM Disk” option to OFF
• Restart your iMac or G3/G4 to enable the new memory setting(s)
Setting Toast USB for optimum performance with iMac and G3/G4
Computers.
Step 1. Setting up Toast memory
After installing the Que! USB Toast on your iMac or G3/G4:
• Open the “Toast folder” and select “Toast 4.0.1.1” icon by clicking once on
the icon.
• Select the “File” option from the desktop and choose the “Get Info”
option and then “Memory”
• Set the “Minimum Size” option to 10285 K
• Set the “Preferred Size” option to 10285 K
• Close the file
32
Mac Troubleshooting
Macintosh Troubleshooting
Problem 1: Installed the Que! USB Drivers but the system keeps on prompting
the following message after each restart:
“The software needed to use the USB device “Que! USB Drive USB” cannot be found.
Please refer to the device documentation to install the necessary software.”
Reason 1:
Step 1.
The USB driver revision installed on your iMac may be older than
version 1.1.
Verify that you have the latest operating system and drivers
installed on your MAC:
• After starting up your iMac or G3/G4: Select the Apple icon located on
the top left corner of the screen
• Choose the “Apple System Profiler” option
• Under the Software overview/Mac OS Overview, verify that you have
Finder and System 8.5.1 installed (if not please make a note of the
Finder and System versions installed).
• Select the “Devices and Volumes” Tab and verify that you have USB 1.1
installed (if not please make a note of it).
Step 2.
For your convenience, we have included the most recent updates from
Apple on the Que! installation CD. However users with Finder and
System 8.1 need to contact Apple directly to obtain the OS 8.5.1 and the
USB 1.1 update CD.
33
Mac Troubleshooting
Step 3. To update your OS 8.5 to 8.5.1, insert the Que! USB Drive installation
CD into the CD-ROM drive.
• Locate and open the “Apple Updates” folder.
• Locate and open the “Mac OS 8.5.1 Update” folder
• Double click on the “Mac OS 8.5.1 Update.smi” icon
• The program will expand and create a copy of the “Mac OS 8.5.1
Update” on your desktop
• Double click on the “Mac OS 8.5.1 Update” icon located on your
desktop and follow the instructions
Step 4. To update your iMac firmware, insert the Que! USB Drive Installation CD
into the CD-ROM drive.
• Locate and open the “Apple Updates” folder.
• Locate and open the “iMac Firmware Update” Folder
• Double click on the “iMac Firmware Update.smi” icon
• The program will expand and create a copy of the “iMac Firmware
Update” on your desktop
• Double click on the “iMac Firmware Update” icon located on your
desktop and follow the instructions
Step 5. To update your USB driver, insert the Que! USB Drive Installation CD
into the CD-ROM drive.
• Locate and open the “Apple Updates” folder.
• Locate and open the “iMac USB 1.1 Driver Update” Folder
• Double click on the “iMac Update 1.1.smi” icon
• The program will expand and create a copy of the “iMac Update 1.1”
on your desktop
• Double click on the “iMac Update” icon located on your desktop and
follow the instructions
34
Mac Troubleshooting
Step 6.
Once you have installed all of the above updates, your system should
recognize the Que! USB Drive upon startup. If the problem persists,
please contact your dealer or QPS for technical support. Please refer to
the first page in the installation manual on how to contact QPS.
Reason 2: The drivers mentioned above may have not installed properly.
Step 1. When you get the driver error message click on “OK” to clear the error
message.
Step 2. Disconnect the USB cable going to the Que! USB Drive and reconnect it.
Step 3.
If the error message dose not appear again, press the eject button to see if
the Que! USB Drive responds.
Step 4.
Insert an Apple data CD into the Que! USB Drive and verify that it has
been recognized and mounted on the desktop.
Step 5.
If steps 1-4 are completed and the error message persists you may need
to reinstall the Mac operating system again. (Do this only after trying all
other possible fixes).
Reason 3: You may be using a third party USB interface card on a PowerMac
or an early G3.
Step 1.
Verify that you have the latest driver from the USB interface card manufacturer.
Step 2.
Verify that the PCI USB interface card is capable of supporting CD-R drives.
Step 3.
Refer to Problem 1, Reason 1, Step 5 and Reason 2 to verify that you
have installed the latest revision of the USB drivers.
Step 4.
Your third party USB interface card may not be compatible with theQue! USB
Drive or you may need to update your USB card drivers. For further support
contact your USB card manufacturer.
Problem 2: Connected the Que! USB Drive to the iMac or G3/G4 computer but
the system does not recognize the Que! USB Drive.
Reason 1: The power or the power cabling may not be applied correctly to the
Que! USB Drive.
35
Mac Troubleshooting
Step 1.
Verify that you have securely fastened the power cable connectors on
the Que! USB Drive and on the power adapter block.
Step 2.
Check to confirm that the power switch on the back of the Que! USB
Drive is ON and the green LED's on both of the power adapter and on
the front bezel of the Que! USB Drive are lit. Refer to “Getting It All Set
Up” section of the installation manual for instruction on how to connect
the USB cable.
Reason 2: The USB cable may not be fully or properly installed on the Que!
Drive or your MAC.
Step 1.
Verify that you have securely fastened the USB cable connector on your
Que! USB Drive and the iMac or G3/G4 USB port. Refer to the “Getting
It All Set Up” section of the installation manual for instructions on how to
connect the USB cable.
Reason 3: If you are connecting the Que! USB Drive to iMac or G3/G4 computer
via an USB Hub you may be experiencing cabling or power problems
with your USB Hub configuration.
Step 1.
Shut down the iMac or G3/G4 and turn off the power on all of the USB
peripherals
Step 2.
Disconnect the USB Hub and all other USB peripherals attached to the
iMac or G3/G4.
Step 3.
Connect the Que! USB Drive to the iMac or G3/G4's USB port using the
supplied Que! USB cable. (Refer to the “Getting It All Set Up” section of
the installation manual for instruction on how to connect the USB cable)
Step 4.
Power up the Que! USB Drive first then the iMac or G3/G4 computer.
Step 5.
If the iMac or G3/G4 computers still doesn't recognize the Que! USB
Drive, please refer to Problem 1 and 2 of the troubleshooting section to
resolve this symptom.
Step 6.
If the Que! USB Drive was successfully recognized under the iMac or
G3/G4 computers, shut down the iMac or G3/G4 and turn off the power
on the Que! USB Drive.
36
Mac Troubleshooting
Step 7.
Reconnect the USB Hub to the iMac or G3/G4 computer and verify that the
power is applied to the USB Hub(Refer to your USB Hub installation manual).
Step 8.
Power up the iMac or the G3/G4 and power up the Que! USB Drive.
Connect the supplied Que! USB cable to the USB Hub first and verify the
recognition of the Que! USB Drive by the iMac or G3/G4.
Step 9.
If the Mac successfully recognizes the Que! USB Drive, proceed by adding
the other USB peripherals in the same manner until you have successfully
connected them all.
Step 10.
If you encounter difficulties recognizing any of the USB peripherals
through the USB hub. Please refer to the USB Hub installation manual
for further support.
Problem 3: The Que! USB Drive does not eject the CD tray and/or the Toast
application does not identify the drive.
Reason 1: The USB connection may be disconnected.
Step 1.
Verify that your USB cable is connected to the back of your Que! USB
Drive and that the other end is connected to your USB port. Do this by
disconnecting and reconnecting the cable at both ends.
Reason 2:
Your system was not rebooted after installing the Toast software.
Step 1.
Reason 3:
Power off the Que! Drive; restart your system, power on the Que! Drive
and then launch Toast.
Your Que! USB Drive is not powered on or has a power supply failure.
Step 1.
Look at the front of your Que! USB Drive and verify that the green LED
under the eject button is on.
Step 2.
If the power on LED is not lit verify the the power switch on the back of the
drive is in the on position.
Step 3.
Observe the external power supply and verify that the green LED is on. If
it is off it is not plugged in or is completely bad. If the LED is flashing
that indicates that the power supply is not functioning properly.
37
Mac Troubleshooting
Reason 4:
The Toast software was not installed or you may have had the
drive off when launching the Toast software.
Step 1.
Open the Toast application and click on the “SEARCH” button on the
right hand side of the main Toast screen. This will scan the USB bus
and identify your drive.
Reason 5:
You may have upgraded from an earlier version of Toast such as
3.8 or 3.8.2 and did not remove the old extensions.
Step 1.
If you have upgraded Toast from 3.8 or 3.8.2 you need to delete the
extensions that were used with those versions of Toast. The names of
the extensions are “Que! USB Support” and Que USB Driver.
Step 2.
Delete those extensions by going to the hard drive icon, on your desk
top, and double clicking on it double click on the system folder, and then
double click on the Extensions folder and throw the two extensions into
the trash.
Step 3.
Restart your system.
Reason 6:
You may have upgraded your Toast software to a Deluxe version
such as 4.0X Deluxe
Step 1.
If you have upgraded from Toast 3.8 or 3.8.2 follw the instructions listed
in Reason 5 and then go to step 2.
Step 2.
Launch your Deluxe version of Toast; Go to the “internet” menu and
select “Web check up”. This will bring you to the Adaptec web site with
the extension that you need to support the QPS Que! USB Drive.
Step 3.
If you have purchased a Deluxe version of the software you should
contact Adaptec for support of the software
38
Mac Troubleshooting
Problem 4: Inserted a blank CD-R or CD-RW media but the Que! USB Drive
keeps on ejecting it.
Reason 1: Unrecorded media cannot be mounted on the desktop without
using the included Toast software to record on the media first.
Step 1.
Launch the provided Toast program first and then insert the blank CD-R
or CD-RW media in to the Que! USB Drive for recording. Refer to the
“And now for the software” section of the installation manual for complete
instructions on how to install the Toast software.
Problem 5: The system freezes or displays an error message while attempting
to record onto a CD at 2X or 4X speed. The error codes are similar to
“SCSI error - 6911, the SCSI connection is not stable”.
Reason 1: This error could be encountered when using inexpensive unbranded
third grade media.
Step 1.
Replace the media in question with grade A branded media such as
Mitsui or TDK etc.
Reason 2: Your memory settings may not be set for optimum performance for
the Que! USB drive
Step 1. Please refer to Impoprtant Information about your memory settings of this
troubleshooting section to resolve the problem.
39
Mac Troubleshooting
Problem 6: The system intermittently displays the following error message while,
attempting to record a data CD from the internal CD-ROM drive at
4x speed with the Que! USB Drive connected to your iMac or G3/G4
computer through an USB Hub.
“The drive reported an error:
Sense Key = ILLEGAL REQUEST
Sense Code = 0x24
INVALID FIELD IN CDB”
Reason 1: Due to the slow nature of the USB interface, recording to the Que!
Drive at 4x speed while connecting multiple active USB peripherals
across the USB Hub may jeopardize the overall performance of the
USB bus.
Step 1.
Select 2x recording speed instead of 4x and repeat the recording session.
It is highly recommended that you create an image of the source CD on
your hard disk drive prior to copying a CD.
Step 2. If problem persists connect the Que! USB Drive directly to the iMac or
G3/G4 USB port and repeat the recording session.
Step 3.
If problem persists please refer to Problem 5 of the troubleshooting section
to resolve this symptom.
Reason 2: You may have a scratched source disc which results in excessive
seek times by the internal CD-ROM drive while attempting to read
the CD. This may cause buffer underruns.
Step 1.
Check the source CD for any scratches or fingerprints.
Step 2.
If excessive fingerprints are visible on the source CD, please refer to the
“Handling Guidlines” section of this manual for instructions on how to
clean the CD.
Problem 7: Your system hangs up or freezes while recording with no error
messages.
40
Mac Troubleshooting
Reason 1: You may have connected the Que! USB Drive to the USB port
available on your keyboard or monitor.
Step 1. Disconnect the Que! USB cable from the USB port on the keyboard.
Step 2.
Connect the Que! USB cable to your USB hub or directly to the USB port
on your iMac or G3/G4.
Reason 2: You need to set up your iMac or G3/G4 memory and the Toast USB
software memory parameters.
Step 1. Refer to the “Important Information” section of this chapter.
Reason 3: You may be experiencing cabling or power problems with your USB
hub. Please refer to Problem 2, Reason number 3.
Reason 4: If you are writing an audio disc from AIFF files on your hard drive
the files may be corrupted
Step 1.
Try running in simulation mode or writing onto a CD_RW disc until the
problem is resolved.
Step 2.
To verify that the problem is an audio file, keep track of how far into the
writing process the error occures. If the error is consistently in the same
place the problem could be the file.
Step 3.
Go to your audio CD layout and remove the file from your selection of
files that you want to copy to the disc. To go to the audio CD layout from
the main window of Toast click on the Audio button. To remove a file,
click on the track to select it and then click on the “Remove” button
toward the bottom of the screen. Click on the “Done” button to return to
the main Toast window. Do a test write on CD-RW or a simulation on a
CD-R.
Step 4.
If this resolves the problem, try to re-extract the audio file that was
causing the problem and then try to write your disc again.
Problem 8: You get a verification error after recording a CD.
41
Mac Troubleshooting
Reason 1:
The master disc may be scratched or have excessive fingerprints
on it.
Step 1.
Please refer to the “Handling Guidelines” section.
Step 2.
Manually verify the data by running the application or opening up the
files and folders that you copied.
Problem 9: After installing the Toast 4.0.X your system reports operating
system errors such as “Apple System Profiler could not be opened
because >> OTUtility Lib<< could not be found” or the extensions
would not load.
Reason 1:
You may have had the Que! Drive powered on when installing the
software.
Step 1.
Power off the Que! Drive and restart your system. After your Mac
restarts you should see the extentions load. Power on the Que! Drive
before launching the Toast application. If the symptoms do not change
go to step 2.
Step 2.
You may need to reinstall the Toast application. To reinstall you should
first remove the current installation of the Toast software. Delete the
Toast extensions by going to the hard drive icon, on your desktop, and
double clicking on it, double click on the system folder, and then double
click on the Extensions folder and throw the extensions that start with
the word “Toast” into the trash.
Step 3.
Go to the Toast folder and throw it into the trash and make sure the
Toast icon is included.
Step 4.
Restart your system and reinstall the Toast application. Make sure that
when you are prompted for the three choices (“680”, “PowrPC” and
“Universal”) that you choose “Universal”.
If you require additional help with your Que! USB Drive; please contact your local
dealer or QPS for technical support for further assistance. Please refer to the first
page in the installation manual on how to contact QPS.
42
PC
Troubleshooting
PC Troubleshooting
Please Note:
• Most CD-Audio players will not recognize CD-RW media.
• You need 4X certified media to write at 4X speed.
Problem 1: The Que! USB Drive disc tray will not open.
Reason 1: The USB device drivers were not installed or not properly installed.
Step 1. Refer to Part 4 of the PC software installation section of this manual for
the step by step USB drivers installation.
Step 2. Click on the Windows “Start” button (usually located at the bottom left of
the screen).
Step 3. Select “Settings” then the ”Control Panel” option from the displayed menu.
Step 4. Double click on the “System” icon. The “System Properties window” will
pop up.
Step 5. The “System Properties Window” will pop up. Click on the “Device
Manager” tab. You should now see a complete alphabetical list of all the
peripherals that interface with your CPU.
Step 6. Double click on the “CDROM” item. This will give a list of all the devices
that are recognized by the operating system as a CD-ROM drive. The
Que! USB Drive is recognized as “Mitsumi CR-4804TE.” Verify that the
Mitsumi CR-4804TE are one of the drives recognized as a CD-ROM
device.
Step 7. If the Que! USB Drive is not recognized, scroll down and double click on
the “Universal serial bus controller” listing. Verify that you have the
following 3 device drivers:
Brand xxxxxxx PCI to USB Universal Host Controller
Que! USB Drive USB
USB Root Hub
(xxxxxxx represents the name of the device driver, which
varies from one system to another)
44
PC Troubleshooting
Step 8.
If you have tried to follow the PC Software Installation section and still
have one of the device drivers missing go to Windows “Start”,
“Settings”, “Control Panel” and then double click on the “Add New
Hardware” icon.
Step 9.
Follow the instructions on the “Add New Hardware” Wizard.
Reason 2: Your CD Recorder is not powered on or the USB cable is not
connected properly.
Step 1.
Verify that you have securely fastened the power cable connectors on
the Que! USB Drive and on the power adapter block.
Step 2.
Check to confirm that the power switch on the back of your Que! USB
Drive is ON and the green LEDs on both the power adapter and on the
front bezel of the Que! USB Drive (below the eject button) are lit. If the
green light on the power adapter is flashing, the power supply is bad.
Refer to “Getting It All Set Up” section of the installation manual for
instructions on how to connect the USB cable.
Step 3.
Verify that you have securely fastened the USB cable connector to your
Que! USB Drive and the USB port on the back of your PC. Refer to the
“Getting It All Set Up” section of the installation manual for instructions on
how to connect the USB cable.
Step 4.
If the problem persists, reset the power on the Que! USB Drive by turning
it off and back on. When you do this the LED on the front of the drive
should blink green.
45
PC Troubleshooting
Reason 3: The USB interface on your system is not enabled. To verify that the
USB interface that is built into your system is enabled follow the
steps below.
Step 1. Click on the Windows “Start” button (usually found on the bottom left
hand side of your screen).
Step 2. Choose “Shut Down”.
Step 3. Click on “Restart”.
Step 4. Press enter on the “OK” button.
Step 5. Press the appropriate function key(s) to enter your computer system’s
BIOS. You may need to refer to your computer owner’s manual to find
out how to enter your BIOS setup.
Step 6. Once you have verified that your USB interface is enabled save your
settings and reboot the system.
Problem 2: When running Easy CD Creator an error message such as: “There
are currently no supported CD Recorders available. Please ensure
that your CD Recorder is powered on and that all cables are
properly connected.”
Reason 1: The USB drivers were not installed.
Step 1. Refer to the PC Software Installation section of this manual.
Reason 2: The Que! USB Drive is not connected properly.
Step 1. Refer to Problem 1, Reason 2.
Reason 3: The USB interface is not enabled.
Step 1. Refer to Problem 1, Reason 3.
46
PC Troubleshooting
Problem 3: The computer locks up when trying to copy a data or audio CD,
from your internal CD-ROM drive, to your Que! USB Drive. It may
also lock up when trying to copy data or audio from your hard drive
to the Que! USB Drive.
Reason 1: You may have other applications open that use up your system’s
resources.
Step 1. Verify that all other applications are closed before writing to your
Que! USB Drive.
Step 2. To look for applications that are open hold down the “Alt” button on your
keyboard and simultaneously press the “Tab” button. This will allow you
to view any other applications that may be open.
Reason 2: Your screen saver may be coming on when you are trying to write
a disc.
Step 1. Turn off your screen saver. Go to the Windows “Start” button, “Control
Panel” and double click on the “Display” icon.
Step 2. This will make the “Display Properties” window pop up. Then click on
the second tab which is titled “Screen Saver.”
Step 3. Choose “none” and then hit the “OK” button.
Reason 3: Your source disc may be damaged (scratched or soiled).
Step 1. Remove the source disc and visually inspect it for scratches or debris.
Step 2. Please follow the handling guidelines mentioned in this manual.
Problem 4 When the eject button on the Que! USB Drive is pressed, the disc
tray ejects, but when in Device Manager the Que! Drive is not
identified.
Reason 1: The Device Drivers were not properly installed.
Step 1. Verify that the operating system can not identify the drive. To do this
fellow steps 2 through 7 in Problem 1, Reason 1.
47
PC Troubleshooting
Step 2. If under the “Universal serial bus controller” the Que! USB Drive
USB” is identified but the Mitsumi CR-4804T is not listed go to step 3
otherwise go to step 6.
Step 3. From Device Manager click on "Que! USB Drive USB" under the
Universal serial bus controller listing. When you click on that item it
should be highlighted blue. Then when the item is listed click on the
"Remove" button towards the bottom of the Device manager window.
Step 4. Turn off the Que! USB Drive by moving the slide switch on the back of
the drive to the off position. Then close all the windows that you have
open. Go to the Start button, select Shut Down, pick the Restart option
and click on OK
Step 5. After the system boots up power on the Que! Drive, you should be
prompted with the "Add New hardware Wizard" window. Follow the
installation instructions in part 4 of the PC installation.
Step 6.
If the QUE! Drive is not listed under the "Universal serial bus controller"
AND is not listed as "Mitsumi CR-4804TE" under the CDROM sections
of the Device Manager you will have to search for the device drivers.
Step 7. Go to Windows explorer by selecting the "Start" button, going to
Programs and then single clicking on Windows Explorer.
Step 8.
When in Windows Explorer select the "Tools" menu; put you pointer
over "Find" then single click on "Files or Folders .". Now the" Find All
Files" window will open.
Step 9. We will want to search for 2 device drivers. The drivers are Falstaff.sys,
which should be located in the C:\Windows\system32\drivers directory
and spd2wdm.mpd, which should be located in the
C:\windows\system\iosubsys directory. This is assuming that the C drive
is where your operating system is loaded. When doing the search make
sure that you have checked the "include subfolders" box.
Step 10: If spd2wdm.mpd is installed on your system and the falstaff is not then
delete the spd2wdm.mpd file. Now go to steps 4 & 5.
48
Appendix
Appendix A
Appendix A
Glossary of Terms
Adapter Cards
Adapter cards (a.k.a, controller cards, expansion cards, interface cards, etc.) plug into
slots of the computer ’s main data bus, or bus extensions such as Local Bus. They
“adapt” the flow of data and instructions between the CPU and the device (peripheral).
ATAPI
ATA Programmer’s Interface. A set of commands designed to address a CD-ROM drive
over an IDE interface. Allows people to install and use a CD-ROM drive in much the
same manner as a hard disk.
Bootable CD
A bootable CD is one that the PC can boot from.
Bus
In computers, a bus is the main or continuous channel of electrical connection
between the CPU, the system memory (RAM), and the peripheral devices.
CD
The Compact Disc was first implemented commercially for storing digital audio data
(CD Digital Audio). The CD is made up of a polycarbonate substrate, a thin reflective
metallic layer (the mirror-like is aluminum), and a lacquer coating. The encoded data
track is a spiral, with the pits making a central band. The encoded track is made up of
sectors (sometimes erroneously named blocks).
CD-Digital Audio
CD-Digital Audio was implemented to hold about 60 minutes of audio data, in up to 99
tracks (songs) at a sampling rate of 44.1 KHz and a sample size of 16 bits, to produce
high quality stereo sound.
50
Appendix A
CD-Recordable
CD-Recordable technology allows production of CD-ROMs on the desktop (one-offs).
It requires a CD-R recorder, appropriate software, a PC, and appropriate media. CDRecordable involves a special CD, the one-off’ blank, very different from the mass
reproduced or ‘hot-pressed’ CDs. It is sold pre-grooved, in 63 or 74 minute capacities,
and it involves a layered structure-with a sensitive chemical recording layer, almost
always with a gold reflective layer, and ready for a CD- Recordable drive. Once recorded,
the CD-Recordable discs (one-offs) perform in the same way as the mass-reproduced CDs.
CD-ROM
The Compact Disc-Read Only Memory is the standard 12cm CD formatted according
to the ISO 9660. Although the physical characteristics and track structure of a CDROM are the some as that of CD-Audio, a CD-ROM is used to store computer data
(text, graphics). It also involves additional error detection and correction.
CD-ROM Drives
The original drives had a transfer rate of 150 KB/second, but recent drives offer double,
quadruple and even higher transfer rates-and are known as 2X, 6X, and so on.
Current drives can handle audio tracks and, for multimedia, have connections -for the
sound card. Some recent drives are also XA-ready, and/or PhotoCD ready, with or
without multiple session capability.
CD-ROM XA
CD-ROM Extended Architecture, is used for data, graphics, video, and compressed
audio, in an interleaved scheme (CD-I structure) making it possible to read and display
jointly text, graphics and audio files of various sample sizes, up to 20 hours of 4-bit
mono aural sound. Kodak’s Photo CD for example, uses XA tracks, and it can therefore be read by an XA drive.
CD-REWRITABLE
CD-Rewritable technology allows for the CD-Rewritable media to be erased and
rewritten over and over again up to 1000 times.
51
Appendix A
Driver
In computers, driver refers to a device driver, which is software that, under CPU
control, implements device 1/0 functions or other functionality (video, sharing,
graphics, printer, mouse, etc.).
DVD
Digital Video Disc is an upcoming product. DVD specifications include a double-layer
single-sided CD with a capacity of 4.7GB, with sufficient playing time for a full-length
movie, compatible with MPEG-2, and backward compatible.
Format
In the computer arena, there are physical and logical formats for storage devices.
Magnetic storage devices implement a physical structure (MFM, RLE, IDE, SCSI, etc.).
The standard logical format is defined by the ISO 9660, which specifies the volume
and file structure.
Firewire
The trademark name that Apple Computer uses to identfy its implementation of IEEE
1394 interface.
IDE
Integrated Drive Electronics. A Standrad for interfacing internal peripherals to a PC.
I.E.E.E.
The Institute of Electrical and Electronics Engineers is an association that is a leading
authority in technical areas ranging from computer engineering, biomedical technology
and telecommunications, to electric power, aerospace and consumer electronics,
among others. For more information you can visit their web site at WWW.IEEE.ORG.
IEEE 1394
Otherwise known as FireWire or i.LINK is a standard for serial interface that contains 6
wires and is platform independent. The six wires consist of two power wires and two
pairs of shielded twisted pair signal wires. The IEEE 1394 connection enables consumer
electronics products like camcorders, televisions and digital cameras to interface with
computers. The IEEE 1394 standard allows up to 63 devices to be connected to one
computer and each device can be as much as 4.5 meters apart from each other.
52
Appendix B
Appendix B
FCC Compliance
This equipment has been tested and found to comply with the limits for a Class B
digital device, pursuant to Part 15 of the FCC Rules. These limits are designed to
provide reasonable protection against harmful interference in a residential installation.
This equipment generates, uses, and can radiate radio frequency energy and, if not
installed and used in accordance with the instructions, may cause harmful interference
to radio communications. However, there is no guarantee that interference will not
occur in a particular installation.
If this equipment does cause harmful interference to radio or television reception,
which can be determined by turning the equipment off and on, the user is encouraged
to try to correct the interference by one or more of the following measures:
Reorient or relocate the receiving antenna.
• Increase the separation between the equipment and receiver.
• Connect the equipment to an outlet on a circuit different from hat to
which the receiver is connected.
• Consult the dealer or an experienced radio/TV technician for help.
Caution: Only equipment certified to comply with Class B (computer input/output
devices, terminals, printers, etc.) should be attached to this equipment, and must have
shielded interface cables.
Any changes or modifications to this equipment by the user not expressly approved by
the grantee or manufacturer could result in violation of Part 15 of the FCC rules and
void the user's authority to operate such equipment.
This device complies with Part 15 of the FCC Rules. Operation is subject to the
following two conditions:
• This device may not cause harmful interference, and
• This device must accept any interference received, including
interference that may cause undesirable operation.
53
Appendix C
Appendix C
Limited Warranty
QPS Inc. warrants its product ("Product") from the date of purchase from QPS (or an
authorized QPS agent) against defects in materials and workmanship for a period of
12 months.
This limited warranty extends only to the original purchaser ("Consumer") of the Product
and is not transferable (or assignable) to any subsequent purchaser (or end user).
This (limited) warranty does not cover any incompatibilities due to the user's computer,
hardware, software or any other related system configuration with which the QPS
Product interfaces.
Proof of purchase will be required before any warranty consideration by QPS.
During the limited warranty period, QPS will repair, or replace, at QPS option any
defective parts, or any parts that will not properly operate for its intended use with new
or factory rebuilt replacement items. No charge will be made to the Consumer for any
such parts. QPS will also pay for the labor charges incurred by QPS in repairing or
replacing the defective parts. The external housing and cosmetic parts shall be free of
defects at the time of shipment and, therefore, shall not be covered under these limited warranty terms.
The Consumer shall bear the cost of shipping the Product to QPS. QPS shall bear the
cost of shipping the Product back to the Consumer after the completion of service
under this limited warranty.
This limited warranty does not cover any damage caused by negligence, non-authorized
modifications or parts installed without prior written permission from QPS.
54
Appendix C
This limited warranty does not apply if the Product has been damaged by accident,
abuse, misuse or misapplication or other acts which are not the fault of QPS or by
non-QPS' authorized alterations, modifications and/or repairs.
If the Product is returned to the Customer Service Department at QPS during the limited
warranty period, but the problem with the Product cannot be fixed under the terms
and conditions of this limited warranty, the Consumer will be notified and given an
estimate of the charges the Consumer must pay to have the Product repaired, with all
shipping charges billed to the Consumer. If the estimate is refused, the Product will be
returned freight collect. If the Product is returned to the Customer Service Department
at QPS after the expiration of the warranty period, QPS' normal service policies shall
apply and the Consumer will be invoiced for all shipping charges.
QPS SHALL NOT BE LIABLE FOR ANY LOST PROFITS, LOST SAVINGS OR
OTHER INCIDENTAL OR CONSEQUENTIAL DAMAGES ARISING OUT OF THE
USE OF OR INABILITY TO USE THIS PRODUCT. THIS INCLUDES DAMAGES TO
PROPERTY AND TO THE EXTENT PERMITTED BY LAW, DAMAGES FOR PERSONAL
INJURY. THIS WARRANTY IS IN LIEU OF ALL OTHER WARRANTIES, INCLUDING
IMPLIED WARRANTIES OF MERCHANTABILITY AND FITNESS FOR APARTICULAR
PURPOSE.
Some states do not allow limitation of implied warranties, or exclusion or limitation of
incidental or consequential damages, so the above limitation may not apply to you
(the Consumer). This limited warranty gives you specific legal rights and you may also
have other rights which vary from state to state. This limited warranty applies only to
this product and is governed by the laws of the State of California.
QPS neither assumes nor authorizes any authorized service center or any person or
entity to assume for it any other obligation or liability beyond that which is expressly
provided for in this limited warranty.
Questions concerning this limited warranty may be directed to the Customer Service
Department at QPS, (949) 595-2184
55
Notes
56
Notes
57
Notes
58