1
Umschlag.qxd
01.08.2003
16:32 Uhr
Seite 1
SEWING MACHINE
MD 8708
11/03
MSN 5000 6411
24/7 CUSTOMER SUPPORT
(877) 604-9498
INSTRUCTION MANUAL
Umschlag.qxd
01.08.2003
16:32 Uhr
Seite 2
20 STITCH SEWING MACHINE
MD 8708
Sewing machine model MD 8708
LIMITED WARRANTY
INFORMATION
PLEASE KEEP ALL YOUR
Warranty documents • product receipt • original packaging
IN A SAFE PLACE
2
22 21
4
3
30
29
MEDION warrants to our customers that this product is free from defects in
materials and workmanship as follows: for a period of one (1) year from the
date of original purchase, defective parts or a defective product returned to
a MEDION repair facility or a MEDION Authorized Service Facility ("ASF") for
such product, as applicable, and proven to be defective upon inspection,
will be exchanged for new or comparable rebuilt parts, or a refurbished
product, as determined by the MEDION repair facility or the ASF.
28
20
11
10
27
23
19
5
9
7
6
24
Limited warranty repair or replacement shall not extend the original limited
warranty period of the defective product. This limited warranty does not
cover any supplies or accessories.
EXCLUSIONS: this limited warranty does not apply, and you will have no remedy
hereunder with respect to (a) products that have been modified, opened,
repaired or otherwise altered, except by MEDION or an ASF, (b) products that
have been damaged or destroyed after delivery to the customer, (c) any third
party software, interfaces, parts, supplies, peripherals or other products or
any defects resulting from use of the product in connection with such third
party products, (d) defects resulting from improper or inadequate maintenance,
calibration or site preparation, (e) defects resulting from any misuse, abuse,
accident, neglect, negligence or any use other than in accordance with the
handling or operating instructions provided by MEDION, (f) defects resulting
from exposure to unusual physical or electrical stress or from any operation
other than in accordance with the published environmental specifications
for the product.
TO THE EXTENT ALLOWED UNDER APPLICABLE LAW, THE ABOVE WARRANTIES ARE
EXCLUSIVE AND NO OTHER WARRANTY OR CONDITION, WHETHER WRITTEN OR ORAL,
IS EXPRESSED OR IMPLIED AND MEDION SPECIFICALLY DISCLAIMS ANY IMPLIED
WARRANTIES, INCLUDING ANY IMPLIED WARRANTY OF MERCHANTABILITY OR FITNESS
FOR A PARTICULAR PURPOSE AND NO IMPLIED WARRANTY APPLIES TO THE PRODUCT
AFTER THE APPLICABLE PERIOD OF THE EXPRESS LIMITED WARRANTY STATED ABOVE.
Some countries, states or provinces do not allow exclusions or limitations on
the duration of an implied warranty, so the above limitation or exclusion
might not apply to you. This limited warranty gives you specific legal rights
and you might also have other rights that vary from country to country, state
to state, or province to province.
MEDION´s limited warranty is valid in any country or locality where MEDION
has a support presence for this product and where MEDION has marketed this
product. The level of warranty service you receive may vary according to local
standards. MEDION will not alter form, fit or function of the product to make
it operate in a country for which it was never intended to function.
8
INCIDENTAL, CONSEQUENTIAL (INCLUDING LOST PROFIT OR DATA), OR OTHER DAMAGE,
WHETHER BASED IN CONTRACT, TORT, OR OTHERWISE. IN NO EVENT SHALL RECOVERY
OF ANY KIND AGAINST MEDION BE GREATER IN AMOUNT THAN THE PURCHASE PRICE
OF THE PRODUCT SOLD BY MEDION WHICH CAUSED THE ALLEGED DAMAGE. WITHOUT
LIMITING THE FOREGOING, YOU ASSUME ALL RISK AND LIABILITY FOR LOSS, DAMAGE
OR INJURY TO YOU AND YOUR PROPERTY AND TO OTHERS AND THEIR PROPERTY
ARISING OUT OF USE OR MISUSE OF, OR INABILITY TO USE THE PRODUCT NOT CAUSED
DIRECTLY BY THE NEGLIGENCE OF MEDION. Some countries, states or provinces
do not allow the exclusion or limitation of incidental or consequential
damages, so the above limitation or exclusion may not apply to you.
THE WARRANTY TERMS CONTAINED IN THIS STATEMENT, EXCEPT AS LAWFULLY
PERMITTED, DO NOT EXCLUDE, RESTRICT OR MODIFY AND ARE IN ADDITION TO THE
MANDATORY STATUTORY RIGHTS APPLICABLE TO THE SALE OF THIS PRODUCT TO YOU.
Please note the following:
Be sure to keep your purchase receipt in a safe place. MEDION, at its option,
may require a copy of the receipt to validate the warranty period effective
date (i.e. date of purchase). Warranty liability only applies to material or
factory faults. It does not apply to damage due to breakage, for example, a
crack in the housing. Our service includes unit exchange or send-in repair:
Unit Exchange
In locations where Unit Exchange is available, MEDION will send you a
replacement unit. You must return the defective unit to MEDION (using the
shipping carton that the new one came in.)
Send-In Repairs
In locations where Send-In Repair Service is available, repair service can be
obtained by shipping your unit to the MEDION Repair Center. The unit will be
repaired and returned to you.
For either Unit Exchange or Send-In Repairs, you must have an authorized
RMA number from Medion support before shipping your defective product.
Replacement products may be either new or equivalent in performance to
new. MEDION replacement or repaired products may contain remanufactured
parts equivalent to new in performance or may have been subject to incidental
use.
Out-of-Warranty Support
In addition to providing free technical support during the warranty period,
MEDION is also available to support your product after the warranty period
has ended. This out-of-warranty support will be provided on a fee basis.
TO THE EXTENT ALLOWED UNDER APPLICABLE LAW, THE REMEDIES IN THIS LIMITED
WARRANTY STATEMENT ARE YOUR SOLE AND EXCLUSIVE REMEDIES. EXCEPT AS
INDICATED ABOVE, IN NO EVENT WILL MEDION OR ITS SUPPLIERS BE LIABLE FOR LOSS
OF DATA OR FOR INDIRECT, SPECIAL,
1
These numbers will be referenced throughout the manual to help you
better understand the use and care of your sewing machine.
A description of the parts of your sewing machine is included on page 4
of the manual.
20 STITCH SEWING MACHINE
LIMITED WARRANTY CERTIFICATE
MD 8708
PLEASE KEEP ALL YOUR
24/7 CUSTOMER SUPPORT
(877) 604-9498
Warranty documents
product receipt • original packaging
IN A SAFE PLACE
W
R
AR
AN
TY
Date of Purchase
17
12
18
16
Place of Purchase
15
13
25
26
Serial No.
14
Medion reserves all rights, at any time, to change support hours.
11/03
MSN 5000 6411
Medion USA, Inc., 1721 Moon Lake Blvd., Ste. 300, Hoffman Estates, IL 60194
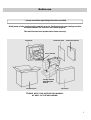
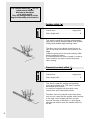
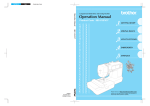
Before use
... please read these operating instructions carefully
Allow plenty of time to thoroughly read this manual. Getting to know your sewing machine
will ensure easier use and more successful projects.
This machine has been produced for home use only.
Styrofoam
Protective hood
Instruction manual
Foot controller
Sewing machine
with integrated
flat bed
Cardboard box
Styrofoam
PLEASE KEEP THIS INSTRUCTION MANUAL
AS WELL AS THE PACKAGING.
1
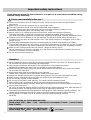
Important safety instructions
Please keep this manual for future reference, or to pass on to a new owner should the sewing
machine change ownership.
! Please read carefully before use !
●
●
●
●
●
●
●
●
●
●
●
●
Please check whether the local voltage of the AC outlet corresponds with the specifications
(see below).
Make sure to connect the machine only to a grounded outlet.
The sewing machine should never be left unattended when plugged in.
To unplug, always grasp the power plug, not the cord. Never unplug by pulling on cord.
Maximum permissible power of the sewing lamp is 15 watts.
Always switch off or unplug the machine from the AC outlet when doing the following:
Changing the needle, changing the presser foot, changing the bobbin, when interrupting
your work (when sewing machine is unattended), replacing the light bulb, cleaning and maintenance.
Children should not be allowed to use the machine. The machine should always be kept and
operated out of the reach of small children. Also, if the sewing machine is unplugged, there is still a
danger of injury.
The packaging material (plastic bags etc.) can be dangerous for children. Keep it away from children.
The cord must not touch any hot surfaces. If the cord is damaged, do not replace it yourself, but have
it replaced by specialists only. When operating the machine, the cord has to be completely uncoiled.
Make sure the sewing machine will not get wet - danger of electric shock!
Do not put anything on the foot controller, since the machine could thereby be started and the foot
controller or the motor could be damaged.
Do not use the machine outdoors.
Attention!
●
●
●
●
●
●
●
●
●
●
●
●
●
Never operate the machine with any air openings blocked: Remove any dust, lint, thread scraps, etc.
Do not allow any objects to penetrate into the openings.
Only use the accessories mentioned by the manufacturer in this instruction manual.
Needles (twin needles) and light bulbs are available at specialized dealers.
When lubricating the machine, only use special sewing machine oils, because other oils are not suitable.
Do not insert any other fluid.
Keep fingers away from all moving parts of the machine.
Special care is required around the needle! Possibly use finger guard.
Always use the right presser foot. Using the wrong presser foot can cause the needle to break!
When sewing, make sure that your fingers will not get under the needle bar screw.
Do not use any crooked or blunt needles.
Do not stop or pull fabric while stitching. This could cause the needle to break.
When finishing your sewing work, always move the needle up to its highest position.
Do not operate the sewing machine, where aerosol (spray) products or similar substances are being
used or have been used.
Do not try to repair the sewing machine yourself as this will void the warranty. Also, after expiration of
the warranty period, the sewing machine may only be repaired by specialists.
The sewing machine has been developed for sewing fabrics under usual household conditions. The
sewing machine must not be used for other purposes.Commercial use will void the warranty.
Foot controller "EZ-168A" only to be used in connection with the sewing machine
MD 8708.
SPECIFICATIONS OF THE SEWING MACHINE:
Rated voltage 120V 60Hz - 0.4A rated power consumption 75 watts
lamp 15 watts)
SPECIFICATIONS OF THE FOOT CONTROLLER:
Rated voltage 120V 60Hz protection class II
2
R
UL Listed
( motor 60 watts
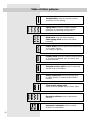
Table of contents
Safety instructions ................................................................................................................................2
Description of the sewing machine ......................................................................................................4
Accessories...........................................................................................................................................5
Power switch, foot controller, attaching or removing the flat bed .......................................................6
Accessory box, changing the sewing lamp ..........................................................................................7
Changing the needle .............................................................................................................................8
Selection of the right needle .................................................................................................................8
Raising or lowering the presser foot .....................................................................................................8
Removing and inserting the presser foot ..............................................................................................9
Removing and inserting the presser foot holder, finger guard............................................................10
Regulating the presser foot pressure .................................................................................................11
Removing the bobbin case and the bobbin........................................................................................12
Threading the bobbin case ..............................................................................................................13
Winding the bobbin ......................................................................................................................14, 15
Threading of the upper thread ......................................................................................................16, 17
Drawing up the under thread .............................................................................................................18
Adjustment of the thread tensions:
- Regulating the under thread tension, checking the under thread tension ......................................19
- Regulating the upper thread tension ................................................................................................20
- Checking the upper and under thread tensions ..............................................................................21
Stitch length dial .................................................................................................................................22
Program selection dial .......................................................................................................................22
Reverse sewing...................................................................................................................................23
Attaching the darning plate.................................................................................................................23
Table of fabrics, threads and needles .................................................................................................24
Program selection ...............................................................................................................................25
Table of stitch patterns........................................................................................................................26
Sewing - general ................................................................................................................................27
Setting the stitch type .........................................................................................................................28
Straight stitch, zigzag stitch, satin stitch ............................................................................................28
Blind stitch .........................................................................................................................................29
Shell-edging stitch .............................................................................................................................30
Elastic stitch .......................................................................................................................................31
Feather stitch - standard overlock stitch ........................................................................................32
Honey comb stitch - triple zigzag stitch .........................................................................................33
Triple stretch straight stitch - decorative embroidery stitches .....................................................34
Sewing buttonholes ..... ................................................................................................................35, 36
Sewing on buttons and eyelets ..........................................................................................................37
Sewing zippers ...................................................................................................................................38
Hemming ............................................................................................................................................39
Darning ...............................................................................................................................................40
Ruffling, embroidering.........................................................................................................................41
Stitching of monograms, sewing appliqués, laces .............................................................................42
Sewing with a twin needle ..................................................................................................................43
Sewing with the free arm, straightedge, quilting guide.......................................................................44
Maintenance and care of the sewing machine: Cleaning and lubricating . ................45, 46, 47, 48, 49
Troubleshooting, cause and remedy.............................................................................................50, 51
3
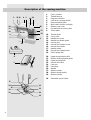
Description of the sewing machine
2
4 3
22 21
30 29
28
20
11
27
10
23
5
9
7
19
6
24
8
1
17
12
18
16
15
13
25
26
14
4
1.
2.
3.
4.
5.
6.
7.
8.
9.
Foot controller
Thread take-up
Program selection
Fold away carrying handle
Reverse sewing lever
Main switch (motor and light)
Bobbin case cover
Flat bed with accessory box
Throat plate
10.
11.
12.
13.
14.
15.
16.
17.
18.
19.
Thread guide
Front cover
Needle bar screw
Needle bar thread guide
Presser foot
Presser foot holder screw
Presser foot holder
Needle holder
Presser foot release lever
Stitch length dial
20.
21.
22.
23.
24.
25.
26.
27.
28.
29.
Upper thread tension dial
Bobbin-winding thread guide
Upper thread guide
Presser foot lever
Free arm
Feed dog
Needle
Balance wheel
Bobbin winder pulley
Bobbin spindle
30.
Extensible spool holder
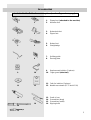
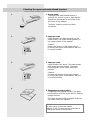
Accessories
included in the flat bed accessory box (number 8, previous page)
1
2
1.
2.
Zigzag foot (attached to the machine)
Hemmer foot
3
4
3.
4.
Buttonhole foot
Zipper foot
5
6
5.
6.
Button foot
Straightedge
8
7.
8.
Quilting guide
Darning plate
9
10
9.
Replacement bobbins (3 pieces)
10. Finger guard (attached)
11
12
11. Felts for bobbins (2 pieces)
12. Needle assortment (N° 75 and N° 90)
16
13.
14.
15.
16.
7
13
Small oil can
Screwdriver (large)
Screwdriver (small)
Ripping knife
14
15
5
Attention!
Before leaving the machine, changing any parts or doing any other work at the machine,
always switch off or unplug the machine from the AC outlet. Do not put anything on the foot
controller, since the machine could be started inadvertently or the foot controller or the
motor could possibly burn out.
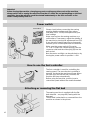
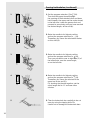
Power switch
Power switch
Off
B
On
A
Please check before connecting the sewing
machine that the voltage and hertz values
indicated (230V - 50Hz) correspond with your
local voltage.
Make sure to place the sewing machine on a
solid surface. If necessary, adjust the stability of
the machine by turning the adjustment foot (25).
If you place the sewing machine on lacquered
furniture, put a nonskid pad under the machine.
Make sure that power switch (6) is set to
"0" = off. Connect the coupler plug (A) into the
connector shell and the mains plug (B) into the
wall socket.
Now the motor and light can be switched on by
turning the power switch to position I = ON.
How to use the foot controller
The foot controller is used for controlling the
sewing speed. The more the foot controller is
pressed, the faster the machine will sew. When
you take your foot off the foot controller, the
machine will stop automatically.
Before using the machine, practice how to
control the speed without the needle threaded.
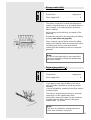
Attaching or removing the flat bed
The sewing machine is supplied with the flat
bed attached - see page 44 (Sewing with the
free arm).
The flat bed is attached to or removed from the
machine as shown in the picture.
6
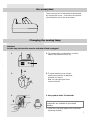
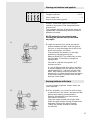
Accessory box
The accessory box is integrated in the flat bed.
By opening the cover - as shown in the picture you will get access to the accessories.
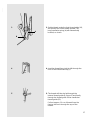
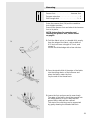
Changing the sewing lamp
Attention!
For this step, the machine must be switched off and unplugged.
1
1. The sewing light is switched on or off by
means of the power switch (6).
2
2. To open the front cover, loosen
small screw with the screwdriver
supplied, as shown.
Now you can swing the front
cover to the left.
3
3. Only replace with a 15 watt bulb.
Note:
Light bulbs are available at specialized
dealers.
4. Close the cover and replace the screw after
replacing the bulb.
7
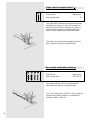
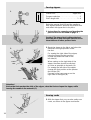
Changing the needle
Attention!
For this step, the machine must be switched off and unplugged.
Turn the balance wheel (28) toward you until the
needle moves up to its highest position.
1. Loosen the needle bar screw (12)
by turning it toward you.
Remove the needle from the
needle holder (17)
1
Needle bar screw
2
2. Insert the new needle with its flat side toward
the back. Push the needle up into the clamp
as far as it will go.
3. Tighten the needle bar screw.
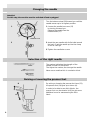
Selection of the right needle
Shank
The number indicating the strength of the
needle is shown on the shank.
The higher the number, the stronger the needle.
Never use a needle which is crooked or blunt.
Raising or lowering the presser foot
B
By raising or lowering the presser foot lever (23),
the presser foot (14) goes up or down (A).
Presser foot lever
A
8
In order to be able to sew thick fabrics, the
presser foot can be raised a bit (B) to get some
additional room for maneuvering the thick
fabric.
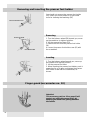
Removing and inserting the presser foot
Attention!
For this step, the machine must be switched off and unplugged.
Removing
Turn the balance wheel (28) toward you until the
needle moves up to its highest position.
1. Raise the presser foot by lifting the
presser foot lever (23).
1
Presser foot lever
Presser foot release lever
2. Lift the presser foot release lever (18) behind
the presser foot holder. The presser foot will
drop down.
2
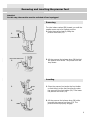
Inserting
1
Groove
Pin
2
1. Place the presser foot under the foot holder
so that the pin at the foot lies directly under
the groove of the foot holder (16). Then lower
the presser foot lever (23).
2. Lift the presser foot release lever (18) while
lowering the presser foot lever (23). The
presser foot will properly engage.
9
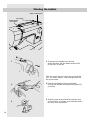
Removing and inserting the presser foot holder
You should not remove the presser foot holder
(16), unless you want to darn or to get some
room for cleaning the feed dog (26).
Presser foot holder screw
Removing
Presser foot shank
Presser foot holder
1. Turn the balance wheel (28) toward you, move
up the needle to its highest position.
2. Lift the presser foot lever (23).
3. Remove the foot from the presser foot holder
(16).
4. Loosen the presser foot holder screw (15) with
the screwdriver.
Inserting
1. Turn the balance wheel toward you, move up
the needle to its highest position.
2. Lift the presser foot lever.
3. When inserting the presser foot holder, push it
upward as far as it goes and tighten the presser
foot holder screw with the screwdriver, as
shown.
Finger guard (accessories no. 10)
Attention!
This accessory part (no. 10 on page 5) will
protect you and help prevent injury by
keeping your hand from getting beneath
the needle.
10
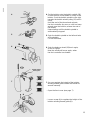
Regulating the presser foot pressure
1. The adjustment lever for the presser foot
pressure is inside of the front cover (11).
For opening the front cover, see page 7.
1
Adjust the lever to the requested position:
2
2. when sewing light or medium material,
set the lever to 1 or 2;
1
3
3. when sewing thick or heavy material,
set the lever to 2 or 3.
This means:
For sewing thick fabrics or fabrics of several
layers, a higher foot pressure is required. For
sewing normal or lighter fabrics, you will need
less foot pressure.
An incorrect foot pressure setting will result in
improper feed dog function, improper fabric
feeding and improper stitches.
The table of fabrics, threads and needles page 24 - provides
further information.
After setting the foot pressure, screw on the
front cover (see page 7)
11
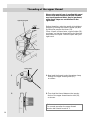
Removing the bobbin case and the bobbin
Attention!
For this step, the machine must be switched off and unplugged.
1
1. Raise the presser foot (14) and turn the
balance wheel (28) toward you until the
needle moves up to its highest position.
2
2. Remove the flat bed (see page 6).
Open the bobbin case cover (7), as shown.
Bobbin case cover
3
3. Open the latch of the bobbin case and
take the bobbin case out of the machine.
Latch
12
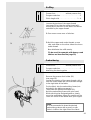
Threading the bobbin case
Bobbin case
Bobbin
Hold the bobbin between the thumb and
forefinger of your right hand and pull out approx.
15 cm of thread.
1. Keep the bobbin case in your left hand,
and place the bobbin into the bobbin case.
1
Slot
2. Draw the end of the thread into the slot at
the edge of the bobbin case.
2
Tension spring
Notch
3
3. Now you draw the thread all the way through
under the tension spring until it reaches the
notch. Make sure to pull out approx. 15 cm
of thread
Inserting the bobbin case and the bobbin:
4
Latch
5
Long lever
4. Hold the bobbin case so that the
long lever of the case points upward. Open
the latch of the bobbin case.
5. Slide the bobbin case onto the pin in the
middle, and push as far as it goes, until the
long lever of the bobbin case attaches to the
shuttle hook. Release the latch, and press
onto the bobbin case.
Latch
6
6. Close the bobbin case cover (7).
13
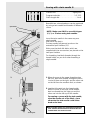
Winding the bobbin
Bobbin / bobbin spindle
Spool holder
Bobbin-winding
thread guide
o
1
1
1. To prevent the needle from moving
during winding, pull the balance wheel (28)
to the side, as shown.
Take the spool and put it onto the spool holder
(31) - as shown above - after having pulled out
the spool holder.
14
2
2. Draw the thread from the spool holder
through the bobbin-winding thread guide (21)
as shown.
3
3. Draw the end of the thread through the hole
of the bobbin, as shown, and manually wind a
few coils onto the bobbin.
4
4. Put the bobbin onto the bobbin spindle (30)
so that the end of the thread is on top of the
bobbin. Push the bobbin spindle to the right
towards the bobbin winder pulley (29) until it
clicks.
Hold the end of the thread and activate
the foot controller. As soon as a bit has been
wound upon the bobbin, release the end of
the thread.
Keep winding until the bobbin spindle is
automatically stopped.
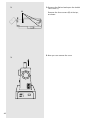
5
5. Push the bobbin spindle to the left and take
off the bobbin.
Cut off the thread.
6
6. Push the balance wheel (28) back again,
as far as it goes.
Now the needle will move again, when
the foot controller is activated.
Bobbin-winding
thread guide
7
7. You can regulate the height of the bobbinwinding thread guide should the thread be
wound unevenly.
- Open the front cover (see page 7)
B
- Loosen screw (A) to regulate the height of the
bobbin-winding thread guide (B).
A
15
Threading of the upper thread
Please take special care in reading this page!
Please note that thread may break, stitches
may be skipped and fabric may be puckered,
when these steps are not followed in the
right order.
Upper thread guide
Tension disks
Before threading, raise the needle to its highest
position by turning the balance wheel (28) and
by lifting the presser foot lever (23).
Place a spool of thread onto a spool holder (31),
as shown, so that the thread will be led from the
backside of the spool. Hold the spool with your
right hand.
Thread take-up lever
Spring clamp
1
1. Now lead the thread under the spring clamp
through the upper thread guide (22),
as shown.
2
2. Then lead the thread between the tension
disks of the upper thread tension dial (20),
as shown.
Note:
For normal operation the upper thread
tension dial should be set to 3.
16
3
A
3. Put the thread under the front thread guide (10),
and pull the end of the thread upward. The
inner small wire spring (A) will automatically
be lifted, as shown.
B
4
4. Lead the thread from right to left through the
hook of the thread take-up (2).
5
5. The thread will then be led through the
internal thread guide (B, figure 3) and finally
through the thread guide of the needle bar
thread guide (13).
Pull out approx. 10 cm of thread from the
front to the back through the eye of the
needle.
17
Drawing up the under thread
1
1. Lift the presser foot (14).
2
2. Turn the balance wheel (28) toward you
with your right hand until the needle moves
down and up again.
Stop the balance wheel, as soon as
the needle is raised to its highest position.
Hold the end of the upper thread with your
left hand.
Draw the upper thread slightly upward so that
the under thread forms a loop.
Upper thread
Under thread
3
3. Pull out approx. 10 cm of both threads under
the presser foot and lay them back.
Upper thread
Thread direction
Under thread
18
Adjustment of the thread tensions:
If the thread is torn while sewing, the thread
tension is too tight.
If small loops are formed while sewing,
the thread tension is too loose.
In both cases the thread tension has to
be adjusted.
The upper thread tension and the under thread
tension must be in proper relation.
Regulating the under thread tension
The bobbin thread tension is just right, if you
can easily draw the thread just with a bit of
resistance out of the bobbin.
The under thread tension should rarely need
to be adjusted, since it has already been
preset by the manufacturer for general
sewing work.
However, when using especially light or heavy
fabrics, the under thread may need to be
adjusted.
1
1. The under thread tension can be changed by
turning the adjusting screw of the bobbin
case. For regulating the tension, use the
small screwdriver.
Take out the bobbin case:
To decrease tension:
Turn the screw counterclockwise.
To increase tension:
Turn the screw clockwise.
Checking the under thread tension
uneven
even
stitches
stitches
The easiest way to check the tension of the
under thread is to use a medium zigzag stitch
for sewing a cloth you would like to sew. Make
sure to use the appropriate needle and threads.
It will be especially obvious, when you use
different colors for the upper and under threads.
Sew only a few zigzag stitches.
The thread tension is correct, when the under thread
cannot be seen on the upper side of the cloth.
Be careful that the stitches are always even
(see figure).
19
Regulating the upper thread tension
.............................................................................................
1
1. The tension is created by the disks through
which the thread is led. The pressure on
these disks is regulated by the upper thread
tension dial (20).
The higher the number, the tighter
the tension.
Note:
For normal operation the upper thread
tension dial should be set to 3.
NOTE: The tension is only activated by
lowering the presser foot.
2
2. There are several reasons, why it is
necessary to regulate the tension. Different
fabrics require different levels of thread
tension.
The required tension depends on the
closeness and thickness of the material, how
many layers of fabric are to be sewed, and
which stitch type you choose.
We recommend using an old piece of cloth
for sewing a test seam.
Please make sure that the tension
of the upper and under thread is even,
since otherwise the fabric could be puckered.
20
Checking the upper and under thread tensions
............................................................................
1
1. Proper seam
The upper and under thread tension is
properly set, when it is just so tight that the
threads are intertwined in the center of the
thickness of the material.
The fabric remains smooth and does
not pucker.
2
2. Improper seam
Upper thread is too tight and pulls up the
under thread. The under thread appears on
the upper surface of the material.
Solution:
Reduce the tension of the upper thread
by turning the upper thread tension dial (20)
to a lower number.
3
3. Improper seam
Upper thread is too loose. The under thread
pulls down the upper thread. The upper
thread appears on the under side of the
material.
Solution:
Increase the tension of the upper thread
by turning the upper thread tension dial (20)
to a higher number.
4
4. Suggestion for zigzag stitch
For getting better zigzag stitches, the upper
thread tension must be looser than for sewing
straight stitches.
The upper thread should be slightly visible on
the under side of the material.
Note:
In both cases of improper seams
(figures 2 and 3),it may also be necessary to
change the under thread tension.
21
Stitch length dial
With the stitch length dial (19) you can select the
length of the chosen stitch pattern.
o
1
Turn the stitch length dial so that the number of
the requested stitch length is set on the mark.
The lower the number, the shorter the stitch.
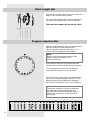
Program selection dial
With this sewing machine, you can choose between
different common and decorative stitches.
With the program selection dial (3) you can
simply dial the requested stitch pattern.
Note:
Before using the program selection dial,
make sure that the needle is not
down in the fabric.
The numbers indicated correspond with the
numbers given above the stitch pattern figures.
Turn the program selection dial so that the
requested stitch type is set on the mark.
The width of the zigzag stitch will automatically
be set by turning the program selection. Four
different zigzag stitch settings are available:
from 0.04 inch (setting 2) to 0.2 inch (setting 5).
Note:
Should the machine not work according to
the selected sewing program, turn the
program selection dial completely around
once; then return again to the requested
stitch type.
22
Reverse sewing
Reverse sewing is used at the beginning and
end of a seam for reinforcement.
- Press the reverse sewing lever (5)
down and keep it pressed.
o
- Activate the foot controller - the more you
press the foot controller, the faster the
machine runs.
1
- If you want to return again to sewing forward,
release the reverse sewing lever.
Attaching the darning plate
1
For sewing buttons, hooks, eyelets and for
stitching of monograms, it is important that the
material will not automatically be fed, but that you
can control the feeding of the material yourself.
In this case you must attach the darning plate.
First lift the presser foot lever (23) and move up
the needle to its highest position by turning the
balance wheel (28).
1. 2. Now press the two pins of the darning
plate into the respective openings of the
throat plate (9), until it snaps into place,
as shown in figures 1 and 2.
The darning plate can be removed again
by raising it at the edges.
2
23
Table of fabrics, threads and needles
Fabric
Thread
Needle
Presser foot
pressure
Upper thread
tension
A d j u s t m e n t Upper thread
lever
tension dial (20)
Fine fabrics
Medium fabrics
nylon
batiste
voile
80 cotton
jersey
60 synthetics
silk
50 silk
wool/silk
50 synthetics
silk
75
percale
pique
linen
60-80
cotton
75 - 90
jersey
60 synthetics
65
75
Heavy fabrics
gabardine
50 silk
jeans fabric
coat fabric
50 cotton
75 -90
jersey
50 synthetics
75 - 90
wool
tweed
50 silk
75 - 90
Note:
Fine threads and needles are generally used for sewing thin fabrics, thicker threads and needles are
used for heavy fabrics.The strength of your thread and needle should always be tested on a remnant of
the fabric which you would like to use for sewing. Use the same thread for the needle and the bobbin.
When using stretch stitches on a fine fabric or on synthetics, use the needles with a blue shank (not
included in the delivery program). These prevent that stitches will be skipped. Needles are available at
specialized dealers.
24
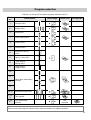
Program selection
Stitches can be set by turning the program selection dial (3).
Stitch
no.
Stitch pattern
1
Straight stitch
2-5
Zigzag stitch
6
Blind stitch
7
Shell-edging stitch
8
Elastic stitch
9
Feather stitch
10
Standard overlock
stitch
11
Honey comb stitch
12
Triple stretch
zigzag stitch
13
Triple stretch
straight stitch
Stitch length
Presser foot
Darning plate
14
15
16
Decorative embroidery
stitches
17
18-20
Automatic buttonhole
1-2-3
13
Twin needle
1-2-3
4-5
Free embroidery
stitches
Not
required
Note:
Before turning the program selection dial, raise the needle to its highest position.
25
Table of stitch patterns
Straight stitch: used for common sewing
purposes and for quilting.
Zigzag stitch: used for common sewing
purposes, for hemming and for sewing
appliqués and stitching monograms.
Blind stitch: used for blind hemming.
Shell-edging stitch: used for decorative
hemming.
Elastic stitch: used for repairing and patching,
or for elastic fabrics.
For sewing on elastics.
Feather stitch: used for hemming and finishing
of all kinds of materials, also for elastic and
fraying materials.
Standard overlock stitch: used for hemming
and finishing of knit fabrics.
Honey comb stitch: used for sewing laces
or elastic bands, for sewing stretch/elastic
material.
Triple stretch zigzag stitch
Used for thicker seams with an elastic effect.
Decorative stitches: used for decorative
stitching.
Automatic buttonhole: used for sewing
all kinds of buttonholes.
26
Sewing - general
Caution! First test all settings, including the
thread tension and stitch type, on a remnant
piece of the cloth you intend to sew.
Turn on the main switch (6).
When changing the stitch types, always move the
needle up to its highest position. Push the fabric far
enough under the presser foot (14).
Pull out upper and under thread approx. 4 inch, and
lay them back. Lower the presser foot lever (23).
While holding the threads with your left hand, turn the
balance wheel (28) toward you, and lower the needle
on the spot of the fabric where you want to start
sewing.
Activate the foot controller - the more you press the
foot controller, the faster the machine will run.
Gently guide the fabric with your hand while sewing.
Sew a few reverse stitches (see page 23) by using the
reverse sewing lever (5), for reinforcing the first
stitches of the seam.
Changing the sewing direction
Stop the machine and turn the balance wheel
toward you until the needle is at its lowest point,
in the fabric. Raise the presser foot. Turn the
fabric around the needle to change the direction,
as desired. Lower the presser foot and continue
sewing.
Attention!
The fabric will automatically be fed under the presser foot: it must not be manually stopped or
pulled, but has just to be gently guided so that the seam line will follow the desired path.
Reinforcing the seams
For reinforcing the seams, lower the reverse
sewing lever (5), and sew a few reverse stitches.
To remove the fabric, raise the presser foot and
draw the fabric back, away from you. Always
finish your sewing work with the needle in its
highest position.
Thread cutter
Cutting the thread
You can cut the thread by passing it over the
thread cutter at the back of the presser foot or
by means of a pair of scissors. Draw about
6 inch of the thread through the eye of the
needle.
27
Setting the stitch type
The stitch type is set by means of the program selection (3).
Important! When changing the stitch types, the needle
must always be raised to its highest position.
Straight stitch
Presser foot . . . . . . . . . . . . . . . . . . . . . .zigzag foot
Stitch length dial (19) . . . . . . . . . . . . . . . . . .1 to 4
Used for common sewing purposes and for quilting.
Note:
When using a twin needle, it has always to be
raised in the pivot.
Zigzag stitch
Presser foot . . . . . . . . . . . . . . . . . . . . .zigzag foot
Stitch length dial . . . . . . . . . . . . . . . . . . . .0.5 to 4
The zigzag stitch is one of the most used stitch
types. It is appropriate for many applications,
including hemming, sewing appliqués and
stitching monograms.
Before beginning a zigzag seam, sew a few
straight stitches for reinforcing the seam.
Note:
When using a twin needle, you may ONLY
choose stitch programs 2 and 3.
Satin stitch
The so-called satin stitch, consisting of zigzag stitches
laid down very close together, is especially useful for
appliqués, monograms and various decorative stitches.
Program selection from 2 to 5.
Stitch length dial between 0.5 and 2.
Whenever using this stitch, be careful to slightly loosen
the upper thread tension. The wider the stitch has to
be, the looser the upper thread tension has to be.
When sewing very thin or soft fabrics, thin paper
should be put under the fabric. This will prevent any
possible skipping of stitches or puckering of the fabric.
As for all stitches, we recommend sewing a test seam
before starting your work.
28
Blind stitch
Presser foot . . . . . . . . . . . . . . . . . . . . . .zigzag foot
Stitch length dial . . . . . . . . . . . . . . . . . . . . . .1 to 3
Used for blind hemming.
Use a thread color matching exactly the fabric.
Note:
In case of heavy and medium fabric types,
thread and fabric should have the same color.
In case of light fabrics, a transparent nylon
thread should be used.
1
1. Fold the fabric over, as shown.
2
2. Sew on the fold, as shown.
The straight stitches should be on the hem,
and the top edges of the zigzag stitches
should only pierce the upper fold of the
fabric.
3
3. Now, remove the fabric from the machine
and smooth it out.
The folded fabric will now show a blind
stitch hem.
29
Shell-edging stitch
Presser foot . . . . . . . . . . . . . . . . . . . . . . zigzag foot
Stitch length dial . . . . . . . . . . . . . . . . . . . . . . 1 to 3
Used for decorative hemming.
Especially suitable for fabrics cut on the bias.
Fold the fabric, as shown, and place the presser
foot parallel to the folded edge of the fabric.
The needle should pierce the edge of the fabric
at the right side in such a way that the stitches
are intertwined at the outer edge of the hem.
30
Elastic stitch
Presser foot . . . . . . . . . . . . . . . . . . . . . . zigzag foot
Stitch length dial . . . . . . . . . . . . . . . . . . . . . . 1 to 3
This stitch is especially suitable for stitching
worn out material.
It can also be used for reinforcing elastic fabrics
and for sewing on pieces of fabric. Also suitable
for sewing on elastics.
1
1. Sewing all kinds of elastic fabrics
A synthetic thread should be used.
So the seam will almost be invisible.
2
2. Sewing together two pieces of fabric
With the elastic seam, two pieces of fabric
can be sewed together without overlapping.
Place the two edges of the fabric under the
presser foot.
Make sure that both edges are kept close
together and that needle evenly pierces the
fabric on the right and on the left side.
3
3. Sewing elastic bands
Place the elastic band on the designated
spot.
Proceed to sew the elastic with the elastic
stitch, while stretching the band with your
hands by holding it both in front of and
behind the presser foot.The tighter the
tension, the closer together the ruffling.
31
The stitches marked by ( ) are socalled stretch stitches
(this refers to the stitches
no. 9, 10, 12, and 13).
They are distinguished by a high
degree of durability and resistance.
Feather stitch ( )
Presser foot . . . . . . . . . . . . . . . . . . . . . . zigzag foot
Stitch length dial . . . . . . . . . . . . . . . . . . . . . . . . . . . 4
This stitch is useful for finishing cutting edges,
especially of easily fraying material, with a good
looking and durable edge finishing seam.
The fabric has to be placed under the foot in
such a way that the stitches are formed on the
edge.
Lower the presser foot and start sewing, while
gently guiding the fabric.
It is recommended to sew a sample, in order to
check whether you have chosen the proper
stitch setting.
Standard overlock stitch ( )
Presser foot . . . . . . . . . . . . . . . . . . . . . . zigzag foot
Stitch length dial . . . . . . . . . . . . . . . . . . . . . . . . . . . 4
This stitch is ideal for sewing and repairing
jersey and jogging suits. This stitch is just as
decorative as it is useful.
It consists of straight side lines with crossconnections and is absolutely elastic.
The fabric has to be placed under the presser
foot in such a way that the needle, when moving
to the right, sews straight stitches and just
touches the edge of the fabric so that zigzag
stitches are sewed, when the needle moves to
the left.
32
Honey comb stitch
Presser foot . . . . . . . . . . . . . . . . . . . . . . zigzag foot
Stitch length dial . . . . . . . . . . . . . . . . . . . . . . . . . . . 4
The honey comb stitch is both decorative and
usable in manifold ways, e.g. for sewing laces or
elastic bands or for sewing stretch and other
elastic material.
As for honey comb stitching, be careful of the
following:
Prepare the material to be sewed by pre-ruffling
it evenly (see notes on page 41).
Place a narrow stripe of fabric under the ruffling
and proceed sewing it with the honey comb stitch.
Complete your honey comb work before
inserting the decorated part into the complete
garment.
Note:
In case of very light fabrics, the same effect
can be achieved by winding the bobbin with
an elastic thread.
Triple zigzag stitch ( )
Presser foot . . . . . . . . . . . . . . . . . . . . . . zigzag foot
Stitch length dial . . . . . . . . . . . . . . . . . . . . . . . . . . . 4
If you want to sew stretch fabrics, this stitch
type will make it possible to avoid any thread
breaking.
It is also suitable for seams which will be subject
to higher loads.
The seam is three times as strong as a normal
seam and it is also significantly more
stretchable. Hence the seam can be stretched
together with the fabric without risking any
thread break - as shown.
Note:
The stitch is suitable for sewing patches of
cloth, also of leather, onto jeans.
33
Triple stretch straight stitch ( )
Presser foot . . . . . . . . . . . . . . . . . . . . . . zigzag foot
Stitch length dial . . . . . . . . . . . . . . . . . . . . . . . . . . . 4
This triple stitch makes for an especially sturdy
straight stitch seam, e.g. for crotch seams of
trousers, sleeve inserts, tickings, etc. which is
three times as strong as a normal seam and
which is also significantly more stretchable.
The seam can be stretched together with the
fabric without risking any thread break.
Decorative embroidery stitches
Presser foot . . . . . . . . . . . . . . . . . . . . . . zigzag foot
Stitch length dial . . . . . . . . . . . . . . . . . . 0.2 to 0.5
Decorative stitches which may be used for
decorative but also for useful purposes.
E.g.: The scallop stitch (stitch no. 14) is ideal for
stitching decorative patterns on tablecloths,
napkins, collars, cuffs, etc.
34
Sewing buttonholes
Presser foot. . . . . . . . . . . . . . . . . . buttonhole foot
Stitch length dial. . . . . . . . . . . . . . . . . . . 0.2 to 0.5
Raise the presser foot (14) and the needle to
their highest position. Remove the presser foot
and attach the buttonhole foot in its place.
NOTE: Instructions for removing and
inserting the presser foot can be found
on page 9.
Mark on the fabric where the buttonhole is to be
sewed, as well as the desired length; use a
pencil or tailor's chalk.
When sewing very fine fabrics and synthetics,
reduce the pressure of the presser foot and sew
on a piece of paper to avoid any entanglement
of threads.
To find the proper stitch length, it is
recommendable to sew a sample buttonhole on
a piece of cloth.
o
1
35
Sewing buttonholes (continued)
36
1
1. Set the program selection (3) to (18).
Then lead the upper thread through
the opening of the buttonhole foot and draw
both threads, the upper and the under thread,
to the left side. Lower the presser foot and
proceed to sew slowly until you have reached
the desired length, at the end (A).
2
2. Raise the needle to its highest position
and set the program selection to (19).
Thereafter, you sew a few stitches of the bar
on this side (B).
3
3. Raise the needle to its highest position
and set the program selection to (20).
Then you proceed to sew to right side (C) of
the buttonhole, over the same length,
as on the left side.
4
4. Raise the needle to its highest position
and set the program selection to (19).
Thereafter, you sew a few stitches of the
upper bar at the end (D).
For knotting the threads together, set the
stitch length dial to ‘O’ and sew a few
stitches.
5
5. Then the buttonhole has carefully to be cut
open by using the ripping knife. Be
careful not to damage the buttonhole bars.
Sewing on buttons and eyelets
Presser foot . . . . . . . . . . . . . . . . . . . . . . . .button foot
Program selection . . . . . . . . . . . . . . . . . . . . . .2 to 5.
Stitch length dial . . . . . . . . . . . . . . . . . . . . . . . . . . . . .0
Attaching the darning plate . . . . . . . . . . . . . . . . . . . .
Buttons, hooks and eyelets can easily be
sewed on by means of the transparent-blue
presser foot.
The program selection (3) has to be set to the
zigzag width corresponding with the distance
between the holes.
NOTE: Instructions for removing and
inserting the presser foot can be found
on page 9.
1
1. Lower the presser foot, while placing the
button between the fabric and the presser
foot just so that the zigzag stitch will hit the
holes in the button, as shown.
Check whether the button is in the right
position by manually turning the
balance wheel (28). The needle has to enter
into the holes. If necessary, change the
zigzag width.
Proceed to sew with low speed 6 to 7
stitches per hole.
In case of buttons with four holes, the fabric
is moved together with the button: then you
repeat sewing 6 to 7 stitches into the other
holes. After having removed the fabric, the
generously cut upper thread has to be drawn
to the under side of the fabric and knotted
with the under thread.
Sewing buttons with stem
In case of heavy materials, button stems are
often required.
2
2. Place a needle, or in case of a thicker stem,
a matchstick on the button, and proceed like
before when sewing normal buttons.
Remove the material from the machine
after about 10 stitches.
Leave the upper thread a bit longer. Now
draw the upper thread through a buttonhole
and wrap it around the stitch threads.
Finally, the threads should be knotted
on the back.
37
Sewing zippers
1
Presser foot . . . . . . . . . . . . . . . . . . . . . .zipper foot
Program selection . . . . . . . . . . . . . . . . . . . . . . . . . .1
Stitch length dial . . . . . . . . . . . . . . . . . . . . . . . .1 - 4
Raise the presser foot (14) and the needle to
their highest position. Remove the presser foot
and attach the zipper foot in its place.
Groove
Groove
1. Instructions for removing and inserting the
presser foot can be found on page 9.
Caution! The zipper foot is either attached
from the left or from the right side and not in
the middle as all other presser foots.
2. Baste the zipper to the fabric and place the
material in the right position under
the foot.
2
For sewing the right side of the zipper,
bring the zipper foot into position
so that the needle will sew on the
left side (A).
Band
Teeth
B
A
Slide
When sewing on the right side of the
zipper, the seam should be stitched
as close as possible to the teeth (A).
For sewing the left side of the zipper,
change the foot position at the presser
foot holder (16).
Proceed in the same way as on the
right side of the zipper (B).
Slide
Teeth
C
Attention!
Before the foot reaches the slide of the zipper, raise the foot and open the zipper, while
leaving the needle in the material (C).
Sewing cords
3
3. With the zipper foot you can also easily sew
cords, as shown in the figure next hereto.
38
Cord
Hemming
Presser foot . . . . . . . . . . . . . . . . . . . .hemmer foot
Program selection . . . . . . . . . . . . . . . . . . . . . . . . . .1
Stitch length dial . . . . . . . . . . . . . . . . . . . . . . . .1 - 4
Raise the presser foot (14) and the needle to
their highest position.
Remove the presser foot and attach the hemmer
foot in its place.
NOTE: Instructions for removing and
inserting the presser foot, can be found
on page 9.
1
3 mm
1. Fold the fabric twice, in a double fold, exactly
from the edge of the fabric, with a width of
0.12 inch and over a length of 2 inch, and
crease it.
Secure the folded edge with a few stitches.
2
2. Pass the double fold of the edge of the fabric
into the rolling device of the hemmer and
place the fabric under the foot.
Lay the end of the thread back.
3
3. Lower the foot and proceed to sew slowly.
The edge of the fabric should be passed into
the rolling device in such a way that the
proper fabric width will be creased.
The start of the stitching can be supported
by gently drawing the threads laid back.
39
Darning
Presser foot. . . . . . . . . . . . . . . without presser foot
Program selection . . . . . . . . . . . . . . . . . . . . . . . . . . . 1
Attaching the darning plate . . . . . . . . . . . . . . . . 1-4
Remove the presser foot holder (16)
(see page 10).
Thread tensions (see page 19): upper thread
looser than usual, under thread as usual.
If necessary, place a piece of cloth under the
worn out place.
1. Place the work under the needle and
lower the presser foot lever (23) so that
the thread tension will become effective.
By slowly manually sliding the fabric
backward and forward, proceed to sew
slowly.
Repeat this process until the worn out
place will closely be covered with parallel
stitches.
1
If necessary, the place can once again be
darned in the other direction, as you do it
when darning manually.
2. While darning, the material must be well
stretched. If the worn out space is large,
it is advisable to use an embroidery frame
(not included) for stretching your work.
2
Embroidery frame
40
Ruffling
Presser foot . . . . . . . . . . . . .without presser foot
Program selection . . . . . . . . . . . . . . . . . . . . . . . . . .1
Stitch length dial . . . . . . . . . . . . . . . . . . . . . . . .1 - 4
3/8’’
Loosen the tension of the upper thread
(see page 20) so that the under thread will
loosely lie on the back of the fabric and will be
entwined by the upper thread.
1
1. Sew one or more rows of stitches.
2
2. Hold the upper and under threads on one
side, and draw on the other side at the loose
under thread.
Now distribute the ruffle evenly.
(To be used, for example, with honey comb
stitches as described on page 33).
Embroidering
Presser foot . . . . . . . . . . . . .without presser foot
Program selection . . . . . . . . . . . . . . . . . . . . . . . . . .1
Attaching the darning plate . . . . . . . . . . . . . . . . .
Remove the presser foot holder (16)
(see page 10).
Loosen the tension of the upper thread a bit so
that the under thread will not be drawn through
to the right side of the fabric.
Put the fabric into the embroidery frame (not
included in the delivery program).
Then lower the presser foot lever (23).
Hold the embroidery frame with your hand.
While stitching the designed pattern, slowly
move the embroidery frame. Be careful not the
come too close to the needle with your fingers.
Note:
It is recommended to draw the desired
embroidery pattern with a pencil or with
tailor's chalk on the right side of the fabric.
41
Stitching monograms
Presser foot . . . . . . . . . . . . . . . . . . . . . .zigzag foot
Program selection . . . . . . . . . . . . . . . . . . . . .2 to 5
Stitch length dial . . . . . . . . . . . . . . . . . . .0.2 to 0.5
Draw the monogram you would like to stitch
and start stitching it with a zigzag stitch with the
desired width.
Sewing appliqués
Presser foot . . . . . . . . . . . . . . . . . . . . . .zigzag foot
Program selection . . . . . . . . . . . . . . . . . . . . .2 to 5
Stitch length dial . . . . . . . . . . . . . . . . . . . . .0.5 to 4
Attach the appliqué to the fabric.
Proceed to sew with close zigzag stitches along
the edges of the motif basted to the fabric
(fine fabrics have to be stretched in an
embroidery frame). As for corners and curves,
the appliqué should only be turned, when the
needle has reached the outer edge of the
appliqué, using the needle as a pivot.
Remove the basting thread.
Sewing of laces
Presser foot . . . . . . . . . . . . . . . . . . . . . .zigzag foot
Program selection . . . . . . . . . . . . . . . . . . . . .2 to 5
Stitch length dial . . . . . . . . . . . . . . . . . . . . .0.5 to 4
Place the lace on or under the fabric.
The lace should lie about 0.2 inch from the edge
of the fabric.
Slide your work under the presser foot and
start stitching.
42
Sewing with a twin needle
*
Presser foot . . . . . . . . . . . . . . . . . . . . . .zigzag foot
Program selection . . . . . . . . . . . . . . . . . .1-2-3-13
Stitch length dial . . . . . . . . . . . . . . . . . . . . . . .1 to 4
Beautiful two-colored patterns can be produced
by using a twin needle and threads of different
colors.
Spool holder
NOTE: Make sure ONLY to use stitch types
1, 2, 3, or 13 when using twin needles.
Insert the twin needle in the same way as a
single needle
(flat side to the back).
Put two equally fully wound spools on the
extensible spool holders (31).
Make sure that both felt disks, which are
supplied with the accessories, are placed on the
two spool holders.
For threading, lead both threads through the
thread holder, as you do it when threading a
single needle.
1. When it comes to the upper thread tension
dial (20), lead both threads through the disks,
i.e.one of them on the right, and the other one
on the left from the medium disk, as shown.
1
2. Lead both threads into the thread guide.
When it comes to the eyes of the needle,
lead one thread into the right eye and the
other one into the left eye of the needle.
For sewing a corner with the twin needle,
raise the needle out of the fabric, since
otherwise the twin needle could either
break or be bent.
2
*
Thread guide
Not included. Please be careful when purchasing
twin needles that the distance between the two
needles does not exceed 0.1 inch.
43
Sewing with the free arm
You can remove the flat bed for free arm
sewing.
The free arm provides for easier sewing of fabric
in tubes. Place sleeves and trouser legs on the
free arm, as shown.
Some example uses of free arm sewing:
- Repairing elbows and knees of garments
will be easier.
o
1
- Sewing sleeves will be easier. In particular,
in case of smaller garments.
- Appliqués, embroidery or hemming edges,
cuffs or trouser legs.
- Sewing elastic waistbands on skirts
and trousers.
Straightedge (accessories no. 6)
The straightedge will help you stitch straight and
parallel seams along the edge of the fabric.
Slightly turn the thumb screw of the
straightedge into the tap hole which is located
on the right, next to the throat plate.
Adjust the guide to the desired distance, then
tighten the screw.
To help you, a few guide lines are marked on the
throat plate.
Quilting guide (accessories no. 7)
Slide the quilting guide into the opening under
the spring clamp as shown.
Draw the first seam in advance with tailor's
chalk and then proceed to sew.
With the aid of the quilting guide, proceed to
sew the second seam parallel to the first one.
The distance between the seams can be
regulated by adjusting the slide bar in the
direction of the arrow.
44
Maintenance and care of the sewing machine:
The sewing machine is a precise mechanical
product requiring regular maintenance and care.
Attention!
Before you start cleaning or maintenance, switch off the machine and disconnect
the plug from the mains socket.
Note:
Use only sewing machine oil. Other oils are
not suitable.
Cleansing and oiling the bobbin case
Removing the shuttle:
1
1. Raise the needle to its highest position,
otherwise the shuttle cannot be removed.
Take out the bobbin case.
2
2. Turn the latch to the outside, as shown, and
remove the shuttle hook.
3
3. Remove the shuttle by holding the pivot
in the center of the shuttle.
Remove any dirt, dust and lint from the
shuttle hook of the shuttle and oil these
parts with a piece of cloth.
45
4
4. Put a few drops of oil on the shuttle hook,
as shown.
5
5. Now assemble the parts again in reverse
order.
Cleaning the feed dog
1. The feed dog teeth must always be kept
clean to guarantee a perfect stitching quality.
Remove the needle and the presser foot.
Open the screws of the throat plate (9), to
remove it from the machine.
1
Throat plate
2
46
2. Use a brush to remove any dust and lint from
the feed dog teeth.
Insert the throat plate again.
Oiling the machine
Attention!
For this step, the machine must be switched off and unplugged.
NOTE: Your sewing machine has already
been oiled and is ready for operation.
Oiling the machine behind the front cover
Note:
This part of the machine should be oiled more
often than the upper and under side of the
machine..
The places to be oiled are marked by arrows in
the figure. Before oiling, these places should be
cleaned. Put one or two drops of a good sewing
machine oil at these places.
If the machine does not run smoothly, after it
has not been operated for a longer period of
time, let the oiled machine run fast for about
one minute, with the front cover closed.
Do not forget to sew first on a small piece of
cloth so that any possible oil which may have
passed out, will be absorbed.
Oiling the upper and under side of the machine
1
Note:
The upper and under side of the machine
should not be oiled too often.
Dismounting the back housing cover
1. Lift the presser foot lever, open the front cover
and loosen the screw (A).
The screws (A), (B) and (C) differ from each
other. They should be kept separately.
A
47
2. Remove the flat bed and open the bobbin
case cover (7).
2
B
3
48
Remove the three screws (B) at the top,
as shown.
3. Now you can remove the cover
Oiling the upper side of the machine
Oil the places marked by arrows, as shown.
Oiling the under side of the machine
Oil the places marked by arrows, as shown.
Assembly of the back housing cover
Bring the cover into its original position.
Tighten the screws (A) and (B) again.
49
Troubleshooting
In case of any faults or defects, please read this instruction manual to make sure you have followed
all instructions.
Common problems
Cause
Remedy page
Machine does not easily run
The machine must be oiled.................................................................................................................45
Dust and lint are in the shuttle.......................................... ..................................................................45
Lint is in the teeth of the feed dog ......................................................................................................46
Wrong oil was used and has blocked the machine ......................................................................45, 47
Breaking of the upper thread
The machine has not properly been threaded ....................................................................................16
Thread tension is too tight ..................................................................................................................20
Needle is bent or blunt..........................................................................................................................8
The thread strength is not suitable for the needle ..............................................................................24
The needle has not been properly inserted ..........................................................................................8
The fabric has not been fed to the back at the end of the seam........................................................27
Throat plate, bobbin or presser foot defect.......................................................contact Customer Care
Breaking of the under thread
The under thread is entangled due to improper bobbin winding..................................................14, 15
The under thread has not been led under the tension spring in the bobbin case ..............................15
Breaking of needle
The needle has not been properly inserted ..........................................................................................8
The needle is bent.................................................................................................................................8
The needle is too fine..........................................................................................................................24
The fabric is pulled during the sewing operation ................................................................................27
There is a knot in the thread ...............................................................................................................16
The needle has not been properly threaded .......................................................................................16
The machine keeps skipping stitches
50
The needle has not been properly inserted ..........................................................................................8
The needle has not been properly threaded .......................................................................................16
The needle and/or the thread does/do not correspond with the fabric ..............................................24
The fabric is too heavy or too hard .....................................................................................................24
The presser foot pressure is not high enough ....................................................................................11
You pull the fabric ...............................................................................................................................27
Gathering or puckering of the seam
The upper thread tension is too tight..................................................................................................20
The machine has not been properly threaded ....................................................................................16
The presser foot pressure is too high (when sewing fine fabrics, place a sheet of paper under them) .......11
The needle is too thick for the fabric...................................................................................................24
The thread keeps forming loops
The thread tension has not been regulated ............................................................................19, 20, 21
The upper thread has not been properly threaded and/or the under thread has not been properly wound.16, 14
The thread strength is not suitable for the fabric ................................................................................24
The fabric is fed unevenly
The stitch length is set to "O"............................................................................................................. 22
Lint has settled in the throat plate so that the feed dog can no longer come out sufficiently.......... ..46
The machine does not work
The sewing machine has not been properly connected, or the mains socket is without current ........6
Lint is in the shuttle ............................................................................................................................45
The balance wheel has been pulled to the side for winding the bobbin ............................................14
51