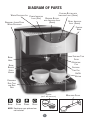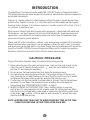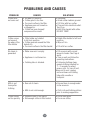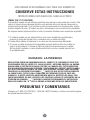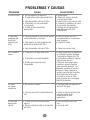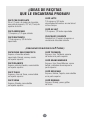
1
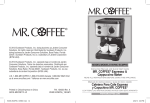
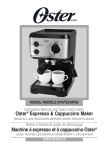
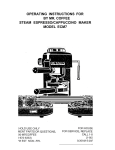
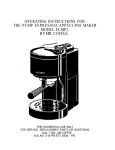
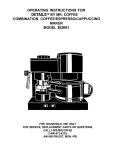
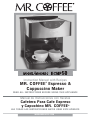
MODEL/MODELO
ECMP50
Instruction Manual with Recipes
MR. COFFEE Espresso &
Cappuccino Maker
®
READ ALL INSTRUCTIONS BEFORE USING THIS APPLIANCE
Manual de Instrucciones con Recetas
Cafetera Para Cafe Expreso
y Capuchino MR. COFFEE®
LEA TODAS LAS INSTRUCCIONES ANTES USAR ESTE APARATO
WWW.MRCOFFEE.COM
IMPORTANT SAFEGUARDS
When using electrical appliances, basic safety precautions should always be followed to
reduce the risk of fire, electric shock and/or injury to persons, including the following:
1. READ ALL INSTRUCTIONS BEFORE USING THE APPLIANCE.
2. DO NOT touch hot surfaces. Use handles or knobs.
3. To protect against electric shock, DO NOT immerse cord, plugs or appliance in water or other liquids.
4. Close supervision is required when any appliance is used by or near children.
5. Turn the side knob to the off position “ ”, press the red switch to the off position “O” and unplug unit from electrical outlet when not in use and before cleaning. Allow it to cool before putting on or taking off parts and before cleaning it.
6. DO NOT operate any appliance with a damaged cord or plug or after the appliance malfunctions or has been damaged in any manner. Return this appliance only to the nearest authorized MR. COFFEE® Service Center for examination, repair or adjustment.
7. The use of accessory attachments not recommended for MR. COFFEE® products may result
in fire, electric shock or injury to persons.
8. DO NOT use outdoors or for commercial purposes.
9. DO NOT let cord hang over edge of table or countertop or touch hot surfaces.
10. DO NOT place this appliance on or near a hot gas or electric burner or in a heated oven.
11. To disconnect, turn any control to off position then remove plug from wall outlet.
12. DO NOT use appliance for anything other than its intended use.
13. Use on a hard, flat level surface only, to avoid interruption of airflow underneath the
appliance.
14. Always be sure to place the water reservoir tightly back in the unit with its lid closed and fill with water on or above the minimum before turning appliance on.
15. DO NOT remove the brew basket while brewing coffee. Please make sure to turn
the side knob to the off position “ ” before you remove the brew basket to make
additional coffee. Caution should also be taken while removing the brew basket since the metal parts will be hot. Please make sure to hold it by the handle and to use the filter retention clip to dispose the grounds. See section “CAUTION” on pages 2 and 4 for additional warnings.
16. DO NOT remove the water reservoir until unit is turned off. See section “CAUTION” on pages 2 and 4 for additional warnings.
THIS UNIT IS FOR HOUSEHOLD USE ONLY
SAVE THESE INSTRUCTIONS
Special Cord Set Instructions
(FOR 120 & 127 VOLTS ONLY)
The appliance has a polarized plug (one blade is wider than the other). To reduce the risk of
electric shock, this plug is intended to fit into a polarized outlet only one way. If the plug does
not fit fully into the outlet, reverse the plug. If it still does not fit, contact a qualified electrician. Do not attempt to modify the plug in any way.
1. A short power supply cord is provided to reduce the hazards resulting from becoming entangled in or tripping over a longer cord.
2. An extension cord may be purchased and used if care is exercised in its use.
3. If an extension cord is used the marked electrical rating of the extension
cord must be the same as the product. The extended cord must be arranged so that it will not drape over the counter top or tabletop where it can be pulled on by children or tripped over accidentally.
Caution: Pressure
In order to avoid possible burns to body parts and/or other injury from
hot steam and water or damages to the unit, never remove the water reservoir or the brew Basket while your MR. COFFEE® espresso/cappuccino
maker is brewing coffee or frothing. The side knob should be in the off
position “ ” before you can remove the brew basket to make additional
cups of coffee. If you need to add more water to the reservoir, please
turn the side knob to the off position “ ” and to switch off the unit by
pressing the red button on the side to the off position “o”. See page 4 for
more important details.
QUESTION OR COMMENTS
Cal us at 1-800-672-6333 (US) or 1-800-667-8623 (Canada) or visit us on the
web www.mrcoffee.com
DIAGRAM OF PARTS
WATER RESERVOIR LID
POWER INDICATOR
LIGHT (RED)
REMOVABLE LARGE/CLEAR
WATER RESERVOIR
FROTHING BUTTON WITH
INDICATOR LIGHT (GREEN)
BREWING BUTTON
LIGHT
(GREEN)
WITH INDICATOR
READY INDICATOR
LIGHT (GREEN)
CONTROL
KNOB
FROTHING TUBE
BREW
HEAD
FILTER
RETENTION
CLIP
BREW
BASKET/
FILTER
HOLDER
FROTHING
TUBE CAP
ON/OFF
BUTTON
REMOVABLE
DRIP TRAY
AND DRIP
GRID
FILTERS
(FOR 1 & 2 DEMITASSES)
BREW
STEAM
POWER
READY
NOTE: Demitasse cups pictured are
not included.
3
MEASURING SCOOP
INTRODUCTION
Congratulations! You have selected a quality MR. COFFEE® Espresso/Cappuccino Maker.
This unique appliance has been designed to provide you with delicious espresso/cappuccino
quickly and conveniently.
Espresso is a unique method of coffee brewing in which hot water is forced through finely
ground coffee. Popular in Europe, it is a far richer and more full-bodied brew than regular
American coffee. Because of its richness, espresso is usually served in 44 to 59 mL (1.5 to 2
oz.) portions, in demitasse cups.
Most espresso drinkers outside of Europe prefer cappuccino, a drink made with about one
third espresso, one third steamed milk, and one third frothed milk. Preparing espresso or
cappuccino is very different from brewing regular drip coffee since this appliance under
pressure and requires special attention.
Please read ALL of the instructions, cautions, notes and warnings included in this Instruction
Manual carefully before you begin to use this appliance. When this unit is used, some parts
and accessories get hot and need to cool down. Proper care and maintenance will ensure the
long life of the MR. COFFEE® Espresso/Cappuccino Maker and its trouble-free operation.
Save these instructions and refer to them often for cleaning and care tips.
CAUTION: PRESSURE
Please follow these important safety instructions while using your unit:
1. Before removing any of the parts and accessories, make sure the control knob on the
side of the unit is turned to the off position “ ”, press the on/off button to the off
position “O” and unplug the appliance.
2. Do not remove the brew basket at any time during the brewing process.
3. Use caution when removing the brew basket. The metal parts may still be very hot.
Also, there may be hot water floating on the top of the filter. Hold it only by its handle and dispose the brewed coffee ground by using the filter retention clip.
4. If coffee does not drip from basket, the brew basket is blocked. Turn off the appliance and allow it to cool down. The blockage may be caused by the coffee being too
finely ground. See “PROBLEMS AND CAUSES” on Page 9.
5. WHEN CLEANING THE FROTHING TUBE: Place a frothing pitcher or large cup
(with at least 11-ounce capacity) half full of water under the frothing tube cap. Make
sure the tip of the frothing tube is submerged in liquid before turning the control knob
to the steam “ ” position. Froth the water for approximately 15 seconds then wipe
clean the frothing tube and cap.
NOTE: In order for your unit to work properly time after time, clean the frothing tip and tube after each use.
HOW TO PREPARE QUALITY ESPRESSO
AND CAPPUCCINO AT HOME
THE COFFEE
The coffee should be freshly ground and dark roasted. You may want to try a French or Italian
roast. Pre-ground coffee will only retain its flavor for 7 – 8 days, provided it is stored in an
airtight container and in a cool, dark area. Do not store in a refrigerator or freezer. Whole
beans are recommended to be ground just before use. Coffee beans stored in an airtight
container will keep up to 4 weeks before they begin to lose their flavor.
THE GRIND
This is a vital step in the espresso making process and takes practice. The coffee must be of
a fine grind.
•The correct grind should look like salt.
•If the grind is too fine, the water will not flow through the coffee even under pressure. These grinds look like powder and feel like flour when rubbed between fingers.
•If the grind is too coarse, the water flows through the coffee too fast, preventing a full-
flavored extraction.
Be sure to use a quality grinder for uniform consistency. Oval shaped coffee grinders are not
recommended because the grind is not consistent.
BEFORE BREWING YOUR FIRST ESPRESSO
Please refer to Page 3 for the Description of the Appliance.
1.Turn the side knob to the off position “ ”, switch the unit off “O” and make sure it is unplugged from the electrical outlet.
2.First remove and then wash the water reservoir, lid, brew basket and filters in a mixture of mild detergent and water. Rinse each thoroughly and place them back into the unit.
Refer to the instructions below on “How to Brew Espresso” before removing the filter and brew basket.
3.To clean the inside of the appliance, follow steps listed on “How to Brew Espresso” using water only. Do not immerse the appliance in water or attempt to reach any of its internal parts.
HOW TO BREW ESPRESSO
1.Make sure the unit is switched off “O” and the side knob is in the off position “ ”.
2.Fill the reservoir with water, you may either use a jar to fill it up or remove it from the unit and then fill it up under the tap. If you have removed it from the unit to fill up with water, please make sure to place it back tightly in its place. Fill the reservoir with the desired amount of water ensuring it ranges within the “MIN” and “MAX” markings on the tank. Never use warm or hot water to fill the water reservoir.
3.Close the water reservoir lid.
PREPARING THE COFFEE
1.Place the filter in the brew basket. Select from the two filters that come with your unit depending on the amount of cups you wish to prepare (1 or 2 demitasses).
2.Fill the selected filter with fresh, fine ground espresso coffee. Clean any excess coffee from the rim of the filter holder. This will assure proper fit under the brew head.
ATTENTION: Tamp or compress coffee using the tamper as show below. Do not
overfill the filter. This might cause clogging or overflow.
3.Position brew basket underneath the brew head, attach brew basket by first moving retainer clip back, position handle so that the handle lines up with the unlocked
icon “ ” on the brew head and fits into the groove. Then, slowly turn to right until brew
basket is located at locked position (indicated by the icon below).
(This symbol is on the brew head)
BREWING ESPRESSO
ATTENTION: If you are planning to make cappuccino, please refer to the next section “how to make cappuccino.”
1.Make sure the drip grid is in place on the drip tray. Place the drip tray in the unit.
2.Make sure the control knob is in the off position “ ”.
3.Place the cup or two cups (demitasses) under the brew basket or if you prefer, place a small
jar or carafe. If you wish to prepare up to 4 cups at a time, you should use a small jar,
carafe or regular cup and then pour the espresso into the demitasses. If you will be
brewing up to two demitasses at a time, you can place the two small cups under the brew
basket ensuring each one of them is directly under one of the two spouts located under the
brew basket.
4.Plug the power cord into an electrical outlet and then switch the unit on by pressing the
red button on the side of the appliance to the on position “I”. The power indicator light will
become solid red while the unit is on and the ready indicator light (green) will start blinking.
5.Once the ready light becomes solid green, press the brew button “ ” and then rotate the side knob counter-clockwise to the brew “ ” position. This will initiate the brewing process and espresso will begin to flow in just seconds.
6.When the cup/carafe is filled to the desired level, turn the side knob clockwise to the off
“ ” position.
CAUTION: Do not leave unit unattended while brewing since the brewing process requires to be manually stopped. This will avoid overflow, spillage and potential Hazards and damages. The unit requires to be turned Off manually.
NOTE: Once the brew (of froth) cycle is completed, steam will be released from beneath the drip tray to remove any remaining water from the heater.
7.Once you have prepared the desired amount of espresso or cappuccino, switch the
power button to the off position “O” and unplug the unit. Allow the unit to cool down before removing parts and accessories prior to cleaning.
8.After the unit has cooled down, remove the brew basket from the brew head. Using the retainer clip to secure the filter in the filter holder, turn the brew basket upside down to empty. Rinse the filter and brew basket with water.
9.If you wish to brew additional espresso, repeat the process. Turn the side knob to the
off position “ ”, remove the demitasses or jar from under the brew basket and place new and empty ones. Carefully remove the brew basket by holding it with the handle, ensuring to use the filter retention clip to hold the filter and dispose of the grounds. Put fresh coffee in the filter, place the brew basket back underneath the brew head and
follow the instructions to brew coffee again (items 3, 5 and 6 from this section).
CAUTION: The metal parts of the brew basket might still be very hot. Make sure to use the filter retainer clip when
discarding the grounds. Cool these parts by running
under cold water.
10.For cleaning instructions, refer to Page 8.
HOW TO MAKE CAPPUCCINO
Cappuccino is espresso topped with steamed and frothed milk. Frothing milk for cappuccino
takes practice. Do not be discouraged if it is not perfect the first time. The milk should be half
steamed (bottom of pitcher) and half froth (top of pitcher). It may take a few times before you
perfect this process.
For best results, we recommend frothing the milk in a separate pitcher and pouring the milk
into your coffee. The milk and pitcher should be cold. Do not use a pitcher, which has just
been washed in warm water. We also recommend a stainless steel frothing pitcher and a
beverage thermometer, if you own one, for preparing the best froth and steamed milk.
1.The first step in making cappuccino is to make espresso. Therefore, fill the water
reservoir with cold water. Never use warm or hot water to fill the water reservoir.
2.Follow steps 1 – 6 in the “Brewing Espresso” section.
3.Fill a small stainless steel or ceramic pitcher 1/2 full with cold milk and set next to machine. Skim or 2% milk will be the easiest to froth.
4.You are now ready to froth and steam your milk. Press the red switch to the on position “I”,
wait until the ready light “ ” becomes solid green. Hold the pitcher under the frothing tube (which can be swiveled) so that the tip of the frothing tube is slightly immersed in the milk, press the steam button “ ”. The ready light “ ” will start blinking and once it
becomes solid green again turn the side knob clockwise to the steam position “ ”. Gently move the pitcher in a circular motion around the steam nozzle for about 50 seconds (for 4oz, of milk) or longer if warmer milk is desired. REMEMBER: The milk and the pitcher should be very cold prior to frothing.
5.When the milk has doubled in volume, or, if you are using a beverage thermometer, when the milk has reached 38°C (100°F), insert the frothing aid deeper into the milk
to further heat the milk. Do not heat milk above 65°C (150°F). To avoid splattering of hot milk, do not let the tip of the frothing tube go above the surface of the milk. After frothing is completed, turn the control knob back to the off position “ ”. The steam
“ ” and the brew “ ” lights will flash. The pump will run intermittently until the brew light and the steam light turn off).
6.You are now ready to make cappuccino. REMEMBER: It is 1/3 espresso, 1/3 steamed
milk and 1/3 frothed milk. Pour the espresso into a cup, which has the capacity of at least 150 ml (5 ounces). Then add the steamed milk to the espresso and spoon on the frothed milk.
7.Follow the instructions on Page 4 under section marked “CAUTION” to flush out any residual milk from the frothing tube. It is important to properly clean your frothing tube and wash its cap after each use to ensure it continues to work properly.
(See Step 2 below)
8.Unplug the power cord and allow the machine to cool.
CLEANING YOUR ESPRESSO/
CAPPUCCINO MAKER
1.Turn the side knob to the off position “ ”, switch the red button on the side to the off position “O” and unplug the power cord from the electrical outlet.
2.The frothing tube may still be hot. Do not touch it with your hands until it has cooled. Remove and wash the frothing tube cap and wipe frothing tube with a damp cloth.
Using the wrench built into the measuring spoon, unscrew the tip of the frothing tube and clean the valve with a needle or toothpick.
3.The water reservoir, filters, drip tray and drip grid can be washed with soapy water or placed in the top rack of your dishwasher (avoid washing the brew
basket in your dishwasher). CAUTION: Do not immerse appliance in water.
4.Discard the remaining water by removing the reservoir and turning it upside down over
the sink. It is recommended to empty the water reservoir between uses.
Do not immerse appliance in water.
5.Wipe housing with a soft wet cloth. Do not use abrasive cleaners or scouring pads, as they will scratch the finish.
6.Do not store the filter holder in the brew head. This can adversely affect the seal between the brew head and the filter holder while brewing espresso.
DELIMING
Mineral deposits built-up in the Espresso Maker will affect the operation of the appliance.
Your Espresso Maker must be delimed when you begin to notice an increase in the time
required to brew espresso, or when there is excessive steaming. Also, you may notice a
build-up of white deposits on the surface of the brew head.
The frequency of cleaning depends upon the hardness of the water used. The following table
gives the suggested cleaning intervals.
SUGGESTED CLEANING INTERVAL
Type of Water
Cleaning Frequency
Soft Water (Filtered Water) Every 80 Brew Cycles
Hard Water (Tap Water) Every 40 Brew Cycles
YOUR ESPRESSO/CAPPUCCINO MAKER
MAY BE DELIMED USING WHITE
HOUSEHOLD VINEGAR, AS FOLLOWS:
TO DELIME WATER RESERVOIR:
1.Make sure the side control knob is in the off position “ ”, the red switch is in the off position “O” and that the power cord is disconnected from the electrical outlet.
2.Fill the reservoir with fresh, undiluted white household vinegar.
3.Allow appliance to sit overnight with the vinegar solution in the water reservoir.
4.Discard vinegar by removing the reservoir and turning it upside down over the sink.
5.Rinse the water reservoir thoroughly with tap water by filling tank half full with water and then pouring the water back out into the sink, repeating this step twice.
TO DELIME INTERNAL PARTS:
1.Make sure you delime the inside of the water reservoir first by following the “Deliming” steps above.
2.Make sure all controls are in the off position and the power cord is disconnected from the electrical outlet and the appliance is. (See Section “CAUTION” on Page 4). Fill the reservoir with white vinegar above the minimum level into reservoir.
3.Insert the brew basket (with filter) and place jar/carafe or regular cup on top of the drip tray and under the brew basket.
4.Plug the power cord into the electrical outlet.
5.Press the red button to switch the unit on “I”, once the ready light “ ” becomes solid green, press the brew button “ ”, turn the side control knob counter-clockwise to the
brew position “ ”. The vinegar will start flowing through the unit. Once you are done, turn the side knob clockwise to the off position “ ”.
6.To clean the frothing tube internally, place a cup with cold water under the tip of the frothing tube. Wait until the ready light “ ” becomes solid green. Insert the frothing
tube into the water, press the steam button “ ”. The ready light “ ” will start blinking and once it becomes solid green again turn the side knob clockwise to the steam
position “ ”. Let the steam come out for about 10 seconds. This will clean any
residue left in the frothing tube from frothing milk.
7.Turn the side knob counter-clockwise to the off position “ ” and press the red switch to the off position “O”.
8.Repeat Steps 1 – 7 as necessary using only tap water to rinse any remaining traces of vinegar out of the machine.
PROBLEMS AND CAUSES
PROBLEM
CAUSES
SOLUTIONS
Coffee does
not come out
• No water in reservoir.
• Coffee grind is too fine.
• Too much coffee in the filter.
• Appliance was not turned on
or plugged in.
• Coffee has been tamped/
compressed too much.
• Add water.
• Grind coffee medium ground.
• Fill filter with less coffee.
• Plug unit into electrical outlet.
Turn it on.
• Refill filter basket with coffee DO NOT TAMP.
Coffee comes
out around
the edge of the
filter holder
• Filter holder not rotated
to full lock position.
• Coffee grounds around the filter
basket rim.
• Too much coffee in the filter basket.
• Rotate filter holder to full lock
position.
• Wipe off rim.
No steam is
generated
• Water reservoir is empty.
• Fill reservoir with correct amount of water. See Page 5
and 6.
• Turn on unit and follow the
operating instructions.
• Following frothing stage, operate frothing function for
1 – 2 seconds to extract excess milk. Or, turn off unit, allow unit to cool, unplug unit and clean out frothing
tube with a needle or
toothpick.
• Appliance is not turned on.
• Frothing tube is blocked.
• Fill with less coffee.
Milk is not
foamy after
frothing
• Ran out of steam.
• Ensure there is enough water
in the reservoir.
• Milk is not cold enough.
• Chill milk and frothing pitcher
prior to making cappuccino.
Coffee comes
out too quickly
• Ground coffee is too coarse.
• Not enough coffee in filter basket.
• Use a finer grind.
• Use more coffee.
10
RECIPE IDEAS THAT YOU
WILL LOVE TO TRY!
CAFÉ MOCHA
30 ml (1oz.) of chocolate syrup, one shot
of espresso, 237 ml (1 cup) frothed milk
CAFÉ LATTE
1/4 espresso and 3/4 steamed milk,
pour both in a mug at the same time
CAFÉ AMERICANO
1/2 espresso and 1/2 hot water
CAFÉ AU LAIT
1/2 espresso, 1/2 steamed milk
CAFÉ MACCHIATO
1/3 espresso and 2/3 steamed milk
MOCHA HOT CHOCOLATE
Add 60 ml (2 oz.) of espresso to one
cup of hot chocolate
(FOR ADULTS 21 YEARS AND OLDER)
SAN FRANCISCO CAPPUCCINO
Espresso, hot steamed chocolate, Brandy,
topped with cream and cinnamon
CAFÉ TIA MARIA
Espresso, Tia Maria liqueur, topped
with frothed milk
CAFÉ IRISH
Espresso, Irish whiskey, topped with
whipped cream
CAFÉ GRAND MARNIER
Espresso, Grand Marnier liqueur, topped
with whipped cream and grated orange peel
CAFÉ TUACA
Espresso, Tuaca liqueur, topped with
whipped cream
MEXICAN CAFÉ
Espresso, Kahlua, Tequila,
topped with whipped cream
CAFÉ VIENNA
Espresso, Brandy, topped with
whipped cream
CAFÉ ROMANO
Espresso, Brandy and lemon twist
11
1-YEAR LIMITED WARRANTY
Sunbeam Products, Inc. doing business as Jarden Consumer Solutions or if in Canada, Sunbeam Corporation
(Canada) Limited doing business as Jarden Consumer Solutions (collectively “JCS”) warrants that for a period of
one year from the date of purchase, this product will be free from defects in material and workmanship. JCS, at its
option, will repair or replace this product or any component of the product found to be defective during the warranty
period. Replacement will be made with a new or remanufactured product or component. If the product is no longer
available, replacement may be made with a similar product of equal or greater value. This is your exclusive warranty.
Do NOT attempt to repair or adjust any electrical or mechanical functions on this product. Doing so will void this
warranty.
This warranty is valid for the original retail purchaser from the date of initial retail purchase and is not transferable.
Keep the original sales receipt. Proof of purchase is required to obtain warranty performance. JCS dealers, service
centers, or retail stores selling JCS products do not have the right to alter, modify or any way change the terms and
conditions of this warranty.
This warranty does not cover normal wear of parts or damage resulting from any of the following: negligent use or
misuse of the product, use on improper voltage or current, use contrary to the operating instructions, disassembly,
repair or alteration by anyone other than JCS or an authorized JCS service center. Further, the warranty does not
cover: Acts of God, such as fire, flood, hurricanes and tornadoes.
What are the limits on JCS’s Liability?
JCS shall not be liable for any incidental or consequential damages caused by the breach of any express, implied or
statutory warranty or condition.
Except to the extent prohibited by applicable law, any implied warranty or condition of merchantability or fitness for a
particular purpose is limited in duration to the duration of the above warranty.
JCS disclaims all other warranties, conditions or representations, express, implied, statutory or otherwise.
JCS shall not be liable for any damages of any kind resulting from the purchase, use or misuse of, or inability to use
the product including incidental, special, consequential or similar damages or loss of profits, or for any breach of
contract, fundamental or otherwise, or for any claim brought against purchaser by any other party.
Some provinces, states or jurisdictions do not allow the exclusion or limitation of incidental or consequential damages
or limitations on how long an implied warranty lasts, so the above limitations or exclusion may not apply to you.
This warranty gives you specific legal rights, and you may also have other rights that vary from province to province,
state to state or jurisdiction to jurisdiction.
How to Obtain Warranty Service
In the U.S.A.
If you have any question regarding this warranty or would like to obtain warranty service, please call 1-800-672-6333
and a convenient service center address will be provided to you.
In Canada
If you have any question regarding this warranty or would like to obtain warranty service, please call 1-800-667-8623
and a convenient service center address will be provided to you.
In the U.S.A., this warranty is offered by Sunbeam Products, Inc. doing business Jarden Consumer Solutions located
in Boca Raton, Florida 33431. In Canada, this warranty is offered by Sunbeam Corporation (Canada) Limited doing
business as Jarden Consumer Solutions, located at 20 B Hereford Street, Brampton, Ontario L6Y 0M1. If you have
any other problem or claim in connection with this product, please write to Consumer Service Department.
PLEASE DO NOT RETURN THIS PRODUCT TO ANY OF THESE ADDRESSES OR TO THE PLACE OF PURCHASE
12
PRECAUCIONES IMPORTANTES
Cuando se utiliza cualquier artefacto eléctrico siempre se deben seguir precauciones básicas
de seguridad para evitar el riesgo de incendio, descarga eléctrica y/o lesiones, incluyendo las
siguientes:
LEA TODAS LAS INSTRUCCIONES ANTES DE UTILIZAR SU ARTEFACTO
1. NO toque las superficies calientes. Utilice las asas o perillas.
2.Para protegerse contra una descarga eléctrica, NO sumerja el cable, el enchufe o el artefacto en agua u otros líquidos.
3. Se requiere supervisión cercana cuando este artefacto esté siendo utilizado por niños o cerca de ellos.
4. Gire la perilla de control lateral para colocarla en la posición de apagado “ ”, presione el interruptor rojo para colocarlo en “O” y desenchufe la unidad del tomacorriente cuando no la esté utilizando y antes de su limpieza. Permita que se enfríe antes de volverla a utilizar, o antes de retirarle las partes y limpiarla.
5. NO opere ningún artefacto con un cable o enchufe dañado, después de que el artefacto haya fallado o si se cae al suelo o se daña de cualquier otra manera. Regrese el artefacto
al Centro de Servicio MR. COFFEE® Autorizado más cercano para examinarlo, repararlo o para ajustarlo mecánica o eléctricamente.
6. El uso de accesorios no recomendados o vendidos por el fabricante del artefacto puede causar incendios, descargas eléctricas o lesiones corporales.
7. NO la utilice al aire libre o para propósitos comerciales.
8. NO permita que el cable cuelgue del borde de la mesa o mostrador o que entre en contacto con superficies calientes.
9. NO coloque este artefacto sobre o cerca de quemadores de estufas de gas o eléctricas, ni dentro de un horno caliente.
10. Para desconectar, gire cualquier control a la posición de apagado, luego desenchufe el cable
del tomacorriente.
11. NO utilice este artefacto para otro propósito que no sea para el que ha sido diseñado.
12. Coloque la cafetera sobre una superficie dura y nivelada para evitar la interrupción del flujo de aire debajo del artefacto.
13. Siempre asegúrese de colocar el depósito de agua firmemente en la parte de atrás de la unidad con la tapa cerrada y cargado con la cantidad de agua a la altura del nivel mínimo o justo por encima, antes de encender el artefacto.
14. NO retire la canasta del filtro mientras esté colando el café. Asegúrese de colocar la
cafetera en la posición de apagado “ ”, antes de remover la canasta del filtro para preparar café adicional. También debe tomar medidas de precaución al remover la canasta del filtro
si las partes de metal se encuentran calientes, asegúrese de sostenerla por el mango y de utilizar el clip de retención del filtro para desechar los residuos de café. Ver la Sección
de “PRECAUCIONES” en las páginas 2 y 4 para advertencias adicionales.
15. NO remueva el depósito de agua hasta que haya apagado la unidad. Ver la Sección de “PRECAUCIONES” en las páginas 2 y 4 para advertencias adicionales.
13
ESTA UNIDAD ESTA DISEÑADA SOLO PARA USO DOMESTICO
CONSERVE ESTAS INSTRUCCIONES
INSTRUCCIONES ESPECIALES DEL CABLE ELECTRICO
(PARA 120 Y 127 VOLTIOS)
Este artefacto cuenta con un enchufe polarizado (una clavija es más ancha que la otra). Para
reducir el riesgo de una descarga eléctrica, este enchufe entra sólo de una manera en un
tomacorriente polarizado. Si el enchufe no entra correctamente en el tomacorriente, simplemente colóquelo al revés. Si todavía no entra, comuníquese con un electricista competente.
De ninguna manera intente modificar o forzar la conexión diseñada como medida de seguridad.
1.El artefacto cuenta con un cable eléctrico corto como medida de seguridad para
prevenir el riesgo de tropezar, tirar o enredarse con un cable más largo.
2.Puede utilizar cables de extensión si se observan las precauciones adecuadas.
3.Si se usa un cable de extensión la capacidad nominal eléctrica del mismo debe ser
igual a la del producto. Coloque el cable de extensión de manera que no cuelgue del borde del mostrador o mesa donde pueda tirarlo un niño o pueda tropezar con
él accidentalmente.
CUIDADO: LA PRESION
Para evitar posibles quemaduras en el cuerpo y/o lesiones de otro tipo
ocasionadas por el vapor y el agua caliente, así como daños a la unidad,
NUNCA abra el depósito de agua o retire la canasta del filtro mientras
que su Cafetera para Café Expreso y Capuchino MR. COFFEE® esté colando
el café o haciendo espuma. La perilla de control lateral debe de encontrarse en la posición de apagado “ ” antes de que usted pueda remover
la canasta del filtro con la finalidad de preparar tazas de café adicionales. Si usted necesita agregar más agua al depósito de agua, por
favor asegúrese de que la perilla de control lateral se encuentra en la
posición de apagado “ ” y apague la unidad presionando el botón rojo
para colocarlo en “O”. Ver la Página 4 para más detalles importantes.
PREGUNTAS Y COMENTARIOS
Llámenos al 1-800-672-6333 (EU), 1-800-667-8623 (Canada) o visitenos en nuestra página
de internet www.mrcoffee.com
DESCRIPTION OF THE APPLIANCE
14
DESCRIPCION DEL ARTEFACTO
BOTÓN PARA ESPUMAR CON
TAPA DEL DEPÓSITO
LUZ INDICADORA (VERDE)
LUZ INDICADORA DE
DE AGUA
ENCENDIDO (ROJA) BOTÓN PARA COLAR
LUZ QUE INDICA QUE
CON LUZ INDICADORA
EL CAFÉ ESTÁ LISTO
DEPÓSITO DE AGUA
(VERDE)
(VERDE)
REMOVIBLE/TRANSPARENTE
PERILLA DE
CONTROL
TUBO
ESPUMADOR
SEGURO
PARA FIJAR
EL FILTRO
PUNTA DEL TUBO
ESPUMADOR
BOTÓN DE
ENCENDIDO/
APAGADO
COMPARTIMIENTO
PARA COLOCAR
EL FILTRO
CANASTA DEL
FILTRO/SOSTENEDOR
DEL FILTRO
BANDEJA Y REJILLA DE
GOTEO REMOVIBLES
FILTROS
(PARA 1 Ó 2 TAZAS PEQUEÑAS DE CAFÉ)
COLAR ESPUMAR ENCENDIDO LISTO
NOTA: Las tazas que aparecen en
la imagen no están incluidas en
el producto.
CUCHARA MEDIDORA
INTRODUCCION
¡Felicidades! Usted ha seleccionado una Cafetera para Café Expreso y Capuchino
MR. COFFEE®. Este artefacto único ha sido diseñado con la finalidad de ofrecerle un café
expreso o capuchino rápido y convenientemente.
El método para preparar café expreso es un método único en el que el agua caliente pasa a
presión por los granos de café finamente molidos. Es muy popular en Europa, ya que tiene
más cuerpo y sabor que el café americano preparado de forma regular. Debido a su sabor
concentrado, el café expreso es generalmente servido en porciones de 44 a 59 mL (1.5- a
2-oz.) en tazas pequeñas.
La mayoría de los que gustan del café expreso fuera de Europa prefieren el café capuchino,
una bebida preparada con aproximadamente un tercio de café expreso, un tercio de leche
vaporizada o calentada por medio de vapor y un tercio de leche espumosa. La preparación
del café expreso o del capuchino es muy diferente de la preparación de café regular. Este
artefacto funciona bajo presión y requiere atención especial.
Por favor lea cuidadosamente TODAS las instrucciones, advertencias, notas y cuidados en
este Manual de Instrucciones antes de que inicie la operación de este artefacto. El cuidado y
mantenimiento adecuado deben asegurar la larga duración y funcionamiento sin problemas
de la Cafetera para Café Expreso y Capuchino MR. COFFEE®. Conserve estas Instrucciones y
consulte con frecuencia los consejos de cuidado y limpieza.
PRECAUCIONES
Por favor sigua estas importantes medidas de seguridad antes de utilizar su unidad:
1.Antes de remover cualquier parte o accesorio, asegúrese de que la perilla de control
localizada en la parte lateral de su cafetera se encuentra en la posición de
apagado “ ”, presione el botón de encendido/apagado para colocarlo en la
posición “O” y desenchufe la unidad.
2.No remueva la canasta del filtro en ningún momento durante el proceso de
preparación.
3.Tenga cuidado cuando remueva la canasta del filtro. Las partes metálicas pueden
estar muy calientes todavía. También puede haber agua caliente flotando en la parte superior del filtro. Solamente sosténgalo por el mango y elimine los restos del café
colado utilizando el seguro para fijar el filtro.
4.Si el café que está colando no sale por la canasta del filtro, significa que esta pueda
estar bloqueada. Apague la unidad y deje que se enfríe. El bloqueo podría ser causado
por un grano de café demasiado fino. Ver “PROBLEMAS Y CAUSAS” en la página 9.
5.CUANDO LIMPIE EL TUBO ESPUMADOR: Coloque una jarra para espumar o una
taza grande (con capacidad de por lo menos 11 onzas) llene con agua a la mitad de la capacidad y coloque debajo del tubo espumador. Verifique que la punta del tubo
espumador esté sumergida en el agua antes de girar la perilla de control a la posición de Vapor “ ” . Espume el agua durante aproximadamente 15 segundos, luego
pásele un paño limpio al tubo espumador y a la punta.
NOTA: Para que su unidad trabaje de manera correcta constantemente,
limpie el tubo espumador y la punta después cada uso.
16
COMO PREPARAR EN CASA
CAFE EXPRESO Y CAPUCHINO DE CALIDAD
Antes de utilizar su Cafetera para Café Expreso y Capuchino MR. COFFEE® por primera vez,
asegúrese de remover la película plástica que se encuentra localizada en el panel de control
al frente de la unidad.
EL CAFE
El café debe estar tostado y recién molido. Usted puede probar con una variedad tostada
italiana o francesa. El café previamente molido solamente retendrá su sabor durante 7 a 8
días, siempre que éste sea almacenado en un contenedor cerrado, en un lugar frío y oscuro.
No lo almacene en el refrigerador o en el congelador. Se recomienda que muela granos
enteros justo antes de utilizarlos. Los granos de café almacenados en un contenedor cerrado
conservaran su sabor durante 4 semanas.
EL MOLIDO
Este es un paso vital en el proceso de preparación de café expreso y requiere mucha práctica.
El café debe ser molido finamente.
•El molido correcto debe tener la misma consistencia de la sal.
•Si se muele demasiado fino, el agua no fluirá a través del café, aun bajo presión.
El molido tiene la apariencia del polvo y se siente como harina cuando se frota entre
los dedos.
•Si el café se muele demasiado áspero, el agua fluirá a través del café demasiado
rápido, y el sabor no se extraerá completamente.
Asegúrese de usar un molino de calidad para obtener una consistencia uniforme. Los
molinos de café con forma ovalada no se recomiendan ya que el molido que ofrecen no es
consistente.
ANTES DE PREPARAR SU PRIMER CAFE EXPRESO
Por favor refiérase a la Página 3 para ver la Descripción del Artefacto.
1.Gire la perilla de control a la posición “ ”, luego coloque el botón de apagado en “O” y
asegúrese de que el artefacto esté desenchufado del tomacorriente.
2.Primero retire y lave el depósito de agua, la tapa, la canasta del filtro y los filtros en
una mezcla de detergente suave con agua. Enjuague generosamente cada parte y vuélvalas a colocar en la cafetera. Consulte las instrucciones “Cómo preparar Café
Expreso” antes de retirar el filtro y el compartimiento del filtro.
3.Para limpiar el interior de la cafetera, siga los pasos de la Sección “Cómo Preparar
Café Expreso,” utilizando solamente agua. No sumerja el artefacto en agua ni tampoco toque ninguna parte interna de la cafetera.
COMO COLAR CAFE EXPRESO
1.Asegúrese de que la unidad está apagada en “O” y que la perilla de control se
encuentra en la posición de apagado “ ”.
2.Llene el depósito con agua, usted puede utilizar una jarra para llenarlo o si prefiere
puede remover el depósito de la unidad y llenarlo directamente del grifo de agua.
Si usted remueve el depósito para llenarlo con agua, asegúrese de volver a colocarlo
firmemente en su lugar. Llene el depósito asegurándose de que la cantidad de agua
deseada se encuentra entre el rango de “MIN” y “MAX” marcado en el depósito. Nunca utilice agua tibia o caliente para llenar el depósito de agua.
3.Cierre la tapa del depósito del agua.
17
PREPARANDO EL CAFE
1.Coloque el filtro en la canasta del filtro. Seleccione uno de los filtros que vienen con su
unidad dependiendo de la cantidad de tazas que desea preparar (1 ó 2 tazas pequeñas).
2.Llene el filtro seleccionado con café expreso recién molido finamente. Limpie cualquier
exceso de café del borde de la canasta del filtro. Esto asegurará un ajuste correcto del
filtro en el cabezal de preparación de la unidad.
ATENCION: Comprima suavemente el café. No llene demasiado el filtro, ya que esto podría ocasionar obstrucciones o derrames. 3.Coloque la canasta del filtro debajo del cabezal de preparación moviendo primero el
seguro para fijar el filtro hacia atrás, coloque el mango de modo que éste se alinee
con el icono abierto “ ” y se ajuste en la ranura. Después, lentamente gire a la
derecha hasta que la canasta del filtro quede localizada en la posición de cierre
(refiérase al diagrama localizado en el panel frontal de la unidad tal y como está
ilustrado a continuación).
(Este simbolo esta en su unidad)
COLANDO CAFE EXPRESO
ATENCION: Si usted va a preparar cafe capuchino, por favor consulte las siguiente seccion “como preparar cafe capuchino.”
1.Verifique que la rejilla de goteo se encuentre en su lugar. Coloque la bandeja de goteo
en la unidad.
2.Verifique que la perilla de control se encuentre en la posición de apagado “ ”.
3.Coloque la taza de su preferencia (1 ó 2 tazas pequeñas) debajo de la canasta del filtro o si prefiere, coloque una jarra pequeña. Si usted desea preparar hasta 4 tazas
al mismo tiempo, podría utilizar una jarra pequeña o una taza regular y luego colocar el
café en las tazas pequeñas. Si usted está colando las 2 tazas pequeñas a la vez,
puede colocarlas debajo de la canasta del filtro asegurándose de que cada una se
encuentre directamente debajo de las dos ranuras por donde sale el café.
4.Conecte el cable eléctrico en un tomacorriente y encienda la unidad presionando el
botón rojo para colocar el artefacto en la posición “I”. La luz indicadora de encendido
se pondrá rojo sólido mientras que la unidad está encendida y la luz indicadora de listo
(verde) comenzará a titilar.
5.Una vez que la luz que indica que el café está listo cambie a verde sólido, presione el
botón de colar “ ” y luego gire el botón lateral a la izquierda para la posición de
colado “ ”. Esto iniciará el proceso de colado y su café expreso comenzará a fluir en
solo segundos.
6.Cuando la taza/jarra esté llena al nivel deseado, gire la perilla de control a la derecha
para colocar en posición de apagado “ ”.
PRECAUCION: No deje la unidad desatendida mientras este Colando, ya que este proceso requiere ser detenido de manera manual. De esta forma evitara que el café se desborde o derrame, asi
como peligros y daños Potenciales a la unidad. Su cafetera
debe ser apagadada manualmente.
Nota: Una vez concluído el ciclo de colar (o espumar), el vapor saldrá por
debajo de la bandeja de goteo para eliminar agua restante del calentandor.
18
7.Una vez que haya preparado la cantidad de café expreso o capuchino deseado, colo que el interruptor en la posición de apagado “O” y desenchufe la unidad. Permita que
la unidad se enfríe antes de remover cualquier parte o accesorio y antes de limpiarla.
8.Luego de que la cafetera se haya enfriado, retire la canasta del filtro del cabezal de
preparación. Utilizando el seguro para fijar el filtro en el soporte, gire la canasta del
filtro hacia abajo para vaciarla. Enjuague el filtro y la canasta del filtro con agua.
9.Si desea colar café expreso adicional, repita el proceso. Gire el botón lateral a la
posición de apagado “ ”, remueva las tazas pequeñas o la jarra de debajo de la
canasta del filtro y coloque unas nuevas y vacía. Cuidadosamente retire la canasta del
filtro sosteniéndola con una mano, asegúrese de usar el seguro para fijar el filtro para
sostener el filtro y desechar los residuos de café. Coloque café nuevo y fresco en el
filtro y ponga la canasta del filtro de nuevo en su lugar, siga las instrucciones de cómo
colar café de nuevo (puntos 3, 5 y 6 de esta sección).
PRECAUCION: Las partes metálicas de la canasta del filtro pueden estar muy calientes. Asegúrese de usar el seguro para fijar el filtro cuando deseche los
residuos de café. Enfríe estas partes enjuagándolas bajo el grifo
con agua fría.
10. Para las instrucciones de limpieza, consulte la Página 8.
COMO PREPARAR CAFE CAPUCHINO
El café capuchino es café expreso con leche evaporada y espuma de leche en la parte
superior. El espumar la leche para el café capuchino requiere práctica. No se desanime si no
lo hace perfectamente la primera vez. La leche debe ser, la mitad evaporada (la parte inferior
de la jarra) y la mitad espumosa (la parte superior de la jarra). Puede tomarse varios intentos
antes de que perfeccione este proceso.
Para mejores resultados, recomendamos espumar la leche en una jarra diferente y verter la
leche en su taza de café. La leche y la jarra deben estar frías. No use una jarra que ha sido
lavada recientemente con agua tibia. También recomendamos una jarra de acero inoxidable
para espumar la leche y un termómetro para bebidas si usted tiene uno, para así preparar la
mejor leche evaporada y espumosa.
1.El primer paso en la preparación de capuchino es preparar café expreso. Llene el
depósito de agua con agua fría. Nunca use agua tibia o caliente para llenar el depósito
de agua.
2.Siga los pasos del 1 al 6 de la Sección “Preparación de Café Expreso”.
3.Llene una jarra pequeña de acero inoxidable o de cerámica a la mitad con leche fría y
colóquela junto a la máquina. La leche descremada o del 2% es más fácil de espumar.
4.Usted está ahora listo para espumar y evaporar la leche. Presione el botón rojo a la
posición “I”, espere hasta que la luz indicadora de listo “ ” se ponga verde sólido.
Sostenga la jarra debajo del tubo espumador de manera que la punta del tubo
espumador esté levemente sumergida en la leche, presione el botón de
espumar “ ” . La luz indicadora de listo “ ” comenzará a titilar y una vez que se
ponga verde sólido de nuevo gire la perilla de control a la derecha hasta alcanzar la
posición de vapor “ ”. Mueva suavemente la jarra en un movimiento circular
alrededor del inyector de vapor por alrededor de 45 segundos. RECUERDE: Tanto la
leche como la jarra deben de estar bien frías antes del proceso de espumar.
19
5.Cuando la leche se haya duplicado en volumen, o si está utilizando un termómetro
especial para bebidas, cuando la leche alcance una temperatura de 38°C (100°F),
inserte el tubo espumador lo más que pueda en la leche para calentarla bien. No
caliente la leche por encima de los 65°C (150°F). Para evitar que la leche caliente
salpique, no permita que la punta del tubo espumador salga de la leche. Una vez
preparada la espuma, gire la perilla de control a la posición de apagado “ “. Luego
las luces de vapor “ “ y de colar “ ” comenzarán a titilar durante este proceso. La
bomba funcionará intermitentemente hasta que estas luces se apaguen.
6.Usted ahora está listo para preparar un café capuchino. RECUERDE: es 1/3 de café
expreso, 1/3 de leche evaporada y 1/3 de leche espumada. Coloque el café expreso
en una taza con una capacidad de por lo menos 150 ml (5 onzas). Luego añada la
leche evaporada y una cucharada de la leche que espumó al café expreso.
7.Siga las instrucciones de la Página 4 bajo la sección señalada como “PRECAUCION”
para eliminar cualquier residuo de leche que haya quedado en el tubo espumador.
Es importante limpiar apropiadamente tanto el tubo espumador de su cafetera expresa
como la punta después de cada uso para asegurarse de que continuará trabajando
correctamente. (Ver el Paso 2 a continuación)
8.Desenchufe el cable del tomacorriente y espere que la unidad se enfríe.
LIMPIANDO SU CAFETERA PARA CAFÉ
EXPRESO Y CAPUCHINO
1.Gire la perilla de control lateral a la posición de “ ”, coloque el botón rojo en la
posición de apagado “O” y desenchufe la unidad.
2.Puede que el tubo espumador se encuentre caliente todavía. No lo toque con sus
manos hasta que se haya enfriado por completo. Remueva y lave el tubo espumador
y la punta con un paño húmedo. Utilizando la llave que se encuentra del otro lado de
la cuchara para medir de su cafetera, desatornille la extremidad del tubo para espumar
y limpie la válvula con una aguja o palillo de dientes.
3.El depósito de agua, los filtros, el compartimiento del filtro, la bandeja y rejilla de goteo
pueden ser lavadas con agua y jabón o las puede colocar en la parte superior de su
lavaplatos automático (a excepción del compartimiento del filtro). PRECAUCION: No
sumerja la unidad en agua.
4.Deseche el agua restante retirando el depósito de agua de su cafetera y colocándolo
boca abajo sobre el fregadero. Se recomienda vaciar el depósito de agua entre un uso
y otro. No sumerja la unidad en agua.
5.Limpie la superficie de su cafetera con un paño húmedo y suave. No utilice limpiadores
abrasivos o esponjas de fregar, ya que éstos podrían rallar la unidad.
6.No guarde el compartimiento para colocar el filtro en el cabezal de preparación de
su cafetera. Esto podría afectar adversamente el sellador entre el cabezal y el
compartimiento para colocar el filtro mientras está colando el café expreso.
DESCALCIFICANDO
Los depósitos minerales que se forman en su cafetera afectan el buen funcionamiento de la
misma. Usted debe descalcificar su Cafetera para Café Expreso y Capuchino MR. COFFEE®
cuando comience a notar un incremento en el tiempo que le toma a la unidad el preparar el
café, o cuando genere un exceso de vapor. También, usted puede notar una acumulación de
depósitos blancos en la superficie del cabezal de preparación del café.
La frecuencia de la limpieza depende de la dureza del agua utilizada. La siguiente tabla le
brinda intervalos de limpieza sugeridos.
20
INTERVALOS DE LIMPIEZA SUGERIDOS
Tipo de agua Frecuencia de limpieza
Agua suave (Agua filtrada)
Cada 80 ciclos de preparación
Agua dura (Agua de grifo) Cada 40 ciclos de preparación
SU CAFETERA PARA CAFE EXPRESO Y
CAPUCHINO PUEDE DESCALCIFICARSE
UTILIZANDO VINAGRE BLANCO DE USO
CASERO, DE LA SIGUIENTE FORMA:
PARA DESCALCIFICAR EL DEPOSITO DE AGUA:
1.Verifique que la perilla de control se encuentre en la posición de apagado “ ” , el
interruptor rojo esté en la posición “O” y el cable eléctrico esté desconectado
del tomacorriente.
2.Llene el depósito de agua con vinagre blanco de uso casero sin diluir y fresco.
3.Permita que la solución de vinagre repose en el depósito de agua del artefacto durante
toda la noche.
4.Deseche el vinagre removiendo el depósito de agua y volteándolo boca abajo en
el fregadero.
5.Enjuague el depósito de agua generosamente, usando agua de grifo y llenando el
depósito a la mitad. Después vierta el agua sobre el fregadero, repita este proceso
dos veces.
PARA DESCALCIFICAR LAS PARTES INTERNAS
1.Verifique que usted ha descalcificado el interior del depósito de agua primero,
siguiendo los pasos de la sección anterior “Descalcificando”.
2.Verifique que todos los controles estén apagados y que el cable eléctrico esté
desconectado del tomacorriente. (Consulte la Sección “PRECAUCIONES ” en la
Página 4). Llene el depósito de agua con vinagre hasta que alcance el nivel mínimo
indicado en el deposito.
3.Inserte la canasta del filtro (junto con el filtro) y coloque la jarra o una taza regular
encima de la bandeja de goteo y debajo de la canasta del filtro.
4.Conecte el cable eléctrico en el tomacorriente.
5.Presione el botón rojo para colocar la unidad a “I”, una vez que la luz indicadora de
listo “ ” cambie a verde sólido, presione el botón de colado “ ”, gire la perilla de
control lateral a la izquierda a la posición de colar “ ”. El vinagre comenzará a fluir a
través de la unidad. Una vez haya terminado, gire la perilla de control lateral a la
derecha para colocarla en posición de apagado “ ”.
6.Para limpiar el tubo espumador internamente, coloque una taza con agua fría debajo
de la punta del tubo espumador. Espere hasta que la luz indicadora de listo “ ”
cambie a verde. Inserte el tubo espumador en el agua, presione el botón de
espumar “ ”. La luz indicadora de listo “ ” comenzará a titilar y una vez que cambie
a verde sólido de nuevo gire la perilla de control lateral a la derecha para colocarla
en posición de espumar “ ”. Deje que el vapor salga por 10 segundos. Esto limpiara
cualquier residuo de leche que haya quedado en el tubo espumador.
7.Gire la perilla de control lateral a la derecha para colocarla en posición de
apagado “ ” y presione el botón rojo a la posición de apagado “O”.
8.Repita los pasos del 1 al 7 tanto como sea necesario utilizando sólo agua de grifo para
enjuagar cualquier residuo de vinagre que haya quedado en la cafetera.
21
Problemas y Causas
PROBLEMA
El café no sale
CAUSA
• No hay agua en el depósito.
• El café está molido demasiado fino.
• Hay demasiado café en el filtro.
• El artefacto no fue encendido
o conectado.
• El café se ha comprimido
demasiado.
El café sale
alrededor del
borde del
soporte para
filtro
No se genera
vapor
• La canasta para el filtro no ha girado • Gire el soporte del filtro completamente a “cerrado”.
completamente a su posición para asegurar.
• Hay granos de café alrededor del
• Limpie el borde.
borde de la canasta del filtro.
• Hay demasiado café en el filtro.
• Llene con menos café.
• El deposito de agua está vacío.
• Llene el depósito de agua con la cantidad correcta de agua.
Consulte las Página 29 y 30
• Encienda la unidad y siga las
intrucciones de uso.
• Después de la etapa para espumar, opere la función para espumar durante 1 ó 2 segundos y extraer el exceso de leche. O bien, apague la
unidad, permita que se enfríe,
desconecte de la toma de corriente y limpie el tubo para espumar con una aguja o palillo de dientes.
• El artefacto no está encendido.
• El tubo para espumar está
bloqueado.
La leche
no queda
espumosa
El café sale
demasiado
rápido
SOLUCCIONES
• Añada agua.
• Muela los granos de café
a un termino medio.
• Llene el filtro con menos café
• Conecte la unidad en la toma
de corriente. Enciendalo.
• Rellene el compartimiento para filtro con café. NO
COMPRIMA.
• Se terminó el vapor.
• Verifique que hay agua en el
depósito de agua.
• La leche no está lo suficientemente
fría.
• Enfríe la leche y la jarra para
espumar antes de la
preparación de café
capuchino.
• El café está molido demasiado
áspero.
• No hay suficiente café en la canasta
del filtro.
• Use un café molido más fino.
• Use más café.
22
¡IDEAS DE RECETAS
QUE LE ENCANTARÁ PROBAR!
CAFÉ CON CHOCOLATE
30 ml (1 onza) de jarabe de chocolate,
una parte de expreso, 237 ml (1 taza) de
espuma de leche
CAFÉ AMERICANO
1/2 expreso y 1/2 agua caliente
CAFÉ MACCHIATO
1/3 de expreso y 2/3 de leche
vaporizada
CAFÉ LATTE
1/4 expreso y 3/4 leche
vaporizada,vierta ambos en una taza al
mismo tiempo
CAFÉ AU LAIT
1/2 expreso, 1/2 leche vaporizada
CHOCOLATE CALIENTE
Añada 60 ml (2 onzas) de expreso a
una taza de chocolate caliente
(PARA ADULTOS MAYORES DE 21 AÑOS)
CAPUCHINO SAN FRANCISCO
Expreso, chocolate caliente
vaporizado, Brandy, crema y canela
en la parte superior
CAFÉ TÍA MARÍA
Expreso, licor Tía María, espuma
de leche en la parte superior
CAFÉ IRLANDÉS
Expreso, whisky irlandés, crema batida
en la parte superior
CAFÉ GRAND MARNIER
Expreso, licor Grand Marnier, crema
batida y ralladura de naranja en la
parte superior
CAFÉ TUACA
Espresso, licor de Tuaca, crema batida
en la parte superior
CAFÉ MEXICANO
Expreso, Kahlua, Tequila, crema batida
en la parte superior
CAFÉ VIENA
Expreso, Brandy, crema batida
en la parte superior
CAFÉ ROMANO
Expreso, Brandy y unas gotitas
de limón
23
GARANTÍA LIMITADA DE
1 AÑO
Sunbeam Products, Inc., operando bajo el nombre de Jarden Consumer Solutions, o si en Canadá, Sunbeam Corporation
(Canada) Limited, operando bajo el nombre de Jarden Consumer Solutions (colectivamente “JCS”), garantiza por un periodo
de un año desde la fecha de compra, que este producto no tendrá defectos de material ni mano de obra JCS, a su elección,
reparará o reemplazará este producto o cualquier componente del mismo que tenga defectos durante el período de garantía.
El reemplazo se realizará por un producto o componente nuevo o reparado. Si el producto ya no estuviera disponible, se lo
reemplazará por un producto similar de valor igual o superior. Ésta es su garantía exclusiva de Sunbeam.
La garantía es válida para el comprador minorista original a partir de la fecha de la compra inicial y no
es transferible. Conserve el recibo de compra original. Para solicitar servicio en garantía se requiere presentar un recibo de
compra. Los agentes y centros de servicio de JCS o las tiendas minoristas que venden productos JCS no tienen derecho a
alterar, modificar ni cambiar de ningún otro modo los términos y las condiciones de esta garantía.
Esta garantía no cubre el desgaste normal de las piezas ni los daños que se produzcan como resultado de: uso negligente
o mal uso del producto, uso de tensión o corriente inapropiada, uso contrario a las instrucciones operativas, desarmado,
reparación o alteración por un tercero que no sea JCS o un Centro de Servicio JCS autorizado. Asimismo, la garantía no cubre:
actos de fuerza mayor tales como incendios, inundaciones, huracanes y tornados.
¿Cuál es el límite de responsabilidad de JCS?
JCS no será responsable de daños incidentales o emergentes causados por el incumplimiento de alguna garantía o condición
expresa, implícita o legal.
Excepto en la medida en que lo prohíba la ley aplicable, cualquier garantía o condición implícita de comerciabilidad o aptitud
para un fin determinado se limita, en cuanto a su duración, a la duración de la garantía antes mencionada.
JCS queda exenta de toda otra garantía, condición o manifestación, expresa, implícita, legal o de cualquier otra naturaleza.
JCS no será responsable de ningún tipo de daño emergente de la compra, uso o mal uso del producto, o imposibilidad de
usar el producto, incluidos los daños incidentales, especiales, emergentes o similares, o la pérdida de ganancias, ni de los
daños emergentes de un hecho ilícito civil, incluidos negligencia, culpa grave o culpa por parte de JCS, sus representantes
o empleados, ni de ningún incumplimiento contractual, sea de una obligación esencial o de otra naturaleza, ni de ningún
reclamo iniciado contra el comprador por un tercero.
Algunas provincias, estados o jurisdicciones no permiten la exclusión o limitación de los daños incidentales o emergentes ni
las limitaciones a la duración de las garantías implícitas, de modo que es posible que la exclusión o las limitaciones antes
mencionadas no se apliquen en su caso.
Esta garantía le otorga derechos legales específicos y es posible que tenga otros derechos que varíen de un estado, provincia o
jurisdicción a otro.
CÓMO OBTENER SERVICIO DE GARANTÍA
En los Estados Unidos
Si tiene alguna pregunta sobre esta garantía o desea obtener el servicio de garantía, llame al 1-800-672-6333 para que se
informe sobre cual es el centro de servicio que le resulta más conveniente.
En Canadá
Si tiene alguna pregunta sobre esta garantía o desea obtener el servicio de garantía, llame al 1-800-667-8623 para que se
informe sobre cual es el centro de servicio que le resulta más conveniente.
En los Estados Unidos, esta garantía es ofrecida por Sunbeam Products, Inc. operando bajo el nombre de Jarden Consumer
Solutions, ubicada en Boca Ratón, Florida 33431. En Canadá, esta garantía es ofrecida por Sunbeam Corporation (Canada)
Limited operando bajo el nombre de Jarden Consumer Solutions, ubicada en 20B Hereford Street, Brampton, Ontario L6Y 0M1.
Si usted tiene cualquier otro problema o reclamo en referencia a este producto, por favor escriba al Departamento de
Servicio al Cliente.
NO DEVUELVA ESTE PRODUCTO AL LUGAR DE LA COMPRA
24
©2007 Sunbeam Products, Inc. d/b/a Jarden Consumer Solutions. All rights reserved. Distributed by
Sunbeam Products, Inc. d/b/a Jarden Consumer Solutions, Boca Raton, Florida, 33431. The product you buy may
differ slightly from the one shown on this carton due to continuing product development.
One year limited warranty – please see inside for details.
©2007 Sunbeam Products, Inc. operando bajo el nombre de Jarden Consumer Solutions. Todos los derechos reservados.
Distribuido por Sunbeam Products Inc. operando bajo el nombre de Jarden Consumer Solutions, Boca Raton, FL 33431.
El producto que usted compró puede variar ligeramente del que se muestra en el empaque debido a
continuo desarrollo del producto.
Garantía limitada de un año – por favor consulte los detalles en el interior.
Printed in China / Impreso en China
P.N. 120671
CBA -062607