1
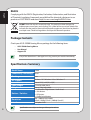
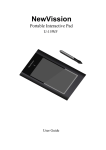
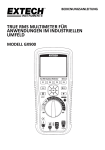
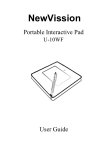
ASUS GX900 Gaming Mouse
User Manual
15G06S002000
English
E5887
First Edition (V1)
July 2010
Copyright © 2010 ASUSTeK Computer Inc. All Rights Reserved.
No part of this manual, including the products and software described in it, may be reproduced,
transmitted, transcribed, stored in a retrieval system, or translated into any language in any form
or by any means, except documentation kept by the purchaser for backup purposes, without the
express written permission of ASUSTeK Computer Inc. (“ASUS”).
Product warranty or service will not be extended if: (1) the product is repaired, modified or altered,
unless such repair, modification of alteration is authorized in writing by ASUS; or (2) the serial
number of the product is defaced or missing.
ASUS PROVIDES THIS MANUAL “AS IS” WITHOUT WARRANTY OF ANY KIND, EITHER EXPRESS
OR IMPLIED, INCLUDING BUT NOT LIMITED TO THE IMPLIED WARRANTIES OR CONDITIONS OF
MERCHANTABILITY OR FITNESS FOR A PARTICULAR PURPOSE. IN NO EVENT SHALL ASUS, ITS
DIRECTORS, OFFICERS, EMPLOYEES OR AGENTS BE LIABLE FOR ANY INDIRECT, SPECIAL, INCIDENTAL,
OR CONSEQUENTIAL DAMAGES (INCLUDING DAMAGES FOR LOSS OF PROFITS, LOSS OF BUSINESS,
LOSS OF USE OR DATA, INTERRUPTION OF BUSINESS AND THE LIKE), EVEN IF ASUS HAS BEEN
ADVISED OF THE POSSIBILITY OF SUCH DAMAGES ARISING FROM ANY DEFECT OR ERROR IN THIS
MANUAL OR PRODUCT.
SPECIFICATIONS AND INFORMATION CONTAINED IN THIS MANUAL ARE FURNISHED FOR
INFORMATIONAL USE ONLY, AND ARE SUBJECT TO CHANGE AT ANY TIME WITHOUT NOTICE, AND
SHOULD NOT BE CONSTRUED AS A COMMITMENT BY ASUS. ASUS ASSUMES NO RESPONSIBILITY OR
LIABILITY FOR ANY ERRORS OR INACCURACIES THAT MAY APPEAR IN THIS MANUAL, INCLUDING THE
PRODUCTS AND SOFTWARE DESCRIBED IN IT.
Products and corporate names appearing in this manual may or may not be registered trademarks or
copyrights of their respective companies, and are used only for identification or explanation and to
the owners’ benefit, without intent to infringe.
English
Contact Information
ASUSTeK COMPUTER INC.
Address
Telephone Fax E-mail
Web site
15 Li-Te Road, Peitou, Taipei, Taiwan 11259
+886-2-2894-3447
+886-2-2890-7798
[email protected]
www.asus.com.tw
Technical Support
Telephone Online support
+86-21-38429911
support.asus.com
ASUS COMPUTER INTERNATIONAL (America)
Address
Telephone Fax
Web site
800 Corporate Way, Fremont, CA 94539, USA
+1-510-739-3777
+1-510-608-4555
usa.asus.com
Technical Support
Telephone Support fax
Online support
+1-812-282-2787
+1-812-284-0883
support.asus.com
ASUS COMPUTER GmbH (Germany and Austria)
Address
Fax
Web site
Online contact
Harkort Str. 21-23, D-40880 Ratingen, Germany
+49-2102-959911
www.asus.de
www.asus.de/sales
Technical Support
Telephone (Component)
Telephone (System/Notebook/Eee/LCD)
Support Fax
Online support
+49-1805-010923*
+49-1805-010920*
+49-2102-9599-11
support.asus.com
* EUR 0.14/minute from a German fixed landline; EUR 0.42/minute from a mobile phone.
English
Contents
Notices..............................................................................................5
Package Contents............................................................................6
Specifications Summary.................................................................6
Knowing your ASUS GX900 Gaming Mouse..................................7
Connecting your ASUS GX900 Gaming Mouse.............................8
Launching the Program..................................................................8
Setting your ASUS GX900 Gaming Mouse.....................................8
English
Notices
Federal Communications Commission Statement
This device complies with Part 15 of the FCC Rules. Operation is subject to the following two
conditions:
•
This device may not cause harmful interference, and
•
This device must accept any interference received including interference that may cause
undesired operation.
This equipment has been tested and found to comply with the limits for a Class B digital device,
pursuant to Part 15 of the FCC Rules. These limits are designed to provide reasonable protection
against harmful interference in a residential installation. This equipment generates, uses and can
radiate radio frequency energy and, if not installed and used in accordance with manufacturer’s
instructions, may cause harmful interference to radio communications. However, there is no
guarantee that interference will not occur in a particular installation. If this equipment does cause
harmful interference to radio or television reception, which can be determined by turning the
equipment off and on, the user is encouraged to try to correct the interference by one or more of the
following measures:
•
Reorient or relocate the receiving antenna.
•
Increase the separation between the equipment and receiver.
•
Connect the equipment to an outlet on a circuit different from that to which the
receiver is connected.
•
Consult the dealer or an experienced radio/TV technician for help.
CAUTION: Any changes or modifications not expressly approved by the grantee of this device could
void the user’s authority to operate the equipment.
Safety Certifications
•
•
•
•
CE Marking
China RoHS EFUP Labeling - 10 Years
C-Tick Mark
BSMI Certification
Complies with 21 CFR 1040.10 and 1040.11 except for deviations pursuant to Laser
Notice No. 50, dated June 24, 2007.
REACH
English
Complying with the REACH (Registration, Evaluation, Authorisation, and Restriction
of Chemicals) regulatory framework, we published the chemical substances in our
products at ASUS REACH website at http://csr.asus.com/english/REACH.htm.
DO NOT throw the mouse in municipal waste. This product has been designed to
enable proper reuse of parts and recycling. This symbol of the crossed out wheeled bin
indicates that the product (electrical and electronic equipment) should not be placed in
municipal waste. Check local regulations for disposal of electronic products.
Package Contents
Check your ASUS GX900 Gaming Mouse package for the following items:
•
ASUS GX900 Gaming Mouse
•
User Manual
•
Support CD
If any of the above items is damaged or missing, contact your retailer immediately.
Specifications Summary
Model Name
GX900
Connectivity Technology Wired
Tracking
Laser
OS Support
Dimensions (mm)
Cable Length
Weight
Windows® XP / Windows® Vista / Windows® 7
Buttons / Switches
Resolution
Interface
Mouse: 122(L) x 82(W) x 43(H)
1.8m with cable sleeve
Mouse: 150g (adjustable)
1 x Left button / Right button / Scroll wheel
2 x Side buttons
1 x DPI button
1 x Profile Switch button
100 ~ 4000 dpi (adjustable)
Default: 1200dpi (Level 1), 4000dpi (Level 2)
Gold plated USB
Specifications are subject to change without prior notice.
Your ASUS GX900 Gaming Mouse comes with a left button, a right button, a scroll
wheel, two side buttons, a DPI button, and a specially designed Profile Switch button.
English
Knowing your ASUS GX900 Gaming Mouse
2
3
1
4
5
10
9
10
8
6
7
11
10
12
10
10
*Profile switch LED indications
1
Left button
2
Right button
LED colors
Indications
3
Scroll wheel
Do not light up.
Normal Profile
4
5
6
7
8
9
10
11
12
Push/Pull DPI switch
Green
Profile 1
Red
Profile 2
Orange
Profile 3
Profile switch button / Profile indicator*
LED DPI indicator**
GX900 logo
IE Forward button
IE Backward button
Mouse feet
Mouse feet and Twin-Eye Laser sensor
Weight base (5 x 4.5g blocks)***
**DPI switch LED indications
Number of lit LEDs
Indications
2
DPI Level 1
4
DPI Level 2
***You can adjust the mouse weight through adding or removing some of the weight blocks.
English
Connecting your ASUS GX900 Gaming Mouse
Connect your ASUS GX900 Gaming
Mouse to your computer’s USB port.
Launching the Program
The bundled support CD includes a specially designed program which allows you to
set up your GX900 to avail all its features. Place the support CD into the optical drive
and follow the onscreen instructions to launch the program.
If Autorun is NOT enabled in your computer, browse the contents of the support CD to
locate the GX900.exe file. Double-click the GX900.exe file to launch the program.
Setting your ASUS GX900 Gaming Mouse
Locate the GX900.exe file, and double-click it to launch the program.
If the screen below appears, plug your ASUS GX900 Gaming Mouse into your
computer’s USB port. The program will automatically detect the mouse and continue
to the main menu.
1
1
1
1
English
Main menu
3
2
4
4
5
6
7
8
9
10
11
Items
Descriptions
1.
Click the each tap to display the selected profile menu.
2.
Displays the profile icon which is configurable in Profile 1~3 menus.
3.
Click to reset the DPI configuration to the last settings you have saved.
4.
Drag the slider to adjust the DPI value for each level.*
5.
Click to reset the button settings to the last settings you have saved.
6.
Click to display the indications of different Profile indicator colors.
7.
Click to load a profile you have saved to your mouse.
8.
Click to save the current profile settings to your hard disk drive.
9.
Click to reset all the mouse settings to the factory defaults.
10.
Click to save the settings you have made.
11.
Click to save the settings you have made and exit the program.
* Each profile provides two DPI levels. Two DPI switch LEDs light up indicating that you are using Level 1, and four light up indicating that you are using Level 2. See page 7 for details.
Profile 1 menu
English
1
2
4
4
3
4
4
4
4
Items Descriptions
10
1.
Click to open the Edit menu which allows you to change the profile name and profile icon.
2.
Enter the profile name you want to use.
3.
Click to locate the image file you want to use as the profile icon.
4.
Select a function for each button / action from the drop down list.
* Refer to the table below for more details.
Items
Descriptions
L-Button
Makes the button behave like the left mouse button.
R-Button
Makes the button behave like the right mouse button.
M-Button
Makes the button behave like the middle mouse button.
IE Backward
Makes the button behave like the IE Backward button. When selected,
press the button to go to the previous page you viewed.
IE Forward
Makes the button behave like the IE Forward button. When selected, press
the button to go to the next page you viewed.
continued on the next page
Descriptions
Macro
When selected, press the button to run a command or series of commands
which you can edit though the Edit Macro menu. See page 12 for more
details.
Script #1~6
When selected, press the button to run a script which you can edit through
the Edit Script menu. See page 13 for more details.
DPI[+]
When selected, press the button to increase the DPI value.
DPI[-]
When selected, press the button to decrease the DPI value.
DPI Level 1/2
When selected, press the button to use the DPI Level 1/2.
Profile Switch
Makes the button behave like the profile switch button.
Normal Profile
When selected, press the button to use the normal profile.
When selected, press the button to perform a keystroke or keystroke
sequence.
English
Items
Keyboard
User Profile 1/2/3 When selected, press the button to use the customized profile 1/2/3 .
Wheel [left] /
[right]
When selected, press the button to scroll leftward / rightward as a tilt
wheel does.
NOTE: This function only work in the Microsoft® Office applications under
the Windows® 7 / Vista operating systems.
Rapid Fire [mouse] When selected, press the button to do a rapid fire in a click-to-attack game,
which is the same as you triple click the left mouse button.
Rapid Fire [key]
When selected, press the button to do a rapid fire in a game using the
Spacebar to attack, which is the same as you press the Spacebar thrice.
Web Browser
When selected, press the button to launch your default web browser.
E-mail
When selected, press the button to launch your default email application.
Media Player
When selected, press the button to launch your default media player.
Play/Pause
Stop
Next Track
When selected, these buttons become playback control buttons in an
active media player.
Prev Track
Volume UP / Down When selected, press the button to increase / decrease the system volume.
Mute
When selected, press the button to turn the volume’s mute mode on/off.
Calculator
When selected, press the button to launch the Calculator application.
My Computer
When selected, press the button to open My Computer window.
Disabled
Select this item to deactivate the button.
11
Edit Macro menu
English
12
Items
Edit Macro
Timing
Descriptions
Insert
When checked, the new instruction will be inserted before the selected
instruction. Otherwise, any new instruction will be given the first priority.
Start
Stop
Clear
Move up/down
Instruction cycle
time
Loop
Fire
Keeping fire
Click to start recording the keystrokes and/or mouse actions.
Export
Import
Click to save the current macro to your hard disk drive.
Click to open the Edit Macro menu.
Check this item to record the time between pressing down and releasing a
button. (Default: 12ms)
Click to stop recording the keystrokes and/or mouse actions.
Click to clear all the saved instructions.
Click to move up/down the selected instruction.
When Timing is unchecked, all the actions’ delay time will be the value you
chose from the drop down list.
Sets the macro to run at a click and stop when you click again.
Sets the macro to run once at one click.
Sets the macro to run when you hold down the button and stop when you
release the button.
Click to load a macro from your hard disk drive.
English
Edit Script menu
Items
Edit Script
Timing
Descriptions
Insert
When checked, the new instruction will be inserted before the selected
instruction. Otherwise, any new instruction will be given the first priority.
Start
Stop
Clear
Move up/down
Instruction cycle
time
Loop
Fire
Keeping fire
Click to start recording the keyboard and/or mouse actions.
Export
Import
Click to save the current script to your hard disk drive.
Click to open the Edit Script menu.
Check this item to record the time between pressing down and releasing a
button. (Default: 12ms)
Click to stop recording the keyboard and/or mouse actions.
Click to clear all the saved instructions.
Click to move up/down the selected instruction.
When Timing is unchecked, all the actions’ delay time will be the value you
chose from the drop down list.
Sets the script to run at a click and stop when you click again.
Sets the script to run once at one click.
Sets the script to run when you hold down the button and stop when you
release the button.
Click to load a script from your hard disk drive.
13