1
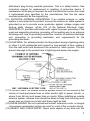
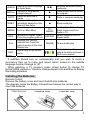
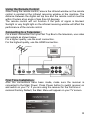
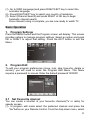
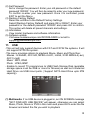
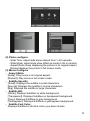
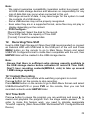
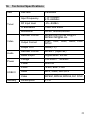
USER’S MANUAL
Premier AV TV-1158HD Freeview Receiver/PVR via USB
(HDMI to 1080P & H.264 HD)
TV-1158HD
Index
Important Safety Instructions ………………………………………………. 3
Main Features ……………………………………………………………….. 6
Front and Rear Panel ………………………………………………………. 7
Remote Control ……………………………………………………………... 8
Installing the Batteries …………………………………………………….... 9
Using the Remote Control ……………………………….………….………10
Connecting to a Television ………………………………………..………. 10
First Time Installation ………………………………………………..…….. 10
Basic Operation ……………………………………………………..……… 11
1. Program Settings …………………………………..………………….. 11
2. Program Edit …………………………………………………..………. 11
2.1 Set Favourite Program ……………………………………..…..… 11
2.2 View Favourite Program ………………………………………..… 12
2.3 Delete a TV or Radio Program …………………………………... 12
2.4 Skip TV or Radio Program ……………………………………….. 12
2.5 Move a TV or Radio Program ………………………………..….. 12
2.6 Lock Program ……………………………………………………… 12
3. EPG (Electronic program guide) ………………………………….…. 13
4. Sort …………………………………………………………………..…. 13
5. LCN (Logical channel number) ………………………………………. 13
6. Video Setting ……………………………………………………..……. 13
7. Channel Search ………………………………………………….……. 14
7.1 Auto Search …………………………………………………..……. 15
7.2 Manual Search ………………………………………………….…. 15
8. Time Setting ……………………………………………………………… 16
9. Option ………………………………………………………………..…… 16
10. System Setting ………………………………………………….……… 17
11. USB ……………………………………………………………………… 18
12. Recording/Time Shift ………………………………………………….. 20
12.1 Real-time Recording ……………………………………………… 20
12.2 Time-Shift …………………………………………………………. 20
12.3 EPG Recording …………………………………………………… 21
12.4 Timer Recording ……………………. …………………………… 21
12.5 Editing Recording contents ……………………………………… 21
13.Troubleshooting ………………………………………………………… 21
14.Technical Specifications ……………………………………………….. 23
2
Important Safety Instructions
To ensure reliable and safe operation of this equipment, please read carefully
all the instructions in this user guide, especially the safety information below.
CAUTION: TO REDUCE THE RISK OF ELECTRIC SHOCK, DO NOT
REMOVE COVER (OR BACK). NO USER-SERVICEABLE PARTS INSIDE.
REFER SERVICING TO QUALIFIED SERVICE PERSONNEL.
The lightening flash with arrowhead symbol, within an
equilateral triangle is intended to alert the user to the presence
of un-insulated “dangerous voltage” within the products
enclosure that may be of sufficient magnitude to constitute a
risk of electric shock to persons.
The exclamation mark within an equilateral triangle is intended to alert the user
to the presence of important operating and maintenance (servicing)
instructions in the literature accompanying the appliance.
WARNING: TO REDUCE THE RISK OF FIRE OR ELECTRIC
SHOCK, DO NOT EXPOSE THIS APPLIANCE TO RAIN OR
MOISTURE.
CAUTION: Use of controls or adjustments or performance of
procedures other than those specified herein may result in
hazardous radiation exposure.
Please, carefully study this manual and always keep it available. There are,
however, some installation and operation precautions which you should be
aware of:
(1) READ INSTRUCTIONS: All the safety and operating instructions should be
read before the product is operated.
(2) RETAIN INSTRUCTIONS: The safety and operating instructions
should be retained for future reference.
(3) HEED WARNINGS: All warnings on the product and in the operating
instructions should be adhered to.
(4) FOLLOW INSTRUCTIONS: All operating instructions should be
followed.
(5) CLEANING: Unplug this product from the wall outlet before cleaning.
Do not use liquid cleaners or aerosol cleaners. Use a damp cloth for
cleaning.
(6) ATTACHMENTS: Do not use attachments not recommended by the
3
product manufacturer as they may cause hazards.
(7) WATER AND MOISTURE: Do not use this product near water – for example,
near a bath tub, wash bowl, kitchen sink, or laundry tub - in a
wet basement or near a swimming pool etc.
(8) ACCESSORIES: Do not place this product on an unstable cart, stand,
tripod, bracket or table. The product may fall, causing
serious injury to a child or adult and serious damage to
the product. Use only with a cart, stand, tripod, bracket or
table recommended by the manufacturer or sold with the
product. Any mounting of the product should follow the
manufacturer’s instructions and
should use a mounting accessory recommended by the
manufacturer.
Excessive force and uneven surfaces may cause the product to overturn.
(9) VENTILATION: Slots and openings in the cabinet are provided for
ventilation and to ensure reliable operation of the product and to protect it
from overheating, These openings must not be blocked or covered. This
product should not be placed in a built-in installation such as a bookcase or
rack unless proper ventilation is provided or the manufacturer’s instructions
have been adhered to.
(10) HEAT SOURCES : Do not install the receiver into any heat sources such
as radiators, heat registers, stoves and other apparatus that produce heat.
(11) POWER SOURCES: Use only the polarised or grounding plug supplied
with the received. If the plug provided does not fit your outlet, please consult
an electrician. This product should be connected only to power source
indicated on the marking label. If you are not sure of the type of power
supply to your home, consult your product dealer or local power company.
For products intended to operate from battery power, or other sources, refer
to the operating instructions.
(12) GROUNDING OR POLARIZATION: This product may be equipped with a
polarized alternating-current line plug (a plug having one blade wider than
the other).This plug will fit into the power outlet only one way. This is a
safety feature .If you are unable to insert the plug fully into the outlet, try
reversing the plug .If the plug should still fail to fit, contact your electrician to
replace your obsolete outlet. Do not defeat the safety purpose of the
polarized plug.
(13) POWER-CORD PROTECTION: Power-supply cords should be routed so
that they are not likely to be walked on or pinched by items placed upon or
against them, paying particular attention to cords at plugs, convenience
receptacles, and the point where they exit from the product.
(14) PERCEPTIVE ATTACHMENT PLUG: The product is equipped with an
4
attachment plug having overload protection. This is a safety feature. See
instruction manual for replacement or resetting of protective device. If
replacement of the plug is required, be sure the technician service has used
a replacement plug specified by the manufacturer that has the same
overload protection as the original plug.
(15) OUTDOOR ANTENNA GROUNDING: If an outside antenna or cable
system is connected to the product, be sure the antenna or cable system is
grounded so as to provide some protection against voltage surges and
built-up static charges. Article 810 of the National Electrical Code,
ANSI/NFPA 70, provides information with regard to proper grounding of the
mast and supporting structure, grounding of the leading wire to an antenna
discharge unit, size of grounding conductors, location of antenna-discharge
unit, connection to grounding electrodes, and requirements for the
grounding electrode:
(16) LIGHTNING: For added protection for this product during a lightning storm,
or when it is left unattended and unused for long periods of time, unplug it
from the wall outlet and disconnect the antenna or cable system. This will
prevent damage to the product due to lightning and power-line surges.
(17) POWER LINES: An outside antenna system should not be located in the
vicinity of overhead power lines or other electric light or power circuits, or
where it can fall into such power lines or circuits. When installing an outside
antenna system, extreme care should be taken to keep from touching such
power lines or circuits as contact with them might be fatal.
(18) OVERLOADING: Do not overload wall outlets, extension cords, or integral
convenience receptacles as this can result in a risk of fire or electric shock.
(19) OBJECT AND LIQUID ENTRY: Never push objects of any kind into this
5
product through openings as they may touch dangerous voltage points or
short-out parts that could result in a fire or electric shock. Never spill liquid
of any kind on the product.
(20) SERVICING: Do not attempt to service this product yourself as opening or
removing covers may expose you to dangerous voltage or other hazards.
Refer all servicing to qualified service personnel.
(21) DAMAGE REQUIRING SERVICE: Unplug this product from the wall outlet
and refer servicing to qualified service personnel under the following
conditions:
● When the power-supply cord or plug is damaged.
● If liquid has been spilled, or objects have fallen into the product.
● If the product has been exposed to rain or water.
● If the product does not operate normally despite following the operating
instructions. Adjust only those controls that are covered by the operating
instructions as an improper adjustment of other controls may result in
damage and will often require extensive work by a qualified technician to
restore the product to its normal operation.
● If the product has been dropped or damaged in any way.
● When the product exhibits a distinct change in performance – this indicates
a need for service.
(22) REPLACEMENT PARTS: When replacement parts are required, be sure
the service technician has used replacement parts specified by the
manufacturer or have the same characteristics as the original part.
Unauthorized substitutions may result in fire, electric shock, or other
hazards.
(23) SAFETY CHECK: Upon completion of any service or repairs to this
product, ask the service technician to perform safety checks to determine
that theproduct is in proper operating condition.
(24) WALL OR CEILING MOUNTING: The product should be mounted to a wall
or ceiling only as recommended by the manufacturer.
(25) HEAT: The product should be situated away from heat sources such as
radiators, heat registers, stoves, or other products (including amplifiers) that
produce heat.
Main Features
Fully compatible with DVB-T and H.264, AVC, MPEG4, MPEG2
Standard
HDMI (up to 1080P) Output
EPG Display with current/next TV programmes
Support 7MHz & 8Mhz Software Setting
PAL & NTSC Auto Switch
6
Support VBI, OSD Subtitle, LCN
One Scart and YpbPr jacks
Multi-languages OSD
Auto / Manual scan
1000 channels
Parent Control
4 digits LED display
Real-time recording function with delay
Supports USB SW Upgrade/Media Playback via USB
Supports recording to external hard drive via USB.
Package Contents
Please check that the following accessories are in the box when you open
it.
~ TV-1158HD Receiver/Recorder x1
~ Remote control
x1
~ User Manual
x1
Front and Rear Panel
Front panel Guide:
`
c
de
f
gh
i
j
k
1. POWER BUTTON: Used to turn on/off the unit
2. OK: Press the button to execute selected options
3. MENU: Display Main Menu
4. LED DISPLAY WINDOW: Used to display channel number.
5. STANDBY INDICATOR: LED will turn red if the set top box is in stand
by mode
6. SIGNAL LED: Used to receive the signal from the remote control.
7.VOL+/VOL-: Press to adjust the volumes
8. CH+/CH-: Used to change channels
9. USB 2.0 Port: Data input/output from or to storage devices
7
Rear panel Guide:
c
d
e
f
g
hi
8
1. ANT IN: This socket connects to your external Aerial.
2. ANT OUT: This socket will bypass the RF signal to either your TV or
another video system.
3. HDMI: High definition audio and video output used to connect to a
HDMI device
4.COAXIAL:Digital Audio Coaxial output jack
5. TV SCART: This socket connects to your TV.
6. Y/Pb/Pr: These sockets connect to your TV component input terminals.
7. VIDEO: This socket outputs composite video signal.
8. R/L: This socket outputs Analog audio L/R signal.
Remote Control
KEY
FUNCTION
POWER Turn the STB Receiver ON
(
) and OFF
MUTE
(
)
0~9
KEY
CH+,
CH-
Mute or Restore Audio
Output
VOL+,
VOL-
Selects a channel or setting
l◄◄
Executes the selected item
OK/LIST in the menu screen or
enter the option
►►l
Displays information about
the current channel
◄◄
INFO
FUNCTION
Navigates through the
Menus. Selects the next or
previous Channel
Increases or decreases
volume. Navigates through
the Menus.
Skips to the previous track
during playing media and
skips to the previous
channel during playing DTV.
Skips to the next track during
playing. media and skips to
the next channel during
playing DTV.
Searches forwards during
media play
8
AUDIO
RECALL
GOTO
SUB-T
MENU
EPG
FAV
EXIT
Selects an Audio Language
or Audio Mode
Go back to the previous
viewed channel
Select the play time of
media
Display subtitle options
(availability depends on the
channel)*see below
Turns on Main Menu
(Electronic Program Guide)
Turns the program guide on
Displays your favorite
channels list. Press FAV
again to access to the other
favorite lists
Use this key to quit current
menu
►►
Searches backwards during
media play
Press this key start to record
the program
►
Starts or resumes media play
■
Stops media play
TV/
RADIO
REPEAT
PAUSE
Switches from TV function to
Radio function and from
Radio to TV.
Selects Repeat or turn off
Repeat mode
Pauses media play
These buttons perform
various functions as shown in
OSD menu screens
NOTE :
- If subtitles should turn on automatically and you wish to avoid a
recurrence then go to menu and select option screen-on the subtitle
language function change to “off”.
- While watching a TV program, press Green button to change TV
format/HDMI resolution, Yellow to change Aspect ratio and Blue to display
Recording schedule
Installing the Batteries
Remote Control
Remove the battery cover and insert 2xAAA size batteries.
The diagram inside the Battery Compartment shows the correct way to
insert the batteries.
9
Using the Remote Control
When using the remote control, ensure the infrared window on the remote
control is pointed at the infrared receiving window or the machine. The
distance between the digital set top box and the remote control must be
within 7meters at an angle of less than 60 degrees.
The remote control will not function if the path of signal is blocked.
Sunlight or very bright light on the infrared receiving window will affect the
performance of the remote control
Connecting to a Television
For a basic connection from your Set Top Box to the television, use video
and outputs as shown below.
For a higher quality, use the scart connection.
For the highest quality, use the HDMI connection.
First Time Installation
After the connections have been made, make sure the receiver is
connected to the Main Power. Press Power button to switch receiver on
and switch on your TV. If you are using the receiver for the first time or
restored Factory Default, the Main Menu will appear on your TV screen.
10
(1). Go to [OSD Language] and press RIGHT/LEFT key to select the
onscreen language.
(2). Press RIGHT/LEFT key to select your country of residence
(3). Select [Channel Search] and press RIGHT or OK key to begin
Automatic channel search
Once channel tuning is complete, you are now ready to watch TV
Basic Operation
1.
Program Settings
2.
Program Edit
Press the MENU button and the Program screen will display. This screen
provides options to manage program settings. Select an option and press
OK or RIGHT to adjust that setting. Press the EXIT button to exit the
Menu.
To edit your program preferences (move, lock, skip, favourite, delete or
remain), you will need to enter the Program Edit Menu. This Menu
requires a password to access. Enter the default password '000000'.
2.1
Set Favourite channel
You can create a shortlist of your favourite channels(TV or radio) for
speedy access.
(1). In program edit mode select the preferred channel and press the
“fav”button on your Remote Control. From the drop down menu, select
11
favourite type [movies, news, sport, musics] and press OK. A star
symbol will appear against the channel recorded as favourite. To
confirm press Exit button.
(2) Repeat the process to select more favourite channels.
2.2
View Favourite Program
2.3
Delete TV or Radio channel from list of favourites
2.4
Skip TV or Radio Program
2.5
Move a TV or Radio Program
2.6
Lock Program
(1). Press “Fav” button on the remote control and the Favourite Menu will
appear.
(2). Use RIGHT/LEFT arrows to select the Program type.
(3). Press UP/DOWN arrows to select your favourite channel.
(4) Press OK to view
(1) Access the program edit mode.
(2) Select the channel you wish to delete and press the BLUE button on
the remote.
(3) On screen message will appear. Press “OK” to delete or “EXIT” to
cancel.
(1). In program edit mode, select the channel you wish to skip and press
the GREEN button. A skip symbol is displayed: The program is marked
as a skip.
(2). Repeat the process to select more channels.
(3). To confirm and exit the menu, press EXIT key. To disable a skip TV or
Radio channel, press GREEN button after selecting the program with
the skip symbol.
(1). Select the preferred channel then press the RED button. A move
symbol will appear
(2). Press UP/DOWN to move the program
(3). Press OK to confirm
(4). Repeat the above steps to move more channels
You can lock selected programs for restricted view in program edit mode.
(1). Select the preferred channel then press the YELLOW button. A
padlock shaped symbol is displayed. The program is now marked as
locked.
(2). Repeat the process to lock more channels
12
(3). To confirm and exit the menu, press the EXIT button
(4). Press the YELLOW button again to disable the locked program
(5). To view the locked program, you will be require to enter either the
default password '000000' or your last set password.
3.
EPG (Electronic program guide)
4.
Sort
5.
LCN (Logical Channel Number)
6.
Video Setting
The EPG is an on-screen TV guide that shows scheduled programs in
advance for every tuned channel. Press the EPG button on the
Remote Control to access guide. The EPG displays a separate screen for
each stored channel and to access other channels use RIGHT/LEFT
arrows on your remote control. Use UP/DOWN arrows to highlight the
preferred program and a brief description of the selected program is
displayed on the adjoining screen.
* Note : Red button for Page Down and Green button for Page Up
(
) unlike the OSD instruction
To access sort function, press menu and on ‘program’ screen use down
arrow. In program mode of the menu you can sort your channels using
any of the preferred options shown below.
[LCN] - Sort the channels in Logical Channel Number order
[Service Name] - Sort the channels in Alphabetical order
Other available options sort channels according to Station, Frequency and
Bandwith. To choose your preferred option, press menu and on ‘program’
screen, use the down arrow to get to ‘sort’. Use RIGHT/LEFT arrows to
access option.
Set LCN on or off.
NOTE : In order for Timer-recording to perform, scan digital channels and
store after the LCN ON is set
To access the Menu, press MENU then select [Picture]. The Menu
provides options to adjust the video settings. Press UP/DOWN to select
13
an option and press RIGHT/LEFT to adjust that setting. Press EXIT to exit
the menu.
(1). Aspect Ratio
To set the display format to 4:3 PanScan, 4:3 Letter Box, 16:9 or Auto
(2). Resolution
If the video does not appear correctly, change the setting. These
settings match the most common setting for HDMI.
[480i]: for NTSC system TV.
[480P]: for NTSC system TV.
[576i] : for PAL system TV.
[576P]: for PAL system TV.
[720P]: for NTSC or PAL system TV.
[1080I]: for NTSC or PAL system TV.
[1080P]: for NTSC or PAL system TV.
(3). TV format
If the video does not appear correctly, you need to change the settings.
This should match the most common settings for TVs in your country.
[NTSC]: for NTSC system TV.
[PAL]: for PAL system TV.
Note : while watching a TV program, you can change the above settings
instantly by toggling YELLOW function button to change Aspect Ratio and
GREEN to change TV format/HDMI resolution
7.
Channel Search
To access this function, press MENU and select CHANNEL SEARCH
SCREEN. The Menu provides options for searching channels. Select
Your preferred option and press the RIGHT arrow to commence the
Search. Scanned channels are stored automatically. Press Exit to exit
the menu.
14
7.1
Auto Search
7.2
Manual Search
Search and install all channels automatically. This option overwrites all the
pre-installed channels.
(1). Select [Auto Search] and press OK or RIGHT to start channel search.
(2). To cancel channel search, press EXIT.
Install new channels manually. This option adds new channels without
changing the current channels list.
(1). Select [Manual Search] then press OK or RIGHT. The channel search
screen will appear.
(2). Press the RIGHT/LEFT ARROW key to select the channel frequency.
(3). Press OK to start searching channels.
If a new channel is found, it is saved and added to the channels list.
(3). Country
Select your country of residence.
(4). Antenna power
Set Antenna Power to ON in case Antenna(Aerial) signal amplifier or
booster is connected
Note : Some channels which are not broadcast live at the time of
scanning the channels can not be installed in the channels list and in
this case re-tune either those specific channels through Manual
Search or all the channels through Auto Search when they are
running on service. eg BBC3/BBC4 would run on service after 7PM
15
8.
Time Setting
To access, press MENU then use RIGHT ARROW to select TIME screen
The MENU provides options to adjust the time settings.
Press UP/DOWN to select an option and press RIGHT/LEFT to adjust the
setting. Press EXIT to exit the menu.
(1). Time offset
Select auto or manual for GMT offset adjustments.
(2). Country Region
Country Region is selected automatically when country of residence is
Input on the previous screen (CHANNEL SEARCH)
(3). Time Zone
Select the Time Zone Offset when [Time Offset] is set to Manual.
(4). Sleep
If this setting is off, you can use RIGHT/LEFT arrows to input the
number of the hours. A message will pop up after your preferred time
to inform you, that the device will go in to sleep mode.
This message will appear under any operation. Auto-off function can
be set in a time period at 0-12 hours. Standard setting is 3 hours.
Press STANDBY button to exit sleep / auto-off mode.
9.
Option
To access, press MENU and select OPTION. The menu provides options
to adjust the OSD Language, Subtitle Language and Audio Language.
Select an option and press RIGHT/LEFT to adjust the setting.
Press EXIT to exit the Menu.
16
(1). OSD Language
Select an OSD language
(2). Subtitle Language
Select the preferred subtitle language Audio Language
(3). Audio Language
Select the preferred audio language for watching TV channels.
If the language is not available, the default program language will be
used Subtitle Language
(4). Digital Audio
Select digital audio output mode.
10.
System Setting
To access the Menu, press MENU and select [System].The menu
provides options to adjust the system settings.
Press the UP/DOWN key to select an option and press RIGHT/LEFT to
adjust the setting.
Press EXIT to exit the Menu .
(1) Parental Guidance
You can restrict access to channels that are unsuitable for children. To
restrict/lock the channel you will need to enter either the default
password '000000' or your own password. Thereafter use
RIGHT/LEFT arrows to set Age as preferred by you
17
(2) Set Password
Set or change the password. Enter your old password or the default
password '000000'. You will then be asked to enter your new password.
To confirm re-enter your new password. Once it is confirmed, press
EXIT to exit the Menu.
(3) Restore Factory Default
Reset the unit Box to the Default Factory Settings.
Select [Restore Factory Default] and press OK or RIGHT. Enter your
password or the default password '000000' and press OK to confirm.
This option will delete all preset channels and settings.
(4) Information
View model, hardware and software information.
(5) Software update
Visit www.avsaleseurope.com/DOWNLOADS or email to
[email protected]
11.
USB
-This unit will only support devices with FAT and FAT32 file systems. It will
not support NTFS file system.
-The menu provides options to playback Movie, Music and Photo files;
Movies : H.264HD, AVC HD, MPEG-4 AVC, H.264, XVID MPEG-4(.avi),
AVC1(.mp4)
Music : MP3, WMA
Photo : JPEG, BMP
- Enable to record TV programmes to USB Flash Storage Disk (available
storage space must be 5GB or more for Movies) as well as to External
Hard Drive via USB in/out ports ( Support SATA Hard Drive upto 2TB
capacity).
(1) Multimedia: if no USB device is plugged in, an ON SCREEN message
"NOT FIND ANY USB DEVICE” will appear, otherwise you can select
Music, Photo, Movie or PVR in this menu and press OK to enter the file
browser and select the file you wish to playback
18
(2) Photo configure:
- Slide Time: adjust slide show interval from 1~25 seconds.
- Slide Mode: adjust slide show effect as mode 0~59 or random.
- Aspect Ratio: Keep displaying the picture in its original aspect,
Discard displays the picture in full screen mode.
(3) Movie Configure
- Aspect Ratio:
[Keep]: Play movie in its original aspect.
[Discard]: Play movie in full screen mode.
- Subtitle Specific:
[Small]: Displays the subtitle in small characters.
[Normal]: Displays the subtitle in normal characters.
[Big]: Displays the subtitle in large characters.
- Subtitle BG:
[White]: Displays Subtitles on white background.
[Transparent]: Displays Subtitles on transparent background.
[Grey]: Displays Subtitles on grey background.
[Yellowgreen]: Displays Subtitles on yellowgreen background.
- Subtitle Font Color:
Displays Subtitles in the font colour you have chosen.
19
Note:
- We cannot guarantee compatibility (operation and/or bus power) with
all USB mass storage devices and assumes no responsibility for any
loss of data that may occur when connected to this unit.
- With large amounts of data, it may take longer for the system to read
the contents of a USB device.
- Some USB devices may not be properly recognized.
- Even when they are in a supported format, some files may not play or
display depending on the content.
- PVR Configure:
[Record Device]: Select the disk for the record.
[Time Shift]: Select the capacity of Time Shift
[Format]: Format the selected disk.
12.
Recording/Time Shift
Insert a USB Flash Storage kit (More than 5GB recommended) or connect
an External HDD with USB lead to the USB port of the unit and Press
MENU button on the remote to go to Main Menu Screen and select
USB/PVR Configure/Format to make them compatible with the unit, then
HBPVR folder will be created in the USB storage device.
Note :
- Ensure that there is sufficient extra storage capacity available in
the USB storage device before activation of record & Time Shift;
One(1) hour recording contents(MPEG-2, .mts) to take up around
1.2GB storage capacity
12.1 Instant Recording
Press button on the remote while watching a program to record.
Press ■ button on the remote to stop recording.
Press MENU button on the remote to go to Main Menu Screen and select
USB/Multimedia/PVR or press PVR on the remote, then you can find
recorded contents under HBPVR folder.
12.2 Time Shift
Press ■ button to pause the program you are watching and press ► to
rewind and playback the program from the stage where paused. *** In
order to make this feature work, you need to allocate appropriate
Timeshift capacity (Main Menu/USB/ Multimedia/PVR Configure/Record
Device)
20
12.3
EPG Recording
Press EPG button to display a list of Program Guide. Select a program
you wish to record and press OK/LIST to display SCHEDULE - Change
MODE to RECORD/ press OK/LIST to confirm.
12.4
Timer Recording
Press the blue function button (
)to display SCHEDULE and follow as
instructed in OSD at the bottom of the screen. - Change MODE to RECORD/
press OK/LIST to confirm.
Note : While watching a TV program, you can access “Recording
Schedule” instantly by pressing BLUE fuction button
12.5 Editing Recording contents
- Recording contents to be stored in FAT32 file system and you can find
them by going to MAIN MENU/USB/Multimedia/PVR/HBPVR folder
- Press UP/DOWN arrow button on the remote to select the one you wish
to edit and when it becomes Grey-highlighted, press one of the function
buttons (
) as instructed in OSD menu appearing at the bottom of the
screen.
-Delete : Press a Yellow Function key/OK/Confirm OK
-Rename : Press a Green Function key/Input
13.
Troubleshooting
Blank Screen -> Check if all connections between the unit and the TV are
well plugged;Change TV format/HDMI resolution by toggling GREEN
function button
“No signal” message ->Check if Aerial cables are well connected;Check
on the antenna signal strength status and in case the aerial signal is weak,
it is recommended to use a Signal Booster/Amplifier;Replace the aerial
cables;Indoor/Loft aerial signal is not strong enough to capture some
DTV(Freeview) channels occasionally; FYI as some Digital channels
signal from a Local Transmitter may be unstable at a certain time, re-try to
scan at a later time or date
The channel is scrambled. -> Select an alternative channel and see if it
displays ok and also check if the channels are originally scrambled i.e. not
Freeview. A certain Digital channel signal may not be strong enough at a
certain time depending on areas.
21
Some channels are missing in the channels list after the tuning process ->
Check on service running time schedule on those channels and re-tune them
through Manual search when the broadcast service is on
The remote control unit does not work ->Aim the remote control unit
towards LED panel of the unit; Replace remote controller batteries if they
become flat.
No Sound from Speakers ->Check if the audio cables are properly
connected;Switch off MUTE setting
There is sound but no image on the screen ->Check if AV cables are
plugged into right postions;Press <TV/Radio> button of the remote to
move to a TV channel
In case picture becomes mosaic or disappeared -> Try to watch it later as
signal may become unstable from a local transmitter
In case some DTV channels are not scanned -> Re-scan at a later time or
date when signal strength from a local transmitter is stable and once they
are scanned, they would remain stored in the unit
Any recording issues -> Refer to detailed instructions in Chapter 12
Recording/Time-shift of this manual
22
14.
Technical Specifications
Item
Tuner
Video
Audio
Power
USB2.0
Standby
Sub Item
Parameter
Input Frequency
170~230MHz
470~860MHz
RF Input level
-25~-82dBm
IF Bandwidth
7MHz and 8MHz
Modulation
QPSK,16QAM,64QAM
Decoder Format
MPEG4 AVC/H.264 HP@L4
MPEG2 [email protected]
Output Format
576P, 720P, 1080i, 1080P, PAL/
NTSC
Output Port
HDMI(1.3)
Decoder Format
MPEG-1 (layer1&2)
Audio output
Digital audio: S/PDIF
Voltage
100-240V~
Power
Max 8W
50/60Hz
Photo
JPEG, BMP, PNG
Audio
MP3, WMA, AAC,AC3
Video
MPEG1,MPEG2,MPEG4,AV1 DIVX
consumption
≤ 1W
23