1
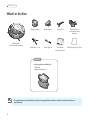
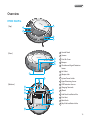
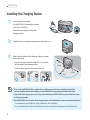
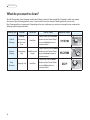
Ver 1.2
RYDIS Hybrid
Robot Vacuum Cleaner
User Manual
Learn more about
user manual at Moneualusa.com
RYDIS H68 Pro
Thank you for purchasing the Moneual RYDIS H68 Pro.
Before using the product, please read this User Manual carefully, and keep it for future reference.
Depending on your model, some contents of this User Manual may differ from the actual product.
The contents of this User Manual are subject to change without notice.
RYDIS Hybrid
Robot Vacuum Cleaner
User Manual
RYDIS H68 Pro
What do you want to clean?
The H68 Pro provides 3 basic cleaning mode (Hybrid Cleaning, Vacuum Cleaning and Mop Cleaning) in which you need to
choose one. Hybrid Cleaning performs mop + vacuum at the same time. Vacuum Cleaning performs vacuum only.
Mop Cleaning performs mopping only. Depending on the user’s preference, you can choose among them to maximize the
cleaning in your living environment.
Cleaning Type
Function
Hybrid
Cleaning
Moping,
Vacuuming
at the same
time
Vacuum
Cleaing
Vacuuming
Only
Mop
Cleaning
Mopping Only
For Where
How to Select
Hard floor
Select Hybrid with the Mode
button on the Control Panel
or press Hybrid button on
remote control
Hard floor and
Carpet
Select Vacuum with the Mode
button on the Control Panel
or press Vacuum button on
remote control
Hard floor
Select Mop with the Mode
button on the Control Panel
or press Mop button on
remote control
Operation Lamps
Special Cleaning modes
Cleaning Mode
Function
For Where
How to Select
Intensive
Cleaning
mode
Clean in a 3 x 3 ft area
where the H68 Pro
located
Heavy Dust
Particles or Heavy
Traffic Area
Select Intensive with the Mode button on
the Control Panel or press the Intensive
button on the remote control
Shadow
Cleaning
mode
Clean in the hard to
reach areas
Under a bed or
furniture
Select Shadow with the Mode button on
the Control Panel or press the Shadow
button on the remote control
Manual
Cleaning
mode
Control the robot
vacuum cleaner
directly using the
remote control
Anywhere you
want to go
Press the Manual button on the remote
control and press the Arrow button where
you want to go
Reservation
Cleaning
mode
Start cleaning after 1
hour or at the same
time every day
Anywhere you
want to go
Press the Reservation button and press
the Select button on the remote control
Option
Function
Turbo
Option
Start cleaning with
turbo suction power
Anywhere you
want to go
Press the Turbo button on the
remote control
Threshold
Option
Set to be able to climb
over a threshold lower
than 0.4 inch (1 cm)
Anywhere you
want to go
Press the Threshold button on the
remote control
Double
Deep
Cleaning
Option
Performs 2 cleaning
sessions of the vertical
pattern overlapped by
the horizontal pattern.
Anywhere you
want to go
Press the Double CL button on the
remote control
For Where
How to Select
0.4 inch
(1 cm)
Features
Hybrid Cleaning
Full utilization of the 5-in-1(Twin Side Brush + Main Brush + BLDC Suction (vacuum) + Big Mop
+ H2O Tank) cleaning technology for spotless hard floors.
Mop Cleaning
Utilizing the attachable full sized mop, the Mop Cleaning mode is optimized for cleaning even
the finest dusts that are harmful to your health.
Smart Vision Mapping
The Smart Vision Mapping Technology is capable of mapping out the surrounding area and
accurately tracking its previous location to further cover the unclean areas.
Big Mop with H2O Tank
2 times bigger than the average mop, the reusable Big Mop is continuously moistened to clean
your hard floors. The 5 oz (150 cc) reservoir H2O Tank can supply moisture to the Big Mop for
up to 3 hours.
Double Deep Cleaning Option
Performs 2 cleaning sessions of the vertical pattern overlapped by the horizontal pattern.
Sweep Pattern
The back-and-forth motion cleans the floor three times in a straight line.
Starting Intensi
ve Cl
eaning
Starting Intensive
Cleaning.
Artificial Intelligence Voice Guidance
The RYDIS H68 Pro kindly speaks to you letting you know what he/she is doing, and lets you
know when maintenance is required.
Various Cleaning Modes
The various cleaning modes provide different cleaning functions and levels of performance,
which are optimized for the user environment.
Shadow Cleaning
Intensive Cleaning
Manual Cleaning
Reservation Cleaning
High Performance BLDC Motor
The cleaning performance is excellent due to the powerful BLDC (suction) motor. The BLDC
motor is 30% more powerful than a DC motor, and the lifetime is approximately 10 times as
long (estimated: 5,000 hours).
3.4 inches (8.6 cm) Slim Design
3.4 inch
(8.6 cm)
With a slim design, the RYDIS H68 Pro is just 3.4 inches (8.6 cm) high, enabling it to clean under
the bed and the sofa, where it is difficult to clean with a vacuum cleaner or by hand.
Eco-friendly Lithium Iron Phosphate Battery
The RYDIS H68 Pro uses an eco-friendly battery that does not contain any heavy metals or acids that
are harmful to the human body. The Lithium Iron Phosphate Battery has a lifetime that is approximately
three times longer (1,000 cycles) than the standard lithium-based or nickel-based batteries.
It provides higher levels of operational safety due to the high resistance to heat and explosion.
Auto Charging
After it is finished cleaning, the RYDIS H68 Pro automatically returns to the charging station and
starts charging. When the battery is low during the cleaning, the battery indicator will be
blinking rapidly and the RYDIS H68 Pro automatically returns to the charging station for charging.
Once the charging is completed, it will return to the previous location where it left off.
Obstacle Avoidance and Fall Protection
The obstacle detection sensors in the bumper help the RYDIS H68 Pro avoid obstacles and
walls. The cliff detection sensors in the bottom detect height differences and prevent it from
falling down stairs.
Contents
Before Use
Installing
What do you want to clean?
02
Shadow Cleaning
32
Special Cleaning modes
03
Manual Cleaning
33
Features
04
Reservation Cleaning (Scheduled Cleaning) 34
Safety Information
07
Turbo Option
35
What’s in the Box
12
Threshold Option
36
Overview
13
Double Deep Cleaning Option
37
Installing the Charging Station
16
Language Setting
39
Installing the Side Brushes
17
Cleaning the Dust Bin
40
Cleaning the Dust Filter
41
Sensors 42
Cleaning the Dust Inlet
44
Using and Managing the Battery
45
Voice Guidance
48
Error Message Description
50
Troubleshooting
52
Specifications
55
59
Installing the Big Mop with H2O Tank 18
20
Big Mop Recommendation
Maintenance
Cleaning Side Brushes, Wheels and
Wet/Dry Disposable Mop Pad
Product
Operation
Recommendation
21
Remote Control
22
Charging
23
Before You Start
25
What do you want to clean?
26
Hybrid Cleaning
27
Vacuum Cleaning
28
Mop Cleaning
29
Special Cleaning modes
30
Intensive Cleaning
31
Customer
Support
Moneual Robot Vacuum Cleaner
Limited Warranty
Before Use
Safety Information
Please read and follow the instructions in this manual to ensure your safety and the safe use of your RYDIS H68 Pro.
Safety symbols
In this manual, various Warnings, Cautions and Notes are provided to help you to avoid potential hazards that can hurt
you and/or damage your RYDIS H68 Pro.
Warning
You may be seriously injured up
to death if you do not follow these
instructions.
Caution
You may be injured or your RYDIS
H68 Pro may be damaged if you do
not follow this instruction.
Note
You should refer to this
note when using your
RYDIS H68 Pro.
Before you use
Do not install or use the RYDIS H68 Pro in a place where it will be exposed to direct sunlight.
ÞIf
the power adapter becomes overheated during charging it may cause a fire, short circuit, or electrical shock.
ÞThe
RYDIS H68 Pro may become discolored and deformed.
Do not install the charging station on an inclined floor, and do not apply impact to the charging station.
ÞThe
charging station may become damaged or broken.
Do not use the product in a room with an unattended child or an elderly person.
ÞThere
is a risk that the child or elderly person may become frightened.
The RYDIS H68 Pro is not intended for use by children, or by persons with reduced physical, sensory or mental
capabilities, unless they have given supervision or instruction concerning the use of the RYDIS H68 Pro by a person
responsible for their safety.
ÞThis
may cause injury or damage the RYDIS H68 Pro.
Before you use the RYDIS H68 Pro, remove any small objects, clothes, and fragile objects from the floor.
ÞThis
may cause damage to the RYDIS H68 Pro and obstruct the movement of the RYDIS H68 Pro.
ÞMake
sure to remove fragile objects (glass, china, flowerpot, etc.).
ÞSmall
cloths, power cords, belts, towels, pads, and telephone cords can become entangled in the wheels or brushes.
7
RYDIS H68 Pro
Install the charging station in a location that can be easily accessed by the RYDIS H68 Pro.
ÞIf
you install the charging station in a corner or if there are many obstacles around the charging station, it may prevent
the RYDIS H68 Pro from automatically charging.
Make sure that the charging station is always plugged into a power source.
ÞIf
no power is supplied to the charging station, you will not be able to use the automatic charge function.
When you use
Remove objects (such as loose clothing, towels, cloths, belts, etc) scattered on the floor before cleaning. Keep objects
away from brushes and wheels to prevent entanglement.
ÞThis
may cause noise, reduce the suction power, and damage the RYDIS H68 Pro.
Do not use the power adaptor with another appliance.
ÞThis
may cause damage to the appliance and fire by overheating.
Do not use or store the RYDIS H68 Pro near flammable materials (alcohol, gasoline, kerosene, thinner, etc.) or heating
sources (cigarettes, candles, stove, etc.).
ÞThis
may cause fire and damage to the RYDIS H68 Pro.
If you notice smoke or a burning smell coming from the RYDIS H68 Pro, immediately turn the system power switch off
and contact our service center.
Do not stand or sit on the RYDIS H68 Pro.
ÞMovement
of the RYDIS H68 Pro may cause injury or the RYDIS H68 Pro may be damaged.
Do not use the RYDIS H68 Pro on a narrow high place such as a desk, table, etc.
ÞThe
RYDIS H68 Pro may fall off which could cause injury or damage to the product.
Do not let the RYDIS H68 Pro pass over or sweep up oil, pet droppings, etc.
ÞThis
ÞOil
may cause malfunction of the RYDIS H68 Pro and damage.
or pet droppings on the wheels may cause stains in other places.
If the RYDIS H68 Pro sucks a plastic bag in while operating, immediately remove it.
ÞIf
you run the RYDIS H68 Pro for a long time with the dust inlet covered with a plastic bag, the motor will overheat
and the RYDIS H68 Pro will be damaged.
8
Before Use
Do not press strongly or impact the bumper.
ÞThis
may cause damage to the bumper sensors and malfunction.
Do not use the RYDIS H68 Pro in a place where the temperature is too low or too high (lower than 23F (-5°C) and
higher than 120F (49°C)).
ÞThis
may cause damage to the product.
Do not use the RYDIS H68 Pro when the dust bin is filled up.
ÞThis
may reduce the suction power.
Never use the RYDIS H68 Pro without the filters.
ÞDoing
so may cause a malfunction of the RYDIS H68 Pro.
Do not use the RYDIS H68 Pro in a place where the floor or wall is made of glass or mirrors.
ÞThe
RYDIS H68 Pro detect obstacles by using an IR sensor, so it may not detect glass and mirrors as obstacle.
Do not use the RYDIS H68 Pro on a flooded floor, on stairs, on a table or shelf, in a warehouse, in a commercial
building, or outdoors.
If you have dropped or given an impact to the RYDIS H68 Pro, contact our service center.
Electrical instructions
Please use the power source and socket with the correct Voltage and Ampere.
ÞIf
you use a power source or socket that does not fit the power specifications, there is the risk of fire, electrical shock,
and damage to the RYDIS H68 Pro.
Make sure the power cord is not bent or crushed by heavy objects.
ÞA
damaged power cord may cause a fire or electrical shock.
ÞTo
repair or replace a damaged power cord, contact our qualified service center to ensure your safety.
When plugging in or removing the power plug, always plug it in or remove it by holding the plug, not the cable.
ÞStress
on the cable will damage the power cord, which may cause a fire or electrical shock.
9
RYDIS H68 Pro
Do not touch the plug or wall socket with wet hands.
ÞDoing
so may cause electric shock.
If you spill water into the RYDIS H68 Pro, unplug the power cord immediately.
ÞWater
can bring the risk of fire and electrical shock.
ÞImmediately
remove the power cord from the outlet and contact our service center.
Do not use charging stations other than the charging station that came with your RYDIS H68 Pro.
ÞOvervoltage
brings the risk of fire and electrical shock.
Do not install the charging station in a location that is damp or wet, dusty, or near water.
ÞThis
may cause a fire or an electrical shock and damage to the unit.
Do not touch the terminal of the charging station with any metallic object (such as a clip, pin, etc.).
ÞThis
creates the risk of fire and electrical shock.
If you do not plan to use the RYDIS H68 Pro for an extended period of time, turn off the system power switch at
the rear.
ÞThe
battery may be discharged if you leave it the system power switch on.
Others
To ensure safety, only a qualified service agent should repair or disassemble the product.
ÞAny
repairs done by unqualified personnel may damage the RYDIS H68 Pro and bring the risk of a fire and electrical
shock.
Dispose of the battery properly.
ÞIf
you throw the battery into a fire or expose it to direct sunlight, there is the risk of fire and explosion.
ÞDispose
of your old batteries according to the local laws and regulations of your region.
Clean the obstacle and bottom sensors periodically.
ÞIf the sensor becomes covered by lint and dust, the RYDIS H68 Pro may malfunction.
Please use the specified filter.
ÞUse
10
of a different filter will void your warranty.
Before Use
Please clean the RYDIS H68 Pro after turning it off.
ÞIf
you clean it when the power is on or it is operating, it may cause injury.
Clean the main brush, dust bin, dust filter, and dust inlet periodically.
ÞIf
you use the RYDIS H68 Pro for a long time without cleaning it, there is the risk of malfunction and damage.
Copyright and instructions
ÞCopyright
© 2014 MONEUAL Inc. All rights reserved.
ÞPublished
January 31, 2014
ÞRYDIS
is the trademarks or registered trademarks of MONEUAL Inc. in the Republic of Korea and/or other conutries.
ÞThis
publication is protected by copyright and all rights are reserved. No part of it may be reproduced or transmitted by
any means or in any form, without the prior written consent of MONEUAL.
ÞDepending
on the model and type of your appliance, some of the contents in this manual may differ from your actual
product.
ÞMONEUAL
Inc. assumes no responsibility for technical or editorial errors or omissions contained herein, nor for any
incidental or consequential damages and failures of the appliance caused by not following the precautions and
instructions.
ÞMONEUAL
Inc. assumes no responsibility for damages resulting from the use of the product that is not approved by
the company.
11
RYDIS H68 Pro
What’s in the Box
Charging Station
Power Adaptor
Power Cord
Remote Control
(included two AAA
batteries)
RYDIS
RobIS
Hybrid
ot Vacuum
Robot RYD
rid
Vacuum Hyb
CleaneQuick Cleaner
r Start Guide
User
Manual
RYDIS H68 Pro
(2800mA built-in battery)
Side Brushes (1 set)
Cleaning Brush
User Manual
Quick Start Guide
Call Moneual Support Card
Mop Kit
H68 Pro Big Mop with H2O Tank
1. H2O Tank
2. Big Mop (Reusable x 2)
ĚThe
appearance and specifications may be changed without notice in order to improve functions or
performance.
12
Before Use
Overview
RYDIS H68 Pro
ǘTopǘ
3
1
2
4
5
1 Control Panel
ǘRearǘ
2 Camera
7
8
9
3 Dust Bin Cover
4 Bumper
5 Obstacle and Signal Detection
Sensor
6 Air Outlet
6
7 Adaptor Jack
10
8 System Power Switch
11
9 Signal Receiving Sensor
ǘBottomǘ
10 Cliff Detection Sensors
14
13
12
11 Charging Terminals
13
10
10
12
12
12 Wheels
13 Side Brush Installation Pins
14 Dust Inlet
15 Main Brush
15
16 Mop Pad Installation Holes
16
13
RYDIS H68 Pro
Big Mop with H2O Tank
1
1 H2O Tank
2 Big Mop (Reusable x 2)
2
Control Panel
1 Start/Stop Button
10 Reservation (Every Day)
2 Main Power Button
10
9 8 7
3 Cleaning Mode Selection
11
6
5
4
1
2
4 Vacuum Cleaning Indicator
12 Double Deep Cleaning
Option Indicator
5 Charging Indicator
6 Shadow Cleaning Indicator
7 Intensive Cleaning
3
11 Reservation (One Hour)
Indicator
Button
12
13
14
15
Indicator
13 Threshold Option
Indicator
14 Battery Level Indicator
Indicator
8 Hybrid Cleaning Indicator
15 Turbo Option Indicator
9 Mop Cleaning Indicator
Charging Station
ǘFrontǘ
ǘBackǘ
1 Power/Charging lamp
2 Guide Signal Transmission Sensor
3 Charging Terminals
1
2
3
14
4
5
6
4 Adaptor Holder
5 Adaptor Jack
6 Signal Distance Selection Switch
Before Use
Remote Control
You can conveniently access the various functions of the RYDIS H68 Pro with your remote control.
Functions that can be controlled through the remote control: Hybrid Cleaning, Vacuuming Cleaning, Mop Cleaning, Shadow
Cleaning, Intensive Cleaning, Reservation Cleaning, Double Deep Cleaning Option, Turbo Option, Threshold Option, Charging.
1 Power Button
Press to turn the power on/off.
Press to return the RYDIS H68 Pro to operation mode when it has stopped
due to failure.
Þ
1
Þ
2
3
4
5
2 Charging ButtonÞPress to move the RYDIS H68 Pro to the charging station.
3 Start/Stop Button
Press to start/stop the selected cleaning.
Þ
4 SELECT/MANUAL Button
Press to confirm your Reservation Cleaning selection.
Press to start Manual Cleaning (see page 33).
Þ
Þ
6
7
8
5 Direction ButtonsÞPress to drive the RYDIS H68 Pro in Manual Cleaning.
(forward, backward, left turn, and right turn.)
9
11
12
13
14
10
6 Hybrid Cleaning ButtonÞPress to start Hybrid Cleaning (see page 27).
(Mop + Vacuum)
7 Vacuum Cleaning ButtonÞPress to start Vacuum Cleaning (see page 28).
(Vacuum only)
8 Mop Cleaning ButtonÞPress to start Mop Cleaning (see page 29). (Mop only)
9 Shadow Cleaning ButtonÞPress to start Shadow Cleaning (see page 32).
10 Intensive Cleaning ButtonÞPress to start Intensive Cleaning (see page 31).
11 Double CL. ButtonÞPress to select Double Deep Cleaning Option
(see page 37).
12 Turbo Option ButtonÞPress to select Turbo Option (see page 35).
13 Reservation Cleaning ButtonÞPress to set the Reservation Cleaning
(see page 34).
14 Threshold Option ButtonÞPress to select Threshold Option (see page 36).
15
RYDIS H68 Pro
Installing the Charging Station
1
Connect the power adaptor.
Þ
Set the RYDIS H68 Pro detection distance
[16ft (5m) or 26ft (8m)].
Þ
Place the power adaptor inside of the
charging station.
Þ
2
Þ
3
Þ
Check the power connection and make sure blue lamp is on.
Make sure the location of the charging station is an open
area as illustrated.
Clear all obstacles in the area within 5ft (1.5m) in front,
left, and right of the charging station
5ft
(1.5m)
Install the charging station firmly against the wall.
5ft
(1.5m)
5ft
(1.5m)
ĚIf
you install the RYDIS H68 Pro in a place where it will be exposed to direct sunlight, the heat of the
sun may interfere with the auto charging, and the RYDIS H68 Pro may become discolored over time.
ĚIf
you install the charging station near a rug or threshold area, the RYDIS H68 Pro may not be able to return
to the charging station.
ĚIf your RYDIS H68 Pro can’t return to the charging station, reset the detection distance as recommended below.
In
If
16
a narrow area, set it to16ft (5m), and in a wide area, set it to 26ft (8m).
you set the detection distance to 26ft (8m) in a narrow area, the Auto Charging may be interfered with.
Installing
Installing the Side Brushes
Rear side
Check for the L mark
under the side brush.
Check for the R mark
under the side brush.
Þ
Þ
Front side
Align with the L mark under the
RYDIS H68 Pro and install the L
brush.
Þ
Align with the R mark under the
RYDIS H68 Pro and install the R
brush.
Þ
17
RYDIS H68 Pro
Installing the Big Mop with H2O Tank
ĚWe
1
Þ
3
Þ
recommend moistening the Big Mop before attaching it for longer wet cleaning performance.
Supply water into the H2O Tank then attach
the mop to it.
Attach the H2O Tank.
Fit the joint parts to the holes of
the RYDIS H68 Pro.
ĚIf
you apply excessive force to the
H2O Tank when you install it on the
RYDIS H68 Pro, the joint parts of the
H2O Tank may be damaged.
18
2
Turn the system power switch
off (on the rear side of the
RYDIS H68 Pro).
Þ
Installing
4
Flip it over and turn the system power switch on.
Þ
ĚAfter
cleaning, remove the H2O Tank from the RYDIS H68 Pro.
ĚRemove
the Big Mop from the H2O Tank.
ĚRemove
the water from the H2O Tank and leave the cover open to dry the inside of the H2O Tank.
ĚWash
and dry the Big Mop for the next use.
19
RYDIS H68 Pro
Big Mop Recommendation
RYDIS H68 Pro’s specially designed Big Mop can be rewashed and reused.
Þ
Dampen the Big Mop before attaching it to the H2O Tank.
Þ
Make sure the Big Mop is not excessively wet to avoid the wheels from slipping.
Þ
You may add cleaning solution to the Big Mop, but it may create wheel slippage.
Þ
The RYDIS H68 Pro with Big Mop is designed to clean hard surface floors including wood, tile, vinyl, linoleum and
laminate. The RYDIS H68 Pro cleans best on smooth hard surfaces and may not perform well on uneven tiles, heavily
waxed floors or rough surfaces like slate or brick which can snag the cleaning cloth.
Þ
ĚDo
not use Hybrid and Vacuum Cleaning in a puddle of liquid. Please use only on dried spills or liquid residue.
You can use Mop Cleaning for puddles of liquid.
ĚAfter
cleaning, remove the Big Mop and the water from the H2O Tank and leave the cover open to dry the
inside of the H2O Tank.
ĚA
wet Big Mop may not be suitable for cleaning unsealed floors. Ask your flooring manufacturer or installer
if you are unsure whether damp mopping is safe for your floor.
ĚRYDIS
H68 Pro is not intended to pick up large debris. Before cleaning with the RYDIS H68 Pro, pick up large
debris and check for gravel or sharp objects that could scratch the floor if captured under the cleaning pad.
20
Installing
Wet/Dry Disposable Mop Pad Recommendation
(Optional, can be purchased separately)
RYDIS H68 Pro is compatible with most disposable dry and pre-moistened cleaning cloths if you buy.
Þ
Always follow the use and care instructions included with any dry or wet cleaning cloths to care for your floors.
Þ
The RYDIS H68 Pro with the Disposable Mop is designed to clean hard surface floors including wood, tile, vinyl,
linoleum and laminate. The RYDIS H68 Pro cleans best on smooth hard surfaces and may not perform well on uneven
tiles, heavily waxed floors or rough surfaces like slate or brick which can snag the cleaning cloth.
Þ
ĚDo
not use Hybrid and Vacuum Cleaning in a puddle of liquid. Please use only on dried spills or liquid residue.
You can use Mop Cleaning for puddles of liquid.
Ě
After
cleaning, remove the mop pad from the RYDIS H68 Pro and remove the Disposable Mop from the mop
pad.
Ě
A
wet Disposable Mop may not be suitable for cleaning unsealed floors. Ask your flooring manufacturer or
installer if you are unsure whether damp mopping is safe for your floor.
Ě
The
Dry Disposable Mop is not intended for use with water, so do not dampen the Dry Disposable Mop.
Do not let the RYDIS H68 Pro go to a wet area when the Dry Disposable Mop is installed.
21
RYDIS H68 Pro
Remote Control
ĚMake
ĚIf
sure to properly orient the + and – poles of the batteries when inserting the battery.
you insert batteries incorrectly, there is a risk of fire or damage to the remote control.
Only
use standard AAA 1.5V batteries. Do not use any non standard batteries.
your batteries have had a leakage, immediately replace them.
Dispose of batteries according to the local laws and regulations of your region.
If
Inserting batteries
22
1
Þ
2
Þ
3
Þ
Remove the battery cover.
Insert the two AAA batteries that came with your RYDIS H68 Pro.
Input the battery cover.
Installing
Charging
If you have prepared the charging station, main body, and remote control, you must then charge the RYDIS H68 Pro to
use it. To charge the RYDIS H68 Pro, follow these steps:
1
Þ
2
Þ
Turn the system power switch on.
Hold the RYDIS H68 Pro with both hands and put it on the charging station.
Match the terminals of the RYDIS H68 Pro with the terminals of the
charging station.
Put the RYDIS H68 Pro in the front center of the charging station and push
the RYDIS H68 Pro toward the charging station slowly until the status
indicator turns solid red.
Blue lamp: charging station power on indicator
Red lamp: H68 Pro charging indicator
3
Use the RYDIS H68 Pro after charging.
Þ
It takes up to 2 hours to charge the battery fully.
Blinking every second
Battery Status Charging
Indicator
Charging completed Solid lamp with 3 bars without blinking
Low battery
Blinking 4 times every second
23
RYDIS H68 Pro
Auto Charging
After it is finished cleaning, the RYDIS H68 Pro automatically returns to the
charging station and starts charging.
Þ
When the battery is low during the cleaning, the battery indicator will be
blinking rapidly. The RYDIS H68 Pro automatically returns to the charging station for
charging. Once the charging is completed, it will return to the previous location
where it left off.
Þ
ĚYou
can also charge the RYDIS H68 Pro by selecting the
Mode button then choosing the charging mode and
hitting the Start/Stop button. H68 Pro will return to
the charging station by itself.
ĚYou
can also charge the RYDIS H68 Pro by pressing the
charging button on the remote control.
H68 Pro will return to the charging station by itself.
ĚYou
can also charge the RYDIS H68 Pro by connecting
the power adaptor directly to the power jack on the
rear side of the RYDIS H68 Pro.
24
Product Operation
Before You Start
Check the following before you start the RYDIS H68 Pro.
1
Be careful not to break the RYDIS H68 Pro when you pull the RYDIS H68 Pro out of the box.
For information of installing the RYDIS H68 Pro, see page 16.
2
Check the location (L/R) of the brushes and install them.
For information on installing the brushes, see page 17.
3
Pull the RYDIS H68 Pro out and manually charge it fully first.
When you start the RYDIS H68 Pro for the first time, it may not work, as the battery has probably been
discharged. For information on manual charging, see page 23.
4
Remove any obstacles on the floor.
Remove small objects, clothes, and fragile objects from the floor before cleaning. Fold up lengthy carpet/rug
tassels or keep the RYDIS H68 Pro away from them.
5
If the dust bin is full, the cleaning performance will be reduced. Emptying the dust bin frequently is highly
recommended.
For information on cleaning the dust bin, see page 40.
6
If there is anything on cliff detection sensors or wheels, remove it.
This may cause failure or malfunction of the RYDIS H68 Pro. For information on cleaning cliff detection
sensors and wheels, see page 42.
7
Children and seniors may be surprised at the sight of the RYDIS H68 Pro in operation.
Please let children and seniors know about the operation of the RYDIS H68 Pro.
8
Be careful not to drop the RYDIS H68 Pro from a high place.
Do not use the RYDIS H68 Pro on a narrow or a high place such as a desk, table, etc. If shoes are placed side by side at
the entrance to the living room, the RYDIS H68 Pro may recognize them as the floor, which may cause falling.
9
For safety reasons, the RYDIS H68 Pro was designed not to climb over a threshold higher than 0.4 inch (1cm).
For less than a 0.4inch threshold height, the user is able to choose threshold climbing over on/off option by the remote
control. We recommend not to climb over while in Mop Cleaning mode and Hybrid Cleaning mode due to the Big Mop
with the H2O Tank. We also recommend that you select the Threshold Option (climb over) ON while in Vacuum
Cleaning mode. Factory default is set to not climb over for Hybrid, Vacuum and Mop Cleaning mode. See page 26~29.
10
After charging is complete, keep the RYDIS H68 Pro docked in the charging station, or turn the system
power switch off which is located on the rear side of the RYDIS H68 Pro.
25
RYDIS H68 Pro
What do you want to clean?
The H68 Pro provides 3 basic cleaning mode (Hybrid Cleaning, Vacuum Cleaning and Mop Cleaning) in which you need to
choose one. Hybrid Cleaning performs mop + vacuum at the same time. Vacuum Cleaning performs vacuum only.
Mop Cleaning performs mopping only. Depending on the user’s preference, you can choose among them to maximize the
cleaning in your living environment.
Cleaning Type
Function
Hybrid
Cleaning
Vacuum
Cleaing
Mop
Cleaning
26
For Where
How to Select
Moping,
Vacuuming
at the same
time
Hard floor
Select Hybrid with the Mode
button on the Control Panel
or press Hybrid button on
remote control
Vacuuming
Only
Hard floor and
Carpet
Select Vacuum with the Mode
button on the Control Panel
or press Vacuum button on
remote control
Mopping Only
Hard floor
Select Mop with the Mode
button on the Control Panel
or press Mop button on
remote control
Operation Lamps
Product Operation
Hybrid Cleaning
In Hybrid Cleaning, the RYDIS H68 Pro performs the Vacuum Cleaning and Mop Cleaning at the same time.
Hybrid Cleaning offers a comprehensive floor care solution because of the use of the twin side brushes, the main brush,
the BLDC suction, and the reusable microfiber Big Mop with the H2O Tank all together. The Hybrid Cleaning is
recommended for comprehensive cleaning on your hard floors.
1
Follow the directions on page 18 to attach the Big Mop
with the H2O Tank.
Þ
2
Turn the main power button on.
The LED light will blink top to bottom.
It will show its ready to operate after
2 seconds.
Þ
or
3
Select the Hybrid Cleaning with the Mode button on the
Control Panel and press the Start/Stop button or just press
the Hybrid Cleaning button on the remote control.
Þ
4
or
ĚWhile in Hybrid Cleaning mode, you can also select Turbo Option, Double Deep Cleaning Option and
Threshold (climb over) Option.
To select these please refer to the pages that reference each.
27
RYDIS H68 Pro
Vacuum Cleaning
Vacuum cleaning is used where the needs are vacuum suction only without mop cleaning. It can be used on hard floor or
carpet.
1
2
Turn the system power switch on.
Þ
Turn the main power button on.
The LED light will blink top to bottom.
It will show its ready to operate after
2 seconds.
Þ
or
3
Select the Vacuum Cleaning with the Mode button on the
Control Panel and press the Start/Stop button or just press
the Vacuum Cleaning button on the remote control.
Þ
4
or
ĚWhile in Vacuum Cleaning mode, you can also select Turbo Option, Double Deep Cleaning Option and
Threshold (climb over) Option.
To select these please refer to the pages that reference each.
28
Product Operation
Mop Cleaning
Mop Cleaning mode is used for when you need mopping only without vacuuming with
Sweep Pattern that Back-and-forth motion cleans the floor three times in a straight line.
It can be used only on hard floor. For H68 Pro Big Mop with H2O Tank,
we recommend moistening the Big Mop before attaching
it for longer wet cleaning performance.
Sweep Pattern
1
Follow the directions on page 18 to attach the Big Mop
with the H2O Tank.
Þ
2
Turn the main power button on.
The LED light will blink top to bottom.
It will show its ready to operate after
2 seconds.
Þ
or
3
Select the Mop Cleaning with the Mode button on the
Control Panel and press the Start/Stop button or just press
the Mop Cleaning button on the remote control.
Þ
4
or
ĚWhile in Mop Cleaning mode, you can also select Turbo Option, Double Deep Cleaning Option and Threshold
(climb over) Option. To select these please refer to the pages that reference each.
29
RYDIS H68 Pro
Special Cleaning modes
Cleaning Mode
Function
For Where
How to Select
Intensive
Cleaning
mode
Clean in a 3 x 3 ft area
where the H68 Pro
located
Heavy Dust
Particles or Heavy
Traffic Area
Select Intensive with the Mode button on
the Control Panel or press the Intensive
button on the remote control
Shadow
Cleaning
mode
Clean in the hard to
reach areas
Under a bed or
furniture
Select Shadow with the Mode button on
the Control Panel or press the Shadow
button on the remote control
Manual
Cleaning
mode
Control the robot
vacuum cleaner
directly using the
remote control
Anywhere you
want to go
Press the Manual button on the remote
control and press the Arrow button where
you want to go
Reservation
Cleaning
mode
Start cleaning after 1
hour or at the same
time every day
Anywhere you
want to go
Press the Reservation button and press
the Select button on the remote control
Option
Function
Turbo
Option
Start cleaning with
turbo suction power
Anywhere you
want to go
Press the Turbo button on the
remote control
Threshold
Option
Set to be able to climb
over a threshold lower
than 0.4 inch (1 cm)
Anywhere you
want to go
Press the Threshold button on the
remote control
Double
Deep
Cleaning
Option
Performs 2 cleaning
sessions of the vertical
pattern overlapped by
the horizontal pattern.
Anywhere you
want to go
Press the Double CL button on the
remote control
30
For Where
How to Select
0.4 inch
(1 cm)
Product Operation
Intensive Cleaning
Intensive Cleaning is used for heavy dust area. The RYDIS H68 Pro intensively cleans the surrounding area relative to its
current location. It cleans in a 3 x 3 ft area where the H68 Pro located.
1
2
Turn the system power switch on.
Þ
Turn the main power button on.
The LED light will blink top to bottom.
It will show its ready to operate after
2 seconds.
Þ
or
3
Select the Intensive Cleaning with the Mode button on the
Control Panel and press the Start/Stop button or just press
the Intensive Cleaning button on the remote control.
Þ
4
or
ĚWhile
in Intensive Cleaning mode, you can also select Turbo Option, Double Deep Cleaning Option and
Threshold (climb over) Option.
To select these please refer to the pages that reference each.
ĚIn
Intensive Cleaning mode, the RYDIS H68 Pro stops on the spot after it has finished the cleaning.
ĚHybrid
Cleaning and Vacuum Cleaning are supported with Intensive Cleaning. Mop Cleaning is not
supported with Intensive Cleaning.
31
RYDIS H68 Pro
Shadow Cleaning
You can clean areas under your bed, sofa, or furniture that are difficult to clean with an upright vacuum cleaner or by hand.
ĚTo
use Shadow Cleaning mode, turn the room light on. In a dark room, the RYDIS H68 Pro can’t detect the
space under the bed or furniture.
ĚThe
RYDIS H68 Pro moves to a place under the bed or furniture to start shadow cleaning. To reduce the time
spent moving through the room, put the RYDIS H68 Pro in front of the bed or furniture under which you want
to perform shadow cleaning.
1
Þ
3
Þ
2
Put the RYDIS H68 Pro in front of
a bed or furniture. Recommend
turn the room light on if any.
Turn the main power button on.
The LED light will blink top to bottom.
It will show its ready to operate after
2 seconds.
4
Select the Shadow Cleaning with the Mode button on the
Control Panel and press the Start/Stop button or just press
the Shadow Cleaning button on the remote control.
Þ
or
or
5
Turn the system power switch on.
Þ
ĚWhile in Shadow Cleaning Mode, you can also select Turbo Option,
Double Deep Cleaning Option and Threshold (climb over) Option.
To select these please refer to the pages that reference each.
ĚRYDIS H68 Pro will stop in front of a bed or furniture after Shadow
Cleaning.
ĚHybrid Cleaning and Vacuum Cleaning are supported with Shadow
32
Cleaning. Mop Cleaning is not supported with Shadow Cleaning.
Product Operation
Manual Cleaning
You can control the RYDIS H68 Pro directly using the remote control to cover anywhere you want to be cleaned.
1
Turn the system power switch on.
Þ
2
Turn the main power button on. The LED light
will blink top to bottom. It will show its ready
to operate after 2 seconds.
Þ
or
3
Press the Manual button on the remote control.
Þ
Air suction will start in its current place.
If you press the Manual button again, air suction will be stopped.
4
By pressing direction keys on the remote control, you can move
the RYDIS H68 Pro where you want it to go.
Þ
ĚDuring
ĚYou
charging, you can’t move the RYDIS H68 Pro manually.
can use this mode when you want to move the RYDIS H68 Pro without air suction.
33
RYDIS H68 Pro
Reservation Cleaning (Scheduled Cleaning)
For daily efficient hands free cleaning, the H68 Pro provides 2 Reservation Cleaning Modes. One starts cleaning after 1 hour
from the time you set it and the other starts at the same time everyday.
ĚReservation
Cleaning only works from the charging station after you set the Reservation Cleaning.
You must put the RYDIS H68 Pro on the charging station to begin at the scheduled time.
ĚYou
ĚIf
can only set the Reservation Cleaning mode using your remote control.
the RYDIS H68 Pro is charging at the scheduled time, it will start the cleaning after finishing the charging.
ĚIf
the cleaning time is scheduled to ˄1 hour˅, your setting will be cleared after completing the ˄1 hour˅
scheduled cleaning.
ĚPlease
1
reference your home security alarm before setting the Reservation Cleaning.
Turn the system power switch on.
Þ
2
Turn the main power button on. The LED
light will blink top to bottom. It will show
its ready to operate after 2 seconds.
Þ
or
34
3
Þ
5
Þ
Press the Reservation Mode
either 1 hour or Daily by
pressing the RESERVATION
button on the remote control.
H68 Pro will be cleaning at the time of your
Reservation setting.
4
Press the SELECT button
to confirm the Reservation
setting.
Þ
Product Operation
Turbo Option
While you are using the Hybrid / Vacuum / Intensive / Shadow / Manual Cleaning, the Turbo Option is on by default (Turbo Option is
disabled during Mop Cleaning)Though, you can turn off the Turbo Option to increase cleaning time by following the steps below:
1
Turn the system power switch on.
Þ
2
Turn the main power button on. The LED light will blink top to
bottom. It will show its ready to operate after 2 seconds.
Þ
or
3
Select any one of Hybrid / Vacuum / Intensive / Shadow / Manual Cleaning and press the Start/Stop button.
To learn how to select these options, you may refer to the relevant sections on the User Manual.
Þ
or
4
or
or
or
Press the Turbo Option button on the
remote control. The Turbo Option
indicator is now turned off.
Þ
OFF
ĚKeep in mind that resetting the main power will automatically enable the Turbo Option.
35
RYDIS H68 Pro
Threshold Option
ĚFor
safety reasons, the RYDIS H68 Pro was designed not to climb over a threshold higher than 0.4 inch (1cm).
Ě
For less than a 0.4inch threshold height, the user is able to choose threshold climbing over ON/OFF option by
the remote control. We recommend not to climb over while in Mop Cleaning mode and Hybrid Cleaning mode due
to the Big Mop with the H2O Tank. We also recommend that you select the Threshold Option (climb over) ON while
in Vacuum Cleaning mode. Factory default is set to not climb over for Hybrid, Vacuum and Mop Cleaning mode.
1
2
Turn the system power switch on.
Þ
Turn the main power button on. The LED
light will blink top to bottom. It will show
its ready to operate after 2 seconds.
Þ
or
3
Select any one of Hybrid / Vacuum / Intensive / Shadow / Manual Cleaning and press the Start/Stop button.
To learn how to select these options, you may refer to the relevant sections on the User Manual.
Þ
or
4
or
Press the Threshold Option button on the remote
control. Threshold Option indicator is now turned on.
Þ
or
5
or
The RYDIS H68 Pro will now travel over
thresholds with height of 0.4 inch (1 cm)
or lower.
Þ
0.4 inch
(1 cm)
36
Product Operation
Double Deep Cleaning Option
The Double Deep Cleaning Option performs 2 cleaning sessions of the vertical pattern overlapped by the horizontal pattern.
Deep Cleaning Mode
Vertical pattern overlapped by
the horizontal pattern
1
Turn the system power switch on.
Þ
Double Deep Cleaning Mode
Performs 2 cleaning sessions of the vertical
pattern overlapped by the horizontal pattern.
2
Turn the main power button on. The LED light will blink top to
bottom. It will show its ready to operate after 2 seconds.
Þ
or
3
Select any one of Hybrid / Vacuum / Mop / Intensive / Shadow Cleaning. To learn how to select these options,
you may refer to the relevant sections on the User Manual.
Þ
or
or
or
or
37
RYDIS H68 Pro
4
Press the Double CL button on the remote control.
The Double Deep Cleaning Option indicator is
now turned on.
Þ
ĚDouble
5
The RYDIS H68 Pro will perform 2 cleaning
sessions of the vertical pattern overlapped
by the horizontal pattern.
Þ
Deep Cleaning Option is available for Hybrid Cleaning, Mop Cleaning, Vacuum Cleaning, Intensive
Cleaning, and Shadow Cleaning. Double Deep Cleaning Option is not available in Reservation Cleaning.
38
Maintenance
Language Setting
ĚYou
can select a language for voice guidance from the ones available in the system.
1
2
First, turn the power switch on.
Then press and hold the Mode
button for 2~3 seconds
until the display appears
with a beep sound.
Turn the system power switch off.
3
Keep pressing the Start/Stop button until you have
reached the language you desire.
Whenever you press the Start/Stop button,
you will hear the following sentence as a
different language.
- ˈStarting automatic cleaning.ˉ
- ˈCleaning is canceled.ˉ
4
After hearing the language you
desire, press the power button to
complete the language setting.
ĚHit
the Start/Stop button once for English, twice
for Spanish, and 3 times for French.
Language
No.
English
1
Spanish
2
French
3
39
RYDIS H68 Pro
Cleaning the Dust Bin
1
2
2
1
Remove the dust bin cover.
Remove the dust bin.
3
4
Empty the dust bin.
Remove the dust filter.
5
6
1
2
Input the dust bin in the RYDIS H68 Pro.
Input the dust filter.
ĚMake
sure to follow the directions carefully
when installing the dust bin.
7
Click
ĚTo
clean the dust filter and determine its lifetime,
see page 41.
Input the dust bin cover.
40
Maintenance
Cleaning the Dust Filter
ĚThe
dust filter can be easily cleaned by gently scraping off the surface or compressed air.
The
It
ĚWe
If
dust filter is reusable.
is recommended not to clean with water.
recommend that you clean the dust filter whenever the bin is more than 2/3 full.
you do not clean the dust filter, the suction power of the RYDIS H68 Pro can be reduced.
ĚReplace
the dust filter if you notice a tear or a hole.
The
lifetime of a dust filter is about 3 months for normal use, but may vary depending on the frequency and
operating environment.
1
Remove the dust filter.
4 Mesh filter
2 Fine mesh filter
2
3
Clean the dust filter.
(Remove dust from each of the four
filters by blowing.)
Filter cover
1 Pre filter
3 Main filter
Filter case
Assemble the dust filter .
(Assemble four filters as described above)
ĚApplying excessive force will damage the dust filter cover while disassembling the dust filter.
ĚIf you assemble the filter incorrectly, the performance may be degraded or the suction power may be reduced.
41
RYDIS H68 Pro
Cleaning Side Brushes, Wheels and Sensors
Cleaning side brushes
Clean the two side brushes.
Þ
To clean the side brushes, pull out the side brushes from the RYDIS H68 Pro.
Cleaning wheels
Clean wheels using the brush.
Þ
To clean the front wheel, remove the screws and remove the wheel, and clean it with the brush.
To clean the two main wheels, clean them with the brush while rotating slightly by hand.
Remove foreign objects such as hair that obstruct the wheel’s operation.
42
Maintenance
Cleaning sensors
Clean (blow or wipe) the three sensors with the included cleaning brush or a cotton swab.
Þ
If sensors are severely contaminated, wipe with a moistened cotton swab.
Do not use benzene or alcohol to clean sensors.
Cleaning the camera sensor
Þ
Clean the camera sensor with a dry cloth.
43
RYDIS H68 Pro
Cleaning the Dust Inlet
2
1
Remove the main brush.
Remove the dust inlet cover.
3
4
Clean the removed main brush with
the cleaning brush.
5
To reinstall the dust inlet cover, insert the 2 tips to the
matching holes on RYDIS H68 Pro.
44
First, insert the main brush’s
hexagonal head to the matching
hexagonal socket on the
RYDIS H68 Pro.
Second, install the main
brush by inserting the
bearing to the housing.
Make sure to orient bearing
so that the smaller tip is
facing inward.
Maintenance
Using and Managing the Battery
The battery is a consumable item. The more you use the battery, the shorter the battery’s lifetime.
Battery lifetime
We guarantee 12 months of use in a normal environment.
Þ
Always charge the battery fully for the best use experience.
Þ
The battery lifetime may vary depending on the use environment.
Þ
Charging battery
If you are using the RYDIS H68 Pro for the first time, please fully charge the battery first.
Þ
It takes about 2 hours to charge the battery fully.
Þ
To extend battery life
If you don’t intend to use the RYDIS H68 Pro for an extended period of time, turn off the system power switch after
charging the battery fully.
Þ
Clean the dust inlet, dust bin, main brush, and side brushes frequently. If you use the RYDIS H68 Pro with the dust bin full,
it may shorten the battery lifetime.
Þ
Always use the RYDIS H68 Pro after fully charged.
Þ
Do not use the RYDIS H68 Pro in a place where it will be exposed to direct sunlight or near the heating source.
Þ
45
RYDIS H68 Pro
Battery replacement
If you notice that the operating time has been significantly reduced, you may need to replace the battery.
Þ
You must use a battery that is manufactured by Moneual.
Þ
Remove the battery from the RYDIS H68 Pro when the system power is off.
Þ
Dispose of your old batteries according to the local laws and regulations of your region.
To purchase an extra battery, please contact our customer service.
Þ
If it is difficult to replace the battery by yourself, please contact our customer service.
Þ
1
2
Turn the system power
switch off.
Remove four screws and remove
the battery cover.
3
Disconnect the battery cable connector and remove the battery.
(Press and hold the lock clip to disconnect the battery cable connector.)
46
Maintenance
4
Install the new battery
and connect the battery
cable connector.
Replace the battery cover and
tighten with four screws.
Battery handling and safety information
If you leave the fully discharged battery for a long time, the battery may become damaged and you may not be able to
use it.
Þ
If you use a battery other than Moneual’s for use with the RYDIS H68 Pro, the RYDIS H68 Pro or the battery may be
damaged.
Þ
Remove the battery before disposing of the RYDIS H68 Pro.
Þ
47
RYDIS H68 Pro
Voice Guidance
Following voices are the basic voice list. Depending on your model, some contents of these voices may differ from the
actual voices.
Voice Guidance
Starting Hybrid cleaning.
The RYDIS H68 Pro will start Hybrid cleaning.
Starting Vacuum Cleaning.
The RYDIS H68 Pro will start Vacuum cleaning.
Starting Mop cleaning.
The RYDIS H68 Pro will start Mop cleaning.
Starting Shadow Cleaning.
The RYDIS H68 Pro will start Shadow cleaning.
Starting Intensive Cleaning.
The RYDIS H68 Pro will start Intensive cleaning.
Cleaning is completed.
The cleaning is completed.
Cleaning is cancelled.
When you press the Start/Stop button during operating.
Turbo option has been activated
The suction power is changed into Turbo.
Threshold option has been activated
The RYDIS H68 Pro can climb a threshold.
Double Deep option has been activated
The RYDIS H68 Pro performs 2 cleaning sessions of the vertical pattern overlapped
by the horizontal pattern.
Moving toward the charging station.
When you press the CHARGE button or the RYDIS H68 Pro is moving to the
charging station for auto charging.
Starting to charge.
The charging station will start the charging process.
Will Start Cleaning in 1 hour
The time setting is completed for 1 hour later cleaning.
Daily Scheduled Setup Completed
The time setting is completed for every day cleaning.
48
Maintenance
Maintenance Messages
Out of battery.
The battery has been discharged.
Dust Bin is missing.
The dust bin has been removed.
Please place the cleaner on the floor.
The RYDIS H68 Pro has been lifted from the floor.
Please check the wheels.
The wheels are jammed. See page 42 for Cleaning the wheels.
Please check the front wheel.
The front wheel is jammed. See page 42 for Cleaning the wheels.
Please check the main brush.
The main brush is jammed with hairs or other obstacles. See page 44 for Cleaning
the Dust Inlet.
Please check the side brush.
The side brushes are jammed with hairs or obstacles. See page 42 for Cleaning the
side brushes.
Please check the bumper.
The bumper is not working properly or the bumper is stuck.
Check if there is anything inside the bumper or jiggle the bumper to loosen it.
Please check bottom sensor.
The bottom sensor is not working properly.
Clean the bottom sensors. See page 43 for the Cleaning sensors.
The RYDIS Robot Cleaner may not perform on dark black carpet or tile.
Attach the mop pad for the hybrid cleaning
When you press Hybrid button while the mop is not installed.
Detach the mop pad for the vacuum cleaning
When you press Vacuum button while the mop is installed.
Can not find the charging station
When the H68 Pro can not find the charging station due to several conditions.
49
RYDIS H68 Pro
Error Message Description
ĚThe
RYDIS H68 Pro will display a combination of numbers and icons to inform the users of what the issue is.
Using the information below, it is important to resolve the issue first as pressing any button will clear the
error message.
ĚIf
the problem has not been solved with one of the solutions below, please contact our customer service.
ĚThe
error voice guidance comes only one time when the error has occurred. You can re-check the error status
by pressing the SELECT button on the remote control.
Cause
The battery is fully discharged, so the RYDIS H68 Pro does not work.
Voice
Out of battery.
Solution
Cause
The wheel motor has been overloaded. Some obstacles (hairs, wires, etc.) are
jammed on one or both wheels.
Voice
Please check the wheels.
Solution
Move the RYDIS H68 Pro to another place. Remove obstacles on the wheel(s).
Cause
The dust inlet fan is overloaded.
Voice
There is an error.
Solution
Remove obstacles in the dust inlet and empty the dust bin.
Cause
The main brush is overloaded.
Voice
Please check the main brush.
Solution
Remove obstacles (hairs, wires, etc.) in the main brush.
Cause
You tried to charge the RYDIS H68 Pro without the battery.
Voice
No Battery.
Solution
Check if the battery is installed in the RYDIS H68 Pro properly.
Cause
The battery failure.
Voice
There is an error.
Solution
50
Charge the RYDIS H68 Pro manually.
Contact your customer service.
Maintenance
Cause
You operated the RYDIS H68 Pro without the dust bin.
Voice
Dust bin is missing.
Solution
Cause
Both main wheels have been lifted.
Voice
Please place the cleaner on the floor.
Solution
Replace the dust bin.
Put the RYDIS H68 Pro on the floor or move it to another place.
Cause
Escape rough road mode continually occurred in excess of the limit while
moving.
Voice
Please check the front wheel.
Solution
Remove obstacles from the front caster and empty the dust bin.
Cause
Bumper crash continually occurred in excess of the limit while moving.
Voice
Please check the bumper.
Solution
Remove obstacles from the bumper and check if the bumper has been dented.
Cause
The RYDIS H68 Pro has continually detected the risk of falling more than
limitation.
Voice
Please check the bottom sensor.
Solution
If the color of the floor is black, move the RYDIS H68 Pro to another place.
Clean or wipe obstacles from the cliff sensors (see page 43).
Cause
Other error.
Voice
There is an error.
Solution
Contact your customer service.
51
RYDIS H68 Pro
Troubleshooting
Problem
Solution
If the RYDIS H68 Pro does not work or
if the power is not turning on.
tTurn on the system power switch at the lower-rear side of the RYDIS H68 Pro.
tCheck the battery level lamp on the control panel.
tCharge the battery if the battery level is low.
If the RYDIS H68 Pro does not charge.
tClean
the charging terminals on the bottom of the RYDIS H68 Pro and the
charging station.
tCheck if the charging lamp is lit up blue for power on and red for charging.
If not, then check if the power cord is connected to the charging station.
tTurn on the system power switch at the rear of the RYDIS H68 Pro.
tYou can also charge the RYDIS H68 Pro by connecting the power adaptor
directly to the power jack at the rear side of the robot vacuum cleaner.
If the RYDIS H68 Pro does not return
to the charging station.
tCheck
the power connection and make sure blue lamp is on.
tMake
sure the charging station is installed to the wall solidly.
tMake sure the location of the charging station is an open area.
See page 16 for Installing the Charging Station.
tClear
all obstacles around the charging station.
tInstall
the charging station on hard floor when mop is attached.
If the remote control does not work.
tTurn on the system power switch at the rear side of the RYDIS H68 Pro.
tReplace
the batteries on the remote control.
If the suction power is weaker than
normal.
tEmpty the dust bin.
tClean the filter of the dust bin.
tCheck if there is anything blocking the dust inlet.
tC
heck if the Turbo option is on. If the Turbo option is on, it will provide more
suction power.
If the main brush does not rotate.
tCheck
if there is anything tangled in the main brush.
tMake
sure the main brush has been installed properly.
If the side brushes do not rotate.
tCheck
if there is anything tangled in the side brushes.
tMake
sure the side brushes have been installed properly.
If the operational noise is louder than
normal.
tCheck
if there is anything tangled in the main brush.
tMake
sure the main brush has been installed properly.
tIf
the Turbo option is on, that can generate more noise.
52
Customer Support
Problem
Solution
If the RYDIS H68 Pro is not driving
properly .
tCheck
if the mop pad is installed properly.
If the RYDIS H68 Pro is slipping during
Hybrid Cleaning or Mop Cleaning.
tMake
sure the Big Mop is attached properly.
tClean
the sensors with a soft cloth. For more information, check on page 43.
tDamp
the Big Mop with less water.
tClean
the two main wheels.
tClean
the Big Mop before cleaning.
tTry
cleaning with water only.
tTry
the Big Mop as dry.
tTry
other floor.
If the Reservation (Scheduled) cleaning tMake sure you are pressing the SELECT button to confirm the time setting
does not work.
on the remote control.
tYou
can check if the Reservation lamp is properly activated on the control panel.
If the RYDIS H68 Pro does not respond
when you press a button.
tF
or your safety, if you are directly connected to the power cord without the
If the cleaning time has been
shortened.
tConfirm that the red light on the charging station is lit up.
charging station, the buttons will not be recognized. After disconnecting
from the power cord, the buttons will be recognized.
tConfirm that the RYDIS H68 Pro is fully charged by checking the battery
status lamp on the display. Three solid bars indicate that the battery is fully
charged.
tContact Moneual support to replace or repair the battery if it does not solve
the issue above.
I cannot select the Turbo Option
(suction power).
The Turbo Option is supported by the Hybrid Cleaning, Vacuum Cleaning,
Intensive Cleaning, and Shadow Cleaning.
The Turbo Option is not supported while in the Mop Cleaning mode.
If the RYDIS H68 Pro cannot climb over
a threshold higher than 0.4inch (1cm).
tFor safety reasons, the RYDIS H68 Pro was designed not to climb over a
threshold higher than 0.4 inch (1cm).
tFor less than a 0.4inch threshold height, the user is able to choose threshold
climbing over on/off option by the remote control. We recommend not to
climb over while in Mop Cleaning mode and Hybrid Cleaning mode due
to the Big Mop with the H2O Tank. We also recommend that you select the
Threshold Option (climb over) ON while in Vacuum Cleaning mode. Factory
default is set to not climb over for Hybrid, Vacuum and Mop Cleaning mode.
53
RYDIS H68 Pro
Problem
Solution
If the Hybrid Cleaning or Mop Cleaning tIf the Big Mop with H2O Tank is not attached, the voice guidance will say
mode have an error message.
ˈAttach the mop pad.ˉGPlease attach the mop pad.
If the Vacuum Cleaning mode has an
error message.
tIf the Big Mop with H2O Tank is attached, the voice guidance will say
I cannot select the Mop Cleaning
mode with the Intensive Cleaning
mode.
tThe Intensive Cleaning mode is only supported by the Hybrid and Vacuum
I cannot select the Mop Cleaning
mode with the Shadow Cleaning
mode.
tThe Shadow Cleaning mode is only supported by the Hybrid and Vacuum
54
ˈDetach the mop pad.ˉGRemove the mop pad.
Cleaning mode. The Intensive Cleaning is not supported if you select the
Mop Cleaning mode.
Cleaning mode. The Shadow Cleaning mode is not supported if you select
the Mop Cleaning mode.
Customer Support
Specifications
RYDIS H68 Pro
Model
H68 Pro
Dimensions
13.7 inches (34.8 cm) (Diameter) x 3.4 inches (8.6 cm) (Height)
Weight
5.9 lbs (2.674 kg)
Speed
Cleaning mode: 12.6 inches/sec. (32 cm/sec.)
Driving mode: 11.8 inches/sec. (30 cm/sec.)
Operating noise
Max. 70 dB
Power consumption
Max. 25 W
Battery
Lithium iron phosphate (LiFePO4) 12.8 V DC (2800 mA)
Dust bin capacity
20 oz (600 ml)
Charging time
Max. 120 minutes
Operating time
- About 120 minutes
- About 80 minutes (Turbo Cleaning)
- About 3 hours with wet mop and 5 hours with dry mop (Mop Cleaning)
Charging Station
Model
MRD6500
Dimensions
10.4 inches (26.4 cm) (W) x 7 inches (17.8 cm) (H) x 5.3 inches (13.5 cm) (D)
Weight
1.3 lbs (606 g)
Input Power
18 V DC
Output Power
18 V DC
Signal Transmission Distance(IR)
16.4 ft (5 m) / 26.2 ft (8 m)
55
RYDIS H68 Pro
Remote Control
Model
MRC6500
Dimensions
5.5 inches (14 cm) (W) x 0.9 inch (2.3 cm) (H) x 2 inches (5.1 cm) (D)
Weight
0.15 lbs (66 g)
Battery
AAA Size x 2
Signal Transmission Distance(IR)
16.4 ft (5 m)
56
Moneual Robot Vacuum Cleaner Limited Warranty
A. Limited Warranty
Moneual, Inc. (ˈMoneualˉ) warrants the product line of Moneual Robot Vacuum Cleaner (ˈThe Productˉ) you have purchased, from Moneual or from a
Moneual Authorized Reseller, is to be free from defects in materials and workmanship under normal use during the period specified below.
The warranty period begins on the date of purchase. Your original purchase invoice (sales receipt), is your proof of the date of purchase. If you cannot
provide the original purchase invoice (sales receipt), the warranty period will be based on the manufacture date-code shown on the Product.
A Product that has been exchanged is warranted starting at the original date of purchase.
The Warranty period for the product line is as follows:
Parts One (1) Year
Labor One (1) Year
This warranty extends only to you, the original purchaser. It is not transferable to anyone who subsequently purchases, leases, or otherwise obtains the
Product from you. It excludes expendable parts. During the warranty period, Moneual will repair or replace defective hardware with factory refurbished
parts and products. All exchanged parts and Products replaced under this warranty will become the property of Moneual. During the warranty period,
there will be no charge for labor or parts. If, after repeated efforts, Moneual is unable to repair the Product to good working order, you may get a
replacement unit from Moneual, please note the replacement model may not be the exact same model, Moneual will always replace with equal or
better spec Product.
To ensure timely response to a service request, please be sure to register your Product at http://www.moneualusa.com. Within ten (10) calendar days
from the time you purchase the Product, be sure to put in the purchase date, location, and serial number associated with the Product purchase, technical
support will ask for sales receipt or other proof of purchase to determine warranty coverage.
B. Warranty Limitation; Exclusion; Exclusive Remedies
This Limited Warranty does not extend to any Product that has been damaged
1. during or as a result of use other than for its normal intended purpose, failure to use the Product in accordance with the User’s Manual which a
ccompanies it, misuse, abuse, or negligence;
2. by the use of parts not manufactured or sold by Moneual;
3. by modifications of the Product;
4. as a result of services by anyone other than Moneual Service Center;
5. improper transportation or packing when returning the Product to Moneual Service Center;
6. unusual physical or electrical stress or interference, failure or fluctuation of electrical power, lighting, static electricity, fire, natural disasters, or acts of
God.
Some states or provinces do not allow the exclusion or limitation of incidental or consequential damages for consumer products, and some states or
provinces do not allow limitation on how long an implied warranty lasts. In such states and provinces, the exclusion or limitation of this limited warranty
may not apply to you.
This Limited Warranty gives you specific legal rights. You may also have other rights that vary from state to state. You are advised to consult applicable
state or provincial laws for full determination of your rights.
C. Obtaining Carry-In or Mail-In Warranty Services
Subject to the following terms and conditions, you are entitled to mail-in repair service during the applicable warranty period.
1. Prior to obtaining service you must contact the Moneual Customer Service Center at 1-866-399-0600. Please have the model number, serial number,
place of purchase, and date of purchase with the receipt of purchase, please have it ready when you call. The serial number (S/N) and model number
are located on the back/ bottom of the Product.
59
2. Moneual Technical Support will attempt to help you resolve your problem over the telephone. During problem resolution, Moneual will require your
assistance in performing routine diagnostic procedures. If appropriate, Moneual will then issue you a Return Merchandise Authorizations (RMA)
number to be used as a means of identifying the Product.
3. After calling 1-866-399-0600 to obtain a Return Merchandise Authorization number. Mail-In Repair service is available for Products purchased and
located in the continental United States, you are responsible for the shipping charge to ship the Product to the Service Center, Moneual will pay for the
shipping to ship the Product back to you. Product purchased in Canada, Alaska, Hawaii and Puerto Rico, you are responsible for the shipping charges
to and back from the Moneual Service Center.
4. All Mail-In service must take place by returning the Product to the Moneual Service Center. You must prepay any shipping charges, export taxes,
custom duties and taxes or any other charges associated with transporting of the Product to the Moneual Service Center. In addition, you are
responsible for insuring the Product during shipment. You assume the risk of loss during shipment. Moneual is not responsible for loss or damage
during shipping to the Moneual Service Center.
5. Use the original shipping and packing materials and include a description of the symptoms of the problem. If the original shipping and packing
materials and boxes are not available, please make sure the Product is properly packaged and secured inside a shipping container. The Return
Merchandise Authorization (RMA) number must be placed on the exterior of the shipping container. Physical damage that occurred during shipping is
not warranted and not covered by the limited warranty.
6. Include your name and address, proof of the place and date of purchase (from original Sales Receipt), and the serial number and model number of the
Product. The serial number and the model number are located on the back of the Product.
7. Moneual is not responsible for a Product shipped to the Moneual Service Center that is scratched or dented, including but not limited to, scratches,
dents, or is not from normal wear and tear use on the Product, the Product will be repaired or replaced with a similar refurbished Product in similar
condition as the original Product that was returned. Products shipped to the Moneual Service Center with missing parts will be replaced without those
parts. Products that are beyond repair will be replaced with refurbished Products in equal or better spec as the original Product that was returned
should the same model not be available.
8. Cross-shipping. For customers that need the replacement Product as soon as possible to reduce down time and loss productivity, cross-shipping can
be arranged with a Credit Card on file as collateral. The value of the Product will be authorized on the customer’s credit card and held as collateral
upon the shipment of the replacement Product from Moneual Service Center, the amount authorized will be cancelled upon receipt of the defective
Product back from the customer. The same terms and conditions applied to this paragraph (#8) as are stated in paragraph #4-#7. Please see above.
The authorization is valid for 30 days, and will be processed for payment if the defective Product is not received. (Caution for Debit Cards, upon
authorization, the amount may be deducted from your balance, so the use of credit card is strongly suggested).
Additional Information
You may request additional information on how to obtain warranty Services by contacting Moneual or any Moneual Service Center. You may also
request information on how to obtain warranty service or the location of the Moneual Service Provider by calling or contacting:
Moneual Customer Service Center (On Monday – Friday, 9AM – 5PM PST)
Tel: 1-866-399-0600
Outside of USA: (909) 334-7500
e-mail: [email protected]
13825 Norton Ave
Chino, CA 91710
Please note:
Warranty is only valid for the Original Owner purchased from an authorized reseller. Second owners or eBay purchase carry no warranty.
All returns, exchanges, refunds, or repairs should be referred back to the origin of purchase.
Proof of purchase (Receipt) will be required for warranty services.
60
Moneual Customer Service
On Monday - Friday, 9AM - 5PM PST
Tel: 1-866-399-0600
Outside of USA: (909) 334-7500
[email protected]
Before you call for service, please be ready to
provide the following information:
ˍGModel name
ˍGA description of your problem ˍGPhone no. & address
www.moneualusa.com