1
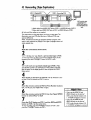
_Video Cassette
Recorder
VRX364AT
Easy Taping.
Owner's
Manual
Once your PHILIPS MAGNAVOX purchase is registered, you're eligible to receive all the privile,
of owning a PHILIPS MAGNAVOX product. So complete and return the Warranty Registration
Card enclosed with your purchase at once.And take advantage of these important benefits.
Know these
PH I LI PS
Congratulations
welcome
Dear
safetysymbols
on your purchase,
and
to the "family!"
PHILIPS
MAGNAVOX
product
owner:
Thank you for your confidence in PHILIPS MAGNAVOX.You've
selected one of the best-built, best-backed products available
today.And we'll do everything in our power to keep you happy
with your purchasefor manyyears to come.
As a member of the PHILIPS MAGNAVOX "family;' you're entitled
to protection by one of the most comprehensive warranties and
outstandingservice networks in the industry.
What's more, your purchase guarantees you'll receive all the information and specialoffers for which you qualify,plus easy accessto
accessoriesfrom our convenient home shoppingnetwork.
And most importantly you can count on our uncompromising
commitment to your total satisfaction.
All of this is our way of sayingwelcome-and thanks for investingin
a PHILIPS MAGNAVOX product.
Sincerely,
This
"bolt ofmaterial
lightning"
indicates
uninsulated
within
your
unit may cause an electrical shock. F,_--the safety of everyone in your ho'
hold, please do not remove procl_
covering.
The
"exclamation
calis
attention
to featurespoint"
for which
you should read the enclosed literature closely to prevent operating
and maintenance problems.
WARNING:
TO PREVENT FIRE OR
SHOCK HAZARD, DO NOT EXPOSE
THIS EQUIPMENT TO RAIN OR
MOISTURE.
CAUTION:To
prevent electric shock,
match wide blade of plug to wide slot,
and fully inser_
ATTENTION:
Pour _viter les chocs
_lectriques, introduire la lame la plus
large de la fiche dans la borne correspondante de la prise et pousser
jusqu'au fond.
For Customer
Robert Minkhorst
President and Chief Executive Officer
P.S. Remember, to get the most from your PHILIPS
MAGNAVOX
product, you must return your
Warranty Registration Card within 10 days. So
please mail it to us right now!
Use
Enter belowthe SerialNo.
whichis locatedon the rear
of the cabinet. Retain this
informationfor future reference.
Model No.
Serial No.
:Introduction3
Welcome
to your VCR
owner's
manual•
i
This manual has seven sections: Setting Up Your VCR; Description of Controls; Basic Operations; Recording;
Playing; Stereo Features; and Information You May Need.The instructions explain all of theVCR's features,
which are listed below.You cannot hurt yourVCR by trying the features! So read on - and relax.
Features
• HQ (High Quality) System
• Automatic Channel Programming
• On-Screen Displays in English or Spanish
• Display Panel
• MTS (Multi-ChanneITelevision Sound) System
• Hi-Fi Stereo Sound System
• Automatic Tracking Adjustment
• One Touch Recording
• Unattended (Timer) Recording
• Special Effects Playback: Forward and Reverse Searching; Still;
Slow Motion
• Remote Control With Capability to Operate'l-V, Cable Box, and
Digital Satellite System
• Repeat Playback
• Automatic Operation Features
• ReaITime Counter
• Daylight-SavingTime
• TheVCR Plus+ Programming
• Time Search Function
• Automatic Head Cleaner
System
• Automatic Clock Setting
• Jog & Shuttle Control
Safety
Precautions
Warning:To
prevent fire or shock hazard, do not expose
this equipment
to rain or moisture.
FCC Warning:Any
unauthorized
changes or modifications
to this equipment
void the user's authority to operate it.
ThisVCR, equipped with a HQ (High Quality) system, is compatible with existingVHS (video home system) equipment.
Philips Consumer Electronics Company recommends that you use
only video cassette tapes that have been tested and inspected for
use in two, four, six, and eight hourVCRs, and which are labeled
with the_
marl_The use of tapes that have not been inspected
for use in two, four, six, and eight hourVCRs may result in poor
picture quality and excessive deposits on the video heads,which
may not be covered by the warranty if damageoccurs.
Note to the Cable TV System Installer: This reminder is provided to call the Cable TV system installer's attention to Article
820-40 of the National Electrical Code, which provides guidelines
for proper grounding - in particular, specifying that the cable
ground shall be connected to the grounding system of the building,
as close to the point of cable entry as possible.
Copyright 1997 Philips Consumer Electronics Company.All rights
reserved.VCR Plus+ and PlusCode are trademarks of Gemstar
Development Corporation.TheVCR
Plus+ system is manufactured
under license from Gemstar Development Corporation.
Before doing anything else, record
the VCR's model and serial numbers
in the spaces provided on page two.
These numbers will help us assist
you if you ever call for help.
_
4:TableofContents
Setting
Up Your VCR
Introduction
......
Table of Contents
..........
.............
.........
.......
.....
....
. : ........
_. _...".,
..........
'........
........
......
,. .....
? -,
Before UsingYourVCR
.......
.. ...........
,...
..........................
5
Hookups Without
a Cable Box ..........................................
6-7
Hookups With a Cable Box/Digital
Satellite System ...................
_ .......
8-9
Hookups With a Stereo "IV ..............................................
I0
Turning on YourVCR
....................................................
II
Channel Memory
..................................................
,12-13
Setting the Clock ...................................................
14-17
Daylight-Saving Time Selection ...............................
_ ............
18
Language Selection
....................................................
19
Setting the Remote to Operate a TV ......................................
20
Setting the Remote to Operate a Cable Box/Digital
Satellite System ..............
21
Description
of Controls
Remote Control Buttons .............................................
VCR Display Panel .....................................................
Front Panel ........................................................
Rear Panel ...........................................................
On-Screen
Status Displays ...............................................
22-24
25
26-27
28
29
Basic Operations
Playing ..............................................................
Recording
...........................................................
Recording
Recording One Channel/Watching
Another
.................................
One Touch Recording
...................................................
Timer Recording
................................
. ..................
Setting Up the VCR Plus+ Programming System ............................
Timer Recording With the VCR Plus+ Programming
System ..................
Rerecording
(Tape Duplication)
...........................................
30
31
3.
33
34-37
38-39
40-41
42
Playing
Repeat Playback .......................................................
Time Search .........................................................
Real Time Counter Memory
.............................................
Special Effects Playback ...............................................
Automatic
Operation
Features .........................................
Stereo
43
44
45
46-47
48-49
Features
MTS Broadcast Stereo System
Hi-Fi Stereo Sound System
Information
.........................................
50-51
.52-53
You May Need
Helpful Hints
Glossary
............................................................
Specifications .........................................................
Limited Warranty
.....................................................
Index ...............................................................
Supplied Accessories
...................................................
.54-55
56
57
58
59
60
3
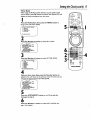
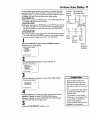
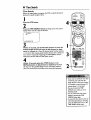
Replace
Using
•
•
•
•
•
the battery
compartment
the Remote
Control
lid.
Point the remote control at theVCR's remote sensor (see page
27) when using the remote control to operate the VCR. Point
the remote control at the TV when using the remote control to
operate the TV. Point the remote control at the Cable Box or
Digital Satellite System when using the remote control to operate the Cable Box or Satellite System.
Do not put objects between the remote control and theVCR.
Before you use the remote control to operate theVCR, you
must first press the VCR button.
Before you use the remote control to operate yourTV, you
must first press the "IV button.
Before you use the remote control to operate your Cable Box
or Digital Satellite System, you must first press the CBI_/DSS
button.
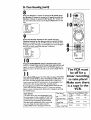
Erasure
Prevention
Video cassette tapes have record tabs to ensure that recordings
are not accidentally erased.
I
To prevent accidental erasure, break off the tab with a
• screwdriver.
. •
To record
VCR
•
•
•
again, cover the hole with
cellophane
tape.
maintenance
In this VCR, use only tapes with the I_
marl_
Make sure any light adhesive stick-on notes are removed from
the video cassette tape before putting the tape in theVCR.
Removable labels like these can jam the VCR.
Periodic maintenance is required to maintain yourVCR's excellent performance.This VCR has an Automatic Head Cleaner.
However, the video heads will eventually require replacement,
which should be performed only by an authorized service center.
• The remote control and its batteries
are supplied.
• Do not mix alkaline and manganese batteries.
• Do not mix old and new batteries.
6 Hookups
Withouta_Cable
Box
o• l+lel+!
•1•
eoooooe" '
,llol
looooloo
1•1++
+ooo
•1••
o•"
+ol+
et
"+"l+o
oilo•o+
+ooo
+IOOO+OOlOQOOlO++Q
t • • olo
••••oo•
o+lol•+ol•••
I
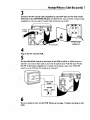
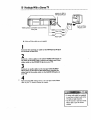
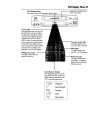
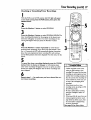
The basic VCR/TV connection - antenna/cable to VCR toTV -is shown below. If you have a
Cable Box ora Digital Satellite System, please refer to pages eight-nine. If you have a Stereo ++
TV, please go to page 10.After you hook up theVCR, please go to page I I to turn on theVC,
I
Disconnect
the antenna
or cable from yourTV.
Antenna
\__]/
F
##
'nd(°3_O_t1°°r
TENNA
IN
Jack
(on back
of TV)
Cable
(75 ohm)
2
Connect
the
antenna
or cable
to the ANT(enna)
IN Jack of yourVCR.
Back of VCR
Antenna
IndoorlOutdoor
(300 ohm)
ANT
IN
OUT
IN
®.®
VIDEO
®®
Cable
(75 ohm)
OUT
OUT
@
IN c_-1c H4
: Hookups
Withouta:Cable::Box (cont7),
eo•
• •e
ee .e
•o
3
•e
• e•
Q• o.
• ee•
o•
o•
••
o•
• • tee
•o.
Q • e•
••
• • •ee
• •o
• ••e
• •0
• ere
• e•
• • •.
•e
•q
.
• _.!., ,,.
Connect
VCR
theRF
coaxial
cable (supplied)
and to the ANTENNA
to the OUT
IN Jack on theTV.(You
lackion the back of the
may us•either
a snap-on type
(supplied) or screw-on type of coaxial cable, whichever you prefer.)
Antenna
or Cable
I_NC H3
RF coaxial
(on back
ANTENNA
example
cable
ofINTV)Jack
only
4
Plug in the TV
and the VCR.
5
Set the CH3/CH4
switch
on the
back
of theVCR
to CH3
channel is not used or least used in your area.To operate yourVCR
or CH4,
whichever
with your TV, set
the TV to the same channel. For example, when playing a tape, if the CH3/CH4
switch is set to CH3, the TV should be on channel 3.
CH3 / CH4
Switch
CH3
CH4
6
You are ready to turn on the VCR. Please go to page I I before turning
VCR.
on the
8 HookupsWith
a CableBox/Digital
SatelliteSystem
• eo6e.
• oo_aQ
eeo4o
meeoo.oe
eee
oeoo
.eOOOQOQe
Oe.eO.O.eOO_.JOeOO
• Q OOOaOO4
OOeOtOOQ.e
_Oe
eooeQoe•
.eO•
OOOOQ.OO
• Q •eeoooee
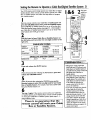
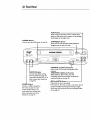
This connection
allows you to view any channel. After you connect the Cable Box/Digital
Satellite System,VCR,
and TV as shown below, the features described on this page will be
available.
I. Cormect a Cable signal to the
IN Jack on the Cable Box/DSS *
receiver.
I
|
_
\
....
2. Use an RF coaxial cable (supplied) to connect
_
_
the OUT Jack on the Cable Box/DSS receiver to mY
the ANT(enna) IN Jack on theVCR.
_
Recording/Viewing
Any
3. Use _i second RF coaxia! cable to connect the
OUT Jack on theVCR to
theTV's ANTENNA
IN
\
_
_,,
__,_
_
Back of TV
_
(example only)
Channel
I
With the VCR on and in VCR position (the VCR light will appear
on the display panel), use the CHANNEL (Up/Down) buttons
or the Number buttons to set theVCR to the Cable
Box/DSS Receiver output channel (channel 03 or 04).
2
3
Set the TV to the same channel
to which you set the VCR.
Select the channel you want to watch or record at the
Cable BoxiDSS Receiver.
Watching
TV With
the VCR
Off
I
Use the TV channel selector to set the TV to the Cable
BoxiDSS
Receiver
output
channel
(channel
3 or 4).
Select the channel you want to watch at the Cable
BoxiDSS Receiver.
Timer
Recordings
With this connection, you may set a timer recording as described
on pages 34-37. However, you must remember the followin_.
• You can only program a timer recording for one channel at a
time.
•
Set theTV and theVCR to the Cable Box/DSS Receiver output
channel (channel 03 or 04).
• When you are prompted to enter the channel you want to
record, select channel 03 or 04 (the Cable BoxiDSS Receiver
output channel). (This is step 5 on page 35.)
• Set your Cable Box/DSS Receiver to the channel you want to
record.
•
Leave the Cable Box/DSS Receiver on while you are recording.
• With this hookup, channels cannot
be changed at the VCR.You must
select channels at the Cable
Box/DSS Receiver.
• You can not view a channel other
than the one you are recording (the
instructions on page 32 do not work
with this hookup).
• Youcannot program channels with
this hookup (as discussed on page
12).
|
IJ
I
Hookups
Witha CableBox/Digital
Satellite
System
(cont'd)9
• • ee •Be
•e
••
e_e
• ••
•o
ee•
• •ee
• eee
• ooeee
• eeee
• eoeooee
oe
oee•
e•
ee
••
see
•eo•
ee
•Be
eea,
eB • • • _ee_ee•,_
•••
eeeee
R•••
•e•
••eo
• e •
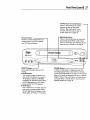
This connection allows you to program an unattended recording of more than one unscrambled channel and to watch one channel while recording another. After you connect the VCR,
Cable Box/Digital Satellite System, and TV as shown below, the features on this page will be
available.
I. Connect a Cable
signal to theVCR's
ANT(enna) IN Jacl_
,_the
2. Use an RF coaxial cable (supplied)to connect
OUT Jack on the VCR to the IN Jack on the
Cable Box/DSS Receiver.
"I'VANTENNA
IN Jack
3. Use a second RF coaxialcable to connect the OUT Jack on the Cable
Box/DSS Receiver to the ANTENNA IN Jack on the back of theTV.
Recording
One
Channel/VVatchingAnother
I
Put the Cable Box/DSS Receiver on the same channel as the VCR's
CH3/CH4 switch. Put the TV on the same channel.
With the VCR in VCR position (the VCR light will appear on the display panel), use the CHANNEL (Up/Down) buttons at theVCR to
select the channel you want to record. Start the recording.
2
Press theVCR/TV button once to put the VCR inTV position. (The VCR light will disappear.)
3
Use the TV channel selector to put the TV on the Cable
Box/DSS Receiver output channel (channel 03 or 04).
4
Select the channel
Receiver.
you want to watch
at the Cable
BoxiDSS
Playing a Tape
I
Press the VCR/TV
button to put the VCR in VCR position
VCR light will appear on the display panel).
(the
2
Make sure the Cable Box/DSS Receiver
nel as the VCR's CH3/CH4
switch.
3
4
is on the same chan-
Use the TV channel selector to put the TV on the same channel.
Press the PLAY button
. Youcannot
record
channels with
this scrambled
connection.
to play the tape.
antennaor cableto
ANT(enna) IN Jack
Audno andV,deo
IN JacksonTV
VIDEO (yellow) andAUDIO (red andwhite)
OUT Jacks
Audio
•
Audio
Cable
andVideo cables are not supplied.
I
Connect the antenna or cable to the ANT(enna)
on the back of theVCR.
IN Jack
2
Connect a video cable to the yellowVIDEO
OUT Jack on
the back of the VCR.Then,
connect the other end of the
video cable to theVIDEO
IN Jack on yourTV.
3
Connect
an audio cable to the red and white AUDIO
OUT Jacks on the back of the VCR.Then,
connect the
other end of the audio cable to the AUDIO
IN Jacks on
you r TV.
4
Turn on yourTV,
making sure it is in Line Input mode. Please
refer to yourTV owner's manual for details.
• A stereo audio cable (not supplied)
is used here to deliver audio to the
TV's left and right channels.
• The TV must be in 13neInput mode.
Please refer to your TV owner's
manual.
Turning
onYour
VCRII
Before turning on yourVCR, make sure there are batteries in the
remote control and theVCR and "IV are connected correctly.
•
Turn on the'l-V.
I_
Follow the steps on this page only when you plug theVCR
power cord into the wall oudet for the first time.
• You may not be able to program channels at step 5 if you are
using a Cable Box.
i
I
I
4
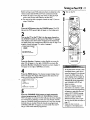
Press theVCR button, then the POWER button. TheVCR
light and the PWR. (power) light will appear on the display panel.
2
Turn on theTV
at theTV.
Set it to the same channel
as
the CH31CH4
switch on the back of theVCR. The language
select display screen shown below will appear. (If the display does
not appear, check your hookups, then follow the steps on page 17.to
program channels and page 19 to select a language.)
/TO
SELECT PUSH NO. SHCNVN
2 ESPAI_IOL
MAKE SELECTION OR
[_
PUSH
MENU TO CONTINUE ON
ENGUSH
1
3
3
[][][]
_c_
O0
Press the Number
I button to select English on-screen displays.ON will appear to the right of ENGLISH on-screen. Or,
v_
®
PHILIPS
press the Number 2 button for Spanish on-screen displays.SI
will appear to the right of ESPAI_IOL on-screen.
4
• To sl_p this feature and play a tape
Press the MENU button. The channel program display shown
below will appear.The display will disappear after about 60 seconds if you do not press any buttons.
R
HEN...
SH CN UP KEY
=oe
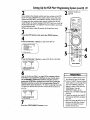
5
Press the CHANNEL
(Up) button to begin automatic
channel programming.
AUTO SET PROCEEDING PLEASE
WAIT will appear on-screen.The VCR will place all of the channels
you receive into its memory, so when you scan through channels
using the CHANNEL (Up/Down) buttons, you'll only scan through
channels that you receive.When all channels are programmed,
CHANNELS ARE SET will appear on-screen briefly.Then the TV
will go to the lowest channel programmed.
immediately, insert a tape with its
record tab remaved. Or, to skip step
3, press the MENU button.All onscreen displays will be in English.To
skip step 5, press the STOP button.
Channels will not be programmed,
and CHANNELS NOT SETwill
appear on-screen.
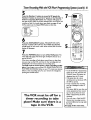
• If you try to program channels
when there is no antenna or cable
connected to the VCR, programming
will appear to take place, but eventually a NO TV SIGNALS message
will appear on-screen. Co.nnect an
antenna or cable to the VCR's
ANT(enna) IN Jack and try again.
You may need to follow the steps on
page 12.
• When the clock is not set,
:
will appear on the display panel.
12 ChannelMemory
• 1••••
cole
iiee•
eeee
• e•
Programming
• ee • • lee
• • eeeeeeeo•
•1•
ioe•
••••1
••••eoeeee•
-
el
• ••
• • • • • ••••ooeieee
• •ie••••••••
•••••••••1•1•
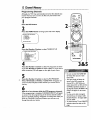
Channels
Although yourVCR may automatically memorize the channels you
receive when you turn it on for the first time, this function lets
you reprogram channels.
I
Press the VCR
2
button.
2
Press the MENU
PROGRAM
VCR SET UP
TUNER SET UP
SET CLOCK
END
PUSH
EXIT
button
to bring up the main menu display.
o•1
I
3
Press the Number
f
t"
3 button
TO SELECT PUSH NO. SHOWN
2 CABLE'iV
ON
3 AUTO PROGRAMMING
4 ADD/DELETE CH
I
S CH
MEMORY
REVIEW
6 TV STEREO
7 2ND AUDIO
TO
END
PUSH
ON
EXIT
to selectTUNER
SET UP.
1
4
Press the Number
3&5
I button
to select'IV
(if you have an anten-
na) or the Number 2 button to select CABLE'IV (if you have a
cable connection). ON will appear to the right of your choice.
5
.11
Press the Number 3 button to selec_AUTO PROGRAMMING. MEMORIZED CHANNEL/PLEASEWAIT will appear onscreen.The VCR will place all the channels you receive into its
memory.
6
Wait for a few minutes while the VCR programs channels.
When programming is complete, CHANNELS ARE SET will appear
on-screen.Then the programming of the lowest channel number
placed in theVCR's memory will appear on-screen. Now when you
press the CHANNEL (Up/Down) buttons, you will scan only
through channels you receive.
• You can not enter the TUNER SET
UP menu when you are in IJne
Input mode.
• IJne Input mode will always be
stored in the VCR'smemory as
channel 001 or 002. When you
select channel 001 or 002 with the
CHANNEL (Up/Down) buttons or
the Number buttons, AV REAR or AV
FRONT will appear on the screen
briefly.
• Youmay not be able to program
channels if you are using[a Cable
Box/DSS Receiver. See pages eightnine for details.
• To switch between TV and CABLETV
selection, repeat the steps on this
page.
•
Channel
Memory(cont,d)13
Adding/DeletingChannels
i
2
3
4
Press the VCR
button.
Press the MENU
button
to bring up the main menu display.
2
Press the Number 3 button to selectTUNER SET UP.
Press the Number 4 button to selectADD/DELETE CH.
I
END PUSH EXIT
5
Use the Number
_
5ELECT PUSH NUMBER
SELECT ANOTHER
END
PUSH EXIT
CH
buttons to enter the channel number.
1
3
5
6
Press the Number I button to add that channelor the
Number 2 button to delete that channel.Or, press the
Number 3 button to leavethat channelunchanged and select
another channel.If you do not make a choicewithin five seconds,
you will return to the previous menu display.
7
Press the STATUS/EXIT
button
to exit_
Reviewing
Programmed
Channels
I. Pressthe VCR button.
2. Pressthe MENU button to bring up the main menu display.
3. Press the Number 3 button to selectTUNER SET UP.
4. Press the Number 5 button to select CH MEMORY REVIEW.A list of programmed channels will appear
on-screen.
• If all the programmed channelsdon't fit on the screen, press the Number I button to see the remaining channels.Then press the Number 2 button to return to the first screen of channels.
• If you do not press any buttons within I0 seconds, you will either go to the next screen of channels or
return to the previous menu display.
5. Press the STATUS/EXIT button once or twice to exit.
14 Setting
theClock:
ooeoeeeeoeoee
ooeoeeooeeoee
• • eeoeeee•e
• • eee
•ooee
o•••
e•oeoeee•ee
•o
• co•
ooa•o
=o • eoee
• • •e
• • •el
• • eee
eo•
• eeeeeoeeeeoee
There are two ways to set the clock.With manual clock setting,
you tell the VCR the current time.With
automatic clock setting,
theVCR gets the current time from your local PBS station. It
keeps track of the time by constantly referring to the time broadcasted by your PBS station.
If you are using a Cable Box or Digital Satellite System,
you must set the clock manually.
Follow the instructions under either manual clock setting or automatic clock setting (page 16) to set the VCR's clock. Before you
begin, make sure:
• The VCR is hooked up and turned on, and channels are programmed into the VCR's memory (see pages six - 12).
• TheVCR is inVCR position. (TheVCR light will appear on the
display panel. If it does not, press theVCRFI'V button once.)
• You make each entry within 60 seconds of the previous entry. (If
you do not, you may start again at step I.)
Manual
Clock
L
Setting
I
I
Press theVCR
button.
2
Press the MENU
4
II
button
to bring up the main menu display.
3-
VCR SET UP
TUNER SET UP
SET CLOCK
END PUSH EXIT
PHILIPS
3
Press the Number
UTO CLOCK
IHANUAL
CLOCK
LIGHT
SVG TIME
ME ZONE
4 button
to select SET CLOCK.
[ON]
[ON]
(AUTO)
II_T
ABLE BOX USER5
CLOCK
MANUALLY
I
SET
CLOCK
SELECT PUSH NO. SHOWN
1
END PUSH EXIT
4
Press the Number
DATE
TIME - -- /- - : --/- -
END PUSH EXIT
2 button
-
J
to select SET MANUAL
CLOCK.
• To display the time on-screen, press
the STATUSIEXIT button. A status
display, which includes the time, will
appear on the TV screen for about
five seconds. For details, see "OnScreen Status Displays" on page 29.
• If you press the STATUS/EXIT button while you are setting the clock,
the TV screen will return to the program you were watching. If this happens, start over.
• Power failures that last for more
than one minute can cau.seyou to
lose your clock setting if you set the
clock manually. If this happens, reset
the clock.
If the clock is not set, - - :- - will
appear on the display panel. The
time will appear on the display
panel when the clock is set.
Setting
theClock(cont,d)
15
5
Press two Number buttons for the hour(s) and two
Number
buttons for the minute(s).Then
press I forAM
or 2 for PM. For example, for 2:15 PM, press 02, I S, 2.
• Enter a 0 before a single digit number.
• Entries that do not match the VCR's internal calendar will cause
a question mark (?) to appear on-screen.
• To make corrections, press the CLEAR button until the space
for the number you want to correct is flashing.Then enter the
correct number.
MONTH
I(_
- - / - - I- -
TIME 02:15 PM
CORRECT PUSH CLEAR
1
END PUSH EXIT
6
Press two Number
buttons
for the month,
two
Number
buttons for the day, and two Number
buttons for the year.
For example, for July I, 1997, press 07, 01,97.The day of the week
will appear automatically.
®
CORRECT
Pt.,tSH CLEAR
ENO PUSH EXIT
7
Press the STATUS/EXIT
button
to start the clock. The
screen will return to the program you were watching.The
will appear on theVCR display panel.
•
.
,
..
time
16 Settingthe
Clock(cont'd)
Automatic
Clock
Setting
I
Press the VCR button, then press the MENU
bring up the main menu display.
button
to
5
PROGRAM
VCR
SET
I
UP
TUNER SET UP
SET CLOCK
END PUSH EXIT
2
Press the Number
2 SET MANUAL
3 DAYUGHT
4 SET TIME
4 button
to select SET CLOCK.
CLOCK
SVG TIME
ZONE
[ON]
(AUTO)
F,AUTo
CLOCK1
CABLE BOX USERS
CLOCKMANUALLY [ON]
SET CLOCK
TO SELECT
PUSH NO. SHOVVN
TOEND
PUSH
EXIT
3
If OFF appears to the right of AUTO CLOCK,
press the
Number
I button once. A new display screen will appear. Go to
step 4. Or, if ON appears to the right of AUTO
CLOCK,
press the Number
I button twice. A new display screen will
appear. Go to step 4.
3
2
4
[] ITI
ITI l-rl
@
o
®
©©
®
PHILIPS
4
• If you want theVCR
to locate a local PBS station from
which to take the time, press the Number
I button to
select SET PBS CH.AUTO.
When the current time appears
on-screen, you're finished. Press the STATUSIEXIT button to exit.
Or, you may be prompted to turn off the VCR. Press the STATUS/EXIT button, then go to step 5.
NOTE: CANNOT FIND PBS CLOCK DATA may flash on-screen. In this
case, tell the VCR the PBS station from which to take the time.
• If you want to tell theVCR
the PBS station from which
to take the time, press the Number
2 button to select
SET PBS CH. MANUAL,
then use the Number buttons
to enter the channel number
of the desired PBS station.
When the current time appears on-screen, you're finished. Press
the STATUSIEXIT button to exit.
NOTE."CANNOT FIND PBS CLOCK DATA may flash on-screen. In this
case, press the Number I button to choose SELECT NEW PBS CH.,
then use the Number buttons to enter the channel number of another
PBS station. Or, press the Number 2 button to select SET PBS CH.
AUTO. Press the STATUS/EXIT button, then go to step 5.
5
Turn off the VCR power, and leave it off for several minutes. When the current time appears on the VCR display panel, the
clock is set.You may turn on theVCR again.
For Automatic Clock Setting
• If you enter an incorrectPBS channel number at step 4, press the
CLEAR button, then enter the correct channel number.
• If you have an antenna, you may
select channels 2 - 69 at step 4. If
you have a cable connection, you
may select channels I - 125.
• If you select SET PBS CH.AUTO at
step 4, you cannot manually select
the PBS channel from which you
want the VCR to take the time.
• The clock cannot be set automatically if you don't receive a channel
that carries a time signal in your
area. Set the clock manually.
• If there are only a few channels in
your area that carry time signals,
setting the clock automatically may
take several minutes. If nothing happens even after you wait several
minutes, set the clock manually.
• You cannot select AUTO CLOCK at
step 3 during tape playback.
Setting
theClock(cont'd)17
Time
Zone
When using the AUTO CLOCK function, you can specify a time
zone in which a local PBS channel is located.That way, theVCR will
update the clock according to your time zone.
I
Press theVCR
button, then press the MENU
bring up the main menu display.
button
to
PROGRAM
VCR SET UP
TUNER SET UP
SET CLOCK
ELECT PUSH NO" SHOWN
_
5
I
2
4
1
END PUSH EXIT
2
Press the Number
4 button
to select SET CLOCK.
o1
UTO CLOCK
{ON]
MANUAL
CLOCK
GHT SVG TIME
ME ZONE
ION]
_(_E_
USERS
ET CLOCK I_,.NUAU.¥
SELECT PUSH NO. SHOWN
END PUSH EXIT
3
Press the Number
I AUTO
4 button
to select SETTIME ZONE.
ON
ATLANTIC
EASTERN
CENTRAL
MOUNTAIN
PACIFIC
ALASKA
HAWAII
CONTINUE
PUSH MENU
4
Find your time zone, then press the Number
button to
select it. You will return to the previous menu.The time zone you
selected will appear beneath SETTIME ZONE.
UTO CLOCK
2 SET MANUAL CLOCK
[ON]
J
I
3DAYLIGHTSVGTIME
[ON]
J
4 SETTIME ZONE
J
I
ATLANTIC)
C_SLE BOX
USERS
SETCLOCK MANUALLY
TO
SELECT
PUSH
NO. SHOWN
O END PUSH EXIT
5
Press the STATUSIEXIT
button
to exit. Or, to set the
clock, go to step 6.
6
Press the Number
page 16 for details.)
I button
to select AUTO
CLOCK.
(See
18 Dayh'ght-SavingTime
Selection
Daylight-Saving
Time
Selection
You may program theVCR so its clock will automatically move
forward one hour in April and turn back one hour in October.
Dayiight-SavingTime
is set to ON prior to shipment from the factory.
You may turn Daylight-SavingTime
ON or OFF by following the
steps below.
I
2
Press the VCR
5
button.
With the clock set, press the MENU
main menu display.
button
2
to bring up the
PROGRAM
VCR SET UP
TUNER
SET UP
SET CLOCK
END PUSH EXIT
3
0
Press the Number
4 button
2 SET MANUAL CLOCK
3 DAYLIGHT SVG TIME [ON]
4 SETTIME ZONE
(AUTO)
CABLE BOX USERS
CLOCKMANUALLY [ON]
CLOCK
_1 SET
AUTO
SET CLOCK
TO SELECT PUSH NO. SHOWN
_,_
to select SET CLOCK.
1
END PUSH EXIT
4
PHILIP$
Press the Number
3 button so that OFF (or ON) appears to
the right of DAYLIGHT SVG TIME.
,_u_CLOC_ EON1
(
/_ET
MANUAL
3 DAYLIGHT
I
CLOCK
SVG TIME
4SETTIMEZONE
{OFF}
/
(AUTO)
I CABLE
BOXUSERS
I/I SET
CLOCK
_ET
MCLOCK
ANUALLY
_
TO SELECT PUSH NO. SHOWN
"_O
END
PUSH
1
EXIT
5
Press the STATUSIEXIT
button
to exit_
4
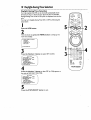
Language
Selection
Follow the steps below to changethe languageof the on-screen
displays.
I
2
Press theVCR
button.
Press the MENU
button
2
6
to bring up the main menu display.
PROGRAM
VCR SET UP
TUNER SET UP
SET
CLOCK
SELECT
PUSH NO. SHOWN
1
END PUSH EXIT
3
Press the Number
2 button
2 ON SCREEN MODE
3 AUDIO OUT
4 LANGUAGE
OFF
END PUSH EXIT
SET UP.
1
/_'T'TTO
SELECT PUSH NO. SHCNVN
ITO 5I VCR
REPEAT
PLAY
PLUS+
REE MAP
to selectVCR
4
@
[]
3
.......IB[]
;ENTER
Press the Number
ENGUSH
4 button
to select LANGUAGE.
_T.
©©
®
®
PHIUPS
ON
F_SPA_OL
KE SELECTION OK
H MENUTO
CONTINUE
5
Press the Number
I button if you want the on-screen displays
in English. ON will appear to the right of ENGLISH on-screen. Or,
press the Number 2 button if you want the on-screen displays
in Spanish.SI will appear to the right of ESPAI_IOL on-screen.
6
Press the MENU
button
to exit.
Helpful
Hint
• If you accidentally select Spanish
on-screendisplays and need English
on-screen displays:
I. Pressthe VCR button.
2. Press the MENU button.
3. Pressthe Number 2 button to
select PREPARELA VCP_ "
4. Pressthe Number 4 button to
select LENGUAJF5. Pressthe Number I button to
select ENGLISH.
6. Pressthe MENU button to exit.
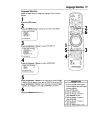
20 SettingtheRemoteto OperateaTV
• Boo
••••.oo•
11 ••lol
ooooloo
••••o
i•.•ooooo•
control doesn't
rem°te
operate
c°ntr°l
yourTV
m_!lY
program your remote control.
ioQooloooooolol
oQoeoloo•lo•
B•.
ooooool
now, follow
y°urTV" the steps
If the
below
rem°te
to
Y°urVCR
°Per•re
_
ol
&6
i•!
Do ioeoolol
o•
ioooQo•
2
ioio•
Find
+.Tv
.G o•
code
yOur
i
Point the remote
Then, press the
try the other'lV
turn on or off, or
control at yourTV and press theTV button.
POWER button. If your TV turns on or off,
buttons (see pages 22 - 24). If yourTV doesn't
if the other buttons don't work, go to step 2.
2
Find the brand of yourTV
ber the two-digit number
TV
EMERSON
FISHER
GE
..............
................
....................
GOLDSTAR
HITACHI
..............
................
JVC ....................
MAGNAVOX
MARANTZ
.......
MONTGOMERY
PANASONIC
PHILCO
................
14
11
PHiLIPS
................
01
10
PHILIPS
04
QUASAR
12
RCA
05
SAMSUNG
MAGNAVOX..01,02,
..............
13
SHARP
.................
14
SONY
07
TOSHIBA
07
ZENITH
10
..............
SEARS
.......
07
...................
13
.....
03
................
.................
.............
PANASONIC-GAOO
14
SANYO
.............
WARD
CODES
01, 02, 03
..............
MITSUBISHI
on the list below, and rememto the right of it.
17
11
08, 11
16
..................
09
...............
..............
5
08
06, 15
3
Press and release
the MUTE
button.
4
Within 30 seconds after releasing the MUTE button, press and
release the TV button.
5
Within 30 seconds after releasing the'IV button, use the
Number buttons to enter the two-digit
code for yourTV
brand. For example, if you have a Zenith TV, press Number buttons I, 5.
6
Try step I again. If the remote control works your TV, you're
finished. If the remote control still doesn't work your-I-V, repeat
steps 2 - 5, using another code.
q
There is no guarantee that the
remote
will work your TV.
!
• Although the remote control that
comes with your VCR will work most
Magnavox TVs,as well as many TVs
sold under other brand names, it is
possible that the remote control will
not operate your T_.
• The remote control may only operate
some features of your TV.For example, the remote control may turn on
the TV power, but it may not change
channels at the T_.
• If you can not change the channels
at the TV by using the Number buttons, press the VCR PLUS+/ENTER
button after you press the Number
buttons. It may change channels at
the TV.
• If you had to program the remote
control to operate your TV here,
whenever you replace the batteries
in the remote control, you will have
to program the remote control
again.
Setting
theRemote
to Operatea CableBox/Digital
Satellite
System21
•
•
eeoc
oleQooeeleooelooeooo.leeeoJeloo
eeoe.oe•
•
ooeI•.•e•o
_Q.OOQO0•O
YourVCR remote control may operate your Cable Box or Digital
Satellite System.If the remote control doesn't operate your Cable
Box or Satellite System now, follow the steps below to program
your remote control.
O••QO
mOmOOO
eo•
••
•OQO•e•OOQO•O
1&6
OOO••
cable
box •
Find your
code or
satellite
I
code.
_1 system
Point the remote control at your Cable Box or Satellite System and
press the CBL/DSS button.Then,
press the POWER button.
If your Cable BOx or Satellite System turns on or off, try the other
Cable Box/Satellite System buttons (see pages 22 - 24 for details). If
your Cable BOx or Satellite System doesn't turn on or off, or if the
other buttons don't work, go to step 2.
2
Find the brand of your Cable
the list below, and remember
right of it.
CABLE
HAMLIN .........
21, 22
JERROLD .... 01, 02, 03,
.........
04, 05, 06, 07
OAK .........
16, 17, 18
PANASONIC .....
19, 20
Box or Satellite System on
the two-digit number to the
BOX
3
CODES
PIONEER
.......
SCIENTIFIC
ATLANTA ..... 08,
TOCOM ......
23,
ZENITH ......
13,
11, 12
09, 10
24, 25
14, 15
5
O_
®
©O
®
PHIUPS
I MAGNAVOX SATELLITE
......
26, 27
SYSTEM
RCA
CODES
..............
28
3
4
Press and release the MUTE button.
Within 30 seconds after releasing the MUTE button, press and
release the CBldDSS button.
5
Within 30 seconds after releasing the CBI_/DSS button, use the
Number buttons to enter the two-digit
code for your Cable
Box or Satellite System. For example, if you have a Zenith Cable
BO_ press Number buttons I, 3.
6
Try step I again. If the remote control works your Cable Box
or Satellite System,you're finished. If the remote control still doesn't work your Cable Box or Satellite System,repeat steps 2 - 5,
using a different code.
There is no guarantee that the
remote
control will work your Cable
Box or Satellite System•
• Although the remote control that
comes with your VCR will work most
Cable Boxesand Satellite Systems,it
is passible that the remote control will
not operate your Cable Box or
Satellite System.
• The remote control may only operate
some features of your Cable Box or
Satellite System.For example, some
Cable Boxesmay only be turned on
at the Cable BOx,therefore the
remote control will not be able to
turn on the Cable BOx.
• If you can not change the channels
at the Cable BOxby using the
Number buttons, press the VCR
PLUS+/ENTER button after you
press the Number buttons. It may
change channels at the Cable Box.
• If you had to program the remote
control to operate your Cable Box or
Satellite System here, whenever you
replace the batteries in the remote
control,you will have to program the
remote control again.
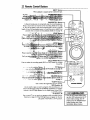
EJECT Button
When playbackis stopped, press to eject the tape.
PAUSEISTILL
In Record mode, press to temporarily stop the recording (pause).
Press a second time to resume normal recording. Details are on page
3 I. You can not pause a one touch recording that is set for a specific
length of time. During playback, press to freeze the picture (still). Press
a second time to resume normal playback. Details are on page 46.
Press to
STATUS_EXIT
•
©
SPEED
Press to_stop,_l"_iyou
"IV mc)de.__
MEMORY
CD
have a_voxTY,_press.
_uSnero_j_r selecti_n_the,Magnavo_
•.-jiL-,_T:_ _"_E_-_-_
--
.._.
,
^_
• _
....
--..,-
i': _" ._:-: ..... _0. STATUS!EXIT
.
Press to see .the on_s_
s_atus-displayor toi_n_
._:displays_
De_s_re o_:page.29.PreSs_O_-_-:_
menus.
Or, _fyou hayea:Na_may6x:l_'V,
press when _n TV mc_l_ _-_._-.ius
,
_- _-6L__I_E
..
r_,
,
. _-_..___:_,_._
.....
- - a_sp_ayor_to remove tn.___avox,_
v menu.
(Tape) SPEED
Press to select the recording speed (SP,LP,or SLP). Details are on pages
CBLK)SS
MUTE
J r-
36and56.11
_,_,,. ,_.,, _,,.__;, _L_ _:_:___
....
,_- ,_:_
' "' ' .......
_:_
- " .....
;:_";__-_'-'tt_:_'_.iJ,
_, ......_:'--.- _._._¢_-r_%_,_,_._
_
ra
.
the _
--.,
TV Butt n
|
Details are 0n'page 20
,, ,- VCR Button
• _: .: :¢BIdDSS
_
Button
/ENTER
0 ....
VCR/TV
VCR/TV
Button _
Use to select the signal that yourTV receives.
VCR Position •
Use to watch a tape, to watch a program while recording it, or to
watch a TV broadcast using the CHANNEL (Up/Down) or Number
buttons. If theVCR light appears on the display panel of theVCR, it
is in VCR position•
TV Position •
Use to watch "IV or to watch one program while recording another.
Details are on page 32. If theVCR light does not appear on the display panel of theVCR, it is in TV position.
SEARCH
©
®
VAR
SLOW
®
PHILIPS
• Pressthe VCR button before pressing other VCR buttons; press the TV
button before pressing other TV
buttons; press the CBL/DSS button
before pressing other Cable
Box/Satellite System buttons.
Remote
Control
Buttons
(cont'd)23
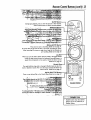
REC(ord)IOTR
Press once to start a recording. Details are on page 3 I.
Or, press three to 18 times to start a one touch recording (an immediate recording, 30 minutes to eight hours long) of the channel you
are watching. Detailsare on page 33.
Jog
When you turn this dial in either direction while in the Jog& Shuttle
mode, the tape moves forward or backward frame-by-frame at a
speed that corresponds to the speed at which the dial is turned.
J
I
c%co
VCR
Details are on page 47.1
I
C_LOSS
Shuttle Ring-_.J
Turn and hold this ring while in the Jog& Shuttle mode to do a forward or backward search.The more the ring is rotated, the faster the
search will be. Detailsare on page 47.
JOG & SHUTTLE
VOLL_
%
Button
CHANNI
Press to use the Jog Dial or the Shuttle Ring. Details are on page 47.1
/
"_ _
'
_ ,_Jslum _ B_itto_ "'----"
Use _'_iect
channelsat the VCR,-I-V, Cabl.e _x,,or_/!gi_
Sy_o
_Selec_on-screen menus;and_r__._.:r_;_
_"_
_-_ _'_
_
MUTE
O
I_UE
(_
_ti_
_)_._
....--_-_--:_-_;_
_-'_.''-_
.ann
_._'_
'_ _
To select, _ress O,tJ_enpress_tE_._l_annelyou Nant-_l,or
"'_,'."*__---_ .... -;_i'example, to select channel 7_ iress:.0,7.
'.
Chann_.J_.YI0_)'_d_ _,-_
To select_.press..the
+I00 button,thenpres's"_e_ast
_:_0_
:_f_ffe
channelyou want.For example,to selectcEann_!"I17,p_
[00
•_
.button,
I,7.
Shaded buttons may also operate
features of your T_, Cable Box, or
Hint " :
Satellite System.
- ",. ;_<'Helpful
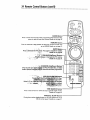
24 RemoteControlButtons
(cont'd)
Press to erase incorrect data when programmingVCR functions.Also,
press to reset the real time counter. Details are on page 45.
MEMORY
Press to memorize a tape position at which the real time counter was
set to 0:00:00. Details are on page 45.
• , .' ..... " _- '-_-l_iCHANNEl,
(Up/Down)
Buttons"]
Pressto scan_p_or d__
the VCR,.TV,,Cable:_Box,
or Digitall
Satellite System's_h'_!_'_e
channe_
h=e been-p og mmed.|
/
When in TV
/
TIME SEARCH
Button
Press to fast forward or rewind the tape a specific length of time.
Detailsare on page 44.
VAR(iable). SLOW Buttons
During slow motion playback, press to vary the speed from I/6 to
1/30 of normal speed. Details are on page 47.
VCRDisplayPanel25
Information aboutVCR
VORO,,p,ay ano,
_"
Cassette Compartment
Insert a tape here.
operations appears here.
(_1
I BD
PHILIPS
Timer Light
This light glows when you turn off
the VCR when a timer recording
has been set. It also glows when a
one touch recording has been set.
It flashes when you turn off the
VCR if a timer recording has been
set but a tape has not been placed
in the VCR. It also flashes when a
Cassette-Inside
Light
This light appears when
there is a tape in theVCR.
timer recording has finished (unless
another timer recording is programmed, in which case it glows).
VCR Light
This light appears when
the VCR is in VCR position.
PWR(power).
Light
This light indicates that the
power is turned on.
_EC(ord)
Light
This light indicates that a
recording is in progress. I_
flashes when a recording
has been paused.
Clock/Feature
Display
This display tells you the current
time (when the clock is set), and
briefly displays which feature the
VCR is currently performing.
P I. ,'r-i
n,I
• Playback
F I-
" Fast forward
/" .I
,_,-,,j
• Rewind
r _ un I_7
.3
• Stop
,_,_,..
• Recording
26 FrontPanel
PLAY Button
Press to play a tape.Also, press to release Slow,
Search or Still mode and to return to normal playback. Details are on pages 46-47.
POWER Button
Press to turn theVCR _ower on and off.
STOPIEJECT
Button
Press once to stop the tape.When
playback is
ff
stopped, press to eject the tape.
PHILIPS_
! _
__./
_
_'_.,,HI-FI
w_o
i. _
R
©
CHANNEL
(UplDown)
Buttons
Press to scan up or down through theVCR's
channels.
AUDIO
IN Jacks
Connect the cables coming
from the audio out jacks of a
camcorder, another VCR, or an
audio source here. Details are
on page 42.
VIDEO
IN Jack
Connect a cable coming from
the video out jack of a camcorder, another VCR, or an
audio-visual source (laser disc,
video disc player, etc.) here.
Details are on page 42.
TRACKING
(Up/Down)
Function
When in Play or Slow mode, press the
CHANNEL (Up/Down) buttons to adjust the
tracking. Details are on page 49.
REC(ord)IOTR
Button
Press once to start a recording.
Press three to 18 times to start a one touch recording (an immediate recording, 30 minutes to eight
hours long) of the channel you are watching. Details
are on page 33.
FrontPanel(cont'd)27
RFWD
(Fast Forward)
Button
When in Stop mode, press to fast
forward the tape at high speed.
When in Play mode, press to fast
forward while the picture stays onscreen. Details are on page 46.
Remote
Sensor
Receivesan infrared signal from your
remote control so you can operate
yourVCR from a distance.
- REW(ind)
Button
When in Stop mode, press to rewind the
tape a_ high speed.When in Play mode,
press to rewind the tape while the picture
stays on-screen. Details are on page 46.
_f
J
VCR/TV
Button
_!
Use to select the signal that yourTV
receives.
• VCR Position
Use to watch a tape, to watch a program while recording it, or to watch a
TV broadcast using the CHANNEL
(Up/Down) or Number buttons.When
theVCR light appears on the display
panel, the VCR is in VCR position.
• TV Position
Use to watch TV or to watch one program while recording another.When
theVCR light does not appear on the
display panel, theVCR is in "IV position.
In Record mode, press to temporarily stop the
recording (pause). Press a second time to resume
normal recording. Details are on page 3 I. You can not
pause a one touch recording that is set for a specific
length of time. In Play mode, press to freeze the picture (still). Press a second time to resume normal
playback. Details are on page 46.
28 RearPanel
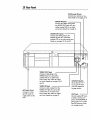
ANT(enna) IN Jack
Connect your antennaor cab._
here. Details are on pages ix-IO.
AUDIO IN Jacks
Connect the cables coming from
the AUDIO OUT Jacks of a camcorder, anotherVCR, or an audio
source here. Details are on page 42.
AUDIO OUT Jacks
Connect the cables going to the
AUDIO IN Jacksof a camcorder,
anotherVCR, or an audio source here.
Details are on pages 10,42 and 50.
Y
r
VIDEO OUT Jack
Connect a cable going to the
VIDEO IN Jackof a camcorder,
another VCR, or an audio-visual
source (laser disc, video disc player,
etc.) here. Details are on pages 10,42
and 50.
Vlrlll=IPI
AC Power Cord
Connect to a standardAC outlet to
supply power to the
VCR.
IIMI
Jl_l.
CH3/CH4
Switch
Set to channel 3 or 4
to use your'IV with
your VCR. Details are
Connect a cable coming from the
VIDEO OUT Jack of a camcorder,
another VCR, or an audio-visual
on pages six-nine.
source (laser disc,video disc player,
etc.) here. Details are on page 42.
OUT
Jack
Use the suplSlied RF coaxial cable to connect this
jack to the ANTENNA
IN
Jack on your "IV or Cable
Box/DSS Receiver. Details
are on pages six-nine.
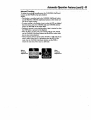
On.Screen
StatusDisplays29
ooeeeoolooeoeoleoDleoeo
•eeeoeeeoQoeeeoeelmQeeeoooetoooeeeee•
eoo
eeQeeeeeeoeoooeeeeoeoees
A status display, which includes the current time, channel, and other
information (see illustration), will appear when you press the STATUS/EXIT button or certain function buttons.The contents of the status display may vary.There are three status display modes:
ON SCREEN ON:
• Whenever you press the STOP button or the PLAY button, the status display will appear for five seconds.
COUNTER
ONLY:
• Whenever you press the STOP button or the PLAY button, the status display will appear for five seconds.After five seconds, only the
counter will remain on-screen.You must press the STATUS/EXIT
button to remove it.
ON SCREEN OFF:
• The status display will not appear when you press function buttons.
You must press the STATUS/EXIT button to see the status display.
To choose the status display mode, follow the steps below.
I
e•
eeeo•
• eeoo•
oee
Function
Receiving and
Button
Recording
Pressed
/
OP
j
I
eeoeeoo
Mode
Tie
Channel
12:00 AM
I I
Tape
Counter
Audio
Speed
and
Counter
Out
Mode
Memory
Press the VCR button, then press the MENU
bring up the main menu display.
button
to
MTS Broadcast
Available
PROGRAM
VCR SET UP
END PUSH EXIT
2
Press the Number
REPEAT PLAY
ON SCREEN MODE
AUDIO OUT
LANGUAGE
_
2 button
OFF
SELECT
PUSH
NO.SHOWN
VCR
PLUS+
REE
MAP
TO END
to selectVCR SET UP.
1
PUSH EXIT
3
Press the Number
ON SCREEN ON
COUNTER
ONLY
_
ON
SCREEN
SELEC-r
PUSH OFF
NO.
"_OEND
2 button
to select ON SCREEN MODE.
blue until you select an active channel.
1
PUSH EXIT
4
Press the
Number
Number
beside the
Number
I button to select ON SCREEN ON, the
2 button to select COUNTER ONLY, or the
3 button to select ON SCREEN OFE ON will appear
selected status display mode.
5
Press the STATUS/EXIT
:
;.-,
Hi_ts
If the channel you select has no
broadcast, the screen will
become
solid blue.The screen will remain
ON
SHOVVN
elp_l
button
to exit.
• You may bring up the status display
at any time by pressing the STATUS/EXIT button.
(The exception is when viewing a
still picture or a slow motion picture,
or when EFWD or REW(ind) is
pressed during playback.)
• Channel numbers (when tuned) are
displayed for a few seconds.
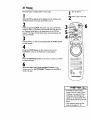
30 Playing
looooool.
• ooo
••
ol
••
oooo
Q oooouQ
• tleoeooloQoeooeooooeooooloeolooBeeo
• oololoooooooooeeo
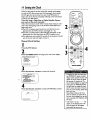
I
Read and follow the steps below to play a tape.
Turn theTV on and set it to channel 3 or 4, whichever the
CH3/CH4 switch on the back of theVCR is set to.
2
Insert a tape in the VCR. The power will come on.The VCR
will place itself in VCR position automatically (the VCR light and
the Cassette-Inside light on the display panel of the VCR will
appear). If the tape's record tab has been removed, playback will
start automatically.
3
• • ••••••Qoos
_
•e
•••••eeooo•
_ •
Insert a tape in theVCR.
Turn on the'IV.
6
3
5
4
If playback does not start automatically,press the PLAY button
to start playbacl_
4
Press the STOP
button
on the remote
STOP/EJECT button on theVCR
control
or the
once to stop playback.
5
Press the REW(ind)
to rewind the tape.
button
on the remote
control or theVCR
6
When the tape stops, press the EJECT button on the
remote control or the STOPIEJECT
button on the VCR
remove the tape.
to
PHILIPS
• If the tape you want to play is
already in the VCR, make sure the
VCR power is on and the VCR is in
VCR pos_on. (The VCR.light will
appear on the display panel.) Press
the VCR button, then press the PLAY
button.
• Other playback options and features are on pages 43 - 49.
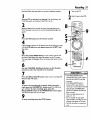
Recording
31
oe eeeee
•eee
ee ee • • •••0•••••
• • • ••••••eeeeeoeeoeoeeeeeeeee
eoooeeoeeeee•eeee•
• e•eooe•ee•••
Read and follow the steps below to record a television program.
_2
eeeo
••eeee•
ee 0•
eee
• eeee
••
Inserton
a tape
in theVCR.
Turn
the T_.
Turn the TV on and set it to channel 3 or 4, whichever the
CH3/CH4 switch on the back of theVCR is set to.
2
Insert a tape with its record tab intact (see page five) in the
VCR.The power will come on, and the Cassette-Inside light will
appear.
3
4
Press the VCR
button
on the remote
control.
8
9
5
7
If theVCR light appears on the display panel of theVCR, go to step
5. If the VCR light does not appear, press the VCR/TV
button once.
5
3-
Press the (Tape) SPEED button on the remote control until
the desired tape speed (see page 36) appears on the'IV screen.
The tape speed will disappear from the screen after about five seconds.
_E_er_R
_o
6
--_©
®
®
PHIUPS
Use the CHANNEL
(UplDown)
buttons or the Number
buttons to select the channel to be recorded.
7
• If the REC(ord)IOTR button is
Press the REC(ord)/OTR
REC(ord) light will appear.
button
once to start recording.The
8
To pause the recording
(for example, during commercials), press the PAUSE/STILL
button once. The REC(ord)
light will flash. To start recording
again, press the
REC(ord)/OTR
button or the PAUSE/STILL
button again.
The REC(ord) light will come on again.
9
To stop recording,
press the STOP
button.
pressed when there is not a tape in
the VCR, NO CASSETTEwill flash
on-screen.
• If the REC(ord)/OTR button is
pressed while a tape without a
record tab is in the VCR, the VCR will
eject the tape and PROTECTED
CASSETTECANNOT RECORD will
flash on-screen.
• Other recording options are on
pages 32 - 42.
• You can change the tape speed
while the VCR is recording, but some
distortion will appear on the tape.
• The VCR will record in a preset voltJITle.
32 Recording
OneChannel/Watching
Another
I
Start
a recording
(see page 31).
2
3
8
Press the VCR button.
Press the VCR/TV
button to put the VCR in TV position.The
VCR light will disappear from the VCR's display panel.
4
i
Press theTV
button, then press the CHANNEL
(Up/Down)
or Number
buttons to choose the channel you
want to watch. Or, use the TV remote control to select the channel you want to watch.
5
To return to the channel being recorded, press the TV button,
then use the Number buttons to select channel 03 or 04
(whichever channel the CH3/CH4 switch on the back of theVCR
is set to).
Or, if theVCR remote control doesn't operate your TV, use the'IV
remote control to select channel 3 or 4.
6
7
Press the VCR
2
6
5
3
button.
Press the VCR/TV
button to put the VCR in VCR position.The
channel being recorded will appear on-screen.
8
Press the STOP
button
to stop the recording.
• If your remote control operates your
TV,press the TV button, then use
the CHANNEL (Up/Down) buttons
on the remote control to select TV
channels. See page 20 for details.
• If you use a Cable Box or Satellite
System hookup, you may not be
able to watch one channel while
recording another. See pages eightnine for details.
• If you don't receive channels, check
your hookups, then follow the
instructions above carefully.
OneTouch
Recording
33
The one touch recording (OTR) functionallowsyou to program
an immediatetimed recording 30 minutes to eight hours long
without settingthe timer. Beforeyou begin,make sure:
• Channelsare programmed.
• The desired recording speed (SP,LRor SLP)hasbeen selected
with the (Tape)SPEEDbutton.
• There is a tape in theVCR. Make sure the tape's record tab is
intact and the tape is 10ngenough to record the program(s).
• The VCR is in VCR position.The VCR light will appear on the display panel if theVCR is in VCR position. If theVCR light does
not appear,press the VCR/TV button once.
I
2
3
Press the VCR button.
Press the CHANNEL
(UplDown)
buttons or the Number
buttons to select the channel you want to record.
3
I
Press the REC(ord)/OTR
button repeatedly
until the desired
recording length (30 minutes to eight hours) appears in the upper
left corner of the screen. Recording will begin immediately. The
REC(ord) light and the Timer light will appear on the display panel.
__ "*_1_°
o_o_s
4
To stop an OTR before recording
is finished, press the
STOP button or the POWER button. To cancel the OTR but
continue recording, press the REC(ord)/OTR button until REC
appears in the upper left corner of the"IV screen. The REC(ord)
light will remain on the display panel of theVCR, but the Timer
light will disappear.
i
• Tocheck the time remaining for an
OTR after the OTRhas been set,
press the STATUS/EXITbutton.
• To change the recording length while
an 07"R is in progress, press the
REC(ord)/OTR button until the
desired length appears on-screen.
• If you begin an OTR when a recording is paused, the OTRwill. begin.
• Youcan not pause recording (for
example, during commercials) during an OTR.
• If the preset time for a timer
recording comes up during an OTR,
the OTR has priority.
34 TimerRecording
Follow the steps below to programyourVCR to record TV programs while you're away from home.You can program up to eight
timer recordings. For each one, the VCR will turn itselfon, record,
and turn itself off automatically. Before you begin make sure:
• Channels are programmed.
• The clock is set.
• There is a tape in theVCR. Make sure the tape's record tab is
intact and the tape is long enough to record the program(s).
• TheVCR is inVCR position.TheVCR light will appear on the display panel when theVCR is in VCR position. If theVCR light
does not appear,press the VCRFI'V button once.
Do each step within 60 seconds of completing the previous step. If you don't, you may start again at step I.
I
Press theVCR button, then press the MENU button to
bring up the main menu display.
I
PROGRAM
VCR SET UP
TUNER SET UP
SET
CLOCK
ELECT
PUSH NO. SHOWN
I!
END PUSH EXIT
2
Press the Number
PROGRAM.
I
button
on the remote
control
to select
I!LE
HNO
1
ONCE
DAILY
WEEKLY
PHILIPS
PROGRAM REVIEW
END
PUSH
EXIT
3
Select a once, daily or weekly recording.
• Press the Number
I button to select ONCE.
The VCR will
record aTV program on any day you choose, up to 12 months
away.
• Press the Number
2 button
to select
DAILY. TheVCR
will
record every day from Monday to Friday - starting at the same
time and for the same length of time.
• Press the Number 3 button to select WEEKLY. The VCR
will record on the same day,at the same time, and for the same
length of time every week.
Daily
Recording
/ /_DAILY PROGRAM (MON-FRI)
| PROGRAM-,Z34S67_
Menu
SELECT PROGIIAM
Screen
TO
\
END
PUSH
EXIT
NUMBER
.:-;" ;_elpful
Hint
If you need to make a correction
while programminga timer recording,press the CLEARbutton until
the cursor is flashingon the item
you want to change.Thenenter the
correct information.
TimerRecording
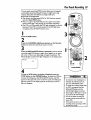
(cont'd)35
4
Use the Number
buttons (I - 8) to select a slot in which
to store the timer recording.
There are eight timer recording
slots. Open slots will flash on-screen.
NOTE:If you enter a number for a slot that has already been used to
store a timer recording, PREVIOUSLYSET PROGRAM will appear onscreen for a few seconds. Then information about the program in that
slot will be displayed on-screen. If this happens, press the STATUS/EXIT
button twice. Then start again at step I.
5
Enter the channel you want to record.
• If you have a basic antenna or cable hookup (as shown on pages
six-seven) enter the channel of the "IV program you want to
record. (You must enter a 0 before all single digit channels.)
• If you are recording from line input, press 0, 0. AV REAR will
appear on-screen.
• If you are using a Cable Box/DSS Receiver, enter the Cable
Box/DSS Receiver output channel (channel 03 or 04). See page
edightfor details.
,__
CORRECT
PUSH
CLEAR
END PUSH EXIT
6
Press two Number
buttons for the hour(s) you want the
recording
to begin. Press two Number buttons for the
minute(s)
you want the recording
to begin. Press I for AM
or 2 for PM. For example, for 9:30 PM, press 09, 30, 2.
NE TIME PROGRAM
RAM
I
HANNEL
10
ME ON
- - :- -
CORRECT PUSH CLEAR
END PUSH EXIT
1
7
Enter the recording's stop time.
Follow the instructions in step 6 to set the recording's
(AM or PM will be set automatically).
stop time
• You must leave the Cable BoxlDSS
OGRAM
HANNEI.
liE ON
I
10
09.30
liE OFF
....
E TIME PROGRAM
CORRECT
PUSH
END
PUSH
Receiver turned on for a timer
recording (if applicable).
• Entries that do not match the VCR's
PM
1
internal clock or calendar will cause
CLEAR
EXIT
Instructions
continue
on page 36.
a question mark (?) to appear onscreen.
36 TimerRecording
(cont'd)
8
II
Press the Number
I button to record in SP speed, press
the Number 2 button to record in LP speed, or press the
Number 3 button to record in SLP speed. (For details, see
the chart below.)You cannot use the (Tape) SPEED button at this
time.
CHANNEL
TIME ON
TIME OFF
REC SPEED
SP=-I
LF=-2
TO
CORRECT
PL_H
I
10
09 30 PM
I1._0 PM
SLP
SI.P=-3
CLEAR
END PUSH EXIT
9
Press two Number
buttons
for the month
and two
Number buttons for the day you want to record the program. For example, for July 10, 1997, press 07, 10.The day of the
week and the year will appear automatically (you cannot program
the VCR to record more than one year in advance).
PROGRAM
CHANNEL
-r__
I
10
_.._ _
llME ON
_ME OFF
REC SPEED
START (3ATE
09 30 PM
I I _0 PM
SiP
07110/97
THU
TO CORRECT PUSH CLEAR
END PUSH EXIT
©©
PHILIPS
I0
Press the STATUSIEXlT
button. PROGRAM WAS COMPLETED / PLEASETURN OFFVCR FORTIMER RECORDING
will
appear on-screen (if PROGRAM NOT COMPLETED appears, try
again from step I). In three seconds the on-screen display will disappear.
II
Turn off the VCR power. T.heTimer light will appear.The VC R
must be turned off for a timer recording to take place. (If
the timer recording will take place several hours or days from
now, you may use theVCR until time for the recording.Just turn
off theVCR a few minutes before the recording starts.)
If you forget to turn off the VCR, PLEASETURN OFF VCR FOR
TIMER RECORDING flashes on yourTV screen two minutes
before a timer recording starts. Remove the messageby pressing
the CLEAR button.
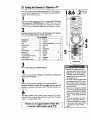
Tape Speeds
This chart shows the recording/playback time
for three types of video cassettes (T160,T 120,
and T60).There are three playback speeds:SP,
LP,and SLR During playback, theVCR selects
the tape speed automatically.When
recording,
you can change the tape speed using the
(Tape) SPEED button (see pages 22 and 31).
®
The VCR must
be off for a
timer recording
to take place!
Make sure there
is a tape in the
VCR.
Tape Speed
Type
SP
(Standard Play)
LP
(Long Play)
SLP
(Super Long Play)
Maximum
T 160
2
40
5
20
hrs.
mins.
hrs.
rains.
8 hrs.
Record/Playback Time
T 120
T60
2 hrs.
I hr.
4 hrs.
2 hrs.
6 hrs.
3 hrs.
TimerRecording
(cont'd)37
Checking
or Cancelling
Timer
Recordings
I
With the VCR on and inVCR position (the VCR lightwill appear
on the display panel), press theVCR button, then press the
MENU button.
2
3
Press the Number
I button
to select PROGRAM.
Press the Number
4 button
to select PROGRAM
5
REVIEW.The
timer recording information for the program in the lowest numbered slot will appear on-screen. If no timer recordings are set,
nothing will happen when you press the Number 4 button.
4
Press the Number
I button repeatedly
to review all programmed timer recordings. If you don't press the Number I button in 10 seconds, the VCR will automatically display information
about the next programmed timer recording.This will continue
until all filled positions have been displayed.Then the menu will disappear.
5
To cancel the timer recording
displayed, press the CLEAR
button. Either the display will disappear or information about
other timer recordings will appear. If you do not press any other
buttons, the display will disappear after all timer recordings have
been displayed.
6
Repeat steps I - 4 to make sure you have cleared the correct timer recording.
I
3
PHILIPS
• CLASH may flash on the screen
when you finishsetting a timer
recording. This means that the timer
recording you just programmed and
another timer recording overlap, and
thus the current timer recording will
not be carried out. In this case, cancel one of the overlapping timer
recordings.
• If the preset time for a timer
recording comes up during an OTR,
the OTR has priority.
• To stop a started timer recording,
press the ST•P/EJECT button on
the VCP_
• If the power fails for more than one
minute, programmed timer recordings will be lost. If this occurs, reset
the clock before re-programming
the timer recording(s).
See page 54 for more hints.
38 Setting
UptheVCRPlus+Programming
System
I
First, fill in the boxes on this page.It will only take a few minutes, and you must do it if you want theVCR
Plus+ programming system to work properly.
Sincethe channelnumbers of the stations you receive may not be the same as the station numbers, and
since channel numbers differ from area to area,you must program the VCR with your local channel information.To fill in the boxes, you will need I) a cable channelline-up list, if applicable (you can request one
from your cable company), and 2) a chart that listsVCR Plus+ channel numbers, which you can find in your
"IV guide or the TV listings of your local newspaper.
TV
LocalTV
Stations
(call letters)
CABLE
Channels
VCR PLUS+ CH.
CABLE/TV CH.
Local"IV
Stations
(call letters)
Channels
VCR PLUS+ CH.
CABLE/TV CH.
SettingUptheVCRPlus+Programming
System
(cant'd)39
2
Examine
page
38. the listson
Now, compare the channelnumbers you have written in theVCR
PLUS+ CH. and CABLEJTV CH. columns.You'llnotice that some
stations haveVCR Plus+ and CableFl'V channel numbers that are
the same,and other stations have channel numbers that do not
match.Where the channel numbers DO NOT match, you must tell
the VCR the VCR Plus+ and Cable/TV channel numbers according
to the following steps.
• Make each entry within 60 seconds of the previous entry.
3
4
Press theVCR
button, then press the MENU button.
Press the Number 2 button to selectVCR SET UP.
REPEAT PLAY
ON SCREEN MODE
AUDIO OUT
LANGUAGE
/Ti
OFF
SELECT
PUSH
NOMAP
SHOWN
VCR
PLUS+
REF
4
6
1
O END PUSH EXIT
5
Press the Number
5 button
R PLUS+
CABLE/T'V
98
98
99
99
I
.....
•
I
2
2
I
TO SELECT CH PUSH CH UP/
/_CcR PLUS+ CROSS REF.MAP
DOWN THEN ENTER CH NO.
_,TO
to selectVCR PLUS+ REE MAP.
PHILIPS
1
END PUSH EXff
6
Look at the lists you filled in on page 38. For stations whose
VCR Plus+ and Cable/TV
channels do not match, press
the CHANNEL
(Up/Down)
buttons until the arrow is
beside the VCR Plus+ channel you need.Then,
press the
Number
buttons to enter the corresponding
Cable/TV
channel from your list. (Enter a"0" before single-digit channels.)
Continue this process until you have entered all the stations on
your list.
98
99
I
2
.....
•
OEND
1
PUSH EXIT
7
Press the STATUS/EXIT
ber, repeat the steps on this page.
• To clear a Cable/TV channel number,
repeat steps 3-5 on this page. Then,
press the CHANNEL (Up/Down)
buttons to select it_Then press the
CLEAR button. Press the
STATUS/EXIT button to exit_
" Always enter a "0" before single-digit
channels.
98
99
23
2
VCR
PLUS+
CABLErl-V
TO
SELECT
CHCROSS
PUSH
CH MAP
UP/
_-VCR
PLUS+
REE
DOWN THEN ENTER CH NO
• To correct a CablelTV channel num-
button
to exit.
• To select line input for the Cable/TV
channel, press O,0.AUX will appear
on-screen.
• When you receivethe VCR from the
factory, all the VCR Plus+ channel
numbers and CablelTV channel
numbers are the same.
40 TimerRecording
WiththeVCRPlus+Programming
System
oeu
eeeeeeee*ee
.eee
eeoeee_oe.oeoooooe
eeeoe
Dee
eieeee.e
*eeoc
.eeQeeeeeeeeeeee.e.eeoe
ee.
Follow the steps below to program a timer recording using the
PlusCode programming numbers in your'IV guide. Before you
begin, make sure:
• Channels are programmed (page 12).
o*ee
• e.
e••eee•.•e•e.e.•ee•.e
k__
EJ_'TA
_
Q
_€_v
•
TheVCR Plus+ and Cable/T_ channel numbers are entered
(pages 38 - 39).
• The clock is set (pages 14-17).
• There is a tape in the VCR. Make sure the tape's record tab is
intact and the tape is long enough to record the program(s).
• TheVCR power is on and theVCR light appears on the display
panel of the VCR. If it does not, press the VCR/TV button once.
Complete
each step within 60 seconds of completing
the
previous step. If you don't, you may return
to step I.
I
ss the VCR
button.
I
Press theVCR
PLUS+/ENTER
button on the remote control.
The on-screen display shown below will appear.
fvcR PLus÷eRo_
3
2
PLUS CODE :
OEND
II
PUSH EXIT
3
Press the Number
buttons to enter the PlusCode programming
number
of the program you wish to record (this
number is different for every program, and it can be four to eight
digits long). Finally, press the VCR PLUS+/ENTER
button.
®
®
PHILIPS
/_vvcR
FLUS+
_o_.
: 13285
--TOPLUS
SET CODE
PUSH VCR
+
TO
CORRECT
PUSH CLEAR
.TO END PUSH EXIT
4
To record the program once, press the Number
I button
to select ONCE.To
record the same program every day
from Monday through Friday, press the Number
2 button
to select DAILY.To record the same program every week
on the same day (such as every Saturday), press the
Number 3 button to selectWEEKLY.
ONCE
DAILY
'_iR
TO
"_O
WEEKLY
PLUS+
SELECT
END
PROG
PUSH
PUSH
1
NO
EXIT
SHOWN
If CODE ERROR flashes after you
enter the PlusCode programming
number and press the VCR
PLUS+/ENTER button, the number
you entered was incorrect (for example, too short). If this happens, enter
the correct number.
CLASH may flash on the screen at
step 3. This means that the timer
recording you just programmed and
another timer recording overlap, and
thus the current timer recording will
not be carried out.
TimerRecording
WiththeVCRPlus+Programming
System
(cont'd)41
5
Press the Number
I button to record in SP speed, the
Number 2 button to record in LP speed, or the Number
3
button to record in SLP speed. Your selection will appear to
the right of REC SPEED on-screen, although SP= I LP=2 SLP=3 will
condnue to flash. For details about tape speed, see pages 36 and
56.You cannot use the (Tape) SPEED button at this time.
TIME ON
TIME OFF
REC SPEED
SP=-I I._-2
START DATE
END
PUSH
6
1_30 PM
II 30 PM
SLP
$1.P=3
10/10/97
IEXIT _1
6
Press the STATUS/EXIT
button. PROGRAM WAS COMPLETED / PLEASETURN OFF VCR FOR TIMER RECORDING
should appear on the screen, After three seconds, the on-screen
display will disappear.
5
7
Press the POWER button to turn off theVCR power. The
Timer lightwill appear.The Timer lightwill flashif there is not a
tape in the VCR.
If the timer recording will take place several hours or days from
now,you may use theVCR until time for the recording.Just turn
off theVCR a few minutes before the recording starts.
The VCR must be turned off for a timer recording to take
place. If you forget to turn off theVCR, PLEASETURN OFFVCR
FOR TIMER RECORDING flasheson your TV screen two minutes
before a timer recording starts.You can remove the messageby
pressingthe CLEAR button.
• To exit the VCR Plus+ programming
system at any time, press the STATUS/EXIT button. The display will
disappear from the TV screen.
• If the preset time for a timer
recording comes up during an OTR,
the OTR has priority.
• To stop a started timer recording,
press the STOP/EJECTbutton on
the VCR.
The VCR must be off for a
timer recording to take
place! Make sure there is a
tape in the VCR.
• If the power fails for more than one
minute, programmed timer recordings may be lost. Reset the clock
before re-programming the timer
recordings.
• If you are using a Cable Box/DSS
Receiver, timer recordings are programmed differently. See page eight
for details.
See page 54 for more hints.
42 Rerecording
(TapeDuplication)
i
oooo
o•
too
•
'
i•
I•
•
•
•••s
•
vynvR
RReco
nVR D
II
• RFc-(supplied)from
VCR's OUT Jack to
TV's ANTENNA IN
Jack
I.Audio cablesfrom AUDIO OUT Jacks ofVCR I to AUDIO IN Jacks ofVCR 2
2.Video cablefrornVIDEO OUT Jack ofVCR I toVIDEO IN Jack ofVCR 2
•
Audio
and Video cables are not supplied.
The instructions on this page show you how to copy tapes.The
illustration uses two VCRs just like yours. DifferentVCRs may
operate differently.
NOTE: Unauthorized recording of copyrighted television programs, video
tapes, or other materials may infringe on the rights of copyright owners and
violate copyright laws.
I
2
Make the connections shown above.
VCR I will play your tape. Insert a prerecorded
tape in VCR
I. If the tape does not have a record tab, playback begins. If this
happens, press the STOP/EJECT button on VCR I once.
3
VCR 2 will record yourcape.Insert a blank tape inVCR 2. Make
suretheVCR 2 power ison andVCR 2 isinVCR position.(TheVCR
light will appearon the displaypanel.If it doesnot, presstheVCRFI'V
button once.)
4
Turn the TV on and set it to channel 3 or 4, whichever channel the CH3/CH4 switch on VCR 2 is set to.
5
Point the remote
control
atVCR
2. Press Number
buttons
O, 0, I or 0, 0, 2. (See Helpful Hints at right.)
6
Point the remote
control atVCR
button to select SP, LP or SLP.
2. Use the (Tape)
SPEED
7
Press the PLAY button on VCR I and the REC(ord)/OTR
button on VCR 2 at the same time.
To stop recording, press the STOP/EJECT button onVCR
press the STOP/EJECT button onVCR 2.
I, then
• If you use theAUDlO IN and
VIDEO IN Jacks on the back of
VCR 2, press Number buttons 0, 0,
I. AV REAR will appear on-screen.
• If you use theAUDlO IN and
VIDEO IN Jackson the front of
VCR 2, press Number buttons 0, 0,
2. AV FRONT will appear on-screen.
Repeat
Playback43
Repeat
Playback
Follow the steps below to program the VCR to play a tape over
and over.
I
Press theVCR
button.
2
Press the
MENU
button
2
to bring up the main menu display.
PROGRAM
VCP. SET UP
TUNER
SET UP
SET
CLOCK
SELECT
PUSH
_
END
PUSH
NO.
SHOVVN
1
EXIT
3
Press the Number
2
3
4
5I
_./_0
ON SCREEN MODE
AUDIO OUT
LANGUAGE
VCR
PLUS*
REE MAP OFF
REPEAT
PLAY
SELECT PUSH NO. SHOWN
_TO
END PUSH EXIT
2 button
to select VCR SET UP.
3
1
4
Press the Number
I button
of REPEAT PLAY on-screen.
so that ON appears to the right
5
PHILIPS
Press the STATUSIEXIT
button to exit. Now, when a tape has
finished playing,the VCR will rewind it and start playback again.
(TV programming will appear while the tape is rewinding.)
•Help[ul
Hints
• The VCR will stay in Repeat Play
mode until you cancel Repeat Play
mode. To do this, follow steps I - 3
above. At step 4, press the Number
I button so that OFF appears to
the right of REPEATPLAY.Press the
STATUS/EXIT button to exit.
• The real time counter memory does
not function during Repeat Play
mode.
44 TimeSearch
I
2
Press theVCR
button.
Press theTIME
SEARCH
button to bring up the time search
display.There must be a tape in theVCR.
I
IME SEARCH
0._0
NTER SEARCH TIME
1
3
Within I 0 seconds, use the Humber buttons to enter the
desired length of time you want to skip forward or backward. For example,for I hour,25 minutes,pressNumber buttons
I, 2, 5. Or, for five minutes, press Number buttons 0, 0, 5. (Make an
entry within I 0 seconds of pressingthe TIME SEARCH button.
Otherwise, theVCR will exitTime Search mode.)
I
3
4
Within
I 0 seconds, press the RFWD
REW(ind)
button to skip forward or
will skip over the specified length of time,
(The time counts down on-screen as the
button or the
backward. The VCR
then begin playback.
searching progresses.)
PHILIPS
i o
If you want to search for more than
59 minutes, you must enter the
length of time in hours and minutes.
For example, to search forward 70
minutes, press I, 1,0 at step 3.
Youcan not enter the TIME
SEARCH menu when you are in
Recording mode.
Youcan remove the Time Search
display by pressing the TIME
SEARCH button again.
To cancel the Time Search when the
VCR is fast forwardingor rewinding,
press the STOP button once or the
TIME SEARCH button twice.
RealTime
CounterMemory
45
Real Time
Counter
Memory
Followthe stepsbelow to reset the real time counter to zero at a
tape locationyou want to refer to later.
I
I
3
Play, fast forward, or rewind a tape to the location that
you would like to refer to later. Press the STOP button to
stop the tape.
2
Press the STATUS/EXIT
button.
on-screen for about five seconds.
TV STEREO
CHI0
/_OP
LP
I._BPM
I
23:45
The status display will appear
1
HIR
3
vc_
While the status display is still on-screen, press the CLEAR
ton to reset the real time counter to zero.
but-
c_oss
MUTE
DDD
DDD I
[] ITI ITI
REO
0
_N_
CH 10
00:00
HIFI
4
o
®
©©
®
PHILIPS
While the real time counter is still on-screen, press the
MEMORY
button so that M appears to the left of the real
time counter on-screen.
STEREO
)P
_,,_.LP
CH I 0
I.'08 PM
I"1 0:00"00
1
HIFI
5
To go to a tape location where the real time counter was
reset to zero, press the REW(ind)
button or the F.FWD
button when playback is stopped. When the tape reaches the
point at which the real time counter was reset to zero, the tape
will stop. Press the PLAY button to watch the tape.
• The MEMORY button does not function when REPEATPLAYis set to
ON. To turn REPEATPLAYOFF,see
the Helpful Hints on page 43.
• To erase a Real Time Counter
Memory, press the MEMORY button
until the M disappears from the
screen.
• You may onlyset the real.time
counter to zero at one location at a
time. If you try to set the real time
counter to zero at a second location, the previous real time counter
to zero setting will be erased.
46 Special
Effects
Playback
Forward
and Reverse
Searching
(SP/LP/SLP)
I
When in Play mode, press and release the F.FWD button or
the REW(ind)
button. A fast forward or reverse picture search
will begin.
2
To return to playback, press the PLAY
Super
High
Speed
Searching
button.
(LP/SLP)
I
When in Play mode, press the F.FWD button or the REW
(ind) button, then press again. TheVCR will now search in
super high speed.
VCR
2
To return to normal playback, press the
PLAY button.
O_JOSS
• mD@
I-q 1_ FI
l
Viewing a Still Picture
I
When in Play mode, press the PAUSE/STILL
picture (frozen image) will appear on-screen.
_PrrEn
button. A still
o
®
©©
®
PHILIPS
2
To release the still picture and return to normal playback, press
the PLAY button or press the PAUSE/STILL
button again.
• Slow and Still modes will automatically switch to Stop mode after five
minutes to protect the VCR and the
tape from damage.
• SP/LP/SLPmeans this feature will
work with tapes recorded in
Standard Play, Long Play, or Super
Long Play.
• LPISLP means this feature will work
with tapes recorded in Long Play or
Super Long Play. For details about
tape speed, see pages 36 and 56.
• To reduce vertical jitter in a Still picture, press the CHANNEL
(UplDown) buttons on the VCR.
Special
Effects
Playback
(conted)
47
"_i,ew,
n_a'_iow'i4o;:ion"_ic;_ure"
................................................
_;i"
....""_'"
......
I
When in Playmode, press the SLOW button. The tape will play
in slow motion.
NOTE:You cancontrol the speed of slow motion playbackby
pressing the VAR(iable). SLOW buttons.
2
OO
To release Slow mode and return to normal playback,press the
PLAY button or press the SLOW button again.
Viewing
a Picture
in Slow to Fast Motion
I
Press the JOG & SHUTTLE
button
while in the Play or Still
mode.The Jog & Shuttle Light comes on. If you do not operate the
Jog Dial or Shuttle Ring within 30 seconds, the Jog & Shuttle light
will go off.
2
Turn the Shuttle Ring in either direction and hold it. The more the
ring is rotated, the faster the search speed will be. Releasingthe
ring stops the picture in the Still mode.
3
oo
PHILIPS
Turn the Jog dial in either direction for frame-by-frame control.
The faster the dial is rotated, the faster the search will be.
Releasingthe dial stops the picture in the Still mode.
4
Press the PLAY button
mD@
l
[][][]
to release the Still mode.
48 Automatic• Operation
Features
e_oo
• eeeoo
• • •oQ
••.oeooeo_oo_•o
•
•0•
• oooQ
•oo
•••e
.••
e_oeo
•_o
eoeoeoiom
•••o_••
The following playback features will always operate:
AutomaticPlayback
When you put a taP•in theVCR, the power will come on automatically. If the tape's record tab is missing, playback will begin.
If a timer recording is set, the power will not come on automatically when you insert a tape with the record tab intact.
If a timer recording is set and theVCR power is off, theVCR will
eject the tape if the record tab is missing.
Automatic
Rewind,
Eject,
Off
When a tape is played,fast forwarded, or recorded to its end, the
VCR will rewind the tape, go into the Stop mode, eject the tape,
then turn itself off.
If the real time counter memory is set, theVCR will only rewind
to the point at which the counter is set to zero, then stop.The
VCR will not eject the tape automatically or shut itself off.
Tape
Eject
A tape can be ejected with theVCR power on or off (but theVCR
must be plugged in). If aTimer Recording is programmed, a tape
can only be ejected with the power on. Make sure you insert a
tape and turn off theVCR power for the Timer Recording.
Automatic
Tracking
Adjustment
TheVCR continually adjusts tracking automatically to give you the
best possible picture quality.With some recordings, however, you
may get a better picture using the manual tracking controls (see
page 49).
e_Qoeoooeoou.
__ _
•*••••
•
or' •••
'*
__
• e•
• • • I •e
• ooooeo
_ : _'?
Automatk
Operation
lFeatures
(€ont'd)49
To adjust the tracking manually, press the CHANNEL (Up/Down)
buttons on theVCR
during tape playback.
NOTES:
• This _unction is controlled on/y by the CHANNEL (UplDown) buttons
on the VC/_ The CHANNEL (UplDown) buttons on the remote control will not adjust tracking.
• To return tracking to the position it was in when the VCR-was shipped
from the factory, press the CHANNEL (Up) and CHANNEL (Down)
buttonson the VCR at the same time.
• Track3ngis returned to auto tracking when a tape is inserted,or when
the STOPbutton is pressed to halt playback.
• When the VCR is in Slow mode, auto tracking will not work. Instead,
use the CHANNEL (Up/Down) buttons on the VCR to reduce noise
lines in slow motion playback.
• Manual tracking will not operate when the VCR is in Still mode. If you
want to reduce noise lines in a still picture, place the VCR in Slow
mode. Use the CHANNEL (Up/Down) buttons on the VCR to
remove the noise lines.Then return to Still mode.
_
Tracking
Adjustment
_
Tracking
Adjustment
50MTSBroadcast
StereoSystem
• O*04
eee•oo
40COLD
•o_
De•
o oDe••oDe
• • eeeoee
•co
• • ••••
• •e•e•
*••
,
••e•e
eieoooeoeoe
ee•ee•
• ••oee•e•••,•eoe•e•••
• • Dee
oeJ•
•
¥ourVCR can playrecordings broadcastin Hi-Fi (high fidelity) stereo,which producesa •crisp,clear soundL.
from two sources.YourVCR also can playtapes recorded in a secondaudio (usually,that meansyour pr_
gram is recorded in a secondlanguage).Of course,yourVCR will playtapes recorded in monaural (singl.
source)soundas well.
YourVCR also will record in Hi-Fi stereo or in second audio,so when you play back that tape on theVCR,
it will be in stereo or second audio. If you play back the tape on aVCR that can't play back tapes in stereo
or second audio, theVCR will automatically playthe tape*in monaural sound.
Read the directions on this page to familiarize yourself with yourVCR's stereo and second audio setups.
Then follow the directions on page 51 to record in stereo or second audio and the directions on pages52
- 53 to play back tapes recorded in Hi-Fi stereo.
Understanding
On-Screen
Displays
When you receive a signalfrom a channel you're watching, portions of the on-screen display shown below
will appear when you press the STATUS/EXIT button on the remote control
f
The indication2ND AUD or TV
STEREOthat appears on this side of
the statusdisplay tells you if your VCR
is programmedto receivea second
audio or stereo broadcast(it cannot
be programmedto receiveboth at
the same time).
m
STOP
TV STEREO
12:00
AM "_
F The indication2NO AUD or STEREO
CH
02
that
appears on this side of the status
STEREO _1
....
2NDAUD _--J a_spraytells you if the programyou're
I I watchingis availablein secondaudio
• II orste o.
JI
SLP
1:23:45
HIFIJ
Thisindicationis not availableduring
. Ltape
playback.
Specifically...
f
STOP
TV STEREO
12:00AM
CH 02
F
SLP
1:23:45
HIFI
When a program broadcast in stereo is available,STEREOappears here.
When a program broadcast in second audio is available,2ND AUD
appears here.
a program is availableboth in stereo and second audio, both
STEREO and 2ND AUD appear here. Eventhough a program is available
in stereo or second audio, you still must program theVCR to receive or
record the program. Follow the directions on page 5 I.
NOTE'Aithougha programmay be broadcastin both stereo and secondaudio,
you cannot recordin both stereoand secondaudio at the sametime.
To record and play back programsbroadcast in stereo,even if you havea Mono SpeakerTV, just use one of
the connections shown, then follow the steps on pages51 - 53.
Stereo Amplifier
or Receiver
Mono
Stereo
Monitor
SpeakerTV
Speaker"IV
TV
DIo,I ID! o,
I
Audio
AUDIO
cables
OUT
from
OUT
Jack
to TV's ANTENNA
IN Jack
Jacks of
VCR to AUDIO
IN Jacks
of Stereo Amplifier
or
Receiver
Video
cable
to VIDEO
from VIDEO
OUT
IN Jack of monitor
Jack of VCR
TV
I
I
MTSBroadcast
StereoSystem(co_t_'d)
51
Press the VCR
button,
then
press the MENU
o
button.
slow
2
L
Press the Number
3 button
to selectTUNER
SET UP.
4
3 AUTO PROGRAHHING
4 ADD/DELETE CH
5 CH MEMORY REVIEW
6 SELECTcABLE
TV STEREO
ON 1
/ ITv_fTO2
TvPUSHNO. SHOWNoN
7 2ND AUOIO
TO END PUSH EXIT
3
Press the Number 6 button to selectTV STEREO or the
Number 7 button to select 2ND AUDIO. ON will appearto
the right of your selection.
4
Press the STATUSIEXIT
button to exi_
5
2
3
I
5
To play a tape, press the PLAY button. Or, to record,
select the channel to be recorded using the CHANNEL
(Up/Down) buttons, then go to step 6.
6
Press the REC(ord)/OTR
button
to start recording.
• Youcan only receive and record in
stereo or secondaudio programs
that are broadcast in second audio
or stereo. Youcan only play in
stereo or second audio tapes that
were recorded in stereo or second
audio. Please see page 50 to determine if the program you Want to
watch/record is being broadcast in
stereo or second audio.
• If you select second audio when
second audio is not available, the
VCR will record normal audio.
52Hi-FiStereo
SoundSystem
ee • • • • • eeeee•
ee • • eeee
_e•e
•eeeee•
eeoo••
• o ee •o•oe•
••eee
• • •••••oeo••
ee
, eeeee•eeooe•
•e
• •eeoeeeoe
•oe•o
• ••e•
eeeee
o•
• • •
Multi-Channel Television Sound System broadcasts are automatical°
ly recorded in Hi-Fi stereo sound. To play in Hi-Fi stereo tapes
recorded in Hi-Fi stereo, however, you'll need to follow the steps
below.
I
Press the VCR button, then press the MENU button.
5
2
Press the Number
2 button
to selectVCR SET UR
I
4
ON SCREEN MODE
AUDIO OUT
LANGUAGE
VCR PLUS+ REE. MAP
END PUSH EXIT
3
Press the Number
3 button
to selectAUDIO
OUT.
4
Press the Number
I button
the right of HIFI on-screen.
3
to select HIFI. ON will appear to
• All programs are automatically
recorded in both Hi-Fi stereo sound
and in monaural sound.
• The audio level of a tape recorded
in Hi-Fi stereo will differ from the
audio level of a tape not recorded in
Hi-Fi stereo.
• Normally, HIFI should be selected
from the AUDIO OUT menu for
playback with Hi-Fi sound. But, you
can change the selection to MONO
END PUSH EXIT
5
Press the STATUSIEXIT
if you want monaural audio playback. To do this, follow steps I - 3
button
to exit.
above.At step 4, press the Number
2 button to select MONO. Press
the STATUS/EXIT button to exit.
HIFI will disappear from the status
display.
• If you play non-Hi-Fi tapes while the
VCR is set to HIFI, HIFI will disappear from the status display and the
tape will play in monaural sound.
See page 55 for more hints.
Hi-FiStereoSoundSystem
(cont'd)53
eoee
• 4Qee
• ee oeeeeeee
ee • eeeeeeeeeoe
Press the MENU
button
• • oe • eeoeoeoo4oeoe4
•
••eeeeee•
oeoeo
eeeeee
eeeo
••eeeQ
oe ee•
ooe
eee
eeooo
••e
oooo
••••
•
to bring up the main menu display.
n
7
Press the Number 3 button to selectTUNER SET UP.
6
TV
I
2 CABLEIW
I
3 AUTO
/
4ADD/DELETE
CH
J
/
5 CH
ON
Pfl.OGRAMMING
MEMO_.Y
6"rvs'r_
REVIEW
TOl ELECT
PUSH
7 2ND AUDIO
TO
END
PUSH
NO.
SHOWN
ON
1
EXIT
8
Press the Number
6 button
to select TV STEREO. ON will
appear to the right of'IV STEREO on-screen.
9
Press the STATUS/EXIT
button
to exit.
AENTER
o
®
O0
®
PHILliPS
•
.'_
•
54 HelpfulHints
• oooeee
.
•_
eoo .oe ooeeo
4_o_•oo
ooeQ
.....
oo•
e•4
•oe
oe o_•o
oooo
•_o
o_ooo
_•o
o • oeoo
.ooo•4
oooo
• e•
••4••_ooe
eeoeooeoeo
coo••co•••e•
If you are having problems with yourVCl_ check the following list of problems and possible solutions before
requesting service.You may be able to solve the problem yourself.
No power
.
•
__
:_
.....
"
• Make sure the power plug is completely connected to an AC (alternating current) outlet.
• Make sure the power is turned on.
Power Failure
• Timer recordings and the clock setting may be lost if the power fails form•re than one minute_ See
pages 14-17 to reset your clock_See pages 34 - 41 to reprogram your timer recordings.
ATV program cannot be recorded.
• Check the connections between the VCR,TV, antenna/cable, and Cable Box/Digital Satellite System (if
applicable) (pages six- 10).
• Make sure the tape has a record tab (page five).
• Check the TV/VCR position (page 27).
• Check the CH3/CH4 switch (pages six-nine).
The VCR will not perform a timer recording.
• Make sure the recording start and stop times are set correctly (pages 34 - 41).
• Make sure a tape is in theVCR and the tape has a record tab (page five). If, after programming a timer
recording, you turn off theVCR power without putting a tape in theVCR, theTimer light will blink.
• If the record tab on a tape is missing,theVCR will eject the tape. The Timer light will blink.
• Make sure the VCR power is off.
• Make sure the clock is set (pages 14-17).
• The VCR may not perform or continue a timer recording if a power interruption of more than one
minute occurs during the timer recording, even if the power comes back on afterward.
• If you have a Cable Box, timer recordings are programmed differently. (See page eight for details.)
• It is best to finish programming a timer recording at least five minutes before the recording is scheduled _
to begin.
• 12 PM is noon; 12 AM is midnight
There is no playback picture or the playback picture is noisy or contains streaks.
• Make sure theTV and the Cable Box, if applicable, are on the same channel as theVCR's CH3/C1-14
switch (pages six-nine).
• Make sure theVCR is inVCR position (page 27).TheVCR light will appear on the display panel of the
VCR when theVCR is in VCR position.
• Make sure channel 3 or 4 is properly adjusted at the
• Adjust the tracking (pages 48 - 49).
TheVCR cannot be controlled with the remote control.
• Make sure theVCR light appears on theVCR display panel. If it does not, press theVCR/TV button once.
• Aim the remote control directly at theVCR's remote sensor (page 27).
• Remove all obstacles between the remote control and the VCR.
• Inspect and/or replace the batteries in the remote control (page five).
• Press theVCR button, then try the otherVCR function buttons.
The Number buttons won't work for channels above 69.
• Select CABLE TV at the TUNER SET UP menu (page 12),then let theVCR program the channels.
HelpfulHints (cont'd)
55
• so•o••••
• Qoooto_e
•oo•
ooo
ot
•QIOOetOOleOOOOOIOItQOOIOOOQOeOOQOQ
•••
I•
QO•
• OOOOO•
• O_O• O•• O• Be OOI ....
•OOOO•
e"• 'l'O'IOOe•
_
OQOOIO
TV programs cannot be watched normally.
_'
• Put theVCR in "IV position. (Press theVCR/'I'V button so that theVCR light disappears from the display
panel. For details see pages 22 and 27.)
-,• Check the connections between the VCR, TV, antenna/cable, and Cable Box/Digital Satellite System (if
applicable). (See pages six-I0 for details.)
Tape cannot be inserted.
• Insert the tape, window side up, with the record tab facing you.
• Make sure a tape isn't already in theYCR by pressing the ST•P/EJECT button on theVCR.
• Gently push on the center of the tape when putting it in theVCR. Never force the tape into theVCR.
• If a timer recording is programmed and theVCR power is off, you can not insert a tape without a record
tab.
Tape cannot be removed.
• Make sure the power plug is completely connected to an AC (alternating current) outlet.
• You have set a timer recording.Turn theVCR power on, then eject the tape. Be sure to insert a tape and
turn off the power for your timer recording.
VCR ejects the tape when the REC(ord)/OTR
turned off to set a timer recording.
• Make sure the tape has a record tab (page five).
button
is pressed or when theVCR
power
is
Channels above 13 cannot be received.
• Select CABLE TV at the TUNER SET UP menu (page 12),then let the VCR program the channels.
Poor reception
• You may need to tune your'IV
again.
The motor (cylinder) rotates even when theVCR
is in Stop mode.
• To enable the quick play mechanism, the cylinder will rotate for about five minutes.This
is normal.
Satellite Hookups
• Watching one TV channelwhile recording another may not be possible if you havea satellite hookup.You
may haveto set your'IV to channel3 or 4, then make your channelselectionsat the satelliteconverter
box.
• With many satellite hookups, if you use accessory audio and video cables to connect yourVCR to your
TV, you will have to put yourVCR in Line Input mode.To enter Line Input mode, press0, 0, I or 0, 0, 2
on theVCR's remote control. AV REAR orAV FRONT will appear on your'IV screen briefly.
Line Input mode
• If you accidentally enter Line Input mode (AV FRONT orAV REAR will appear on yourTV screen
briefly), press the CHANNEL (Up/Down) buttons or use the Number buttons to select another channel.
Daylight-Saving
Time
• When automatic Daylight-SavingTime
is set, the clock time will change automatically as follows: on the
first Sunday in April, from 2 AM to 3 AM; on the last Sunday in October, from 2 AM to I AM.
• During the April time change, a timer recording programmed to start between 2 AM and 3 AM will not
record.A timer recording programmed to end between 2 AM and 3 AM will end when the clock moves
forward (2 AM).
• During the October time change, a recording cannot be started between the second I AM and 1:59 AM.
Hi-Fi Stereo Sound
• During playback, Hi-Fi audio may temporarily revert to normal audio when you adjust tracking. This is
normal.
• When connecting theVCR to a stereo TV, you will only get stereo sound if you use audio cables to connect the AUDIO OUT jacks on theVCR to the AUDIO IN jacks on your-IV, and if the'l'V is in Line
(Auxiliary) Input mode.
• When you connect the AUDIO OUT jacks on theVCR to the AUDIO IN jacks on your'l-_, the stereo
light on the'IV might not glow. But, as long as the status display indicates you are receiving a stereo signal, you are receiving a stereo signal. This is normal.
• If Hi-Fi audio continually reverts to normal audio during playback, you may want to change AUDIO OUT
to MONO at step 4 on page 52.
• Only tapes recorded in Hi-Fi audio will play back in Hi-Fi audio. Tapes recorded in normal audio will play
back in monaural audio.
56 Glossary
• o•
• • • oeoe
•oeo
• • eoe
o•
e.¶e
eeoe
• • • • • o•
••
•e•
• • • • eeo
• • o• •8
• • • •1
• • • •o•
••
•.•
AUDIO
IN/OUT
lacks: jacks located on the front and back of
theVCR which are used to record audio from another source
(IN) or to send audio to another source (OUT).
Automatic
Channel Pro__rammin__: process in which the VCR
scans all available channels and places the ones you receive in its
memory.Then, when you push the CHANNEL (Up/Down) buttons, you only scan through channels you receive.
Bands." settings that allow you to tune channels.
• Antenna-VHF
(very high frequency; channels 2 - 13) and UHF
(ultra high frequency; channels 14 - 69).
• Cable - all standard channels can be received without a Cable
Box.
Cable Box/DSS Receiver Output Channel: Channel03 or 04.
Dubbing: copyinga tape using a secondVCR.
Frame: a singlestillpicture.
HQ: highquality; a feature in the VCR circuitrywhich provides
enhanced picture detail.
Line Input:The channel to which you set yourVCR during dubbing.The line input channel is always channel 001 (AV REAR) or
002 (AV FRONT).
If you accidentally enter Line Input mode (AV REAR or AV
FRONT will appear on your TV screen briefly), press the CHANNEL (Up/Down) buttons or use the Number buttons to select
another channel.
Mode: aVCR operation.
OTR: one touch recording; programming a timed recording that
starts immediately and records for 30 minutes to eight hours,
whichever you specify.
Remote Control: the small electronic unit that came with your
VCR; allows you to operate yourVCR from a distance.You may be
able to operate your'l-V, Cable Box or Digital Satellite System with
the remote control.
RF coaxial cable: The cable supplied with yourVCR. Use it to
connect yourVCR to your'rV (or Cable Box/DSS Receiver, if
applicable).The supplied cable is a snap-on type. However, you may
also use a screw-on type if you prefer.
Special Effects: forward
ture; slow motion.
and reverse searching; viewing a still pic-
Tape Speeds: how fast the tape travels during a recording.
• SP (standard play) - fastest tape speed (recording time for a
T120 tape is approximately two hours); best picture quality.
• LP (long play) - average tape speed (recording time for aTI20
tape is approximately four hours).
• SLP (super long play) - slowest tape speed (recording time for
a T120 tape is approximately six hours).
VCR: video cassette recorder.
VIDEO
IN/OUT
Jacks: jacks located on the front and back of
the VCR which are used to record video from another source
(IN) or send video to another source (OUT).
• •o•o•
•e
• ••
• • •e•
• • •oo
• •eo•e
• e•
0••
• • o•
• • • o•
i,SpecificationS
57
Video Signal
EIA standards; NTSC color
Antenna
VHF/UHF - 75 ohm external
antenna terminal
VHF Output
Signal
Channel 3 or 4 (switchable)
75 ohms unbalanced
Power Requirement
120V AC; 60Hz
Power Consumption
20W
Operating
Temperature
41°F (5°C) to 104°F (40°C)
Relative Humidity
10%to 80%
Weight
6.17 Ibs. (2.8 kg.)
Dimensions
14-3/16" (W) x 3-1/16" (H) x 10" (D)
(360 mm x 92mm x 230mm)
Tuner Broadcast
Channels
VHF 2-13, UHF 14-69
Cable TV Channels
2-13
Midband:AI
Superband: J - W
Hyperband:A-5 - A- I
Special Channel: 5A
Ultraband: 37 - 94, 100 - 125
NOTE" Designs and specifications are subject to change without notice.
58Limited
Warranty
VIDEO
CASSETTE
RECORDER
90 Days Free Labor/One Year Parts Exchange. This product must be carried in for repair.
WHO IS COVERED?
You must have proof of purchase to receive warranty
service.A sales receipt or other document showing
that you purchased the product is considered proof
of purchase.
WHAT IS COVERED?
Warranty coverage begins the day you buy your
product. For 90 days thereafter, all parts will be
repaired or replaced, and labor is free. From 90 days
to one year from the day of purchase, all parts will be
repaired or replaced, but you pay for all labor
charges. After one year from the day of purchase, you
pay for the replacement or repair of all parts, and for
all labor charges.
All parts, including repaired and replaced parts, are
covered only for the original warranty period.When
the warranty on the product expires, the warranty
on all replaced and repaired parts also expires.
WHAT IS EXCLUDED?
Your warranty does not cover:
• labor charges for installation or setup of the product, adjustment of customer controls on the product, and installation or repair of antenna systems
outside of the product.
• product repair and/or part replacement because
of misuse, accident, unauthorized repair or other
cause not within the control of Philips Consumer
Electronics Company.
• reception problems caused by signal conditions or
cable or antenna systems outside the unit.
• a product that requires modification or adaptation
to enable it to operate in any country other than
the country for which it was designed, manufactured, approved and/or authorized, or repair of
products damaged by these modifications.
• incidental or consequential damages resulting from
the product. (Some states do not allow the exclusion of incidental or consequential damages, so the
above exclusion may not apply to you.This
includes, but is not limited to, prerecorded material, whether copyrighted or not copyrighted.)
• damage caused by the use of non-VHS tapes or
tapes that have not been tested and labeled for
use in two, four, six, and eight hourVHS recorders.
• a product that is used for commercial or institutional purposes (including but not limited to rental
purposes).
WHERE IS SERVICE AVAILABLE?
Warranty service is available in all countries where
the product is officially distributed by Philips
Consumer Electronics Company. In countries where
Philips Consumer Electronics Company does not distribute the product, the local Philips service organization will attempt to provide service (although there
_iips'Se_e_6mpany,
may be a delayif the appropriatespare parts and
technical manual(s) are not readily available).
MAKE SURE YOU KEEP...
Please keep your sales receipt or other document
showing proof of purchase.Attach it to this owner's
manual and keep both nearby.Also keep the original
box and packing material in case you need to return
your productBEFORE REQUESTING
SERVICE...
Please check your owner's manual before requesting
service.Adjustments of the controls discussed there
may save you a service call.
TO GET WARRANTY SERVICE IN U.S.A.,
PUERTO RICO OR U.S. VIRGIN ISLANDS...
Take the product to a Philips factory service center
(see enclosed list) or authorized service center for
repair.When the product has been repaired, you
must pick up the unit at the center. Centers may
keep defective parts.
(In U.S.A., Puerto Rico and U.S.Virgin Islands,all
implied warranties, including implied warranties of
merchantability and fitness for a particular purpose,
are limited in duration to the duration of this express
warranty. Because some states do not allow limitations on how long an implied warranty may last, this
limitation may not apply to you.)
TO GET WARRANTY SERVICE IN CANADA...
Pleasecontact Philips at:
1-800-661-6162 (French Speaking)
1-800-363-7278 (English Speaking)
(In Canada, this warranty is given in lieu of all other
warranties. No other warranties are expressed or
implied, including any implied warranties of merchantability or fitness for a particular purpose. Philips
is not liable under any circumstances for any direct,
indirect, special, incidental, or consequential damages,
howsoever incurred, even if notified of the possibility
of such damages.)
REMEMBER...
Please record below the model and serial numbers
found on the product.Also, please fill out and mail
your warranty registration card promptly. It will be
easier for us to notify you if necessary.
MODEL#
SERIAL #
This warranty gives you specific legal rights.You may have
other rights which vary from state to state.
_l_O_E_ss_j_n_:Tel__9_l_60,
: (423)_4:_869
EL4946E007
/ MAC 6108,
'''_
Index59
eeooeeeeeeeo
eeoc
• ee • ee•eeooe
eeeeoeoee
ac power cord .........................i.......28
accessories......................................60
ant(enna) in jack ...................6- IO,28
audio in/out jacks..............IO,26, 28,
...............................................
42, 50, 56
automatic
playback.......................................
48
rewind, eject, off.........................
48
oeoeooeee.eoooe•
eeeo
eee,eeee•
oeeeeeee•o•o•
long play.....................................
.36, 56
Ip ..................................................
36, 56
memory button ........................
24, 45
menu button ....................................
23
mts broadcast stereo system.50-53,55
mute button .....................................
24
number buttons ..............................23
batteries ..............................................
5
cassette compartment ...................25
cassette-inside light ........................25
cbl/dss button ........................5, 21-22
ch3/ch4 switch .........................6-9, 28
channel
above IO0....................................
23
adding ...........................................
13
deleting ........................................
13
memory .......................................
12
programming ..............................12
reviewing .....................................
13
up/down buttons ..........24, 26, 49
clear button ...............................
24, 45
clock/feature display .......................25
clock setting ...............................14-17
connections .....................6- IO,42, 50
contents, table of. ..............................
4
controls
remote ...................................
22-24
vcr ...........................................
26-27
counter only mode .........................
29
daylight-saving time .........................18
display panel .....................................
25
duplication ........................................
42
eject button ......................................
22
erase prevention ................................
5
f.fwd button .........................23,27, 46
• front panel ........................................
27
on screen off mode ........................29
on screen on mode ........................29
on screen status displays...............29
one touch recording ......................33
out jack. .....................................
6-9, 28
jog & shuttle button ................23, 47
jog dial.........................................
23, 47
language selection ....................I I, 19
line input mode ..................12, 42, 56
eel
ee ,e•e
oe •,oeeeee
speed button ....................................
22
standard play..............................
36, 56
status display....................................
29
status/exit button .....................22, 29
stereo
broadcast
receiving ...........................
50-5 I
recording ..........................50-5 I
hookups .......................................
50
still picture ........................................
46
stop button ......................................
22
stop/eject button ............................
26
super high speed searching ..........46
super long play ..........................
36, 56
table of contents...............................
4
pause button ....................................
27
pause/still button ................22, 3 I, 46
play button ..............22, 26, 30, 46-47
playing................................................
30
power
button ....................................
22, 26
cord ..............................................
28
pwr.(power) light ............................
25
rear panel..........................................
28
redotr button ..............23, 26, 3 I, 33
rec(ord) light ....................................
25
recording
basic ..............................................
3I
one channel/
watching another .......................
32
timer .......................................
34-37
with the vcr plus+
programming system ..........38-41
remote control
buttons ...................................
22-24
sensor ...........................................
27
using ................................................
5
repeat playback................................
43
rerecording .......................................
42
rew(ind) button ..................23, 27, 46
rf coaxial cable..................6-9, 42, 56
glossary .............................................
56
helpful hints ................................
54-55
hi-fi stereo sound system .......52-53
hookups
with cable box/dss receiver...8-9
with stereo tv .............................I0
without cable box ....................6-7
• ••••leeoeeeee
safety precautions.............................
3
satellite hookups .............................
55
searching ...........................................
46
second audio broadcast
receiving ...........................
50-5 I
recording ..........................
50-5 I
sensor (remote) ..............................
27
shuttle ring .................................
23, 47
slow
button ..........................................
23
motion ..........................................
47
sip
...........................................
36, 56
sp
...........................................
36, 56
tape
duplication ...................................
42
eject .................................
22, 26, 48
speed ......................................
36, 56
time
(setting) ..................................
14-17
timer
light ...............................................
25
recording
cancelling ................................
37
checking ..................................
37
setting ...............................
34-37
with vcr plus+ programming
system...............................
38-4 I
tracking ........................................
48-49
tv
button ................................
5, 20, 22
controls .......................
5, 20, 22-24
hookups ...................................
6- I0
position .................................
22, 27
var(iable), slow buttons ...........24, 47
vcr
button ......................................
5, 22
light ...............................................
25
plus+
programming system ..........38-41
plus+/enter button .......24, 38-41
position .................................
22, 27
vcr/tv button .............................
22, 27
video
inlout jacks. IO,26, 28, 42, 50, 56
volume up/down buttons ..............24
warranty
.................................. ...........58
Check to be sure the items on this page are packed
with your VCR. These accessories are provided to help
you use or set up your VCR.
-s
@
_w
_Jr
"7000
300[3
-1000
[3O0
3O
0
Remote Control
4835 218 37204
Two"AA"
Batteries
4835 138 17012
RF Coaxial
Cable, 75 ohm
4835 323 2701 I
If any of these items are not included, or if you need
to replace an item, contact Philips Service Company
at the address below.
Philips Service Company
P.O. Box 967
Greeneville, TN 37744-0967
Or, call 1-800-851-8885.
IBT_I E001
MACI_I97
Ch,na
Prr -_
0VMNOI935
I H74