1
5000-series
Security and Remote Start System
Owner's Guide
Congratulations
Congratulations on the purchase of your state-of-the-art security and
remote start system. Reading this Owner’s Guide prior to using your
system will help maximize the use of your system and its many features.
For more information please visit us online at:
www.directed.com/SmartStart
For any additional questions please contact your authorized Directed
dealer or contact Directed at 1-800-753-0600. Additional support is
also available at:
http://support.directed.com
What’s included
•
•
•
•
One 4-button 1-way remote control
Your warranty registration
Quick reference card
This owner's guide
er’s
n
w
O
e
Guid
Warranty
Card
Quick
Reference Card
© 2010 Directed Electronics. All rights reserved.
iii
Important information
Government Regulations and Safety information
Read the Government Regulations and Warning! Safety
First sections of this manual prior to operating this system.
Warning! Failure to heed this information can result in
death, personal injury or property damage and may also
result in the illegal use of the system beyond its intended
purpose.
Your Warranty
Your system comes with a warranty. Please make sure you receive
the warranty registration card and proof of purchase from your dealer
indicating the product was installed by an authorized Directed dealer.
Your product warranty must be validated within 10 days of purchase.
You can validate online at: www.prodregister.com/directed or complete and return the warranty registration card.
Replacement Remote Controls
If additional remote controls are desired, please see your authorized
dealer or visit us at www.directedstore.com to order. The supplied remote control is part number 474T.
iv
© 2010 Directed Electronics. All rights reserved.
Contents
Congratulations ............................................................................................... iii
What’s included............................................................................................... iii
Important information ....................................................................................... iv
Your Warranty ......................................................................................... iv
Replacement Remote Controls.................................................................... iv
Getting Started .................................................................................................3
System Maintenance .................................................................................3
Battery Replacement..................................................................................3
1-way Remote Control .......................................................................................3
Basic Commands ..............................................................................................4
Arm/Lock ................................................................................................4
Disarm/Unlock .........................................................................................4
AUX ........................................................................................................4
Remote Start.............................................................................................5
Advanced Commands .......................................................................................6
Additional Auxiliary functions.....................................................................6
Timer mode ..............................................................................................6
Short-run turbo mode .................................................................................6
Optional rear window defogger .................................................................6
Temperature Start Mode ............................................................................7
Remote and System operations ...........................................................................8
Passive arming/locking .............................................................................8
Warn away® response...............................................................................8
Triggered response ...................................................................................8
Multi-level security arming ..........................................................................9
Arming while driving ...............................................................................10
High security disarm ...............................................................................10
System Override .....................................................................................11
Valet mode ............................................................................................12
Panic Mode ...........................................................................................12
Remote start ...........................................................................................12
Optional rear window defogger ...............................................................14
Timer Mode ..........................................................................................14
Short Run/Turbo Mode ............................................................................15
Temperature Start Mode ..........................................................................15
Valet Take-Over ......................................................................................16
Safety features ................................................................................................17
Starter-anti-grind circuitry .........................................................................17
Disabling the remote start system ..............................................................17
Shut down inputs ....................................................................................17
Diagnostics ....................................................................................................18
Arming diagnostics .................................................................................18
Disarming diagnostics .............................................................................18
Nuisance Prevention® Circuitry ................................................................18
Programming options.......................................................................................21
Government Regulations ..................................................................................24
Warning! Safety First .......................................................................................25
Caution .................................................................................................26
Patent Information ...........................................................................................27
Limited lifetime consumer warranty ....................................................................28
Getting Started
System Maintenance
The system requires no specific maintenance beyond battery replacement for the remote controls. Your 1-way remote control is powered by
a coin cell battery (CR-2032) that can be purchased at most retailers.
The operating range diminishes as the battery weakens.
Battery Replacement
Locate the small slot on the side of the remote control. Insert a small
slotted screwdriver or equivalent tool into slot and pry the case apart.
Replace battery while verifying the correct polarity and then snap case
together.
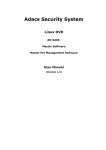
1-way Remote Control
Feature
Description
Transmit LED
On (flashes) during remote control activity
Command buttons (4)
Used to perform arming/locking, disarming/unlocking, auxiliary channel and remote start commands
© 2010 Directed Electronics. All rights reserved.
3
Basic Commands
Arm/Lock
Press and release
The alarm arms, doors lock (if connected), and the siren/horn sounds
and parking lights flash once. If Valet mode* is On, the doors lock. Exit
Valet mode to arm/lock the alarm normally.
To Arm/lock and Panic
Press and hold
The alarm Arms (or Locks in Valet) and, after 2 seconds, sounds the
siren/horn and flashes the parking lights.
Disarm/Unlock
Press and release
The alarm disarms, doors unlock (if connected), and the siren/horn
sounds and parking lights flash twice. Turns panic off if on. If Valet
mode* is On, the doors unlock.
AUX
Press and release
Perform before the Arm/lock or Disarm/unlock command to use the
remote control in Silent Mode™.
Note: The Warn away response to lighter impacts is bypassed if the
system is armed using silent mode. this ensures that no chirps are emitted by the siren in an area you want chirp -free but the system is fully
capable of triggering.
4
© 2010 Directed Electronics. All rights reserved.
For optional function (trunk release)
Press and hold
Activates the Aux output, such as trunk release or an expansion
function that you have added to your system. The auxiliary output
controls:
.
Remote Start
Press and release
Activates (or if On, deactivates) the remote starter. The engine and
parking lights turn On.
*
See Remote and System Operations for details.
© 2010 Directed Electronics. All rights reserved.
5
Advanced Commands
Additional Auxiliary functions.
Press
and
buttons simultaneously
Activates an optional auxiliary convenience or expansion function that
you have added to your system.
The auxiliary output controls
Press
and
buttons simultaneously
Activates an optional auxiliary convenience or expansion function that
you have added to your system.
The auxiliary output controls
Press
and
buttons simultaneously
Activates an optional auxiliary convenience or expansion function that
you have added to your system.
The auxiliary output controls
Timer mode
Press
and
buttons simultaneously
Activates timer mode.
Short-run turbo mode
Press
and
buttons simultaneously
Activates short-run timer mode.
Optional rear window defogger
Press
and
and
buttons simultaneously
Activates the optional Rear window defogger. The parking lights flash
two times and the rear defogger is no longer active when the vehicle
6
© 2010 Directed Electronics. All rights reserved.
is remote started. When the same procedure is repeated, the defogger
activates and the parking lights flash three times. If the vehicle interior
temperature is greater than 55°F when the remote start is activated, the
rear defogger does not turn on.
Temperature Start Mode
Press
and
and
buttons simultaneously
Activates the Temperature Start mode. The parking lights flash fast four
times to confirm activation. The engine does not start once activated, it
starts when the vehicle interior temperature drops below 0°F.
Warning! Car should be parked in a well ventilated area
when using this feature.
Deactivate Temperature Start mode by pressing the same buttons again
or turning the vehicle ignition on. The parking lights flash slowly four
times to confirm deactivation.
© 2010 Directed Electronics. All rights reserved.
7
Remote and System operations
Passive arming/locking
The system can be programmed to arm/lock itself automatically (called
passive arming/locking). If the system is programmed for passive arming/
locking, it will automatically arm/lock 30 seconds after the ignition is
turned off and the system detects that you have left the vehicle by opening
and closing a door. Whenever the system is in its 30-second passive arming/locking countdown, the status LED will flash twice as fast as it does
when the system is armed/locked. At the 20-second point of the countdown, the siren/horn will sound to indicate that the system is about to
arm/lock. At the 30-second point, the parking lights will flash to indicate
that the system is armed/locked.
Note: If any protected entry point (such as a door or a switch-protected
trunk or hood) is open, the system will not passively arm/lock (unless
forced passive arming/locking is programmed on). See Programming
Options section in the expanded version of this manual online at www.
automatecarsecurity.com..
Warn away® response
A Warn Away Response consists of an alarm page along with the
responses described below.
• Shock Sensor - Light impacts to the vehicle will flash the vehicle
lights and sound the siren/horn for a few seconds.
Triggered response
A Triggered Response can be activated by any of the triggers listed
below. The default Triggered Response duration is 30 seconds but can
be programmed from 1-180 seconds by your installer.
8
© 2010 Directed Electronics. All rights reserved.
•
•
•
•
•
Shock Sensor Trigger - Heavy impacts to the vehicle will instantly
sound the siren/horn and flash the lights for the programmed duration and report Zone 2.
Door Trigger - If a door is opened the siren/horn will sound and
lights flash for three seconds, then the siren/horn will sound continuously and the lights will flash for the programmed duration and
report Zone 3. The three seconds allow the user time to disarm/
unlock the system with a minimum of noise should a door be
opened inadvertently while the system is armed/locked.
Hood Trigger - Opening the hood will sound the siren/horn, flash
the lights for the programmed duration, and report Zone 1.
Trunk Trigger - Opening the trunk (if connected) will instantly sound
the siren/horn and flash the lights for the programmed duration
and report Zone 4.
Ignition Trigger - Turning on the ignition key will trip the same progressive response as the door trigger and report Zone 5.
Multi-level security arming
Multi-Level Security Arming allows you to select which of the system’s
inputs or sensors will be active and which will be bypassed when the
system is armed.
Pressing
again within five seconds of arming the system activates
the Multi-level security feature. Each time
is pressed, a different
security level is selected.
To select the security levels:
Press
once: The siren chirps once. The system is armed with all
zones active.
Press
a second time within five seconds. The siren chirps twice fol-
© 2010 Directed Electronics. All rights reserved.
9
lowed by a long chirp. Zone 2 is now bypassed.
Press
a third time within five seconds. The siren chirps three times
followed by a long chirp. Zone 4 is now bypassed.
Press
a fourth time within five seconds. The siren chirps four times
followed by a long chirp. Zones 2 and 4 are now bypassed.
Press
a fifth time within five seconds. The siren chirps five times
followed by a long chirp. All input zones, except the ignition are now
bypassed.
Note: Multi-level security arming only applies to a single arming cycle.
Once the system is disarmed and then re-armed, all the zones will be
active again.
Arming while driving
Your security system can be armed while driving the vehicle.
Press
on the remote control for two seconds while the vehicle is
running. The siren/horn will sound once to indicate that the security
system is armed, and then once more to indicate that the ignition is on.
The system will not respond to any input except the door triggers, and
the starter kill relay (if installed) will not be activated. Once you have
arrived at your destination, the system will disarm when the ignition is
turned off. The siren/horn will sound twice and the LED will then stop
flashing. The system can also be disarmed at any time by pressing
High security disarm
This security system offers High Security Disarm. High Security Disarm
is a feature that makes it possible to silence and reset the system while
it is triggering, without disarming the system.
10
© 2010 Directed Electronics. All rights reserved.
If the system is triggered and the siren has been sounding for longer
than six seconds, pressing
on the remote silences the siren while
keeping the system in the armed state. The system does not disarm,
but resets. Pressing
again after silencing the system will disarm the
system.
If the system is triggered and the siren has been sounding for less than
six seconds, pressing
disarms the system. The six second timer is
provided for your convenience, in case the system is accidentally triggered.
System Override
If your remote control is lost or damaged, you can manually disarm your
vehicle security system or disable an optional starter kill. To disarm or
disable the system without a remote control, you must have the vehicle’s
ignition key.
To disarm/disable the system:
1. Turn the ignition to the ON position.
2. Press the control center button the preset number of times (one to
five times) within 15 seconds. The factory default setting is 1 press.
After five seconds, the system will disarm/disable. If the system
does not disarm/disable, you may have waited too long. Start
over by turning the ignition off and on.
Number of Presses_____________________________________
Important: The control center button can be programmed to
respond to 1-5 presses for the disarm/disable function. You
must check with the installer to verify the programming for your
individual unit.
© 2010 Directed Electronics. All rights reserved.
11
Valet mode
You can prevent your system from automatically arming/locking and
triggering by using Valet Mode. This is very useful when washing the
vehicle or having it serviced. In Valet Mode, the system/starter kill will
not arm/enable, even with the remote control, but all convenience functions (door locks, trunk release, etc.) will continue to work normally.
To enter or exit Valet Mode:
1. Turn the ignition on.
2. Turn the ignition off.
3. Press and release the control center button within 10 seconds.
To enter or exit Valet Mode using the remote control:
4. Open any vehicle door.
5. Press .
6. Press
and then press
again.
The status LED lights solidly if you are entering Valet Mode, and goes
off when you exit Valet Mode.
Panic Mode
if you are threatened in or near your vehicle, you can attract attention
by triggering the system with your remote control.
Press and hold
for two seconds. The siren sounds and the parking
lights flash for the programmed siren duration. To stop panic made at
any time, press
on the remote control again.
Remote start
This feature allows you to remotely start and run your vehicle for a
programmable period of time. This makes it possible to warm up the
engine, as well as adjust the interior temperature of the vehicle with
12
© 2010 Directed Electronics. All rights reserved.
the climate control system. If interior heating or cooling is desired, the
climate controls must be preset, and the fan blower must be set to the
desired level prior to remote starting the vehicle.
Warning! (1) Never remote start your vehicle when
the keys are in the ignition, except when performing
Valet® Take-Over, and (2) Never start the vehicle if it
is not in PARK or NEUTRAL
To remote start the vehicle:
• Press
on the remote control once.
The parking lights flash to confirm that the vehicle will attempt to
start. With gas vehicles the engine starts 4 seconds after the parking lights flash. With diesel vehicles the engine starts when the
WAIT-TO-START indicator on the dashboard goes out or the programmed delay has ended.
Once the vehicle has started, it runs for the pre-programmed period of time or until a shutdown input is triggered.
Warning! It is unsafe to operate a vehicle’s motor in a
garage or other closed off area. Breathing the exhaust
from the vehicle is hazardous to your health. Never
activate the remote start in an enclosed space.
When you are ready to drive the vehicle:
1.
2.
Insert the ignition key and turn it to the On position.
Press the brake pedal.
Note: If the brake pedal is pressed before the key is in the ON position,
the engine will shut down.
© 2010 Directed Electronics. All rights reserved.
13
While the vehicle is running during remote start operation, the system
monitors the vehicle and automatically shuts down the engine if the
system receives any of the following:
• The brake pedal is pressed
• The hood is opened
• The shutdown toggle switch is put into the Off position.
• Runtime (12,24, or 60 minutes) expires
• Remote control button
is pressed once.
Optional rear window defogger
Pressing the
,
and
simultaneously activates/deactivates
the optional rear window defogger. The parking lights flash two times
and the rear defogger is no longer active when the vehicle is remote
started. When the same procedure is repeated, the defogger activates
and the parking lights flash three times. If the vehicle interior temperature is greater than 55°F when the remote start is activated, the rear
defogger does not turn on.
Timer Mode
When you activate timer mode the system automatically starts the vehicle every three hours for a maximum of 6 starts. The pre-programmed
engine runtime is 12 minutes.
•
•
•
14
Press
and
to activate timer mode. The parking lights flash
four times, and after a 1 second delay, the engine starts.
To shutdown the engine, press the
button. The engine will shutdown while the system remains in timer mode and will continue to
start every 3 hours until the system reaches the maximum amount
of starts or is cancelled by turning on the ignition, activating the
brake, or turning off the shutdown toggle switch.
The parking lights flash 4 times indicating timer mode is exited.
© 2010 Directed Electronics. All rights reserved.
Important! Timer Mode should be used only in open areas. Never start
and run the vehicle in an enclosed space such as a garage or carport.
Short Run/Turbo Mode
Short run turbo mode keeps the engine running after arriving at your
destination for a programmable period of 1, 3, 5 or 10 minutes. This
allows the system’s timer to conveniently cool down the turbo after you
have left the vehicle.
To activate:
1. Park the vehicle and set the parking brake.
2. Remove your foot from the brake pedal and leave the engine
running.
3. Press and release the
and
buttons at the same time. The
lights will flash to indicate the remote start has entered short run
turbo mode.
4. Turn off the key, the engine will keep running.
5. Exit and secure the vehicle. The engine will turn off after the programmed run time.
Temperature Start Mode
Pressing the
,
and
simultaneously activates the Temperature Start mode. The parking lights flash fast four times to confirm activation. The engine does not start once activated, it starts when the vehicle
interior temperature drops below 0°F.
Deactivate Temperature Start mode by pressing the same buttons again
or turning the vehicle ignition on. The parking lights flash slowly four
times to confirm deactivation
© 2010 Directed Electronics. All rights reserved.
15
Valet Take-Over
The Valet Take-Over feature allows the vehicle to remain running after
the key has been removed from the ignition. This feature is useful for
occasions when you wish to exit and lock the vehicle for short periods
of time, but would like to leave the motor running and the climate
controls on.
To perform Valet Take-Over:
1. Before turning off the engine, press and release
on the remote
control (or press and release the optional momentary switch). Then
wait five seconds.
2. Turn the ignition key to the OFF position. (The engine will stay running.) The engine will run until the pre-programmed time elapses
or a shut-down input is received. (See the previous Remote Start
section for a complete list of shut-down inputs.)
This feature will not work if the brake pedal is being pressed.
16
© 2010 Directed Electronics. All rights reserved.
Safety features
This system has several important safety features to ensure proper operation of the motor and prevent accidental damage to the engine or
its components.
Starter-anti-grind circuitry
Whenever the vehicle is remote started, advanced anti-grind circuitry
prevents the starter from engaging, even if the key is turned to the start
position. This prevents damage to the starter motor if the key is turned
to the start position during remote start operation.
Important: The Fail Safe starter kill option must be installed for this
feature to work.
Disabling the remote start system
This feature allows your system’s remote start unit to be temporarily
disabled to prevent the vehicle from being remote started accidentally.
This feature is useful if the vehicle is being serviced or stored in an
enclosed area. To disable the remote start, move the shutdown toggle
switch to the OFF position. The switch can be installed in a location
of your choice. Check with your installer for recommended locations.
Location of Shutdown Switch____________________________
Shut down inputs
This security system uses several inputs to shut down the remote start operation of the motor or prevent remote start if certain inputs are active.
The two most important are hood and brake inputs. The hood input will
prevent the motor from starting, as well as shut it down, any time the
hood is opened. The brake pedal will shut down the motor at any time
during remote start operation, as well as preventing the remote start
from activating while it is being pressed.
© 2010 Directed Electronics. All rights reserved.
17
Diagnostics
The microprocessor at the heart of your system is constantly monitoring
all of the switches and sensors connected to it. It is designed to detect
any faulty switches and sensors and prevents them from disabling the
entire system. The microprocessor will also record and report any triggers that occurred during your absence. Refer to the Table of Zones
sections of this guide for diagnostic information.
Arming diagnostics
If the security system is armed at the same time that an input is active
(such as a door opening or sensor triggering), you will hear one siren/
horn sound to indicate arming and a second siren/horn sound to indicate Bypass Notification.
A Bypass Notification sound means that the security system ignores
the input that was active when the system was armed, until that input
ceases. For more information, please refer to the expanded version of
this manual online at www.automatecarsecurity.com
Disarming diagnostics
Extra sounds that are heard when disarming the system are the Tamper
Alert. If four sounds are heard when disarming the system, then the
security system was triggered in your absence. If five sounds are heard
when disarming the system, a zone was triggered so many times that
the Nuisance Protection® Circuitry has bypassed that zone. For more
information, please refer to the expanded version of this manual online
at www.automatecarsecurity.com
Nuisance Prevention® Circuitry
Your system has Directed’s Nuisance Prevention Circuitry (NPC). It
18
© 2010 Directed Electronics. All rights reserved.
prevents annoying repetitive trigger sequences due to faulty door pin
switches or environmental conditions such as thunder, jackhammers,
airport noise, etc.
Example: If the alarm triggers three times within a 60-minute period
and each time the same sensor or switch triggers the alarm, NPC will
interpret those triggers as false alarms. After the third trigger, NPC ignores, or bypasses, that sensor or switch (along with any other sensors
or switches sharing the same zone) for 60 minutes.
If the bypassed sensor tries to trigger the security system while it is being bypassed, the 60-minute bypass period will start over. This ensures
that a sensor that is continually being triggered will remain bypassed.
The vehicle doors are protected by NPC differently. If your security
system is triggered by an open door for three full cycles, the system will
bypass the doors until the trigger ceases.
Note: Arming and disarming the system does not reset this function. The
only way to reset a bypassed zone is to not have it trigger for 60 minutes, or to turn on the ignition. If testing your system, remember that the
NPC programming can cause zones to be bypassed and appear to
stop working. If five chirps are heard when disarming, NPC has been
engaged. If you wish to clear the NPC memory, turn the ignition on.
Table of zones
A zone is represented by the number of LED flashes used by the system
to identify a particular type of input. Standard input assignments are
listed in the following table, along with spaces to write in any optional
sensors or switches that have been installed.
© 2010 Directed Electronics. All rights reserved.
19
Zone
Description
Dealer installed options
1
Trunk Pin
2
Instant trigger: a heavier impact detected by the
shock sensor
3
Door switch trigger
4
Instant trigger: for optional sensors
5
Ignition trigger
6
Hood Pin
Your system stores the last two triggered zones in memory. If your system
has been triggered but the LED has been reset by turning on the ignition, your dealer can still recall the last two zones that were triggered.
Contact your dealer for details.
Interpreting zone diagnostics
Warn Away responses are not reported by arming or disarming diagnostics. If you receive a Bypass notification when arming or a Tamper
Alert notification when disarming, look at the LED in the vehicle. Active
or triggered zones will be indicated by a pattern of blinks by the LED.
For example: If zone 3 was active or triggered, the LED will blink three
times with a two-second pause. Then it will blink three times again, and
repeat until the ignition is turned on.
Your system stores the last two triggered zones in memory. If your system
has been triggered but the LED has been reset by turning on the ignition, your dealer can still recall the last two zones that were triggered.
Contact your dealer for details.
20
© 2010 Directed Electronics. All rights reserved.
Programming options
Programming options control your system’s normal, operational set-up.
Most options do not require additional parts, but some may require
installation labor. See your authorized Directed dealer for more details.
The following is a list of the programmable options, with the factory
settings in Bold.
•
Active arming (transmitter only) or Passive arming (automatic arming 30 seconds after the last door has been closed).
•
Arming/disarming siren chirps On or Off.
•
The ignition controlled door lock feature On or Off: When this feature is programmed on, the doors will lock three seconds after the
ignition is turned on, and unlock when the ignition is turned off. If
your installer is programming the security system with the Directed
Bitwriter, ignition lock and unlock are independent features that
can be programmed separately.
Important: The vehicle doors must be closed for the ignition lock
feature to work.
•
Passive door locking (with passive arming) or Active door locking
(only when arming with the transmitter). Passive locking allows the
vehicle’s doors to lock when the security system passively arms
(after the 30-second countdown). This feature only works if passive
arming has been programmed.
•
Panic mode Enabled/Disabled when the ignition is turned on.
(Some states have laws against sirens sounding in moving cars.)
•
Forced passive arming On or Off. If your security system is programmed for passive arming and the forced passive arming feature has been programmed on, the system will passively arm after
one hour, even if a protected entry has been left open. Forced
passive arming ensures that the system will be armed if a door has
accidentally been left ajar when leaving the vehicle.
When the system passively arms after one hour, the entry point that
has been left open, and anything connected to the same zone, is
bypassed and cannot trigger the system. However, the remaining
inputs to the system are fully operational.
•
Full trigger response 30 or 60 seconds: This determines how long
the full triggered sequence lasts. Some states have laws regulating
how long a security system can sound before it is considered a
nuisance.
If your installer is programming the security system with the Directed Bitwriter, the full triggered response can be programmed
for any duration ranging from 1 to 180 seconds.
•
Siren tones and chirp volume. The output of the Revenger™ Soft
Chirp™ siren consists of six different tones in sequence. Any of
these tones can be eliminated by a dealer, resulting in a unique,
easily identifiable siren sound. The chirps can be either full volume
or 6 decibels quieter than the full alarm blast.
•
12, 24, or 60 minute run time. your system can be programmed
to allow the vehicle to run for 12, 24, or 60 minutes when remote
started. Can be set up to minute increments by your installer.
22
© 2010 Directed Electronics. All rights reserved.
Note: If your installer is programming the system with the Bitwriter,® the remote start run time may be programmed for any duration ranging from 1 to 60 minutes.
•
3, 6, 9, or 12 minute timer mode run time. Your system can be
programmed to allow the vehicle to run for 3, 6, 9, or 12 minutes
when remote started in timer mode. Can be set from 1 to 16
minutes by your installer.
•
While the remote start is running the engine, the parking lights
Flash on and off, or Come on steadily.
•
Comfort closure is a programming option which closes the vehicle’s windows after remote locking.
© 2010 Directed Electronics. All rights reserved.
23
Government Regulations
This device complies with Part 15 of FCC rules. Operation is subject to the following two conditions: (1) This device may not cause harmful interference, and
(2) This device must accept any interference received, including interference that
may cause undesirable operation.
This equipment has been tested and found to comply with the limits for a class B
digital device, pursuant to Part 15 of the FCC Rules. These limits are designed to
provide reasonable protection against harmful interference in a residential installation. This equipment generates and can radiate radio frequency energy and,
if not installed and used in accordance with the instruction manual, may cause
harmful interference to radio communications. However, there is no guarantee
that interference will not occur in a particular installation. If this equipment does
cause harmful interference to radio or television, which can be determined by
turning the equipment OFF and ON, the user is encouraged to try to correct the
interference by one or more of the following measures:
• Reorient or relocate the receiving antenna.
• Increase the separation between the equipment and receiver.
• Connect the equipment into an outlet on a circuit different from that to which
the receiver is connected.
• Consult the dealer or an experienced radio / TV technician for help.
This device complies with the Industry Canada Radio Standards Specification
RSS 210. Its use is authorized only on a no-interference, no-protection basis; in
other words, this device must not be used if it is determined that it causes harmful interference to services authorized by IC. In addition, the user of this device
must accept any radio interference that may be received, even if this interference
could affect the operation of the device.
Warning:
Changes or modifications not expressly approved by the party responsible for
compliance could void the user’s authority to operate this device.
24
© 2010 Directed Electronics. All rights reserved.
Warning! Safety First
The following safety warnings must be observed at all times:
Due to the complexity of this system, installation of this product must only
be performed by an authorized Directed dealer.
When properly installed, this system can start the vehicle via a command signal from the remote control/transmitter. Therefore, never operate the system in an enclosed area or partially enclosed area without
ventilation (such as a garage). When parking in an enclosed or partially enclosed area or when having the vehicle serviced, the remote
start system must be disabled using the installed toggle switch. It is the
user’s sole responsibility to properly handle and keep out of reach from
children all remote control/transmitters to assure that the system does
not unintentionally remote start the vehicle. THE USER MUST INSTALL A
CARBON MONOXIDE DETECTOR IN OR ABOUT THE LIVING AREA
ADJACENT TO THE VEHICLE. ALL DOORS LEADING FROM ADJACENT LIVING AREAS TO THE ENCLOSED OR PARTIALLY ENCLOSED
VEHICLE STORAGE AREA MUST AT ALL TIMES REMAIN CLOSED.
These precautions are the sole responsibility of the user.
Use of this product in a manner contrary to its intended mode of operation may result in property damage, personal injury, or death. (1)
Never remotely start the vehicle with the vehicle in gear, and (2) Never
remotely start the vehicle with the keys in the ignition. The user must
also have the neutral safety feature of the vehicle periodically checked,
wherein the vehicle must not remotely start while the car is in gear. This
testing should be performed by an authorized Directed dealer in accordance with the Safety Check outlined in the product installation guide.
If the vehicle starts in gear, cease remote start operation immediately
and consult with the authorized Directed dealer to fix the problem.
© 2010 Directed Electronics. All rights reserved.
25
After the remote start module has been installed, contact your authorized dealer to have him or her test the remote start module by performing the Safety Check outlined in the product installation guide. If the
vehicle starts when performing the Neutral Safety Shutdown Circuit
test, the remote start unit has not been properly installed. The remote
start module must be removed or the installer must properly reinstall the
remote start system so that the vehicle does not start in gear. All installations must be performed by an authorized Directed dealer.
OPERATION OF THE REMOTE START MODULE IF THE VEHICLE STARTS
IN GEAR IS CONTRARY TO ITS INTENDED MODE OF OPERATION.
OPERATING THE REMOTE START SYSTEM UNDER THESE CONDITIONS MAY RESULT IN PROPERTY DAMAGE OR PERSONAL INJURY.
YOU MUST IMMEDIATELY CEASE THE USE OF THE UNIT AND SEEK
THE ASSISTANCE OF AN AUTHORIZED DIRECTED DEALER TO REPAIR OR DISCONNECT THE INSTALLED REMOTE START MODULE.
DIRECTED WILL NOT BE HELD RESPONSIBLE OR PAY FOR INSTALLATION OR REINSTALLATION COSTS.
Caution
This product is designed for fuel injected, automatic transmission vehicles only. Use of this product in a standard transmission vehicle is
dangerous and contrary the product’s intended use.
Patent Information
This product is covered by one or more of the following U.S. patents:
303,223
345,711
4,383,242
5,103,221
5,534,845
5,907,195
333,633
347,190
4,438,426
5,117,217
5,572,185
5,914,667
333,634
348,622
4,553,127
5,132,660
5,646,591
5,945,936
333,635
352,685
4,584,569
5,193,141
5,656,997
5,952,933
333,636
383,689
4,794,368
5,245,694
5,712,638
5,990,786
333,795
383,690
4,887,064
5,285,186
5,783,989
6,093,979
340,000
390,830
4,897,630
5,315,285
5,798,711
344,905
392,944
4,922,224
5,357,560
5,872,519
345,317
4,327,444
4,987,402
5,532,670
5,900,806
International Patents:
Australia: 694,925
Canada: 1,315,859 and 2,067,099
Taiwan: 91817
Other patents pending
© 2010 Directed Electronics. All rights reserved.
27
Limited lifetime consumer warranty
Directed Electronics. (“Directed”) promises to the original purchaser to repair or replace (at
Directed’s election) with a comparable reconditioned model any Directed unit (hereafter the
“unit”), excluding without limitation the siren, the remote transmitters, the associated sensors
and accessories, which proves to be defective in workmanship or material under reasonable use during the lifetime of the vehicle provided the following conditions are met: the
unit was purchased from an authorized Directed dealer, the unit was professionally installed
and serviced by an authorized Directed dealer; the unit will be professionally reinstalled in
the vehicle in which it was originally installed by an authorized Directed dealer; and the
unit is returned to Directed, shipping prepaid with a legible copy of the bill of sale or other
dated proof of purchase bearing the following information: consumer’s name, telephone
number and address; the authorized dealers name, telephone number and address; complete product description, including accessories; the year, make and model of the vehicle;
vehicle license number and vehicle identification number. All components other than the
unit, including without limitation the siren, the remote transmitters and the associated sensors
and accessories, carry a one-year warranty from the date of purchase of the same. ALL
PRODUCTS RECEIVED BY DIRECTED FOR WARRANTY REPAIR WITHOUT PROOF OF
PURCHASE WILL BE DENIED. This warranty is non-transferable and is automatically void
if: the original purchaser has not completed the warranty card and mailed it within ten
(10) days from the date of purchase to the address listed on the card; the unit’s date
code or serial number is defaced, missing or altered; the unit has been modified or used
in a manner contrary to its intended purpose; the unit has been damaged by accident,
unreasonable use, neglect, improper service, installation or other causes not arising out of
defects in materials or construction. The warranty does not cover damage to the unit caused
by installation or removal of the unit. Directed, in its sole discretion, will determine what
constitutes excessive damage and may refuse the return of any unit with excessive damage.
TO THE MAXIMUM EXTENT ALLOWED BY LAW, ALL WARRANTIES, INCLUDING
BUT NOT LIMITED TO EXPRESS WARRANTY, IMPLIED WARRANTY, WARRANTY OF
MERCHANTABILITY, FITNESS FOR PARTICULAR PURPOSE AND WARRANTY OF NONINFRINGEMENT OF INTELLECTUAL PROPERTY, ARE EXPRESSLY EXCLUDED; AND
DIRECTED NEITHER ASSUMES NOR AUTHORIZES ANY PERSON OR ENTITY TO ASSUME
FOR IT ANY DUTY, OBLIGATION OR LIABILITY IN CONNECTION WITH ITS PRODUCTS.
DIRECTED DISCLAIMS AND HAS ABSOLUTELY NO LIABILITY FOR ANY AND ALL ACTS
OF THIRD PARTIES INCLUDING ITS AUTHORIZED DEALERS OR INSTALLERS. DIRECTED
SECURITY SYSTEMS, INCLUDING THIS UNIT, ARE DETERRENTS AGAINST POSSIBLE
THEFT. DIRECTED IS NOT OFFERING A GUARANTEE OR INSURANCE AGAINST
VANDALISM, DAMAGE OR THEFT OF THE AUTOMOBILE, ITS PARTS OR CONTENTS;
AND HEREBY EXPRESSLY DISCLAIMS ANY LIABILITY WHATSOEVER, INCLUDING
WITHOUT LIMITATION, LIABILITY FOR THEFT, DAMAGE AND/OR VANDALISM. THIS
28
© 2010 Directed Electronics. All rights reserved.
WARRANTY DOES NOT COVER LABOR COSTS FOR MAINTENANCE, REMOVAL OR
REINSTALLATION OF THE UNIT OR ANY CONSEQUENTIAL DAMAGES OF ANY KIND.
IN THE EVENT OF A CLAIM OR A DISPUTE INVOLVING DIRECTED OR ITS SUBSIDIARY,
THE VENUE SHALL BE SAN DIEGO COUNTY IN THE STATE OF CALIFORNIA.
CALIFORNIA STATE LAWS AND APPLICABLE FEDERAL LAWS SHALL APPLY AND GOVERN
THE DISPUTE. THE MAXIMUM RECOVERY UNDER ANY CLAIM AGAINST DIRECTED
SHALL BE STRICTLY LIMITED TO THE AUTHORIZED DIRECTED DEALER’S PURCHASE
PRICE OF THE UNIT. DIRECTED SHALL NOT BE RESPONSIBLE FOR ANY DAMAGES
WHATSOEVER, INCLUDING BUT NOT LIMITED TO, ANY CONSEQUENTIAL DAMAGES,
INCIDENTAL DAMAGES, DAMAGE TO VEHICLE, DAMAGES FOR THE LOSS OF TIME,
LOSS OF EARNINGS, COMMERCIAL LOSS, LOSS OF ECONOMIC OPPORTUNITY
AND THE LIKE. NOTWITHSTANDING THE ABOVE, THE MANUFACTURER DOES OFFER
A LIMITED WARRANTY TO REPLACE OR REPAIR THE CONTROL MODULE SUBJECT TO
THE CONDITIONS AS DESCRIBED HEREIN. THIS WARRANTY IS VOID IF THE UNIT
HAS NOT BEEN PURCHASED FROM DIRECTED, OR AN AUTHORIZED DIRECTED
DEALER, OR IF THE UNIT HAS BEEN DAMAGED BY ACCIDENT, UNREASONABLE USE,
NEGLIGENCE, ACTS OF GOD, NEGLECT, IMPROPER SERVICE, OR OTHER CAUSES
NOT ARISING OUT OF DEFECT IN MATERIALS OR CONSTRUCTION.
Some states do not allow limitations on how long an implied warranty will last or the exclusion or limitation of incidental or consequential damages. This warranty gives you specific
legal rights and you may also have other rights that vary from State to State.
This warranty is only valid for sale of product(s) within the United States of America.
Product(s) sold outside of the United States of America are sold “AS-IS” and shall have NO
WARRANTY, express or implied. This product may be covered by a Guaranteed Protection
Plan (“GPP”). See your authorized Directed dealer for details of the plan or call Directed
Customer Service at 1-800-876-0800.
Make sure you have all of the following information from your authorized Directed dealer:
A clear copy of the sales receipt, showing the following:
o
Date of purchase
o
Your full name and address
o
Authorized dealer’s company name and address
o
Type of alarm installed
o
Year, make, model and color of the automobile
o
Automobile license number
o
Vehicle identification number
o
All security options installed on automobile
o
Installation receipts
920-0003 06-06
© 2010 Directed Electronics. All rights reserved.
29
The company behind this system is Directed Electronics
Since its inception, Directed Electronics has had one purpose, to provide consumers
with the finest vehicle security and car stereo products and accessories available. The
recipient of nearly 100 patents and Innovations Awards in the field of advanced electronic
technology, DIRECTED is ISO 9001 registered.
Quality Directed Electronics products are sold and serviced throughout North America
and around the world.
Call (800) 274-0200 for more information about our products and services.
Directed Electronics is committed to delivering world class quality products
and services that excite and delight our customers.
Directed Electronics
Vista, CA 92081
www.directed.com
© 2010 Directed Electronics—All rights reserved
GADSS5003 2010-08
Qwc
Installation Points
e
5000-series Security and Remote Start System
A~usting
the Shock Sensor
Important! Make sure the vehicle is disarmed. The shock sensor sensitivity can be
adjusted by using a trimmer tool to turn the poten tiometer.
Open a door. (The GREEN w ire, H 1/8, or the VIOLET, H 1/6 must be connected.(
2.
3.
Wiring Connections
Turn the ignition to the ON posi tion (The heavy gouge p ink wire must be connected}.
Within 10 seconds, press and release the control center button: 2 times if you
won t to delete remotes, 3 times to reset features o r 4 times to reset virtual tach
These features are described next.
Delete remotes: This feature erases all remotes from the memory of the
security system. This is useful in cases when a customer's remote is !ost
or stolen.
Note: This does not reset the programmed features of the security system
or reset the Virtua l Tach setti ng.
Adjusting the sensor:
1
Disarm the system, turn the ignition Off.
2.
W ith the sensor mounted in its permanent location, locate the trim pot on the
shock sensor module and using a trimmer tool:
Turn the potentiometer clockwise for increased sensitivity or
Turn it counterclockwise for decreased sensitivi ty
Note: You con test the new setling by cautiously impacting the vehicle with in
creasing intensity while noting the LED status on the shock sensor. The LED turns
on for a short duration for sma ll impacts befor e turning off (indicati ng a worn·
away trigger]. The impact level requ ired to fully trigger the alarm is indicated
when the LED rema ins on for a longer duration before turn ing off.
Reset Features: Th is resets oil features of the security system to the factory
default settings.
N o te: Th is feature does not delete the remotes from the security system
or reset the Virtual Tach setting or security features enabled/d isabled
settings
Virtual Toch Reset: Deletes all previously learned values for Virtual Tach,
and on the next remote start sequence the un it begins virtual tach initialization.
Note : The "Zap" fea ture
setting
Tach Learning
To learn the loch signal:
1
Start the veh icle with the key.
2.
W ithin 5 seconds, press and hold the control center burton.
3.
Aher 3 seconds the LED will light constant when the tach signa l is learned
4
Release the control center button.
* The door trigger w ire will sti ll need to be connected if the system is prog ra mmed
w ith security features OFF to al low the system to enter the programming modes.
Antenna/Receiver
4
5.
on the Bitvvriter does not reset the Virtual tach
Once you have selected the func tion step, press the control center button once
more and hold it. The LED flashes and the siren ch irps to confirm the selected
functiona l step. Do not re lease the control center button
Wh ile hold ing the control center button , press the Q button on the remote
control. The unit chirps to confirm that the feature has been successful ly reset.
Once the feature is reset, the control center button can be released.
Important: Th is unit con learn the tachometer with the analog input or
through D2D us ing on interface module. The un it confirms which sou rce
is used.
I
L
When programming tach learning with:
Analog, the parking lights flash one time
020 inerfoce module, the parking lights flash twice
If the tachometer input on
the system is connected to the veh icle, the D2D tachometer
input w ill be ignored
Control Center button• input (use blue 2-pin
connector from Control Center cable)
Con trol Cen ter LED output (use white 2-pin
connector from Control Center cable)
Ykt.uilladt_ _ _ _ _ ~------Note: Virtual tach is not recommended for diesel trucks
• Also referred to as Valet/Program button
H4 AUX 4/Horn, 2-pin connector
(· ) 200 mA HORN OUTPUT
LED Flashes
I flash
2 flashes
To program Virtual Tach:
Aher the insta ll is complete, remote start the car.
1
If the co r does not sta rt on the firs t atlempt, let the remote start attempt aga in
2.
Once the cor starts, let it run unti l the pa rking lights come on
3
When the parking lights come on, shut off the remote start w ith the remote
4.
that's it! Virtua l Tach is programmed
(-) 200m A AUX 4 OUTPUT
Rernote..£tart Shutdown Diagnostics__
To perform shutdown diagnostics:
With the ignition Off, press and hold the control center button.
1
2.
Turn the ignition On a nd then back O ff wh ile holding the control center
button
3.
Release the control center button.
Press and release the control center button. The LED fl ashes to report the last
4.
shutdown for one minute or until the ign ition is turned on, as shown in the
fol lowing table:
Virtual Tach handles d isengaging the starter motor during remote sta rting - it does
not address over-rev. If the customer wonts to hove the over-rev protection copobil·
ity, the tach wire must be connected. Th is may involve more insta llation shop
charges than initia lly quoted
3 flashes
4
5
6
7
8
flashes
flashes
flashes
flashes
fla shes
Shutdown Mode
Timed o ut
Over-rev shutdown
Low or no RPM, low battery [voltage and virtue! tach modes]
Tra nsmitter shutdown [or optional push button)
1-1 Hood Shutdown IH3/4 GRAYI
1+1Shutdown IH3/3 BROWN]
1-1 Neutcol safety shutdown IH3/l BIACK/WHITEI
Wait-to-start timed out
Bitwriters wlth a date code
of 6a
or older require on IC
upgrade lp/ n 998MI. Some b itw-riters w ith a dote code
of 6 B do not requ ire the IC upgrade, refer to tech tip #
I I 12 for more information
Important: If the Virtual Tach mode over cranks o r doesn 't crank the
vehicle long enough to sta rt and run the cor, use the Bitwriter to odd o r
subtract the starter output ti me. You con ad just the output ti me in inc remen ts o f 50msec of the learned time using the Bilwriter
Re5eLandJleletion _ _~--~----~*The ribbon harness connects to the heavy gauge relay satellite.
102011 DirectedEiectronics.AIIrightsReserved
If a feature/virtual tach needs to be reset o r the remote contro ls need to be deleted,
use the following procedure.
·-------=- .
See full Insta llation Guide lor more
detailed info rmation on this system
Such information a nd more con be
found on line a t
www.directechs.com
Eil
11;!1
The Bit-writer® (p/ n 998U)
requires chrp version 2.7 or
newer to program this unit
E L E C T R 0
N I C S
Note: When doing any prog ramm ing w ith secu rity features off, the horn function
(feature menu 1 item 131 must be programmed as Si ren function to get on audible
confirmation from the un it
The System Featu res Learn Routine dictates how the un it operates. It is possible to
access and change most of the feature settings using the control center button.
1.
2
3.
4.
5.
6
Open a door
Turn the ignition on, then off.
Select a 1\1\enu. Press and hold the control center button . The number of siren
chirps indicates the menu number. 1 chirp indicates menu 1, 2 chirps- menu
2 and 3 chi rps for menu 3
When the desired menu chi rps o re hea rd, release the control center button.
Select a Feature. Press and release the control center button the numbe r of
times corresponding to the feature you wish to change . Then press and hold
one more ti me to select the fea tu res.
Program the Feature. Wh ile holding the Control center button. you ca n
program the feature using the remote control
For features with only tvvo options; ~ = oRtion 1 w hile • =option 2.
For features w ith more thon tvvo options; • selects the optio ns in ascendi ng order.
Full Trigger Operation
Armed Wh ile Driving
Automatic Eng ine Disable
Note: Disabled featu res with progra mmable options con still be prog ram med manually or with the Bitvvriter but will not operate until the Security Featu res have been
enabled .
The Security Features Disable/enable routi ne exits if the fol lowing occurs :
The open door is closed
The ignition is turned on
There is no activity for 15 seconds
The control center button is pressed too many times
Bitwriter_,_Only_QpJio.os ___ _
H
If programm ing w ith the Bitwriter®, the learn routine can be locked or unlocked. If the learn routine has previously been locked , it must be unlocked
with Bitvvriter® - this can not be done ma nually w ith the control center but-
too
M
The Bitvvriter®
g ives you access to a wider ra nge of system options. These
features and th~justments that may be programmed o re desc ribed in the table
below
Once o feature is programmed:
O ther features can be programmed within the same menu
Another menu con be selected
The learn routine can be exited if progra mming is complete
To access another feature in the some menu:
Press and release the control center button the number of times necessary to
1
advance from the feature you just programmed to the next one you want to
prog ra m
2. Then press the con trol center button once more and hold it
To select another menu:
1. Press and hold the control center button .
2
After 3 seconds, the unit advances to the next menu and the si ren ch irps, indicating wh ich menu has been accessed
The learn routine exits if any of the following occurs:
The open door is closed
The ignition is turned On
There is no activity lor 30 seconds
The control center button is pressed too ma ny times
Security Features Disable/Enable
The system has the abil ity to function as a security/remote start system or keyless/
remote start system by enabling or disabling secu ri ty. The default setti ng is Enabled.
To prog ram the fea ture .
1 Open a door.
2. Turn the ign ition on , then off.
3. Press and hold the control center button until the LED flashes 3 times and the
siren (if connected} ch irps 3 times.
4
Release the control center button .
Note: If the control center button is released and then pressed aga in, the sys·
tem w ill enter the fea tures progra mm ing menus.
5. Within 15 seconds, simultaneously press the ~ and • buttons of o programmed remote control.
6
The siren (if con nected) wil l chirp and the pa rking lig hts w ill flash as listed
below
1 flash/chirp: Secu rity featu res d isa bled
2 flashes/ chirps: Security features enabled
Security Fea tures Disabled w il l disable all secu rity operations of the system, includ ing
but not limited to those listed below:
Multi Level Arming
Sensor Warn-away
0 201 r Directed Electron ics. All rights Resel"\led
Note: The "Zap" fea ture on the Bitwriter does not reset the Virtual tach or secu rity
fea tures enabled/disabled settings
Red 4-pin port, Bitwriter/ESP2 or 020 programming
The Red 4-pin plug may be configu red as a Bitwriter/ESP2 or D2D port
The factory default is Bitvvriter/ ESP2 mode.
To use as D2D mode follow the below steps:
1. Make su re Wh ite/Blue activation w ire is grounded
2.
Power the un it up. The system LED flashes for 5 seconds to confirm D2D mode
change.
3. Remove the Wh ite/ Blue w ire from ground
To change from 020 to Bitwriter/ESP2 mode:
1 Make su re the Whi te/Blue activation wi re is g rounded
2
Power the un it up, the system LED turns on solid for 5 seconds to confirm Bitwriter/ES P2 mode change
3. Remove the White/Blue w ire from g round.
The procedure con be repeated to togg le from one mode to the other
Important: If you power up the system w ith the White/Blue activa tion
w ire ungrounded, the system LED wil l come on solid for 5 seconds indicating the system is in Bitvvriter/ ESP2 mcx.le.
Ee.atur:e_Menus_______~-- -~----Default settings o re in bold type
Menu l - Basic
Manu '
One·chirp setting
Two-chirp setting
flem
Q1NDSS500m l1-11
2
LAD00603
Quick Reference
User's Guide
VSM200/250, 3000/5000-series
Congratulations on the purchase of your state-of-the-art Viper SmartStart system. Reading this user’s guide
prior to using your system will get you off to a quick and smooth start.
Start Here
Before you can start using your system, the following steps must be performed:
1. Download the free SmartStart application to your smartphone from the iTunes App Store, BlackBerry
App World or Android Market site depending on which brand you own. Links to download BlackBerry
and Android apps are also available at www.viper.com/SmartStart
2. Have the SmartStart system installed by your authorized Directed dealer. Once installed and activated
by the installer, you will receive an e-mail prompting you to activate your account. Your installer can
also provide you with information about your system.
3. After you activate your account, enter your username and password on the More/Settings/SmartStart
Login page of the handset app to activate your SmartStart app.
4. Once you have completed the log-in process on your smartphone, you can begin using your app to
control your vehicle(s). From the Car screen, select the vehicle you wish to send commands to.
Note 1:
Note 2:
Note 3:
Accessing SmartStart GPS features in the app requires installation of VSM250 SmartStart GPS module.
Accessing Home Control features in the app requires compatible home security panel. See www.alarm.com for more
details on compatible hardware.
Smartphone coverage for GPS and other features may differ by platform. Please visit www.viper.com/SmartStart for the
most current information on app/smartphone coverage.
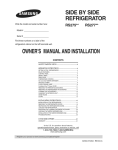
Basic Commands at a Glance
System
Commands
Description
Select this icon to lock the vehicle. When a confirmation message is received, select it to clear.
Select this icon to unlock the vehicle. When a confirmation message is received, select it to clear.
Select this icon to remote start* your vehicle. When a confirmation message is received, select it to clear. The vehicle remote
starts and stays running for the programmed run time*. Select
this icon again to turn off the engine during the run time.
Select this icon to open trunk. A dialog box will open, asking
you to confirm you want to open the trunk. Select "Yes" to confirm, or "No" to cancel the request. If you selected "Yes", select
again to clear the confirmation message when it pops up.
System
Commands
*
Menu Bar
Select this icon to activate panic mode for 30 seconds. Select
again during this time to turn off. This feature is used to attract
attention if in a threatened position.
See your Remote Start system user's guide or installer for important information about starting a manual transmission vehicle and
how long the engine will run when remote started.
Your vehicle responds exactly the same, with audible and visual confirmations, for both Smartstart and remote control commands.
For more information on app features, use the in-app Help function.
QRGVSM250 2012-01
Menu Bar and Screens
Menu Bar
Description
Home
This screen is the default screen for direct access to all your remote commands. Select
any command on the Home screen to perform it.
Alerts
This screen provides alerts and notifications from the system. New alerts or notifications are indicated by a red circle above the Alerts icon which also indicates the number of uncleared notifications received. The available Alerts may vary depending on
the type of system installed in your vehicle.
Cars
This screen allows you to access and personalize your vehicle settings.
GPS
This screen allows you to access SmartStart GPS features (requires SmartStart GPS
hardware and GPS Secure service plans).
More
Access settings and other advanced app features. Go to More/Settings to log in to
SmartStart, and use in-app Help function to explore additional feature details.
Screens
Home Screen
Alerts Screen
Cars Screen
GPS Screen
More Screen
Please visit www.viper.com/SmartStart for the latest updates and information about your SmartStart system.
Note:
The amount of time it takes for your vehicle to respond to a command can be affected by cellular
coverage or network congestion.
Note:
Your SmartStart module automatically checks for updates once every 24 hours. During updates, system
operation is disrupted for approximately one minute.
2
© 2012 Directed. All rights reserved.
Quick Reference
Install Guide
SMARTSTART~
VSM200/250, DSM200/250
Installation Procedure
obstructions that can affect communications
and within reach of the main Directed system
using the provided cables (do not extend).
This product is compatible with most Directed Electronics Security, Remote Start and hybrid systems that
are ESP2 compatible 13 or 4-pin) . Non-compatible
systems include 300 lL and older AM 1/ AM5 models.
The module's signal strength (RSSI) can be viewed in the
activation portal after a successful transmission test.
-50 to ·90 dB
-91 to -100 dB
> -100 dB
Please read the following before proceeding
1 . Customer Information required:
•
Record the customer information requested
in step 4a of this procedure. The module ID
# is provided on a sticker which can be affixed to the space provided in step 4a.
This information is required for final verification/activation of the VSM200/250 or
DSM200/250.
2.
Installation Points:
•
Install and test the security/ remote start system first using the associated guides and
wiring diagram. If using an existing system,
verify it is fully functional before installing the
Directed SmartStart module.
•
For 3000-series or standalone SmartStart
systems with no remote control, test the installed system via the SmartStart activation
portal.
•
Mount the SmartStart module as high as possible in the vehicle (the engraved side faces
up for GPS devices). Mount with minimal
•
good signal strength
borderline/inconsistent signal strength
= weak, insufficient signal strength
=
=
DO NOT connect the SmartStart module until the final programming of the Remote Start
main unit and verification of security/remote
start system operations are completed.
&cAUTIONS
The white plug is ONLY for RSR (Remote Start
Ready) and RXT applications using certain Xpresskit
interfaces (go to www.xpresskit.com for details on
supported devices & vehicles).
For systems with combined 4-pin ESP/D2D ports,
you CANNOT use an interface module in D2D
mode when using a SmartStart module. You must
use W2W on the bypass module.
DO NOT connect the black 3-pin ESP connector to
white Door Lock port on Directed systems.
There should NEVER be more than one data plug
connected from the 3-way harness.
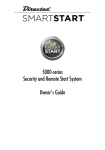
Wiring Schematic
-
SmartStart Module
(Top view)
Configuration wires
Gray & White
5 pin (see table below)
.
D'
1udu
1recte System
(Top view)
(Q
ESP (4 pin, brn)
or
~
ESP (3 pin, blk)
Fuse
-
.
Not used here:
D2D (4 pin, wht)
LED
Ground
5-pin Cable
Pin#
Wire Color
Connection/Description
1
White/Blue
(-) RS (Remote Start)/AUX output
2
Brown
(-) Factory horn/Alert input
3
Green
(-) lock
4
Blue
(-) Unlock
Red/White
5
(-) Trunk/AUX output
Note: T e analo out ut wires are on active it the device has
been configureifor Analog Wire mode in the installation portal.
ro
~
11
1lj
1r
~
NOTE: The appearance and connector/port
arrangement on the Directed/Avitai/Xpresskit
system may differ to the examples shown .
QRNDSM250 2011-10
3.
Install the VSM200/250 or DSM200/250 using
the information in the wiring diagram and steps
(Note CAUTIONS during installation).
a. Configuration Wires: Connect the loose gray
or white configuration wire(s) to match the
desired application (see table below).
MODE
GRAY WIRE
WHITE WIRE
ESP2
Open
Open
D2D, RSR/RXT
GND
Open
Autos tart/AstroStart
Open
GND
Connect the serial data cable and adapter to
the correct port of the main module. For D2D
RSR/RXT applications, connect the serial
data cable and adapter to Xpresskit module.
c. Complete the main power connections.
d. When power is connected, the module begins an initialization procedure that may
take several minutes. During this procedure,
progress is reported via the flashing Amber/
Green LEDs next to the module cable. When
both LEDs turn on solid, the initialization procedure is completed (See Status LEOs for a
description of the various LED states).
b.
4 . Verify and Activate the SmartStart module:
The following steps need to be performed for the
Verification/Activation of the Directed SmartStart
module.
a.
Collect Customer Information:
Customer's Full Name:
Customer's E-mail Address:
Customer's mobile phone# and phone carrier
Log on to: www.directechs.com, and click on
the SmartStart link.
c. Follow the on-screen directions to activate
and test a SmartStart device. If this is the customer's first SmartStart system, you will be
prompted to enter their information as collected in step 4a .
d . Set configuration for commands to match the
installed application.
e. Test the SmartStart system from the website
using the supplied function links.
f. The customer is sent log-in information via
e-mail. After logging into the site at www.
mysmartstart.com, they must select and pay
for the service plan in order to start using the
system.
b.
Status LEDs
Amber LED states:
• Off: No cellular communication. Check
connections such as module harness.
Flashing slowly: The module is seeking
•
cellular system commun ication.
If no cell coverage is available the Amber
LED continues to flash slowly, move the
veh ide to a location with better reception.
Flashing quickly: The module is negotiat•
ing with a cellular system .
solid: Communication successfully esOn
•
tablished .
Green LED states:
Off: Communication not established with
•
the remote start main unit or no serial device is connected.
Check connection at the Bitwriter port,
once connected properly the LED turns on
after resetting the power to the SmartStart
module.
On solid : Communication successfully es•
tablished with the remote start main unit.
Record/place Module ID #here:
Please return this guide and point the customer to
steps 4a and 4f after successfully completi ng the installation as it contains details required for account
setup.
D
Notes: SmartStart response time can vary depending on cellular coverage and network congestion .
Operating temperature range: -30°C to + 70oC.
New Account:
Existing Account:
D
If this is an existing account, are you :
2
adding a new system:
D
or replacing an existing one:
D
Additional information
can be found at:
www.directechs.com
EL
E C TRONIC S
© 20 11 Directed Electronics. All rights reserved .
Please send products and other
correspondence to:
Directed
1 Viper Way
Vista, CA 92081 ·
XFR01-01
DIRECTED®
PO BOX 174391
DENVER CO 80217-4391
11 .. 1.11 ..... 1.1 ••• 111 ••• 1.1 .. 1.. 11.1.1 ••••• 111.1 ..... 11.1.1.1
DIRECTED®
PRODUCT REGISTRATION
Ptofect Your lnresltnent
Register your product now
. to receive these benefits:
--
~ Owner Verification
Proof of purchase in case of product theft or loss
~ Efficient Warranty Service
In case there is a problem with your product
Or register online at www.prodregister.com/directed
IMPORTANT!
DIRECTED
®
IMPORTANT!
Please complete and return within the next 10 days
or register online at productregister.com/directed.
XFR01
1.
1. 0 Mr.
3. 0 Ms.
2. 0 Mrs.
First Name
4. 0 Miss
Initial
Street
State/Province
City
E-mail address
2. Your date of birth:
Month
3.
Marital status:
4.
Date of purchase:
01. 0 Married
Model number:
6.
Name of store where purchased:
7.
Price paid:
(excluding tax)
13. What benefits most influenced your decision to purchase
04. 0 Python
05 0 Vyper
06 0 Other
9. What type of product did you purchase?
10.
What factors most influenced the purchase? (check up to three)
01. 0 Directed's reputation
09. 0 Rebate/Promotion
02. 0 Experience with
10. 0 Style/Design/Color
Directed products
11. 0 Dealer proximity
03. 0 Experience with dealer 12. 0 Friend's
04. 0 Value/Price
recommendation
05. 0 Special features
13. o Salesperson
06. 0 Warranty
recommendation
07. 0 Quality/Durability
14. 0 Compatibility w/vehicle
08. 0 Display in-store demo 15. 0 Other
Year
8. Which Directed brand did· you purchase?
·
12.
02. 0 Single
Day
5.
01.
02.
03.
04.
How did you first become aware of this product? (check one)
01. 0 Local newspaper
07. 0 Radio commercial
02. 0 Yellow pages
08. 0 Salesperson's
03. 0 Magazine Ad
recommendation
04. 0 TV commercial
09. 0 Motorsports
05. 0 Magazine article/
sponsorship
review
10. 0 Internet
06. 0 Friend/Relative's
11. 0 Other
recommendation
Year
Month
01. 0 Autostart
02. 0 Avital
03. 0 Clifford
11.
0 Security system
0 Security system with remote start
0 Remote start system
0 Keyless entry system
In what vehicle will this product be used?
01. 0 Car
04. 0 Van
07. 0
02. 0 Truck
05. 0 Minivan
08. 0
03. 0 SUV
06. 0 Motorcycle 09. 0
Boat
Motorhome
Other
Make of vehicle:
this product? (check up to three)
01. 0 Improved security
02. 0 Improved convenience
03. 0 Improved performance
04. 0 Compatibility w/vehicle
05. 0 Ease of installation
06. 0 Style/Design/Color
07. 0 Special features
08. 0 Quality/Durability
09. 0 Increase vehicle value
10. 0 Functionality
11.
12.
13.
14.
0 ·Warranty
0 PriceNalue
0 Rebate/Promotion
0 Immediate
avai labi Iity
15. 0 Friend/Family's
recommendation
16. 0 Salesperson's
recommendation
17. 0 Dealer proximity
14. What other brands did you seriously consider before
making this purchase?
01. 0 No other brands
Model name:
02.
03.
04.
05.
YIN:
0
0
0
0
considered
Other Directed brands
Code Alarm
Audiovox
Auto Page
06.
07.
08.
09.
10.
0
0
0
0
0
Compustar
Prestige
Pursuit
Crime Stopper
Bulldog
01. 0 Bought new 03.
02. 0 Boughtused 04. 0
Failure to return this form will not change your warranty rights.
Copyright 0 2012 All Rights Reserved - Please seal with tape. Do not staple. 540-0070 (B)
LRDEI007
This product is covered by one or more of the following U.S. patents:
303,223
340,000
352,685
4,383,242
4,897,630
5, 193, 141
5,534,845
5,798,711
5,952,933
333,633
344,905
383,68~
4,438,426
4,922,224
5,245,694
5,572,185
5,872,519
5,990,786
333,634
345,317
383,690
4 ' 553 ' 12'7
4,987,402
5,285, 186
5,646,591
5,900,806
6,093,979
333,635
345,71 I
390,830
4,584,569
5, I03,221
5,315,285
5,656,997
5,907,195
333,636
347,190
392,944
4,794,368
5,117,217
5,357,560
5,712,638
5,914,667
333,795
348,622
4,327,444
4,887,064
5,132,660
5,532,670
5,783,989
5,945,936
-~
,!!;
~~~
__ s_·;·_.
$(
International Patents:
Australia:
694,925
Canada:
I ,315,859 and 2,067,099
Taiwan:
91817
Other patents pending
MKG-1
7/00
LADDEIN7
A'fr~'~f~Pi'!Ji!lf($1!!'Jt';i!fo"ir~~~l'~~"ll)l!JJI!IJIIIII!. . .~~l~, "'....-fl!i'<>'4\1i"''Jj~~-"·'it""(Jk-~---1Xt-L-_~({l!'~-4'- ~":;!iltt4li.~;!I. -,,A!J )$,_i ,,'!l/i/PUKi)"' "'*''fi!;~'
VEHICLE EQUIPPED WITH A DEl ® REMOTE START SYSTEM
If vehicle battery is disconnected, the system may attempt to start when the battery is reconnected or transmitter
is used. Press brake to disengage. Check with vehicle owner to determine if hood pin switch or override switch
was installed to disengage the system for service.
IMPORTANT SAFETY NOTICE