1
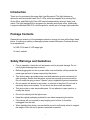
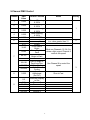
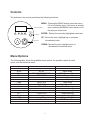
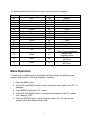
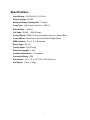
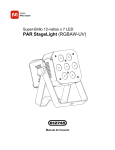
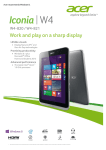
Bright, 8-Watt x 7 LED PAR-575
StageLight (RGBW)
612740
USER’S MANUAL
Introduction
Thank you for purchasing this stage light from Monoprice! This light features an
aluminum shell and seven 8-watt 4-in-1 LEDs, which are capable of producing Red,
Green, Blue, and White light. Each LED can be independently dimmed, faded, and
mixed. The light features built-in programs for dimming and strobe effect. Additionally,
it supports standard DMX-512 control signals for use as part of a larger light production.
Package Contents
Please take an inventory of the package contents to ensure you have all the items listed
below. If anything is missing or damaged, please contact Monoprice Customer Service
for a replacement.
1x PAR-575 8-watt x7 LED stage light
1x User's manual
Safety Warnings and Guidelines
•
Prior to operation, check the unit and power cord for physical damage. Do not
use if physical damage has occurred.
•
Before plugging the unit into a power outlet, ensure that the outlet provides the
same type and level of power required by the device.
•
This device uses a grounded power cord and requires a ground connection for
safe operation. Ensure that the power source has a proper ground connection.
Do not modify the plug or use a "cheater" plug to bypass the ground connection.
•
Do not expose this device to rain, water, or moisture of any kind. Do not use in
extremely dusty environments. Do not touch the device with wet hands.
•
This device has no user serviceable parts. Do not attempt to open, service, or
modify this device.
•
Do not look directly into the light source.
•
Keep the original packaging material for use when transporting the device.
•
If the device will not be used for any lengthy period of time, it should be
unplugged from the wall.
•
When installing this device, ensure that the mount is sufficiently robust to support
the weight of the unit and to prevent unwanted movement.
1
DMX Control
This light is capable of operating with 3, 4, 5, 8, or 9 DMX channels. The more channels
used, the more precise control options are available. The following terms are used in
these tables:
Chromaticity: Visible light, such as red, green, yellow, cyan, etc.
Color Saturation: The proportion of color chromaticity present, with 100%
saturation meaning that the color has reached its highest state of purity.
Purity: Refers to the color brightness. When purity is at 100%, the color is the
brightest.
3-Channel DMX Control
Channel
1
2
3
DMX Value
0-255
0-255
0-255
Control Function
RGB Color Mixing
W Dimming 0-100%
General Dimming 0-100%
Notes
Hue
Color Saturation
Purity
Control Function
R 0-100%
G 0-100%
B 0-100%
W 0-100%
Notes
Control Function
General Dimming
R 0-100%
G 0-100%
B 0-100%
W 0-100%
Notes
4-Channel DMX Control
Channel
1
2
3
4
DMX Value
0-255
0-255
0-255
0-255
5-Channel DMX Control
Channel
1
2
3
4
5
DMX Value
0-255
0-255
0-255
0-255
0-255
2
8-Channel DMX Control
Channel
DMX
Value
1
0-255
2
0-255
3
0-255
4
0-255
5
0-255
0-14
15-255
0-31
6
32-63
64-95
7
96-127
128-159
160-191
192-223
224-225
8
0-255
Control Function
Notes
General Dimming
0-100%
Red Dimming
0-100%
Green Dimming
0-100%
Blue Dimming
0-100%
White 0-100%
Dimming
Strobe Speed
Invalid
From Dark to
Bright
From Bright to
Dark
From Dark to
Bright to Dark
RGB Gradient
Dark to Bright to
Dark Auto-Run
4-Color Cycling
Multi-Color
Cycling
Speed
Adjustment
(for CH7)
Priority
1
Disabled when Channel 7 is set
to a value greater than 31
2
Must use Channels 1,2,3,4,5 to
obtain a light output. Channel 8
controls the speed
3
Use Channel 8 to control the
speed
Slow to Fast
3
9-Channel DMX Control
Channel
DMX
Value
1
0-255
2
0-255
3
0-255
4
0-255
5
0-255
0-14
15-255
0-31
6
32-63
64-95
7
96-127
128-159
160-191
192-223
224-225
8
0-255
0-5
9
6-55
56-105
106-155
156-205
206-255
Control Function
Notes
General Dimming
0-100%
Red Dimming
0-100%
Green Dimming
0-100%
Blue Dimming
0-100%
White 0-100%
Dimming
Strobe Speed
Invalid
From Dark to
Bright
From Bright to
Dark
From Dark to
Bright to Dark
RGB Gradient
Dark to Bright to
Dark Auto-Run
4-Color Cycling
Multi-Color
Cycling
Speed
Adjustment
(for CH7)
Press the Display
to Set
Dimmer 0
Dimmer 1
Dimmer 2
Dimmer 3
Dimmer 4
Priority
1
Disabled when Channel 7 is set
to a value greater than 31
2
Must use Channels 1,2,3,4,5 to
obtain a light output. Channel 8
controls the speed
Use Channel 8 to control the
speed
3
Slow to Fast
4
Controls
The buttons on the control panel have the following functions:
POWER
AC100-240V
MENU
UP
DOWN ENTER
MENU: Pressing the MENU button opens the menu,
if it is not already open. If the menu is already
4 DIGIT LED DISPLAY
open, pressing the MENU button backs out to
the previous menu level.
POWER IN
DMX IN/OUT
DMX IN
DMX OUT
ENTER: Selects the currently highlighted menu item.
UP: Moves the menu highlight up or increases
the selected value.
DOWN: Moves the menu highlight down or
decreases the selected value.
Menu Options
The following table shows the available menu options, the possible values for each
option, and the functional result:
Menu Option
Addr
SLAU
CHnd
SP-Pr-ASC
FAdE
FLAS
rL-GL-BL-UL-SouA
LED
nodE
EUrn
Possible Values
D001-d512
SL.AU
3CH/4CH/5CH/8CH/9CH
SP00-SP15
Pr00-Pr30
AC00-AC15
FA00-FA15
FL00-FL15
r.000-r.255
G.000-G.255
b.000-b.255
U.000-U.255
So.uA
on/Off
Nod0-nod4
UE2.0
5
Control Function
DMX Mode
Slave Mode
DMX Channel Mode
Built-in Program Speed
Built-in Program Selection
Color Cycling
Fade Mode
White Strobe Mode
Red Dimming
Green Dimming
Blue Dimming
White Dimming
Sound Activated Mode
Display On/Off
DMX Dimmer Mode
Software Version Number
The following table lists the function of each of the thirty built-in programs:
Program
00
01
02
03
04
05
06
07
08
09
10
11
12
13
Function
Red
Green
Blue
Off
Off
Yellow
Magenta
Red
Red
Turquoise
Green
Green
Blue
Blue
Program
18
19
20
21
22
23
24
25
26
27
28
29
30
31
14
Off
32
15
White
33
16
Yellow
34
17
Yellow
35
Function
Magenta
Magenta
Turquoise
Turquoise
Red
Green
Blue
White
Yellow
Magenta
White
Turquoise
Dimmed White
White
Fast Fade
White-Turquoise-Magenta
Strobe/Flash
Red-Blue-Green
Fast Fade
All Colors
Flash/Strobe
All Colors
Menu Operation
To illustrate the methods used to manipulate the menu options, we will take as an
example selecting one of the thirty programs to execute:
1. Press the MENU button.
2. Use the UP and DOWN buttons to scroll through the menu options until "Pr--" is
displayed.
3. Press ENTER to select the "Pr--" option.
4. Use the UP and DOWN buttons to increment and decrement the "Pr" number
until it displays "Pr33".
5. Press the ENTER button to set the Program value to 33. The light will now
operate in Red-Blue-Green Strobe mode.
6
Master/Slave Operation
Multiple lights can be daisy chained together, with one serving as the master and the
others configured as slaves to perform whatever actions are performed by the master
unit. The master light can be in any mode except DMX mode, while all the slaves must
be set to SLAV mode to ensure they receive signals from the master unit.
Note: If the daisy chain is longer than 60 meters or if it contains 20 or more light fixtures,
a DMX signal amplifier should be used to ensure that all devices get valid instruction
signals.
Note: The last device in any DMX chain must be terminated using a DMX Terminator.
You can make a DMX terminator by soldering a 120-ohm (1/4 watt) resistor between
pins 2 and 3 of a standard XLR male plug.
3-pin XLR to 5-pin DMX Conversion
While most DMX compatible equipment uses 3-pin XLR connectors, some devices use
the official 5-pin DMX connector. To make a 3-pin to 5-pin converter simply make a
cable with a 3-pin XLR connector on one end and a 5-pin DMX connector on the other.
Connect the pins as follows:
3-pin XLR to 5-pin DMX Adapter
Signal
3-pin XLR
Ground/Shield
1
Data Compliment (- signal)
2
Data True (+ signal)
3
Do Not Use
Do Not Use
7
5-pin DMX
1
2
3
4
5
Troubleshooting
Following are some common problems and common solutions.
Problem:
The light will not turn on.
Solutions:
•
Check to ensure the power cord is connected to a power outlet.
•
Check to ensure that the connected outlet has available power.
•
Check to ensure the power switch is in the ON position.
•
Check to see if the fuse has blown, replace as necessary.
Problem:
The light will not execute DMX instructions.
Solutions:
•
Check to ensure that the light is connected to the controller via a DMX cable.
•
Check to ensure that the DMX chain is properly terminated.
•
Check to ensure that the DMX cable is good, swap out a known good cable to
test.
•
Check to ensure the light is in DMX mode (d001).
•
Check to ensure the DMX controller is operating properly.
If you experience other problems with this light and cannot solve them on your own,
please contact Monoprice Technical Support for assistance.
Monoprice is pleased to provide free, live, online technical support to assist you with
any questions you may have about installation, setup, troubleshooting or product
recommendations. If you ever need assistance with your new product, please come
online to talk to one of our friendly and knowledgeable Tech Support Associates.
Technical support is available through the online chat button on our website
(www.monoprice.com) during regular business hours, 7 days a week. You can also get
assistance through email by sending a message to [email protected].
8
Specifications
Input Voltage: 100~264 VAC, 47~63 Hz
Output Voltage: 28 VDC
Maximum Power Consumption: 56 watts
Lamp Type: High Power 8-watt 4-in-1 LED x7
Refresh Rate: > 400 Hz
Life Span: 50,000 ~ 100,000 hours
Control Signal: DMX512, Sound Activated, Auto Run, Master/Slave
Control Mode: Stand Alone, Sound Activated, Master/Slave
DMX Channels: 3, 4, 5, 8, or 9 channels
Beam Angle: 25°, 45°
Cooling Mode: Fan Cooling
Dielectric Strength: 1.5KV
Insulation Resistance: > 2 megohm
Protection Rating: IP20
Dimensions: 5.5" x 7.5" x 9.4" (140 x 190 x 240 mm)
Net Weight: 3.3 lbs. (1.5Kg)
9