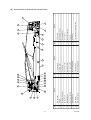
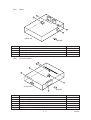
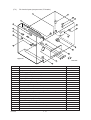
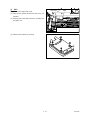
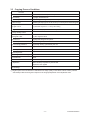
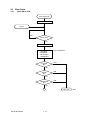
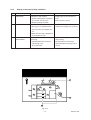
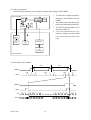
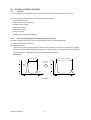
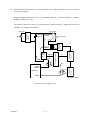
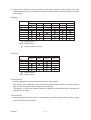
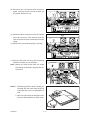
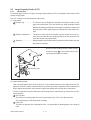
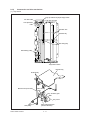
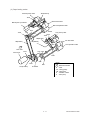
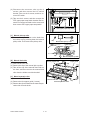
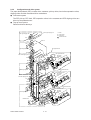
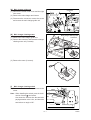
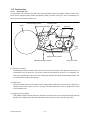
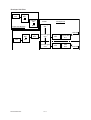
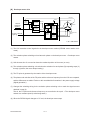
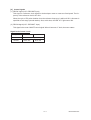
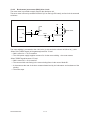
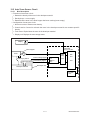
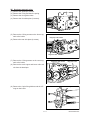
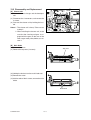
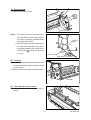
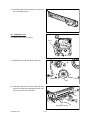
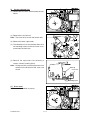
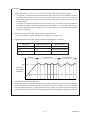
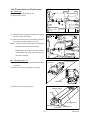
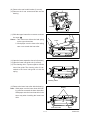
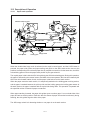
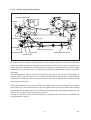
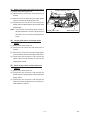
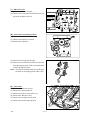
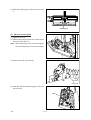
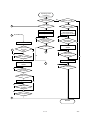
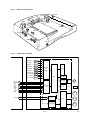
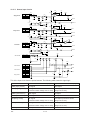
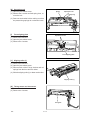
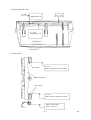
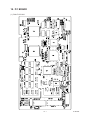
1
SERVICE MANUAL CODE : 00ZAR650//F1E DIGITAL COPIER MODEL AR-650 CONTENTS [1] [2] [3] [4] [5] [6] [7] [8] [9] [10] [11] [12] [13] [14] [15] [16] [17] [18] [19] SPECIFICATIONS•ACCESSORIES•OPTIONS•SUPPLIES . . . 1 - 1 OUTLINE OF THE MACHINE . . . . . . . . . . . . . . . . . . . . . . . . . . 2 - 1 COPYING PROCESS . . . . . . . . . . . . . . . . . . . . . . . . . . . . . . . . 3 - 1 COPIER OPERATION. . . . . . . . . . . . . . . . . . . . . . . . . . . . . . . . 4 - 1 DISPLAY UNIT . . . . . . . . . . . . . . . . . . . . . . . . . . . . . . . . . . . . . 5 - 1 IMAGE PROCESSING . . . . . . . . . . . . . . . . . . . . . . . . . . . . . . 6 - 1 SCANNER. . . . . . . . . . . . . . . . . . . . . . . . . . . . . . . . . . . . . . . . . 7 - 1 PRINTING . . . . . . . . . . . . . . . . . . . . . . . . . . . . . . . . . . . . . . . . . 8 - 1 PAPER FEED SYSTEM . . . . . . . . . . . . . . . . . . . . . . . . . . . . . . 9 - 1 DRUM-RELATED SECTION . . . . . . . . . . . . . . . . . . . . . . . . . . 10 - 1 TRANSFER/TRANSPORT UNIT. . . . . . . . . . . . . . . . . . . . . . . 11 - 1 DEVELOPER UNIT . . . . . . . . . . . . . . . . . . . . . . . . . . . . . . . . . 12 - 1 CLEANER UNIT . . . . . . . . . . . . . . . . . . . . . . . . . . . . . . . . . . . 13 - 1 FUSER UNIT. . . . . . . . . . . . . . . . . . . . . . . . . . . . . . . . . . . . . . 14 - 1 AUTOMATIC DUPLEXING UNIT (ADU) . . . . . . . . . . . . . . . . . 15 - 1 AUTOMATIC DOCUMENT FEEDER (ADF) . . . . . . . . . . . . . . 16 - 1 POWER SUPPLY UNIT . . . . . . . . . . . . . . . . . . . . . . . . . . . . . . 17 - 1 PC BOARD . . . . . . . . . . . . . . . . . . . . . . . . . . . . . . . . . . . . . . . 18 - 1 UNPACKING AND INSTALLATION . . . . . . . . . . . . . . . . . . . . . 19 - 1 Parts marked with “ “ are important for maintaining the safety of the set. Be sure to replace these parts with specified ones for maintaining the safety and performance of the set. SHARP CORPORATION This document has been published to be used for after sales service only. The contents are subject to change without notice. GENERAL PRECAUTIONS REGARDING THE INSTALLATION AND SERVICE FOR THE COPIER The installation and service should be done by a qualified service technician. 1. Transportation/Installation • When transporting/installing the copier, move it by the casters while lifting the stoppers. The copier is quite heavy and weighs approximately 250 kg (551 lb), therefore pay full attention when handling it. • Be sure to use a dedicated outlet with AC 115V or 120V/20A (220V, 230V, 240V/10A) or more for its power source. • The copier must be grounded for safety. Never ground it to a gas pipe or a water pipe. • Select a suitable place for installation. Avoid excessive heat, high humidity, dust, vibration and direct sunlight. • Also provide proper ventilation as the copier emits a slight amount of ozone. • To insure adequate working space for the copying operation, keep a minimum clearance of 80 cm (32”) on the left, 80 cm (32”) on the right and 10 cm (4”) in the rear. 2. Service of Machines • Basically, be sure to turn the main switch off and unplug the power cord during service. • Be sure not to touch high-temperature sections such as the exposure lamp, the fuser unit, the damp heater and their periphery. • Be sure not to touch high-voltage sections such as the chargers, the transfer belt and the highvoltage transformer. • Be sure not to touch rotating/operating sections such as gears, belts, pulleys, fan, etc. • When servicing the machines with the main switch turned on, be sure not to touch live sections and rotating/operating sections. Avoid exposure to laser radiation. • Use suitable measuring instruments and tools. • Avoid exposure to laser radiation during servicing. − Avoid direct exposure to beam. − Do not insert tools, parts, etc. that are reflective into the path of the laser beam. − Remove all watches, rings, bracelets, etc. that are reflective. 3. Main Service Parts for Safety • The breaker, door switch, fuse, thermostat, thermofuse, thermistor, etc. are particularly important for safety. Be sure to handle/install them properly. 4. Cautionary Labels • During servicing, be sure to check the rating plate and the cautionary labels such as “Unplug the power cord during service”, “Hot area”, “Laser warning label” etc. to see if there is any dirt on their surface and whether they are properly stuck to the copier. 5. Disposition of Consumable Parts/Packing Materials • Regarding the recovery and disposal of the copier, supplies, consumable parts and packing materials, it is recommended to follow the relevant local regulations or rules. 6. When parts are disassembled, reassembly is basically the reverse of disassembly unless otherwise noted in this manual or other related documents. Be careful not to reassemble small parts such as screws, washers, pins, E-rings, toothed washers in the wrong places. 7. Basically, the machine should not be operated with any parts removed or disassembled. 8. Precautions Against Static Electricity • The PC board must be stored in an anti-electrostatic bag and handled carefully using a wristband, because the ICs on it may become damaged due to static electricity. Caution: Before using the wrist band, pull out the power cord plug of the copier and make sure that there is no uninsulated charged objects in the vicinity. Caution : Dispose of used RAM-IC’s (including lithium batter y) according to the manufacturer’s instructions. Vorsicht : Entsorgung des gebrauchten RAM-IC’s (inklusive der Lithium Batterie) nach Angaben des Herstellers. CONTENTS 1. SPECIFICATIONS • ACCESSORIES • OPTIONS • SUPPLIES ........................................... 1-1 1.1 1.2 Specifications ......................................................................................................................... 1-1 Accessories ............................................................................................................................ 1-12 1.3 Options ................................................................................................................................... 1-12 1.4 Supplies ................................................................................................................................. 1-12 1.5 System List ............................................................................................................................ 1-13 2. OUTLINE OF THE MACHINE ................................................................................................ 2-1 2.1 Sectional Views and Electrical Parts Location Diagram ......................................................... 2-1 2.1.1 Sectional view ............................................................................................................. 2-1 2.1.2 Electrical parts layout ................................................................................................. 2-8 2.2 Symbol and Function of Components .................................................................................... 2-25 2.3 System Block Diagram ........................................................................................................... 2-30 2.4 Removal of Covers and PC Boards ....................................................................................... 2-31 2.4.1 Removal of covers ...................................................................................................... 2-31 2.4.2 Removal of PC boards ................................................................................................ 2-35 3. COPYING PROCESS ............................................................................................................ 3-1 3.1 Copying Process .................................................................................................................... 3-1 3.2 Details of Copying Process .................................................................................................... 3-2 3.3 Comparison of Copying Process Conditions .......................................................................... 3-9 4. COPIER OPERATION ........................................................................................................... 4-1 4.1 Operation Outline ................................................................................................................... 4-1 4.2 Description of Operation ........................................................................................................ 4-1 4.2.1 Warming up ................................................................................................................ 4-1 4.2.2 Standby (ready) .......................................................................................................... 4-2 4.2.3 Automatic feed copying using the START key ............................................................ 4-2 4.2.4 Bypass-feed copying ................................................................................................... 4-4 4.2.5 Interrupt copying ......................................................................................................... 4-4 4.3 Fault Detection ....................................................................................................................... 4-5 4.3.1 Classification of faults ................................................................................................. 4-5 4.4 4.3.2 Explanation of faults ................................................................................................... 4-5 Flow Charts ............................................................................................................................ 4-10 4.4.1 Power ON to ready ..................................................................................................... 4-10 4.4.2 Automatic feed copying ............................................................................................... 4-12 5. DISPLAY UNIT ...................................................................................................................... 5-1 5.1 Detailed Drawing of the Control Panel and the Display Panel ............................................... 5-1 5.2 Items Shown on the Display Panel......................................................................................... 5-2 5.2.1 Display during normal copying .................................................................................... 5-2 5.2.2 Display in the event of faulty conditions ...................................................................... 5-3 CONTENTS I 5.3 Relation between Copier Conditions and Operator's Actions ................................................ 5-6 5.4 Description of Operation ........................................................................................................ 5-7 5.4.1 Dot matrix LCD circuit ................................................................................................. 5-7 5.5 5.4.2 LED display circuit ...................................................................................................... 5-9 Disassembly and Replacement .............................................................................................. 5-10 6. IMAGE PROCESSING .......................................................................................................... 6-1 6.1 Introduction ............................................................................................................................ 6-1 6.2 Image Processing Circuit ....................................................................................................... 6-2 6.2.1 Overview ..................................................................................................................... 6-2 6.3 6.2.2 Configuration .............................................................................................................. 6-3 SLG Board (PWA-F-SLG-300) ............................................................................................... 6-4 6.3.1 Features ...................................................................................................................... 6-4 6.3.2 Functional description of the image processing circuit ............................................... 6-4 6.4 PLG Board (PWA-F-PLG-300) ............................................................................................... 6-8 6.4.1 Features ...................................................................................................................... 6-8 6.4.2 Description of image processing functions ................................................................. 6-8 6.5 Scanner .................................................................................................................................. 6-9 6.6 Printer .................................................................................................................................... 6-9 7. SCANNER ............................................................................................................................. 7-1 7.1 Functions ............................................................................................................................... 7-1 7.2 Configuration .......................................................................................................................... 7-2 7.3 Description of Operation ........................................................................................................ 7-5 7.3.1 Scanning motor ........................................................................................................... 7-5 7.3.2 Document motor ......................................................................................................... 7-5 7.4 7.3.3 Optical fan motor ........................................................................................................ 7-5 Drive of the 5-Phase Stepping Motor ..................................................................................... 7-6 7.4.1 Features ...................................................................................................................... 7-6 7.4.2 Principle of the stepping motor ................................................................................... 7-6 7.4.3 5-phase motor drive circuit (fixed current type) .......................................................... 7-8 7.5 Exposure Control Circuit ........................................................................................................ 7-9 7.5.1 Overview ..................................................................................................................... 7-9 7.5.2 Lamp regulator function .............................................................................................. 7-10 7.5.3 Control section ............................................................................................................ 7-10 7.5.4 Lamp regulator circuit ................................................................................................. 7-11 7.6 Outline of Control ................................................................................................................... 7-13 7.6.1 Photo-voltaic conversion ............................................................................................. 7-13 7.6.2 Shading compensation ............................................................................................... 7-13 7.7 Automatic Original-Size Detection Circuit .............................................................................. 7-14 7.7.1 Principle of original-size detection .............................................................................. 7-14 7.7.2 Original size detection ................................................................................................ 7-14 7.8 Disassembly and Replacement .............................................................................................. 7-18 II CONTENTS 8. PRINTING .............................................................................................................................. 8-1 8.1 Function Outline ..................................................................................................................... 8-1 8.2 Structure ................................................................................................................................ 8-3 8.3 8.4 Laser Diode ............................................................................................................................ 8-8 Disassembly and Replacement .............................................................................................. 8-9 9. PAPER FEED SYSTEM ......................................................................................................... 9-1 9.1 General .................................................................................................................................. 9-1 9.1.1 Functions .................................................................................................................... 9-1 9.1.2 Motor drive circuit ....................................................................................................... 9-2 9.2 9.1.3 Detection of the remaining amount of paper............................................................... 9-4 Aligning Section ..................................................................................................................... 9-5 9.2.1 Introduction ................................................................................................................. 9-5 9.2.2 Configuration and drive system .................................................................................. 9-5 9.2.3 Disassembly and replacement .................................................................................... 9-6 9.3 Large Capacity Feeder (LCF) ................................................................................................ 9-10 9.3.1 Introduction ................................................................................................................. 9-10 9.3.2 Construction and drive mechanism ............................................................................ 9-12 9.3.3 Description of operation .............................................................................................. 9-14 9.3.4 Disassembly and replacement .................................................................................... 9-19 9.4 Paper Feed Pedestal (PFP) ................................................................................................... 9-29 9.4.1 Introduction ................................................................................................................. 9-29 9.4.2 Component names ..................................................................................................... 9-30 9.4.3 General operation ....................................................................................................... 9-31 9.4.4 Configuration and drive system .................................................................................. 9-42 9.4.5 Explanation of operation ............................................................................................. 9-43 9.4.6 Disassembly and replacement .................................................................................... 9-49 10. DRUM-RELATED SECTION ................................................................................................. 10-1 10.1 Construction ........................................................................................................................... 10-1 10.2 Functions ............................................................................................................................... 10-2 10.3 Disassembly and Replacement .............................................................................................. 10-3 11. TRANSFER/TRANSPORT UNIT ........................................................................................... 11-1 11.1 Construction ........................................................................................................................... 11-1 11.2 Description of Operation ........................................................................................................ 11-2 11.3 Functions ............................................................................................................................... 11-3 11.4 Disassembly and Replacement .............................................................................................. 11-5 12. DEVELOPER UNIT ............................................................................................................... 12-1 12.1 General Description ............................................................................................................... 12-1 12.2 Construction ........................................................................................................................... 12-2 12.2.1 Developer unit ............................................................................................................. 12-2 12.2.2 Toner hopper unit ........................................................................................................ 12-4 12.3 Developer Unit Drive .............................................................................................................. 12-5 CONTENTS III 12.4 Motors ................................................................................................................................... 12-7 12.4.1 Developer motor (IC motor) drive .............................................................................. 12-7 12.4.2 Brush motor (toner motor (M14)) drive circuit ............................................................ 12-10 12.5 Auto-Toner Sensor Circuit ..................................................................................................... 12-11 12.5.1 Brief description ......................................................................................................... 12-11 12.5.2 Operation of auto-toner sensor .................................................................................. 12-12 12.6 Disassembly and Replacement ............................................................................................. 12-14 13. CLEANER UNIT ................................................................................................................... 13-1 13.1 Construction .......................................................................................................................... 13-1 13.2 Description of Functions ....................................................................................................... 13-2 13.3 Drum Temperature Detection Circuit ..................................................................................... 13-4 13.4 Control for Maintaining Image Quality Using a Toner Adhesion Amount Sensor .................. 13-5 13.4.1 Outline ....................................................................................................................... 13-5 13.4.2 Principle of sensor operation ..................................................................................... 13-5 13.4.3 Outline of control........................................................................................................ 13-6 13.4.4 Configuration ............................................................................................................. 13-7 13.5 Disassembly and Replacement ............................................................................................. 13-8 14. FUSER UNIT ........................................................................................................................ 14-1 14.1 General Description .............................................................................................................. 14-1 14.2 Description of Operation ....................................................................................................... 14-1 14.3 Functions .............................................................................................................................. 14-2 14.4 Heater Control Circuit ........................................................................................................... 14-4 14.4.1 Temperature detection unit ........................................................................................ 14-4 14.4.2 Detection of thermistor burnout ................................................................................. 14-6 14.4.3 Control for abnormal heater condition ....................................................................... 14-6 14.5 Heat-Roller Motor Drive ........................................................................................................ 14-7 14.5.1 Outline of operation ................................................................................................... 14-7 14.5.2 Control signals ........................................................................................................... 14-8 14.6 Disassembly and Replacement ............................................................................................. 14-9 15. AUTOMATIC DUPLEXING UNIT (ADU) ............................................................................... 15-1 15.1 Introduction ........................................................................................................................... 15-1 15.2 Drive ................................................................................................................................... 15-3 15.2.1 ADU/exit switching gate drive .................................................................................... 15-3 15.2.2 Stack guide drive ....................................................................................................... 15-4 15.2.3 ADU inlet/reversal roller drive .................................................................................... 15-4 15.2.4 Holding gate drive ...................................................................................................... 15-5 15.2.5 ADU pick-up roller, ADU feed roller and ADU separation belt drive .......................... 15-5 15.2.6 ADU aligning roller drive ............................................................................................ 15-5 15.2.7 ADU transport roller drive .......................................................................................... 15-5 15.3 Description of Operation ....................................................................................................... 15-6 15.3.1 Paper stack operation ................................................................................................ 15-6 CONTENTS IV 15.3.2 Duplex copy (re-feed) operation ................................................................................ 15-7 15.3.3 Reversal exit operation .............................................................................................. 15-9 15.4 Disassembly and Replacement ............................................................................................. 15-10 16. AUTOMATIC DOCUMENT FEEDER (ADF) ......................................................................... 16-1 16.1 Outline ................................................................................................................................... 16-1 16.2 Construction .......................................................................................................................... 16-2 16.2.1 ADF Construction ...................................................................................................... 16-2 16.2.2 Drive mechanism ....................................................................................................... 16-3 16.3 Description of Operations ..................................................................................................... 16-5 16.3.1 Description of operation ............................................................................................. 16-5 16.3.2 Double-side feed operation ........................................................................................ 16-11 16.4 Description of Interface Signals ............................................................................................ 16-20 16.5 Detection of Paper Jam ......................................................................................................... 16-21 16.5.1 Feed section jams ...................................................................................................... 16-21 16.5.2 Transport section jams ............................................................................................... 16-21 16.5.3 Exit/reversal jams ....................................................................................................... 16-22 16.6 Detection of Original Size ..................................................................................................... 16-23 16.6.1 Original size detection method .................................................................................. 16-23 16.7 Flow Charts ........................................................................................................................... 16-24 16.7.1 Main routine processing ............................................................................................ 16-24 16.7.2 Operation control ....................................................................................................... 16-25 16.7.3 Initial alignment control .............................................................................................. 16-26 16.7.4 One-sided feed control .............................................................................................. 16-27 16.7.5 No.1 double-sided transport control (double-sided transport of initially aligned original) .................................................. 16-28 16.7.6 No.2 double-sided transport control (double-sided transport of original on platen) ............................................................ 16-29 16.7.7Double-sided reversal control ................................................................................................ 16-30 16.7.8 Exit control ................................................................................................................. 16-31 16.7.9 Operating status monitoring ...................................................................................... 16-32 16.8 Timing Charts ........................................................................................................................ 16-34 16.8.1 A4,3 sheets, one-sided mode .................................................................................... 16-34 16.8.2 A3,2 sheets, one-sided mode .................................................................................... 16-35 16.8.3 A4,2 sheets, double-sided mode ............................................................................... 16-36 16.8.4 A3,2 sheets, double-sided mode ............................................................................... 16-37 16.9 Descriptions of Symbols, Layout of Electrical Parts and Signal Block Diagrams .......................................................................... 16-38 16.9.1 Symbols ..................................................................................................................... 16-38 16.9.2 Electrical parts layout ................................................................................................ 16-39 16.9.3 Signal block diagram.................................................................................................. 16-39 16.10 Description of Circuits ........................................................................................................... 16-40 16.10.1 Aligning sensor, timing sensor and exit sensor circuit diagrams ............................. 16-40 16.10.2 +5v power circuit diagram ....................................................................................... 16-41 16.10.3 Rush current limiting circuit diagram ....................................................................... 16-41 CONTENTS V 16.10.4 Pulse motor drive circuit .......................................................................................... 16-42 16.10.5 Solenoid drive circuit ............................................................................................... 16-42 16.10.6 Reset circuit ............................................................................................................ 16-43 16.10.7 EEPROM circuit diagram ........................................................................................ 16-44 16.11 Description of I/O signals ...................................................................................................... 16-45 16.11.1 REQ, ACK and TXD signals .................................................................................... 16-45 16.11.2 DF-ACK, DF-REQ and RXD signals ....................................................................... 16-45 16.11.3 Sensor input circuits ................................................................................................ 16-46 16.11.4 Pulse motor drive circuit diagram ............................................................................ 16-47 16.11.5 Solenoid drive circuit diagram ................................................................................. 16-47 16.11.6 Open switch input circuit diagram ........................................................................... 16-48 16.12 Disassembly and Replacement ............................................................................................. 16-49 16.12 PC Board .............................................................................................................................. 16-74 17. POWER SUPPLY UNIT .......................................................................................................... 17-1 17.1 Configuration ........................................................................................................................... 17-1 17.2 Operation of DC Output Circuit ............................................................................................... 17-1 18. PC BOARD ............................................................................................................................. 18-1 19. UNPACKING AND INSTALLATION ....................................................................................... 19-1 CONTENTS VI 1. SPECIFICATIONS • ACCESSORIES • OPTIONS • SUPPLIES 1.1 Specifications 1. System Copy system Body type Original table type Original cover Frame structure Photoconductor Original scan system Scan data output system Exposure system Scan sensor Scan resolution Scan light source Exposure light source Exposure resolution Scan system Developing system Discharging system Charging system Transfer system Separation system Transfer belt cleaning system Drum cleaning system Toner supply system Toner density adjustment system Toner empty detection system Indirect electronic photo system (Dry type) Console type Fixed type (Left center reference) RADF standard provision Fixed frame type OPC drum (ø100) CCD line sensor (7500 pixel) 600 x 600dpi Halogen lamp (180W) 1-scan multi-copy system Semiconductor laser 600dpi Using polygon mirror 2-component magnetic brush developing system Photo discharging by red LED Negative corona system (Scorotron) Transfer belt system Transfer belt system Fur brush system + Blade system Blade system + Fur brush system Toner hopper system, right top side toner bottle supply system Magnetic auto toner system 1. Mechanical sensor system Note 1: When detecting, the toner supply lamp flashes. 2. Electrical system (Using auto toner sensor) Note 1: When detecting toner empty, the toner supply lamp flashes and the message is displayed. Fusing system Heat roller system Infrared heater (Upper) 2 pcs. 700W + 600W Roller dia. (Upper) ø 60 Roller dia. (Lower) ø 60 1-1 SPECIFICATIONS 2. Basic specifications A. Copy speed (1) Continuous copy Paper feed system Paper size A4,B5,A5-R,LT,ST-R A4-R,B5-R,LT-R B4,FOLIO,LG,COMP A3,LD LCF Cassette 65 X X X 65 51 44 38 Manual feed Size specified Size not specified 48 33 42 33 37 33 33 33 Note 1: The above specifications are for manual feed, single and continuous copy. Note 2: The state which is other than the toner supply mode. (2) First copy First copy time 3.6sec or less Note 1: The above specification is for manual feed, normal size, A4/LT size, LCF feed. Note 2: When APS is not used. B. Warming up time Normal About 420sec @20˚C C. Original Max. size Kind Original size detection A3 or LD Sheet, cubic material, book Glass surface: Provided Note 1: Fixed detection system with the platen cover open RADF: Provided Note: The original width and length are detected in RADF feed. Note 2: Only the first sheet is detected except when the mixed original mode is selected. Allowable original size for auto detection SPECIFICATIONS Fixed size AB series: A3,A4,A4-R,A5-R,B4,B5,B5-R LT series: LD,LG,LT,LT-R,ST-R 1-2 D. Paper (1) Size Fixed size Cassette AB series: A3,A4,A4-R,A5-R,B4,B5,B5-R,FOLIO LT series: LD,LG,LT,LT-R,ST-R,COM AB series: A3,A4,A4-R,A5-R,B4,B5,B5-R,FOLIO LT series: LD,LG,LT,LT-R,ST-R,COM SFB LCF : A4,LT,B5 Note 1: Postcards cannot be used. Note 2: Name cards cannot be used. Note 3: Same surface copy cannot be used. Note 4: Envelopes cannot be used. Note 5: The paper width of fixed size is detected with the manual tray guide width. Note 6: The upper stage of B5 cassette cannot be used. Note 7: SFB mixed size paper cannot be used. (2) Kind Cassette LCF PPC paper SFB PPC paper Tracing paper: Out of warranty OHP film: Out of warranty Label sheet: Out of warranty Note 1: Only one sheet feed is allowed except for PPC paper. Note: Special paper such as postcards and PPC paper with punch holes cannot be used. (3) Weight Cassette, LCF SFB 64~ 80 g/m2,17~ 22 lbs 64~ 80 g/m2,17~ 22 lbs 80~157g/m2,22~ 41 lbs Continuous feed allowed Only one sheet feed allowed (4) Curl level Curl level PPC paper: The highest point when paper is put on a flat surface must be 5mm or less. 1-3 SPECIFICATIONS E. Paper feed Paper feed means LCF Cassettes: 3 steps (Drawers of the copier) SFB LCF: 4,000 sheets (Load height: max. 415mm) Cassette: 500 sheets (Load height: max. 55mm) SFB: 100 sheets (Load height: max. 11mm) Note 1: 50 sheets for SFB duplex copy. Note 2: However, the cassette load height is displayed as 53mm. Note 3: however, the SFB load height is displayed as 10mm. Capacity Manual feed start Priority feed means Manual feed specification size Start key start LCF priority Note 1: By data input of the adjustment mode, another paper feed means can have priority to be selected. After setting paper, press the paper size key to specify the paper size. Note 1: By specifying the paper size, the binding margin, duplex edge erase, and continuous page copy can be performed. For APS and AMS, invalid. Factory priority setup: LCF F. Continuous copy No. of sheets Input system Count system Increment of 1 sheet up to max. 999 sheets 10-key input Reduction system Note 1: “1”is displayed in auto clear and warming up. G. Density adjustment Auto density adjustment Manual density adjustment Priority mode Available 11-step adjustment (Operated with keys on the control panel LCD) Auto density adjustment Note 1: By data input of the adjustment mode, selection of auto/manual is allowed. Factory setup: Auto H. Picture quality mode Picture process mode Priority mode Standard/Photo/Text mode Standard mode Note: By data input of the adjustment mode, the mode can be selected. I. Magnification ratio (1) Reduction and enlargement Reduction and enlargement SPECIFICATIONS Auto setup system depends on selecting the original size and paper size. Note 1: A desired fixed-size series (including a different series) can be selected: Japan A5, UNIVERSAL, OTHER. 1-4 (2) Selected magnification ratio a. AB series Paper Original A3 B4 FOLIO A4 B5 A5 A3 B4 FOLIO A4 B5 A5 100 115 127 141 163 200 86 100 110 122 141 173 71 82 100 100 115 141 71 82 90 100 115 141 61 71 78 86 100 122 50 57 63 71 82 100 b.LT series Paper Original LD COMP LG LT ST LD COMP LG LT ST 100 108 121 129 200 82 100 100 119 165 78 84 100 100 154 65 78 78 100 129 50 54 60 65 100 Note 1: The above numbers show magnification ratios. (3) Other Zoom Copy allow area display Auto paper selection (APS)/Auto magnification ratio selection 20 – 400%, increment of 1% Available Available Factory priority setup: APS J. Counter display Total counter A3/LD double count mode PM counter Mechanical system 7 digits Displayed on the control panel. Available (Electronic counter) Available (Electronic counter) Resettable counter Available (Electronic counter) Original counter Available (Electronic counter) Copy job counter Print job counter Available (Electronic counter) Available (Electronic counter) 1-5 Factory setup: ON Factory setup: 400,000 Factory setup Europe: Used. Others: Not used. Factory setup Europe: Used. Others: Not used. SPECIFICATIONS K. Charger wire cleaning Charger wire cleaning Available (Auto cleaning system) Note 1: The charging wire is cleaned. L. Special functions Interruption Pre-heat Available Available Key input is accepted during warming up and in the ready state. Note 1: Auto pre-heat function can be set in the adjustment mode. Note 2: By data input of the adjustment mode, time can be set in the increment of 5min (5 – 60min). Note 3: The fuser temperature in pre-heat can be set in the adjustment mode. Available Setup can be changed in the adjustment mode. (15 – 150sec, in the increment of 15sec, and cancel of setup) Available Note 1: Time up to OFF can be changed in the adjustment mode or in the adjustment screen setup. (Max. 240min. Only the adjustment code can be canceled.) Note 2: Use or non-use can be selected in the adjustment mode. Note 3: For time setup, selection of User adjustment Allow/Not Allow can be made. Auto clear Auto off Self diag Error code history Password code Dew-prevention Message Available Available Available Available (Optional in some destinations) Available Note 1: Graphic LCD, backlight provided. All clear Mode memory Cover paper mode Available Available (4 modes) Available (in the following 4 modes) (1) White cover mode (2) Copy cover mode (3) White cover/white back cover mode (4) Copy cover/white back cover mode Sheet insertion mode Available (in the following 2 modes) (1) White paper insertion mode (2) Copy paper insertion mode Weekly timer Pre-heat start Pre-heat copy Auto duplex selection Available Available Available Available SPECIFICATIONS auto Factory setup (Note 2) North America, Europe: 15min Others: Cancel Factory setup (Note 3); 170 C Factory setup: 45sec Factory setup (Note 1, 2) North America, Europe: 90min Others: Not used. Factory setup (Note 3) North America, Europe: Available Others: Not Available Factory setup: OFF AC key Factory setup: OFF 1-6 Timer display Available Factory setup: Display provided Factory setup: ON Factory setup: Available Paper feed means which allow selection: (1) LCF (2) Cassette Auto sort Auto cassette selection Available Available Network printer Language selection Allows connection of network printer board (option). Available (3 languages) Note 1: Language selection of DSS display must be initialized. FROM update Available Note 1: Download from PC Performed serviceman. Adjustment code output Available (05, 08 code) Performed serviceman. Mixed original load Available by by a a M. Edit function Continuous page copy Edge erase Available Available By data of the adjustment mode, the edge erase priority mode can be selected. Binding margin (Image shift) Trimming, masking 2in1 4in1 Electronic sort Magazine sort Page numbering Rotational copy Document storage Date write Available Available Available Available Available Available Available Available Available Available Factory priority setup: No N. Digital edit functions Independent zoom of magnification ratio Mirror image Black-white reversion Available Available Available 1-7 SPECIFICATIONS O. Operation panel Operation key Status display Message display Hard key Note 1: There are following 19 keys. Start 0 – 9 (10 keys) Clear Stop All clear Interruption Pre-heat HELP Copy Printer Displayed with the message display and LED. Note 1: There are following 6 LED’s. All clear Interruption Pre-heat Copy Printer Timer Graphic LCD with touch panel (with backlight) Note 1: Details of LCD Display dot: 320 x 240 (1/4 VGA) Display area: 115.7mm c 86.37mm P. Environmental conditions Normal use Special use Transit or storage with consumable parts packed together Transit or storage without consumable parts packed together Transit or storage of consumable parts 10~30˚C,20~85%RH,without dew (1)-5~10˚C,20~85%RH,without dew (2)30~35˚C,20~85%RH,without dew -10~35˚C,85%RH or less, without dew -40~50˚C,85%RH or less, without dew -10~35˚C,85%RH or less, without dew Q. Noises Ready state Continuous copy 45dB(A)or less 65dB(A)or less R. Reliability Full system MSBSC 52,700 MCBJ 11,500 S. Conforming standards Safety standards Interruption wave standards SPECIFICATIONS 1) Electrical appliances regulations (S mark) 2)UL 3)CSA 4)CDRH 5)CE mark 6)TUV 1)VCCI 2)FCC(IC) 3)CE mark 4)C-TICK(Australia) 1-8 T. Power source Power voltage, frequency Power consumption Power cord 100V-50/60Hz,115V-50/60Hz,220V-50/60Hz,230~240V-50/60Hz,240V-50Hz 2.0kW or less 2m Note 1: For 200 series, detachable. U. External view External dimensions Weight (1) Body: W920 X D742 X H1111 mm (2) Body + Finisher: W1735 X D742 X H1111 mm (3) Body + Finisher + DSSC: W1735 X D905 X H1111 mm Body only: 250 kg V. Packing External dimensions Weight Packed items W1015 X D845 X H1290 mm (with palette) 285 kg Operation Manual Drum Operation Manual Pocket Original feed tray Maintenance management table (Card, sheet) Delivery installation contract (EU only) MSDS card (USA,UK only) Warranty for Australia Warranty registration (EU only) W. Maintenance (1) Periodic inspection Periodic inspection interval 400,000 sheets (Reference) (2) Overhaul Overhaul interval 800,000 sheets 1-9 SPECIFICATIONS X. Automatic original feeder Automatic original feeder ADF conforming to duplex original (Standard provision) (1) Functions Functions Loaded originals are automatically separated and fed. a) Auto magnification ratio/Paper selection b) Conforming to duplex original c) SADF/ADF Size: A3 – A5R, or LD – STR Weight: 60~90g/m2(16~24 Lbs) Kind: High quality paper A4, A4R, B5, B5R, A5R, LT, LTR, STR: 60 sheets B4, LG, COMP, FOLIO: 35 sheets A3, LD: 30 sheets Setup method: The final page is at the bottom, and the front surface is up. Paper fee d method: The paper at the bottom (the last page) is fed first to the copy section. Paper exit method: The last page is put in face-up, and the others are stacked on it. Center reference Supplied from the copier. Allowable original Original capacity Original process method Original position Power source Y. Auto duplex function (1) Auto duplex function Applicable paper Paper conditions Capacity Separation system Transfer reference Load system Refeed system Refeed process speed Jam process system Stack quantity SPECIFICATIONS Standard provision Size Weight A3,A4,A4-R,B4,B5,B5-R,A5-R LD,LG,LT,LT-R,ST-R 64 80g/ m2(17~22 Lbs) Curl level 5mm or less A4,A4R,B5,LT,LT-R:60 sheets A3,B4,LD,LG,COMP,FOLIO,B5-R,A5-R,ST-R:35 sheets Separation belt system Center reference Face-down Take-up from the bottom A4,B5,A5-R,LT,ST-R:65cpm A4-R,B5-R,LT-R:51cpm B4,LG:44cpm A3,LD:38cpm Open the front cover and pull out the unit. Remove all paper in M/C. 1 set 1 - 10 Z. Reverse paper exit function Reverse paper exit Process speed Applicable paper Paper conditions Use conditions Available A4,B5,A5-R,LT,ST-R:65cpm A4-R,B5-R,LT-R:45cpm B4,LG:36cpm A3,LD:30cpm Size A3,B4,A4,A4-R,B5,B5-R,A5-R LD,LG,LT,LT-R,ST-R Weight 64~80g/m2 17~22 Lbs Curl level 5mm or less (Paper feed section) 20mm or less (Refeed section) In duplex paper exit of the first set in Single ➔ Duplex mode, with an odd number of the quantity of originals. 4 Picture and picture quality specifications A. Picture quality Picture density Background copy Resolution Magnification ratio error Lead edge shift Side shift Inclination 1.0 or above Original density: 1.0 3.0 or less Normal: Vertical 4.0mm or above/Horizontal 4.0mm or above Enlargement 200%: Vertical 4.5mm or above/Horizontal 4.0mm or above Reduction 50%: Vertical 2.0mm or above/Horizontal 1,7mm or above Normal: ± 1.0% Enlargement 200%/Reduction 50% ± 1.5% Body 0±2mm, system 0 ±4.0mm Body 0±3.0mm, system 0 ±4.0mm Body 1.0mm or less, system 3.0mm or less/200mm 1 - 11 SPECIFICATIONS 1.2 Accessories Operation Manual Drum Operation Manual Pocket Original feed tray Maintenance management table (Card, sheet) Delivery installation contract (EU only) MSDS card (USA,UK only) Warranty for Australia Warranty registration (EU only) 1.3 Options MODEL ITEM NOTE Finisher AR-FN8 Finisher AR-FN9 Finsher with Saddle Stitching Punch unit AR-PN2A 2 holes (80mm pitch) Europe AR-PN2B 2 holes (70mm pitch) 3 holes (108mm pitch) USA/Canada AR-PN2C 4 holes (80mm pitch) France AR-PN2D 4 holes (70/21mm pitch) Printer kit Sweden AR-P13 Network Card(NIC) AR-NC4T Memory AR-SM3 Expansion Memory for Printer 1.4 Supplies USA/CANADA No. 1 Name Toner (Black) Content Toner (AR-650NT) Life MODEL Pack Remark 240K AR-650MT 1 *Life: By A4 6% documents. Toner: Net 1500g: 60K 2 Developer (Black) (MT=NT x 4) Developer 400K AR-650ND 4 400K AR-650DR 10 (Developer: Net 1500g: 400K) 3 Drum Drum Note 1) Print on Master/individual carton: Toner/Developer in 2 languages (English/French), DR in 4 languages (English/French/German/Spanish). Packed with machine: DR 400K/Developer 400K OTHER COUNTRY No. 1 Name Toner (Black) Content Toner (AR-650T) Life MODEL Pack Remark 240K AR-650LT 1 *Life: By A4 6% documents. Toner: Net 1500g:60K 2 Developer (Black) (LT=T x 4) Developer 400K AR-650DV 4 400K AR-650DM 10 (Developer: Net 1500g: 400K) 3 Drum Drum Note 1) Print on Master/individual carton: 4 languages (English/French/German/Spanish). Packed with machine: DR 400K/Developer 400K SPECIFICATIONS 1 - 12 No. ITEMS 1 Maintenance Kit 1 2 Maintenance Kit 2 3 Fusing Kit 4 DF Kit 5 CONTENTS Drum cleaning Blade Drum Separation Claw Drum Cleaning Roller Charger Wire (Main) Charger Wire Cleaning Pad Charger Grid Transfer belt Transfer belt charger roller Transfer belt brush roller Transfer belt cleaning blade Ozone filter Air filter (toner filter) Pick up roller for large capacity feeder Feed roller for large capacity feeder Separation roller for large capacity feeder Heat roller upper Heat roller lower Heat roller scraper (upper) Heat roller silicone roller (upper) Heat roller cleaning roller Heat roller cleaning roller (lower) Heat roller cleaning roller (silicon roller ) (lower) Picck up roller for Auto document Feeder Feed roller for auto document feeder Separation roller for auto document feeder Transport belt for auto document feeder Waste toner bottle x1 x2 x1 x1 x1 x1 x1 x1 x1 x1 x1 x1 x1 x1 x1 x1 x1 x1 x1 x1 x1 x1 x1 x1 x1 x1 x4 LIFE MODEL Pack 400K AR-650KA 1 400K AR-650LC 1 400K AR-650FU 1 400K AR-650DF 1 Waste toner bottle AR-650HB Stapler for Finisher Staple Cartrige x1 5000x3 SF-SC11 5000 sheets Stapler for Finisher Staple Cartrige x1 5000x3 SF-SC3 7 2000 sheets Note: Maintenance parts other than above items must be ordered through the parts department using the proper part number. 6 Remark 1 20 Cartridge for AR-FN8 and AR-FN9 Common with S55,S55N 40 (For AR-FN9 Saddle Stitch) 1.5 System List Staple cartridge Finisher AR-FN8 AR-FN9 Supplies Drum Developer Toner bag Toner 1 - 13 SPECIFICATIONS 2. OUTLINE OF THE MACHINE 2.1 Sectional Views and Electrical Parts Location Diagram 2.1.1 Sectional View [A] Front views of copiers excluding drive systems 1 13 14 5 10 4 6 3 2 9 12 11 29 31 30 7 34 8 23 24 19 17 15 16 120 28 121 26 18 20 67 32 33 117 112 115 113 116 21 27 114 25 66 22 122 37 68 38 41 40 39 109 49 71 36 35 70 48 50 51 108 118 123 119 55 54 69 74 111 110 53 72 52 42 56 44 47 45 43 46 73 57 80 58 65 64 59 60 61 62 63 82 75 105 83 92 84 90 76 104 85 87 103 101 97 99 100 102 2-1 96 94 93 91 89 107 106 77 OUTLINE No. Name No. Name 1 Carriage 1 39 Transfer belt 2 Mirror 1 40 Transfer belt drive roller 3 Reflector 41 Transfer belt cleaning brush 4 Exposure lamp 42 Transfer belt/toner recovery auger 5 Thermostat 43 Transfer belt power supply roller 6 Carriage 2 44 Lower damp heater 7 Mirror 2 45 Lower damp heater cover 8 Mirror 3 46 Transfer belt follower roller 9 CCD drive PC board 47 Transfer belt separation auxiliary roller 10 Scanner control PC board 48 Exit roller 11 Lens 49 ADU/eject selector gate 12 Original glass 50 ADU/reversal transport roller 13 Scanner optical cooling fan 51 ADU/ reversal selector gate 14 SLG board cooling fan 52 TR1 sensor 15 Toner empty detection lever 53 Empty sensor 16 Toner hopper 54 Holding gate 17 Toner stirrer lever 55 ADU inlet/reversal roller 18 Toner empty switch 56 Separation belt 19 Spiral shaft 57 Feed sensor 20 Toner transport auger unit 58 Aligning sensor 21 Upper magnetic roller 59 ADU/aligning roller 22 Lower magnetic roller 60 Feed roller 23 Transport roller 61 Pick-up roller 24 Leveler 62 Paper transport roller 1 25 Mixer 1 63 Paper transport roller 2 26 Mixer 2 64 Paper transport roller 3 27 Supply/recovery paddle 65 Paper transport roller 4 28 Auto-toner sensor 66 Manual pickup roller 29 Fur brush 67 Manual feed roller 30 Main blade 68 Manual feed separation roller 31 Discharge LED 69 LCF paper empty switch (S26)/tray up switch (S39) 32 Main charger 70 Manual feed tray 33 Main charger wire cleaner 71 LCF feed roller 34 Drum 72 LCF pick-up roller 35 Toner adhesion sensor 73 LCF separation roller 36 Separation claw 74 Aligning roller 37 Toner recovery auger 75 Elevator tray 38 Recovery blade 76 LCF (large capacity feeder) OUTLINE 2-2 No. Name No. Name 77 Tray bottom switch (S40) 104 Middle cassette 80 PFP upper aligning roller 105 Upper cassette 82 PFP upper feed roller 106 Wire rewind roller 83 PFP middle aligning roller 107 Tray motor (M30) 84 PFP upper paper switch (S28) 108 Lower heat roller 85 PFP upper separation roller 109 Thermostat 87 PFP lower aligning roller 110 Cleaning roller 3 89 PFP middle paper start switch (S32) 111 Lower separation claw 90 PFP middle separation roller 112 Upper separation claw 91 PFP lower paper start switch (S36) 113 Heater lamp 92 PFP middle feed roller 114 Upper heat roller 93 PFP lower separation roller 115 Cleaning roller 1 94 PFP lower Feed roller 116 Cleaning roller 2 96 PFP lower pick-up roller 117 Exit roller 97 Upper elevator 118 Exit switch (S10) 99 PFP middle pick-up roller 119 Cleaning roller 4 100 Middle elevator 120 Manual feed inlet fan 101 PFP upper pick-up roller 121 System fan 102 Lower elevator 122 Laser unit fan 103 Lower cassette 123 Transfer belt cleaning blade 2-3 OUTLINE [B] Front Drive System 126 127 125 136 128 130 132 129 133 137 138 131 134 135 139 140 141 No. Name No. Name 125 Cleaning roller 2 134 Gate solenoid 126 Cleaning roller 1 135 End guide motor (M8) 127 Upper heat roller 136 Side guide motor (M9) 128 Belt for the toner auger (M15) 137 ADU inlet/reversal roller 129 Main cleaning motor (M11) 138 Forward rotation clutch 130 Toner recovery auger 139 Reversal clutch 131 Toner transport auger 140 Holding gate solenoid 132 Fur brush 141 Transport roller clutch 133 Transport roller (G23) OUTLINE 2-4 [C] Rear Drive System 150 149 148 146 145 147 204 206 205 208 156 153 152 155 154 157 159 158 160 207 176 163 151 200 175 177 209 162 199 198 167 178 197 201 203 202 161 169 168 164 196 195 165 194 174 193 173 172 171 170 166 192 179 191 180 181 190 182 189 183 184 186 185 188 187 2-5 OUTLINE No. Name No. Name 145 Scanning motor (M1) 178 Toner transport motor (M15) 146 Drive belt 179 PFP upper feed roller 147 Drive pulley 180 Upper feed roller clutch (CL6) 148 Follower pulley 181 PFP upper separation roller 149 Drive wire 182 PFP middle feed roller 150 Toner motor (M14) 183 Middle feed roller clutch (CL10) 151 Toner transport auger 184 PFP middle separation roller 152 Developer motor (M16) 185 Lower feed roller clutch (CL11) 153 Paddle 186 PFP lower feed roller 154 Upper magnetic roller 187 PFP lower separation roller 155 Lower magnetic roller 188 Pedestal motor (M31) 156 Mixer 189 Lower aligning roller clutch (CL9) 157 Drum motor (M12) 190 PFP lower aligning roller 158 Drum pulley (Drum) 191 Middle aligning roller clutch (CL8) 159 Drum drive belt 192 PFP middle aligning roller 160 Belt transport unit drive motor (M25) 193 Upper aligning roller clutch (CL7) 161 Belt transport unit contact/release cam motor (M26) 194 PFP upper aligning roller 162 Exit roller 195 LCF separation roller 163 ADU/reversal transport roller 196 LCF pick-up roller 164 Coupling 197 Feed motor (M32) 165 Aligning clutch 198 Manual feed separation roller 166 Aligning roller 199 Manual pick-up roller 167 ADU motor 200 Manual feed roller 168 Feed clutch 201 LCF feed roller 169 Separation belt 202 Aligning rollers 170 Feed roller 203 Aligning motor (M17) 171 Paper transport roller 1 204 Slot exhaust fan (M23) 172 Paper transport roller 2 205 Exit fan (M19) 173 Paper transport roller 3 206 Heater fan (M20) 174 Paper transport roller 4 207 Reversal fan (M27) 175 Upper heat roller pulley 208 Duct in fan (M22) 176 Fuser drive belt 209 Developer fan (M23) 177 Heat roller motor (M18) OUTLINE 2-6 2-7 Empty sensor Separation pad Feed cover switch Aligning sensor 4 5 6 7 Size sensor lever Empty sensor lever 3 9 Weight 2 Size sensor Pick-up roller 8 11 Name 1 No. 9 8 7 5 10 12 6 4 2 1 Transport belt Belt holding roller 18 Belt holding roller DF open switch 17 16 15 Belt drop roller Belt drive roller 13 14 Feed roller Aligning roller Timing sensor 17 12 11 10 No. 13 14 15 16 3 Name 18 16 20 Exit sensor 22 26 25 24 Name 24 22 Transport belt cleaning brush Exit roller Flapper Exit cover switch Reversal roller 23 21 25 Belt follower roller APS switch 18 21 20 19 No. 19 26 23 [D] Sectional View of Automatic Document Feeder OUTLINE 2.1.2 Electrical parts layout [A] Configuration of Units S ne can r un er Upp nit mu e t s Sy it er Las t unit AD er Low uni U unit Rear side OUTLINE 2-8 [B] Scanner Unit (B-1) PC board 2 1 3 Scanner unit Rear side No. 1 2 3 Name CCD drive PC board (PWA-F-CCD-300) Scanning optical system control PC board (PWA-F-SLG-300) Scanning motor drive PC board (PWA-F-SDV-300) 2-9 Symbol CCD SLG SDV OUTLINE (B-2) DC electrical parts (except motors, PC boards) [A4 series] 1 2 Scanner unit Rear side No. 1 2 Name Automatic paper size detector (APS1-6) Home switch (HOME-SW) Symbol S1-6 S2 [LT series] 1 2 Scanner unit Rear side No. 1 2 OUTLINE Name Automatic paper size detector (APS1-4) Home switch (HOME-SW) 2 - 10 Symbol S1-4 S2 (B-3) Motors 3 4 2 1 Scanner unit Rear side No. 1 2 3 4 (B-4) Name Scanning motor (SCN-MOT) Document motor (DCM-MOT) Scanning optical system cooling fan motor (OPT-FAN-MOT) SLG PC board cooling fan motor (SLG-FAN-MOT) Symbol M1 M2 M3-1,-2 M4 AC electrical parts 5 6 4 2 1 3 Scanner unit 7 No. 1 2 3 5 6 7 Name Damp heater (M) (D-HTR-M) Damp heater (L) (D-HTR-L) Fuse PC board (PWA-F-FUS-351) Thermostat (85°C) Exposure lamp (EXPO-LAMP) (EXP) Lamp regulator PC board (PS-LRG-300) 2 - 11 Rear side Symbol DHM DHL FUS THMO EXP LRG OUTLINE [C] Laser Unit (C-1) PC boards 2 3 4 4 1 Laser unit 4 Rear side 4 No. 1 2 3 4 (C-2) Name PLG PC board (PWA-F-PLG-300) Polygon mirror motor drive PC board (M/A-DRV-POL-300) Sensor PC board (PWA-F-SNS-300) Laser PC board (K-PWA-F-LDR-300) Symbol PLG POL SNS LDR Electrical parts (except motors, PC boards) 1 1 1 1 Laser unit Rear side No. 1 OUTLINE Name Galvanomirror (ASM-GALVA) 2 - 12 Symbol GLV (C-3) Motors 1 2 Laser unit Rear side No. 1 2 Name Symbol M5 M6 Polygon mirror motor (POL-MOT) Laser unit fan (LSU-FAN-MOT) [D] System Unit (D-1) PC boards System unit 4 1 2 3 Rear side 5 No. 1 2 3 4 5 Name System PC board (PWA-F-SYS-300) Mother board (PWA-F-MTB-300) Hard disk (HDD) LAN printer board or SCSI board (option) NIC board (option for LAN printer board) 2 - 13 Symbol SYS MTB HDD LAN or SCSI NIC OUTLINE (D-2) Motor 1 System unit Rear side No. 1 Name Symbol M7 System fan motor (FAN-SYS) [E] ADU (E-1) PC board 1 Rear side ADU No. 1 OUTLINE Name ADU PC board (PWA-F-ADU-300) 2 - 14 Symbol ADU (E-2) DC electrical parts (except motors, PC boards) 8 7 5 9 10 6 4 3 11 12 2 1 13 Rear side ADU No. 1 2 3 4 5 6 7 8 9 10 11 12 13 Name Transport switch (TR2-SW) End switch (END-SW) Transport switch 1 (TR1-SW) Transport clutch (TR-CLT) Reverse clutch (REV-CLT) Guide solenoid (GID-SOL) Stack clutch (STK-CLT) Feed switch (FED-SW) Empty switch (EMP-SW) Aligning switch (RGT-SW) Aligning clutch (RGT-CLT) Feed clutch (FED-CLT) Side switch (SID-SW) 2 - 15 Symbol S3 S4 S5 CL1 CL2 SOL1 CL3 S6 S7 S8 CL4 CL5 S9 OUTLINE (E-3) Motors 1 2 Rear side ADU No. 1 2 OUTLINE Name End guide motor (END-MOT) Side guide motor (SID-MOT) 2 - 16 Symbol M8 M9 [F] Upper Unit (F-1) PC board 1 Upper unit No. 1 Rear side Name Motor control PC board (PWA-F-MOT-300) 2 - 17 Symbol MOT OUTLINE (F-2) DC electrical parts (except motors, PC boards) 1 17 14 13 2 21 10 3 15 4 5 6 19 18 16 12 Upper unit 7 20 9 11 Rear side 8 No. 1 2 3 4 5 6 7 8 9 10 11 12 13 14 15 16 17 18 19 20 21 OUTLINE Name Fuser exit switch (EXIT-SW) Scraper solenoid (SOL3) Toner supply sensor (TNR-HOP-SW) Auto toner sensor (SNR-ATC-300) Toner empty sensor (TNR-EMP-SW) Paper stop switch (P-STP-SW) Developer switch (DEV-SW) Toner full switch (T-FULL-SW) Main cleaning switch (CLN-M-SW) Heat roller thermistor (THMS-HTR-300) Developer bias transformer (PS-HVT-DB-300) High-voltage power supply for main charger and transfer belt (PS-HVT-TM-300) Reversal exit switch (TRNE-SW) Reversal switch (TRN-SW) Reversal door switch (EXC-SW) Discharge LED lamp (ERS-300) Gate solenoid (GATE-SOL) Transfer belt touch switch (IR-TCH-SW) Transfer belt separation switch (TR-SEP-SW) Toner adhesion sensor Drum thermister 2 - 18 Symbol S10 SOL3 S11 ATS S12 S13 S14 S15 S16 THMSH HVT-DB HVT-TM S17 S18 S19 ERS SOL4 S43 S44 IQM THMSD (F-3) Motors 11 1 18 2 14 10 3 4 5 9 15 16 Rear side 13 7 Upper unit No. 1 2 3 4 5 6 7 8 9 10 11 12 13 14 15 16 17 18 8 6 12 Name Fur brush motor (FUR-MOT) Main cleaning motor (CLN-MOT) Drum motor (DRM-MOT) Manual inlet fan motor (SFB-FAN-MOT) Toner motor (TNR-MOT) Toner transport motor (AUG2-MOT) Developer motor (DEV-MOT) Aligning motor (RGT-MOT) Heat roller motor (HTR-MOT) Exit fan motor (EXIT-FAN-MOT) Heater fan motor (HTR-FAN-MOT) Developer fan motor (DEV-FAN-MOT)M21 Duct in fan motor (DUCT-IN-FAN-MOT) Duct out fan motor (DUCT-OUT-FAN-MOT) ADU motor (ADU-MOT) Transfer belt motor (TRB-MOT) Transfer belt cam motor (TRB-CAM-MOT) Reversal fan motor (REV-FAN-MOT) 2 - 19 Symbol M10 M11 M12 M13 M14 M15 M16 M17 M18 M19 M20 M22 M23 M24 M25 M26 M27 OUTLINE (F-4) AC electrical parts 1 8 6 7 2 9 Rear side Upper unit 5 4 3 No. 1 2 3 4 5 6 7 8 9 OUTLINE Name Door switch (DOOR-SW) Main switch (MAIN-SW) Fuse PC board (PWA-F-FUS-351) Damp heater (lower) (D-HTR-L) Thermostat Heater lamp (HTR-LAMP) Fuser thermostat (THERMO-152-FUS) EXIT door switch (EXIT-AC-SW) Fuser switch (HTR-SW) 2 - 20 Symbol S41 S42 FUS DHL-1,-2 THM-D HTR-L THM-F S45 S46 [G] Lower Unit (G-1) PC boards 2 1 Rear side Lower unit No. 1 2 Name Logic PC board (PWA-F-LGC-300) LCF PC board (PWA-F-LCF-150) 2 - 21 Symbol LGC LCF OUTLINE (G-2) DC electrical parts (except motors, PC boards) 11 8 7 6 14 13 12 25 15 16 9 31 10 17 1 3 18 29 21 23 No. 1 2 3 4 5 6 7 8 9 10 11 12 13 14 15 16 24 19 26 Name Upper feed clutch (FD2-CLT) Upper cassette switch (CST2-SW) Upper aligning clutch (RGT2-CLT) Middle aligning clutch (RGT3-CLT) Lower aligning clutch (RGT4-CLT) Manual paper width detector switch (SFB-SIZE-SW) Manual pick-up solenoid (MANUAL-SOL) Manual feed switch (M-FEED-SW) LCF switch (LCF-SW) LCF door switch (LCF-DOOR-SW) LCF paper start switch (LCF-FEED-SW) LCF paper empty switch (LCF-EMP-SW) PFP upper paper stop switch (PSTP2-SW) PFP upper paper start switch (FEED2-SW) PFP upper paper empty switch (EMP2-SW) PFP upper tray up switch (TUP2-SW) OUTLINE 27 5 28 22 Lower unit 4 2 Symbol CL6 S20 CL7 CL8 CL9 S21 No. 17 SOL5 21 S22 S23 S24 S25 22 18 19 20 23 24 S26 25 26 S27 27 28 29 30 31 S28 S29 S30 2 - 22 20 30 Rear side Name Symbol PFP middle paper stop switch S31 (PSTP3-SW) PFP middle paper start switch S32 (FEED3-SW) PFP middle empty switch S33 (EMP3-SW) PFP middle tray up switch S34 (TUP3-SW) PFP lower paper stop switch S35 (PSTP4-SW) PFP lower paper start switch S36 (FEED4-SW) PFP lower empty switch S37 (EMP4-SW) PFP lower tray up switch S38 (TUP4-SW) LCF tray up switch (T-UP-SW) S39 LCF tray bottom switch S40 (LCF-BOTTOM-SW) Middle feed clutch (FD3-CLT) CL10 Lower feed clutch (FD3-CLT) CL11 Middle cassette switch (CST3-SW) S47 Lower cassette switch (CST3-SW) S48 LCF door switch 2 (LCF-DOOR-SW) S49 (G-3) Motors 6 1 2 Rear side 3 Lower unit 5 4 No. 1 2 3 4 5 6 Name PFP upper tray motor (TR2-MOT) PFP middle tray motor (TR3-MOT) PFP lower tray motor (TR4-MOT) LCF tray motor (TRAY-MOT) Pedestal motor (PFP-MOT) Feed motor (FED-MOT) 2 - 23 Symbol M27 M28 M29 M30 M31 M32 OUTLINE (G-4) AC electrical parts 4 2 6 3 5 1 Lower unit Rear side No. 1 2 3 4 5 6 OUTLINE Name SSR Breaker Noise filter Switching power supply unit for JPD (PS-ACC-300JU) Switching power supply unit for EUR (PS-ACC-300E) Power outlet Fuse holder (FUSE -HOLDER) 2 - 24 Symbol SSR BRK NF PS POUT FHOL 2.2 Symbols and Functions of Components (1) Motors Symbol Name Function M1 SCN-MOT (scanning motor) Scans the optical system M2 DCM-MOT (document motor) Drives the copy range indicator M3 OPT-FAN-MOT (scanning optical system cooling fan motor) Cools the optical system M4 SLG-FAN-MOT (SLG PC board cooling fan motor) Cools the SLG PC board M5 POL-MOT (polygon mirror motor) Drives the polygon mirror M6 LSU-FAN-MOT (laser unit fan motor) Cools the laser unit M7 FAN-SYS (system fan motor) Cools the system unit M8 END-MOT (end guide motor) Drives the ADU paper end guides M9 SID-MOT (side guide motor) Drives the ADU paper side guides M10 FUR-MOT (fur brush motor) Drives the fur brush M11 CLN-MOT (main cleaning motor) Drives the charger wire cleaner M12 DRM-MOT (drum motor) Drives the drum M13 SFB-FAN-MOT (manual inlet fan motor) Sends air to the cleaner and charger M14 TNR-MOT (toner motor) Supplies toner M15 AUG2-MOT (toner transport motor) Transport waste toner to the toner bag M16 DEV-MOT (developer motor) Drives the developer unit and suction fans M17 RGT-MOT (aligning motor) Drives the aligning roller M18 HTR-MOT (heat roller motor) Drives the heat rollers M19 EXIT-FAN-MOT (exit fan motor) Cools paper exit M20 HTR-FAN-MOT (heater fan motor) Cools the drum and cleaner M21 DEV-FAN-MOT (developer fan motor) Used for sucking air into the developer M22 DUCT-IN-FAN-MOT (duct in fan motor) Cools the machine inside M23 DUCT-OUT-FAN-MOT (duct out fan motor) Cools the machine inside M24 ADU-MOT (ADU motor) Drives the ADU paper feed M25 TRB-MOT (transfer belt motor) Drives the transport belt M26 TRB-CAM-MOT (transfer belt cam motor) Contacts the transfer belt to the drum M27 TR2-MOT (PFP upper tray motor) Drives vertical movement of the upper tray M28 TR3-MOT (PFP middle tray motor) Drives vertical movement of the middle tray M29 TR4-MOT (PFP lower tray motor) Drives vertical movement of the lower tray M30 TRAY-MOT (LCF tray motor) Drives the LCF tray M31 PFP-MOT (pedestal motor) Drives all rollers in the feed and transport systems M32 FED-MOT (feed motor) Drives the feed roller and manual roller 2 - 25 Remarks OUTLINE (2) Solenoids Symbol Name Function SOL1 GID-SOL (guide solenoid) SOL3 SOL3 (scraper solenoid) Drives the separation claw SOL4 GATE-SOL (gate solenoid) Drives the exit/ADU switching gate SOL5 MANUAL-SOL (manual Pick-up solenoid) Drives vertical movement of the manual Remarks pick-up roller (3) Electromagnetic spring clutches Symbol Name Function CL1 TR-CLT (ADU transport clutch) Drives the paper transport of the ADU CL2 REV-CLT (ADU reverse clutch) Exits the copy in reverse CL3 STK-CLT (ADU stack clutch) Stacks the copy in the ADU CL4 RGT-CLT (ADU aligning clutch) Aligns the paper feeding of the ADU CL5 FED-CLT (ADU feed clutch) Drives the ADU paper feeding CL6 FD2-CLT (PFP upper feed clutch) Feeds the PFP upper cassette paper CL7 RGT2-CLT (PFP upper aligning clutch) Transfers drive to the PFP upper aligning roller CL8 RGT3-CLT (PFP middle aligning clutch) Transfers drive to the PFP middle aligning roller CL9 RGT4-SW (PFP lower aligning clutch) Transfers drive to the PFP lower aligning roller CL10 FD3-CLT (PFP middle feed clutch) Feeds the PFP middle cassette paper CL11 FD4-CLT (PFP lower feed clutch) Feeds the PFP lower cassette paper Remarks (4) Counters Symbol T Name T-CTR (total counter) Function Remarks Function Remarks Total counter (5) Switches Symbol Name S1-* APS1-6 (automatic paper-size detector) Detects the paper-size S2 HOME-SW (home switch) Detects the optical system home position S3 TR2-SW (transport switch) Detects a paper in the ADU transporting section S4 END-SW (end switch) Detects the end guide position of the ADU S5 TR1-SW (transport switch 1) Detects a paper in the ADU transporting section S6 FED-SW (feed switch) Detects a leading edge of the paper in the ADU S7 EMP-SW (empty switch) Detects a paper on the ADU stacking tray OUTLINE 2 - 26 Symbol Name Function S8 RGT-SW (aligning switch) Detects aligning position of the paper in the ADU S9 SID-SW (side switch) Detects the side guide position of the ADU S10 EXIT-SW (fuser exit switch) Detects exiting paper S11 TNR-HOP-SW (toner supply cover switch) Detects opening/closing of the toner Remarks supply cover S12 TNR-EMP-SW (toner empty switch) Detects a no toner state in the toner hopper S13 P-STP-SW (paper stop switch) Used for stopping the feed roller S14 DEV-SW (developer switch) Detects attachment of the developer unit S15 T-FULL-SW (toner full switch) Detects a waste toner full state S16 CLN-M-SW (main cleaning switch) Detects the position of the main charger wire cleaning pad S17 TRNE-SW (reversal exit switch) S18 TRN-SW (reversal switch) S19 EXC-SW (reversal door switch) S20 CST2-SW (upper cassette switch) Detects misplacement of the upper cassette S21 SFB-SIZE-SW (manual paper width detector switch) Detects width of the paper S22 M-FEED-SW (manual feed switch) Detects manual feed S23 LCF-SW (LCF switch) Detects attachment of the LCF unit S24 LCF-DOOR-SW (LCF door switch) Detects opening/closing of the LCF door S25 LCF-FEED-SW (LCF paper start switch) Detects the LCF feed roller S26 LCF-EMP-SW (LCF paper empty switch) Detects LCF paper empty S27 PSTP2-SW (PFP upper paper stop switch) Used for aligning paper supply from the upper cassette S28 FEED2-SW (PFP upper paper start switch) Detects paper supply from the upper cassette S29 EMP2-SW (PFP upper empty switch) Detects a no paper state in the upper cassette S30 TUP2-SW (PFP upper tray up switch) Detects rising of the upper tray S31 PSTP3-SW (PFP middle paper stop switch) Used for aligning paper supply from the middle cassette S32 FEED3-SW (PFP middle paper start switch) Detects paper supply from the middle cassette S33 EMP3-SW (PFP middle empty switch) Detects a no paper state in the middle cassette S34 TUP3-SW (PFP middle tray up switch) Detects rising of the middle tray S35 PSTP4-SW (PFP lower paper stop switch) Used for aligning paper supply from the lower cassette S36 FEED4-SW (PFP lower paper start switch) Detects paper supply from the lower cassette S37 EMP4-SW (PFP lower empty switch) Detects a no paper state in the lower cassette S38 TUP4-SW (PFP lower tray up switch) Detects rising of the lower tray S39 T-UP-SW (LCF tray up switch) Detects rising of the LCF tray 2 - 27 OUTLINE Symbol Name Function S40 T-DOWN-SW (LCF tray down switch) Detects the bottom position of the LCF tray S41 DOOR-SW (door switch) Used for ensuring safety S42 MAIN-SW (main switch) Remarks Used for switching the main power supply ON and OFF S43 S44 TR-TCH-SW (Transfer belt touch switch) Used for touching the transfer belt TR-SEP-SW Used for separating the transfer belt (Transfer belt estrangement switch) S45 EXIT-AC-SW (Exit door inter lock switch) Used for ensuring safety S46 HTR-SW (Fuser switch) Used for safety without fuser unit S47 CST3-SW (Middle cassette switch) Detects misplacement of the middle cassette S48 CST4-SW (Lower cassette switch) Detects misplacement of the lower cassette S49 LCF-DOOR2-SW (LCF door switch 2) Detects opening/closing of the LCF door (6) Heaters and lamps Symbol DHM Name Function D-HTR-M (damp heater (M)) Remarks Maintains the optical system at the preset temperature DHL D-HTR-L (damp heater (L)) Maintains the optical system at the preset temperature DHL Maintains the drum, and transfer/separation D-HTR-L (damp heater (lower)) charger case at the preset temperature HTR-L HTR-LANMP (heater lamp) Used for fusing EXP EXPO-LAMP (exposure lamp) Exposes the original LRG PS-LRG-300 (lamp regulator PC board) Controls the exposure lamp ERS ERS-300 (discharge LED lamp) Used for discharging the drum (7) PC boards Symbol Name CCD PWA-F-CCD-300 (CCD image pre-processing PC board) Control CCD image pre-processing PWA-F-SLG-300 (scanning optical Controls the scanning optical system SLG Function system control PC board) SDV PWA-F-SDV-300 Drives the scanning motor (scanning motor drive PC board) PLG PWA-F-PLG-300 (PLG PC board) Controls the laser unit POL M/A-DRV-POL-300 Drives the polygon mirror motor (polygon mirror motor drive PC board) SNS PWA-F-SNS-300 (sensor PC board) Detects the beam position LDR K-PWA-F-LDR-300 (laser PC board) Drives the laser SYS PWA-F-SYS-300 (system PC board) Whole system control and data processing OUTLINE 2 - 28 Remarks Symbol Name Function MTB PWA-F-MTB-300 (mother board) Option board connecting HDD Hard disk (HDD) Stores image data LAN or SCSI LAN printer board or SCSI board NIC NIC board Remarks Printer Option Network interface card Option for LAN printer board ADU PWA-F-ADU-300 (ADU PC board) Controls the ADU MOT PWA-F-MOT-300 (motor control PC board) Drives the drum and transport belt LGC PWA-F-LGC-300 (logic PC board) Controls the entire copier LCF PWA-F-LCF-150 (LCF PC board) Displays LCF tray, scan key and tray operations IPC (Finisher interface board) Finisher interface board (8) Transformers Symbol HVT-DB HVT-TM Name Function PS-HVT-DB-300 Generates high voltage for the developer (developer bias power supply) bias PS-HVT-TM-300 (high-voltage power supply for main charger and transfer belt) Develops high voltage for charging and transfer and the developer bias voltage Remarks (9) Other Symbol Name Function ATS SNR-ATC-300 (auto toner sensor) Senses the toner temperature by a magnetic sensor GLV ASM-GALVA (galvanomirror) Control the beam position FUS PWA-F-FUS-351 (fuse PC board) Cuts out an over current of the damp heater THMS-HTR-300 (heat roller thermistor) Detects the temperature of the heat roller SSR (SSR) Switches the heater lamp BRK Breaker Safety switch NF Noise filter Cuts out a noise signal THM-D Thermostat Protects over heating of the damp heater THMO Thermostat (85°C) Protects the exposure lamp over heating THM-F THERMO-152-FUS (fuser thermostat) Protects the fuser unit over heating PS-ACC-300JU (switching power supply unit) Supplies electrical power THMSH PS PS-ACC-300E (switching power supply unit) IQM THMSD Remarks For 100V series For 200V series (Toner adhesion sensor) Detects toner adhesion volume on the drum surface (Drum thermistor) Detects drum surface temperature 2 - 29 OUTLINE HDD LCD 2 - 30 7 8 9 PWA-DSP-300 4 5 6 1 0 2 CLR/STP 3 BT 8 Finisher IPC ADU LCF PFP PWA-F-SYS-300 LCD Controller VRAM NVRAM RTC PCI-Bus(33MHz) 32 PCI-Bus CODEC CLK SRAM Serial-I/F PFC ASIC PWA-F-MTB-300 LAN-Card (for Debug) ISA-Bus SCSI OSC (Optional Board) M-CPU Gate Array 64bit-RISC ASIC Serial-I/F NVRAM ROM SRAM PWA-F-LGC-300 Flash ROM.1 Flash ROM.1 Boot ROM SDRAM OSC Image Data DRAM SDRAM Serial-I/F I/O-Bus ADR/DAT-Bus D/A L-CPU ASIC Image Data Serial-I/F SRAM EPROM PWA-F-SLG-300 Galvano DRV Galvano DRV D/A Image Data EPROM SRAM Image Data PWA-F-PLG-300 ASIC S-CPU Serial-I/F ADR/DAT-Bus OUTLINE ADR/DAT-Bus ADF A/D A/D Amp A/D Amp Amp Amp DRV Galvanic Mirror 4 LD Laser Beam Sensor LD PWA-F-LDR-300 DRV Galvanic Mirror 3 LD PWA-F-LDR-300 DRV Galvanic Mirror 2 LD PWA-F-LDR-300 DRV PWA-F-LDR-300 Laser Unit PWA-F-CCD-300 Galvanic Mirror 1 PWM PWM PWM PWM ASIC CCD 2.3 System Block Diagram 2.4 Removal of Covers and PC Boards 2.4.1 Removal of covers [A] Right front cover (1) Open the right front cover. (2) Remove the screws on the hinges at both ends (2 screws for each). Hinge Right front cover [B] Left front cover (1) Open the right front cover, then open the left front cover. (2) Remove the top and bottom hinge brackets (2 screws for each). Hinge Left front cover [C] Lower front cover (1) Remove the intermediate and lower cassettes. (2) Remove the 3 screws. Lower front cover [D] Rear cover (1) Remove the 10 screws. (2) Remove the lower hook (3 p’ces). Rear cover Fooks 2 - 31 OUTLINE [E] Upper feed cover (1) Slide the LCF unit. (2) Remove the 2 screws. [F] Lower feed cover (1) Draw out the LCF, and remove the manual feed unit. (2) Remove the lower feed cover (3 screws, 1 connector, both sides hooks 4 pcs.). Hooks [G] Power switch cover (1) Slide the LCF unit. (2) Remove the 3 screws. Power switch cover OUTLINE 2 - 32 [H] Rear top cover on paper (feed side) and toner bag cover (1) Remove feed-side rear cover (2 screws). Feed side upper rear cover Toner bag cover (2) Remove the 2 coin screws, open the toner bag cover and remove the upper hinge screw. (3) Remove the toner bag cover from the lower hinge. Toner bag cover [I] Upper exit cover, lower exit cover, PFP exit Upper exit cover cover, front exit cover and rear exit cover (1) Remove the upper exit cover (2 screws). (2) Remove the front exit cover (3 screws). (3) Remove the rear exit cover (2 screws). Rear exit cover (4) Remove the lower exit cover (4 screws). (5) Remove the PFP exit cover (4 screws). [J] Front exit cover Lower exit cover Left top cover Left top cover (1) Remove the 2 screws. PFP exit cover 2 - 33 OUTLINE [K] Rear top cover Rear top cover (1) Remove the ADF unit. (2) Remove the 2 screws. Original glass [L] Right top cover (1) Remove the rear cover. (2) Remove the 3 screws. Right top cover [M] Toner supply cover (1) Remove the right top cover. (2) Remove the two hinges (1 screw for each), and Toner supply cover remove the toner supply cover. Hinge [N] Middle inner cover (1) Open the right and left front covers. Left inner cover Middle inner cover Right inner cover (2) Remove the 3 screws. [O] Right inner cover (1) Remove the middle inner cover. (2) Remove the 3 screws. [P] Left inner cover (1) Remove the middle inner cover. Left front cover (2) Remove the 3 screws. OUTLINE 2 - 34 Right front cover [Q] Belt transport unit right cover (1) Push down the jam release in the direction of the arrow, and draw out the belt transport unit Belt transport unit left cover Belt transport unit right cover towards you. (2) Remove the 2 screws. [R] Belt transport unit left cover (1) Remove the 2 screws. [S] PFP inner cover (1) Draw out the ADU unit. (2) Remove the 4 screws. PFP inner cover 2.4.2 Removal of PC boards Locking support Locking support [A] Logic PC board (PWA-F-LGC-300) (1) Remove the rear cover. (2) Disconnect the 15 connectors. (3) Remove the lock supports (2 pcs.) and the 2 screws, then remove the logic PC board. 2 - 35 OUTLINE Lamp regulator PC board [B] Motor drive PC board (PWA-F-MOT-300) (1) Remove the rear cover. SDV-PC board (2) Disconnect the 3 connectors. (3) Remove the lock supports (4 pcs.), then remove the motor drive PC board. [C] Lamp regulator PC board (PS-LRG-JU-300, PS-LRG-E-300) (1) Remove the rear cover. (2) Disconnect the 3 connectors. Locking support Motor driver PC board Locking support (3) Remove the 2 screws, then remove the lamp regulator PC board. [D] SDV-PC board (PWA-F-SDV-300) (1) Remove the rear cover. (2) Disconnect the 3 connectors. (3) Remove the 2 screws and then remove the SDV-PC board. [E] High-voltage transformer for main charger and transfer (PS-HVT-TM-300) High - voltage transformer for main charger / transfer (1) Remove the rear cover. (2) Disconnect the 5 connectors. (3) Remove the lock supports (2 pcs.) and the 2 screws. Then remove the high-voltage transformer for main charger and transfer. Lock supports [F] Developer bias transformer (PS-HVT-DB300) (1) Remove the rear cover. (2) Disconnect the 2 connectors. (3) Remove the 2 unit fixing screws and the earth lead fixing screws, and take out the developer bias transformer. Ground wire fixing screw OUTLINE 2 - 36 (4) Remove the PC board fastener hook, and draw Hook out the developer bias transformer. Power inner cover [G] Switching power supply unit (1) Remove the front exit cover (3 screws). (2) Remove the rear exit cover (2 screws). (3) Remove the PFP exit cover (4 screws). (4) Remove the power supply inner cover (5 screws). (5) Disconnect the 9 connectors. (6) Remove the 4 screws, and remove the switching power supply unit. Note: Claws are located on the base frame side (floor side) of the connector shown in the view A, and are difficult to see. Claw A Base frame (floor) side 2 - 37 OUTLINE [H] System PC board (PWA-SYS) Connector (1) Remove the glass holder, original glass and left top cover. (2) Remove the indicator screw, and slide the indicator to remove the scanner section lens cover. (3) Disconnect the connector from the system PC board side of the harness connecting the scanner logic PC board and the system PC board, and remove the cover on the rear side. (4) Remove the system PC board side of the harness connecting the system PC board and the PLG PC board. (5) Remove the screw fastening the system electrics unit. (6) Remove the upper exit cover, and open out the lower exit cover. (7) Remove the slot cover on the inside of the upper exit cover (15 screws). (8) Disconnect the 4 connectors from the system PC board and the 2 screws, and drive out the system electrics unit. (9) Remove the 6 screws, and draw out the system PC board in the direction of the arrow from the mother PC board. OUTLINE 2 - 38 [I] HDD (1) Remove the upper exit cover. Connector HDD (2) Remove the system electronics slot cover (15 screws). (3) Remove the screw and connector, and take out the HDD unit. (4) Remove the bracket (4 screws). 2 - 39 OUTLINE 3. COPYING PROCESS 3.1 Copying Process 2 Image processing Original exposure Scanning 3 4 Halogen lamp CCD 180 W 600 dpi, 7500-pixels Printing Semiconductor laser Pw = 4.7 nJ/mm2 1 Charger Toner –650V 10 Carrier Discharger LED array – – Wavelength 660 nm x 16 – 5 – 9 Blade cleaning – – – – – 8 – Fur brush cleaning + + Development + + – Magnetic roller + + + + Bias –400 VDC+AC – – – – – Paper exit ~ ~ 7 Fixing – – ++++ Heat roller Separation/Transfer • 700 W x 1 50 µA • 600 W x 1 Manual paper supply (100 sheets) LCF 6 (4000 sheets) PFP Cleaning brush + Blade (500 sheets each) 5 µA 1 Charging: Negatively charges the surface of the 6 Transfer/separation: Transfers the visible image from the drum onto the transfer (copy) sheet. photosensitive drum. 2 Original exposure: Images are converted to Simultaneously separates the transfer sheet and toner from the drum. optical signals. 7 Fixing: Fixes the toner on the transfer sheet by 3 Scanning: Image optical signals are converted applying heat and pressure. to electrical signals. 8 Fur brush cleaning: Dirt and paper dust is 4 Printing: Image electrical signals are converted cleaned from the drum. to optical signals (for laser emission) and ex9 Cleaning: Mechanically removes any remain- posed on the photosensitive drum. ing toner on the drum. 5 Development: – toner adheres to the surface of the photosensitive drum and forms a visible 10 Discharger LED array: Discharges any remain- ing – charge from the drum. image. 3-1 COPYING PROCESS 3.2 Details of Copying Process (1) Photosensitive Drum The photosensitive drum has two layers, an outer and an inner layer. The outer layer is a semi-conductive layer. It uses an organic pho- Photoconductive layer Base toconductive carrier (OPC) material. The inner layer is Aluminum and is a conductive material. The resistance of the drum's semi-conductive Structure of the photosensitive drum outer layer changes depending on the strength of the incident light. Time (t) • When the incident light is strong, its resist- • When the incident light is weak, the resistance increases and the photosensitive drum becomes an insulator. Formation of “Latent Image” is performed in the following manner. The minus (negative) poten- 0 Surface potential (V) ance decreases and the photosensitive drum becomes a conductor. Black area of original – 500 tial on the drum surface, corresponding to the black areas of the original document, are removed (neutralized) by light from the scanner/ optics system while the minus charge remains on the surface of the drum corresponding to the white areas of the original document. The White area of original – 1000 Discharge Charging process process Electric potential of the photosensitive drum resultant image (which the human eye cannot see) is called “Latent Image.” Main charger (2) Charging Charging is the process of uniformly applying a charge to the surface of the photosensitive drum. The minus (negative) electrostatic charge pro- Rotation of drum duced by the charge corona assembly is applied to the charge corona “grid.” Its purpose is to produce a uniform minus (negative) electrostatic charge across the photosensitive drum surface. The Grid Control Circuit that is part of the Discharge Transformer ultimately determines the voltage potential on the drum surface. (See illustration) COPYING PROCESS 3-2 Discharge transformer Grid control circuit (3) Scanning Scanning is the process of directing light at the original document. Part of the scanning proc- CCD board ess is the conversion of reflected light (from the original document) into electrical signals. Scanner control PC board The Charged Coupled Device (CCD) receives light from the optics area and converts them Image processor into electrical signals that are sent to the Image Processing System for further processing Logic PC board into digital signals. (Example) Light intensity at the CCD photodetector Value of signals to be output Light 255 Dark 0 (differ Contrast ences in light and dark) is divided into 256 steps. (4) Printing (Latent Image forming) Image processor Printing is the process of converting image signals (from the image processor) into optical LGC Printing control PC board signals and then directing these signals towards the photosensitive drum via a laser unit. This action produces an electrostatic latent image on the surface of the drum. Polygonal mirror Semiconductor laser Photosensitive drum 3-3 COPYING PROCESS (5) Development Magnetic roller Drum Development is the process of converting the electrostatic latent image into “visible image.” The developing agent is “brushed” unto the surface of the photosensitive drum by means of magnetic roller(s). The developing agent, commonly called “developer,” is coated with toner (which has a minus/negative charge). Toner is attracted to the latent image on the drum surface on the areas whose surface potential is lower than the developer bias voltage of the magnetic roller. At this point, the latent image becomes developed image. Intermediate tones White background Black solid Magnet Magnetic roller Toner Carrier (always attracted on to the magnet) White background Toner Image is not developed by bias potential – 650V When the d potential of the photosensitive drum is higher than the developer bias: Bias voltage –400 VDC Bias Image is developed by toner voltage – 400V Toner When the d potential of the photosensitive drum is lower than the developer bias: – 300V – 200V – 100V Drum Photoconductor layer 0 Aluminum base • About Developing Agent Carbon (5 ~ 10%) Two materials comprise the Developing Agent (developer): the toner material and the Ferrite carrier material. The toner has a minus (nega5 ~ 20 µm tive) charge applied to it and the developer, a plus polarity (positive charge). Mixing and agitating the carrier material during the mixing process produces electrostatic charge of the material. This action produces a plus polarity (positive charge) on the carrier maCOPYING PROCESS 3-4 Resin (90 ~ 95%) [Toner] 30 ~ 100 µm [Carrier] terial. Toner, which has a minus (negative) charge, adheres to the carrier material and producing what is commonly referred to as “developer.” Toner is a material mainly made with plastic and carbon materials. Carrier is ferrite beads with a coating layer for the reason of the stabilization of the frictional charge with toner. Note: If the developer material is used for long periods (beyond its normal life span), toner will become stuck to the carrier. Toner Carrier ↓ The carrier’s (charging) performance is lowered. Result: 1. Image density is lowered. 2. Toner scattering occurs. 3. Fogging occurs. Solution: Exchange the developer material. Where toner has settled, no frictional electrification occurs. • Magnetic roller - Magnetic brush development The South and North poles are arranged, as Lines of magnetic force tacts the drum forming a brush. S shown in the figure on the right inside the magnetic roller. The developer material con- N S Drum This is caused by the lines of magnetic force between the South and North poles. Magnetic roller 3-5 COPYING PROCESS (6) Transfer/Separation The transfer process transfers the developed Drum image onto the surface of the copy paper. • Paper passing under the drum is held in contact to the belt by static electricity produced by the transfer belt. onto the paper. Transfer belt • Separation is accomplished shortly after transfer begins. Paper 1. Transfer Plus bias is applied to the power supply m u r Dr laye um e n i Alumubstrat r laye of s ive t i s n tose Pho roller, and the transfer belt is charged to have a plus bias. This causes an electric field (E) to form between the transfer belt (plus charge) and the aluminum layer E Toner Paper (earth) of the drum substrate. This, in turn, polarizes the paper as shown in the figure. ower s P (minus charge) and the polarization charge (plus charge) on the top surface of the pa- Transfer belt ply ro up ller Tone is transferred to the paper by electrostatic attraction acting between the toner per. 2. Separation The paper is held in contact against the belt and separated from the drum by electrostatic attraction acting between the belt (plus charge) and the polarization charge (minus charge) on the bottom surface of the paper. Reference Separation claw • Combined use of transfer belt and separation claw. To prevent the copy paper from failing to be separated during the operation, due to incomplete Rotation of drum transfer belt charging or absorption of moisture, and thus jamming up the cleaner, a separation claw mechanically separates any copy paper which fails to be separated. Paper movement Transfer belt COPYING PROCESS 3-6 (7) Fixing Toner is melted into the fibers of the paper with the application of heat and pressure. Method: Melting point of the toner is 100°C. Upper heat roller Paper ~110°C. ↓ Heat: The upper (heat) roller applies the required heat that melts the toner. plus Pressure: Pressure The pressure (lower) roller applies pressure that fixes the melted toner into the fibers of the paper. Upper heat roller The combination and the function of the two rollers accomplish the Heater lamp Separation claw Direction of paper movement fixing process of the fusing system. (Pressure) Lower heat roller (8) Cleaning This process cleans the surface of the drum. It also collects the residual toner. Main blade The following two processes are carried out: (1) The fur brush scrapes of excessive toner and paper scraps. (The flicker scrapes off toner from the Rotation of drum brush.) (2) Residual toner on the drum is scraped off. Fur brush The drum surface is cleaned. Flicker Recovery blade 3-7 COPYING PROCESS (9) Discharge This process electrically discharges any residual electrostatic charge left on the surface of the drum. If not removed, an uneven charge is placed on the drum surface that will affect the print quality of the next copy. Double imaging will occur. Method: A discharge LED array illuminates the entire surface of the drum. The drum becomes a conductor and all residual charges will be grounded. All electrostatic charges are removed at this time. The drum therefore is prepared to take on a new charge. COPYING PROCESS 3-8 Discharge LED array Drum 3.3 Copying Process Conditions AR-650 Process 1. Drum AR-650DR, AR-650DM (OPC drum) (1) Sensitivity (1) Highly sensitized drum (2) Surface potential 2. Main charger *(2) -650 V (grid voltage -720 V) Scolotron system Variable grid output (input 0 to 255 is set up on control panel numerical keypad) 3. Exposure (1) Light control (1) Automatic exposure + 11-step LCD setting (2) Light source (2) Laser scan (Adjustment not needed) 4. Image density control Toner adhesion volume sensor 5. Development (1) Magnetic roller (1) Two magnetic rollers (2) Auto-toner (2) Magnetic bridge-circuit system (3) Toner replenishment (3) Toner hopper system (4) Toner-empty detection (4) Density sensing system/lever joint use (5) Toner (5) AR-650MT, AR-650LT (6) Developer material (6) AR-650MD, AR-650LD (7) Developer bias *(7) DC-400 V + AC 6. Discharge before cleaning None 7. Transfer bias None 8. Transfer Transfer belt system 9. Separation Static electricity separation by transfer belt Separation claw applied 10. Discharge LED (red) (*) Digital copiers of the AR-650 have a maintenance of image quality, so the values of Drum surface potential and Developer bias are changed in response to the image quality based on the adjustment value. 3-9 COPYING PROCESS Process AR-650 11. Pre-cleaning discharge None 12. Cleaning (1) System (1) Blade system + brush (2) Recovered toner (2) Non-reusable 13. Fur brush bias Earth 14. Fixing (1) System • Fixing (1) Long-life heat roller system • Upper heat roller: Teflon-coated roller (ø60) (lamp rating: 700 + 600W) • Pressure (2) Cleaning • Lower heat roller: PFA tube roller (ø60) (without lamp) (2) • Upper heater roller cleaning roller (Cleaning roller 1) (ø33) • Cleaning felt roller (Cleaning roller 2) (ø27) • Lower heat roller cleaning felt roller (Cleaning roller 3) (ø28) • Cleaning metal roller (Cleaning roller 4) (ø29) (3) Heater temperature control (3) ON/OFF control by thermistor (upper/lower roller independent temperature control) 15. Control Microcomputer control 16. Drive system Separated independent drive by DC motor COPYING PROCESS 3 - 10 4. COPIER OPERATION 4.1 Operation Outline Copier operation Operation during warm up and standby Automatic feed copying using PRINT key Copying operation Bypass-feed copying Interrupt copying 4.2 Description of Operation 4.2.1 Warming up (1) Initialize operation • The main switch is turned ON. • The heater lamp is turned ON. • Copy quantity indicator “1” and “WAIT WARMING UP” are displayed. • Fan • Initialization of the scanning optical system ~ The carriages move to their home positions and then stop. ~ The carriages move to the peak detection position. ~ The halogen lamp is turned ON. ~ The peak is detected. (white color detection of the shading correction board) ~ The halogen lamp is turned OFF. ~ Original size indicators are initialized and move to a position indicating the copy area. • Initialization of the paper feed section ~ Each slot’s cassette trays move upward. ~ The ADU (auto-duplexing unit) guides move to the maximum size position after their home position is detected. • Initialization of laser optical system ~ The polygon mirror is rotated. ~ The beam position is controlled. • Other ~ The main charger cleaner operates. (2) Pre-running operation When the heater reaches a preset temperature, the pre-run operation is carried out. (This operation is not carried out if the heat roller is sufficiently hot.) • The fuser unit rotates. • The drum rotates. ~ The drum motor, fur brush motor and auger motor turns ON. • Maintenance of image control ~ A patch is formed on the drum, and the reflectivity of this patch is read so that the optimum conditions are set. • This operation stops after 2 minutes of operation. 4-1 COPIER OPERATION (3) When the heat roller temperature is sufficient for fixing, • The heater lamp is turned OFF. • Copy quantity indicator “1” and “READY” are displayed. 4.2.2 Standby (ready) • All keys on the control panel are operable. • When there is no key input for a set amount of time. ~ The copy quantity “1” is indicated, the reproduction ratio indicates “actual size”, and the exposure is set to automatic. 4.2.3 Automatic feed copying using the START key (1) The START key is pressed to ON. • “READY” changes to “COPYING”. • The main charger, developer bias and discharge lamp turns ON. The fans operate at high speed. • The drum, transfer belt, fuser and developer are running. (2) Cassette feeding • The PFU motor and feed clutch on the feed trays turn ON. ~ The pick-up roller, paper feed roller, separation roller and transport roller start to rotate. • Paper reaches the transport roller. ~ The paper stop switch of the paper feed tray turns ON. • After a set amount of time, the feed clutch is turned OFF. • Paper reaches the aligning roller. ~ The aligning switch is turned ON, and the aligning operation is carried out. • After a set amount of time, the feed roller stops rotating. (3) Carriage operation • The exposure lamp is turned ON. → White shading compensation is carried out. • The scanning motor is turned ON. → Carries 1 and 2 start to advance. • At this time, if the toner density of the developer material is lower than the set value, the copier enters the toner supply operation. (4) After a set time lag after the carriage operation: • The aligning motor is turned ON. → Paper is sent to the transfer unit. • The counter is incremented. (5) Shortly after the aligning motor is turned ON: The transfer charge come ON. (6) Termination of carriage scanning • The scanning motor is turned OFF. • The exposure lamp is turned OFF. • The aligning motor is turned OFF (after the trailing edge of the paper exits the aligning roller). COPIER OPERATION 4-2 (7) Exit operation • The exit switch detects the passing of the paper’s trailing edge. • The main charger, developer bias and discharge lamp turns OFF. • Operation of the drum, transfer belt, fuser unit and developer unit stops. The fans return to standby mode rotation. • The copier displays “READY” and enters the standby mode. 4-3 COPIER OPERATION 4.2.4 Bypass-feed copying (1) A sheet of paper is inserted through the bypass guide. • The manual feed switch is turned ON. ~ “READY FOR BYPASS FEEDING” is displayed. • Carriages move to their home positions. (2) The START key is pressed • “READY FOR BYPASS FEEDING” changes to “COPYING”. • The main charger, developer bias and discharge lamp turns ON, and the fans rotate at high speed. • The drum, transfer belt, fuser and developer unit are running. (3) Sheet-bypass feeding • The manual pickup solenoid turns ON and the LCF motor rotates in reverse. ~ The manual feed roller is lowered. ~ The manual feed roller, paper feed roller, and separation roller are running. • Aligning operation • Paper reaches the aligning roller. • After a set time lag, the manual pickup solenoid and LCF motor turns OFF. ~ Paper feeding is terminated. (4) Same as operation (3) through (6) of automatic feed copying using the START key. 4.2.5 Interrupt copying (1) The INTERRUPT key is pressed. • The interruption LED is turned ON. • The copying operation is temporarily halted and carriages-1 and -2 return to their home position. • “JOB INTERRUPTED JOB 1 SAVED” is displayed. • The copying mode is set to automatic exposure and 1-to-1 reproduction ratio. The copy quantity indicator remains unchanged. (2) The preferred copying modes are specified. (3) After interrupt copying is terminated: • “PRESS INTERRUPT TO RESUME JOB 1” is displayed. • When the INTERRUPT key is pressed again, the interrupt lamp goes OFF and the copier returns to the conditions before the interruption. • “READY TO RESUME JOB 1” is displayed. (4) The START key is pressed. The copying operation before the interruption is resumed. COPIER OPERATION 4-4 4.3 Fault Detection If a fault occurs in the copier, a symbol corresponding to the type of fault will be displayed in order to draw the attention of the operator. 4.3.1 Classification of faults A) Faults which can be cleared without resetting the door switch. (1) ADD PAPER (2) BYPASS MISFEED (3) ADD TONER (4) REPLACE TONER BAG B) Faults which cannot be cleared without resetting the door switch. (1) CLEAR PAPER (2) DEVELOPER UNIT MISLOADING C) Faults which cannot be cleared unless the main switch (S1) is turned OFF. (1) CALL SERVICE 4.3.2 Explanation of faults A-1) ADD PAPER [In the case of the copier and PFP cassettes] (When the cassette is not installed) Detects the absence of the cassette tray. ↓ When the cassette is not installed: When the cassette is installed but there is no paper in the cassette: → Paper empty status. ↓ Signal sent to control circuit. ↓ The ADD PAPER display will flash. ↓ *The START key will not function. 4-5 COPIER OPERATION [In the case of the Copier and LCF and the pedestal] (When the cassette is installed) By combining the operation of the tray motor and the condition of the tray-up switch and the empty switch, the CPU detects whether or not there is paper. • When the power is turned ON or when the LCF door is opened/closed (for the pedestal: when the power is turned ON or when the cassette is loaded) ~ The PFC (Paper Feed Controller) causes the LCF to initialize. ↓ Detects whether or not there is paper Tray motor comes ON ~ The tray rises. At this time, both tray-up and LCF empty switches are OFF. A fixed time later, if the tray-up switch is not turned ON: → The “ADD PAPER” is displayed regardless of paper being present or not. ↔ The tray is not normal Turning OFF/ON the power clears this condition. Within a fixed time, the tray-up switch is turned ON: ~ The tray motor stops. At this time, if the empty switch is ON ~ It is determined there is paper. At this time, if the empty switch is OFF ~ It is determined there is no paper. ↓ The add paper indication blinks. • During copying, sheets of paper are fed and when the paper supply becomes low → The tray-up switch goes OFF → The PFC turns on the tray motor ~ The tray moves up. → The tray-up switch come ON → The tray motor stops. • During copying, when the empty switch goes OFF despite the tray-up switch being ON ↓ It is determined there is no paper. ↓ The add paper indication blinks. ↓ Copying stops. COPIER OPERATION 4-6 A-2) BYPASS MISFEED ( ) • During sheet bypass copying The manual pick-up solenoid has been turned ON ↓ The paper stop switch-1 comes ON * If the paper stop switch-1 does not come ON within the specified time: (E12) ↓ BYPASS MISFEED ↓ The BYPASS MISFEED symbol is displayed ( ↓ ) Copying cannot be started ↓ Clearing method: Remove the paper from the sheet-bypass guide. The manual-feed switch goes OFF. B-1) CLEAR PAPER ( ) • Leading-edge jam detection by the exit switch: (E01) The aligning motor is turned ON ↓ 1.144 sec.* ON Aligning motor The exit switch comes ON * When the exit switch has not come ON Exit switch ON after 1.144 seconds have elapsed. ↓ Timer The CLEAR PAPER symbol (E01) appears and copying will stop. 0 1.144sec CLEAR PAPER (E01) 4-7 COPIER OPERATION • Trailing-edge jam detection by the exit switch : (E02) The aligning motor goes OFF. Aligning motor OFF Exit switch ON ↓ 1.132 sec* The exit switch goes OFF (detects paper exit) * When the exit switch does not go OFF even after 1.132 seconds: Timer ↓ The CLEAR PAPER symbol appears (E02), and 0 1.132sec CLEAR PAPER (E02) copying stops. • Immediately after power ON ↓ The exit switch is detecting paper (ON) ↓ CLEAR PAPER (E03) • If the front cover is opened during copying ↓ CLEAR PAPER (E41) • Leading edge jam detection by the paper stop switch in front of the aligning roller:(E31~36) After the leading edge of the paper passes the transport rollers, if the paper stop switch-1 is not turned ON within a fixed time ↓ Paper misfeeding (E31~36) • During paper feeding from the ADU: After the feed clutch is turned ON, if the paper stop switch (S16) does not come ON within a fixed time. ↓ Paper misfeeding (E53) • During paper stacking in the ADU: If the ADU jam switch does not detect any paper at the fixed timing ↓ Paper misfeeding (E50) • During paper feeding from the copier and the pedestal: After the feed clutch is turned ON, if paper stop switch does not come ON within a fixed time ↓ Paper misfeeding (E15,16,17,19: The error code is different according to the cassette used.) COPIER OPERATION 4-8 B-2) ADD TONER ( ) Toner density has become low ↓ Toner empty detection: Auto-toner sensor ↓ Control circuit: f the ADD TONER symbol appears: copying is not possible Clearing method: Open the toner supply cover and supply toner from the toner cartridge. Toner supply operation: copying is possible B-3) REPLACE TONER BAG ( ) The toner bag becomes full of toner ↓ The toner bag tilts due to its own weight: the toner-full switch will be turned ON. ↓ REPLACE TONER BAG display • When the toner-full switch comes ON during copying ↓ Copying will stop after the last sheet has exited during copying Clearing method: Replace with a new toner bag. B-4) Developer unit misloading Disconnection of the developer unit. ↓ Developer unit loading abnormal is displayed. Clearing method: Connect the developer unit connector and close the front cover. C-1) CALL SERVICE If the CLEAR/STOP key and the “8” key are pressed simultaneously when the CALL SERVICE symbol is flashing, one of the error codes will appear on the message display. For the contents of the error codes, refer to the “SERVICE HANDBOOK”. 4-9 COPIER OPERATION 4.4 Flow Charts 4.4.1 Power ON to ready Main switch ON DC power ON Restart YES Cover open? NO Heater lamp ON • SCN-MTR • DCM-MTR • STOP-MTR • GUIDE-MTR P-STP-SW ON? Start of initialization YES NO EXIT-SW ON? YES NO ADU-JAM-SW ON? YES NO A COPIER OPERATION 4 - 10 Paper jam “E03” A Initialization of laser optical system T-FULL-SW ON? YES NO NO Toner empty? Main motor 6 sec. ON NO YES T-FULL-SW ON? Toner-full cancel operation YES Toner bag replacement Toner replenishment Initialization over? NO YES 20 sec. passed since start of initialization? Carriage and indicator indicate copy area NO YES Service call “C26” Heat roller pre-running sufficient for fixing? NO YES Pre-running OFF Heat roller at ready temperature? YES Thermistor broken? NO Heater broken? NO Polygon motor NG? YES YES YES Service call Service call Service call “C41” “C44” “CA1” NO READY 4 - 11 COPIER OPERATION 4.4.2 Automatic feed copying Start key ON Developer bias ON Fusing motor ON Main charger ON Developer motor ON Discharge lamp ON Transfer belt motor ON Drum motor ON Transport system control Process system control Polygon mirror OK? YES Optical system control NO Service call “CA1” Laser ON Feed clutch ON Exposure lamp ON Transfer belt bias ON Feed clutch OFF Carriage advances Carriage stops Aligning clutch ON Counter ON/OFF Transfer belt bias OFF Exposure lamp OFF Scraper solenoid ON NO HSYNC OK? Service call “CA2” NO Scraper solenoid OFF Aligning clutch OFF Carriage retracts. YES NO Number of remaining copies=0? Number of remaining copies=0? Carriage stops. YES End of optical system control YES Laser OFF Exit switch check 1? OK Process control end COPIER OPERATION B 4 - 12 NG Paper jam “E01” B Paper jam NG “E02” Exit switch check 2? OK Main charger OFF Discharge lamp OFF Developer bias OFF Drum motor OFF Transfer belt motor OFF Fuser motor OFF Developer motor OFF Drum rotation reversed Standby 4 - 13 COPIER OPERATION 5. DISPLAY UNIT 5.1 Detailed Drawing of the Control Panel and the Display Panel The display unit consists of key switches and touch-panel switches for copier operation/selection of each mode, LEDs and an LCD displaying the copier state or messages. When the operator’s attention is needed, a graphic symbol lights or flashes and a message indicating that particular condition is displayed in the LCD panel. FUNCTION CLEAR HELP 1 2 3 4 5 6 7 8 9 COPY STOP ENERGY SAVER TIMER START PRINTER INTERRUPT 0 C CLEAR Arrangement of the control panel LCD panel indicating operator’s attention 5-1 DISPLAY UNIT 5.2 Items Shown on the Display Panel 5.2.1 Display during normal copying No. 1 Message WAIT WARMING UP Conditions of machine Being warmed up • Indicated after the main switch is switched ON up until the machine becomes capable of copying. 2 3 READY COPYING Notes • The number and reproduction ratio of copies are indicated, for example, as “0”, “100%” when the main switch comes ON. Capable of copying. • Indicated when the machine is capable of copying and the operator’s instructions for copying • Copy quantity indicator indicates as “1”. When a digital key is pressed, the set number is indicated. • The set number is cleared to “1” by conditions are awaited. • Returns to the initial condition if no key input is given for 45 seconds. pressing the CLEAR/STOP key. • Manual copying is possible. Now copying. • Indicated by pressing the START key. • After completion of copying, the copy quantity indicator returns to the initially set number. • Copy quantity indicator becomes “1” and copying is completed. 4 WAIT 30 SEC FOR WARMING UP Energy saving conditions. • Released by pressing the ENERGY SAVER key or the START key. 5 PLACE NEXT ORIGINAL ADU 1-sided copying standby state. • When using ADU 1-sided, and when not using ADF. Timer OFF • No message is displayed in the display panel. • Press the START key to clear. 6 • Timer LED is turned ON. DISPLAY UNIT 5-2 5.2.2 No. 7 Display in the event of faulty conditions Message ADD PAPER Abnormal state & indication Indication of lack of paper. • Flashes when there is no paper in the cassette A in Fig. 5.2-2. Solution • Supply paper to the selected cassette. • Select another cassette. • Manual copying is possible. 8 ADD TONER Indication of lack of toner. • B in Fig. 5.2-2 is indicated when the toner in the toner hopper runs out. • When this message is displayed, it • Released after the toner is supplied and the toner supply cover is closed. is not possible to copy. 9 DISPOSE OF USED TONER Indication of need to replace the toner bag. • Indicated when the toner bag is full. D in Fig. 5.2-2. The copier stops. • Open the toner bag cover and replace the toner bag. Released after the toner bag is replaced and the toner bag cover is closed. B D A Fig. 5.2-2 5-3 DISPLAY UNIT No. Message Abnormal state & indication 11 PAPER MISFEED IN BYPASS Bypass paper jamming • Indicated when paper jams at the bypass guide. A in Fig. 5.2-3. The machine is returned to normal conditions automatically by pulling the paper out from the bypass guide. 12 MISFEED IN COPIER Paper jammed in the machine. • Indicated when paper jams in the Press the HELP/INFO key and remove the paper jammed in the copier by machine. B in Fig. 5.2-3. 13 MISFEED IN COPIER Cassette paper misfeed. • Indicated when paper supplied from the cassette does not reach the sensor in front of the aligning Solution following the message. Press the HELP/INFO key and remove the paper jammed in the copier by following the message. roller in a set time. C in Fig. 5.2-3. 14 15 16 MISFEED IN DOC. Original jammed Open the jam access cover and ADF FEEDER • Indicates when an original is jammed in the document feeder. D in Fig. 5.2-3. unit, and remove the jammed original. MISFEED IN FINISHER Paper jammed in the finisher. • Indicates when paper is jammed in the finisher. E in Fig. 5.2-3. Remove the paper jammed in the finisher and open and close the front cover once. MISFEED IN Indicates when paper is jammed Press the HELP/INFO key and remove DUPLEXER in the ADU section. F in Fig. 5.2-3. the paper jammed in the copier by following the message. D A B E F C Fig. 5.2-3 DISPLAY UNIT 5-4 No. Message Abnormal state & indication Solution 17 CALL FOR SERVICE Some part of the mechanism, motors, switches or sensors is abnormal. A in Fig. 5.2-4. Turn OFF the machine, remove the cause of the fault and turn the machine back ON. 18 TIME FOR PERIODIC MAINTENANCE Indication of PM cycle. • Indicated when it is time for Maintenance and inspection by a qualified service technician. periodic maintenance and inspection. • Capable of copying. A Fig. 5.2-4 5-5 DISPLAY UNIT DISPLAY UNIT — — — — Manual feed jammed Toner bag replaced Paper jammed in the unit Serviceman call 5-6 — Pre-heating — — — — — — — — — — — — — — Digital keys — — — — — — Zoom keys — — — — — — Density key — — — — — — Paper size key * — — — — — — Cassette key — — — — — * Interrupt key Interrupt key is acceptable during copying operation, but not acceptable during original scanning operation. Note: Interruption condition is automatically released if the machine is not used for 45 sec. (2) Avoid manual insertion during the copying operation since this may result in paper jamming. — — — — — — Copy size key (1) Energy saver condition is released by pressing the Energy saver key or the START key. : Performs the action or indication according to the operation. – : Ignores the operation — Interrupted — — — — Key counter missing — — Lack of toner — — — Lack of paper — Copying — — — Zoom switching Reserve setting enabled — Stop keys Copy ready — Clear key — START key Warm-up Condition Operation — — — — — — Energy saver key — — — — — — Manual feed insertion — — — — — — Touch panel 5.3 Relation between Copier Conditions and Operator’s Actions 5.4 Description of Operation 5.4.1 Dot matrix LCD circuit (1) Structure (320 x 240) The DSP-LCD-230 is an STN black & white mode transmissive type LCD with a 320x240-dot display capacity. It includes a driver LSI, frame, print board, and lateral CFL backlighting. *STN:Super Twisted Nematic (2) Block diagram XSCL UD0 UD1 UD2 UD3 WF IC5 80 IC6 80 IC7 80 IC1 IC2 IC3 IC4 80 80 80 80 LP LCDEN VDD GND V0 VEE power supply LCD PANEL 320 x 240 DOTS 5-7 DISPLAY UNIT (3) LCD drive operation The following describes the drive operation to display the message “100% READY”. PWA-F-SYS-300 GA (scc) 1 1 3 SM CPU PROM 2 3 3 LCD controller 4 R A M 2 PROM. The PROM outputs the data for dis- 3 playing the message to the SM CPU. The SM CPU writes the data for LCD 4 display to RAM IC41. The LCD controller/driver IC42 reads the display data from RAM IC41, and outputs the data to the 4 LED driver LED The SM CPU requests the data for displaying “100% READY” from the LCD. KEY CPU LCD Key switches and touch panel PWA-F-DSP-300 (4) Data Transmission Method 1/tF 1/tF FRAME 240 1 2 240 1 2 LOAD FRAME LOAD CP CP x(320/4) pulses D0-D3 DISPLAY UNIT 5-8 240 1 2 5.4.2 LED display circuit (1) Method of LED display The following description is based on the example of displaying “TIME” on the LED display. 5VL LDON0 Current "L" "L" 6 D16 G Q3 (TIME) LP1 R1 IC1(7932) When the signal LDON0 changes to “L” level, the transistor is turned ON. Also when pin 6 (D16) of IC1 changes to “L”, a current flows from 5VL via the transistor to LP1 (“TIME”) i.e. LP1 (“TIME”) is turned ON. Conditions for LED to light 1 The transistor (Q2 or Q3) connected to the LED anode is ON. 2 The output connected to the cathode of that LED is “L”. The LED comes ON when 1 and 2 above are satisfied. 5-9 DISPLAY UNIT 5.5 Disassembly and Replacement [A] Control Panel (1) Open the control panel. (2) Remove the left, middle and right inner covers (3 screws for each). (3) Disconnect the connector inserted into the copier frame. (4) Remove the 3 screws fixing the control panel. (5) Remove the control panel upwards. (6) Disconnect the connector. (7) Remove the 5 locking supports and screw. (8) Disconnect the 7 connectors, and remove the PC board. (9) Remove the toothed screw and aluminum sheet (2 places). (10) Remove the 4 screws and bracket. (11) Remove the 8 screws and LCD board. (12) Remove the 9 screws and KEY board. (13) Remove the 4 screws and LCD. LCD board DISPLAY UNIT 5 - 10 LCD KEY board 6. IMAGE PROCESSING 6.1 Introduction The following diagram shows the processes beginning at the Scanner section to the Printer section (where light is transferred to the photosensitive drum.) ASIC which is short for “Application Specific IC” is for a specific use. Scanner Image processor Printer Original System board [SYS] Original glass Scanner [CCD] Image processing [SLG] Image processing/ Print control [PLG] Laser drive board [LDR] Polygonal motor drive board [POL] LGC board Semiconductor laser device Photosensitive drum The following table shows the functions carried out by the two image processing boards. Board SLG board (PWA-F-SLG-300) PLG board (PWA-F-PLG-300) Number of ASIC 1 Fanction High quality image processing, image memory editing, editing processing, gamma correction, tone processing, external output system interface 1 Smoothing processing, external input system interface, image area control, laser related control 6-1 IMAGE PROCESSING 6.2 Image Processing Circuit 6.2.1 Overview Unlike existing analog copiers where reflected light is projected directly to the photosensitive drum, digital copiers project reflected light (from the original document) to the Charged Coupled Device (CCD). The CCD converts optical images into electrical signals which ultimately undergo shading correction which is nothing more than compensations for variance in the light source and the CCD unit. After shading corrections are made, signals are sent to the image processing section where processing operations are performed. Data are then sent to the printer section for conversion into light beam that are directed to the photosensitive drum for printing of the latent image. The image processing operation is performed by the SLG board (PWA-F-SLG-300) and PLG board (PWA-F-PLG-300). (1) Image processing circuit on the SLG board One image processing ASIC is mounted on the SLG board and implement the following functions: <Functions> High quality image processing, image memory editing, editing processing, gamma correction, tone processing, external output system interface (2) Image processing circuit on the PLG board One image processing ASIC is mounted on the PLG board and implements the following functions: <Functions> Smoothing processing, external input system interface, image area control, laser related control IMAGE PROCESSING 6-2 6.2.2 Configuration Figure A shown below represents the image processing section of this digital copier. CCD board (PWA-F-CCD-300) CCD A/D conversion Shading correction Image processing section SLG board (PWA-F-SLG-300) Scanner system image processing ASIC High quality image processing Image memory editing Editing processing Gamma correction Tone processing External output system interface SYS board (PWA-F-SYS-300) PLG board (PWA-F-PLG-300) Printer system image processing ASIC Sort copy, group copy, magazine copy, simplex reduction concatenation, duplex reduction concatenation, image combination, date annotation, sheet insertion mode, etc. Smoothing processing External input system interface Image area control Laser related control : Image data flow Laser drlve board (PWA-F-LDR-300) Laser drive Fig. A. Construction of the image processing section 6-3 IMAGE PROCESSING 6.3 SLG Board (PWA-F-SLG-300) 6.3.1 Features (1) The image processing ASICs are controlled by CPU on the SLG board (PWA-F-SLG-300). (2) The image processing functions of the SLG board implement the following functions: • High quality image processing • Image memory editing • Editing processing • Gamma correction • Tone processing • External output system interfacing 6.3.2 Functional description of the image processing circuit An ASIC mounted on the SLG PC board implement the functions described below. (1) High quality image processing (A) Range correction This function converts image signals to density range width and corrects it to match each original document’s image. When copying the images of an original having a certain amount of background (such as appear in newspapers), it reduces the background density. <Example> After range correction No. of pixels No. of pixels Background Smaller Smaller Text Density Lower Density Lower Higher Histogram IMAGE PROCESSING Larger Extended dynamic range width Larger Dynamic range width 6-4 Higher (B) Filtering This function is comprised of a low-pass filter circuit and a high-pass filter circuit. (a) Low-pass filter circuit This circuit eliminates image and electrical noise as well as restrict Moire. It provides an image that closely resembles the original document’s. It does this by averaging the differences between the targeted pixel and those adjacent to it. For example, assuming the density of the target pixel position to be x and the densities of its front and back positions to be a and b, respectively, the density of the target pixel position x’ after lowpass filter operation is given: For (3 x 1) matrix, a x b x’ = a+b+x 3 The above operation is performed for all pixel positions to accomplish high original reproducibility. The following figure shows the primary scanning pixel is processed by the low-pass filter. Density Density After low-pass filter operation 0 1 2 3 4 5 6 7 8 9 0 1 2 3 4 5 6 7 8 9 Primary scanning pixel positions Primary scanning pixel positions (b) High-pass filter circuit When images with sharp edges are scanned and directed to the CCD, the edges of these characters tend to become dull in appearance. This is due to the physical imperfections of the CCD lens as well as the mirrors that direct the light to it. To compensate for this phenomenon, an edge-enhancement operation is performed. It recognizes the differences in density between the targeted pixel and those adjacent to it an makes compensations to ensure that the final output image closely resembles the image of the original document. (See illustration below) Solid black area Low contrast area Original Image signal After correction 6-5 IMAGE PROCESSING (2) Image memory editing Editing functions such as enlargement/reduction and mirror image copying are performed by using a line memory. The line memory is used for storing one line of pixel data in the primary scanning direction and is updated with new pixel data each time the next line is scanned. (a) Enlargement/reduction This function is accomplished by using line memory control in the portion of the operation. <Example> Enlargement 100% 1 2 3 4 5 6 7 8 9 10 200% 1 1 2 2 3 3 4 4 5 5 6 7 8 9 10 <Example> Reduction 100% 1 2 3 4 5 50% 1 3 5 7 9 (b) Mirror image This function reverses the right side and the left side in the primary direction of the original and this reversed image is output. (3) Editing operations Trimming, masking and negative/positive reversal functions are accomplished. (a) Trimming With the rectangular area signal, the image signals inside the rectangular area are left and other image signals are erased. (b) Masking Using the rectangular area signal, the image data inside the rectangular area are erased with other image signals left. (c) Negative/positive reversal This function reverses image data from negative to positive or vice versa on the entire area. IMAGE PROCESSING 6-6 (4) Gamma correction processing This function is used to correct the input/output characteristics of the scanner/printer so that image signals are obtained which have input/output characteristics matching a particular copying mode. (5) Tone processing This function works to process tone so that faithful reproduction of halftone images such as photographs are accomplished. (6) External output system interface This function performs the output control of the output interface for the SYS board (PWA-F-SYS300). 6-7 IMAGE PROCESSING 6.4 PLG Board (PWA-F-PLG-300) 6.4.1 Features (1) The image processing ASICs are controlled by CPUs mounted on the PLG board (PWA-F-PLG-300) and the LGC board (PWA-F-LGC-300). (2) The image processing functions of the PLG board work to accomplish the following: • Smoothing processing • External input system interface • Image area control • Laser related control 6.4.2 Functional description of the image processing circuit An image processing ASIC of the PLG board works to accomplish the following: (1) Smoothing processing This function works to eliminate jaggedness occurring on character edges of images input from the external input system interface for smooth image output. (2) External input system interface This function works to control the input interface to the SYS board (PWA-F-SYS-300). (3) Image area control This function works to set the effective image area of four directions of output image. (4) Laser related control This function works to control the DAPC (Double Auto Power Control) and to adjust the multiple laser beam position. IMAGE PROCESSING 6-8 6.5 Scanner Light that is reflected from the original document’s surface is directed to the CCD where photovoltaic conversion occurs. During this operation, optical image data are converted into electrical signals which are then converted into digital signals by the A/D conversion portion of the image processing system. CCD Signal amplification A/D conversion Shading compensation To next stage (1) Photo-voltaic conversion A conversion from optical signals to electrical signals performed by the CCD. See Chapter 7, 6-1. (2) Signal amplification The amplification of the electrical signals from the CCD. (3) A/D conversion The conversion from Analog signals to Digital signals. (4) Shading correction Corrections made by the shading compensation circuit to make up for distortions of images produced by the mirrors and the elements of the CCD. See Chapter 7, 6-2. 6.6 Printer Image signals processed by the PLG board perform the laser writing operation through the writing control ASIC and the laser drive board processings. (1) Setting of effective image area .......................... • The top, bottom, left and right margins are set. (2) Synchronization Clock Generation block .......... • HSYNC and the reference clock signal at printer of horizontal synchronizing signal (HSYNC) block synchronized with the signal. (3) Laser drive block ............................................... • ON/OFF control of the semiconductor laser and DAPC (Double Auto Power Control) control. 6-9 IMAGE PROCESSING 7. SCANNER 7.1 Functions During a scanning process, light is directed at the surface of the original document and then to the CCD via mirrors and the CCD lens and a slit. The CCD unit in which optical image data are converted to electrical signals accomplishes photovoltaic conversion. The resultant analog signals undergo A/D conversion, which ultimately become digital signals. These signals undergo compensation processes in order to produce the required image. Digital signals are then sent to the printer section of image processing. CCD drive PC board Exposure lamp Reflector CRG-1 Drive pulley Rail for CRG-1 CCD sensor Original glass Rail for CRG-2 Lens CRG-2 Scanner control PC board (SLG board) 7-1 SCANNER 7.2 Configuration The following describes the configuration of the optical system and the purpose of its components. (1) Original glass The original glass is where the original document is placed for scanning. The exposure lamp illuminates the original document. (2) Carriage 1 Carriage 1 is the optical assembly that has the exposure lamp and is used for scanning the original document. The illustration below shows some of the components that make up the assembly. Thermostat Mirror 1 Carriage 1 a. Exposure lamp The exposure lamp is the light source used for illuminating the original document. It is a 180-watt Halogen lamp. b. Reflector The reflector’s purpose is to maximize the amount light being directed to the original document that is emitted by the exposure lamp. Reflector Original Glass Exposure lamp Reflector Mirror 1 c. Mirror 1 Mirror 1 is for guiding light reflected from the original to mirror 2. Mirror 2 is described later on. d. Thermostat It is a temperature-control device that prevents over-heating of the exposure lamp’s assembly. SCANNER 7-2 (3) Carriage 2 The Carriage 2 assembly directs light reflected from mirror 1 to the CCD assembly. It contains mirrors 2 and 3. The scanner motor drives this assembly. Its scanning speed as well as the distance that it travels is half that of carriage 1. Mirror 2 Mirror 3 Carriage 2 (4) Lens → CCD Light reflected from mirror 3 is projected to the CCD. The CCD is located at the focal point of a fixed lens. (5) CCD drive PC board The Image processing board performs image correction preprocessing (amplification, mixing, A/D conversion and shading correction of electrical signals obtained by the CCD). CCD drive PC board 7-3 SCANNER (6) Automatic original detection unit The automatic original detection unit (APS sensor) uses sensors located on the lens cover and on the base frame for detection of the size of the original without the process of scanning. (7) Original width indicator unit The original width indicator unit is for indicating the original width currently selected by the copier. The original size is displayed by the yellow lines on the indicator and carriage 1. Original indicator unit Carriage 1 Copiable width Copiable length SCANNER 7-4 7.3 Description of Operation 7.3.1 Scanning motor CRG-2 pulley 27 CRG-2 CRG-1 Carriage drive wire Scaning motor Motor pulley 3GT-Z24 Idle pulley 27 Idler pulley 27 Wire windup pulley/motor deceleration pulley 39.75/3GT-Z28 Optical System (rear side) Scanner motor drive is transferred to carriages 1 and 2 via the timing belt and the carriage drive wire. Initially, carriage 1 moves to the home position. The actuation of the “home switch” determines the home position of Carriage 1 assembly. During a PRINT cycle, carriages 1 and 2 are driven to scan the original document. 7.3.2 Document motor The document motor positions the “original width indicators” to indicate the placement position of the original document when the reproduction ratio is changed from its default setting of 100% or when a particular paper size is selected from any of the cassette trays. 7.3.3 Optical fan motor The optical fan motors rotate to cool the optical unit during copying and stop rotation during standby. 7-5 SCANNER 7.4 Drive of the 5-Phase Stepping Motor 7.4.1 Features Up till now, 2-phase hybrid stepping motors having a step angle of 1.8 have been regarded as being the highest performing motors. Compared to these motors, however, 5-phase stepping motors have the following features: (1) A small step angle (full step: 0.72°, half-step: 0.36°) achieves a resolution 2.5 times that of conventional stepping motors. As 2.5 times the number of steps can be used when moving the same distance, high-speed positioning using optimum acceleration and deceleration is now possible. (2) Extremely small fluctuation in operating torque achieves little vibration and smooth rotation. This makes a 5-phase stepping motor ideal for applications where uneven torque and noise are a problem. (3) As vibrations are small even at the resonant point, special dampers are not required, and the motor can be used in all operating ranges. (4) The self-start frequency is roughly 2.5 times higher than that of 2-phase stepping motors, and moreover, 5-phase stepping motors do not have a resonant range. This achieves speed control with a large variable speed ratio without the need for acceleration and deceleration. (5) Response is much faster than that of 2-phase stepping motors, allowing higher speed setting. (6) 4- and 5-phase excitation systems achieve excellent damping characteristics. (7) The step angle can be varied (e.g. 0.72°, 0.36°, 0.18°) depending on the excitation system. 7.4.2 Principle of the stepping motor The fundamental differences between a 2-phase hybrid stepping motor and a 5-phase stepping motor are the number of stator main poles and the winding configuration. A 2-phase stepping motor is wound in a 2-phase, 4-pole configuration, whereas a 5-phase stepping motor is wound in a 5-phase, 2-pole configuration. Fig. 7.4-1 shows the relationship between stator and rotor teeth in a 5-phase stepping motor, and the winding configuration. A phase (blue) Stator B phase (white) (green) C phase (brown) (gray) Rotor D phase (black) (purple) E phase (orange) (yellow) (red) Fig. 7.4-1 Structure of 5-phase Stepping Motor SCANNER 7-6 The stator comprises 10 main poles, with two main poles in apposition forming a single phase. The coil is wound so that the two opposite main poles are the same polarity (N or S). Assuming a rotor tooth pitch of τR, the stator teeth are arranged in such a way that the stator teeth on adjacent main poles shift by 0.6 τR with respect to the rotor teeth. This means that the stator teeth on adjacent main poles shift by (0.6-0.5) τR=τR/10 with respect to teeth on the rotor cup on the opposite side that are shifted by 0.5 τR. Fig. 7.4-2 illustrates this relationship. 0.6 τR Stator 0.5τR 1 10 τ R Rotor Fig. 7.4-2 Relationship between Stator Teeth and Rotor Teeth Consequently, if the polarity of the stator is moved as shown in Fig. 7.4-3, the rotor rotates clockwise 1/ 10th of the rotor tooth pitch at a time. τR 10 A Phase N = 1 360 × = 0.72° ...................... (1) 10 50 B Phase D Phase C Phase S N N 2 1 S 4 3 S A Phase S N B Phase C Phase D Phase N 6 E Phase S S 7 8 S S 5 S N N E Phase N 9 10 N N S Fig. 7.4-3 Movement of Poles at 1-phase Excitation 7-7 SCANNER 7.4.3 5-phase motor drive circuit (fixed current type) The drive circuit mainly comprises the following: • microstep drive controller (IC4) • driver (IC5) • current detection resistor (R2) VDD 2 R31 1/10W1M R26 2 1/10WO 10 [HCU045] R28 1 2 1/10WO R29 1 2 12 1/10WO R30 2 1 1/10W330 1 IC2 [VCC] [GND] 13 1 R32 1 1 [HCU045] 1 11 IC2 [VCC] 14 7 [GND] 2 1/10WO 14 7 X1 2 1 BM C14 1 2 68P/50 C18 1 2 68P/50 GND GND +36V VDD VDD GND PULSEM TP13 1 2 A1 R18 1/10W4.7K 1 2B7 2C7 2D7 2B7 2C7 2D7 2D7 2D7 SCNCLK-0A SCNDIR-0A SCNRST-0A H.OFF-1A SDATA0-0A SDATA1-0A SDATA2-0A SDATA3-0A [U7001S] IC4 PM EXTAL MO XTAL CW/CK PA CCW/UD PB RST PC ISEL PD DSEL PE POFF NA D00 NB D01 D02 NC D03 ND D10 NE D11 D12 D13 [VDD] [VDD] [VSS] [VSS] [VSS] 2 2W820 K 1 R4 D3S6M K CH1 1 2 2W470 DBLC40 GND 20 21 19 22 23 7 11 10 8 9 24 25 5 6 3 ZD1 A K U1ZB12 GND 2 +36V VDD D2 36 35 34 33 32 30 29 28 27 26 D1 SF12-50 A2 4 5 A C4 + 1 100/25 2 [AZ5301S] IC5 VM PA A0 PB B0 PC C0 PD D0 PE E0 NA RS1 NB RS2 NC ND RS3 NE OCRF [VCC0] [VCC1] [VCC2] [VCC3] [GND] 18 13 14 15 16 17 12 2 4 1 MOT-A MOT-B MOT-C MOT-D MOT-E 1 R2 2 5W0.1 1 R6 2 1/10W10K 1 R5 2 C3 330/50 TP1 3A2 3B2 3B2 3B2 3B2 + 11 12 1 2 24 3 14 25 15 16 17 18 20 21 22 23 19 43 6 31 47 R3 1 R1 2 5W0.1 2 1 SCNVREF 1/10W1K GND GND GND GND 3B2 SCNVREFA Fig. 7.4-4. PWA-SDV – Excitation Process of Phase A – 1 H.OFF is set to ON (High). 2 CLK signal, rotation direction DIR signal and division data (DATA 0 to 3) are input. 3 After about 10 ms, SCCLK is input. 4 IC4 outputs excitation ON according to the division data from PA1 (Pch side) and NA to NE (Nch side). IC5 receives this excitation signal, drive and flows current to the motor. 5 The current flowing to the motor passes through the current detection resistor R2 as it is as the total current. The total current and the CPU set current value are compared by IC5. IC5 controls the motor drive power. SCANNER 7-8 7.5 Exposure Control Circuit 7.5.1 Overview [A] The exposure control circuit is comprised of the following four blocks: (1) Lamp regulator This circuit applies voltage to the exposure lamp correspondent to the duty ratio of the PWM signal. (2) CCD sensor circuit This circuit reads the amount of light from the shading correction plate. This information is used to compare the light intensity reflected from the original document and the light from the shading correction plate. Adjustments are made in the image processing circuit for enhancement of signals. (3) Image processing circuit This circuit converts the signals from the CCD into binary values and performs a series of image processing operations such as gamma correction, shading correction, etc. (4) Control panel The duty ratio of PWM signal can be set at increments of 1% through the digital keys by the operator. Note: The ON/OFF switching of the exposure lamp is carried out by a unique signal (EXPO-ON) separate from the PWM signal. Original Shading correction plate Exposure lamp Lamp regulator PWA-CCD CCD sensor PWA-CCD/PWA-SLG PWA-SLG A/D Control panel 1 4 7 2 3 5 6 8 9 Image processing circuit Main CPU IC37 Key input Construction of exposure control circuit 7-9 SCANNER [B] The exposure control circuit has two functions: (1) Normal mode The duty ratio of the PWM signal is controlled at 55% (lamp voltage : 61.25V). (2) Check mode Through input from the digital keys, the PWM signal output is varied from 30% ~ 70% to allow the exposure to be set arbitrarily. 7.5.2 Lamp regulator function The figure below shows a typical characteristic diagram. Control is performed so that a voltage across the lamp voltage proportional to the duty ratio of PWM signal is produced. Lamp voltage [V] 70 Actual-use range 61.25 50 Actual-use range 10 55 90 PWM duty [%] Setting for normal operation Characteristic diagram of the lamp regulator 7.5.3 Control section The control section consists of the folllowing 2 blocks: 1 Scanner CPU Comprised of software, the main CPU calculates the voltage to be applied to the lamp according to the normal mode and check mode. 2 PWM timer circuit This comprised by the following circuit. The exposure data is converted to PWM signals by the scanner CPU, and output to J9-26 via IC2 from the scanner CPU PWM output terminal. PS-ACC S-CPU IC2 J9-26 LRG PWM 7407 SCANNER Lamp regulator 7 - 10 7.5.4 Lamp regulator circuit The lamp regulator circuit ensures that illumination from the exposure lamp is constant. Any tendencies for variances in illumination is monitored and controlled by a series of detection and comparison circuits. Its principle control is as follows: (1) AC115V (or 220/240V) power source is rectified to provide DC160V (or 310/340V) which is used as the power source for the exposure lamp. (2) The PWM1 signal for light adjustment is averaged by an integration circuit and provides reference VS for feedback control of the lamp regulator circuit. (3) When the oscillator circuit is triggered by EXPO-ON/OFF signal, it generates a lamp drive PWM2 signal which turns on the lamp drive transistor (Tr1), causing current I1 to flow through: Capacitor C → Exposure lamp (L) → Primary side of T1 (P) → Lamp drive transistor (Tr1) → Capacitor C This causes current I2 proportional to the winding ratio of T1 and the rate of change of I1 to generated on the secondary side of T1(s). (4) The amount of lamp current converted to detection voltage VD by a current detection circuit is compared with the smoothing signal VS of PWM1 signal from the logic circuit by a comparison circuit whose difference signal VF is fed back to the oscillator circuit. 7 - 11 SCANNER (5) When the lamp drive transistor (Tr1) is turned OFF, the counter electromotive force of T1 causes current to flow along: Primary winding of transformer T1 (P) → Freewheeling diode D1 → Exposure lamp (L) → Primary winding of tranformer T1 (P) This causes continuous current I3 to flow through the exposure lamp (L) regardless of the drive transistor (Tr1) being turned ON/OFF. AC Thermostat Rectification circuit Relay-SW I3 Capacitor C Exposure lamp (L) D1 I2 I1 PWM2 Vcc EXPO ON/OFF VD VF Comparison circuit Lamp drive (Tr1) S Oscillator circuit P Current detection T1 VS Vcc PC PWA-SLG Integration circuit PC PWM1 PC: Photo coupler Construction of lamp regulator circuit SCANNER 7 - 12 7.6 Outline of Control 7.6.1 Photo-voltaic conversion The purpose of photo-voltaic conversion is to form electrical signals corresponding to the intensity of light reflected from the original. A CCD is used for photo-voltaic conversion. CCDs are single-chip photovoltaic conversion device in which several thousands of photosensing elements several microns square are arranged in a single line. This copier uses a CCD having 7,500 of these photosensing elements. The photosensor comprises a P-layer, N-layer semiconductor. Optical energy generates a (–) (minus) charge on the P-layer proportional to the optical energy and irradiation time. The charge generated at the photosensor is transferred to the transfer area, shifted from center to right and left in the figure below according to the transfer clock, and is output from the CCD. During this operation, in order to increase the image transmission speed from CCD, even-numbered and odd-numbered image signals are separated into left and right signals, and 4 channels are output in parallel. Transfer block Transfer area 1 2 3 4 7497 7498 7499 7500 Photosensor area Optical energy P-layer N-layer Detailed photosensor Transfer area Shift register Transfer clock Fig. 7.6-1 Principle of CCD Photo-Voltaic Conversion 7.6.2 Shading compensation The following problems affect the voltage values obtained by photo-voltaic conversion by the CCD: 1 Variation in light distribution from the light source. 2 Light intensities vary at the CCD elements. The elements farthest from the center do not receive as much light as those elements in the center of the CCD. 3 The photo-voltaic capacities of each of the 7,500 CCD elements are uneven. Consequently, these problems must be compensated. This is called “shading compensation.” Shading compensation involves normalizing optical energy according to the following equation based on already known scanned black data and white data, and compensating for uneven illuminance of the image data and device unevenness. (S – K) I = k × ————— (W – K) where, k: S: Coefficient Image data before compensation K: W: Black data (in black memory) White data (in white memory) 7 - 13 SCANNER 7.7 Automatic Original-Size Detection Circuit This circuit detects the original size (standard sizes only) using reflection-type photosensors on the base frame and lens cover of the optical unit. 7.7.1 Principle of original-size detection The reflection-type photosensors are located on the base frame and lens cover of the optical unit. Each photosensor comprises an infrared light emitting diode (LED, light-emitting side) and a phototransistor (light-receiving side). When an original is placed on the original glass, the light emitted by the LEDs is reflected by the original and led to the phototransistor. In this way, the presence or absence of an original is detected by whether reflected light exists or not. [A4 Series] [LT Series] Original Original Original glass APS Original glass APS Fig. 7.7-1 7.7.2 Original size detection (1) If the copier is set in the original size detection mode, the carriage is set at its home position. (2) Detection is performed in an instant when the platen cover is opened, each sensor receive the reflecting light and the condition of a matrix shown in (4) are satisfied. (3) Original size detection is performed when the output signals from each sensor are input to the SCPU (IC7) on the scanner control PC board. SCANNER 7 - 14 A5-R B5-R A4-R A5 B5 B4 A3 [A4 Series] APS-4 A5-R B5-R A5 A4-R B4 B5 A5-R APS-5 APS-1 B5-R A5 APS-2 B5 APS-6 A4-R B4 APS-3 A3 A3 LG ST-R LT-R ST LD LT [LT Series] APS-3 ST-R ST-R APS-1 APS-4 ST LT-R LG ST LT-R LG APS-2 LT LD LT LD Fig. 7.7-3 Sensor Detection Points 7 - 15 SCANNER (4) Original size is determined by a combination of the presence/absence of the original at the each locations stated in step (3). Combination charts for size determination of A4 series and LT series are shown below. [A4 Series] APS-1 APS-2 1 beam sensor (No.) APS-3 APS-4 APS-5 APS-6 A5 A5-R A4 A4-R A3 B5 B5-R B4 : Original presence blank : Original absence : Original presence or absence [LT Series] APS-1 1 beam sensor (No.) APS-2 APS-3 APS-4 ST ST-R LT LT-R LG LD : Original presence blank : Original absence * Platen SW=OFF • Following judgement is performed by the APS sensor output signal. Size decision :Size is displayed on the LCD panel and select a specific paper or reproduction ratio. Size not fixed :Reproduction ratio and paper are not selected. The carriage-1 is stay on the standby position even though the reproduction ratio is changed when original size is changed. * Platen SW=ON • Keep the recognized original size (or no original state) just before the platen SW is turned on regardless the APS sensor output signal. SCANNER 7 - 16 Supplementary comments • Concerning the reflecting photointerruptor: The reflecting photointerruptor consists of an infrared diode and a phototransistor. It detects originals by use of pulse modulation. Original 8µsec 130µsec LED Phototransistor The light emitting diode (LED) is driven by pulses with a period of 130 msec. If a signal which has the same characteristics is received by the phototransistor, an original is determined to be present. Pulse modulation is performed within the reflecting photointerruptor. 7 - 17 SCANNER 7.8 Disassembly and Replacement [A] Original glass (1) Remove the 2 screws and glass holder. Glass fix Note: During assembly, feed the mylar sheet under the original glass. (2) Tilt the original glass up at an angle ( 1 ), and remove in the direction of the arrow ( 2 ). 2 Glass 1 Automatic paper-size detector unit [B] Automatic paper size detector (1) Remove the original glass, and move the carriage to the feed side. (2) Remove the original width indicator unit. (3) Remove the lens cover (11 screws, 1 connector). [A4 series] Automatic paper-size detector unit [LT series] SCANNER 7 - 18 (4) Remove the APS cover (2 screws). APS cover (5) Remove the screw, disconnect the connector and remove the harness from the 3 clamps (base side). Then remove the automatic paper size detector. Clamp A4 series : 6 pcs. LT series : 4 pcs. [C] Exposure lamp (1) Move the carriage to the center. (2) Remove the reflector (Upper) (2 screws). (3) Loosen the front side screw fixing the holder. Carriage (4) Remove the exposure lamp from the blade. Note: When installing the exposure lamp on the Blade Blade holder, face the projection of the lamp opposite to the reflector. Do not touch the glass surface of the exposure lamp with your bare hand. Exposure lamp Holder Exit side Lamp Protrusion Reflector(Upper) Reflector(Lower) [D] Thermostat Thermostat (1) Remove the screw and draw out the thermostat from the carriage. (2) Release the harness from the terminal, and remove the thermostat. Note: If the thermostat has been used once, it should be replaced with a new one, because it is designed basically for one-time use only. Do not push the reset pin to reuse a ther- Terminal mostat that has been operated once. 7 - 19 SCANNER [E] Copy area indicator unit (1) Remove the rear cover. (2) Remove the top left cover. Indicator unit (3) Disconnect the connector from the relay harness. (4) Remove the 8 screws fixing the indicator unit, and then remove the indicator unit. (5) When removing the document motor, remove the 2 screws. Belt (6) When removing the belt, remove the 2 screws and the cover first. (7) When removing the shooting plate board, remove the 2 screws, leaf springs and glass first. Shading board Document motor Plate spring [F] Scanning motor (1) Disconnect the connector. Scanning motor (2) Remove the 2 screws and stepped screw, then the scanning motor bracket. Screw Connector (3) Remove the 3 screws and then the scanning motor. SCANNER 7 - 20 Scanning motor [G] Optical fan (1) Remove the top left cover. (2) Remove the indicator unit, and disconnect the Optical fan 2 connectors. (3) Remove each of the 2 screws and the fan. [H] Carriage 1 (1) Remove the original glass. Connector (2) Remove the blindfold cover on the control panel and top rear cover. (3) Disconnect the power supply cable from the clamp, disconnect the connector, and remove the earth terminal (1 screw). Ground terminal (4) Move the carriage to the feed side. (5) Remove each screw fixing carriage-1 on the Clamp Carriage 2 front and rear. (6) Move carriage-1 to the center, tilt the entire carriage-1 using the notch on the frame, and draw out upwards to remove. Carriage 1 [I] Mirror 1 (1) Remove carriage-1. (2) Remove the 2 leaf springs fixing mirror 1. Plate spring Plate spring Mirror 1 7 - 21 SCANNER [J] Carriage 2 and carriage drive wire (1) Remove the original glass, top rear cover, top left cover, top right cover, control panel, PC Rear top frame board, 2 ADF brackets and top rear frame (9 screws). (2) Remove the top front frame (8 screws). Front top frame (3) Remove the 11 screws, 1 connector and the lens cover. Lens cover Connector (4) Remove the 4 screws, and disconnect the 7 connectors. Then, remove the scanner control PC board PC board (SLG board). (5) Loosen the wire tension bracket, and remove Hook the spring. (6) Remove carriage-2. Note: When assembling carriage-2, adjustment is necessary. Spring Carriage wire SCANNER 7 - 22 (7) Remove the shaft cover (1 screw). (only on TWD, ASD, MJD destination models) (8) Remove the shaft and pulley assembly (1 stop ring), and remove the wire from the pulley. Notes: 1. When attaching the wire, make sure that the wire is hooked on as shown in the figure below. 2. When attaching the wire, refer to the Service Handbook. 3. When attaching carriage-1, carriage-2 and the wire, adjustment is necessary. CRG-2 pulley 27 CRG-2 CRG-1 Carriage drive wire Scaning motor Motor pulley 3GT-Z24 Idle pulley 27 Idler pulley 27 Wire windup pulley/motor deceleration pulley 39.75/3GT-Z28 [K] Mirrors 2 and 3 (1) Remove carriage-2. (2) Remove each of the 2 leaf springs. Mirror 2 Mirror 3 7 - 23 SCANNER [L] Lens unit Shield bracket (1) Remove the damp heater. (2) Remove the shield bracket (2 screws). (3) Remove the 5 screws, and disconnect the 2 connectors. (4) Draw out the lens unit upwards. FG clamp Notes: 1: When replacing the lens unit, do not touch the paint-locked screws (6 pcs.). (Front side) (Rear side) 2: Also, when handling the unit, take sufficient care not to hold the adjustment section and the lens. 3: When installing the lens unit, lens scaling adjustment is necessary (Refer to the Service Handbook). Installation standard Setting holes SCANNER 7 - 24 [M] Upper damp heater (1) Remove the lens cover. (2) Remove the 1 screw, disconnect the cable from the clamp, and disconnect the 2 relay connectors. Then, remove the upper damp heater. (3) Remove the screw fixing the damp heater for the mirror. Remove the clamp fixing the cable. (4) Remove the 2 screw fixing the cable bracket. (5) Disconnect the connector, and remove the cable. Then, remove the damp heater unit. [N] SLG board cooling fan (1) Remove the original glass and the lens cover. (2) Remove the 2 screws and the harness from the clamp, and disconnect the connector connected to the APS harness from the lens cover to remove the fan. [O] Home switch (1) Remove the 2 claws fastening the home switch Claws mounting section on the base to remove the home switch. 7 - 25 SCANNER 8. PRINTING 8.1 Function Outline The laser optical system functions to irradiate the photosensitive drum with a laser beam producing a latent image. The printer controller circuit generates the laser beam. The Laser drive board converts the image signals to light emissions that are ultimately sent to the laser diode for irradiation. The polygonal mirrors, the lenses, the reflective mirrors, as well as other optical elements, play a role in directing the laser beam to the photosensitive drum. The unit should not be disassembled in the field, as they are susceptible to dust which would deteriorate the quality of its output. Laser unit Laser diode Lens Aperture Cylinder lens [Rear side] Laser drive board Polygonal mirror [Exit side] Polygonal mirror motor Galvanic mirror Half mirror fθ2 lens Polygonal mirror motor drive board Reflection mirror HSYNC detection board To the drum [Front side] Slit glass (Laser light window) fθ1 lens [Feed side] HSYNC detection mirror Fig. 8.1-1 Laser Scanning Overview 8-1 PRINTING Feed side Rear side Front side PLG PCboard Exit side Fig. 8.1-2 Laser Optical Unit Overview PRINTING 8-2 8.2 Structure (1) Laser Unit The laser unit comprises a laser diode, laser drive board, finite lens and aperture. 1 Laser diode and laser drive board The laser diode controls emission of laser beams based on the laser control (ON/OFF) signals from the laser drive board. 2 Finite lens The finite lens focus the laser beam on the surface of the photosensitive drum. 3 Aperture The aperture regulates the shape of the laser beam at the laser beam irradiation position. 4 LASER SAFETY The beam of the semiconductor laser is itself extremely weak (about 120 mW), but focusing the parallel rays results in an increase in energy to which extended exposure is hazardous. The laser optical system of the digital plain paper copier is encased in metal which in turn is housed in the external cover. There is thus no risk of leaks during use, nor during normal servicing. Note, however, extreme care must be exercised when servicing involves focusing the laser. Such operations are hazardous and must not be attempted unless you are specifically trained to work in this area. The warning label shown below is attached on the left side of the upper inner cover. DANGER – LASER RADIATION WHEN OPTICAL UNIT OPEN OR DRUM UNIT REMOVED AND INTERLOCK DEFEATED. AVOID DIRECT EXPOSURE TO BEAM. >PS< VORSICHT – LASERSTRAHLUNG, WENN DIE ABDECKUNG GEÖFFNET ODER DIE TROMMEL ENTFERNT UND DIE VERRIEGELUNG UNWIRKSAM GEMACHT WIRD. NICHT DIREKT DEM STRAHL AUSSETZEN. DANGER – RAYON LASER LORSQUE LE BLOC OPTIQUE EST OUVERT, LE TAMBOUR RETIRE ET LE VERROUILLAGE HORS D’USAGE. EVITER L’EXPOSITION DIRECTE AU RAYON. [CAUTION] • Do not insert tools that are highly reflective into the path of the laser beam. • Remove all watches, rings, bracelets, etc. (2) Galvanomirror Four laser units are mounted on this scanning unit, and 4-line scanning is possible by scanning of one plane of the polygonal mirror. The galvanomirror controls the position of the laser beams in the secondary scanning direction so that optimum pitch (42.3 µm) between the four laser beams can be maintained at all times. 8-3 PRINTING (3) Half mirror Half mirrors are used for combining and aligning to separate optical axes the laser beams that are emitted from the four laser units. The transmissivity and reflectivity of each half mirror are designed so that the laser power is the same at the point that the four laser beams are combined. Laser 1 Half mirror 1 2 Half mirror 2 3 Half mirror 3 4 1 2 3 4 PRINTING 8-4 Laser beams (4) Polygonal Mirror Motor Unit The polygonal mirror motor unit comprises a polygonal mirror and a polygonal mirror motor. Drum A 1 Polygonal mirror motor The polygonal mirror motor rotates the polygonal mirror at high speed as follows: During standby: 18608.1 rpm During copying (600 dpi): 18608.1 rpm 2 Polygonal mirror The laser beams emitted from the laser diodes are reflected by this mirror. As the po- Laser beams lygonal mirror is rotated by the polygonal mirror motor, the direction of the reflected B Drum laser light moves in sync with mirror rotation. The direction of movement is the primary scanning direction of the image with four scans ending in one plane of the polygonal mirror as four lasers are mounted. As the polygonal mirror has eight planes, 32 scans are completed in one rotation of the polygonal mirror. Laser beams Drum C Four scans are completed by completion of steps A to C . Four scans are carried out on one plane of the polygonal mirror. 32 scans can be carried out with one rotation of the polygonal mirror. 8-5 PRINTING (5) fθ lens 1 and 2 These lenses perform the following compensations on the laser light reflected by the polygonal mirror. 1 Equidistant scanning Wide The laser light reflected on the polygonal mirror is scanned at the same angle as the polygonal mirror is rotated at the same speed. That is, when the scan is completed, Narrow the dot-pitch on the drum becomes the wide spaces at both edges and the narrow Drum spaces in the center. So, in order to make the dot pitch equidistant, laser light is compensated so that it is scanned on the drum at equal speeds. Lens 1 Lens 2 Equidistant Mirror plane is tilted. 2 Pyramidal error compensation The reflecting plane of the polygonal mirror is tilted in either of two directions with respect to the perfect vertical. Deviation of the laser light (with respect to the perfect horizontal) caused by this reflected plane’s pyramidal error is compensated. Deviation 3 Laser beam sectional shape The sectional shape of the laser beam on the drum is compensated. (6) HSYNC detection PC board After the laser beams are scanned by any reflecting plane of the polygonal mirror, they are reflected by the HSYNC detection mirror to become incident to the PIN diode on the HSYNC detection PC board. The primary scanning synchronizing signal is formed by detection of these laser beams. The pitch (42.3 µm) between the four laser beams and the laser beam power are detected on the drum surface. PRINTING 8-6 (7) Laser drive board This drive board has the following functions: 1 APC control function (for compensating unevenness in the laser intensity caused by temperature) 2 Laser ON/OFF generating function 3 Function for generating synchronizing signals in the primary scanning direction (8) Reflection mirror The mirror reflects and guides laser light reflected by the polygonal mirror onto the drum. (9) Slit glass The slit glass is located at the position where the laser beam is output from the laser unit to prevent dust inside the laser unit. 8-7 PRINTING 8.3 Laser Diode The laser used in this copier is an AlGaInPtype semiconductor laser. This laser outputs in the singlehorizontal mode, and its oscillation wavelength is about 685 nm. This semiconductor laser is powered by a +5VDC power supply, and its optical output is controlled to about 2.5 mW. Output of a PIN diode for monitoring light output built into the semiconductor laser is used for controlling this. The semiconductor laser has the optical forwardoutput current, and monitors the current characteristics shown in the figure on the right. Emission Optical output (mW) of light is started when the forward current reaches or becomes greater than the threshold current. The Low temperature High temperature monitor current is disparate due to the characteristics of each of the semiconductor lasers. Optical output must be adjusted so that it is maintained at a constant value. Forward current Monitor current Also, as the optical output of the semiconductor laser drops when its temperature increases, APC Current (mA) Bias current Threshold current is also required to maintain the optical output at a constant value. APC is also carried out on the bias current when the copier is not printing to improve the optical output rise time due to the temperature Fig. 8.3-1 characteristics of the laser used in this copier. Semiconductor laser Laser power comparison circuit Laser driver circuit Constant optical output Monitor output Monitor conversion Fig. 8.3-2 Block diagram Fig. 8.3-2 shows a block diagram of the semiconductor laser control circuit. The monitor output from the semiconductor laser is controlled for each of the semiconductor lasers beforehand so that a constant voltage is maintained when the optical output is 2.5 mW. After conversion, the voltages are fed back to the laser power comparison circuit. Here, comparison of the laser power voltage set to the control circuit is carried out for every single scan. As a result, the laser driver circuit increases the forward current when laser power is insufficient. Alternately, the forward current is decreased when laser power is excessive so that the optical current is constant. Likewise, the bias current is controlled so that it is constant. PRINTING 8-8 8.4 Disassembly and Replacement [A] Laser light unit (1) Remove the FAX glass holder, original glass and left top cover. (2) Slide the carriage to the feed side, and remove the 2 fastening screws on the laser unit from the panel holes. (3) Remove the indicator screws, and remove the scanner section lens cover after sliding the indicator. (4) Disconnect the connector on the system board Cover Connector side of the harness connecting the scanner logic board and system board, and remove the cover on the rear side. (5) Disconnect the connector on the system board side of the harness connecting the system board and PLG board. Connector (6) Remove upper exit cover, and open the lower exit cover. (7) Remove the slot cover on the inside of the upper exit cover (15 screws). 8-9 PRINTING (8) Disconnect the 4 connectors from the system board, and remove the 2 screws to draw out Connector the system electronics unit. (9) Disconnect the 2 connectors on the PLG board and realy connector of the harness from the Stay PLG board and remove the harness from the clamp. (10) Remove the unit positioning stay (2 screws). Clamp (11) Draw out the laser unit along the rail paying attention to where you are holding it. Note: Before you draw out the laser unit, make sure that the connectors in step (10) are disconnected. Notes: 1. Temporarily place the laser unit that you removed with the motor side facing up so that the laser unit is not subjected to a load. 2. Take care not to dirty the slit glass of the laser unit with fingerprints or other marks. PRINTING 8 - 10 [B] PLG board (1) Disconnect the 4 connectors at section A (WHPLG-GLV) and section B (WH-PLG-LDR1 to 4- A 300). B (2) Turn the laser unit over to its motor side, remove the fixing screw on the PLG board, and E disconnect the connectors at section C (WHPLG-SNS1-300) and section D (WH-PLGPOL). Note: During this operation, prevent the connec- C D tor at section A from becoming disconnected. 8 - 11 PRINTING 9. PAPER FEED SYSTEM 9.1 General 9.1.1 Functions This unit feeds paper which is set in the LCF, the cassette or the manual feed tray to the transfer position. The paper feed section is mainly comprises an aligning section, large capacity feeder (LCF) and paper feed pedestal (PFP). 9-1 PAPER FEED SYSTEM 9.1.2 Motor drive circuit ■ Brush motor drive circuit • Feed motor (M32) (FED-MOT) : Driven by IC39 (LGC PC board: TA8428K) • Tray motor (M30) (TRAY-MOT) • Main cleaning motor (M11) (CLN-MOT) : Driven by IC37 (LGC PC board: TA8429H) : Driven by IC58 (LGC PC board: TA8428K) • Belt cam motor (M26) (TRB-CAM-MOT) : Driven by IC2 (LGC PC board: TA8428K) The block diagram of TA8428K is shown below. Detector for overheating and overvoltage Short-circuit protector Control logic 1 2 D11 D12 3 M (+) 4 5 6 7 GND M(-) Vcc Vcc DI1 and DI2 are input terminals for the signals from the microcomputer. In the control logic section, forward and backward rotation of the motor is controlled (ON and OFF) based on the signals from the microcomputer. Output Input PAPER FEED SYSTEM Remarks DI1 DI2 M(+) M(-) H H L L Brake L H L H CW H L H L CCW L L OFF (high impedance) 9-2 STOP ■ Pulse motor drive circuit (Constant voltage bipolar type) Aligning motor (M17) (RGT-MOT) is driven by 2SD1415A of Q2 to Q5 on the logic PC board. The circuit is shown below. A DC 24V ZDA A X ZDA QA B ZDB QA DA ZDB QB DA B QB DB DB 2SD1415 X 4/STA404A Construction of motor drive In the case of 2-phase excitation, AB, BA, AB, and BA will be successively excited. While transistors QA and QB are ON, current from the +24V stabilized power supply will flow into phases A and B. Next, while QA is OFF and QA is ON, the current which flowed through phase A will be cut off owing to the disappearance of a flow path. At this point, however, phases A and A will be inductively coupled, causing the current from the 24VDC power supply to be diverted through diode DA to phase A, in the direction marked X. When the currnet flowing in this direction becomes zero, current will flow through QA to excite phase A. At the instant when QA goes OFF, the current which flowed through phase A abruptly decreases, causing a high voltage to appear at the collector of QA. Because of Zener diode ZDA, however, the collector voltage is held at the Zener voltage, protecting transistor QA and diode DA. 9-3 PAPER FEED SYSTEM 9.1.3 Detection of the remaining amount of paper ■ Paper-empty detection • When the LCF or the cassette has run out of paper, the LCF door is opened, or the cassette is removed, the “ADD PAPER” symbol ↓ lights on the display panel on the copier. ■ Detection principle • When the cassette is selected and after the START button is depressed, the tray is lifted to the feed position and makes contact with the feed rollers. The Tray-Up Switch is directly connected to the feed roller assembly and thus it is actuated moments after the feed rollers make contact with the paper. After the completion of every paper-feed operation (per tray unit), the same unit is repositioned to the down position and is removed from the feed roller assembly and thus, from the Tray-Up Switch. The PFC measures the period of time that it takes the Tray-Up Switch of each cassette to be actuated (turned ON) for every time that it is used. It does this for every paper feeding operation. Obviously, the Paper Feed Control Circuit (PFC) acknowledges the differences in the duration of time it takes for the Tray-Up Switch to actuate during every print cycle and makes calculations based on time differences every time the tray is used. These calculations are translated into icons depicting one of five displays on the LCD panel. See illustrations below. PFP cassette LCF N Status N=0 N Status Empty N=0 Empty 1< =N< = 125 Paper remaining 1< =N< = 500 Paper remaining 125<N < = 250 Paper remaining 500<N < = 1000 Paper remaining 250<N < = 375 Paper remaining 1000<N < = 2000 Paper remaining 375<N Paper remaining 2000<N Paper remaining PAPER FEED SYSTEM Display 9-4 Display 9.2 Aligning Section 9.2.1 Introduction The aligning section aligns the leading edge of paper fed from the LCF, PFP and manual feed tray, and transports the paper to the transfer position. This section comprises an aligning roller, paper stop switch and its drive mechanisms (aligning motor). (1) Aligning roller Paper fed from the feed roller is held in contact against the aligning roller, which is at rest, to align the leading edge. The upper and lower aligning rollers then rotate to transport paper to the transfer position. The aligning rollers are brushed to prevent paper dust from adhering to them. (2) Paper stop switch Detects that the leading edge of paper has arrived at the aligning roller. It also detects that the trailing edge of paper has passed through the aligning roller. In the former case, the copier detects that the aligning rollers have completed paper alignment. The switch also uses paper jam detection. 9.2.2 Configuration and drive system Upper aligning roller G20 Notes Lower aligning rolle G TP TB Z P TP16 TP22 : Forward rotation : Backward rotation : Gear : Timing pulley : Timing belt : Number of teeth : Pich (mm) Aligning motor G25 TB(Z58/P3) 9-5 PAPER FEED SYSTEM 9.2.3 Disassembly and replacement [A] Upper aligning roller Developer stay (1) Remove the aligning motor and developer stay front side and rear side 3 screws for each. (2) Remove the front E-ring, bearing and bush. (3) Slide the upper aligning to the rear, take off the rear bushing, and then remove the upper aligning roller. (4) When replacing the roller, also remove the 2 set screws, 2 E-rings, pulley, bearing, bush, Bush E-ring [Front side] gear and pin. [Rear side] [Rear side] [B] Upper brush (1) Remove the developer and one brush Fixing screw. (2) Remove the upper brush in the direction of the arrow. Brush fixing screw [C] Lower aligning roller (2) (1) Remove the aligning unit. (2) Remove the paper guide (2 screws). Paper guide (3) Remove the spring hooked on the roller end. (2 screws). (4) Remove the clip on the front side, and slide the roller together with the bush and bearing to the front side, draw out the rear side from the frame. Then, lift the roller upwards to remove. (5) When replacing the roller, remove the gear and the pin. PAPER FEED SYSTEM 9-6 Aligning roller (L) Clip (2) [D] Lower brush (1) Remove the developer and the cleaner. After drawing out the transfer belt unit, remove the brush fixing screw. (2) Remove the lower brush in the direction of the arrow. Note: When assembling, insert the projection of the brush securely in the hole in the rear frame. [E] Aligning motor (1) Remove the flywheel. (2) Remove the waste toner transport pipe unit. (3) Remove the motor bracket (3 screws). Note: When installing motor bracket, Make sure tat the motor bracket is fastened properly matching the embossed sections for posi- Embossed section for positioning Motor bracket tioning shown in the figure on the right. Contact Embossed section for positioning (fulcrum) (4) When replacing the motor, loosen the 2 set screws, remove the flange and pulley, and then the 3 screws. Note: When assembling, align the cut surface of the pulley with the one of the shaft. Set screw Aligning motor Flange Pulley 9-7 PAPER FEED SYSTEM [F] Paper-stop switch (1) Remove the aligning unit. (2) Remove the 2 screws and the bracket fixing the paper stop switch. (3) Disconnect the connector, remove the two hooks, and then the paper-stop switch. Aligning unit frame Actuator Note: When installing the switch bracket, install the switch bracket so that the positional relationship between the actuator and switch is as shown in the figure on the right. Switch Mounting switch [G] Aligning unit (1) Disconnect the connector on the rear side. Wheel Connector (2) Remove the developer and the cleaner, draw out the belt transport unit, and then remove the pin bracket (1 screw). PAPER FEED SYSTEM 9-8 Belt transport unit (3) Slide the aligning unit to the front side and remove in the direction of the arrow. Note: When installing the aligning unit, prevent the two leaf springs from becoming bent. 1 2 9-9 PAPER FEED SYSTEM 9.3 Large Capacity Feeder (LCF) 9.3.1 Introduction For making large volumes of copies, the large capacity feeder (LCF) is designed to stack about 4,000 sheets of copy paper. The LCF consists of the following three main parts: (1) Tray section 1 Elevator tray ................... The elevator tray is designed to transport the stacks of paper to the paper feed mechanism. The unit functions to keep the paper biased towards the feeding mechanism so that paper is always in contact with the feed rollers. When paper supply is exhausted, the tray will be lowered. 2 Elevator mechanism ....... The wire on either side of the elevator tray are wound around (or un- wound from around) the wire winding pulley by the tray motor drive to move the elevator tray up and down. 3 Switches ......................... Switches detect at the bottom and top positions of the elevator tray and the presence of paper. When the belt winding pulleys rotate counter clockwise (arrow A ), the elevator tray moves up using the principle of a tackle. R F Wire winding pulley A Tray elevation gear A (2) Paper feeding section This unit sends paper which is set in the LCF or the manual feed tray to the aligning section.The paper feed secton is mainly comprised of pick-up rollers, feed rollers, separation rollers, manual-feed switch, paper-empty switch, tray-up switch, paper-start switch and also their drive mechanism. The drive mechanism has the feed motors for driving and the manual pick-up solenoid for up-anddown operation. 1 Pick-up roller This roller is for feeding paper out of the manual feed tray or LCF unit to the feed roller. The manual pickup roller feeds paper vertically. 2 Feed roller This roller is opposite of the separation roller. It is responsible for feeding paper to the aligning roller. PAPER FEED SYSTEM 9 - 10 3 Separation roller This roller is responsible for allowing only one copy paper to pass through during a paper feeding process. When more than one sheet of paper is present at the feed roller area, the tendency for more than one paper to feed through. The separation roller reverse-rotates and that action pushes the paper that is below the sheet that is to be fed, backwards thus not allowing it to be fed. Only the top paper is fed through. The principle of co-efficient of friction is what allows the top sheet of paper to be fed and not the lower sheet. The following explains the switches for detecting paper presence, height of the tray and paper feeding position to control the respective rollers ON and OFF. 4 Manual-feed switch Detects if paper is set in the manual feed tray. If so, manual paper feeding takes priority over cassette paper feeding. 5 Paper-empty switch This photointerruptor sensor detects paper in the LCF. If there is paper in the LCF, the actuator is lifted by the paper and the sensor detects the presence of paper. 6 Tray-up switch When the tray is lifted to allow the paper set in the LCF to contact with the LCF pick-up roller, the tray-up switch detects the height of the tray. 7 Paper-feed switch Detects the leading/trailing edge of paper passing through the feed roller. The switch is also used for paper jam detection. 9 - 11 PAPER FEED SYSTEM 9.3.2 Construction and drive mechanism (1) Tray section Tray up switch/LCF paper empty switch LCF feed roller LCF pick-up roller LCF separation roller Elevator wire Elevator tray Wire fixing stay Wire takeup pulley Tray-bottom switch Elevator tray Guide pulley Elevator wire (front side) Wire winding pulley Tray elevation gear Belt Tray motor Side pulley PAPER FEED SYSTEM Rise rotation direction (forward direction) 9 - 12 (2) Paper feeding section TB (Z105/P2) Manual pick-up roller TP20 Manual feed roller Manual pick-up solenoid Manual separation roller G20 TP30 TP20 G22 G30 LCF pick-up roller TP20 TP20 TB(Z57/P2) LCF feed roller TB(Z96/P2) TB(Z78/P3) TP20 LCF separation roller Rear side Feed motor G20 G20 TP10 TP20 G22 TP27 TB (Z110/P2) G30 TP78/G18 9 - 13 Notes : Forward rotation : Backward rotation G : Gear TP : Timing pulley TB : Timing belt Z : Number of teeth P : Pitch (mm) PAPER FEED SYSTEM 9.3.3 Description of operation ■ Operation of elevator tray (1) When the LCF door is closed with the power ON, the tray motor rotates in a forward direction and the elevator tray rises. (2) When the paper rises it pushes the LCF pick-up roller to which the tray switch and the LCF empty switch are connected. When this happens, the motor turns OFF. (3) The LCF pick-up roller moves down 2 to 3 mm when 10 to 20 sheets are fed. When this happens, the tray-up switch is actuated and electrically turns on the motor that raises the tray up 2 to 3mm. This raises the paper up to the level where it feeds efficiently. (4) When paper supply runs out in the LCF, the empty switch's actuator falls into a hole in the tray’s platform. When this happens, the motor is energized and is made to rotate in the direction that allows the paper tray to lower. Simultaneously, the LCD panel displays the ADD PAPER symbol. The tray motor stops when the LCF bottom switch is actuated. (5) When the tray is loaded with paper, and the door closed, the motor turns ON and drives the paper tray upward until it reaches the paper feed mechanism which turns the motor OFF. Note: The other time the motor rotates in the direction to move the tray down is when the TRAY DOWN key is depressed. Opening the door and then closing it allows the motor to energize and raise the tray. PAPER FEED SYSTEM 9 - 14 ■ Up-and-down movement of manual pick-up Manual pick-up roller roller When the manual pick-up solenoid is energized, the pick-up bracket is lowered and allows the Manual pick-up roller to also lower. When the manual pick-up solenoid is de-energized, the pick-up bracket is raised by the action of the solenoid’s spring that pulls back the lever and thus,the pick-up roller. Pick-up bracket Spring 1 Lever 1 Manual pick-up solenoid Pick-up bracket Manual pick-up roller 2 3 Manual pick-up roller Pick-up bracket Lever 1 Manual pick-up solenoid 9 - 15 PAPER FEED SYSTEM ■ LCF pick-up roller The LCF pickup roller remains lowered due to the force of gravity. The lower limit is fixed by the bracket. Bracket The tray height for the LCF is controlled by the trayup switch. LCF pick-up roller ■ Paper feed operation (manual feed, LCF feed) Manual feed roller Manual feed switch Manual pick-up roller Manual feed tray Manual separation roller LCF paper-empty switch / tray-up switch Upper aligning roller Lower aligning roller Paper-stop switch LCF paper-start switch LCF feed roller LCF separation roller LCF pick-up roller LCF (large capacity feeder) PAPER FEED SYSTEM 9 - 16 (1) Manual feed • The manual feed switch detects the presence of paper in the manual feed tray. • The manual pick-up solenoid is turned ON and the manual pick-up roller is lowered. • The feed motor revolves in a backward* direction and the manual pick-up roller, manual feed roller, and manual separation roller rotate, and paper feeding is started. • The manual pick-up solenoid is turned OFF, the manual pick-up roller rises, the paper presses the paper-stop switch and is aligned at the aligning rollers. • The feed motor stops, the aligning motor turns, and the paper is transported to the transfer process. (2) LCF feed • When the LCF is installed, the LCF pick-up roller remains in the lowered position. • The feed motor revolves in a forward* direction and the LCF pick-up roller, LCF feed roller, and LCF separation roller rotate, and paper feeding is started. • The paper presses the paper-stop switch and is aligned at the aligning rollers. • The feed motor stops, the aligning motor turns, and the paper is transported to the transfer process. In multicopying, the next sheet is fed to the paper-start switch by the feed motor and waits. * Forward rotation: clockwise viewed from the rear. ** Backward rotation: counterclockwise viewed from the rear. 9 - 17 PAPER FEED SYSTEM ■ Paper separation function Since the paper cassettes do not have separation claws, a pair of rollers (feed roller and separation The direction of paper feeding Paper-feed roller roller) are used inside the machine, as shown in Fig. 9.3-1. The separation roller is connected to its shaft through a spring joint torque limiter. The feed roller Spring joint (torque limiter) is rotated in the direction of the arrow ( ) at the same timing as the pick-up roller by the feed motor. Sparation roller The sepatation roller is driven in the direction of the arrow ( ) through the torque limiter. But when Fig. 9.3-1 there is no paper or only one sheet between the rollers, the friction between the rollers or that be- Paper-feed roller tween the sheet and the separation roller is large enough to force the separation roller in the direction of the arrow ( ), causing a slip in the torque limiter. 1 2 However, if multiple-sheet feeding occurs (Fig. 9.32), since the friction between the sheets is small, the lower sheet is forcibly separated from the upper sheet and is sent back in the direction of the arrow ( ) by the separation roller. The Upper sheet is fed in the directino of the arrow ( ) by the feed roller. Examples: If only sheet of paper 1 arrives at the separation roller, the force of the feed roller, which is greater than that of the separation roller, causes the separation roller to rotate in the ( ) direction, sending the paper on to the aligning rollers. If two sheets of paper ( 1 and 2 ) arrive at the separation roller, the force of the respective rollers is greater than the friction between the sheets of paper, and the top sheet 1 is sent in the ( ) direction by the feed roller while the bottom sheet 2 is sent in the ( by the separation roller. PAPER FEED SYSTEM ) direction 9 - 18 Separation roller Fig. 9.3-2 9.3.4 Disassembly and replacement (LCF LCF door section) [A] LCF door (1) Open the LCF door, take out the 3 screws holding the hinge, and remove the LCF door. Hinge [B] LCF feed cover (1) Remove the LCF door. (2) Remove the 5 screws. LCF feed cover [C] LCF unit (1) Open the right front cover and remove the LCF knob (2 screws). (2) Pull the LCF release lever to move the LCF unit toward the arrow in the figure. Note: Take care not to pinch your fingers. LCF release lever LCF knob (3) Remove the 2 screws each at the front and rear that fasten the LCF unit to the rails. LFC unit Rail(front side) 9 - 19 PAPER FEED SYSTEM (4) Lift the LCF unit to remove it. LCF unit [D] LCF fornt cover (1) Remove the 4 screws and then remove the LCF front cover. Drive bracket [E] Elevator wire (1) Lower the elevator tray as for as possible, and turn the power switch OFF. (2) Remove the LCF front cover. (3) Remove the 2 screws and the lowest PFP paper feed guide. (4) Remove the 2 screws and drive bracket. PFP paper feed guide unit (5) Remove the wire winding pulleies (front and rear Elevator wire sides) from the LCF unit together with the flange. Wire winding pully Flange (6) Remove the gear claw. You can now disassemble the gear and flange, and remove the eleva- Elevater wire Wire winding pully Flange Claw tor wire. Clip PAPER FEED SYSTEM 9 - 20 Clip (7) Remove the 4 clips (front and rear) fastening the elevator wire. LCF stay (8) Remove the 2 elevator wire clips each on the front and rear sides and the 4 elevator wires. Elevator wire clips Elevator wire Notes: Precautions when installing the elevator wires 1. Judging the elevator wires The longer of the 2 elevator wires is 1 (LCF door cover side), and the shorter is 2 the (LCF paper feed side). B A 2. Taking up the elevator wires Take up the 2 elevator wires ( 1 , 2 ) so that the following relationships are satisfied for each of the four pulleys ( A to 2 1 D ): Inner groove Outer groove A 1 Inner side 2 — B C Inner side D D Lower side C Outer side Upper side 9 - 21 PAPER FEED SYSTEM 3. Securing the elevator wire gears Insert elevator wire 1 into the gear groove followed by elevator wire 2 . Gear 4. Installing the gears Install so that the line formed by joining Flange the arrow marks is horizontal. If the arrow marks are out of alignment, this causes the elevator tray to be an angle. Horizontal Arrow marks [F] Tray motor (1) Disconnect the connector, take out the 3 screws, and then remove the tray motor unit. (2) Remove the 3 screws, and then take out tray motor. Note: Always carry this out with the elevator tray lowered. If the tray motor unit is removed while the tray is up, the tray is in danger of dropping. Connector Tray motor Tray motor unit [G] LCF door switch/LCF motor switch LCF door switch (1) Remove the LCF front cover. (2) Remove the 2 connectors. Fast-on tarminal (3) Remove the 2 screws and the LCF door switch unit. LCF motor switch (4) Remove the screw, the cover bracket and the fast-on terminal. (5) Remove the 2 screws and LCF door switch. (6) Remove the 2 screws and LCF motor switch. PAPER FEED SYSTEM Connector 9 - 22 [H] Tray bottom switch (1) Raise the elevator tray, and stop at the middle. (2) Remove the 2 screws and the bottom switch unit. Bottom switch unit (3) Remove the and connector on the tray bottom switch from the tray bottom switch unit. You can Tray bottom switch Connector now remove the switch. [I] LCF switch/PFP upper paper-stop switch (1) Pull out the LCF unit. (2) Remove the handle of front side and guide lever (1 screw for each). Guide lever Handle (3) Take off the top screw of link, and then remove the 2 guides (2 screws for each). Guide 9 - 23 PAPER FEED SYSTEM (4) Disconnect the connector, take out the 2 screws, and then remove the LCF switch bracket. Take out the 2 screws, and then remove LCF switch. (5) Take out the 2 screws, and then remove the PFP upper paper-stop switch bracket. Disconnect the connector and take out the screw, and LCF switch then remove PFP upper paper-stop switch. PFP upper paper stop switch [J] Manual pick-up roller (1) Remove the clip and draw out the shaft from the holder arm by pressing down the manual pickup roller. Then remove the pickup roller. Clip Pulley Manual feed pick-up roller Holder arm Clip [K] Manual feed roller Timing belt Manual feed pick-up roller One-way built-in side (1) Draw out the LCF unit. (2) Remove the clip of the manual pick-up roller. Paper guide Clip [L] (3) Take off the clip of the manual feed roller on the front, and then remove the manual feed roller from the holder arm with the shaft. [L] Manal separatin roller (1) Draw out the LCF unit. Manual feed roller (2) Remove the front paper guide (1 screw). (3) Remove the clip and draw out the manual separation roller from the shaft. PAPER FEED SYSTEM 9 - 24 Manual separation roller Clip Notes: Observe the following when assembling the pick-up roller, feed roller, and separation roller: 1. Mount the timing belt securely on the pulleys. 2. Mount the timing belt in the correct position. 3. Clips are to engage securely into the grooves in the shafts. 4. Check that there is no oil, on the timing Manual separation roller belt, pulley, or roller surfaces. Spring joint [M] LCF pick-up roller (1) Open the LCF door. Papar guide (2) Remove the clip and remove the weight from the front side. (3) Slide the shaft and remove the pick-up roller. Weight LCF pick-up roller Clip [N] LCF feed roller (1) Open the LCF door and remove the paper guide (2 screws). LCF feed roller Clip (2) Remove the clip and draw out the LCF feed roller from the shaft. Clip Note: The roller can be drawn out more easily from the shaft by pressing the separation roller shaft down. LCF separation roller [O] LCF separation roller LCF pick-up roller (1) Open the LCF door and remove the paper guide (2 screws). (2) Remove the clip and take the LCF separation roller off the shaft. Note: The roller can be drawn out more easily from the shaft by pressing the pick-up roller up, Built-in one-way clutch Weight LCF feed roller and pressing the separation roller shaft down. LCF feed roller 9 - 25 Built-in spring joint PAPER FEED SYSTEM [P] Feed motor Feed motor (1) Remove the LCF unit out and remove the manual feed tray. (2) Disconnect the connector, remove the 3 screws and the timing belt from the pulley to remove the motor bracket. (3) Remove the feed motor (3 screws). [Q] Varistor (1) Draw out the LCF unit and remove the varistor (2 screws). Notes: 1. When assembling, attach the short lead directly to the paper guide. 2. Tighten the screws securely. [R] Manual pick-up solenoid (1) Draw out the LCF unit. (2) Remove the rear paper guide (1 screw). Paper guide PAPER FEED SYSTEM 9 - 26 (3) Disconnect the connector, take out the 2 screws, and then remove the manual pick-up Manual pick-up solenoid solenoid. Note: When assembling, fasten the screws diagonally as shown below. Solenoid Screws [S] Manual-feed switch (1) Remove the paper guide. (2) Disconnect the connector, take out the screw, Connector and then remove the switch bracket. (3) Release the 4 hooks from the switch bracket, and then remove the manual-feed switch. Manual feed switch [T] LCF paper-empty switch/tray-up switch (1) Open the LCF cover. (2) Disconnect the 2 connectors, and remove the screw to remove the switch bracket. (3) Unhook the 4 claws to remove the switches. Connector 9 - 27 PAPER FEED SYSTEM [U] LCF paper-start switch (1) Draw out the LCF unit and remove the manual feed tray unit. (2) Remove the paper guide (2 screws on the rear side). (3) Remove the screw, disconnect the connector and remove the switch bracket. (4) Unhook the 4 claws to remove the switches. [V] Manual feed tray unit (1) Draw out the LCF unit and disconnect the 2 connectors on the rear side. Connector (2) Remove the 2 screws fixing the manual feed tray unit. (3) Bring the width guide towards the outside, and draw out the manual feed tray unit while pressing the manual pick-up roller down. PAPER FEED SYSTEM 9 - 28 9.4 Paper Feed Pedestal (PFP) 9.4.1 Introduction The paper feed pedestal (PFP) consists of three front-loading cassettes, which can feed paper independently. The PFP consists of the following components. 1 Font-loading cassette ......... A cassette which allows paper to be loaded from the front. 2 Elevator mechanism ........... The paper in the cassette is loaded on top of the tray. The tray motor can raise tray so that the top sheet of paper in the tray is in the pick-up position. 3 Paper feed mechanism ...... The paper feed mechanism consists of the pick-up roller, feed roller, separation roller and aligning roller which transport the paper from the cassette to the aligning roller in the copier. 4 Switch ................................ Switches (sensors) detect whether the cassette is inserted, whether there is any paper, the tray height and the movement of paper on the paper feed path. 9 - 29 PAPER FEED SYSTEM PAPER FEED SYSTEM 9 - 30 Lower tray PFP lower tray-up switch PFP lower paper-empty switch Middle tray Middle elevator PFP middle tray-up switch PFP middle paper-empty switch Upper tray PFP middle pick-up roller MIddle feed clutch Upper elevator Upper feed clutch Lower elevator PFP lower pick-up roller PFP upper paper-start switch PFP upper separation roller PFP middle separation roller PFP middle paper-start switch PFP middle feed roller PFP lower aligning rollers PFP lower paper-stop switch PFP middle paper-stop switch Middle aligning clutch PFP middle aligning rollers Upper aligning clutch PFP upper aligning rollers PFP upper paper-stop switch Lower aligning clutch PFP lower separation roller PFP lower paper-start switch PFP lower feed roller Lower feed clutch PFP upper pick-up roller PFP upper tray-up switch PFP upper paper-empty switch PFP upper feed roller 9.4.2 Component names 9.4.3 General operation ■ Explanation of operation [A] From power-on to the ready state (1) When the copier power is switched ON, power is also supplied to the PFP. At this time, the PFP tray motors (M27), (M28) and (M29) are turned ON in the CCW direction causing each tray to start to rise. When the rising trays switch on the PFP tray-up switches (S30), (S34) and (S38) (L→H), the PFP tray motors (M27), (M28) and (M29) stop and the trays no longer move. At this time, if the PFP paperempty switches (S29), (S33) and (S37) are OFF (L), there is assumed to be no paper and the PFP tray motors (M27), (M28) and (M29) are switched ON in the CW direction, lowering the trays. When the PFP paper-empty switches (S29), (S33) and (S37) aer ON (H), it is assumed that there is paper in the tray and the tray stays in the raised position for two seconds. If there is no copy request during this time, the tray is lowered. (2) If the cassette is not inserted when the power is switched ON, the PFP tray motor for that level cannot be switched ON. When the cassette is inserted, the tray will rise and check for paper. (3) If any of the PFP paper-stop switches (S27), (S31) or (S35) are ON when the power is switched ON (meaning that there is paper in the transprot mechanism), the copier goes into a jam state and does not operate until the paper removed. [B] Ready state (1) After the trays are checked for paper by the above tray movements, the copier goes into the ready state. In the ready state, the trays are left in the lowered position. (2) If the cassette is removed and inserted while in the ready state, the tray movements are performed to check for paper. [C] From copy start to copy completion (1) When the PRINT key is pressed, the copier sets the CRUN (copier running) signal “H” and turns ON the developer motor (M16), drum motor (M12), heat roller motor (M18), etc. When the CRUN signal goes to “H”, the PFP turns ON the selected PFP tray motor (M27), (M28) or (M29) in the CCW direction and starts to raise the tray. 0.3 seconds after the CRUN signal goes to “H”, the pedestal motor (M31) is turned ON. (2) When the rising tray turns ON the PFP tray-up switch (S30), (S34) or (S38), the tray stops. At this point the paper-ready signal PRDY is returned to the copier (L→H). (3) The copier outputs the RQF (paper feed request) signal (L→H). (4) When the PFP receives the RQF signal, it sets the PRDY signal to “L” (BUSY) and starts to feed paper. (5) When the copier detects the PRDY signal state changing to Low, it assumes that the RQF signal was received, and resets RQF to Low. (6) The paper is aligned initially by the PFP aligning roller and then is aligned again by the copier’s aligning roller. (7) When the trailing edge of the paper passes the PFP paper-start switch (S28), (S32) or (S36), the next sheet of paper is ready to be fed so the PRDY signal is set to “H”. If subsequent paper feeding is required, the copier sets the RQF signal to High. This is repeated for the required number of copies. 9 - 31 PAPER FEED SYSTEM (8) For multiple copying, paper is fed so as to keep the distance between the sheets of paper constant. Consequently when the previous sheet of paper is being aligned by the copier’s aligning roller, the next sheet is being fed into the transport mechanism by the PFP. When the preceding sheet is stopped, the next one is also stopped. When the preceding sheet restarts, the next one also restarts. This maintains a constant spacing between the sheets of paper. (9) When copying is complete, the copier sets the CRUN signal to “L”. When the CRUN signal goes to “L”, the PFP turns OFF the pedestal motor (M31) and starts the PFP tray motor (M27), (M28) or (M29) in the CW direction to lower the tray. PAPER FEED SYSTEM 9 - 32 9 - 33 PAPER FEED SYSTEM Internal signals Signals at the copier side Signals at the PFD H L L H H L H PURGC PURGT PMRGC PMRGT PMFED PMFDC PFP PMTOP PMTRM ON OFF OFF ON ON OFF OFF ON ON OFF ON OFF ON OFF OFF ON OFF ON OFF ON OFF PSTP-SW ON (PRDY) (RSTART) (RQF) (CRUN) L 0 0.31 1.04 0.89 0.88 tray-up 0.88 brake 1.62 1.63 1.62 1.63 1.98 2.13 1.32 1.32 1.59 1.61 1.98 1.86 1.79 1.72 3.18 3.11 tray-down 2.81 3.05 2.68 2.61 2.43 2.80 3.05 3.58 3.65 4.20 stop 5.48 Timing chart for feeding two A4 sheets of paper from the middle cassette 2.27 2.13 2.73 2.67 2.41 2.41 2.14 2.20 1.95 2.26 2.20 1.32 1.62 1.79 2.14 2.15 1.30 1.33 1.76 2.02 1.24 0.89 0.90 0.89 0.90 5.47 Signals at the copier side Signals at the PFD PAPER FEED SYSTEM 9 - 34 Internal signals H L L H L H PURGC PURGT PMRGC PMRGT PMFED PMFDC PFP PMTOP PMTRM ON OFF OFF ON ON OFF OFF ON ON OFF ON OFF ON OFF OFF ON OFF ON OFF ON OFF PSTP-SW ON (PRDY) (RSTART) (RQF) (CRUN) L 0 0.33 1.07 1.07 0.90 tray-up 0.90 brake 1.66 1.67 1.66 1.67 2.01 2.16 2.35 1.35 1.35 1.62 1.65 2.49 2.46 2.86 2.74 2.67 3.08 3.23 3.16 3.69 3.62 tray-down 3.08 4.30 stop 5.53 Timing chart for feeding two LT sheets of paper from the middle cassette 2.16 2.31 2.18 2.24 1.99 2.02 1.91 1.83 1.74 1.84 2.85 2.77 2.70 2.45 2.30 1.35 1.36 1.67 1.79 2.18 2.19 1.33 2.06 1.27 0.91 0.92 0.91 0.92 5.52 ■ Abnormality detection [A] Jam detection (1) A paper misfeed in PFP is detected under the following conditions: 1 When the PFP paper-start switch (S28), (S32) or (S36) does not come ON within 1.6 seconds of the shart of paper feeding. 2 When the leading edge of the paper does not pass the PFP paper-stop switch within a constant time. (2) To clear a jam, slide the LCF unit, remove all paper from the transport mechanism and then close the front cover. If any of the PFP paper-stop switches (S27), (S31) or (S35) are ON when the door is closed, it is assumed that there is still paper in the transport mechanism and the jam is not cleared. (3) When a jam occurs in the PFP during multiple copying, paper fed prior to the jammed paper will be copied normally. [B] Service call (1) If the PFP tray-up switch (S30), (S34) or (S38) does not come ON within two seconds of the tray’s starting to rise at the following times: when the power is turned on, removing and inserting the cassette or starting to copy; then that cassette can no longer be used and “Add paper” will appear on the message display. (2) In order to clear the above condition, the cassette must be removed and installed or the power must be switched OFF and ON (It will not be cleared by opening closing the door.). 9 - 35 PAPER FEED SYSTEM *: Branch according to each level's PFP paper-empty switch (paper-empty detection). Only when a NO cassette with no paper is selected C1 * C2 All motors and clutches OFF PFP paper-empty switch ON? "ADD PAPER" flashing YES Is the copier's CRUN signal "H"? "ADD PAPER" symbol flashes NO YES PFP tray motor CW ON 7 Two-second delay 13 NO Lower tray Have two seconds passed since tray stopped? YES PFP tray motor CW ON Tray lowers Two-second delay 13 PFP tray motor OFF Tray stops PFP tray motor OFF Cassette switch OFF? Tray stop NO YES Cassette switch ON? YES 5 "ADD PAPER" no longer flashing 6 In the copier's CRUN signal "H"? Standby Paper feed standby NO Door open? YES 10 1 NO PAPER FEED SYSTEM YES 9 - 36 NO 10 3 Paper feed standby PFP tray motor CCW ON PFP tray-up switch ON? Tray rises YES PFP tray motor OFF NO Have two seconds passed since the tray started to rise? YES All motors and clutches OFF Tray stops 7 NO "ADD PAPER" display Pedestal motor ON? 13 YES NO NO Have 0.3 seconds passed since the copier's CRUN signal become "H"? Have 0.3 seconds passed since pedestal motor came ON? NO YES Pedestal motor ON YES NO 3 PFP tray motor OFF? 3 4 YES PRDY signal goes to "H" (READY) C3 9 - 37 PAPER FEED SYSTEM C3 Was there a paper feed request? (Copier's RQF signal="H") Waiting for paper feeding NO Copying completed? (CRUN="L") PRDY signal goes to "L" (BUSY) YES Paper feeding completed Paper feeding Feed clutch ON PFP paper-start switch ON? Paper feeding starts Have 1.6 seconds passed since feed clutch came ON? NO YES Jam NO 12 NO YES Leading-edge check time over? NO PFP paper-stop switch ON? NO YES Jam Delay for the aligning period 9 Feed clutch OFF 9 Aligning clutch ON Copier's paper-stop switch ON? YES NO Leading edge check time over? Delay for aligning period Aligning clutch OFF C4 PAPER FEED SYSTEM 9 - 38 YES Jam 9 NO C4 (The ON/OFF signal for the copier's aligning motor) NO Is the copier's RSTART signal "L"? YES Aligning clutch ON PFP paper-stop switch OFF? NO YES Delay from the trailing edge of paper passing PFP paper-stop switch (PFP paper-stop switch off) until it has cleared the aligning roller. Aligning clutch OFF 4 9 - 39 PAPER FEED SYSTEM 12 Paper feeding completed Aligning clutch ON Pedestal motor OFF PFP tray motor CW ON Tray lowers Copying started? (Copier's CRUN="H") YES PFP tray motor OFF NO NO 50 msec. delay Have two seconds passed since PFP tray motor CW came ON? Paper feeding standby YES PFP tray motor OFF Tray stops 5 PAPER FEED SYSTEM 9 - 40 10 Tray stops 9 Jam All motors and clutches OFF "CLEAR PAPER" flashing NO Door open? YES NO Door closed? YES PFP paper-stop switch ON? YES NO "CLEAR PAPER" goes OFF 6 9 - 41 PAPER FEED SYSTEM 9.4.4 Configuration and drive system The paper feed pedestal (PFP) consists of the cassettes, pick-up rollers, feed rollers separation rollers, aligning rollers and their associated drive mechanisms. ● Feed motor system The PFP pick-up, PFP feed, PFP separation rollers in the cassettes and PFP aligning rollers are driven by the pedestal motor. ● Tray-up motor system Raises and lowers the trays. PFP upper aligning unit G : Gear PFP upper aligning roller TP : Timing pulley TB : Timing belt : Fixed to the shaft G21 G35 Drive unit G15 G30 G30 Upper aligning clutch PFP upper feed unit G25 TP25/Z28 PFP upper feed roller PFP middle aligning roller le PFP upper rol up separation c ki p roller er pp Pu PF TP20 G22 G21 TB G20 G35 TP25/G28 G30 G15 G30 Middle aligning clutch G30 G25 G30 G25 Upper feed clutch G25 TP20 TB G25 G25 TB TP20 G20 PFP middle feed roller PFP middle feed roller TP25/G28 o PFP middle pr k-u separation pic e l roller idd Pm PF TP20 G22 PFP lower aligning roller G20 G21 TB TB G25 G25 G35 G15 G25 G25 Lower aligning clutch TP20 rol PFP lower -up separation ick p roller er ow Pl PF TP20 TB TB G22 G20 TB G10 G25G25 PAPER FEED SYSTEM G25 G30 Lower feed clutch 9 - 42 TP20 G30 G25 G64/TP28/ TP25/G28 PFP lower feed roller PFP lower feed roller TP25/G28 Pedestal motor TP20 TB G25 G30 G20 Middle feed clutch G30 ller G30 TP25/G2R G30 r G20 TB TP20 ler 9.4.5 Explanation of operation ■ Cassette tray up-and down operation The previous paper feeding method was for the pick-up roller to lower itself on to the paper and feed at forward. With the paper feed pedestal, the paper-feed elevator mechanism raises the tray at the base of the cassette to the pick-up roller’s paper feed position to feed paper. Gear15 Gear20 Gear35 Spring Gear144 Wheel 28/gear14 Elevator B Gear25 Cassette protrusion Pusher Tray motor A Elevator lever Spring Raising the tray • The tray motor rotates in the direction of the arrow ( ). • Worm wheel 28 rotates in the direction of the arrow ( the same direction. ). Gear 14 is connected so it also rotates in • When gear 35 rotates in the direction of the arrow ( rotate in the same direction. ) the spring tightens and gear 15 and 20 • Gear 144 rotates in the direction of the arrow ( the cassette tray. ) raising the elevator via the shaft and pushing up Lowering the tray • The tray motor rotates in the direction of the arrow ( ). • Worm wheel 28 and gear 14 rotate in the direction of the arrow ( • Gears 35, 15 and 20 rotate in the direction of the arrow ( ). • Gear 144 rotates in the direction of the arrow ( the cassette tray. ). ), lowering the elevator via the shaft and lowering Lowering the tray when the cassette is removed The tray is lowered as follows when the cassette is removed with the tray in the raised position: • The protrusion on the front side of the cassette lowers the elevator lever pusher as the cassette is removed (arrow A). • The gear at the tip of the elevator lever moves in a CCW direction (arrow B), engaging gear 25 which rotates in a CW direction. 9 - 43 PAPER FEED SYSTEM • When gear 20 rotates in a CCW direction ( ), the spring loosens and gear 15 becomes free. • As gear 15 becomes free, gear 144 is pulled in a CCW direction ( elevator. PAPER FEED SYSTEM 9 - 44 ) by its spring, lowering the ■ PFP feed roller and PFP separation roller release operation The PFP feed roller and PFP separation roller have a releasing mechanism to enable jams to be cleared if a paper misfeed occurs with the leading edge of the paper not clear of the PFP feed roller. This releasing mechanism prevents the paper from ripping inside the copier which would otherwise happen if the cassette was removed to clear a jam with the paper held between the PFP feed roller and PFP separation roller. Spring B PFP feed roller PFP separation roller Spring A Pressure lever Cassette rib D C Cassette Set lever C D Set lever Cassette rail Pressure lever Spring A With the cassette installed When the cassette is inserted, the PFP separation roller is pushed up against the PFP feed roller by the pressure lever connected to spring A . At this time, the set lever is pushed by the cassette rib, and rotates in the direction and is not in contact with the pressure lever. Spring B PFP feed roller PFP separation roller Pressure lever Set lever Spring A Pressure lever Set lever Spring A With the cassette removed When the cassette is removed, the set lever is rotated in the ( ) direction by spring B . Position D of the set lever pushes up at position C of the pressure lever, causing it to rotate in a CCW direction ( ), separating the PFP separation roller from the PFP feed roller. 9 - 45 PAPER FEED SYSTEM ■ Cassette insertion operation When the cassette is inserted into the paper feed pedestal, the cassette latch pushes up the lever arm, lowering the PFP pick-up roller. (The roller does not lower itself onto the paper in the cassette.) Rear side PFP tray-up switch (S30) PFP paper-empty switch (S34) (S29) (S38) (S33) (S37) Pick-up arm Actuators Pick-up roller Cassette latch Lever arm Front side The cassette switches on the rear side detect whether a cassette is inserted or not. Cassette switch Cassette Actuator PAPER FEED SYSTEM 9 - 46 The PFP tray motor (M27), (M28) or (M29) turns ON and raises the cassette tray when the cassette switch detects that a cassette is installed. The pa- PFP tray-up switch PFP paper-empty switch per on the tray contacts with the PFP pick-up roller, which pushes up the roller. When the pick-up arm Actuator Pick-up roller is detected by the tray-up switch (S30), (S34) or (S38), the tray motor turns OFF and the tray stops. This position becomes the paper-feed position. If there is paper on the tray, the actuator at the center Pick-up arm Cassette tray Paper of the PFP pick-up roller is also detected by the PFP paper-empty switch (S29), (S33) or (S37). If there is no paper on the tray, then the actuator enters the hole in the tray (only at the position of the actuator) and does not reach the PFP paperempty switch detection position, indicating that there is no paper. Cassette base Fig 9.4-1 In the case where there is paper (the actuator is detected) If no copy is started, the tray is lowered two seconds after the tray reaches the paper feed position. PFP tray-up switch PFP paper-empty switch PFP pick-up roller Pick-up arm Tray hole in the actuator position Cassette tray Actuator Cassette base Fig 9.4-2 In the case where there isn't paper (the acutuator isn't detected) 9 - 47 PAPER FEED SYSTEM ■ Paper feed operation When the PRINT key is pressed on the control panel: • The PFP tray motor (M27), (M28) or (M29) corresponding to the selected cassette rotates to CCW direction raising the cassette tray until the paper on the tray contacts the PFP pick-up roller. At this point the tray stops. • The pedestal motor (M31) rotates, the feed clutch corresponding to the selected cassette comes ON and the pedestal motor (M31) drives the PFP pick-up, PFP feed and PFP separation rollers which start to feed paper from the cassette. • The leading edge of the paper is detected by the PFP paper-start switch (S28), (S32) or (S36). If the PFP paper-stop switch (S27), (S31) or (S35) is ON, then the paper stops at this point. If the switch is OFF, the paper continues. • When the leading edge of the paper is detected by the PFP paper-stop switch (S27), (S31) or (S35), it is aligned by the stationary PFP aligning roller. • A fixed period of time after the PFP paper-stop switch (S27), (S31) or (S35) detects the leading edge of the paper, the feed clutch goes OFF and the PFP pick-up, PFP feed and PFP separation rollers stop. Aligning is complete. • Next, the aligning clutch (CL7), (CL8) or (CL9) comes ON and the pedestal motor (M31) drives the PFP aligning roller to transport the paper to the copier. • The paper is aligned again by the copier’s aligning roller and transported to the copy process. PAPER FEED SYSTEM 9 - 48 9.4.6 Disassembly and replacement [A] Cassettes (upper, middle, and lower) (1) Pull out the cassette, take out the 2 stopper screws, and then remove the cassette. * Repeat the procedure for the upper, middle and lower cassettes. Cassette [B] PFP feed unit (upper, middle, and lower) (1) Pull out the LCF unit. (2) Slightly draw out the cassettes corresponding to the feed units of each of the top, middle and lower cassettes from a loaded state. (3) Remove the 2 screws. (4) Pull out the PFP feed unit. Note: When installing, after installing the feed unit, put in the cassette. * There are three PFP feed units (upper, middle and lower), with identical units used for the upper and middle units. The PFP aligning roller and PFP paper stop switch are not attached to the lower unit. 9 - 49 PAPER FEED SYSTEM [C] PFP pick-up roller (upper, middle, and PFP pick-up roller Preseparation roller guide lower) (1) Remove the PFP feed unit. Arms (2) Press the arm in the direction of allow ( ) to remove the PFP pick-up roller from the arm and then take off the PFP pick-up roller from the timing belt. PFP pick-up roller PFP pick-up roller Timing belt PFP feed unit Arm [D] PFP feed roller/PFP separation roller (upper, middle, and lower) PFP separation roller PFP feed roller PFP feed roller (1) Remove the pre-separation roller guide (2 screws). See Fig. [C]. (2) Take out the clips and then remove the rollers from the shafts. Guide Clips With built-in spring joint PFP separation roller [E] PFP aligning roller (metallic roller) (upper, Bushing and middle) (1) Remove the 3 E-rings, and the gear, pin, collar, Pin and bushing. (2) Remove the opposite E-ring and bushing. Gear Note: When assembling, be sure to keep to the mounting direction of the gear and collar as Bushing shown below. E-ring PFP aligning rollers E-ring E-rings Collar PAPER FEED SYSTEM Collar Gear 9 - 50 (3) Slide the whole roller in the direction of arrow A, lift out one shaft and then remove the metalic roller. PFP aligning roller (metallic roller) Gear E-ring (4) When replacing the roller, remove the E-ring, gear, and pin. Pin Note: When assembling, be sure to keep to the mounting direction of the gear as shown below. Rubber roller Gear [F] E-ring PFP aligning roller (rubber roller) (upper and middle) Gear (1) Remove the metal roller. (2) Remove the spring, E-ring, and bushing on each end. (3) Remove the rubber roller. E-ring Pin Spring, E-ring, and bushing E-ring (4) When replacing the rubber roller, remove the E-ring, gear and pin. Spring Notes: Precaution for assembling 1. Spring Bushing Front : Yellow, Rear : black 2. Gear mounting direction E-ring PFP aligning roller (rubber roller) Gear [G] PFP paper-stop switch (upper and middle) (1) Remove the pre-separation roller guide. See Fig. [C]. (2) Take off the 2 E-rings, gear pin and bushing at the rear of the separation roller shaft. (3) Pull out the separation roller with its shaft toward the front. E-ring Gear Stay guide fixing screws Pin,E-ring,bushing Separation roller 9 - 51 PAPER FEED SYSTEM (4) Take out the 4 screws each at the front and rear and remove the stay guide. Note: When removing the stay guide, pay atten- Stay guide tion to the harness fastening the guide. (5) Take out the screw, disconnect the connector and then remove the PFP paper-stop switch. PFP paper-stop switch Connector PFP paper-stop switch [H] PFP paper-start switch (upper, middle, and lower) PFP paper-start switch (1) Remove the stay guide. (2) Disconnect the connector, take out the 2 screws and then remove the switch bracket. (3) Release the 4 hooks from the bracket and then remove the PFP paper-start switch. Connector Clips PFP paper-start switch [I] PFP tray-up switch/PFP paper-empty E-ring switch (PWA-F-PEM-700) (upper, middle and lower) Bushing (1) Remove the PFP feed unit. (2) Take out the E-ring and bushing, then slide the PFP pick-up roller unit in the direction of arrow A , extract the bushing, take off the timing belt from the pulley and then remove the PFP pickup roller unit. A Timing belt Bushing PAPER FEED SYSTEM 9 - 52 PFP pick-up roller unit (3) Remove the switch cover (1 screw). Switch cover (4) Take out the screw, disconnect the connector and then remove PWA-F-PEM-700. PFP tray-up switch Connector PFP paper empty switch Note: When installing the PFP pick-up roller unit, remember to fit the spring in position. [J] Spring PFP upper aligning unit (1) Pull out the LCF unit. (2) Remove the 2 screws and pull the PFP upper aligning unit out to the paper feed side. 9 - 53 PAPER FEED SYSTEM [K] PFP upper aligning roller (metallic roller) (1) Remove the PFP upper aligning unit. (2) Remove the 3 E-rings, gear, pin, collar and PFP upper aligning roller (metal roller) bush. (3) Remove the E-ring and bush on the opposite end. Note: When assembling, pay attention to the mounting direction of the gear and collar. PFP upper aligning roller (rubber roller) Pin Collar Gear Bushing PFP upper aligning roller (metallic roller) Gear Pin E-ring Gear Gear Collar E-ring E-ring E-ring [L] PFP upper aligning roller (rubber roller) (1) Remove the PFP upper aligning unit. PFP upper aligning roller (rubber roller) Gear (2) Take out the spring, E-ring, and bushing on each end and then remove the rubber roller. (3) When replacing the rubber roller, remove the E-ring, gear and pin. Pin Notes: Precaution for assembling 1. Spring Front : Yellow, Rear : Black 2. Gear mounting direction Gear [M] PFP tray motor (upper, middle, and lower) (1) Remove the PFP inner cover. (2) Remove the harness from the harness clamp (unnecessary for the upper tray). (3) Disconnect the connector. (4) Remove the motor bracket (3 screws). PAPER FEED SYSTEM 9 - 54 E-ring E-ring (5) Remove the 2 gear units (2 screws). Tray motor (6) Remove the PFP tray motor (3 screws). Motor fixing screws Gear units [N] Feed clutch/aligning clutch (upper, middle and lower) (1) Remove the rear cover. (2) Disconnect the connector. Spring PC board Bracket Aligning clutch Feed clutch (3) Loosen the setscrew holding the clutch. Pedestal motor [O] Pedestal motor (1) Remove the rear cover. (2) Disconnect the connector and then remove the 2 screws. Cassette switch connector [P] Cassette switch (upper, middle, and lower) (1) Remove the rear cover. (2) Unhook the 2 switch claws from the cassette rail, disconnect the connector, and then remove the cassette switch. 9 - 55 PAPER FEED SYSTEM [Q] PFP drive unit (1) Remove the rear cover. (2) Remove the harness from the 2 harness clamps and then the bracket (2 screws). (3) Remove the board (2 screws and 1 locking support). (4) Remove the spring from the waste toner transport pipe. (5) Disconnect the feed clutch, aligning clutch and PC board Spring Bracket Aligning clutch Feed clutch Pedestal motor Cassette switch connector cassette switch connectors (9 connectors). (6) Disconnect the pedestal motor connector. (7) Remove the harness from the 3 harness clamps. (8) Remove the 8 screws, and draw out the PFP drive unit towards you to remove. PAPER FEED SYSTEM 9 - 56 (Outside) (Inside) 10. DRUM-RELATED SECTION 10.1 Construction Main charger Discharge LED Main charger wire cleaner Drum Transfer belt drive roller Transfer belt Recovery auger Transfer belt follower roller Lower damp heater Transfer belt cleaning brush Lower damp heater cover Transfer belt separation auxiliary roller In this section, the drum-related parts including the drum are described. Construction of the parts is as follows: • Drum • Main charger • Ozone filter unit—Slot exhaust, exhaust fan motor • Discharge LED 10 - 1 DRUM 10.2 Functions (1) Drum The drum comprises a drum-shaped, Aluminum base coated with an organic photosensitive element (photoconductor) film. The principle of “Photoconductivity” indicates that insulating properties of the material are evidenced in the dark. Likewise, its conductive properties are evidenced in the presence of light. (2) Main Charger The main charger is configured by stretching a special wire between two insulation blocks provided at both ends of a u-shaped metal bracket. When high voltage is applied to this charger wire, the air around the wire is ionized (electrostatically charged). The ionized air is attracted to the drum’s surface. This phenomenon is referred to as “corona discharge.” In the dark, the surface of the drum is negatively (minus) charged using the principle of corona discharge. (3) Charger wire cleaner The charger wire cleaner moves backwards and forwards to clean the charger wire after the power is turned ON and after more than 2000 continuous copies have been made since the door switch is turned ON or from the previous cleaning operation. (4) Discharge LED “Discharge” refers to the process of reducing or eliminating the electrostatic charge left on the photosensitive element after the charging and the transfer processes. The function of the discharge LED is to lower the electrical resistance of the photosensitive surface that was left over after the exposure and transfer processes. The LED device is a light source. The LED has two effects, a cleaning effect and “pre-exposure” effect. The cleaning effect neutralizes and eliminates the residual charge on the surface of the photosensitive element while the pre-exposure effect maintains a fixed photosensitive surface potential before the charging process is again initiated. DRUM 10 - 2 10.3 Disassembly and Replacement Thermistor bracket Connector [A] Drum (1) Remove the cleaner unit (Refer to 13.3 [A].). (2) Disconnect the connector from the drum thermistor. Drum thermistor (3) Remove the thermistor bracket (1 screw). (4) Rotate the cam until it locks. (5) Remove the 2 drum shaft fixing screws. Cam (6) Draw out the drum shaft from the front side. (7) Remove the drum by lifting it up. Drum [B] How to replace the drum (1) Remove the drum. (2) Remove the 3 screws. 10 - 3 DRUM (3) Remove the front flange. Front flange (4) Draw out the drum upwards. Drum [C] Main charger (1) Remove the middle inner cover. (2) Remove the screw, and draw out the main charger to the front side. DRUM 10 - 4 [D] Charger wire • Main charger: 398mm long, 0.06mm dia., tungsten oxide wire Grid Grid cover Remove the grid cover Main charger Wire terminal (Small) Terminal (main charger) Charge wire Wire terminal (Large) Wire cleaner V-groove Charge wire Spring V-groove Terminal (1) Remove the grid cover, grid and terminal cover, and then remove the charger wire from the main charger. Installation Precautions 1. The charger wire must be inserted into the V Charge wire grooves at both the front and the rear. 2. Do not allow the charger wire to be twisted. V-groove 3. Do not touch the charger wire directly with your hands or fingers. 10 - 5 DRUM [E] Transfer charger wire cleaner (1) Remove the main charger wire. (2) Remove the wire cleaner (1 screw). Note: During assembly, make sure that the charger wire passes through the pads. Pad Wire cleaner Charger wire Wire cleaner [F] Main charger timing belt Tension pulley (1) Loosen the screw securing the tension pulley to remove the timing belt. Notes: 1. When assembling the timing belt, secure the timing belt with the end faces of the Switch pusher Mark Timing belt main charger wire cleaner base and switch pusher aligned with the center of the mark. Main charge wire cleaner base 2. During assembly, the tension of the tim- Screw Main charger wire cleaner base ing belt must be adjusted as follows: • Tighten the screw securing the tension pulley so that the timing belt is pulled by 4 to 5 mm when a force of 200g 200g is applied at the mark. Mark Spring balance Mark S Timing belt DRUM 200g S = 4 to 5mm Rear side of belt from outside of plate bending outer side 10 - 6 [G] Main charger guide unit Connector (1) Remove the center inner cover and the right inner cover. (2) Remove the main charger and cleaner. (3) Disconnect the connector, remove the screw and remove the main charger guide unit. [H] Main charger cleaning motor (1) Remove the main charger guide unit. Main charger cleaning motor Connector (2) Remove the connector, and remove the charger cleaning motor unit (2 screws). (3) Remove the motor (2 screws). [I] Main charger cleaning switch Black (1) Disconnect the 2 connectors, and remove the screw. White Connector 45° A Note: When installing the switch, press in the direction of arrow A and secure. Also insert the harness into the terminals paying attention to the color, and bend the terminals to an angle of 45°. Switch fixing screw 10 - 7 DRUM [J] Discharge LED (1) Remove the stopper bracket (1 screw), and disconnect the connector. (2) Draw out the discharge LED. Connector [K] Ozone filter (1) Remove the upper exit cover. Ozone filter (2) Unlock the claw lock, turn the knob and draw out the ozone filter. (3) Remove the ozone filter from its holder. Ozone filter [L] Ozone filter unit (1) Disconnect the 2 connectors, remove the 2 screws, and remove the ozone filter unit. DRUM 10 - 8 [M] Slot exhaust fan motor/exit fan motor (1) Remove the exhaust fan duct (2 screws). (2) Remove the slot exhaust fan duct (2 screws). (3) Remove each of the 2 screws. Note: When installing the slot exhaust fan motor and the exit fan motor, install in the direction shown in the figure. [N] Reversal Fan Motor (1) Open the exit door and draw out the ADU unit. (2) Remove the reversal fan motor bracket (2 screws, connector). Connector 10 - 9 DRUM (3) Remove the reversal fan motor from the bracket (2 screws). Note: Attach the reversal fan motor in the direction shown in the figure. DRUM 10 - 10 11. TRANSFER/TRANSPORT UNIT 11.1 Construction This section describes the belt transport unit excluding the fuser unit. Belt transport unit Transfer belt unit Transfer belt support/power supply mechanism High-voltage transformer Transport guide Transfer belt cleaning mechanism Belt transport unit lock/unlock mechanism Lower damp heater unit Copier rear frame Transfer belt drive mechanism Transfer belt contact/release mechanism Belt transport unit simple lock mechanism 11 - 1 TRANSFER/TRANSPORT UNIT 11.2 Description of Operation 1 While the copier is ready, the transfer belt stands by at a position separated from the photosensitive drum. 2 When printing is started, the transfer belt is controlled to rise, and is held in contact against the photosensitive drum. 3 Voltage from the high-voltage transformer unit is applied to the transfer belt via the power supply roller. 4 As the surface of the transfer belt is electrified by a plus voltage by dielectric polarization, the paper is held in contact by static electricity, and the processes of transfer, separation, and paper transport can be carried out continuously. 5 After printing ends, the transfer belt is separated from the photosensitive drum and stands by again. Figure 1 shows a sectional view of the belt transport unit. Transfer belt separation auxiliary roller Transfer belt power supply roller Transfer belt follower roller Drum Transfer belt drive roller Transfer belt cleaning brush Transfer belt Transport guide Recovery auger Lower damp heater cover Transfer belt cleaning blade Lower damp heater Fig. 1 Belt transport unit sectional view TRANSFER/TRANSPORT UNIT 11 - 2 11.3 Functions (1) Transfer belt unit The transfer belt is coated with a high-precision flat rubber belt and has electrical resistance. The transfer belt unit is divided into a belt support/power supply section and a cleaning mechanism. The belt support/power supply section supports the belt and rotates to supply power, and the cleaning mechanism scrapes of toner from the belt surface. (2) Transfer belt support/power supply mechanism As shown in Figure 1, the transfer belt is supported by four rollers. Voltage having a polarity opposite to that of the toner on the photosensitive drum is applied to the power supply roller. The current flowing to the transfer belt is controlled to a constant current of 50 µA. (Though the applied voltage changes as current is constant, the voltage change is normally within the range +3 to +5 kV.) A voltage probe is required for measurement. To prevent danger, do not use a digital voltmeter. (3) Transfer belt cleaning mechanism The cleaning mechanism has two functions, a function for scraping off residual toner from the belt surface by the cleaning blade, cleaning brush and recovery auger, and a function for bringing the transfer belt into contact with and separating it from the drum. (4) Cleaning blade After the paper is separated, remove any paper scraps and foreign objects remaining on the belt surface. (5) Cleaning brush Removes residual paper scraps and foreign matter from the belt surface after the paper is separated. The brush is made to electroconductive for electrostatically cleaning the toner. A voltage opposite to that of the toner is applied to the toner. The current flowing to the brush is controlled to a constant current of 5 µA. (Though the applied voltage changes as current is constant, the voltage change is normally within the range +300 to +700V.) A voltage probe is required for measurement. To prevent danger, do not use a digital voltmeter. (6) Recovery auger Feeds scraped off residual toner to the waste toner transport auger section. (7) Transport guide Guides paper that is held in contact by static electricity to the fuser unit. This guide is made of material that prevents electrification caused by friction with the paper. 11 - 3 TRANSFER/TRANSPORT UNIT (8) Belt transport unit lock/unlock mechanism The belt transport unit is locked inside the copier. It is structured in such a way that it is locked when a paper jam is cleared, and can be drawn out towards you. The belt transport unit has a function for separating the transfer belt from the drum and a function for preventing erroneous operation of the handle when it is drawn out. • When the handle is rotated left when viewed from the front, the belt transport unit can be drawn out horizontally. • When the belt transport unit is inserted into the copier, and the handle is rotated right when viewed from the front, the unit is located to the vertical position. • If the belt transport unit is not completely inserted into the copier, the handle cannot be rotated from the horizontal position. (9) Lower damp heater (for preventing condensation) The damp heater is located under the transfer belt, and is powered when the main power switch is turned OFF. Standard accessories: TWD, SAD, ASD, AUD Options: Other than the above (10) Transfer belt drive unit Drive is transferred from the transfer belt motor, travels via the timing belt and the relay gears, and is transmitted to the transfer belt drive gear to rotate the drive roller. Drive is transmitted to the belt transport unit via a gear having a planetary joint. (11) Transfer belt contact/release mechanism This mechanism has a function for separating the transfer belt from the drum when a jam occurs, and a function for bringing the transfer belt into contact with the photosensitive drum when copying is started. • Rotation of the cam by drive transmitted by gear from the cam motor moves the lever on the rear side inside the transfer belt up and down. • The transfer belt is brought into contact with and separated from the photosensitive drum by vertically operating this lever. • The cam phases are controlled by two sensors. (12) Belt transport unit simple lock mechanism When the belt transport unit is inserted into the copier, this mechanism simply holds the belt transport unit before it is locked by rotation of the handle. TRANSFER/TRANSPORT UNIT 11 - 4 11.4 Display and Replacement [A] Belt transport unit Grip (1) Rotate the handle to the left, and draw out the belt transport unit. (2) Remove the fuser unit (1 screw) (When the lower damp heater is attached, disconnect the rear connector.). (3) Remove the 2 stepped screws (blue). (4) Lift up the belt transport unit holding it by both grips. [Right side] Note: When installing the belt transport unit on the slide rail, firmly insert the stepped pin on the slide rail into the notch on the belt transport unit. Grip [Left side] [B] Transfer belt unit (1) Remove the inner cover (2 screws). (2) Disconnect the transfer belt power supply connector, the cleaning brush power supply connector and the earth (2 screw). (3) Remove the front clip, and slide the bearing. 11 - 5 TRANSFER/TRANSPORT UNIT (4) Remove the 2 rear bearing bracket fastening screws and the 2 casing fastening screws. (5) Draw out the transfer belt unit upwards on the 1 front side. Notes: 1. During assembly, fasten the screws in order 1 , 2 and 3 . 3 2 2. When assembling the transfer belt unit, make sure that the front lever of the transfer belt unit fits under the cam on the front frame. [C] Transfer belt (1) Rotate the transfer belt support/power supply mechanism inside the transfer belt unit by 90°, and then draw out upwards. (2) Remove the 2 fastening screws from the drive roller support bracket. TRANSFER/TRANSPORT UNIT 11 - 6 Front frame side cam Front side lever (3) Rotate the drive roller in the direction of the arrow in the diagram. (4) Draw out the transfer belt. Notes: 1. Attach the belt so that the belt travels along the center of the inside of the housing. 2. Do not touch the belt surface directly with your hands. 3. The drive roller support bracket fastening screw on the front side is also used for connecting the earth lead. Pay attention to the direction of the terminal. 4. When installing the transfer belt support/ power supply section onto the cleaning section, take care to prevent the recovery mylar on the cleaning section from being turned over. [D] Transfer belt power supply roller (1) Remove the transfer belt. (2) Remove the 2 stop rings on the power supply drive roller shaft. (3) Remove the 2 holders and 2 springs. (4) Draw out the power supply roller temporarily to the front, remove the rear side shaft, and replace the power supply roller. Notes: 1. When replacing the power supply roller, 2 1 take care not to scratch or leave any knock marks on the roller surface. 2. Make sure that the two stop rings are firmly fitted in the groove. 3. Make sure that the spring is firmly fitted on the upper and lower projections. 4. After assembly, make sure that the power supply roller rotates smoothly, and moves vertically smoothly by the spring. 5. Do not touch the surface of the power supply roller directly with your hands. 11 - 7 TRANSFER/TRANSPORT UNIT [E] Brush (1) Remove the transfer belt support/power supply mechanism from the transfer belt unit. 2 1 (2) Remove the short transport guide fastening screw, and slide the transport guide. Then, draw out the transport guide upwards. (3) Remove the front stop ring and the 3 gears. c b Note: a and c have claws. Remove in order a, b and then c. a (4) Remove the stop ring on the rear brush axis and pull out the bushing. (5) Press the brush temporarily to the rear, rotate the shaft on the front side, and draw out the brush upwards to the front. Notes: 1. When installing the gear, install so that the projection on the inner diameter of the gear shaft fits firmly into the groove on the shaft. 2. When the bush in the nozzle side comes off, securely install it with care of the direction. 3. Do not directly touch the surface of the brush with your hands. [F] Cleaning blade (1) Remove the transfer belt support and power supply mechanisms from the transfer belt unit. (2) Remove the 3 screws, the reinforcing plate and remove the cleaning blade upwards. Notes: 1. When assembling the cleaning blade, assemble so that the bosses on both side fit properly into the blade plate holes, and fasten by screws. 2. Do not directly touch the blade edge by hand. Also, do not allow hard objects to bump against the blade edge. TRANSFER/TRANSPORT UNIT 11 - 8 2 1 [G] Transfer belt drive unit (1) Remove the main unit rear cover. (2) Disconnect the connector from the transfer belt motor. (3) Remove the 2 screws, and transfer belt drive unit. [H] Transfer belt contact/separation cam drive unit (1) Remove the main unit rear cover. (2) Remove the flywheel (3 screws). (3) Remove the toner transpor t auger unit (5 screws). (4) Disconnect the harness connector for the cam motor and sensor. (5) Remove the 2 screws, align the cam with the holes on the copier rear frame, and draw out the unit towards you. [I] Transfer belt contact/separation sensor (1) Remove the transfer belt contact/separation cam drive unit. (2) Disconnect the connector from each of the sen- (Green PCboard) (Silver PCboard) sors. (3) Remove the sensor pins from the bracket holes to remove the sensor. Notes: 1. When replacing the sensor, pay attention to the type of sensor (color-coded on the PC board) and its mounting direction. 2. Make sure that sensor pins are firmly fitted into the bracket holes. 3. Do not forget to re-connect the connectors. 11 - 9 TRANSFER/TRANSPORT UNIT [J] Mounting the lower damp heater (1) Remove the transfer belt unit. (2) Remove the transport guide (1 screw). (3) Attach the lower damp heater unit on the base of the belt transport unit (3 screws). (4) Attach the lower damp heater cover (2 screws). (5) Pass the damp heater harness through the M band on the belt transport unit, and attach locking supports (1 pc. to the rear frame and 2 pcs. to the base frame). (6) Make sure that the damp heater connector is inserted into the rear side of the fuser unit. Notes: 1. When installing the damp heater cover, prevent the harness from becoming nipped. 2. Before installing the lower damp heater unit, check the power voltage. TRANSFER/TRANSPORT UNIT 11 - 10 M band Locking support 12. DEVELOPER UNIT 12.1 General Description Transport roller Lower developer sleeve Leveler Upper developer sleeve Drum Mixer 1 Suction duct Mixer 2 Auto-toner sensor Separation auxiliary member Supply/recovery paddle When a fine power (toner) that has a charge of the same polarity as the electrostatic latent image and color black (or other color) comes near the electrostatic latent image formed on the drum surface, the toner adheres to the image only by electrostatic force, causing the electrostatic latent image to be developed, resulting in a visible image being formed. This is the developing process performed in the developer unit. Toner cartrige Toner hopper unit Developer unit 12 - 1 DEVELOPER UNIT 12.2 Construction 12.2.1 Developer unit The developer unit consists of the lower and upper developer sleeves (magnetic rollers), leveler, autotoner sensor, supply/recovery paddle, separation auxiliary member, mixing unit, etc. The developer material is poured into the developer unit. Transport roller Lower developer sleeve Drum Upper developer sleeve Mixig unit Leveler Mixer 1 Mixer 2 Supply/recovery paddle Separation auxiliary member Auto-toner sensor (1) Developer material The developer material contains carrier and toner. The carrier is made of iron powder of about 65µ m in diameter, being a conductor. The toner is made of resin particles, about 9µ m in diameter. The toner has a weight ratio of about 5% of the developer material. Developer material deteriorates with use and must be replaced periodically. (2) Mixing unit When the carrier and toner are mixed, friction is generated, causing the carrier to have a positive (+) charge and the toner to have a minus (–) charge. The toner adheres to the drum surface as a result of electrostatic force. (3) Supply/recovery paddle This paddle supplies stirred developer material to the feed roller, and recovers developer material that has been separated by the lower developer sleeve and returns it to the stirring section. DEVELOPER UNIT 12 - 2 (4) Lower and upper developer sleeves (magnetic rollers)/transport roller (magnetic roller) These parts are made of aluminum, with magnets positioned inside them. By using the magnetic force, the developer material is attracted (because the carrier is made of iron powder), forming magnetic lines of force shaped like a brush. Further, the magnets are secured, and only the sleeves around them rotate. Through this rotation, the magnetic brush of the lower and upper developer sleeves sweeps the surface of the photosensitive drum, enabling development. (5) Leveler This regulates the amount of developer material transferred by the transport roller so that the magnetic brush correctly comes into contact with the surface of the photosensitive drum. (6) Separation auxiliary member This member supports the task of separating the developer material on the lower developer sleeve. (7) Auto-toner sensor For making good copies, it is necessary to keep the carrier and toner in the developer unit at a fixed ratio. The auto-toner sensor monitor the toner density in the developer material by operating a magnetic bridge circuit. When the toner density drops, a fixed amount of toner is added from the toner hopper. 12 - 3 DEVELOPER UNIT 12.2.2 Toner hopper unit When there is little toner left in the toner hopper, this status is detected and the “ADD TONER” symbol flashes. The principle is as follows. Toner hopper Sensor lever Magnetic sensor (Toner empty switch) Magnet 1 As shown in the left figure above, there is a sensor lever on the inside of the toner hopper. The lever is fitted with a magnet. 2 There is a magnetic sensor (toner-empty switch) on the outside of the toner hopper, such as when the amount of toner in the hopper drops, the sensor lever lowers, which is detected by the magnet sensor. The copier then requires toner to be added. Sensor lever Sensor lever 3 The left figure above shows the sensor lever lifted by the toner. 4 The right figure above shows the sensor lever down due to lack of toner and the magnetic sensor detecting the toner-empty state. DEVELOPER UNIT 12 - 4 12.3 Developer Unit Drive Idle gear (G24) Mixer 1 gear (G45/G24) Upper magnetic roller gear (G17) Idle gear (G20) Drum Mixer 2 gear (G45) Input gear(G27) Lower magnetic roller gear (G17) Rear paddle gear (G31) Rear side Transport roller gear(G23) Idle gear (G19) Drum Front paddle gear (G18) Front side 12 - 5 DEVELOPER UNIT Developer Unit Drive Motor shaft G10 Idle gear G48 P25 Idle gear P25 G25 Copier rear side drive Paddle Developer unit Drive input gear G27 Rear side Mixer 1 G24 Mixer 2 G45 Idle gear G24 Rear side gear G31 Lower and upper magnetic rollers G17 Idle gear G19 Transport roller G23 G45 Front side gear G18 DEVELOPER UNIT Idle gear G20 12 - 6 Front side 12.4 Motors 12.4.1 Developer motor (IC motor) drive [A] IC motor Rotor Motor winding Stator U S N U Shaft W V 1 2 A V W B C U W N S V Hall element Hall elements Equivalent Circuit of Motor Winding Structure of IC Motor 0 U W(30 ) U V(60 ) 30 N N S S S S N S N S S S S N N N N S N V(90 ) W N V U(120 ) U(150 ) N N S S N N N 30 S N W(180 ) N 30 N N N S N N S S V S S S S S N W 30 N N S S S S N N S N S S 30 30 0° Hall element A 30° 60° 120° 0 150° 180° P M M P Hall element B P P P 210° 240° M M 0 P P P 360° 0 P M M M P 0 330° M 0 0 M 300° 0 M P 270° 0 0 0 M Hall element C 90° P 0 P M M 0 Hall voltage 12 - 7 DEVELOPER UNIT [B] Developer motor drive FG pulse +24VA Wave shaping DEVCK Reference requency V-phase Phase comparator Difference Voltage detection circuit Speed comparator Difference Control signal DEVON Rotation control U-phase Excited phase switching unit W-phase A C B Developer motor (M13) Roter position detector A, B, C: Hall element (1) The LGC transmits control signals for the developer motor rotation (DEVON: motor rotation command). (2) The excitation phase switching unit excites each phase on the developer motor. →Developer motor rotates. (3) Hall elements A to C are used to detect the rotational position of the motor (or rotor). (4) The excitation phase switching unit switches the excitation for each phase (By repeating steps (2) through (4) above, the motor keeps rotating.). (5) The FG pulse is generated by the rotation of the developer motor. (6) The phases and velocities of the FG pulse and the reference frequency from the LGC are compared, and the differences are added. Further to this are added the fluctuations in the power supply voltage (Signal generation). (7) Changes the switching timing for the excitation phase switching unit to match the signal amount obtained in step (6). That is, the FG pulse and reference frequency are controlled to be equal. →The developer motor rotates at a constant speed (Locked range state.). (8) When the DEVON signal changes to “H” level, the developer motor stops. DEVELOPER UNIT 12 - 8 [C] Control signals (1) DEVCK signal (LGC→DEV-MOT:input) This signal is a reference clock signal for the developer motor to rotate at a fixed speed. The frequency of the reference clock is 821.2Hz. When the cycle of FG pulse deviation from the reference frequency is within ±6.25%, this state is specified as lock range (normal rotation). Also, at this time, the LED “LP1” light comes ON. (2) DEVON signal (LGC→DEV-MOT: input) This signal is the motor ON/OFF control signal. When it becomes “L” level, the motor rotates. Signal level of motor circuit Signal DEVCK DEVON “H” level “L” level Reference clock (821.2Hz) Motor OFF Motor ON 12 - 9 DEVELOPER UNIT 12.4.2 Brush motor (toner motor (M14)) drive circuit The toner motor is provided to supply toner for the developer unit. The toner motor is driven by transistor 2SD1415 (Q1 on the logic PC board), and its circuit is structured as follows. +24 VDD Gate array PH4 Q29 D1 Toner motor 142 TNRMT R213 Q1:2SD1415 IC48 R236 The motor winding is connected to the +24V at its (+) side and to the collector of Q40 at its (–) side. -When PH4 (TNRMT signal) of the gatearray becomes “L” level• Q29 is turned on → Q1 is turned on • The +24V power supply supplies current to Q1 via the motor winding → the motor rotates -When TNRMT signal becomes “H” level• Q29 is turned off → Q1 is tuned off • The current which was flowing in the motor winding flows via the route of diode D1. ~ It decreases at the rate of the time constant determined by the inductance and resistance of the winding. • The motor stops. DEVELOPER UNIT 12 - 10 12.5 Auto-Toner Sensor Circuit 12.5.1 Brief description • Functions of auto-toner circuit. • ~ • Detects the density of the toner in the developer material Density drops → toner supply. • • • • Auto-toner sensor: Detects toner density. Control section: Control to maintain the toner in the developer material at a constant specific Detects that the toner in the toner hopper has been used up (toner-empty). • Configuration of auto-toner circuit. density. Toner motor: Replenishes the toner in the developer material. Display unit: Displays the toner-empty status. Display Arithmetic and control unit Toner hopper Toner PWA-F-LGC-300 Toner motor Toner-empty switch Auto-toner sensor Developer material Gate array Control voltage signal Toner density signal DA converter IC15 MB88347 (A04) Main CPU IC48 IC49 Developer unit BC-RAM IC23 12 - 11 DEVELOPER UNIT 12.5.2 Operation of auto-toner sensor (1) Functions of auto-toner sensor. 1 Initialization function: -When the copier is set up or when the developer material is replacedAutomatic or semi-automatic adjustment is made so that the output of the auto-toner sensor (input value of the main CPU) will be 2.45 to 2.55V for the toner density of new developer material. 2 Toner the density stabilization function: -During the copying operation- • Toner consumption→toner density decreases→detection that the auto-toner sensor output changes→toner motor drive→supply of toner to the developer unit from the toner hopper. ∼ Maintains toner density at a constant level. 3 Toner-empty detection, release function: • Detects toner-empty situation inside toner hopper ~ Drives toner motor→auto-toner sensor output is not changed→the toner density does not • change→judges that there is no toner (toner empty). Release of toner-empty situation. ~ Toner supply→driving the toner motor→auto-toner sensor output changes→returning of toner density of normal value→toner-empty release. (2) Mechanism of auto-toner sensor. The auto-toner sensor is composed of the following circuits. • Drive winding: Magnetic head with a high-frequency magnetic field (primary side). • • Placed in developer material and forms magnetic circuit. Detection winding: Receives the changes in magnetic resistance of the developer material via a magnetic circuit (Secondary side). DC conversion circuit: Converts the high-frequency output from the detection winding to a DC signal. ↓ Auto-toner output VATS Magnetic resistance Drive winding Detection winding (Developer material) Magnetic circuit DEVELOPER UNIT 12 - 12 Auto-toner DC output To conversion main LGC V ATS circuit -When the toner density is low Iron powder (carrier) in the developer material ..... much Toner in the developer material ............................. little →Magnetic resistance: small→detection output: large→auto-toner output VATS: large -When the toner density is high Iron powder (carrier) in the developer material ..... little Toner in the developer material ............................. much →Magnetic resistance: large→detection output: small→auto-toner output VATS: small • DC voltage corresponding to toner density in the developer material = auto-toner output VATS 12 - 13 DEVELOPER UNIT 12.6 Disassembly and Replacement Connector [A] Developer unit (1) Remove the upper inner cover. (2) Tu r n t h e d eve l o p e r u n i t s l i d e l eve r counterclockwise. (3) Disconnect the 1 connector. Developer unit (4) Pull the developer unit toward the front. Developer unit [B] Developer material (1) Remove the developer unit. (2) Remove the top cover (2 screws). Top cover (3) Completely remove the old developer material while rotating the gear on the rear side plate. DEVELOPER UNIT 12 - 14 (4) Fill with new developer material. Developer material (5) Rotate the gear several times to distribute the developer material evenly. (6) Install the top cover. Note: When installing the top cover, position it securely on its hooks and be sure not catch Top cover the urethane seal. Seat of topcover Urethan seal Mylar of sideframe 12 - 15 DEVELOPER UNIT [C] Guide roller (1) Remove the developer unit. Handle (2) Remove the developer unit handles (2 screws). Guide roller (3) Remove the E-ring and then the spring. (4) Remove the 2 E-rings and both the front guide Upper guide roller (Gray) rollers from the magnetic roller shaft. Note: Pay attention to the color of the rollers when assembling the upper and lower guide rollers. E-ring E-ring Lower guide roller (Blue) Spring (5) Remove the E-ring and then the gear. Bias connector (6) Remove the rear side plate (4 screws) and then disconnect the bias connector. E-ring Gear (7) Remove the 2 E-rings and bias plate. (8) Remove the spring and the 2 rear guide rollers Upper guide roller (White) from the magnetic roller shaft. Note: Pay attention to the color of the rollers when Bias plate assembling the upper and lower guide rollers. Lower guide roller (Black) E-ring DEVELOPER UNIT 12 - 16 [D] Developer magnetic roller Front side plate (1) Remove the developer material. (2) Remove the E-ring and then the spring. (3) Remove the front guide rollers. (4) Remove the front side plate (3 screws). (5) Remove the 2 fixing screws on the front magnetic roller holder. Magnetic roller holder (6) Remove the rear side plate (4 screws). Magnetic roller (7) Remove the 2 fixing screws on the rear magnetic roller holder. Magnetic roller holder Magnetic roller (8) Remove the entire upper and lower roller sub unit from the developer. (9) Remove the 2 pole fixing holders and the 2 E- Pole fixing holder rings on the inside. 12 - 17 DEVELOPER UNIT (10) Remove the 2 pushers. Pusher E-ring (11) Remove the 2 E-rings and 2 gears. (12) Remove the magnetic roller holders from the front and the rear sides. Magnet roller holder Gear E-ring (13) Remove the 2 seals the 4 shield bushes on both ends of the developer roller, scraper, and the Shield bush upper and lower magnetic rollers. Seal Scraper Seal Transport roller [E] Transport magnetic roller (1) Remove the upper and lower developer roller sub unit. (2) Remove the front gear and the E-ring. DEVELOPER UNIT 12 - 18 E-ring Gear (3) Remove rear side screw, and then the transport roller and pole fixing bush. Pole fixing bush Transport roller (4) Remove the front side bearing and transport roller. [F] Leveler (1) Remove the top cover. Leveler (2) Remove the 2 screws and then the leveler. Note: When installing the leveler, both ends of the leveller must be contacting the protrusions on the front and rear side frames (2 screws). [G] Auto-toner sensor (1) Remove developer material. Leveler Convex part of sideframe Auto-toner sensor (2) Remove the auto-toner sensor (2 screws). 12 - 19 DEVELOPER UNIT [H] Oil seal (mixer section) (1) Remove the rear side plate. Gear (2) Remove the 2 E-rings and 2 gears. E-ring (3) Remove the 2 screws and draw out the nozzle mixer. Nozzle mixer Bush (4) Remove the 2 E-rings and 2 bushes. E-ring (5) Remove the 2 oil seals from the nozzle mixer with the C-ring pliers. Nozzle mixer Oil seal (6) After removing the 2 bearings with the C-ring pliers, remove the 2 oil seals. Oil seal Bearing DEVELOPER UNIT 12 - 20 Notes: Assembling the oil seal Developer unit frame (Nozzle mixer) Outside 1. Push the new oil seal in parallel to the mounting holes of the developer frame (or the nozzle mixer). * Pay attention to the direction that the oil seal is assembled (See figure on right). Grease Inside 2. Apply a uniform coating of grease to the inside surface of the oil seal. Oilseal • Amount: 2 large drops • Grease: Alvania No.2 3. Wipe off any surplus grease that oozes out from inside. Note: Assembling the bearing Coat the entire periphery of the mixer shaft Mixer shaft with grease (Alvania No.2) and assemble the bearing. Bearing [I] Oil seal (paddle section) (1) Remove the front side plate, rear side plate and nozzle mixer. (2) Remove the E-ring, and then the gear and parallel pin. Gear 12 - 21 E-ring DEVELOPER UNIT (3) Remove the E-ring and then the rear paddle bush. (4) Remove the gear and then the E-ring. Paddle bush (rear side) (5) Remove the front paddle bush. E-ring Paddle bush (front side) E-ring (6) Remove each of the oil seals pressure-fitted into the paddle bushes on the front and rear Oil seal sides. Note: The oil seal installation follows the description in previous item [H]. Rear paddle bush [J] Front paddle bush Oil seal (upper/lower developer rollers and transport roller) (1) Remove the 2 sealed bushes on the rear side from the upper and lower developer rollers. (2) Remove each of the oil seals pressure-fitted into the sealed bushes on the front and rear sides. (3) Remove the transport roller. Top Bottom Oil seal DEVELOPER UNIT 12 - 22 (4) Remove the oil pressure-fitted into the front side frame. Note: The oil seal installation follows the descrip- Oil seal tion in previous item [H]. [K] Toner hopper unit Connector (1) Remove the rear cover and right top cover. (2) Disconnect the connector. (3) Remove the 3 screws. Toner hopper unit (4) Press the toner hopper unit towards the rear side to release the hooks, and then lift the rear side up at an angle to remove. 12 - 23 Toner hopper unit DEVELOPER UNIT [L] Toner motor (1) Remove the toner hopper unit. Connector Toner motor (2) Disconnect the toner motor connector. (3) Remove the motor bracket (3 screws). Motor bracket (4) Remove the toner motor (2 screws). Toner motor [M] Toner-empty switch (1) Remove the toner hopper unit. Toner empty switch (2) Take out the screw, disconnect the connector, and remove the toner-empty switch. Connector [N] Toner-supply cover switch (1) Remove the switch cover (1 screw). Switch cover DEVELOPER UNIT 12 - 24 (2) Disconnect the connector and remove the toner-supply cover switch. Toner-supply cover switch Connector [O] Toner-transport auger unit (1) Remove the upper feed cover. (2) Remove the developer unit. (3) Remove the toner hopper unit. (4) Draw out the large capacity feeder. (5) Remove the 2 screws. Toner transport auger unit [P] Developer motor (1) Remove the rear cover. Connector (2) Disconnect the developer bias connector and remove the duct (2 screws). Motor unit Developer bias connector (3) Remove the motor unit (3 screws). Duct 12 - 25 DEVELOPER UNIT (4) Remove the developer motor (2 screws). Developer motor [Q] Developer switch (1) Remove the right inner cover and the developer unit. Connector (2) Disconnect the connector and take off the harness from the harness clamp. (3) Remove the switch bracket (1 screw). (4) Disconnect the 2 connectors, and unscrew the screw and then remove the switch. Connector Developer switch [R] Toner filter unit (1) Remove the rear cover. (2) Remove the 2 screws, and disconnect the connector, and then remove the toner filter unit. Connector Toner filter unit (3) Remove the 3 screws, the harness from the harness clamp, and then the toner filter fan. Note: After installing the toner filter unit, make sure that the duct is properly overlapping the toner filter unit seal. (If there is a clearance between the duct and seals, toner may be blown out and dirty the inside of the copier.) DEVELOPER UNIT 12 - 26 Harness clamp Toner filter fan [S] Laser fan unit (1) Remove the cover behind the hopper (2 screws). (2) Remove the 3 screws and disconnect the connector. Connector (3) Remove the 2 screws and the panel cover. (4) Draw out the fan. [T] Replacing toner filter (1) Remove the feed cover. (2) Remove the screw and the filter cover. 12 - 27 DEVELOPER UNIT (3) Draw out the toner filter. DEVELOPER UNIT 12 - 28 13. CLEANER UNIT 13.1 Construction The cleaner unit consists of a driver section, cleaning section, waste toner carry section, fur brush, toner adhesion amount sensor, separation claw, toner full switch and toner bag. Recovery blade Main blade Drum thermistor Drum Weight Fur brush Toner recovery auger Toner adhesion amount sensor Separation claw G16 G17/30 G15 G25 13 - 1 CLEANER UNIT Fur brush Main blade Toner adhesion amount sensor Drum thermistor Separation claw Recovery blade 13.2 Description of Functions (1) Main blade Scrapes off residual toner on the drum surface. The blade is pushed against the drum at a constant pressure by a weight. The main blade is separated from the drum by manually turning the lever. (2) Recovery blade Catches the toner after it is scraped off by the main blade. (3) Toner recovery auger Carries scraped residual toner to the toner bag via the waste toner carry auger unit. (4) Toner bag Toner scraped off by the main blade is carried by the toner recovery auger, and recovered to the toner bag via the waste toner carry auger unit. (5) Toner full switch When the toner bag becomes full of recovered toner, its weight causes both the toner bag and actuator to drop, and the toggle switch to be turned OFF. (6) Separation claw To separate paper that could not be separated by the transport belt, the separation claw is pressed against the drum by the separation claw solenoid only when the leading edge of the paper passes through. CLEANER UNIT 13 - 2 Toner transport auger Toner-full switch Spring Drum 1 2 Toner bag The weight of the toner pulls the toner bag down against the spring in direction of arrow 1 . Separation claw Paper When the toner bag drops the actuator also lowers in the direction of arrow 2 , turning the toner-full switch OFF. (7) Toner adhesion amount sensor Measures the relative reflectivity of the toner image on the drum to maintain the image density at an appropriate value. (8) Drum thermistor The charge on the drum surface varies greatly depending on the drum surface temperature. For this reason, the temperature of the drum surface is detected to control the drum surface charge to a constant value. (9) Fur brush Removes paper dust and foreign matter remaining on the drum surface after separation of the transfer paper, reduces blade wear, lengths the blade life, and improves image reliability. 13 - 3 CLEANER UNIT 13.3 Drum Temperature Detection Circuit C5 +15 +15 R12 J60-1 TH R13 (Thermistor) R14 C10 R16 6– IC2 5+ 7 B R3 R11 E R2 R4 R5 2 – 3 +IC2 C2 1 J59-B1 DRM-TMP C9 R1 J60-2 Drum Temperature Detection Circuit (1) Temperature sensor In this detection circuit, the voltage obtained by R12, thermistor, R13 and R14 passes through the operation amplifier IC2 to be taken as input voltage B . Input voltage B is applied to pin No.2 of operation amplifier IC2, and is output as the temperature signal to the microcomputer and as the main charger control signal. (2) High-voltage transformer for the main charger control output unit Input voltage B connected to pin No.2 of operation amplifier IC2 via R11 is compared with reference voltage E that is applied by the divided voltage of R3, R2 and R1, amplified and is output from output terminal pin No.8. This output voltage is input to the A/D converter of the microcomputer to control the temperature of the high-voltage transformer for the main charger. CLEANER UNIT 13 - 4 13.4 Control for Maintaining Image Quality Using a Toner Adhesion Amount Sensor 13.4.1 Outline The toner adhesion amount sensor performs the following functions: • Controls the image formation conditions to an optimum state so that image density and line width can be maintained under varying environments and throughout the service life of the machine. • Detects the density of the test pattern developed on the drum. • Changes the image formation conditions based upon the detection results to minimize changes in density caused by changes in the operating environment. 13.4.2 Principle of sensor operation • Toner adhesion amount sensor: This sensor emits light onto the drum and onto the toner image (test pattern) developed on the drum, and outputs a voltage corresponding to the reflected light intensity. • Toner adhesion amount: The relative reflectivity is calculated from the reflected light intensity obtained by the toner adhesion amount sensor. This is referred to here as the “toner adhesion amount.” Toner adhesion amount sensor Light source intensity signal Reflected light intensity signal Light emitting element Light sensing element Test pattern (toner image) Photosensitive drum 13 - 5 CLEANER UNIT 13.4.3 Outline of control Start of Control (Control is executed during the pre-run after the power is turned ON.) [1] The reference image formation conditions are set. [2] The sensor light source is adjusted. [6] [3] The test pattern is exposed. [4] The value of the toner adhesion amount sensor is read. [5] The result is judged. (Control judges whether or not the toner adhesion amount of the test pattern is within the permissible range.) When the result is judged as GOOD. [7] End of Control (The determined image formation conditions are reflected in subsequent copies.) When the result is judged as NG (No Good). [6] The image formation conditions are changed. Return to [3] CLEANER UNIT 13 - 6 13.4.4 Configuration • Toner adhesion amount sensor Emits light corresponding to the light intensity control voltage onto the drum, and outputs a voltage corresponding to the reflected light intensity of the drum or the toner image on the drum. • D/A converter Outputs the light source intensity control voltage. • Laser optical system Exposes the test pattern for forming the toner image. • A/D converter Converts the voltage values output from the sensor to digital values before they are read. • Image formation system Executes the charging, exposure and developing processes. • MCPU Executes steps [1] to [7] described in 13.4.3. Image Formation Process Photosensitive drum Toner adhesion amount sensor Test pattern Reflected light intensity signal A/D Light source intensity signal Various image formation conditions D/A MCPU 13 - 7 CLEANER UNIT 13.5 Disassembly and Replacement Handle [A] Cleaner unit (1) Remove the main charger and the developer unit. (2) Disconnect the 2 connectors, and remove the Gear 2 screws. (3) Draw out the cleaner unit by holding the han- Cleaner unit dle. Notes: 1. The cleaner unit is heavy. Take care not to drop it. 2. When installing the cleaner unit, make sure that the cleaning unit gear is engaged with the gear on the rear of the toner auger motor pulley before you secure it. [B] Main blade (1) Remove the drum. (2) Remove the top cover (4 screws). Top cover (3) Holding the bracket turn the main blade over. (4) Remove the screw. (5) Hold the ends of the 2 screws, remove the main blade. Screw ends CLEANER UNIT 13 - 8 [C] Recovery blade (1) Remove the recovery blade. Recovery blade Notes: 1. The recovery blade is secured by double-sided adhesive tape. Make sure that the tape is completely removed before Recovery blade securing the new blade. 2. When installing the recovery blade, press the edge of the recovery blade against the stepped section of the cleaner frame, A and fix at point A making sure that there is no gap. Cleaner casing Drum surface [D] Fur brush (1) Draw out the support shaft knob of the fur brush in the direction of the arrow to set the fur brush to a free state. (2) Remove the fur brush from the cleaner body. Fur brush [E] Toner adhesion amount sensor (1) Remove the sensor mounting bracket (2 screws). 13 - 9 CLEANER UNIT (2) Disconnect the sensor connector, and remove the 2 mounting screws. [F] Separation claw (1) Remove the cover (2 screws). Cover (2) Remove the E-ring, and remove the cam. Cam (3) Slide the separation claw unit to the front side to draw it out from the bushing on the rear side, and draw out the unit to the rear. 1 2 Separation claw unit CLEANER UNIT 13 - 10 (4) Remove the 3 screws, and draw out the 2 separation claws from the shaft together with the stopper and paper guide. Separation claw Stopper Paper guide [G] Drum thermistor (1) Disconnect the connector, and remove the Thermistor bracket Connector screw. (2) Cut the bundling band. Drum thermistor [H] Toner auger motor (1) Remove the cleaner unit. (2) Remove the left inner cover. Reinforcement plate (3) Remove the 4 screws securing the bracket and the reinforcement plate, disconnect the connector and bundling band. The motor can be removed as an individual unit. Bracket (4) Remove the toner auger motor (2 screws and bundling band). Toner auger motor 13 - 11 CLEANER UNIT [I] Scraper solenoid unit (1) Remove the rear cover, and disconnect the connector. (2) Remove the carry belt unit. Note: Take care not to scratch the transfer belt. (3) Remove the toner auger motor. (4) The solenoid unit can be removed when the 2 unit mounting screws on the rear frame are removed from the front side. (5) Remove the separation claw solenoid (2 screws, connect, bundling band). Note: During assembly, move the separation claw solenoid in the direction of the arrow, and secure. Solenoid Connector Bunding band [J] Drum motor (1) Remove the flywheel (3 screws). CLEANER UNIT 13 - 12 (2) Remove the motor bracket (3 screws, connector) and remove the harness from the clamp. Note: When installing the motor bracket, press in A clockwise (direction of arrow A ) and secure. (3) When replacing the motor, remove the 3 screws and remove the harness from the edge saddle. Note: When installing the motor, pay attention to the position of the harness with respect to the metal plate. [K] Toner bag Toner bag cover (1) Remove the 2 coin screws and open the toner bag. (2) Draw out the toner bag. Toner bag [L] Toner-full detector (1) Remove the toner bag. (2) Disconnect the toner-full detector connector. (3) Remove the screw on the bracket securing the toner-full detector. Toner-full detector 13 - 13 CLEANER UNIT [M] Toner transport auger unit (1) Remove the 5 screws securing the toner transport auger unit. (2) Disconnect the transport auger motor. [N] Toner transport motor (1) Remove the toner transport motor (2 screws). Note: Adjustment of the main blade, recovery blade and fur brush cleaner unit is not necessary. CLEANER UNIT 13 - 14 14. FUSER UNIT 14.1 General Description Cleaning roller 1 Cleaning roller 2 Upper heat roller Upper thermistor Upper separation claw Thermostat Heater lamp Heat roller guide Exit roller Exit switch Discharge brush Lower separation claw Lower thermistor Cleaning roller 3 Cleaning roller 4 Lower heat roller Fig. 14.1-1 Heat and pressure are applied to fuse the toner to the paper, which is separated from the drum after the transfer process. After fusing, the paper exits onto the copy receiving tray through the paper-exit unit. The fuser unit comprises the heater lamps, upper heat roller, lower heat roller separation claws, cleaning roller 1, 2, 3, 4, thermistor, thermostat, exit rollers, and exit switch, etc. 14.2 Description of Operation (1) Fuser Heat and pressure are applied to the transfer paper that is separated and transported on top of the drum to fuse the toner. The upper and lower heat rollers are rotated by drive from the heat roller motor at a constant pressure applied by spring force. The upper heat roller has two built-in heater lamps and rotates by motor drive. The built-in heater lamps do not rotate. The upper and lower heat rollers are pressurized by spring force at all times. After fusing is completed, the transfer paper is separated smoothly from the upper and lower heat rollers by the separation claw. In the temperature sensing section, the temperature of the upper and lower heat rollers is controlled by a thermistor. If the temperature becomes abnormally hot, the power to the heater lamps is cut by a thermostat. 14 - 1 FUSER UNIT 14.3 Functions (1) Heater lamp Two halogen lamps are provided inside the upper heat roller to heat the upper heat roller. The heater lamp stays fixed even when the upper heat roller is rotating. (2) Upper heat roller The upper heat roller is made of aluminum having comparatively good heat conducting properties. It is heated by the heater lamps. The upper heat roller is held in contact with the above-mentioned lower heat roller. Fusing is carried out by passing the transfer paper through the section where these two heat rollers contact each other so that the toner image on the paper faces the upper heat roller. In other words, the toner is melted by the heat of the upper and lower heat rollers, and the heat transfer efficiency is improved by the pressure of the lower heat roller so that the toner soaks in between the fibers of the paper. To prevent adhesion of toner onto the rollers (phenomenon called “offset”) and to facilitate separation of toner from the upper heat roller, the surface of the upper heat roller is coated with Teflon. (3) Lower heat roller The lower heat roller is made of rubber to facilitate pressurization of the upper heat roller. The lower heat roller is pressed against the upper heat roller by springs. (4) Separation claw The upper and lower separation claws separate paper affixed to the upper and lower heat rollers. (5) Cleaning roller 2 A cleaning roller 2 is attached so as to contact the upper heat roller to clean the toner that has stuck to the upper heat roller during the fusing process. This roller contains silicon oil that transfer to the surface of the heat roller by the heat of the heat roller and so on. This makes it easier to clean the toner on the heat roller. (6) Cleaning roller 1 A cleaning roller 1 for the upper heat roller is attached so as to contact the upper heat roller to remove toner and paper scraps that have stuck to the upper heat roller during the fusing process. This cleaning roller 1 does not contain silicon oil. (7) Cleaning roller 3 A cleaning roller 3 is attached so as to contact the press roller to remove the toner and paper scraps that have stuck to the press roller during the fusing process. This roller contains silicon oil that transfer to the surface of the press roller by the heat of the press roller and so on. This makes it easier to clean the toner and paper scraps on the press roller. (8) Cleaning roller 4 A cleaning roller 4 is attached so as to contact the lower heat roller to remove the toner and paper scraps that have stuck to the lower heat roller during the fusing process. FUSER UNIT 14 - 2 (9) Exit roller After the paper is separated by the separation claw, the paper is output to the copy tray by the exit roller of the fuser and the exit roller of the reversal unit. (10) Exit switch This switch detects arrival of the leading edge or trailing edge of the transfer paper at the exit roller of the fuser. It is used for detecting paper jams in the fuser output section. (11) Upper heat roller No.1 thermistor (center section) The thermistor detects the temperature of the heat rollers so that it is maintained within a fixed temperature width (actually, about 190°C) higher than the lower limit (defective fusing temperature) and the upper limit (toner burning temperature). In other words, the thermistor controls the temperature so that the heater lamps turn ON when the heat rollers are lower than the temperature setting, and turn OFF when they are above the temperature setting. (12) Upper heat roller No.2 thermistor (end section) The temperature distribution of the upper heat roller sometimes differs greatly at the center section and end section in the lengthwise direction depending on the printing conditions. The No.2 thermistor detects the temperature at the end section. This thermistor controls the temperature so that the heater lamp turns OFF when either of the values detected by the No.1 or No.2 thermistor exceeds the temperature setting. (13) Lower heat roller thermistor The thermistor detects the temperature so that the lower heat roller stays at around 115°C while the copier is standing by for printing. If the lower heat roller falls below the temperature setting limit, the upper and lower heat rollers are rotated at a speed of about 25% of high speed. (14) Thermostat The thermostat cuts power to the heater lamps if the upper heat roller become abnormally hot as a result of thermistor malfunction, for example. The thermostat on this copier is for preventing abnormal operation. When the thermostat detects an abnormality, the thermostat must be replaced together with the other damaged parts in the fuser. 14 - 3 FUSER UNIT 14.4 Heater Control Circuit 14.4.1 Temperature detection unit To maintain the heat roller temperature, this unit detects the heat-roller temperature by thermistor-1, and then performs heater lamp ON/OFF control. • The thermistor is an electrical element whose resistance decreases as its detected temperature increases. If the thermistor is open-circuited, the control circuit erroneously determines that the fuser temperature is extremely low and continues to energize the heater lamp. As a result, the fuser temperature rises abnormally high, possibly activating the thermostat provided for safety purposes. The CPU works to detect the breakage of the thermistor and prevents the condition mentioned above. The following abnormalities are detected: (1) Abnormal detection during warming up 25 sec. after the power has been turned ON, if the thermistor output voltage does not exceed 0.078 V, CALL SERVICE (C41) is displayed. (2) Abnormal detection during stand-by/copying If the thermistor output voltage decreases to and remains at 0.078 V or lower for 500 msec. or more, CALL SERVICE (C43) is displayed. (3) Thermistor status counter control • For improved fuser-unit safety, the CPU works as follows: After a C41 error occurs two times in succession, even when the power is turned ON, the heater will not come ON and the C41 error will be immediately displayed. However, with “1” or less stored in the Thermistor status counter, if the copier becomes ready correctly, the Thermistor status counter clears to “0”. • After CALL SERVICE (C41 – C45) has occurred and the thermistor, heater lamp, etc. have been repaired (or replaced), if turning ON the power switch does not cause the heater to energize resulting in an error, check the Thermistor status counter (08-code 400) and reset it to “0”. Surface temperature of heat roller: 200°C (Thermistor resistance value: about 0.8 kΩ) FUSER UNIT 14 - 4 Reference 1. A value other than 0, 1, 2, 3, 4, 5, 6, 7, 8 or 9 is never written in the Thermistor status counter. • At the power on, if the heater is not turned ON and the copier goes into C41 CALL SERVICE, check the Thermistor status counter to see if it is 2 or more. If it is 2 or more, be sure to check the thermistor and heater lamp, and after repair, reset the Thermistor status counter (08-code 400) to 0 and then turn ON the power switch. • If the value of the Thermistor status counter is more than 10 (11, for example), it may be possible that BC-RAM or the data in it have been destroyed by charger leaking, etc. In this case, check the guide bias, high-voltage transformers, charger wires, etc. for any defects. Also, all the data inside BC-RAM need to be rechecked. 2. Relationship between the output voltage and the fusing temperature. • 200°C corresponds to approx. 2.5V and 0.25 V corresponds to approx. 40°C. 3. Relationship between heat roller surface temperature and thermistor-1 resistance. Temperature Thermistor resistance Heater lamp state Less than 200°C More than 0.8 kΩ ON 200°C 0.8 kΩ Maintains previous status More than 200°C Less than 0.8 kΩ OFF °C Warm-up Standby (200°C) Copying (200°C) 200 Heat roller temperature distribution Heater lamp OFF ON ON 4. OFF ON OFF ON OFF ON OFF ON OFF Temperature control at heat roller ends During multicopying, the temperature at each end (no paper-contact area) of the heat roller normally tends to rise higher than the controlled temperature of the paper-contact area. Therefore, the circuit is so devised that if the temperature in the no paper-contact area rises to 240°C, the second thermistor detects this, causing the heater to be turned OFF immediately regardless of the temperature in the paper-contact area. 14 - 5 FUSER UNIT 14.4.2 Detection of thermistor burnout * Since thermistor burnout detection circuits of the thermistor-1 and -2 are common, it is explained with the thermistor-1. • The input voltage is obtained by voltage dividing +5 R165, thermistor, R170 and R174. • The surface temperature of the heat roller R165 changes. → The thermistor resistance value changes Thermistor-1 HTRTHR170 Main Processor → The input voltage also changes • The main processor detects an abnormality → thermistor broken C125 R174 14.4.3 Control for abnormal heater condition When something abnormal occurs in the heater turn-ON circuit, such as a shorted triac, it may become incapable of ON/OFF control. In this case, the microcomputer detects abnormal temperatures through the first and second thermistors, determines the corresponding error codes and counter values, and causes the main power to switch OFF to protect the fuser unit. (1) Temperature detection The following abnormal temperatures are detected by the respective thermistors: First thermistor: 230°C Second thermistor:270°C (2) Error codes “C44” : Displayed when keys C + 8 are pressed simultaneously at the time of Call Service. Counter value “9”: Displayed when you input “400” in the setting mode. (3) Machine condition After de-energizing all outputs (heater lamp, exposure lamp, control-panel displays, motors, etc.), the microcomputer causes the main power to switch OFF. (4) Corrective action After the error code and counter value in (2) have been determined, abnormal temperature detection in (1) continues. So, if the main switch is turned ON immediately, it will be turned OFF again as long as the temperature on the heater surface remains above the abnormal detection temperatures of thermistors. Thereafter, this will be repeated. So, after waiting for the heater surface temperature to drop, turn ON the main switch and you can check the counter value before the main switch is turned OFF again. After confirming that an abnormal heater condition has occurred, repair the problem and then clear code 400 of the setting mode with “0”. After that, you can bring the copier into its normal operating condition. FUSER UNIT 14 - 6 14.5 Heat-Roller Motor Drive 14.5.1 Outline of operation FG pulse +36A Wave shaping Phase comparator Difference V Reference requency (H-MOT-REF) Control signal Voltage detection circuit Speed comparator Difference HTR MOT HTR MOTL Rotation control Excited phase switching unit U W A B C Roter position detector Heat roller motor M/DC-HTR-300N U, V, W: Phase A, B, C: Hall element Fig. 14.5-1 (1) The LGC transmits control signals for the heat-roller motor rotation (HTRMOT:Motor rotation command). (2) The excited phase switching unit excites each phase on the heat roller motor → Heat roller motor rotates. (3) Hall elements A to C are used to detect the rotation position of the motor (or rotor). (4) The excited phase switching unit switches the excitation for each phase (By repeating steps (2) through (4) above, the motor keeps rotating.). (5) An FG pulse is generated by the rotation of the heat roller motor. (6) The phases and velocities of the FG pulse and the reference frequency from the SUB are compared, and the differences are added up. In addition to this are added the fluctuations in the supply voltage (Signal generation). (7) The switching timing for the excited phase switching unit is changed to match the signal obtained in step (6). That is, control ensures that the FG pulse and reference frequency are equal. → The heat roller motor runs at a constant speed (Locked range state.). (8) When the HTRMOT signal changes to “H” level, the heat roller motor stops. (9) During standby, the HTRMOTL level changes to “L” if the temperature of the lower heat roller drops below the reference temperature, and the heat roller motor rotates at low speed. 14 - 7 FUSER UNIT 14.5.2 Control signals (1) HMOT-REF signal (LGC → MOT:Input) This signal is a reference clock signal for the heat roller motor to rotate at a fixed speed. The frequency of the reference clock is 1247.6Hz. (2) HTRMOTL signal (LGC → MOT:Input) This signal switches low-speed heat-roller motor rotation ON/OFF. When the signal is “L”, the heat roller rotates at a low speed. (3) HTRMOT-ON signal (LGC → MOT:Input) This signal is the heat-roller motor ON/OFF control signal. When the signal changes to “L”, the heat roller motor is turned ON. Signal level of motor circuit Signal “H” level “L” level HMOT-REF Reference clock (1247.6Hz) HTRMOTL Motor OFF Motor low-speed ON HTRMOT Motor OFF Motor ON FUSER UNIT 14 - 8 14.6 Disassembly and Replacement [A] Fuser unit (1) Draw out the belt transport unit. Belt transport unit (2) Remove the screw. (3) Disconnect the connector from the rear side of the fuser unit (115V/230V). (4) Draw out the fuser unit to the front by about 6 mm, and lift up horizontally to remove. Note: The fuser unit must be held by holding the handles on the front and rear sides. * Replacement of parts on the fuser section is described assuming that the fuser unit has been removed. [B] Cleaning roller 1, 2 Fuser unit guard (1) Remove the fuser front cover and the rear cover (2 screws). Front cover (2) Remove the fuser unit guard (3 screws). Rear cover (3) Remove one rear E-ring each. Cleaning roller 1 E-ring Cleaning roller 2 Spring (black) Rear side 14 - 9 Spring (silver) FUSER UNIT (4) Remove the shaft and 3-stage gear. (5) Remove the cleaning roller 1 and the cleaning roller 2. Front side Shaft Bush Cleaning roller 2 Bush E-ring Gear 22 E-ring E-ring Pin Bush Bush Cleaning roller 1 Rear side E-ring Front side [C] Upper thermistor and thermostat (1) Remove the front cover, rear cover and fuser unit guard. Clamp Thermostat bracket Drawer connector (2) Remove the drawer connector bracket (1 screw). (3) Disconnect the thermistor connector, and remove the 3 harness clamps. (4) Remove the 2 upper thermistor brackets (1 screw for each). (5) Remove the thermostat bracket (1 screw). (6) Remove the thermostat (2 screws). Thermistor connector Notes: 1. When assembling, make sure that the thermostat is attached as shown in the figure on the right. 1mm~1.5mm FUSER UNIT Gear 27 14 - 10 2. When removing the 2 upper thermistors and thermostats, prevent the heat rollers from becoming scratched (Wind paper onto the heat rollers as shown in the figure on the right.). Paper [D] Lower thermistor (1) Remove the harness cover (1 screw). (2) Remove the lower thermistor (1 screw). Lower thermistor Harness cover [E] Upper separation claw (1) Remove the jam release unit (1 screw on the front side). Jam release unit 14 - 11 FUSER UNIT (2) Remove the upper separation claw unit (1 screw on the front side). Notes: 1. When fixing screws onto the shaft, make sure that the D cut section of the shaft fits into the D cut hole on the bracket. 2. The separation claw positions can be moved 3 mm each to the front and rear by the position of the E-ring on the shaft (Before the copier is shipped from the factory, the E-ring is at the center groove.). Before the copier is shipped from the factory, the E-ring is at the center groove. Rear side Front side (3) Remove the spring and upper separation claw. Note: The spring is attached in the direction shown Spring in the following figure. Spring Separation claw Separation claw [F] Lower separation claw/cleaning roller 4 (1) Remove 1 screw for each from the front and rear sides, and open the lower separation claw unit. Lower separation claw unit FUSER UNIT 14 - 12 (2) Remove the spring and lower separation claw. (3) Cleaning roller 4 opens together with the lower separation claw unit. Cleaning roller 4 is attached to the lower separation claw unit via bushes and springs. Cleaning roller4 Lower separation claw Spring [G] 2 heater lamps (1) Remove the front lamp bracket (1 screw). Connector (2) Disconnect the 2 connectors from the front heater lamp. Lamp bracket (3) Remove the drawer connector bracket (1 Lamp bracket screw). (4) Remove the rear lamp bracket (1 screw). (5) Disconnect the 2 connectors from the rear heater lamp. (6) Draw out the 2 heater lamps. Drawer connector bracket Notes: 1. When attaching the 2 heater lamps, make sure that they are attached with the Connector Upper hearter lamp manufacture's logo marks facing the front. manufacture's logo mark Lower hearter lamp 14 - 13 FUSER UNIT 2. The wattage of the 2 lamps is different. Make sure that the lamp having the correct wattage is attached by aligning the lamp with the holes on the heater lamp bracket. 3. Do not directly touch the glass sections of the lamps, and leave fingerprints or 6 7 other marks. 6 7 [H] Upper/lower heat roller and cleaning roller 3 (1) Remove the fuser unit guard and jam processing unit. (2) Draw out the 2 heater lamps. (3) Completely loosen the 2 screws fixing the pressure springs. (4) Remove the front handle bracket (1 screw). Bearing (5) Remove the front stop ring and gear. (6) Remove the 2 front screws and take out the Stop ring bearing. (6) (6) (4) Handle bracket (7) Remove the timing belt. Stop ring (8) Remove the rear stop ring and take out the pulley. Timing belt Pulley FUSER UNIT 14 - 14 (9) Remove the rear handle bracket (2 screws). (10) Remove the 2 rear screws and take out the Rear handle bracket (9) bearing. (9) (10) (10) Bearing (11) Slide the upper heat roller to remove as shown the arrow A . Notes: 1. Take care not to deform the lead spring on the upper thermistor. Paper A Upper heat roller 2. Wind paper onto the heat roller taking care not to scratch the heat roller. (12) Open the lower separation claw unit (2 screws). (13) Open the lower inlet guide unit (2 screws). (14) The cleaning roller 3 opens together with the lower inlet guide. The cleaning roller 3 is attached to the lower inlet guide unit via the spring. Lower inlet guide unit Cleaning roller 3 (15) Remove the lower heat roller with the bearing. Note: Wind paper onto the lower heat roller taking care not to scratch the lower heat roller. Bearing Wind paper onto the lower heat roller in the same way when installing the lower heat roller. Lower heat roller 14 - 15 Paper FUSER UNIT Notes: Precautions during Replacement 1. Make sure on the front and rear sides that the bearing of the lower heat roller fits into the pressure lever. 2. Take care not to bump and scratch the surface of the heat roller against the bracket or other parts. 3. Take care not to scratch the thermistor. 4. Make sure that the screws of the pressure springs are firmly fastened (2 loca- Bearing Pressure lever tions). When thin paper is frequently used, and paper frequently wrinkles, Lower heat roller loosen these screws to adjust. 5. If paper jams occur frequently in the fuser or paper frequently wrinkles, make adjustments referenced to the markings Lower inlet guide lower inlet guide on the 2 screws. Stamped mark [I] Exit roller (1) Remove the front and rear stop ring, then remove the exit roller. Stop ring FUSER UNIT 14 - 16 (2) Remove the 2 stop rings, screw, handle, gear and 2 pins. Then draw out the shaft to replace the exit roller. Gear Stop ring Gear Handle Stop ring Screw,spring Pin Handle Stop ring Stop ring Pin Bush Bush Pin Spring Screw Rear side [J] Front side Exit switch (1) Remove the front cover (2 screws). (2) Disconnect the connector. Claw (3) Release the claw from the bracket, and remove the exit switch. Connector [K] Heat roller motor (1) Remove the rear cover. (2) Remove the rear side cover. (3) Remove the connector cable bracket (2 screws). Connector cable bracket 14 - 17 FUSER UNIT (4) Disconnect the connector from the heat roller motor PC board. Heat roller motor PC board (5) Remove the motor (3 screws). Connector Heat roller motor [L] Heater fan motor (1) Remove the system electronics unit. Connector (2) Remove the screw and disconnect the 2 connectors, and then remove the heater fan duct in the direction of the arrow. (3) Remove the rear side cover. (4) Remove the connector cable bracket (2 screws). (5) Disconnect the motor connector. Connector cable bracket (6) Remove the motor bracket (1 screw). Connector FUSER UNIT 14 - 18 Heater fan (7) Remove the heater fan motor from the bracket (2 screws). Note: When assembling, the direction of the arrow on the blow out side of the heater fan motor must be as shown in the figure on the right. [M] SSR for the upper heater lamp (1) Remove the protective cover (3 screws). (2) Disconnect the 4 connectors, and remove each of the 2 screws to remove the SSR. Note: Wiring is as follows. Thin wire Blue Yellow Black Yellow connector 16A 8A Blue Blue White Transparent connector White White Thick wire 14 - 19 FUSER UNIT 15. AUTOMATIC DUPLEXING UNIT (ADU) 15.1 Introduction The Automatic Duplexing Unit (ADU) is a device for automatically making copies on both the front and rear sides of paper. The ADU also has a stack function that allows up to 60 copies to be made on both sides of the paper in a single operation. In other words, the stack function operates to make copies on the rear side for the number of sets specified when making multiple sets of copies, and stacking these sets. Up to 60 sheets can be stacked. Double-sided copying is completed by making the next copy on the rear side of the paper by re-feeding the stacked copies for the specified number of copies. As the ADU uses the FIFO (First In First Out) system, it is structured to re-feed copy paper from the bottom side. The exit section is provided with a reversal mechanism for offsetting the order of doublesided copying depending on the double-sided copy mode (for example, when the one-sided and doublesided mode are selected for odd-numbered originals without the number of originals specified) using the ADF. The ADU comprises the following mechanisms: (1) ADU/exit switching gate This gate is for guiding paper output from the fuser to the ADU. During one-sided copying, and after double-sided copying is completed, the movement of this gate guides copy paper to the copy tray. (2) ADU inlet/reversal roller This roller is for guiding the paper to the stack section from the gate. During the reversal exit operation, it guides the copy paper again to the stack section. Reversal of this roller turns the paper over, and guides the paper to the copy tray from the exit section. (3) Stack section This is where paper is stacked. This section is provided with guides for aligning the leading and trailing edges, and left and right sides of the paper. (4) Holding gate section This section functions to hold stacked paper for re-feeding, and to receive paper to be stacked. Rotation of this gate re-feeds paper while simultaneously stacking paper. (5) Re-feed section This feed mechanism is for guiding paper on the stack section again to the copier. It comprises a pickup roller, feed roller, separation belt, aligning roller and other parts. (6) Transport section This section comprises a transport roller and transport guide for guiding re-fed paper to the feed section on this copier. 15 - 1 ADU Drum ADU/exit switching gate Aligning roller Fuser Exit roller ADU inlet/reversal roller Separation belt Stack section Holding gate Aligning roller Pick-up roller Transport roller Feed roller ADU 15 - 2 Transport guide 15.2 Drive Holding gate Inlet/reversal roller Reverse rotation clutch Forward rotation clutch Drive motor Transport roller A Feed clutch Transport clutch Aligning clutch A Aligning roller Pick-up roller Separation belt Feed roller 15.2.1 ADU/exit switching gate drive When the gate solenoid turns ON, the link is pulled (arrow 1 ), the arm rotates (arrow 2 ), the gate opens, and the copied 3 paper is transported to the ADU stack section. 2 When the gate solenoid turns OFF, the arm returns to its original position (arrow 3 ) 1 by spring force, and the copied paper is output. 15 - 3 ADU 15.2.2 Stack guide drive Paper side guide Paper trailing edge guide (1) Paper side guide The width guide motor operates in accordance with the size of the selected paper to move the paper side guide to the specified position. With each five sheets of paper stacked on the stack section, the width guide motor moves the side guide to the left and right to align the paper. (2) Paper trailing edge guide The length guide motor operates in accordance with the size of the selected paper to move the Width guide motor Length guide motor paper trailing edge guide to the specified position. 15.2.3 ADU inlet/reversal roller drive When the forward rotation clutch turns ON, the in- Reverse rotation clutch let roller rotates in the direction (forward rotation) for feeding paper to the stack section of the ADU. Inlet/reversal roller When the reverse rotation clutch turns ON, the inlet roller rotates in the direction (reverse direction) for turning the paper over. Forward rotation clutch Inlet roller Input gear Reverse rotation clutch ADU 15 - 4 Forward rotation clutch 15.2.4 Holding gate drive When the flapper solenoid turns ON, the projection on the spring clutch becomes disconnected and Holding gate rotates. When the flapper solenoid turns OFF, the projection on the spring clutch stopped by the flapper solenoid to stop rotation. Spring clutch Flapper solenoid 15.2.5 ADU pick-up roller, ADU feed roller and ADU separation belt drive Feed clutch • When the ADU feed clutch turns ON, the ADU feed roller and ADU pick-up roller rotates. Pick-up roller • The ADU separation belt rotates by the gear on the ADU feed roller in the direction opposite (reverse direction) to that of the ADU feed roller. Separation belt Feed roller 15.2.6 ADU aligning roller drive When the ADU aligning clutch turns ON, the ADU aligning roller rotates. Aligning clutch Aligning roller 15.2.7 ADU transport roller drive When the ADU transport clutch is turn ON, the ADU transport roller rotates. Trasport roller Trasport clutch 15 - 5 ADU 15.3 Description of Operation 15.3.1 Paper stack operation ADU/exit switching gate Reversal sensor ADU inlet guide ADU inlet roller Pick-up roller Holding gate Side guide Stack section Empty switch When the double-sided copy mode is selected on the copier’s control panel, and the COPY button is pressed, the paper side guides and paper trailing end guide on the ADU stack section move to the positions corresponding to the selected paper size by respective motor drive. At the same time, the ADU/ exit switching gate moves to the paper stack position by the gate solenoid. The copied paper is fed inside the ADU inlet guide by the ADU/exit switching gate. During this operation, the paper is detected by the reversal sensor, and ADU drive motor operates, the inlet roller rotates by the ADU inlet roller forward rotation clutch, and the paper is fed further into the stack section. When the paper enters the stack section, it is temporarily stacked on the holding gate receiving section, and the paper is stacked between the pick-up roller and the holding gate as the holding gate rotates. At the stack section, the paper is stacked with the copied side facing down. This operation is repeated until the specified number of sheets of paper are stacked. When paper stacking is started, the paper side guides open to make a gap of 1 mm on both sides of the paper and are set at this position. Each time that five sheets of paper are stacked continuously during stacking, the side guides align the sides of the paper. The ADU empty switch is for detecting whether or not paper is on the stack section. ADU 15 - 6 15.3.2 Duplex copy (re-feed) operation ADU/exit switching gate Exit roller Aligning roller Separation belt Holding gate ADU feed switch ADU aligning switch ADU aligning roller Position detection switch 1 Pick-up roller Position detection switch 2 ADU feed roller When the first sheet of paper is stacked, the pick-up roller located on the bottom side of the stack section rotates by the ADU feed clutch to feed paper out to the ADU feed roller section. If two or more sheets are fed out during this operation, the ADU separation belt rotates in the reverse direction to draw the upper sheet(s) back onto the stack section. The ADU feed roller and ADU separation belt are driven by the ADU feed clutch. The holding gate also rotates at the same time as the pick-up roller, and functions to hold the paper on the stack section. After the paper is fed out, it passes through the ADU aligning roller, is detected by the position detector switch located in the transport section, and stops temporarily at the transport section (initial alignment operation). When paper stacking ends, the paper that has been initially aligned is fed to and aligned by the aligning roller of the copier, and copies are made on the side opposite to the initially copied side. Paper that has been copied on both sides passes over the ADU/exit switching gate that is already positioned in the exit direction, and is output to the copy tray by the exit roller. The paper on the stack section is fed successively from the bottom side. This operation is repeated until all stacked paper is copied. 15 - 7 ADU 1) The ADU feed switch detects the leading and trailing edges of the paper passing through the ADU feed roller. It is also used for detecting paper jams. 2) The ADU aligning switch detects the leading and trailing edges of the paper passing through the ADU aligning roller. It is also used for detecting paper jams. 3) The ADU position detection switch 1 and ADU position detection switch 2 switch detect the leading and trailing edges of the paper passing through the ADU transport roller. They are also used for detecting paper jams. ADU 15 - 8 15.3.3 Reversal exit operation Reverse guide ADU/exit switching gate Exit roller Reversal gate Aligning roller Reversal switch Inlet/reversal roller Solenoid Reverse direction clutch ADU feed guide In the double-sided copy mode, the reversal exit operation is carried out when the second side is output if the following conditions are met: Conditions: The 1st of several copies of two or more odd-numbered originals made in the one-sided and double-sided modes using the ADF. Or, when one copy is made. By the reversal exit operation, the double-sided copy sheets are detected by the body aligning switch when the sheets arrive at the aligning roller on the copier, and the ADU/exit switching gate are positioned in the direction of the paper stack section by solenoid. Next, the double-sided copy sheets are fed inside the ADU inlet guide by During this operation, the leading edge of the paper is detected by the reversal switch, and the inlet/reversal roller rotates in the forward direction to transfer the paper to the ADU stack section. When the paper passes through the reversal gate, and the trailing edge of the paper passes the reversal switch, the inlet/reversal roller rotates in the reverse direction by the reverse direction clutch, and the paper is guided to the reversal guide section by the reversal gate. After the paper is guided to the reversal guide section, it is output to the copy tray by the exit roller. 1) The reversal switch detects the leading and trailing edges of the paper passing through the reversal gate. It is also used for detecting paper jams. 15 - 9 ADU 15.4 Disassembly and Replacement [A] Removing the ADU covers [A-1] Removing the ADU front cover Stop ring Upper guide cover [A-2] (1) Draw out the ADU from the copier. (2) Remove the screw fixing the rotation knob, and [A-2] then remove the rotation knob. (3) Remove the 3 screws fixing the ADU front cover. (3) (3) (4) Remove the upper guide cover fastened by the stop ring. [A-2] Removing the ADU feed cover (1) Remove the 2 screws fixing the ADU feed cover. (3) [B] Stack guide unit (1) Remove the 6 screws fixing the stack guide unit. (2) Disconnect the connector. (3) Remove the stack guide unit. Connector ADU 15 - 10 (2) [C] Width guide motor and width guide switch (1) Remove the stack guide unit. (2) Disconnect the connector, and remove the 2 Length guide switch Width guide switch Position detection switch1 screws. (3) Remove the 2 screws fixing the width guide motor to remove the width guide motor. (4) Disconnect the connector, and release the switch claw from the bracket to remove the width guide switch. Note: The position of the width guide switch is adjusted before the copier is shipped from Width guide motor Length guide motor Stack empty switch the factory. Do not remove the adjustment screw. [D] Length guide motor and length guide switch (1) Remove the stack guide unit. (2) Disconnect the connector and remove the 2 screws. (3) Remove the 2 screws fixing the length guide motor and then remove the length guide motor. (4) Disconnect the connector, and release the switch claw from the bracket to remove the length guide switch. [E] Stack empty switch, position detection switch 1 (1) Remove the stack guide unit. (2) Disconnect the connector, and release the switch claw from the bracket to remove the stack empty switch. (3) Disconnect the connector, and release the switch claw from the bracket to remove the position detection switch 1. 15 - 11 ADU [F] Pick-up roller guide unit (1) Remove the stack guide unit. (2) Remove the 4 screws fixing the pick-up roller guide to remove the pick-up roller guide. [G] Pick-up roller (1) Remove the pick-up roller guide unit. (2) Remove the 3 clips fixing the pick-up roller, clutch and pick-up roller. [H] Transport clutch (1) Remove the ADU front cover. (2) Remove the stack guide unit. (3) Remove the pick-up roller guide unit. (4) Remove the 2 screws fixing the clutch guide and then the clutch guide. Note: When returning the clutch guide to its original position, make sure that the protrusion on the clutch is fitted into the notch on the clutch guide. (5) Remove the set screw fixing the transport clutch and disconnect the connector. Then remove the transport clutch. ADU 15 - 12 [I] Transport roller 2, 3, 4 2 3 4 (1) Remove the PC board. (2) Remove the front E-ring and bush. (3) Remove the rear E-ring, pulley pin and belt. (4) Remove the E-ring and bush and then the transport roller. The transport roller 2 and 3 are same parts. [J] Transport roller 1 (1) Remove the front clutch guide and the transport clutch. (2) Remove the front E-ring and bush. (3) Remove the 3 screws fixing the rear connector bracket, and then remove the connector bracket. (4) Remove the rear E-ring, pulley pin and belt. (5) Remove the E-ring and bush, and then the transport roller. The transport roller 1 and 4 are same parts. [K] Transport switch 2 (1) Turn the ADU unit cover. (2) Disconnect the connector, and release the switch claw from the bracket to remove transport switch 2. 15 - 13 ADU [L] ADU drive unit (1) Disconnect the 2 connectors. (2) Remove the 5 screws fixing the ADU drive unit and then the ADU drive unit. [M] Feed clutch and aligning clutch (1) Remove the ADU drive unit. (2) Remove the bracket (2 screws). (3) Remove the 4 bushes. (4) Remove the E-ring, gear and pin. (5) Remove the feed clutch and the 2 set screws fixing the aligning clutch. Then, remove the feed clutch and aligning clutch. Note: The gear on the feed clutch side is Z32, and the hear on the aligning clutch side is Z22. [N] Feed roller (1) Remove the ADU front cover. (2) Remove the stack guide unit. (3) Remove the pick-up roller guide unit. (4) Remove the ADU drive unit. (5) Remove the transport clutch guide. (6) Remove the front E-ring and bush. ADU 15 - 14 (7) Remove the rear E-ring, gear (black) and pin. (8) Remove the E-ring and bearing. (9) Remove the spring from the transport guide. (10) Slide the feed roller to the rear to remove. (11) Remove the spring and separation belt gear drive unit. (12) Remove the E-ring, pick-up gear drive unit and pin. [O] Aligning roller (1) Remove the ADU front cover. (2) Remove the stack guide unit. (3) Remove the pick-up roller guide unit. (4) Remove the ADU drive unit. (5) Remove the transport clutch guide. (6) Remove the front E-ring and bearing. 15 - 15 ADU (7) Remove the rear E-ring, gear (white) and pin. (8) Remove the E-ring and bearing. (9) Slide the aligning roller to the rear to remove. [P] Feed switch (1) Remove the ADU feed cover. (2) Remove the screw fixing the feed switch bracket. (3) Disconnect the connector, and release the switch claw from the bracket to remove the feed switch. Feed switch [Q] Aligning switch (1) Remove the ADU feed cover. (2) Disconnect the connector, and release the switch claw from the bracket to remove the aligning switch. ADU 15 - 16 Aligning switch [R] ADU feed unit (1) Remove the ADU front cover. (2) Remove the ADU feed cover. (3) Remove the transport clutch holder. (4) Disconnect the 5 connectors, and release the harness from the feed unit. (5) Remove the 2 E-ring from the front side of the fulcrum shaft fixing the ADU feed unit. Color (black-black) (white-white) (white-black) (6) Remove the rear E-ring. (7) Remove the rear spring. (8) Draw out the fulcrum shaft to the front. (9) Remove the feeder unit by lifting it upwards. [S] Forward rotation clutch and reverse rotation clutch (1) Remove the ADU feed unit. (2) Remove the 2 E-rings, 2 screws and then the feed drive unit. 15 - 17 ADU (3) Remove the 2 E-rings, 2 screws and bracket. (4) Remove the 2 E-rings and bush. (5) Remove each of the 2 set screws fixing the forward rotation clutch and reverse rotation clutch, and then remove forward rotation clutch and reverse rotation clutch. E-ring [T] Holding gate solenoid (1) Remove the ADU feed unit. (2) Remove the feed drive unit. (3) Remove the screw fixing the holding gate solenoid to remove the holding gate solenoid. ADU 15 - 18 [U] inlet/reversal roller (rubber roller, plastic roller) Transport guide-u (1) Remove the ADU feed unit. (2) Remove the feed drive unit. (3) Remove the E-ring, gear and pin. (4) Remove 2 screws for the transport guide-u. E-ring Pin (5) Remove the rear E-ring, and take out the bush. (6) Remove the transport guide-u (2 screws). E-ring Bush (7) Slide the inlet/reversal roller (rubber roller) to the front to remove. 2 1 (8) Remove the front springs and rear springs (2 each). (9) Remove the front E-ring, and take out the bush. (10) Remove the rear E-ring, and take out the bush. Spring E-ring 15 - 19 ADU (11) Slide the inlet/reversal roller (plastic roller) to the front, and take it out. 2 1 [V] Separation belt (1) Remove the ADU unit. (2) Remove the feed drive unit. (3) Remove the 4 screws fixing separation mounting bracket, and then the separation mounting bracket. Separation mounting bracket (4) Remove the E-ring, collar, gear, pin and bush. E-ring,collar,gear & pin (4) (5) Remove the 2 E-rings, bush and bracket. Bush (4) Bush (5) E-ring (5) E-ring (5) (6) Remove the E-ring, slide the bush from the bracket and then remove the separation belt roller. Remove the 2 E-rings, and remove the drop roller. Drop roller E-ring E-ring Separation belt roller E-ring Bush ADU 15 - 20 (7) Remove the 3 E-rings and collar. (8) Draw out the shaft to the rear side. (9) Replace the 4 separation belts. Collar [W] Pre-stack discharge brush (1) Remove the ADU feed cover. Discharge brush (2) Remove the 2 screws fixing the pre-stack discharge brush and then the pre-stack discharge brush. Sheet [X] Holding gate (1) Remove the ADU feed unit. (2) Remove the feed drive unit. (3) Remove the E-ring and clutch unit. (4) Remove the 2 front E-rings, each of the 2 gears and pins. (5) Draw out arm F to the front side. E-ring Arm F (6) Remove the 2 rear E-rings, each of the 2 gears and pins. (7) Draw out arm R to the rear side. Note: For reassembling, refer to the service handbook 1.15.2 “Holding gate position adjustment”. Arm R 15 - 21 ADU (8) Slide the holding gate to the front and remove it. Holding gate [Y] ADU/exit switching gate (1) Open the exit unit. (2) Remove the spring from the arm, and the screw fixing the link to the arm. Note: When assembling, take care not to tighten the screw fixing the link to the arm too tight. (3) Remove the rear clip and bush. Clip (4) Slide the ADU/exit switching gate to the front and remove it. Gate ADU 15 - 22 (5) Remove the E-ring, arm, pin and bush from the removed ADU/exit switching gate, and replace the gate. E-ring Arm Bush [Z] Gate solenoid (1) Remove the 4 screws fixing the exit cover, and then remove the exit cover. (2) Remove the screw fixing the link to the gate arm. (3) Disconnect the connector, and remove the 2 Gate solenoid screws fixing the gate solenoid. Then remove the gate solenoid. [AA] Reversal gate (1) Open the exit unit. Reversal gate (2) Remove the E-ring fixing the reversal gate. Then remove the arm, spring and bush. (3) Slide the reversal gate to the rear and remove it. Arm Spring [AB] Exit roller E-ring (1) Remove the exit cover. (2) Remove the rear E-ring, and slide the bearing to the inside of the frame. (3) Slide the exit roller to the rear and remove the bearing from the frame, and then take out the exit roller. Exit roller 15 - 23 ADU [AC] Transport (reversal) roller (1) Open the exit unit. (2) Remove the rear E-ring, gear, pin and bush. (3) Remove the E-ring, slide the transport (reversal) roller to the front, remove the bush from the frame, and then take out the transport (reversal) roller. Transport / reverse roller (4) Remove the E-ring from the transport (reversal) roller and bush, and replace the transport (reversal) roller. [AD] ADU drive motor (1) Remove the main unit rear cover. (2) Disconnect the connector. (3) Remove the 3 screws fixing the drive motor bracket and then the drive motor bracket. (4) Remove the 2 screws fixing the ADU drive motor and then the ADU drive motor. Assembly of clutch and solenoid connector As the clutch and solenoid connector have the same shape, it is possible that they may contact with each other. Using the following figure and list, carry out the assembly after checking the color of each connector and harness. A C B Connected Point Connector Color Harness Color Connector Color Harness Color A Black Black Black Black Harness for reverse clutch B White White Black Black Harness for forward clutch C White Brown Harness for solenoid ADU 15 - 24 White Black 16. AUTOMATING DOCUMENT FEEDER (ADF) 16.1 Outline The ADF (Automatic Document Feeder) automatically feeds sheet originals onto the original glass, and outputs them to the tray after they have been copied. The figure below shows the configuration of the ADF. 1 Original feed section ................. This mechanism feeds originals one at a time onto the original glass. It comprises a pickup roller, feed roller, separation pad, aligning roller and other parts. 2 Original transport section .......... This section transports originals after they exit the original glass. It comprises a transport belt and rollers for driving the transport belt. 3 Original exit/reversal section ..... This section outputs originals onto the exit tray after copying is com- pleted. When making copies in the double-sided mode, the original is guided to the reversal section where it is turned over. The original is then fed to the original glass again. The original exit/reversal section comprises an exit roller, flapper, reversal roller and other parts. Original (face-up) Pick-up roller Transport belt Original feeding tray Exit roller Separation pad Exit from ADF Flapper Reverse roller Aligning roller Original stopper Original glass Feed roller 16 - 1 Sent onto the original glass for duplex copying ADF 16.2 Construction 16.2.1 ADF construction Control section Original receiving tray Exit / Reverse section Transport section Original feeding tray Jam release cover Feeding section Document feeder unit consists of feeding section (includes the original feeding tray), transport section, reverse (includes exit) section and control section. Mechanical part Feeding section Electrical part • Jam release cover • ADF feed motor • ADF pick up roller • ADF feed roller • ADF separation pad • ADF aligning roller • ADF aligning sensor • ADF timing sensor • ADF empty sensor • ADF size sensor • ADF feed cover switch Transport section Reverse section • Belt drive roller • ADF transport motor • Transport belt • Belt retainer roller • ADF open switch • ADF fan motor • Jam release cover • ADF reverse roller • ADF reverse flapper • ADF exit roller • ADF reverse motor • ADF reverse solenoide • Exit sensor • ADF exit cover sensor Control section ADF • PC board 16 - 2 16.2.2 Drive mechanism (1) Drive motor rotates CW (Front view) 8 7 6 Front side 5 Reverse motor Rear side 1 Transport motor 4 Lock 2 Stop 3 Feed motor Free 1 Pick-up roller rotates CCW. 2 Feed roller rotates CCW. 3 Aligning roller stops. 4 Weight goes down. 5 Transport belt rotates CW. 6 Exit roller rotates CW. 7 Reverse roller rotates CW. * 8 Flapper goes up at the duplexing mode and the following conditions. I. The solenoid turns ON when trailing edge of the first original is passed the timing sensor. II. The solenoid turns ON when transport of the original is restarted after reversal of the original is stopped. III. The solenoid turns ON when transport of the second original is restarted after the first original is exited and transport of the second original is stopped on the glass. 16 - 3 ADF (2) Drive motor rotates CCW (Front view) 8 7 6 Front side 5 Reverse motor Rear side 1 Free Transport motor 4 Stop Stop 2 3 Feed motor Lock 1 Pick-up roller stops. 2 Feed roller stops. 3 Aligning roller rotates CCW. 4 Weight goes up. 5 Transport belt rotates CCW. 6 Exit roller rotates CCW. 7 Reverse roller rotates CCW. ADF 16 - 4 16.3 Description of Operations 16.3.1 Description of operation (1) Setting the original The original is set on the tray, and the empty sensor turns ON. The empty sensor detects that the original is set, and the original set signal is set. (2) Start of feed to aligning When the feed signal is received from the copier, the DF operation in progress signal is set. Then, the feed motor starts operating in the reverse direction, the feed roller is rotated, the weight plate is lowered, and initial alignment is started. At the same time, the transport motor and reversal motor start to operate in the forward direction, the transport belt and reversal roller rotate, and the dummy exit operation is started. After the alignment sensor detects the leading edge of the original, the original is transported for a specified number of pulses, and the leading edge of the original arrives and is aligned at the aligning roller. The feed motor then stops. 16 - 5 ADF (3) Restart to end of initial alignment The feed motor starts to operate in the forward direction to rotate the aligning roller, transport of the original is started, and the initial alignment operation is restarted. After the timing sensor detects the leading edge of the original, the original is transported by a specified number of pulses. At the point that the original arrives at the initial alignment standby position, the feed motor stops, and the initial alignment operation is completed. At this time, forward rotation of the feed motor causes the weight plate to rise. At the point that initial alignment operation is completed, the status of the width sensor is checked and stored to memory. The transport motor and reversal motor stop at the point when they have been driven by a specified number of pulses, and exit operation is completed. However, note, that if the original exit operation was in progress at this time, dummy exit operation is completed at the point when the exit operation of this original is completed. (4) Start of original transport to aligning sensor OFF (detection of scan size) After completion of dummy exit, the feed motor and transport motor start to operate in the forward direction, and the aligning roller and transport belt rotate to start transport of the original standing by at the initial alignment position to the exposure position. At this time, detection of the scan size is started. From the second original onwards, the reversal motor also starts to rotate in the forward direction at the same time to start exit operation. The number of pulses from start of transport of the original at the initial alignment position to when the trailing edge of the original passes the aligning sensor is counted to detect the length of the original. The stop notice signal is set at the set timing of the stop notice signal. At the point that the aligning sensor detects the trailing edge of the original, the DF operation in progress signal is reset, detection of the scan size is completed, and the original size is determined also by the state of the width sensor that was stored to memory at completion of initial alignment. If the original is a non-standard size, or the original size differs from that of the previously fed original, the original size data is sent to the copier. ADF 16 - 6 (5) Aligning sensor OFF to timing sensor OFF At the point when the timing sensor turns OFF and the trailing edge of the original is detected, the feed motor stops. The number of drive pulses until the feed motor stops is set. (6) Setting the original at the exposure position (completion of feed) The original stops signal is set by the set timing of the original stop signal. After the timing sensor detects the trailing edge of the original, the original is transported for a specified number of pulses. At the point when the original arrives at the exposure position, the feed motor stops, the original is set at the exposure position, and feed is completed. 16 - 7 ADF (7) Start of initial alignment of next original to completion of initial alignment When there is an original on the tray at the point when feed is completed, the initial alignment signal is set, the feed motor starts to operate in the reverse direction, and initial alignment of the next original is started. If there is no original on the tray, operation from (8) is started. The same processes as (2) and (3) are carried out, initial alignment of the next original is completed, and the original stands by. * When initial alignment is carried out on the 2nd original onwards, the dummy exit operation is not carried out. If an original is in the process of being output, the next original waits for completion of the exit operation. (8) Start of feed to setting the original at the exposure position (completion of feed) When the feed signal is received, the initial alignment signal is reset, feed of the original standing by at the initial alignment position is started, the same processes from (4) to (8) are carried out, and the original is set at the exposure position. When the exit signal is received during feed of the 2nd original onwards, the DF operation in progress signal is set. Then, the reversal motor starts to operate in the forward direction to rotate the reversal roller, and the exit operation is started to output the original. Exposed originals are transported to the exit section side. If the original transported to the exit section can be drawn out and output, they are drawn out and output from the platen top during exposure of the original. If there is an original on the tray when feed is completed, initial alignment of the next original is started. * This operation is repeated until all originals on the tray are fed. ADF 16 - 8 (9) Start of original feed and exit to exit sensor ON When the original is output, the number of drive pulses up start of exit deceleration is set at the point when the exit sensor turns ON. When the output original is nipped by the exit roller by a specified amount or more when setting of the original to be fed is completed, the original is drawn out and output as it is. If the output original has not been nipped by the specified amount or more, the original is not drawn out and output. In this case, output of this original is carried out when the next original is fed. (10) Start of exit deceleration At the point when the number of drive pulses up to start of exit deceleration set in (9) has been counted, deceleration of the reversal motor is started, and the original is output at low speed. (11) Turn guide sensor OFF At the point when the exit sensor turns OFF, the number of pulses up to reversal motor stop is set. 16 - 9 ADF (12) Completion of exit At the point when the original is completely output onto the exit tray, the reversal motor stops, and exit is completed. (13) Start of exit of final original to completion of exit When the exit signal is received during exit of the final original, the DF operation in progress signal is set. Then, the transport motor and reversal motor start to operate in the forward direction, the transport belt and reversal roller rotate to start exit operation, and the original on the original glass is transported to the exit section. At the point when the exit sensor turns ON, the number of drive pulses up to start of exit deceleration is set. At the point when the number of pulses is counted up, deceleration of the transport motor and reversal motor is started, and the original is output at low speed. At the point when all originals in the DF have been output, the transport motor and reversal motor stop, exit is completed, the DF operation in progress signal is reset, and feed operation is completed. * During step feed, 2 originals are output continuously. ADF 16 - 10 16.3.2 Double-sided feed operation (1) Setting the original The original is set on the tray, the empty sensor turns ON, setting of the original is detected, and the original set signal is set. (2) Start of feed to aligning When the feed signal is received from the copier, the DF operation in progress signal is set. Then, the feed motor rotates in the reverse direction to rotate the feed roller, lower the weight plate and start initial alignment operation. After the aligning sensor turns ON and the leading edge of the original is detected, the original is transported for a specified number of pulses, and the leading edge of the original arrives and is aligned at the aligning roller. The feed motor then stops. At the same time, the transport motor and reversal motor start to operate in the forward direction to rotate the transport belt and reversal roller and start the dummy exit operation. 16 - 11 ADF (3) Restart of initial alignment to completion of initial alignment The feed motor starts to operate in the forward direction to rotate the aligning roller. Transport of the original starts, and the initial alignment operation is restarted. After the timing sensor turns ON, and the leading edge of the original is detected, the original is transport for a specified number of pulses, and the feed motor stops and the initial alignment operation is completed at the point when the original arrives at the initial alignment standby position. At this time, forward rotation of the feed motor causes the weight plate to lower. At the point that initial alignment operation is completed, the status of the width sensor is checked and stored to memory. After initial alignment operation is completed, the transport motor and reversal motor stop at the point when they have been driven by a specified number of pulses, and exit operation is completed. However, note, that if the original exit operation was in progress at this time, dummy exit operation is completed at the point when the exit operation of this original is completed. (4) Start of original transport to aligning sensor OFF (detection of scan size) After completion of dummy exit, the feed motor and transport motor start to operate in the forward direction, and the aligning roller and transport belt rotate to start transport of the original standing by at the initial alignment position to the exposure position. From the 2nd original onwards, the reversal motor also starts to rotate in the forward direction at the same time to start exit operation. The number of pulses from start of transport of the original at the initial alignment position to when the trailing edge of the original passes the aligning sensor is counted to detect the length of the original. At the same time, the original size is determined also by the state of the width sensor that was stored to memory at completion of initial alignment. If the original is a non-standard size, or the original size differs from that of the previously fed original, the original size data is sent to the copier. ADF 16 - 12 (5) Aligning sensor OFF to timing sensor OFF The feed motor stops at the point when the timing sensor turns OFF and the trailing edge of the original is detected. If exit operation is not carried out simultaneously or has already completed at this time, the reversal motor starts to rotate in the forward direction simultaneously to rotate the reversal roller. At the same time, the flapper solenoid turns ON to switch the reversal flapper over to the reversal side. When the exit operation is in progress, the transport stops after being driven for a specified number of pulses. The original being feed pauses before the reversal section, and stands by for exit operation to complete. After the exit sensor turns ON and the leading edge of the original is detected, the original is transported for a specified number of pulses. (6) Completion of forward rotation transport At the point where the leading edge of the original is nipped by the reversal roller lower passage roller by a specified amount or more, the transport motor and the reversal motor stop. 16 - 13 ADF (7) Start of reversal to flapper solenoid OFF After forward rotation transport is completed, the transport motor starts to rotate in the reverse direction and the reversal motor starts to rotate in the forward direction to rotate the transport belt and reversal roller to start reversal of the original. The original passes along the reversal path and is transported onto the original glass. The DF operation in progress signal is reset at the reset timing of the DF operation in progress signal. The stop notice signal is set at the set timing of the stop notice signal. The original top side/rear side signal is set or reset at the point when the exit sensor detects the trailing edge of the original. The original stop signal is set at the set timing of the original stop signal. At the point when the trailing edge of the original has passed the reversal flapper, the flapper solenoid turns OFF, and the reversal flapper is switched to the exit side. (8) Setting the original at the exposure position (completion of No.1 side feed) The original is transported by a specified number of pulses after reversal starts. At the point where the original arrives at the exposure position, the transport motor and reversal motor stop, and feed is completed. The original is stopped in contact with the original stopper, and the rear side of the original is set. ADF 16 - 14 (9) Start of feed to completion of forward rotation transport When the feed signal is received, and the DF operation in progress signal is set, the reversal feed of the original that is set at the exposure position is started. First of all, the transport motor and reversal motor start operating in the forward direction to rotate the transport belt and reversal roller. At the same time, the flapper solenoid turns ON to switch the reversal flapper to the reversal side, and the original is transported to the reversal section. After the exit sensor turns ON, the original is transported for a specified number of pulses. At the point where the leading edge of the original is nipped by the reversal roller lower passage roller by a specified amount or more, the transport motor and the reversal motor stop. (10) Start of reversal to flapper solenoid OFF After forward rotation transport is completed, the transport motor starts to rotate in the reverse direction, and the reversal motor starts to rotate in the forward direction to rotate the transport belt and reversal roller to start reversal of the original. The original passes along the reversal path and is transported onto the original glass. At the point when the trailing edge of the original has passed the reversal flapper, the flapper solenoid turns OFF, and the reversal flapper is switched to the exit side. 16 - 15 ADF (11) Setting the original at the exposure position (completion of No.2 side feed) The original is transported by a specified number of pulses after reversal starts. At the point where the original arrives at the exposure position, the transport motor and reversal motor stop, and feed is completed. The original is stopped in contact with the original stopper, and the rear side of the original is set. (12) Start of initial alignment to completion of initial alignment When there is an original on the tray at the point when feed is completed, the initial alignment signal is set, and initial alignment of the next original is started. The same processes as (2) and (3) are carried out, initial alignment of the next original is completed, and the original stands by. * When initial alignment is carried out on the 2nd original onwards, the dummy exit operation is not carried out. If there is no original on the tray, operation from (21) is started. (13) Start of feed to aligning sensor OFF When the feed signal is received, the feed motor, transport motor and reversal motor start to operate in the forward direction to rotate the aligning roller, transport belt and reversal roller. Feed of the original standing by at the initial alignment position and exit of the original set at the exposure position are carried out simultaneously. In the same way as (4), the original size is detected at the point when the trailing edge of the original has passed the aligning sensor. ADF 16 - 16 (14) Aligning sensor OFF to timing sensor OFF The feed motor stops at the point when the timing sensor turns OFF. When the 2nd original onwards is being fed, exit of exposed originals is carried out at the same time, and the original being fed must be made to stand by before the reversal section until exit is completed. For this reason, the number of drive pulses up to feed motor stop is set at the point when the timing sensor turns OFF to stop the original being fed before the reversal section. (15) Timing sensor OFF to pause of forward rotation transport After the timing sensor turns OFF, the original is transport for a specified number of pulses, and the feed motor stops at the point when the original being fed arrives at the specified position before the reversal section. The original stands by until exit of the output original is completed. The number of drive pulses up to start of exit deceleration is set at the point when the turn guide sensor turns ON by the leading edge of the output original, deceleration of the reversal motor is started at the point when the timer has counted the number of pulses, and the original is output at low speed. (16) Completion of exit At the point when the original is completely output onto the exit tray, the reversal motor stops, and exit is completed. 16 - 17 ADF (17) Restart of forward rotation transport to completion of forward rotation transport After exit of the output original is completed, forward rotation transport of the original standing by before the reversal section is restarted. The transport motor and reversal motor start to rotate in the forward direction to rotate the transport belt and reversal roller. At the same time, the flapper solenoid turns ON to switch the reversal flapper to the reversal side. After the exit sensor turns ON, the original is transported for a specified number of pulses. At the point where the leading edge of the original is nipped by the reversal roller lower passage roller by a specified amount or more, the transport motor and the reversal motor stop. (18) Start of reversal to flapper solenoid OFF After forward rotation transport is completed, the transport motor starts to rotate in the reverse direction, and the reversal motor starts to rotate in the forward direction to rotate the transport belt and reversal roller to start reversal of the original. The original passes along the reversal path and is transported onto the original glass. At the point when the trailing edge of the original has passed the reversal flapper, the flapper solenoid turns OFF, and the reversal flapper is switched to the exit side. (19) Setting the original at the exposure position (completion of No.1 side feed) The original is transported by a specified number of pulses after reversal starts. At the point where the original arrives at the exposure position, the transport motor and reversal motor stop, and feed is completed. The original is stopped in contact with the original stopper, and the rear side of the original is set. ADF 16 - 18 (20) Setting the original at the exposure position (completion of No.2 side feed) The same processes from (9) to (11) are carried out, and the top side of the original is set at the exposure position. If there is an original on the tray when feed is completed, initial alignment of the next original is started. * From here on, operation is repeated until all of the originals on the tray are fed. (21) Start of exit of final original to completion of exit When the exit signal is received during exit of the final original, the DF operation in progress signal is set. Then, the transport motor and reversal motor start to operate in the forward direction, the transport belt and reversal roller rotate to start exit operation, and the original on the original glass is transported to the exit section. At the point when the exit sensor turns ON, the number of drive pulses up to start of exit deceleration is set. At the point when the number of pulses is counted up, deceleration of the transport motor and reversal motor is started, and the original is output at low speed. At the point when all originals in the DF have been output, the transport motor and reversal motor stop, exit is completed, the DF operation in progress signal is reset, and feed operation is completed. 16 - 19 ADF 16.4 Description of Interface Signals The following 6 lines are used for sending and receiving signals between the copier and the ADF: REQ ......................... Communications request signal (copier to ADF) DF-REQ ................... Communications request signal (ADF to copier) DF-ACK .................... Communications request answer signal (copier to ADF) ACK .......................... Communications request answer signal (ADF to copier) TXD .......................... Data sent from the copier to the ADF RXD ......................... Data sent from the ADF to the copier Data communications (RXD, TXD) between the copier and the ADF is carried out by serial communications. So, you cannot check whether or not signals are being sent or received correctly in the field using a multimeter. ADF COPIER REQ DF-ACK TXD DF-REQ ACK RXD ADF 16 - 20 16.5 Detection of Paper Jam 16.5.1 Feed section jams [1] Aligning sensor non-arrival jam 1) Up to aligning sensor ON from start of feed from the tray in the one-sided and double-sided modes The number of pulses equivalent to 15X the distance from the original set position to the aligning sensor ON position is set as the jam pulse. This is set when feed from the tray is started. [2] Timing sensor non-arrival jam 1) Up to timing sensor from start of transport after aligning in the one-sided and double-sided modes The number of pulses equivalent to 4X the distance from the aligning roller nip position to the timing sensor ON position is set as the jam pulse. This is set when transport by the aligning roller after original aligning is started. [3] Aligning sensor accumulation jam 1) Up to aligning sensor OFF after start of transport from the initial alignment position in the one-sided and double-sided modes The number of pulses equivalent to twice the distance from the aligning sensor to the trailing edge of the original when the longest original (LD) is standing by at the initial alignment position is set as the jam pulse. This is set when transport from the initial alignment position is started. [4] Timing sensor accumulation jam 1) Up to timing sensor OFF from aligning sensor OFF The number of pulses equivalent to twice the distance from the aligning OFF position to the timing sensor OFF position is set as the jam pulse. 16.5.2 Transport section jams [1] Turn guide sensor non-arrival jam 1) From timing sensor OFF to exit sensor ON when making the first copy (in all modes) The number of pulses equivalent to twice the distance from the leading edge position of the original at the point when the trailing edge of the original has passed the timing sensor to the exit sensor ON position when the shortest original (personal check) has been fed is set as the jam pulse. This is set at the point when the trailing edge of the original has passed the timing sensor when the first copy is made. 2) From exit sensor OFF for the output original to exit sensor ON for the next original in the one-sided mode The number of pulses equivalent to twice the interval between originals when the shortest original (personal check) is being fed by normal feed in the one-sided mode is set as the jam pulse. This is set at the point when the trailing edge of the output original has passed the exit sensor in the one-sided mode. 16 - 21 ADF 3) From restart of No.1 side transport to exit sensor ON in the double-sided mode The number of pulses equivalent to twice the distance from the leading edge position of the original being fed when the original being fed is paused on the original glass and standing by for exit of the output original to be completed during No.1 side transport in the double-sided mode is set as the jam pulse. This is set when transport of the original being fed is restarted after exit of the output original is completed during transport of the No.1 side. 4) From start of No.2 side transport to exit sensor ON in the double-sided mode The number of pulses equivalent to twice the distance from the trailing edge position of the original to the exit sensor ON position when the shortest original (personal check) is set at the exposure position is set as the jam pulse. This is set when transport of the No.2 side is started. 16.5.3 Exit/Reversal jams [1] Exit sensor accumulation jam 1) From exit sensor ON to exit sensor OFF at original exit The number of pulses equivalent to twice the length of the longest original (LD) is set as the jam pulse. This is set at the point when the trailing edge of the output original has arrived at the exit sensor during original exit. 2) From start of reversal operation to exit sensor OFF in the double-sided mode The number of pulses from start of reversal operation (reverse rotation of the transport belt) to completion of feed in the double-sided mode is set as the jam pulse. When the exit sensor turns ON at completion of feed in the double-sided mode, this is judged to be the exit sensor accumulation jam. In the double-sided mode, the motor is driven and is stopped by a specified number of pulses (number of feed pulses up to the original stopper position) after start of reversal operation (reverse rotation of the transport belt). Accordingly, in the same way as detection of other accumulation jams, the exit sensor accumulation jam pulse is set at the start of reversal operation (reverse rotation of the transport belt), and occurrence of an accumulation jam is judged by the timer counting up the jam pulse. If this method is adopted, the feed pulse count is counted and the motor stops before the jam pulse count is counted. So, the exit sensor accumulation jam does not occur even if originals accumulate at the exit sensor section. For this reason, when the exit sensor turns ON at completion of double-sided feed, the exit sensor accumulation jam is judged. This method is adopted to detect jams. ADF 16 - 22 16.6 Detection of Original Size 16.6.1 Original size detection method The number of drive pulses of the feed motor from start of transport of the original standing by at the initial alignment position up to when the trailing edge of the original being fed passes the aligning sensor is counted to detect the original size in the feed direction. At the same time, the original size in the width direction is judged by the size width sensor. As it is difficult to judge A4 horizontal and letter size horizontal (and also A3 and LD) by detection in the feed direction and width direction alone as described above, two sensors are provided to detect A4 horizontal and letter size horizontal. 1 Start of transport of original standing by at the initial alignment position 2 Passage of the trailing edge of the fed original through the aligning sensor The number drive pulses output by the feed motor between 1 and 2 is counted to detect the size of the original in the feed direction. 16 - 23 ADF 16.7 Flow Charts 16.7.1 Main routine processing Main routine START 5 msec passed? Parsing of port input General-purpose timer count processing No Sensor adjustment E2PROM control Initialization over? Status change monitoring Operating status monitoring Operation control Jam processing Communications control ADF unit test mode? No ADF unit test mode control General-purpose timer set processing ADF 16 - 24 No Initialization processing 16.7.2 Operation control Operation control Initial alignment One-side feed control No.1 double-sided transport control No.2 double-sided transport control Double-sided reversal control Eject control Dummy exit control Weight plate initialization control RETURN 16 - 25 ADF 16.7.3 Initial alignment control Initial alignment START Original on tray? No Aligning sensor non-arrival jam Aligning sensor OFF? No Timing sensor OFF? No Setting of jam pulse from start of initial alignment to aligning sensor ON Timing sensor accumulation jam Feed motor reverse rotation started Timing sensor OFF? Aligning ON? Setting of jam pulse from start of feed motor forward rotation to timing sensor ON No Jam pulse cleared Setting of feed motor deceleration request by aligning sensor ON interrupt (deceleration started after specified pulse drive) Feed motor reverse rotation started No Timing sensor ON? Jam pulse cleared No Feed motor OFF? Setting of feed motor deceleration request by aligning sensor ON interrupt (deceleration started after specified pulse drive) No Feed motor OFF? Initial alignment END ADF 16 - 26 No 16.7.4 One-sided feed control One-sided feed control START Aligning sensor ON? No Timing sensor ON? No Aligning sensor non-arrival jam Setting of feed delay pulse Timing sensor non-arrival jam Transport motor forward rotation started No Feed delay pulse count up? Setting of jam pulse from start of one-sided feed to aligning sensor OFF Feed motor forward rotation started Jam pulse cleared No No 2 originals on glass? Setting of jam pulse from aligning sensor OFF to timing sensor OFF Number of originals > number of output originals No Timing sensor OFF? Deceleration of all motors started Jam pulse cleared Aligning sensor OFF? No Feed motor deceleration started Setting of transport motor deceleration request by timing sensor OFF interrupt (deceleration started after specified pulse drive) No Feed motor and transport motor stopped? One-sided feed control END 16 - 27 ADF 16.7.5 No.1 double-sided transport control (double-sided transport of initially aligned original) No.1 double-sided transport started (double-sided transport of initially aligned original) Aligning sensor ON? No Original exiting? Aligning sensor nonarrival jam Timing sensor ON? No Timing sensor nonarrival jam No Setting of transport motor deceleration request by timing sensor OFF (deceleration started after specified pulse drive) Setting of jam pulse from start of No.1 double-sided transport to aligning sensor OFF Feed motor forward rotation started No Transport motor forward rotation started Transport motor stopped? No Exit completed? No output original? No Flapper solenoid ON (switchover to reversal direction) Turn guide motor forward rotation started Setting of jam pulse from restart of No.1 double-sided transport to exit sensor ON No Aligning sensor OFF? Jam pulse cleared Transport motor forward rotation started Setting of jam pulse from aligning sensor OFF to timing sensor OFF Turn guide motor forward rotation started No No Timing sensor OFF? Exit sensor ON? Jam pulse cleared Jam pulse cleared Setting of transport motor/ reversal motor deceleration request by exit sensor ON interrupt Feed motor deceleration started No Transport motor and reversal motor stopped? No.1 double-sided transport END ADF 16 - 28 Flapper solenoid ON (switchover to reversal direction) Setting of jam pulse from timing sensor OFF to exit sensor ON 16.7.6 No.2 double-sided transport control (double-sided transport of original on platen) No.2 double-sided transport START (double-sided transport of original on platen) Exit sensor OFF? Flapper solenoid ON (switchover to reversal direction) No Exit sensor accumulation jam Setting of jam pulse from start of No.2 double-sided transport to exit sensor ON Transport motor forward rotation started Reversal motor forward rotation started No Exit sensor ON? Jam pulse cleared Setting of transport motor/ reversal motor deceleration start request by exit sensor ON interrupt (deceleration started after specified pulse drive) No Transport motor and reversal motor stopped? No.2 double-sided transport END 16 - 29 ADF 16.7.7 Double-sided reversal control Double-sided reversal control START No Exit sensor ON? Setting of double-sided reversal pulse (after specified pulse drive) (motor stopped) Exit sensor non-arrival jam Transport motor reverse rotation started Reversal motor forward rotation started Exit sensor OFF? Setting of pulse up to flapper solenoid OFF by exit sensor OFF Flapper solenoid OFF at pulse count up (switchover to exit direction) No Transport motor and reversal motor stopped? No All motors stopped? Double-sided reversal control END ADF 16 - 30 No Transport motor and reversal motor stopped? Exit sensor accumulation jam No 16.7.8 Exit control Exit control START Reversal motor forward rotation started No Exit sensor ON? Setting of jam pulse from exit sensor ON to exit sensor OFF Setting of exit deceleration start pulse at exit sensor ON No Pulse count up? Reversal motor deceleration started to exit deceleration speed No Exit sensor OFF? Jam pulse cleared Output original present? No No Exit sensor ON? Setting of jam pulse from exit sensor ON to reversal sensor OFF Setting of reversal motor deceleration request at exit sensor OFF (deceleration started after specified pulse drive) Reversal motor stopped? No Exit control END 16 - 31 ADF 16.7.9 Operating status monitoring No (The second original onwards) Back side setting in progress? No (Front side setting progress) Double-sided mode? No (One-sided mode) No.2 double-sided transport started (double-sided transport of original on platen) No Double-sided mode? Initial alignment started No.2 double-sided transport started (double-sided transport of original on platen) Doublesided transport completed? B Exit started 2 originals on platen? 1 No No Double-sided reversal started No A No Doublesided transport ompleted? Exit completed? No.1 double-sided transport started (double-sided transport of original on platen) Double-sided reversal started Doublesided reversal completed? No Initial alignment completed? Double-sided reversal completed? No Double-sided transport completed? (exit completed?) Next original on tray? One-sided feed started Initial alignment started Exit started No No Initial alignment completed? Double-sided reversal started No No One-sided feed completed? Doublesided reversal completed? No Exit completed? C ADF 16 - 32 Operating status monitoring Feed signal received? A B No First copy? Back side setting in progress? Initial alignment started No.2 double-sided transport started (double-sided transport of original on platen) Dummy exit started No (One-sided mode) No No Initial alignment completed and dummy exit completed? Doublesided transport completed? Double-sided mode? Double-sided reversal started Exit started 2 originals on platen and normal feed? 2 No No Exit signal received? 1 No No Doublesided reversal completed? No Exit completed? No Exit started One-sided feed started 2 No Exit completed? No One-sided feed completed? Next original on tray? Initial alignment started No No Initial alignment completed? No Exit completed ? C RETURN 16 - 33 ADF ADF CW CCW OFF CW 16 - 34 Empty sensor Exit sensor Timing sensor Aligning sensor Reverse motor ON OFF ON OFF OFF ON OFF ON OFF ON CCW Transport motor OFF Feed motor PRE-FED ORG-STP DF-ACT 0 0 0 0 0 1.14 1.27 Exposure time 1.21 0.72 1.09 0.54 0.54 0.82 0.83 0.38 0.75 0.26 0.31 0.54 0.44 0.83 0.75 0.75 0 0 0 0 0 0.67 0.21 0.19 0.45 0.83 1.00 1.18 Exposure time differents with the machine type or the feed original mode. Exposure time 0.10 0.27 1.42 1.08 1.42 0.66 0.94 0.45 0.35 0 0.22 0 0 0 0.35 0.69 0 0.28 0.11 0.28 0 Exposure time 0.21 0.19 0.55 0.35 0.60 0.28 0 0 0.29 0 0.21 0 0.20 0 0.29 0.73 0.29 0 0.22 0 0.20 0 16.8.1 ORG-OUT ORG-IN 16.8 Timing Charts A4, 3 sheets, one-sided mode CW CCW OFF CW 16 - 35 Empty sensor Exit sensor Timing sensor Aligning sensor Reverse motor ON OFF ON OFF OFF ON OFF ON OFF ON CCW Transport motor OFF Feed motor PRE-FED ORG-STP DF-ACT ORG-OUT ORG-IN 0 0 0 0 0 0.54 0.54 0.54 0.37 0.26 0.31 0.44 0.92 1.44 1.31 1.38 0.89 1.26 0.99 0.99 1.00 0.92 0.92 Exposure time 0.34 0.14 0.97 Exposure time 0.69 0.55 0.38 0.36 0.45 0.45 0.46 0.37 0.37 0 0 0 0 0.97 0.97 0.69 0.55 0.45 0.25 0.14 0 Exposure time differents with the machine type or the feed original mode. 0 0 0 0 0 0 0 16.8.2 A3, 2 sheets, one-sided mode ADF ADF CW OFF CCW 16 - 36 ON OFF OFF ON OFF ON Timing sensor Exit sensor Empty sensor ON Reverse motor OFF OFF Flapper solenoid ON ON Aligning sensor OFF CW Transport motor OFF CCW Feed motor PRE-FED ORG-STP DF-ACT ORG-OUT ORG-IN 0 0 0 0 0 0.82 1.29 1.73 1.46 Exposure time 1.64 1.66 1.40 1.03 0.43 0.74 0.31 0.72 0.75 0.75 1.59 0.54 0.54 0.36 0.54 1.16 0.49 1.23 0 0 0 0 0 0 0.56 0.30 0.67 0.43 0.18 0 0.55 0.16 0 0 0 0 1.14 Exposure time 0.55 0.30 0.66 0.43 0.91 0.47 0.30 0.89 0.89 0.64 0.41 0 0.55 0 0 0 Exposure time 0.73 1.00 0.93 0.43 0.86 0.50 0 Exposure time differents with the machine type or the feed original mode. 1.27 1.01 0 0.64 1.44 1.62 0 1.71 1.64 0.89 1.34 0.47 0.30 1.35 0.20 1.26 0.91 0 0.28 1.21 0 0.45 0.89 1.14 1.57 0 0 0 Exposure time 0.73 1.00 1.31 1.00 1.44 1.00 0.93 0.43 0.86 0.50 0 16.8.3 A4, 2 sheets, double-sided mode CW OFF CCW 16 - 37 ON OFF OFF ON OFF ON Timing sensor Exit sensor Empty sensor Reverse motor ON OFF OFF Flapper solenoid ON ON Aligning sensor OFF CW Transport motor OFF CCW Feed motor PRE-FED ORG-STP DF-ACT ORG-OUT ORG-IN 0 0 0 0 1.04 1.46 Exposure time 0.45 0.45 1.22 1.80 1.72 1.29 Exposure time 0.68 0.33 0.14 0.37 0.35 1.10 1.52 0.97 1.59 0.62 0.73 0.74 0.69 0 0.97 0.68 0.45 0.55 0.97 0.14 0 0 0.25 0 0 Exposure time 0.14 0.56 0 0 0.83 0.76 0 0.26 0 0 0.33 0 Exposure time 0.97 0.45 0.54 1.70 0 0.97 1.69 1.95 0 0 0 0 0 0 Exposure time differents with the machine type or the feed original mode. 0.14 0.56 1.21 0.37 0.91 0.66 0.74 0.69 1.10 0 0 0.26 1.28 0.83 0.83 1.15 0.83 0.76 0 0.26 0 0 0.33 0 0.89 0.26 1.64 1.60 1.63 0.92 1.53 0.92 0.54 1.16 0.31 0.54 1.16 1.73 1.66 1.24 0.44 0.54 0.99 0 16.8.4 A3, 2 sheets, double-sided mode ADF 16.9 Descriptions of Symbols, Layout of Electrical Parts and Signal Block Diagrams 16.9.1 Symbols 1 Motors Symbol Code name Function Remarks FMOT FMOT (feed motor) Drives pick-up roller, feed roller and aligning roller Pulse motor TMOT TMOT (transport motor) Drives transport belt Pulse motor RMOT RMOT (reversal motor) Drives reversal roller and exit roller Pulse motor FAN ADF-FAN-MOT (ADF fan motor) ADF PC board cooling IC motor 2 Solenoid Symbol RSOL Code name RSOL (reversal solenoid) Function Drives reversal flapper Remarks DC solenoid 3 Sensors Symbol Code name Function Remarks EMPS EMP-SNS (empty sensor) Detects the original on the original tray Semiconductor optical sensor REGS REG-SNS (aligning sensor) Detects the original for aligning Semiconductor optical sensor TIM TIM-SNS (timing sensor) Semiconductor optical sensor SIZES1 SIZE-SNS1 (size sensor 1) Original width sensor 1 Semiconductor optical sensor SIZES2 SIZE-SNS2 (size sensor 2) Original width sensor 2 Semiconductor optical sensor EXITS EXIT-SNS (exit sensor) Detects originals in the exit/reversal section Semiconductor optical sensor OPN DF-OPN-SW (ADF open/close switch) Detects open/close of the ADF unit Reed switch FCOVER FCOVER-SW (paper feed cover switch) Detects open/close of the feed section Reed switch RCOVER RCOVER-SW Detects open/close in the exit/reversal section Reed switch APS start switch Microswitch Detects the initial alignment position of the original (exit cover switch) APSSW APS-STR-SW (APS start switch) ADF 16 - 38 16.9.2 Electrical parts layout RCOVER TMOT FAN FMOT RMOT APSSW RSOL EXITS FCOVER EMPS SIZES2 SIZES1 REGS OPN TIM 16.9.3 Signal block diagram PPC ADF EMP-SNS EMPS REG-SNS REGS TIM-SNS TIM SIZE-SNS1 SIZES1 SIZE-SNS2 SIZES2 EXIT-SNS EXITS Control board Sensor input circuit ROM FCOVER-SW FCOVER RCOVER-SW RCOVER DF-OPN-SW OPN CPU EEPROM APS-STR-SW APSSW DF-ACK DF-REO REO CNT RXD SGND TXD SGND ACK D/A converter Communications circuit Driver Driver FAN RSOL FMOT +5V +24V +5V power circuit DC+24V Rush current limiting circuit 16 - 39 Driver TMOT RMOT ADF 16.10 Description of Circuits 16.10.1 Aligning sensor, timing sensor and exit sensor circuit diagrams This item describes the aligning sensor circuit. A description of the timing sensor and exit sensor circuits is omitted in this item as the aligning sensor, timing sensor and exit sensor share the same circuit configuration. +5V 1 Aligning sensor A 2 C 1 PT1 LED1 K 1 CN6.1 CN6.2 CN6.3 +5V 1 R43 2 +5V 2 *REGS 3 REGLED 1 NF2 3 2 C30 2 E 2 SGND E 3 1 B 24 1 R16 C31 R81 2 2 R84 7 + 6 IC5.2 _ 2 1 +5V 1 R45 2 1 2 SGND SGND SGND 12 + 1 IC4.4 _ 13 C17 1 R36 2 2 TP25 1 REG TP45 R44 SGND C 2 Q7 1 R15 2 1 1 1 1 1 REG-AD TP35 1 1 2 REGS-DA R55 SGND This aligning sensor circuit comprises two circuits, a voltage-current conversion circuit for adjusting the intensity of light emitted from the infra-red LEDs, and a voltage comparison circuit for comparing the output voltage of phototransistor (PTr) with the reference voltage and converting the output voltage to digital signals. The aligning sensor is a mirror reflection-type sensor, and comprises a light-emitting sensor (infra-red LED) and light-receiving sensor (PTr) pair each having the same optical axis. A mirror is placed along an imaginary line extending from the optical axis of these sensors. When there is no original between the sensors and the mirror, the infra-red rays radiated from the LED are reflected into the PTr at high reflectance. Alternatively, when there is an original, the light radiated on the mirror and the light reflected from the mirror is broken by the original, markedly reducing the infra-red incident to the PTr. When there is a large amount of light incident to the PTr (that is, there is no original), the photo-current flowing through the PTr increases, and the voltage of pin 6 of IC5 rises at the voltage drop by R81. The comparator on IC5 compares the signal voltage of pin 6 (reversal input terminal) with the reference voltage input to pin 7 (no reversal input terminal). If the voltage of pin 6 is higher, output (pin 1 of IC5) turns Low. Alternatively, if there is little amount of light incident to the PTr (that is, there is an original), the voltage of pin 6 of IC5 becomes low, and as a result, pin 1 of IC5 turns High. R15, C30 and C31 (NF2) in the circuit diagram are noise filters. This circuit has an automatic sensitivity adjusting function for suppressing unevenness in sensor sensitivity. This function keeps the PTr voltage when there is no original at a constant level in all sensors , and absorbs unevenness in sensor sensitivity caused by the physical differences of the sensor elements. The PTr voltage is adjusted by varying the intensity of the infra-red light radiated from the LED. Automatic adjustment is executed when the sensor sensitivity adjustment is selected and when power is turned ON. By this adjustment, the PTr output voltage (analog value) is measured on the A/D input terminal of the CPU, and the output voltage of the D/A converter is varied to adjust the LED current in the voltage-current conversion circuit comprising IC4, R16 and Q7 so that the output voltage of PTr is the required voltage. The D/A output voltage values at this time are values unique to each of the sensor elements, and are stored to non-volatile memory EEPROM (IC11). ADF 16 - 40 16.10.2 +5V power circuit diagram D3 +24V CN2.1 CN2.2 DC24V PGND 1 1 R6 IC15 2 4 Vin Vo C43 1 + 1 CP1 1 GND 2 2 TP44 PGND 1 2 A K 1 + 1 K 1 C38 PGND 1 ZD2 2 2 TP26 +5V 1 +5V 2 C27 2 A 2 PGND SGND TP43 SGND 1 SGND This circuit generates the +5VDC voltage to be supplied to the CPU, logic IC and other components. +24VDC input from CN2 is converted to +5V by switching regulator IC15. ZD2, CP1 and D3 are used to protect IC15. Resistor R6 limits the input rush current to C43 when the power is turned ON. 16.10.3 Rush current limiting circuit diagram ADF open SW 7 CN6.7 DF SW 8 CN6.8 DF SW1 Exit cover SW 2 R34 2 1 CN7.1 DF SW2 2 CN7.2 PGND 2 3 2 1 R35 2 1 4 CN5.4 DF SW1 5 CN5.5 DF SW2 C36 2 1 C37 1 PGND 1 1 R8 2 OPNSW C 2 Q1 E 3 SGND PGND 1 R38 2 1 R68 1 R7 2 R101 ZD1 22 11 1 1 B A 1 PM+24V K 5 2 TP16 2 Q3 ZD3 1 R71 2 2 1 1 C 2 B 1 Q13 + 1 B C45 E 3 2 2 K Feed cover SW A 2 4 D2 PTH1 D K 1 1 S 3 1 +24V TP15 +24V 1 C 2 Q2 A DC24V RY1 C TP17 +5V 1 TP27 R56 2 1 E 3 PGND R67 PGND This circuit suppresses to a fixed value the inrush current flowing to current-generating capacitors C39, C40 and C41 that are included in the drive motor drive circuit. It comprises a posistor (PTH1) for limiting the current, and a FET (Q3) for allowing a current to flow during constant operation. From the time that the ADF open/close switch, feed cover switch and exit cover switch up to the cathode voltage of ZD3 reaches the Zener voltage by the time constants of R38 and C45, base current is not supplied to Q2 to set Q2 to an OFF state, and Q3 turns OFF so that current flows through PTH1. When the cathode voltage of ZD3 exceeds the Zener voltage after a delay provided by the time constants of R38 and C45, base current is supplied to Q2 to set Q2 to an ON state, and Q3 turns. This allows the current that was flowing through PTH1 to flow through Q3, and cancels the current limitation. Discharge resistor R7 immediately extracts the load that accumulates in C39, C40 and C41 when one of the ADF open/close switch, feed cover switch and exit cover switch becomes open. The circuit comprising R67, R68, R71 and Q13 immediately extracts the load that accumulates in C45 when one of the ADF open/close switch, feed cover switch and exit cover switch becomes open, and limits the inrush current that flows when the cover is opened or closed momentarily. 16 - 41 ADF 16.10.4 Pulse motor drive circuit This item describes the feed motor drive circuit. As the feed motor, transport motor and reversal motor share the same circuit configuration, a description of the transport motor and reversal motor circuits is omitted in this item. TP2 TP3 TP4 TP5 1 1 R65 2 1 R97 2 MODE CLOCK 1 1 TP6 1 1 GND 1 R98 2 1 R99 2 10 VDD MODE 9 CLOCK 6 1 D/A 2 C8 R73 1 2 2 C9 1 C7 1 C11 1 12 2 1 1 2 2 11 C21 RESETB 8 7 R59 CWB +5V C24 2 1 1 C69 1 2 + 1 2 C68 A AB CWB RESETB Vref SP B BB 5 4 4 3 3 2 1 2 PM+24V 5 ICB GND 1 1 1 1 + 1 C81 C80 C79 C78 C39 2 2 2 2 2 6 A CN8.4 *A CN8.3 B CN8.2 *B CN8.1 PM+24 CN8.5 PM+24 CN8.6 Feed motor 2 PGND This circuit controls start/stop, direction of rotation and motor current of drive motor operation. 2 phase excitation/1-2 phase excitation can be selected by inputting the D/A converter output voltage (either of two values 00H or FFH) to pin 8 (MODE) of IC8. (On this document feeder, the feed and reversal motors are fixed to 1-2 phase excitation, and the transport motor is fixed to 2 phase excitation.) The rotating speed of the motor and direction of rotation can be controlled by inputting the drive clock signal (CLOCK) and rotation direction signal (CWB). When the CPU sets the enable signal to Low, pin 6 (RESETB) of IC8 turns Low, all outputs of the drive IC are turned OFF regardless of the state of other signals. The motor current value is set by dividing the D/A converter output voltage by R73 and R59 and inputting the resultant voltage to pin 12 (Vref) of IC8. The motor current value can be set to any value by varying the D/A converter output value. 16.10.5 Solenoid drive circuit D4 1 TP6 CPU 1 D 2 R105 2 IC3.2 3 A Y 4 1 1 2 R100 K A +5V +24V 1 2 3 4 +24V CN7.3 *RSOL CN7.4 Reverse solenoid D12 1 G S 3 R104 PGND 2 SGND This circuit limits actuation and release of the reversal solenoid. When the CPU output port is Low level, pin 3 of IC3 turns Low and pin4 of IC3 turns High. Q12 then turns ON to actuate the solenoid. The solenoid drive signal is a PWM signal. When the solenoid starts to actuate, the solenoid actuates at its maximum torque at 100% duty. After actuation is completed, the duty ratio is reduced to hold actuation while heating of the solenoid is held in check. ADF 16 - 42 16.10.6 Reset circuit A 2 2 2 5 1 VCC C20 C71 + 1 D1 RES +5V 24 CK *RES IC1 GND CT 3 K 1 1 8 1 2 CK *RES 1 2 R27 VREF R103 1 6 C70 2 VS 7 1 C5 2 + 1 SGND C4 2 SGND This circuit generates the CPU reset signal when the power is turned ON, and when the power voltage is momentarily interrupted or low. It has a watchdog timer for diagnosing CPU system operation. After the power is turned ON, pin 8 (*RES) of IC3 is normally High. However, when the power is turned OFF, or an error causes the +5V voltage to fall below 4.2V, pin 8 of IC3 turns Low to reset the CPU and stop system operation. During normal operation, a fixed cycle clock is input to pin 3 (CK) of IC3 and IC3’s built-in watchdog timer is cleared. If a system error prevents the clock from being input from the CPU, pin 8 of IC3 turns Low, to reset the CPU and stop system operation. Resistor R27 is for stopping the watchdog timer, and is normally not mounted. 16 - 43 ADF 16.10.7 EEPROM circuit diagram This circuit comprises an EEPROM for storing ADF data and other peripheral circuits. +5V E2PROM+5V A 1 +5V D11 1 K 2 R75 D10 D0 8 RA2.4 A 7 1 1 7 CS 5 CLK 3 DI 2 RA1.1 RA1.4 RA1.3 RA1.2 IC11 2 2 R74 4 DO 2 1 + 8 1 6 2 CLK NC1 4 3 DI NC2 7 5 CS C42 2 6 SGND RA2.3 3 RA2.2 RA2.1 1 K 2 1 4 6 SGND IC11 is memory for storing the adjustment values of reflection-type sensors. Data transactions with the CPU are performed on a 4-lead type serial interface. Once data is stored, it is held in memory and does not disappear even when the power is turned OFF. Pin 1 (CS) of IC11 is the chip select terminal, and is High when data transactions are in progress. Pin 2 (CLK) of IC11 is the serial clock terminal, and is sent synchronized with the clock that is input to this terminal. Pin 3 (DI) of IC11 is the serial data input terminal, and pin 4 (DO) is the serial data output terminal. IC11 is powered by +5V from E2PROM. IC11 power is held by D11, R74 and C42 until writing of data is completed even if something causes the power voltage to fall during writing of data. ADF 16 - 44 16.11 Description of I/O signals 16.11.1 REQ, ACK and TXD signals +5V 1 CN1.3 REQ DA3 K 3 2 3 TP23 IC2.1 R90 2 1 1 2 1 C46 R30 A 1 IC3.5 2 A Y 11 10 A Y REQ1 1 REQ1 2 SGND +5V 1 DA1 K 3 2 9 CN1.9 IC2.3 R92 2 1 ACK 1 C48 R32 A 1 5 2 A Y TP19 IC3.4 8 9 A Y 6 1 ACK2 ACK2 2 +5V SGND 1 CN1.7 TxD DA2 K 3 2 7 R91 TP21 IC2.2 2 1 2 R31 A 1 3 1 C47 IC3.1 2 1 A Y 4 A Y 1 DF-RxD 2 SGND This input circuit is for communicating with the copier body. It is “1” at 5V and “0” at 0V. Logic at connector sections and the CPU input port is the same. 16.11.2 DF-ACK, DF-REQ and RXD signals +5V CN1.1 DF-ACK 1 1 1 04 DF-REQ 1 12 1 R52 2 Y A 13 IC2.6 1 R88 2 10 B E 3 1 R53 2 SGND 1 R9 2 Y A 11 IC2.5 +5V 1 ACK1 +5V 1 TP22 2 1 REQ2 +5V 1 TP20 R22 C 2 1 05 ACK1 R21 1 5 2 SGND 06 RxD 2 2 C 2 CN1.5 R87 B E 3 CN1.2 TP18 R20 C 2 1 R89 B E 3 1 R54 2 2 8 Y A 9 2 1 DF-TxD IC2.4 SGND This output circuit is for communicating with the copier body. It is “1” at 5V and “0” at 0V. Logic at connector sections and the CPU output port is the same. 16 - 45 ADF 16.11.3 Sensor input circuits +5V 1 +5V CN6.2 #REGS REGLED 1 NF2 1 R15 2 1 1 3 1 3 C30 2 SGND 1 B 1 R16 E 3 Timing sensor +5V #DTS CN6.6 DTSLED 1 NF4 1 R36 2 1 6 C32 2 SGND 1 B 1 10 + IC4.3 - 9 28 R18 E 3 CN7.6 CN7.7 NF2 +5V SGND 1 R64 2 C 2 1 010 B E 3 APS start SW #APS CN3.2 SGND 1 R29 2 2 1 + IC5.1 - 2 2 1 DTS TP33 1 1 DTS-AD 2 1 R86 1 2 R51 TP36 2 11 + 10 IC5.4 - 2 13 13 IC3.6 12 1 Y A R50 1 EXIT-AD 2 SGND TP31 SGND 1 1 2 EXIT-DA R61 1 C19 1 R66 2 1 2 TP47 1 APS +5V C63 2 R24 1 1 2 1 2 1 2 1 1 R11 2 1 R12 2 2 TP29 SGND CN4.1 SIZE2+5V Size sensor 2 SGND CN4.3 SIZES2 CN4.4 SIZE1+5V Size sensor 1 1 1 1 2 2 CN4.2 EXIT TP24 1 C35 DTS-DA +5V R60 SGND R77 TP34 R48 R49 2 SGND +5V 2 2 TP32 +5V 1 1 3 + IC4.1 2 - 21 1 R5 1 CN3.1 C18 2 2 SGND R85 1 SGND R70 2 REGS-DA +5V 2 1 C34 2 7 2 R47 1 R19 2 1 1 1 1 3 6 EXITSLED 5 SGND SGND R25 Exit sensor 1 1 4 SGND 5 REG-AD R55 2 C33 +5V #EXITS REG 1 R46 2 2 SGND C 2 08 CN7.5 2 R82 2 1 TP35 +5V 1 1 R17 2 1 1 3 TP25 2 TP45 1 C17 SGND 5 1 SGND 1 4 CN6.5 1 R45 R44 2 +5V CN6.4 +5V 2 + IC5.2 - SGND SGND 12 + IC4.4 - 13 24 C31 2 2 SGND C 2 07 R84 1 R81 2 7 6 R10 CN6.3 2 R26 Aliging sensor 2 1 CN6.1 1 R43 +5V R3 SIZE1 TP9 3 1 2 4 1 SIZE2 R2 TP30 5 CN4.5 SGND CN4.6 SIZES1 1 2 6 1 EMP R1 Empty sensor CN5.1 EMP+5V CN5.2 SGND CN5.3 EMP 1 1 C3 2 SGND 1 2 2 C2 2 3 1 C1 SGND This is the input circuit from the optical sensors. The following table shows the signal logic. Sensor name Connector section level 5V (“1”) Connector section level 0V (“0”) EMPS (empty sensor) No original With original REGS (aligning sensor) No original With original (connection section (connector section voltage 2.5V or more) voltage 2.5V or less) SIZES1 (size sensor 1) With original No original SIZES2 (size sensor 2) With original No original TIM (timing sensor) No original With original (connection section (connector section voltage 2.5V or more) voltage 2.5V or less) EXITS (exit sensor) No original With original (connection section (connector section voltage 2.5V or more) voltage 2.5V or less) APSSW (APS start switch) ADF open ADF ADF closed 16 - 46 16.11.4 Pulse motor drive circuit diagram 1 +5V C24 TP2 TP3 TP4 TP5 1 1 R65 2 1 R97 2 MODE CLOCK 1 1 2 TP6 1 1 1 SGND 8 9 1 R98 2 1 R99 2 6 1 2 1 C9 C8 C11 1 1 C7 1 2 R73 B/A 2 12 1 2 1 11 C21 RESETB 7 R55 CWB 1 1 C69 2 + 2 10 C68 VDD A 5 MODE CLOCK AB 4 CWB 3 B RESETB 2 BB Vref 4 2 1 PM+24V SP ICB 1 1 1 1 C81 C80 C79 C78 GND 2 2 2 A 3 2 2 2 5 6 + 1 2 CN8.4 #A CN8.3 B CN8.2 #B CN8.1 PM+24V CN8.5 PM+24V CN8.6 Feed motor C39 2 PGND 2 phase excitation/1-2 phase excitation can be selected by the excitation mode setting signal (MODE). (On this document feeder, the feed and reversal motors are fixed to 1-2 phase excitation, and the transport motor is fixed to 2 phase excitation.) The rotating speed of the motor and direction of rotation can be controlled by the drive clock signal (CLOCK) and rotation direction signal (CWB). When the reset signal (RESETB) turns Low, all outputs of the drive IC are turned OFF regardless of the state of other signals. The motor current value can be set by inputting the analog voltage to the current setting terminal (Vref). 16.11.5 Solenoid drive circuit diagram D4 1 +5V TP41 1 1 2 +24V 3 4 +24V CN7.3 *RSOL CN7.4 Reverse solenoid D 2 R105 CPU K A 2 IC3.2 3 A Y 4 1 1 2 R100 D12 1 G R104 2 S 3 PGND SGND When the CPU output port is Low level, Q12 turns ON to actuate the solenoid. The solenoid drive signal is a PWM signal. When the solenoid starts to actuate, the solenoid actuates at its maximum torque at 100% duty After actuation is completed, the duty ratio is reduced to hold actuation while heating of the solenoid is held in check. 16 - 47 ADF 16.11.6 Open switch input circuit diagram TP17 DC24V RY1 3 1 1 5 K 1 4 +24V 2 D2 ADF open SW CN6.7 DFSW CN6.8 DFSW1 7 A 2 8 1 R34 Feed cover SW CN5.4 DFSW1 CN5.5 DFSW2 2 4 5 1 C37 Exit cover SW CN7.1 DFSW2 CN7.2 PGND 2 1 2 PGND When all three reed switches turn ON, the relay coil is excited to supply +24V power to the drive circuit. The voltage of CN6 and CN7 becomes 0V when all three switches are ON. When one of the switches turns OFF, the voltage of CN6 and CN7 becomes 24V. ADF 16 - 48 16.12 Disassembly and Replacement [A] Transport unit (1) Remove the 2 clips fastening the transport unit. (2) Push down the top of the transport unit (front side), and remove the rear side from the belt drive section. Belt Transportt unit Note: During assembly, insert the clips and fix the transport unit at the position shown in the figure. Clip [B] Transport belt (1) Remove the transport unit. (2) Loosen the screw (front) fastening the belt tension plate. 16 - 49 ADF (3) Rotate the belt tension plate to provide the transport belt with slack. (4) Remove the transport belt from the front side (Magnet catch side). Transport belt Notes: 1. During assembly, make sure that the Belt tension plate Frame edges of the transport belt are at the inside of the transport unit side frame. 2. After assembly is completed, make sure that the belt is carried in the center and does not drift to either side. Transport belt [C] Belt tension roller/brush Belt tension roller (feed side) (1) Remove the transport belt. Belt tension roller (exit side) Belt tension roller (1) Replace the feed-side belt tension roller after removing the feed-side drop roller. Replace the exit-side belt tension roller with the belt tension plate brought down. (The drop roller need not be removed.) Notes: 1. When the belt tension roller is replaced is replaced, do not remove the transport unit side frame. (Do not remove the side frame fixing screws except when replacing the side frame.) 2. The belt tension roller in the feed and exit side is different in the shape of the leaf spring at the central one and the end. So, pay attention the shape difference at installation. ADF 16 - 50 Idle roller Idle roller Brush (1) Remove the 2 screws and brush fastening bracket. Brush [D] Original feeding tray (1) Loosen the two M4 screws, and slide the original feeding tray to the front to remove. Original feeding tray [E] Feed unit (1) Remove the original feeding tray. (2) Remove the rear cover. (3) Disconnect the 2 connectors and remove the Connector earth lead (1 screw) and harness band. (4) Remove the 2 screws, and slide the ADF unit to the rear side and light up to remove. ADF unit 16 - 51 ADF (5) Turn the entire unit over, and remove the cover (3 screws: M4 x 8). Cover (6) Disconnect the 4 connectors from the PC board. (7) Open the jam release cover, and loosen the screw. Jam release cover (8) Remove the 6 screws and the feed unit. Note: M4 x 12 ..... 4 pcs. M4 x 8 ....... 1 pc. A ADF M3 x 6 ....... 1 pc. B (harness guide) 16 - 52 Front side Rear side Feed unit [F] Feed motor (1) Loosen the tensioner fixing screw from the tim- Spring ing belt. Note: Do not remove the springs hanging on the belt tensioner. (2) Remove the motor connector, and 2 motor fixing screws. Note: During assembly, be sure to fasten the belt tensioner last of all. [G] Jam release cover (1) Remove the feed unit. (2) Remove the jam release cover by removing the 2 screws (front and rear sides). Note: To assemble, be sure to insert spring washers to fasten the jam release cover. Jam release cover 16 - 53 ADF [H] Separation unit (1) Open the jam release cover. (2) Remove the 2 screws and leaf spring, then, re- Spring Separation unit Leaf spring move the unit. (3) Draw out the bracket holder making sure that the pressurizing springs do not become loose. [I] Front aligning plate Adjustment screw (1) Remove the feed unit. (2) Open the jam release cover. (3) Remove the 2 screws. Front aligning plate [J] Aligning roller (L) (1) Remove the feed unit. (2) Open the jam release cover. (3) Remove each of the E-rings, bushes and coil springs from the front and rear sides. (4) Slide the aligning roller (L) to draw out the roller. Aligning roller (L) [K] Timing sensor and size sensor (1) Remove the feed unit. (2) Remove the 4 screws. Inlet guide ADF 16 - 54 (3) Draw out the inlet guide while pushing the empty sensor upwards. Empty guide (4) Remove the 2 bracket fixing screws from the timing sensor and the bracket fixing screw from the size sensor, and disconnect the connectors from the sensors. Size sensor Timing sensor [L] Feed roller (1) Remove the feed unit. (2) Remove the inlet guide. (3) Remove the E-ring, bush and spring from the front side. (4) Remove the front-side plastic ring fastening the feed roller, and draw out the roller from the front frame opening. Feed roller Gear [M] Pick-up roller/aligning roller (R) Feed roller (1) Remove the feed unit. Pick-up roller (2) Remove the inlet guide. (3) Remove the front-side E-ring and bush. (4) Remove the plastic ring fastening the roller, and Pick-up roller draw out the roller. Plastic ring Aligning roller(R) 16 - 55 ADF Aligning roller (R) (2) Remove the inlet guide, and remove the timing sensor and size sensor. (3) Remove the pulley from the drive section (1 Ering). (4) Remove the 2 E-rings from the frame inside, and draw out the roller. Pulley [N] Transport motor (1) Remove the 2 screws and 1 connector. [O] Reversal unit (1) Remove the ADF unit. (2) Remove the transport unit and cover. (3) Disconnect the 2 connectors from PC board. (4) Remove the earth lead fastened to the hinge section. (5) Remove the screw from the harness guide. (6) Remove the 5 screws and the reversal unit. Reverse unit ADF 16 - 56 [P] Exit cover (1) Remove the reversal unit. (2) Remove the screws from the front and rear sides, and remove the cover. Exit cover [Q] Reversal motor Disconnect the connector and remove the 2 screws. [R] Reversal roller (1) Remove the reversal unit. (2) Remove the stay (2 screws). (3) Remove the E-rings from the front side. 16 - 57 ADF (4) Slide the reversal roller to the rear side, and remove the parallel pin. (5) Draw out the reversal roller while tilting it on its side from beneath the unit. Reverse roller [S] Exit sensor (1) Remove the stay (4 screws). Stay (2) Remove the sensor from the guide (1 screw). Exit sensor [T] PC board (1) Remove the ADF unit. (2) Remove the cover. (4) (3) Disconnect the 11 connectors. (4) Remove the 2 screws, and slide the PC board from the hooking section on the rear side to remove. ADF 16 - 58 (4) [U] ADF fan motor (1) Remove the PC board. (2) Disconnect the connector and remove the Connector screw. (3) Remove the 2 screws. 16 - 59 ADF [V] Mylar sheet, etc. When replacing damaged mylar sheets, fix the new mylar sheet according to the reference positions shown below. Before you fix a new mylar sheet, first clean the fixing position with alcohol. After fixing the mylar sheet make sure that it is not rising up and the ends of the sheet are not peeling up. 1. Jump mylar sheet (feed guide) Feed guide A A Fixing reference: Clearance 0 to 0.5mm (when pushed up against this line) Jump mylar sheet 0 e anc lear e: c enc efer e) ng r Fixi -0.5mm ferenc e 0 to face r (end A-A cross-section ADF 16 - 60 2. Mirror seal, feed cover mylar sheet * When fixing the mirror seal, do not scratch the mirror surface. a a b Mirror seal Feed cover mylar sheet Fixing reference: Clearance 0 to 0.5mm (when pushed up against this rib) b Fixing reference: Clearance 0 to 0.5mm (when pushed up against this rib) ren efe gr in e Fix .5mm fac ± 0 b end (ri Fi 0 xing to (w 0. ref he 5m ere n pu m nce :C sh ed lea up ra nc ag e ain st th is rib ) b-b cross-section : ce ara e nc e) nc ere Cle ref a-a cross-section 16 - 61 ADF 3. Feed sheets 1, 2, 4, 5 Fixing reference 0 to -1 Feed sheet 2 0 Fixing reference (when pushed up against this indented section) Feed sheet 5 Fixing reference 0 to -1 0 Feed sheet 4 Sheets 4 and 5 must be fixed according to the rib contact reference in the direction of the arrows shown in the figure on the left. (Overlapping of ribs is not allowed. Clearance must be 0 to 2mm.) Feed sheet 1 Feed sheet 5 ADF 16 - 62 4. Guide mylar sheets, mirror seals, mirror mylar sheets * When fixing the mirror seal, do not scratch the mirror surface. Fixing reference: Clearance 0 to 0.5mm * The opposite side must be fixed at the same Fixing reference. C C eet) r sh ±0.5mm a l y : ) de m ference erence (gui e ef r r g e n c Fixi end fa p (ste C-C cross-section 0 Mirror mylar sheet Guide mylar sheet (2 locations) B (mirror mylar sheet) Fixing reference: Clearance 0 to 0.5mm (when pushed against end face) B (mirror seal) Fixing reference: Clearance 0 to 0.5mm (when pushed against end face) Mirror seal 16 - 63 e anc lear al) C e : s ) nce ror face (mir g refere end t s n i n ai Fix .5mm d ag 0 0 to n pushe e heet) (wh mylar s : Clearance r o r ir m ( ce referen Fixing ce) m m t end fa 0 to 0.5 shed agains pu (when B-B cross-section ADF 5. Aligning mylar sheet (aligning plate) Aligning mylar Sheet Fix i 0 to ng re f (wh 0.5m erenc e: C the en pu m lea she cut ran -of d ce f se aga ctio ins t n) 0 ) (Al i pro gning tru s my (1 .2 +0ion) lar sh .5 ee t Aligning plate Fixing reference: Deviation 0 to -0.5mm (protrusion not allowed) (protrusion also not allowed on opposite face) 0 6. Weight mylar Sheet (weight holder) ce a le C e: ef m d r g .5m she n xi 0 u Fi to n p 0 he (w t ns d fa en ai ag Weight mylar sheet Fixing reference: Deviation 0 to -0.5mm (protrusion not allowed) (protrusion also not allowed on opposite face) nc e er ) ce n ra Weight holder 0 ADF 16 - 64 Fixing reference: Clearance 0 to 0.5mm (overlapping not allowed) A Fixing reference: Clearance 0 to 0.5mm (overlapping not allowed) A 16 - 65 Fixing reference: Clearance 0 to 0.5mm (overlapping not allowed) 7. Guide mylar sheet (2) Guide mylar sheet (2) (3 locations) nce nce: Cleara Fixing refere 0 to 0.5mm ed against (when push indentation) Overlapping not allowed A-A cross-section ADF 0.5mm 8. Guide mylar sheet (3) Fixing reference: Arrow view Fix in order 1 , 2 and 3 so that mylar does not sag. 1 2 0 3 0 Guide mylar sheet (3) Fixing reference: 0 to 1 Sagging not allowed Make sure that edges of mylar guide do not deviate. Fixing reference: 0 to 1 0 ADF 16 - 66 Arrow View 9. Separation pad, separation mylar sheet Pad holder Separation pad, Separation mylar sheet Fixing reference: Clearance 0 to 0.5mm (overlapping not allowed) Separation pad A Separation pad Fixing reference: Clearance 0 to 0.3mm (overlapping not allowed) Paper path direction Separation pad Separation mylar sheet A Separation mylar sheet Fixing reference: Clearance 0 to 0.5mm (when pushed up against this line) * The paper path direction in the figure must be free from steps that may catch the paper. A-A cross-section 10. Flapper rubber skirt Fixing re ference: 0 to -0.5 (end face mm referenc e) 0 Flapper rubber skirt Arrow vie w Fixing re ference: 0 to -0.5m (end face m reference ) 0 Arrow view 16 - 67 ADF 11. Reversal mirror seal * When fixing the reversal mirror seal, do not scratch the mirror surface. A A Fixing reference: (when pushed against indentation) Clearance 0 to 0.5mm (Overlapping not allowed) Reversal mirror seal ce: ren d e f re he on) ing us tati m Fix hen p nden 0.5m ed) (w nst i o low t l 0 i ta a e o g c n a n ara ping Cle erlap (Ov Reversal mirror seal A-A cross-section ADF 16 - 68 Fixing reference: Clearance 0 to 0.5mm (end face reference) Cushions Fixing reference: Clearance 0 to 0.5mm (end face reference) 12. Cushions Fixing reference: Clearance 0 to 0.5mm (end face reference) 16 - 69 ADF Reversal roller mylar sheets (3 locations) ADF Reversal roller cushions (3 locations) 16 - 70 (Fix these cushions between the ribs so that they do not overlap the ribs.) (3 locations) (reversal roller mylar sheet) Fixing reference (when pushed against this line) (reversal roller cushion) Fixing reference: ± 0.5mm (Fix these cushions between the ribs so that they do not overlap the ribs.) (3 locations) (reversal roller cushion) Fixing reference (when pushed against this line) 13. Reversion roller cushions, reversal roller mylar sheets (reversal roller mylar sheet) Fixing reference: 0 to -0.5mm 14. Discharge brush Fixing reference: 0 to -0.5mm (hold end reference (line w/out crimp)) m m .5 e) 0 nc to 0 fere : e re nc re rimp e f tc re g /ou n i w x Fi ine (l Discharge brush (0.5) Hole A A 0 a The tip must be firmly pressed against the DF cover. (The tip must not protrude from the DF cover.) Section a: Insert into hole, and fix to rib. A-A cross-section 16 - 71 ADF 15. DF cover sheets 1, 2, 4, 5, 6 and 8 Each of the DF cover sheets must be fixed according to the rib contact reference in the direction of the arrows shown in the figure below. (Overlapping of ribs is not allowed. Clearance must be 0 to 2mm.) Firmly fix the DF cover sheets so that they do not rise up along the curve of the DF cover. DF cover sheet 2 (2 locations) (Overlapping of the gate not allowed.) ADF DF cover sheet 5 DF cover sheet 4 DF cover sheet 8 (2 locations) DF cover sheet 1 (2 locations) (Overlapping of the gate not allowed.) 16 - 72 Fixing reference: Deviation ±0.5mm (slide tool line) DF cover sheet 6 16. Tray sheet guides 0 0 Fixing reference: 0 to -0.5mm (end face rounded corner end reference) Fixing reference: 0 0.5mm (indentation end face reference) (indentation end face reference) Tray sheet guide Fixing reference: 0 0.5mm Fixing reference: 0 to -0.5mm (end face rounded corner end reference) 16 - 73 Tray sheet guide ADF 16.13 PC Board (1) ADF PWA-F-LGC-794 16 - 74 (2) PWA-F-SEN-794 16 - 75 ADF 17. Gasket (transfer belt unit) FRAME-BELT-F Gasket Gasket Window Aligning Gap:0~1mm -0~1mm -0~1mm Must not protrude beyond the window Must not protrude beyond the edge of the frame 18. Discharge (Paper feeder area) [Attaching Position] Attach it to the two edge positions in GUIDE-ALGN-IN (A and B below). Note1. Insert the discharge brush between the FRM-FEED-794 and the GUIDE-ALGN-IN (rear side only). Note2. To perform correctly Note 1, be sure to make the discharge brush rise up from the GUIDE-ALGN-IN. FRM-FEED-794-R Note 1 Note 2 A GUIDE-ALGN-IN Note 2 Rear side B Discharge brush ADF 16 - 76 19. Shield mylar (DF cover) 0~1mm (2.4 ~ 2.5) Aligning with rib 0 ~ 1mm Aligning with rib Shield mylar COV-DF-794 20. Pad cushion Pad cushion 0~1mm Must not protrude beyond the bracket BKT-PAD-SPT-794 Pad cushion 0~1mm Must not protrude beyond the bracket Align and then attach (Gap = 0~0.5mm) 16 - 77 ADF 21. Reverse section entrance mylar Unit: mm SHEET-RVS-M BELT +0.5 1 –0.5 0~0.5 MYLAR-RVS-M Not to protrude 0~1 0~1 MYLAR-RVS-M SHEET-RVS-M 22. Reverse section side mylar Rounded corner end +1 0 ~ 0.5 Not to become stuck on the rib 0 –1 MYLAR-RVS-U-R View MYLAR-RVS-U-F 0 ~ 0.5 Not to become stuck on the rib Unit: mm ADF 16 - 78 17. POWER SUPPLY UNIT 17.1 Configuration The power supply unit comprises an AC filter and isolated DC output circuit. (1) AC filter This filter removes external electrical noise, and prevents leakage of electrical noise generated within the machine to the outside. (2) DC output circuit DC output is divided into the following two lines: : This power supply is used by the entire machine during image formation. 4 1 Main line voltages (+3.35V, +5.1V, +12V, +24V) are output when the machine is started up by turning the power switch ON. 2 Door switch line: This power supply passes via the door switch and is used by the entire ma- chine during image formation. 3 voltages (+5.1V, +24V, +36V) are output when the machine is started up by turning the power switch ON and operation of the door switches (2 locations). 17.2 Operation of DC Output Circuit (1) Start When the main switch on the main unit is turned ON, the power on all lines starts up if the door is closed. (2) Stop When the main switch on the main unit is turned OFF, the power OFF signal (PWR-DN) signal is output after the momentary power failure guarantee time (20 ms or more) passes. The power voltage is dropped after the rated voltage is held for the minimum hold time (10 ms or more) after the power OFF signal is output. (3) Output protection Each of the output lines has a built-in overcurrent protection circuit (fuse, internal protection circuit) and overvoltage protection. This prevents trouble such as damage to the secondary circuit or erroneous operation caused by overcurrent (e.g. shorting of the load) or overvoltage (e.g. shorting between different voltages) from occurring. When the protection circuit has operated, remove the cause of circuit operation (e.g. short), and reset the circuit by turning the power OFF then ON again. 17 - 1 POWER SUPPLY Exposure lamp load 5VA Heater lamp load F3 GNDA 24VA DGA 24VB Frequecy reactor F4 Breaker Main switch Live F5 F1 N.F Neutral N.F DGB 24VC DGC 24VD DGD Reg. Door switch F6 DGE 36VA DGA 36VB F7 DGB Switching power supply F8 DGC 36VD DGD Frequecy reactor 3.3VA~C GNDA~C(3.3V) 5.1VB,D,E,H,I F2 GNDB,D,E,H,I(5.1V) N.F 12VA~C Reg. F9 DGA~C(12V) 24VF DGF 24VG F10 DGG 24VH DGH POWER SUPPLY 17 - 2 Power supply sequence ON OFF AC input 700 ms or less Within 10 ms 3.2V or more +3.3V(MAIN) 3.2V or more 4.95V or more +5.1V(MAIN) 4.95V or more 10 ms~120 ms 20 ms or more 10 ms or more 20 ms or more 50 ms or more PWR-DN 0~200 ms 5 ms or more 0 ms or more 11.4V or more 0~200 ms 21.6V or more +12V(MAIN) 11.4V or more +24V(MAIN) 21.6V or more 4.95V or more +5.1V(DOOR) 4.95V or more 21.6V or more +24V(DOOR) 21.6V or more 34.2V or more +36V(DOOR) 34.2V or more 17 - 3 POWER SUPPLY 18. PC BOARD (1) PWA-F-SYS-300 18 - 1 PC BOARD (2) PWA-F-MTB-300 PC BOARD 18 - 2 (3) PWA-F-LGC-300 18 - 3 PC BOARD (4) PWA-F-ADU-300 (5) PWA-F-MOT-300 PC BOARD 18 - 4 (6) PWA-F-SLG-300 (7) PWA-F-SDV-300 18 - 5 PC BOARD (8) PWA-F-PLG-300 PC BOARD 18 - 6 19. UNPACKING AND INSTALLATION 5)set the rails WARNING The unpacking and set-up procedure shall be done 1)Unpack 6)Unload the machine (Japan only) 2)Unpack 3)Remove the rails 7)Remove the glass holder 4)Remove the lower packing case 19 - 1 UNPACKING AND INSTALLATION 8)Remove the screws 12)Open the cover 1 2 9)Install the glass holder and the cover 13)Remove the lock screws 10)Remove the protectors 14)Pull out the transfer unit 1 2 11)Remove the protector UNPACKING AND INSTALLATION 15)Remove the lock screws 19 - 2 16)Close the transfer unit 20)Remove the charger unit 1 2 21)Remove the drum unit 17)Remove the cover 1 1 1 2 1 2 2 3 18)Remove the protector 22)Remove the screw 19)Remove the developer unit 23)Remove the thermistor 1 2 3 19 - 3 UNPACKING AND INSTALLATION 24Remove the drum shaft 28)Install the drum 1 2 25)Apply the starting powder for cleaning blade 29)Unlock the cleaner 26)Lock the cleaner 30)Rotate the drum manually 1 27)Apply the starting powder (UKOG-0123FCZZ) 31)Apply the starting powder for the drum for the drum UNPACKING AND INSTALLATION 2 19 - 4 32)Rotate the drum manually 1 36)Remove the developer unit cover 2 33)Install the thermistor 37)Fill developer into the developer unit 34)Install the drum unit 3 2 2 1 38)Fix the cover 35)Install the charger unit 2 1 19 - 5 UNPACKING AND INSTALLATION 43)Install the tray 39)Install the developer unit 3 2 1 40)Install the cover 44)Fix the machine position 2 2 2 1 41)Close the covers 45)Check the level 1 3 2 42)Remove the tape UNPACKING AND INSTALLATION 19 - 6 46)Install the stocker (4) After a short time, the value in Zone “B” will automatically stop changing and, at the same time, the message will also change as shown below. 250% 200 LT ADJUST MODE 128 135 (5) In this status, check that the value in Zone “B” is in the range of 245~255 (auto-toner sensor output range of 2.45V~2.55V). (6) If the value in Zone “B” is in not in the range of 245~255, use the "Down / 'Up keys to adjust the value. (7) Press the SET key. The message display will return to 100% TEST MODE A. 47)Install the paper 100% A LT TEST MODE (8) Press the keys 0 and 9 at the same time. The message will change as shown below. 100% 1 LT READY 48)Adjust the toner level 1. Adjustment of the Auto-Toner Sensor (1) While pressing keys 0 and 5 simultaneously, turn on the power switch to show 100% TEST MODE A on the message display. 100% A 49)Fill toner into the toner hopper LT TEST MODE (2) Key in code “200” and press the START key. The copier will start operating, and certain values will appear in Zones “A” and “B”. d Zone B 230% 200 LT TEST MODE 128 128 Zone A c (3) About 2 minutes later, the values in Zone “B” will start changing. 230% TEST MODE 128 200 LT WAIT 128 19 - 7 UNPACKING AND INSTALLATION 50)Setting the date and time adjust the image center position. 1. Setting the Date and Time (1) Press the PROGRAM key to enter the program menu, and then press the DATE/TIME key. (2) Enter values for the year, month, date, day, hour and minute, and press the SET key. (The example on below is for 1999, April, 1st, Thursday, 10(a.m.) and 10(minutes).) Day Code No. Sunday 1 Monday 2 Tuesday 3 Wednesday 4 Thursday 5 Friday 6 Saturday 7 2. Center Adjustment (1) Prepare an A4 (or Letter) sized test original, drawing a line in the center of the sheet, as shown. (2) Place the test original 1 face up in the original feed tray and adjust the side guides to the edges of the original. (3) Press START to make a copy. Fold the copy in half to check that the center line is copied in the center of the sheet. If not, loosen the two screws and adjust the position of the original feed tray. Repeat the procedure until the center line on the copy is in the fold. After the adjustment, tighten the two screws of the original feed tray. 1 1 UNPACKING AND INSTALLATION 19 - 8 COPYRIGHT © 2001 BY SHARP CORPORATION All rights reserved. Printed in Japan. No part of this publication may be reproduced, stored in a retrieval system, or transmitted, in any form or by any means, electronic, mechanical, photocopying, recording, or otherwise, without prior written permission of the publisher. SHARP CORPORATION Digital Document Systems Group Quality & Reliability Control Center Yamatokoriyama, Nara 639-1186, Japan 2001 January Printed in Japan N