1
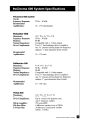
DeFnitive Technolngj®
The Leader in High-Performance Loudspeakers®
ProCinema® 600 System
Ownerls Manual
Congratulations
Congratulations on your purchase of the
Definitive Technology ProCinema 600
System. This high-performance sixspeaker system is designed to deliver
equally superb sound with music or
movies. Please read the instructions
carefully in order to fully familiarize
yourself with the speaker system and
assure yourself that you realize all the
performance that has been engineered
into this superior product.
Please Inspect For Shipping Damage
Each loudspeaker leaves our plant in perfect condition. Any visible
or concealed damage most likely occurred in handling after it left
our plant and should be reported at once to your Definitive dealer
or the shipping company which delivered your loudspeaker.
Safety Precautions for ProSub 600
CAUTION! To reduce the risk of electric shock and fire, do not remove the cover or back
plate of this device. There are no user serviceable parts inside. Please refer all servicing to
licensed service technicians. Avis: Risque de choc electricque, ne pas ouvrir.
CAUTION! The international symbol of a lightning bolt inside a triangle is intended to alert
the user to uninsulated "dangerous voltage" within the device's enclosure. The international
symbol of an exclamation point inside a triangle is intended to alert the user to the presence
of important operating, maintenance and servicing information in the manual accompanying
the device.
CAUTION! To prevent electrical shock, match wide blade of plug to wide slot, fully insert.
Attention: Pour eviter les chocs electriques, introduire la lame la plus large de la fiche dans
la borne correspondante de la prise et pousser jusqu'au fond.
CAUTION! To reduce the risk of electrical shock, do not expose this equipment to rain
or moisture.
1.
2.
3.
4.
5.
6.
7.
8.
9.
10.
II.
12.
13.
14.
IS.
16.
Read Instructions-All safety and operating instructions should be read before operating the device.
Retain Instructions-The safety and operating instructions should be retained for future reference.
Heed Warnings-All warnings on the device and in the operating instructions should be adhered to.
Follow Instructions-All operating and safety instructions should be followed.
Water & Moisture-The device should never be used in, on or near water for risk of fatal shock.
Carts & Stands-The device should only be used on carts or stands recommended by the manufacturer.
Wall & Ceiling Mounting-The device should be mounted on a wall or ceiling only as recommended
by the manufacturer.
Ventilation-The device should always be located in such a way that it maintains proper ventilation. It
should never be placed in a built-in installation or anywhere that may impede the flow of air through its
heat sink.
Heat-Never locate the device near heat sources such as radiators, floor registers, stoves or other
heat-generating devices.
Power Supply-The device should only be connected to a power supply of the type described in the
operating instructions or as marked on the device.
Power Cord Protection-Power cables should be routed so they are not likely to be stepped on or
crushed by items placed on them or against them. Special attention should be paid to areas where the
plug enters a socket or fused strip and where the cord exits the device.
Cleaning-The device should be cleaned in accordance with manufacturer's instructions.
Periods Of Non-Use-The device should be unplugged when not being used for extended periods.
Dangerous Entry-Care should be taken that no foreign objects or liquids fall or are spilled inside
the device.
Damage Requiring Service-The device should be serviced by licensed technicians when:
• The plug or power supply cord has been damaged.
• ObjeCts have fallen or liquid spilled inside of the device.
• The device has been exposed to moisture.
• The device does not appear to be operating properly or exhibits a marked change in perfonnance.
• The device has been dropped or the cabinet becomes damaged.
Service-The device should always be serviced by licensed technicians. Only replacement p'arts
specified by the manufacturer should be used. The use of unauthorized substitutions may result in
fire, shock. or other hazards.
ProCinema 600 Six-Piece Surround Sound System
The Definitive Technology ProCinema 600 System consists of six speakers:
four ProMonitor® 600s, one ProCenter® 600 and one ProSub® 600. Normally two of
the ProMonitor 600s will be used as front speakers and two will be used as side or
rear surround speakers. These speakers can be used with any surround decoding
technology; however, since they will most often be used with Dolby Digital*
receivers and decoders, the instruction manual is written for Dolby Digital hook-ups
(and DTS which is hooked up the same way). If you are using an earlier ProLogic'
receiver, please contact Definitive customer service for specific instructions that
apply to your system.
Connecting Your Loudspeakers
Wiring up Your Speakers to Your Home Theater Surround Receiver
There are many different ways to wire your ProCinema 600 System to your home
theater surround receiver. In order to simplify this process, we will describe the two
most common methods. Method 1, which involves wiring your front left and right
ProMonitor 600s to your ProSub 600 and then wiring your ProSub 600 to your
receiver, is the preferred method in terms of sound quality - it will give you the
best blending between the satellite speakers and the sub as well as the fullest, richest
sound quality. Method 2, which involves wiring the front left and rightProMonitor
600s directly to your receiver and hooking your sub up with an RCA cable, uses
less speaker wire and still sounds good but clearly not as good as Method 1.
We recommend Method 1, if possible.
Usually if distortion is heard when the speakers are being driven at loud levels, it is
caused by driving (turning up) the amplifier too loud and not driving the speakers with
more power than they can handle. Remember, most amplifiers put out their full rated
power well before the volume control is turned all the way up! If your speakers distort
when you play them loud, turn down the amplifier or get a bigger one.
Method 1
1. First, wire the + (red) terminal of the left channel speaker wire output of your receiver or amplifier to the + (red) terminal of the left channel speaker wire
(high level) input of your ProSub.
2. Next, wire the - (black) terminal of the left channel speaker wire output of your
receiver or amplifier to the - (black) terminal of the left channel speaker wire
(high level) input of the ProSub.
3. Repeat Steps I and 2 for the right channel.
4. Wire the + (red) terminal of the left ProMonitor 600 to the left channel + (red)
speaker wire (high level) out on the back of the ProSub.
* Registered trademarks.
5. Wire the - (black) terminal of the left ProMonitor 600 to the left channel - (black)
speaker wire (high level) out on the back of the ProSub.
6. Repeat steps 4 & 5 for the right ProMonitor 600.
7. Set the low frequency filter control on the back of the subwoofer to approximately
10 - 12 o'clock. Please note that the exact frequency will depend on many factors
including specific positions of the speakers in the room, so you might experiment
with a slightly higher or lower setting to achieve ideal blending between the sub
and the satellites for your particular set-up. Listen to a wide variety of music to
determine the correct.setting for this in your system.
8. Set the subwoofer level control to approximately 12 o'clock. Please note that the
exact level depends on many factors including your room size, positions of the
speakers, etc. as well as your personal listening taste, so you might experiment
with the subwoofer level while listening to a wide variety of music until you
achieve the ideal setting for your system.
9. Wire your center channel to the center channel out on your receiver (or center
channel amplifier) and your left and right rear surround speakers to the rear
channel outputs on your receiver or rear channel amplifier (taking care that all
speakers are in phase, i.e. + (red) to + (red) and - (black) to - (black).
10. Set the bass management system of your receiver or decoder for "Large Left and
Right Main Speakers," "Small Center" and "Small Rear Surround Speakers" and
"No Subwoofer." All the bass information including the .1 channel LFE signal
will be directed to the main left and right channels and into the subwoofer giving
you all the benefits of Dolby Digital.
Option for Method 1 Hook-Up
An option on this hook-up (if your decoder will allow you to select "Large Left and
Right Main Speakers" and a "Subwoofer"), in addition to the hook-up as described
above, is to use an RCA-to-RCA low level cable to connect the LFE/sub-out on your
receiver to the low-level LFE/sub-in (the lower RCA input) on a ProSub. Tell your
bass management system that you have "Large Left and Right Main Speakers" and a
"Subwoofer" and "Small Center" and "Small Surrounds." You will then be able to
raise the LFE .1 channel level being fed to the subwoofer by either using the LFE/sub
remote level adjustment on your decoder (if it has one) or the LFE .1 channel level
control on your Dolby Digital channel balancing procedure. This set-up has the advantage of allowing you to set the low frequency level on the ProSub for smooth balance
with music while also allowing you to "juice up the bass" for movies with the controls
on your decoder. It should also sound somewhat better.
Variation on the Method 1 Optional Hook-up
One variation on the optional hook-up is to hook up and adjust the system as
described under "Optional Hook-Up" except select "Small Left and Right Main
Speakers" and a "Subwoofer" on the bass management system (along with "Small
Center" and "Small Rear Surrounds"). The advantage of this over the Optional HookUp will be somewhat greater dynamic range (i.e., you can play the system louder).
However, depending on the specific characteristics of the crossovers designed into
your bass management system, the transition and blending between the satellites and
subwoofer may not be quite as smooth and continuous as the Optional Hook-Up, or
with the basic hook-up detailed above in Steps 1-10. However, if you wish to play the
system louder, you can experiment with this variation. In addition, this variation is also
one which can be used if your decoder bass management system does not allow a
"Large Left and Right Main Speakers" and "Subwoofer" setting.
We encourage you to experiment with the various settings on your subwoofer,
settings on your decoder, and hook-up options as described until you find the best
combination for you.
VERY IMPORTANT: SETTING CHANNEL BALANCE AND BASS MANAGEMENT SYSTEMS
Dolby Digital and Dolby ProLogic systems and decoders have a critical channel balancing
procedure for the left and right front speakers, center channel, rears and subwoofer (if it is hooked
up through the LFE or Sub Out low level connection) which must be followed if the system is to
perform properly. We have spoken with many system users with problems relating to the overall
sound of their system which could be clearly traced back to improper system balance.
Also note that Dolby Digital decoders have bass management systems (systems which direct the
bass to the various channels) which vary from unit to unit. This bass management system must also
be properly adjusted. Follow the directions in the hook-up directions regarding bass management.
Method 2
1. Wire the left front ProMonitor 600 directly to the left front channel of your amplifier
or receiver and the right front ProMonitor 600 directly to the right channel of your
amplifier or receiver taking care that the speakers are in phase, i.e. + (red) to + (red)
and - (black) to - (black).
2. Use an RCA-to-RCA low-level cable to connectthe LFE/subwoofer out on your
receiver to the LFE input on your subwoofer.
3. Wire your center channel to the center channel out on your receiver (or center
channel amplifier) and your left and right rear surround speakers to the rear channel outputs on your receiver or rear channel amplifier (taking care that all speakers
are in phase, i.e. + (red) to + (red) and - (black) to - (black)).
4. Set the bass management system of your receiver or decoder for "Small Left and
Right Main Speakers," "Small Center" and "Small Rear Surround Speakers" and
"Yes Subwoofer."
5. Set the variable low-pass crossover to 150 and set the subwoofer level control to
120' clock. Please note that you can set the subwoofer level either by turning the
subwoofer level control on the back of the subwoofer or with LFE level adjustment in your receiver. We suggest setting the subwoofer to 12 o'clock and then
making fine adjustments to the subwoofer level using the LFE level control on
your receIver.
Speaker Break-In
Your ProCinema 600 System should sound good right out of the box; however, an
extended break-in period of 20 - 40 hours or more of playing is required to reach full
performance capability. Break-in allows the suspensioGs to work in and results in fuller
bass, a more open "blossoming" midrange and smoother high frequency reproduction.
Positioning Your Speakers in Your Room
It is important that some simple set-up recommendations be followed in order to
assure optimum performance in your room. Please remember that although these
recommendations are usually valid, all rooms and listening set-ups are somewhat
unique, so do not be afraid to experiment with the speakers. Remember, whatever
sounds best to you is correct.
Positioning the ProMonitor 600s in Your Room
When used as front or sidelrear surround speakers, the ProMonitor 600s may be
used on a stand, a shelf, or mounted on the wall or ceiling. If you place the speakers
on a shelf, try to place them forward on the shelf with the front of the speaker even
with the front of the shelf rather than pushed back toward the rear of the shelf. If you
wish to use a stand we strongly recommend the Definitive ProStand 60/80/600/800
which was designed to be used with these speakers in order to achieve the highest
level of performance as well as the most attractive styling combination. Wall mounting can be accomplished either by using the keyhole mount which is built into the
speakers or with the ProMount 80/800 pivoting wall mount which is available separately. Placement close to the wall will increase the bass and low midrange output
while placement further from the wall will decrease output in these ranges and at the
same time yield a somewhat more open and three-dimensional sound. As with other
aspects of set-up and adjustment we encourage experimentation in order to achieve
perfect sound in your particular room.
Using the Built-In Keyhole Wall Mount
Your ProMonitor 600 also has a built-in keyhole wall-mount on the back.
Use a toggle bolt or other similar very well anchored fastener in the wall to hold
the screw which the keyhole mount will hang on. Do not use an unanchored
screw in the wall. Please note that there is an optional pivoting wall mount
available which may be purchased separately.
Positioning Your ProMonitor 600 Front Speakers
Your two ProMonitor 600 speakers which you are using as front speakers (please
note all ProMonitor 600s are exactly the same) should usually be placed 6 to 8 feet
apart and kept away from side walls and comers if possible. A good rule 9f thumb is to
place the speakers separated by one half the length of the wall they are positioned
along, and each speaker one quarter the length of the wall behind them away from the
side walls.
Speakers may be angled in toward the listening position or pointed straight ahead.
Note: Angling the speakers in so that they point directly at the listeners will result in
more detail and greater clarity.
Positioning Your ProMonitor 600 Rear/Side Surround Speakers
The surround speakers may be located on the side or behind the listeners. When
used on the sides, take care never to locate the speakers forward of the listeners. The
speakers may be located at or above ear level. If the speakers are placed on the rear
wall follow the same guidelines given for positioning the front speakers along the wall.
Speakers may be angled in toward the listening position or pointed straight ahead.
Note: Angling the speakers in so that they point directly at the listeners will result in
more detail and greater clarity.
Positioning Your ProCenter 600 Speaker
The ProCenter 600 can be placed either above or below the TV. If you are
putting the ProCenter 600 on a shelf or on a TV, try to place it forward with the
front of the speaker even with the front of the TV or the front of the shelf.
ProCenter Vertical Angle Adjustment
Your ProCenter 600 loudspeaker has a simple built-in device which allows you
to adjust the vertical angle of the speaker. Please note that on the rear/center/underside of the speaker there is a foot. When you set the speaker down, the speaker will
lean back and rest of the foot. By varying how far you screw in the foot, you can
adjust the vertical angle of the speaker. We suggest that you aim the speaker so that
it aims directly towards the height of the listeners' ear.
Subwoofer Placement
Your Definitive Technology subwoofer has been designed to operate at frequencies
generally below 150 Hz. Because low-frequency information in this range essentially
is non-directional, your subwoofer can be located anywhere in your listening room
that is most convenient. Also, the continuously variable low-pass filter operates at a
very fast roll-off, ensuring great performance wherever you place your subwoofer.
There are, however, some general rules that you should bear in mind when locating
your subwoofer:
1. For maximum output, the subwoofer should be placed in a comer or against the
wall, leaving roughly 2"- 4" clearance between the subwoofer and the waIl(s).
2. Comer placement will increase the subwoofer's efficiency, which in tum will
increase your system's maximum output and improve the dynamic capability of
the subwoofer.
3. While one Definitive Technology subwoofer will always sound great, the use of
two subwoofers will definitely enhance your system's performance by providing
a smoother and more consistent response pattern. Here, it is recommended that
you locate the subwoofers on the same side of the room as the main speaker of
the same channel.
4. Always remember that frequency response and output level are greatly influenced by the subwoofer's placement. A movement of even a foot or two can
dramatically change your system's response characteristics. You should experiment with placement in your particular listening room in order to achieve the
highest performance from your subwoofer.
5. Your subwoofer contains a powerful amplifier inside its cabinetry. When placing the subwoofer into a built-in cabinet, please be sure it receives a clear flow
of cooling air. If your subwoofer is to be located in a closed-back cabinet, be
sure to put some ventilation holes in the cabinet back behind the subwoofer's
back panel.
Powering Up Your Subwoofer
Your subwoofer contains a built-in, active powered subwoofer section as well as
an electronic crossover and so each subwoofer must be plugged into an electrical
socket of the appropriate voltage (as indicated on the back of your unit) using the
plug on the end of the black cord attached to the electronics module on the back of
the loudspeaker. The subwoofer has a special circuit which automatically turns the
powered subwoofer section on when a signal is fed to the loudspeaker and does not
require an on-off switch. The red LED on the back panel will light up when a signal
is sensed and the amplifier turns on. It will automatically tum off a little while after
the signal is discontinued.
The ProSub 600 has a special circuit which automatically turns the powered
subwoofer section on when a signal is fed to the loudspeaker and does not require an
on/off switch. We suggest plugging the ProSub 60 into a circuit which is on all the
time and not into a switched outlet. When the ProSub 60 is plugged into a circuit and
receives AC current, initially you will hear a relatively loud pop which is completely
normal as the system first activates itself to stand-by mode. Then, when a program
signal is fed to the speaker, it will fully activate itself with a lower level pop which is
normal. If you unplug the speaker or tum off the AC current going to it, it will reactivate itself with a pop when AC current is restored, which is normal.
Please note that after the cessation of a signal, it may take up to an hour for the
amplifier to actually turn off from active to standby mode. It can also take up to an
hour for the LED to tum off.
Subwoofer Operating Controls
Your Definitive Technology ProSub 600 subwoofer is equipped with a full complement of operating controls to ensure complete flexibility and maximum performance in
any installation. Most of them basically are the "set and forget" type, although occasionally certain controls will require minor adjustments.
Level Control
This control varies how loud the subwoofer plays. Please follow the level control
suggestions in hook-up section.
Low-Pass Filter
Your subwoofer's back panel features a continuously variable low-pass filter. If
you are using the low level LFE input, you will normally tum the Low-Pass Filter
Control all the way up to 150. If you are using Method 1 System Hook-up you will
normally set the low-pass filter to between 10 and 12 o'clock. Always remember the
exact setting will vary with different rooms and different positions as well as personal
taste, so we encourage you to experiment.
Troubleshooting
If you experience any difficulties with your subwoofer, try the suggestions described
below. If you are still having problems, please consult your Definitive Technology
Authorized Dealer for assistance.
1. Make sure all your system interconnects and power cords are solidly in
their place.
2. Should you experience any level of ground hum or noise, try plugging the subwoofer into the same circuit as your amplifier. Please note that some cable TV
hookups induce hum into the whole system and require a special isolation device.
Please consult your dealer.
3. The system is provided with sophisticated internal protection circuitry. If for some
reason the protection circuitry is tripped, please turn down your system's volume
and wait five minutes before trying the system again. If the amplifier should overheat, the system will tum itself off until the amplifier cools and resets.
4. Check to be sure that your power cord has not been damaged.
5. Check that no foreign objects or liquid has entered the cabinet.
6. If you cannot get your subwoofer to turn on or if no sound comes out and you're
sure the system is set up properly, please bring the subwoofer to your Definitive
Technology Authorizeq Dealer for assistance.
Dolby Digital 6.1 and 7.1 Systems
Some advanced surround sound receivers are now offering Dolby Digital 6.1 and
7.1. Basically, this allows you to add additional rear/side surround speakers for even
higher performance. If you wish to add additional rear or side surround speakers we
suggest that you use Definitive ProMonitors which are available at your Definitive
dealer. A Definitive ProCenter can also be used as a rear center speaker in 6.1 systems.
Technical Assistance
It is our pleasure to offer assistance if you have any questions regarding your
ProCinema System or its set-up. Please contact your nearest Definitive Technology
dealer or contact us directly at 410-363-7148 or [email protected].
Service
Service and warranty work on your Definitive loudspeakers will normally be
performed by the Definitive Technology dealer from whom you have purchased
your loudspeakers. If, however, you wish to return the speaker to us, please contact
us first, describing the problem and requesting authorization as well as the location
of the nearest factory service center. Please note that the address given in this
booklet is the address of our offices only. Under no circumstances should loudspeakers be shipped to our offices or returned without contacting us first and
obtaining return authorization.
Definitive Technology Offices
11433 Cronridge Drive
Owings Mills, Maryland 21117
Phone: 410-363-7148
Visit us at www.definitivetech.com
ProCinema 600 System Specifications
ProCinema 600 System
Overall
Frequency Response:
Recommended
Amplification:
22 Hz- 30 kHz
10 - 175 watts/channel
ProCenter 600
Dimensions:
Frequency Response:
Efficiency.:
Nominal Impedance:
Driver Complement:
Recommended
Amplification:
101/z" W X 4 1/4" D x 4" H
55 Hz- 30 kHz
89 dB
Compatible with 4 - 8 ohm outputs
Two 31/4" bass/midrange drivers coupled to
two 31/4" pressure-driven planar low frequency
radiators, 1" pure aluminum dome tweeter
10 - 175 watts
ProMonitor 600
Dimensions:
Frequency Response:
Efficiency:
Nominal Impedance:
Driver Complement:
Recommended
Amplification:
4" W X 4 1/4" D x 7" H
65 Hz- 30 kHz
88 dB
Compatible with 4 - 8 ohm outputs
Two 3 1/4" bass/midrange drivers coupled to
one 3'/4" pressure-driven planar low frequency
radiator, 1" pure aluminum dome tweeter
10 - 150 watts
ProSub 600
Dimensions:
Frequency Response:
Driver Complement:
Built-in Amplifier:
High Pass Filter:
Low Pass Filer:
103/8" W x 13" D x 13" H
22 Hz-150 Hz
One 8" woofer with polymer cone,
one 8" infrasonic radiator
250 watts RMS
6 dB/octave speaker level at 100Hz
24 dB/octave continuously variable
(40 Hz - 150 Hz)
All specifications subject to change.
Limited USA Warranty:
5-Years for Drivers and Cabinets,
3-Years for Electronic Components
Definitive Technology warrants to the original retail purchaser only that this Definitive
Technology Loudspeaker Product (the "Product") will be free from defects in materials and
workmanship for a period of five (5) years covering the drivers and cabinets. and three (3)
years for the electronic components from the date of the original purchase from a Definitive
Technology Franchised Dealer. However, this warranty will automatically terminate prior to
the expiration of five (5) years for the drivers and cabinets and three (3) years for the electronic
components if the original retail purchaser sells or otherwise transfers the Product to any other
party. The original retail purchaser shall hereinafter be referred to as "you." To obtain the warranty protection for your Definitive Technology Product(s), you must fill out the Warranty
Registration Card(s), within ten days of the date of purchase.
Defective Products must be shipped, together with proof of date of purchase, prepaid
insured to the Franchised Dealer from whom you purchased the Product, or to the nearest factory service center. Product(s) must be shipped in the original shipping container or its equivalent; in any case the risk of loss or damage in transit is to be borne by you. If, upon examination at the Factory or a Definitive Technology Franchised Dealer, it is determined that the unit
was defective in materials or workmanship at any time during this Warranty period, Definitive
Technology or the Definitive Technology Franchised Dealer will, at its option, repair or
replace this Product at no additional charge, except as set forth below. All replaced parts and
Product(s) become the property of Definitive Technology. Product(s) replaced or repaired
under this Warranty will be returned to you, within a reasonable time, freight collect.
This Warranty does not include service or parts to repair damage caused by accident, misuse, abuse, negligence, inadequate packing or shipping procedures, commercial use, voltage in
excess of the rated maximum of the unit, cosmetic appearance of cabinetry not directly attributable to defects in materials or workmanship, Of service, or repair or modification of the
Product which has not been authorized by Definitive Technology.
Definitive TechnoLogy makes no Warranty with respect to its Products purchasedfrom
dealers or outlets other than Definitive Technology Franchised Dealers. This Warranty is for
purchases made in the US. Warranty for purchases made outside of the US are determined by
the authorized distributor for the country ofpurchase.
This Warranty is in lieu ofall other expressed Warranties. If this Product is defective in
material or workmanship as warranted above, your sole remedy shall be repair or replacement
as provided above. In no event will Definitive Technology be liable to youfor any incidental or
consequential damages arising out ofthe use or inability to use the Product, even if Definitive
Technology or a Definitive Technology Franchised Dealer has been advised ofthe possibility
ofsuch damages, or for any claim by any other party. Some states do not allow the exclusion or
limitation of consequential damages, so the above limitation may not apply to you.
All implied warranties on the Product are Limited to the duration of this expressed
Warranty. Some states do not allow Limitation on how long an implied Warranty lasts, so the
above Limitations may not apply to you. This Warranty gives you specific legal rights, and you
also may have other rights which vary from state to state.
C(
This product complies with the essential requirements of
EMC directives 89/336/EEC and 73/23/EEC (inclusive of
93/68/EEC) and carries the CE mark accordingly.
DVAT120406
•~
-
You could win a FREE powered subwoofer worth $400 retail value*
There are important benefits to registering your new Definitive Technology product:
• We'll automatically enter your name into a monthly drawing for a FREE $400 powered subwoofer*
• You'll have peace of mind knowing that we have a permanent record of your product purchase for
warranty verification (with upload of receipt scan)
• You'll be assured of receiving service/upgrade alerts
• It's fast and easy
• Privacy. The data we gather during on-line registration is never sold
http://registration.definitivetech.com
*Definitive Technology ProSub 800 or equivalent. See Official Rules for Details. No purchase necessary.
Sweepstakes void outside tile 50 United States and tile District of Columbia, and where prohibited by law.
ProSub 800
Failure to complete and submit tile product registration form does not diminish your warranty rights.
Warranties apply as stated in tile product manual. Please be sure to keep your original purchase receipt
No Internet access?
Call Definitive Technology Customer Service M-F 9:30 AM - 6:30 PM US Eastern Standard Time at (410) 363-7148, and we'll help you with the simple registration process.
Or you can send us a letter to Definitive Warranty Registration at the address below with your name, address, phone number, serial number(s) of the product(s) and
a photocopy of your sales receipt or upload a scan as part of the on-line registration process. Your name will be entered into the drawing regardless of how you choose to register.
Dejjnitive TechnnlDgy®
The Leader in High.Performance Loudspeakersf;