1
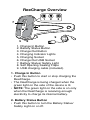
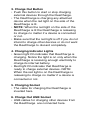
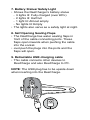
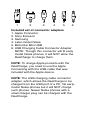
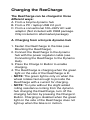
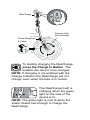
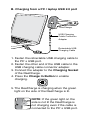
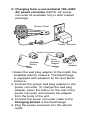
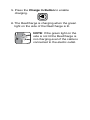
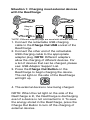
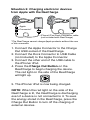
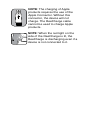
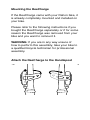
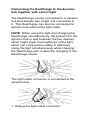
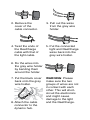
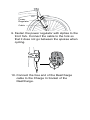
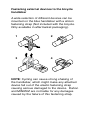
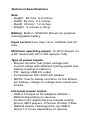
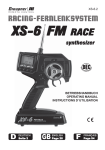
Biologic ™ ReeCharge
Owner’s Manual
Biologic ™ ReeCharge
CAUTION
Carrying the ReeCharge
The ReeCharge contains delicate components.
Do not bend, drop, or crush ReeCharge units.
Using connector ports
Never force a connector into a port. Make sure
that the connector matches the port and that
you have positioned the connector correctly in
relation to the port.
Keep the ReeCharge within acceptable
temperatures
Battery life might be affected by extreme
temperature conditions. Always keep the
ReeCharge between -20°C and 45°C. Avoid fire
and high heat conditions.
Charging the ReeCharge
Connect the ReeCharge to the bicycle dynamo
hub using only a compatible cable with a power
regulator. Do not connect the ReeCharge
with a regular wire to the dynamo hub.
Standard 6V/ 2.4W or 6V/ 3.0W dynamo hubs
can be connected via a power regulator cable
to the ReeCharge.
The ReeCharge can be charged using a USB
port.
When charging the ReeCharge with alternative
power sources, use only 5V DC output
charging devices rated at less than 1A. The
ReeCharge and its adaptor may become warm
during normal use. Always allow adequate
ventilation around the ReeCharge.
Please read the safety instructions for all
products and accessories before using them
with the ReeCharge. MINIWIZ and Dahon are
not responsible for the operation of third party
accessories or their compliance with safety and
regulatory standards.
Avoid submerging in water
Do not submerge the ReeCharge in water.
The ReeCharge is weatherproof, but not water
resistant. Do not attempt to dry the ReeCharge
device with an external heat source such as a
hair dryer, radiator, or oven.
Charge safely while cycling
Do not attempt to operate the buttons or
connectors of the ReeCharge while cycling.
Do not charge the ReeCharge when using a
light that is connected to the same dynamo
hub. When using the light and charging the
ReeCharge simultaneously, the power from the
dynamo hub is split between the two devices,
which lowers the brightness of the light, which
can compromise safety at night.
Choking hazard
The ReeCharge contains small parts, which
may present a choking hazard to small children.
Keep the ReeCharge and its accessories away
from small children.
Do not throw in trash
The built-in lithium-ion battery can be recycled.
Please dispose of the battery at the nearest
recycling location in your area.
Notice
Dahon and MINIWIZ are not responsible for any
failures the ReeCharge might cause to devices
charged with the unit.
FEATURES
1. The ReeCharge enables the charging of a
mobile device from a bicycle dynamo hub.
3. The ReeCharge can be securely fastened
onto a bicycle handlepost, stem or handlebar,
so that it can be charged while cycling.
4. E
lectronic devices can be charged through
the ReeCharge while cycling or they can
be charged from the charged battery of the
ReeCharge when not cycling.
5. The ReeCharge has universal adaptors
and a USB cable, which allow charging of a
large selection of different devices, including,
but not limited to iPhone®, iPod®, Nokia®,
Sony®, Samsung®, BlackBerry®, Mini-USB
port, PDA, GPS, MP3 player, and other 5V
handheld devices.
6. An included wall charger allows the
ReeCharge to be used as a universal charger
for most 5V handheld wireless devices.
7. The ReeCharge can be used as an extra
power source for a wide variety of electronic
devices. Its built-in 1600 mAh lithium ion
polymer rechargeable battery gives you extra
battery capacity when you need it.
8. No additional software is required.
ReeCharge Overview
1
7
2
3
4
5
6
8
9
1. Charge In Button
2. Battery Status Button
3. Charge Out Button
4. Charging Indicator Lights
5. Charging Socket
6. Charge Out USB Socket
7. Battery Status/ Safety Light
8. Self Opening Sealing Flaps
9. USB charging cable (included).
1. Charge In Button
• Push this button to start or stop charging the
ReeCharge.
• The ReeCharge is being charged when the
green light on the side of the device is lit.
• NOTE: The green light on the side is on only
when the ReeCharge is receiving enough
electricity to charge its internal battery.
2. Battery Status Button
• Push this button to turn the Battery Status/
Safety Light on or off.
3. Charge Out Button
• Push this button to start or stop charging
external devices through the ReeCharge.
• The ReeCharge is charging any attached
device when the red light on the side of the
ReeCharge is lit.
• NOTE: When the red light on the side of the
ReeCharge is lit the ReeCharge is releasing
its charge no matter if a device is connected
or not.
• Make sure that the red light is off if you do not
intend to charge other devices or do not want
the ReeCharge to discard completely.
4. Charging Indicator Lights
• Green light On indicates that ReeCharge is
charging. Notice the light is on only when the
ReeCharge is receiving enough electricity to
charge its internal battery.
• Red light On indicates that ReeCharge is
ready to charge external devices. NOTE:
When the red light is on the ReeCharge is
releasing its charge no matter if a device is
connected or not.
5. Charging Socket
• The cable for charging the ReeCharge is
inserted here.
6. Charge Out USB Socket
• USB cables for charging other devices from
the ReeCharge are connected here.
7. Battery Status/ Safety Light
• Shows the ReeCharger’s battery status
-- 3 lights lit: Fully charged (over 80%)
-- 2 lights lit: Half full
-- 1 light lit: Almost empty
-- No lights lit: Empty
• The lights also serve as a safety light at night.
8. Self Opening Sealing Flaps
• The ReeCharge has water sealing flaps in
front of the cable connecting ports. These
flaps open inwards when pushing the cable
into the socket.
• Just push the plugs into the ports and the
flaps will open.
9. Retractable USB charging cable
• This cable connects other devices to
ReeCharge and also ReeCharge to PC.
OTE: The USB plug has to be upside down
N
when inserting into the ReeCharge.
1
2
3
4
5
6
Included set of connector adapters
1. Apple Connector
2. Sony Ericsson
3. Samsung
4. Later-model Nokia
5. Motorola/ Mini USB
6. USB Charging Cable Connector Adapter
N
OTE: Though this connector will fit early
model Nokia phones, it will NOT allow the
ReeCharge to charge them.
NOTE: To charge Apple products with the
ReeCharge, you need to use the Apple
Connecting with the USB cable that was
included with the Apple device.
NOTE: The USB charging cable connector
adapter, which allows the ReeCharge to be
charged from the USB port of a PC, fits earlymodel Nokia phones but it will NOT charge
such phones. Newer Nokia phones with a
small charger plug can be charged with the
ReeCharge.
Charging the ReeCharge
The ReeCharge can be charged in three
different ways:
A. From a bicycle dynamo hub
B. From a PC / laptop USB 2.0 port
C. From a conventional 100~240V AC wall
adaptor (Not included with OEM package.
Only included in aftermarket package)
A. Charging from a bicycle dynamo hub
1. Fasten the ReeCharge to the bike (see
Mounting the ReeCharge).
2. Connect the ReeCharge to the dynamo
hub with the power regulator cable (see
Connecting the ReeCharge to the Dynamo
Hub).
3. Press the Charge In Button to enable
charging.
4. The ReeCharge is charging when the green
light on the side of the ReeCharge is lit.
• NOTE: The green light is only on when the
wheel rotates fast enough to provide the
ReeCharge with a current for charging.
• NOTE: To cycle without the slight added
rolling resistance coming from the dynamo
hub charging the ReeCharge, turn off the
charging function by pressing the Charge In
Button. Charging is disabled when the green
light on the side of the ReeCharge does not
light up when the bike is in motion.
ReeCharge
Dynamo Hub
(not included)
Power Regulator
& Cable
To starting charging the ReeCharge,
press the Charge In Button. This
enables the device to be charged.
NOTE: If charging is not enabled with the
Charge In Button the ReeCharge will not
charge, even when the bike is in motion.
he ReeCharge itself is
T
charging when the green
light on the side of the
device is lit.
NOTE: The green light is only lit when the
wheel rotates fast enough to charge the
ReeCharge.
B. Charging from a PC / laptop USB 2.0 port
ReeCharge
USB Charging
Cable Connector
Adapter
Retractable USB
Charging Cable
1. F
asten the retractable USB charging cable to
the PC´s USB port.
2. F
asten the other end of the USB cable to the
USB charging cable connector adapter.
3. C
onnect the adapter to the Charging Socket
of the ReeCharge.
4. P
ress the Charge In Button to enable
charging.
5. The ReeCharge is charging when the green
light on the side of the ReeCharge is lit.
NOTE: If the green light on the
side is not lit the ReeCharge is
not charging even if the cable is
connected to the PC´s USB port.
C. C
harging from a conventional 100~240V
AC power converter (NOTE: AC power
converter kit available only in after market
package)
Electric Outlet
Power Converter
Power Converter
Release
Button
North
America
Adapter
EU
Adapter
1.Select the wall plug adapter to the match the
available electric network. The ReeCharge
is equipped with adapters for EU and North
America.
2. C
onnect the proper wall plug adapter to the
power converter. To change the wall plug
adapter, press the button on the side of the
power converter and release the adapter
from the body of the unit.
3. C
onnect the power converter cable to the
Charging Socket of the ReeCharge.
4. P
lug the power converter into the electric
outlet.
5. P
ress the Charge In Button to enable
charging.
6. The ReeCharge is charging when the green
light on the side of the ReeCharge is lit.
NOTE: If the green light on the
side is not lit the ReeCharge is
not charging even if the cable is
connected to the electic outlet.
Charging external devices with the
ReeCharge
The ReeCharge’s internal battery needs to
have some charge before it can charge other
devices. Other devices can be charged at the
same time when the ReeCharge is charging
or they can be charged after the battery of the
ReeCharge is first charged.
Depending on the device being charged there
are two different situations when charging with
the ReeCharge.
• Situation 1: Charging most electronic
devices with the ReeCharge.
• Situation 2: Charging electronic devices from
Apple with the ReeCharge.
Situation 1: Charging most external devices
with the ReeCharge
Adapter
Plug*
*NOTE: Different adapter plugs are used with different devices.
1. Connect the retractable USB charging
cable to the Charge Out USB socket of the
ReeCharge.
2. Connect the other end of the retractable
USB charging cable to the appropriate
adapter plug. NOTE: Different adapters
allow the charging of different devices. For
a list of devices that can be charged, please
see: USB Adaptor Support List.
3. Press the Charge Out Button on the
ReeCharge to begin charging the device.
The red light on the side of the ReeCharge
will light up.
4. The external device is now being charged.
NOTE: When the red light on the side of the
ReeCharge is lit, the ReeCharge is discharging
even if a device is not connected to it. To save
the energy stored in the ReeCharge, press the
Charge Out Button to turn off the charging of
external devices.
Situation 2: Charging electronic devices
from Apple with the ReeCharge
Apple
Connector*
iPhone/ iPod Dock Connector cable
(not included with ReeCharge)
*The ReeCharge cannot charge Apple products without the use
of this connector.
1. Connect the Apple Connector to the Charge
Out USB socket of the ReeCharge.
2. Connect the Dock Connector to USB Cable
(not included) to the Apple Connector.
3. Connect the other end of the USB cable to
the iPhone/ iPod.
4. Press the Charge Out Button on the
ReeCharge to begin charging the device.
The red light on the side of the ReeCharge
will light up.
5. The iPhone/ iPod is now being charged.
NOTE: When the red light on the side of the
ReeCharge is lit, the ReeCharge is discharging
even if a device is not connected to it. To save
the energy stored in the ReeCharge, press the
Charge Out Button to turn off the charging of
external devices.
NOTE: The charging of Apple
products requires the use of the
Apple Connector. Without this
connector, the device will not
charge. The ReeCharge cable
cannot be used to charge Apple
products.
NOTE: When the red light on the
side of the ReeCharge is lit, the
ReeCharge is discharging even if a
device is not connected to it.
Mounting the ReeCharge
If the ReeCharge came with your Dahon bike, it
is already completely mounted and installed on
your bike.
Please refer to the following instructions if you
bought the ReeCharge separately or if for some
reason the ReeCharge was removed from your
bike and you want to remount it.
WARNING: If you are in any way unsure of
how to perform this assembly, take your bike to
a qualified bicycle technician for professional
assembly.
Attach the ReeCharge to the Handlepost
Connecting the ReeCharge to the dynamo
hub together with a front light
The ReeCharge can be connected to a dynamo
hub that already has a light unit connected to
it. The ReeCharge can also be connected to
dynamo hub without the light cable.
NOTE: When using the light and charging the
ReeCharge simultaneously, the power from the
dynamo hub is split between the two devices,
which might lower the brightness of the light,
which can compromise safety in darkness.
Using the light simultaneously while charging
the ReeCharge also makes the charging of the
ReeCharge slower.
The light cable connector is connected to the
dynamo hub.
1. Unplug the light cable connector.
2. R
emove the
cover of the
cable connector.
3. Pull out the wires
from the grey wire
holder.
4. Twist the ends of
the ReeCharge
cable with that of
the light cable.
5. P
ut the connected
light and ReeCharge
wires back into the
grey wire holder.
6. F
ix the wires into
the grey wire holder
by bending them
around the holder.
7. P
ut the black cover
back onto the grey
wire holder.
8. Attach the cable
connector to the
dynamo hub.
WARNING: Please
make sure the two
groups of wires are not
in contact with each
other. This will shortcircuit the electronics
and might cause
damage to the light
and the ReeCharge.
Power
Regulator
Cable
9. F
asten the power regulator with zipties to the
front fork. Connect the cable to the fork so
that it does not go between the spokes when
cycling.
10. Connect the free end of the ReeCharge
cable to the Charge In Socket of the
ReeCharge.
Fastening external devices to the bicycle
handlebar
A wide selection of different devices can be
mounted on the bike handlebar with a silicon
fastening strap (Not included with the bicycle.
Only available in aftermarket packaging).
1
2
3
4
NOTE: Cycling can cause strong shaking of
the handlebar, which might make any attached
device fall out of the elastic fastening strap
causing serious damaged to the device. Dahon
and MINIWIZ are not liable for any damages
caused by the failure of this fastening strap.
Technical Specifications
Size:
• Height: 85 mm/ 3.3 inches
• Width: 60 mm/ 2.4 inches
• Depth: 30 mm/ 1.2 inches
• Weight: 3 ounces (~90 g)
Battery: Built-in 1600mAh lithium-ion polymer
rechargeable battery
Input current: less than 1A or 1000mA and 5V
max
Minimum operating speed: 15 km/h (based on
a 20” wheel with 6V/ 2.4W dynamo hub)
Type of power inputs:
• Bicycle dynamo hub (input voltage and
current varies with different cycling speed and
battery loading conditions)
• PC/ laptop USB 2.0 outlet
• Conventional 100~240V AC adaptor
• NOTE: Due to safety concerns for the lithiumion battery, charge-in voltage and current are
limited.
Universal power output:
• USB 2.0 output at 5V adaptive 200mA ~
850mA depending on devices
• Common 5V digital devices include mobile
phone, MP3 players, iPhones/ iPods3, PDAs
• (Mobile device recharge time via USB is
about 1-2 hours depending on device)
USB adapter support list*
* V
alid as of September 1, 2009. For models
not listed below, consult with your device
manufacturer.
Compatible with:
Apple3 iPhone 2G/3G/3Gs, iPod touch, iPod
nano, iPod 5th generation, iPod classic, iPod
video
Most new Nokia4, Sony Ericsson5, Motorola7,
BlackBerry8, iRiver10, Garmin9 GPS, TomTom11
and new Samsung6 phones and devices
Some Digital Cameras and many other devices
that can be charged via a USB Port.
Referenced Trademarks
1. BioLogic™ is a registered trademark of
Dahon in the U.S.A. or other countries.
2. ReeCharge is a trademark of Dahon in the
U.S.A. or other countries.
3. iPod® and iPhone® are registered
trademarks of Apple Inc. in the U.S.A. or
other countries.
4. Nokia is a registered trademark of Nokia
Corporation in the U.S.A. or other countries.
5. Sony Ericsson is a registered trademark of
Sony Ericsson Mobile Com. AB in the U.S.A.
or other countries.
6. Samsung is a registered trademark of
SAMSUNG Corporation in the U.S.A. or
other countries.
7. Motorola is a registered trademark
of Motorola, Inc in the U.S.A. or other
countries..
8. BlackBerry® is a registered trademark
of Research In Motion in Canada or other
countries.
9. Garmin® is a registered trademark of
Garmin Ltd. in the U.S.A. or other countries.
10. iriver is a registered trademark of
ReignCom Co., Ltd. in the U.S.A.or other
countries.
11. TomTom® is registered Trademark of
TomTom International.
* Brand and product names mentioned are
trademarks of their respective companies.
* All specifications are subject to change without
notice. Please check with your supplier for
exact offers.
* Products may not be available in all markets
.
* Product colors and accessories are subject to
change without notice.
*M
INIWIZ and Dahon accept no responsibility
for damages of other devices charged by the
BioLogic™ ReeCharge.
Dahon California INC.
833 Meridian Street
Duarte CA 91010
1-800-442-3511
Dahon TW
8F-8, #6, Lane 609, Chung Hsin RD., Sec 5
San Chung, Taipei Hsien ROC 241, Taiwan
+886-2-2999-5623
http://www.thinkbiologic.com/reecharge