1
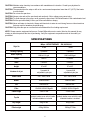
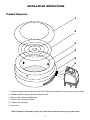
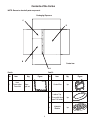
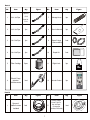
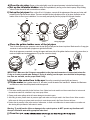
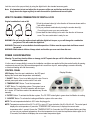
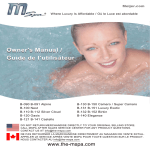
CE 001
Hydrotherapy Owner′s Manual
J-211 Luxury Exotic – 4 persons
J-213 Luxury Exotic – 6 persons
DO NOT RETURN MERCHANDISE DIRECTLY TO YOUR ORIGINAL SELLING STORE.
CALL MSPA AFTER SALES SERVICE CENTER FOR ANY PRODUCT QUESTIONS.
CONTACT US AT [email protected]
IMPORTANT SAFETY INSTRUCTIONS
!
WARNING
For your own safety and that of your equipment, make sure to take the following precautions. Failure
to follow warning notices and instructions may result in property damage, serious injury or death.
Improper installation or operation will void the warranty
When install or use this equipment, basic safety precautious must be followed, including the following:
WARNING: The spa must be supplied by an isolating transformer or supplied through a residual current device
(RCD) having a rated residual operating current not exceeding 30mA.
WARNING: RCD must be tested before each use.
WARNING: To reduce the risk of electric shock, do not use extension cord to connect unit to electric supply;
provide a properly located receptacle.
WARNING: No part of the appliance can be located above the spa during use.
WARNING: Parts containing live parts, except parts supplied with safety extra-low voltage not exceeding 12V,
must be inaccessible to a person in spa pool. Earthed appliance must be connected to the fixed receptacle
which is permanently connected to fixed wiring. Parts incorporating electrical components, except remote
control devices, must be located or fixed so that they cannot fall into the spa pool.
ATTENTION: How to avoid static shock
Static shock is easier to happen in the winter when indoor air is very dry and it usually disappears in warmer or damper
weather. Static elimination is easier, there are many steps you can take to avoid the static electricity. Static shocks can
can be a nuisance, but are not generally a health risk.
Tip #1 - Increase the huminity in your house. Air is much drier in the winter, which increases the frequency of shocks.
Use a humidifier or have a cup of water in the room helps to prevent static shock.
Tip #2 - Change clothes - switch to natural fibers, since synthetic pick up more of a static charge.
Tip #3 - If your skin or hands are very dry, put one some lotion also helps.
To avoid static shocks in MSpa, damper your body and hands, or touch some metal items to dissipate
the charge before entering into MSpa.
WARNING: Spa plug should be placed at least 3.5m away from the spa pool.
DANGER: Risk of Injury. The suction fittings in this spa are sized to match the specific water flow created by the
pump. Never operate the spa if the suction fittings are broken or missing. Never replace a suction fitting
with one rated less than the flow rate marked on the original suction fitting.
WARNING: Spray head must not be used to fill the spa tub.
WARNING: Spa outlet must not be connected to any tap or fitting other than those specified.
WARNING: Electric installations should fulfill the requirements of local standards.
WARNING: To avoid electric shock, DO NOT use the spa when it is raining, thundering, or lightening.
WARNING: To reduce the risk of injury, do not permit children to use this product unless they are closely supervised
at all times.
WARNING: Water attracts children. Always have the spa locked after each use.
WARNING: Pets must be kept away from the spa to avoid any damages and/or accidental drowning.
WARNING: There may be an air-block in the water pump the first time you run the spa. Please press the “JET”
button a few times to release the air-block.
WARNING: Do not turn on the spa if there are any possibilities that the water in the spa is frozen.
2
WARNING: Only use approved accessories. Any usage of non-approved accessories could void the warranty.
WARNING: RISK OF ACCIDENTAL DROWNING. Extreme caution must be exercised to prevent unauthorized
access by children. To avoid accidents, ensure that children can not use the spa unless they are
supervisded by an adult.
WARNING: RISK OF ELECTRIC SHOCK. Install at least 5 feet (1.5 m) from all metal surfaces. As an alternative,
the spa may be installed within 5 feet of metal surfaces, if each metal surface is permanently connected
by a minimum 8 AWG (8.4 mm2) solid copper conductor to the wire connector on the terminal box that is
provided for this purpose.
WARNING: RISK OF ELECTRIC SHOCK. Never operate any electric appliance when you are in the spa or
when your body is wet or damped. Never place any electric appliances, such as lamp, telephone, radio, or
television, within 5 feet (1.5 m) to the spa.
WARNING: During pregnancy, soaking in hot water may cause damage to the fetus. Limit use to 10 minutes at a
time.
WARNING: This appliance is not intended for use by persons (including children) with reduced physical, sensory
or mental capabilities, or lack of experience and knowledge, unless they have been given supervision or
instruction concerning use of the appliance by a person responsible for their safety.
WARNING: Children should be supervised to ensure that they do not play with the appliance.
WARNING: The appliance should be supplied through a residual current device (RCD) having a rated residual
operating current not exceeding 30 mA.
WARNING: TO REDUCE THE RISK OF INJURY:
A. If the supply cord is damaged, it must be replaced immediately by the manufacturer, its service agent or a
qualified person in order to avoid a hazard.
B. Do not bury cord. Locate cord to minimize abuse from lawn mowers, hedge trimmers, and other equipment.
C. Connect to grounded. Grounding type receptacle only.
D. The water temperature in a spa should never exceed 42°C (108°F). Water temperature between 38°C (100°F)
and 40°C (104°F) are considered safe for a healthy adult. Lower water temperatures are recommended for young
children and when spa use exceeds 10 minutes.
E. Since excessive water temperatures increase the potential for causing fetal damage during the early months of
pregnancy, pregnant or possibly pregnant women should lower the spa water temperature to 38°C (100°F).
F. Before entering the spa, user should test the water temperature with an accurate thermometer.
G.The use of alcohol, drugs or medication before or during spa use, may lead to unconsciousness and increase
the danger of drowning.
H. Obese persons and persons with a history of heart disease, low or high blood pressure, circulatory system
problems, or diabetes should consult a physician before using the spa.
I. Persons using medication should consult a physician before using a spa since some medication may cause
drowsiness, while other medication may affect heart rate, blood pressure, and circulation.
WARNING: TO REDUCE THE RISK OF INJURY: Never pour water higher than 42°C (108°F) into the spa pool
directly.
WARNING: The use of alcohol, drugs, or medication can greatly increase the risk of fatal hyperthermia. Hyperthermia
occurs when the internal temperature of the body reaches a level several degrees above the normal body
temperature of 37°C (98.6°F). The symptoms of hyperthermia include an increase in the internal
temperature of the body, dizziness, lethargy, drowsiness, and fainting. The effects of hyperthermia include
failure to perceive heat, failure to recognize the need to exit spa, unawareness of impending hazard, fetal
damage in preganant woman, physical inability to exit the spa, and unconsciousness resulting in drowning.
WARNING: People with infectious diseases should not use the spa.
WARNING: To avoid injury, have extra care when entering or exiting the spa.
WARNING: Do not use spa immediately following strenuous exercises.
WARNING: Prolonged immersion in spa may be hazardous to your health.
3
CAUTION: Maintain water chemistry in accordance with manufacturer’s instruction. Consult your physician for
recommendations.
CAUTION: The spa should not be setup or left out in a environment temperature lower than 4°C (40°F) if the heater
is not activated.
CAUTION: Do not use the spa alone.
CAUTION: Always enter and exit the spa slowly and cautiously. Wet or slippery may cause injury.
CAUTION: To avoid damage to the pump, never operate the spa unless it is filled with water to the marked water level.
CAUTION: Exit the spa immediately if when you fell uncomfortable or sleepy.
CAUTION: Never add water to chemicals. Always add chemicals to water to avoid strong fumes or violent reactions
that may result in hazardous chemical spray.
CAUTION: Only place the spa on a surface that can withstand the floor loading requirement.
NOTE: Please examine equipment before use. Contact MSpa after service center (listed on this manual) for any
missing or defective parts at the time of purchasing. Verify the equipment components match to the model you
purchased.
SPECIFICATIONS
Style No.
MSpa - HYDROTHERAPY (EU,UK,SW,AU)
J-211
J-213
Seating capacity
4 persons
6 persons
Water capacity
800 Ltr/211 gal.
1200 Ltr/320 gal.
Outer
1.8m/71”
2.04m/80”
Inner
1.40m/55”
1.60m/63”
Height
0.7m/28”
0.7m/28”
Number of air jet
5 powerful &
adjustable hydro-jets
8 powerful &
adjustable hydro-jets
Power rated
220~240V, 50Hz
220~240V, 50Hz
Heater
1500W/2.04HP
1500W/2.04HP
Jet
650W/0.9HP
650W/0.9HP
Filter
12V/60W 2000L/530gal/H
12V/60W 2000L/530gal/H
Cable length
3.3m/11 feet
3.3m/11 feet
Top lid
Synthetic leather cover with foil inside. Synthetic leather cover with foil inside.
Inflatable bladder is included.
Inflatable bladder is included
Dry weight
55kg/121lbs
60kg/132lbs
Filled weight
855kg/1881lbs
1260kg/2772lbs
4
INSTALLATION INSTRUCTIONS
Product Exposure
1
2
3
4
5
6
1. Leather top zipper cover with aluminum foil inside. Digital lock is included to lock the cover to the pool body.
3. Spa pool body - the inner inflatable tub.
4. Leather cover of the spa pool body.
5. Leather cover of jet pipes.
6. Control box.
NOTE: Drawings for illustration purpose only in this manual. Actual product may vary. Not to scale.
5
Contents of the Carton
NOTE: Ensure to check all parts are present.
Packaging Exposure
C
D
B
Carton box
A
Part B:
Part A:
No.
1
Item
Heat
Preservation
Foam Mat
Qty
Figure
9pcs
per set
6
No.
Item
Qty
1
Control Box
1pc
2
Leather Top
Cover with Aluminum Foil Inside
1pc
3
Inflatable
Bladder
1pc
Figure
Part C:
No.
Item
Qty
Figure
No.
Item
Qty
7
Drainage Hose
1pc
8
Manual
1pc
9
Spare O-rings
(2 sizes available)
1set
10
Repair Kit
1set
Figure
3pcs for
1
No.1 Jet Pipe
J-213
2pcs for
1
J-211
2
No.2 Jet Pipe
1pc
2
3
No.3 Jet Pipe
1pc
3
4
No.4 Jet Pipe
1pc
4
5
Filter Cartridge
2pcs
11
Digital Lock
1pc
6
Electric Pump
attached
with Manometer
1set
12
Remote Control
1pc
No.
Item
Qty
Part D:
No.
1
Item
Spa pool
leather covers
included
Qty
Figure
Golden Leather
Cover Trim For
the Jet Pipes
1set
2
7
(3-way pipe
connector included)
1set
Figure
A.Site Selection Requirements
WARNING: The site to place the spa must be capable of supporting the expected load.
WARNING: An adequate drainage system has to be provided to manage overflow water.
IMPORTANT: Because of the combined weight of the spa, water and users, it is extremely important that the base
where the spa is installed is smooth, flat, level and capable of uniformly supporting the weight for the
entire time the spa is installed. If the spa is placed on a surface which does not meet these requirements,
any damage caused by improper support will void the warranty. It is the responsibility of the spa owner
to ensure the integrity of the site at all times.
Be Aware of Special Requirements If Spa is installed Indoors.
1. The floor must be able to withstand the capacity of the spa.
2. The floor should be a non-slip, level surface.
3. Proper drainage is essential for indoor spa installation.
4. When building a new room for the spa it is recommended that a floor drain be installed.
5. Humidity is naturally present with the spa installation; determine the effects of airborne moisture on exposed
wood, paper, etc. in the proposed location.
6. To minimize these effects it is best to provide plenty of ventilation to the selected area. An architect can help
determine if more ventilation is needed.
NOTE: Do not install the spa on carpet or other material that can be damaged by moisture.
B. RCD Test
WARNING: RISK OF ELECTRIC SHOCK. The RCD plug must be tested before each use.
WARNING: Insert the RCD plug into a residual current device (RCD) protected power receptacle only.
WARNING: Before inserting the plug into a power receptacle, make sure the current rate of the power receptacle and
the fixed wiring are suitable for the spa. Contact a qualified electrician if you cannot verify.
1. Insert the plug into the power receptacle. (1)
2. Press the “RESET” button. The indicator area should turn red. (2)
3. Then press the “TEST” button. The indicator area should disappear. (3)
WARNING: Do not use the plug if above test fails.
4. Finally, press the “RESET” button again. If the indicator area turns red and the spa is ready for use. (4)
C. PRCD Test
Mspa comes with a PRCD plug for Swiss and Australian standard, follow the diagram flow listed below
to test the plug before use.
RESET
RESET
RESET
TEST
TEST
TEST
(1)
(2)
(3)
8
1.Press the “RESET” button.The indicator
area should turn red.
.
2.Then press the “TEST” button. The
indicator area should disappear
WARNING: Do not use if above test
fails.
3.Finally, press the “RESET” button again.
The indicator area should turn red and
the spa is ready to use.
D. ASSEMBLY
a) Un-packaging: Unfold the spa pool from the packaging box. Take out
the pool body, cover and heat preservation mat. Make sure the spa and
spa cover are right side up. Connect each piece of foam mat to make a
square mat.Place the heat preservation foam mat underneath the spa tub.
It is possible to install and leave the spa tub outside at a temperature
(a)
below 4°C, but only if the water temperature inside the pool is higher
than 4°C and water in pipe is not frozen. The spa tub can be operated in cold weather with temperature down
to maximum -10°C if the unit is properly set up and no frozen water inside the control box, pipes or spa pool.
It’s helpful to put temp barrier mat in between the spa pool and the ground. Similar mat which is made of foam
material or other materials with temp barrier function can also be used.
Remove the protective tapes from the pipe connectors, water inlet/outlets and jet nozzles of spa pool.
b) Inflation and deflation
1. Unscrew the top part of the air valve on the spa pool
2. Connect the inflation hose (attached with the manometer) of the electric pump into the air valve on the pool body
3. Inflate the spa pool by turning on the electric pump
4. For deflation, unscrew the stopper to deflate the spa pool. After complete deflation, screw the stopper onto
the spa pool again
Valve
Unscrew
(1)
(2)
(3)
(4)
c) Check and test the air pressure status inside the spa pool:
Read the dial plate of manometer.
If the pin points to the Yellow Sector, the spa is well inflated. You may fill in water now.
To avoid over inflation caused by warm weather, direct sunshine or leaving MSpa
for weeks in an environmental temperature higher than 20°c, reduce the air pressure
to the yellow sector of manometer.
After filling in water, check the air pressure again to make sure the pin reads in the Green Sector. If you need to
inflate more air during use, make sure the pin reads in Green Sector in any terms. If the pin points to the Red Sector,
it means the spa is over inflated. Unscrew the valve to release some air. Recheck the air pressure to make sure the pin
reads within the Green Sector again.
When press the black button on the manometer, the air will be let out from the position
where the button locates. Keep pressing the button till the pin points within the Green
Sector.
DO NOT OVER INFLATE. OVER INFLATION MAY CAUSE SPA POOL LEAKAGE
AND VOID THE MANUFACTURER’S WARRANTY.
9
d) Close the air value: Screw on the valve tightly once the spa air pressure is tested and ready to use.
e) Set up the inflatable bladder: Inflate the top bladder by turning on the electric pump. Stop inflating
when it looks almost full with no wrinkels on surface
f) Set up the jet pipes: Take out the #1 to # 4 jet pipes, connect all the pipesaround the spa pool outer wall
according to the picture shown below. There are number sticker indications on the of jet pipes, and also on the
leather cover to direct your installation. You can easily and quickly find the jet pipe for its proper location.
1#
1#
1#
3#
1#
1#
3#
2#
2#
4#
4#
(J-213 )
(J-211 )
O-ring of jet pipe
g) Close the golden leather cover of the jet pipes
First, fix the three-way pipe connector onto the top fitting of spa pool as shown in picture. Make sure the 3-way pipe
connector is well screwed with jet pipes on right and left sides.
After the jet pipes are connected, now zip the upper and lower side of the golden leather cover at the same time, to
make a complete and neat appearance. Zip up the cover trim slowly.
r
pe
zip
(g)
(h)
IMPORTANT: Make sure the O-rings are assembled on the pipes and connectors. It’s important to have the
O-ring on in order to avoid water leakage. If O-ring is missing, use the spare ones included in the package,
two sizes are available, use the proper sized O-ring.
h) Connect the control box to the spa: Screw the connecting hoses tightly and secure.
i) Fill the water: Use a garden hose to fill the water in until the water level reaches in between the Maximum
and Minimum water lines that printed inside the spa wall.
WARNING:
1. Fill in water carefully especially for the first time of use. Water level must reach the minimum water lines but not exceed
the maximum water line, otherwise it may cause pump failure.
2. Please avoid water spillage which will cause damage to the electric parts.
3. After filling in water, please check air pressure again and make sure the pin reads in the Green Sector. When needs to
inflate more air during use, please make sure the pin must always reads in the Green Sector at all times.
4. Reduce the air pressure to the yellow sector of manometer, to avoid over inflation due to warm weather or sunshine etc.
after leaving the spa inflated or with water for weeks.
Warning: To avoid function failure or damage to the control system, do NOT operate any functions until
the spa is filled with water with appropriate water level.
j) Close the spa
10
Lock the cover to the spa pool body by using the digital lock in the standard accessory pack.
Note: It is important to test and adjust the air pressure of the spa pool before each time of use.
Apply wax to the zipper regularly to make it smooth for operation and to avoid splits.
HOW TO CHANGE COMBINATION OF DIGITAL LOCK
Original combination is set as 000
(c)
(a)
1) Push the release button (a) in the direction of the arrow shown and the
lock will be released.
2) Set your preferred combination by turning the number wheel (b).
Do not forget to press your new combination.
3) Insert back the steel cable(c) to its end in the direction of the arrow
arrow. The new combination is ready for use.
(b)
(1)
(2)
(3)
WARNING: Do not move the number wheels while the digital lock is open, or you will change the combination
you just set. This will unable the digital lock.
WARNING: The cover is not a substitute for adult supervision. Children must be supervised at all times around
he spa tub.
WARNING: Water attracts children. Always attach and lock the spa cover each time after use.
POWER PACK OPERATION
Warning: To avoid any function failure or damage, do NOT operate the spa until it is filled with water to the
minimum water mark.
It is the owner’s responsibility to ensure the installation conditions are applied all the time and all safety & warning
requirements are met. Any failure and damages that is result from dry-run, water spillage, excessive humidity
or structural loading will void the warranty.
CONTROL PANEL
LED Display: Once the spa is switched on, the LED panel
displays the current water temperature automatically.
Display Window
1.“ON/OFF” Button: Turns in red after plug in the spa. Press to
activate power pack when remote control is not used.
2.“TEMPERATURE” Button: To set the temperature.
3.“JET” Button: To start jetting system. The system has an
auto feature that every 30-minute operation will shut down
for 1 minute. JET functions needs to be started every 30-mins
manually.
4.“FILTER” Button: To activate the filtration system. The “FILTER” button lights in green when the filtration is working.
5. “HEATER” Button: To activate the heating and filtration system at the same time.
NOTE: The set temperature defaults to 38°C when first plugged in.
NOTE: Temperature can be set from 36°C to 42°C by every 2°C as a circulation, like 36->38->40->42. The contorl panel
displays the set temperature. If press the “TEMPERATURE” button once, it displays the current water
temperature after 1 second. If press the “TEMPERATURE” for 3 seconds, the LED light starts flashing and then
you can set your preferred temperature. Once the temperature is set, press the temperature button again for 10
10 seconds, the indicator will displays the current water temperature again.
11
Remote Control:
1.“ON/OFF” Button: To activate the remote control or the control box. The display window of
control box will show the same information as displays on the remote control window.
2. “°C/°F” Button: To select a temperature display. Celsius is used to operate the European
standard spa. Fahrenheit is used to operate the North American
, standard spa.
Button: Increase the temperature.
3.
4.
Button: Lower the temperature.
5.“HEATER ON” Button: To activate the heating and filtration system at the same time.
6.“HEATER OFF” Button: To stop the heating system.
7.“FILTER ON” Button: To activate the filtration system
8.“FILTER OFF” Button: To stop the filtration system
9.“JET ON” Button: To activate the jetting system
10.“JET OFF” Button: To stop the jetting system.
The remote control does not have any user serviceable parts. Opening the case, except for the
battery cover, may cause permanent damage to your remote control. Keep the remote control dry and
do not break it by force.
Installing Batteries
The remote control requires installing two (2) new AAA batteries (not included in the package).
1. Pull back the remote control’s battery cover and remove it.
2. Insert the two (2) supplied AAA batteries according to the + and - marks in the battery case.
3. Push the battery cover back into place.
4. Test the unit by pressing the power key.
NOTE: When batteries need replacement, the remote control will stop operating. Replace the old batteries within
15 minutes and the unit will be restored to its full functionality.
JET Button: Use this button to activate the massage jet system.
(1) Adjust the jet nozzles in the proper direction for your needs.
(2) Screw the jet control knob clockwise or anticlockwise to change the
massage power and water stream. The maximum power is air & water
combo jet. The minimum power is water jet only.
There are 3 jet control knobs on the side of the J-211 spa and 4 knobs
for the J-213 spa.
“HEATER” button shows red when the heating system is activated.
NOTE: It’s normal that filtration system cannot be turned off individually when it is working.
open
(1)
e
clos
(2)
NOTE: Filtration function can only be turned off by pressing “HEATER” button but not “FILTER” button.
The heater will be stopping heating when the current water temperature reaches the set temperature. After the
set temperature is reached, the “FILTER” button will be off and “HEATER” button shows green. After the current
water temperature drops 2°C below the set temperature, the heating system will restart again and light turns into red.
The “FILTER” button will be activated automatically at the same time. The heat increase rate is maximally 1.2 to
2°C(1-3°F) per hour.
NOTE: The following conditions will lead to slow heating:
1. Environmental temperature lower than 10°C (50°F)
2. Outdoor wind force above Gentle breeze/F 3
3. Environmental temperature lower than 10°C (50°F) and wind power above Gentle breeze/F 3
4. Activate bubbling system when heating
5. Spa lid is not covered or improperly covered when heating
It is recommended to fill spa tub with luke warm water for quick heating and energy saving.
12
Spa Water Maintenance
Poor water quality can be extremely hazardous to your health. The following recommendation is helpful to keep spa water
crystal clean:
A: Use filter cartridge regularly.
Note: Prepare two filter cartridges for switch using, if one is in use, you can clean and dry the spare one.
Note: Do not use filter cartridge when heating water. To avoid the filter cartridge get damaged,
DO NOT use the filter when there are children or more than two bathers in the spa. After finish using, replace the filter
cartridge.
be replaced at least once a week during peak using season.
Filter cartridge should
2. The filter cartridge can be rinsed off with a garden hose and reused. However, if the filter cartridge remains soiled and
discolored, the filter should be replaced .
every few days or use appropriate pool chemicals. All spas require the use of pool chemicals. Consult
your local pool supply retailer for more information about chemical maintenance. Pay close attention to the chemical
manufacturer’s instructions. Spa damage resulting from misuse of chemicals and mismanagement of spa water is not
covered by the warranty.
a. Water Balance: We recommend to maintain water pH between 7.2 and 7.8, total alkalinity between 80 and 120ppm
and free chlorine between 3 to 5ppm. Use test strip to test the water chemistry before each use of the spa, no less than
once per week. Low pH will damage to the spa and pump. Damaged resulting from chemical imbalance is not covered
by the warranty.
b. Water Sanitation: Water Sanitation is the responsibility of the spa owner, achieved through the regular and periodic
present in the water or introduced during use of the spa.
Note:
13
Special Notice on Water Treatment
Please read about water quality and filter usage in user manual. Always shower before entering the spa.
Use test strip to test the water chemistry before each use of the spa. Apply testing at least once a week. The pH
level must be between 7.2 and 7.8, total alkalinity between 80 and 120ppm and free chlorine between 3 to 5ppm.
If the pH level is too low, it will result in excessive wrinkles and damage to the spa pool as well as corrosion in
the motor unit. Too high of a pH level(hard water) will result in scale incrustation, e.g. sheets of white coagulations
inside the filter pump, which will block or break down the filter pump.
If you have any questions regarding chemicals, please contact your local spa and pool water treatment specialist
stores.
It is the owner’s responsibility to maintain the chemical balance and sanitation of the water regularly and properly.
Mspa is not responsible for any damages that result from improperly maintained water. Improper water maintenance
may result in voiding the warranty.
Spa Cleaning
Detergent residues or dissolved solids from bathing suits and chemicals will gradually accumulated in the water.
If any dirt is visible in the water, change the water and clean the pool. Use a mild cleaner to wash the inner vinyl
of the spa tub and rinse with clean luke warm water.
NOTE: Do not use hard brushes or abrasive cleaners to clean the spa.
Drainage
1. Turn off all the functions on the control panel.
2. Connect the drainage hose on to the drainage structure and make sure it is
well connected. Ensure the other end of the drainage hose is connected to
a ground drain.
3. Screw off the cover of the drainage structure inside of the spa pool, let the
water flow out of the drainage hose.
4. Wait till the spa has no water flow out of the drainage hose, empty the
the rest of water manually and completely.
DO NOT leave your spa full of water if you will be away for awhile or no one can take care of the spa pool.
Drain the water before you leave and deflate the spa pool body a little bit.
Spa Pool Repair
If the spa pool body is damaged, use the repair patch provided in the package. Clean and dry the damaged
area in order to prevent dust or dirt from getting on the tacky glue. Apply glue to the PVC of the repair patch
and quickly attach it onto the damaged surface. Smooth the surface to remove any air bubbles and allow it
dry for roughly 3-10 minutes. A secure and unnoticeable can usually be made.
Spa Storage
After the spa is drained, unscrew the complete part of the air valve on the spa pool and the spa will be deflated.
Make sure all water is drained from the spa tub and the control box. This is essential to extend the life of the spa.
You could also use a vacuum or hair blower to suck up or blow out the water from the pipe and pump lines.
Filter cartridge also needs to be removed. It is recommended to store the spa tub in the original packaging box
Ensure your spa is stored in a warm and dry place.
14
NOTE: All components must be completely dry and clean before packaging and storage. Store the spa safely in a
warm and dry condition. Exposure to sunshine is not recommended. Plastic can becomes brittle and susceptible to
breakage when exposed to a sub-zero temperature environment. Icy weather or store below sub-zero temperature can
severely damage the spa tub. Improper winterization of your MSpa may void your warranty.
Spa checklist before unpack the unit and re-use for the new season
In order to have your MSpa runs smoothly and easily for the new season, follow the check steps below:
1. Check if there is water in the air pipe. If there is water, dry the air pipe before operating the spa tub again.
2. Connect control panel correctly. Turn on the spa tub, check if the LED displays correctly and if the signal cable is
well connected.
3. Press ON / OFF button on the control panel,. Turn on the “JET” function, check if jetting operates properly.
After the above steps is done, your MSpa should be ready for use.
Note: Any damage caused by improper storage or failure to do the checklist of reuse will void your warranty.
WATER PROTECTION LEVEL
SAFETY & ANNOUNCEMENTS
TROUBLESHOOTING
Mspa® strives to provide the most trouble-free spas on the market. If you experience any product related problems,
do not hesitate to contact us or your local after sales service center.
Here are some helpful tips to help you to diagnose and rectify some common sources of trouble.
*For any spare parts you need for replacement, refer to the warranty policy for replacing details.
*For any other unknown failures out of the list, contact your national or regional MSpa service center.
15
Problems
Probable Causes
Control panel/display
panel shows nothing
without any power at all
The spa pool is not in a
normal shape
1. Power failure
2. "ON/OFF" button of control
panel is not turned on.
1. Check if power supply is normal and well
connected to your MSpa.
2. Press "ON/OFF" button again
Extra air pressure by strong
sunshine
Check the air pressure first. The spa can get
an abnormal shape if pressure is too high.
Normally the shape becomes screwed
if the spa is exposured under dirent sunshine or
in a hot weather enviornment. It is recommended
to have a spa cover to protect your spa from
UV, rain or other pollution. Spa cover can be
purchased from your local MSpa dealer.
1. Air valve looses
Drain out the water completely from the spa if
it is necessary and possible. Try to use
Vaseline or similar thing to grease the rubber
gaskets in the air valve and in the part to
open to fit the black tube into the panel. Inflate
the spa to proper air pressure again.
2. Holes or pin splits on
the spa pool
Use a spray bottle with a mild detergent to
be able to see the air leak when it’s coming
some small soap bubbles. Try to find the air
leak on both sides on the spa body. Any
holes or splits within size of 10cm and not in
welding seam part can be repaired by the PVC
swatch and glue that is provided in repair kit.
The air leaking of the
spa pool
Water leakage
Solutions
1. There is water leakage of the
the Jet pipes, pipes connecting
between the control box and
the spa pool, or inlet and outlet.
1.If there is water leakage like tear drops, it
is ok for use. Just screw the pipes tightly
and correctly.
2.Water is leaking from the
drainage valve
2.Check if the O-rings are missing or placed
improperly. If yes, attach the O-ring to the pipe,
and screw the jet pipes tightly and correctly.
DISPOSAL
1.The marking
indicates that this product shall not be disposed with the general household waste. Please
contact your local community about collection points or ask your dealer.
2.This product contains valuable materials that can be recycled and contributed to a sustainable environment.
3.For recovery, recycling and dismantling information for this product, please visit us at www.the-mspa.com.
16
MSpa® products are designed with reliability and simplicity in mind. In addition, our internal Quality
Assurance Team carefully inspects each unit thoroughly before it leaves our facility. Oriental Recreational
Products (Shanghai) Co., Ltd. (ORPC) is pleased to extend this limited warranty coverage to the original
purchaser of an MSpa® Product. This warranty is not transferable. The warranty period commences on
the original purchase date through 6-12 months accordingly.
The Limited Warranty
This warranty is subject to the obligations, limitations and exclusion listed below:
1. Spa pool –six (6) months from the original date of purchase.
2. Electric Parts (Control Box) – twelve (12) months from the original date of purchase.
*Report damage after this time will be subject to rejection.
Repair/replacement parts purchased by the consumer from ORPC after the original coverage has expired on the
unit will carry a 90 day warranty, valid with a receipt only. Any item shown to be defective will be repaired at our
discretion. No labor coverage is included within these parts.
Shipping Policy: Consumers are responsible for the shipping/freight when return the defect parts to MSpa
authorized service center or ORPC. All subsidized labour costs of removal and reinstallation of parts might be
subject to dealer service charges.
Conditions:
This warranty applies to the original purchaser and terminates upon any transfer of ownership. ORPC’s obligation
under this warranty is only limited to replacing or repairing at ORPC’s option once any part or parts of this unit
which in our judgment show evidence of such defect.
All repairs for which warranty claims are made must be pre-authorized by ORPC through an accredited distributor
or agent provided that the defective part be returned to the distributor or agent Transportation Prepaid, if requested.
requested.
All the Mspa authorized selling dealer is responsible for all in-field service work carried out on your MSpa®
product. ORPC will not be liable for results or cost of workmanship from unauthorized service persons or dealers.
Warranty Registration is required. Warranty Registration Card can be only filled out by mail. All claims must be
submitted to ORPC by authorized selling dealers. It is essential that all submitted claims provide all of the
necessary information including customer name, purchase date, serial #, product model, problem, and part or
parts requested, without this information the warranty will be invalid.
Warranty Cards must be completed and mailed to ORPC by authorized dealer within thirty (30) days from
the original purchase date.
Limitations on Warranties
This warranty is a limited warranty. It does not extend to any product or damage to a product caused by or
attributable to freight damage, abuse, misuse, or abnormal usage, or repairs not provided by ORPC
authorized service personnel, to products used for commercial or rental purpose, or to products used as
store display models.
17
Damages caused by or attributable to the following incidents are specially excluded:
a. Any damage caused by the operation of the spa with water temperatures outside the range of
0°C-42°C/32°F-107.6°F (Europe/Australia) or 0°C-40°C/32°F-104°F (USA)
b. Any damage caused by clogged, dirty or calcified filters
c. Any damage that are purely aesthetic and do not hinder the function of the MSpa
d. Any damage to the exterior resulting from improper maintenance or any damage to the exterior attribut able to freight
mishandling
e. Overfilling
f. Damage resulting from improper winterization
g. Damage to the spa liner resulting from improper chemical treatment, damage to the spa resulting from exposure to
extreme temperatures.
h. Damage to the spa resulting from exposure to direct sunlight and ultraviolet rays while the spa is empty
i. Damage to the pump, motor, plumbing and components due to improper maintenance, chemical treatment, or exposure.
j. Damage resulting from failure to properly follow user’s manual installation, operating, or maintenance instructions.
Spa accessories (optional) are excluded from the warranty, including but not restricted to the following:
* Comfort set (headrests, cup holder)
* Filter cartridge
* Heat preservation foam mat
* Seat cushion
* Test trip
* Bubble spa overall cover
* Ice box
* Foot bath
* Led light
* Plastic wood step
* Electric pump
* Remote control
Any alterations to the spa will void this warranty. Alterations include but are not limited to: any component or plumbing
change, electrical conversion, or addition of alternate sanitation or heating systems.
ORPC authorizes no other warranty beyond that specifically set forth above. ORPC is not responsible or liable for
indirect, special or consequential damages arising out or in connection with the use or performance of the
product or damages with respect to any economic loss, loss of or damage to property including water damage,
loss of revenue, loss of enjoyment or use, costs of removal, installation or other consequential damages of whatsoever
nature.
No agent, dealer, distributor or Service Company or other party is authorized to change or modify or extend the
terms of this warranty.
Legal Rights
This warranty gives you specific legal rights and you may have other rights, which vary from country to country.
For warranty service contact, see the MSpa After Service Center Contact List in the User Manual.
Manufactured By:
Oriental Recreational Products (Shanghai) Co., Ltd.
1699 Daye Road, Wuqiao, Fengxian
Shanghai, China
18
MSpa® Warranty Registration Card
Congratulations on purchasing a quality MSpa® product! To get the most value from your
investment, please fill in the Warranty Registration Card below. By submitting this form, your
warranty will be registered.
*Note: Incomplete form will not to be accepted and honored by MSpa.
Please fill out the required file with correct info:
*Last Name: _______________________________________________________________
*First Name: ______________________________________________________________
*Mailing Address 1: _________________________________________________________
Address 2: ________________________________________________________________
*City: ____________________________ *State/Province: __________________________
*Zip/Postal Code: ____________________*Country:_____________________ __________
*Phone Number: ____________________________________________________________
*Email Address: ____________________________________________________________
*Purchase Date: __ __ (mm) __ __(dd) __ __(yyyy) *Product Model: ___________________
*Serial Number _______________________________ Find the SN# underneath the control panel
and on the spa pool cover. e.g. (2GNBUB#####SC##)
*Dealer Where Purchased: ____________________________________________________
*Dealer Store Address: _______________________________________________________
* Purchase Invoice with purchase date and product model cycled attached:
Defect Problem Description:
Spa Pool Cracking ( ) Control Box (
)
Other Problems, state details in the below (
)
IMPORTANT:
For Spa pool (body) problem – Picture of defect part need to be attached along with
the mail-in warranty card and is MANDATORY to claim the warranty
For electric part(s) or control box problem – Send the control box to your local MSpa
Service Center. See the Service Center Contact List in the manual.
19
16