1
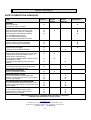
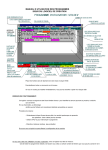
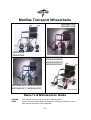
Medline Transport Wheelchairs
MDS808210AR
MDS808210AB
MDS808150
MDS808200
MDS808200SLRR*
MDS808200SLBR*
MDS808200SLRC*
MDS808200SLBC*
MDS808200AR MDS808200AB
MDS808200PC MDS808210PC
*patent pending
Owner’s & Maintenance Guide
DEALER:
This manual must be given to the user of the wheelchair.
USER:
Please read this manual before operation for, warnings, maintenance and
safe usage instructions of this wheelchair.
1
10/20/2008
Congratulations on your selection of a
Medline Transport Wheelchair.
Medline wheelchairs are the result of extensive
engineering and are manufactured to meet our rigid specifications
and to surpass your expectations.
Medline wheelchairs are designed to combine comfort, safety and
reliability. Medline Industries, Inc. is committed to the quality of our
products and to the satisfaction of our customers.
NOTE: Transport wheelchairs are ideal for airports, shopping centers or other
public places that require short term transport from one location to another. They
are designed for safe and efficient transport with someone pushing the chair.
Transport wheelchairs are not intended for independent use by individuals as the
design does not allow maneuvering by the occupant.
REORDER NUMBERS:
MDS808150
Transport
Excel
17” wide, permanent full-length arms, swing-away detachable footrests,
steel frame, black upholstery
MDS808200
Transport
Excel
19” wide, permanent full-length arms, swing-away detachable footrests,
steel frame, black upholstery
MDS808210AR
Excel
Deluxe Aluminum
Transport
19” wide, permanent full-length arms, swing-away detachable footrests,
red aluminum frame, black upholstery, hand grip wheel locks
MDS808210AB
Excel
Deluxe Aluminum
Transport
19” wide, permanent full-length arms, swing-away detachable footrests,
blue aluminum frame, black upholstery, hand grip wheel locks
MDS808200AR
Excel
Aluminum Transport
19” wide, permanent full-length arms, swing-away detachable footrests,
red aluminum frame, black upholstery
MDS808200AB
Excel
Aluminum Transport
19” wide, permanent full-length arms, swing-away detachable footrests,
blue aluminum frame, black upholstery
MDS808200PC Excel
Aluminum Transport
19” wide, permanent full-length arms, swing-away detachable footrests,
steel frame, plaid upholstery
MDS808200SLRR/SLRC
MDS808200SLBR/SLBC
Freedom Superlight
Transport Wheelchair
19” wide, permanent desk-length arms*, swing-away detachable footrests,
red aluminum frame, black upholstery
*desk length arms allow for greater ease in getting into/out of the chair
2
Typical Product Specifications for Transport Wheelchairs:
MODEL
Excel Transport
Excel Transport
Excel Aluminum Transport
Excel Deluxe Aluminum
Transport
Model #
MDS808150
MDS808200 MDS808200PC
MDS808200AR/AB
MDS808210AR/AB/PC
17”
19”
19.5”
19”
Size (seat width)
Seat depth
Excel Superlight
Freedom Transport
MDS808200SLRR/SLRC
MDS808200SLBR/SLBC
19”
16”
16”
16”
16”
16”
Weight (w/o legrests)
25 lbs
25 lbs
15.5 lbs
23.5lbs
15.5 lbs
Weight Capacity
300lbs
300lbs
300lbs
300lbs
300lbs
Armrests
permanent full-length
permanent full-length
vinyl, black
Legrests
steel, chrome plated
aluminum, red
permanent full-length
nylon, black
PC – nylon, plaid
aluminum red/blue/red
fixed desk length
Arm pads
permanent full-length
vinyl, black
PC - nylon, plaid
steel, chrome plated
fixed /folding backrest
nylon, black or plaid,
seat belt
plastic, black
fixed /folding backrest
nylon, black, seat belt,
hand loop
plastic, black
fixed /folding backrest
nylon, black or plaid,
seat belt
plastic, black
fixed /folding backrest
nylon, black, seat belt,
hand loop
plastic, black
8” polyurethane, black
5.5” polyurethane black
8” polyurethane, black
5.5” polyurethane, black
8” polyurethane, black
8” polyurethane, black
12” polyurethane, black
8” polyurethane, black
Frame
fixed /folding backrest
Upholstery
nylon, black, seat belt
Casters
Front tire
Rear tire
Fork
plastic, black
8” polyurethane,
black
8” polyurethane,
black
steel, chrome plated
nylon, black
nylon, black
aluminum, red
steel, chrome plated
aluminum, silver
aluminum, silver
plastic, black
Foot plate
aluminum
Aluminum
plastic, black
plastic, black
plastic, black
Brake style
push to lock brake
push to lock brake
pull to lock brake
push to lock brake
pull to lock brake
rear wheels
rear wheels
rear wheels
hand grip and rear wheels
rear wheels
Limited Lifetime
Limited Lifetime
Limited Lifetime
Limited Lifetime
Limited Lifetime
1 year
1 year
1 year
1 year
1 year
--
--
E1038
E1038
Brakes
Warranty : Frame &
Crossbar
Warranty: Upholstery
Parts & Components
HCPCS code
-cup holder, wallet with key
ring, cell phone bag on back
upholstery
Miscellaneous
*Patent Pending
3
!
Ì
WARNINGS
A CAREGIVER / TRANSPORTER MUST BE PRESENT AT ALL TIMES
WHILE THE TRANSPORT WHEELCHAIR IS IN USE. NEVER LEAVE THE
OCCUPANT UNATTENDED. THIS WHEELCHAIR DESIGN IS NOT
INTENDED TO ALLOW A PATIENT TO MANEUVER THE WHEELCHAIR.
TO ENSURE YOUR SAFETY IN USING THIS MEDLINE TRANSPORT
CHAIR, ALL WARNINGS AND SAFETY INFORMATION AND ALL
INSTRUCTIONS MUST BE FOLLOWED. FAILURE TO DO SO MAY
RESULT IN SERIOUS BODILY INJURY OR DAMAGE TO THE CHAIR.
DO NOT USE THIS PRODUCT WITHOUT FIRST READING AND
UNDERSTANDING THE INSTRUCTIONS CONTAINED IN THIS BOOKLET.
IF YOU ARE UNABLE TO UNDERSTAND THE WARNINGS, CAUTIONS OR
INSTRUCTIONS, CONTACT A HEALTHCARE PROFESSIONAL, DURABLE
MEDICAL DEALER OR TECHNICAL PERSONNEL, OR CONTACT
MEDLINE AT 1-800-MEDLINE BEFORE USE - OTHERWISE SERIOUS
BODILY INJURY OR PRODUCT DAMAGE MAY OCCUR.
A QUALIFIED WHEELCHAIR TECHNICIAN MUST PERFORM ANY REPAIR
OR CHANGE TO THIS WHEELCHAIR OR SERIOUS INJURY MAY OCCUR.
TECHNICIANS: DO NOT SERVICE THE WHEELCHAIR WITHOUT FIRST
READING AND UNDERSTANDING THIS OWNER’S MANUAL. IF YOU ARE
UNABLE TO UNDERSTAND THE WARNINGS, CAUTIONS, OR
INSTRUCTIONS, CONTACT MEDLINE AT 1-800-MEDLINE.
DO NOT USE ACCESSORIES, PARTS, OR ADAPTERS OTHER THAN
THOSE AUTHORIZED BY MEDLINE.
CONSULT WITH YOUR DOCTOR, PHYSICAL OR OCCUPATIONAL
THERAPIST, OR OTHER QUALIFIED PROFESSIONAL REGARDING THE
SELECTION OF THE TYPE OF WHEELCHAIR AND ACCESSORIES BEST
SUITED TO YOUR INDIVIDUAL NEEDS AND CAPABILITIES.
4
TABLE OF CONTENTS
Reorder Numbers………………….……….……………………………………...
Product Specifications……………………………………………………………
General WARNINGS…………….……………………………..…………………..
Table of Contents………………………..………………………………………...
2
3
4
5
WARNINGS and Safety Instructions.............................................................
6
Guidelines: Safety and Handling of Wheelchairs…………………………….
9
List of Contents…………………………………………………………………….
12
General Use Instructions
Opening/Closing the Wheelchair………………………………………………….
12
Folding/Unfolding seat back……………………………………………………….
13
Wheel Locks…………………………………………………………………………
14
Adjusting the Wheel Locks…………………………………………………….......
15
Locking/Unlocking handgrip (specific models)…………………………………..
18
Installing / Removing the Swing-Away Legrest Riggings…………...……........
19
Safety Inspection and Maintenance……………………………………………
20
Monthly Check list / Troubleshooting……………………………………………..
20
Installing/Removing front wheels…………………………………………………
21
Medline Limited Warranty………………………………………………………….
22
Safety Inspection Checklist………………………………………………………..
23
5
WARNINGS & SAFETY INSTRUCTIONS
!
Ì
General Information
DO NOT use this product without first reading and understanding the instructions
contained in this booklet. If you are unable to understand the Warnings, Cautions or
Instructions, contact a healthcare professional, durable medical equipment dealer or
technical personnel, or contact Medline at 1-800-Medline before use - otherwise
serious bodily injury or product damage may occur.
Transport wheelchairs are ideal for airports, shopping centers or other public places
that require short term transport from one location to another. They are designed for
safe and efficient transport with someone pushing the chair. Transport wheelchairs
are not intended for independent use by wheelchair bound individuals. The design
does not allow maneuvering by the occupant.
DO NOT use the wheelchair in a vehicle for transport. This wheelchair has not been
approved as a seat surface to be used within a vehicle of any kind. Always transfer
the wheelchair user to an approved vehicle seat and use restraints available from the
auto industry for this application.
DO NOT exceed the weight capacity of the wheelchair: 300lbs. The weight capacity
includes the weight of the rider plus items carried or attached to the wheelchair.
DO NOT use the wheelchair while weight training. Medline wheelchairs have not been
tested for any type of weight training. If the chair is used during weight training,
Medline will not be held liable. If the weight capacity is exceeded, risk
of fall, tip-over or loss of control may occur which can result in bodily injury or
product damage.
Use of the seat belt is recommended to maximize safety and stability.
!
Ì
Environmental
The wheelchair is designed for use on firm, even surfaces such as concrete, asphalt,
and indoor floors and carpeting.
DO NOT operate the wheelchair on streets or roadways.
DO NOT operate the wheelchair on loose, slippery, or uneven surfaces such as sand,
gravel, hills, dirt roads, or ice.
DO NOT operate the wheelchair on inclines greater than 10% (6 degrees) without
assistance.
DO NOT attempt to go up or down inclines that are covered with oil, water, ice or any
other potentially slippery substance.
DO NOT attempt to ride over curbs or obstacles. Doing so may cause your
wheelchair to tip over and cause bodily harm to you or damage to the wheelchair.
DO NOT use the wheelchair on stairs or escalators.
6
WARNINGS & SAFETY INSTRUCTIONS
!
Ì
General Use
DO NOT stand on the frame of the wheelchair.
DO NOT stand or put pressure on the footrests. When getting in or out of the
wheelchair, make sure the footplates are in the up position.
DO NOT attempt to lift the wheelchair by any detachable components.
There are potential finger pinch point areas at moving parts and between the seat
frame and the seat cradles on some models. When opening the wheelchair, take care
not to place your hand or fingers between the seat frame and the seat cradles (if
present) or on any other moving parts.
ALWAYS keep hands and fingers away from moving parts. DO NOT sit in the
wheelchair until the seat is completely in the open position. Risk of injury may occur
if care is not taken.
Ensure the seatback fold-down section is locked in the upright position before use.
The wheelchair should be on a stable, level surface with the wheel locks engaged
before transferring the user to or from the wheelchair.
Completely engage the wheel locks when entering and leaving the wheelchair or
using the wheelchair in an elevator or a wheelchair lift.
DO NOT transfer in or out of the wheelchair on your own unless you have sufficient
upper body strength, balance and agility and have been instructed in transfer
techniques by a health professional. Every precaution should be taken to reduce the
gap distance between the wheelchair and the target seat or bed. Turn both casters
parallel to the object you are transferring to.
DO NOT use the wheel locks (or hand grip locks if present) to stop the wheelchair
from moving. Wheel locks are not brakes. DO NOT use the wheel locks to slow your
descent down an incline.
Changing direction when going down an incline could cause instability.
DO NOT lean forward out of the wheelchair any farther than the length of the
armrests.
DO NOT attempt to reach for objects if doing so means you must move forward in the
seat.
DO NOT attempt to reach objects if you have to pick them up from the floor by
reaching down between your knees.
DO NOT shift your weight or sitting position toward the direction you are reaching as the
wheelchair may tip over.
DO NOT attempt to lean over the top of the back upholstery to reach objects.
Before leaning or reaching forward, make sure to rotate the casters straight ahead toward the
front of the wheelchair and engage the wheel locks to prevent the wheelchair from tipping
over or moving.
7
WARNINGS & SAFETY INSTRUCTIONS
!
Ì
General Use
DO NOT tip the wheelchair without assistance. DO NOT lean the wheelchair back since this
can cause the wheelchair to tip over. If trying to reach objects, reach back only as far as your
arm will extend without altering your seating position.
Any person assisting the rider in maneuvering or lifting of the wheelchair must have sufficient
strength and be able to see obstacles in the path of travel. When learning a new assistance
technique, have an experienced assistant help you before attempting it alone. Remember to
use good body mechanics.
Contact with water or excess moisture may cause the non-aluminum wheelchairs to rust or
corrode. DO NOT use the chair in a shower, pool or other body of water. Avoid excess
moisture (example: do not leave the chair in a damp bathroom while taking a shower). Dry
the chair immediately if exposed to moisture.
When cleaning the hand grips, use only a clean towel lightly dampened with cool water.
Ensure the hand grips are dry before use. Use of soap or ammonia based cleaning solutions
may result in the hand grips sliding off.
If the wheelchair is exposed to extreme temperatures, high humidity and/or becomes wet,
check the hand grips to ensure they are not loose and do not twist on the handle.
Avoid storing or using the wheelchair near open flames or combustible products.
!
Ì
Adjustments
DO NOT operate, maintain, or adjust the wheelchair without reading and understanding all
instructions in the manual.
DO NOT adjust the footrests any closer than 2 ½ inches from the floor.
DO NOT modify the wheelchair. Examples: drilling holes, grinding, welding parts, using nonauthorized / non-approved parts. Such modifications may change the chair’s structure and
center of balance which may increase the risk of serious injury to the user and void the
warranty.
!
Ì
Before EACH Use
9 Make sure the chair rolls easily and that all parts work smoothly.
9 Check for noise, vibration, or any change in use. Changes may indicate loose parts or
9
9
9
9
wheelchair damage.
Check to ensure wheel locks are in good working order.
Make sure hand grips are not loose and cannot be moved or twisted.
Make sure the seatback is locked in the upright position.
Have any problem found repaired promptly with authorized parts.
8
GUIDELINES:
SAFETY & HANDLING OF WHEELCHAIRS
Center of Gravity, Balance and Stability
The transport wheelchair has been designed to be safe and stable during normal transport
activity as long as proper balance is maintained. The point at which a wheelchair will tip
forward, backward, or to the side depends on its center of balance. To assure stability and
proper operation of the wheelchair, the center of gravity must be maintained in the chair.
Center of gravity is the point at which all the weight of an object can be considered to be
concentrated and represents the balance point.
Most activities such as transferring in and out of the wheelchair, bending, and reaching
affect the center of gravity and weight distribution of the wheelchair. Addition of accessories
such as a backpack will also re-distribute weight. Loss of proper balance may cause the
chair to tip over. Use of the seat belt is advised to help maintain stability by minimizing
movement within the wheelchair seat. The use of anti-tip devices (available only for
MDS808200SLR /C models), especially when maneuvering on ramps or inclines, will also
enhance safety.
Transport wheelchairs are designed for safe and efficient transport with someone pushing
the chair. Transport wheelchairs are not intended for independent use by wheelchair bound
individuals. The design does not allow maneuvering by the occupant.
To determine safety limits of the transport chair, practice with activities such as transferring,
bending, and reaching with a healthcare professional that is knowledgeable about
wheelchair use.
To assure safe operation of the transport wheelchair, ALL of the Warnings and Instructions
in this manual must be followed. Failure to do so may result in tipping the wheel chair over
or causing the user to fall which may result in serious bodily injury or damage to the
wheelchair.
Some basic wheelchair safety guidelines follow. The guidelines are critical for standard
wheelchair use, however, the principles also hold true for transport chairs. If any of the
following activities are required while using the transport chairs, these guidelines must be
followed to ensure safety and to avoid potential injury to the user or the transporter and to
avoid damage to the chair.
Reaching / Leaning / Bending – FORWARD or SIDEWAYS
• Position the wheelchair as close as possible to the object.
• Make sure the front casters are pointing in a forward position. This extends the wheel
base and will help stabilize the chair.
• Make sure the wheel locks are engaged before activity.
• DO NOT attempt to reach for objects if doing so means you must move forward in the
seat. DO NOT shift your weight toward the direction you are reaching.
• DO NOT attempt to reach objects if you have to pick them up from the floor by reaching
down between your knees.
• DO NOT shift your weight or seat position toward the direction you are reaching.
9
GUIDELINES:
SAFETY & HANDLING OF WHEELCHAIRS
Reaching / Leaning – BACKWARD
• Position the wheelchair as close as possible to the object.
• Make sure the front casters are pointing in a forward position. This extends the wheel
base and will help stabilize the chair.
• DO NOT engage the wheel locks – if your weight shifts while reaching backwards it is
better for the wheelchair to roll than to tip.
• DO NOT lean back over the top of the back upholstery.
• Reach back only as far as your arm will extend without changing your position in the
seat.
Transferring into and out of the wheelchair
Transport chairs do not have detachable arms, requiring the user to be able to stand and
assist with pivoting to the chair.
• Position the wheelchair as close as possible.
• Make sure both wheel locks are engaged.
• Remove or swing away the footrests that are in the transfer path.
• DO NOT put weight on the foot rests.
• Transfer as far back into the seat or onto the bed/chair as possible.
Obstacles
Obstacles such as floor threshold strips, uneven floors, cords or items on the floor, or cracks
in pavements can damage your wheelchair and may cause loss of control or a tip over. Be
alert! Scan your path and avoid any items that may cause instability.
Curbs, Steps and Stairs
Do not attempt to negotiate curbs or single steps without assistance. Ask your healthcare
worker to provide instructions regarding safe wheelchair use for curbs, steps and stairs.
Proper body mechanics and awareness of the center of gravity is crucial for these
maneuvers. The step tubes at the back of the chair are utilized to tilt the transport chair
backwards until the balance point is achieved and the front casters clear the curb/step.
Gently lower the front wheels to the ground and slowly roll the transport chair forward until
the rear wheels roll up over the curb/step.
Extreme caution is required if it is absolutely necessary to maneuver an occupied chair up or
down stairs. Two assistants with adequate body strength and endurance must be present.
DO NOT lift the chair by any removable parts (i.e. swing-away footrests). Make sure the
hand grips are not loose. Techniques for going up or down steps should be received from a
health care professional familiar with wheelchair use and practiced before attempting to
transport on stairs. If at all possible, an alternate means of transport up or down stairs is
recommended.
10
GUIDELINES:
SAFETY & HANDLING OF WHEELCHAIRS
Ramps / Inclines
The assistant must know their capabilities and limitations in terms of strength and endurance
before attempting to go up or down a ramp. Slopes will change the center of gravity. DO
NOT attempt to negotiate steep inclines greater than 10% (6 degrees, or one foot of rise or
fall for every ten feet of ramp length) without an experienced assistant. Use of anti-tip
devices are encouraged (available only for MDS808200SLR /C models), however, they may
not prevent a tip-over. Sometimes anti-tip devices may catch at the beginning of a ramp. If
this occurs, they will need to be disengaged and extra care should be taken. Backpacks or
other gear on the back of the wheelchair will cause it to tip backward more easily. Training
and practice negotiating ramps with a healthcare professional is recommended.
• Go as straight up or down the incline as possible.
• Check the ramp for any obstacles, bumps, depressions, or wetness before beginning.
Ask for additional assistance if necessary.
• Stay in the center of the ramp if possible.
• Avoid changing direction while on the ramp as this may cause loss of control of the
wheelchair.
• Avoid stopping on a ramp. Stopping may cause loss of control of the wheelchair. If
stopping is necessary, avoid sudden, abrupt forward movement when you resume
propelling the chair as that could cause instability.
• When going up an incline, the occupant should lean forward. This will adjust the center
of gravity to counteract the tendency of the wheelchair to tip backward.
• When going down a ramp, the occupant should face forward and lean backward into the
seat. Descent should always be done slowly. DO NOT use wheel locks as brakes to
slow down or stop the chair. Attempting to use the wheel locks could result in accidental
locking, veering or tipping to one side, or suddenly stopping.
• When going down a steep incline, the assistant should turn the chair and go down
backwards to avoid tipping the occupant out of the chair.
Basic Information for Wheelchair Assistants / Transporters
Work with the wheelchair user’s healthcare professional or your institution to learn safe ways
to assist that are within your capability and comfort level. To prevent injury to yourself or the
chair occupant use good body mechanics:
• Always tell the rider what you intend to do so he/she is ready for your actions and can
assist with maintaining a balanced center of gravity for stability.
• Bend at the knees, not at the waist. Keep knees bent, not locked straight.
• Use legs for strength, not the weaker muscles of the back or arms. This will help prevent
back strain.
• Do not twist at the waist. Keep the torso facing the same direction as the hips and move
the feet to turn. This will help prevent back strain.
• Maintain a straight back. Hunching or rounding the shoulders can cause back strain.
• Do not hesitate to call for additional assistance if needed.
• If you do not feel comfortable with an activity you are requested to assist with (such as
negotiating a step or a steep incline), you may decline to assist and should help find
appropriate assistance for the occupant.
11
List of Contents
1. Transport Wheelchair
2. Foot rests
3. Manual & Tool Kit
GENERAL USE INSTRUCTIONS
OPENING AND FOLDING THE WHEELCHAIR
IMPORTANT NOTES:
There are potential finger pinch point areas at moving parts and between the seat
frame and the seat cradles on some models. When opening the wheelchair, take
care not to place your hand or fingers between the seat frame and the seat cradles
(if present) or on any other moving parts.
ALWAYS keep hands and fingers away from moving parts. DO NOT sit in the
wheelchair until the seat is completely in the open position. Risk of injury may
occur if care is not taken.
To OPEN the Chair
1. Hold onto one armrest and push the opposite side to open the chair.
2. With your fingers and thumbs pointed towards the inside of the wheelchair, push
downward on the seat to ensure the wheelchair is fully open. Keep hands and fingers
away from any moving parts.
Alternative method to open the chair:
1. Tilt the chair to one side by grasping the hand grip or arm nearest to you.
2. With fingers pointed away from the seat rail, push down on one side of the seat frame
/ rail until the wheelchair is fully open. Keep hands and fingers away from any
moving parts.
To CLOSE / FOLD the chair
1. Ensure the swing-away legrests are in the forward and locked position.
2. Fold the footplates up to the vertical position.
3. Using both hands, grasp the center of the seat upholstery at the front and back edge
and lift the seat up.
12
GENERAL USE INSTRUCTIONS
Alternative method to close the chair:
1.
2.
3.
4.
5.
Ensure the swing-away legrests are in the forward and locked position.
Fold the footplates up to the vertical position.
Grasp the handles/straps on each side of the seat.
Pull up until the chair is fully closed.
The handles can be used to carry the closed wheelchair.
Folding / unfolding the seat back
The top portion of the wheelchair seat back can be folded down for more compact
storage.
Caution: DO NOT use the wheelchair with the seat back in the folded down
position.
seat
back
release
lever
To fold the back down:
1. Push/pull down on the seat
back release lever on each
side of the chair back canes.
seat back
spring
button
locked in
full upright
position
seat back
release
assembly
2. Fold the top portion of the
seat back frame / upholstery
down.
To return the seat back to the
upright position:
seat back
1. Push the seat back up until the
seat back release assembly
spring buttons click fully into
the folding mechanism on both
sides. You should see the
spring buttons fully engaged
from the front of the seat back
canes.
seat back
spring
button
unlocked
2. Ensure the frame / handles are
locked securely into place
before using the chair for
transport.
13
GENERAL USE INSTRUCTIONS
WHEEL LOCKS
!
Ì
WHEEL LOCK WARNINGS
• Check the wheel locks to ensure proper function before using the chair. Wheel
locks should embed into the wheel at least 1/8 inch when engaged.
• Engage the wheel locks on both wheels before entering the chair, leaving the
chair, leaning forward in the chair or while being transported in an elevator or a
wheelchair lift.
• Check to make sure that the legrests do not unlock the wheel locks when they
are swung back.
• DO NOT use the wheel locks (or hand grip locks if present) to stop the
wheelchair from moving. Wheel locks are not brakes. DO NOT use the wheel
locks to slow your descent down an incline.
For models:
MDS808150, MDS808200
To Engage the Wheel Locks
• Push down on the wheel lock handle to LOCK the chair.
• Pull up on the wheel lock handle to UNLOCK the chair.
wheel
lock
handle
MDS808150
MDS808200
wheel
lock
14
GENERAL USE INSTRUCTIONS
WHEEL LOCKS
To Adjust the Wheel Locks for MDS808150, MDS808200
1. Loosen the bolt located on inside of Wheel Lock Assembly under seat.
2. Slide Wheel Lock Assembly to desired Height.
3. Tighten the bolt located on inside of Wheel Lock Assembly under seat
Front
Back
For models:
Side
MDS808210AR, MDS808210AB & MDS808210PC
To Engage the Wheel Locks
• Push down on the wheel lock handle to LOCK the chair.
• Pull up on the wheel lock handle to UNLOCK the chair.
wheel
lock
handle
MDS808210AR
MDS808210AB
MDS808210PC
wheel
lock
15
GENERAL USE INSTRUCTIONS
For models: MDS808200AR, MDS808200AB, MDS808200PC, MDS808200SLRR,
MDS808200SLBR, MDS808200SLRC & MDS808200SLBC
To Engage the Wheel Locks
• Pull up on the wheel lock handle to LOCK the chair.
• Push down on the wheel lock handle to UNLOCK the chair.
Wheel
Lock
Handle
MDS808200AR
MDS808200AB
MDS808200PC/PS/PW
MDS808200SLR
MDS808200SLRC
Wheel
Lock
To Adjust the Wheel Locks for MDS808200SLRR, BR, MDS808200SLRC, BC
1. Loosen the both bolts located on
inside of Wheel Lock Assembly
under seat.
2. Slide Wheel Lock Assembly to
desired Height.
3. Tighten the both bolts located on
inside of Wheel Lock Assembly
under seat
16
GENERAL USE INSTRUCTIONS
For models:
MDS808210AR, MDS808210AB, MDS808210PC
A. To Adjust the Wheel Lock Assembly to the wheel
4. Loosen the both bolts located on inside of Wheel Lock Assembly under seat.
5. Slide Wheel Lock Assembly to desired Height.
6. Tighten the both bolts located on inside of Wheel Lock Assembly under seat
B. To Adjust the Wheel Lock Assembly Cable to Handbrake
1. Loosen the cable retaining bolt
2. Pull cable to desired tightness
3. Tighten cable retaining bolt
17
GENERAL USE INSTRUCTIONS
For models: MDS808210AR, MDS808210AB, MDS808210PC
To use Locking Hand Grip Brakes
Handle grip wheel lock in open /
unlocked position.
Squeeze brake to hold chair in
stopped position.
Handle grip wheel lock in closed /
locked position.
To Lock, squeeze handle and with
other hand push lock forward.
Release handle while holding lock
forward.
To Release, squeeze handle.
Installing / Removing the Swing-away Legrest / Footrest Riggings
To Install the Riggings:
1. Hold the legrest rigging to the side of the wheelchair.
2. Install the legrest assembly hinge plates onto the hinge pins of the wheelchair
frame.
3. Push the legrest rigging to the front until it locks securely into place.
18
GENERAL USE INSTRUCTIONS
To Swing-away / Remove the Legrest assembly:
1. Fold the footplate up to the vertical position.
2. Release the legrest lock by pushing on the legrest lever.
3. Swing the legrest outward and to the side.
4. To remove the legrest, lift up on the assembly to remove the legrest off the
hinge pins.
SAFETY INSPECTION & MAINTENANCE
It is highly recommended that the transport wheelchair be taken to a qualified
dealer annually for a thorough inspection and maintenance / repair service.
GENERAL CARE
• Wipe off chrome / aluminum parts at least once per week using a clean, soft cloth.
• Clean all metal parts with auto wax or similar products.
• Dry the chair immediately if exposed to moisture.
• Do not use abrasive cleanser or materials that will scratch the finish of the chair.
• Clean the upholstery with a mild soap solution, rinse and wipe dry.
• Clean the hand grips with water only and dry thoroughly. Use of soap or
ammonia based cleaning solutions may loosen the grips.
MONTHLY CHECK LIST / TROUBLESHOOTING
General:
Inspect the entire wheelchair for broken parts, sharp edges and loose fasteners.
Ensure that everything works and the chair rolls straight without drag and does not
pull to one side. Replace or tighten parts as needed. Inspect for bent frame and
crossbars.
Frame and Crossbraces:
Check that the frame and crossbraces are not bent or dented. Check the tubing for cracks
and rust. If such issues are found, take the wheelchair to your local service dealer.
19
SAFETY INSPECTION & MAINTENANCE
Upholstery:
Inspect for any rips, tears or worn spots and replace as necessary. Inspect the
upholstery screws and assure that all are present and tight. Torn or worn
upholstery may not support the user’s weight and could result in a fall with serious
bodily injury.
Seat back:
Ensure the seat back folding mechanism is functioning properly and the seat back
locks securely in the upright position.
Armrests:
Check for cracks, looseness, or sharp edges.
Hand grips:
Ensure the hand grips are tight and secure on the handles. They should not move
or twist.
Footrests / Legrests:
Ensure the legrest assembly release works properly. Ensure the assembly
automatically locks securely into place when attached and will not accidentally
unlock.
Front Caster Forks:
Verify the forks swivel freely without binding. Check to ensure the casters roll freely
by lifting the chair and spinning the caster. The caster should come to a gradual
stop. If the nut is too loose, the caster will flutter or shimmy. If the nut is too tight,
the chair will be difficult to steer. Check the bearings and clean the fork stem
housing.
Front Casters and Rear Wheels:
Ensure the caster / wheel axle and nut are tight. The fork housing and the rear and
front wheels are constructed with low maintenance, sealed bearings to keep dirt out
and increase the durability of the chair. Bearings are also protected with an
additional bearing spacer component. Check that the wheels are not warped,
cracked or otherwise damaged and the spokes are not broken. Replace as
needed. Assure that the wheels spin freely. Replacement and maintenance of
wheel bearings should be completed by a qualified wheelchair technician only.
Front and Rear Tires:
Solid tires require minimal maintenance. They should occasionally be cleaned with
a damp cloth. Replace the tires if they become cracked, excessively worn, or have
flat spots.
20
MAINTENANCE
Installing / Removing Front Wheels
2. Remove wheel axle and nut.
3. Be sure to replace with the
proper size wheel.
4. Install wheel, axle, and nut.
Installing / Removing Rear Wheels
Warning:
After changing a rear wheel, check wheel locks for proper adjustment before
use.
1. Remove hubcap if present.
2. Remove wheel axle and nut.
3. Be sure to replace with the
proper size wheel.
4. Install wheel, axle, and nut.
5. Check wheel locks for proper
adjustment after changing the
wheel.
Wheel Locks
Check to ensure both locks engage correctly and embed in the tire at least
1/8 inch. If the lock is worn or damaged, it needs to be replaced. Make sure
the locking assembly is securely attached to the frame and the wheel will not
move when the lock is engaged. Make sure the wheel lock does not interfere
with wheel rotation when the lock is not engaged. See wheel lock adjustment
instructions in the General Use section.
21
MAINTENANCE
Hand grip wheel locks (select models):
Check to ensure the hand grips cause the wheel locks to engage correctly and
embed in the tire at least 1/8 inch. If the lock is worn or damaged, it needs to be
replaced. Make sure both the intermittent and full lock functions work by testing
the hand grips in both the up and down positions. Ensure the chair will not move
when the hand lock is engaged. Make sure the wheel lock does not interfere
with wheel rotation when the lock is not engaged. See wheel lock adjustment
instructions in the General Use section.
Cautions:
Use only Medline Industries authorized accessories and parts.
DO NOT modify the wheelchair. Examples: drilling holes, grinding, welding
parts, using non-authorized / non-approved parts. Such modifications may
change the chair’s structure and center of balance which may increase the risk
of serious injury to the user and void the warranty.
Medline Limited Warranty
Medline has great confidence in the quality of our wheelchairs. That is why Medline
warranties for the original purchaser, that the frame of the wheelchair will be free
from defects in materials and workmanship for the life of the chair.
Medline also warranties the parts and upholstery on the wheelchair to be free from
defect in materials and workmanship for a period of one (1) year from date of
purchase by the original purchaser.
If within the warranty period any such product shall be proven to be defective, such
product shall be repaired or replaced, at Medline’s option.
This warranty does not cover device failure due to owner misuse or negligence, or
normal wear and tear.
All warranty claims must include the product in question unless otherwise
authorized by Medline.
For more information about your wheelchair, warranty or to reorder parts call
1-800-MEDLINE.
22
MAINTENANCE
SAFETY INSPECTION CHECKLIST
INITIALLY
ITEM
GENERAL
Chair rolls straight.
(no excessive pull to one side)
INSPECT /
ADJUST
WEEKLY
INSPECT /
ADJUST
MONTHLY
X
CLEANING
Wipe chrome parts with clean, soft cloth.
Auto wax / similar product on metal parts.
Clean upholstery with mild soap solution.
Use only water on hand grips.
Dry chair immediately when wet.
Do not use abrasive cleansers or cloths.
X
X
X
FRAME & CROSSBRACES
Inspect for loose or missing hardware.
Inspect for bent frame or crossbraces.
X
X
SEAT AND BACK UPHOLSTERY
Inspect for rips or sagging.
Inspect for loose or broken hardware.
X
X
FRONT CASTERS AND REAR WHEELS
Inspect wheel / fork assembly for proper tension
by lifting the chair and spinning the caster. It
should come to a gradual stop.
Loosen locknut if wheel wobbles / tighten locknut
if wheel binds to a stop.
Ensure wheel bearings are clean and free of
moisture.
REAR WHEELS
No excessive side movement or binding when
chair is lifted and wheels are spun.
FRONT AND REAR TIRES
Inspect for flat spots and wear.
X
X
X
X
X
X
X
X
X
X
X
X
X
X
X
X
X
X
X
HAND GRIP WHEEL LOCKS
Test in both complete and intermittent lock
positions. Ensure the chair does not move when
the locks are engaged.
X
X
X
X
X
X
FOLD DOWN SEAT BACK MECHANISM
Ensure the seat back folding mechanism works
smoothly and locks securely into place when seat
back is upright.
X
X
X
X
X
X
WHEEL LOCKS
Do not interfere with tires when rolling.
Pivot points free of wear and looseness.
Wheel locks easy to engage.
X
X
X
X
X
X
Take the transport chair to a qualified dealer annually for a thorough
inspection and maintenance / repair services.
www.Medline.com
© 2008 Medline is a registered trademark of Medline Industries, Inc.
Manufactured for Medline Industries, Inc., Mundelein, IL 60060 USA
Made in China 1-800-MEDLINE
23
INSPECT / ADJUST
PERIODICALLY