1
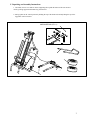
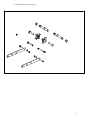
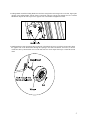
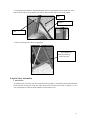
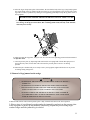
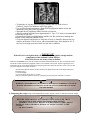
Pow‘R’kraft 4 Ton Cart Model Log Splitter Manual and Safety Instructions Model 65559 Table of Contents A. Introduction . . . . . . . . . . . . . . . . . . . . . . . .2 F. Operation . . . . . . . . . . . . . . . . . . . . . . . . .10 B. Log Splitter Specification . . . . . . . . .. . . . .2 G. Rem oval of logs jam m ed on the wedge . . .11 C. Unpacking and Assembly Instructions .. .3 H. How to change the hydraulic oil . . . . . 12 D. Special Safety Information . . . . . .. . . . . . .6 I. Sharpening the wedge . . . . . . . . . . . . . . .13 1. Safety Decals . . . . . . . . . . . . . . . . . .. . . .. . .6 2. Safety Warnings . . . . . . . . . . . . . . . . .. . . . . .7 3. Important extension cord information . .. . . .8 4. Always disconnect power cord from power source . . . . . . . . . . . . . . . . . . . . . . . . .8 5. Hydraulic Safety . . . . . . . . . . . . . . . . . . . . . .8 J. Transport . . . . . . . . . . . . . . . . . . . . . . . . .14 K. Maintenance . . . . . . . . . . . . . . . . . . . . . 14 L. Troubleshooting . . . . . . . . . . . . . . . . . . . .14 M. Storage . . . . . . . . . . . . . . . . . . . . . . . . . . 15 N. Mantis Warranty Policy . . . . . . . . . . . . .16 E. Before You Start Splitting . . . . . . . . . . . .9 A. Introduction B. Log Splitter Specification for Model #65559 The Pow’R’kraft log splitter is designed for residential (non-commercial) use and makes your job less physically demanding, more efficient and safer. With a log splitter, the log is split when pressed against a fixed splitting wedge by a pressure plate. An electric motor assembly provides the power for the system. The motor is connected to a hydraulic oil pump that creates a flow of high-pressure oil which runs to a solenoid valve. A switch set and the solenoid valve lets the operator actuate the hydraulic cylinder to split a log. An internal reservoir holds the hydraulic oil that feeds the pump. The hydraulic assembly is attached to the wheel frame assembly, making it easy to move the log splitter around with no lifting. The frame is equipped with folding handles for storage, pivoting support for stability and cord storage hooks for convenience. This log splitter is designed with safety in mind with two hand operating controls. The electrical motor is protected by a 15 amp circuit breaker. The pressure relief valve protects the hydraulic assembly. When the log is jammed, relief valve will prevent pressure from going over its maximum allowable level. M axim um O utput Force Total Stroke (in)- Ram Travel Recom nd. M ax. Log D iam eter Size Voltage M otor M otor H P H yd. Pressure H yd. O il Capacity M axim um Log Length W heel Size Total Weight LxWxH Factory Warranty 2 8,000 lbs (4 tons) 20” 12” 120V 1500W att 1.75hp 2320 P.S.I. 3.7 qt. 20” (520m m ) 10” 134 lbs (60 K g) 36” L x 21” W x 38” H 2 Years C. Unpacking and Assembly Instructions 1. Cut bands; remove cover and two inserts supporting the top and the bottom of the unit. Remove wheels, pivoting support and hardware bag from the box. 2. Put log splitter in the vertical position by holding the top of the beam and carefully lifting the top of the log splitter until it can stand. HARDW ARE BAG (Q TY=1) 3 3. Check contents of the hardware bag. 4 4. Folding Handle: Install the folding handle onto the frame using knobs and carriage bolts. To do this, align square opening of the folding handle with the frame’s round hole and insert carriage bolt through. Secure it with the handle knob. Repeat the same steps for the opposite side of the handle and tighten the knobs. 5. Installing Wheels: Insert the Wheel Shaft in the hub of the Wheel and secure it with the Nut provided. Slide the opposite side of the Wheel Shaft through the opening in the frame and bracket, then screw, it into the welded nut. Start by hand and then use a wrench and secure the wheel. Repeat these steps to install the second wheel. 5 6. Pivoting Support Installation: Align mounting hole of the Pivoting Support with the frame hole, insert Bolt and secure with Lock Nut. Repeat these steps to attach the other side of the Pivoting Support. Bolt Support Nut 7. Attach Connecting Link to the Pivoting Support. Secure Support by attaching connecting Link to the frame D. Special Safety Information 1. Safety Decals An important part of the safety system incorporated in this log splitter is the Warning Labels and Information Decals found on various parts of the unit. These decals must be replaced in time due to abrasion, etc. It is your responsibility to replace the decals when they become hard to read. 6 2. Safety Warnings WARNING WHEN USING THIS LOG SPLITTER, BASIC SAFETY PRECAUTIONS (INCLUDING THE FOLLOWING) SHOULD ALWAYS BE FOLLOWED TO REDUCE THE RISK OF FIRE, ELECTRIC SHOCK AND PERSONAL INJURY. • The Unit is to be operated by one person only! Keep in mind that the operator or user is responsible for accidents or hazards occurring to other people or their property. Always keep area clear of children, pets, and bystanders. • Never request the assistance of another person to help you remove a jammed log, or for any other reason. • Don’t allow children, incapable people, or people who are not familiar with these instructions to operate this log splitter. • Dress properly. Do not wear loose closing or jewelry that can be caught in moving parts. Long pants, non-slip gloves and sturdy work shoes with non-skid soles are recommended when working outdoors. Wear protective hair covering to contain long hair. • Keep the working area clean and free from obstructions, i.e. logs, split wood, etc. Cluttered areas invite injuries. • Work only in daylight or in good artificial light. • Always inspect your unit before each use and ensure that handles, guards and fasteners are secure and in place. • Never attempt to use an incomplete machine or one fitted with unauthorized modification. Any modifications to your machine can cause personal injuries, and will void your Warranty. • Check the log before splitting. It should be free from nails or wire that may fly out during splitting operation. This could cause personal injury or damage to the machine. The ends of the log should be cut as squarely as possible. • Never attempt to split more than one log at a time, unless the ram is fully extended, and you need the second log to complete the split of the first log. Do not attempt to load the log while the ram of the log splitter is in motion. You could get trapped and injured. • Keep your hands and body parts away from the open splits and cracks in the log. The wood can close in suddenly and cause injury. • Do not try to defeat or override any safety features. • Stay alert. Watch what you are doing. Use common sense. Do not operate machine when you are tired, ill, or under the influence of alcohol or other drugs. • Never leave the machine unattended when in use. • Do not use machine in an area were natural gas, gasoline fumes or flammable liquids are present. • Never open the switch boxes or motor cover. Never try to do any electrical repairs yourself. Contact a qualified electrician. • When log splitter is used outdoors, use only extension cords intended for outdoor use. • Always place log splitter on firm, level ground and block the w heels. IMPORTANT! ONLY OPERATE THE LOG SPLITTER WITH THE POWER CORD PLUGGED INTO A PROPERLY GROUNDED OUTLET THAT SUPPLIES THE CORRECT LINE VOLTAGE AND A MINIMUM OF 15 AMPS OF CURRENT. FOR ADDITIONAL PROTECTION, IT IS RECOMMENDED THAT A GFCI (GROUND FAULT CIRCUIT INTERRUPTER) OUTLET BE USED. 7 3. Important extension cord information • Make sure the extension cord is in good condition before use. • Based on the total length of cord that you are going to use, check the chart to make sure the cord meets the correct minimum cord gauge (AWG) requirements. IMPORTANT NOTE: USING AN UNDERSIZED CORD, A LARGER NUMBER CORD GAUGE (AWG) THAN RECOMMENDED IN THE CHART, OR AN EXCESSIVELY LONG CORD COULD CAUSE A LOSS IN POWER (VOLTAGE DROPS). THIS PREVENTS THE MOTOR FROM DEVELOPING ITS FULL POWER AND OVERHEATS THE UNIT AND WILL VOID YOUR WARRANTY. EXTENSION CORD CHART Length (feet) Cord Gauge (AWG) 0 to 25 25 to 50 14 12 • Don’t overload extension cords by plugging in appliances that draw a total of watts more than the rating of the cord. • Do not abuse the cord; never yank it to disconnect it from the socket or outlet. • Keep cord away from heat, oil and sharp edges. • Never expose log splitter to rain or operate in wet conditions, doing so will void your warranty. • Never attempt to move or reposition the log splitter by pulling the cord. • Don’t operate the log splitter with a damaged electrical or extension cord. • Never operate the log splitter unless the power cord is plugged into a properly grounded outlet that supplies 110-120V power, and a minimum of 15 amps of current. 4. Disconnect power cord from power source • When not in use • Before servicing • Before clearing blockages • Before checking, cleaning or working on the cutting portion of the unit. • When you need to move or reposition machine. • Whenever you leave the unit 5. Hydraulic safety Periodically check for hydraulic fluid leaks by placing a sheet of cardboard under the wood splitter when system is running. WARNING NEVER USE YOUR HAND OR ANY PART OF YOUR BODY TO CHECK FOR HYDRAULIC SYSTEM LEAKS WHILE SYSTEM IS PRESSURIZED. ESCAPING PRESSURIZED FLUID CAN HAVE ENOUGH FORCE TO PENETRATE SKIN AND CAUSE SERIOUS INJURY. 8 WARNING NEVER CHECK HYDRAULIC FLUID LEVEL WHILE MOTOR IS RUNNING OR WHILE THE TANK IS STILL WARM AFTER THE MOTOR IS SHUT OFF. HOT PRESSURIZED FLUID CAN ESCAPE THROUGH THE OPENING AND CAUSE SERIOUS INJURY. BEFORE PERFORMING ANY MAINTENANCE, BE SURE THAT: • LOG SPLITTER IS DISCONNECTED FROM THE POWER SOURCE • PUSHER PLATE IS FULLY RETRACTED (RETURNED TO THE LOWEST POSITION) AND NO RESIDUAL HYDRAULIC ENERGY IS LEFT IN THE SYSTEM • OIL HAS COOLED • Failure to comply in any way with these instructions, improper use of the log splitter and improper maintenance operations may result in serious injury and void warranty. • Manufacturer shall not be liable for any injuries or damage occurred as a result of improper use or improper maintenance of the log splitter. E. Before you start splitting • Before each use, inspect your unit and ensure that all handles, guards and fasteners are secure and in place. Be sure that all electrical cords are not damaged or broken. • Before use of the log splitter, check it for alignment of moving parts, free running of moving parts, breakage of parts, mounting and any other conditions that may affect its operation. WARNING BLOCK WHEELS TO PREVENT SUDDEN MOVEMENT. • Inspect hydraulic fluid level. Cycle the unit a few times. Then remove the dipstick using an Hex Key wrench, clean the dipstick and insert it to check the oil level. It should be between the two notches on the stem. If level is low, add recommended type of the hydraulic oil. See Page If the level is too high, poor out a little at a time into a suitable container. • Reinstall the dipstick and the o-ring seal. Be careful not to damage the threads of the plug and aluminum top cover. • Break wood in the direction of the grain, never place wood across the log splitter. • Do not hold the log by the ends when you are positioning it onto the log splitter. • Any damaged part of the log splitter should be properly repaired or replaced unless otherwise indicated in this instruction manual. • Do not use the log splitter if the switch does not turn it ‘on’ and ‘off’. • Lubricate ram, vertical beam and guides to reduce wear. Use #2 Lithium grease. 9 NOTE: We recommend that wood be left to air dry, as it will make the splitting process much easier and faster. Wood which is well seasoned also produces up to 44% more heat than green wood. Several things can limit the splitting capacity of the log splitter: knotty wood, wood with twisted grain, or a stump with roots. The more of these characteristics present in a piece of wood, the more difficult it will be to split. A knot is that portion of a branch that has become incorporated in the bole of a tree. The influence of a knot on the mechanical properties of a wood member is due to the interruption of continuity and change in the direction of wood fibers associated with the knot. The diameter of a log does not necessarily indicate the difficulty of the split. A larger log can be split easier than a smaller log, if its fiber is straight. THE PRESSURE RELIEF VALVE PROTECTS THE HYDRAULIC ASSEMBLY. WHEN THE LOG IS JAMMED, THE RELIEF VALVE WILL PREVENT PRESSURE FROM GOING OVER ITS MAXIMUM ALLOWABLE LEVEL. THE PRESSURE PLATE SLOWLY TRAVELS DOWN AND CAN BE IMMEDIATELY RE-ACTIVATED. IF THE LOG DOES NOT SPLIT IMMEDIATELY, DO NOT FORCE THE PRESSURE PLATE OF THE LOG SPLITTER. STOP THE LOG SPLITTER, REPOSITION THE LOG BY TURNING IT AND TRY AGAIN. IF THE WOOD STILL CAN NOT BE SPLIT, IT MEANS THAT THE LOG EXCEEDS THE CAPACITY OF THE MACHINE AND IT SHOULD BE REJECTED. Overloading or abusing your log splitter can cause premature failure, can result in injury, and void your warranty. Use common sense. • Always be sure to stand inside the Operator Zone when running your log splitter. F. Operations 1. Place Log Splitter on firm leveled ground and block wheels to prevent them from rolling. 2. Find the Air Bleed Wing Screw on the top of the machine and loosen it by turning 3 -4 times. Caution-Do Not Over Tighten 3. Connect the electric cord of the log splitter to the power source or proper extension cord (see “Extension Cord Chart”) 4. Before starting the splitting operation, cycle pressure plate of the log splitter three to four times back and forth by pushing and releasing switches, to help remove any air that may have mixed into the hydraulic fluid during handling, storage, etc. Always warm up the unit before use during cold weather by cycling 4 -5 times more. Oil is incompressible; therefore, to ensure the efficiency of the log splitter, it is important that the hydraulic system does not contain air bubbles. If there is an air bubble in the system, the force applied gets used compressing the air bubble rather than moving the piston. This can compromise the efficiency of the system. 10 5. Place the log on the pressure plate of the machine. Be sure that the body of the log is lying firmly against the vertical beam of the log splitter and the end of the log is well supported by the pressure plate. If the log tends to wobble, reposition it by turning it. The supporting guides help to keep the log at the center or the log splitter. MAXIMUM LOG SIZE FOR THE POW’R’KRAFT LS4T IS 20” LONG X 12” DIA. • If the log moves away from the beam, retract the pressure plate and turn the log 90 degrees. Do not force the log on the tip part of the blade; this can damage blade welds, the body of the machine, and void your warranty. 6. While operating the log splitter, always be sure of a safe and secure operating position and stand inside of the Operator Zone. 7. Activate pressure plate, by depressing both switch and lever keeping hold of them until split pieces of the log fall away. Then, release them. This will cause the pressure plate to retract to its starting position. 8. When the job is finished and you are ready to store your log splitter, tighten the bleed screw to prevent oil leakage during storage time. G. Removal of logs jammed on the wedge WARNING • NEVER REQUEST THE ASSISTANCE OF ANOTHER PERSON TO HELP YOU REMOVE A • JAMMED LOG! NEVER REMOVE LOG JAMMED ON THE SPLITTING WEDGE WITH YOUR HANDS! • KEEP YOUR HANDS AND BODY PARTS AWAY FROM THE OPEN SPLITS AND CRACKS IN THE LOG. THE WOOD CAN CLOSE IN SUDDENLY AND CAUSE INJURY. • NEVER TRY TO REMOVE THE JAMMED LOG BY HITTING IT WITH A HAMMER OR ANY OTHER OBJECT; THIS CAN DAMAGE THE HYDRAULIC PUMP COVER, MOTOR COVER OR OTHER PARTS OF THE LOG SPLITTER. 1. Release both switches and wait until pressure plate is fully retracted and returns in the lowest position. 2. Place a piece of wood shaped as wedge under the jammed log and activate the pressure plate of the log splitter to push it up and under the jammed log. Repeat this process using larger wooden wedges until the jammed log is released. 11 H. How to change the hydraulic oil Oil should be changed after every 100 hours of operation. The drain port/dipstick is located at the end of the unit Recommended Oil Types: Shell Tellus T22 Aral Vitam GF22 SP Energol HCP22 Mobil DTE11 or equivalent IMPORTANT! DO NOT MIX FLUID BRANDS AND TYPES! DO NOT USE OTHER GRADE OILS. W A R N IN G BEFO R E PER FO R M IN G A N Y M A IN TEN A N C E BE SU R E TH AT: • LOG SPLITTER IS DISCONNECTED FROM THE POWER SOURCE. • PUSHER PLATE IS FULLY RETRACTED (RETURNED TO THE LOWEST POSITION) AND NO RESIDUAL HYDRAULIC ENERGY IS LEFT IN THE SYSTEM. • OIL HAS COOLED. • YOUR MACHINE IS CLEAN. DO NOT CONTAMINATE HYDRAULIC FLUID. CONTAMINANTS OF HYDRAULIC FLUID INCLUDE SOLID PARTICLES, AIR, WATER OR ANY OTHER MATTER THAT IMPAIRS THE FUNCTION OF THE FLUID. CONTAMINATION ACCELERATES WEAR OF HYDRAULIC COMPONENTS. 12 • To drain the oil, tip unit, place an empty container that can hold at least 1 Gallon (4 Liters) of oil under the end of log splitter. • Use an Allen Wrench and remove Drain Port Plug/Dipstick and the seal in the aluminum cover plate of the log splitter. • Wait until the oil completely drains from the oil reservoir. • After the used oil is drained, pour approximately 3.7qts. (3.15 liters) of recommended oil into the Oil Fill Port. • Reinstall the Drain Port Plug/Dipstick and the seal. Be careful not to damage the threads of the Aluminum Bottom Cover. • Clean the Dipstick and insert it to check the oil level; it should be between the two notches on the stem. If level is low, add recommended type of the hydraulic oil. If the level is too high, pour out a little at a time into a container. IMPORTANT! If the oil level is too high the heat will not be dissipating quickly enough and the temperature of the hydraulic system will rise. If the oil level is too low it may cause cavitation*. *Reference: Cavitation occurs when the volume of hydraulic fluid demanded by any part of a hydraulic circuit exceeds the volume of fluid being supplied. If there is an air bubble in the system, the force applied gets used compressing the air in the bubble rather than moving the piston. This affects the efficiency of the system. In this case, Force (Rated 4 tons) will be cut down. • Reinstall the Dipstick and the seal. Be careful not to damage the threads of the Dipstick Plug and Aluminum Cover. • Clean thoroughly. • Loosen air bleed screw, turn 3 to 4 times. • Purge air from the hydraulic system by cycling the pressure plate back and forth 3 to 4 times. DUMPING USED HYDRAULIC OIL IN THE ENVIRONMENT IS FORBIDDEN. THE FLUID MUST BE DISPOSED IN ACCORDANCE WITH THE LOCAL ENVIRONMENTAL RULES AND PROCEDURES. I. Sharpening the wedge using a fine-toothed file to remove any burs, nicks, or flat spots from the wedge. BEFO RE PERFO RM ING A NY M AINTEN A NCE BE SU RE TH AT: • LOG SPLITTER IS DISCONNECTED FROM POWER SOURCE. • PUSHER PLATE IS FULLY RETRACTED (RETURNED TO THE LOWEST POSITION) AND NO RESIDUAL HYDRAULIC ENERGY IS LEFT IN THE SYSTEM. • OIL HAS COOLED. 13 J. Transport Log Splitter is equipped with two 10” diameter Wheels to make it easier to move around. If you would like to move your log splitter to different locations, secure the unit during transport to prevent damage or injury. Always tighten the bleed screw to prevent oil spill K. Maintenance WARNING! Before performing any maintenance be sure that: Log splitter is disconnected from power source. Pusher plate is fully retracted Oil has cooled Before each Use Inspect hydraulic fluid level (see page 9) Inspect log ram, vertical beam, and guides Grease using #2 Lithium Grease Inspect/Sharpen Splitting wedge (see page 13) Inspect/Tighten Nuts, Bolts, and Hardware Visually Inspect All welds Check Alignment of moving parts and for damaged or worn parts Inspect Electrical Cord Inspect Extension Cord (when applicable) After Each Use Clean/Lubricate Every 100 Hours of Operation Replace Hydraulic Oil (see page 12) L. Troubleshooting Problem – Log Fails to Split Possible Cause o Incorrect Positioning of Log Reposition Log Problem – Log Fails to Split Possible Cause o Log exceeds permitted dimensions or the wood is too hard for the capacity of the machine Reduce log Size Problem – Log Fails to Split Possible Cause o Wedge has burs, nicks, or flat spots and needs to be sharpened Sharpen the splitting wedge (see page 12) Problem – Log Fails to Split Possible Cause o Oil Level is Low Check and Adjust Hydraulic Fluid Oil Level (see page 9) Problem – Log Fails to Split Possible Cause o Leak of Hydraulic Oil Hydraulic Pressure is too low Place a piece of cardboard under the log splitter to locate the leak. Worn components should be replaced. 14 L. Troubleshooting Continued Problem – Pressure Plate Advances with a Jerky Motion or with Strong Vibration Possible Cause o Air in the Hydraulic System Open bleed screw, and cycle pressure plate of log splitter three to four times back and forth to help remove any air that may have mixed into the hydraulic fluid. Problem – Pressure Plate Advances with a Jerky Motion or with Strong Vibration Possible Cause o Hydraulic Fluid Level is Low Check and Adjust Hydraulic Fluid Oil Level (see page 9) Problem – Slow Pressure Plate Response Possible Cause o Hydraulic Fluid Oil Level is Low Check and Adjust Hydraulic Fluid Oil Level (see page 9) Problem – Hydraulic Fluid Leak Possible Cause o Bleed Screw was not tightened before machine was moved Tighten Bleed Screw before Moving Splitter Problem – Hydraulic Fluid Leak Possible Cause o Worn hydraulic Oil Seals Contact Qualified Hydraulic Mechanic M. Storage 1. 2. 3. 4. 5. Clean unit Lubricate for Rust Prevention Tighten Air Bleed Screw Fold in the Handle (optional) Store Indoor in a shelter/dry area not accessible to children 15 Betst Products, LLC. / Pow’R’kraft Log Splitter WARRANTY & REGISTRATION TIYA Lawn & Garden Products warrants to original Purchaser that its product is free from major defects in material under normal use and service for a period of 2 Years from the date the product is purchased. Warranty Void if product has been disassembled by unauthorized personnel. TIYA Lawn & Garden Products obligation under this warranty is to repair or replace defective product upon approval of our USA Agent; Betst Products 83371 Melton Rd. N., Creswell OR 97426 that Warranty Claim is Valid. Product shall be returned upon request of Betst Products. Transportation charges to be prepaid by seller. TIYA Lawn & Garden Products assumes no responsibility for outside labor. THE GOODS SOLD PURSUANT TO THIS AGREEMENT ARE SOLD AS IS BY AGENT BETST PRODUCTS. BETST PRODUCTS MAKES NO WARRANTY. THE ONLY WARRANTY IS THAT OF THE MANUFACTURER AND THE PURCHASER MUST LOOK SOLELY TO THE MANUFACTUERER FOR WARRANTY. THERE SHALL BE NO LIABILITY FOR PRODUCT LIABILITY OR LIABILITY ON THE PART OF BETST PRODUCTS FOR OR TIYA LAWN & GARDEN PRODUCTS ANY GENERAL, SPECIAL OR CONSEQUENTIAL DAMAGES ARISING OUT OF THE SALE OR USE OF ANY PRODUCTS SOLD HEREUNDER. BETST PRODUCTS & TIYA LAWN & GARDEN PRODUCTS MAKES NO WARRANTIES, EXPRESS OR IMPLIED, (INCLUDING, BUT NOT LIMITED TO, ANY WARRANTY OF MERCHANTABILITY OR FITNESS OF THE PRODUCTS FOR ANY PURPOSE) WITH RESPECT TO THE PRODUCTS COVERED BY THIS AGREEMENT EXCEPT AS IN THIS PARAGRAPH OTHERWISE EXPRESSLY PROVIDED. THIS IS THE SOLE AND ONLY WARRANTY OF POW’R’KRAFT LOG SPLITTER AND NO OTHER WARRANTY IS APPLICABLE, EITHER EXPRESSED OR IMPLIED, IN FACT OR BY LAW, INCLUDING ANY WARRANTY AS TO MERCHANTABILITY OR FITNESS FOR A PARTICULAR USE OR PURPOSE. This warranty shall not be interpreted to render TIYA Lawn & Garden Products or our USA agent liable for injury or damages of any kind or nature, direct, consequential, or contingent, to person or property. The sole and only remedy in regard to any defective products shall be the replacement thereof herein provided, and neither TIYA Lawn & Garden Products nor our agent Betst Products shall not be liable for any consequential, special, incidental or punitive damages resulting from or caused by any such defects. TIYA Lawn & Garden Products reserves the right to make improvements in design or changes in specifications at any time, without incurring any obligations to owners of units previously sold. No one is authorized to alter, modify, or enlarge this warranty nor the exclusions, limitations, and reservation. 16 WARRANTY VOID IF REGISTATION IS NOT MAILED WITHIN 15 DAYS OF PURCHASE DATE REGISTRATION Log Splitter Model # _____________________ Purchase Date___/___/___ Purchased From: _____________________________ Owner Name: _______________________________________ Owner Address: _______________________________________ City: ________________________ County: ___________ ST: ______ Zip Code: _____________ Phone: ____________________ Email: _____________________ Attach a Copy of Purchase Receipt Acceptance of responsibility: I (Purchaser) have read operators manual and Limited Warranty or someone has read/and explained all instructions to me. I understand this warranty does not cover any labor and that all disputes will be settled by binding arbitration. Warranty void if any attempt to repair or replace defective parts has been made by unauthorized personnel. I have received my Operators Manual and fully understand my requirements. The mark next to each item below confirms my acceptance of responsibility for the use and maintenance of this Log Splitter. I understand that I alone am responsible for proper maintenance, care and safe operation of this Log Splitter. __ Received and read or will read Operators Manual Specifically Safe Operation section __ Specifications accepted __ Controls understood __ Maintenance Requirements understood __ Storage of Log Splitter I (purchaser) also understand that persons not familiar with the operation of this equipment should not be allowed to use it. Children especially should not operate or be near equipment. ANYONE OPERATING EQUIPMENT SHOULD HAVE READ ALL EQUIPMENT OPERATIONS MANUALS AND SAFETY MANUALS. Is Log Splitter used in a business __ NO ___ YES If yes business type _________________ Owners Signature: x ____________________________________________ Date: ___/___/___ It is recommended that a copy of the registration be given to the seller. You must sign this warranty and mail copy to Betst Products, 83371 Melton Rd N.#3, Creswell OR 97426. This warranty is not effective unless the Purchaser mails this Registration and Warranty Form within 15 days of purchase. NOTE: The Manufacturer may refuse warranty of any kind unless Betst Products receives a completed, legible and signed warranty registration. It is the responsibility of the purchaser to assure that this registration document is received by Betst Products. 17