1
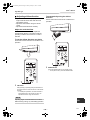
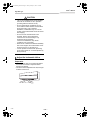
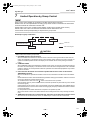
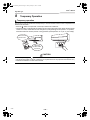
+001111053801_00Ta.book Page 1 Friday, January 21, 2011 3:52 PM AIR CONDITIONER (MULTI TYPE) Owner’s Manual Indoor Unit Model name: High Wall Type MMK-AP0073H2UL MMK-AP0093H2UL MMK-AP0123H2UL MMK-AP0153H2UL MMK-AP0183H2UL MMK-AP0243H2UL Owner’s Manual Manuel du propriétaire 1 English 29 Français +001111053801_00Ta.book Page 1 Friday, January 21, 2011 3:52 PM Owner’s Manual High Wall Type Thank you very much for purchasing TOSHIBA/Carrier Air Conditioner. Please read this owner’s manual carefully before using your Air Conditioner. • Obtain the “Owner’s manual” and “Installation manual” from constructor or dealer. Request to constructor or dealer • Please clearly explain the contents of the Owner’s manual and hand over it. NOTE This manual describes operations of the indoor unit and the wireless remote control. For details of the wired remote control and the outdoor unit, refer to the Owner’s manual supplied with the outdoor unit. (Keep these manuals carefully.) ADOPTION OF NEW REFRIGERANT This Air Conditioner uses R410A an environmentally friendly refrigerant. Contents 1. Precautions for Safety . . . . . . . . . . . . . . . . . . . . . . . . . . . . . . . . . . . . . . . . . . . . . . 2 2. System Characteristics . . . . . . . . . . . . . . . . . . . . . . . . . . . . . . . . . . . . . . . . . . . . . 5 3. Energy Saving Recommendations . . . . . . . . . . . . . . . . . . . . . . . . . . . . . . . . . . . . 7 4. Accessories . . . . . . . . . . . . . . . . . . . . . . . . . . . . . . . . . . . . . . . . . . . . . . . . . . . . . . 8 5. Part Names . . . . . . . . . . . . . . . . . . . . . . . . . . . . . . . . . . . . . . . . . . . . . . . . . . . . . . . 8 6. Wireless Remote Control. . . . . . . . . . . . . . . . . . . . . . . . . . . . . . . . . . . . . . . . . . . 10 6-1.Part Names of Remote Control . . . . . . . . . . . . . . . . . . . . . . . . . . . . . . . . . . . 10 6-2.Adjusting Clock . . . . . . . . . . . . . . . . . . . . . . . . . . . . . . . . . . . . . . . . . . . . . . . 13 6-3.The Degree Celsius (°C) Display . . . . . . . . . . . . . . . . . . . . . . . . . . . . . . . . . 14 6-4.Handling the Remote Control . . . . . . . . . . . . . . . . . . . . . . . . . . . . . . . . . . . . 14 6-5.Wireless Remote Control . . . . . . . . . . . . . . . . . . . . . . . . . . . . . . . . . . . . . . . 15 7 Limited Operation by Group Control . . . . . . . . . . . . . . . . . . . . . . . . . . . . . . . . . 22 8 Temporary Operation. . . . . . . . . . . . . . . . . . . . . . . . . . . . . . . . . . . . . . . . . . . . . . 23 9. Maintenance . . . . . . . . . . . . . . . . . . . . . . . . . . . . . . . . . . . . . . . . . . . . . . . . . . . . . 24 10 Troubleshooting . . . . . . . . . . . . . . . . . . . . . . . . . . . . . . . . . . . . . . . . . . . . . . . . . . 27 1-EN –1– +001111053801_00Ta.book Page 2 Friday, January 21, 2011 3:52 PM Owner’s Manual High Wall Type 1. Precautions for Safety The manufacturer shall not assume any liability for the damage caused by not observing the description of this manual. DANGER • Only a qualified installer or service person is allowed to do installation work. Inappropriate installation may result in water leakage, electric shock or fire. • Do not disassemble, modify, repair or move the product yourself. Ask a qualified installer or service person to do any repairs or to move the product. • Opening or removing the cover will expose you to dangerous voltage. • Turning off the power supply will not prevent potential electric shock. WARNING Installation • Electrical work must be performed by a qualified installer or qualified service person in accordance with this installation manual. An insufficient power supply capacity or inappropriate installation may cause fire. • Do not use any refrigerant different from the one specified for complement or replacement. Otherwise, abnormally high pressure may be generated in the refrigeration cycle, which may result in a failure or explosion of the product or an injury to your body. • Connect ground wire. (grounding work) Incomplete grounding may cause an electric shock. Do not connect ground wires to gas pipes, water pipes, lightning rods or ground wires for telephone wires. • When the air conditioner is installed in a small room, provide appropriate measures to ensure that the concentration of refrigerant leakage occur in the room does not exceed the critical level. Consult the dealer from whom you purchased the air conditioner when you implement the measures. Accumulation of highlyconcentrated refrigerant may cause an oxygen deficiency accident. • Check whether the piping work has been properly completed. When existing pipes are used and if they are not constructed properly, the refrigerant gas may leak. Contact the installation company and confirm that the piping work has been properly completed. For details of installation of the air conditioner, refer to the Installation Manual. Use tools and piping materials for R410 only. Failure to do so or improper installation may cause a burst of pipe, resulting in injury. EN –2– 2-EN +001111053801_00Ta.book Page 3 Friday, January 21, 2011 3:52 PM Owner’s Manual High Wall Type Operation • Cleaning of the air filter and other parts of the air filter involves dangerous work in high places, so be sure to have a service person do it. • Avoid cooling the room too strong or exposing the human body to cool breeze for a long time as it is bad for the health. • Do not insert your finger or a stick into the air intake or outlet. Doing so may result injury as the fan is rotating at high speed inside the unit. • Do not spill water or other liquid on the indoor unit. If the unit is wet, it may cause an electric shock. • If there is kind of trouble (such as when an error display has appeared, there is a smell of burning, abnormal sounds are heard, water is leaking) has occurred in the air conditioner, do not touch the air conditioner yourself but set the circuit breaker to the OFF position, and contact a qualified service person. Take steps to ensure that the power will not be turned on (by marking “out of service” near the circuit breaker, for instance) until qualified service person arrives. Continuing to use the air conditioner in the trouble status may cause mechanical problems to escalate or result in electric shocks or other trouble. Relocation and repairs • When the air conditioner cannot cool or heat a room well, contact the dealer from whom you purchased the air conditioner as refrigerant leakage is considered as the cause. In the case of repair that requires refill of refrigerant, ask service personnel about details of the repair. The refrigerant used in the air conditioner is harmless. Generally, the refrigerant does not leak. However, if the refrigerant leaks in a room and a heater or stove burner in the room catches fire, it may generate toxic gas. When you ask service personnel for repairing refrigerant leakage, confirm that the leakage portion has been completely repaired. • Do not disassemble, modify, repair or move the product yourself. Doing so may cause fire, electric shock, injury or water leaks. Ask a qualified installer or service person to do any repairs or to move the product. CAUTION Installation • Certainly lay the drain hose for perfect draining. Wrong drainage may cause flooding in the house and getting furniture wet. • Use an exclusive power supply circuit for air conditioner at the rated voltage. Capacity shortage of the power supply or inappropriate work may result in electric shock or fire. • Do not install in a location where flammable gas leaks are possible. If the gas leak and accumulate around the unit, it may ignite and cause a fire. Operation • Carefully read this manual and the manual supplied with the outdoor unit before starting the air conditioner. The manual includes many important things for daily operation. • Do not use this air conditioner for special purpose such as preserving food, precision instruments, art objects, breeding animals, vehicle or vessel. • Do not install this air conditioner in a special-purpose room such as a ship or any kind of vehicle, otherwise it deteriorates the machine performance. 3-EN –3– +001111053801_00Ta.book Page 4 Friday, January 21, 2011 3:52 PM Owner’s Manual High Wall Type • When the air conditioner is operated together with a combustion appliance in the same place, adequately ventilate the room. Poor ventilation may causes oxygen shortage. • When the air conditioner is used in a closed room, adequately ventilate the room. Poor ventilation may causes oxygen shortage. • Do not operate the buttons with wet hands. Doing so may cause electric shock. • Do not place any combustion appliance in a place where it is directly exposed to wind of the air conditioner; otherwise, it may cause imperfect combustion. • If the air conditioner will not be used for a considerably long time, turn off the main switch or the circuit breaker, for safety. Disconnection from the power supply prevents the unit from lightning and power source surge. • Do not put a water container such as a vase on the unit. Water intrusion into the unit may occur and it may cause deterioration of electric insulation and result in electric shock. • Do not wash the air conditioner. Doing so may result in electric shock. • Do not use alcohol, benzene, thinner, glass cleaner or polishing powder for cleaning the unit. They deteriorate or damage the air conditioner. • When cleaning the unit, turn off the main switch or circuit breaker beforehand for preventing you from getting injured by the electric fan running inside. For details of cleaning method, refer to “Maintenance”. • To make the air conditioner operate in its original performance, operate it within the range of the operating temperature specified in the instructions. Otherwise it may cause a malfunction, or water leak from the unit. • Do not climb onto or place objects on top of the outdoor unit. You may fall or the objects may fall off of the outdoor unit and result in injury. EN –4– 4-EN +001111053801_00Ta.book Page 5 Friday, January 21, 2011 3:52 PM Owner’s Manual High Wall Type 2. System Characteristics Air conditioner operating conditions For proper performance, operate the air conditioner under the following temperature conditions: Cooling operation Outdoor temperature : 23 °F to 109.4 °F (-5 °C to 43 °C) * Room temperature : [CAUTION] Heating operation 69.8 °F to 89.6 °F (21 °C to 32 °C) (Dry bulb temperature), 59 °F to 75.2 °F (15 °C to 24 °C) (Wet bulb temperature) Room relative humidity – less than 80 %. If the air conditioner operates in excess of this figure, condensation may occurs on the surface of the air conditioner. Outdoor temperature : -5 °F to 59.9 °F (-15 °C to 15.5 °C) (Wet bulb temperature) Room temperature : 59 °F to 82.4 °F (15 °C to 28 °C) (Dry bulb temperature) If air conditioner is used outside of the above conditions, safety protection may work. Check before operation • Turn on the power switch at least 12 hours before starting operation. • Connect the ground wire securely. • Attach the air filter to the indoor unit. Heating performance • A heat pump system, which gathers outside heat and emits it into a room, is used for heating. When the outside air temperature falls, the heating capacity of the unit is reduced. • When the outside temperature is low, it is recommended that you also use other heating equipment. Defrosting during heating • If frost falls on the outdoor unit during heating, defrosting is automatically performed (for approximately 2 - 10 minutes) to increase the heating effect. • The fan of the indoor unit is stopped during defrosting. 3-minute protection The outdoor unit will not operate for approximately 3 minutes after the air conditioner has been immediately restarted after stopping, or the power switch has been turned on. This is to protect the system. Auto restart The unit will stop after a power failure. • The unit will restart automatically in the same operating mode as before the power failure when the power is restored. Fan rotation of a stopped indoor unit • While other indoor units operate, the fans on indoor units in stand-by mode rotate for several minutes approximately once per one hour to protect the machines. Protective device (High pressure switch) The high pressure switch stops the air conditioner automatically when excessive load is applied to the air conditioner. If the protective device activates, the unit’s running stops and the operation lamp blinks. The protective device may activate in the following cases: 5-EN –5– +001111053801_00Ta.book Page 6 Friday, January 21, 2011 3:52 PM Owner’s Manual High Wall Type During cooling • When the air intake or air discharge of the outdoor unit is blocked. • When strong wind blows continuously against the air outlet of the outdoor unit. During heating • When dust or dirt is excessively adhered to the air filter of the indoor unit. • When the air outlet of the indoor unit is blocked. NOTE When the protective device activates, turn off the power switch, remove the cause, and then restart running. Characteristics of heating • Air does not come out immediately after heating starts. Heated air comes out after 3 to 5 minutes (depending on the room/outside temperatures), after the indoor heat exchanger warms up. • When the outside temperature increases, the outdoor unit may stop. EN –6– 6-EN +001111053801_00Ta.book Page 7 Friday, January 21, 2011 3:52 PM Owner’s Manual High Wall Type 3. Energy Saving Recommendations Maintain room temperature at comfortable level Select a comfortable set point and minimize adjusting it. Clean, please. • Clean the filter every 2 weeks. • Keep doors and windows closed and open them only when necessary. • Use drapes, curtains, or shades to keep direct sun light from heating the room on very hot days. • Do not obstruct the return air grille. • Adjust the air flow direction for even air distribution in the room. Checks before operating Pl ea se clo s e • Check whether the ground wires are properly connected. • Check whether the air filters are installed. • Turn on the circuit breaker the initial startup or after an extended shut down. Blows upward d an ol Co W ar m air ir ya dr Air flow adjustment Blows downward 7-EN –7– +001111053801_00Ta.book Page 8 Friday, January 21, 2011 3:52 PM Owner’s Manual High Wall Type 4. Accessories Wireless Remote control 5. Remote control holder Batteries (two) Part Names Indoor unit 10 11 FILTER RESET TEST TIMER SET FAN MODE TIME SAVE VENT SWING/FIX UNIT LOUVER SET CL 3 1 5 1 2 3 4 5 Room temperature sensor Front panel Return air grille Air filter Air discharge 2 4 6 7 8, 9 6 Horizontal airflow louver 7 Vertical airflow louver 8 Display panel 9 Infrared signal receiver 10 Remote control (wireless) 11 Remote control (wired, sold separately) EN –8– 8-EN +001111053801_00Ta.book Page 9 Friday, January 21, 2011 3:52 PM Owner’s Manual High Wall Type Names and functions of indicators and controls on indoor unit CAUTION Disagreement in operation mode • This model is not equipped with the Automatic Operation feature. If Auto changeover control is selected with the mode selection button, “A” appears on the remote controller display. However, the alarm tone sounds twice from the air conditioner unit and the Timer (green) and Preheat/Defrost (orange) indications blink alternately on the Display panel to tell the Automatic Operation is not available. • When local prohibition is set by the central control from other equipment, no signal is received even if the remote control button is pressed. However, a signal of ON/OFF button is accepted. (An alarm sound “beep” arises intermittently five times.) Display panel 3 2 1 4 The operating conditions are indicated below. 1 OPERATION (Green) This lamp illuminates during operation. 2 TIMER (Green) This lamp illuminates white the timer reserved. NOTE When timer is set by wired remote controller, TIMER lamp does not illuminate. 3 Preheat/Defrost (Orange) This lamp illuminates when the power is turned on or right after heating operation starts or during defrost operation. 4 TEMPORARY operation If the wireless remote control is misplaced or lost or its batteries are exhausted, push the button. • Push the button to start the air conditioner. Push this button once again to stop it. 9-EN –9– +001111053801_00Ta.book Page 10 Friday, January 21, 2011 3:52 PM Owner’s Manual High Wall Type 6. Wireless Remote Control 6-1. Part Names of Remote Control 4 Wireless remote control and its functions Temperature button ( TEMP TEMP 1 13 5 2 3 16 6 7 14 9 15 12 11 10 8 CLR SLEEP SET ) ......... The set temperature is increased up to 86 ... °F (30 °C). ......... The set temperature is dropped down to 62 ... °F (17 °C). (A receiving beep is heard.) FAN button Use to select desired fan speed. When AUTO is selected, the fan speed is automatically adjusted according to the room temperature. The desired fan speed can be also manually selected from among five settings. (LOW , LOW+ , MED , MED+ , HIGH ) (A receiving beep is heard.) 4 5 TEMP TEMP 6 SWING button Use to select automatic swing or fixed louver position. 7 FIX button Use to adjust the louver direction. (A receiving beep is heard.) While this button is kept depressed, the receiving tone continuously sounds. 8 OFF TIMER button Use to set the OFF timer. 9 ON TIMER button Use to set the ON timer. 10 SET button Use to reserve time settings. (A receiving beep is heard.) 11 CLR button 1 Use to cancel ON timer and OFF timer. (A receiving beep is heard.) Infrared signal emitter 12 Hi POWER button Transmits a signal to the indoor unit. 2 ON/OFF button Use to start the high power operation. This function is not operated group control. Press the button to start operation. (A receiving beep is heard.) Press the button again to stop operation. (A receiving beep is heard.) If no receiving sound is heard from the indoor unit, press the button twice. 3 13 PRESET button Use to change the operation mode to the preferred operation mode memorized previously. To memorize the operation mode, press this button for at least 3 seconds during the preferred operation mode. is displayed and the operation mode is memorized. MODE button Use to select desired operation mode. Each time the button is pressed, a mode is selected in a sequence that illuminates from A : Auto changeover control, : Cool, : Dry, : Heat, : Fan only, and back to A. (A receiving beep is heard.) EN – 10 – 10-EN +001111053801_00Ta.book Page 11 Friday, January 21, 2011 3:52 PM Owner’s Manual High Wall Type Names and functions of indications on wireless remote control 1 Display 13 4 5 TEMP 2 3 16 6 7 14 9 15 12 11 10 8 CLR SLEEP SET All indications, except for clock time indication, are indicated by pressing the ON/OFF button. 1 3 2 8 9 6 10 7 5 4 • In the illustration, all indications are indicated for explanation. During operation, only the relevant indications will be displayed on the remote control. 1 Transmission mark This transmission mark ( ) displayed when the remote control transmits signals to the indoor unit. 2 The selected operation mode is displayed. (A : Auto changeover control, : Cool, : Heat, : Fan only) 14 SLEEP button Use to start the OFF timer operation that automatically adjusts the room temperature and the fan speed. The OFF timer time can be selected from four durations (1, 3, 5 or 9 hours). 3 16 QUIET button 4 Set temperature display FAN speed display Indicates the selected fan speed. AUTO or one of five fan speed levels (LOW , LOW+ , MED , MED+ , HIGH ) can be indicated. Indicates when the operating mode is : Dry. 5 TIMER and clock time display The time set for timer operation or clock time is indicated. The present time is always indicated except for TIMER operation. Use to start quiet operation. Pressing this button again will restore normal operation. 11-EN : Dry, The selected fan speed is displayed (62 °F to 86 °F (17 °C to 30°C)). When you set the operating mode to : Fan only, no temperature setting is indicated. 15 COMFORT SLEEP button Use to start the OFF timer operation that automatically adjusts the room temperature and the fan speed. The OFF timer time can be selected from four durations (1, 3, 5 or 9 hours). During group control operation, the set temperature and the fan speed are not automatically adjusted. Only off timer function is activated. Operation mode – 11 – +001111053801_00Ta.book Page 12 Friday, January 21, 2011 3:52 PM Owner’s Manual High Wall Type 1 3 2 8 9 6 10 Loading Batteries 7 5 4 1. Remove the battery cover. 2. Insert 2 new batteries (R03 [AAA]) following the (+) and (-) positions. Hi POWER display A C L 6 Preparation and check before use Displayed when the high power operation starts. Press the Hi POWER button to start and press it again to stop the operation. 7 (PRESET) display Displayed when memorizing the preferred operation mode or when it has been memorized. Also, this icon is indicated when the memorized preferred operation is displayed. 8 (COMFORT SLEEP) display Displayed during the OFF timer operation that automatically adjusts the room temperature and the fan speed. Each time the COMFORT SLEEP button is pressed, the display changes in the sequence of 1h, 3h, 5h, and 9h. 9 (QUIET) display Displayed during the quiet operation. 10 Swing display Displayed during the swinging operation where the horizontal louver automatically moves up and down. Batteries • To replace the batteries, use two new batteries (R03 [AAA]). • In normal use, the batteries will last about one year. • Replace the batteries if there is no receiving beep from the indoor unit or when the air conditioner cannot be operated using the remote control. • To avoid malfunctions by battery leakage, remove the batteries when not using the remote control for more than one month. NOTE When both wired remote control and wireless remote control are used, display on the screen of wireless remote control may differ from the actual operation in some cases. EN – 12 – 12-EN +001111053801_00Ta.book Page 13 Friday, January 21, 2011 3:52 PM Owner’s Manual High Wall Type 6-2. Adjusting Clock Clock adjusting Setting the clock Before operating the air conditioner, set the clock of the remote control by following the procedures given in this section. The clock panel on the remote control will indicate the time regardless of whether the air conditioner is in use or not. Initial setting TEMP When batteries are inserted in the remote control the clock panel will indicate AM 0:00 and will flash. 2 CLR SLEEP SET TEMP 1 3 1 CLOCK button Press the CLOCK by tip of a pencil. The CLOCK display flashes. 2 1 TIMER ON or OFF 2 3 button Press the TIMER or button to set the current time. Each press of the TIMER button changes the time in one minute steps. Pressing the TIMER button continually changes the time in ten minute steps. ON 2 SET SET OFF button Press the SET SET button. The current time is indicated and the clock starts. 13-EN or OFF button ON CLR SET ON Press the TIMER or button to set the current time. Each press of the TIMER button changes the time by one minute. Pressing the TIMER button continually changes the time by ten minutes. 1 SLEEP TIMER – 13 – SET SET OFF button Press the SET SET button. The current time is indicated and the clock starts. +001111053801_00Ta.book Page 14 Friday, January 21, 2011 3:52 PM Owner’s Manual High Wall Type 6-3. The Degree Celsius (°C) Display Location of the remote control • Keep the remote control where its signals can reach the receiver of the indoor unit (a distance of 23’ (7 m) is allowed). • When the timer operation is selected, the remote control automatically transmits a signal to the indoor unit at the specified time. If the remote control is kept in a position that hinders proper signal transmission, a time lag of up to 15 minutes may occur. The temperature display can be changed to the degree Celsius (°C) display as required. 1. Press (°C/°F) button while pressing pen tip or the like. with a 2. The temperature display is changed to the degree Celsius (°C) display. CLR SLEEP SET 23' (7 m) 6-4. Handling the Remote Control CAUTION • The air conditioner will not operate if curtains, doors or other materials block the signals from the remote control to the indoor unit. • Prevent any liquid from falling into the remote control. Do not expose the remote control to direct sunlight or heat. • If the infrared signal receiver on the indoor unit is exposed to direct sunlight, the air conditioner may not function properly. Use curtains to prevent the sunlight from reaching the receiver. • If the room using the air conditioner has fluorescent lighting with electronic starters, signals may not be properly received. If you are planning to use such fluorescent lamps, consult your local dealer. • If other electrical appliances react to the remote control move these appliances or consult your local dealer. Remote control holder Installing the remote control holder • Before installing the remote control holder on a wall or pillar, check whether the remote control signals can be received by the indoor unit. Mounting and removing the remote control • To mount the remote control hold it parallel to the remote control holder and push it in fully. To remove the remote control slide the remote control upwards and out from the holder. EN – 14 – 14-EN +001111053801_00Ta.book Page 15 Friday, January 21, 2011 3:52 PM Owner’s Manual High Wall Type 6-5. Wireless Remote Control Dry operation Start Cooling/heating/fan only operation Start 3 TEMP 3 4 1 2 TEMP 1 ON/OFF button ( 1 2 3 , Heat ) , or Fan only Set temperature button ( TEMP ) , LOW+ , ) Stop ON/OFF button ( ) Press this button again to stop the air conditioner. , • The OPERATION lamp (green) on the display panel of the indoor unit illuminates. And operation starts after approximately 3 minutes. (If FAN ONLY mode is selected, the unit will start immediately.) • The : Fan only mode does not control temperature. • Fan speed is the same as HIGH . Therefore, perform only steps 1, 2 and 4 to select this mode. Stop ON/OFF button ( ) Press this button again to stop the air conditioner. 15-EN TEMP • The fan speed display indicates • The OPERATION lamp (green) on the display panel of the indoor unit lights, and operation starts after approximately 3 minutes. . FAN button Select one of LOW MED , MED+ HIGH . . Set temperature button ( Set the desired temperature. Set the desired temperature. When the air conditioner is in FAN ONLY operation, the temperature display is not indicated. 4 MODE button Select DRY 3 MODE button Select Cool ) Press this button to start the air conditioner. Press this button to start the air conditioner. 2 ON/OFF button ( 1 2 – 15 – +001111053801_00Ta.book Page 16 Friday, January 21, 2011 3:52 PM Owner’s Manual High Wall Type Automatic operation (Auto changeover) CAUTION This model is not equipped with the Automatic Operation feature. If Auto changeover control is selected with the mode selection button, “A” appears on the remote controller display. However, the alarm tone sounds twice from the air conditioner unit and the Timer (green) and Preheat/Defrost (orange) indications blink alternately on the Display panel to tell the Automatic Operation is not available. Timer operation Use the wired remote control for timer setting if it is also in use. ON timer and OFF timer • When the timer operation is selected, the remote control automatically transmits the timer signal to the indoor unit at the specified time. Therefore, keep the remote control in a location where it can transmit the signal to the indoor unit properly. Otherwise, the time lag of up to 15minutes will occur. • If you do not press the SET SET button within 30 seconds after setting the time, the setting will be cancelled. Once the timer operation mode is selected, the settings are saved in the remote control. The air conditioner will start operating under the same conditions when the ON/OFF button of the remote control is pressed. If the clock display is flashing, the timer cannot be set. Follow the instructions in the section “SETTING THE CLOCK” and then set the timer. TEMP 1 3 2 CLR SLEEP SET Setting TIMER 1 ON/OFF TIMER button ( ON or OFF ) Press the ON or OFF TIMER buttons as required. • The previous timer setting is displayed and flashes along with ON/OFF timer display. Set the timer to the desired time. Each press of the TIMER button changes the time in ten minute steps. Pressing the TIMER button continually changes the time in one hour step. 2 SET SET button Press the SET SET button to set the timer. The timer is indicated and the timer starts. EN Cancelling TIMER 3 CLR CLR button Press the CLR CLR button to cancel the timer setting. – 16 – 16-EN +001111053801_00Ta.book Page 17 Friday, January 21, 2011 3:52 PM Owner’s Manual High Wall Type Combined timer (Setting both ON and OFF timers simultaneously) Every day combined timer (setting both ON and OFF timer simultaneously and activate every day.) OFF timer —> ON timer (Operation —> Stop —> Operation) This feature is useful when you want to stop the air conditioner after you go to sleep, and start it again in the morning when you wake up or you return home. Example: To stop the air conditioner and start it again next morning. Operation Operation again Stop This feature is useful when you want to use combined timer at the same time every day. ▼ Setting combined TIMER 1. Press the ON TIMER ON 2. Press the OFF TIMER timer. 3. Press the SET SET button to adjust the ON timer. OFF button to adjust the OFF button. 4. After step 3, an arrow mark ( or ) flashes for about 3 seconds and during this flashing, press the SET SET button. • During the every day timer is activating, both arrows ( , ) are indicated. Cancel the timer operation ▼ Setting combined TIMER 1. Press the OFF TIMER timer. 2. Press the ON TIMER 3. Press the SET SET OFF ON Press the CLR button to adjust the OFF button to adjust the ON timer. button. ON timer —> OFF timer (Stop —> Operation —> Stop) This setting can be used to start the air conditioner when you wake up and stop it when you leave the house. Example: To start the air conditioner next morning and stop it. During the TIMER operation (ON-OFF, OFF-ON, OFF timer) clock display is disappeared so as to show the setting time. To see the present time, press SET button briefly and the present time is displayed about 3 seconds. Stop ▼ Setting combined TIMER 1. Press the ON TIMER ON 2. Press the OFF TIMER timer. 3. Press the SET SET button to adjust the ON timer. OFF button to adjust the OFF button. • Either ON or OFF timer function which is closer to the current time, is activated first. • If the same time is set for both ON and OFF timers, no timer operation is performed. Also, the air conditioner may stop operating. 17-EN button. Clock display Operation Stop CLR – 17 – +001111053801_00Ta.book Page 18 Friday, January 21, 2011 3:52 PM Owner’s Manual High Wall Type Hi POWER operation Quiet operation • The Hi POWER mode automatically controls room temperature, airflow and operation mode so that the room is quickly cooled in summer and warmed in winter. • The QUIET mode provides quiet operating status by automatically setting the fan speed to the lowest speed. TEMP TEMP 1 1 Setting QUIET mode Setting Hi POWER mode 1 1 Press the QUIET button after starting any operation. At the same time, the mark is indicated. Press the Hi POWER button after starting any operation. At the same time, the “Hi POWER” mark on the remote control is indicated. Cancelling QUIET mode 1 Cancelling Hi POWER mode 1 QUIET button Hi POWER button QUIET button Press the QUIET button once again. At the same time, the mark on the remote control goes off. Hi POWER button Press the Hi POWER button once again. At the same time, the “Hi POWER” mark on the remote control goes off. CAUTION CAUTION The QUIET mode cannot be activated in the DRY operation. • The Hi POWER mode cannot be activated in the DRY and FAN ONLY operation and when the ON TIMER operation is reserved. • Hi POWER mode is not available for group control. When Hi POWER is transmitted to the Header indoor unit, the receiving sound is heard but the Hi POWER mode will not be performed. Please cancel the Hi POWER mode. NOTE Under certain conditions, the quiet operation may not provide adequate cooling or heating due to the feature of quietness. EN – 18 – 18-EN +001111053801_00Ta.book Page 19 Friday, January 21, 2011 3:52 PM Owner’s Manual High Wall Type Preset Operation CAUTION Set preferred operation mode for future use. The setting is memorized by the unit for future operation (except airflow direction). The COMFORT SLEEP mode is not enabled in the DRY or FAN ONLY operation. NOTE 1 • For the cooling operation, the set temperature will automatically increase 1 degree/hour for 2 hours (maximum 2 degrees increase). For the heating operation, the set temperature will decrease. • During group control operation, the set temperature and the fan speed are not automatically adjusted. Only off timer function is activated. TEMP Select preferred operation. 1 Press the PRESET button for 3 seconds to memorize the setting. The mark is displayed. Sleep timer operation When this button is pressed next time, the memorized operation mode will be enabled. To start the sleep timer (OFF timer) operation Comfort sleep operation COMFORT SLEEP mode is a OFF timer operation with automatic temperature and fan speed adjustment. TEMP TEMP CLR 1 1 1 1 Press the COMFORT SLEEP button. Select 1, 3, 5 or 9 hours for the OFF timer operation. 19-EN – 19 – SLEEP SET Press the SLEEP button. Select 1, 3, 5 or 9 hours for the OFF timer operation. +001111053801_00Ta.book Page 20 Friday, January 21, 2011 3:52 PM Owner’s Manual High Wall Type Adjusting airflow direction • Adjust the airflow direction properly. Otherwise, it might cause discomfort and make the room temperature uneven. • Adjust the vertical airflow using the remote control. • Adjust the horizontal airflow manually. To automatically swing the airflow direction Perform this function when the air conditioner is in operation. Adjust the vertical airflow The air conditioner automatically adjusts the vertical airflow direction in accordance with the operating conditions when AUTO or A mode is selected. To set the airflow direction you desire Perform this function when the air conditioner is in operation. TEMP 1 1 SWING button Press the SWING button on the remote control. • To stop the function, press the SWING button. TEMP 1 1 FIX button Keep pressing or pressing briefly the FIX button on the remote control to move the louver in the desired direction. • In subsequent operations, the vertical airflow is automatically set in the direction to which you adjusted the louver using the FIX button. NOTE Operating angle of vertical airflow louver will be different during cooling, dry and heating operation. – 20 – EN 20-EN +001111053801_00Ta.book Page 21 Friday, January 21, 2011 3:52 PM Owner’s Manual High Wall Type CAUTION • The FIX and SWING buttons will be disabled when the air conditioner is not in operation (including when the ON timer is set). • Do not operate the air conditioner for long hours with the airflow direction set downward during the cooling or dry operation. Otherwise, condensation may occur on the surface of the vertical airflow louver and cause dew dripping. • Do not move the vertical airflow louver manually. Always use the FIX button. If the louver is moved manually, it may malfunction during operation. If the louver malfunctions, stop the air conditioner once, and restart. • When the air conditioner is started immediately after it was stopped, the vertical airflow louver might not move for 10 seconds or so. • Louver operation is limited when performing group control. (Refer to “7 Limited Operation by Group Control”) Adjust the horizontal airflow Preparation • Take hold of the lever on the horizontal airflow louver and move them to adjust the airflow direction as required. • The airflow can be adjusted at the left, and right locations of the louver. 21-EN – 21 – +001111053801_00Ta.book Page 22 Friday, January 21, 2011 3:52 PM Owner’s Manual High Wall Type 7 Limited Operation by Group Control NOTE Group control: Control multiple air conditioners in multiple systems at the same time. Header indoor unit: The representative unit during group control. Receive commands from wired remote control and transmit the commands to follower units. (Header indoor unit is indoor unit that receives ON/OFF signal from the wireless remote control.) Follower indoor unit: Indoor units other than the Header unit are called follower unit. A wired remote control (Sold separately) is required for the group control. ▼ Example of group combination Indoor Indoor Indoor Control line Wired Remote control Other connecting line Outdoor CAUTION When indoor unit is used in group control, 1. Hi POWER operation will not function. When Hi POWER is transmitted from wireless remote control the receiving sound will be heard from the indoor unit and display on the wireless remote control will also change. However, the indoor unit does not operate Hi POWER operation. Restore the display on the wireless remote control pushing Hi POWER button. 2. COMFORT SLEEP When COMFORT SLEEP is transmitted from wireless remote control, the receiving sound will be heard from the indoor unit and the display on the wireless remote control will also be changed as same as Hi POWER operation. However, the set temperature and the fan speed will not be automatically adjusted. Only off timer function is activated. 3. Units other than the Header unit cannot be operated with wireless remote control and the TEMPORARY operation. When air conditioner is operated with wireless remote control, transmission should be sent to the Header unit. Header and follower indoor units are decided through address setting upon installation. Follower unit will not receive any signals from wireless remote control. Air conditioner will not work even if the button on the follower unit is pressed. (Some Follower units may receive SWING and FIX, but these operations are performed only on the unit that received the signal.) (When wireless remote control is used, only the Header unit receives SWING signal. If the SWING signal is transmitted to follower unit, the sound to refuse receiving signal (3 beeps) is heard and the follower unit does not receive the signal. For FIX operation, both Header and follower unit perform the operation by itself. When wired remote control is used, airflow direction can be changed on each unit by selecting the indoor unit.) 4. TIMER lamp illuminates only on the Header unit, when timer is set with wireless remote control. When timer is set with wired remote control, the TIMER lamps on indoor units will not illuminate. EN – 22 – 22-EN +001111053801_00Ta.book Page 23 Friday, January 21, 2011 3:52 PM Owner’s Manual High Wall Type 8 Temporary Operation Temporary operation This function is used to operate the unit temporarily in case the wireless remote control is misplaced or its batteries are exhausted. • Push the button once (less than 3 seconds) to start the air conditioner. • The last operation conducted with the wireless remote control will be performed. (When wireless remote control is not used, models with the auto-changeover (cooling/heating) function perform “A” operation, and those without the function perform cooling operation (set temperature: 75 °F (24 °C), fan: HIGH).) I cannot find the remote control A temporary operation feature is provided! CAUTION Continuous pressing of the button for 10 seconds and above will start the forced cooling operation. (This will impose burden on the air conditioner. Do not perform this for the purposes other than test run.) In this time all indicators of indoor unit illuminate. 23-EN – 23 – +001111053801_00Ta.book Page 24 Friday, January 21, 2011 3:52 PM Owner’s Manual High Wall Type 9. Maintenance WARNING Cleaning the parts other than the air filter involves dangerous work in high places, ask a service person to do it. Do not attempt to do it by yourself. To avoid the possibility of electric shock, always turn off power to the system before performing any cleaning or maintenance to the system. Turn off the outdoor disconnect switch located near outdoor unit. Operating the system with dirty filters may damage the indoor unit and could cause reduced cooling performance. Periodic Maintenance - periodic maintenance is recommended to ensure proper operation of the unit. Recommended maintenance intervals may vary depending on the installation environment, e.g. dusty zones. Refer to table below. Periodic Maintenance INDOOR UNIT 1 Clean Air Filter* Clean Drain Pan Clean indoor heat exchanger*2 Clean fan*2 Change Remote Control Batteries OUTDOOR UNIT EVERY MONTH EVERY 4 MONTHS EVERY YEAR 2 1 1 1 1 EVERY MONTH EVERY 4 MONTHS EVERY YEAR 1 Clean Outdoor heat exchanger from Outside Clean Outdoor heat exchanger from Inside*2 Blow Air Over Electric Parts*2 Check Electric Connection Tightening*2 Clean Fan Wheel*2 Check Fan Tightening*2 Clean Drain Pans*2 1 1 1 1 1 1 *1: Increase frequency in dusty zones. *2: Maintenance to be carried out by qualified service personal. EN – 24 – 24-EN +001111053801_00Ta.book Page 25 Friday, January 21, 2011 3:52 PM Owner’s Manual High Wall Type Cleaning the air filter 5. Insert the upper portion of air filter confirming to fit its right and left edges on the indoor unit until it is firmly set. Clean the air filters every 2 weeks. If the air filters are covered with dust, the performance of the air conditioner will deteriorate. 1. Open the return air grille. Lift the return air grille up to the horizontal position. 2. Take hold of the left and right handles of the air filter and lift it up slightly, then pull it downward to take it out from the filter holder. Air filter Filter holder 6. Close the return air grille. Cleaning the return air grille Filter holder 1. Remove the return air grille. Hold the two sides of the return air grille and open upwards. Move the centre arm to the left and remove the grille. 3. Vacuum the filter and reuse it with water. 4. Dry the filter. 25-EN – 25 – +001111053801_00Ta.book Page 26 Friday, January 21, 2011 3:52 PM Owner’s Manual High Wall Type 2. Wipe the grill with a soft, dry cloth. If necessary, a mild liquid detergent can be applied and wiped off with a dry cloth. 3. Fit the left and right arms of the air inlet grille to the shafts on the two sides of the air conditioner and push in completely, and then push in the centre arm. 4. Check that the centre arm has been completely inserted and close the air inlet grille. • Push the arrow locations (four) at the bottom of the air inlet grille to check whether the grille is completely closed. Preparing for long Shut Down Period 1. Clean the filters and reposition them in unit. 2. Operate the unit in fan mode for 3 or 4 hours to dry all internal parts. 3. Turn the unit off and disconnect the main power supply. 4. Before unit is turned on again, turn the circuit breaker for at least 12 hours. EN – 26 – 26-EN +001111053801_00Ta.book Page 27 Friday, January 21, 2011 3:52 PM Owner’s Manual High Wall Type 10 Troubleshooting For contents of the outdoor unit, combinations or other details, refer to the owner’s manual supplied with the outdoor unit. CAUTION If any of the following conditions occur, stop the air conditioner immediately, set to off the main power switch and contact the dealer: • Switch operation are erratic. • The main power fuse often blows out, or the circuit breaker is often activated. • Foreign matter or water has fallen inside the air conditioner. • Any other unusual condition is observed. • Abnormal display appears on the remote control display while using wired remote control. Before you ask for servicing or repairs, check the following points. ▼ Recheck Inoperative • The power main switch is turned off. (Indoor) • The circuit breaker is activated to cut off the power supply. • The main power fuse has blown out. • The batteries in the remote control are exhausted. • ON TIMER is set. • Signal is sent to the follower indoor unit with the remote control. (See page 14) • Operation of the indoor unit is limited by the wired remote control that is controlling some other system. (When signal is transmitted, warning sound (5 beeps) will be heard.) • Disagreement in operation mode occurred. (When the operation mode disagrees, the “ OPERATION” lamp lights up, and the “ TIMER” and “ Preheat/Defrost” lamps blink alternately with an alarm sound.) (see page 9) Poor cooling or heating performance • Doors or windows are opened. • The air filter is clogged with dust. • The louver is not at the correct position. • The fan speed is set to low. • The air conditioner is set in the QUIET or DRY mode. • The set temperature is too high. (In cooling operation) • The set temperature is too low. (In heating operation) • (Only when the air is not cooled even during cooling operation) When another indoor unit in the same system is heating. ▼ These are not failures. The back of indoor unit is dewed. • Dewdrops on the back of the indoor unit are automatically collected and drained out. Indoor unit or outdoor unit makes a strange noise. • When temperature sharply changes, the indoor or outdoor unit occasionally makes a strange noise because of expansion/contraction of parts or change of refrigerant flow. The room air is smelly. A bad odour comes from the air conditioner. • Smells impregnated in the wall, carpet, furniture, clothing, or furs, are coming out. 27-EN – 27 – +001111053801_00Ta.book Page 28 Friday, January 21, 2011 3:52 PM Owner’s Manual High Wall Type Louver does not work in the FIX or SWING mode. • The FIX and SWING modes are restricted under the group control. (see page 22) Fan and louvers of the indoor unit moves when the unit is not operated. • When the other indoor unit(s) is operating within the system, a fan of switched off indoor unit may temporary operate. EN – 28 – 28-EN +001111053801_00Ta.book Page 79 Friday, January 21, 2011 3:52 PM 1111053801