1
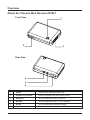
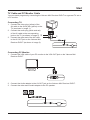
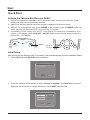
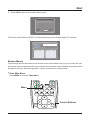
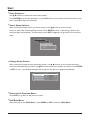
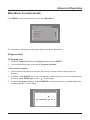
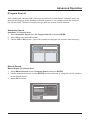
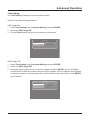
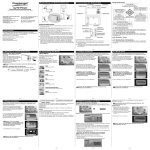
Handbuch
Manual
D
GB
F
E
Yakumo Mini Receiver DVB-T
Digitaler TV-Receiver
Preface
About the User Manual
This manual is designed to help you familiarize yourself with the operation of the Yakumo Mini
Receiver DVB-T. It also describes the features of the product and the remote control. Please read
this manual carefully before using the Yakumo Mini Receiver DVB-T.
Note
Check that you can receive DVB-T in your region. Also check whether you need a roof-mounted
aerial to receive the TV signals or if you can also receive them via an indoor aerial. For more
information about the broadcast regions and the required aerials, please visit
www.ueberallfernsehen.de or www.ueberall-tv.de
Copyright
This user manual and the content herein are protected under the intellectual property law. No
part of this document may be copied, transmitted, reproduced, stored in any retrieval systems, or
translated into any languages or computer languages in any form or by any means, electronic,
mechanical, magnetic, optical, chemical, hand-copy or otherwise, without the prior written consent
of the manufacturer. All other products, trademarks and trade names mentioned herein are the
properties of their respective owners.
Copyright © 2005 All rights reserved.
Compliance Statement
Please read carefully the following compliance statement before using this product.
The product complies with the WEEE Directive.
CE Statement (European Union)
This statement indicates that the equipment has been tested and passed in accordance with the
European Standard for the electromagnetic compatibility directive and low voltage directive.
EN 55013: Limits and measuring methods of sound and television broadcast receivers and as
sociated apparatus.
EN 55020: Electromagnetic immunity of broadcast receivers and associated apparatus.
Important Safety Instructions
Keep this manual in a safe place where it is easy to get at for future references. For your personal
safety and to protect the product, please use and install the product components properly in accordance with the instructions in this manual.
1. Read the instructions below.
2. Follow the instructions below.
3. Heed all warnings and follow all instructions.
4. Do not use this apparatus near water.
5. Clean only with a dry cloth.
6. Do not block any ventilation openings. Install in accordance with the manufacturer’s instructions.
7. Do not install near any heat sources such as radiators, heat registers, stoves, or other apparatus
(including amplifiers) that produce heat.
8. Do not defeat the safety design of the polarized or grounding-type plug. A polarized plug
has two blades with one wider than the other. A grounding-type plug has two blades and
a third grounding prong. The wide blade or the third prong are provided for your safety. If
the provided plug does not fit into your outlet, consult an electrician for replacement of the
obsolete outlet.
9. Protect the power cable from being walked on or pinched particularly at plugs, convenience
receptacles, and the point where they exit from the apparatus.
10. Only use attachments/accessories/cables specifie by the manufacturer.
11. Connect only with attachments/accessories/cables in accordance with the manufacturer’s
instructions.
12. Do not use the power cable during lightning storms.
13. Unplug all power cables when unused for long periods of time.
14. Use caution when moving the apparatus to avoid a tip-over and further damage to the
apparatus.
15. Refer all servicing to qualifie service personnel. Servicing is required when the apparatus
has been damaged in any way, such as power cable or plug is damaged, liquid has been
spilled or objects have fallen into the apparatus, the apparatus has been exposed to rain or
moisture, does not operate normally, or has been dropped.
16. This apparatus shall not be exposed to dripping or splashing and that no objects fille with
liquids shall be placed on the apparatus.
17. Warning: To reduce the risk of fir or electric shock, do not expose this product to rain or
moisture.
18. Remarks:
a) Do not perform any serving other than that specifie in this manual. Refer all other servicing
to qualifie service personnel.
b) Use the correct external power source. Operate the product only from the type of power
source indicated on the electrical rating label. If you are not sure of the type of power
source required, consult your authorized service provider or local power company. For more
information on the use of battery power or other power sources, see the product operation
instructions.
Contents
Overview
Product Features
1
1
Package Contents
About the Yakumo Mini Receiver DVB-T
Front View
Rear View
About the Remote Control
1
2
2
2
3
Start
Connection Cables
Power Cable
Antenna Cable
TV Cable and PC Monitor Cable
Quick Start
Activate the Yakumo Mini Receiver DVB-T
Initial Setup
Browse Menus
Advanced Operation
Main Menu Function Guide
Program List
Program Search
System Setting
Accessory
Personal Style
Appendix
4
4
4
4
5
6
6
6
7
9
9
9
11
12
14
14
Specifications
Glossary
Troubleshooting
15
15
16
16
Service
Warranty
17
17
Overview
Product Features
1.
2.
3.
4.
Complies with the international specificatio (DVB-T ETS 300 744)
Uses an MPEG-2 video decoder and delivers the same quality as DVDs
Compact design and easy to move
Designed to receive a DVB-T system and all digital TV programs of 6/7/8MHz channel
bandwidth
5. Electronic Program Guide (EPG) support for the latest program information
6. Teletext support for the real-time information in pure text format.
This feature is available depending on the service provided by the local TV broadcasters.
7. Full-function infrared ray remote control support
8. Provides auto channel search functions
9. Provides multi-channel preview of 9 channels on the same screen
10. Multi-language support
11. AV output support for use with TV
12. VGA output support for use with PC monitors (CRT/LCD)
Package Contents
Check the following items from the list to make sure that all accessories are included,
and no damage or loss is found.
1. Yakumo Mini Receiver DVB-T
2.
3.
4.
5.
6.
Power adapter
Remote control (battery included)
Video out cable
User Manual
Audio adapter
1
Overview
About the Yakumo Mini Receiver DVB-T
Front View
1
2
3
Rear View
4
5
6
Name
Descriptions
1
Power
Yakumo Mini Receiver DVB-T ON
2
Infrared ray receiver
Receives signals from the remote control
3
VGA OUT
To be connected to the PC monitor
4
AV OUT
To be connected to the TV or PC speaker
5
DC IN
To be connected to the power supply
6
Antenna Input
To be connected to the antenna
2
Overview
About the Remote
Control
1
10
2
11
3
12
4
5
6
7
13
14
15
16
17
8
18
19
9
1
2
3
4
5
6
Name
MUTE
MENU
VOL ▲ / ▼
EPG
TELETEXT
DIGEST/GREEN
7
8
9
10
11
12
13
14
15
16
17
18
19
FAVORITE/RED
VGA OUT / AV OUT
EXIT
POWER
VIDEO MODE
CH ▲ / ▼
INFO
MTS
EDIT/YELLOW
DVB RADIO/BLUE
DIRECTIONS/ ENTER
0-9
RETURN
Descriptions
Mutes during playback
Displays the main menu
Adjusts the volume levels
Enables EPG
Teletext (European regions only)
Displays a 9-grid screen for you to review the live programs available
on the digital channels. With support for Teletext shortkeys
Favorite channels ON/OFF. With support for Teletext shortkeys
Toggles between the TV screen and PC monitor
Exits the menu setup
Yakumo Mini Receiver DVB-T ON
Toggles among PAL, NTSC and AUTO modes
Changes channels
Displays the information of the active TV program
Bilingual toggle (available for bilingual programs)
Edits your favorite channels. With support for Teletext shortkeys
Provides musical program channels. With support for Teletext shortkeys
Browses / confirms menus
Toggles among TV channels
Returns to the previous active channel
3
Start
Connection Cables
Power Cable
Connecting Power:
1. Connect the power plug to the power supply socket.
2. Connect the other end of the power converter to DC IN on the Yakumo Mini Receiver DVB-T.
Antenna Cable
Connecting Antenna:
1. Connect the antenna cable to the Yakumo Mini Receiver DVB-T.
4
Start
TV Cable and PC Monitor Cable
You can watch programs by connecting the Yakumo Mini Receiver DVB-T to a general TV set or
a PC monitor.
Connecting TV:
1. Connect the video plug (yellow) of the
AV cable to the AV IN jack (yellow) on the
TV (as shown in image 1).
2. Connect the audio plug (white and red)
of the AV cable to the corresponding
jack on the TV (as shown in image 2). 2
3. Connect the other end of the AV cable
to the AV OUT jack on the Yakumo Mini
Receiver DVB-T (as shown in image 3).
R
L VIDEO
1
3
Connecting PC Monitor:
1. Connect the VGA cable of your PC monitor to the VGA OUT jack on the Yakumo Mini
Receiver DVB-T.
2. Connect the Audio adapter to the AV OUT jack on the Yakumo Mini Receiver DVB-T.
3. Connect the other end of audio adapter to the PC speaker.
5
Start
Quick Start
Activate the Yakumo Mini Receiver DVB-T
1. Follow the instructions (indicated in the “Connection Cable” section) to connect the power
supply and other required peripheral devices.
2. Make sure that the batteries have been properly installed in the remote control.
3. After the TV or the monitor is on, press POWER on the remote control or POWER on the top
of the Yakumo Mini Receiver DVB-T to turn on the TV receiver.
4. The default of video output is for the TV. If the Digital TV Receiver is connected to a PC
monitor / LCD display, press VGA OUT / AV OUT button on the remote control to switch to
the monitor / LCD display.
POWER
VGA OUT /
AV OUT
Initial Setup
After the Yakumo Mini Receiver DVB-T is turned on, it will automatically lead you to the Installation Wizard.
1. Select YES and press ENTER to start installation.
First Time Installation
Do you want to start first time
Installation Wizard ?
NO
YES
2. Press the Up/Down arrow buttons to select Country, Language, and Time Zone. Press the
Right/Left arrow buttons to change the setting. Select NEXT when finished
First Time Installation
(1)
England
Country
Language
English
Time Zone
GMT + 00:00
BACK
NEXT
6
Start
3. Select YES to start an automatic channel scan.
First Time Installation
(2)
Do you want to start Auto Search ?
Previous channel list will be replaced.
YES
BACK
NO
The Yakumo Mini Receiver DVB-T will start searching for the available digital TV channels.
Automatic Search
Progress
05%
Channel No
17
Frequency
491.0 MHz
TV List:
000
Music List:
000
Browse Menus
The following section describes how to browse menus and makes it easy for you to learn and use
the remote control buttons and the menu content setup methods. More detailed information will be
provided in the later “Advance Operation” section for each menu content setup.
* Enter Main Menu:
Press MENU to enter the “Main Menu”.
Menu
Control Buttons
7
Start
* Enter Submenu:
▼
▼
Use ▲ ▼ buttons to select the menu setup option.
Press ENTER to go into the submenu, or press button on the remote control as shown on the
menu option to enter the submenu.
* Select Setup Options:
▼
After entering the setup option (as shown below), use ▲ ▼ buttons on the remote
control to select the desired setting content. Press ENTER to finis setup and go back to the
previous page automatically. To abort setup, press EXIT or button to go back to the previous
page.
Main Menu
System Setting
TV Standard
PAL
NTSC
Service
ID
AUTO
* Change Setup Screen:
▼
▼
After entering the setup screen (as shown below), use ▲ ▼ buttons on the remote control to
select the desired setting content. Use
buttons to select the setting you want. Press ENTER
or EXIT to finis your setting changes and go back to the previous page automatically.
Language
OSD Language
English
1st Audio Language
English
2nd Audio Language
English
* Return to the Previous Menu:
Press EXIT to go back to the previous menu.
* Exit Main Menu:
After returning to the “Main Menu”, press MENU or EXIT to exit the “Main Menu”.
8
Advanced Operation
Main Menu Function Guide
Press MENU on the remote control to enter the “Main Menu”:
Main Menu
Program List
Program Search
System Setting
Accessory
Personal Style
You can perform the following setup tasks after entering the “Main Menu”:
[Program List]
TV Program List
1.
2.
Select TV Program List from the Program List and press ENTER.
You can start editing after entering the “Program edit table”.
* Set Favorite Programs:
1. Use the directional buttons to move the color block to define certain programs as your
favorites.
2. In “Favor”, press ENTER and a “ ” icon appears, showing that you have successfully setup.
To cancel, press ENTER again in the “
” icon to delete.
3. To exit the Program List page, press FAVORITE on the remote control to enable/disable the
favorite programs you have setup.
Program edit table
No.
Program Name
1
CTV
2
CTV News
3
CTV Life
4
CH26-1
5
CH26-2
6
FTV 1
7
FTV 2
8
FTV 3
9
TTV
10
TTV Home
9
Favor
Move Del
Advanced Operation
* Move Programs
1. Use the directional buttons to move the color
block to defin certain programs you wish to move.
2. In “Move”, press ENTER and a “ ” icon appears.
Use the directional buttons again to move the
programs to a new location.
Program edit table
No.
Program Name
1
CTV
2
CTV News
3
CTV Life
4
CH26-1
5
CH26-2
6
FTV 1
7
FTV 2
8
FTV 3
9
TTV
10
Favor
Move Del
TTV Home
* Delete Programs
1. Use the directional buttons to move the color block
to defin certain programs you wish to delete.
2. In “Del”, press ENTER and an “X” icon appears,
showing that you have deleted the setting.
To add in the program again, press ENTER
again in the “X” icon fiel to delete “X”.
3. Exit the Program List page to delete the program.
4. To add in the deleted programs, you need to go to
the “Program Search” and rescan the channels.
Program edit table
No.
Program Name
1
CTV
2
CTV News
3
CTV Life
4
CH26-1
5
CH26-2
6
FTV 1
7
FTV 2
8
FTV 3
9
TTV
10
Favor
Move Del
X
TTV Home
Music Program List
1. Select Music Program List from the Program List and press ENTER.
2. You can start editing after entering the “Program edit table”. Edit in the same way as indicated in the “Program edit table” section under the “TV Program table”.
Sort
To view the Program List as a sorted list:
1. Select Sort from the Program List and press ENTER.
2. Select one from the list and sort “By Name”, “By Service ID”, or “By Channel No.” according
to your personal requirement.
Main Menu
Program List
Sort
By Name
By Service ID
By Channel No.
10
Advanced Operation
[Program Search]
After installing the Yakumo DVB-T Receiver mini, follow the “Initial Setup” instruction and it will
automatically lead you to the Installation Wizard. However, if you need to rescan the channels,
the Yakumo DVB-T Receiver mini provides you with two channel rescan methods:
Automatic Search
Automatic TV Channel Scan:
1. Select Automatic Search from the Program Search and press ENTER.
2. Select OK to start automatic search.
3. Choose YES or NO toconfir if you wish to delete the program list and then start scanning.
Automatic Search
Progress
05%
Channel No
17
Frequency
TV List:
491.0 MHz
000
Music List:
000
Manual Search
Manual Digital TV Channel Scan:
1. Select Manual Search from the Program Search and press ENTER.
2. Use the directional buttons or press ENTER to select channels by using the numeric numbers
on the remote control.
3. Select OK to confirm
Manual Search
Channel No
34
Frequency
593.0 MHz
Bandwidth
6
OK
Strength
00%
Quality
79%
11
MHz
Advanced Operation
[System Setting]
TV Standard
Change TV Standard Settings:
1. Select TV Standard from the System Setting.
2. Select the correct TV type.
Main Menu
System Setting
TV Standard
PAL
NTSC
Service
ID
AUTO
Regional Setting
If you travel to another country, you may need to change certain regional setting. To change the
regional setting:
1. Select Regional Setting from the System Setting and press ENTER.
2. Change Country to the country where you are currently located. Because you have changed
the country setting, it will automatically change the “Time Zone” settings to the corresponding
values in your current country.
3. Change OSD Language to your desired language.
Regional Setting
Country
England
English
OSD Language
GMT + 00:00
Time Zone
Language
This feature enables you to change the menu and audio usage languages. To change each language setting:
1. Select Language from the System Setting and press ENTER.
2. Change OSD Language to your desired language.
3. Change the audio language to your desired language.
Language
OSD Language
English
1st Audio Language
English
2nd Audio Language
English
12
Advanced Operation
Time Setting
The Time Setting enables you to set the date and time.
There are two ways of setting the time:
GMT Usage ON
1. Select Time Setting from the System Setting and press ENTER.
2. Switch the GMT usage ON.
3. Change Time Zone to the time zone where you are located.
Time Setting
GMT usage
ON
Time Zone
GMT + 00:00
GMT Usage OFF
1. Select Time Setting from the System Setting and press ENTER.
2. Switch the GMT usage OFF.
3. Select the option (date or time) you wish to change and press ENTER. Use the Left/Right
arrow buttons to select the number field you wish to change. Use the Up/Down arrow buttons
to adjust the number, or directly press the numeric button to input the number. Press ENTER
when finished
Time Setting
GMT usage
OFF
Set Date
2005/08/23
Set Time
02:17
13
Advanced Operation
[Accessory]
System Information
The System Information displays the current system software version information.
To view the current version number:
1. Select Accessory and then select System Information.
Main Menu
Accessory
System Information
System Version:
1.05
Factory Default
To reset the menu to the factory default settings:
1. Select Factory Default from the Accessory menu. Select YES and then OK.
Main Menu
Accessory
Factory Default
NO
YES
[Personal Style]
You can customize the menu to your preferred color or pattern.
1. Select Personal Style and press ENTER.
2. Select the setting value and change it to the required value.
The settings are as follows:
Personal Style
* Menu Color: to change the color of the
Menu Color
BLUE
Transparency Level
6
menu.
Border Pattern
Round
* Transparency Level: to determine the
transparency level of the menu. The
higher the value, the less transparent the menu is.
* Border Pattern: to change the border to a square
border or a circle.
14
Appendixes
Specification
Item
COFDM & FEC
Features
DVB-T Compliant
FFT: 2K / 8K
Bandwidth: 6 / 7 / 8 MHz
Tuner
Receiving Frequency: 48.25-863.25 MHz Tuning Range (VHF&UHF)
Channel Bandwidth: 6 / 7 / 8 MHz
RF Impedance: 75 Ohm
RF Connector: IEC
Demodulator
FFT: 2K / 8K
Constellations (Modulation): QPSK / 16 QAM / 64 QAM
Guard Interval: 1/32, 1/16, 1/8, 1/4
Code Rate: 1/2, 2/3, 3/4, 5/6, 7/8
Video
Video Decoding: MPEG2
Video Output: PAL (720 x 576) / NTSC (720 x 480)
Video Output Interface: AV / VGA
Audio
Audio Decoding: MPEG2, Layer I/II
Audio Output: Stereo / Mono
AV Port
Power
Main Power Input Voltage: 5V, DC, 1A
Main Consumption: Max. 4W
Power Supply Input: 100/240V~1.5A 50-60Hz, Output: 5V, 1A
I/O Interface
Power Jack x 1
Antenna Plug (ICE) x 1 (Input)
Infrared Ray Receiver x 1 (Input)
AV Composite Output x 1 (Yellow-Video, Red/White-Audio) (Output)
D-SUB Connector for VGA Output
Dimension (W×L×H)
96×68×22 mm
Weight
85g
15
Appendixes
Glossary
DVB:
The Digital Video Broadcasting Project (DVB) is an industry-led consortium of over 260
broadcasters, manufacturers, network operators, software developers, regulatory bodies
and others in over 35 countries committed to designing global standards for the global
delivery of digital television and data services.
NTSC: (National TV Standards Committee) A color TV standard that was developed in the U.S.
Administered by the Federal Communications Commission (FCC), NTSC broadcasts 30
interlaced frames per second (60 half frames per second) at 525 lines of resolution. The
signal is a composite of red, green and blue and includes an audio FM frequency and an
MTS signal for stereo. NTSC is used throughout the world including the U.S., Canada,
Japan, South Korea and several Central and South American countries.
PAL:
(Phase Alternating Line) A color TV standard that was developed in Germany. It
broadcasts 25 interlaced frames per second (50 half frames per second) at 625 lines
of resolution. PAL is used throughout Europe and China as well as in various African,
South American and Middle Eastern countries. PAL’s color signals are maintained automatically, and the TV set does not have a user-adjustable hue control.
Troubleshooting
This section describes some frequently asked questions or malfunctions you may encounter during the course of using this Yakumo Mini Receiver DVB-T.
Question
No picture
or sound.
It cannot
scan
channels.
Possible Reasons
Q&A
Solutions
The power cable is not connected. Check if the power cable is connected properly.
The power on the Yakumo Mini
Receiver DVB-T is not turned on.
Make sure that the power is ON.
The AV cable is not connected.
Make sure that the both ends of the AV cable are
connected properly
Make sure that the antenna is connected
properly.
Install the antenna at a location (e.g. outside the
window or on the rooftop) with better reception.
You can visit the following web sites to fin out
about your digital TV reception in your area.
The antenna is not connected.
The local signal is weak.
There is no digital channel signal
in the local area.
UK: http://www.dtg.org.uk/retailer/coverage.html
France: http://www.tvnt.net/couverture.php#2
Germany:
http://www.ueberall-tv.de/1home/Uef-home.htm
Italy: http://www.digitaleterrestre.it/
Taiwan: http://www.dtvc.org.tw/html/p2_3.htm
The picture The volume level is too low
is normal, The sound is disabled.
but there is The AV cable is not connected.
no sound.
Press VOL to turn up the volume.
Press MUTE to cancel the mute.
Make sure that the both ends of the AV cable
are connected properly
16
Appendixes
Question Possible Reasons
Blurred
Weak signal.
and grainy
picture
with
message
"Bad signal".
How can I
No / bad reception.
re-orientate
the aerial?
Sporadic
bad
reception.
Q&A
Solutions
Re-orientate or re-adjust your aerial.
Check the signal cable and connectors.
A signal strength of approx. 30 - 38 dBµV
should reach the RF input.
When using an indoor aerial, the aerial should be
moved slowly, as the set-top boxes will only show
an image when they have been synchronized and
decoded the channel. However, the synchronisation
may take several seconds. Normally it is recommended
that you position the indoor aerial near a window.
Should you still not be able to receive a station
satisfactorily, an aerial with a higher amplification
(normally a larger model) is recommended.
Interference from other electrical If you observe sporadic reception problems, these
appliances in the vicinity.
can be caused by electrical appliances operating
in the vicinity of the aerial (e.g. drill, stairwell lighting,
fluorescent lights, computers). The interfering device
can also be located in other rooms or outdoors.
Mobile phones may also interfere with the reception
of active aerials.
Service
In case of technical problems with your Yakumo product, contact our hotline on 00 800 / 92
58 66 00. ing the course of using this Digital
Warranty
If you think that you need to make a claim on your Yakumo product under the warranty, call
the hotline on 00 800 / 92 58 66 00. Experienced staff will advise you and arrange how you
should proceed. Please do not send any goods to the Yakumo service centre without obtaining
an RMA number from the hotline first, as otherwise the goods will be returned unrepaired or
refused.
Yakumo grants you a 2-year warranty from the invoice date. In case of defects, the buyer only
has a right to subsequent performance. This subsequent performance will include either repair
or the delivery of a replacement product. Exchanged units or parts will be the property of
Yakumo.
Evidence of the warranty must be provided in the form of proper proof of purchase (sales
receipt or invoice).
Damage caused by improper handling, operation storage or by force majeure or other external
influences is not covered by the warranty. The same applies to wearing parts, e.g.
rechargeable batteries (6 months).
In case of technical queries, go to the Yakumo homepage at
www.yakumo.com or send an e-mail to: [email protected].
17
91M-0005-V50-00
www.yakumo.com