1
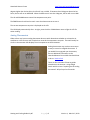
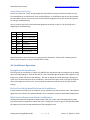
Heartland Owners Forum
http://manuals.heartlandowners.org
Heating & Cooling Guide
This guide is intended to assist Heartland Owners in understanding how to use and do routine
maintenance and troubleshooting on their heating and cooling systems.
Important Notices
Who created this document?
This document has been created by Heartland Owners independently of the
Heartland RV Company, and is posted to the Heartland Owners Forum as a
service to the owner community.
Errors and Omissions
Because the authors are Heartland owners, not engineers or service technicians,
it’s possible that this document could contain errors or omissions. Readers are
advised to also review the manufacturers’ product documentation for more
complete information and guidance.
Limitations on Using this Document
This document may not be sold. It may not be posted on the internet (other
than on the Heartland Owners Forum website) without permission. Other
websites may link to the page from which the document may be downloaded,
but may not link directly to the document without permission.
Heating and Cooling Guide V1.pdf
Page |1
Version: 1, March 15, 2013
Heartland Owners Forum
http://manuals.heartlandowners.org
Heating & Cooling Guide
Table of Contents
Thermostats .................................................................................................................................................. 4
Dometic Single Zone LCD Thermostat ...................................................................................................... 4
Checking and Changing the Set Point Temperature ............................................................................. 5
Multizone Bedroom LCD Thermostat ....................................................................................................... 5
Analog Thermostats .................................................................................................................................. 6
Analog Thermostat Wiring .................................................................................................................... 7
Air Conditioner Operation ............................................................................................................................ 7
Living Room Air Conditioner ..................................................................................................................... 7
Do You Need the Optional Bedroom Air Conditioner............................................................................... 7
What You Can Expect from the Air Conditioners...................................................................................... 7
Humidity.................................................................................................................................................... 8
Bedroom Air Conditioner .......................................................................................................................... 8
Toy Haulers with Three Air Conditioners .................................................................................................. 9
Whisper Quiet Air Conditioning System ................................................................................................... 9
Minimizing A/C Noise in the Living Room or in the Bedroom .............................................................. 9
Dealing with Very High Outside Temperatures ...................................................................................... 10
Stay Ahead of the Heat ....................................................................................................................... 10
Cut the Heat Load ............................................................................................................................... 10
Run the Bedroom A/C at Maximum Output ....................................................................................... 10
Redirect the Bedroom Air Flow........................................................................................................... 10
Adjust the Living Room Thermostat ................................................................................................... 10
Run the Ceiling Fan ............................................................................................................................. 10
Dealing with Moderate Outside Temperatures ...................................................................................... 10
Electrical Loads........................................................................................................................................ 11
A/C Units ............................................................................................................................................. 11
30 Amp Campground Electrical Service .............................................................................................. 11
12V DC for the Thermostat and Air Conditioners ............................................................................... 11
Short-Cycling ........................................................................................................................................... 12
Heating and Cooling Guide V1.pdf
Page |2
Version: 1, March 15, 2013
Heartland Owners Forum
http://manuals.heartlandowners.org
Fan Operation ......................................................................................................................................... 12
Coil Freeze-Up ......................................................................................................................................... 12
Routine Maintenance ............................................................................................................................. 13
Cleaning the Return Air Intake Filter(s) .............................................................................................. 13
Cleaning the Outside Coils .................................................................................................................. 13
Common Problems ................................................................................................................................. 13
Insufficient cooling .............................................................................................................................. 13
Modifications to Improve Airflow Through A/C Ducts ....................................................................... 14
Cooling Starts and Stops Frequently ................................................................................................... 14
Air Conditioner Runs with Thermostat Set to HEAT Mode ................................................................. 14
Air conditioner Won’t Start................................................................................................................. 14
Furnace Operation ...................................................................................................................................... 15
Normal Sequence and Theory of Operation ........................................................................................... 15
Using Electric Heat .................................................................................................................................. 15
Routine Maintenance ............................................................................................................................. 16
Common Problems ................................................................................................................................. 16
Low Voltage......................................................................................................................................... 16
Low or No Propane Flow ..................................................................................................................... 16
Troubleshooting Low or No Propane Flow ......................................................................................... 17
Restricted Return Air Flow .................................................................................................................. 17
Blocked Heat Registers ....................................................................................................................... 17
Propane characteristics in cold weather ................................................................................................ 18
How Long Will a Tank of Propane Last? .................................................................................................. 18
Heating and Cooling Guide V1.pdf
Page |3
Version: 1, March 15, 2013
Heartland Owners Forum
http://manuals.heartlandowners.org
Heating & Cooling Guide
This guide is based on the Dometic Thermostats and Air Conditioners, and Suburban Furnaces
commonly found in most Heartland RVs.
Thermostats
The living room thermostat is the primary control for either your living area air conditioner (or heat
pump), and your furnace. The bedroom thermostat controls only the bedroom A/C or heat pump. The
thermostat simply makes or breaks electrical connections in response to what you want it to do (based
on operating mode and set point) and what the temperature in coach actually is. Heartland has used
several types of thermostats in their production, and many owners have performed modifications to use
after-market digital or programmable thermostats.
Dometic Single Zone LCD Thermostat
Depending on which model is installed in your RV,
you may have either three or four modes of
operation. Fan/Cool/Furnace are present on all
thermostats, but the control for Heat Pump or Heat
Strip is not needed unless you have those optional
components.
The button labeled “On/Off Mode” is used to cycle
through the modes. One of the LEDs will light to
indicate to which mode the thermostat is set. If no
LEDs are lit, the thermostat is OFF.
Fan Mode: Allows you to set the fan to HIGH, LOW
or AUTO. It’s usually best to leave this set on AUTO.
NOTE: If the fan is set to HIGH or LOW, the overhead A/C blower will run continuously, including
when you set the thermostat to HEAT mode.
Cool Mode: Use the On/Off Mode switch to cycle the thermostat to Cool Mode. If the air temperature
at the thermostat is warmer than the set point showing in the LCD display, the air conditioner will start.
Furnace Mode: When cycled to Furnace, furnace operation is enabled. If the air temperature at the
thermostat is lower than the set point showing in the LCD display, the furnace will start.
Heating and Cooling Guide V1.pdf
Page |4
Version: 1, March 15, 2013
Heartland Owners Forum
http://manuals.heartlandowners.org
Heat Pump or Heat Strip Mode: If you have this option, cycling to this mode will put the air conditioner
into heat pump mode, or if you have a heat strip, will activate the heat strip. These act as an alternative
to running the furnace when heat is needed.
Heat pump operation is basically an air conditioner running backwards in the sense that instead of
cooling the inside air and moving hot air outside, it cools the outside air and moves heat inside. Heat
pumps operate reasonably well in mild temperatures, but as outside temperatures fall, they have
increasing difficulty extracting heat from the cold outside air. With some thermostats, at an outside
temperature of 30 degrees, the thermostat will shut of the heat pump and start the furnace.
Heat strips are simple electric resistance heating devices.
A heat pump or heat strip can assist you in conserving propane, at the cost of using more electricity
instead.
NOTE: In sub-freezing weather, on models with heated underbelly, running the furnace pumps heat
into the underbelly, helping to keep water in water lines and tanks from freezing. If you rely entirely
on a heat pump or heat strip (or other electric heaters inside the coach), your plumbing could freeze
at a higher temperature than if you use the furnace.
Checking and Changing the Set Point Temperature
When the thermostat is set to OFF, pressing either the + or – button will display the current
temperature of the RV on the LCD display.
When the thermostat is set to heat or cool, pressing the + or – button will increase or decrease the set
point temperature.
Multizone Bedroom LCD Thermostat
The optional 2nd air conditioner installed in the bedroom often will have a thermostat such as pictured
below. Although it is capable of controlling multiple zones,
only Zone 1 is used. Notice that there is an ON/OFF switch
on the bottom edge of the thermostat.
Similar to the living room thermostat, the MODE button will
cycle the unit to the Cool mode. Since this thermostat
controls only the bedroom air conditioner, unless the
bedroom air condition includes a heat pump option, the
other modes don’t do anything.
A separate FAN button allows you to set the fan speed to
LOW, MEDIUM, HIGH, or AUTO. Most of the time, setting
to AUTO works best. In AUTO, if the air temperature is 8
Heating and Cooling Guide V1.pdf
Page |5
Version: 1, March 15, 2013
Heartland Owners Forum
http://manuals.heartlandowners.org
degrees higher than the Set Point, the fan will run on HIGH. If between 8 and 4 degrees above the Set
Point, the fan will run on MEDIUM. When the difference is less than 4 degrees, the fan will run on LOW.
The UP and DOWN buttons control the temperature set point.
The ZONE button should not be used. Leave the thermostat set to zone 1.
The current temperature set point is displayed on the LCD.
The LCD display automatically dims. At night, press the UP or DOWN button once to light the LCD for
easier reading.
Analog Thermostats
Older trailers may have an analog thermostat where a switch determines whether to activate the air
conditioner or the furnace, and a simple lever controls the temperature set point. There will usually be
a built-in thermometer that displays the air temperature at the thermostat.
Analog thermostats may not be as accurate or
as easy to control as a digital thermostat. If
you would like to upgrade your thermostat,
there is additional information on the
Heartland Owners Forum Wiki that details how
to do so. Here’s a link.
There are also a number of how-to guides
elsewhere on the internet. Using Google
Search with the terms “replacing the RV analog
thermostat” will pull up a list of tutorials
Heating and Cooling Guide V1.pdf
Page |6
Version: 1, March 15, 2013
Heartland Owners Forum
http://manuals.heartlandowners.org
Analog Thermostat Wiring
There is an informal or “loose” wiring standard for thermostats, but exact terminal functions can vary
from manufacturer to manufacturer. Yours may be different, or use different color wiring, but the basic
functions will be similar. You can rely more on the terminal designations than you can the wiring colors
for wiring or troubleshooting.
Here is a typical chart for the thermostat and equipment terminals in your RV. This may help you in
diagnosing or troubleshooting.
Terminal
Color
Description
R
Red
12 volt DC (+)
RH / RC
Red
12 volt DC (+) HEAT / COOL
W / W1
White
Heat (Furnace)
W2
White
Backup Heat
Y / Y1
Yellow
A/C Compressor
G
Green
A/C Fan low-speed
O / OB
Orange
Reversing valve (Heat Pump)
B
Blue
A/C Fan high-speed
Digital thermostats may have fewer wires going into the thermostat. Some of the remaining control
wires may be located in the relay box above the air intake.
Air Conditioner Operation
Living Room Air Conditioner
The living room air conditioner is usually a 15,000 BTU unit that pumps cold air through a main air dump
that has an adjustable grill. Some of the cold air is also routed through ceiling ducts with registers in the
living room, kitchen, bathroom, and bedroom. The main air dump can be left wide open, spilling most
of the air in the area nearest to the air conditioner. Even when fully open, some air will get through the
ducts to the registers in other areas. You may want to experiment with how to set the grills for best
cooling.
Do You Need the Optional Bedroom Air Conditioner
In mild climates, the living room air condition may be satisfactory to cool the entire coach. Most owners
agree that in hot climates, the optional bedroom unit is required to maintain comfortable temperatures.
What You Can Expect from the Air Conditioners
Cooling load is based on temperature and humidity inside your coach, and the cooling capacity of the
A/C varies based on temperature outside the coach. Having your fan set on high or low speed will affect
the capacity of the unit and the temperature of the discharge air also.
Heating and Cooling Guide V1.pdf
Page |7
Version: 1, March 15, 2013
Heartland Owners Forum
http://manuals.heartlandowners.org
Generally, with the fan on HIGH speed your discharge temperature at the main air dump should be
about 20 degrees Fahrenheit lower than the air entering at the return air grille. That will hold true up to
about 90-95 degrees outside, when the cooling efficiency begins to go down.
Dometic representatives speaking at the North American Heartland Rally have told owners that at best,
they can expect a 20 degree warmer temperature at the rear corner of the coach, than the air coming
out of the main air dump. If the air coming out of the main air dump is 58 degrees, the rear corner of
the coach may be 78 degrees. This may vary based on trailer layout, size and distance between these
two points.
Cooling efficiency is obviously affected by a number of other factors including:
•
•
•
•
•
•
Outside temperature and humidity
Direct sunlight, especially in the afternoon
Insulation
Dual pane vs. single pane windows
Shades and blinds
Size of the area being cooled
At 4:00 PM in South Florida during August, temperatures will be in the high 90s. Humidity will be in the
high 90s. Very intense direct sun will be on one side of the RV creating a significant heat load. Under
these conditions, in any larger RV, even an air conditioner that works perfectly will struggle to cool the
unit satisfactorily.
Specific tips on managing the air conditioning in hot weather are presented later in this guide.
Humidity
Excess humidity inside the coach puts a very significant load on the system. When the humidity has
been reduced, the heat can be more effectively handled. This is most noticeable when starting the air
conditioner in the late afternoon on a hot and humid day.
Maximize you systems performance by parking in shaded areas, minimizing humidity in the coach by
using vents when showering and cooking, running the fan on high speed, keeping windows and doors
closed as much as possible, closing shades, and turning the A/C on early in the day.
Bedroom Air Conditioner
Compared to the living area, the volume of air that is cooled in a bedroom is far less and doesn’t require
as large an air conditioner. A 13,500 BTU unit is typical. On trailers that have the “Whisper Quiet Air
Conditioning” design, the bedroom air conditioner is integrated into the ductwork, and works together
with the living room air conditioner to cool the entire trailer. The “Whisper Quiet” design is a fairly
recent innovation and is currently available on high-end fifth wheels.
When the bedroom air conditioner is an option, as on most units, it is not integrated into the ceiling
ducts. Rather it has air dumps at front and rear with directional louvers that allow directional control of
Heating and Cooling Guide V1.pdf
Page |8
Version: 1, March 15, 2013
Heartland Owners Forum
http://manuals.heartlandowners.org
the cold air streams. In most cases, the bedroom unit will quickly cool the bedroom down and the air
stream can then be directed toward the hallway to help cool the living area.
Toy Haulers with Three Air Conditioners
Some of the toy hauler trailers have an option to install a 3rd air conditioner in the garage. Operation is
similar to the living room and bedroom air conditioners. But due to the high electrical load that air
conditioners require, only two can be operated at any time. The living room unit is always powered, but
a transfer switch cuts power to the bedroom when the garage air conditioner is turned on.
Although 50 Amp shore power may provide enough power to run all three units at the same time, the
generator in the toy hauler does not. Due to that limitation only two can operate at the same time.
Whisper Quiet Air Conditioning System
The Whisper-Quiet system comes standard with 15,000 BTU high efficiency air conditioners in both the
living area and the bedroom, along with a redesigned ducting system that combines the cold air output
and warm air return from both units. Each air conditioning unit is controlled by its own thermostat; one
in the living area and the other in the bedroom. The separate thermostats and combined ductwork
allow owners to customize how the two units work together to better cool the entire trailer and even
out air temperatures.
Because of the redesigned ducting, the compressor and blower motors are repositioned to reduce noise
inside the coach. The larger bedroom unit is taller than the lo-profile 13,500 BTU unit used on other
coaches and raises the highest point of the coach by 3-4” to a new height of 13’3”.
Minimizing A/C Noise in the Living Room or in the Bedroom
A key advantage of the Whisper Quiet system is the ability to tailor settings to minimize noise in the
living room or in the bedroom.
To minimize noise in the living room, set the bedroom thermostat to a very low set-point temperature.
With the FAN set to AUTO, the temperature differential will cause it to run on HIGH and pump lots of
cold air through the integrated ducts, into the living room. The living room thermostat FAN setting can
be changed to LOW, with a higher set point temperature for cooling mode. The living room A/C will
then operate quietly, but will still circulate the cold air coming from the bedroom A/C.
When getting ready to go to sleep, you can reverse these settings to keep the bedroom cool with
minimum A/C noise.
Heating and Cooling Guide V1.pdf
Page |9
Version: 1, March 15, 2013
Heartland Owners Forum
http://manuals.heartlandowners.org
Dealing with Very High Outside Temperatures
Stay Ahead of the Heat
The most important thing you can do is to keep ahead of the outside temperature. Take advantage of
cooler morning temperatures and cool the interior to the lowest temperature you can tolerate. Then as
the heat load increases in the afternoon, even if the air conditioner can’t keep up, the trailer will still be
reasonably comfortable.
Cut the Heat Load
If possible, cut some of the heat load by opening your patio awning(s). Pick a trailer orientation so that
the afternoon sun is not directly on the largest windows. Consider closing the inside blinds/shades,
especially on the side facing the sun. Reflective material on those windows will also help.
Run the Bedroom A/C at Maximum Output
For trailers that don’t have the Whisper-Quiet system, you can still set controls so that the bedroom A/C
helps to cool the living room. Set the bedroom thermostat to a set point of 60 degrees. That will keep it
producing maximum output even after the bedroom gets cooled down. Leave the FAN setting on AUTO.
Redirect the Bedroom Air Flow
Close off the ceiling vents so that the living room A/C output is not wasted on the bedroom (see the
ceiling vent section later in the guide). Close the front louvers on the A/C unit and redirect the rear
louvers so that the air stream flows toward the living room.
Adjust the Living Room Thermostat
Because the redirected cold air stream will pass by the living room thermostat (usually located in the
hallway), you’ll need to adjust the living room thermostat set point to 60 degrees as well. This will keep
the living room A/C running at maximum. Leave the FAN setting on AUTO.
Run the Ceiling Fan
Since heat rises, warmer air from the living area rises to the ceiling and naturally flows toward the front
of the RV. Running the ceiling fan helps to circulate and distribute the air.
Dealing with Moderate Outside Temperatures
In moderately warm conditions where there’s not as much demand on the air conditioning units, a
different technique may be used with the thermostats.
During the daytime, set the bedroom thermostat to 74 degrees and the living room thermostat a bit
higher at 78 degrees. The bedroom A/C will come on first to remove the heat. The cooler air will
naturally flow down to the living room keeping it more comfortable. If it gets too warm in the living
room, the living room A/C will come on as needed to pick up the additional cooling load.
Reverse the set points at night so as to only start the bedroom A/C when it gets very warm, reducing the
noise in the bedroom while you’re trying to sleep.
Heating and Cooling Guide V1.pdf
P a g e | 10
Version: 1, March 15, 2013
Heartland Owners Forum
http://manuals.heartlandowners.org
Electrical Loads
A/C Units
Air conditioners are rated for their capacity in British Thermal Units (BTUs). The higher the BTU rating,
the more capacity it has to move heat, and the more electricity it requires.
All of our RV air conditioners run on 120 volts AC. If you have two air conditioners on your coach, your
coach will also have what is referred to as 50-Amp RV electrical service. The 50-Amp service consists of
two 120 volt, 50-Amp circuits. The circuit breakers in the main circuit breaker panel each use one leg or
the other of 50-Amp service.
Each rooftop air conditioner gets power from a separate circuit breaker. Typically, to spread the
electrical load, one unit will be powered from the first 50-Amp leg, and the other from the 2nd leg.
Like all motors, the air conditioner has a large inrush of current when it first starts, and then the current
drain is reduced after its motors come up to full speed. The initial inrush only lasts for a couple seconds.
A 15,000 BTU A/C unit will have a line voltage inrush current of about 19.8 amps, and back down to
about 9.5 amps when running. It will be fed by a 30-amp circuit breaker.
A slightly smaller 13,500 BTU unit will have a line voltage inrush current of about 19.4 amps and back
down to about 9.0 amps when it is running. It will be fed by a 20-amp circuit breaker. You might notice
that the 19.4 amp inrush current is quite close to the 20-amp circuit breaker rating. That is normal, as
the load would have to remain over the 20-amp circuit breaker rating for more than a few seconds to
trip the circuit breaker.
These electrical numbers are approximate and can vary with conditions. One determinant of the actual
current that you could see is the voltage applied to the motor. The lower the voltage, the higher the
current will be. Excessive current is what will cause circuit breakers to trip, or the motor in the air
conditioner to overheat. A drop in the voltage of only 10 volts will cause the current to increase by
about 2 amps. This can easily happen due to overloaded circuits in campgrounds, or by using extra long
or under-rated extension cords.
An electrical management system/power surge protector that protects against low voltage conditions
will protect your air conditioners by shutting off power to your rig should the voltage become
unacceptably low.
30 Amp Campground Electrical Service
If you are limited to a 30-Amp campground pedestal, you will likely only be able to run one air
conditioner at a time, and very little else.
12V DC for the Thermostat and Air Conditioners
The thermostats in your RV use 12-volts DC for control voltage. If you have a problem with 12-volt DC
supply (from either the power converter and/or batteries) your air conditioner will not operate. Note
that the 12-volt fuse panel has separate fuses for front A/C, rear A/C, and for the furnace.
Heating and Cooling Guide V1.pdf
P a g e | 11
Version: 1, March 15, 2013
Heartland Owners Forum
http://manuals.heartlandowners.org
Short-Cycling
When the air conditioner is shut off by any means (loss of power, thermostat cycled to OFF, or the
thermostat reaching the set point and turning it off) it should not be restarted for several minutes. This
is to allow the refrigerant gas to equalize and the compressor motor to cool down. (That is the hissing
sound you hear when the A/C shuts off).
If the motor tries to restart too soon, it can cause an over temperature condition. The motor has
internal thermal protection that will protect it and you may hear it try to start several times before it
succeeds. Most RV power protection systems will delay restoring power to your coach for two minutes,
specifically to protect you’re A/C motors. Some thermostats also have built-in short cycle protection.
Fan Operation
There are two motors in each air conditioner. One motor drives both the inside fan (evaporator) and the
outside fan (condenser). The other motor is inside the compressor and moves the refrigerant. The fan
motors are two or three-speed while the compressor motor is single-speed.
To minimize noise and drafts, we may set the thermostat FAN to LOW to run the air conditioner fans at
the low fan speed setting. This somewhat reduces the efficiency and capacity of the air conditioner, but
should only be done during cooler and less humid weather. If you try to run the air conditioner during
warmer, more humid weather with the fan on low speed, the inside coil (evaporator) is more prone to
freezing.
Coil Freeze-Up
If the condensation that forms on the fins of the coil freezes, this will eventually block the all airflow at
the coil. The compressor, if not equipped with a defrost sensor, will continue to run and may be
damaged. Coil freeze-up can also happen as a result of restricted airflow from a severely dirty filter or
blocked vents.
Coil freeze-up can also happen when the A/C runs for a very long period without “catching up.” This can
happen when your coach has been allowed to get very warm and you try to cool it down all at once. If
you leave for the day consider leaving the air conditioner on, setting the thermostat a couple degrees
higher. When you return and reset the thermostat, the air conditioner won’t have to work as long to
recover.
Some owners have found air leaks allowing the discharge air from the main air dump to be pulled back
into the return air plenum. This causes the coil to get abnormally cold and freeze up. This can be
checked by turning the air conditioner on and removing the return air grille and filter. Place your hand
into the return air plenum. If you feel cold air blowing back into the return plenum, you should
investigate further and attempt to seal any leaks with aluminum tape.
If you hear the A/C compressor and fan running but do not feel any cold air flow, the coil may be frozen.
If you suspect this, the coil must be thawed. To thaw a frozen coil, cycle the thermostat to OFF, and the
fan setting to HIGH. This will melt the ice off of the coil. This may take some time depending on the
Heating and Cooling Guide V1.pdf
P a g e | 12
Version: 1, March 15, 2013
Heartland Owners Forum
http://manuals.heartlandowners.org
amount of icing. You might also get some condensation dripping out of the return air grille. Keep an eye
out for this, especially with the bedroom unit, as no one likes a wet bed.
Routine Maintenance
Cleaning the Return Air Intake Filter(s)
The air conditioners have a washable filter media located directly behind the return air intake grille(s).
You should be able to see the filter(s) with the grille in place. This should be washed out with warm
soapy water as needed and allowed to air dry before reinstallation. The return air grille is easily removed
by pressing inward on a couple plastic locking tabs. Note that there is no filter used for the furnace air
return.
Cleaning the Outside Coils
Both the Evaporator and Condenser coils are accessible from the roof. The plastic shroud must be
removed from the air conditioner.
CAUTION: Before removing the shroud, cycle the thermostat to OFF and turn off the circuit
breaker(s) for the air conditioner(s).
Both of these coils and the two sets of fan blades can accumulate dust, spider webs, mud daubers, etc.
that can restrict airflow over time. This reduces the efficiency of your air conditioner and can make it
noisier. These should be inspected periodically regardless of run time, and cleaned if necessary. Light
dust can probably brushed off with a soft bristle brush. For heavier buildup, mild soap and water can be
used. Be very careful not get water into the fan motors, electrical components, or into the RV ductwork.
CAUTION: Be very careful to not bend the aluminum fins of the coils. They are soft and can easily
be bent by high pressure air cleaning or by rough hand cleaning.
You should also clean the drain pan and make sure the drain holes are clear of any obstruction. Allow
the air conditioner to dry thoroughly before restoring the power or running the equipment.
Common Problems
Insufficient cooling
• Turn off any unnecessary internal heat sources.
• Run vent vans as required in the bathroom and over the stove to exhaust excess heat and
moisture while showering or cooking.
• Check the A/C filter(s).
• Make sure the thermostat fan speed is set to high.
• Make sure all A/C vents are open and unobstructed.
• Check for frozen coils.
Heating and Cooling Guide V1.pdf
P a g e | 13
Version: 1, March 15, 2013
Heartland Owners Forum
•
http://manuals.heartlandowners.org
Clean the outside coils.
Modifications to Improve Airflow Through A/C Ducts
The living room air conditioner sends much of the cold air through the main air dump, and the rest
through the duct system. Depending on the layout of the trailer, this can result in uneven distribution of
cold air. If the main air dump is further forward, the seating area at the very rear of the coach may not
get as much cold air as desired through the ceiling vents.
TimK Tent Modification
Several years ago, a Heartland owner devised a relatively simple modification that redirects airflow so
that more goes through the ceiling vents. Here’s a link to the document that shows you how to add this
to your main air conditioner.
Closing the Bedroom Vents
During the day, closing the bedroom and bathroom vents helps to force more cold air out the living
room vents. Several owners have replaced the factory vents with adjustable vents that can be closed.
Here’s a link to the DwinCorp website. Click on the line drawing specifications to make sure you’re
ordering a compatible size.
Note that at night, you’ll probably want the vents open. The living room air conditioner usually sends
enough cold air into the bedroom that you don’t need the bedroom air conditioner on at night.
Cooling Starts and Stops Frequently
Check above the air intake for short-cycling where cold air leaks through gaps in the panel that
separates the main air dump from the warm air return. Use aluminum tape to seal gaps and leaks.
Air Conditioner Runs with Thermostat Set to HEAT Mode
The air conditioner blower runs continuously any time the thermostat’s fan setting is on HIGH or LOW –
even when the thermostat mode is set for HEAT. Cycle the Mode to FAN and use the + or – button to
change Fan speed to AUTO.
Air conditioner Won’t Start
• Check the thermostat settings. Cycle the mode to OFF. Then press the + or – button to display
the current temperature at the thermostat location. Cycle the mode back to COOL. Use the + or
- buttons to adjust the temperature set point to several degrees below the current temperature.
• Check the circuit breakers. When a circuit breaker trips, it moves slightly toward the off
position. If you run your fingers along the bottom edge of the circuit breakers, you can feel if
any of them are slightly out of place. To reset, flip the breaker to OFF and then back to ON.
• Check the DC fuse panel. On most panels, a red LED will illuminate next to a blown fuse. If you
suspect a blown fuse, carefully remove it and replace with a fuse of the same value.
Heating and Cooling Guide V1.pdf
P a g e | 14
Version: 1, March 15, 2013
Heartland Owners Forum
http://manuals.heartlandowners.org
Furnace Operation
Normal Sequence and Theory of Operation
When the thermostat is set to heat mode and the sensed temperature falls below the thermostat set
point, the furnace will start. First, the fan comes on for about 20 seconds. This is to purge the
combustion chamber of any potential gas. There is an air flow switch (sail switch) that must close before
the furnace will even attempt to light. Next the gas valve will open and the direct spark igniter will light
the main burner. A flame sensor checks for successful ignition. If the flame sensor does not detect the
burner being lit within a few seconds of the gas valve opening, the gas valve is closed and the fan will
run for about 60 seconds to purge any propane gas from the combustion chamber. This cycle will
continue for 3 or 4 attempts. After several unsuccessful tries at ignition, the furnace controller will lock
out and will not attempt to re-light until you cycle the thermostat to OFF and back ON.
If you’re not on shore power (converter powered) and your batteries are getting low on power, the fan
may come on but not move enough air to close the sail switch. In this case, the gas valve will not open
and the ignition sequence will not take place.
As the furnace runs, there will be a large amount of “waste” heat blowing out of the exhaust port of the
furnace outside. This is the combustion gas exhaust from the furnace and is normal.
If you see any buildup of soot around the exhaust port, this is a warning sign of improper flame
adjustment and that service is required.
When the temperature in your coach warms up sufficiently, the thermostat shuts the furnace off. The
gas valve closes, but the fan will continue to run until the burner has cooled down and the exhaust gases
have been purged from the combustion chamber.
Using Electric Heat
With the high price of propane and the inconvenience of filling propane tanks, you may want to consider
electric heat alternatives that can reduce the furnace runtime. If you are in a spot where the electric
use is included in site rental, using a heat pump, an electric fireplace, ceramic disc heaters, or similar
devices will reduce your camping cost.
Note that a fireplace or ceramic disc heater can require up to 15 amps of electric service. If you plug
them into outlets that are shared with other appliances, you could trip the circuit breaker. If you plan
on regular use of devices like these, it’s advisable to have a dedicated outlet and circuit breaker
installed.
CAUTION: In sub-freezing weather, running the furnace is the only way to pump heated air into
the underbelly. By running auxiliary heating devices, the furnace will usually not run as much,
and the underbelly will not be as warm. This could lead to parts of your plumbing system or
holding tanks freezing. It’s advisable to monitor underbelly temperature with a remote sending
thermometer.
Heating and Cooling Guide V1.pdf
P a g e | 15
Version: 1, March 15, 2013
Heartland Owners Forum
http://manuals.heartlandowners.org
Routine Maintenance
There is no filter for the furnace air return. The only regular maintenance is to regularly inspect the
furnace air intake and exhaust vents on the outside of the coach for obstructions. Look for evidence of
insects, spiders, mud daubers, etc. Also check regularly for soot buildup around the exhaust vent.
Common Problems
The most common problems affecting the furnace are:
•
•
•
•
Low voltage from the battery/power converter
Low or no propane flow
Restricted return air flow
Blocked heat registers
Low Voltage
The furnace blower, circuit board, and gas valve all depend on 12V DC power. If you are connected to
shore power, this is generally supplied by both the power converter and the battery. If you are boon
docking, the voltage comes from the battery.
The furnace blower consumes quite a bit of current and can run a battery down in one night when boon
docking. You may need more than one battery for cold weather boon docking. Using a generator to
recharge the batteries during the day is a common practice.
There is a 12V circuit breaker where the power converter and battery come together (usually located in
a group of automotive type circuit breakers near the battery). If that circuit breaker trips, the power
converter will no longer charge the battery. When on shore power, you may not notice that the battery
is not charging, because the power converter supplies the required 12V power to the interior lights and
to the furnace. The problems generally start up when you disconnect shore power. There is more on
this topic, along with diagrams and other troubleshooting assistance in our 12V Block Diagram &
Diagnostics guide, located in the manuals section of the Heartland Owners Forum.
Low or No Propane Flow
When the thermostat calls for heat, the furnace blower starts turning, blowing cold air through the
ducts. A short while later, gas flow is started and ignition is attempted. Inside the furnace, a flame
sensor determines if ignition succeeded. If the flame sensor doesn’t indicate that the burner is on, the
propane flow shuts off.
If propane flow is marginal, ignition may succeed, but the burner may not be hot enough for the flame
sensor to be triggered, and the propane valve will be shut off. In some cases, the flame sensor may
indicate success, and the furnace may produce lukewarm air. As the propane supply fluctuates, the
burner temperature can drop. The flame sensor will act as though the burner has gone out. The
propane valve will shut off.
A common symptom of low propane flow is to wake up to a cold interior, with cold or lukewarm air
coming out of the heat registers.
Heating and Cooling Guide V1.pdf
P a g e | 16
Version: 1, March 15, 2013
Heartland Owners Forum
http://manuals.heartlandowners.org
Troubleshooting Low or No Propane Flow
The furnace places a very high demand on propane flow. Checking the range burners for good propane
flow is a good first step if you suspect a problem with the propane supply, but because the range
doesn’t need as much propane flow as the furnace, it’s not a definitive test.
To definitively test propane flow, a manometer is required. But since most of us don’t have one, we’ll
need to try other methods.
First, go to the propane tank currently in use. Close the tank valve, wait about 10 seconds, and reopen
the valve very slowly (to avoid triggering the excess flow safety cutoff inside the tank). If that corrects
the problem, you may have just opened the valve a bit too fast.
If that doesn’t help, go to the auto-changeover regulator and manually switch it to the other propane
tank, and slowly open that valve. If that corrects the problem, you may have a problem with a failing
high-pressure pigtail from the first tank to its regulator, or you may have a failing regulator.
The pigtails and regulators are not difficult to replace. The hard part is being absolutely certain you have
the correct replacement parts. If you’re not certain, you should leave the repair to a certified
technician.
Restricted Return Air Flow
When the thermostat calls for heat, the furnace blower starts turning, blowing cold air through the
ducts. Inside the furnace assembly, a “sail switch” catches the blowing air and is designed to close if the
air is moving at 75% of normal velocity. If the return air duct is blocked, the blower may be unable to
move air at the correct velocity. To prevent a dangerous overheating condition inside the furnace, if the
sail switch doesn’t close, the furnace will not start on the propane flow. In that case, you may find that
the furnace just blows cold air.
Blocked Heat Registers
It’s quite common for the heat registers closest to the furnace to blow more hot air than you would like,
while the registers furthest away blow less hot air than you would like. Many people install adjustable
registers or cover some of the heat registers in part or in full and report some success in redirecting
furnace heat.
It’s important to note that Suburban, the furnace manufacturer, warns against blocking the registers.
Restricting airflow can result in an over-temperature condition developing inside the furnace burner
area. As a safety feature, there is a “high-limit” sensor inside the furnace. When an over-temperature
condition develops, the high-limit switch shuts off the furnace.
A symptom of a blocked register failure is that the blower may run constantly and the burner cycles on
and off. It’s possible that if this situation is allowed to continue, the high-limit switch could fail
altogether, preventing the burner from igniting.
Heating and Cooling Guide V1.pdf
P a g e | 17
Version: 1, March 15, 2013
Heartland Owners Forum
http://manuals.heartlandowners.org
Propane characteristics in cold weather
As outside temperatures fall below freezing, propane pressure from your tanks may fall below what’s
necessary for reliable furnace operation. Propane gas pressure at 0 degrees (F) is about ½ the pressure
from the same tank at 50 degrees (F).
For example, if you have a 30 pound tank that’s 40% full, and a 42,000 BTU furnace, at +20 (F), the
propane pressure will be slightly under what’s needed to reliably operate the furnace.
In very cold weather, an external tank may be necessary.
How Long Will a Tank of Propane Last?
This is a little like asking “how long is a piece of string?” It depends on how cold it is, how well the RV is
insulated, what kind of windows you have, size of the tanks, size of the furnace, furnace efficiency, and
perhaps other factors.
That said, a 30 pound tank contains enough propane to supply 646,440 BTU of heat. If the furnace
consumes 42,000 BTU per hour of operation, that would give you about 15.4 hours of furnace
operation. Of course you don’t normally have the furnace running continuously. So if it runs for 10
minutes of every 30 at night, and 5 minutes of 30 during the day, the tank might give you about 2.5 days
of operation.
Because propane vapor pressure drops as temperature drops, the efficiency of the furnace may
decrease as outside temperatures drop. This may result in a drop in the temperature of the hot air
coming out of the registers.
Also, as temperatures drop, the trailer loses heat faster and the thermostat will call for heat more
frequently to keep the trailer warm. So you may get far less than 2.5 days from a 30 pound tank if
temperatures drop to zero (F) overnight.
Heating and Cooling Guide V1.pdf
P a g e | 18
Version: 1, March 15, 2013