1
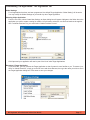
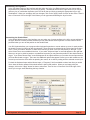
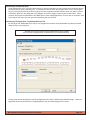
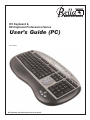
DV Keyboard &
EZ Keyboard Professional Series
User’s Guide (PC)
Rev 4-26-04
DV Keyboard & Professional Series User Guide
Contents
Copyright Notice
Placement of the Keyboard, Mouse, and Other Input Devices
Furniture and Posture
Hand and Arm Position and Motion
Follow these guidelines when working at the computer
Introducing the DV Keyboard/Professional Series EZ Keyboard
System Requirements
Package Contents
The DVKeyboard
The Professional Series
Registration
About Bella Corporation
Hardware Installation
Software Installation
Launching the DV Keyboard Settings Program
Interface Basics
Presets Included
Customizing The Application: The Jog/Shuttle Tab
Global Settings
Selecting A New Application
Renaming A Target Application
Understanding The Interface
Three Steps To Programming Most Settings
Entering Settings
Customizing The Jog Wheel
Customizing The Shuttle Wheel
Advanced Shuttle Wheel Techniques
Customizing The Specialty Keys
Customizing The Application: The Multimedia Keys Tab
Customizing The Multimedia Keys
Modifying Individual Multimedia Keys
Using the Power Button
Importing & Exporting Settings
Removing Settings
Changing a Target Application
Obtaining Technical Support
DV Keyboard & Professional Series User Guide
3
3
3
4
4
5
5
5
5
5
5
5
6
6
6
6
6
7
7
7
7
8
8
8
9
9
10
11
11
12
12
12
12
12
12
13
Page 2
Copyright Notice
Copyright 2003 - 2004 Bella Corporation; all rights reserved.
This manual is furnished under license and may be used or copied only in accordance with the terms of such license.
Except as permitted by such license, no part of this publication may be reproduced, stored in a retrieval system, or transmitted, in any form or any means, electronic, mechanical, recording, or otherwise, including translation to another language or format, without the prior written permission of Bella Corporation.
The content of this manual is furnished for informational use only, is subject to change without notice, and should not be construed as a commitment by Bella Corporation. Bella
Corporation assumes no responsibility or liability for any errors or inaccuracies that may appear in this book.
All product names, trademarks and registered trademarks in this document are the property of their respective holders.
Federal Communications Commission (FCC) Notice
This device complies with Part 15 of the FCC rules. Operation is subject to the following two conditions: (1) this device may not cause harmful interference, and (2) this device
must accept any interference received, including interference that may cause undesired operation.
This equipment has been tested and found to comply with the limits of a Class B digital device, pursuant to Part 15 of the FCC Rules. These limits are designed to provide reasonable protection against harmful interference in a residential installation. This equipment generates, uses and can radiate radio frequency energy and, if not installed and used
in accordance with the instructions, may cause harmful interference to radio communications. However, there is no guarantee that interference will not occur in particular installations, if this equipment does cause harmful interference to radio or television reception, which can be determined by turning the equipment off and on, the user is encouraged
to try to correct the interference by one or more of the following measures:
Declaration of Conformity
Bella Corporation declares that the DV Keyboard/Professional Series EZ Keyboard conforms to the following standards, in accordance with the provisions of the EC Directive
89/366/EEC: EN 55022 (CISPR 22:1985), Class A.
Warranty
Bella Corporation warrants that this product will be free from defects in materials and workmanship for period of time specified on the product packaging. This limited warranty
shall commence from the date of purchase. Bella Corporation’s warranty is not transferable and is limited to the original purchaser. If the product is found to be defective then,
as your sole remedy and as the manufacturer's only obligation, Bella Corporation will repair or replace the product. This warranty shall not apply to products that have been subjected to abuse, misuse, abnormal electrical or environmental conditions, normal wear and tear or any condition other than what can be considered normal use.
Warranty Disclaimers
Bella Corporation makes no other warranties, expressed or implied, and specifically disclaims any warranty for merchantability or fitness for a particular purpose. The exclusion
of implied warranties is not permitted in some states and the exclusions specified herein may not apply to you. This warranty provides you with specific legal rights. There may
be other rights that you have which vary from state to state.
Limitation of Liability
The liability of Bella Corporation arising from this warranty and sale shall be limited to a refund of the purchase price. In no event shall Bella Corporation be liable for costs of
procurement of substitute products or services, or for any lost profits, or for any consequential, incidental, direct or indirect damages, however caused and on any theory of liability, arising from this warranty and sale. These limitations shall apply not with standing any failure of essential purpose of any limited remedy.
Placement of the Keyboard, Mouse, and Other Input Devices
The keyboard, mouse, and other input devices, such as a numeric keypad, should be positioned so that your arms
and hands are in a relaxed, comfortable, and natural position.
•
•
•
Select a work surface that is large enough to hold the computer equipment and any additional items required
for your work.
Position the keyboard directly in front of you. This makes it possible to type with your shoulders relaxed and
your upper arms hanging freely at your sides.
Position the mouse at the same level as the keyboard.
Furniture and Posture
Adjust the furniture to meet your needs for comfort. If the workstation table is adjustable, move it to the proper
height. If it is not adjustable, then arrange the chair to suit your needs.
•
•
•
•
•
Adjust the height of the chair and/or work surface so your forearms are parallel with the floor and your wrists
are straight.
You should be able to maintain your proper arm position and place your feet flat on the floor. Avoid pressure
along the underside of your thigh near the knee and the back side of your lower leg.
Position the backrest and yourself so that your lower back is supported comfortably while you sit at your work
station.
Adopt a relaxed, upright working posture. Avoid slouching forward or leaning far backward.
Place frequently used work materials within easy reach.
DV Keyboard & Professional Series User Guide
Page 3
Hand and Arm Position and Motion
You can prevent straining of your arms, wrists, and hands by using natural, comfortable motions while working at
the computer. Refer to the illustrations in this section for examples of correct and incorrect positions of arms, wrist,
and hands.
Follow these guidelines when working at the computer:
•
When typing, your forearms and wrist should be level and parallel to the floor.
• Keep your elbows in a relaxed position near your body. Your elbows may lightly touch your sides, but don’t
press them tightly against your body.
• When using a keyboard, mouse, or other input devices, keep your wrists in a natural, straight position. Avoid
bending, arching, or angling your wrist.
• If you use a palm rest, use it only briefly for resting. Do not use a palm rest, or rest your hands on the table,
while you are typing.
• Pay particular attention to keeping your thumbs and fingers in a relaxed, natural position.
• Use the minimum amount of force that is needed to push down the keys. Avoid banging on the keys using
more force than is required.
•
•
Hold the mouse with a relaxed hand. Do not grip the mouse tightly.
Use your whole arm to move the mouse
DV Keyboard & Professional Series User Guide
Page 4
INTRODUCTION
Introducing Bella Corporation’s DV Keyboard & EZ Keyboard Professional Series
Thank you for purchasing Bella Corporation’s DV Keyboard or EZ Keyboard Professional Series. The keyboard is
a multimedia keyboard specifically designed for video, audio, multimedia and internet use. It’s unique jog/shuttle
controller and Specialty keys allow you to have the precise control over your video and audio clips. It is a full size
USB keyboard with 14 extra multimedia keys and our unique jog/shuttle controller with two Specialty keys. The DV
Keyboard/Professional Series EZ Keyboard is a true time saver for both professionals and amateurs alike.
System Requirements
•
Windows XP, Windows 2000 or Windows 98
• Available USB port
Package Contents:
The DV Keyboard package includes the following:
• DV Keyboard or Professional Series with jog/shuttle controller and Specialty keys
• Free sticker set and mail-in coupon for additional sticker set (DV Keyboard only, US customers only)
• Driver CD - Contains Keyboard driver, User’s Guide, and Premiere Pro keyboard layout
The Professional Series package includes the following:
• Professional Series keyboard with color and icon coded keycaps, jog/shuttle controller and Specialty
keys
• Driver CD - Contains Keyboard driver, User’s Guide, and Premiere Pro keyboard layout
Registration
We are confident that the DV Keyboard/EZ Keyboard Professional Series will greatly increase your productivity
and simplify the usage of your computer. Please register this product at www.Bella-USA.com/registration. It will
help you obtain the latest drivers, updates, technical support and Bella Corporation product release information.
About Bella Corporation
Bella Corporation was established to focus on designing and producing innovative products. Bella's first product to
market was the highly successful EZ Keyboard series of editing keyboards. The company is headquartered in
Burbank, California. More information about Bella Corporation products and services is available through the following sources:
Bella Corporation
Telephone: 818-563-9500
Email: [email protected]
Web: www.Bella-USA.com
DV Keyboard & Professional Series User Guide
Page 5
Hardware Installation
Plug your DV Keyboard directly into any available USB port on your computer - there is no need to shut down the
computer first. Once the computer has recognized the new hardware, the keyboard's standard functions will be
ready for use, however, in order to take advantage of the programmable jog/shuttle controller, Specialty keys, or
multimedia keys, you must install the keyboard driver from your installation CD. The keyboard also features two
USB ports of the back of the keyboard - perfect for plugging in a mouse or other USB device.
Software Installation
To install the drivers insert the installation CD into an available CD-ROM drive on your computer. The installation
utility should start on its own automatically. If it doesn't, you can start it manually by going into Windows Explorer
and clicking on My Computer. Find the listing for the CD-ROM you inserted the driver disk into. Click on it to open
and then find the "setup" or "setup.exe" icon and double-click on it. This will launch the driver installation. Follow
the instructions on your screen to complete the driver installation. It should take less than a minute on most systems. At the end of the installation it will ask you if you want to execute the keyboard driver now. Select yes and
your keyboard should now be correctly installed.
Launching the DV Keyboard Settings Program
To confirm its installation or to load or modify your keyboard settings, launch the DV Keyboard utility program from your Windows Start menu under All Programs/ DV Keyboard / DV Keyboard Settings. You can
also double click on the DV Keyboard icon in the Notifications area of your Taskbar.
Interface Basics
The driver interface is designed to be simple and straightforward. It is divided into two sections: Jog/Shuttle and
Multimedia. You can toggle back and forth between the two sections by clicking on the Jog/Shuttle and Multimedia
tabs in the upper left corner.
Presets For Popular Applications Included
The DV Keyboard software already includes presets for popular applications. If you click on the drop-down window
next to “Target Application” and see the software you are using, you should be ready to use the keyboard.
Remember to check the Support section of the Bella web site for the latest drivers and
presets available for download from the site.
DV Keyboard & Professional Series User Guide
Page 6
Customizing The Application: The Jog/Shuttle Tab
Global Settings
For all applications that have not been programmed, the default Target Application “Global Setting” will be active.
You may modify the Global Settings as you would any other Target Application.
Selecting A New Application
From the File menu, select Create New Settings; an Open dialog box will appear. Navigate to the folder where the
application you wish to create a setting for resides. You will need to select the .exe file that launches the application. For Adobe Premiere Pro, you would select “Adobe Premiere Pro.exe”
Click Open and your application will now be part of the list of other Target Applications.
Renaming A Target Application
If you would like, you may rename the Target Application so that it’s name is more familiar to you. To rename “premiere” to “Adobe Premiere,” simply go to the file menu and chose Rename, then type the name you wish to see in
the Target Application dialog box. Press enter to save your changes.
DV Keyboard & Professional Series User Guide
Page 7
Understanding The Interface
In order to program the DV Keyboard Settings, it may be helpful to understand how the application works.
Essentially, when we are programming either the jog, shuttle, or Specialty keys, we are simply having those
devices produce keystrokes found on the keyboard. For example, with the Jog wheel, when we turn the wheel to
the left, we may have it produce an arrow left command. When you are using the jog wheel and spin it to the left,
the faster you spin the wheel the faster the jog wheel “hits” the arrow key.
Three Steps To Programming Most Settings
1. Select the Action of either the Jog Wheel, Shuttle Wheel, or Specialty keys (see Entering Settings below). The
Action is the physical action of the device, such as turning the Shuttle wheel to position Shuttle Right 1.
2. Select what type of input you want - None,
Keyboard or Mouse. Under the Input menu,
use your mouse to select one of these
options.
3. If you have selected Keyboard under the
Input menu, then the Keyboard Input menu
will become active - you can press any key or
key combination.
Tip: By clicking on the radio button next to Keyboard Input, you can select special
keyboard commands, such as F18.
Under the Shuttle Wheel section, you will also have a Frequency option, allowing your computer to continue to
produce a certain keystroke or mouse input at a regular interval.
Entering Settings
There are three ways to enter Action settings:
1. By clicking on the appropriate area of the the interface (for example, for the Jog
Left function, you would click on the left portion of the Jog Wheel and have the
Action dialog box switch to Jog Left). The area you are affecting will turn red to
show that it is the active area.
2. By using the drop-down menu under Action. Simply click the down arrow and
select the appropriate Action.
3. By pressing a button or turning the jog or shuttle wheel on the keyboard itself. The area you are affecting will
turn red to show that it is the active area.
DV Keyboard & Professional Series User Guide
Page 8
Customizing The Jog Wheel
In the Jog Wheel section of the interface and with either Jog Left or Jog Right selected you may choose which
keystroke will be produced when you turn the jog wheel. The defaults are left arrow, right arrow but you can program any key or combination keystroke (such as Ctrl+R) that you like by pressing the appropriate keys or key
combinations. When you are happy with your changes, click on the "Apply" button for them to take effect. There is
also a "Comment" field to the right of this where you can type notes describing the keys function.
Customizing the Shuttle Wheel
In the Shuttle Wheel section of the interface you can select any of seven positions to the left or seven positions to
the right. With one of these positions selected you may then choose which keystroke or mouse function will be
produced when you turn to that position on the shuttle wheel.
Your DV Keyboard allows you to program either keyboard keystrokes or mouse actions to occur for each position
the shuttle is turned (or None can also be selected). These choices are selected in the "Select Input" drop down
menu. Once you make a selection, it alters which choices you have in the next field directly to the right. If you
select "None" there are no additional choices. If you select "Keyboard Input" a text field appears to the right that
allows you to type in which keystroke or combination keystroke you may want that position of the shuttle wheel to
trigger. If you select "Mouse Input" a text field appears to the right that allows you to select the scroll amount that
you want that shuttle to trigger. There are also additional options that appear to allow you to add modifiers to the
mouse input to have the same effect as pressing the control, alt or shift keys along with the selected mouse input.
For both the Keyboard Input and the Mouse Input, a "Frequency" field is available to select how often you would
like to have the action repeated if the shuttle wheel is held in that position. When you are happy with your
changes, click on the "Apply" button for them to take effect. There is also a "Comment" field to the right of this
where you can type notes describing the keys function.
DV Keyboard & Professional Series User Guide
Page 9
Advanced Shuttle Wheel Techniques
For certain applications it may be beneficial to program an action that is (or is not) produced when the shuttle
wheel is returning to the Shuttle Center position.
Notice how the Action menu has two types of action for the Shuttle: basic settings (Figure 1) of Shuttle Left 1-7
and Shuttle Right 1-7 commands, as well as the more advanced settings (Figure 2) of Shuttle from Left 1 to Left 2,
Shuttle Left 2 to Left 3 etc. Note that these settings are all part of the same drop-down menu.
Figure 1 - basic settings
Figure 2 - advanced settings
The basic settings perform the same function when the wheel is turned back to the center position as when it was
turned to any of the right or left positions. For example, if you programmed the shuttle wheel to produce a right
arrow keystroke for positions Shuttle Right 1 through 7, as you turn the shuttle from the Shuttle Center position all
the way to the Shuttle Right 7 position (90 degree to the right), the keyboard would produce seven right arrow keystrokes. As you turn the shuttle wheel and return it to the Shuttle Center position, another seven right arrow keystrokes will be produced.
With the advanced settings, you can control what keystrokes the shuttle produces when it is returned to the Shuttle
Center position. To take advantage of this feature, you must program both directions of the shuttle turning using
the advanced settings. For example, if you wanted to have the shuttle produce keystrokes while turning it from the
Shuttle Center to the Shuttle Right 7 but not when it returns to the Shuttle Center position, you must do the following:
1.
2.
3.
4.
5.
Select Shuttle From Center to Right (or Left) 1
Select the desired keystroke
Select From Right (or Left) 1 to Right (or Left) 2
Select the desired keystroke
Repeat this until you have reached Shuttle position 7
Now program the shuttle’s return to the Shuttle Center position
1. Select Shuttle From Right (or Left) 7 to Right (or Left) 6
2. Select the desired keystroke (for this example, None).
3. Repeat this until you have reached the Shuttle Center position
As you can see, there is great flexibility when programming the shuttle functions. With a little experimentation, you
will most likely be able to achieve the results you desire.
DV Keyboard & Professional Series User Guide
Page 10
Customizing The Specialty Keys
Under Specialty Keys you can select either left key or right key and then you may choose which keystroke this will
produce when you push a Specialty key. The defaults are alt+left arrow and alt+right arrow but you can program
any key or key sequence that you like by typing it into the keystroke text field while the action you want to control
is selected. When you are happy with your changes, click on the "Apply" button for them to take effect. Some
common choices are to select Mark In and Mark Out for video editing applications. There is also a "Comment" field
to the right of this where you can type notes describing the keys function.
Customizing The Application: The Multimedia Keys Tab
By clicking on the “Multimedia Keys” tab you can program the functions of the Multimedia keys that are located
along the top of your keyboard.
Although some of the media keys are labeled with specific symbols,
they can all be reprogrammed or customized to your own preferences.
Directly under the Multimedia tab is the Target Application list, with the default being Global Settings. Unless an
application has been specified in the Target Application list, the Global settings will be active.
DV Keyboard & Professional Series User Guide
Page 11
Customizing The Multimedia Keys
To choose a new application or rename an application, please follow the “Selecting A New Application” and
“Renaming A Target Application” earlier in this guide.
You can change the function of any of the multimedia keys and save custom configurations to load when a specific
program is active. For instance, you may not need any of the pre-set keys for the internet while in your video editing program. It may be useful to program the www buttons to open your sound editing program or trigger helpful
keyboard shortcuts.
Modifying Individual Multimedia Keys
To modify the function of a multimedia key first highlight it by clicking on its picture in the driver interface or by simply pressing the multimedia key you want to modify on your keyboard. The name of the button that is highlighted
will appear under "Button Name". To the right of this, under "Button Action", the currently programmed function will
be listed. To change this function click on it and a drop-down menu will appear with choices to program the button
with. Take note of the "Open Item" and "Keystroke" choices. These require additional user input and open up
many possibilities for programming. When "Open Item" is selected a Windows browser window appears asking
you to select which application you would like to open when this multimedia key is pressed. You can select any
.exe file that has been installed on your computer. When "Keystroke" is selected under button action, a new field
appears below it titled Keystroke. Click in it’s text field and type whatever key or combination keystroke you would
like to be assigned to the multimedia key. There is also a "Comment" field where you can type notes describing
the key’s function. When you are happy with the changes you have made click on the apply button to save the
changes.
Using the Power Button
To the left of the Multimedia keys is the Power button: by pressing
the button, you will get the “Shut Down Computer screen. use
your keyboard or mouse to make the appropriate selection. Note:
the Power button will not wake up or turn on the computer - you
must do this via the switch on the computer.
Importing & Exporting Settings
You can easily load settings using the Import Settings feature located under the File menu. Once you have selected Import Settings you will be able to select the setting from the Open dialog box. Chose the appropriate file and
choose Open. The settings will now be loaded and ready for use.
To export a setting, make sure the setting you wish to export is selected in the Target Application box, then choose
Export Settings under the File menu. Select the destination where you would like the file to be saved, and click
Save.
Removing Settings
WARNING: Removal of settings is permanent and can not be undone.
Although having additional settings in the Target Application will not decrease performance, you may wish to
remove settings that you are not using. To Remove a setting, simply select the setting you would like to remove in
the Target Application dialog box, then go to Remove Settings under the File menu, and the setting will immediately be removed.
Changing a Target Application
Our driver determines what application setting to load based upon the executable file for the software, for example
“Vegas4.exe” If you install a new release of the software, it is possible that the executable file name will be
changed (perhaps to Vegas5.exe). If this happens, you will notice that the jog/shuttle will no longer work. To fix
this, simply make sure the old target application - in this case Vegas 4 - is selected as the Target Application.
Under the File menu, simply select “Change Target Application” and choose the new file, “Vegas5.exe” and all of
the previous settings for Vegas 4 will now work with Vegas 5. Finally, you will want to rename the setting from
Vegas 4 to Vegas 5.
DV Keyboard & Professional Series User Guide
Page 12
Obtaining Technical Support
We are confident that our product will provide you with many years of trouble free service, however should you
need assistance, we have provided you with a number of resources.
The support section of our web site, www.Bella-USA.com/Support is the best source for the latest information and
support on our products. Please check the Post-Sales FAQ section of the web site prior to contacting us for technical support, as this will provide you with immediate answers to most of your issues or concerns. On the site you
will find:
Driver Updates
Settings Files
FAQ (Frequently Asked Questions)
Latest Product Information
Bella Corporation
Telephone: 818-563-9500
Email: [email protected]
Web: www.Bella-USA.com
DV Keyboard & Professional Series User Guide
Page 13