1
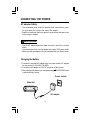
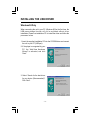
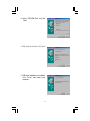
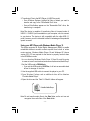
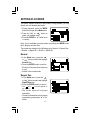
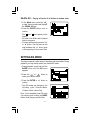
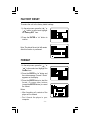
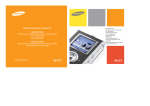
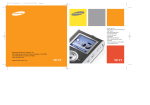
Instruction Manual
HDD Digital Audio Player
HDP3202BS
FCC INFORMATION
C
C
This equipment has been tested and found to comply with the limits for a
Class B digital device, pursuant to Part 15 of the FCC Rules. These limits
are designed to provide reasonable protection against harmful
interference in a residential installation. This equipment generates, uses
and can radiate radio frequency energy and, If not installed and used in
accordance with the instructions, may cause harmful interference to
radio communications. However, there is no guarantee that interference
will not occur in a particular installation. If this equipment does cause
harmful interference to radio or television reception, which can be
determined by turning the equipment off and on, the user is encouraged
to try to correct the interference by one or more of the following measures:
- Reorient or relocate the receiving antenna.
- Increase the separation between the equipment and receiver.
- Connect the equipment into an outlet that is on a circuit different from
the one the receiver is connected.
- Consult the dealer or an experienced radio / TV technician for help.
You are cautioned that any changes or modifications not
expressly approved in this manual could void your authority to
operate this equipment.
-1-
SAFETY PRECAUTIONS
1. The apparatus shall not be exposed to dripping or splashing and that
no objects filled with liquids, such as vases, shall be placed on
apparatus.
2. Mains plug is used as the disconnect device. It shall remain readily
operable and should not be obstructed during intended use. To be
completely disconnected the apparatus from supply mains, the mains
plug of the apparatus shall be disconnected from the mains socket
outlet completely.
What You Need to Know About Safety Instructions
Warning and Important Safety Instructions appearing in this manual are
not meant to cover all possible conditions and situations that may occur.
Common sense, caution and care must be exercised when operating,
mounting, or cleaning this unit.
Always contact your dealer, distributor, service agent or manufacturer
about problems or conditions you do not understand.
This is the safety alert symbol. It is used to alert you to potential
personal injury hazards. Obey all safety messages that follow
this symbol to avoid possible injury or death.
DANGER
DANGER indicates an imminently/potentially
hazardous situation which, if not avoided,
will result in death or serious injury.
WARNING
WARNING indicates a potentially hazardous
situation which, if not avoided, may result in
moderate injury or product/property damage.
CAUTION
CAUTION used without the safety alert
symbol indicates a potentially hazardous
situation which, if not avoided, may result in
minor damage.
-2-
SAFETY PRECAUTIONS
DANGER
Serious injury or death can result if not handled as directed.
• Connect the AC adapter only to rated power outlet as described in the
user manual.
• Do not touch the AC adapter with wet hands. If the inside or outside of
the adapter gets wet, and electric shock may result.
• Do not repair, disassemble, or modify the product. Refer servicing to
qualified personnel only.
• Promptly disconnect the AC adapter from the power outlet if the product
produces smoke, smells, or makes unusual sounds.
• Do not use earphones or headphones while driving a vehicle,
motorcycle, or riding a bicycle.
WARNING
Moderate injury or product/property damage can result if not handled as
directed.
• Promptly turn the power off and disconnect the AC adapter from the
power outlet during electrical storms, to avoid product damage due to
excessive current surges.
• Do not place the product near sources of strong magnetism such as
magnets, TVs, monitors, or speakers.
• The product should not be used near water-for example, near a bathtub,
washbowl, or kitchen sink, etc.
CAUTION
Minor damage can result if not handled as directed.
• Clean by lightly wiping with a dry soft cloth. Do not use volatile chemicals
on this product.
• Do not expose the product to direct sunlight or any source of heat for
a long period.
• Do not place heavy objects on top of the product, to avoid product
malfunction.
-3-
TABLE OF CONTENTS
FCC INFORMATION....................................................................................1
SAFETY PRECAUTIONS..........................................................................2
TABLE OF CONTENTS..............................................................................4
NAMES OF EACH PART............................................................................5
CONNECTING THE POWER......................................................................8
INSTALLING THE USB DRIVER ..............................................................10
USING IN PC...........................................................................................12
Using your MP3 Player without Windows Media Player 10.....................12
Using your MP3 Player with Windows Media Player 10........................13
Synchronize tracks to the MP3 Player..................................................14
Disconnecting the Player from your Computer........................................17
GETTING STARTED................................................................................18
PLAYING MUSIC FILES............................................................................19
RECORDING.............................................................................................20
SEARCHING MUSIC...............................................................................22
PLAYLIST OPERATION..........................................................................23
SETTING PLAY MODE............................................................................25
SETUP FUNCTION...................................................................................27
Music ..................................................................................................28
Record ...............................................................................................29
USB ...................................................................................................30
Back Light ..........................................................................................31
Sleep Timer .........................................................................................31
Factory Reset.......................................................................................32
Format.................................................................................................32
INFORMATION...........................................................................................33
LICENSE.....................................................................................................33
TROUBLESHOOTING.................................................................................34
SPECIFICATION.......................................................................................35
-4-
NAMES OF EACH PART
Front Overview
2
MENU
3
MODE
4
1
ENTER
VOL
VOL
5
STOP
6
10 9 8 7
Side Overview
DC IN 5V
11 12
18
13
14
15
16
17
19
-5-
Function of Controls
1
LCD Display
To display current status.
2
MENU Button
In Music/Record display mode or during playback, press this
button to go into main menu.
3
MODE Button
During playback, press this button to set play mode. Or press
and hold this button to set the EQ mode.
4
F.F Button
Press “” lightly/repeatedly:
To locate the beginning of the next tracks.
Keep “” depressed:
To go ahead at high speed.
5
VOLUME+/ UP Button
Increases volume or select options upward.
6
STOP Button
To stop playback.
To stop current recording.
7
ENTER Button
To confirm your selection or enter sub-menu.
8
PLAY/PAUSE Button
Press this button to start playing.
Press this button to pause during playback, press it again to
resume.
9
VOLUME-/ DOWN Button
Decreases volume or select options downward.
10
R.W Button
Press “” lightly/repeatedly:
To locate the beginning of the current track or previous tracks.
Keep “” depressed:
To go back at high speed.
-6-
11
STRAP MOUNT
For buckling the strap (not included).
12
RESET HOLE
For resetting the unit.
13
POWER Button
Press this button to turn on/off the device.
14
HOLD Knob
Slide this button to lock/unlock the buttons.
15
Microphone
For voice recording.
16
RECORD Button
In record mode, press this button to record some songs or
others.
17
EARPHONE/LINE IN Jack
For connecting the earphone to enjoy your music.
For connecting the Line-in cord to record.
18
Main Socket
DC IN 5V. For connecting the AC adapter.
19
Min USB Port
For connecting to your PC with supplied USB cable.
-7-
CONNECTING THE POWER
AC adapter Safety
• The uninsulated parts inside the adapter could cause electric shock.
For your safety, do not open the case of the adapter.
• Read this Instruction Manual to prevent any problems that may occur
while using the adapter.
WARNING
• Use the AC adapter away from water sources to avoid fire or electric
shock.
• To avoid electric shock, use the adapter only with a 120V power outlet.
• Make sure that the adapter’s plug is inserted all the way into the outlet.
Charging the Battery
1. Connect the supplied AC adapter plug to a power socket. AC adapter
for this product is 100~240V, 50~60Hz.
2. Connect the AC adapter to 5.0V DC connector of the product.
3. When charging the battery, you may press the
PLAY/PAUSE button
to play and enjoy musics.
Power socket
Main Unit
DC IN 5V
AC adapter
-8-
CONNECTING THE POWER
Notes:
• When the battery voltage level is low, “
” will flash, and the player
will power off automatically if the “Battery Low!” message appears.
Please charge it.
• If a power source is connected, the product is being charged and the
“Charging...” notice appears.
• If the built-in battery is fully charged, the charging process will
automatically terminate and the “Battery Full” will appear.
• Battery recharge time in normal operation is approximately 3.5 hours.(It
needs more than 12 hours when the battery is indicated full for the
first time.)
• To prolong the life of the built-in battery, use the fully charged battery
until it is completely discharged, and then fully charge it again before
use. If you charge the battery that is not completely drained, the
battery operating time will decrease. In this case, fully cycle (fully
charge and then fully discharged) the battery several times.
• The playback time expected from one full charge is approximately 1012 hours.
CAUTION
•
•
•
•
To avoid the risk of fire, do not charge longer than 12 hours.
Do not plug several devices into the same outlet.
Overcharging will reduce the battery life.
Do not let metallic objects, such as necklaces or coins, come into
contact with the terminals (metallic parts) of the adapter.
• Do not touch the adapter with wet hands.
• Turn off the unit before unplugging the AC adapter from the product
so as to avoid the product being damaged.
• When the unit is not going to be used for a long time, disconnect the
AC power supply cord from the AC outlet.
-9-
INSTALLING THE USB DRIVER
Windows 98 Only
When connecting the unit to your PC (Windows 98) for the first time, the
USB mass storage function will not be activated without driver
installation. Please use installation CD to install the driver and follow the
processes below.
1. Insert the supplied installation CD into the CD-ROM drive and connect
the unit to your PC (USB port).
2. If the player is recognized by your
PC, the “Add New Hardware
Wizard” is activated, and click
“Next”.
3. Select “Search for the best driver
for your device (Recommended)”.
Click “Next”.
- 10 -
4. Select “CD-ROM Drive” and click
“Next”.
5. USB driver file is found. Click “Next”.
6. USB driver installation is completed,
click “Finish” and restart your
computer.
- 11 -
USING IN PC
No Driver is required for Windows Me/2000/XP Operating System. They
will detect the Audio Player automatically after the connection with the
USB port is established.
This player supports two USB modes: USB Disc & DRM Music. Please
see page 30 for setting USB mode.
Mass Storage Class (USB Disc) devices can act as removable hard
drives for storage of important files and information.
Media Transfer Protocol (DRM Music) is REQUIRED with the player if
you want to purchase music content in Windows XP (above version
SP1) from your favorite music provider. It is used to validate the licenses
of existing music files as well as new music files you may have
purchased from online sources.
Using your MP3 Player without Windows Media Player 10
It is unnecessary to set USB mode if you are running the Windows 98/
Me/2000 operating system. After connecting the player to PC, the player
will be recognized as the USB Mass Storage Device (USB Disc mode).
For Windows XP without Windows Media Player 10, please set the USB
mode to USB Disc.
1. Use the supplied USB cable to connect the
unit to your PC (in USB Disc mode).
2. Open Windows Explorer and an additional
drive will be listed as “Removable Disk”. (In
Windows Me/2000/XP, the
icon appears
on the bottom of the desktop.)
Note: It might take several seconds for the device to be detected,
especially in Windows2000/XP. Click Refresh in My Computer to make
sure the device has been detected.
- 12 -
3. Transferring Files to the MP3 Player (in USB Disc mode)
• From Windows Explorer, highlight all files or folders you want to
transfer and copy to the “Removable Disk” drive.
• Once all files/folders appear on the “Removable Disk” drive, the
transferring is complete.
Note:The device is capable of transferring files at hi-speed mode of
USB 2.0. If USB 2.0 port is available on your computer, use it to connect
to your device. The device is still compatible with the older USB 1.1
ports. However, you will not be able to take full advantage of the potential
speed increase.
Using your MP3 Player with Windows Media Player 10
This player supports for Digital Rights Management (DRM) to enable
networked devices to access content acquired from a host of online
music services. Windows Media Player 10 and Windows XP (above
version SP1) PC are required for the device to properly function when
in the DRM Music mode.
• You can download Windows Media Player 10 from Microsoft by going
to www.microsoft.com/windows/windowsmedia/download/default.asp.
1. Set the USB mode to DRM Music.
• If you set the USB mode to USB Disc, it will act as removable hard
drives for storage of the files.
2. Use the supplied USB cable to connect the player to your PC.
3. Open Windows Explorer and an additional drive will be listed as
“Portable Media Player”.
4. Open the drive and the “Data” & “Media” folders will appear.
Note: Do not transfer media files to the Data folder, as the unit can not
recognize the media files of the Data folder.
- 13 -
Do You Want to buy Musics from an Online Service?
You may download musics from an online service (such as, Napster,
MusicNow). It is necessary to sign in to your account to perform certain
functions in the online service you selected.
You may visit http://windows/windowsmedia/mp10/onlinestrores.aspx.
for details. Below is an example for your reference.
1. Login to the online service (example, Napster).
2. Search for music on the online service.
3. Select the tracks you would like to download and click the “download”
button in the track list or right click and choose download track(s).
4. The track(s) will begin downloading to your PC.
Synchronize tracks to the MP3 Player
1. Open Windows Media Player10.
a) Click the Library tab from the menu bar on the top of the Windows
Media Player screen.
b) All songs purchased from online services should be listed in
Windows Media Player Library.
- 14 -
5. Locate a song in the Library and Right-Click on it. Select “Add to ->
Sync List”, then the song will be added to “Sync List”. Repeat and
add other songs.
6. Click Sync and the “Sync List” pane appears. Select the “Portable
Media Player” from the dropdown list on the right side of this screen.
- 15 -
7. Click “Start Sync” to transfer the songs. A progress indicator will
show each file transferring.
After transferring, the notice message “Synchronized to Device (7
items)” appears on the left side of the screen. Total 7 songs are
synchronized to player.
- 16 -
Disconnecting the Player from your Computer
— Windows 98:
1) After use, you can directly unplug the device.
2) The “Removable Disk” disappears on the screen of your computer.
— Windows XP (in DRM Music mode)
1) After use, you can directly unplug the device.
2) The “Portable Media Player” disappears on the screen of your
computer.
— Windows Me/2000/XP(Such as Windows 2000):
1) Move the mouse to the
icon on the bottom of the desktop, and
the “Unplug or Eject Hardware” message appears on the display
as below:
2) Click the
icon and the “Stop USB Mass Storage Device” message
is shown as below:
3) Click the “Stop USB Mass Storage Device” message and pops up
the notice message as below:
4) Click “OK”, and then you can unplug the unit safely.
- 17 -
GETTING STARTED
Power On
1. Press the POWER button to power
on the player.
Note: If the onscreen message says
“Key Locked !” and then shuts off, you
need to locate the HOLD knob on the
side of the device (see HOLD function
below for details).
3. The startup screen will appear briefly.
4. After a few seconds, the main menu
is displayed.
Power Off
1. Press the POWER button to power
off the player. Or
2. Press and hold the STOP button to
power off the player.
Hold Function
HOLD function is used for preventing wrong operation during playback.
Locking Buttons
• To lock all function buttons by sliding
the HOLD knob to right, and the “Key
Locked” dialog box appears briefly.
Then all function buttons are disabled.
Note: After locking, the notice message
“Switch [HOLD] to Unlock” will appear
on the display if any button (except the
POWER button) is pressed.
- 18 -
Unlock Buttons
• To release all function buttons by
sliding the HOLD knob to left, and the
“Cancel Lock” dialog box appears
briefly.
PLAYING MUSIC FILES
1. Connect the earphone to the player.
2. Press the POWER button to power
on the player.
3. Press the “ VOL ” or “ VOL ” button to
select and highlight the MUSIC item
in the main menu, then press ENTER
button.
4. Press the “ VOL ” or “ VOL ” button to
select and highlight the PLAY/
RESUME item.
5. Press
PLAY/PAUSE button to
start playing. If the ENTER or “”
button is pressed, it will also start
playing.
Volume Control
• Press the “ VOL ” or “ VOL ” button to adjust volume.
- 19 -
To Skip a Track
• During playback, you can skip a track by pressing the “” or “”
button. Each press skips one track. The first press on the skip backward
“” button goes to the beginning of the current track.
• It will start playing automatically after a desired track is searched.
Fast Forward / Backward
• Press and hold the “” button will go fast forward during playback.
• Press and hold the “” button will go fast backward during playback.
To Pause Playback
• Press the “
” button to pause.
• Press the “
” button again to resume play.
To Stop Playback
• Press the STOP button to stop playback.
RECORDING
Before recording, you should set the record mode (Microphone & Line
In). Please see page 29 for details.
Recording via Microphone
1. Set the record mode to Microphone,
then go back to the main menu.
2. Press the “ VOL ” or “ VOL ” button to
select the Record item in the main
menu, then press the ENTER button.
3. Press the REC button to start
recording.
4. Press the STOP button to stop
recording, then the record file appears
in the record folder.
Note: If there is not any recording files in
the unit, the Record folder will not
appear in the record menu.
- 20 -
Recording via Line In
1. Set the record mode to Line In, then
go back to the main menu.
2. Connect the Line-Out or earphone
jack of the external device to the
earphone jack of the unit with the
Line-In cord (not included).
3. Press the “ VOL ” or “ VOL ” button to
select the Record item in the main
menu, then press the ENTER button.
4. Press the REC button to start
recording.
5. Press the STOP button to stop the
recording, then the record file appears
in the record folder.
Playing the Recorded Files
1. Connect the earphone to the player.
2. Press the “ VOL ” or “ VOL ” button to
select the Record item in main menu
and press the ENTER button.
3. Open the Record folder by pressing
the ENTER button . (If there is not any
recording files in the unit, the Record
folder will not be shown.)
4. Press the “ VOL ” or “ VOL ” button to
select the recorded files.
PLAY/PAUSE button
5. Press the
to start playing.
- 21 -
SEARCHING MUSIC
After downloading some musics, the system will categorize all songs
automatically.
1. Press the “ VOL ” or “ VOL ” button to
select and highlight the MUSIC item
in the main menu, then press the
ENTER button.
2. Press the “ VOL ” or “ VOL ” button to
select the desired search method.
Playlist, Artists, Titles, Albums,
Genres, and Folder/Files are
supported as options.
3. Press the ENTER or “” button to
confirm (For example, select the
Artists item), and the artist names
will display in the Artists.
4. Select an artist name by pressing the
“ VOL ” or “ VOL ” button.
5. Press the
PLAY/PAUSE button
to start playing. Or go into the sub
artists folder by pressing the ENTER
button.
• If there are no further sub folders
for selection, the track selected will
be stored into playlist after the
ENTER button is pressed.
• For more playlist operation details,
please refer to page 23.
Note: Press the “” button in a sub menu to go back to the previous
menu.
- 22 -
PLAYLIST OPERATION
User can select favorite music and add to playlist or delete music from
playlist.
Add Files to Playlist
1. First, search your favorite musics.
(Please refer to page 22 details about
how to search the music files.)
2. Select a favorite track and press the
ENTER button, then “Added to Playlist”
appears on the display.
• This track is stored into the playlist.
3. Press the ENTER button again and
this track will be deleted from the
playlist.
Delete Files from Playlist
1. Go into the playlist folder and select
a track.
2. Press the ENTER button, then
“Delete? Y: ENTER” appears on the
display.
3. Press the ENTER button again to
confirm, and this track is deleted from
the playlist.
Or,
- 23 -
1. Go into the other music folder (except
playlist folder) and the “ ” icon
indicates that this track is added to
the playlist.
2. Select a track marked the “ ” icon
and press the ENTER button, then
“Deleted from Playlist” appears on the
display.
3. This track is deleted from the playlist.
Playing Your Favorite Music (Playlist Files)
1. Go into the Playlist, select a desired
track by pressing the “ VOL ” or “ VOL ”
button.
2. Press the
PLAY/PAUSE button
to start playing.
Or,
1.Go into the other music folder (except
playlist folder) and the “ ” icon
indicates that this track is added to
the playlist.
2. Press the “ VOL ” or “ VOL ” button to
select a track added to the playlist.
3. Press the
PLAY/PAUSE button
to start playing.
- 24 -
SETTING PLAY MODE
The device supports a variety of play modes. During playback, you may
directly set your desired play mode.
1. During playback, press the MODE
button and it pops up the Mode menu.
2. Press the “ VOL ” or “ VOL ” button to
select your desired mode.
3. Press the ENTER or “” button once
to confirm.
Note: It’s not available to set play mode via pressing the MODE button
while playing recorded files.
The modes are changed in the following cycle: Normal -> Repeat One > Repeat -> Repeat All -> Shuffle -> Shuffle All
Normal
1. In the Mode menu, press the “ VOL ”
or “ VOL ” button to select and highlight
Normal item.
2. Press the ENTER button to confirm.
• All tracks will be played from beginning
to end.
• Default is the normal mode.
Repeat One
1. In the Mode menu, press the “ VOL ”
or “ VOL ” button to select and highlight
Repeat One item.
2. Press the ENTER button to confirm.
• The “ ” and “
” icons will appear on
the display.
• The current track will be played
repeatedly.
• To select a desired track to be played
repeatedly by pressing the “” or “”
button.
- 25 -
Repeat-
Playing repeatedly all tracks of the current folder
1. In the Mode menu, press the “ VOL ”
or “ VOL ” button to select and highlight
Repeat item.
2. Press the ENTER button once to
confirm.
• The “ ” icon appears on the display.
• All tracks of the current folder will be
played repeatedly.
Repeat All-
Playing repeatedly all tracks of all folders
1. In the Mode menu, press the “ VOL ”
or “ VOL ” button to select and highlight
Repeat All item.
2. Press the ENTER button once to
confirm.
• The “ ” and “ ” icons appear on the
display.
• All tracks will be played repeatedly.
Shuffle-
Playing all tracks of the current folder in random order
1. In the Mode menu, press the “ VOL ”
or “ VOL ” button to select and highlight
Shuffle item.
2. Press the ENTER button once to
confirm.
• The “ ” icon appears on the display.
• All tracks of the current folder will be
played without sequence.
• To locate another track: press the “”
or “” button. The first press on the
skip backward “” button goes to
the beginning of the current track.
- 26 -
Shuffle All -
Playing all tracks of all folders in random order
1. In the Mode menu, press the “ VOL ”
or “ VOL ” button to select and highlight
the Shuffle All item.
2. Press the ENTER button once to
confirm.
• The “ ” and “ ” icons appear on the
display.
• All tracks of all folders will be played
without sequence.
• To locate another track: press the “”
or “” button. The first press on the
skip backward the “” button goes
to the beginning of the current track.
SETTING EQ MODE
The player supports a wide variety of equalizer and sound effect. During
playback, you may directly select your desired EQ mode.
1. During playback, press and hold the
MODE button until the EQ menu
appears.
2. Press the “ VOL ” or “ VOL ” button to
select your desired mode.
3. Press the ENTER or “” button to
confirm.
• The EQ modes are changed in the
following cycle: Normal->Bass>Classic->Rock->Jazz->Pop
Note: It’s not available to set EQ mode
via pressing and holding the MODE
button while playing recorded files.
- 27 -
SETUP OPERATION
The setup includes: Music, Record, USB, Back Light, Sleep Timer, Factory
RST and Format. Use the Setup features to set detailed options for
each function.
1. Press the POWER button to power on
the player.
2. Press the “ VOL ” or “ VOL ” button to
select and highlight the Setup item in
the main menu.
3. Press the ENTER or “” button.
The menu diagram of the setup shows as below:
Music
Mode
Normal
Repeat One
Repeat
Repeat All
Shuffle
Shuffle All
EQ
Normal
Bass
Classic
Rock
Jazz
Pop
Record
Microphone
Line In
USB
USB Disc
DRM Music
Back Light
10S
20S
40S
60S
SETUP
Sleep Timer
Factory RST
Format
- 28 -
Disable
10Mins
20Mins
30Mins
60Mins
MUSIC SETUP
1. In the setup menu, press the “ VOL ” or
“ VOL ” button to select and highlight
the Music item.
2. Press the ENTER or “” button.
• It includes: Mode & EQ.
Mode (Play Mode)
1. Press the “ VOL ” or “ VOL ” button to
select and highlight the Mode item.
2. Press the ENTER or “” button.
• Please refer to page 25 for details.
EQ (EQ Setup)
1. Press the “ VOL ” or “ VOL ” button to
select and highlight EQ item.
2. Press the ENTER or “” button.
3. Press the “ VOL ” or “ VOL ” button to
select your desired EQ mode.
4. Press the ENTER or “” button to
confirm.
5. Press the “” button to return.
• The EQ modes are changed in the
following cycle: Normal->Bass>Classic->Rock->Jazz->Pop
- 29 -
RECORD SETUP
1. In the setup menu, press the “ VOL ” or
“ VOL ” button to select and highlight
the Record item.
2. Press the ENTER or “” button.
3. Press the “ VOL ” or “ VOL ” button to
select Microphone or Line In.
4. Press the ENTER or “” button to
confirm.
USB SETUP
1. In the setup menu, press the “ VOL ” or
“ VOL ” button to select and highlight
the USB item.
2. Press the ENTER or “” button.
3. Press the “ VOL ” or “ VOL ” button to
select USB Disc or DRM Music.
4. Press the ENTER or “” button to
confirm.
• USB Disk mode stands for Mass
Storage Class.
• DRM Music mode stands for Digital
Rights Management (Media Transfer
Protocol).
• Refer to page 12 for details.
- 30 -
BACKLIGHT SETUP
1. In the setup menu, press the “ VOL ” or
“ VOL ” button to select and highlight
the Back Light item.
2. Press the ENTER or “” button.
3. Press the “ VOL ” or “ VOL ” button to
select the time of the backlight.
4. Press the ENTER or “” button to
confirm.
• It includes four options: 10S, 20S, 40S
and 60S.
• The LCD backlight will remain on for
10, 20, 40 or 60 seconds as your
setting.
Note: Excessive use of the backlight will
cause the battery to discharge more
quickly.
SLEEP TIMER SETUP
1. In the setup menu, press the “ VOL ” or
“ VOL ” button select and highlight the
Sleep Timer item. Then press the
ENTER or “” button.
2. Press the “ VOL ” or “ VOL ” button to
select the sleep time.
3. Press the ENTER or “” button to
confirm.
• It includes five options: Disable,
10Mins, 20Mins, 30Mins and 60Mins.
• After setting the sleep time, it will
automatically power off when the
sleep time reaches.
• To clear the sleep time by setting it to
Disable.
- 31 -
FACTORY RESET
To restore the unit to the factory default settings.
1. In the setup menu, press the “ VOL ” or
“ VOL ” button to select and highlight
the Factory RST item.
2. Press the ENTER or “” button to
confirm.
Note: The data of the unit wil still remain
after this function is performed.
FORMAT
1. In the setup menu, press the “ VOL ” or
“ VOL ” button select and highlight the
Format item.
2. Press the ENTER or “” button and
the notice message “Format Y: Enter”
appears on the display.
3. Press the ENTER button to start the
format. Or press other buttons
(except the ENTER button) to cancel
the format.
Notes:
• After formatting, all contents of the
player will be erased.
• Don’t format the player in your
computer.
- 32 -
INFORMATION
1. Press the POWER button to turn the
power on.
2. Press the “ VOL ” or “ VOL ” button to
select and highlight the Information
item in the main menu.
3. Press the ENTER button and the
memory information will appear on the
display.
• Press the “” button to go back to
main menu.
LICENSE
When you download (purchase) the musics online, the License (or ID) of
the musics will be stored into the unit and it will take some space of the
unit. If you remove the musics from your unit, the License of the musics
will still remain. So you should use the License function to delete them.
1. Press the “ VOL ” or “ VOL ” button to
select and highlight the MUSICS item
in the main menu and press the ENTER
button.
2. Press the “ VOL ” or “ VOL ” button to
select and highlight LICENSE and
press ENTER button, then Maintain
appears.
3. Press ENTER button and the notice
message “Y: Enter N: Other” appears.
• Press the ENTER button to confirm.
• Press other buttons (except ENTER
button) to exit.
Note: Press the “” button to return to the previous menu.
- 33 -
TROUBLESHOOTING
Should any problem persists after you have made the following checks,
please consult your nearest service facility.
The device can not power on.
• Check if the built-in battery is discharged.
Connect the AC adapter to recharge.
No sound
• Check if the volume level is 0. Adjust the volume control.
• The headphones/earphones plug is not firmly connected to the “Phone”
jack.
The player does not work.
• Make sure the Hold knob is in the off position.
• Reset the Player.
The files cannot be played normally.
• Check if there are MP3 or WMA files on the player.
• Check if the audio files are corrupted.
The device can not appear on the computer as a drive.
• Check if the USB cable is correctly connected.
• Check the USB control in BIOS and ensure it is enabled.
Heavy noise
• Check if plug of the earphone is clean. Dirty plug may cause the noise.
• Check the music file. If the file data is damaged, heavy noise or skipping
may result. Try another music file to confirm.
The unit appears locked up after unplugging the USB cable:
• If your unit has stored a large number of music files, it can take up to 5
minutes to complete it's processes after unplugging the USB cable. This
can be avoided by switching the unit OFF before unplugging the cable.
- 34 -
SPECIFICATION
Type
Item
Specification
HDD
Capacity
20GB
Operating System
Windows 98/ME/2000/XP
Interface
USB 2.0
Frequency
20Hz~20KHz
Headphone Output
15mW (32Ω)
Signal to Noise ratio
90dB
File format
MP3, WMA, WMA-DRM
AC adapter
DC 5.0V
PC
Audio
Files
Power Supply
Built-in Rechargeable
1100mAh
Battery Capacity
General
Dimension
Approx. 122mmx89mmx30mm
(W x D x H)
Weight
Approx. 260g
Design and specifications are subject to change without notice!
- 35 -
Please check and identify the supplied accessories.
AC Adapter ....................................................................... x 1
USB Cord ........................................................................... x 1
Earphones ......................................................................... x 1
Installation CD .................................................................. x 1
- 36 -
811-340291-010