1
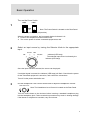
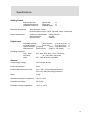
INDIGO Series Digital Analog Converter Owner’s Manual QUALIA & Co. of America Safety Precautions In order to ensure this product is used safely and correctly, protect you and others from harm, and prevent any property damage, please read the following precautions carefully and completely. Indicates a potential hazard, which could result in serious injury or fatality due to fire or electric shock if this warning is ignored and the product is mishandled. In the event of any abnormality: Disconnect the power plug. Prohibited If any smoke, abnormal smell, or sound is emitted, or any foreign substance or water, etc. enters this equipment, turn off the power on the main unit immediately, and disconnect the power plug.. Continued use under abnormal conditions may cause a fire or electric shock.Please contact a dealer for repairs. Take care not to damage the power cord. Do not place heavy objects on the power cord. Check that the cord is not crushed under this equipment. Do not modify, forcibly bend, twist, pull, or heat the power cord. A damaged power cord can cause a fire or electric shock. If the power cord is damaged (e.g. the wire become exposed or severed), contact a dealer for replacement. Do not allow dust to accumulate on the power plug. If dust builds up between the plug and the outlet, a short circuit may occur, which can result in a fire or electric shock. Regularly remove the plug and clean off any dust. Only use AC 100-volt supply. This equipment is only designed for use in Japan. Do not use this equipment on voltage supplies other than that specified for this equipment. Do not connect to the direct current (DC) supply of a boat, or suchlike, as such sources may result in a fire or electric shock. Do not place a vase or other containers with water or other liquids on or near this device. If a liquid is spilt onto this equipment, it may result in a fire or electric shock. 2 SafetyPrecautions Precautions(Continued) (Continued) Safety Indicates a potential hazard, which could result in serious injury or fatality due to fire or electric shock if this warning is ignored and the product is mishandled. The outer casing (cabinet) of this equipment must not be removed. Opening or modifying the cabinet may result in a fire or electric shock. Contact a dealer to check inside the equipment and for repairs. Do not disassemble. Do not remodel this equipment. Doing so may result in a fire or electric shock. Mandatory Allow at least a 20 cm gap from the wall when this equipment is installed. In order to facilitate cooling, place this unit slightly apart from other equipment. When installing this equipment in a rack, or suchlike, make sure that there is at least a 5 cm above the unit, and a 10 cm clearance at the back. Without such clearances for ventilation, the heat may remain trapped inside this equipment, which may result in a fire. Indicates a potential hazard, which could result in injury due to electric shock or other causes, or property damage, if this warning is ignored and the product is mishandled. Please read the Owner’s Manual carefully and completely to learn how to connect this audio equipment. Turn off the power before connecting the equipment, and follow the connection instructions in this manual. The designated cords must be used for all connections, as inappropriate cables may result in failure, fire, or electric shock. Mandatory Before turning on the power, turn down the volume of the equipment to the minimum. This is to avoid hearing damage which can occur if a very loud volume is initially output. This equipment is very heavy (31 kg), so great care must be taken to prevent injury while unpacking or carrying. Install this equipment near a power outlet in such a way that the power plug can be easily removed. In the event of any abnormality, immediately pull out the power plug from the outlet. 3 Indicates a potential hazard, which could result in injury due to electric shock or other causes, or property damage, if this warning is ignored and the product is mishandled. Do not place this equipment on an unstable surface, for example, an unbalanced or uneven table. Do not place it in areas of extremely high humidity or dust. Do not use it in a bathroom. Do not place it where it may be exposed to oily smoke or steam, for example near a cooker or humidifier. Such contaminants may result in a fire, electric shock, or injury. Prohibited Do not place the power cord near a heater. The cord covering may melt, resulting in a fire or electric shock. Do not pull out the power plug with a wet hand. Doing so may result in an electric shock. Do not pull on the power cord to unplug it. Such action degrades and may damage the cord, which may result in a fire or electric shock. When disconnecting from the socket, only pull on the plug itself. When moving this device, be sure to turn off its power switch, pull out the power plug from the outlet, and remove the external connection cord. Disconnect the power plug. Otherwise, the cord covering may melt, resulting in a fire or electric shock. When the equipment is not going to be used for a prolonged period for any reason, remove the power plug from the outlet for safety. Before servicing, be sure to disconnect the power plug from the outlet for safety. Failure to take this precaution may result in an electric shock. 4 Contents Before use Safety Precautions … 2, 3, 4 Before Use … 5 Connection … 6 Part Names (Main Unit) … 7 Basic Operation … 8 Playback of Music Files via PC … 9, 10 PC Connection Procedure … 11 PC Settings (Windows 7) … 12 PC Settings (Windows Vista) … 13 PC Settings (Windows XP) … 14 Confirmation of Accessories In the event that any parts are found to be missing or damaged, please contact the dealer or our customer service center. Main unit … ×1 Power cord … ×1 Instruction manual … ×1 Usage Warning Do not place anything on top of this equipment. Do not position this equipment in an area subject to direct sunlight, high temperatures (for example, near a heater), or on other equipment that generates heat, such as an amplifier. Install the equipment on a stable surface. PC Settings (Mac OS X 10.6.3) … 15 Specifications … 16 Troubleshooting … 17 Maintenance … 18 Warranty and Servicing … 19 5 Connection Connection Warning Only insert the power plug of this equipment into the outlet after connecting all cables. Follow the instruction manual for details on connecting the equipment. A Digital audio input terminal (DIGITAL INPUT) Digital audio is input using the digital audio input terminal (DIGITAL INPUT). Use a commercially available digital cable in accordance with the digital audio output terminal specifications of the equipment being connected. AES/EB XLR digital cable U RCA coaxial digital cable COAX Optical digital cable OPTICAL B USB input terminal (USB) C Analog audio output terminal (ANALOG OUTPUT) Digital audio can be input from a computer using the USB input terminal (USB). The USB input terminal (USB) is connected to the USB terminal of a PC via USB cable. The terminal connector on this equipment is a USB-B type. Use a commercially available USB cable for connection. Analog audio is output using the analog audio output terminal (ANALOG OUTPUT). Use a commercially available balanced XLR cable if the connected equipment has an XLR terminal audio input. XLR pin No. COMMON HOT (+) COLD (−) Use a commercially available RCA audio cable to connect to the RCA terminal’s (pin jack’s) audio input. D Headphone audio output terminal (Headphone Jack) E AC power input (AC Inlet) Supports the standard plug (plug diameter: 6.3 mm). Connect a headphone with a standard headphone plug on the end of the cable to the headphone jack. If the headphone does not have the standard plug attached, use a commercially available adapter. Connect the enclosed cord to the power socket. Connect the power plug to a 100 V AC outlet after connecting all the required cables. 6 Part Names Main Unit Front panel Rear panel 7 Basic Operation Turn on the Power Switch. POWER POWER 1 Note: The Power Switch is located on the Rear Panel. (OFF position) (ON position) When the power is turned on, the front panel display (Indicator) is lit. ● Power to the amplifier must be turned on last. ● Turn on the power for all the connected equipment as well. 2 Select an input source by turning the Selector Knob to the appropriate input. OPTICAL USB COAX AES/EBU Indicator (LED lamp) The selected input source is shown by the Indicator (LED lamp) Once the input has been selected, the source can be played. If no digital signal is sensed, the indicator (LED lamp) will flash. Check that the power for the connected equipment is turned on, and confirm the connections. Turn off via the power switch after use. 3 Use the Headphone Level Control at the back to adjust the headphone volume. HEAD PHONE LEVEL Note: The Headphone Level Control is located on the Rear Panel. Turn the volume down to the minimum before inserting a standard headphone plug into the headphone jack. Failure to take this precaution may result in hearing damage if the listener is subjected to a sudden, very loud volume. 8 Playback of Music Files via PC PC audio can be input to this equipment by connecting this equipment to a computer via the USB input terminal and a USB cable. USB connection is possible with computers running the following types of operating systems (OS). Operation on computers running other types of operating systems cannot be guaranteed. Supported Operating Systems: Windows 7, Windows Vista, Windows XP, Mac OS X 10.6.3 and higher Turn on the PC. Confirm that the OS is up and running. Connect this equipment to the PC with a USB cable. Use an appropriate cable for this equipment’s connection terminal. This equipment features a USB-B type terminal. ・When this equipment is connected to a PC for the first time, the USB port on this equipment is automatically detected by the PC, which will then install a driver. Complete the driver installation in accordance the PC’s instructions. ・Even if the power to this equipment is turned off, the PC recognizes the USB connection to this equipment. Play a music file on the PC. Increase the volume of the PC to the maximum and adjust the volume of the amplifier connected to this equipment in order to obtain the best possible quality audio. Turn down the volume on the amplifier to the minimum when starting playback and then gradually turn it up. ・It is not possible to control this equipment from the PC, or vice-versa. ・Music files cannot be transferred from this equipment to a PC via a USB connection. ・Do not connect or disconnect the USB cable while playing a music file via the USB connection. This may cause the PC to malfunction. Make sure the music playback software on the PC is turned off before connecting or disconnecting the USB cable. ・While playing music files via the USB connection, operational audio output from the PC is also transferred. If such sounds are not required, adjust the related settings using the PC. Audio input may be discontinuous or subject to noise if the data transmission rate via USB is insufficient depending on the PC environment. Audio may be interrupted subject to interference when another application is launched while a music file is playing. 9 Playback of Music Files via PC (Continued) ・After launching the music playback software while this equipment is connected to the PC, or when switching input on this equipment to “USB”, the music file may not play correctly. In this case, restart the music playback software or restart the PC. ・When a PC is connected via USB, the PC recognizes the USB connection and sends audio to this equipment even when the power to this equipment is turned off. If you intend to output audio from the PC’s speaker or a headphone directly connected to the PC, disconnect the USB cable or adjust the audio output settings on the PC. 10 PC Connection Procedure Power Connection Warning Only connect the power plug for this equipment into the outlet after all other connections have been made. Turn off the power to any other equipment before connection to this equipment. Make sure the power plug is properly connected to the outlet. If not, the electrical current might be adversely affected and the power plug and cord may become overheated during use, which could become very dangerous. Furthermore, if the power plug is inadvertently pulled out for any reason while the equipment is in use, the equipment may be adversely affected (for example, it may cause a sudden surge of noise from the speaker connected to the amplifier). Connection to a PC via USB cable Confirm the hardware requirements before connecting to a computer. Hardware requirements: Compatible PCs: Windows and Mac computers with a USB port mounted as standard Supported Operating Systems: Windows 7, Windows Vista, Windows XP, Mac OS X 10.6.3 (or later) Supported processors: Clock frequency 1 GHz or more (96 KHz, or 1.6 GHz or more for 24-bit playback) Some PCs that meet the above hardware specification requirements may not work correctly with this product due to specifications unique to the model or differences in the customer’s setup. USB Connection Procedure Turn off power to all equipment (amplifier, etc.) connected to this equipment’s analog output, or turn down the volume to the minimum before connecting the power plug of this equipment to the outlet. Set the input selector switch to USB. Connect the USB cable to the PC while the PC is operational. The computer will recognize that new hardware has been connected, and device driver software is then automatically installed. The connection has been established when the lock indicator supporting this equipment’s USB input changes from blinking to continuously lit. PC Setting Screens The content displayed in the actual PC screens may differ from that shown in screens illustrated in the “PC Setting” section (pages 12 to 15) due to specifications unique to the PC model or differences in the customer’s setup. 11 PC Settings (Windows 7) Sound Go to Start → Control Panel → Sound → Play to set and activate the SPDIF Interface (TE7022 Audio w/ SPDIF) using its default device settings. SPDIF Interface Use the General tab on the TE7022 Audio w/ SPDIF properties screen to set Device Usage to “Use this device (enable)”. SPDIF Interface Use the Level tab on the TE7022 Audio w/ SPDIF properties screen to move the slider for the SPDIF interface to set the level to 100, and confirm that it has not been muted. Use the audio amplifier to control the volume, to prevent any deterioration in audio data, and ensure the highest quality of audio playback. 12 PC Settings (Windows Vista) Sound Go to Start → Control Panel → Sound → Play tabs to set and activate the SPDIF Interface (TE7022 Audio w/ SPDIF) using its default device settings. SPDIF Interface Use the General tab on the TE7022 Audio w/ SPDIF properties screen to set Device Usage to “Use this device (enable)”. SPDIF Interface Use the Level tab on the TE7022 Audio w/ SPDIF properties screen to move the slider for the SPDIF interface to set the level to 100, and confirm that it has not been muted. Use the audio amplifier to control the volume, to prevent any deterioration in audio data, and ensure the highest quality of audio playback. 13 PC Settings (Windows XP) Sounds and Audio Devices Properties Double click Start → Control Panel → Sounds and Audio Devices, and open “Sound and Audio Devices Properties”. Then, select the Audio tab, and set the “Default Device” under Sound playback to “TE7022 AUDIO w/ SPDIF”. Tick the checkbox beside “Use only default devices”. SPDIF Interface Click the Audio tab on the Sound and Audio Properties screen. Then, select “Volume under” Device for sound playback. This will display a which allows you to adjust the volume of the Interface. Device Default screen SPDIF Increase the volume to the maximum level, and ensure that the “Mute” checkbox is not ticked. 14 PC Setting (Mac OS X 10.6.3) ~ Later Mac OS X 10.6.3 or later is supported. Sound Select System Preferences from the Apple menu, and open the Sound panel. Click the Output tab and select “TE7022 Audio w/ SPDIF” under “Select a device for sound output”. Increase the “Output volume” to the maximum level, and ensure the Mute option is left unchecked. Audio System From the Applications folder, select Utilities → Audio MIDI Setup to open the Audio Devices panel. Click on “TE7022 Audio w/ SPDIF” and under the Output tab, select one of [44100.0 Hz], [48000.0 Hz], or [96000.0 Hz] as the Format, with [2ch-24 bit Integer] as the sub-selection. 15 Specifications Analog Output Balance terminal: Unbalanced terminal: Headphone terminal: [XLR male] [RCA jack] [Standard jack] ×1 ×1 ×1 Maximum output level: XLR terminal/4.5 Vrms RCA terminal/2.2 Vrms (1 KHz, full scale, under 10 KΩ load) Audio characteristic: Frequency characteristic: 5 Hz to 50 KHz S/N comparison: 125 dB Distortion rate: 0.0005% Digital Input AES/EBU terminal: [XLR Female] (5.0 Vp-p/110 Ω) Co-axial terminal: [RCA jack] (0.5 Vp-p/75 Ω) Optical terminal: [TOS link] (−24 to −14.5 dBm peak) USB terminal: [USB−B type] (USB 1.1 Full-speed) Sampling frequency XLR,RCA: OPTICAL: USB: ×1 ×1 ×1 ×1 44.1, 48.0, 88.2, 96.0, 176.4, 192.0 KHz 44.1, 48.0, 88.2, 96.0 KHz 44.1, 48.0, 96.0 KHz,192.0KHz General Power supply voltage: 120 V AC(50~60 Hz) Power consumption: 30 W External dimensions (W×H×D): 410 × 105 × 518 (including protrusion) 410 × 85 × 480 (excluding protrusion) Mass: 31 Kg Operational ambient temperature: 10°C to +30°C Operational humidity: 5% to 85% Allowable storage temperature: −20°C to +55°C 16 Remove the power plug from the outlet before servicing to ensure safety. In the event of any problem with this device, please double-check the following information before requesting servicing. Some problems may be caused by connected devices. Please also recheck how to use any connected equipment. If the equipment still does not work correctly, please contact your dealer. Wipe the surface with a soft dry cloth if the device becomes dirty. When extremely dirty, gently remove dirt using a soft cloth dampened with water and a small amount of mild detergent, then rinse the cloth in water, and wipe clean with the damp cloth after it has been firmly wrung out. The equipment will not turn on Avoid leaving in contact with rubber or vinyl for a long time, as this may damage the cabinet. No sound Do not use chemicals, benzene, or paint thinner on the cloth when cleaning, as these substances are likely to damage the cabinet surface. ・Ensure the power plug is appropriately inserted into the outlet. ・Check the power switch is turned on. ・Check the connections with the amplifier and any other digital equipment. ・Check the analog output setup. The input indicator is blinking ・Check that the power for the equipment connected to the selected input terminal has been turned on. ・Check that the selected input terminal is appropriately connected. 17 18