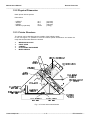
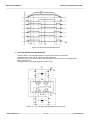
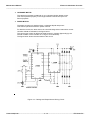
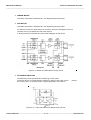
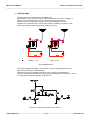
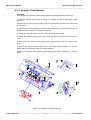
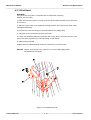
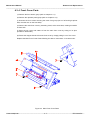
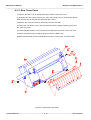
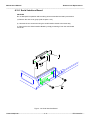
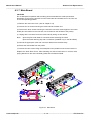
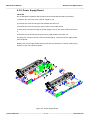
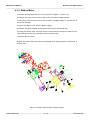
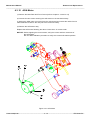
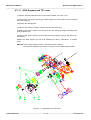
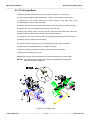
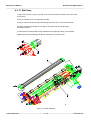
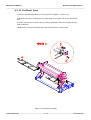
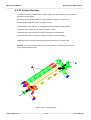
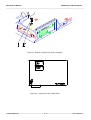
1
1 Service Manual Order Number: ER-LA400-SV Maintenance Manual Revision Record _______________________________________________________________________________________ REVISION RECORD Edition 001 Date published June 1996 Page All Revised contents First issue Specification No. ER-LA400-SV The contents of this manual may be revised without prior notice. All Rights Reserved, Copyright 1996 Digital Equipment Corporation. Printed in Ireland. No part of this manual may be reproduced in any form without permission. Address your comments and inquiries on this manual to: ____________________________________________________________________________________________ LA400 Multiprinter r. 1 ER-LA400-SV Maintenance Manual Contents ____________________________________________________________________________________________ Table of Contents CHAPTER 1 GENERAL OVERVIEW 1.1 1.1.1 1.1.2 1.2 1.2.1 1.2.2 1.2.3 1.2.3.1 1.2.3.1.1 1.2.3.2 1.2.3.3 1.2.3.4 1.2.3.5 1.2.3.6 1.3 Introduction Scope of the Products Printers Features Summary General Description Physical Overview Physical Dimension Printer Structure Mechanical Assy Tractor Unit Assy Print Head Cabinet Electronic Hardware Inked Ribbon Cartridge Mechanical Options Printer Technical Specifications 1.2 1.2 1.2 1.3 1.3 1.5 1.5 1.6 1.6 1.6 1.6 1.7 1.7 1.7 1.8 CHAPTER 2 PAPER HANDLING OVERVIEW 2.1 2.1.1 2.1.2 2.1.2.1 2.1.2.2 2.1.2.3 Introduction Paper Handling Architecture Paper Path Configurations Basic Configuration Dual Fanfold Configurations ASF Configuration 2.2 2.2 2.5 2.5 2.8 2.9 ____________________________________________________________________________________________ LA400 Multiprinter i. 1 ER-LA400-SV Maintenance Manual Contents ____________________________________________________________________________________________ Table of Contents cont'd CHAPTER 3 ELECTRONIC HARDWARE OVERVIEW 3.1 3.1.1 3.1.2 3.1.2.1 3.1.2.1.1 3.1.2.1.2 3.1.2.2 3.1.2.3 3.1.2.4 3.1.2.5 3.1.2.6 3.1.3 3.1.3.1 3.1.4 3.1.5 Hardware General Overview Electronic Architecture Controller Overview V55PI µProcessor V55PI Internal Block Architecture V55PI Block Features ASIC Memories Operator Panel Serial Interface Board Expansion Bus Mechanical Drivers DOE Block Features Power Supply Board Controller SW Overview 3.2 3.3 3.4 3.4 3.5 3.6 3.8 3.9 3.9 3.9 3.10 3.10 3.11 3.18 3.20 CHAPTER 4 REMOVAL AND REPLACEMENT 4.1 4.2 4.3 4.3.1 4.3.2 4.3.3 4.3.4 4.3.5 4.3.6 4.3.7 4.3.8 4.3.9 4.3.10 4.3.11 4.3.12 4.3.13 4.3.14 4.3.15 4.3.16 4.3.17 4.3.18 4.3.19 4.3.20 4.3.21 4.3.22 Overview Recommended Hand Tools and Equipment ORU Order of Access Front Push-Pull Tractor Group Operator Panel Boards Print Head Front Cover Parts Rear Cover Parts Serial I/F Board Main Board Power Supply Board Ribbon Motor AGA Motor AGA Support and T/F Lever Carriage Motor Bail Assy Cut Sheet Assy Upper Feeder Assy Platen Assy Lower Feeder Assy Carriage Assy Sensor Assy Mechanical Assy Paper Motor Friction Bar Assy 4.2 4.2 4.3 4.4 4.5 4.6 4.7 4.8 4.9 4.10 4.11 4.12 4.13 4.14 4.15 4.16 4.17 4.18 4.19 4.20 4.22 4.23 4.24 4.25 4.26 ____________________________________________________________________________________________ LA400 Multiprinter i. 2 ER-LA400-SV Maintenance Manual Contents ____________________________________________________________________________________________ Table of Contents cont'd CHAPTER 5 ADJUSTMENTS 5.1 5.1.1 5.1.2 5.1.3 Overview Carriage Belt Paper Belt Print Head Gap 5.2 5.2 5.3 5.4 CHAPTER 6 SERVICE MAINTENANCE 6.1 6.2 6.2.1 6.2.2 6.2.3 6.2.4 6.3 6.3.1 6.3.2 6.3.2.1 6.3.2.2 6.3.2.3 6.3.3 6.3.3.1 6.3.4 6.3.5 6.3.6 6.4 6.4.1 6.4.2 6.4.3 6.4.4 Overview Initial Ispection Set-Up Cleaning Paper Specifications Consumables Troubleshooting Guide Initializing Phase Printer Errors Status Errors Recoverable Errors Not Recoverable Errors Power Malfunctions P.S. Troubleshooting Guide Self-Test Hex-Dump Faulty Probability Guide Service Tests and Adjustments Introduction Loop-back Coonectors Execution of the Service Adjustments Execution of the Service Tests 6.2 6.2 6.2 6.3 6.3 6.3 6.4 6.4 6.4 6.5 6.5 6.6 6.8 6.8 6.10 6.11 6.12 6.16 6.16 6.16 6.17 6.19 ____________________________________________________________________________________________ LA400 Multiprinter i. 3 ER-LA400-SV Maintenance Manual Contents ____________________________________________________________________________________________ Table of Contents cont'd CHAPTER 7 ELECTROMECHANICAL DEVICES 7.1 7.1.1 7.1.2 7.1.2.1 7.1.2.2 7.1.2.3 7.1.2.4 7.1.2.5 7.1.2.6 7.1.2.7 7.1.2.8 7.1.3 7.1.3.1 7.1.3.2 7.1.3.3 7.1.3.4 Overview Print Head Motors Carriage Motor Paper Motor AGA Motor Ribbon Motor Alternance Motor ASF Motor Color Motor Stacker Motor Cables Sensors Cable Alternance Cable Paper Stacker Cable Operator Panel Cable 7.2 7.2 7.4 7.4 7.5 7.6 7.7 7.8 7.9 7.9 7.11 7.12 7.12 7.13 7.13 7.14 Overview Automatic Sheet Feeder Color Motor 8.2 8.2 8.6 CHAPTER 8 OPTIONS 8.1 8.1.1 8.1.2 CHAPTER 9 HW SETTING & FW INSTALLATION 9.1 9.1.1 9.1.2 Overview Hardware Setting Firmware Installation 9.2 9.2 9.2 ____________________________________________________________________________________________ LA400 Multiprinter i. 4 ER-LA400-SV Maintenance Manual Contents ____________________________________________________________________________________________ Figures 1.1 1.2 1.3 2.1 2.2 2.3 2.4 2.5 2.6 2.7 3.1 3.2 3.3 3.4 3.5 3.6 3.7 3.8 3.9 3.10 3.11 3.12 3.13a/b 3.14 3.15 3.16 3.17 4.1 4.2 4.3 4.4 4.5 4.6 4.7 4.8 4.9 4.10 4.11 4.12 4.13 4.14 4.15 4.16 4.17 4.18 4.19 4.20 4.21 4.22 Basic Printer Parts Location (front view) Basic Printer Parts Location (rear view) Printer Internal Architecture Paper Handling Architecture Front Load Push-Mode Rear Load Push-Mode Rear (bottom) Load Pull-Mode Front Load Push-mode and Rear Front Push-mode with two tractors Front Load Push-Pull with two tractors Automatic Sheet Feeder Electronics Structure Electronics Architecture Microprocessor Internal Block Diagram DOE Blocks Diagram Reset and Prefault Circuit Reset and Prefault Waveforms Color & Paper Stacker Motors Driving Circuit Carriage and Paper Motors Driving Circuits Ribbon and AGA Motors Driving Circuits Color and Alternance Motors Driving Circuits ASF Motor Driving Circuit Sensors Driving Circuits Print Head Behaviour Print Head Needle Drivig Circuit Print Head Needle Current Waveforms Power Supply Major Block Diagram Software Architecture Front Push Tractor Group Operator Panel Boards Print Head Front Cover Parts Rear Cover Parts Serial Interface Board Main Board Power Supply Board Ribbon Motor AGA Motor AGA Support and T/F Lever Carriage Motor Bail Assy Cut Sheet Assy Upper Feeder Assy Platen Assy Lower Feeder Assy Carriage Assy Sensor Assy Mechanical Assy Paper Motor Friction Bar Assy 1.3 1.4 1.5 2.4 2.6 2.6 2.7 2.7 2.8 2.9 3.2 3.3 3.5 3.10 3.11 3.12 3.12 3.13 3.14 3.14 3.15 3.15 3.16 3.16 3.17 3.19 3.21 4.4 4.5 4.6 4.7 4.8 4.9 4.10 4.11 4.12 4.13 4.14 4.15 4.16 4.17 4.18 4.19 4.21 4.22 4.23 4.24 4.25 4.26 ____________________________________________________________________________________________ LA400 Multiprinter i. 5 ER-LA400-SV Maintenance Manual Contents ____________________________________________________________________________________________ Figures cont'd 5.1 5.2 5.3 6.1 6.2 6.3 6.4 6.5 6.6 7.1 7.2 7.3 7.4 7.5 7.6 7.7 7.8 7.9 7.10 7.11 8.1 8.2 8.3 8.4 8.5 8.6 Carriage Assy Belt Adjustment Paper Belt Adjustment Print Head Adjustment Power Supply Test Points Self-Test Printout Hex-Dump Printout Serial Interface Loop-back Diagram Parallel Interface Loop-back Diagram Service Test Fanfold Printout Print Head pinout Carriage motor pin connector assignment Paper Motor pin connector assignment AGA Motor pin connector assignment Ribbon Motor pin connector assignment Color Motor pin connector assignment Stacker Motor pin connector assignment Sensors Cable Alternance Cable Paper Stacker Cable Operator Panel Cable 1st ASF Components ASF and Stacker Blocks Diagram ASF Installation (rear view) Second Bin ASF Installation Color Motor Installation Color Ribbon Installation 5.2 5.3 5.5 6.9 6.10 6.11 6.16 6.16 6.21 7.3 7.4 7.5 7.6 7.7 7.10 7.11 7.12 7.13 7.13 7.14 8.2 8.3 8.4 8.5 8.6 8.7 Tables 2.1 4.1 6.1 7.1 7.2 Printer Path Configurations ORU Order of Access Unrecoverable Error Display Messages Print Head Resistance/Temperature Characteristics Print Head Pin assignment 2.4 4.3 6.7 7.2 7.3 ____________________________________________________________________________________________ LA400 Multiprinter i. 6 ER-LA400-SV Maintenance Manual General Overview _______________________________________________________________________________________ Chapter 1 General Overview ____________________________________________________________________________________________ LA400 Multiprinter 1. 1 ER-LA400-SV Maintenance Manual General Overview _______________________________________________________________________________________ 1.1 Introduction This Manual describes the features and the maintenance procedures for the new Digital LA400 Multiprinter and its options. 1.1.1 Scope of the Products This printer is an advanced impact printer which give real and effi cient solutions to the actual and future printer needs. It is designed to be extremely flexible in paper handling and capable to manage different paper types and formats, able to print on thick and multipart forms, specialized on dual fanfold management in non-attended mode. In the same time, these printers are intended to support EDP, Office and "Administrative" environments applications requiring very high throughput, high level print quality and graphic capabilities, either in black or in colors, in order to print listing, invoicing & billing, spread sheets, diagrams, business or technical graphics and machine readable texts. This printer enters the top segment of the SIDM pinter market and can be a valide and convenient alternative to the low end line-printers. 1.1.2 Printers Features Summary • • • • • • • • • • • 24 wire print head. Draft print at 400 cps and LQ print at 133 cps High resolution Graphics Printing at 360x360 dpi DEC ANSI Conformance Level 2, IBM Proprinter XL24E and Epson LQ2550/LQ1170 (ESC P2) resident emulations Paper path switching selected by operator panel or SW commands. Easy print function selection and printer configuration via the operator panel or with SW commands. Centronics Compatible Bidirectional (IEEE-1284) parallel interface and Moduar 6-pin DECconnect type serial interface. Font styles in multiple international character sets. Optional second tractor assembly for dual fanfold operation. Optional Automatic Sheet Feeder that handles cut sheets, multicopies & envelopes. Optional color motor for color feature printing. ____________________________________________________________________________________________ LA400 Multiprinter 1. 2 ER-LA400-SV Maintenance Manual General Overview _______________________________________________________________________________________ 1.2 General Description 1.2.1 Physical Overview A sketch of the resulting appearance is reported on figures 1.1 and 1.2. 1. Top Cover 2. Operator Panel 3. Power Switch 4. Single Sheet Support 5. Paper Knob 6. Front Tractor Unit Cover Fig. 1.1 Basic Printer Parts Location (front view) ____________________________________________________________________________________________ LA400 Multiprinter 1. 3 ER-LA400-SV Maintenance Manual General Overview _______________________________________________________________________________________ 1. Interface Cover 2. Rear Tractor Unit Cover 3. Paper Stacker Covers 4. ASF Location Cover 5. AC Power Inlet Fig. 1.2 Basic Printer Parts Location (rear view) ____________________________________________________________________________________________ LA400 Multiprinter 1. 4 ER-LA400-SV Maintenance Manual General Overview _______________________________________________________________________________________ 1.2.2 Physical Dimension Basic printer without options Dimensions - HEIGHT - WIDTH - DEPTH - WEIGHT (unpacked) 12.1" 26.2" 13.3" 38 lbs (310 mm) (665 mm) (390 mm) (18 Kg) 1.2.3 Printer Structure The printer can be described as the complex of the following parts. In the next figure it is possible to see the internal printer architecture and where the major blocks described below are located. • • • • • MECHANICAL ASSY PRINT HEAD CABINET ELECTRONIC HARDWARE INKED RIBBON Fig. 1.3 Printer Internal Architecture ____________________________________________________________________________________________ LA400 Multiprinter 1. 5 ER-LA400-SV Maintenance Manual General Overview _______________________________________________________________________________________ 1.2.3.1 Mechanical Assy This block is composed of a rubber platen roller with a carriage carrying a print head with 24 needles in front of the platen. This movement is obtained via a step-motor (providing 1/120" movement per step) and a minipitch belt. The movement of the rubber drum for paper traslation is obtained via a specific step motor providing a minimum movement of 1/180" and a couple of minipitch belts. The motion of the ribbon cartridge is obtained through a specific step-motor indipendently from the actual carriage speed, movement, direction and width. In this way in front of the print head there is a continuously renewing well inked ribbon. The ribbon speed is optimized to reduce conflicts with ribbon and graphic printout appearance when ribbon and print head are moving in the same direction. The color ribbon and the extended life black cartridges are moved up and down through a linear actuator (step motor) with a plastic coupler that transmits the axial movement to the plastic print head mask installed on the color ribbon cartridge. Another step motors is used for the A.G.A. (automatic gap adjustment) of the print head movement to have the best perfomance on the paper in use. 1.2.3.1.1 Tractor Unit Assy A removable push tractor unit is installed on the printer. Inside of it, a DC motor switches to engage/disengage the gear to allow the fanfold or the single sheet to be fed. The tractor unit can be installed in two different positions depending on the type of fanfold management (front - rear - both). In the next chapter all the paper handling possibilities of this mechanism are detailed. 1.2.3.2 Print Head The core of the printer is the print head, which is an electromagnetic non- ballistic type with a life of 400 MChrs. See chapter 3.1.3.1 and 7.1.1 for major hardware and mechanical details. 1.2.3.3 Cabinet The cabinet allows safety-proof lifting of frontal part for ribbon substitution and paper path check. It is composed of various parts to allow an easy access to all the printer internal parts. ____________________________________________________________________________________________ LA400 Multiprinter 1. 6 ER-LA400-SV Maintenance Manual General Overview _______________________________________________________________________________________ 1.2.3.4 Electronic Hardware See chapter 3 for major details. This section is composed of the following boards: MAIN BOARD located in the bottom right side of the printer which controls the motors movement, the various input sensors, the parallel interface and the print head needles. It also provides the management of the asynchronous host serial interface, external synchronous serial interface for mechanical options and fonts cartridge. POWER SUPPLY BOARD located in the bottom left side of the printer which provides specific voltages for logical area, printhead needles and drive motors. There are two power supply boards: 120 and 220/240 Vac respectively. OPERATOR PANEL BOARD placed on the front side of the printer driving 9 push buttons and 8 leds (3 for printer status and 5 for paper path selection). This board also drives a 16 Digit LCD Alphanumeric display to easily interact with parameters setting for menu operation. SERIAL INTERFACE board located on the rear right side and plugged to the main board which drives the proper drivers for serial interface. 1.2.3.5 Inked Ribbon Cartridge The ribbon cartridge is installed in different ways according to the ribbon types. In case of the black ribbon, the cartridge is fixed on both sides on four points. Its position is obliquous to the print line to automatically show the complete height of the ribbon in front of print head while printing on the full print line. The inked ribbon inside of these cartridges is a continuous loop. In case a color ribbon is installed, the cartridge is fixed on both sides only on the two rear points, so that is is free to move its frontal part upward and downward. Its installation is parallel to the print line to assure the correct color band selection. A specific step motor is used to move the ribbon band up and down for color selection. 1.2.3.6 Mechanical Options This printer can provide some mechanical options : AUTOMATIC SHEET FEEDER (up to 3 bins). Each bin has a DC motor inside it to automatically load the single sheet paper. Internally on the bin a series of gears takes the movement of the motor to the rubber roller shaft. Together with the first bin a PAPER STACKER is provided to collect the output printed paper. Also this part has an internal step motor to select the path where the paper should be output. See chapter 9 for more details. ____________________________________________________________________________________________ LA400 Multiprinter 1. 7 ER-LA400-SV Maintenance Manual General Overview _______________________________________________________________________________________ 1.3 Printers Technical Specifications The following features refer mainly to intrinsic characteristics and can change without notice. • PRINT HEAD N. of Needles Life (MChrs draft) H. Pitch V. Pitch Needle Diameter • PRINT SPEED CPI= DPI= CPS= DPS= • 24 400 1/120" 1/180" 0.2 mm (0.0078") characters per inch dots per inch characters per second dots per second CPI DPI CPS DPS Draft mode: 10 12 15 17 20 24 60 60 60 120 120 120 400 480 600 343 400 400 Letter Quality mode: 10 12 15 17 20 24 180 180 180 180 180 180 133 160 200 229 267 320 Dot Graphic Mode: - 60 80 90 120 180 240 360 - 2100 1660 1245 2100 2100 2100 2100 THROUGHPUT PPH ECMA 132 PPH= pages per hour PPH Fanfold ASF Letter Draft: Letter Quality: Graphic: Spread 17: Spead 10: 402 208 75 226 246 330 150 95 170 - ____________________________________________________________________________________________ LA400 Multiprinter 1. 8 ER-LA400-SV Maintenance Manual General Overview _______________________________________________________________________________________ • CHARACTER PITCH Basic: Compressed: Double-Wide: Other: 10, 12, 15 16.7, 17.14, 20, 24 5, 6, 7.5, 8.33, 8.5 Proportional Intercharacter spacing n/120 n/180 n/360 n/720 • CHARACTER FORMATION DPC= dots per character Draft (text 10 cpi): Draft (text 12 cpi): Draft (text 15 cpi): Draft (graphic char): LQ (text 10 cpi): LQ (text 12 cpi): LQ (text 15 cpi): LQ (proportional): LQ (graphic char): • S H Res (V) 9 7 7 12 31 27 21 42 36 3 3 1 0 5 3 3 0 0 1/120" 1/120" 1/120" 1/120" 1/360" 1/360" 1/360" 1/360" 1/360" (24) (24) (16) (30) (24) (24) (24) (24) (30) VERTICAL SPACING LPI= • H lines per inch Basic: 2, 3, 4, 6, 8, 12 Incremental n/60 n/72 n/180 n/216 n/360 BIT IMAGE (DOT GRAPHICS) Horizontal: 60, 80, 90, 120, 180, 240, 360 Vertical: 60, 72, 144, 180 ____________________________________________________________________________________________ LA400 Multiprinter 1. 9 ER-LA400-SV Maintenance Manual General Overview _______________________________________________________________________________________ • MEDIA HANDLING BACKWARD PAPER MOVEMENT The reverse paper movement is always allowed except: - When NO TEAR option is selected in Set-up. - When PULL TRACTOR option is installed and PULL ONLY mode is selected. • MEDIA CHARACTERISTIC The basic printers can manage a manual single sheet front insertion and up to 3 fanfold modules formats in 4 different paths. SINGLE SHEET Front insertion and straight path The printer can accept these formats: • A5, A4, A3, portrait and landscape • A2 portrait • LETTER, LEGAL and EXECUTIVE WIDTH LENGTH THICKNESS COPIES WEIGHT (original) WEIGHT (Multicopy) first sheet other carbon minimum 114.3mm 4.5" maximum 444.5 mm 17.5" minimum 101.6 mm 4" maximum 558.8 mm 22" maximum 0.635 mm 0.025" 1 + 5 (1 + 7 with High Impact Draft selected) minimum maximum 50 gr/M² 120 gr/M² 12.5 lbs 30.0 lbs minimum maximum minimum maximum minimum maximum 55 gr/M² 75 gr/M² 45 gr/M² 75 gr/M² 14 gr/M² 35 gr/M² 18.75 lbs 11.25 lbs 18.75 lbs 3.5 lbs 8.75 lbs FRONT PUSH FANFOLD Frontal push fanfold feeding and straigh path WIDTH LENGTH THICKNESS COPIES WEIGHT (original) WEIGHT (Multicopy) copies carbon minimum maximum minimum maximum maximum 1+5 76.2 mm 431.8 mm 76.2 mm 609.6 mm 0.635mm 3.0" 17.0" 3.0" 24" 0.025" minimum maximum 55 gr/M² 150 gr/M² 13.75 lbs 37.5 lbs minimum maximum maximum 45 gr/M² 75 gr/M² 35 gr/M² 11.25 lbs 18.75 lbs 8.75 lbs ____________________________________________________________________________________________ LA400 Multiprinter 1. 10 ER-LA400-SV Maintenance Manual General Overview _______________________________________________________________________________________ PULL TRACTOR OPTION Same as Front Push Fanfold REAR PUSH FANFOLD Rear push fanfold feeding WIDTH LENGTH THICKNESS COPIES WEIGHT (original) WEIGHT (Multicopy) copies carbon minimum maximum minimum maximum maximum 1+3 76.2 mm 431.8 mm 76.2 mm 609.6 mm 0.35mm 3.0" 17.0" 3.0" 24" 0.0138" minimum maximum 55 gr/M² 80 gr/M² 13.75 lbs 20 lbs minimum maximum maximum 45 gr/M² 75 gr/M² 35 gr/M² 11.25 lbs 18.75 lbs 8.75 lbs The printer can accept also the Automatic Sheet Feeder option with these paper limitations: ASF ALL BINS Capacity Bin of 120 sheets LENGTH maximum THICKNESS maximum COPIES 1+2 WIDTH minimum maximum WEIGHT (original) minimum maximum WEIGHT (Multicopy with carbon) first/last sheet minimum maximum other minimum maximum carbon approx. 355 mm 0.35mm 14" 0.0138" 88.9 mm 304.8 mm 6" 12" 60 gr/M² 150 gr/M² 15 lbs 37.5 lbs 70 gr/M² 80 gr/M² 35 gr/M² 40 gr/M² 25 gr/M² 17.5 lbs 20.0 lbs 8.75 lbs 10.0 lbs 6.25 lbs WEIGHT (Multicopy sensitive) first/last sheet minimum 70 gr/M² maximum 80 gr/M² other minimum 40 gr/M² maximum 60 gr/M² ENVELOPES Capacity of 30 envelopes max., Size US 6, US 10 17.5 lbs 20.0 lbs 10.0 lbs 15.0 lbs ASF 1 BIN LENGTH minimum 114 mm 4.5" ASF 2 BIN LENGTH minimum 216 mm 8.5" ASF 3 BIN LENGTH minimum 267 mm 10.5" ____________________________________________________________________________________________ LA400 Multiprinter 1. 11 ER-LA400-SV Maintenance Manual General Overview _______________________________________________________________________________________ • INTERFACES There are two interfaces with automatic protocol and I/F switching on SW commands. - Parallel interface Centronics Compatible Bidirectional (IEEE-1284) nibble and byte modes 36 pin Amphenol connector with ESD protection - Serial interface Modular 6-pin DECconnect type Baud Rate:300 to 19200 bps Character Format: 1 Start bit + 7 or 8 data bits, + optional parity bit + 1 stop bit • • • DEVICE PROTOCOLS Emulation: Printer Names EPSON IBM ANSI ESC P/2 Proprinter X24E/XL24E DEC PPL2 ELECTRICAL CHARACTERISTICS JA/US Specification : 120 V +10% -15%, 50/60Hz ±2Hz EU/UK Specification : 220/240 V +10% -15%, 50/60Hz ±2Hz AC Consumption : Idle Printing less than 80 VA less than 200 VA ENVIRONMENTAL CONDITIONS The storage and transit environment (1 year) of the device and the related expansion module and supplies is: Temperature Range Humidity Range - 20 °C to + 60 °C (-4 °F to 140 °F) 5% RH to 90% RH (not condensing) The operating environment is : Temperature Range Humidity Range + 10 °C to + 40 °C (41 °F to 104 °F) 20% RH to 80% RH (not condensing) Additional resctrictions are introduced by the paper. The ECMA standard suggestions are : Temperature Range + T16 °C to + 24 °C Humidity Range 40% RH to 60% RH (not condensing) • NOISE Sound Pressure level bystander position according to ISO 7779: Printing: less than 56 dBA Stand-by: less than 45 dBA ____________________________________________________________________________________________ LA400 Multiprinter 1. 12 ER-LA400-SV Maintenance Manual General Overview _______________________________________________________________________________________ • STANDARDS, REGULATIONS AND APPROVALS Printer Safety: - DEC std 119/178 - UL standard 1950 - IEC Publication 950 - European Norm 60950 - CSA Standard C22.2 No 950 AC Power - DEC std 002/122 Electromagnetic Compatibility - DEC std 103 - FCC Rules and Regulations, Part 15 - Subpart J (B Level) - CISPR 22 - EMC Directive - EN 55022 Class B EEC/89/336 - EN 55082 Environment - DEC std 102 Approvals - UL Listing to UL 1950 - CSA Certification to CSA C22.2 No 950 - Approval to EN60950 and IEC with a GS Mark - Nordik deviations to EN60950: EMKO-TSE (74-SEC) Energy Consumption - EPA compliant with a power consumption of max 30W in stand-by ____________________________________________________________________________________________ LA400 Multiprinter 1. 13 ER-LA400-SV Maintenance Manual General Overview _______________________________________________________________________________________ • MAINTAINING PARAMETERS Next maintaining parameters are valid under the following conditions: Standard temperature and humidity (23 ± 2 °C, 50 ± 5 RH) MTTR The MTTR is the estimated time to repair the printer at Optimum Replaceable Unit (ORU) level is 15 minutes. It includes: - Identifying the faulty ORU - Changing the ORU - Cleaning paper paths - Testing locally MTBF/RELIABILITY MTBF depends on duty cycle rate (D.C.). For these printers it is 10.000 HRS @ 25 % D.C. (excluding print head). Duty cycle rate estimated for this printer is calculated as follows: Paper Movement & Print Time Duty Cycle = ---------------------------------------------------- = 25 % Power-on Time Reference usage of 25% duty-cycle is assumed on the basis of the following parameters : 60% column density, 50% line density, 40% character density, 40 hours/week. LIFE • - UNIT 5 years - RIBBON 15 Mcharacters Draft (standard black type) 3 MCharacters Draft each band (color type) - PRINT HEAD 400 M Characters Draft USER INTERFACE The Operator Panel of this printer has the overall appearance of a plane surface as shown in the next figure 1.4 with the following: - 1 LCD Display with 16 alpha-numeric digit - 9 Push Buttons - 8 LED indicators (3 for status and 5 for paper paths) ____________________________________________________________________________________________ LA400 Multiprinter 1. 14 ER-LA400-SV Maintenance Manual Paper Handling Overview _______________________________________________________________________________________ Chapter 2 Paper Handling Overview ____________________________________________________________________________________________ LA400 Multiprinter 2. 1 ER-LA400-SV Maintenance Manual Paper Handling Overview _______________________________________________________________________________________ 2.1 Introduction As described in chapter 1.1.1, this printer is designed to be extremely flexible in paper handling. Moreover, the new mechanism has been designed to be, first of all, ergonomic for a better and easier end-user operation. 2.1.1 Paper Handling Architecture All the paper paths described below can co-exist and can be selectable via MENU and SW commands. Paper Feed Options (Pull Tractor, Push Tractors) presence and type are detected at Power-up. The printer automatically switches from one path to the other except for the rear pull tractor positions. Via operator panel menu it is possible to select one macro per each path (up to 6) or a single format (equal for all paths). The basic configuration provides these ways to manage the paper formats: (In the next figure the paths for continuous modules are indicated as <⋅⋅⋅ >, while the paths for single sheet forms are indicated as --->; each path is identified with a number). • SINGLE SHEET A semi-automatic frontal single sheet insertion (PATH 1). The cut sheets, envelopes or particular paper formats are manually loaded in this path. When a sheet is inserted, the sensors detect its presence and the printer loads the paper automatically through the cut sheet stand without any other action. • CONTINUOUS MODULE (FANFOLD) WITH PUSH TRACTOR UNIT Through a user installable/removable push tractor unit the fanfold module can be fed through the following positions: PUSH FRONT mode (PATH 2) with push tractor unit installed in the front position. PUSH REAR mode (PATH 3) with tractor unit installed in the rear position. The continuous module exits from the rear paper slot (PATH 5). • DOUBLE MODULE (FANFOLDS) WITH PUSH TRACTOR UNITs Through a second optional user installable/removable push tractor unit the following feeding position for continuous module is available for alternate use: FRONT+REAR PUSH fanfolds mode. The first fanfold from the front in push mode with basic push tractor unit installed in the front position (PATH 2), the second from the rear in push mode with the optional push tractor unit installed in the rear position (PATH 2). For this path, the fanfolds exit (once at a time) from from the rear paper slot (PATH 5). ____________________________________________________________________________________________ LA400 Multiprinter 2. 2 ER-LA400-SV Maintenance Manual Paper Handling Overview _______________________________________________________________________________________ • CONTINUOUS MODULE (FANFOLD) WITH PULL TRACTOR UNIT Through the optional user installable/removable pull tractor unit the following feeding positions for continuous module are available : PULL mode in which the fanfold can be manually loaded from the front and fed with the optional pull tractor unit (PATH 4). PUSH&PULL mode in which the fanfold can be fed from the front in push mode with the basic tractor unit (PATH 2) and at the same time is pulled from the optional pull tractor unit in position C (PATH 4). REAR PULL and PUSH&PULL modes are selectable from Control Panel. • AUTOMATIC SHEET FEEDER (ASF) Through the optional Automatic Sheet Feeder the following feeding positions for single sheets are available : ASF1 in the first bin (PATH 6). ASF2 in the second bin (PATH 7). ASF3 in the third bin (PATH 8). Inside the paper output stacker, a mechanical switch allows the alternance between the output single sheets, which are collected to the output stacker (PATH 9), and the fanfold using this exit (PATH 5). From control panel it is possibl to set combined asf path configurations (1+2, 2+3 and 1+2+3). On the next figure 2.1 it is possible to see the internal architecture of this printer in which the different paper paths handled by the new design of the mechanical assembly are put in evidence. On the table 2.1 it is possible to find all the Paper Path Types that can be selected from the Control Panel in according to the printer Path Configurations. ____________________________________________________________________________________________ LA400 Multiprinter 2. 3 ER-LA400-SV Maintenance Manual Paper Handling Overview _______________________________________________________________________________________ Fig. 2.1 Paper Handling Architecture PAPER PATH TYPES 1 - 2 2 2 - 3 3 - 4 4 - 6 6 6 7 7 7 7 8 8 8 PAPER PATH CONFIGURATIONS FROM CONTROL PANEL MANUAL PUSH FRONT PUSH REAR PUSH FRONT+REAR PULL PUSH+PULL ASF1 ASF2 ASF3 ASF1+ASF2 ASF2+ASF3 ASF1+ASF2+ASF3 Table 2.1 Printer Path Configurations ____________________________________________________________________________________________ LA400 Multiprinter 2. 4 ER-LA400-SV Maintenance Manual Paper Handling Overview _______________________________________________________________________________________ 2.1.2 Paper Path Configurations 2.1.2.1 Basic Configuration The next figures 2.2, 2.3 show the alternative positions of the standard push tractor unit and related paper paths, figure 2.4 and 2.5 show the position of the optional pull tractor unit and related paper path. The figure 2.2 shows the Front Load Push-Mode of the fanfold. The figure 2.3 shows the Rear Load Push-Mode of the fanfold. The figure 2.4 shows the Rear Load Pull-Mode of the fanfold (alternatively the paper can enter in the bottom feed slot). The figure 2.5 shows the Front Load Push-Pull Mode of the fanfold. IMPORTANT REMARK • • There is no the Overlay mode of manual with any fanfold modules. For the REAR PUSH mode, the fanfold must have a maximum thickness of 0.35 mm instead of 0.52 mm of the other paths (see chapter 1.4 for major details). ____________________________________________________________________________________________ LA400 Multiprinter 2. 5 ER-LA400-SV Maintenance Manual Paper Handling Overview _______________________________________________________________________________________ Figure 2.2 Front Load Push-Mode Figure 2.3 Rear Load Push-Mode ____________________________________________________________________________________________ LA400 Multiprinter 2. 6 ER-LA400-SV Maintenance Manual Paper Handling Overview _______________________________________________________________________________________ Figure 2.4 Rear (Bottom) Load Pull-Mode Figure 2.5 Front Load Push-Pull Mode with two tractors ____________________________________________________________________________________________ LA400 Multiprinter 2. 7 ER-LA400-SV Maintenance Manual Paper Handling Overview _______________________________________________________________________________________ 2.1.2.2 Dual Fanfold Configurations The next figure 2.6 show the dual tractor units configuration allowing the alternance between two fanfolds, and related paper paths. IMPORTANT REMARK • For the REAR PUSH mode, the fanfold must have a maximum thickness of 0.35 mm instead of 0.52 mm of the other paths (see chapter 1.4 for major details). Figure 2.6 Front Load Push-Mode and Rear Load Push-Mode with two tractors ____________________________________________________________________________________________ LA400 Multiprinter 2. 8 ER-LA400-SV Maintenance Manual Paper Handling Overview _______________________________________________________________________________________ 2.1.2.3 ASF Configuration The figure 2.7 below shows the positions of the Automatic Sheet Feeder and related paper paths. The ASF can co-exists with both the push-pull tractor units (front and rear) installed. The 1st BIN can accept also envelopes. See chapter 1.4 for details regarding the paper specifications. Figure 2.7 Automatic Sheet Feeder ____________________________________________________________________________________________ LA400 Multiprinter 2. 9 ER-LA400-SV Maintenance Manual Electronic Hardware Overview ____________________________________________________________________________________________ Chapter 3 Electronic Hardware Overview ____________________________________________________________________________________________ LA400 Multiprinter 3. 1 ER-LA400-SV Maintenance Manual Electronic Hardware Overview ____________________________________________________________________________________________ 3.1 Hardware General Overview The electronic structure of this printer is composed of four boards as shown in next figure 3.1: • • • • Main Controller board Power supply board One for 120 Vac One for 230 Vac Operator panel board LCD Display board plus some optional boards as: • • • • Serial interface board Optionally expansion board Font cartridge board Paper Stacker board Figure 3.1 Electronics Structure ____________________________________________________________________________________________ LA400 Multiprinter 3. 2 ER-LA400-SV Maintenance Manual Electronic Hardware Overview ____________________________________________________________________________________________ 3.1.1 Electronic Architecture The electronic hardware of this printer is based on 1 µprocessors (V55PI NEC). The electronics architecture of the printer is as illustrated on next figure 3.2. The controller unit of LA400 printer is implemented on one board. This board can be splitted in two sections at functional level: • • The first section is a digital one, mainly dedicated to provide the physical and logical interface between the host and the engine mechanical/electrical feature. The second one is an analogic one, mainly dedicated to drives the motors, the print head needles, the generation of the Reset (power-on phase) and Prefault (power-off phase) signals. On this board are also provided the hardware dedicated to the Operator Panel management and to support mechanical options. The operator panel hardware, is realized on a specific board connected by flat cable. Figure 3.2 Electronics Architecture ____________________________________________________________________________________________ LA400 Multiprinter 3. 3 ER-LA400-SV Maintenance Manual Electronic Hardware Overview ____________________________________________________________________________________________ 3.1.2 Controller Overview 3.1.2.1 V55PI µProcessor The V55PI is microprocessor with a 16 bit CPU, a RAM, a serial interface, a parallel interface, an A/D converter, a timer, a DMA controller, an interrupt controller and other relevants units integrated in a single chip. Therefore, it is best suited for data process systems including mechanical controls, such as printers. The V55PI µprocessor has the following functions: • • • • • • • • • • • • • • • • • • • • • 16 bit internal architecture: 16/8 bit external data bus width selection enabled. Minimum instruction cycle: 160 ns/12.288 MHz (externally operated at 24.576 MHz) Address space : 16 Mbytes - 1Mbyte for basic memory space - 15Mbytes for expansion memory space Register file space (on-chip RAM) : 512 bytes / 16 register banks I/O space : 64 Kbytes Memory space under division control in variable size (6 blocks max.) Automatic wait control. I/O line (input port : 11 bits, input/output port : 42 bits). DMA controller (DMAC): configuration possible with a maximum of 4 channels. 4 types of DMA transfer modes (single transfer, demand release, single step, burst). Intelligent DMA modes 1 and 2. Serial interface : 2 channels. Either asynchronous (UART) or clocked mode (CSI) can be selected. Parallel interface : 8 bits. Centronics data input/output and general data input/output. A/D converter (8 bit resolution) : 4 channel. Realtime output port : 4 bits x 2 channels, or 8 bits x 1 channel. PWM (Pulse Width Modulation) signal output function (8 bits). Interrupt controller Multiple interrupt service control by programmable priority (4 lev els). 3 types of interrupt response methods: vectored interrupt function, Register bank switching function and macro service function. bit timer counter : 4 channel. Watch-dog timer function. Software interval timer (16 bits). Address block wait insert function and RAS/CAS switching timing generate function. DRAM and pseudo-SRAM refresh function. Stanby function (STOP mode and HALT mode). Built-in clock generator. ____________________________________________________________________________________________ LA400 Multiprinter 3. 4 ER-LA400-SV Maintenance Manual Electronic Hardware Overview ____________________________________________________________________________________________ 3.1.2.1.1 µP V55PI Internal Block Architecture The figure 3.3 shows the internal architecture of the µprocessor. Figure 3.3 Microprocessor Internal Block Diagram ____________________________________________________________________________________________ LA400 Multiprinter 3. 5 ER-LA400-SV Maintenance Manual Electronic Hardware Overview ____________________________________________________________________________________________ 3.1.2.1.2 µP V55PI Block Features Bus Control Unit (BCU) This block controls the main bus. In the CPU the necessary internal/external bus cycles are started in accordance with the physical address obtained with the execution unit (EXU). Execution Unit (EXU) This block controls address calculations, arithmetic logic calculations and data transfer with micro programs (firmware to control the macro sequencer based on the operation code decoding results). The EXU incorporates a 512-byte RAM corresponding to the register file space. Interrupt Controller (INTC) The interrupt request from the built-in peripheral hardware and external hardware interrupt requests are processed either by switching between the vectored interrupt and the register bank or with macro service. Further, programmable 4-level interrupt prioriry can be controlled and multi ple processing control can be executed on interrupt sources. DMA Controller (DMAC) This block is a general DMA controller and can handle a 16 Mbyte memory space linearly. The operating modes consist of a memory-to-memory transfer mode, an intelligent DMA (ring buffer method and counter control method), a next address specify mode and 2channel operating mode. Serial Interface (UART/CSI) This block includes the asynchronous serial interface (UART) for data synchronization with start/stop bit and the clocked serial interface (CSI). Either interface can be selected for use. The CSI can employ either the serial bus interface mode (SBI) or the 3-wire serial I/O mode. Parallel Interface (PIU) This blocks performs input/output in 8-bit units using strobe signal synchronization and supports the Centronics interface and general-purpose parallel data communication functions. A/D Converter Unit (8-bit A/D) This is a successive conversion 8-bit A/D converter having 4 analog inputs. It is equipped with four A/D conversion result registers. Timer/Counter Unit (TCU) This units incorporates a 16-bit timer/counter and can be used as the interval timer, the freerunning counter or the event counter. Pulse Width Modulation Unit (PWM) This unit is provided with an 8-bit accuracy PWM signal output function. Watch-Dog Timer (WDT) An 8-bit watchdog timer is incorporated to detecct an inadvertent overrun and system errors. The WDT is equipped with the WDTOUT pin to externally notify the generation of a watchdog timer interrupt. ____________________________________________________________________________________________ LA400 Multiprinter 3. 6 ER-LA400-SV Maintenance Manual Electronic Hardware Overview ____________________________________________________________________________________________ Port (PORT) Up to 53 port pins are available. Port pin and control pin functions can be selected for use. Port 0 - EEPROM selection,clock and data input lines - PCMCIA Memory Card line - Alternance motor front tractor lines - Alternance motor rear tractor lines Port 1 - Prefault line - EEPROM data output line - Home position and ribbon sensors line - PCMCIA interface ready/busy line - Expansion interface line - Parallel interface input line (INIT) Port 2 - Memory card address line - PSRAM resfresh and address lines - Paper sensors driving lines - DMA request for fir configuration request line Port 3 - Serial synchronous I/F lines (CLOCK, TX, RX) - Enable serial synch. lines for O.P. and options - Serial asynchronous I/F lines (CTS, TX, RX) Port 4 - Parallel host data lines Port 5 - Parallel Host input and output lines (STROBE, ACK, BUSY) Port 6 - Outputs lines from analog MUX Head temperature Single sheet presence Front fanfold presence Rear fanfold presence - Board type line - Optional voltage reference line Port 7 - Carriage motor enable and phase lines - Ribbon motor reference and phase lines Port 8 - DMA request for "clear bit map" and needles configuration Realtime Output Port (RTOP) This block is a reltime output port to be triggered with an interrupt from timer 0. it can output 8-bit buffer register contents in 4-bit or 8-bit units at a programmable interval. System Control (SC) This block generates 1/2, 1/4, 1/8, 1/16 specific frequencies of the crystal or ceramic resonator connected to the X1 and X2 pins and supplies them as CPU operation clocks. Also generates the master reset for the correct synchronization of all logic devices. Software Interval Timer (SIT) A 16-bit software interval timer is incorporated as one for software timer or clock functions. It can set interval interrupts by selecting the input clock (count clock) and setting the software timer counter compare register. ____________________________________________________________________________________________ LA400 Multiprinter 3. 7 ER-LA400-SV Maintenance Manual Electronic Hardware Overview ____________________________________________________________________________________________ 3.1.2.2 ASIC The ASIC (Application Specific Intergrated Circuit) main functions are: Logic integration such as the memories selection and the I/O registers support. 1) The I/O registers provided to drive output lines or to realize variable memory mapping and are summarized below. Reg. 1 - Parallel interface input lines (SLCTIN, AUTOFD). - Serial asynchronous I/F lines (DCD, DSR). Reg. 2 - Parallel I/F output lines (SLCT, PE, FAULT). - Parallel I/F data lines input/output set. - Serial asynchronous I/F lines (SRTS, RTS, DTR). Reg. 3 - Operator Panel output control lines Reg. 4 - Carriage motor reference lines - Paper motor enable, reference and phase lines Reg. 5 - Color motor phase lines - AGA motor reference and phase lines Reg. 6 - Rear and front fanfolds moving sensor lines - MUX selection lines - Fan driving line Reg. 7 - EPROM/Memory-Card size selection lines - Power enable line The ASIC output also provides these control lines: Carriage motor phase lines Paper motor phase lines 2) Provides the support for printing management in agree with the head type. For the printing management the ASIC provide the signal and related timing for the DMA management usefull to transfer the needles configuration and to clear the bit-map. It also include some timers necessary to the needles driving. The count frequency is defined by a prescaler counter set to have a CLK/16 period; CLK is the V55PI output base clock (12.288 MHz). The registers are summarized below. Reg. 8 - Print Head control register Needles number, print direction, DMA request, needles time reset and timers enable lines Reg. 9 - Needles driving Timer 1 value Reg. 10 - Needles driving Timer 2 value Reg. 11 - Chopper frequency value Timer 3 Reg. 12 - Negative duty cycle inside choppering (Timer 3 value) Reg. 13-14-15 Needles configuration registers (up to 24 bit) ____________________________________________________________________________________________ LA400 Multiprinter 3. 8 ER-LA400-SV Maintenance Manual Electronic Hardware Overview ____________________________________________________________________________________________ 3.1.2.3 Memories As memory support must be intended the hardware support for the software, so it includes registers, memories and logic providing their addressing. The memories supports can be resident and/or optional and can be located in the 16 MB addressability provided by the microprocessor with a rescriction for the "code" type that is located at the first mega address. Resident Memory : CONTROLLER EPROM i.c. up to 512 KBytes x 8 (4 Mb) GENERATOR EPROM i.c. up to 512 KBytes x 8 (4 Mb) Optional Memory : Memory Card, OTP or SRAM types up to 256 KBytes x 8 (2 Mb) 3.1.2.4 Operator Panel For the operator panel management, a serial port (Port 3) of the µprocessor is used in synchronous mode to enable lines. In addition, inside the ASIC, a control register (Reg. 3) is provided for the access to the register located on the operator panel specific board. On the operator panel board a specific registers are used to drive the LCD, the LEDs and the PUSH- BUTTONs. Port 3 Enable serial synchronous lines Reg. 3 Operator Panel control register - Latching strobe for the status selected by the means of the O.P. selection lines in read mode - Kind of the data to send to LCD in write mode - Read/Write type access on O.P. board register - O.P. status selection in read mode or latch for LEDs register in write mode - O.P. status selection in read mode or latch for LCDs register in write mode - O.P. status selection in read mode or latch for KEYs register in write mode Reg. LED LEDs output data lines. Reg. LCD LCD input data lines. Reg. KEY1-2 Push Button input lines. 3.1.2.5 Serial lnterface Board The logical hardware support are provided on the basic board by the means of specific port on the µprocessor and register on ASIC. This board provides only the physical connection with the line receivers and drivers intergrated circuits. ____________________________________________________________________________________________ LA400 Multiprinter 3. 9 ER-LA400-SV Maintenance Manual Electronic Hardware Overview ____________________________________________________________________________________________ 3.1.2.6 Expansion Bus The expansion bus is provided to connect additional board to support also complex functionality such as particolar host interfaces. This bus provides all the microprocessor signals so the lines managing is implicit in the microprocessor feature and partially also in the decoding logic with the hardware register support and the addressing map involved. 3.1.3 Mechanical Drivers As indicated in previous chapters, analogic part of the board drives the power circuits and generates the Reset and Prefault signals. All the driver (excepts for the paper motor) are disable when there are no activities for more than 20 seconds. The next figure shows the blocks structure of the DOE (device oriented electronics). Figure 3.4 DOE Blocks Diagram ____________________________________________________________________________________________ LA400 Multiprinter 3. 10 ER-LA400-SV Maintenance Manual Electronic Hardware Overview ____________________________________________________________________________________________ 3.1.3.1 D.O.E. Block Features • RESET and PREFAULT This block handles some important signals indispensable for the correct intialization of the microprocessor and power drivers during the power-on and power-off transitions phases. There is a Voltage Supervisor TL7705A that monitorizes the voltages during the transition phases and a Schmitt Trigger that rigenerates the signal edges for the logic HCMOS compatibility. This circuit is supplied with the analogic "or" of the two voltages +5 and +38. In this way it is ready if only one voltage is present. It generates the CPU Reset when the logic voltage reaches +4.75V. It also generates the PREFAULT signal to handles the printer status in the NVM. In the next two figures are shown the schematics and the typical vaweforms of this circuit. Typical timing: with +38 V = +10V and with +5V = +4.4V the signal are as point A. TD-TB > 30 msec. TF-TE > 2 msec. Figure 3.5 Reset and Prefault Circuit ____________________________________________________________________________________________ LA400 Multiprinter 3. 11 ER-LA400-SV Maintenance Manual Electronic Hardware Overview ____________________________________________________________________________________________ Figure 3.6 Reset and Prefault Waveform • COLOR & PAPER STACKER MOTORS The color ribbon and the paper stacker movement are obtained via a linear movement of the rotor of a 15 degrees bipolar step motor. The driver device is a L293D in which are intergrated four driver with recycle diodes and logic control circuits. The figure below shows the schematic of this circuit. Figure 3.7 Color & Paper Stacker Motors Driving Cicruit ____________________________________________________________________________________________ LA400 Multiprinter 3. 12 ER-LA400-SV Maintenance Manual Electronic Hardware Overview ____________________________________________________________________________________________ • CARRIAGE MOTOR The carriage movement is obtained via a 1.8 degrees bipolar stepper motor. This motor operates properly in the range between 6 and 40 IPS (Inch Per Second) speeds. • PAPER MOTOR The paper movement is obtained via a 1.8 degrees bipolar step motor. This motors operate at maximum speed of 8 IPS. For both the motors, the driver device is a dual full bridge driver L298 with a current controller L6506 as indicated in the figure below. The current level control is defined as fixed frequency chopper (depending by the internal oscillator of the controller in a range of 19 to 28 KHhz). The figure below shows the schematics of this circuit. Figure 3.8 Carriage and Paper Motors Driving Cicruit ____________________________________________________________________________________________ LA400 Multiprinter 3. 13 ER-LA400-SV Maintenance Manual Electronic Hardware Overview ____________________________________________________________________________________________ • RIBBON MOTOR The ribbon movement is obtained via a 7.5 degrees bipolar step motor. • AGA MOTOR The ribbon movement is obtained via a 3.6 degrees bipolar step motor. For both the motors, the driver device is a L6219 in which are intergrated a current controller, the recycle diodes and the power drivers. In the figure below is indicated the internal block diagram of this device. Figure 3.9 Ribbon and AGA Motors Driving Cicruit • ALTERNANCE MOTORS The alternance motor (tractor/friction switching) is a DC motor. The driver device is a L293D with two resistors in series to the motor coils to the inrush curent. In the figure below a typical application of this device. prevent Figure 3.10 Color and Alternance Motors Driving Cicruit ____________________________________________________________________________________________ LA400 Multiprinter 3. 14 ER-LA400-SV Maintenance Manual Electronic Hardware Overview ____________________________________________________________________________________________ • ASF MOTOR The asf motor is a DC motor. The driver device is a darlington transistor array with two resistors in series to the motor coils to prevent the inrush curent. In the figure below a typical application of this device. Figure 3.11 ASF Motor Driving Cicruit • SENSORS The DOE is provided with the sensors summarized below. The following two sensors enters directly in the port 1 of the microprocessor. - Home Position (interrupting sensor) - Ribbon Fault (interrupting sensor) The following sensors enters in a analog MUX (multiplexer) with 8 input and 2 outputs and then in the A/D section of the microprocessor. (The number on the diodes represents the pin number of the sensors cable connector, see chapter 8 for major details). - Fanfold Front presence - Fanfold Rear presence - Single Sheet presence - Printhead Temperature Figure 3.12 Sensors Driving Circuit ____________________________________________________________________________________________ LA400 Multiprinter 3. 15 ER-LA400-SV Maintenance Manual Electronic Hardware Overview ____________________________________________________________________________________________ • PRINTING HEAD Printing head is a electromagnetic non-ballistic type. With reference to the figure 3.13 below, when the actuator is at rest, the clapper is ushed to the central O-Ring by the hinge O-Ring and by the leaf spring. When a dot has to be printed, a proper current pulse is applied to the coil, magnetic flux is pushed into the core and the clapper is pulled to contact the core, so that the needle is pushed against the media (fig. 3.13 b). Figure 3.13 a Figure 3.13 b Print Head Behaviour The coil is energized through the TR1 transitor and then is disharged through the TR2 and D1 drived by the TR3 transistor. These phases can be repeated more times in the "chopper" mode behaviour. After that, the phase of coil stored energy discharge is activated and allows the power to come-back to the power supply through the D2. Figure 3.14 Print Head Needle Driving Circuit ____________________________________________________________________________________________ LA400 Multiprinter 3. 16 ER-LA400-SV Maintenance Manual Electronic Hardware Overview ____________________________________________________________________________________________ The maximum firing frequency is 2400 Hz for alphanumeric printing and 2100 Hz for graphic printing. In the next figure are shown the typical waveform of the print head needle current. The LOW and NORMAL energy can be selected via operator panel in order to obtain the best performance in term of printout/noise when multiple forms paper is used. The timing values (µsec) are programmed by the ASIC timer registers. Low Normal T1 = Timer 1 T2 = Timer 2 typical T3 = Timer 3 T4 = Negative duty cycle inside T3 100 100 37.5 12.5 115 85 37.5 12.5 T1+T2+discharge time 230 230 Energy (mJ) 4 5 Figure 3.15 Print Head Needle Current Waveforms ____________________________________________________________________________________________ LA400 Multiprinter 3. 17 ER-LA400-SV Maintenance Manual Electronic Hardware Overview ____________________________________________________________________________________________ 3.1.4 Power Supply Board The power supply is an off-line switched mode power supply. There are two type of boards, one for input voltage of 120 Vac (-18% +10%) and the other for 230 Vac (-19% +10%). Stand-by power : Continuous power : Peak power: 30 W 100 W 200 W Output voltages are: + 38 VDC ± 4 % (0 to 2.5 A max) + 5 VDC ± 4 % (0.3 to 1.2 A max) Input voltage is: + 79 VDC ± 6 % (0 to 0.25 A max) the tolerance is considered between the difference between +79 V and +38 V. It is composed of the following main blocks. The number between brackets ( ), is the one reported on next figure 3.16. 1) RFI Input filter. 2) Main switch with Fuses (1 for 120 V type, 2 for 220 V type). 3) Main Low frequency reftification and filtering. 4) Main Switching Converter (forward type). 5) Main High frequency reftification and filtering. 6) Linear regulator for + 5 output voltage. 7) High precision zener-diode regulator. 8) Optical linear circuit for galvanic insulation. 9) Pulse Width Modulator circuit. 10) Energy recovery Circuit. The low frequency section includes receptacle, fuses, switch, EMI/RFI filter, rectifier bridge and smoothing capacitors. The main converter section is forward type converter, working at a frequency variable of 65 Khz. The outputs of the transformer are +38 VDC and +9 VDC. This block includes a safety isolating main transformer, the high frequency rectifier bridge and smoothing capacitors for the outputs voltages, a voltage regulator, a optodecoupler which provides safety isolation between the main and the low voltage outputs, a PWM module which drives the power Mosfet properly. The linear regulator section delivers + 5 VDC from the +9 VDC. The Energy Recovery circuit is a block that allows to transfer the not-used energy from the print head circuits on the +38 VDC. Internally there is a swicthing DC-DC converter which maintains the +79 VDC on the proper value. ____________________________________________________________________________________________ LA400 Multiprinter 3. 18 ER-LA400-SV Maintenance Manual Electronic Hardware Overview ____________________________________________________________________________________________ 1 2 10 +78 V +38 V 5 4 3 6 9 +5 V 8 7 Fig. 3.16 Power Supply Major Block Diagram ____________________________________________________________________________________________ LA400 Multiprinter 3. 19 ER-LA400-SV Maintenance Manual Electronic Hardware Overview ____________________________________________________________________________________________ 3.1.5 Controller SW Overview All software elements are made in a structured way, both for device oriented electronics and mainly for controller aspects. The Controller S/W is structured into two separate layers: the APPLICATION layer and the PLATFORM layer. The Application layer main task is to provide the emulation function. It normally contains the Supervisor module, the Interpreter module (s) of the supported emulation. The Application Interpreter task is the interpretation of the emulated Presentation protocol commands (typically : Escape Sequences and Control Codes) to convert the string of received data into printable data, conforming to the interface requirements of the lower layer involved module. A separate part, application dependent, is responsible of the emulations and of the font management. Due to presence of the Platform layer, the Application layer is significantly independent from the characteristics of the running H/W. The PLATFORM layer is structured into several module swhich are personalized on the H/W characteristics (CPU, Host Interface, Operator Panel H/W, Device, etc.). The synchronisation of the Platform modules is performed by a Real Time Compuprint Operating System, which offers a set of primitives to the Application layer in order to simplify the application programming job and to standardize the S/W interface between the two layers. The interfaces among the Platform modules are also standardized to allow independent programming and (where possible) a stand-alone debugging of the program module with software simulation of the input and output data. The Platform layer can be easily improved or updated with new modules to support new printer features, options and/or hardware characteristics to generate different printer models or non-standard products. On the figure below, is reported the Software architecture of these printers. ____________________________________________________________________________________________ LA400 Multiprinter 3. 20 ER-LA400-SV Maintenance Manual Electronic Hardware Overview ____________________________________________________________________________________________ Figure 3.17 Software Architecture ____________________________________________________________________________________________ LA400 Multiprinter 3. 21 ER-LA400-SV Maintenance Manual Removal and Replacement ____________________________________________________________________________________________ Chapter 4 Removal and Replacement ____________________________________________________________________________________________ LA400 Multiprinter 4. 1 ER-LA400-SV Maintenance Manual Removal and Replacement ____________________________________________________________________________________________ 4.1 Overview This section describes the removal and replacement procedures for the basic printer. Before starting any of these procedures, turn the power switch OFF, and take off the plug from the wall socket. Before disassembling the printer, remove the paper in the printer and the inked ribbon cartridge. After the covers removal, the power supply cover tool must be installed to prevent any accidental contact of technician hand with the main heat-sink of the power supply itself if the printer is powered-on without covers. REMARK Caution and Warning in this section highlight specific information. A CAUTION provides information intended to prevent equipment damage. A WARNING provides information intended to prevent personal injury. You must observe anti-static precautions when maintaining this printer. Disassembly procedure must to be executed from the front side of the printer. 4.2 Recommended Hand Tools and Equipment The following items should be available for the technicians performing cor rective maintenance on printers: • Assortment of Philips head and common screwdrivers • Set of spanners for M3 and M5 nut • Extractor for chip • Pliers • Soldering iron (and soldering wire with flux core) • A Multimeter for resistance and voltage measurements • Feeler gauge for print head gap adjustment • Dynamometer for carriage and motor belts adjustment • Slender spring hook • Set of fastener loop self-lock ____________________________________________________________________________________________ LA400 Multiprinter 4. 2 ER-LA400-SV Maintenance Manual Removal and Replacement ____________________________________________________________________________________________ 4.3 O.R.U. ORDER OF ACCESS Table 4.1 shows the accessibility of EACH ORU (Optimum Replaceable Unit), and the procedure necessary to access to each one. Remove ORU: Requires these procedures in the order shown: 1) 2) 3) 4) 5) 6) 7) 8) 9) 10) 11) 12) 13) 14) 15) 16) 17) 18) 19) 20) 21) 22) 1 2 3 1,2,4 5 5,6 5,6,7 5,6,8 1,2,4,5,9 1,2,4,5,10 1,2,4,5,11 1,2,4,5,12 13 1,2,4,14 1,2,4,5,15 1,2,4,5,16 1,2,4,5,17 1,2,4,5,18 1,2,4,5,19 1,2,4,5,20 1,2,4,5,20,21 1,2,4,5,20,22 Push Tractor Group Operator Panel Boards Print Head Front Cover Parts Rear Cover Parts Serial Interface Board Main Board Power Supply Board Ribbon Motor AGA Motor AGA Support and T/F lever Carriage Motor and Fan Bail Assy Cut Sheet Assy Upper Feeder Assy Platen Assy Lower Feeder Assy Carriage Assy Sensor Cable Assy Mechanical Assy Paper Motor Friction Bar Assy (section 4.3.1) (section 4.3.2) (section 4.3.3) (section 4.3.4) (section 4.3.5) (section 4.3.6) (section 4.3.7) (section 4.3.8) (section 4.3.9) (section 4.3.10) (section 4.3.11) (section 4.3.12) (section 4.3.13) (section 4.3.14) (section 4.3.15) (section 4.3.16) (section 4.3.17) (section 4.3.18) (section 4.3.19) (section 4.3.20) (section 4.3.21) (section 4.3.22) (*) (*) (*) (*) (*) (*) Table 4-1 ORU ORDER OF ACCESS NOTE : Procedure with an asterisk require ADJUSTMENT PROCEDURE (see chapter 5) All the spare parts available on logistic are reported in the specific Illustrated Parts Catalog P.N.: ER-LA400-IP. REMARK. In the following chapters, the steps of removal procedures are labeled in the corresponding figures. ____________________________________________________________________________________________ LA400 Multiprinter 4. 3 ER-LA400-SV Maintenance Manual Removal and Replacement ____________________________________________________________________________________________ 4.3.1 Front Tractor Group CAUTION Do not remove and install the push tractor group with the printer at power-on. 1) Open the front antinoise cover. 2) Close the single sheet support cover, if open, by pulling it upward until it is fastened with the magnetic lock. 3) Disengage the tractor group from the mechanical assy by acting on the two small levers (located on plastic tractor sides) that block the tractor group on it. 4) Remove the tractor unit by pulling it downward. Replace the tractor group following the above instructions in reverse order. Figure 4.1 Push Front Tractor Group removal ____________________________________________________________________________________________ LA400 Multiprinter 4. 4 ER-LA400-SV Maintenance Manual Removal and Replacement ____________________________________________________________________________________________ 4.3.2 Operator Panel Boards CAUTION Don't attempt this operation without taking all recommended anti-static precautions. 1) Open the operator panel group by acting on its middle top side to disengage it from the cover. 2) Open the top cover group by acting on the two push-buttons (located on the front side of the cover). 3) Unscrew the screw securing the operator panel shield to the mechanical assy (in new printers this action will be not necessary anymore). 4) Unplug the operator panel connector from the operator panel board. 5) Rotate the operator panel group of 90° and at the same time extract it from the front cover. 6) Unscrew the six screws securing the operator panel boards to the cover and remove them. 7) Remove the operator panel board from the LCD display board by acting on the two plastic spacers catches that retain the boards together. Replace the operator panel boards group following the above instructions in reverse order. Figure 4.2 Operator Panel Parts removal ____________________________________________________________________________________________ LA400 Multiprinter 4. 5 ER-LA400-SV Maintenance Manual Removal and Replacement ____________________________________________________________________________________________ 4.3.3 Print Head WARNING The print head may have hot surface after a certain time of printing. Wait for it to cool down. 1) Open the top cover group by acting on the two push-buttons (located on the front side of the cover). 2) Place the print head to the rightmost carriage position and remove the inked ribbon cartridge and bail assy. 3) Unscrew the screw securing the print head cable to the carriage assy. 4) Unscrew the two screws securing the print head. 5) Open the printhead cable zif-connectors and unplug these connectors and the color motor connector (if present) by manually acting on their bends. 6) Remove the printhead. Replace the Print Head following the above instructions in reverse order. NOTICE : Before securing the screw, push the P.H. to its inside stop position. No adjustment is required. Figure 4.3 Printhead Removal ____________________________________________________________________________________________ LA400 Multiprinter 4. 6 ER-LA400-SV Maintenance Manual Removal and Replacement ____________________________________________________________________________________________ 4.3.4 Front Cover Parts 1) Remove the front tractor group (refer to chapter 4.3.1) 2) Remove the operator panel group (refer to chapter 4.3.2) 3) Unscrew the four screws securing the main front group (two on left and right printer side, the other two on the front side). 4) Remove the main front cover by extracting it and, at the same time, rotating it towards its front side. 5) Open the top cover and extract it from the main front cover by acting on its pins (located on both sides). 6) Extract the magnet interlock from the front cover by simply pulling it out of the cover. Replace the Main Front Cover Parts following the above instructions in reverse order. Figure 4.4 Main Front Cover Parts ____________________________________________________________________________________________ LA400 Multiprinter 4. 7 ER-LA400-SV Maintenance Manual Removal and Replacement ____________________________________________________________________________________________ 4.3.5 Rear Cover Parts 1) Remove the ASF cover by simply extracting it from the main rear cover. 2) Unscrew the four screws securing the main rear group (two on left and right printer side, the other two on the rear side under the ASF cover). 3) Remove the main rear cover by extracting it from the rear side. 4) Extract the rear tractor cover with the interlock board by simply extracting them from the main rear cover. 5) Extract the paper stacker covers by simply unhooking them from the main rear cover. 6) Extract the paper knob by simply pulling it out from the platen axis. Replace the Main Rear Cover Parts following the above instructions in reverse order. Figure 4.5 Main Rear Cover Parts ____________________________________________________________________________________________ LA400 Multiprinter 4. 8 ER-LA400-SV Maintenance Manual Removal and Replacement ____________________________________________________________________________________________ 4.3.6 Serial Interface Board CAUTION Do not attempt this operation without taking all recommended anti-static precautions. 1) Remove the rear cover group (refer chapter 4.3.5) 2) Unscrew the two screws securing the serial interface board to the base assy. 3) Remove the the Serial Interface Board by simply extracting it from the main board connector. Figure 4.6 Serial Interface Board ____________________________________________________________________________________________ LA400 Multiprinter 4. 9 ER-LA400-SV Maintenance Manual Removal and Replacement ____________________________________________________________________________________________ 4.3.7 Main Board CAUTION Do not attempt this operation without taking all recommended anti- static precautions. Remember to remove the eproms from the main board and install them on the new one in the corresponding position. 1) Remove the main rear cover (refer to chapter 4.3.5) 2) Unscrew the six screws securing the main board to the base unit. 3) Unscrew the three screws securing the interface connector metal support to the lower shield (two are located on the rear side, one is located on the left side of the printer). 4) Unplug all the connectors from the main board by acting on their bends. Note: Open the print head cable zif-connector before extracting the cable. Open the metal retaining clip with a screwdriver (installed only on the flat cables) 5) Unhook the upper part of the rear connector bracket from the base assy. 6) Extract the main board from the printer. 7) Unscrew the two screws fixing the metal plate on the parallel connector and remove it. Replace the Main Rear Cover Parts following the above instructions in reverse order paying attention to the rear horizontal guides and to its bottom shield. Figure 4.7 Main Board ____________________________________________________________________________________________ LA400 Multiprinter 4. 10 ER-LA400-SV Maintenance Manual Removal and Replacement ____________________________________________________________________________________________ 4.3.8 Power Supply Board CAUTION Do not attempt this operation without taking all recommended anti-static precautions. 1) Remove the main rear cover (refer to chapter 4.3.5) 2) Unscrew the screw securing the inlet bracket and remove it. 3) Unscrew the screw securing the ground cable on the metal shield. 4) Unscrew the screws securing the power supply cover to the lower shield and remove it. 5) Unscrew the six screws securing the power supply board to the base unit. 6) Unplug the connector from the main board and gently extract the power supply board from the printer. Replace the power supply board following the above instructions in reverse order paying attention to the rear horizontal guides. Figure 4.8 Power Supply Board ____________________________________________________________________________________________ LA400 Multiprinter 4. 11 ER-LA400-SV Maintenance Manual Removal and Replacement ____________________________________________________________________________________________ 4.3.9 Ribbon Motor 1) Remove the Main Rear and Front Covers (refer to chapter 4.3.4 and 4.3.5) 2) Remove the circlip retains the pivot assy to the left ribbon cartridge support. 3) Unscrew the four screws securing the left ribbon cartridge support on the left side of the mechanical assy. 4) Extract the ribbon motor from the plastic support. 5) Remove the plastic support and the pivot assy from the mechanical assy. 6) Unplug the ribbon motor connector from the main board and extract the cable from its cable retainers located in the rear part of the mechanical assy. 7) Remove the pivot assy. Replace the ribbon motor assy and the left support parts following above instructions in reverse order. Figure 4.9 Ribbon Motor and left cartridge support ____________________________________________________________________________________________ LA400 Multiprinter 4. 12 ER-LA400-SV Maintenance Manual Removal and Replacement ____________________________________________________________________________________________ 4.3.10 AGA Motor 1) Remove the Main Rear and Front Covers (refer to chapter 4.3.4 and 4.3.5) 2) Unscrew the two screws securing the AGA motor on the mechanical assy. 3) Unplug the AGA motor connector from the main board and extract the cable from its cable retainers located on the rear part of the mechanical assy. 4) Remove the AGA motor assy. Replace the AGA motor following the above instructions in reverse order. NOTICE : Before tighteing the motor screws, verify the correct and free movement of the AGA gears. Run the AGA calibration procedure to verify the correct AGA marker position. Figure 4.10 AGA Motor ____________________________________________________________________________________________ LA400 Multiprinter 4. 13 ER-LA400-SV Maintenance Manual Removal and Replacement ____________________________________________________________________________________________ 4.3.11 AGA Support and T/F Lever 1) Remove the Main Rear and Front Covers (refer chapter 4.3.4 and 4.3.5) 2) Unscrew the two screws securing the AGA support on the left side of the mechanical assy and remove it. 3) Remove the AGA support. 4) Remove the retainer circlip by a proper tool from the platen axis. 5) Remove the friction washer, the open gear and the spring by simply extracting them from the platen axis. 6) Remove the tractor friction lever by simply extracting upward from the left side of the mechanism. Replace the AGA support and T/F lever following the above instructions in reverse order. NOTICE: Put the AGA marker position in the same previous position. Run the AGA calibration procedure to verify the correct AGA marker position. Figure 4.11 Aga Support ans T/F Lever ____________________________________________________________________________________________ LA400 Multiprinter 4. 14 ER-LA400-SV Maintenance Manual Removal and Replacement ____________________________________________________________________________________________ 4.3.12 Carriage Motor 1) Remove the Main Rear and Front Covers (refer to chapter 4.3.4 and 4.3.5) 2) Cut the self-lock plastic strips retaining the cables on the carriage motor bracket. 3) Unscrew the two screws securing the motor bracket on the right side of the mechanical assy and to the ground shield. 4) Remove the M3 nut securing the motor bracket on the front tractor connector support. 5) Remove the rear motor bracket by extracting it from the rear. 6) Unplug the carriage motor connector from the main board and extract the cable from its cable retainers located in the rear part of the mechanical assy. 7) Unscrew the four screws securing the front carriage motor bracket to the mechanism. 8) Remove the front carriage motor bracket. 9) Unscrew the two screws securing the carriage motor assy to the mechanism. 10) Drive off the carriage belt from the carriage motor gear. 11) Unscrews the three studs securing the carriage motor to its support. 12) Remove the carriage motor assy. Replace the carriage motor assy following the above instructions in reverse order. NOTICE : The carriage motor replacement requires an appropriate carriage belt adjustment (refer to chapter 5). Figure 4.12 Carriage Motor ____________________________________________________________________________________________ LA400 Multiprinter 4. 15 ER-LA400-SV Maintenance Manual Removal and Replacement ____________________________________________________________________________________________ 4.3.13 Bail Assy 1) Open the top cover group by acting on the two push-buttons (located on the front side of the cover). 2) Put the carriage unit in the rightmost position. 3) Gently unhook the left and right bail springs from the hole on the mechanical side. 4) Rotate the bail assy toward its front side to unhook it from the left and right mechanical frames. 5) Remove the bail assy after having released the two springs holding it to the frame. Replace the bail assy following the above instructions in reverse order. Figure 4.13 Bail Assembly ____________________________________________________________________________________________ LA400 Multiprinter 4. 16 ER-LA400-SV Maintenance Manual Removal and Replacement ____________________________________________________________________________________________ 4.3.14 Cut Sheet Assy 1) Remove the Main Rear and Front Covers (refer to chapter 4.3.4 and 4.3.5) 2) Unscrew the screw securing the cut sheet assy on the right side of the mechanical assy. 3) Gently remove the cut sheet assy by simply extracting it from the mechanical assy from the left side. Replace the cut sheet assy following the above instructions in reverse order. Figure 4.14 Cut Sheet Assembly ____________________________________________________________________________________________ LA400 Multiprinter 4. 17 ER-LA400-SV Maintenance Manual Removal and Replacement ____________________________________________________________________________________________ 4.3.15 Upper Feeder Assy 1) Remove the Main Rear and Front Covers (refer to chapter 4.3.4 and 4.3.5) 2) Remove the bail assy (refer to chapter 4.3.13). 3) Remove the circlip retaining the upper feeder axis on the left side of the mechanical assy and shift the bushing on the the feeder assy axis right. 4) Remove the right bushing. 5) Drive off the platen belt from the upper feeder assy gear. 6) Put the rear tractor plastic slider push-pull selector in its rear position. 7) Remove the upper feeder assy by extracting it from the left side of the mechanical assy rotating the feeder assy on the left side slightly to the front. Replace the upper feeder assy following the above instructions in reverse order. Figure 4.15 Upper Feeder Assy ____________________________________________________________________________________________ LA400 Multiprinter 4. 18 ER-LA400-SV Maintenance Manual Removal and Replacement ____________________________________________________________________________________________ 4.3.16 Platen Assy 1) Remove the Main Rear and Front Covers (refer chapter to 4.3.4 and 4.3.5). 2) Remove the upper feeder assy (refer to chapter 4.3.15). 3) Remove the Aga support and the T/F lever (refer to chapter 4.3.11). 4) Remove the circlip retaining the platen assy to the pulley gear. 5) Unscrew the two screws securing the bearing bracket to the left side of the mechanism and remove it. 6) Remove the bearing and the special washer from the platen axis. 7) Put the print head to its maximum distance from the platen assy. 8) Gently shift the platen assy left from its position and then extract it from the left side of the mechanical assy. Replace the platen assy following the above instructions in reverse order. NOTICE: the platen assy replacement requires an appropriate print head gap adjustment procedure (refer to chapter 5). Figure 4.16 Platen Assy ____________________________________________________________________________________________ LA400 Multiprinter 4. 19 ER-LA400-SV Maintenance Manual Removal and Replacement ____________________________________________________________________________________________ 4.3.17 Lower Feeder Assy 1) Remove the Main Rear and Front Covers (refer chapter to 4.3.4 and 4.3.5). 2) Remove the AGA motor (refer to chapter 4.3.10). 3) Remove the AGA support (refer to chapter 4.3.11). 4) Remove the cut sheet assy (refer to chapter 4.3.14) 5) Remove the circlip retaining the AGA gear to its pivot and remove the gear. 6) Unscrew the screw securing the AGA sector to the main shaft and remove it. 7) Remove the carriage motor assy (refer to chapter 4.3.12). 8) Loosen the paper belt tensioning lever screw and remove the paper belt from the lower feeder assy gear and the gear from its axis. 9) Remove the circlip retaining the lower feeder gear to the axis. 10) Unscrew the four screws securing the cut sheet profile to the mechanical assy. 11) Remove the cut sheet profile by simply extracting it from the front. 12) Remove the circlip retaining the lower feeder axis on the right side of the mechanical assy and shift the feeder assy from its location. 13) Remove the lower feeder assy by simply extracting it from the mechanism. Replace the lower feeder assy following the above instructions in reverse order. NOTICE : the lower feeder assy replacement requires an appropriate carriage and paper belts adjustment procedure (refer to chapter 5). ____________________________________________________________________________________________ LA400 Multiprinter 4. 20 ER-LA400-SV Maintenance Manual Removal and Replacement ____________________________________________________________________________________________ Figure 4.17 Lower Feeder Assy ____________________________________________________________________________________________ LA400 Multiprinter 4. 21 ER-LA400-SV Maintenance Manual Removal and Replacement ____________________________________________________________________________________________ 4.3.18 Carriage Assy CAUTION : Before starting with this procedure, put the carriage assy in the maximum distance from the platen assy to avoid any print head mask damage. 1) Remove the Main Rear and Front Covers (refer to chapter 4.3.4 and 4.3.5). 2) Remove the print head (refer to chapter 4.3.3). 3) Remove the carriage motor assy (refer to chapter 4.4.12). 4) Remove the AGA support and the AGA sector on the left side part. 5) Unscrew the screw securing the carriage belt to the carriage assy. 6) Unscrew the two screws securing the main shaft retainer to the left side of the mechanism. 7) Unscrew the two screws securing the main shaft retainer to the right side of the mechanism. 8) Gently rotate the carriage assy with the front bar upward and extract it from the rear bar. Replace the carriage assy following the above instructions in reverse order. NOTICE: the carriage assy replacement requires the appropriate print head gap and carriage belt adjustment procedures (refer to chapter 5). Slowly introduce the front bar into the carriage holes paying attention to the oil-felt inside it. Figure 4.18 Carriage Assy ____________________________________________________________________________________________ LA400 Multiprinter 4. 22 ER-LA400-SV Maintenance Manual Removal and Replacement ____________________________________________________________________________________________ 4.3.19 Sensor Assy 1) Remove the Main Rear and Front Covers (refer to chapter 4.3.4 and 4.3.5). 2) Remove the AGA support and the T/F lever on the left side part (refer to chapter 4.3.11). 3) Remove the ribbon motor and support (refer to chapter 4.4.9). 4) Remove the platen assy (refer to chapter 4.3.16). 5) Remove the two left-most friction assemblies. 6) Unscrew the screw securing the rear fanfold sensor support to the frame and remove it by simply extracting it from the left side. 7) Unscrew the screw securing the front fanfold sensor to its support. 8) Unscrew the screws securing the ribbon fault and home position sensors to the plastic support. 9) Unscrew the single sheet sensor from its metal support and extract it from the left side of the mechanical assy. 10) Unplug the connector from the main board and extract the cable from its cable retainers located in the rear part of the mechanical assy. Replace the sensor assy following the above instructions in reverse order. Figure 4.19 Sensor Assy ____________________________________________________________________________________________ LA400 Multiprinter 4. 23 ER-LA400-SV Maintenance Manual Removal and Replacement ____________________________________________________________________________________________ 4.3.20 Mechanical Assy 1) Remove the Main Rear and Front Covers (refer to chapter 4.3.4 and 4.3.5). 2) Unscrew the screws securing the ground strips on the lower shield on both sides of the printer. 3) Unplug all the connector from the main board. 4) Unscrew the two screws retaining the mechanical block to the base assy. 5) Cut the two plastic self-locked strips retaining the mechanical blocks on the base assy and remove the mechanical assy. 6) Pay attention to the paper position mylar on the base assy. Replace the mechanical assy following the above instructions in reverse order. Figure 4.20 Mechanical Assy ____________________________________________________________________________________________ LA400 Multiprinter 4. 24 ER-LA400-SV Maintenance Manual Removal and Replacement ____________________________________________________________________________________________ 4.3.21 Paper Motor 1) Remove the Main Rear and Front Covers (refer to chapter 4.3.4 and 4.3.5). 2) Remove the mechanical assy (refer to chapter 4.3.20). 3) Loose the paper belt tensioning lever screw and remove the paper belt from the paper motor gear. 4) Unscrew the three screws securing the paper motor to the right side of the mechanical assy and remove it. Replace the paper motor following the above instructions in reverse order. NOTICE: the paper motor replacement requires an appropriate paper belt adjustment procedure (refer to chapter 5). Figure 4.21 Paper Motor ____________________________________________________________________________________________ LA400 Multiprinter 4. 25 ER-LA400-SV Maintenance Manual Removal and Replacement ____________________________________________________________________________________________ 4.3.22 Friction Bar Assy 1) Before proceeding, assure that the friction rollers are open; the flat part of the friction bar assy must be upward. 2) Remove the Main Rear and Front Covers (refer to chapter 4.3.4 and 4.3.5). 3) Remove the platen assy (refer to chapter 4.3.16). 4) Extract the friction supports by simply pulling them upward from their location. 5) Remove the mechanical assy (refer to chapter 4.3.20). 6) Remove the circlip retaining the friction bar assy to the mechanism. 7) Remove the friction bar assy by simply extracting it from the left side. Replace the friction bar assy following the above instructions in reverse order. NOTICE: the friction bar assy must have a proper position coherently with the sensor tuning values stored in NVM. Figure 4.22 Friction Bar Assy ____________________________________________________________________________________________ LA400 Multiprinter 4. 26 ER-LA400-SV Maintenance Manual Adjustments ____________________________________________________________________________________________ Chapter 5 Adjustments ____________________________________________________________________________________________ LA400 Multiprinter 5. 1 ER-LA400-SV Maintenance Manual Adjustments ____________________________________________________________________________________________ 5.1 Overview This section describes the adjustment procedures for the basic printer. A specific section of the Digital LA400 Multiprinter User Manual is dedicated to the User Adjustment (chapter 9). 5.1.1 Carriage Belt This adjustment is required only if the carriage belt or parts related to the replacement of this are removed (pulley assy, carriage motor assy, ect.). Standard Value : 650 gr ± 5% (620 to 680 gr / 1.4 to 1.5 pounds) Tools : Push-Force type Dynamometer 1) Put the carriage assy in the rightmost position on the printer. 2) Unloose the nut securing the loose pivot to its support. 3) Put the carriage belt under tension through a counter-clockwise rotation of the screw located on the loose pivot. 4) Apply the specified load in the middle of the carriage belt through a dynamometer with the indicated force to obtain the contact between the upper and the lower side of it. Repeat the step 3, if necessary. 5) Keep fix the screw and, in the same time, tightened the nut. Figure 5.1 Carriage Assy Belt Adjustment ____________________________________________________________________________________________ LA400 Multiprinter 5. 2 ER-LA400-SV Maintenance Manual Adjustments ____________________________________________________________________________________________ 5.1.2 Paper Belt This adjustment is required when the paper motor or the paper belt is removed. Standard Value : 650gr ± 0.1 Kg (550 to 750 gr / 1.2 to 1.6 pounds) Tools : Push-Force type Dynamometer 1) Unscrew the two screws securing the adjustment lever to the right side of the mechanism. 2) Apply the specified load on the hob of the lever with inward orientation as figure 5.2 and securing the screws to stretch the paper belt. First tighten the screw indicated as A). Figure 5.2 Paper Belt Adjustment ____________________________________________________________________________________________ LA400 Multiprinter 5. 3 ER-LA400-SV Maintenance Manual Adjustments ____________________________________________________________________________________________ 5.1.3 Print Head Gap This adjustment is required only if the platen is removed when the carriage assy is removed. Standard Value : 0.25 mm (+ 0.05 mm - 0) Tools : Feeler Gauge To assure the correct printhead gap on all the carriage movement, follow these procedure: 1) Remove the ribbon cartridge. 2) Verify with the feeler gauge, that in any carriage position, the distance between the print head needles and platen must be 0.25 ÷ 0.3 mm. 3) Furthermore, the platen ends must be aligned with the printhead needles by 0.08 mm. Example : ------------------------------------------------------- platen A B C printhead needles Possible Values: A B C --------------------------------0.25 0.25 0.25 0.3 0.3 0.3 0.22 0.27 0.3 0.3 0.27 0.22 4) Mount the AGA marker by slightly tightening the rightside screw. Set the thumbwheel on reference 1. Drop the AGA marker to its standard position and tighten both the screws. Check for its rotation to range from 1 to maximum degree. 5) At normal operation, with a 80 gr/M² single sheet paper, the AGA marker must be at "1" position. Run, if it necessary, the FACT. AUTO GAP procedure in next chapter to verify the correct AGA position. ____________________________________________________________________________________________ LA400 Multiprinter 5. 4 ER-LA400-SV Maintenance Manual Adjustments ____________________________________________________________________________________________ Figure 5.3 Print Head Adjustment ____________________________________________________________________________________________ LA400 Multiprinter 5. 5 ER-LA400-SV Maintenance Manual Service Maintenance ____________________________________________________________________________________________ Chapter 6 Service Maintenance ____________________________________________________________________________________________ LA400 Multiprinter 6. 1 ER-LA400-SV Maintenance Manual Service Maintenance ____________________________________________________________________________________________ 6.1 Overview This section describes how to maintain the printer in order to obtain from it always the best performances. In this chapter it is possible to find also some help to test printer and to identify defective components. GENERAL REMARK Turn the printer off, unplug the power cord and wait for at least 15 minutes before starting with the cleaning operations due to the high temperature on some mechanical parts when the printer is on normal operation from a long time period (print head, carriage motor, paper motor). 6.2 Initial Ispection When the printer presents a trouble, before proceeding to the service maintenance, an initial inspection must be done. In fact, a problem in the printout is often due to a bad or wrong conditions of the printer itself. The parameters that must be previous checked are: set-up, cleaning, paper specification. After that, if the problem remains, a troubleshooting session can be activated. 6.2.1 Set-Up Check for the following items to make sure they are satisfied. • Is the printer place in a correct position ? • Is the ambient temperature in the nominal range ? • Is the relative humidity in the nominal range ? • Is the unit installed in a bad location ? (Close to high temperatures or humidity, near heat sources, dusty areas, areas where gas is generated, exposed to direct sunlight) • Has the printer a good configuration ? Please refer to the User Manual for more details on all these items. ____________________________________________________________________________________________ LA400 Multiprinter 6. 2 ER-LA400-SV Maintenance Manual Service Maintenance ____________________________________________________________________________________________ 6.2.2 Cleaning No preventive maintenance, on a schedule basis, is required. Periodic cleaning will help to keep your printer in top condition. Clean the printer as follow: • Use a neutral detergent or water solution on a soft cloth to clean dirt and grease from the cabinet of the printer. • Do not use an abrasive cloth, alcohol, paint thinner or similar agents because thay may cause discoloration and scratching. • Do not LUBRICATE the main and rear shaft, but only clean dirt. • Be especially carefull not do damage the electronic and mechanical components. Check for the paper paths condition and to make sure they are correct. If they are dirty (by paper residues or by ink), please clean using a soft cloth. 6.2.3 Paper Specifications Also the paper is important to have high performances. Check for the correct paper specifications. See chapter 1.3 and the User Manual for more details. 6.2.4 Consumables Digital Equipment Co. recommends to use only its original consumables with original packaging. I In this way, a proper utilization of the printer at quality level and reliability stated in the product characteristics will be assured. All typical usage problems typically related of not certified consumables can be avoid, such as: an overall degradation of the printing quality level and often, the reduction of the total life of the product due to the fact that the proper working conditions of the print head and other parts are not assured. Moreover, the original consumables are controlled in compliance with the internationally standard rules concering: • no cancerous materials • no inflammability of the plastic materials • other standard ____________________________________________________________________________________________ LA400 Multiprinter 6. 3 ER-LA400-SV Maintenance Manual Service Maintenance ____________________________________________________________________________________________ 6.3 Troubleshooting Guide The recommended sequences for the printer fault detection are: • To observe initializing procedure and Operator Panel messages. • To check power malfunctions. • To run the SELF-TEST procedure. • To run the SERVICE procedure. • If necessary, run the HEXADECIMAL dump procedure. At any stage where appropriate, refer to the troubleshooting guide. 6.3.1 Initializing Phase When the printer is powered on, before starting the normal operations, it performs an initializing phase (BOOSTRAP). During this phase the Software of the printer initialized the hardware resources of the printer for the correct function. • The display will show: Starting-up... and then: • The display will show : Testing... After a successfull initialization phase, the printer enters in the normal operation phase, moves the carriage assy on the left most position to check the home position sensor and goes in READY state. If the printer does not initialize correctly see next chapter to see the possible error messages displayed on the LCD. 6.3.2 Printer Errors Some errors can be displayed by the printer. These errors can be divided into three main groups: • Status errors • Recoverable errors • Not recoverable errors ____________________________________________________________________________________________ LA400 Multiprinter 6. 4 ER-LA400-SV Maintenance Manual Service Maintenance ____________________________________________________________________________________________ 6.3.2.1 Status Errors When an error of this kind occurs, the printer shows some messages to the User with the action to do for this condition. 6.3.2.2 Recoverable Errors When an error of this kind occurs, the display will show the first message indicating the error then, in some cases, another second message will be displayed giving more specific information about the error condition. The buzzer sounds an intermittent sound. All these errors can be reset by pressing the PAUSE key or through specific actions. • The display shows: Top cover open with a buzzer sound. Cause: Action: Cause: Action: • The top cover is open Close the cover, check for magnet installed on cover. The operator panel board may be faulty. Install a new one. The display shows a first message PAPER JAM followed by CHECK ALL PATHS Cause: A paper jam error condition occured in a paper path. Action: Check if the paper is correctly installed and remove it if is jammed. Press PAUSE key to reset the error condition. • The display shows a first message JAM ON PATH2 followed by CHECK PAPER Cause: The tractor with paper jam sensor detected a paper jam in path 2. Action: Check if the paper is correctly installed and remove it if is jammed. Press PAUSE key to reset the error condition. • The display shows a first message JAM ON PATH3 followed by CHECK PAPER Cause: The tractor with paper jam sensor detected a paper jam in path 3. Action: Check if the paper is correctly installed and remove it if is jammed. Press PAUSE key to reset the error condition. • The display shows a first message RIBBON BLOCKED followed by CHECK RIBBON Cause: The inked ribbon of the cartrdige is blocked and the relative sensors detects this fault (the problem appears with some characters printed with poor ink density). Action: Check if the ribbon is correctly inserted. Remove the ribbon and turn the tension knob to make sure that the ribbon is not jammed. Press PAUSE key to reset the error condition. • The display shows: PRINT INTEGRITY . Cause: Carriage is blocked or lost its position. Action: Check if the carriage assy movement is free. Press PAUSE key to reset the error condition. ____________________________________________________________________________________________ LA400 Multiprinter 6. 5 ER-LA400-SV Maintenance Manual Service Maintenance ____________________________________________________________________________________________ • The display shows a first message BUFFER OVERFLOW followed by CHARACTER LOST Cause: An overflow condition occurs in the buffer (if the serial interface is selected). The host is sending data to the printer even if it has been required to stop transmission. Action: Check the connection between the printer and the host. Press PAUSE key to reset the error condition. Turn the printer off if the buffer must be cleared. • The display shows: COMMUNICATION ERROR Cause: Communication error. Action: Check the connection between the printer and the host. Check the Serial I/F configuration. Press PAUSE key to reset the error condition. • The display shows a first message NVM CHANGED followed by TYPE ANY KEY Cause: The printer detects a NVM change. Action: The operation will be completed as soon as any button will be pressed. The printer will be inizialized with the factory default values. 6.3.2.3 Not Recoverable Errors When an error of this kind occurs, the printer is halted and enters in error state. All these errors cannot be resetted through specific actions and required the powering-off of the printer. Typically all these problems appears if an internal error in the BOOSTRAP or normal operation phases is detected. If after powering-on the printer the problem appears again, contact your nearest Digital Customer Service Center. In the BOOSTRAP phase the following messages can be displayed. If one of these messages appears, the BOOSTRAP phase is not positively ended and, consequently, the hardware resources of the printer are not initialized. • STARTING UP (fixed) • SOFTWARE ERROR • ENGINE DRIVER • PM SET-UP ERR • # VOID EXEC LIST • # MFILE CHECKSUM • UNK MFILE TYPE • TOO MANY FILES • # CARD 0 REMOVED ____________________________________________________________________________________________ LA400 Multiprinter 6. 6 ER-LA400-SV Maintenance Manual Service Maintenance ____________________________________________________________________________________________ For all these messages, the fault mainly depends on the EPROMs or on the microcontroller or on the data bus problems. In the normal operation phase a unrecoverable message with a combination of the following parameters can be displayed. DEVICE SERVO CODE COMMAND (SPV, INT, P_M, ENG) (n1) (n2) (n3) Example: ENG FLT 4 3 0 Means an error on engine device in the intialization phase. If one of these messages appears, the BOOSTRAP phase is positively ended but some problems arised in the handshaking between the various modules of the SW PLATFORM layer. The possible combinations can be: DEVICE SERVO CODE COMMAND ERROR DESCRIPTION SPV FLT 0 1 0 SPV FLT SPV FLT SPV FLT SPV FLT SPV FLT 0 0 0 1 1 2 3 4 5 6 0 0 0 0 0 Supervisor error (no servo, interpreter do not answer) As above (Font error) As above (NVM read error) As above (NVM write error) As above (open driver line error) As above (attach driver line error) INT FLT 0 1÷13 0 Interpreter errors P_M FLT P_M FLT P_M FLT P_M FLT P_M FLT P_M FLT 0 0 0 0 0 0 1 2 3 4 5 6 0 0 0 0 0 0 Print Manager Error (command error) As above (pending action) As above (setup errror) As above (unknown command code error) As above (invalid command argument) As above (unrecoverable run-time error) ENG FLT ENG FLT ENG FLT ENG FLT ENG FLT ENG FLT ENG FLT ENG FLT ENG FLT ENG FLT ENG FLT ENG FLT ENG FLT ENG FLT ENG FLT ENG FLT 2 2 2 2 2 2 2 2 2 3 3 3 4 4 4 4 3 3 3 3 3 3 3 3 3 3 3 3 3 3 3 3 40 41 42 43 44 45 46 47 48 10 11 12 0 1 2÷7 8 Engine paper error (load) As above (eject) As above (park) As above (step by step) As above (continuous) As above (stop) As above (tear-off) As above (recover tear-off) As above (push-pull media load) Engine carriage error (init) As above (position) As above (printing) Engine master error (init phase) As above (p.h. energy phase) As above (T.B.D.) As above (paper stacker) Table 6.1 Unrecoverable Error Display Messages ____________________________________________________________________________________________ LA400 Multiprinter 6. 7 ER-LA400-SV Maintenance Manual Service Maintenance ____________________________________________________________________________________________ 6.3.3 Power Malfunctions If the printer does not power on, it is essential to check the power supply condition. 6.3.3.1 P.S. Troubleshooting Guide This little guide can be usefull to find a fault on the power supply . • The printer is not powered on. Cause: Actions: • No AC voltage reaches the printer. Check power cord insertion. Press power switch. Check voltage at wall outlet. Replace power supply board. The DC voltages are not present on the main board. Cause: Actions: The power supply may be faulty. Remove the power supply cable from the main board (refer to chapter 4.3.5). Put a load on the + 5 voltage pin of 300 mA minimum (a resistor of 15 Ω of 3 W). This load is indispensable to run correctly the power supply, otherwise the feed-back reaction is not present and the regulation is not activated. Check for the voltages on the power supply connector and on the board as indicated in the figure 6.1. All voltages are protected for short-circuit. If the voltages are corrected, check for electromechanical parts impedance (refer to chapter 8). Replace the defective electromechanical part. If the impedances are correct, replace the main board. • The AC printer fuse blown. Cause: Actions: An overcurrent on primary circuit is occurred. Replace the FUSES with new ones. For 230 VAC the value must be 3.15 A (2 fuses). For 120 VAC the value must be 5 A (1 fuse). Unplug the connector from the main board an apply the load on +5v. If the fuses blown again, replace the power supply board. • The printer is power off after a short time power on. Cause: Actions: An overload is present on secondary voltages. If the voltages are corrected, check for electromechanical parts impedance (refer to chapter 8). Replace the defective electromechanical part. If the impedances are correct, replace the main board. ____________________________________________________________________________________________ LA400 Multiprinter 6. 8 ER-LA400-SV Maintenance Manual Service Maintenance ____________________________________________________________________________________________ • The printer initializes correctly but it does not display anything. Cause: Actions: The operator panel board is faulty or with bad connection to main board. Check for the proper connection to the main board. Replace the operator panel board or the operator panel cable or the main board. TEST POINT OUTPUT VOLTAGES: CONNECTOR PIN 1 CONNECTOR PIN 2 CONNECTOR PIN 3 CONNECTOR PIN 4 CONNECTOR PIN 5 CONNECTOR PIN 6 CONNECTOR PIN 7 CONNECTOR PIN 8 CONNECTOR PIN 9 CONNECTOR PIN 10 (a) KATODE DIODE D1 CONNECTOR PIN 12 +5V +5V GROUND GROUND GROUND GROUND GROUND + 38 V + 38 V + 38 V + 79 V FAN CONTROL (not used) Figure 6.1 Power Supply Test Points ____________________________________________________________________________________________ LA400 Multiprinter 6. 9 ER-LA400-SV Maintenance Manual Service Maintenance ____________________________________________________________________________________________ 6.3.4 SELF TEST Self-Test is an internal test to check the logic and electromechanical perfomances at User level. To put under execution this test is necessary to press the Set-up key. MACROS will be displayed. Then press the R key three times until TEST/ HEX-DUMP is displayed. Press the D key to enter the Test Menu selection level. Pressing the R or L key you can choose which test you want to perform among: Self-Test R Hex-Dump Mode R Init Set-up Card The Self-Test printout consists of a heading containing configuration and firmware information and a repeated ASCII characters printout. Press the SEL/SAVE key to start the test ( Exit key to stop it). key If the fanfold paper is present in the path, the test automatically starts, otherwise a message to load paper is displayed. Inspect the print sample for: • • • • • • • • Equal density of the character Equal darkness Character sharpness No missing part of character Underline character and descenders No smudges or strikes Equal density of lines Compose character correctly formed (graphic) Refer to the faulty probability table to correct any printing problem. SELF TEST PRINTOUT CONFIGURATION: FIRMWARE: Ver. B2.3-02 CONTROLLER: 78xxxxxx GENERATOR: 78xxxxxx Ver. B2.3 Ver: 1.0 Draft 10 CPI !"#$%&'()*+,-./0123456789:;<=>?@ABCDEFGHIJKLMNOPQRSTUVWXYZ[\]^_abc !"#$%&'()*+,-./0123456789:;<=>?@ABCDEFGHIJKLMNOPQRSTUVWXYZ[\]^_abcd "#$%&'()*+,-./0123456789:;<=>?@ABCDEFGHIJKLMNOPQRSTUVWXYZ[\]^_abcde #$%&'()*+,-./0123456789:;<=>?@ABCDEFGHIJKLMNOPQRSTUVWXYZ[\]^_abcdef Figure 6.2 Self-Test Printout ____________________________________________________________________________________________ LA400 Multiprinter 6. 10 ER-LA400-SV Maintenance Manual Service Maintenance ____________________________________________________________________________________________ 6.3.5 HEX DUMP This test is necessary when a protocol line error is detected but no error appears by the other internal tests of the printer. This procedure allows to see in a readable printout all the characters sent by the host to the printer even if they are control code character (example: ESC, DC4, CR, LF, etc.). Access to the menu as described at the beginning of chapter 6.3.4 and select the HexDump mode option. Press SEL/SAVE key when the display shows HEX-DUMP The display shows Ready (or Pause) Hex-Dump The FF,LF Pause and Set-Up/Exit keys are active. To exit from Hex-Dump mode, Press the Exit key and the printer will return to the standard printing mode. Example: Text in normal mode ASCII: ESC C H HEX: 1B 43 48 BASIC: CHR$(27);CHR$(67);CHR$(72) The same text in hex-dump mode 41 53 43 49 49 3A 20 45 53 43 20 43 20 48 0D 0A 48 45 58 20 20 3A 20 31 42 20 34 33 20 34 38 0D 0A 42 41 53 49 43 3A 20 43 48 52 24 28 32 37 29 3B 43 48 52 24 28 36 37 29 3B 43 48 52 24 28 37 32 29 0D 0A Figure 6.3 Hex-Dump Printout The INIT SET-UP CARD option gives you the possibility to inizialize a dedicated battery backed-up RAM cartridge on which you can save the whole NVM. This cartridge can be used to inizialize other printers with the same seetings. (See Appendix A of the User Manual for more details). ____________________________________________________________________________________________ LA400 Multiprinter 6. 11 ER-LA400-SV Maintenance Manual Service Maintenance ____________________________________________________________________________________________ 6.3.6 Faulty Probability Guide Please use this guide whenever a fault is detected but no special display configuration is displayed. Usually, if a fault regards an electromechanical part and if no feed-back is arised, no error is detected by the firmware of the printer. In fact, except for the home postition and ribbon sensors, (that have a feed-back circuit to return the status condition), the other mechanical parts don't have a return feed-back because they are in open-loop circuit. So, for example, if the paper doesn't advance, the fault regards this parts: (paper motor, driver circuit and logic H/W). SYMPTOM: Inconsistent character printing (some dark, some lights, gaps or spaces or incomplete. CAUSE: ACTION: The ribbon may not be correctly mounted. Re-install the ribbon cartridge. CAUSE: ACTION: The ribbon cartridge may be faulty. Install a new one. CAUSE: ACTION: The ribbon doesn't work correctly (RIBBON BLOCKED) message.. Check if the carriage unit movement allows a correct ribbon cartridge movement. Replace the left support group pivot assy. CAUSE: ACTION: The printhead cable may be incorrectly installed. Check for the P.H. cables to be correctly mounted. Replace printhead cable. CAUSE: ACTION: The printhead may be faulty. Install a new one. CAUSE: ACTION: The AGA function doesn't work. Check for the AGA motor impedance, connection and gears movement. Replace defective components. CAUSE: ACTION: The main board may be faulty. Install a new one. CAUSE: ACTION: The power supply board may be faulty. Check the voltages. Install a new one. CAUSE: ACTION: The gap between P.H. and platen is not correct. Check for the platen adjustment procedure. ____________________________________________________________________________________________ LA400 Multiprinter 6. 12 ER-LA400-SV Maintenance Manual Service Maintenance ____________________________________________________________________________________________ SYMPTOM: The printer stops the printing (slowly printing). CAUSE: ACTION: The thermal sensor in the P.H. is broken. Check for thermal sensor impedance (see chapter 8). Replace print head. CAUSE: ACTION: The connection of the P.H. and MAIN board is bad. Verify the connection. Replace P.H. cable. CAUSE: ACTION: The main board may be faulty. Install a new one. Note: This operation must be done at room temperature. SYMPTOM: Color printing is not performed correctly. CAUSE: ACTION: The ribbon is not correctly installed. Re-install the color ribbon. CAUSE: ACTION: The color motor is not correctly mounted or faulty. Check for color motor impedance (see chapter 8). Replace the color motor. CAUSE: ACTION: The connection of the P.H. and main board is bad. Verify the connection. Replace P.H. cable. CAUSE: ACTION: The main board may be faulty. Install a new one. SYMPTOM: The character printing is in vertical disalignment. CAUSE: ACTION: The printer may not be correctly adjusted. Run Bidi. alignment to check vertical adjustments. CAUSE: ACTION: The carriage belt is not correctly adjusted. Check for correct carriage belt tension. Refer to adjustments procedures. SYMPTOM: The tractor/friction motor doesn't work. CAUSE: ACTION: The tractor/friction (alternance) motor may be faulty. Check for solenoid impedance (see chapter 8) Replace t/f solenoid. CAUSE: ACTION: The connection of the motor and main board is bad. Verify the connection. Replace the cable. CAUSE: ACTION: The main board may be faulty. Install a new one. ____________________________________________________________________________________________ LA400 Multiprinter 6. 13 ER-LA400-SV Maintenance Manual Service Maintenance ____________________________________________________________________________________________ SYMPTOM: The paper doesn't advance correctly. CAUSE: ACTION: The paper motor cable is not correctly mounted. Check for paper motor connection on main board. CAUSE: ACTION: The paper motor may be faulty. Check for paper motor impedance or connection on main board. Replace the paper motor. CAUSE: ACTION: The paper movement has not equal line spacing. Check for paper belt tension to be correct. Check for the paper belt adjustment. CAUSE: ACTION: The main board may be faulty. Install a new one. CAUSE: ACTION: The paper holes of fanfold are torn. Remove torn paper and replace with incoming proper sheet. Check the tension of the paper between left and right tractors. CAUSE: ACTION: Paper is not correctly aligned on sprocket wheels. Relaod paper, ensuring that corresponding holes at each side of the paper are correctly aligned on tractor (see tractor assy removal). SYMPTOM: The printer initialized, but the display and Leds are off. O.P. keys are available. CAUSE: ACTION: The connection of the operator panel board and main board is bad. Verify the connection. Replace the cable or the o.p. board or the display. SYMPTOM: The printer initialized, but only the display is off. O.P. key are not available. CAUSE: ACTION: The connection of the operator panel board and main board is bad. Verify the connection. Replace the cable or the o.p. board or the display. CAUSE: ACTION: The ribbon sensor is faulty. Check for the ribbon sensor action through the pivot assy. Replace the pivot assy. Replace the sensors cable group. Replace the ribbon motor assy. ____________________________________________________________________________________________ LA400 Multiprinter 6. 14 ER-LA400-SV Maintenance Manual Service Maintenance ____________________________________________________________________________________________ SYMPTOM: The printer initialized, but the carriage assy moves 1 inch on the right. CAUSE: The connections of the home position sensor or the carriage motor are bad. Verify the connections of the sensors cable group and carraige motor on main board. ACTION: CAUSE: ACTION: The home position sensor or the carriage motor assy are faulty. Check for the sensor action through the carriage assy and the motor impedance. Replace the sensors cable group or the carriage motor assy. SYMPTOM: The printer does not initialize, the buzzer sound continuously. CAUSE: ACTION: The Controller eprom or the main board may be faulty. Replace the controller eprom or the main board. SYMPTOM: The printer initializes but the paper is not loaded. CAUSE: ACTION: The paper optical reflective sensors may be faulty. Check if the sensor cable is correctly inserted in the main board. Check if the sensors cable is correctly installed in the mechanical without short circuit. Check for the correct optical sensors diode impedance (about 1 KΩ) Refer to chapter 8. ____________________________________________________________________________________________ LA400 Multiprinter 6. 15 ER-LA400-SV Maintenance Manual Service Maintenance ____________________________________________________________________________________________ 6.4 Service Tests and Adjustments 6.4.1 Introduction The SERVICE TESTS & ADJUSTMENTS program, is adopted to check some of the various functional parts composing the printer, and to diagnose possible operating defects which might occur during said phase. 6.4.2 Loop-Back Connectors To check the functionalities of the I/F's existing on the printer, a proper loop-back connector for each port is required. Note: It is possible to use the parallel Loop-Back connector starting from the FW rel. 2.0. Here below, the loop-back plugs layout: SERIAL INTERFACE LOOP-BACK DTR SD SC ( 1) ( 2) ( 3) ---------------------------------------------------- ( 6) DSR ( 5) RD ( 4) RC DEC P/N 12-25083-01 Figure 6.4 Serial I/F Loop-Back Diagrams PARALLEL INTERFACE LOOP-BACK STROBE ( 1) ACK (10) P.E. (12) FAULT (32) --------------------- (11) BUSY ----------- -------- ( 2) DATA 1 -------- ( 5) DATA 4 -------- ( 8) DATA 7 ----------- -------- ( 3) DATA 2 -------- ( 6) DATA 5 -------- ( 9) DATA 8 ----------- -------- ( 4) DATA 3 -------- ( 7) DATA 6 DEC P/N 29-27887-01 Figure 6.5 Parallel I/F Loop-Back Diagrams ____________________________________________________________________________________________ LA400 Multiprinter 6. 16 ER-LA400-SV Maintenance Manual Service Maintenance ____________________________________________________________________________________________ 6.4.3 Execution of the Service Adjustments Press and hold the Set-Up/Exit key until the message SERVICE is displayed. Press the D key and the message ADJUSTMENT will be displayed. Press the D key again to reach the available adjustments and FACTORY AUTO GAP will appear on the display. Press the R and L keys to scroll through the 3 adjustments: FACTORY AUTO GAP R PROG.GAP OFFSET R Pap. sensor tune - FACTORY AUTO GAP: This adjustment is made to calibrate the AGA marker position located on the left side of the mechanism. After the print head gap adjustment is performed (see chapter 5.1.3 for more details), the AGA marker position must be coherent with the paper thickness of the loaded form. If a single form of 80 gr/m2 paper is loaded, the marker must be in position 1. If this value is not correct proceed as follows: Enter the FACTORY AUTO GAP adjustment by pressing the D key and a number from 8 to -8 will be displayed. Press the Sel/Save key and the display will show Load Manual. Load a single 80gr/m2 cut sheet form from the manual feeder. Loading paper... will be displayed during loading. At this point select the value that sets the AGA marker in position 1 by acting through the R and L keys. Sel/Save key will test and set the value. The selection will be confirmed with the appearance of an asterisk on the leftmost part of the display. Press Exit and if the value has been modified the display will show Save Config. After that, press Sel/Save to store the change in NVM (Processing... will be displayed during storing). - PROG. GAP OFFSET: This adjustment is performed to set the fixed position of the AGA marker. Enter the PROG. GAP OFFSET adjustment by pressing the D key and a number from 12 to -12 will be displayed. No paper will be required. Proceed as above to set and store the right value. ____________________________________________________________________________________________ LA400 Multiprinter 6. 17 ER-LA400-SV Maintenance Manual Service Maintenance ____________________________________________________________________________________________ - Paper sensor tune: This adjustment is suggested when the main board is changed or if some problem appears in the paper detection. The paper sensors are reflecting type. They are driven by the main board in a dynamic mode. This means that the input led is driven by the +5 Volts with an impulse wave to increase its life. The sensors are adjusted at maufacturing site with a proper tool which stores the output voltage level of the three sensors detected with NO PAPER installed. This value is stored in the NVM. If the adjustment is required, proceed as follows: With NO PAPER installed, enter the Pap. sensor tune adjustment by pressing the D key, then press the Sel/Save key to run the adjustment, Tuning sensor... will be displayed. Press Exit key to return to standard procedures. ____________________________________________________________________________________________ LA400 Multiprinter 6. 18 ER-LA400-SV Maintenance Manual Service Maintenance ____________________________________________________________________________________________ 6.4.4 Execution of the Service Tests Press and hold the Set-Up/Exit key until the message SERVICE is displayed. Press the D key and the message ADJUSTMENT will be displayed. Press the R key and the message TESTS will be displayed. Press the D key to enter the first test (Carriage test) and R and L keys to go through the available tests that are: Carriage test R Serial I/F test R Paral. I/F test R Service Test - Carriage test This test verifies the smoothness of the carriage movement and the correct performance of the carriage home position sensor by moving the carriage assy from right to left until the carriage home position sensor is covered and than back about 2 inches towards the right side of the frame. Sel/Save key starts the test. During testing Testing carriage will be displayed. If an error is detected, the following will be displayed: 1. Carriage error and 2. Check its moving. - Serial I/F test This test checks by means of loop-back plug closing, for the correct operation of control, status and data signals of the serial I/F (see loop-back diagram at chapter 6.4.2). Sel/Save key starts the test. If the loop-back connector is not inserted or the test fails Loop-back failed will be displayed. If it succeds Loop-back passed will be displayed. - Paral. I/F test This test checks by means of loop-back plug closing, for the correct operation of control, status and data signals of the Parallel I/F (see loop-back diagram at chapter 6.4.2). Sel/Save key starts the test. If the loop-back connector is not inserted or the test fails Loop-back failed will be displayed. If it succeds Loop-back passed will be displayed. ____________________________________________________________________________________________ LA400 Multiprinter 6. 19 ER-LA400-SV Maintenance Manual Service Maintenance ____________________________________________________________________________________________ - Service Test This test consist in printing a standard module (136 characters, 72 lines) having defined dimensions containing a set of tests checking the parts involved in printing, printhead, needles, carriage. etc. Sel/Save key starts the test. A single form of fanfold paper has to be installed in the front-push tractor. Loading paper... will be displayed during loading. If the paper is not installed Load Push-Front will be displayed. Please use this standard printout module as reference when checking all printing quality problems and tractor movement. The following is the explanation of the various test performed in this module. 1. In the first line is printed in draft mode with two patterns of 6 "E" character near to the left and right margin with a continuous line to check the horizontal printing skew of the paper at the top margin of the module 2. In the second line the printer configuration is printed in terms of: EPROM Code, CARTRIDGE (free or a type), RIBBON (black or color), type of tractor installed (FRONT-PUSH and REAR-PUSH or PULL) and ASF(yes or no) 3. Prints a complete pattern which exercises all the 24 needles of the printhead 4. A paper movement test is performed (with forward and backward movements) composed by: a) At first, the printer prints the first and third chopped-lines b) After point 10 a backward paper movement is performed and a line is printed in the center of the two chopped lines previously printed. 5. A set of "H" pattern is printed to check the bidirectional vertical alignment. 6. A PLU/PLD test to stress the paper movement is performed. 7 Prints three lines of character set with different type of printing (horizontal density and quality) and with the composed colors (orange, violet and green). 8. Prints a special pattern of "H" to stress the carriage movement. 9. Prints a color graphic pattern to check the printing of color graphic test. 10. Prints a continouous line in line 51 (6 LPI) from the first continuous line in line 1 to check the paper movement. See step B of item 5. 11 A forward paper movement is performed to reach the 72th line and a pattern as point 1 is printed. ____________________________________________________________________________________________ LA400 Multiprinter 6. 20 ER-LA400-SV Maintenance Manual Electromechanical Devices ____________________________________________________________________________________________ Chapter 7 Electromechanical Devices ____________________________________________________________________________________________ LA400 Multiprinter 7. 1 ER-LA400-SV Maintenance Manual Electromechanical Devices ____________________________________________________________________________________________ 7.1 Overview This chapter describes all the electromechanical parts of the printer with their main electrical and mechanical requirements to allow the field service technicians to check the correct functioning. 7.1.1 Print Head The print head installed on this printer is an electromagnetic non-ballistic type. The needles of the 24-pin printhead have diameter of 0.2 mm (0.0087") and they are positioned in a diamond layout in which the odd pins (1÷23) are positioned in the right row with the vertical pitch of each row of 0.282 mm (1/90"). Needle 1 is the top most of right row, needle 2 is the top most of the left row. ELECTRICAL REQUIREMENTS Coil resistance 5.0 Ω ± 10% measured at 25° Thermal sensor (see table below) 1000 Ω ± 6% measured at 25° Temperature (°C) Resistance (Ω) 10 20 25 30 40 50 60 70 80 90 100 110 120 130 140 150 887 961 1000 1039 1121 1206 1295 1387 1483 1583 1687 1794 1905 2020 2138 2260 Table 7.1 Print Head Resistance/Temperature Characteristics ____________________________________________________________________________________________ LA400 Multiprinter 7. 2 ER-LA400-SV Maintenance Manual Electromechanical Devices ____________________________________________________________________________________________ MECHANICAL REQUIREMENTS The print head overview and its pin connector assignment are shown in figure 7.2 and table 7.3. CONNECTOR P1 Pin1 Pin2 Pin3 Pin4 Pin5 Pin6 Pin7 Pin8 Pin9 Pin10 Pin11 Pin12 Connector P4 Pin 1 Connector P4 Pin 2 Connector P4 Pin 3 Connector P4 Pin 4 + 38 Volt + 38 Volt GND (thermal sensor) Needle N. 8 Thermal Sensor Needle N. 10 + 38 Volt + 38 Volt Pin13 Pin14 Pin15 Pin16 Pin17 Pin18 Pin19 Pin20 Pin21 Pin22 Pin23 Pin24 + 38 Volt Needle N. 12 Needle N. 14 Needle N. 16 Needle N. 18 Needle N. 20 Needle N. 22 Needle N. 24 Connector P3 Pin 2 Connector P3 Pin 1 Connector P3 Pin 4 Connector P3 Pin 3 CONNECTOR P2 Pin1 Pin2 Pin3 Pin4 Pin5 Pin6 Pin7 Pin8 Pin9 Pin10 Pin11 + 38 Volt Needle N. 2 + 38 Volt Needle N. 4 Needle N. 6 Needle N. 23 + 38 Volt Needle N. 21 + 38 Volt Needle N. 19 Needle N. 17 Pin12 Pin13 Pin14 Pin15 Pin16 Pin17 Pin18 Pin19 Pin20 Pin21 Pin22 Needle N. 15 + 38 Volt Needle N. 13 + 38 Volt Needle N. 11 Needle N. 9 Needle N. 7 Needle N. 5 Needle N. 3 + 38 Volt Needle N. 1 Table 7.2 Print head pin assignment Figure 7.1 Print head pinout ____________________________________________________________________________________________ LA400 Multiprinter 7. 3 ER-LA400-SV Maintenance Manual Electromechanical Devices ____________________________________________________________________________________________ 7.1.2 Motors 7.1.2.1 Carriage Motor The carriage motor is a 1.8° hybrid bipolar stepper motor. ELECTRICAL REQUIREMENTS Phase resistance 0.84 Ω ± 15% Measured at 25° between pin 1-2 and 3-4 Phase inductance 2 mH ± 20% Measured at 1 Khz 100 mV with energized coil. Rated motor voltage 2.1 V With rated voltage applied to both phases (parallel). Rated phase current 2.5 A With rated current applied to both phases (series). Back electromotive force 20 Vpeak ± 20% With motor shaft at the constant speed of 1000 RPM MECHANICAL REQUIREMENTS Step angle 1.8° The pin connector assignment is shown in fig. 7.3 Fig 7.2 Carriage motor pin connector assignment ____________________________________________________________________________________________ LA400 Multiprinter 7. 4 ER-LA400-SV Maintenance Manual Electromechanical Devices ____________________________________________________________________________________________ 7.1.2.2 Paper Motor The paper motor is a 1.8° hybrid bipolar stepper motor. ELECTRICAL REQUIREMENTS Phase resistance 2.4 Ω ± 10% Measured at 25° between pin 1-2 and 3-4 Phase inductance 36 mH ± 20% Measured at 1 Khz 100 mV. Rated motor voltage 4.4 V With rated voltage applied to both phases (parallel). Rated phase current 1.4 A With rated current applied to both phases (series). Back electromotive force 29 Vpeak ± 20% With motor shaft at the constant speed of 1000 RPM MECHANICAL REQUIREMENTS Step angle 1.8° The pin connector assignment is shown in fig. 7.4. Fig 7.3 Paper motor pin connector assignment ____________________________________________________________________________________________ LA400 Multiprinter 7. 5 ER-LA400-SV Maintenance Manual Electromechanical Devices ____________________________________________________________________________________________ 7.1.2.3 AGA Motor The aga motor is a 3.6° permanent magnet bipolar stepper motor. ELECTRICAL REQUIREMENTS Phase resistance 19 Ω ± 10% Measured at 25° between pin 1-2 and 3-4 Phase inductance 18 mH ± 20% Measured at 1 Khz 100 mV. Rated motor voltage 7.7 V With rated voltage applied to both phases (parallel). Rated phase current 0.31 A With rated current applied to both phases (series). Back electromotive force 15.5 Vpeak ± 20% With motor shaft at the constant speed of 1000 RPM MECHANICAL REQUIREMENTS Step angle 3.6° The pin connector assignment is shown in fig. 7.5 Fig 7.4 AGA motor pin connector assignment ____________________________________________________________________________________________ LA400 Multiprinter 7. 6 ER-LA400-SV Maintenance Manual Electromechanical Devices ____________________________________________________________________________________________ 7.1.2.4 Ribbon Motor The ribbon motor is a 7.5° permanent magnet bipolar stepper motor. ELECTRICAL REQUIREMENTS Phase resistance 24 Ω ± 10% Measured at 25° between pin 1-2 and 5-6 Phase inductance 33 mH ± 20% Measured at 1 Khz 100 mV. Rated motor voltage 7.3 V With rated voltage applied to both phases (parallel). Rated phase current 0.35 A With rated current applied to both phases (series). Back electromotive force 21 Vpeak ± 20% With motor shaft at the constant speed of 1000 RPM MECHANICAL REQUIREMENTS Step angle 7.5° The pin connector assignment is shown in fig. 7.6 Fig 7.5 Ribbon motor pin connector assignment ____________________________________________________________________________________________ LA400 Multiprinter 7. 7 ER-LA400-SV Maintenance Manual Electromechanical Devices ____________________________________________________________________________________________ 7.1.2.5 Alternance Motor The alternance motor is a direct current motor. ELECTRICAL REQUIREMENTS Terminal resistance 46.15 Ω ± 10% The terminal resistance is calculated as the rated motor voltage divided by stall current. Terminal inductance Measured at 1 Khz. 24.5 mH ± 20% Rated motor voltage 24 V Rated motor current 0.215 A The rated motor is the current supplied to the motor at rated torque (0.51 Ncm), rated voltage and constant speed of 100 RPM. Stall current 0.52 A ± 10% The Stall current is the armature current when the rated motor voltage is applied to the motor with locked rotor. No load current 0.035 A ± 40% The No load current is the motor armature supply current at no load speed. Back Electromotive Force 1.7 V ± 10% The back electromotive force is the voltage measured across the terminal, carrying the motor shaft to a constant speed of 1000 rpm. 7.1.2.6 ASF Motor The automatic sheet feeder motor is a direct current motor. ELECTRICAL REQUIREMENTS Terminal resistance 37.56 Ω ± 10% The terminal resistance is calculated as the rated motor voltage divided by stall current. Terminal inductance Measured at 1 Khz. 20 mH ± 20% Rated motor voltage 24 V Rated motor current 0.15 A The rated motor is the current supplied to the motor at rated torque (0.51 Ncm), rated voltage and constant speed of 100 RPM. Stall current 0.62 A ± 10% The Stall current is the armature current when the rated motor voltage is applied to the motor with locked rotor. No load current 0.038 A ± 40% The No load current is the motor armature supply current at no load speed. Back Electromotive Force 1.7 V ± 10% The back electromotive force is the voltage measured across the terminal, carrying the motor shaft to a constant speed of 1000 rpm. ____________________________________________________________________________________________ LA400 Multiprinter 7. 8 ER-LA400-SV Maintenance Manual Electromechanical Devices ____________________________________________________________________________________________ 7.1.2.7 Color Motor The ribbon motor is a linear actuator stepper motor. ELECTRICAL REQUIREMENTS Phase resistance 150 Ω ± 10% Measured at 25° between pin 1-2 and 3-4 Phase inductance 106 mH ± 20% Measured at 1 Khz 100 mV. Rated motor voltage 12 V With rated voltage applied to both phases (parallel). Rated phase current 0.07 A With rated current applied to both phases (series). MECHANICAL REQUIREMENTS Travel Incremental unit 18 mm 0.0846 mm ± 10% The pin connector assignment is shown in fig. 7.7 Fig 7.6 Color motor pin connector assignment ____________________________________________________________________________________________ LA400 Multiprinter 7. 9 ER-LA400-SV Maintenance Manual Electromechanical Devices ____________________________________________________________________________________________ 7.1.2.8 Stacker Motor The ribbon motor is a 15° permanent magnet bipolar stepper motor. ELECTRICAL REQUIREMENTS Phase resistance 200 Ω ± 10% Measured at 25° between pin 1-2 and 3-4 Phase inductance 170 mH ± 20% Measured at 1 Khz 100 mV. Rated motor voltage 12 V With rated voltage applied to both phases (parallel). Rated phase current 0.06 A With rated current applied to both phases (series). Back electromotive force 17.5 Vpeak ± 20% With motor shaft at the constant speed of 1000 RPM MECHANICAL REQUIREMENTS Step angle 15° The pin connector assignment is shown in fig. 7.8 Fig 7.7 Stacker motor pin connector assignment ____________________________________________________________________________________________ LA400 Multiprinter 7. 10 ER-LA400-SV Maintenance Manual Electromechanical Devices ____________________________________________________________________________________________ 7.1.3 Cables 7.1.3.1 Sensors Cable This cable is composed of five optical sensors (two interrupter and three reflective ones). The figure below shows the electrical connections of this cable. Fig. 7.8 Sensors Cable ____________________________________________________________________________________________ LA400 Multiprinter 7. 11 ER-LA400-SV Maintenance Manual Electromechanical Devices ____________________________________________________________________________________________ 7.1.3.2 Alternance Cable The figure below shows the electrical connections of this cable. Fig. 7.9 Alternance Cable 7.1.3.3 Paper Stacker Cable The figure below shows the electrical connections of this cable. Fig. 7.10 Paper Stacker Cable ____________________________________________________________________________________________ LA400 Multiprinter 7. 12 ER-LA400-SV Maintenance Manual Electromechanical Devices ____________________________________________________________________________________________ 7.1.3.4 Operator Panel Cable The figure below shows the electrical connections of this cable. Fig. 7.11 Operator Panel Cable ____________________________________________________________________________________________ LA400 Multiprinter 7. 13 ER-LA400-SV Maintenance Manual Options ____________________________________________________________________________________________ Chapter 8 Options ____________________________________________________________________________________________ LA400 Multiprinter 8. 1 ER-LA400-SV Maintenance Manual Options ____________________________________________________________________________________________ 8.1 Overview This section describes the options available for this printer with their characteristics and installation procedure. 8.1.1 Automatic Sheet Feeder The Automatic Sheet Feeder consists of a motorized input feeder that can handle up to 120 single sheet paper forms. The ASF can coexist also with the Rear tractor unit. This option is USER installable and a MENU personalization is required. In the figure 8.1 it is possible to see the various components of the 1st ASF, which are: 1) First Bin Feeder Assembly 2) Output Paper Stacker Assembly 3) Antinoise Cover 4) Paper Support for input paper 5) Paper Support for output paper 6) Metal hooks for ASF installation on basic mechanism 7) Electrical finger-board for ASF electrical connection 8) Output Stacker metal supports 9) Cable connection ASF-Output Stacker Figure 8.1 1st ASF Components ____________________________________________________________________________________________ LA400 Multiprinter 8. 2 ER-LA400-SV Maintenance Manual Options ____________________________________________________________________________________________ ASF BLOCKS DIAGRAM The ASF hardware is composed of two separate boards: • • Paper Stacker Board ASF Board. and up to five motors (with 3 ASF installed): • • Paper Stacker stepper motor which switches a metal plate to allow the correct loading of the single sheet or the fanfold through it. ASF DC motor inside each ASF which loads the single sheet into the printer. The first board is included in the STACKER assembly and connects, through its fingertype edge and the stacker cable, the main board. The second board is integrated in the ASF1 assembly and allows the connection of the DC motors As described in chapter 3, the ASIC integrated circuit drives the mechanical option connector lines via its internal serial synchronous interface. The blocks diagram of the STACKER/ASF option isa shown below. Figure 8.2 ASF and Stacker Blocks Diagram ____________________________________________________________________________________________ LA400 Multiprinter 8. 3 ER-LA400-SV Maintenance Manual Options ____________________________________________________________________________________________ ASF INSTALLATION 1) Remove the ASF rear cover by simply extracting it from the main rear cover. 2) Remove the upper antinoise cover by simply extracting it from the main rear cover and install the new one in the same position (item 3 of fig. 8.1). 3) Remove the two slot covers with the paper deflector for output stacker installation by simply unooking them from the top cover. 4) Locate the two grooves on the metal base frame of the mechanical assy. In these grooves you have to insert the two metal hooks of the ASF support (item 6 of fig. 8.1). OUTPUT STACKER INSTALLATION 5) Locate the connector which provides the connection of Output Stacker board with the Main Board through the Paper Stacker Cable on the right side of the top cover. - Install the output stacker inserting the grooves (item 8 of fig. 8.1) in the dedicated pins present on the basic mechanism. - Slowly insert the board edge (item 7 of fig. 8.1) in the connector until the stacker clicks. - Connect the bin cable (item 9 of fig. 8.1) in the proper connector present in the right side of output stacker. To remove the output stacker, open the two metal supports of the Output Stacker (item 8 of fig. 8.1) by acting on the two proper black levers and extracting it. Figure 8.3 ASF Installation (rear view) ____________________________________________________________________________________________ LA400 Multiprinter 8. 4 ER-LA400-SV Maintenance Manual Options ____________________________________________________________________________________________ SECOND (and THIRD) BIN INSTALLATION The second and the third bin are also installable by the USER. 1) First of all, remove the plastic cover plates located on both rear sides of the first bin by simply extracting them. 2/3) Slide the second bin into the first bin until the two support arms snap in place. (The pin located in the bottom part of in the first bin must be inserted into the hole present in the hook lever (item 3) located on the front part of the second bin (both sides). 4) Remove the ASF board cover by simply extracting it from the metal frame. 5) Install the second BIN cable in the proper connector of the board shown inside the circle in the figure below. Follow the same procedure for the installation of the third BIN on the second one. To remove the BINs, is necessary to start from the first one. Remove the two plastic caps (item 6) by simply extracting them from the first bin case. Locate the hook lever and related pin (item 2 and 3) through the front hole remaining after the plastic caps removal. Put a flat screwdriver between these parts to un-hook them and, at the same time, extract the second BIN from the first one. Follow the same procedure for the removal of the second bin from the third one. Figure 8.4 Second Bin ASF Installation ____________________________________________________________________________________________ LA400 Multiprinter 8. 5 ER-LA400-SV Maintenance Manual Options ____________________________________________________________________________________________ 8.1.2 Color Motor The color option consist in a linear actuator (step motor) installed on the carriage assy. The linear movement of this motor causes the up-and-down movement of the metal bar present in front of the color inked ribbon cartridge. This cartridge has only two fixing points in its rear part, therefore it is free to up and down in its front part where the four color band inked ribbon is installed. This option is USER installable and no MENU personalization is required. COLOR MOTOR INSTALLATION Before proceeding to color motor installation remove, if present, the inked ribbon cartridge. 1) Insert the color motor connector in the plug present on the left side of print head support. 2) Insert the color motor assy in its position on the carriage assy. 3) Tighten the two screws. Figure 8.5 Color Motor Installation ____________________________________________________________________________________________ LA400 Multiprinter 8. 6 ER-LA400-SV Maintenance Manual Options ____________________________________________________________________________________________ COLOR RIBBON INSTALLATION Before proceeding to color ribbon installation power on the printer to initialize hte color motor (the actuator will be in its maximum inner position). 1) Install the color ribbon cartridge on its left and right supports. 2) Insert the plastic bracket present on the color ribbon over the ribbon color plastic side. 3) Gently push down the ribbon plastic bracket over the motor plastic braket guide until it "clicks" into place. 4) To remove the color ribbon a slightly pree on the lever before extracting the ribbon plastic bracket. Figure 8.6 Color Ribbon Installation ____________________________________________________________________________________________ LA400 Multiprinter 8. 7 ER-LA400-SV Maintenance Manual HW Setting & FW Installation ____________________________________________________________________________________________ Chapter 9 HW Setting & FW Installation ____________________________________________________________________________________________ LA400 Multiprinter 9. 1 ER-LA400-SV Maintenance Manual HW Setting & FW Installation ____________________________________________________________________________________________ 9.1 Overview This section describes the hardware setting and the correct FW mounting. 9.1.1 Hardware Setting There are some personalization jumpers inside the printer. MAIN BOARD On this board near the parallel interface connector a 2 pins connector with a jumper allows the availability of the + 5 V on the pin 18 of the parallel interface (typ. 100 mA, max. 250 mA). The jumper is shown in the figure 9.1 below as J01. If the jumper is only in position 1 (default setting), the + 5V is not available at the external side. If the jumper is in position 1-2 the + 5V is available at the external side. On the main board you find also an insulated washer (default setting) as indicated in the figure 9.2 (item 1). This washer insulates the Frame Ground (chassis) fronm the DC Ground (in any case the two grounds are connected through a resistor of some KΩ to discharge any capacitance). If a particolar connection requires these grounds being connected, it is indispensable to remove this washer. The pin 17 (frame ground) of the parallel interface is connected to the Frame Ground. OPERATOR PANEL BOARD On this board a 2 pin connector without jumper (default setting) is present. This connection is only for Manufacturing purpose only. The jumper is shown in the figure 9.3 as J02. SERIAL INTERFACE BOARD On this board a 2 pin connector with a jumper installed (default setting) is present. This jumper allows the connection of the pin 1 of the serial interface connector to the Frame Ground. If a particular connection requires these pins not being connected together, it is necessary to remove this jumper. The jumper is shown in the figure 9.4 as J03. 9.1.2 Firmware Installation The FirmWare installed on these printers is composed of two 4 MB dual in line type eproms installed as indicated in figure 9.1. The eprom indicated as U50 is the CONTROLLER FW. The eprom indicated as U108 is the GENERATOR FW. ____________________________________________________________________________________________ LA400 Multiprinter 9. 2 ER-LA400-SV Maintenance Manual HW Setting & FW Installation ____________________________________________________________________________________________ Figure 9.1 Washer for Frame-DC Ground Insulation Figure 9.2 Jumper and FW on Main Board ____________________________________________________________________________________________ LA400 Multiprinter 9. 3 ER-LA400-SV Maintenance Manual HW Setting & FW Installation ____________________________________________________________________________________________ Figure 9.3 Jumper on Operator Panel Board Figure 9.4 Jumper on Serial Interface Board ____________________________________________________________________________________________ LA400 Multiprinter 9. 4 ER-LA400-SV