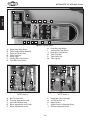
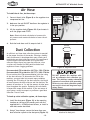
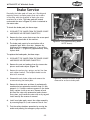
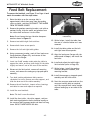
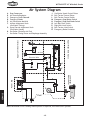
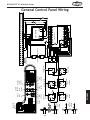
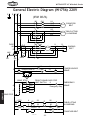
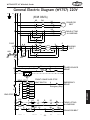
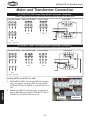
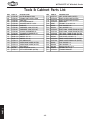
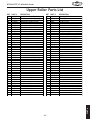
1
MODEL W1756/W1757
43" WIDE-BELT SANDER
OWNER'S MANUAL
Phone: (360) 734-3482 • Online Technical Support: [email protected]
COPYRIGHT © AUGUST, 2007 BY WOODSTOCK INTERNATIONAL, INC.
#9084BL
WARNING: NO PORTION OF THIS MANUAL MAY BE REPRODUCED IN ANY SHAPE OR FORM WITHOUT
THE WRITTEN APPROVAL OF WOODSTOCK INTERNATIONAL, INC.
Printed in Taiwan
�����������������������������������������������������������������������
��������������������������������������������������������������
����������������������������������������������������������������������
��������������������������������������������������������������������
������������������������
�����������������������������������������������������������������������
������������������������������������������������������������������������
�������������������������������������������������������������������
�����������������������������������������������������������������
����������������������������������������������������������������������
�����������������������������������������������
����������������������������������������������������������������
��������������������������������������������������������������������
�������
��������������������������������������������������������������������
�����������������������������������������������������������������������
����������������������������������������������������������������������
�������������������������������������
�� ����������������������������
�� ������������������������������������������������������������������
�� ����������������������������������������������������
������������������������������������������������������������������
������������������������������������������������������������������
��������������������������������������������������������������������
���������������������������������������������������������������������
��������������������������
SAFETY ............................................. 11
Standard Safety Instructions ..................11
Additional Safety for Wide-Belt Sanders ....13
SERVICE
PARTS
USE THE QUICK GUIDE PAGE LABELS TO SEARCH OUT INFORMATION FAST!
MAINTENANCE
MAINTENANCE .................................... 29
General ...........................................29
Lubrication .......................................29
Cleaning Sanding Belts .........................30
Cleaning Feed Belt ..............................30
Air System ........................................31
Dust and Water Traps ..........................31
PARTS .............................................. 57
Electrical & Controls ...........................57
Tools & Cabinet .................................59
Sanding Motor & Frame (W1756) .............61
Sanding Motor & Frame (W1757) .............62
Table Lift ........................................64
Feed & Conveyor ................................66
Upper Roller .....................................68
Belt Oscillation (W1756) .......................70
Belt Oscillation (W1757) .......................71
Sanding Drum & Pressure Roller (W1756) ...73
Sanding Drum & Pressure Roller (W1757) ...74
Label Placement ................................76
OPERATIONS
OPERATIONS ...................................... 23
Control Panel ....................................23
General ...........................................24
Setting Feed Speed .............................24
Choosing Sandpaper ............................25
Amp Draw Meter ................................25
Emergency Stop Plate ..........................26
Keypad and Display .............................26
Sanding Workpiece ..............................27
Platen Adjustment ..............................28
SET UP
SETUP .............................................. 16
Unpacking ........................................16
Inventory .........................................16
Machine Placement .............................17
Cleaning Machine................................17
Air Hose ...........................................18
Dust Collection ..................................18
Sanding Belt ......................................19
Pressure Roller Height..........................20
Breather Pin......................................20
Test Run ..........................................21
Recommended Adjustments ..................22
ELECTRICAL
ELECTRICAL ....................................... 14
220V/440V 3-Phase Operation ................14
Phase Converter .................................14
Electrical Specifications .......................14
Converting to 440V .............................15
SERVICE ............................................ 32
General ...........................................32
Table Calibration ................................32
Platen Service ...................................33
Table Limit Switches ...........................34
Brake Service ....................................35
Oscillation Timing ...............................36
Oscillation Speed ................................37
Table Parallelism ................................38
Pressure Rollers .................................39
V-Belt Tension ...................................41
Changing V-Belts ................................42
Feed Belt Replacement ........................43
Feed Belt Tension ...............................45
Sanding Belt Replacement .....................45
Feed Belt Tracking ..............................46
Sanding Belt Tracking Limit Switches .......46
Sanding Belt Tension Safety Switch ..........47
Air System Diagram .............................48
General Control Panel Wiring ................49
Wiring Box Electrical Diagram 220V..........50
Wiring Box Components 220V .................51
General Electric Diagram (W1756) 220V ...52
General Electric Diagram (W1757) 220V ....53
Motor and Transformer Connection ..........54
Troubleshooting .................................55
SAFETY
INTRODUCTION .....................................2
Woodstock Technical Support .................. 2
W1756 Machine Specifications ................. 3
W1757 Machine Specifications ................. 6
Controls and Features ........................... 9
INTRODUCTION
Contents
INTRODUCTION
W1756/W1757 43" Wide-Belt Sander
INTRODUCTION
Woodstock Technical Support
This machine has been specially designed to provide many years of trouble-free service. Close attention
to detail, ruggedly built parts and a rigid quality control program assure safe and reliable operation.
Woodstock International, Inc. is committed to customer satisfaction. Our intent with this manual is to
include the basic information for safety, setup, operation, maintenance, and service of this product.
We stand behind our machines! In the event that questions arise about your machine, please contact
Woodstock International Technical Support at (360) 734-3482 or send e-mail to: tech-support@shopfox.
biz. Our knowledgeable staff will help you troubleshoot problems and process warranty claims.
If you need the latest edition of this manual, you can download it from http://www.shopfox.biz.
If you have comments about this manual, please contact us at:
Woodstock International, Inc.
Attn: Technical Documentation Manager
P.O. Box 2309
Bellingham, WA 98227
Email: [email protected]
-2-
��������
��������������
����������������������������������������������������������������������������������������������
�����������
����������������
������
������������
����������������������������������������������������������������������������������������������������������� ��������������
�������������������������������������������������������������������������������������������������������������������������
������������������������������������������������������������������������������������������������������������������ ��������
����������������������������������������������������������������������������������������������������������������������� ����
��������������������������������������������������������������������������������������������������������������������������
�������������������������������������������������������������������������������������������������������������������� ������
������������������������������������������������������������������������������������������������������������������ ��������
����������������������������������������������������������������������������������������������������������������������� �����
����������������������������������������������������������������������������������������������������������������������� �
���������������������������������������������������������������������������������������������������� �������������������
�������������������������������������������������������������������������������������������������� ���������������������
�������������
����������������������������������������������������������������������������������������������������������� ��������������
��������������������������������������������������������������������������������������������������������������������� �����
������������������������������������������������������������������������������������������������������������������ ��������
����������������������������������������������������������������������������������������������������������������������� ����
��������������������������������������������������������������������������������������������������������������������������
����������������������������������������������������������������������������������������������������������������������� ����
������������������������������������������������������������������������������������������������������������������ ��������
����������������������������������������������������������������������������������������������������������������������� �����
����������������������������������������������������������������������������������������������������������������������
������������������������������������������������������������������������������������������������������������ ������������
�������������������������������������������������������������������������������������������������� ���������������������
��������������������
����������������������������������������������������������������������������������������������������������� ��������������
������������������������������������������������������������������������������������������������������������������ �������
������������������������������������������������������������������������������������������������������������������ ��������
����������������������������������������������������������������������������������������������������������������������� ����
��������������������������������������������������������������������������������������������������������������������������
������������������������������������������������������������������������������������������������������������������ ��������
������������������������������������������������������������������������������������������������������������������ ��������
����������������������������������������������������������������������������������������������������������������������� �����
����������������������������������������������������������������������������������������������������������������������� �
������������������������������������������������������������������������������������������������������������ ������������
�������������������������������������������������������������������������������������������������� ���������������������
-3-
�����������������������������������������������
INTRODUCTION
W1756/W1757 43" Wide-Belt Sander
INTRODUCTION
W1756/W1757 43" Wide-Belt Sander
������������������
����������������������������������������������������������������������������������������������������������������������������������
����������������������������������������������������������������������������������������������������������������������������
������������������������������������������������������������������������������������������������������������ ���������������
�������������������
���������������������������������������������������������������������������������������������������������������� ���������������
�������������������������������������������������������������������������������������������������������������������������� �������
����������������������������������������������������������������������������������������������������������������������������������
����������������������������������������������������������������������������������������������������������������������������
����������
���������������������������������������������������������������������������������������������������������������������������
���������������������������������������������������������������������������������������������������������������������������� ����
��������������������������������������������������������������������������������������������������������������������������
�������������������
���������������������
������������������������������������������������������������������������������������������������������������������������ �
����������������������������������������������������������������������������������������������������������������������
����������������������������������������������������������������������������������������������������������������� ������
����������������������������������������������������������������������������������������������������������������� �����
������������������������������������������������������������������������������������������������������������� ��������
�����������������������������������������������������������������������������������������������������������������������
������������������������������������������������������������������������������������������������������������� ��������
��������������������������������������������������������������������������������������������������������������������� ��
���������������������������������������������������������������������������������������������������������� �����������
�������������������������������������������������������������������������������������������������������������������������
��������������������������������������������������������������������������������������������������������������������������
�������������������
������������������������������������������������������������������������������������������� ����������������������
������������������������������������������������������������������������������������������������������������������� �����
�������������������������������������������������������������������������������������������������������������� ��
���������������������������������������������������������������������������������������������������������������������
������������������������������������������������������������������������������������������������������������� ���������
���������������������
����������������������������������������������������������������������������������������������������������������������� ����
��������������������������������������������������������������������������������������������������������������� ����������
����������������������������������������������������������������������������������������������������������������� ���������
������������
��������������������������������������������������������������������������������������������������������������� ������
��������������������������������������������������������������������������������������������������������������������������
��������������������������������������������������������������������������������������������������������������������������
�����������������������������������������������������������������������������������������������������������������������������
-4-
�����������������������������������������������
�������������������������
��������������������������������������������������������������������������������������������������������������������������
��������������������������������������������������������������������������������������������������������������� ����������
������������������������������������������������������������������������������������������������������������� ���������
������������������������������������������������������������������������������������������������������������������������� �
������������������������������������������������������������������������������������������������������������������ ������
���������������������������������������������������������������������������������������������������������������������� �����
������������������������������������������������������������������������������������������������������������� ����������
�������������������������������������������������������������������������������������������������������������������������
����������������������������������������������������������������������������������������������������������������������� �����
�������������������������������������������������������������������������������������������������������������������������� �
����������������������������������������������������������������������������������������������������������������������� �����
������������������������������������������������������������������������������������������������������������������� ������
�����
������������������������������������������������������������������������������������������������������������������ ��������
������������������������������������������������������������������������������������������������������������������ ������
��������������������������������������������������������������������������������������������������������������������� ������
��������������������������������������������������������������������������������������������������������������������
��������
��������������������
�������������������������
�������������������������
�����������������������
����������������������
�����������������������������������������
�����������������������������������������������
-5-
INTRODUCTION
W1756/W1757 43" Wide-Belt Sander
INTRODUCTION
W1756/W1757 43" Wide-Belt Sander
��������
��������������
����������������������������������������������������������������������������������������������
�����������
����������������
������
������������
����������������������������������������������������������������������������������������������������������� ��������������
�������������������������������������������������������������������������������������������������������������������������
������������������������������������������������������������������������������������������������������������������ ��������
����������������������������������������������������������������������������������������������������������������������� ����
��������������������������������������������������������������������������������������������������������������������������
�������������������������������������������������������������������������������������������������������������������� ������
������������������������������������������������������������������������������������������������������������������ ��������
����������������������������������������������������������������������������������������������������������������������� �����
����������������������������������������������������������������������������������������������������������������������� �
���������������������������������������������������������������������������������������������������� �������������������
�������������������������������������������������������������������������������������������������� ���������������������
�������������
����������������������������������������������������������������������������������������������������������� ��������������
��������������������������������������������������������������������������������������������������������������������� �����
������������������������������������������������������������������������������������������������������������������ ��������
����������������������������������������������������������������������������������������������������������������������� ����
����������������������������������������������������������������������������������������������������������������������������
����������������������������������������������������������������������������������������������������������������������� ����
������������������������������������������������������������������������������������������������������������������ ��������
����������������������������������������������������������������������������������������������������������������������� �����
����������������������������������������������������������������������������������������������������������������������
������������������������������������������������������������������������������������������������������������ ������������
�������������������������������������������������������������������������������������������������� ���������������������
��������������������
����������������������������������������������������������������������������������������������������������� ��������������
������������������������������������������������������������������������������������������������������������������ �������
������������������������������������������������������������������������������������������������������������������ ��������
����������������������������������������������������������������������������������������������������������������������� ����
����������������������������������������������������������������������������������������������������������������������������
������������������������������������������������������������������������������������������������������������������ ��������
������������������������������������������������������������������������������������������������������������������ ��������
����������������������������������������������������������������������������������������������������������������������� �����
����������������������������������������������������������������������������������������������������������������������� �
������������������������������������������������������������������������������������������������������������ ������������
�������������������������������������������������������������������������������������������������� ���������������������
-6-
�����������������������������������������������
������������������
����������������������������������������������������������������������������������������������������������������������������������
�������������������������������������������������������������������������������������������� ����������������������������
������������������������������������������������������������������������������������������������������������ ���������������
�������������������
���������������������������������������������������������������������������������������������������������������� ���������������
�������������������������������������������������������������������������������������������������������������������������� �������
����������������������������������������������������������������������������������������������������������������������������������
������������������������������������������������������������������������������������������������������ ��������������������
����������
���������������������������������������������������������������������������������������������������������������������������
���������������������������������������������������������������������������������������������������������������������������� ����
��������������������������������������������������������������������������������������������������������������������������
�������������������
���������������������
������������������������������������������������������������������������������������������������������������������������ �
����������������������������������������������������������������������������������������������������������������������
����������������������������������������������������������������������������������������������������������������� ������
����������������������������������������������������������������������������������������������������������������� �����
�������������������������������������������������������������������������������������������������������������� �������
�����������������������������������������������������������������������������������������������������������������������
�������������������������������������������������������������������������������������������������������������� ��������
�������������������������������������������������������������������������������������������������������������� ��������
����������������������������������������������������������������������������������������������������������������� ������
���������������������������������������������������������������������������������������������������������������������� ��
���������������������������������������������������������������������������������������������������������� �����������
�������������������������������������������������������������������������������������������������������������������������
��������������������������������������������������������������������������������������������������������������������������
�������������������
������������������������������������������������������������������������������������������� ����������������������
������������������������������������������������������������������������������������������������������������������� �����
���������������������������������������������������������������������������������������������������������������������
������������������������������������������������������������������������������������������������������������� ���������
��������������������������������������������������������������������������������������������������������������� ��
����������������������������������������������������������������������������������������������������������� �����
���������������������
����������������������������������������������������������������������������������������������������������������������� ����
��������������������������������������������������������������������������������������������������������������� ����������
����������������������������������������������������������������������������������������������������������������� ���������
������������
��������������������������������������������������������������������������������������������������������������� ������
��������������������������������������������������������������������������������������������������������������������������
��������������������������������������������������������������������������������������������������������������������������
�����������������������������������������������������������������������������������������������������������������������������
�������������������������
��������������������������������������������������������������������������������������������������������������������������
��������������������������������������������������������������������������������������������������������������� ����������
������������������������������������������������������������������������������������������������������������� ���������
������������������������������������������������������������������������������������������������������������������������� �
������������������������������������������������������������������������������������������������������������������ ������
-7-
�����������������������������������������������
INTRODUCTION
W1756/W1757 43" Wide-Belt Sander
INTRODUCTION
W1756/W1757 43" Wide-Belt Sander
���������������������������������������������������������������������������������������������������������������������� �����
��������������������������������������������������������������������������������������������������������� �������������
�������������������������������������������������������������������������������������������������������������������������
����������������������������������������������������������������������������������������������������������������������� �����
������������������������������������������������������������������������������������������������������������������������� ��
����������������������������������������������������������������������������������������������������������������������� �����
������������������������������������������������������������������������������������������������������������������� ������
�����
������������������������������������������������������������������������������������������������������������������ ��������
������������������������������������������������������������������������������������������������������������������ ������
��������������������������������������������������������������������������������������������������������������������� ������
��������������������������������������������������������������������������������������������������������������������
��������
��������������������
�������������������������
�������������������������
�����������������������
����������������������
�����������������������������������������
-8-
�����������������������������������������������
INTRODUCTION
W1756/W1757 43" Wide-Belt Sander
Controls and Features
D
B
C
I
A
H
J
N
E
G
O
M
F
K
L
Figure 1. Front and rear views.
A.
B.
C.
D.
E.
F.
G.
H.
I.
J.
K.
L
M.
N.
O.
Amperage Load Chart
Digital Table Height Key Pad
Control Panel
4" Dust Collection Ports
Emergency Stop Plate
Table Height Handwheel
Table Lift Motor Access Panel
Upper Left Access Door
-9-
Upper Right Access Door
Non-Slip Feed Belt
Main Wiring Box
Feed Belt Speed Control
Air Pressure Regulator
Feed Belt Gear Box
Sanding Motor Access Panel
W1756/W1757 43" Wide-Belt Sander
A
SAFETY
B
M
L
C
D
K
J
E
F
I
G
H
Figure 2. Control panel.
A.
B.
C.
D.
E.
F.
G.
H.
I.
J.
K.
L.
M.
Digital Amp Draw Meter
Table-Height Digital Readout
Table Set (Enter) Key
Table Start Key
Power Light
Sanding Belt Start Button
Feed Belt Start Button
Feed Belt Stop Button
Sanding Belt Stop Button
Emergency Stop Button
Table Stop Key
Table Down Key
Table Up Key
H
F
F
G
B
A
E
J
D
C
I
C
Figure 4. Inside right access door (Model
W1757 shown ).
Figure 3. Inside left access door (Model
W1757 shown).
A.
B.
C.
D.
E.
F.
G.
H.
I.
J.
Belt Tension Knob
Tracking Adjustment Knob
Lock Post Release Lever
Platen Adjustment Lock Lever
Platen Adjustment Lever
-10-
Diaphragm Valve Assembly
Air Fork and Air Jet
Upper Rollers
Speed Control Adjustment Knob
Airflow Adjustment Knob
W1756/W1757 43" Wide-Belt Sander
SAFETY
Indicates an imminently hazardous situation which, if not avoided, WILL
result in death or serious injury.
Indicates a potentially hazardous situation which, if not avoided, COULD
result in death or serious injury.
Indicates a potentially hazardous situation which, if not avoided, MAY
result in minor or moderate injury.
NOTICE
This symbol is used to alert the user to useful information about proper
operation of the equipment, and/or a situation that may cause damage
to the machinery.
Standard Safety Instructions
1.
READ THROUGH THE ENTIRE MANUAL BEFORE STARTING MACHINERY. Machinery presents serious
injury hazards to untrained users.
2.
ALWAYS USE ANSI APPROVED SAFETY GLASSES WHEN OPERATING MACHINERY. Everyday eyeglasses only have impact resistant lenses—they are NOT safety glasses.
3.
ALWAYS WEAR AN NIOSH APPROVED RESPIRATOR WHEN OPERATING MACHINERY THAT PRODUCES
DUST. Wood dust is a carcinogen and can cause cancer and severe respiratory illnesses.
4.
ALWAYS USE HEARING PROTECTION WHEN OPERATING MACHINERY. Machinery noise can cause
permanent hearing damage.
5.
WEAR PROPER APPAREL. DO NOT wear loose clothing, gloves, neckties, rings, or jewelry which may
get caught in moving parts. Wear protective hair covering to contain long hair and wear non-slip
footwear.
6.
NEVER OPERATE MACHINERY WHEN TIRED, OR UNDER THE INFLUENCE OF DRUGS OR ALCOHOL.
Be mentally alert at all times when running machinery.
7.
ONLY ALLOW TRAINED AND PROPERLY SUPERVISED PERSONNEL TO OPERATE MACHINERY. Make
sure operation instructions are safe and clearly understood.
8.
KEEP CHILDREN AND VISITORS AWAY. Keep all children and visitors a safe distance from the work
area.
9.
MAKE WORKSHOP CHILD PROOF. Use padlocks, master switches, and remove start switch keys.
-11-
SAFETY
READ MANUAL BEFORE OPERATING MACHINE.
FAILURE TO FOLLOW INSTRUCTIONS BELOW WILL
RESULT IN PERSONAL INJURY.
W1756/W1757 43" Wide-Belt Sander
10. NEVER LEAVE WHEN MACHINE IS RUNNING. Turn power off and allow all moving parts to come to
a complete stop before leaving machine unattended.
SAFETY
11. DO NOT USE IN DANGEROUS ENVIRONMENTS. DO NOT use machinery in damp, wet locations, or
where any flammable or noxious fumes may exist.
12. KEEP WORK AREA CLEAN AND WELL LIT. Clutter and dark shadows may cause accidents.
13. USE A GROUNDED EXTENSION CORD RATED FOR THE MACHINE AMPERAGE. Undersized cords overheat and lose power. Replace extension cords if they become damaged. DO NOT use extension cords
for 220V machinery.
14. ALWAYS DISCONNECT FROM POWER SOURCE BEFORE SERVICING MACHINERY. Make sure switch is
in OFF position before reconnecting.
15. MAINTAIN MACHINERY WITH CARE. Keep blades sharp and clean for best and safest performance.
Follow instructions for lubricating and changing accessories.
16. MAKE SURE GUARDS ARE IN PLACE AND WORK CORRECTLY BEFORE USING MACHINERY.
17. REMOVE ADJUSTING KEYS AND WRENCHES. Make a habit of checking for keys and adjusting
wrenches before turning machinery ON.
18. CHECK FOR DAMAGED PARTS BEFORE USING MACHINERY. Check for binding and alignment of
parts, broken parts, part mounting, loose bolts, and any other conditions that may affect machine
operation. Repair or replace damaged parts.
19. USE RECOMMENDED ACCESSORIES. Refer to the instruction manual for recommended accessories.
The use of improper accessories may cause risk of injury.
20. DO NOT FORCE MACHINERY. Work at the speed for which the machine or accessory was designed.
21. SECURE WORKPIECE. Use clamps or a vise to hold the workpiece when practical. A secured
workpiece protects your hands and frees both hands to operate the machine.
22. DO NOT OVERREACH. Keep proper footing and balance at all times.
23. MANY MACHINES WILL EJECT THE WORKPIECE TOWARD THE OPERATOR. Know and avoid conditions that cause the workpiece to "kickback."
24. ALWAYS LOCK MOBILE BASES (IF USED) BEFORE OPERATING MACHINERY.
25. BE AWARE THAT CERTAIN DUST MAY BE HAZARDOUS to the respiratory systems of people and
animals, especially fine dust. Make sure you know the hazards associated with the type of dust you
will be exposed to and always wear a respirator approved for that type of dust.
-12-
W1756/W1757 43" Wide-Belt Sander
Additional Safety for Wide-Belt Sanders
USE this and other machinery with caution
and respect. Always consider safety first,
as it applies to your individual working
conditions. No list of safety guidelines can
be complete—every shop environment is
different. Failure to follow guidelines could
result in serious personal injury, damage
to equipment or poor work results.
1.
INFEED/OUTFEED AREA. When feeding workpiece into the machine, keep clear of kickback path
by standing to the side of the feed belt. Kickback is when the workpiece is thrown off the sander
by the force of the sanding drums.
2.
WORKPIECE FEEDING. Never force workpiece into sander, and feed only one workpiece at a time.
3.
CLOTHING. Roll up or button sleeves, tie all loose clothing or hair so it will keep clear of
entanglement hazards.
4.
WORKPIECE LIMITS. Never sand workpieces narrower than 2'', thinner than 3⁄16'' (Model W1756) or
1
/4" (Model W1757), or shorter than 14''.
5.
HANDS. Never place hands near, or in contact with, sanding drums or feed belt during operation.
6.
MAINTENANCE. Perform machine inspections/maintenance service at the appropriate intervals.
7.
POWER AND AIR DISCONNECT. Unless specifically stated in the manual, always disconnect the
power source and air from the machine when performing maintenance, adjustments, or assembly.
8.
UNATTENDED MACHINE. Never leave the machine running unattended.
9.
SANDPAPER. Replace sanding belt when it becomes worn or damaged.
10. FOREIGN MATERIAL. Always inspect workpiece for nails, staples, knots, and other imperfections
that could be dislodged and thrown from the machine during sanding operations.
11. DUST COLLECTION. Never operate the sander without an adequate dust collection system in place
and running.
12. INTENDED USE. Sand wood and wood products only, not plastics or metals.
13. ALLERGIES. Certain woods may cause an allergic reaction in people and animals, especially when
exposed to fine dust. Make sure you know what type of wood dust you will be exposed to and
always wear an approved respirator.
14. ACCESS DOORS. Never perform sanding operations when the side access doors are open.
15. UNDERSTAND INSTRUCTIONS. Never allow unsupervised or untrained personnel to operate the
machine. Make sure instructions regarding machine operation are approved, correct, safe, and
clearly understood.
-13-
SAFETY
READ and understand this
entire instruction manual
before using this machine.
Serious personal injury
may occur if safety and
operational information is
not understood and followed. DO NOT risk your
safety by not reading!
W1756/W1757 43" Wide-Belt Sander
ELECTRICAL
ELECTRICAL
The machine must be properly set up before it is
safe to operate. DO NOT connect this machine to the
power source until instructed to do so in the "Test
Run" portion of this manual.
220V/440V 3-Phase
Operation
OFF
The Model W1756/W1757 is prewired for 220V 3-phase
operation, but may be rewired for 440V 3-phase operation
(see Pages 15 & 54).
TURN OFF and LOCK your
master power switch so
no power is available
to the sander before
connecting electrical
wires! If you ignore
this warning
serious
electrical
shock may
occur causing injury or
death!
This machine must be hardwired to a locking shutoff
switch by a qualified electrician. Hardwiring involves a
permanent installation with conduit runs that can only be
accomplished safely by a qualified electrician. As always,
observe all applicable electrical codes when connecting
this machine to power.
This machine must be grounded! Verify the ground before
connecting this machine to the power source.
Attempting to connect this machine to
the power source without a qualified
electrician greatly increases the risk
of electrocution, fire, or machine
damage.
Phase Converter
The power from the manufactured power leg (wild wire)
of a phase converter fluctuates, which may damage
electrical components if connected to the wrong incoming
power terminal. If you must use a phase converter for
3-phase power, only connect the L2 "wild wire" to the S
terminal (See Page 50).
The wire from the S terminal can handle some fluctuation
because it goes directly to the motor. The power going to
the R and T terminals goes to the transformer and must
be consistent to prevent damage.
Electrical Specifications
This machine must be
grounded! If you have
any questions about
correct
electrical
installation, contact a
qualified electrician for
assistance to make sure
all connections are safe
and adhere to your local
electrical codes.
Model
Voltage
Amp Draw
Min. Circuit Size
Connection
Cord
Extension Cord
W1756/W1757
220V
71.2
90A
Hardwire
Conduit Setup
N/A (Hardwire Only)
W1756/W1757
440V
35.6
60A
Hardwire
Conduit Setup
N/A (Hardwire Only)
-14-
W1756/W1757 43" Wide-Belt Sander
Converting to 440V
�����������
To convert this machine for 440V three-phase operation,
you must purchase two thermal overload relays, Part
X1756037-1 and X1756037-2, or purchase the 440V
Conversion Kit, Part X1756037 (refer to Pages 57 & 58).
If you do not have three-phase power available for your
wide-belt sander, you must install a phase converter
(Refer to Phase Converter sub-section, Page 14 for
requirements and setup).
1.
DISCONNECT THE SANDER FROM THE POWER SOURCE!
2.
Open the electrical box located on the back of the
machine.
3.
On the transformer, remove the wire connected to
the 220V terminal for your model of sander, and
connect it to the 440V terminal, as shown in Figure
5 and in the illustrations on Page 54.
4.
Refer to Figure 6 and open the main wiring box on
your machine.
5.
Swap out the applicable thermal relays at the
locations shown in Figure 6 or in the photo on Page
54, and set them to 16A and 3A.
— For the Model W1756 and W1757, use 440V
Conversion Kit #X1756037 or purchase Part
X1756037-1 and X1756037-2, and change out the two
relays.
6.
Wire the sanding belt, feed belt, and table elevation
motors as shown on the diagrams on the inside of
each motor wire cover, or refer to the diagrams
shown on Page 54, Motor and Transformer
Connections.
-15-
��
����
�
�
�
�
�
��
���� ����
Figure 5. Rewiring transformer from 220V
to 440V.
LR3D-216
LR3D-086
Set to: 16A Set to: 3A
Figure 6. Thermal overload relays.
ELECTRICAL
To convert the sander for 440V, do these steps:
�
W1756/W1757 43" Wide-Belt Sander
SETUP
Unpacking
This machine has been carefully packaged for safe
transportation. If you notice the machine has been
damaged during shipping, please contact your authorized
Shop Fox dealer immediately.
OFF
Inventory
SETUP
The following is a description of the main components
shipped with the Model W1756/W1757. Lay the
components out to inventory them.
Keep machine disconnected from
power until instructed otherwise.
Note: If you can't find an item on this list, check the
mounting location on the machine or examine the
packaging materials carefully. Occasionally we pre-install
certain components for safer shipping.
SUFFOCATION
HAZARD!
Immediately discard
all plastic bags and
packing materials to
eliminate
choking/
suffocation hazards for
children and animals.
Box Inventory (Figure 7)
Qty
A. Sanding Belt 100 Grit .....................................1
B. Sanding Belt 180 Grit .....................................1
C. Dust Ports 4" (Model W1756) ............................5
Dust Ports 4" (Model W1757) .......................... 10
D. Platen Felt ..................................................1
E. Platen Graphite Flaps.....................................2
F. Tool Box .....................................................1
— Phillips Head Screwdriver #2 .........................1
— Standard Screwdriver #2 ..............................1
— Open-End Wrench 8/10mm ...........................1
— Open-End Wrench 12/14mm ..........................1
— Open-End Wrench 17/19mm .........................1
— Metric Hex Wrench Set 10 Pcs. .......................1
— Door Keys ................................................2
— Ceramic Limit Switch Rub Rods ......................2
— Flexible Grease Gun Extension .......................1
— Platen Removal Tool ...................................1
The Model W1756/W1757
is a heavy machine
weighing over 2400 lbs.
Use power or hydraulic
equipment to avoid
serious personal injury
or death.
A
B
F
C
E
D
Figure 7. Parts and tool inventory.
-16-
W1756/W1757 43" Wide-Belt Sander
Machine Placement
Floor Load: This machine distributes a
heavy load in a small footprint. Some shop
floors may require additional bracing to
support both machine and operator.
•
Working Clearances: Consider existing and
anticipated needs, size of material to be
processed through the machine, and space
for auxiliary stands, work tables or other
machinery when establishing a location for
your wide-belt sander.
•
Lighting: Lighting should be bright enough
to eliminate shadow and prevent eye strain.
•
Electrical: Electrical circuits must be
dedicated or large enough to handle
amperage requirements. Outlets must be
located near each machine, so power or
extension cords are clear of high-traffic
areas. Follow local electrical codes for
proper installation of new lighting, outlets,
or circuits.
•
Dust Collection: Place this machine as
close to your dust collector as possible to
eliminate long runs of large ducting and
improve dust collection from the machine.
The upper sanding drum on this machine is
coated with a waxy grease that protects it from
corrosion during shipment. Clean this grease off
with a solvent cleaner or citrus-based degreaser.
DO NOT use chlorine-based solvents such as
brake parts cleaner or acetone—if you happen to
splash some onto a painted surface, you will ruin
the finish.
NEVER clean with gasoline
or other petroleum-based
solvents.
Most
have
low flash points, which
make them extremely
flammable. A risk of
explosion and burning
exists if these products
are used. Serious personal
injury may occur if this
warning is ignored!
ALWAYS work in wellventilated areas far from
possible ignition sources
when using solvents to
clean machinery. Many
solvents are toxic when
inhaled or ingested. Use
care when disposing
of waste rags and
towels to be sure they
DO NOT create fire or
environmental hazards.
USE helpers or power
lifting equipment to lift
this wide-belt sander.
Otherwise,
serious
personal injury may
occur.
MAKE your shop “child
safe.” Ensure that your
workplace is inaccessible
to kids by closing and
locking all entrances when
you are away. NEVER allow
untrained visitors in your
shop when assembling,
adjusting or operating
equipment.
-17-
SETUP
•
Cleaning Machine
W1756/W1757 43" Wide-Belt Sander
Air Hose
To install the air line, do these steps:
1.
Connect the air inlet (Figure 8) on the regulator to a
compressed air line.
2.
Make sure the red ON/OFF handle on the regulator is
in the open position.
3.
Lift the regulator knob (Figures 8 & 9) and rotate it
until the gauge reads 75 PSI.
Note: Rotate the knob clockwise to increase the
air pressure and counterclockwise to lower the air
pressure.
4.
Regulator
Knob
Air ON/OFF
Lever (Open
Position)
Air Inlet
Figure 8. Air hose attached to regulator.
Push the knob down until it snaps to lock it.
SETUP
��������
Dust Collection
An efficient and clean dust collection system is essential
to the proper function of the sander. Ensuring a healthy
work environment is also dependent upon cleaning and
maintaining your dust collection system. We recommend
connecting this wide-belt sander to a cyclone dust
collector rather than a bag type dust collector, since
a cyclone will handle fine dust particles better and
experience fewer clogging problems.
Recommended CFM at Machine (W1756): 1500 CFM Min.
Recommended CFM at Machine (W1757): 2000 CFM Min.
Do not confuse this CFM recommendation with the rating
of the dust collector. To determine the CFM at the
machine, you must take into account many variables,
including the CFM rating of the dust collector, the length
of hose between the dust collector and the machine, the
amount of branches or Y's, and the amount of other open
lines throughout the system. Explaining this calculation
is beyond the scope of this manual. If you are unsure of
your system, consult an expert or purchase a good dust
collection "how-to" book.
��������
������
Figure 9. Regulator knob.
Figure 1. Regulator knob.
DO NOT operate this machine without an adequate dust collection system. This machine creates substantial
amounts of wood dust while operating.
Failure to use a dust collection system
can result in short and long-term respiratory illness.
To hook up a dust collection system, do these steps:
1.
2.
Install the dust ports (Figure 10) to the mounting
locations on the top of the sanding unit with the
supplied M6-1 x 10 Phillips head screws, or install a
wide-belt sander dust hood.
Using 4" hose clamps, secure the hoses from your
dust collection system to the dust ports (Figure 10).
-18-
Hose Clamp
Figure 10. Dust collection hose
attached to dust port.
W1756/W1757 43" Wide-Belt Sander
Sanding Belt
REMOVE AIR PRESSURE COMPLETELY!
2.
Remove the lock post release lever (Figure 11) by
turning it counterclockwise 1⁄2 turn and pulling it up
and out of the mounting hole.
3.
Remove the spacer block (Figure 11).
4.
Making sure the rotation arrows on the sanding belt
point the same direction as those shown in Figure
11, install the sanding belt by starting first on the
upper roller and then the lower roller.
Belt Tension
Knob
SETUP
Note: The sanding belt must be centered between
the limit switches, and the edge of the sanding
belt must be between tongs of the belt oscillation
controller fork, as shown in Figure 12. Damage to
the sanding belt will occur if the sander is turned
ON before the sanding belt is correctly positioned.
Rotation
1.
Rotation
To install the sanding belt, do these steps:
Lock Post
Release Lever
NOTICE
The directional arrow on the back of the sanding
belt must be pointing in a counterclockwise direction
during installation. Failure to install the sanding belt
correctly could result in damage to the sanding belt
or the sander itself.
5.
Replace the spacer block and tighten down the lock
post release lever.
6.
Reconnect the sander to air pressure.
7.
With your hands clear of all moving parts, check to
make sure the belt tension knob is turned to the
12:00 position, to tension the belt.
— If it is turned to the 9:00 position, the belt will have
no tension.
Belt Centered
In Fork
Spacer
Block
Figure 11. Components used when
changing a sanding belt.
(Back)
Sanding Belt
Limit Switches
-19-
Oscillation Controller
Fork
(Front)
Figure 12. Sander 0utline (Top View).
Proper position of belt between the limit
switches.
W1756/W1757 43" Wide-Belt Sander
Pressure Roller Height
The pressure rollers have been set at the factory, but to
ensure safety, you should verify that they are set below
the level of the sanding roller.
SETUP
To check the pressure roller height, do these steps:
1.
DISCONNECT THE SANDER FROM THE POWER SOURCE!
2.
Place a piece of scrap wood of uniform thickness
across the table so it spans both the front and the
rear pressure rollers at the same time.
3.
With the air pressure connected and the sanding belt
installed and tensioned, manually raise the table and
verify that the board touches both pressure rollers
before it touches the sanding belt.
It is absolutely essential to keep the
pressure rollers set below the level
of the sanding roller. If the pressure
rollers are even with or higher than
the sanding roller, the wood may be
propelled from the sander at a high
rate of speed. This situation could
cause serious kick-back injury.
Note: If the board does not touch both pressure
rollers before it touches the sanding belt, then the
pressure rollers must be adjusted before operation.
See Pressure Rollers on Page 39 for step-by-step
instructions.
Breather Pin
The Model W1756/W1757 has a breather sealing pin
installed in the fill plug for the feed belt gear reducer.
Remove this pin before using your sander (see Figure 13);
otherwise, the gear oil will expand with heat and the
seals in the gear reducer may leak due to the pressure
build up.
You may want to retain this pin if you plan on storing your
sander for a long period of time.
Breather Pin
Removed
Figure 13. Breather sealing pin removed.
-20-
W1756/W1757 43" Wide-Belt Sander
Test Run
Once the assembly is complete, test run your machine
to make sure it runs properly and is ready for regular
operation.
The test run consists of verifying the following: 1) The
motor powers up and runs correctly, 2) the stop button
safety feature works correctly, and 3) the feed belt motor
turns the correct direction.
If, during the test run, you cannot easily locate the source
of an unusual noise or vibration, stop using the machine
immediately, then review Troubleshooting on Page 55.
Loose hair and clothing could get
caught in machinery and cause serious
personal injury. Keep loose clothing
rolled up and long hair tied up and
away from machinery.
If you still cannot remedy a problem, contact our Tech
Support at (360) 734-3482 for assistance.
�����
To test run the machine, do these steps:
Make sure you understand the safety instructions
at the beginning of the manual, and verify that the
machine is setup properly.
2.
Ensure all tools and objects used during setup are
cleared away from the machine, and close all panels
or access doors.
3.
Make sure the machine is connected to an air
compressor and the pressure gauge reads 75 PSI.
4.
Make sure all wiring is correct.
5.
Put on your safety glasses and respirator.
6.
Connect the machine to the power source.
7.
Push the EMERGENCY STOP button in, then twist it
clockwise so it pops out. When the STOP button pops
out, the switch is reset and ready for operation (see
Figure 14).
8.
Verify that the power is not connected out of phase
by pressing the TABLE UP and TABLE DOWN keys,
using the criteria below:
— If the table moves in the same direction as the
button description, it is moving in the correct
direction.
— If the table moves in the opposite direction to the
arrow on the button, it is moving in the wrong
direction.
-21-
��������
���������
������������
����������
���
Figure 14. Resetting the switch.
SETUP
1.
W1756/W1757 43" Wide-Belt Sander
Stop the machine, shut OFF the power source,
then swap any two wires (U2, V2, or W2) at the
"Table Up/Down" motor connection as shown in
Figure 15.
9.
������������������
��
Press the FEED BELT START and FEED BELT STOP
buttons. The feed belt should start, run, and stop
smoothly.
10. Press the SANDING BELT START and SANDING BELT
STOP buttons. The sanding belt should start, run,
and stop smoothly.
��
��
�������������
����������
��
��
��
�������������
����������
Figure 15. Example of switching Table Up/
Down Motor connection wires.
— When operating correctly, the machine runs smoothly with little or no vibration or rubbing noises.
SETUP
However, you will hear an air leaking sound from
the oscillation controller fork jet (Figure 12).
— Investigate and correct strange or unusual noises
or vibrations before operating the machine further.
Always stop the machine and disconnect it from
power before investigating or correcting potential
problems.
11. Press the EMERGENCY STOP button to stop the
machine.
NOTICE
Using the emergency stop system for
daily machine shutdown will wear out
the sanding belts and the brake pads.
When shutting down the machine under
non-emergency conditions, use the red
OFF push buttons.
Recommended
Adjustments
12. WITHOUT resetting the switch, press the FEED BELT
START button. The machine should not start.
— If the machine does not start, the EMERGENCY
STOP button safety feature is working correctly.
— If the machine does start (with the EMERGENCY
STOP button pushed in), immediately disconnect
power to the machine.
The STOP button safety feature is not working
correctly. This safety feature must work properly
before proceeding with regular operations. Call
Tech Support for help.
13. Reset the EMERGENCY STOP button.
14. Press the FEED BELT START button, then press the
emergency stop plate. The sander will come to a
complete stop. The stop plate should only be used
during emergencies. Sanding belts will wear quicker
if this feature is used for daily shut down.
— If the feed belt does not come to a complete stop,
the emergency stop plate is not working correctly.
Call Tech Support for help.
-22-
For your convenience, the adjustments
listed below have been performed at the
factory and require no further adjustment.
However, we recommend that you verify
that the adjustments are correct and to
your satisfaction.
Recommended adjustment checklist:
1.
2.
3.
4.
5.
6.
7.
8.
9.
Pressure Rollers (Page 20).
Air System (Air Regulator to 75 PSI;
Page 31).
Table Calibration (Page 32).
Oscillation Timing (Page 36).
Oscillation Speed (Page 37).
Table Parallelism (Page 38).
V-Belt Tension (Page 41).
Feed Belt Tension (Page 45).
Feed Belt Tracking (Page 46).
W1756/W1757 43" Wide-Belt Sander
OPERATIONS
Control Panel
Below is a summary of your sander control panel
and the components that it controls. Use the
list with Figure 16 to become familiar with your
sander.
•
Sanding Load Amp Meter: Indicates the
current amp load on the sanding motor
when a sanding operation is in progress.
•
Input LED: Indicates the sander is waiting
for new numerical dimension values.
•
Run LED: Indicates the feed belt lift motor
is operating.
•
Digital Readout: Shows final table sanding
depth.
•
For manual table positioning, turn the
handwheel located under the front of the
infeed table.
Sanding
Load
Amp
Meter
Digital Table
Up
Readout
Key
Table
Set
Key
Power
Lamp
SET Key: Press and hold the SET key for 3
seconds to calibrate display at the current
board thickness; or press and hold key for
10 seconds to toggle the display between
metric and standard measurement.
•
Power Lamp: Indicates when machine has
power to the control panel.
•
Sanding Belt Start and Stop Buttons:
Turns the sanding motor ON and OFF if
the sander has air pressure and the belt is
tensioned.
•
Feed Belt Start and Stop Buttons: Cycles
the feed belt motor ON and OFF for
feeding wood into the sander.
•
Emergency Stop Button: Stops all
electrical power to motors in event of
emergency, and stops sanding drums with
an air-disc brake.
•
Table Start and Stop Keys: Moves table
to a preset sanding depth; stops table
movement immediately.
•
Key Pad: Enters the position of sanding
depth.
Sanding
Belt
Start
Button
Input LED
Feed
Belt
Start
Button
Run LED
Key
Pad
Table
Down
Key
Table
Stop
Key
Table
Start
Key
Emergency
Stop
Button
Sanding
Belt Stop
Button
Figure 16. Control panel interface.
-23-
Feed
Belt
Stop
Button
OPERATIONS
Table Up and Down Keys: Manually cycles
the table lift motor to raise and lower
the table. Press the UP or DOWN key once
for motorized table positioning in 0.005"
(0.125mm) increments.
•
W1756/W1757 43" Wide-Belt Sander
General
This sander will perform many types of operations that
are beyond the scope of this manual. Many of these
operations can be dangerous or deadly if performed
incorrectly. This sander is only designed to sand wood—
not metal, fiberglass, or plastics.
The instructions in this section are written with the
understanding that the operator has the necessary
knowledge and skills to operate this machine. If at any
time you are experiencing difficulties performing any
operation, stop using the machine!
If you are an inexperienced operator, we strongly
recommend that you read books, trade articles, or seek
training from an experienced wide-belt sander operator
before performing any unfamiliar operations. Above all,
your safety should come first!
OFF
DO NOT investigate problems or adjust
the machine while it is running. Wait
until the machine is turned OFF,
unplugged and all working parts
have come to a complete stop before
proceeding!
Setting Feed Speed
OPERATIONS
The dial attached to the side of the feed belt motor
cover (Figure 17) adjusts the feed rate of the sander.
To change the feed belt speed, do these steps:
1.
Start the feed belt.
2.
Turn the dial clockwise to decrease the feed rate
and counterclockwise to increase it.
Always wear safety glasses and a
respirator when operating this machine.
Failure to comply may result in serious
personal injury, allergic reactions, or
respiratory problems.
Note: Never adjust the feed rate dial unless the
feed belt is running, otherwise you can damage the
control.
Determining Ideal Feed Rates
Softwoods typically require a faster feed rate than
hardwoods; however, there is no definitive rule to follow
when determining the best feed rate. As a general rule,
always start with the slowest feed rate and work your
way up. We always recommend testing the feed rate
using scrap wood similar to your workpiece. Be sure
to monitor the amperage meter (see Page 25) when
adjusting the feed rate. Decrease the feed rate if the
load begins to slow the motor RPM.
-24-
Figure 17. Variable feed rate dial.
W1756/W1757 43" Wide-Belt Sander
Choosing Sandpaper
When selecting sandpaper, keep in mind that the Model
W1756/W1757 accepts only 43" wide by 60" long belts.
The grit you choose will depend on the type of work, the
species of wood and the stage of finishing. When choosing
which sandpaper to use, use these grit numbers as a
general guide to sandpaper type:
Grit
Type
60 or less .................................................. Coarse
80-100 .................................................. Medium
120-150 .......................................................Fine
We recommend using aluminum oxide sanding belts for
the best results. The general rule of thumb is to sand a
workpiece with progressively higher grit numbers, with
no one grit increase of more than 50; however, the type
of wood and desired finish will determine the best grit to
use.
Note: When used on wide-belt sanders, sandpaper finer
than 150 grit will often be problematic and load up or
burn workpieces.
OPERATIONS
Amp Draw Meter
The amperage draw meter (Figure 18) is used to keep
the machine from being overloaded during sanding
operations.
As a general rule, always start with a small load and work
your way up. DO NOT work your machine to its maximum
load, or where you can hear the motor lose RPM; instead,
make multiple passes or install a coarser grit sandpaper.
Amp load will be directly affected by many factors such
as feed rate, depth of cut, wood type, sandpaper grit,
and workpiece width. If the amp load is in the red load
range, the machine is overloaded and motor damage may
soon occur. Use the amp load chart on the meter to keep
the amp load in the green range during operation.
Figure 18. Amp draw meter.
NOTICE
DO NOT VOID MACHINE WARRANTY!
Keep the amp draw within the GREEN
zone shown on the AMP LOAD CHART.
If you operate the sander in the RED
zone, motor damage may occur and
will not be covered under warranty.
-25-
W1756/W1757 43" Wide-Belt Sander
Emergency Stop Plate
When pushed, the emergency stop plate, shown in Figure
19, stops the electricity to the motors and also applies an
air-disc brake to stop the sander immediately.
To use the emergency stop plate, push and hold it until
the sander has come to a complete stop.
KEEP the sanding drum V-belts correctly tensioned
(refer to Page 41). Otherwise, the sanding drum
pulley will slip when the emergency brake is applied
and not immediately stop the machine in the event
of an emergency!
NOTICE
Emergency
Stop Plate
Figure 19. Emergency stop plate.
OPERATIONS
Using the emergency stop system for daily machine
shutdown will wear out the sanding belts and the
brake pads. Inspect for any grease or oil on the brake
rotor, as oil reduces emergency braking ability.
Keypad and Display
You can push the UP or DOWN arrow keys to lift or lower
the table, or you can use the automated function of auto
height adjustment (Page 27) for your next sanding pass.
All functions are controlled through the key pad and are
presented on the digital display (see Figure 20).
Input LED
Run
LED
Up and Down
Keys
Figure 20. Digital display and key pad.
-26-
W1756/W1757 43" Wide-Belt Sander
Sanding Workpiece
To achieve the best sanding results experiment with
conveyor feed rate, sanding depth, various grits of
sandpaper, and oscillation speed. Also, make sure the
workpiece has been jointed and planed before sanding.
Typically, no more than 0.5mm (approx. 1⁄64") of material
is removed during each pass. Attempts to remove too
much material can cause jamming, wood burning, rapid
sandpaper wear or tearing, poor finish, short motor life,
and belt slippage.
To sand a workpiece, do these steps:
Measure the workpiece and record the thickest spot.
2.
Put on safety glasses, a dust mask, and hearing
protection!
3.
Make sure the sander is connected to power and
compressed air and turn ON the dust collector and
the sander.
4.
Raise the table to the thickness of the workpiece
and make an initial pass to eliminate any high spots.
5.
Continue to raise the table 0.0625" between each
successive pass until the sander begins to sand the
entire workpiece.
6.
Type in the thickness of your workpiece using the
numeric key pad (Example: for a 2" thick workpiece
type 2.000"), and press the table start key. Note:
The upper left corner Input LED will illuminate (See
Figure 20), and the display numbers will flash when
entering measurements.
7.
Measure the sanding depth needed. Example: let’s
say you need 1⁄64 ".
8.
Convert 1⁄64" fraction to a 0.016" decimal
measurement using the conversion table on the
sander.
9.
Calculate the resulting workpiece thickness (2.000"—
0.016" = 1.984"), and type that thickness (1.984") on
the key pad.
10. Press the table start key: The table will raise to the
new setting. Note: The computer rounds the sanding
thickness measurements in increments of 0.005",
and if you want to move the table up in 0.005"
increments, just tap the up arrow. The same holds
true for the down button.
-27-
For best results when finish sanding,
feed each piece through the sander
two or three times without adjusting
the depth of cut. Turn the workpiece
180˚ and feed it through two or three
more times at this same depth. As
always, use your best judgement. If
you no longer hear the sanding belt
making contact with the workpiece
on successive cuts, then no further
passes are needed at that depth.
OPERATIONS
1.
Tip
W1756/W1757 43" Wide-Belt Sander
Note: The lower left corner Run LED will illuminate
and the display numbers will glow steadily when
measurements have been accepted and the table is
auto-adjusting. When the correct sanding depth is
achieved, the lower left corner Run LED will turn
off and the final resulting workpiece thickness is
displayed.
11. Start the feed belt, stand to the side as shown in
Figure 21, and feed the workpiece into the sander.
12. Observe the amp draw meter, and press the table
down arrow key on the key pad to reduce the
sanding depth if the amp load meter indicates motor
overload, or reduce the feed rate.
13. Remove the workpiece from the outfeed side, which
is now sanded down 1⁄64". Re-sand the workpiece
a couple of times more at this depth to ensure a
consistent sanding depth.
Figure 21. Operator feeding workpiece at
correct body position and out of the way
of potential kickback.
14. Add a new sanding depth the same way as in Steps 9
and 10, and sand again.
OPERATIONS
Platen Adjustment
Your sander is equipped with an adjustable felt platen and
graphite slip for those extra sensitive sanding operations.
The platen position allows for three basic types of
sanding. These different positions can be adjusted by
rotating the height lever shown in Figure 22.
The three basic platen positions:
Platen Up: The platen is raised above the level of the
sanding rollers. This position allows the front roller to
remove large amounts of material quickly, but leaves a
rough finish. The best belt grit for this position is #100 or
coarser.
Platen Even: The platen is set even with the sanding
rollers. The rollers work together with the platen to
produce intermediate/final finishing. The best belt grit for
this position is #100-#150.
Platen Down: The platen is lowered below the sanding
rollers. The majority of the work is accomplished by the
platen pressure on the workpiece. The result is a smooth,
flat finish. The best belt grit for this position is #150.
Avoid lowering the platen more than 0.2 mm below the
sanding belt rollers, or you will prematurely wear the
platen.
Note: The platen scale is in millimeter increments.
-28-
Scale and
Pointer
Height
Lever
Lock
Lever
Figure 22. Platen controls.
W1756/W1757 43" Wide-Belt Sander
MAINTENANCE
General
Regular periodic maintenance on your machine will ensure
its optimum performance. Make a habit of inspecting your
machine each time you use it.
Check for the following conditions and repair or
replace when necessary:
•
•
•
•
•
•
•
Loose mounting bolts.
Damaged sanding belt.
Worn or damaged wires.
Water collection cups filled with water.
Dust trap.
Safety features.
Any other condition that could hamper the safe
operation of this machine.
OFF
Make sure that your machine is unplugged
during all maintenance procedures! If
this warning is ignored, serious personal
injury may occur.
Lubrication
Wipe off all sawdust and abrasives from grease fittings
and plugs before lubrication. When lubricating machine
parts, your goal is to achieve adequate lubrication to
prevent rust, and a thin layer of lubricant to prevent
metal-to-metal friction. Too much lubrication will attract
dirt and sawdust, causing machine parts to bind.
Grease
Fittings
Lubricate the following areas according to frequency of
use:
Figure 23. Right/left grease fitting
locations.
Grease
Figure 24. Conveyor grease fitting
locations.
-29-
MAINTENANCE
Weekly. Give one or two pumps of a multi-purpose
automotive grease to the grease fittings (Figure 23 & 24)
located on the feed belt roller axles and the sanding belt
roller axles. They are identified with yellow labels.
W1756/W1757 43" Wide-Belt Sander
•
Monthly. Pull the dust cover down and apply a
generous amount of multi-purpose automotive grease
to the table elevation screws (Figure 25). Be sure to
re-position the dust covers when finished.
Remove the left lower side panel to access the table
lifting mechanism. Apply multi-purpose automotive
grease to the chain and gears associated with the
table lifting mechanism (Figure 26). Be careful to
not get grease on the V-belts. This could cause them
to slip off of the pulleys. If you do, replace them.
•
Yearly. Replace the internal white moisture filters
on the air regulator.
•
After the First 100 Hours: Replace the conveyor
gear reducer oil (Figure 27) after the first 100
working hours of operation. We recommend 90 Wt.
gear oil.
•
Every 2500 Hours: After the first conveyor gear
reducer oil change, replace the oil after every 2500
working hours of operation. We recommend 90 Wt.
gear oil.
Cleaning Sanding Belts
Grease
Figure 25. Table elevation screw (shown
with dust cover).
Grease
Figure 26. Table lifting mechanism
lubrication location.
Filler Plug
MAINTENANCE
To increase the working life of your sanding belts, clean
them whenever they decrease in performance due to
heavy loading. Use a Model D3003 Pro-Stik® Cleaning Pad
as shown in Figure 28.
To clean the belts, simply set your table to the thickness
of the cleaning pad, and run the pad through the sander
two or three times. DO NOT take too deep of a cut—
the belt should barely touch the cleaning pad!
Sight
Glass
Figure 27. Gear reducer breather and
filler plug.
Cleaning Feed Belt
Vacuum or sweep dust off the feed belt with compressed
air. Use a diluted solution of mild dish cleaning soap and
water with a clean rag to remove resin from the belt. Do
NOT use solvent cleaners or harsh chemicals.
Figure 28. Pro-Stick® Cleaning Pad.
-30-
W1756/W1757 43" Wide-Belt Sander
Air System
The air system is durable and reliable; however,
components do wear with age. If you suspect that an item
in your air system may be having problems, see the Air
System Diagram on Page 48 for troubleshooting locations.
Verify or set the following:
•
Adjust regulator to 75 PSI.
•
Carefully inspect all air lines for cracks, pinches, or
hardening. Replace faulty hoses.
•
Check the air connections for leaks. A small amount
of soapy water in a questionable area will bubble if
there is a leak.
•
Make sure lines are not clogged. Remove a
questionable line and blow through it as a test.
If a component in the air system is
malfunctioning, bleed all air from the
system, and fix the problem before
you resume sanding.
Dust and Water Traps
Three collection traps on this wide-belt sander need to
be emptied when they become half full. One water trap
is attached to the bottom of the air regulator, and two
dust traps are attached on the air diaphragm assemblies.
DO NOT allow the water trap and dust bowls to become
full.
Water Trap: With the system under air pressure, push the
lower drain valve and empty the water trap (Figure 29).
Also, replace the internal white moisture filters yearly.
Dust Trap
Bowl
Dain
Valve
Figure 29. Diaphragm dust bowl and air
regulator water trap.
-31-
MAINTENANCE
Dust Traps: To empty the dust trap bowls, TURN OFF AIR
PRESSURE, allow air pressure to bleed out, then unscrew
and empty the bowls (Figure 29).
Water
Trap
W1756/W1757 43" Wide-Belt Sander
SERVICE
General
This section covers the most common service adjustments
or procedures that may need to be made during the life
of your machine.
If you require additional machine service not included
in this section, please contact Woodstock International
Technical Support at (360) 734-3482 or send e-mail to:
[email protected].
OFF
Table Calibration
Feed a test board through the sander and measure it in
many locations on both sides along the length to test the
accuracy of the digital thickness gauge.
SERVICE
To calibrate the digital thickness scale, do these steps:
1.
Using a properly set-up planer, plane a board to
uniform thickness.
2.
Adjust the sander table far enough to place the
planed board under the sander roller.
3.
Using the handwheel, manually raise the table until
the board just touches the sandpaper.
4.
Remove the board without changing the table
height. This ensures the table will be properly
adjusted for the first sanding pass.
5.
Run the board through the sander several times at
the initial height setting. Manually raise the table
0.020" and pass the board through the sander several
more times. Monitor the amperage meter and the
resulting load on the sander.
6.
Measure the thickness at various points around the
board using a precise micrometer or set of calipers.
7.
Continue sanding the board at that height until the
average thickness measurement is within +⁄- 0.003".
Note: These final passes should be done without
adjusting the table height. This ensures the most
consistent average thickness.
-32-
MAKE SURE that your machine is
unplugged during all service procedures! If this warning is ignored, serious personal injury may occur.
W1756/W1757 43" Wide-Belt Sander
8.
Observe the digital display read-out, it should
indicate the average thickness of the sanded wood.
— If it does, the sander is properly calibrated and
accurate to the nearest 0.005".
— If it does not, you must recalibrate the digital
thickness scale.
To recalibrate the digital thickness scale, do these
steps:
1.
Without moving the table height, enter the
numerical measurement of the average thickness
of the sanded wood into the digital key pad on the
control panel.
Note: The average thickness of the sanded wood
should now be flashing on the digital read-out.
2.
Press and hold the SET key until the display stops
flashing. The sander is now correctly calibrated.
Platen Service
To replace the platen felt and graphite pad, do these
steps:
DISCONNECT THE SANDER FROM THE POWER SOURCE
AND REMOVE AIR PRESSURE COMPLETELY!
2.
Open the left access door and remove the lock post
release lever and spacer block.
3.
Use the platen tool to remove the platen (see Figure
30).
4.
Replace the platen felt pad and graphite pad.
5.
Reinsert the platen until it stops.
6.
Reinstall the lock post release lever and spacer
block.
7.
Close the access door.
-33-
Figure 30. Removing platen.
SERVICE
1.
W1756/W1757 43" Wide-Belt Sander
Table Limit Switches
The table limit switches prevent the table lift motor
from driving the table into the sanding drum. Periodically
check and adjust (if required) the table stop switches to
protect the feed belt.
To adjust table limit switches, do these steps:
Stop Block
1.
Supply air to the sander and tension the sanding
belt.
2.
Push the down arrow key and lower the table until
you achieve six inches between the sanding drum
and the feed belt table surface.
3.
Loosen the mounting bolts for the table-down limit
switch and slide the switch so the switch plunger
depresses against the stop block and you hear the
switch click (see Figure 31).
4.
5.
Table Up
Limit Switch
Mounting
Bolt
Re-tighten the mounting bolts.
Push the up arrow key and raise the table until it is
⁄8" below the sanding drum.
1
Loosen the mounting bolts for the table-up limit
switch, and move the switch so the switch plunger
depresses against the stop block and you hear the
switch click (see Figure 31).
7.
Re-tighten the mounting bolts.
8.
With the sanding belt OFF, use the up and down
buttons to test the table operation and make sure
the switches shut the table lift motor OFF when
the table is at the minimum and maximum distance
from the sanding drum.
SERVICE
6.
-34-
Switch
Plungers
Table Down
Limit Switch
Mounting
Bolt
Figure 31. Table stop switch adjustment
locations (right rear).
W1756/W1757 43" Wide-Belt Sander
Brake Service
Eventually the brake pads will wear out. Checking and
replacing these is a simple project that can be done
in the shop, with the exception of having the rotor
resurfaced on a lathe. The brake pads are located
underneath the rotor in Figure 32, which is attached to
the motor arbor.
Rotor
Retaining
Nut
To check the brake pads, do these steps:
1.
DISCONNECT THE SANDER FROM THE POWER SOURCE
AND REMOVE AIR PRESSURE COMPLETELY!
2.
Remove the four screws that secure the access panel
on the right-hand side of the machine.
3.
The brake pads consist of a metal plate with a
composite pad. With a fine ruler, measure the
thickness of the composite pad only. If one of the
pads is below 1⁄8" (Figure 33) (approximately 3mm),
replace both.
Caliper Assemblies
Figure 32. Disc brake assembly (Model
W1757 shown).
Min
To replace the brake pads, do these steps:
Anchor
Pins
Brake
Pads
⁄8"
1
DISCONNECT THE SANDER FROM THE POWER SOURCE
AND REMOVE AIR PRESSURE COMPLETELY!
2.
Remove the nuts and washers from the two anchor
pins on each brake caliper (Figure 32).
3.
Remove the anchor pins, springs, and air line from
each caliper bracket. The calipers should now be
able to be removed.
4.
Disassemble each brake caliper and remove the
screws securing the brake pads.
5.
Remove the brake rotor and have it professionally
resurfaced at an automotive machine shop if it has
gouges in it. If visible cracks are present in the brake
rotor, replace it with a new one. Remove oil and
dirt from the rotor with automotive brake cleaner.
Once clean, only handle the rotor with a dry rag and
install exactly the reverse of removal.
6.
Install new brake pads, mount the caliper assembly
by reversing Steps 2-4, and reconnect the air line.
7.
Test the safety shutdown operation by running the
sander and pressing the emergency stop controls.
-35-
Figure 33. Example of brake caliper
removed for access to brake pads.
SERVICE
1.
W1756/W1757 43" Wide-Belt Sander
Oscillation Timing
When the oscillation is correctly adjusted, the sanding
belt oscillates to the left and to the right at the same
speed. If the sanding belt makes contact with a limit
switch, as shown in Figure 34, the emergency braking
system will activate and stop the sander immediately.
NOTICE
The oscillation adjustments have been
performed at the factory and should
require no further attention. However,
we recommend verifying the settings.
To check the sanding belt oscillation, do these steps:
1.
Be sure the sanding belt is properly installed and the
belt tension knob is ON.
2.
Turn ON the sanding belt.
Limit
Switches
— If the belt oscillates without contacting the limit
switches, but the oscillation time to the left and
right are NOT equal, proceed to Step 6, Page 37.
— If the belt tracks away from the air fork and air
jet, triggering the limit switch, continue with Step
3.
3.
An adequate stream of air through the air fork gap
(Figure 35) is essential for proper oscillation. If the
jet of air is weak through the gap, the belt will track
away from the controller and into the limit switch
on the opposite end of the roller. The pivot action of
the upper roller, and the resulting oscillation of the
belt, are dependent upon adequate airflow through
the air fork gap.
To set the correct amount of airflow through the air
fork gap, do these steps:
1.
DISCONNECT THE SANDER FROM THE POWER SOURCE!
2.
Remove the sanding belt, then turn the belt tension
knob to the tensioned position.
SERVICE
3.
Loosen the lock nut on the airflow adjustment knob
(Figure 36).
4.
Turn the airflow adjustment knob (Figure 36)
clockwise until the airflow is completely OFF. The
upper roller should pivot to the right.
5.
Slowly turn the airflow adjustment knob
counterclockwise, and continue turning up the air
pressure until the roller pivots to the left.
Note: The basic factory setting is established by
backing out the knob until it stops, then turning it
31⁄2 turns.
-36-
Sander Outline
(Top View)
Sanding Belt
Figure 34. Improper oscillation.
Oscillation Controller Gap
Air Jet
Air Fork
Figure 35. Air jet and air fork assembly.
Lock Nut
Figure 36. Airflow adjustment knob.
W1756/W1757 43" Wide-Belt Sander
6.
Tighten the lock nut (Figure 36) to secure the
airflow adjustment knob.
7.
Restrict the airflow across the air fork gap with a
scrap piece of wood. You should notice the roller
pivot to the right. When the wood scrap is removed,
the roller should pivot back to the left.
8.
Reinstall the sanding belt.
9.
Test the oscillation by running the sander. Make note
of the time it takes for the belt to oscillate from
left-to-right and from right-to-left.
When correctly timed, the oscillation should take a
similar amount of time to oscillate from side-to-side.
Adjustment Knobs
Figure 37. Oscillation adjustment knobs.
— If the oscillation time to the right is 2 seconds,
but the oscillation time to the left is longer,
loosen the oscillation adjustment knob (Figure 37)
and move it to the left (counterclockwise) until
proper tracking is achieved. Tighten down the
oscillation adjustment knob when satisfied.
— If the oscillation time to the left is 2 seconds, but
the oscillation time to the right is longer, loosen
the oscillation adjustment knob and move it to the
right (clockwise) until proper tracking is achieved.
Tighten the oscillation adjustment knob when
satisfied.
10. Continue to the next page to adjust the oscillation
speed.
Oscillation Speed
The oscillation speed of the sanding belt is adjustable.
Different oscillating speeds yield different sanding results.
We recommend trying various speeds on a scrap piece of
wood similar to the final workpiece.
Lock Nut
To adjust the oscillation speed, do these steps:
Loosen the lock nut on the speed control adjustment
knob (Figure 38).
2.
Turn the knob clockwise to decrease the oscillation
speed and counterclockwise to increase it. Note: To
re-establish the factory setting, back out the knob
until it stops, then turn it 31/2 turns.
3.
Tighten the lock nut loosened in Step 1 to secure
the knob.
-37-
Speed Control
Knob
Figure 38. Speed control adjustment
knob.
SERVICE
1.
W1756/W1757 43" Wide-Belt Sander
Table Parallelism
The corners of the table can be independently adjusted
up or down. By disconnecting the chain and turning the
pertinent table elevation screw sprocket (Figure 39),
table parallelism can be achieved.
Adjusting the table parallelism can be a very tedious task
that takes a great amount of patience. DO NOT adjust the
table unless you have trouble sanding your workpiece to a
uniform thickness.
NOTICE
The table has been adjusted at the
factory and should require no further
attention. However, we recommend
verifying that it is parallel with the
sanding roller.
If a table adjustment is needed, take precise notes on the
positioning of the table elevation screws. This will allow
the original setting to be re-established.
To adjust the table parallelism, do these steps:
1.
Pass a 43" wide board through the sander until the
entire surface of the board is making contact with
the sanding belt.
2.
Measure the thickness of the board at various points
around the edge.
3.
4.
If there is a variation of thickness, the table can be
adjusted accordingly.
DISCONNECT THE SANDER FROM THE POWER SOURCE!
— For minor adjustment, loosen the table mounting
bolts, shown in Figure 40, and rotate the
elevation screw flange.
— For major adjustment, mark the chain location
on all sprockets, remove the chain from the
sprocket to be adjusted, and turn the sprocket
counterclockwise to raise the table. One quarter
of a turn raises or lowers an elevation screw
approximately 0.020".
SERVICE
5.
Reinstall the chain onto the sprocket adjusted in
Step 4, tighten the bolts, and test the machine.
Elevation Screw
Sprockets
OFF
Figure 39. View of elevation screw
sprockets.
Table Mounting Bolts
Elevation
Screw
Flange
Figure 40. Table mounting bolts and
elevation screw flange.
NOTICE
When adjusting the left front elevation
screw, make the same adjustment to
the left rear elevation screw. This
ensures the height from the front to the
back of the table remains unchanged.
Do the same when adjusting the right
elevation screws.
-38-
W1756/W1757 43" Wide-Belt Sander
Pressure Rollers
To adjust the pressure rollers, do these steps:
1.
DISCONNECT THE SANDER FROM THE POWER SOURCE!
2.
Plane a 6' long 2x4 to a uniform thickness and cut
it in half. Place one board along the length of the
feed belt on the right-hand side and place the other
board on the left-hand side.
3.
With the sanding belt tensioned (Figure 41), move
the sanding rollers by hand and manually raise the
table until you hear the sandpaper just contact the
surface of the wood. DO NOT continue to raise the
table beyond that point.
4.
Connect the sander to the power source and make
note of the reading on the digital display. Then
manually lower the table 0.020" to 0.030". This is
how much lower the W1756 infeed pressure roller
and W1757 front sanding drum pressure rollers
should be set when compared to the sanding surface
of the sanding roller.
5.
DISCONNECT THE SANDER FROM THE POWER SOURCE!
6.
Model W1756: Loosen the roller lock nuts (Figure
42) on both ends of the infeed pressure roller.
Turn the adjustment bolts (Figure 42) to lower
the infeed pressure roller until it just touches the
board. Tighten the roller lock nuts and recheck your
setting.
NOTICE
The pressure rollers has been adjusted
at the factory and should require
no further attention. However, we
recommend verifying that they are
parallel with each other, the sanding
drum, and the feed belt table surface.
Belt Tension
Knobs
Figure 41. Belt tension knobs (W1757).
Adjustment
Bolt
Note: DO NOT continue to lower the roller beyond
that point.
Continued on next page
Roller Lock Nut
-39-
SERVICE
Figure 42. Infeed pressure roller
adjustment location (W1756).
W1756/W1757 43" Wide-Belt Sander
Model W1757: Loosen the roller lock nuts on the
front sanding drum infeed and outfeed pressure
rollers (Figure 43). Turn the adjustment bolts and
studs on both sides of the sander to lower the infeed
and outfeed pressure rollers until they just touch the
board.
Outfeed
Roller
Adjustment Adjustment
Bolt
Stud
Note: DO NOT continue to lower the roller beyond
that point.
7.
8.
9.
Roller Lock Nuts
Tighten the roller lock nuts and recheck your
settings.
Connect the sander to the power source and make
note of the reading on the digital display. Then
manually lower the table an additional 0.020" to
0.030". This is how much lower the Model W1756
outfeed pressure roller or Model W1757 rear sanding
drum outfeed pressure roller should be set when
compared to the height of the Model W1756 infeed
roller or Model W1757 front sanding drum pressure
rollers.
DISCONNECT THE SANDER FROM THE POWER SOURCE!
10. Loosen the roller lock nuts on the Model W1756
outfeed pressure roller (Figure 44) or Model W1757
rear sanding drum outfeed pressure roller (Figure
45). Turn the adjustment bolts to lower the pressure
roller until it just touches the board.
Note: DO NOT continue to lower the roller beyond
that point.
Infeed
Roller
Figure 43. Front sanding drum pressure
roller adjustment locations (W1757).
Adjustment
Bolt
Roller Lock Nut
Outfeed Roller
Figure 44. Outfeed pressure roller
adjustment locations (W1756).
SERVICE
11. Tighten the roller lock nuts and recheck your
settings.
Note: Variables such as feed rate, depth of the
cut, and the type of sanding belt can play a
big part in determining the proper amount of
downward pressure exerted by the rollers. Some
experimentation may be necessary to achieve the
desired results. However, under no circumstances
should the pressure rollers be set even, or higher
than, the sanding roller, because this can invite
kickback.
Adjustment
Bolt
Roller Lock Nut
Outfeed
Roller
Figure 45. Rear sanding drum outfeed
pressure roller adjustment locations
(W1757).
-40-
W1756/W1757 43" Wide-Belt Sander
V-Belt Tension
The sanding motor (Figure 46) and table elevation motor
(Figure 47) V-belts must be tensioned properly for best
performance. Always replace the sanding motor belts as
a matched set. Both table elevation and sanding motor
belts are adjusted the same way.
OFF
V-Belts
Note: The sanding motor belts must be tensioned
correctly. Loose belts will not allow the machine ot stop
immediately if the emergency push panel is pushed.
Lock Nut
The sanding motor uses a set of three matching belts.
The table elevation motor uses one belt.
To adjust either V-belt, do these steps:
1.
DISCONNECT THE SANDER FROM THE POWER SOURCE!
2.
Loosen the lock nut (Figures 46 & 47).
3.
Turn the adjustment nut up or down until the Vbelts deflect 3/4" off of center when pushed with
your finger, as shown in Figure 48.
4.
Retighten the lock nut.
Adjustment
Nut
Figure 46. Sanding motor V-belts.
OFF
Lock Nut
Adjustment
Nut
V-Belt
Figure 47. Table elevation V-belt.
������
����������
/4"
3
Figure 48. Belt deflection.
-41-
SERVICE
������
W1756/W1757 43" Wide-Belt Sander
Changing V-Belts
Check the V-belts periodically to check for signs of
glazing, cracking or fraying. If any of these conditions are
present, change both V-belts.
Safety
Cover
Mounting
Screws
Note: If the emergency stop system is used to stop the
machine as a normal daily event, the breaking system
and belts will prematurely wear and require replacement.
When shutting down the machine under non-emergency
conditions, use the red OFF push buttons.
To change the V-belts, do these steps:
1.
DISCONNECT THE SANDER FROM THE POWER SOURCE
AND REMOVE AIR PRESSURE COMPLETELY!
2.
Open both right-side upper and lower access panels.
3.
Remove the screws and the safety cover for access
to the upper pulley (Figure 49 and 50).
4.
Remove the upper caliper anchor pin retaining nut
and washer (Figure 51) on both brake calipers.
5.
Use locking pliers to clamp on the anchor pin end,
pull the pin from the caliper mount, and remove the
springs (Figure 51) from both brakes.
6.
Pivot the calipers down and away from the rotor for
belt clearance.
7.
Remove the upper belt adjustment nut and washer
(Figure 51).
8.
9.
Pry the motor base plate upward to de-tension the
belts, and roll the belts off of the motor pulley.
Install the new V-belts.
Figure 49. Safety cover and mounting
screws.
Figure 50. Upper pulley exposed.
Rotor
Caliper
Assemblies
Retaining
Nut
SERVICE
10. Replace the upper belt adjustment nut and washer,
and tension the belt as necessary.
11. The V-belt is properly tensioned when it will move
no more than 3/4" in the center with moderate
pressure from your thumb. See V-Belt Tension on
Page 41 for details.
12. Reassemble in reverse order and test the emergency
brake operation.
Belt Adjustment
Nut
Anchor
Pins
Figure 51. Belt removal access.
-42-
W1756/W1757 43" Wide-Belt Sander
Feed Belt Replacement
To remove the feed belt, use Figure 53 on Page 44 and
match the number with the steps below:
1.
Raise the table up so the conveyor belt is
approximately two-inches away from the sanding
roller or platen, and then DISCONNECT THE SANDER
FROM THE POWER SOURCE!
2.
Remove the gearbox mounting bracket, and with an
assistant's help, slide the motor and gearbox from
the roller shaft and lower it to the floor.
Note: Do not loosen the two vibration dampener
washers shown in Figure 53.
Timing Mark
Figure 52. Marking lead screw for
reassembly.
13. With a helper, install the table from
the rear in a similar fashion as it was
removed.
3.
Remove two table height limit switches.
4.
Remove both lower access panels.
5.
Remove the left and right table guides.
14. Install the table guides and the left
and right lower access panels.
6.
Using a permanent marker, mark all four lead screw
flange positions (Figure 52), and remove all hex
bolts from the flanges.
15. Align the lead screw flanges with the
marks made in Step 6, and install the
hex bolts.
7.
Insert two 2x4x8' wooden studs under the table to
support the table, and then (with help) lift the table
slightly and move it out of the rear of the machine.
16. Install and adjust the table height
limit switches (refer to Page 34).
8.
Disconnect the limit switch, remove all mounting
screws, and remove the emergency stop push-panel
assembly.
9.
Turn both tracking adjustment bolts counterclockwise five turns, remove one roller support, and
slide the drum out of the table assembly.
10. Remove the old feed belt, inspect rollers, bearings,
and table for wear and replace as required.
11. Install the new feed belt.
12. Install the front roller, the roller support, and turn
both tracking adjustment bolts clockwise equally so
the conveyor belt becomes taught and does not hang
loose. DO NOT OVERTIGHTEN the belt.
-43-
18. Install the emergency stop push panel
assembly and the limit switch.
19. Start the conveyor motor and turn the
conveyor tracking bolts as required
until the conveyor belt tracks straight
without loading up on one side of the
table.
SERVICE
Note: The belt is non-directional.
17. With a helper, install the gearbox,
vibration dampener washers, and
mounting bracket.
W1756/W1757 43" Wide-Belt Sander
�
������������
����������������
�����������
����������
����������
������
������
�����
�
�
�
�
�
�
�
�
���������
�����������
�����
SERVICE
��
Figure 53. Conveyor belt removal sequence.
-44-
W1756/W1757 43" Wide-Belt Sander
Feed Belt Tension
To adjust the feed belt tension, do these steps:
1.
DISCONNECT THE SANDER FROM THE POWER SOURCE!
2.
Do not remove the safety guard!
3.
Find the adjustment ports in the safety guard
(Figure 54) at the front end of the feed table.
4.
Using a 20mm wrench, turn both left and right
adjustment bolts (Figure 54) clockwise equally to
increase tension.
5.
NOTICE
The feed belt tension has been adjusted
at the factory and should require no
further attention. However, adjust the
feed belt tension if you notice that
your feed belt is slipping or is tracking
off center.
Safety Guard
When tensioned properly, you should not be able
to slide the feed belt back and forth on the table
surface.
Sanding Belt Replacement
To replace the sanding belts, do these steps:
1.
Follow Steps 1–3 on Page 19.
2.
Making sure the rotation arrows on the sanding belt
point the same direction as those shown in Figure
11, remove the sanding belt and install the new
sanding belt by starting first on the upper roller,
and then the lower roller.
Note: The sanding belt must be centered between
the limit switches and the edge of the sanding belt
must be between tongs of the oscillation controller
as shown in Figure 12 on Page 19. Damage to the
sanding belt could occur if the sander is turned ON
before the sanding belt is correctly positioned.
Left
Adjustment
Bolt
Right
Adjustment
Bolt
Feed Belt
Figure 54. Feed belt tension adjustment
bolts. Note: Safety guard removed only
for clarity.
DO NOT sand boards with the guard
removed. Failure to follow this warning
could result in serious personal injury.
NOTICE
3.
Follow Steps 6–7 on Page 19.
-45-
SERVICE
The directional arrow on the back of the sanding
belt must be pointing in a counterclockwise direction
during installation. Failure to install the sanding belt
correctly could result in damage to the sanding belt
or the sander itself.
W1756/W1757 43" Wide-Belt Sander
Feed Belt Tracking
To adjust the feed belt tracking, do these steps:
NOTICE
1.
Turn the feed belt ON.
2.
If the feed belt is tracking to the right side of the
table, turn the right adjustment bolt (Figure 54)
clockwise.
3.
If the feed belt is tracking to the left side of the
table, turn the left adjustment bolt clockwise.
Adjust the feed belt tension before
adjusting the feed belt tracking.
Note: The edge of the feed belt should just touch
the guide wheels, as shown in Figure 55.
4.
Run the feed belt for 3-5 minutes and recheck the
tracking.
Sanding Belt Tracking
Limit Switches
Sanding belt tracking safety switches are placed on both
sides of the belt to act as emergency machine stops if
the belt travels too far to one side during oscillation (see
Figure 56).
Guide Wheel
Figure 55. Guide wheel (one shown).
Adjustment
Bolt
SERVICE
To adjust the belt tracking safety switches, do these
steps:
1.
DISCONNECT THE SANDER FROM THE POWER
SOURCE!
2.
Make sure the sanding belt tracking and oscillation is
adjusted (See Page 36).
3.
Release the belt tension, center the sanding belt on
the top roller, then re-tension the belt.
4.
Measure the distance from the edge of the sanding
belt to the ceramic rod protruding from the switch.
5.
Loosen the adjustment bolt shown in Figure 56, and
move the switch so the belt and the ceramic rod have
approximately 1⁄2" clearance from each other.
6.
Tighten the bolt and repeat the adjustment with the
other side if necessary.
7.
Start the sander and make sure it is working
properly.
-46-
Figure 56. Tracking safety switch
adjustment bolt.
W1756/W1757 43" Wide-Belt Sander
Sanding Belt Tension
Safety Switch
The belt tension safety switch shuts the sanding motor
OFF if the belt breaks or has no tension when the lock
flange pushes the belt tension safety switch lever (see
Figures 57 & 58).
To adjust the belt tension safety switch, do these
steps:
1.
DISCONNECT THE SANDER FROM THE POWER SOURCE!
2.
Apply normal system air pressure of 75 PSI, and
tension the belt.
3.
Loosen the mounting screw and position the switch
so the lever is in the center of the lock flange hole.
4.
Re-tighten the screw and test the switch operation.
Belt Tension Safety Switches
Figure 57. Belt tension safety switch
location (W1757).
Mounting
Screw
Lock
Flange
Switch
Lever
Figure 58. Belt Tension safety switch
(W1756).
SERVICE
-47-
W1756/W1757 43" Wide-Belt Sander
Air System Diagram
A.
B.
C.
D.
E.
F.
J.
K.
L.
M.
N.
O.
P.
Q.
R.
Oscillation Speed Control Piston
Belt Tension Control Piston
Belt Tension Control Switch
Emergency Stop Button Switch
Emergency Stop Push Brake Switch
Left Belt Limit Switch
Right Belt Limit Switch
Belt Tension Limit Switch
Emergency Brake Contactor
Upper Right Door Access
Upper Left Door Access
Shop Compressor
Air Pressure Regulator
Emergency Brake Solenoid
Emergency Brake
Air Distribution Manifold
Airflow Adjustment Knob
(Oscillation Timing)
G. Speed Control Adjustment Knob
(Oscillation Speed)
H. Oscillation Controller Air Fork
I. Oscillation Timing Piston and Diaphragm Assembly
J
K
I
��������
L
Q
���������������
P
O
H
G
F
Lower Right
Access Panel
Power Box
E
C
R
D
B
SERVICE
A
Front
N
M
Note: Both Model W1757 sanding heads operate on separate, but identical air systems.
air system diagram
-48-
-49-
�
�
�
�
�
�
�
�
�
�
�
�
�
�
�
�
�
�
�
�
�
�
��
��
��
��
��������
��������
��������
���������
���������
��
��
��
��
�������
��������
���������
��������
������
�������
������������
���������������
���������������
�
�
�������
������
���������
�����
SERVICE
�
�������
��
��
�
�����������
�
��
��
��
�
��
����������
��
��
�
��
�����������
��
��
��
��
�
�����������
�������������
��
��
��
��
��
��������������
�������������
�������������
��������
���������
�����������
���������
�����������
�������
��������
���������
�������������
�����
���� ���������
�����
�������
������
�����
�������
��������
�����
� �
� �
�
����
�����
���������������������
����
�����
� �
� �
�
������������������������
����������
������������
�� �� �� �� �� ��
�
�
�
�
�
�� �� �
����������
�
�
�
�
�� �� �
���
�
� � �
��
� � � � �
��������������
�
�
��
��
�� �� �� �� �� �� �� ��
�� �� �� �� �� �� �� �� �� �� ��
�
W1756/W1757 43" Wide-Belt Sander
General Control Panel Wiring
�
�� �� �� �� ��
�
�
��
��
��������
�����
���������
�
�
��
��
�� �� �� �� ��
�
-50-
�
��
��
�
�
��
��
���
��
��� ���
��
��
�����
��������
�������� �����
�
��
�
�
�
���������
�
�
�� �� �� �� ��
�
�
��
��
��������
�����
�
��
�
�
�
��
��
�� �� �� �� ��
�
���������������
��������������
��
�
�
�
SERVICE
��
�
�
��
��
��
�
���
�
���
��
��
�
�
��
��
�� �� �� �� �� ��
��
��
�� ��
��������
�����
��
�� ��
��
��
�
�
��
��
�� �� �� �� ��
���������
�
�
�� �� �� ��
� ��
�
��
��
���
� �
��
�
���
��
��
� ��
�
��
��
��
�� �� ��
���
� ��
� ��
�����
��������
���������
���
��
�� �� �� ��
���������
��������� �
��
��
�
�
�
�
��
��
�������������������������
�
�
���������
��
���
��
���
��
��
��
��
��
�
�
��
���
��
� ��
���������
���
��
���
�� �� �� ��
��
��
� ��
�
�
�
��
���
��
�
���
�� �� �� ��
���������
���������
�
�� �� �� ��
��
���
� ��
�
�
��
��
� ��
�
�
�� ����
�
�
�
�
�����
�����
������
�
�
�
�
��
�
��
��
� �
�
��
��
��
��
�
�
�
��
�
�������������
�
�� ���� ����
�
�����������
�
�
����������������������������������������
������������������������ See Page 14.
��
�������������
��
�� �� �� ��
� ��
�
� �� �� �� �� �� �� �� ��
��
��
���
�� �� �� ��
� �� �� �
�
� ��
�� �� �� ��
� ��
��
�������������
��
��
�
��
��
�
�
��
�
� �� �
�
�
��
��
������
�
� �� �
�
W1756/W1757 43" Wide-Belt Sander
Wiring Box Electrical Diagram 220V
W1756/W1757 43" Wide-Belt Sander
Wiring Box Components 220V
Sanding Motor
Contactors
Feed Belt
(Conveyor) Motor
Contactor
Emergency Brake
Contactor
Sanding Motor
Overload Relay
Transformer
Sanding Motor
Start Delay
UP/DOWN Table Motor
Contactors
-51-
Amp Meter
Current Sensor
220V ThreePhase Power
Supply
Junction Block
SERVICE
Feed Belt
(Conveyor) Motor
Overload Relay
4 Amp Fuses
W1756/W1757 43" Wide-Belt Sander
General Electric Diagram (W1756) 220V
�
�
�
�
�������������
���
��
� �
� �
� �
�
� �
� �
���
� �
� �
� �
�� ���
� �
� �
�� �
� �
� �
� �
����
�������
�
�
�� ��
���
��
��
����
����
����
�
�
��
��
��
��
��
��
�
������������������
��
�
��
�
��
���
���
���
���
�
�
�������������
������������
�������
�������
�
������������
�����
�
���
��������
����������
�
�
�����
��
� ���������
SERVICE
�����
�
��
�
�����
��������������������
������������
�
�
��������������
���������
�����
��������
��
����
�
�
��
���� �
��
��
��
��
�
��
�
��
����� ��
��
�����
���� ��
��
��
-52-
�
�
�������������
����������
�
��
��
���
��
���
�������������
������������
W1756/W1757 43" Wide-Belt Sander
General Electric Diagram (W1757) 220V
�
�
�
�
�������������
���
��
� �
� �
� �
�
� �
� �
���
� �
� �
� �
�� ���
� �
� �
�� �
� �
� �
� �
����
�������
�
�
�� ��
���
��
��
����
����
����
�
�
��
��
��
��
��
��
�
������������������
��
�
�
�
�
�
���� �
��������������������
������������
�
�
��������������
��
��
��
��
�
��
�
��
����� ��
��
�����
���� ��
��
��
��
-53-
� ��
�������
�������
���������
�����
SERVICE
��������
��
��
�������������
������������
�
������������
�����
��
���
���
���
���
���
���
���
����
�
�
���
��������
����������
�
�
�����
��
� ���������
��
�����
�
��
�
�����
�
�������������
����������
�
��
��
���
��
���
�������������
������������
W1756/W1757 43" Wide-Belt Sander
Motor and Transformer Connection
W1756/W1757 220V Three-Phase Motor/Transformer Connection
†
† Power Supply Phase Converter Installation May Be Required—Consult Your Electrician.
������������������
������������������
���������������������
���������������������
���������������
���������������
��
��
��
��
��
��
��
��
��
��
��
��
��
��
��
��
��
��
��
��
��
��
��
��
��
��
��
��
��
��
��
��
��
��
��
��
��
��
��
��
��
��
�
�
�
��
��
��
��
��
��
�
��
�
��
�
��
��
��
��
��
��
��
��
��
��
��
��
��
��
��
��
��
��
��
����
����
�
�
��
��
��
����
����
�����������
�����������
�
��
����
�
��
����
�
�
�
�
�
�
�
�
�
��
���� ����
��
���� ����
�
�
�
����
� � � �����
� �� � � � �
� � � � � �� � � � �
W1756/W1757 440V Three-Phase Motor/Transformer Connection
††
†† Thermal Overload Relay Replacement Required—Consult Your Electrician.
������������������
������������������
���������������������
���������������������
���������������
���������������
��
��
��
��
��
��
��
��
��
��
��
��
��
��
��
��
��
��
��
��
��
��
��
��
��
��
��
��
��
��
��
��
��
��
��
��
��
��
��
��
��
��
��
��
��
��
��
��
��
��
��
��
��
��
��
��
��
��
��
��
�
�
�
��
�
��
�
��
�
��
�� ����
��
��
��
��
�
�
��
����
��
��
����
����
�����������
�����������
�
��
����
�
��
����
�
�
�
�
�
�
�
�
��
���� ����
��
���� ����
�
�
�
�
����
� � � � ����
� �� � � � �
� � � � � �� � � � �
SERVICE
Rewiring W1756 and W1757 for 440V:
1.
DISCONNECT POWER, remove the LR3D-356 overload
relay, and replace it with an LR3D-216 type (Model
W1756/W1757 Part #X1756037-1), and the dial set to
16A.
2.
Remove the LR3D-126 overload relay, and replace it
with an LR3D-086 type (Model W1756/W1757, Part #
X1756037-2), and set the dial set to 3A.
-54-
LR3D-356
(Replace)
LR3D-126
(Replace)
W1756/W1757 43" Wide-Belt Sander
Troubleshooting
This section covers the most common problems and corrections with this type of
machine. WARNING! DO NOT make any adjustments until power is disconnected and
moving parts have come to a complete stop!
OFF
Motor & Electrical
Motor & Electrical
PROBLEM
POSSIBLE CAUSE
CORRECTIVE ACTION
Motor will not start.
1. Limit switch or emergency stop is at 1.
fault.
2.
2. Low voltage.
3. Open circuit in motor or loose 3.
connections.
4. No air pressure to sander.
4.
Motor will not start; fuses or
circuit breakers blow.
1. Short circuit in line cord or plug.
Motor overheats.
1. Motor overloaded.
2. Air circulation through the motor
restricted.
2. Short circuit in motor or loose
connections.
3. Incorrect fuses or circuit breakers in
power line.
Motor stalls (resulting in blown 1. Short circuit in motor or loose
fuses or tripped circuit)
connections.
2. Low voltage.
3. Incorrect fuses or circuit breakers in
power line.
4. Motor overloaded.
Correct situation that caused limit switch to engage, reset
the emergency stop button.
Check power line for proper voltage.
Inspect all lead connections on motor for loose or open
connections.
Connect sander to compressed air system (Page 18).
1. Inspect cord or plug for damaged insulation and shorted
wires.
2. Inspect all connections on motor for loose or shorted
terminals or worn insulation.
3. Install correct fuses or circuit breakers.
1. Reduce load on motor (see Page 25).
2. Clean out motor to provide normal air circulation.
1. Inspect connections on motor for loose or shorted terminals
or worn insulation.
2 Correct the low voltage conditions.
3. Install correct fuses or circuit breakers.
4. Reduce load on motor (see Page 25).
Machine Operations
PROBLEM
Machine
operating.
slows
POSSIBLE CAUSE
when
CORRECTIVE ACTION
1. Feed workpiece slower (see Pages 24).
2. Reduce depth of cut (see Page 28).
1. Feed rate too high.
2. Depth of cut too great.
Loud, repetitious noise coming 1. Pulley set screws or keys are missing or
loose.
from machine.
2. Motor fan is hitting the cover.
3. V-belt is defective.
1. Inspect keys and set screws. Replace or tighten if
necessary.
2. Tighten fan or shim cover.
3. Replace V-belt (see Page 42).
Machine is loud, overheats or
bogs down in the cut.
1. Excessive depth of cut.
2. Dull or dirty sanding belt.
1. Decrease depth of cut (see Page 28).
2. Replace or clean sanding belt (see Pages 30 & 45).
Rounded workpiece edges.
1. Excessive depth of cut.
1. Reduce depth of cut (see Page 28).
Uneven thickness from left to 1. Feed table not parallel to sanding 1. Adjust the table (see Page 38).
roller.
right of board.
2. Feed belt is worn.
2. Replace feed belt (see Page 43).
Workpiece slips on feed belt.
Straight strip of notches on 1. Pressure rollers are dirty or damaged.
workpiece.
Snake shaped
workpiece.
marks
on
1. Clean or repair pressure rollers.
1. Clean or replace sanding belt (see Pages 30 & 45).
1. Sanding belt damaged or dirty.
-55-
SERVICE
1. Lower pressure rollers (see Page 39).
2. Clean feed belt (see Page 30).
3. Replace feed belt (see Page 43).
1. Pressure rollers set too high.
2. Dirty feed belt.
3. Feed belt is worn.
W1756/W1757 43" Wide-Belt Sander
Machine Operations (continued)
PROBLEM
Lines
across
workpiece.
width
POSSIBLE CAUSE
of
CORRECTIVE ACTION
1. Sanding belt seam is open or damaged.
1. Replace sanding belt (see Page 45).
2. Raise rear pressure roller. (See warning in Pressure Roller
section, Page 20!)
Glossy spots or streaks on 1. Worn sanding belt.
workpiece.
2. Rear pressure roller too low.
Sanding belt clogs quickly.
1. Repair or replace sanding belt (see Page 45).
1. Sanding belt grit too small for particu- 1. Replace with a coarser grit sanding belt.
2. Reduce depth of cut (see Page 28).
lar job.
2. Excessive depth of cut.
3. Allow wood to dry out.
3. Wood is too moist.
Sanding belt does not tension 1. Low air pressure.
correctly; rollers slip under
belt.
2. Air leaks in system.
1. Adjust air pressure to 75 PSI at primary regulator (see Page
31).
2. Inspect all hoses and connections for leaking air; use water
on suspected area to detect bubbles.
Sanding belt runs off to one 1. Air eye fork clogged.
side, stopping the sander.
2. Oscillation return valve closed.
3. Oscillation timing incorrect.
1. Clean the intake hole on the air eye fork.
2. Open valve.
3. Adjust oscillation timing (see Page 36).
Sanding belt will not start.
4. No air pressure to sander.
1. Tension sanding belt (see Page 19).
2. Center sanding belt so it is not touching the limit switches
(see Page 46).
3. Make sure emergency stop plate is released (see Page
26).
4. Connect sander to compressed air system (Page 18)
1. Worn sanding belt.
2. Sanding belt loaded with sawdust.
1. Replace sanding belt with a new one (see Page 45).
2. Clean sanding belt to unload sawdust (see Page 30).
1. Sanding belt is not tensioned.
2. Limit switches engaged.
3. Emergency stop plate engaged.
Poor, non-aggressive sanding
results.
Feed belt not tracking in cen- 1. Feed belt moved out of adjustment.
ter.
1. Adjust feed adjustment bolts (see Page 46).
Feed belt slipping.
1. Feed rollers have incorrect tension.
1. Adjust feed rollers to place more tension on the workpiece
2. Feed rollers contaminated with dirt or
(see Page 45).
2. Clean feed rollers.
dust.
Emergency brake stops slow.
1.
2.
3.
4.
Grinding noise when braking.
1. Brakes severely worn out.
Air pressure incorrect.
Air leak in system.
Brake rotor contaminated with oil.
Brake pads worn out.
Adjust air pressure to 75 PSI (see Page 31).
Find and fix air leaks.
Clean brake rotor with automotive brake parts cleaner.
Replace brake pads (see Page 35).
1. Replace brake pads (Page 35), have rotor turned (possibly
replaced).
For your safety, turn the
power switch off and disconnect the sander from the
power source and the air
supply before starting the
applicable troubleshooting.
SERVICE
OFF
1.
2.
3.
4.
-56-
W1756/W1757 43" Wide-Belt Sander
PARTS
Electrical & Controls
�
��
�
��
��
��
��
��
��
��
�
�
��
��
��
��
��
�
��
��
��
�� ��
��
�����������
��
��
��
��
�����������
�
�
��
����
��
�������
��
��
� �
����
PARTS
-57-
W1756/W1757 43" Wide-Belt Sander
Electrical & Controls Parts List
REF PART�#
DESCRIPTION
REF PART�#
DESCRIPTION
1
2
3
4
5
6
7
8
9
10
11
12
13
14
15
16
17
ELECTRICAL�CONTROL�BOX
HINGE
DOOR
BASE�PLATE
HEX�NUT�1/4-20
LOCK�WASHER�1/4
CONTROL�PANEL
PHLP�HD�SCR�M4-.7�X�8
CURRENT�SENSOR
TRANSFORMER
MAGNETIC�CONTACTOR�LC1-D386
OVERLOAD�RELAY�LR3D-356�(30-38A)�220V�32A
FUSE�TE10.3�X�38�&�500V�/�4A�X�2
OVERLOAD�RELAY�LR3D-126�(5.5-8A)�220V�6A
MAG�CONTACTOR�LC1-096�(W/LOCK)
MAGNETIC�CONTACTOR�LC1-D326
POWER�WIRE�TERMINAL
18
19
20
21
22
23
24
25
26
27
28
29
32
33
34
35
36
PHLP�HD�SCR�M4-.7�X�30
TERMINAL�PLATE
FLAT�WASHER�1/4
LOCK�WASHER�1/4
HEX�BOLT�1/4-20�X�1/2
PU�CONNECTOR�1/2"
PU�CONNECTOR�3/4"
CABLE�CONNECTOR�1"
DIGITAL�AMP�METER
START�DELAY�TIMER�LSD
START�SWITCH
STOP�SWITCH
POWER�INDICATION�LIGHT
EMERGENCY�STOP�SWITCH
WIRE�COLUMN
COMPUTER
WIRE�COLUMN
X1756001
X1756002
X1756003
X1756004
XPN05
XPLW02�
X1756007
XPS07M
X1756009
X1756010
X1756011
X1756012
X1756013
X1756014
X1756015
X1756016
X1756017
XPS51M
X1756019
XPW06
XPLW02�
XPB19
X1756023
X1756024
X1756025
X1756026
X1756027
X1756028
X1756029
X1756032
X1756033
X1756034
X1756035
X1756036
W1756/W1757 440 Conversion Kit
PARTS
37 X1756037
220V-440V�CONVERSION�KIT
37-1 X1756037-1 RELAY�LR3D-216�(12-18A)�#8112�440V�25HP
37-2 X1756037-2 RELAY�LR3D-086�(2.5-4A)�#8114�440V�1HP
-58-
W1756/W1757 43" Wide-Belt Sander
Tools & Cabinet
���
���
���
���
���
�
���
�
���
���
���
���
���
���
���
���
���
���
���
���
���
��� ���
���
��������
���
���
��������
���
���
���
���
���
���
���
���
PARTS
���
���
���
-59-
W1756/W1757 43" Wide-Belt Sander
Tools & Cabinet Parts List
PART�#
DESCRIPTION
REF
PART�#
DESCRIPTION
X1756100
X1756101
X1756102
X1756103
X1756104
X1756105
X1756106
X1756107
X1756108
X1756109
XPWR810
XPWR1214
XPWR1719
X1756113
X1756114
X1757114
X1756115
XPS14M
X1756117
PLATEN�REMOVAL�TOOL
CERAMIC�LIMIT�SWITCH�TUBE
TOOL�BOX
FELT�PLATEN�PAD�25"
GRAPHITE�PAD�25"�X�3.54"
DOOR�KEY
SANDPAPER:�#100�(43"�X�60")
SANDPAPER:�#180�(43"�X�60")
PHILLIPS�SCREWDRIVER�#2�
STANDARD�SCREWDRIVER�#2�
WRENCH�8�X�10
WRENCH�12�X�14
WRENCH�17�X�19
HEX�WRENCH�SET
UPPER�FRAME�COVER�(W1756)
UPPER�FRAME�COVER�(W1757)
DUST�PORT�4"
PHLP�HD�SCR�M6-1�X�12
LEFT�ACCESS�PANEL�(W1756)
117
118
118
119
120
121
122
123
123
124
124
125
126
126
127
128
129
130
131
X1757117
X1756118
X1757118
X1756119
XPB07
XPW07
XPLW01
X1756123
X1757123
X1756124
X1757124
XPFH03
X1756126
X1757126
XPW06
XPLW02
XPS14M
XPB83M
X1756131
LEFT�ACCESS�PANEL�(W1757)
RIGHT�ACCESS�PANEL�(W1756)
RIGHT�ACCESS�PANEL�(W1757)
DOOR�LOCK
HEX�BOLT�5/16-18�X�3/4
FLAT�WASHER�5/16
LOCK�WASHER�5/16
RIGHT�DOOR,�LOWER�FRAME�(W1756)
RIGHT�DOOR,�LOWER�FRAME�(W1757)
LEFT�DOOR,�LOWER�FRAME�(W1756)
LEFT�DOOR,�LOWER�FRAME�(W1757)
FLAT�HD�SCR�1/4-20�X�1/2
FRONT�PROTECTION�PLATE�(W1756)
FRONT�PROTECTION�PLATE�(W1757)
FLAT�WASHER�1/4
LOCK�WASHER�1/4
PHLP�HD�SCR�M6-1�X�12
HEX�BOLT�M6-1�X�16
STANDOFF�BRACKET
PARTS
REF
100
101
102
103
104
105
106
107
108
109
110
111
112
113
114
114
115
116
117
-60-
W1756/W1757 43" Wide-Belt Sander
Sanding Motor & Frame (W1756)
��� ���
���
���
���
���
���
���
���
���
���
�����
���
�����
�����
�����
������
�����
������
�����
�����
�����
��� ������
������
���
������
���
���
���
������
���
���
���
���
���
���
���
���
���
���
���
���
�����
���
�����
���
���
���
���
PARTS
-61-
���
W1756/W1757 43" Wide-Belt Sander
Sanding Motor & Frame (W1757)
���
���
���
���
���
���
���
���
���
�����
���
���
���
���
���
���
���
���
���
���
���
���
���
���
���
���
���
���
���
���
���
���
���
���
�����
�����
��� ������
������
���
���
���
������
���
������
�����
�����
����� �����
������
�����
������
���
���
���
���
��� ���
���
�����
�����
PARTS
���
-62-
���
W1756/W1757 43" Wide-Belt Sander
Sanding Motor & Frame Parts List
REF
PART�#
DESCRIPTION
REF
PART�#
DESCRIPTION
200
200
201
201
202
202
203
204
204
205
206
207
208
208-1
208-2
209
210
211
212
212
213
214
215
216
217
218
218
219
220
221
222
223
224
225
226
X1756200
X1757200
X1756201
X1757201
X1756202
X1757202
XPN06
X1756204
X1757204
XPLW07
XPB41
XPW01
X1756208
X1756208-1
X1756208-2
X1756209
XPSB11
XPLW01
X1756212
X1757212
XPB03
XPLW01
X1756215
XPVB76
X1756217
XPVB68
XPVA50
XPFH30M
X1756220
XPW02
XPLW04
XPB21
X1756224
XPSB05
X1756226
MACHINE�FRAME�(W1756)
MACHINE�FRAME�(W1757)
MOTOR�BASE�(W1756)
MOTOR�BASE�(W1757)
MOTOR�BASE�HINGE�(W1756)
MOTOR�BASE�HINGE�(W1757)
HEX�NUT�1/2-12
MOTOR�BASE�ADJ.�ROD�(W1756)
MOTOR�BASE�ADJ.�ROD�(W1757)
LOCK�WASHER�1/2
HEX�BOLT�1/2-12�X�1-1/2
FLAT�WASHER�1/2
MOTOR�25HP�220V/440V�3PH
MOTOR�FAN
MOTOR�FAN�COVER
PULLEY
CAP�SCREW�5/16-18�X�1-1/4
LOCK�WASHER�5/16
KEY�14�X�9�X�105�(W1756)
KEY�14�X�10�X�105�(W1757)
HEX�BOLT�5/16-18�X�1
LOCK�WASHER�5/16
ROTOR
V-BELT�B-76�5L760�(W1757)
PULLEY�BUSHING
V-BELT�B-68�5L680�(W1756)
V-BELT�A-50�4L500�(W1757)
FLAT�HD�SCR�M5-.8�X�8�(W1756)
BRAKE�BRACKET
FLAT�WASHER�3/8
LOCK�WASHER�3/8
HEX�BOLT�3/8-16�X�3/4
THREADED�HUB�5/8�X�11
CAP�SCREW�1/4-20�X�3/4
LIMIT�SWITCH�ME8111
227
228
229
230
231
232
233
234
235
236
237
238
239
240
241
242
243
244
245
246
247
247-1
247-2
247-4
247-5
247-6
247-7
247-8
247-9
247-10
247-11
247-12
247-13
247-14
247-15
X1756227
XPB02
XPLW02
XPW06
X1756231
XPFH30M
XPB19
XPLW02
X1757235
XPLW10
XPN17
XPW13
XPB84
XPN08
X1757241
XP6305
X1757243
XP6206
XPR11M
XPVA40
X1756247
X1756247-1
X1756247-2
X1756247-4
X1756247-5
X1756247-6
X1756247-7
X1756247-8
XPFH04
X1756247-10
XPSB31
XPLW04
XPN08
XPSB04
X1756247-15
LIMIT�SWITCH�PLATE
HEX�BOLT�1/4-20�X�5/8
LOCK�WASHER�1/4�(W1756)
FLAT�WASHER�1/4
BACK�COVER�(W1756)
FLAT�HD�SCR�M5-.8�X�8�(W1757)
HEX�BOLT�1/4-20�X�1/2�(W1756)
LOCK�WASHER�1/4�(W1757)
IDLE�WHEEL�ADJ�BRAKET�(W1757)
LOCK�WASHER�3/4�(W1757)
HEX�NUT�3/4-10�(W1757)
FLAT�WASHER�3/4�(W1757)
HEX�BOLT�3/8-16�X�3-1/2�(W1757)
HEX�NUT�3/8-16�(W1757)
IDLE�WHEEL�SHAFT�(W1757)
BALL�BEARING�6305ZZ�(W1757)
PULLEY�(W1757)
BALL�BEARING�6206ZZ�(W1757)
EXT�RETAINING�RING�25MM�(W1757)
V-BELT�A-40�4L400�(W1757)
BRAKE�ASSEMBLY
BRAKE�BRACKET
BRAKE�BRACKET�FRONT�GUARD
BRAKE�LINING�SET
BRAKE�LINING�SET
BRAKE�ARBOR
BRAKE�COMPRESSION�SPRING
BRAKE�INSIDE�PIECE
FLAT�HD�SCR�1/4-20�X�5/8
BRAKE�PIN
CAP�SCREW�10-24�X�5/8
LOCK�WASHER�3/8
HEX�NUT�3/8-16
CAP�SCREW�1/4-20�X�1/2
BRAKE�GASKET
PARTS
-63-
W1756/W1757 43" Wide-Belt Sander
Table Lift
���
���
���
���
���
���
�����
���
����� ����� ���
���
�����
���
�����
�����
���
���
�����
������
�����
�����
�����
�����
�����
�����
�����
�����
���
�����
�����
���
���
���
�����
�����
���
���
���
���
���
���
���
���
����� ������
PARTS
���
���
���
�����
���
���
���
���
���
���
���
���
�����
���
�����
�����
���
-64-
���
���
���
������ ���
�����
�����
�����
�����
���
���
�����
�����
������
������
W1756/W1757 43" Wide-Belt Sander
Table Lift Parts List
REF
PART�#
DESCRIPTION
REF
PART�#
DESCRIPTION
300
301
302
303
304
306
307
308
309
310
311
311
312
312-1
312-2
312-3
312-4
312-5
313
313-1
313-2
313-3
313-4
313-5
313-6
313-7
313-8
313-9
313-10
313-11
313-12
313-13
313-13
315
316
316
317
317
X1756300
XPB03
XPW07
XPLW01
XPLW04
XPB18
X1756307
X1756308
XPB07
XPLW01
X1756311
X1757311
X1756312
X1756312-1
X1756312-2
X1756312-3
XPR12M
X1756312-5
X1756313
X1756313-1
X1756313-2
XP6005
X1756313-4
XPSB05
X1756313-6
XP6002ZZ
X1756313-8
XPSB31
X1756313-10
XPSB01
X1756313-12
XPSS07
XPSS08
X1756315
XPVA34
XPVA36
X1756317
X1757317
ELEVATION�SCREW
HEX�BOLT�5/16-18�X�1
FLAT�WASHER�5/16
LOCK�WASHER�5/16
LOCK�WASHER�3/8
HEX�BOLT�3/8-16�X�1
ELEVATION�SLIDE
DUST�BOOT
HEX�BOLT�5/16-18�X�3/4
LOCK�WASHER�5/16
CHAIN�3/8"�(W1756)
CHAIN�1/2"�(W1757)
NUT�HOUSING�ASSEMBLY
NUT�HOUSING
NUT
THRUST�BEARING�51107
EXT�RETAINING�RING�35MM
SPROCKET�WHEEL
ELEVATION�GEAR�BOX�ASSEMBLY
ELEVATION�GEAR�BOX
WORM�GEAR
BALL�BEARING�6005ZZ
BEARING�CAP
CAP�SCREW�1/4-20�X�3/4
WORM�SHAFT
BALL�BEARING�6002ZZ
BEARING�CAP
CAP�SCREW�10-24�X�5/8
BEARING�CAP
CAP�SCREW�1/4-20�X�5/8
SPROCKET�WHEEL
SET�SCREW�1/4-20�X�1/2�(W1756)
SET�SCREW�5/16-18�X�1/2�(W1757)
PULLEY
V-BELT�A-34�4L340�(W1756)
V-BELT�A-36�4L360�(W1757)
PULLEY�(W1756)
PULLEY�(W1757)
318
319
320
321
322
323
324
325
325-1
326
327
328
329
330
330-1
330-2
331
332
333
335
335
336
337
338
339
340
341
342
342-1
342-2
342-3
342-4
342-5
342-6
342-7
342-8
342-9
342-10
XPSS07
XPLW01
XPB07
XPSS07
X1756322
X1756323
XPB31
XPLW02
XPW06
X1756326
XPW01
XPN06
XPLW07
X1756330
X1756330-1
X1756330-2
XPN05
XPB89
X1756333
X1756335
XPB19
X1756336
X1756337
XPN07M
XPK14
XPK48M
XPK37M
X1756342
X1756342-1
X1756342-2
XP6003
X1756342-4
X1756342-5
XPW02
XPN08
XPN02
XPLW01
XPB07
SET�SCREW�1/4-20�X�1/2
LOCK�WASHER�5/16
HEX�BOLT�5/16-18�X�3/4
SET�SCREW�1/4-20�X�1/2
HANDWHEEL
MOTOR�BASE
HEX�BOLT�1/4-20�X�1
LOCK�WASHER�1/4
FLAT�WASHER�1/4
MOTOR�BASE�ADJUSTMENT�ROD
FLAT�WASHER�1/2
HEX�NUT�1/2-12
LOCK�WASHER�1/2
MOTOR�1/4HP�220V/440V�3PH
FAN�COVER
FAN
HEX�NUT�1/4-20
HEX�BOLT�1/2-12�X�4-1/2
PROXIMITY�SWITCH�PLATE
SPECIAL�SCREW�1/4-20�X�3/4�(W1756)
HEX�BOLT�1/4-20�X�1/2�(W1757)
PROXIMITY�SWITCH
SPECIAL�SCREW�M3-.5�X�30
HEX�NUT�M3-.5
KEY�5/16�X�5/16�X�3/4
KEY�4�X�4�X�20
KEY�4�X�4�X�16
SPROCKET�WHEEL�SET
SPROCKET�WHEEL�ADJUSTOR
SPROCKET�WHEEL�SHAFT
BALL�BEARING�6003ZZ
ADJUSTMENT�SPROCKET
ADJUSTMENT�ROD
FLAT�WASHER�3/8
HEX�NUT�3/8-16
HEX�NUT�5/16-18
LOCK�WASHER�5/16
HEX�BOLT�5/16-18�X�3/4
PARTS
-65-
W1756/W1757 43" Wide-Belt Sander
Feed & Conveyor
���
���
���
���
���
���
���
���
��� ���
���
���
�����
��� ���
���
���
�����
���
���
���
��� ���
���
���
���
���
���
���
���
���
���
���
���
���
���
���
���
���
���
���
���
��� ���
���
���
���
���
���
���
��� ���
PARTS
���
-66-
���
���
���
W1756/W1757 43" Wide-Belt Sander
Feed & Conveyor Parts List
REF
PART�#
DESCRIPTION
REF
PART�#
DESCRIPTION
400
401
402
403
404
405
406
407
408
409
410
411
412
413
414
415
415
416
417
417
418
419
420
421
421-1
421-2
X1756400
X1756401
X1756402
X1756403
XPW02
XPB32M
X1756406
X1756407
X1756408
X1756409
X1756410
XPUCF205
XPLW04
XPB24
X1756414
X1756415
X1757415
XPB16
X1756417
X1757417
XPK151M
XPB07M
XPLW04M
X1756421
X1756421-1
X1756421-2
CONVEYOR�TABLE
CONVEYOR�BELT
GEARBOX�REDUCER�FIXED�PLATE
CUSHION
FLAT�WASHER�3/8
HEX�BOLT�M10-1.5�X�25
OUTFEED�ROLLER
BEARING�UCF206
GEARBOX�REDUCER
BREATHER�PLUG
PLUG
BALL�BEARING�UCF205
LOCK�WASHER�3/8
HEX�BOLT�3/8-16�X�1-1/4
BEARING�CAP
DRIVE�PULLEY�2HP�(W1756)
DRIVE�PULLEY�1HP�(W1757)
HEX�BOLT�3/8-16�X�1-1/2
DRIVING�PULLEY�2HP�(W1756)
DRIVING�PULLEY�1HP�(W1757)
KEY�8�X�8�X�55
HEX�BOLT�M8-1.25�X�25
LOCK�WASHER�8MM
MOTOR�2HP�220V�/�440V�3PH
MOTOR�FAN�COVER
MOTOR�FAN
422
423
424
425
426
427
427
428
429
430
431
432
433
434
435
436
437
438
439
440
441
442
443
444
445
446
XPLW06M
X1756423
XPSB64M
X1756425
X1756426
XPSS21M
XPB09M
X1756428
XPSB16
X1756430
X1756431
XPSB70
XPLW01
XPN02
X1756435
XPS04
X1756437
X1756438
XPLW06M
XPB95
X1756441
X1756442
XP6206
XPR15M
X1756445
XPSB62
LOCK�WASHER�10MM
TIMING�BELT�1422V-290
CAP�SCREW�M10-1.5�X�25
BASE�PLATE
VARIABLE�SPEED�UNIT�COVER
SET�SCREW�M8-1.25�X�25�(W1756)
HEX�BOLT�M8-1.25�X�20�(W1757)
INFEED�ROLLER�BRACKET
CAP�SCREW�3/8-16�X�3/4
INFEED�ROLLER�BRACKET
CONVEYOR�BELT�POSITION�WHEEL
CAP�SCREW�5/16-18�X�2
LOCK�WASHER�5/16
HEX�NUT�5/16-18
EMGNCY�BRAKE�PUSH-PLATE
PHLP�HD�SCR�1/4-20�X�1/2
LIMIT�SWITCH
PHLP�HD�SCR�10-24�X�1-1/2
LOCK�WASHER�10MM
HEX�BOLT�1/2-12�X�3
INFEED�ROLLER�SHAFT
INFEED�ROLLER
BALL�BEARING�6206ZZ
EXT�RETAINING�RING�30MM
ELEVATION�SWITCH
CAP�SCREW�1/4-20�X�1-1/2
PARTS
-67-
W1756/W1757 43" Wide-Belt Sander
Upper Roller
���
���
���
���
���
���
���
���
���
���
���
���
���
���
���
���
���
���
���
���
���
���
�����
���
���
���
���
���
�����
���
�����
�����
���
�����
�����
���
�����
��� ���
�����
���
���
�����
���
���
���
���
���
���
���
���
���
���
���
���
���
���
���
���
���
���
���
��� ���
���
���
���
���
���
���
�����
���
�����
���
���
���
����� ���
���
���
���
���
���
���
���
���
���
���
���
���
���
���
���
���
���
���
���
���
���
���
���
PARTS
���
���
���
���
���
���
���
-68-
����������
���
W1756/W1757 43" Wide-Belt Sander
Upper Roller Parts List
REF
PART�#
DESCRIPTION
REF
PART�#
DESCRIPTION
500
500
501
502
503
503
504
505
505
506
507
508
509
510
511
512
513
514
515
516
517
517
518
519
519-1
520
520-1
521
522
523
524
525
526
527
528
529
529-1
530
531
532
533
534
535
X1756500
X1757500
X1756501
X1756502
X1756503
X1757503
X1757504
X1756505
X1757505
X1757506
XPFH03
XPLW04
XPB18
XPLW07
XPSB76
XPB53
XPS04
XPSB07
XPSB03
XPB03
X1756517
X1757517
X1756518
X1756519
X1756519-1
X1756520
X1756520-1
X1756521
X1756522
X1756523
X1756524
X1756525
X1756526
X1756527
X1756528
X1756529
X1756529-1
X1756530
XPS52M
XPS02M
X1756533
XPN11
XPW07
SQUARE�FRAME�(W1756)
SQUARE�FRAME-�REAR�(W1757)
SQUARE�FRAME-�FRONT�(W1757)
SUPPORTING�FRAME�(W1756)
SQUARE�FRAME�SEAL�(R)�(W1756)
SQUARE�FRAME�SEAL�(R)�(W1757)
SQUARE�FRAME�SEAL�(FR�R)�(W1757)
SQUARE�FRAME�SEAL�(L)�(W1756)
SQUARE�FRAME�SEAL�(L)�(W1757)
SQUARE�FRAME�SEAL�(FR�L)�(W1757)
FLAT�HD�SCR�1/4-20�X�1/2
LOCK�WASHER�3/8
HEX�BOLT�3/8-16�X�1
LOCK�WASHER�1/2
CAP�SCREW�1/2-12�X�1-1/2�(W1756)
HEX�BOLT�1/2-12�X�1�(W1757)
PHLP�HD�SCR�1/4-20�X�1/2
CAP�SCREW�5/16-18�X�3/4
CAP�SCREW�5/16-18�X�1�(W1756)
HEX�BOLT�5/16-18�X�1�(W1757)
AIR�CYLINDER�(W1756)
AIR�CYLINDER�(W1757)
LIMIT�SWITCH�HOLDER�(L�TYPE)
LIMIT�SWITCH�WITH�CERAMIC�TIP
CERAMIC�TIP
LIMIT�SWITCH�W/PLASTIC�TIP
PLASTIC�TIP
LIMIT�SWITCH�HOLDER
AIR�SENSOR�NOZZLE�(FEMALE)
AIR�FORK
AIR�SENSOR�NOZZLE�(MALE)
THROTTLE�VALVE
THROTTLE�VALVE�BASE
PLATE
HOUSING�ASSEMBLY
OIL�CUP
OIL�CUP�GASKET
ALUMINUM�PLATE
PHLP�HD�SCR�M4-.7�X�20
PHLP�HD�SCR�M4-.7�X�12
SHUTDOWN�BRACKET
HEX�NUT�3/8-24
FLAT�WASHER�5/16
536
537
539
540
541
542
543
543
544
544
547
548
549
550
551
552
553
554
555
556
557
558
559
560
561
562
563
564
565
566
567
567-1
567-2
567-3
567-4
567-5
567-6
567-7
567-8
567-9
567-9
568
569
XPLW01
XPB09
XPSB33
XPN07
X1756541
X1756542
XPB53
X1757543
XPSB76
X1757544
XPSB76
XPLW07
XPB53
X1756550
X1756551
X1756552
X1756553
XPSS02M
XPSB16
XPLW04
X1756557
XPSW03-1
X1756559
XPSB99
XPW01
X1756562
X1756563
XPR05M
X1756565
XPN06
X1756567
X1756567-1
X1756567-2
X1756567-3
X1756567-4
XPFH02M
X1756567-6
X1756567-7
XPN07
XPSB33
XPS08
X1756568
X1756569
LOCK�WASHER�5/16
HEX�BOLT�5/16-18�X�1/2
CAP�SCREW�10-24�X�3/4
HEX�NUT�10-24
OIL�CAP�CONNECTOR
SHAFT�OF�OIL�CAP
HEX�BOLT�1/2-12�X�1�(W1756)
BRACKET�(W1757)
CAP�SCREW�1/2-12�X�1-1/2�(W1756)
BRACKET�(W1757)
CAP�SCREW�1/2-12�X�1-1/2�(W1757)
LOCK�WASHER�1/2�(W1757)
HEX�BOLT�1/2-12�X�1�(W1757)
UPPER�ROLLER�BRACKET
UPPER�ROLLER
UPPER�ROLLER�BRACKET
BEARING�UCC205
SET�SCREW�M6-1�X�6
CAP�SCREW�3/8-16�X�3/4
LOCK�WASHER�3/8
GREASE�FITTING�W/DUST�CAP
KNOB
ECCENTRIC�ROD
CAP�SCREW�1/2-12�X�3-1/4
FLAT�WASHER�1/2
ECCENTRIC
CLEVIS�ASSEMBLY
EXT�RETAINING�RING�15MM
HEX�NUT�M10-1.5(LH)
HEX�NUT�1/2-12
AIR�CYLINDER�DIAPHRAGM�ASSY
SHAFT�OF�AIR�CYLINDER
BOTTOM�COVER
COMPRESSION�SPRING
ALUMINUM�PLATE
FLAT�HD�SCR�M6-1�X�12
PLATE
TOP�COVER
HEX�NUT�10-24
CAP�SCREW�10-24�X�3/4�(W1756)
PHLP�HD�SCR�10-24�X�3/4�(W1757)
AIR�CYLINDER�BASE
ECCENTRIC�SHAFT�FRAME
PARTS
-69-
W1756/W1757 43" Wide-Belt Sander
Belt Oscillation (W1756)
���
���
���
���
���
���
���
���
���
���
���
���
���
���
���
���
���
���
���
���
���
���
���
���
���
���
���
���
���
���
���
���
���
���
���
���
�����
���
PARTS
��
-70-
W1756/W1757 43" Wide-Belt Sander
Belt Oscillation (W1757)
���
���
���
���
���
���
���
���
���
���
���
���
���
���
���
���
���
���
���
���
���
���
���
���
���
���
���
���
���
���
���
���
���
���
���
���
���
���
�����
���
��� ���
���
���
���
���
���
���
���
���
���
���
���
���
���
���
���
���
���
���
���
���
���
���
���
���
�����
��
PARTS
-71-
W1756/W1757 43" Wide-Belt Sander
Belt Oscillation Parts List
REF PART�#
DESCRIPTION
REF PART�#
DESCRIPTION
600
600-1
602
603
604
605
605
606
607
608
609
610
611
612
613
613
614
614
615
615
616
617
618
619
PRESSURE�REGULATOR
FILTER�CUP
BRONZE�CONNECTOR�5/16N�X�1/4T
FLEXIBLE�HOSE�8X900MM
AIR�SWITCH�1/4"
ELBOW�1/4T�X�1/4N�90˚�(W1756)
ELBOW�1/4T�X�1/4N�90˚�(W1757)
PHLP�HD�SCR�10-24�X�5/8
ELBOW�5/16N�X�1/8T�90_
SOLENOID�VALVE
T-FITTING�5/16N�X�5/16N�X�1/8T
CONNECTOR�1/4N�X�1/4T
MANIFOLD�1/4N
CONNECTOR�5/16N�X�1/4T
ELBOW�1/4N�X�1/8T�90˚�(W1756)
ELBOW�1/4T�X�1/4T�X�90˚�(W1757)
CONNECTOR�5/16N�X�1/8T�90˚�(W1756)
CONNECTOR�1/4N�X�1/8T�90˚�(W1757)
CONNECTOR�5/16N�X�1/8T�90˚�(W1756)
CONNECTOR�1/4N�X�1/8T�90˚�(W1757)
THROTTLE�VALVE�1/8"
CONNECTOR�1/4N�X�1/8T�(W1756)
CONNECTOR�1/4N�X1/4N�-28U�90˚
CONNECTOR�1/4N�X�3/8T
620
621
622
623
624
625
626
627
627
628
628-1
629
629
630
630
631
631
632
632
633
634
635
636
636
CONNECTOR�1/4N�X�1/8T
AIR�SWITCH�1/8"
CONNECTOR�1/4N�X�1/8T
CONNECTOR�1/4N�X�1/8T�90˚
BUFFER�1/8"
BUFFER�(PLASTIC)�1/8"�(W1757)
CONNECTOR�5/16N�X�1/8T�90˚
FLEXIBLE�HOSE�8�X�700MM�(W1756)
FLEXIBLE�HOSE�8�X�900MM�(W1757)
FLEXIBLE�HOSE�8�X�1400MM
FLEXIBLE�HOSE�6�X�1400MM�(W1757)
FLEXIBLE�HOSE�6�X�1600/1800MM�(W1756)
FLEXIBLE�HOSE�6�X�1100/1420MM�(W1757)
FLEXIBLE�HOSE�6�X�750/950MM�(W1756)
FLEXIBLE�HOSE�6�X�500/620MM�(W1757)
FLEXIBLE�HOSE�6�X�600MM�(W1756)
FLEXIBLE�HOSE�6�X�560MM�(W1757)
FLEXIBLE�HOSE�6�X�250MM�(W1756)
FLEXIBLE�HOSE�6�X�650MM�(W1757)
FLEXIBLE�HOSE�6�X�650MM
FLEXIBLE�HOSE�6�X�300MM
FLEXIBLE�HOSE�6�X�650MM
FLEXIBLE�HOSE�6�X�1500/1700MM�(W1756)
FLEXIBLE�HOSE�6�X�860/1350MM�(W1757)
PARTS
X1756600
X1756600-1
X1756602
X1756603
X1756604
X1756605
X1757605
X1756606
X1756607
X1756608
X1756609
X1756610
X1756611
X1756612
X1756613
X1757613
X1756614
X1757614
X1756615
X1757615
X1756616
X1756617
X1756618
X1756619
-72-
X1756620
X1756621
X1756622
X1756623
X1756624
X1757625
X1756626
X1756627
X1757627
X1756628
X1757628-1
X1756629
X1757629
X1756630
X1757630
X1756631
X1757631
X1756632
X1757632
X1756633
X1756634
X1756635
X1756636
X1757636
W1756/W1757 43" Wide-Belt Sander
Sanding Drum & Pressure Roller (W1756)
���
�����
�����
�����
���
���
���
���
���
���
���
�����
���
���
����� �����
���
�����
���
���
���
�����
��� ���
���
���
���
���
���
���
�����
���
�����
���
���
���
���
���
���
���
���
���
���
���
���
���
���
���
���
���
���
���
���
���
���
���
���
���
���
���
���
���
���
���
���
���
���
���
���
���
���
���
���
���
���
���
���
-73-
PARTS
��� ���
���
W1756/W1757 43" Wide-Belt Sander
Sanding Drum & Pressure Roller (W1757)
�����
�����
���
���
���
���
���
���
�����
�����
�����
���
��� ���
���
�����
���
���
���
���
�����
���
���
���
���
���
�����
���
���
�����
���
���
���
���
���
���
���
���
���
���
���
���
���
���
��� ��� ���
���
���
���
���
���
���
���
���
���
���
���
���
���
���
���
���
��� ���
���
��� ���
��� ���
���
���
�����
�����
���
���
���
�����
���
���
���
���
���
���
���
���
���
���
���
���
���
���
���
���
���
���
���
���
���
���
���
���
���
���
���
���
���
���
���
PARTS
���
���
-74-
���
W1756/W1757 43" Wide-Belt Sander
Sanding Drum & Pressure Roller Parts List
REF
PART�#
DESCRIPTION
REF
PART�#
DESCRIPTION
700
700
701
701
702
702
703
704
705
706
707
708
709
710
711
712
712
713
714
715
716
716
717
717
718
719
721
722
723
723
724
725
726
726
727
728
729
730
731
732
733
734
735
736
737
738
739
740
741
X1756700
X1757700
X1756701
X1757701
X1756702
X1757702
X1756703
X1756704
XPSB11
XPK136M
XPLW01
XP62052RS
XPLW07
XPB41
XPSB04
X1756712
X1757712
X1756713
X1756714
X1756715
X1756716
X1757716
XPS02
X1757717
XPLW02
X1756719
X1756721
X1756722
XPSS02M
X1757723
X1756724
X1756725
X1756726
X1757726
X1756727
X1756728
X1756729
X1756730
X1756731
XPS01
X1756733
X1756734
X1756735
X1756736
XPSS03
XPK143M
X1756739
X1756740
X1756741
BEARING�HOUSING�(W1756)
BEARING�HOUSING�(W1757)
RUBBER�ROLLER�(W1756)
RUBBER�ROLLER�(W1757)
FASTENING�TUBE�(W1756)
FASTENING�TUBE�(W1757)
BEARING�UCC206
PULLEY
CAP�SCREW�5/16-18�X�1-1/4
KEY�8�X�8�X�30
LOCK�WASHER�5/16
BALL�BEARING�6205-2RS
LOCK�WASHER�1/2
HEX�BOLT�1/2-12�X�1-1/2
CAP�SCREW�1/4-20�X�1/2
BEARING�CAP�(W1756)
BEARING�CAP�(W1757)
GREASE�FITTING�W/CAP
GREASE�FITTING�W/CAP
PLUG
PULLEY�COVER�(W1756)
PULLEY�COVER�(W1757)
PHLP�HD�SCR�1/4-20�X�3/4�(W1756)
PHLP�HD�SCR�1/4-20�X�3/8�(W1757)
LOCK�WASHER�1/4
SPANNER�NUT
BEARING�HOUSING
STEEL�ROLLER
SET�SCREW�M6-1�X�6�(W1756)
SPCL�SET�SCREW�M6-.5�X�6�(W1757)
BEARING�UCC205
HANDLE
LOCK�POST�RELEASE�LEVER�(W1756)
LOCK�POST�RELEASE�LEVER�(W1757)
BEARING�BRACKET�PAD
44"�GRAPHITE�BRACKET�MALE
44"�GRAPHITE�BRACKET�FEMALE
44"�FELT�PLATEN�PAD
GRAPHITE�PAD�44"�X�3.54"
PHLP�HD�SCR�10-24�X�1/2
44"�GRAPHITE�PRESSURE�PLATE
GRAPHITE�BRACKET�BASE
GRAPHITE�BRACKET�SHAFT
LOCK�COLLAR
SET�SCREW�1/4-20�X�3/8
KEY�6�X�6�X�25
COMPRESSION�SPRING
HOUSING
GRAPHITE�BRACKET�SHAFT
742
743
744
745
745-1
745-2
745-3
746
747
748
749
750
751
753
754
755
756
757
758
759
760
761
761
762
762
763
764
765
765
766
767
768
769
770
771
771
771-1
771-1
771-2
771-2
771-3
771-4
771-4
771-5
771-5
771-6
772
773
774
XPSB16
XPW02
XPW02
X1756745
X1756745-1
XPSS08
X1756745-3
XPB03
XPW07
X1756748
X1757749
X1757750
X1757751
X1757753
XPSB11
X1757755
X1757756
XP6206
X1757758
X1757759
X1757760
X1756761
X1757761
X1756762
X1757762
X1756763
X1756764
XPSB04
XPSS07
XPB11
XPN08
XPB12
XPLW01
XPN02
X1756771
X1757771
X1756771-1
X1757771-1
X1756771-2
X1757771-2
XP6003
X1756771-4
X1757771-4
XPSS03
XPSS07
XPN05
X1757772
X1757773
XPRP55M
CAP�SCREW�3/8-16�X�3/4
FLAT�WASHER�3/8
FLAT�WASHER�3/8
GRAPHITE�BRACKET�ADJ�ASSY
HANDLE
SET�SCREW�5/16-18�X�1/2
ADJUSTMENT�RING
HEX�BOLT�5/16-18�X�1
FLAT�WASHER�5/16
HANDLE
BEARING�HOUSING�(W1757)
RUBBER�ROLLER�(W1757)
FASTENING�TUBE�(W1757)
PULLEY�(W1757)
CAP�SCREW�5/16-18�X�1-1/4�(W1757)
BEARING�HOUSING�(W1757)
BEARING�BRACKET�PAD�(W1757)
BALL�BEARING�6206ZZ�(W1757)
SPANNER�CAP�(W1757)
BEARING�CAP�(W1757)
PULLEY�COVER�(W1757)
PISTON�SLIDERAIL�(W1756)
PISTON�SLIDERAIL�(W1757)
PISTON�BRACKET�(W1756)
PISTON�BRACKET�(W1757)
COMPRESSION�SPRING
ALIGNMENT�PIN�10�X�35
CAP�SCREW�1/4-20�X�1/2�(W1756)
SET�SCREW�1/4-20�X�1/2�(W1757)
HEX�BOLT�5/16-18�X�1-1/2
HEX�NUT�3/8-16�(W1757)
HEX�BOLT�5/16-18�X�1-1/4
LOCK�WASHER�5/16
HEX�NUT�5/16-18
PISTON�ROLLER�ASSEMBLY�(W1756)
PISTON�ROLLER�ASSEMBLY�(W1757)
PISTON�ROLLER�SHAFT�(W1756)
PISTON�ROLLER�SHAFT�(W1757)
PISTON�ROLLER�(W1756)
PISTON�ROLLER�(W1757)
BALL�BEARING�6003ZZ
SHAFT�BEARING�COLLAR�(W1756)
SHAFT�BEARING�COLLAR�(W1757)
SET�SCREW�1/4-20�X�3/8�(W1756)
SET�SCREW�1/4-20�X�1/2�(W1757)
HEX�NUT�1/4-20�(W1757)
GUIDE�STUD�(W1757)
PISTON�BRACKET(MIDDLE,�W1757)
ROLL�PIN�3�X�27�(W1757)
PARTS
-75-
W1756/W1757 43" Wide-Belt Sander
Label Placement
Safety labels warn about machine hazards and how to prevent machine damage or injury. The
owner of this machine MUST maintain the original location and readability of all labels on this
machine. If any label is removed or becomes unreadable, REPLACE that label before allowing the
machine to enter service again. Contact Woodstock International, Inc. at (360) 734-3482 or www.
shopfoxtools.com to order new labels.
800
815
816
817
801
802
803
818
814
804
802
805
804
814
805
813
812
806
811
819
807
814
808
820
809
810
PART�#
DESCRIPTION
REF
PART�#
DESCRIPTION
X1756800
X1757800
X1756801
X1756802
X1756803
X1756804
XLABEL-11
X1756806
X1756807
XPPAINT-1
X1756809
X1756810
MACHINE�ID�LABEL�(W1756)
MACHINE�ID�LABEL�(W1757)
SHOP�FOX�LOG�PLATE
SANDER�KICKBACK�LABEL
DUST�MASK�LABEL
HAND�PINCH�LABEL
SAFETY�GLASSES�LABEL
BRAKE�LABEL
EMERGENCY�STOP�STRIPE�LABEL
SHOP�FOX�WHITE�TOUCH�UP�PAINT
DECORATIVE�STRIPING
MODEL�W1756�LABEL
810
811
812
813
814
815
816
817
818
819
820
X1757810
X1756811
X1756812
XLABEL-12
X1756814
X1756815
X1756816
X1756817
X1756818
XLABEL-04
X1756820
MODEL�W1757�LABEL
ROTATION�LABEL
NOTICE�LABEL
READ�MANUAL�LABEL
DISCONNECT�POWER�LABEL
CONVERSION�CHART�LABEL
AMP�LOAD�METER�LABEL
CONTROL�PANEL�LABEL
DANGER�STRIP�LABEL
ELECTRICITY�LABEL
SPEED�LABEL
PARTS
REF
800
800
801
802
803
804
805
806
807
808
809
810
-76-
W1756/W1757 43" Wide-Belt Sander
Warranty Registration
Name ___________________________________________________________________________________
Street __________________________________________________________________________________
City _________________________ State ___________________________Zip ________________________
Phone # ______________________ Email __________________________Invoice # ___________________
Model #_________Serial #______________Dealer Name__________________Purchase Date___________
CUT ALONG DOTTED LINE
The following information is given on a voluntary basis. It will be used for marketing purposes to help us
develop better products and services. Of course, all information is strictly confidential.
1.
How did you learn about us?
_____ Advertisement
_____ Mail Order Catalog
2.
How long have you been a woodworker/metalworker?
_____ 0-2 Years
_____ 2-8 Years
____ 8-20 Years
_____ 20+ Years
3.
How many of your machines or tools are Shop Fox?
_____ 0-2
_____ 3-5
____ 6-9
_____ 10+
4.
Do you think your machine represents a good value?
_____ Yes
____ No
5.
Would you recommend Shop Fox products to a friend?
_____ Yes
____ No
6.
What is your age group?
_____ 20-29
_____ 50-59
7.
What is your annual household income?
_____ $20,000-$29,000
____ $30,000-$39,000
_____ $50,000-$59,000
____ $60,000-$69,000
8.
Which of the following magazines do you subscribe to?
____
____
____
____
____
____
____
____
____
____
9.
Cabinet Maker
Family Handyman
Hand Loader
Handy
Home Shop Machinist
Journal of Light Cont.
Live Steam
Model Airplane News
Modeltec
Old House Journal
____ Friend
____ Website
____ Local Store
____ Other:
____ 30-39
____ 60-69
____
____
____
____
____
____
____
____
____
____
Popular Mechanics
Popular Science
Popular Woodworking
Practical Homeowner
Precision Shooter
Projects in Metal
RC Modeler
Rifle
Shop Notes
Shotgun News
____ 40-49
____ 70+
____ $40,000-$49,000
____ $70,000+
____
____
____
____
____
____
____
____
____
Today’s Homeowner
Wood
Wooden Boat
Woodshop News
Woodsmith
Woodwork
Woodworker West
Woodworker’s Journal
Other:
Comments:__________________________________________________________________
_____________________________________________________________________________
_____________________________________________________________________________
_____________________________________________________________________________
_____________________________________________________________________________
FOLD ALONG DOTTED LINE
Place
Stamp
Here
WOODSTOCK INTERNATIONAL INC.
P.O. BOX 2309
BELLINGHAM, WA 98227-2309
FOLD ALONG DOTTED LINE
TAPE ALONG EDGES--PLEASE DO NOT STAPLE
Warranty
Woodstock International, Inc. warrants all Shop Fox machinery to be free of defects from workmanship and materials for a period of two years from the date of original purchase by the original owner.
This warranty does not apply to defects due directly or indirectly to misuse, abuse, negligence or accidents, lack of maintenance, or reimbursement of third party expenses incurred.
Woodstock International, Inc. will repair or replace, at its expense and at its option, the Shop Fox
machine or machine part which in normal use has proven to be defective, provided that the original
owner returns the product prepaid to a Shop Fox factory service center with proof of their purchase
of the product within two years, and provides Woodstock International, Inc. reasonable opportunity to
verify the alleged defect through inspection. If it is determined there is no defect, or that the defect
resulted from causes not within the scope of Woodstock International Inc.'s warranty, then the original
owner must bear the cost of storing and returning the product.
This is Woodstock International, Inc.'s sole written warranty and any and all warranties that may be
implied by law, including any merchantability or fitness, for any particular purpose, are hereby limited to the duration of this written warranty. We do not warrant that Shop Fox machinery complies
with the provisions of any law or acts. In no event shall Woodstock International, Inc.'s liability under
this warranty exceed the purchase price paid for the product, and any legal actions brought against
Woodstock International, Inc. shall be tried in the State of Washington, County of Whatcom. We shall
in no event be liable for death, injuries to persons or property or for incidental, contingent, special or
consequential damages arising from the use of our products.
Every effort has been made to ensure that all Shop Fox machinery meets high quality and durability
standards. We reserve the right to change specifications at any time because of our commitment to
continuously improve the quality of our products.