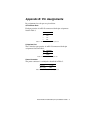
1
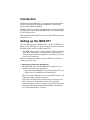
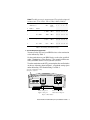
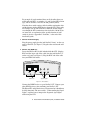
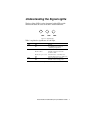
ISDN Network
Termination (NT1)
Installation Guide
Fourth Edition (March 2001)
203-077-04
Eicon is either a registered trademarks or trademark of Eicon Networks Corporation.
Changes are periodically made to the information herein; these changes will be
incorporated into new editions of the publication. Eicon Networks may make
improvements and/or changes in the products and/or programs described in this
publication at any time.
A Product Comment Form is provided at the back of this publication. If the form has
been removed, address your comments to:
Eicon Networks Corporation
Attn: Technical Publications
9800 Cavendish Blvd.
Montreal, Quebec, Canada
H4M 2V9.
Eicon Networks may use or distribute whatever information you supply in any way
it believes appropriate without incurring any obligations to you.
Eicon Networks Corporation is a business unit of i-data international a-s.
Copyright © 1998-2001 Eicon Networks Corporation. All rights reserved, including
those to reproduce this publication or parts thereof in any form without permission
in writing from Eicon Networks Corporation.
Table of Contents
Introduction ............................................................................ 4
Setting up the ISDN NT1 ....................................................... 4
Understanding the Signal Lights ............................................ 7
Appendix A: Illustrated Scenarios ......................................... 8
Appendix B: Pin Assignments ............................................... 9
Appendix C: Switches ......................................................... 10
Technical Specifications ...................................................... 10
International Regulatory Information .................................. 11
Introduction
The Eicon Networks ISDN NT1 is a compact network termination
device for connecting data terminal equipment to an Integrated
Services Digital Network (ISDN).
The NT1 provides an interface port without the need for a specialized
interface cable. You can connect ISDN devices to the NT1 through
two S/T interface ports.
This installation guide describes how to set up the NT1 and connect
your devices to it.
Setting up the ISDN NT1
You can connect up to two ISDN devices —such as an ISDN fax or
phone—to the NT1. However, there are some restrictions on how far
the ISDN devices can be located from the NT1.
• The ISDN devices must be located within 150 meters (500 feet)
of the NT1. Alternatively, you can connect a single device at a
distance of up to 900 meters (3000 feet), but in this case only one
device can be connected.
Follow the instructions below to set up the NT1. Be careful not to
touch any exposed wires.
1 Determine Your Termination Requirements
The ISDN NT1 and your other ISDN devices must be set to a
specific termination value according to:
• how many other ISDN devices you connect to the NT1, and
• the distance of each ISDN device from the NT1.
Table 1 lists all the different ways to set up the NT1 and gives the
termination values required in each case.
Locate the row which exactly matches how you plan to use the
NT1. To help you, an illustration of each row is provided
beginning on page 8, and two examples are given below the table.
You will use the information under the headings “Termination”
and “NT1 Switch Settings” in Step 2.
Note: The table uses metric measurements. The equivalent imperial
measures are: 75 m (250 ft), 150 m (500 ft), 900 m (3000 ft).
Devices Connected to the NT1
ISDN Devices
#
1
2
Number
1
3
4
5
6
Distance
up to 75 m
Termination
NT1
ISDN
Devices
50 Ω
or 100 Ω
None
100 Ω
on on
off on
on on
off on
on
on
100 Ω
100 Ω
off on
off on
off
50 Ω
or None
None
100 Ω
on on on on on
off off off off on
None
100 Ω
off off off off off
75 to 900 m
2
up to 75 m
NT1 Switch Settings
1
2
3
4
5
75 to 150 m
Table 1. Determining Termination Settings
2 Set the Required Termination
You must set the NT1 and your ISDN devices to the termination
value indicated by Table 1.
Set the termination on your ISDN devices to the value specified
under “Termination—Other Devices.” The manuals which came
with your ISDN devices can tell you how to do this.
To set the termination on the NT1, you manipulate five small switches
on the rear of the unit, shown in Figure 1, to match the settings given
under the heading “NT1 Switch Settings” in Table 1.
Select the termination setting
using these switches
Connect the power
supply to this port
Connect your ISDN
wall socket to this port
Figure 1. Rear Panel
Eicon Network Termination (NT1) Installation Guide
5
For example, if you determined that row #3 describes how you
will be using the NT1, set switches 1, 3, and 5 to the OFF position
(up), and set switches 2 and 4 to the ON position (down).
Note that these switch settings reflect both the termination value
and the distance of other ISDN devices from the NT1. This is why,
for example, row #2 and row #3 have different switch settings,
even though the NT1 termination value for both is 100 Ω. If you
are interested, an explanation of the specific function of each
switch is given in “Appendix C: Switches,” at the end of this
installation guide.
3 Connect the Power Supply
Plug the power supply into the jack labelled “Power” on the rear
panel of the NT1 (see Figure 1). Plug the other end into the wall
socket.
4 Connect Your ISDN Line
Locate the RJ45-to-RJ11 cable included with the NT1. Plug the
RJ45 end (the larger end of the cable) into the jack labelled “U”
on the rear panel (see Figure 1). Plug the RJ11 end of the cable
into your ISDN wall outlet..
S/T Ports
Signal Lights
Figure 2. Front Panel
Connect the ISDN Device to a port labelled “S/T.” Connect your
other ISDN devices to the remaining port labelled “S/T.”
The Eicon NT1 and all the devices you connected to it should now
be fully functional. The next section, “Understanding the Signal
Lights,” explains how to interpret the diagnostic signal lights
while using the NT1.
6 Eicon Network Termination (NT1) Installation Guide
Understanding the Signal Lights
The three lights (LEDs) on the front panel of the NT1 provide
information about the status of the NT1 and the ISDN line.
L-BK
LINE
PWR
Figure 3. Signal Lights
Table 2 explains the significance of each light.
Light
L-BK
State
Off
On
LINE
On
Flashes 8 times
PWR
Flashes once per second
Off
On
Off
Explanation
Normal.
Your ISDN service provider is
conducting a loopback test.
The S/T and U interfaces are not active.
The NT1 is trying to activate the
U-interface link.
The S/T interface is not fully active.
The S/T and U interfaces are fully active.
The power supply is connected.
The NT1 is not receiving power.
Table 2. Explanation of the Signals
Eicon Network Termination (NT1) Installation Guide
7
Appendix A: Illustrated Scenarios
Find the illustration which matches how you plan to use the Eicon
NT1, then consult the appropriate row in Table 1 on page 5 to find the
required settings for the NT1 and for your other ISDN devices.
Row #1 and #2: One device up to 75 meters from the NT1.
NT1
Up to 75
Figure 4. One device up to 75 meters from the NT1
Row #3: One device up 75 to 900 meters from the NT1, without an
EiconCard attached.
NT1
Up to 900 meters
Figure 5. One device up to 900 metres from the NT1
Row #4 and #5: Two devices up to 75 meters from the NT1, with or
without an EiconCard attached.
NT1
Up to 75
Figure 6. Two devices up to 75 metres from the NT1
Row #6: Two devices located from 75 to 150 meters.
NT1
75 to 150
Figure 7. Two devices up to 75 - 150 meters from the NT1
8 Eicon Network Termination (NT1) Installation Guide
Appendix B: Pin Assignments
Pin assignments for each port are given below.
S/T interface Ports
Each port consists of an RJ-45 connector with the pin assignments
listed in Table 3.
Pin
3
4
5
6
Function
RX+
TX+
TXRX-
Table 3. RJ-45 Pin Connector Assignments
U-Interface Port
The U-interface port consists of an RJ-45 connector with the pin
assignments listed in Table 4.
Pin
4
5
Function
TIP
RING
Table 4. U-Interface Pin Assignments
Power Connector
The power connector is a minijack as described in Table 5.
Component
Center pin
Outer casing
Function
+9 VDC
GND
Table 5. Power Connector Pin Assignments
Eicon Network Termination (NT1) Installation Guide
9
Appendix C: Switches
The significance of each switch on the rear panel of the ISDN NT1
is given in Table 6.
Value
No termination
Termination of 50 Ω
Termination of 100 Ω
Devices located less than 75 m
from the ISDN NT1
Devices located more than 75 m
from the ISDN NT1
Switch Positions
1
2
3
off
off
off
on
on
on
off
on
off
4
off
on
on
5
on
off
Table 6. Significance of the Switches
Technical Specifications
Safety
• Use with a certified Class 2 power supply.
Typical Power Requirements
• 80 mA at +9 Volts
Environmental Requirements
• Operating temperature: 0°C to 50°C
• Operating humidity: 0 to 90% (non-condensing)
• Barometric operating pressure: 86 to 106 kPascals
10 Eicon Network Termination (NT1) Installation Guide
International Regulatory
Information
Regulatory Information for the USA:
Declaration of Conformity
We:
Eicon Networks Corporation
2155 Chenault Drive, Suite 503
Carrollton, Texas USA 75006
1-800-80-EICON
(972) 417-5500
Fax: (972) 417-5610
Declare under our sole legal responsibility that the products listed below to which
this declaration relates, are in conformity with Part 15 of the FCC Rules. Operation
is subject to the following two conditions:
(1) This device may not cause harmful interference, and
(2) This device must accept any interference received, including interference that
may cause undesired operation.
This equipment has been tested and found to comply with the limits for a Class B
digital device, pursuant to Part 15 of the FCC Rules. These limits are designed to
provide reasonable protection against harmful interference in a residential
installation. This equipment generates, uses and can radiate radio frequency energy
and, if not installed and used in accordance with the instructions, may cause harmful
interference to radio communications.
However, there is no guarantee that interference will not occur in a particular
installation. If this equipment does cause harmful interference to radio or television
reception, which can be determined by turning the equipment off and on, the user is
encouraged to try to correct the interference by one or more of the following
measures:
Reorient or relocate the receiving antenna.
Increase the separation between the equipment and receiver.
Connect the equipment into an outlet on a circuit different from that to which the
receiver is connected.
Consult the dealer or an experienced radio/TV technician for help.
Eicon Network Termination (NT1) Installation Guide
11
FCC Part 68 Notice
This unit complies with Part 68 of the FCC rules. On the bottom of this equipment
is a label that contains, among other information, the FCC registration number. If
requested, this information must be provided to the telephone company.
An FCC compliant telephone cord and modular plug is provided with this equipment,
designed to be connected to the telephone network or premises wiring using a
compatible modular jack which is Part 68 compliant.
This equipment cannot be used on telephone company-provided coin service.
Connection to party line service is subject to state tariffs.
If this equipment causes harm to the telephone network, the telephone company will
notify you in advance that temporary discontinuance of service may be required. If
advance notice isn't practical, the telephone company will notify the customer as
soon as possible. Also, you will be advised of your right to file a complaint with the
FCC if you believe it is necessary.
The telephone company may make changes in its facilities, equipment, operations,
or procedures that could affect the operation of the equipment. If this happens, the
telephone company will provide advance notice in order for you to make the
necessary modifications in order to maintain uninterrupted service.
If trouble is experienced with this equipment, please contact us for repair and
warranty information. If the trouble is causing harm to the telephone network, the
telephone company may request you to remove the equipment from the network until
the problem is resolved.
Safety Notice
Use certified class 2 power supply with this equipment.
Regulatory Information for Canada
NOTICE: The Industry Canada label identifies certified equipment. This
certification means that the equipment meets certain telecommunications network
protective, operational and safety requirements. Industry Canada does not guarantee
the equipment will operate to the user’s satisfaction.
Before installing this equipment, users should ensure that it is permissible to be
connected to the facilities of the local telecommunications company. The equipment
must also be installed using an acceptable method of connection. In some cases, the
company’s inside wiring associated with a single line individual service may be
extended by means of certified connector assembly (telephone extension cord). The
customer should be aware that compliance with the above conditions may not prevent
degradation of service in some situations.
Repairs to certified equipment should be made by an authorized Canadian
maintenance facility designated by the supplier. Any repairs or alterations made by
the user to this equipment, or equipment malfunctions, may give the
telecommunications company cause to request the user to disconnect the equipment.
12 Eicon Network Termination (NT1) Installation Guide
For their own protection, users should ensure that any electrical ground connections
of the power utility, telephone lines and internal metallic water pipe system are
connected together. This precaution is particularly important in rural areas.
Users should not attempt to make such connections themselves, but should contact
the appropriate electric inspection authority, or electrician, as appropriate.
This Class B digital apparatus complies with Canadian ICES-003.
Cet appareil numérique de la classe B est conforme à la norme NMB-003 du Canada.
Safety Notice
Use certified class 2 power supply with this equipment.
Eicon Network Termination (NT1) Installation Guide
13
Limited Warranty
Eicon Networks Corporation warrants to the original purchaser of this
Eicon Networks Product that it is to be in good working order for a period of five (5)
years from the date of purchase from Eicon Networks or an authorized Eicon
Networks dealer. Should this Product, in Eicon Networks’s opinion, fail to be in good
working order at any time during this five year warranty period, Eicon Networks
will, at its option, repair or replace this Product at no additional charge except as set
forth below. Repair parts and replacement Products will be furnished on an exchange
basis and will be either reconditioned or new. All replaced parts and Products become
property of Eicon Networks. This Limited Warranty does not include service to
repair damage to the Product resulting from accident, disaster, misuse, abuse, or nonauthorized alterations, modifications, and/or repairs.
Products requiring Limited Warranty service during the warranty period should be
delivered to Eicon Networks with proof of purchase. If the delivery is by mail, you
agree to insure the Product or assume the risk of loss or damage in transit. You also
agree to prepay shipping charges to Eicon Networks and to use the original shipping
container or equivalent.
EICON NETWORKS HEREBY DISCLAIMS ALL OTHER EXPRESSED AND
IMPLIED WARRANTIES FOR THIS PRODUCT INCLUDING, BUT NOT
LIMITED TO, THE WARRANTIES OF MERCHANTABILITY AND FITNESS
FOR A PARTICULAR PURPOSE. Some jurisdictions do not allow the exclusion of
implied warranties, so the above limitations may not apply to you.
IN NO EVENT WILL EICON NETWORKS BE LIABLE IN ANY WAY TO THE
USER FOR DAMAGES, INCLUDING ANY LOST PROFITS, LOST SAVINGS,
OR OTHER INCIDENTAL OR CONSEQUENTIAL DAMAGES ARISING OUT
OF THE USE OF, OR INABILITY TO USE, SUCH PRODUCT. Some jurisdictions
do not allow the exclusion or limitation of incidental or consequential damages for
consumer products, so the above limitations or exclusions may not apply to you.
THIS WARRANTY GIVES YOU SPECIFIC LEGAL RIGHTS, AND YOU MAY
ALSO HAVE OTHER RIGHTS WHICH MAY VARY FROM ONE
JURISDICTION TO ANOTHER.
This Limited Warranty applies to hardware products only.
Product Comment Form
Eicon ISDN NT1
Installation Guide
203-077-04
We value your comments. Please use the tables below to rate this product.
Name
Title
Company
Address
Eicon ISDN NT1
Poor
➀ ➁ ➂ ➃ ➄ ➅ ➆ ➇ ➈ ➉
Excellent
Difficult
➀ ➁ ➂ ➃ ➄ ➅ ➆ ➇ ➈ ➉
Easy
Performance
Poor
➀ ➁ ➂ ➃ ➄ ➅ ➆ ➇ ➈ ➉
Excellent
Workmanship
Poor
➀ ➁ ➂ ➃ ➄ ➅ ➆ ➇ ➈ ➉
Excellent
Packaging
Configuration
Installation Guide
Low
➀ ➁ ➂ ➃ ➄ ➅ ➆ ➇ ➈ ➉
High
Confusing
➀ ➁ ➂ ➃ ➄ ➅ ➆ ➇ ➈ ➉
Clear
Difficult
➀ ➁ ➂ ➃ ➄ ➅ ➆ ➇ ➈ ➉
Easy
Poor
➀ ➁ ➂ ➃ ➄ ➅ ➆ ➇ ➈ ➉
Excellent
Accuracy
Organization
Readability
Presentation
Please return this form to:
Eicon Networks Corporation
Attention: Technical Publications
9800 Cavendish Blvd.
Montreal, Quebec, Canada H4M 2V9
Fax: (514) 745-5502
Tel: (514) 745-5500
Printed in Canada