1
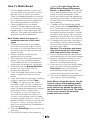
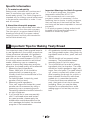
BKK 2505
BreadMaker
User Manual
Read this manual prior to initial operation of the product!
Dear Customer,
We hope that your product, which has been manufactured in modern facilities and
passed through a strict quality control procedure, will give you very good results.
We advise you to read through this manual carefully before using your product and
keep it for future reference.
The User Manual will help you use your machine in a fast and safe way.
• Read the User Manual before installing and starting your product.
• In particular, follow the instructions related to safety.
• Keep this User Manual within easy reach for future reference.
• Also read all additional documents supplied with this product.
Remember that this User Manual is also applicable for several other models.
Differences between models will be identified in the manual.
Explanation of symbols
Throughout this User Manual the following symbols are used:
C
Important information or useful hints about usage.
A
Warning for hazardous situations with regard to life and property.
B
Warning for supply voltage.
TABLE OF CONTENTS
This product has been produced in environmentally friendly, modern facilities
CONTENTS
1 Safety Warnings
4
2 Technical Specifications of Your Appliance
5
3 Using the Appliance 6
Program selection Program descriptions
Start / Stop Baking Selection
Size of Loaf
Keeping Warm
Memory
Ambient Conditions
Warning Display
First Use
How To Make Bread Specific Information
6
6
7
7
7
7
7
7
7
7
8
9
4 Important Tips for Baking Tasty Bread
About Bread Ingredients
9
10
Useful Tips / Recommendations
11
Bread Recipes
12
5 Cleaning and Care
14
6 Troubleshooting
15
3
EN
1 Safety Warnings
The following safety warnings must be
observed when using electrical appliances.
1. Please read all instructions thoroughly.
14. Never hit the edge of the chamber in
order to remove the bread; otherwise, the
chamber may be damaged.
2. Before use, check that the local voltage
corresponds to the voltage indicated on the
rating plate.
15. Due to the risk of fire or short circuit,
avoid putting metal foils or similar materials
in the breadmaker.
3. Never use the appliance when; the
power cable or plug is damaged, dropped
or exposed to any other damage. Take the
appliance to the nearest authorized service
for inspection and repair.
16. Never cover breadmaker with towels or
cloths; heat and steam should freely exit the
appliance. Covering the appliance with a
flammable material or contacting with such
materials may cause a fire.
4. Never touch hot surfaces. Use the grips
and handles.
17. Use the appliance only its intended use.
5. Never immerse the cable, plugs or
sockets of the appliance in water or any
other liquid to avoid risk of electric shock.
19. Keep these instructions for further
reference.
18. Do not use the appliance outdoors.
6. Disconnect the plug when the appliance
is not in use, when mounting or dismounting
the parts and before cleaning.
20. This appliance is only for household use,
and is not recommended for commercial
use.
7. Do not allow the cable to hang from the
edge of the table or to make contact with
hot surfaces.
21. If a power fails does not last more than
15 minutes when the product is in use, the
program will resume.
8. Using accessories not recommended by
the manufacturer may cause injury.
22. If you press the 'stop' button when
the product is in use or a power failure
continues for more than 15 minutes, the
program will not resume.
9. This appliance is not intended for use by
persons (including children) with reduced
physical, sensory, or mental capabilities, or
lack of experience and knowledge, unless
they are supervised or instruct on the use
of the appliance by a person responsible for
their safety.
10. Never leave your breadmaker
unattended when using it in the proximity
of children. Never let children use the
breadmaker without supervision.
11. Never place the appliance on hot gas
stoves or electrical stoves, next to them or
inside heated ovens.
23.If you are using a commercially sold
ready bread mix in the machine, please
use your breadmaker's standard program
with the recipes provided on the mixture's
package rather than the recipes provided in
this user manual. Do not add salt, sugar, oil
or yeast other than provided in the package
of the ready bread mix.
24.Unless necessary, do not open the lid
of the breadmaker, otherwise the bread will
not rise sufficiently. The machine continues
to operate even if the lid is opened.
12. Never touch moving or rotating parts
when the machine is cooking.
13. Never turn on the appliance before
placing the chamber securely in place when
it contains dough.
4
EN
2 Technical Specifications of Your Appliance
4
5
1
2
7
6
3
9
8
10
1- Kneading paddle
Voltage: 230 V~50 Hz
2- Chamber
3- Body
Power: 600 W
Insulation class: 1
4- Lid
5- Product's carrying handle
6- On/Off switch
7- Measuring cup
8- Large measuring spoon
9- Small measuring spoon
10- Kneading paddle removal hook
Markings on the product or the values stated in other documents supplied with the product
are values obtained under laboratory conditions as per relevant standards. These values
may vary according to the use of the product and ambient conditions.
5
EN
3 Using the Appliance
Function Description
Shows the
selection of bread
size.
Shows baking
selection.
(Less / Moderate / More)
(Small 1 / Large 2)
Shows the selected
program.
Shows operating time for
each program.
As soon as you connect the breadmaker's
plug into the wall socket and press the on/
off button, you will hear a beep sound and
"3:00" will soon be shown on the display.
However, the colon (:) between 3 and 00
will not continuously flash. The arrow “
” symbol on the panel will be on the II
position. This is the default setting.
Note: Small bread “I” setting represents
a loaf of bread weighing (~750g) whereas
Large bread “II” setting means a loaf of
bread weighing (~900g).
Program selection
It is used to set different programs. Every
time you press this button, the program
changes along with a short beep. When
continuously pressing the button, 12
menus will be shown on the LCD display
sequentially. Select the program that you
want. The 12 menu functions are described
below.
Program descriptions
1. Standard: Kneading, rising and
baking normal bread. Also, you may
add various ingredients to give added
flavour. If you wish to use ready-made
bread mixes sold in grocery stores,
you should use this program in all
circumstances.
2. Village bread: Kneading, rising and
longer baking. This menu bakes the
bread with a crisper crust and lighter
texture.
6
3. Whole wheat bread: Kneading, rising
and baking with whole wheat flour. This
setting provides a longer preheating
time to help the grain soak in water.
Delaying function is not recommended
to avoid unintended results.
4. Quick: This function does not allow
the selection of loaf size. Kneading,
rising and baking normal bread with
baking soda as described in the recipe.
This setting generally bakes the bread
with a thicker texture and smaller size
compared to normal programs.
5. Wholemeal bread: Kneading, rising
and baking wholemeal bread. Intended
to bake wholemeal bread.
6. Ultra quick-I :Small (I) Kneading, rising
and baking normal bread in the quickest
time. This setting bakes smaller and
thicker loaves of bread compared to
Quick program.
7. Ultra quick-II: With the same features
above, it is intended for Large (II) bread.
8. Preparing Dough: It kneads and rises
dough, but does not bake.
Remove the dough to shape loaves of
bread, pizza and etc.
9. Preparing Jam: Intended to boil jam
and marmalade.
10. Baking Cake: Kneading, rising and
baking the cake mixes with baking
soda.
11. Bread Rolls: Kneading, rising and
baking bread rolls. It is intended to bake
bread rolls in a lighter texture and with a
thinner crust.
EN
12. Baking: No kneading or rising, only
baking.
power failure continues for longer than 15
minutes, the memory cannot be maintained
and you will need to start the breadmaker
again. However, if the dough has not
passed the stage of rising when the power
failure occurs, you should directly press
"Start/Stop" button to start the program.
Start / Stop
Starts and stops the selected program.
Press “Start/Stop” button once to start
a program. You will hear a short beep
and when the colon (:) on the timer begins
flashing, this means that the program has
started. After starting a program, all buttons
become inactive except for the “Start/
Stop” button.
Press and hold the “Start/Stop” button
for approximately 3 seconds to stop the
program. A long beep confirms that the
program has turned off. This feature ends
the program.
Ambient Conditions
The breadmaker can operate within a wide
range of temperature, but the size of loaf
may vary when the room is too warm or
too cold. We recommend storing bread
ingredients at room temperature, between
20°C and 34°C.
Baking Selection
Warning Display
This button allows the user to select
cooking the crust LESS, MODERATE or
MORE. Press this button to select the crust
colour of your choice. On the LCD display,
the " ” arrow will turn to the colour that
was selected.
1. If the display shows “H:HH” after
starting the program (see Figure 1
below), it indicates that temperature
in the chamber is still too high. In this
case, you should end the program.
Open the lid and let the machine to cool
down for 10 to 20 minutes.
2. If the display shows “E:EE” after
pressing the Start/Stop button, this
indicates that the temperature sensor
is disconnected, please have an
Authorized Service Centre check the
sensor.
Size of Loaf
Press this button to select the size of bread
loaf. On the LCD display, you will see that
the arrow will move to the positions of
Small I and Large II. Total time of running
will vary according to different loaf sizes.
Keeping Warm
The appliance may keep the bread warm
for 60 minutes after baking is complete. If
you want to remove the bread in the keep
warm stage, press and hold the Start/
Stop button for 3 seconds to turn off the
program.
AZ
ORTA
ÇOK
Figure 1
AZ
ORTA
ÇOK
Figure 2
First Use
IMPORTANT NOTE: AFTER REMOVING
THE BREAD AT THE END OF THE
PROGRAM, PRESS AND HOLD START/
STOP BUTTON FOR 3 SECONDS TO
STOP THE APPLIANCE AND TURN OFF
THE PRODUCT VIA ON/OFF BUTTON
ON THE BACK.
1. Please make sure that all parts and
accessories are complete and free from
damage.
2. Clean all parts in accordance with the
section "Cleaning and Care".
3. Switch the breadmaker to baking mode
and perform baking for 10 minutes with
the empty chamber. It is normal for the
machine to emit some smoke. Clean
the breadmaker again after it cools.
4. Completely dry all parts before replacing
them; the appliance is now ready for
use.
Memory
If a power failure occurs during the baking
process; even if you don't press on the
Start/Stop button, the baking automatically
resumes if less than 15 minutes. If the
7
EN
How To Make Bread
1. Put the bread chamber in place and
turn clockwise until you hear a click to
indicate that it is fixed in to position.
Place the kneading paddle on the pivot
pin. Apply a small amount of oil on the
pin to facilitate removal of paddle after
the kneading process is complete.
2. Place ingredients into the bread
chamber. Please observe the order
of the recipe. You should place liquid
ingredients first, then add sugar, salt
and flour. The yeast and baking soda, if
required, should be added last.
Note: Please check the recipe for
maximum amounts of flour and
yeast.
3. Create a small hollow in the middle
of the flour using your finger. Put the
dry yeast in this hole and ensure that
the yeast does not make contact with
liquids and salt.
4. Slowly close the lid and plug the
appliance into the socket.
5. Press and hold the Program selection
button until your choice is selected.
The number and time of the selected
program will be shown on the display.
6. Press and hold the Baking Selection
button until your choice of crust
preference is selected.
7. Press the Bread Size button to select
small I or large II for the size of your
bread.
8. If you would like to postpone the baking
process, press the buttons Time +
or Time – to adjust the time. Press
the button time+ or time- to select the
hour when you want the bread to be
ready. Prepare the appliance for baking
and press the Start / Stop button.
For instance, if it is 20:00 now, and
you want the bread to be ready at 8
o'clock in the morning; then you need
to adjust program time to 12 hours. This
appliance allows the user to set the time
for up to 13 hours. You may skip this
step if you would like the breadmaker to
start immediately.
9. Press the Start/Stop button to start the
operation.
10.You will hear a beep when operating
8
programs Normal, Village Bread,
Whole Wheat Bread, Wholemeal
Bread and Bread Rolls. This reminds
you to add ingredients such as olives,
walnuts, raisins and cereals. Open
the lid and quickly add the ingredients
according to the recipe. The lid should
be kept open as shortly as possible
during baking.
11.10 beeps will be heard when baking
ends. Press and hold Start/Stop button
for 3-5 seconds to end the process
and remove the bread. Open the lid
and grab the bread chamber's handle
firmly with oven gloves. By turning the
chamber anti-clockwise, lift it upwards
slowly and remove it from the machine.
12.To release the bread from the sides of
the chamber, lightly loosen the sides
with a nonstick spatula. It will be easier
to remove the bread.
Warning: The chamber and bread
may be extremely hot! Hold them
with oven gloves very carefully.
13.Turn the bread chamber upside down
and shake lightly until the bread release.
14.Remove the bread carefully from the
chamber and allow it cool down for
about 20 minutes before slicing.
15.If you are not in the room when baking
ends, and you have not pressed the
Start/stop button, the bread will
automatically be kept warm for 1 hour
and the warming process will end.
16. Turn off and unplug the appliance when
not in use or not fully operating.
Note: Before slicing the bread, use the
hook to remove the kneading paddle
which might be in the bread. You can
easily remove the paddle by inserting
the hook beneath the bread. The bread
is hot; never remove the kneading
paddle with bare hands.
EN
Specific Information
1. To make bread quickly
Baking soda, activated with moisture and
heat, is used when you need to get the
bread ready quickly. The Quick program is
intended only for baking normal white bread
in the amounts prescribed, in under 1 hour
and 40 minutes.
Important Warnings for Quick Programs
1. For all quick programs, the water
temperature should be 45-50 ºC.
2. We recommend not to use quick
programs unless it is necessary. As the
leavening time is shorter in quick programs,
the inner texture of the bread will be thick
and rising will be less comparable to normal
programs.
3. In quick programs, baking soda should
be used in the prescribed amounts in
addition to Instant dry yeast.
2. About the ultra quick program
The appliance can bake bread within about
1 hour thanks to the ultra quick program.
The ultra quick I program makes Small (I)
bread and ultra quick II program makes
Large (II) bread, and they are intended for
normal white bread only.
4 Important Tips for Baking Tasty Bread
One important step of baking good bread is
to use ingredients in the correct proportions.
Unless otherwise indicated, all ingredients
should be at room temperature. Only water
and milk can be used lukewarm (20-25º C).
It is strongly recommended to use kitchen
scales, measuring cups or measuring
spoons to accurately determine amounts;
otherwise, the bread quality will be effected.
1. Measuring liquid ingredients:
Water, fresh milk, or oil should be
measured with a measuring cup.
Visually check the horizontal level of the
measuring cup.
For baking bread, Instant dry yeast
powder must be used.
2. Measuring solid ingredients:
Flour, salt, sugar and Instant dry yeast
powder can be measured by using a
measuring cup or measuring spoon.
Remaining materials should be stored in
air-tight containers.
3. If you would like to use commercially
sold 1-loaf bread mixes and Instant
dry yeast powder, please apply the
breadmaker recipes described on the
mix's package and select the standard
program of the breadmaker.
9
4. All ingredients should be appropriate for
use (using potable water, using fresh dry
ingredients such as flour, yeast, salt and
sugar).
5. The lid should not be opened unless
necessary. The breadmaker keeps
operating even if the lid is open.
6. You should follow the order of adding
ingredients into the chamber. The order
should be: liquid ingredients, eggs, salt,
sugar, flour and yeast. The yeast should
not come in contact with water or salt.
After kneading the dough for a while, a
beep indicates the time to add olives,
cereals etc. in prescribed amounts.
If those food items are added too
early, their taste is lost due to excess
kneading. When you use the delay
function for an extended time, avoid
adding eggs or fruit as they can turn
bad.
EN
About Bread Ingredients
Bread flour
Bread flour is rich in gluten content (that
is why it is also known as gluten flour
with high level of protein), it has a good
elasticity and prevents deformation
of the bread after rising. As its gluten
content is higher than normal flour, it
can be used for making larger bread
and a thicker inner texture. The most
important ingredient of bread is bread
flour.
1. Regular flour:
Regular flour is prepared by mixing well
selected soft and hard grains and used
for baking bread and cake quickly.
2. Whole wheat flour:
Whole wheat flour is prepared by milling
whole wheat, it contains wheat husks;
the gluten of whole wheat flour is richer
and is more nutritious than regular flour.
Bread made of whole wheat flour is
generally smaller. Thus, many recipes
recommend using whole wheat and
regular flour together for obtaining the
best results.
3. Brown wheat flour:
Also known as "Coarse flour", brown
wheat flour contains high fiber and
resembles wholemeal flour. To obtain
larger loaves after rising, it should be
used in combination with bread flour in
high proportions.
4. Cake flour:
Cake flour is prepared by milling soft
wheat or low-protein wheat and is
used especially in the cakes. Various
flour types have similar appearance;
actually, the yeast's performance or
water absorption capacity of various
types of flour vary according to the
region of origin, growing conditions,
milling process, and storage life of the
flour. You may test different brands of
flour sold in your local environment and
compare their tastes in order to select
one that offers the best flavour.
5. Corn flour and oatmeal:
Corn flour and oatmeal are prepared by
milling corn and oats, respectively. Both
are additives used for baking coarse
bread and to enrich the flavour and
texture.
10
Sugar
Sugar is a very important ingredient
that increases flavour and colour of
the bread. It leavens the bread and
increases nutritional value; generally
white sugar is used. Optionally, brown
sugar, icing sugar or candy floss may be
used.
Instant dry yeast powder
The yeast goes through a dough-like
fermentation process; it generates
carbon dioxide, makes the bread
rise and provide a soft inner texture.
However, leavening requires the
carbohydrates in the sugar as well as
from the flour for nourishment.
As it will go bad in high temperatures,
the yeast should be stored in the
refrigerator; please check the date of
production and shelf life of your yeast.
Immediately after each use, return the
yeast to the refrigerator in an air-tight
container. Generally, bread does not rise
because of stale yeast.
You can check if your yeast is fresh
and active by applying the following
methods.
(1) Pour 1/2 cup of lukewarm (4550°C) water into a measuring cup.
(2) Add 1 teaspoon of white sugar
into the cup, mix and sprinkle 2
teaspoons of yeast powder onto the
water.
(3) Leave the measuring cup for 10
minutes in a warm place. Do not stir the
water.
(4) The resulting foam should
be approximately equal to 1 cup.
Otherwise, the yeast is stale and won't
work.
Salt
Salt is required to increase taste and
the crust colour of the breads. The salt
also limits the rising of yeast. Never use
too much salt in your recipe; and if you
don't want to use salt, skip this step.
The bread will be larger without salt.
Eggs
Eggs improve the texture of the bread,
and makes the bread more nutritious,
increases the size, and gives a flavour
EN
to the bread, you may use one whisked
egg in the village bread.
Oil, butter and vegetable oil
Oil makes the bread soft and extends
storage life. After removing the butter
from the refrigerator, you should melt
it or cut it into small pieces to make it
suitable for mixing.
Baking soda
Baking soda is used in quick bread
programs. It does not require time
for rising and generates air bubbles
that soften the texture of the bread
according to its chemical properties.
Water and other liquid
Water is a basic ingredient when baking
bread. Generally, water temperature
between 20°C and 25°C is best.
However, in quick baking, the water
temperature should be 45-50°C to
obtain necessary rising speed. To
increase the bread's taste and improve
the crust colour, you can use a mixture
of fresh milk and water instead of only
water. In some recipes, apple juice,
orange juice or lemon juice may be
used to improve the taste of bread.
All suggestions depends on personal
preference.
5.
6.
7.
8.
Useful Tips /
Recommendations
1.Tips for measurements in the recipes;
1 Larger measuring spoon = 15 ml /
tablespoon
1 Small measuring spoon = 5 ml /
teaspoon
1 Measuring cup of flour = 150g
1 Measuring cup of liquid = 200
ml.(shown on the cup)
2. In all baking programs, you will hear a
beep when the program ends. If the
bread is going to be removed without
delay, press and hold start/stop button
for 3 seconds to stop the machine.
Otherwise, the machine will keep
running in the oven baking mode.
3. Avoid opening the breadmaker's lid if
possible.
and the yeast powder supplied in
the package, you should apply the
breadmaker recipe described on the
mix's package and select the 3-hour
standard program of the appliance
whatever the type of bread mix used.
As the ready bread mix contains salt,
sugar etc., you should not add those
ingredients.
If you would like to make different kinds
of bread: using standard program
and the programs of village bread,
wholemeal bread and bread rolls,
you can optionally add 100g of olives
(without seeds), walnuts, raisins or
cereals into the dough by opening
the lid when you hear the first beep.
This adding process should be done
as quickly as possible as we do not
recommend opening the lid of the
machine to ensure proper rising level of
the bread.
You are not able to select the bread
size in the quick program; the machine
automatically selects the normal size
and normal white bread is baked using
the prescribed amounts.
In Ultra Quick and Quick programs, hot
water (45-50 C) and 1 packet of (10g)
baking soda should be used.
Ultra Quick and Quick programs provide
the advantage of time, however, the
inner texture and rising of the bread will
be less satisfying than the bread made
in other regular programs. Thus, we
recommend not to use quick programs
unless necessary.
4. If you are going to use ready made
bread mixes sold in grocery stores
11
EN
Bread Recipes
Normal White Bread
Program Position
Standard
Baking position
Bread size
Water
Less/Moderate/More
Small ( I )
Large ( II )
300 ml
320 ml
Vegetable oil
1 Large measuring spoon
1 ½ Large measuring spoon
Milk
1 Large measuring spoon
1 ½ Large measuring spoon
White Flour
3 Measuring Cups (450g)
3 and 1/3 Measuring cups (500g)
Sugar
2 Small measuring spoons
3 Small measuring spoons
Salt
1 ½ Small measuring spoons
1 ½ Small measuring spoons
Instant dry yeast powder
1 ½ Small measuring spoons
1 ½ Small measuring spoons
Village Bread
Program Position
Village Bread
Baking position
Bread size
Water
Vegetable oil
White Flour
Less/Moderate/More
Small ( I )
Large ( II )
280 ml
300 ml
1 Large measuring spoon
1 ½ Large measuring spoon
3 full measuring cups (450g)
3 and 1/3 Measuring cups (500g)
Milk
1 Large measuring spoon
1 ½ Large measuring spoon
Sugar
2 Small measuring spoons
2 Small measuring spoons
Salt
1 Small measuring spoons
1 ½ Small measuring spoons
1 ½ Small measuring spoons
1 ½ Small measuring spoons
Instant dry yeast powder
Whole Wheat Bread
Program Position
Whole Wheat Bread
Baking position
Less/Moderate/More
Bread Size
Water
Small ( I )
Large ( II )
260 ml
280 ml
2 1/3 measuring cups (300g)
3 full measuring cups (400g)
1 measuring cup (150g)
2/3 measuring cup (100g)
Vegetable oil
1 Large measuring spoon
1 ½ Large measuring spoons
Sugar
2 Small measuring spoons
3 Small measuring spoons
1 ½ Small measuring spoons
1 ½ Small measuring spoons
2 Small measuring spoons
2 ½ Small measuring spoons
Whole Wheat flour
White Flour
Salt
Instant dry yeast powder
12
EN
Quick White Bread
Program Position
Quick
Baking position
Less/Moderate/More
Bread size
------(selection not allowed)
Hot Water ( 45-50 C)
280 ml
Vegetable oil
1 Larger measuring spoon
Milk
1 Larger measuring spoon
White Flour
3 Measuring Cups (450g)
Sugar
2 Small measuring spoons
Salt
1 ½ Small measuring spoons
Baking soda
1 packet (10g)
Instant dry yeast powder
1 ½ Small measuring spoons
Wholemeal Bread
Program Position
Wholemeal Bread
Baking position
Bread Size
Water
Less/Moderate/More
Small ( I )
Large ( II )
290 ml
300 ml
Vegetable oil
1 Large measuring spoon
1 ½ Large measuring spoon
Wholemeal flour (pure)
2/3 measuring cup (90g)
1 measuring cup (120g)
2 1/3 measuring cups (360g)
2 4/3 Measuring cups (380g)
White flour
Sugar
Salt
Instant dry yeast powder
2 Small measuring spoons
3 Small measuring spoons
1 ½ Small measuring spoons
1 ½ Small measuring spoons
2 Small measuring spoons
2 ½ Small measuring spoons
Ultra Quick-I
Ultra Quick-II
Ultra Quick White Bread
Program Position
Baking position
Bread size
Hot Water ( 45-50 C)
Less/Moderate/More
Small ( I ) (Auto selection)
Larger ( II ) (Auto selection)
280 ml
300 ml
Vegetable oil
1 Larger measuring spoon
1 ½ Larger measuring spoon
Milk
1 Larger measuring spoon
1 ½ Larger measuring spoon
White Flour
3 Measuring Cups (450g)
3 and 1/3 Measuring cups (500g)
Sugar
Salt
Baking soda
Instant dry yeast powder
2 Small measuring spoons
3 Small measuring spoons
1 ½ Small measuring spoons
1 ½ Small measuring spoons
1 packet (10g)
1 packet (10g)
1 ½ Small measuring spoons
2 Small measuring spoons
13
EN
Bread Rolls
Program Position
Bread Rolls
Baking position
Less/Moderate/More
Small ( I )
Large ( II )
280 ml
300 ml
Vegetable oil
1 Larger measuring spoon
1 ½ Larger measuring spoon
Milk
1 Larger measuring spoon
1 ½ Larger measuring spoon
White Flour
3 Measuring Cups (450g)
3 and 1/3 Measuring cups (500g)
Salt
1 ½ Small measuring spoons
1 ½ Small measuring spoons
Instant dry yeast powder
1 ½ Small measuring spoons
1 ½ Small measuring spoons
Bread size
Water
Jam Recipes
Program Position
Jam Preparation
Strawberry
500g
Granulated sugar
500g
Admixture for jam
Half packet of jam admixture (Approximately 15g)
Water
1/4 Measuring cup (50 ml)
Sour Cherry
500g
Granulated sugar
500g
Admixture for jam
Half packet of jam admixture (Approximately 15g)
Water
1/2 Measuring cup (100 ml)
Clean and dice strawberries or sour cherries finely and place them into the chamber. In
another bowl, mix 3 large measuring spoons of granulated sugar and a 1/2 packet of jam
admixture. Add sugar to the ingredients in the chamber and wait for 3 hours. Later, pour
the mixture of sugar and jam admixture into the chamber, add 50ml water for strawberries
and 100ml water for sour cherries. Select the program of jam preparation and start the
appliance.
Note: If the jam does not reach the intended texture at the end of the program, you can
make the jam thicker by using the baking function.
5 Cleaning and Care
Unplug the breadmaker and let it cool down
before cleaning.
1. Chamber: Wipe inner and outer parts
with a damp cloth. Never use sharp
or abrasive objects to avoid damaging
the nonstick coating. Dry the chamber
thoroughly before mounting it in place.
2. Kneading paddle: When it is difficult to
remove the kneading paddle from the
pin, fill the chamber with hot water and
wait for 30 minutes. Thus, the kneading
paddle may be easily removed for
cleaning. Clean the kneading paddle
carefully with a damp cotton cloth.
Clean dough from the pin thoroughly.
14
3. Lid and window: clean inside and
outside of the lid with a damp cloth.
4. Clean the outer surface of the body
softly with a damp cloth. Never use
abrasive cleaning agents. Never
immerse the appliance body in water to
clean.
5. Before returning the breadmaker to its
package for storage, make sure that it is
cold enough, dry and clean and its lid is
closed.
6. Never wash the chamber and kneading
paddle in the dishwasher.
EN
6 Troubleshooting
No.
Problem
Reason
Solution
1
Smoke comes out of the
vent hole during cooking.
Some materials can stick on the heating
element or to the side of it or oil remains on
the heating element during first use.
Unplug the breadmaker and clean the heating element,
but be careful not to burn your hands.
2
Lower crust of the bread
is too thick
Using the keep warm function or keeping the
bread in the chamber for a long time causes
large loss of moisture.
In the warming function, remove the bread earlier
3
It is difficult to remove
the bread
Kneading paddle might be stuck on the pin.
To release the sides of the bread from the chamber,
carefully loosen the sides with a nonstick spatula softly.
Fill the chamber with hot water after removing the bread,
keep the kneading paddle soaking in water for 30
minutes, then remove and clean.
Improper program selection
Do not open the lid if possible.
The bread has dried and the crust is not
brown as the lid was opened several times
during the operation.
Do not open the lid at the final rising stage
Kneading paddle cannot rotate and cannot
blend ingredients properly if the mixing
resistance is too high.
Check the kneading hole, remove the bread chamber
and mix without the load. If it is not normal again,
contact the authorized service centre.
4
Ingredients do not mix well
and poor baking results
5
The display shows “H HH”
after pressing the "Start/
Stop” button.
The temperature of the breadmaker is too
high for baking bread.
Press the "Start/Stop” button and unplug the bread
maker. Then, remove the bread chamber and keep the
lid open until the machine cools down.
6
Motor sound is heard, but
kneading is not performed.
The chamber or kneading paddle is not
installed properly or the dough is too big for
mixing.
Check if the chamber is installed properly and the dough
is prepared according to the recipe, also check if the
ingredients were weighed accurately.
7
The size of bread is so
large that is pushes the lid
Excessive amounts of yeast, flour or water or
ambient temperature is too high.
Check the factors above and reduce amounts to
intended levels.
8
The size of bread is too
small or the bread is not
rising.
You haven't add yeast or it is not enough; also
yeast does not function properly if the water
temperature is too high, or the yeast mixes
with salt, or the ambient temperature is low,
Check the amount and performance of the yeast, raise
to the intended ambient temperature.
9
The dough is so large that
it overflows the chamber.
There are excessive liquid ingredients
softening the dough, or the amount of yeast
is excessive.
Reduce the amount of liquid ingredients and adjust the
dough's hardness.
The flour and baking soda is not strong
enough to rise the dough
Use bread flour or a strong baking soda.
Leavening is too fast or the yeast temperature
is too high.
The yeast should be used at room temperature.
Excessive amount of water softens the dough
and dampens it excessively.
Depending on the water's absorption, adjust the amount
of water in the recipe.
Too much flour or lack of water.
Reduce the amount of flour or increase the water.
Additives are excessive or the amount of
whole wheat flour is excessive
Reduce that ingredient's amount or increase the yeast.
Excessive amount of water or yeast, or no
salt used.
Reduce the amount of water or yeast and check the salt.
Water temperature is too high.
Check water temperature.
The bread contains sticky ingredients such as
butter, banana etc.
Do not add sticky ingredients in the bread.
It is not blended properly due to lack of water.
Check the amount of water and mechanical operation of
the breadmaker.
Various recipes and ingredients give different
results; the large amount of sugar darkens
the colour.
If the colour is too dark due to use of excessive sugar,
press the Start/Stop button to end the program 5-10
minutes earlier than the intended time. Before removing
the bread, you need to keep the bread or cake in the
chamber for 20 minutes with the lid closed.
10
The middle of the bread
collapses when the dough
is cooking.
11
The bread is too heavy
and has a thick texture.
12
The interior of the bread
has tunnels.
13
14
The bread's surface is
dusty.
The crust is too thick and
the colour is too dark in
cakes and sweet pastry.
15
EN
www.beko.com