1
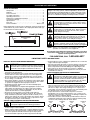
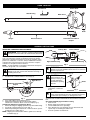
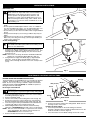
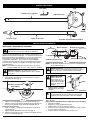
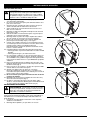
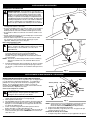
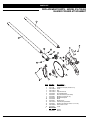
Operator’s Manual
®
Bladed Pruner
ATTACHMENT
Model No. 316.792480
• SAFETY
• ASSEMBLY
• OPERATION
• MAINTENANCE
• PARTS LIST
• ESPAÑOL, P. E1
CAUTION: Before using
this product, read this
manual and follow all
safety rules and operating
instructions.
Sears, Roebuck and Co., Hoffman Estates, IL 60179, U.S.A.
Visit our website: www.sears.com/craftsman
769-03520A
RULES FOR SAFE OPERATION
TABLE OF CONTENTS
Safety Rules . . . . . . . . . . . . . . . . . . . . . . . . . . . . . . . . . . . . . . .2
Warranty . . . . . . . . . . . . . . . . . . . . . . . . . . . . . . . . . . . . . . . . . .4
Know Your Unit . . . . . . . . . . . . . . . . . . . . . . . . . . . . . . . . . . . . .5
Assembly Instructions . . . . . . . . . . . . . . . . . . . . . . . . . . . . . . . .5
Operating Instructions . . . . . . . . . . . . . . . . . . . . . . . . . . . . . . . .6
Maintenance and Repair Instructions . . . . . . . . . . . . . . . . . . . .7
Cleaning and Storage . . . . . . . . . . . . . . . . . . . . . . . . . . . . . . . .8
Specifications . . . . . . . . . . . . . . . . . . . . . . . . . . . . . . . . . . . . . .8
Parts List . . . . . . . . . . . . . . . . . . . . . . . . . . . . . . . . . . . . . . . . .E9
Service Numbers . . . . . . . . . . . . . . . . . . . . . . . . . . .Back Cover
The purpose of safety symbols is to attract your attention to possible
dangers. The safety symbols, and their explanations, deserve your
careful attention and understanding. The safety warnings do not by
themselves eliminate any danger. The instructions or warnings they
give are not substitutes for proper accident prevention measures.
SYMBOL
MEANING
DANGER: Failure to obey a safety warning will result
in serious injury to yourself or to others. Always follow
the safety precautions to reduce the risk of fire, electric
shock and personal injury.
Before beginning, locate the unit’s model plate. It lists the model and
serial numbers of your unit. Refer to the sample plate below and copy
the information for future reference.
WARNING: Failure to obey a safety warning can
result in injury to yourself and others. Always follow the
safety precautions to reduce the risk of fire, electric
shock and personal injury.
CAUTION: Failure to obey a safety warning may result
in property damage or personal injury to yourself or to
others. Always follow the safety precautions to reduce
the risk of fire, electric shock and personal injury.
MODEL :
S/N :
ITEM :
SAFETY ALERT: Indicates danger, warning or caution.
Attention is required in order to avoid serious personal injury.
May be used in conjunction with other symbols or pictographs.
Copy the model and parent part number here:
Copy the serial number here:
NOTE: Advises you of information or instructions vital to the
operation or maintenance of the equipment.
Read the Operator’s Manual and follow all warnings and safety
instructions. Failure to do so can result in serious injury to the
operator and/or bystanders.
FOR QUESTIONS, CALL 1–800–659–5917
• IMPORTANT SAFETY INSTRUCTIONS •
READ ALL INSTRUCTIONS BEFORE OPERATING
WARNING: When using the unit, you must follow the
safety rules. Please read these instructions before operating
the unit in order to ensure the safety of the operator and any
bystanders. Please keep these instructions for later use.
• Carefully read and understand the operator's manual of the unit
that powers this attachment.
• Read this operating instruction manual carefully. Be thoroughly
familiar with the controls and the proper use of the equipment.
Know how to stop the unit and disengage the controls quickly.
• Do not operate this unit when tired, ill, or under the influence of
alcohol, drugs, or medication.
• Never allow children to operate the equipment. Never allow adults
unfamiliar with the instructions to use the unit. Never allow adults
to operate the equipment without proper instruction.
• All guards and safety attachments must be installed properly
before operating the unit.
• Inspect the unit before use. Replace damaged parts. Check for fuel
leaks. Make sure all fasteners are in place and secure. Replace
parts that are cracked, chipped, or damaged in any way. Do not
operate the unit with loose or damaged parts.
• Be aware of the risk of injury to the head, hands and feet.
• Clear the area of children, bystanders, and pets. At a minimum,
keep all children, bystanders, and pets outside a 50 feet (15 m.)
radius; there still may be a risk to bystanders from thrown objects.
Bystanders should be encouraged to wear eye protection. If you
are approached, stop the unit immediately.
SPECIAL SAFETY WARNINGS FOR GAS POWERHEADS
WARNING: Gasoline is highly flammable, and its vapors
can explode if ignited. Take the following precautions:
• Store fuel only in containers specifically designed and approved
for the storage of such materials.
• Always stop the engine and allow it to cool before filling the fuel tank.
Never remove the cap of the fuel tank, or add fuel, when the engine is
hot. Never operate the unit without the fuel cap securely in place.
Loosen the fuel tank cap slowly to relieve any pressure in the tank.
2
• Avoid creating a source of ignition for spilled fuel. Do not start the
engine until fuel vapors dissipate.
• Move the unit at least 30 feet (9.1 m) from the fueling source and site
before starting the engine. Do not smoke. Keep sparks and open
flames away from the area while adding fuel or operating the unit.
• Never start or run the unit inside a closed room or building.
Breathing exhaust fumes can kill. Operate this unit only in a well
ventilated area outdoors.
SAFETY WARNINGS FOR ELECTRIC POWERHEADS
WARNING: To reduce the risk of electrical shock, use
only extension cords approved for outdoor use, such as an
extension cord of cord type SW-A, SOW-A, STW-A, STOWA, SJW-A, SJOW-A, SJTW-W or SJTOW-A. Extension
cords are available from your local retailer. Use only roundjacketed extension cords approved for outdoor use.
• CORD SETS: Make sure your cord set is in good condition. When
using a cord set, be sure to use a cord that is heavy enough to
carry the current that your unit will draw. An undersized cord set
will cause a drop in line voltage resulting in loss of power and
overheating. See the operator’s manual for the unit that will power
this attachment for the recommended cord size.
• Inspect all extension cords and the unit power connection
periodically. Look closely for deterioration, cuts or cracks in the
insulation. Also inspect the connections for damage. Replace the
cords if any defects or damage appear.
• Prevent disconnection of the electric powerhead from extension
cord during operation by using a plug-receptacle retaining strap,
connector, or by making a knot as shown below:
Extension
Cord
Power Head
Cord
Extension
Cord
Power Head
Cord
RULES FOR SAFE OPERATION
DANGER: RISK OF CUT OR SHOCK — Keep hands
away from blades. Keep one hand on assist handle on the
powerhead and on the loop handle of attachment when power
is on. Do not attempt to remove cut material or hold material to
be cut when blades are moving. Make sure the switch on the
power unit is off when clearing jammed material from blades.
Wear gloves when handling the blade. Do not operate unit
with one hand.
• Avoid dangerous environments. Never operate your unit in damp
or wet conditions. Moisture is a shock hazard.
• Do not use the unit in the rain. Do not use in or around water. Do
not use on wet hedges or shrubbery.
• Do not handle the plug or unit with wet hands or standing on any
wet surfaces.
• Do not leave the unit plugged in when not in use, changing
attachments or attachments, or while being serviced.
BLADED PRUNER OPERATING PROCEDURES
• Keep bystanders, especially children and pets, at least 50 ft (15 m) away.
• Wear safety glasses or goggles that are marked as meeting ANSI
Z87.1–1989 standards. Wear ear/hearing protection and protective
head gear when operating this unit. Non-skid footwear is
recommended when working outdoors. Wear protective hair covering
to contain long hair. Wear a face or dust mask if the operation is dusty.
• Be sure the cutting attachment is not in contact with anything
before starting the unit.
• Wear heavy, long pants, boots, gloves and a long sleeve shirt. Do
not wear loose clothing, jewelry, short pants, sandals or go
barefoot. Secure hair above shoulder level.
• Use the unit only in daylight or good artificial light.
• Use the right tool. Only use this tool for the purpose intended.
• Always stop the engine/motor when operation is delayed or when
walking from one location to another.
• Use only genuine factory replacement parts and accessories for
this unit. These are available from your authorized service dealer.
Use of any unauthorized parts or accessories could lead to serious
injury to the user or damage to the unit, and void your warranty.
• Do not attempt to touch or stop the blade when it is rotating.
• A coasting blade can cause injury while it continues to spin after the
engine is stopped or the throttle trigger is released. Maintain proper
control until the blade has completely stopped rotating.
• Do not run the unit at high speed when not cutting.
• If you strike or become entangled with a foreign object, stop the
engine immediately and check for damage. Have any damage
repaired before attempting further operations. Do not operate unit
with a bent, cracked or dull blade. Discard blades that are bent,
warped, cracked or broken.
• Do not sharpen the cutting blade. Replace the blade.
• Use the bladed pruner only for the purpose described in this manual.
• Stop the engine IMMEDIATELY if you feel excessive vibration. Vibration
is a sign of trouble. Inspect thoroughly for loose nuts, bolts or damage
before continuing. Repair or replace affected parts as necessary.
BLADE THRUST PRECAUTIONS
WARNING: Blade thrust may occur when the spinning
blade contacts an object that it does not immediately cut.
Blade thrust can be violent enough to cause the unit and/or
operator to be propelled in any direction, and possibly lose
control of the unit. Blade thrust can occur without warning if
the blade snags, stalls or binds. This is more likely to occur
in areas where it is difficult to see the material being cut.
• With a basic understanding of blade thrust, you can reduce or eliminate
the element of surprise. Sudden surprise contributes to accidents.
• Always cut with the engine running at full speed. Fully squeeze
the throttle trigger and maintain a steady cutting speed.
• Do not overreach. Always keep proper footing and balance.
• Always hold the unit with both hands when operating. Keep a
firm grip on both handles or grips.
• Keep hands, face, and feet at a distance from all moving parts. Do not
touch or try to stop the cutting attachment when it rotates.
• Keep unit clean of vegetation and other materials. They may
become lodged between the blade and blade cover.
OTHER SAFETY PRECAUTIONS
• DO NOT operate a bladed pruner with one hand! Serious injury to
the operator, helpers, or bystanders may result from one-handed
operation. A bladed pruner is intended for two-handed use.
• Keep the work area clean. Cluttered areas invite injuries. Do not
start cutting until you have a clear work area, secure footing, and
a planned retreat path from the falling branches.
• Stay Alert. Watch what you are doing. Use common sense. Do
not operate the bladed pruner when you are tired. Keep all parts
of your body away from the pruner blade when the motor is
operating. Before you start the pruner, make sure the pruner
blade is not contacting anything.
• Disconnect the bladed pruner when not in use, before servicing,
and when changing blades.
• Check damaged parts. Before further use of the bladed pruner, a
guard or other part that is damaged should be carefully checked
to determine that it will operate properly and perform its intended
function. Check for alignment of moving parts, binding of moving
parts, breakage of parts, mounting, and any other conditions that
may affect its operation. A guard or other part that is damaged
should be properly repaired or replaced by an authorized service
center, unless otherwise indicated in this instruction manual.
• Do not operate a bladed pruner in a tree unless you are
specifically trained to do so. When cutting a limb that is under
tension, be alert for spring back so that you will not be struck
when the tension in the wood fibers is released.
• Do not expose the bladed pruner to rain. Do not use the bladed
pruner in damp or wet locations.
• Do not use the bladed pruner in the presence of flammable
liquids or gases.
• All bladed pruner service, other than the items listed in the user
manual safety and maintenance instructions, should be performed
by qualified personnel. Do not attempt to repair it yourself; there
are no user serviceable parts inside.
• The bladed pruner will do a better and safer job when used at the
rate for which it was intended.
• Use the right tool. Cut wood only. Do not use the bladed pruner for
purposes for which it was not intended. For example, do not use the
bladed pruner for cutting plastic, masonry, or non-building materials.
• Do not operate a bladed pruner that is damaged, improperly
adjusted, or not completely and securely assembled. Be sure that
the blade stops moving when the trigger is released.
• Do not attempt operations beyond your capacity or experience.
• Never remove, modify or make inoperative any safety device
furnished with your unit.
• This pruner is intended for infrequent use by homeowner’s,
cottagers and campers, and for such general applications such as
clearing, pruning, cutting firewood, etc. It is not intended for
prolonged use. If the intended use involves prolonged periods of
operation, this may cause circulatory problems in the user’s hands
due to vibration. It may be appropriate to use a pruner having an
anti-vibration feature.
• Safety clothing required by your safety organizations, government
regulations, or your employer should be used; otherwise, snug fitting
clothing, safety footwear, and hand and ear protection should be worn.
• Never touch the blade or attempt to service the unit while the
engine is running. Make sure all moving parts have stopped.
Allow the blade to cool as the blade can be hot.
• Make sure the blade is properly tightened. Visually inspect for
damage. Repair any damage before restarting or operating the unit.
• Do not cut near electrical cables or power lines.
• Do not use the bladed pruner to fell a tree. Use a standard chain
saw for this application.
MAINTENANCE AND STORAGE
• Allow the unit to cool before storing or transporting. Be sure to
secure the unit while transporting.
• Store the unit in a locked up and dry or high and dry place to
prevent unauthorized use or damage, out of the reach of children.
• Never douse or squirt the unit with water or any other liquid. Keep
handles dry, clean and free from debris. Clean after each use. See
Cleaning and Storage.
• Keep these instructions. Refer to them often and use them to
instruct other users. If you loan someone this unit, also loan them
these instructions.
• Only qualified personnel should perform any repairs or
maintenance procedures that are not described in this manual.
SAVE THESE INSTRUCTIONS
3
RULES FOR SAFE OPERATION
• SAFETY AND INTERNATIONAL SYMBOLS •
This operator's manual describes safety and international symbols and pictographs that may appear on this product. Read the operator's
manual for complete safety, assembly, operating, maintenance, and repair information.
SYMBOL
MEANING
SYMBOL
• SAFETY ALERT SYMBOL
Indicates danger, warning or caution. May be used in
conjunction with other symbols or pictographs.
• READ OPERATOR'S MANUAL
WARNING: Read the operator’s manual(s) and follow
all warnings and safety instructions. Failure to do so can
result in serious injury to the operator and/or bystanders.
• WEAR HEAD, EYE, AND HEARING PROTECTION
WARNING: Thrown objects and loud noise can
cause severe eye injury and hearing loss. Wear eye
protection meeting ANSI Z87.1–1989 standards and
ear protection when operating this unit. Use a full face
shield when needed.
• HOT SURFACE
WARNING: Do not touch a hot surface. You may
get burned. These parts get extremely hot from
operation. They remain hot for a short time after the
unit is turned off.
MEANING
• USE BOTH HANDS
Always use both hands while operating the bladed
pruner. Never use only one hand to operate the unit.
• KEEP BYSTANDERS AWAY
WARNING: Keep all bystanders, especially
children and pets, at least 50 feet (15 m) from the
operating area.
• POWER LINES CAN CAUSE SEVERE INJURY
WARNING: Do not operate unit near power lines.
Contact with a power line may cause serious injury or
damage to the unit. Maintain a clearance of at least
50 ft (15 m) between the bladed pruner (including any
branches it is contacting) and any electrical line.
WARRANTY STATEMENT
CRAFTSMAN FULL WARRANTY
If this Craftsman product fails due to a defect in material or workmanship within one year from the date of purchase, return it to any Sears
store or other Craftsman outlet in the United States for free replacement.
This warranty applies for only 90 days from the purchase date if this product is ever used for commercial or rental purposes.
This warranty covers ONLY defects in materal and workmanship. Sears will NOT pay for:
• The pruner blades, which are expendable items that can wear out from normal use within the warranty period.
• Repairs necessary because of accident or failure to operate or maintain the product according to all supplied instructions.
This warranty gives you specific legal rights, and you may also have other rights which vary from state to state.
Sears, Roebuck and Co., Hoffman Estates, IL 60179
4
KNOW YOUR UNIT
Allen Wrench
Pruner Blade
Shaft Housing
Blade Cover
Nut
Washer
Hook
Extension Boom
Hanger
Craftsman Convertible™
Coupler
ASSEMBLY INSTRUCTIONS
INSTALLING / REMOVING THE ATTACHMENT
Primary Hole
Release Button
WARNING: Prior to operation, read and understand the
operator’s manual for unit to be used with this attachment.
Coupler
The Bladed Pruner Attachment may be mounted to different power
tools. The instruction manuals for the basic power tool and the
attachment contain the information necessary for operation of the
power tool combination. Therefore, always read BOTH instruction
manuals before using the power tool for the first time. Keep the
manuals in a safe place for future reference.
NOTE: To make installing or removing the attachment easier, place
the unit on the ground or on a work bench.
WARNING: To avoid serious personal injury and
damage to the unit, shut the unit off before removing or
installing attachments.
WARNING: To avoid serious personal injury and
damage to the unit, NEVER install more than one extension
boom to a power tool.
4.
Craftsman Convertible™
Coupler
5.
Fig. 1
Press and hold the release button (Fig. 1).
While firmly holding the upper shaft housing, pull the
attachment or extension boom out of the coupler (Fig. 2).
Installing the Attachment or Extension Boom
1. Remove the hanger or shipping cap from the top of the shaft housing.
2. Turn knob counterclockwise to loosen (Fig. 1).
3. While firmly holding the attachment or extension boom, push it
straight into the coupler (Fig. 2).
NOTE: Aligning the release button with the guide recess will help
installation (Fig. 1).
2.
3.
Turn the knob clockwise to tighten (Fig. 3).
CAUTION: Lock the
release button in the
primary hole (Fig. 2) and
securely tighten the
knob before operating
this unit.
Guide Recess
Knob
Lower Shaft Housing
Fig. 2
Removing the Attachment or Extension Boom
1. Turn the knob counterclockwise to loosen (Fig. 1).
Release Button
Knob
Upper Shaft Housing
Repeat steps 1–4 for the
attachment or extension
boom.
Knob
Fig. 3
CAUTION: The attachments with the coupler system is
to be used in the primary hole only. Using the wrong hole
could lead to personal injury or damage to the unit.
The attachment should be installed with the release button in the primary
hole.
Check Flex Shaft Engagement Prior to Using
1. Start the unit.
2. Briefly engage and release the trigger.
3. Check that attachment is operating.
4. If the attachment is not operating, remove attachment and
repeat steps for installing the attachment.
5. Recheck operation of attachment.
5
OPERATING INSTRUCTIONS
OPERATING PRECAUTIONS
WARNING: Dress properly to reduce the risk of injury
when operating this unit. Do not wear loose clothing or
jewelry. Wear eye and ear/hearing protection. Wear heavy
long pants, boots and gloves. Wear a hard hat. Use a full
face shield when needed.
1.
Keep bystanders 50 feet (15 meters) away when operating the
pruner.
2. Do not use the bladed pruner to cut down trees. Use a chain saw.
3. Grip bladed pruner securely—one hand on the grip, the other
on the handle.
5. Keep finger off the trigger until ready to make cut.
6. Before starting the bladed pruner, make sure the blade is not
touching anything.
7. Keep all parts of your body away from the blade when the
pruner is running.
8. Do not force the bladed pruner while cutting. Apply light
pressure. It will do the job better and safer at the rate for which
it was intended.
9. When cutting limbs or branches that are under tension, use
extreme caution. Be alert for wood springing back. When wood
tension is released, the limb could spring back and strike
operator causing severe injury or death.
10. When carrying bladed pruner from one place to another:
• hold pole at balance point
• keep blade to the rear
11. Do not cut small brush and saplings with the bladed pruner.
Slender matter may catch in the blade and be whipped toward
you. This could also pull you off balance.
12. Never stand directly under the limb you are trimming. Always
position yourself out of the path of falling debris (Fig. 4).
13. Never stand on a ladder or other type of unstable support while
using the bladed pruner.
14. Always use both hands to operate bladed pruner. Keep a firm,
steady pressure on the bladed pruner while cutting, but do not
try to force the blade through the wood.
15. Do not use the bladed pruner to cut limbs larger than 1.5”
(38 mm) in diameter.
16. Keep other persons away from cutting end of bladed pruner
and at a safe distance from work area. (Fig. 5).
17. Do not use the bladed pruner near cable, electric power or
telephone lines (Fig. 6). Maintain a minimum clearance of 50
feet (15 m) from all power lines.
STARTING INSTRUCTIONS
Fig. 4
Fig. 5
WARNING: To reduce the risk of fire and burn injuries,
start the engine at least 30 ft. (9.1 m) from the fueling spot,
outdoors only.
Start and operate your bladed pruner without assistance. For
specific starting instructions, see the appropriate section of your
powerhead manual. Proper starting methods reduce the risk of
injury.
1. Place the bladed pruner on firm ground or other solid surface
in an open area.
2. Maintain good balance and secure footing.
Fig. 6
6
OPERATING INSTRUCTIONS
OPERATING TIPS
WARNING: Blade thrust may occur when the spinning
blade contacts an object that it does not immediately cut.
Blade thrust can be violent enough to cause the unit
and/or operator to be propelled in any direction, and
possibly lose control of the unit. Blade thrust can occur
without warning if the blade snags, stalls or binds. This is
more likely to occur in areas where it is difficult to see the
material being cut.
Cut 1
• Avoid blade thrust. Blade thrust can result in severe injury or
death.
• Do not operate the bladed pruner while in a tree, on a ladder or
any other unstable work surface, or in any awkward position. You
may lose control of the bladed pruner causing severe injury.
• Do not extend your arms above shoulders when using the bladed
pruner.
• Seek professional help if you are facing conditions beyond your
ability.
• Trimming a tree is the process of cutting limbs from a living tree.
Make sure your footing is firm. Keep your feet apart. Divide your
weight evenly on both feet.
To trim a limb (pruning):
Fig. 7
WARNING: To avoid serious personal injury, make sure
you NEVER stand directly beneath the branch being cut or
in the arc of its detachment.
1.
Using the top edge of the blade (Fig. 7), score the bottom of
the branch to a depth of up to about a half inch for Cut 1. This
will help keep the bark from ripping away from the tree when
the branch is cut.
NOTE: If the score is too deep, the branch will bend and bind the
blade in the cut making the blade difficult to pull out.
2. Using the bottom edge of the blade (Fig. 8), align the blade
with Cut 1, lower the pruner until the blade contacts the
branch, and cut through the branch in one slow, steady motion
(Cut 2).
Cut 2
Fig. 8
MAINTENANCE AND REPAIR INSTRUCTIONS
PRUNER BLADE REPLACEMENT/INSTALLATION
The pruner blade is an expendable item not covered by the product
warranty. The pruner blade is a 5.5-inch 100-tooth circular saw
blade. Do not use any other type of blade. Replacement blades
(replacement part number 753-05740) are available for purchase
through Sears Parts and Repair.
Removing the Pruner Blade
Housing
Nut (13 mm)
Washer
Screw
Locking
Teeth
WARNING: Whenever handling the pruner blade, always
wear work gloves for protection against sharp cutting edges.
Use the provided Allen wrench to remove the screws holding
the blade guard in place (Fig. 9).
2. Remove the blade guard.
3. Turn the unit so that you are looking at the end of it (Fig. 10).
4. Rotate the nut until one of the locking holes on the bushing
beneath the blade aligns between the locking teeth (Fig. 10).
5. Insert the long end of the provided Allen wrench between the
Locking Teeth and into the Locking Hole (Fig. 10).
6. While holding the Allen wrench in the hole, remove the nut by
turning it in a CLOCKWISE direction with a 13 mm socket wrench.
NOTE: This nut is reverse-threaded to compensate for the rotation
of the cutting blade. Be careful to turn the wrench in a
CLOCKWISE direction to loosen the nut.
7. Remove the Allen wrench from the Locking Hole.
Bushing
1.
Screw
Pruner Blade
Blade Guard
Fig. 9
8.
Remove the washer and then the cutting blade. Make sure the
bushing remains on the shaft.
Installing the Pruner Blade
1. Place the pruner blade on the shaft making sure that the
bushing is already in place and that the directional arrow on the
blade is oriented as shown in Figure 9.
2. Place the washer over the blade making sure the the convex
7
Locking Teeth
Nut
8.
Blade
Bushing
Locking Hole
Fig. 10
3.
4.
5.
6.
7.
side is facing away from the blade.
Insert the long end of the provided Allen wrench between the
Locking Teeth and into the Locking Hole in the bushing (Fig. 10).
While holding the Allen wrench in the hole, start the nut onto the
shaft by hand making sure to turn the nut COUNTERCLOCKWISE
to tighten.
While continuing to hold the Allen wrench in the hole and using a
13 mm socket wrench, turn the nut in a COUNTERCLOCKWISE
direction until tight.
Remove the Allen wrench from the Locking Hole.
Place the blade guard over the blade and align the holes in it with
the holes in the housing.
Insert the screws into the blade guard holes and hand start them
to tighten.
9. Finish tightening the screws using the provided Allen wrench.
Replacing the Pruner Blade
If you need to replace the pruner blade, you can replace it with a
5.5-inch 100-tooth circular saw blade.
CLEANING
Use a small brush to clean off the outside of the unit. Do not use strong
detergents. Household cleaners that contain aromatic oils such as pine
and lemon, and solvents such as kerosene, can damage plastic housing
or handle. Wipe off any moisture with a soft cloth.
STORAGE
• Lock up the unit to prevent unauthorized use or damage.
• Store the unit in a dry area.
• Store the unit out of the reach of children.
LONG TERM STORAGE
1. Follow Removing the Pruner Blade instructions.
2. Thoroughly clean the unit and inspect for any loose or damaged parts.
3. Repair or replace damaged parts and tighten loose screws, nuts or bolts.
4. Follow Installing the Pruner Blade instructions to reinstall the
blade and blade guard. The unit is ready for storage.
TRANSPORTING
• Secure the unit while transporting.
• Cover the blade so that the blade edges will not come into contact
with anything.
SPECIFICATIONS
Approximate Operating Weight of Attachment . . . . . . . . . . . . . . . . . . . . . . . . . . . . . . . . . . . . . . . . . . . . . . . . . . . . . . . . . . . . . . . 3.3 lbs. (1.5 kg)
Drive Shaft Length . . . . . . . . . . . . . . . . . . . . . . . . . . . . . . . . . . . . . . . . . . . . . . . . . . . . . . . . . . . . . . . . . . . . . . . . . . . . . . . . . . . . . . . . 26” (66 cm)
Cutting Width . . . . . . . . . . . . . . . . . . . . . . . . . . . . . . . . . . . . . . . . . . . . . . . . . . . . . . . . . . . . . . . . . . . . . . . . . . . . . . . . . . . . . . . . . . . 1.5" (38 mm)
8
Manual del Operador
®
Accesorio de
PODADORA CON CUCHILLA CIRCULAR
Modélo No. 316.792480
• SEGURIDAD
• MONTAJE
• FUNCIONAMIENTO
• MANTENIMIENTO
• LISTADO DE PIEZAS
PRECAUCIÓN: Antes de utilizar
este producto, lea este manual
y siga todas las reglas de
seguridad y las instrucciones
de funcionamiento.
Sears, Roebuck and Co., Hoffman Estates, IL 60179, U.S.A.
Visite nuestro sitio web: www.sears.com/craftsman
769-03520A
NORMAS PARA UNA OPERACIÓN SEGURA
INDICE DE CONTENIDOS
Normas para una operación segura . . . . . . . . . . . . . . . . . . . . . . .E2
Garantía . . . . . . . . . . . . . . . . . . . . . . . . . . . . . . . . . . . . . . . . . . . .E4
Conozca su unidad . . . . . . . . . . . . . . . . . . . . . . . . . . . . . . . . . . .E5
Instrucciones de montaje . . . . . . . . . . . . . . . . . . . . . . . . . . . . . . .E5
Instrucciones de operación . . . . . . . . . . . . . . . . . . . . . . . . . . . . .E6
Instrucciones de mantenimiento . . . . . . . . . . . . . . . . . . . . . . . . .E7
Limpieza y almacenamiento . . . . . . . . . . . . . . . . . . . . . . . . . . . . .E8
Especificaciones . . . . . . . . . . . . . . . . . . . . . . . . . . . . . . . . . . . . .E8
Lista de piezas . . . . . . . . . . . . . . . . . . . . . . . . . . . . . . . . . . . . . . .E9
Numeros de servicio . . . . . . . . . . . . . . . . . . . . . . . . .Contraportada
Antes de que empiece a ensamblar su nuevo equipo, por favor
ubique la placa que contiene el modelo de la unidad y escriba esa
información en el espacio en blanco aquí debajo. Aquí debajo se
explica la muestra de una placa del modelo.
MODEL :
S/N :
Los símbolos de seguridad se utilizan para llamar su atención
sobre posibles peligros. Los símbolos de seguridad y sus
explicaciones merecen toda su atención y comprensión. Los
símbolos de seguridad no eliminan ningún peligro por sí mismos.
Las instrucciones o advertencias que ofrecen no substituyen las
medidas adecuadas de prevención de accidentes.
SIMBOLO
SIGNIFICADO
PELIGRO: El no obedecer una advertencia de
seguridad puede conducir a que usted u otras personas
sufran graves lesiones. Siga siempre las precauciones
de seguridad para reducir el riesgo de incendio,
descarga eléctrica y lesiones personales.
ADVERTENCIA: El no seguir una advertencia de
seguridad puede conducir a que usted u otras personas
sufran lesiones. Siga siempre las precauciones de
seguridad para reducir el riesgo de incendio, descarga
eléctrica y lesiones personales.
PRECAUCIÓN: El no seguir una advertencia de
seguridad puede conducir a daño patrimonial o a que usted
u otras personas sufran lesiones personales. Siga siempre
las precauciones de seguridad para reducir el riesgo de
incendio, descarga eléctrica y lesiones personales.
ITEM :
Copiez le numéro de modèle / pièce mère ici :
ALERTA DE SEGURIDAD: Indica peligro,
advertencia o precaución. Debe prestar atención para
evitar sufrir graves lesiones personales. Puede ser
utilizado junto con otros símbolos o figuras.
Copiez le numéro de série ici :
REMARQUE: Le ofrece información o instrucciones que son
esenciales para la operación o mantenimiento del equipo.
Lea el manual del operador y siga todas las advertencias e instrucciones de seguridad. De no hacerlo, el operador y/o los
espectadores pueden sufrir graves lesiones.
SI TIENE PREGUNTAS, LLAME AL 1–800–659–5917
• IMPORTANTE INFORMACION DE SEGURIDAD •
LEA TODAS LAS INSTRUCCIONES ANTES DE OPERAR LA UNIDAD
ADVERTENCIA: Se debe seguir las siguientes
reglas de seguridad cuando use la unidad. Por favor lea
estas instrucciones para su propia seguridad y las de
los espectadores, antes de hacer funcionar la unidad.
Por favor mantenga estas instrucciones en un lugar
seguro para uso futuro.
• Lea con cuidado y comprenda el manual del operador de la
unidad que propulsa este accesorio.
• Lea este manual de instrucciones de funcionamiento detenidamente.
Familiarícese completamente con los controles y el uso apropiado del
equipo. Sepa cómo apagar la unidad y desactivar los controles con rapidez.
• No opere esta unidad si está cansado, enfermo, o bajo los efectos
del alcohol, drogas o medicamentos.
• Nunca permita que los niños operen la unidad. Nunca permita que
adultos que no estén familiarizados con las instrucciones operen
la unidad. Nunca permita que adultos operen la unidad sin los
debidos conocimientos.
• Todos los dispositivos de protección y los accesorios de seguridad
deben estar instalados adecuadamente antes de operar la unidad.
• Inspeccione la unidad antes de usarla. Cambie las piezas dañadas.
Verifique si existen fugas de combustible. Asegúrese de que todos
los sujetadores estén en su lugar y asegurados. Reemplace las
piezas que estén agrietadas, astilladas o dañadas en cualquier
forma. No opere la unidad si tiene piezas flojas o dañadas.
• Tenga en cuenta el riesgo de lesiones en la cabeza, manos y pies.
• Aleje a todos los niños, espectadores y animales domésticos.
Mantenga todos los niños, espectadores y animales domésticos
a una distancia de por lo menos 50 pies (15 m); aún así puede
existir un riesgo de objetos despedidos contra los espectadores.
Los espectadores deben usar protección para sus ojos. Si
alguien se le acerca, pare la unidad de inmediato.
ADVERTENCIAS ESPECIALES DE SEGURIDAD PARA
POWERHEADS DE GASOLINA
ADVERTENCIA: La gasolina es muy inflamable y
sus gases pueden explotar si se encienden. Tome las
siguientes precauciones:
• Almacene el combustible solamente en recipientes diseñados y aprobados
E2
específicamente para el almacenamiento de dichos materiales.
• Pare siempre el motor y deje que se enfríe antes de llenar el tanque de
combustible. Nunca quite la tapa del tanque de combustible, ni agregue
combustible, cuando el motor esté caliente. No opere nunca la unidad sin
la tapa del combustible colocada firmemente en su lugar. Afloje la tapa
del tanque de combustible lentamente para disipar la presión del tanque.
• Evite crear un posible incendio por combustible derramado. No arranque
el motor hasta que se hayan disipado los vapores del combustible.
• Aleje siempre la unidad a por lo menos 30 pies (9.1 m) de la fuente y
sitio de combustible antes de arrancar el motor. No fume. Mantenga
las chispas y las llamas vivas alejadas del área mientras añada
combustible o esté operando la unidad.
• Nunca arranque ni opere la unidad dentro de una sala o edificio cerrado.
Respirar los vapores de escape puede causarle la muerte. Haga
funcionar esta unidad solamente en un área exterior bien ventilada.
ADVERTENCIAS DE SEGURIDAD ESPECIALES PARA LAS
UNIDADES MOTRICES
ADVERTENCIA: Para reducir el riesgo de descarga
eléctrica, use sólo cables de extensión aprobados para ser
usados en exteriores, como los cables de extensión tipo
SW-A, SOW-A, STW-A, STOW-A, SJW-A, SJOW-A,
SJTW-W o SJTOW-A. Puede adquirir cables de extensión
en su distribuidor local. Use sólo cables de extensión de
camisa cilíndrica aprobados para ser usados en exteriores.
• CABLES DE EXTENSIÓN: Verifique que su cable de extensión esté
en buenas condiciones. Cuando utilice un cable de extensión,
verifique que el mismo sea lo suficientemente grueso para conducir
la corriente que consume la unidad. Si utiliza un cable demasiado
delgado, eso ocasionará una caída de voltaje de la línea, y en
consecuencia, una pérdida de potencia y recalentamiento. Lea el
manual del operador de la unidad que accionará este accesorio para
informarse acerca del tamaño recomendado de cable de extensión.
• Inspeccione con frecuencia todos los cables de extensión y la
conexión de la unidad a la corriente. Revise con cuidado para ver
si hay deterioros, cortes o grietas en el aislamiento. Inspeccione
también las conexiones para ver si han sufrido daños. Cambie
los cables si observa algún defecto o daño.
• Evite la desconexión del cable de extensión del cabezal motorizado
de la cortadora de setos durante el funcionamiento, utilizando un
retenedor de enchufe-receptáculo, conector o haciendo un nudo
NORMAS PARA UNA OPERACIÓN SEGURA
como se muestra aquí debajo:
Cable de
extensión
Cable de la
Cabeza
Cable de
extensión
Cable de la
Cabeza
PELIGRO: PELIGRO DE CORTE O DESCARGA -
Mantenga las manos lejos de las cuchillas. Mantenga una
mano en el mango auxiliar del cabezal motorizado y en el
mango curvo del aditamento cuando la unidad esté
prendida. No intente quitar el material cortándolo ni
sostener el material a cortar cuando las cuchillas estén en
movimiento. Compruebe que el interruptor de la unidad
motorizada esté apagado cuando despeje el material
atascado en las cuchillas. Use guantes cuando manipule la
cuchilla. No haga funcionar la unidad con una mano.
• Evite los ambientes peligrosos. No opere nunca su unidad en
ambientes húmedos ni mojados. La humedad representa un
peligro de descarga eléctrica.
• No use la unidad bajo la lluvia. No la use dentro del agua ni
alrededor de ella.
• No toque el enchufe ni la unidad con las manos mojadas ni cuando
esté parado sobre una superficie mojada.
• No deje la unidad enchufada mientras no la use, mientras cambie
los accesorios o aditamentos, ni mientras le haga mantenimiento.
PROCEDIMIENTOS DE OPERACIÓN DE SIERRAS DE PÉRTIGAS
• Mantenga a los espectadores, especialmente a los niños y
animales domésticos, a una distancia de al menos 50 pies (15 m).
• Use espejuelos o gafas de seguridad que estén marcados como
que cumplen con las normas ANSI Z87.1–1989. Use protección
para las orejas/audición y equipos de protección para la cabeza
cuando opere esta unidad. Se recomienda usar zapatos que no
resbalen cuando trabaje en exteriores. Póngase una redecilla
para contener el cabello largo. Use siempre una máscara facial o
para protegerse contra el polvo si la operación levanta polvo.
• Asegúrese de que el accesorio de corte no esté haciendo
contacto con ningún objeto antes de poner en marcha la unidad.
• Use pantalones largos y gruesos, botas, guantes y camisa de mangas
largas. No use ropa holgada, alhajas, pantalones cortos, sandalias ni
esté descalzo. Sostenga el cabello sobre el nivel de los hombros.
• Use la unidad únicamente con la luz del día o con buena luz artificial.
• Use la herramienta correcta. Use esta herramienta solamente
para el propósito debido.
• Siempre apague el motor cuando se aplace el trabajo o cuando
camine de un punto a otro.
• Use únicamente piezas de repuesto y accesorios del fabricante original
para esta unidad. Se encuentran disponibles en el distribuidor autorizado.
El uso de piezas o accesorios que no sean genuinos puede ocasionarle
lesiones graves al usuario o dañar la unidad y anular la garantía.
• No intente tocar o parar la cuchilla cuando esté girando.
• Una cuchilla girando por inercia puede causar lesiones mientras
continúa girando después de que se ha parado el motor o se ha
soltado el gatillo del regulador. Mantenga el control adecuado
hasta que la cuchilla haya dejado de girar completamente.
• No haga funcionar la unidad a alta velocidad cuando no esté cortando.
• Si golpea o se enreda con un objeto extraño pare el motor de
inmediato y compruebe si ha habido algún daño. Repare todos
los daños antes de volver a intentar operar la unidad. No opere la
unidad con una cuchilla doblada, agrietada o roma. Deseche las
cuchillas dobladas, deformadas, agrietadas o rotas.
• No afile la cuchilla de corte. Reemplace la cuchilla.
• Use la podadora de sierra circular solamente para el propósito
descrito en este manual.
• Pare el motor de INMEDIATO si siente demasiada vibración. La
vibración indica que hay problemas. Inspeccione bien si hay
tuercas o pernos flojos o algún daño antes de continuar. Repare
o reemplace las piezas afectadas según sea necesario.
PRECAUCIONES DE EMPUJE DE LA CUCHILLA
ADVERTENCIA: Se puede producir un empuje de la
cuchilla cuando entre en contacto con un objeto mientras está
girando y no lo corta de inmediato. El empuje de la cuchilla
puede ser lo suficientemente violento para ocasionar que la
unidad y/o el operador sea lanzada(o) en cualquier dirección, y
posiblemente pierda el control de la unidad. El empuje de la
cuchilla puede producirse sin aviso si la cuchilla se desbasta,
se atasca o se dobla. Esto es más probable que ocurra en
áreas en las que es difícil ver el material que se está cortando.
• Con una comprensión básica del empuje de la cuchilla, usted
puede reducir o eliminar el elemento de sorpresa. Las sorpresas
momentáneas contribuyen a los accidentes.
• Haga el corte siempre con el motor funcionando a plena velocidad.
Oprima completamente el Gatillo del regulador y mantenga una
velocidad de corte uniforme.
• No se estire demasiado. Mantenga siempre una posición y
equilibrio adecuados.
• Sostenga la unidad con ambas manos cuando la opere. Mantenga
un agarre firme sobre ambas manijas.
• Mantenga las manos, la cara y los pies lejos de todas las partes móviles.
No intente tocar ni detener el accesorio de corte mientras gira.
• Mantenga la unidad limpia de vegetación y otros materiales. Los
mismos se atascan entre la cuchilla y el protector de la cuchilla.
OTRAS PRECAUCIONES DE SEGURIDAD
• NO opere una podadora de sierra circular con una sola mano. La
operación de la unidad con una sola mano puede conducir a
lesiones graves para el operador, los ayudantes u otras personas
que se encuentren en las inmediaciones. La podadora de sierra
circular está diseñada para usarse con las dos manos.
• Mantenga limpia el área de trabajo. Las áreas de trabajo sucias
pueden provocar lesiones. No comience a cortar hasta que tenga
un área de trabajo limpia, tenga una pisada firme, y una zona de
retirada planificada de las ramas que caen.
• Manténgase alerta. Proceda con cautela. Utilice el sentido común. No
opere la podadora de sierra circular cuando esté cansado. Cuando el
motor esté funcionando, mantenga todas las partes del cuerpo
alejadas de la cuchilla. Antes de arrancar la cuchilla, asegúrese de
que la hoja de la cuchilla no haga contacto con ningún objeto.
• Desconecte la podadora de sierra circular cuando no la use,
antes de dar mantenimiento, y cuando cambie las cuchillas.
• Compruebe las piezas dañadas. Antes de continuar utilizando la
podadora de sierra circular, se deberá comprobar cualquier
protector u otra pieza que esté dañada a fin de determinar si la
misma funcionará debidamente y realizará sus funciones.
Compruebe la alineación de las partes en movimiento, el atasco de
las partes en movimiento, rotura de piezas, montaje y cualquier otra
condición que pueda afectar su operación. Un protector o cualquier
otra pieza que esté dañada debe ser debidamente reparada o
reemplazada por un centro de servicio autorizado, a menos que se
indique lo contrario en este manual de instrucciones.
• No opere una podadora de sierra circular en un árbol a menos
que usted haya recibido instrucciones específicamente para
hacerlo. Cuando corte una rama que se encuentra bajo tensión
esté alerta a la posibilidad de que ésta salte de vuelta a su
posición original; puede golpearlo cuando se libera la tensión de
las fibras de la madera.
• No exponga la podadora de sierra circular a la lluvia. No utilice la
podadora de sierra circular en lugares húmedos o mojados.
• No utilice la podadora de sierra circular en presencia de líquidos
o gases inflamables.
• Todos los trabajos de mantenimiento de la podadora de sierra
circular, excepto aquellos que se explican en las instrucciones de
seguridad y mantenimiento del manual del usuario, deben ser
hechos por personal calificado en podadoras de sierras
circulares. No trate de repararla usted mismo; la unidad no tiene
piezas dentro que puedan ser reparadas por el usuario.
• La podadora de sierra circular realizará un trabajo mejor y más
seguro a la velocidad para la cual fue diseñada.
• Use la herramienta correcta. Corte madera solamente. No use la
podadora de sierra circular para fines para los cuales no ha sido
diseñada. Por ejemplo, no use la hoja podadora de sierra circular para
cortar plástico, mampostería o materiales que no sean de construcción.
• No haga funcionar una podadora de sierra circular que esté
dañada, incorrectamente ajustada, o que no esté completamente
ensamblada con seguridad. Asegúrese de que la cuchilla se
detenga de girar cuando se suelta el gatillo.
• No intente realizar operaciones más allá de su capacidad o experiencia.
• Nunca quite, modifique o haga que no funcione ningún dispositivo
provisto con su unidad.
• Esta cuchilla está diseñada para ser usada de manera poco
frecuente por propietarios de casas, de cabañas y de casas
motorizadas, así como para aplicaciones generales como limpieza,
poda, corte de malezas, etc. No está diseñada para uso prolongado.
Si se piensa utilizar durante prolongados períodos de operación,
puede ocasionar problemas circulatorios en las manos del usuario
debido a la vibración. Es posible que sea inadecuado utilizar una
sierra que tenga una función contra la vibración.
• La ropa de seguridad requerida por sus organizaciones de
seguridad, reglas gubernamentales, o su empleador deben ser
usadas; de lo contrario, debe ponerse ropa que quede ajustada,
zapatos de seguridad y protección para las manos y los oídos.
• Nunca toque la cuchilla ni intente dar servicio a la unidad mientras
el motor esté funcionando. Asegúrese de que todas las partes en
E3
NORMAS PARA UNA OPERACIÓN SEGURA
movimiento se hayan detenido. Deje que la cuchilla se enfríe ya
que puede estar caliente.
• Asegúrese de que la cuchilla esté bien apretada. Inspeccione
visualmente la cuchilla para ver si está dañada. Repare el daño
antes de volver a arrancar y hacer funcionar la unidad.
• No corte cerca de cables ni líneas eléctricas.
• No utilice la podadora de sierra circular para cortar un árbol. Use
una sierra de cadenas estándar para esta tarea.
MANTENIMIENTO Y ALMACENAJE
• Deje que el motor se enfríe antes de almacenarlo o transportarlo.
Cerciórese de asegurar la unidad al transportarla.
• Guarde la unidad bajo llave en un lugar adecuado y seco para
evitar que sea usada por personas no autorizadas y se dañe,
fuera del alcance de los niños.
• Nunca moje ni rocíe la unidad con agua ni con ningún otro líquido.
Mantenga las manijas secas, limpias y sin residuos. Límpiela
después de usarla. Vea la sección Limpieza y Almacenamiento.
• Guarde estas instrucciones. Consúltelas con frecuencia y utilícelas
para enseñar a otros usuarios. Si le presta esta unidad a alguien,
préstele también estas instrucciones.
• Solamente el personal calificado debe realizar las reparaciones o efectuar
los trabajos de mantenimiento que no se describen en este manual.
GUARDE ESTAS INSTRUCCIONES
• SIMBOLOS DE SEGURIDAD E INTERNACIONALES •
Este manual del operador describe los símbolos y figuras de seguridad e internacionales que pueden aparecer en este producto. Lea el
manual del operador para obtener información completa acerca de la seguridad, ensamble, operación y mantenimiento y reparación.
SÍMBOLO
SIGNIFICADO
SÍMBOLO
SIGNIFICADO
• SIMBOLO DE ALERTA DE SEGURIDAD
Indica peligro, advertencia o precaución. Puede ser
utilizado junto con otros símbolos o figuras.
• LEA EL MANUAL DEL OPERADOR
ADVERTENCIA: Lea el manual del operador y siga
todas las advertencias e instrucciones de seguridad. De
no hacerlo, el operador y/o los espectadores pueden
sufrir graves lesiones.
• USE PROTECCIÓN OCULAR Y AUDITIVA
ADVERTENCIA: Los objetos arrojados por la unidad y
el ruido fuerte pueden causar graves lesiones oculares y
pérdida auditiva. Utilice protección ocular que cumpla con las
normas ANSI Z87.1–1989 y protección auditiva cuando opere
esta unidad. Use una careta completa cuando la necesite.
• SUPERFICIE CALIENTE
ADVERTENCIA: No toque una superficie que
esté caliente. Puede quemarse. Estas partes se
calientan mucho con el uso. Luego de apagarse
permanecen calientes durante un corto tiempo.
• USE AMBAS MANOS
Use siempre ambas manos al operar la podadora
con hoja circular. Nunca opere la sierra con una sola
mano.
• MANTENGA ALEJADOS A LOS ESPECTADORES
ADVERTENCIA: Mantenga retirados a los
espectadores, especialmente a los niños y animales
domésticos por lo menos a 15 m (50 ft) de distancia.
• LAS LÍNEAS DE CORRIENTE ELÉCTRICA PUEDEN
OCASIONAR LESIONES GRAVES
ADVERTENCIA: No opere la unidad cerca de
líneas de corriente eléctrica. El contacto con una
línea de corriente eléctrica puede ocasionar lesiones
graves o dañar la unidad. Mantenga una separación
de al menos 50 pies (15 metros) entre la sierra de
pértiga (incluyendo cualquier rama con la que esté en
contacto) y cualquier línea de corriente eléctrica.
GARANTÍA
GARANTÍA TOTAL DE CRAFTSMAN
Si este producto Craftsman falla debido a un defecto en el material o en la mano de obra dentro de un período de uno año a partir de la fecha de
compra, devuélvalo a cualquier tienda Sears u otro establecimiento de Craftsman en Estados Unidos para que sea reemplazado sin costo alguno.
Esta garantía tiene vigencia solamente por 90 días a partir de la fecha de compra si este producto se usa para fines comerciales o de alquiler.
Esta garantía abarca SOLAMENTE los defectos en el material o en la mano de obra. Sears NO pagará:
• Las cuchillas de la podadora que son artículos consumibles que se desgastan debido al uso normal dentro del período de garantía.
• Las reparaciones necesarias debidas a accidente así como por no operar o no mantener el equipo de acuerdo con todas las instrucciones
provistas.
Esta garantía le concede a usted derechos legales específicos, y usted pudiera tener otros derechos que varían de un estado a otro.
Sears, Roebuck and Co., Hoffman Estates, IL 60179
E4
CONOZCA SU UNIDAD
Llave Allen
Hoja
Bastidor del eje impulsor
Cubierta del hoja
Gancho
Brazo de extensión
Asa para colgar
Acoplador de Craftsman Convertible™
INSTRUCCIONES DE MONTAJE
INSTALACIÓN / REMOCIÓN DEL ACCESORIO
Orificio primario
Botón de desconexión
ADVERTENCIA: Lea y comprenda el manual del
operador de los accesorios antes de su operación.
El accesorio de la podadora de sierra circular puede instalarse en
diferentes herramientas motorizadas. Los manuales de instrucción
para la herramienta motorizada básica y el accesorio contienen la
información necesaria para la operación de las herramientas
motorizadas combinadas. Por lo tanto, lea siempre AMBOS
manuales de instrucción antes de usar la herramienta motorizada
por primera vez. Guarde los manuales en un lugar seguro para
consultas futuras.
NOTA: Para facilitar la instalación o remoción de los accesorios,
ponga la unidad sobre el suelo o sobre un banco de trabajo.
ADVERTENCIA: Para evitar graves lesiones
personales, apague la unidad antes de sacar o instalar
accesorios.
Acoplador
Cubierta superior del eje
ADVERTENCIA: Para evitar lesiones personales
graves y daños a la unidad, NUNCA instale más de una
pluma de extensión a una herramienta motorizada.
4.
Apriete el botón girándolo hacia la derecha (Fig. 3).
PRECAUCIÓN:
Trabe el botón de
desconexión en el
orificio primario (Fig. 2)
y ajuste bien la perilla
antes de operar esta
unidad.
Hueco de Guía
Acoplador de Craftsman
Convertible™
Cubierta inferior del eje
Fig. 2
NOTA: La alineación del botón de desconexión con la guía ayuda
en la instalación (Fig. 1).
Remoción del accesorio:
1. Para aflojarlo, gire el botón en el sentido opuesto al de las
manecillas del reloj (Fig. 1).
Botón de desconexión
Botón
5.
Repita los pasos 1-4 para los
siguientes accesorios o de la
extensión.
Botón
Fig. 3
PRECAUCIÓN: Los accesorios deben ser usados en
Botón
Fig. 1
2. Oprima y sostenga oprimido el botón de liberación (Fig. 1).
3. Mientras sostiene con firmeza el bastidor del eje superior, tire
del accesorio de jardín hacia afuera del acoplador (Fig. 2).
Instalación del accesorio:
1. Quite el colgador o el tapa para transporte de encima de la
cubierta del eje.
2. Apriete el botón girándolo hacia la derecha (Fig. 1).
3. Mientras sostiene el accesorio con firmeza, empújelo en línea
recta en el acoplador (Fig. 2).
el orificio primario. El usar el orificio incorrecto puede
conducir a lesiones personales o daño de la unidad.
El accesorio deberá instalarse con el botón de desconexión en el
orificio primario.
Inspeccione el acoplamiento del eje acodado antes de usar la unidad
1. Arranque la unidad.
2. Enganche y suelte el gatillo brevemente.
3. Verifique que el accesorio esté funcionando.
4. Si el accesorio no está funcionando, retire el accesorio y repita
los pasos para su instalación.
5. Vuelva a verificar el funcionamiento del accesorio.
E5
INSTRUCCIONES DE OPERACIÓN
PRECAUCIONES DE CORTE
ADVERTENCIA: Vista en forma adecuada para reducir
el riesgo de lesiones cuando opere esta unidad. No use
ropa holgada ni alhajas. Use protección ocular y auditiva.
Use pantalones largos y gruesos, botas y guantes. No use
pantalones cortos, sandalias ni trabaje descalzo.
1.
Mantenga a espectadores 15 metros (50 pies) lejos cuando
este operando la herramienta.
2. No use la motosierra telescopica para derrumbar arboles. Use
para esto la motosierra.
3. Asegúrese de que el tanque de aceite esté lleno y de que el
aceite esté lubricando la cadena antes de arrancar.
4. Sujete el tubo de la motosierra firmemente-una mano en el
tube, otra en el maneral.
5. Mantenga su dedo lejos del gatillo interruptor hasta estar listo
para hacer el corte.
6. Antes de encender su motosierra telescopica, aseg-urese que la
cadena de corte no esta tocando nada.
7. Mantenga todas las partes del cuerpo alejadas de la cadena
de corte cuando su motosierra este en funcionamiento.
8. No force la motosierra cuando este cortando. Aplique una
presion lijera. Hara el trabajo mejor y mas seguro.
9. Cuando este cortando ramas que se encuentren bajo tension,
use extrema precaucion. Este alerta a el resorteo de las ramas.
Cuando la rama se libere, esta pudiera regresarse
intempestivamente y golpear al operador causandole severas
lesiones o hasta la muerte.
10. Cuando transporte la motosierra telescopica de un lugar aotro:
• mantenga el tubo en posicion balanceada cerca de la unidad
de poder
• mantenga la barra guia y la cadena hacia atras
11. No corte maleza o arbustos con la motosierra telescopica. Las
ramas delgadas de la maleza o arbustos pudieran enrredarse
en la unidad de corte y pudieran regresarse intempestivamente
hacia usted causandole lesiones o la posibilidad de que pierda
el balance.
12. Nunca se pare directamente por debajo de la rama que esta
podando. Siempre posicionese fuera de la trayectoria de caida
de dichas ramas (Fig. 4).
13. Nunca se pare en una escalera o otro tipo de soporte inestable
cuando utilice la motosierra telescopica.
14. Siempre use ambas manos al operar su motosierra
telescopica. Mantenga una presion firme y constante en la
motosierra telescopica mientras este cortando pero no trate de
forzar la sierra a traves de la madera.
15. No use la sierra de poste para cortar ramas de mas de 38 mm
(1.5 pulg.) de diámetro.
16. Mantenga a las otras personas alejadas de la zona de corte y
de la motosierra telescopica (Fig. 5).
17. No utilice su motosierra telescopica cerca de cables, cables
electricos, o lineas telefonicas. Mantenga una minima distancia de
15 metros (50 pies) de cualquier cable electrico (Fig. 6).
INSTRUCCIONES DE ARRANQUE
Fig. 4
Fig. 5
ADVERTENCIA: Para disminuir el riesgo de incendio
y lesiones por quemaduras, arranque al motor al menos a
30 pies (9.1 metros) del sitio de aprovisionamiento de
combustible, en exteriores solamente.
Arranque y opere su sierra de pértiga sin ayuda. Para conocer
instrucciones precisas para el arranque, vea la sección adecuada de su
manual del motor. Los métodos de arranque adecuados reducen el
riesgo de lesiones.
1. Coloque la sierra de pértiga en tierra firme u otra superficie
sólida en un área abierta.
2. Mantenga buen equilibrio y los pies firmes en el suelo.
E6
Fig. 6
INSTRUCCIONES DE OPERACIÓN
SUGERENCIAS DE OPERACIÓN
ADVERTENCIA: Se puede producir un empuje de la
cuchilla cuando entre en contacto con un objeto mientras está
girando y no lo corta de inmediato. El empuje de la cuchilla
puede ser lo suficientemente violento para ocasionar que la
unidad y/o el operador sea lanzada(o) en cualquier dirección,
y posiblemente pierda el control de la unidad. El empuje de la
cuchilla puede producirse sin aviso si la cuchilla se desbasta,
se atasca o se dobla. Esto es más probable que ocurra en
áreas en las que es difícil ver el material que se está cortando.
Corte 1
• Evite el efecto de reculado. Este efecto de reculado pudiera
causar graves lesiones o la muerte.
• No opere la unidad mientras este sobre un arbol, en una escalera o
cualquier otra superficie inestable, o en una posicion incomoda.
Pudiera perder el control de la unidad causando graves lesiones.
• No extienda sus brazos mas alla de sus hombros cuando use la
unidad.
• Solicite ayuda profesional si ve que el trabajo que necesita hacer
esta fuera de sus posibilidades.
• Podar un arbol es el proceso de cortar las ramas de un arbol
vivo. Asegurese que esta bien parado. Mantenga sus pies
separados, Divida su peso en los dos pies.
Para cortar una rama (poda):
Fig. 7
ADVERTENCIA: Para evitar lesiones personales
graves, asegúrese de NUNCA pararse directamente detrás
de la rama que se está cortando o en el arco de su
esprendimiento.
1.
Usando el borde superior de la hoja (Fig. 7), haga una ranura
en la parte inferior de la rama a una profundidad de
aproximadamente media pulgada para el Corte 1. Esto
ayudará a evitar que se desgarre la corteza del árbol cuando
se corte la rama.
NOTA: Si la ranura es demasiado profunda, la rama se doblará y
atascará la cuchilla en el corte haciendo difícil sacar la
cuchilla.
2. Usando el borde inferior de la cuchilla (Fig. 8), alinee la cuchilla
con el Corte 1, baje la sierra hasta que la hoja haga contacto
con la rama, y corte la rama en un movimiento lento pero firme
(Corte 2).
Corte 2
Fig. 8
INSTRUCCIONES DE MANTENIMIENTO Y REPARACIÓN
REEMPLAZO/INSTALACIÓN DE LA HOJA DE LA CUCHILLA
La podadora de sierra circular es un producto que se desgasta que
no está cubierto por la garantía del producto. La cuchilla de la
podadora es una hoja de sierra circular de 5.5 pulgadas y 100
dientes. No use ningún otro tipo de cuchilla. Las hojas de
reemplazo (p/n 753-05740) están a la venta a través del Centro de
Servicio de Piezas y Reparaciones Sears.
Como sacar la hoja de la cuchilla
ADVERTENCIA: Cada vez que manipule la hoja de la
cuchilla, póngase siempre guantes de trabajo para
protegerse de los bordes de corte afilados.
1.
2.
3.
4.
5.
6.
Use la llave Allen provista para quitar los tornillos que
sujetan el protector de la hoja en su lugar (Fig. 9).
Quite el protector de la hoja.
Gire la unidad de manera que mire al extremo de la misma (Fig. 10).
Haga girar la hoja hasta que uno de los orificios de traba del
buje que se encuentra debajo de la hoja quede alineado entre
los dientes de traba (Fig. 10).
Inserte el extremo largo de la llave Allen provista entre los
dientes de traba y el orificio de traba (Fig. 10).
Mientras sostiene la llave Allen en el orificio, quite el Tornillo de
Tuerca haciéndolo girrar hacia la DERECHA con una llave de
cubo de 13 mm.
Caja
Tuerca (13mm)
Arandela
Tornillo
Dientes
de traba
Buje
Tornillo
Hoja
Protector de hoja
Fig. 9
NOTA: Esta tuerca tiene la rosca invertida para compensar la rotación
de la hoja de corte. Tenga cuidado de girar la hoja de los
Dientes de Traba hacia la DERECHA para aflojar la tuerca.
7. Saque la llave Allen del Agujero de Traba.
8. Saque la arandela y luego la hoja de corte. Asegúrese de que
el buje permanezca en el eje.
Instalación de la hoja de la cuchilla
1. Coloque la hoja de la cuchilla en el eje asegurándose de que el
E7
Dientes de traba
Tuerca
Hoja
Buje
Orificio de traba
Fig. 10
2.
3.
4.
5.
6.
7.
8.
buje ya esté colocado.
Coloque la arandela sobre la hoja asegurándose de que el lado
convexo miren en sentido contrario a la hoja.
Inserte el extremo largo de la llave Allen provista entre los
Dientes de Traba y el Agujero de Traba en el buje (Fig. 9).
Mientras sujeta la llave Allen en el agujero, comience a
enroscar la tuerca en el eje con la mano asegurándose de
enroscar la tuerca hacia la IZQUIERDA para apretar.
Mientras sujeta la llave Allen en el orificio y utilizando una llave
de cubo de 13 mm, haga girar la tuerca hacia la IZQUIERDA
hasta que quede apretada.
Saque la llave Allen del Orificio de Traba.
Coloque el protector de la hoja sobre la hoja y alinee los
orificios que tiene con los orificios en la caja.
Inserte los tornillos en los orificios del protector de la hoja y
apriételos con la mano.
9. Termine de apretar los tornillos usando la llave Allen provista.
Remplazo de la hoja de la cuchilla
Si necesita sustituir la hoja, puede reemplazarla por una de 5,5
pulgadas y 100 diente hoja circular.
LIMPIEZA
Use un cepillo pequeño para limpiar la parte exterior de la unidad.
No utilice detergentes fuertes. Los limpiadores caseros que
contienen aceites aromáticos como el pino y limón, y los
disolventes como el queroseno, pueden dañar la caja de plástico o
la manija. Limpie la humedad con un paño suave.
ALMACENAMIENTO
• Cierre la unidad con llave para evitar el uso no autorizado o que
se dañe.
• Guarde la unidad en un local seco.
• Guarde la unidad fuera del alcance de los niños.
ALMACENAMIENTO A LARGO PLAZO
1. Siga las instrucciones "Remplazo de la hoja de la sierra".
2. Limpie bien la unidad e inspeccione si hay piezas sueltas o
dañadas.
3. Repare o reemplace las piezas dañadas y apriete los tornillos,
tuercas o pernos sueltos.
4. Siga las instrucciones de Instalación de la hoja de la cuchilla
para volver a instalar la hoja y el protector de la hoja. La unidad
está lista para guardarse.
TRANSPORTE
• Asegure la unidad mientras la transporte.
• Cubra la hoja de manera que los bordes de la hoja no toquen con
ningún objeto.
ESPECIFICACIONES
Peso del Accesorio . . . . . . . . . . . . . . . . . . . . . . . . . . . . . . . . . . . . . . . . . . . . . . . . . . . . . . . . . . . . . . . . . . . . . . . . . . . . . . . . . . . . 1,5 kg (3,3 lbs.)
Longitud del Eje Conductor . . . . . . . . . . . . . . . . . . . . . . . . . . . . . . . . . . . . . . . . . . . . . . . . . . . . . . . . . . . . . . . . . . . . . . . . . . . . . 66 cm (26 pulg)
Anchura de Corte . . . . . . . . . . . . . . . . . . . . . . . . . . . . . . . . . . . . . . . . . . . . . . . . . . . . . . . . . . . . . . . . . . . . . . . . . . . . . . . . . . . 38 mm (1,5 pulg)
E8
PARTS LIST
REPLACEMENT PARTS - MODEL 316.792480
BLADED PRUNER ATTACHMENT
7
1
14
13
2
3
12
4
5
12
6
11
15
10
9
8
Item Part No.
1
2
3
4
5
6
7
8
9
10
11
12
13
14
15
*
753-04352
753-1190
791-182057
791-181617
791-181981
753-04386
753-05724
753-05763
753-05739
753-05740
753-05741
791-182425
753-05742
791-180288
753-05743
Description
Extension Boom
Split Boom Coupler (includes 3-6)
Screw
Bolt
Adjustment Knob
Knob Retaining Nut
Drive Shaft Housing Assembly
Blade Cover (includes 15)
Blade Retaining Kit
Blade
Blade Spacer
Tube Mounting Hardware
Gearbox Assembly (includes 12, 14 & 15)
Anti-Rotation Screw
Screw
Not Shown
*
*
791-612605
753-05744
Hanger
Wrench
E9
NOTES
E10
NOTES
E11
Get it fixed, at your home or ours!
Your Home
For expert troubleshooting and home solutions advice:
www.managemyhome.com
For repair – in your home – of all major brand appliances,
lawn and garden equipment, or heating and cooling systems,
no matter who made it, no matter who sold it!
For the replacement parts, accessories and
owner’s manuals that you need to do-it-yourself.
For Sears professional installation of home appliances
and items like garage door openers and water heaters.
1-800-4-MY-HOME®
(1-800-469-4663)
Call anytime, day or night (U.S.A. and Canada)
www.sears.com
www.sears.ca
Our Home
For repair of carry-in items like vacuums, lawn equipment,
and electronics, call anytime for the location of your nearest
Sears Parts & Repair Service Center
1-800-488-1222 (U.S.A.)
www.sears.com
1-800-469-4663 (Canada)
www.sears.ca
To purchase a protection agreement on a product serviced by Sears:
1-800-827-6655 (U.S.A.)
1-800-361-6665 (Canada)
Para pedir servicio de reparación
a domicilio, y para ordenar piezas:
Au Canada pour service en français:
1-888-SU-HOGAR®
1-800-LE-FOYER MC
(1-888-784-6427)
® Registered Trademark / TM Trademark / SM Service Mark of Sears Brands, LLC
® Marca Registrada / TM Marca de Fábrica / SM Marca de Servicio de Sears Brands, LLC
MC
Marque de commerce / MD Marque déposée de Sears Brands, LLC
(1-800-533-6937)
www.sears.ca
© Sears Brands, LLC