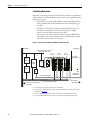
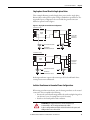
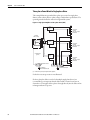
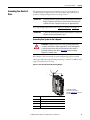
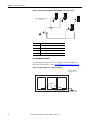
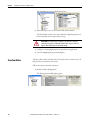
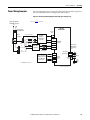
1
User Manual
Kinetix 3 Component Servo Drives
Catalog Numbers 2071-AP0, 2071-AP1, 2071-AP2, 2071-AP4, 2071-AP8, 2071-A10, 2071-A15
Important User Information
Read this document and the documents listed in the additional resources section about installation, configuration, and
operation of this equipment before you install, configure, operate, or maintain this product. Users are required to
familiarize themselves with installation and wiring instructions in addition to requirements of all applicable codes, laws,
and standards.
Activities including installation, adjustments, putting into service, use, assembly, disassembly, and maintenance are required
to be carried out by suitably trained personnel in accordance with applicable code of practice.
If this equipment is used in a manner not specified by the manufacturer, the protection provided by the equipment may be
impaired.
In no event will Rockwell Automation, Inc. be responsible or liable for indirect or consequential damages resulting from the
use or application of this equipment.
The examples and diagrams in this manual are included solely for illustrative purposes. Because of the many variables and
requirements associated with any particular installation, Rockwell Automation, Inc. cannot assume responsibility or
liability for actual use based on the examples and diagrams.
No patent liability is assumed by Rockwell Automation, Inc. with respect to use of information, circuits, equipment, or
software described in this manual.
Reproduction of the contents of this manual, in whole or in part, without written permission of Rockwell Automation,
Inc., is prohibited.
Throughout this manual, when necessary, we use notes to make you aware of safety considerations.
WARNING: Identifies information about practices or circumstances that can cause an explosion in a hazardous environment,
which may lead to personal injury or death, property damage, or economic loss.
ATTENTION: Identifies information about practices or circumstances that can lead to personal injury or death, property
damage, or economic loss. Attentions help you identify a hazard, avoid a hazard, and recognize the consequence.
IMPORTANT
Identifies information that is critical for successful application and understanding of the product.
Labels may also be on or inside the equipment to provide specific precautions.
SHOCK HAZARD: Labels may be on or inside the equipment, for example, a drive or motor, to alert people that dangerous
voltage may be present.
BURN HAZARD: Labels may be on or inside the equipment, for example, a drive or motor, to alert people that surfaces may
reach dangerous temperatures.
ARC FLASH HAZARD: Labels may be on or inside the equipment, for example, a motor control center, to alert people to
potential Arc Flash. Arc Flash will cause severe injury or death. Wear proper Personal Protective Equipment (PPE). Follow ALL
Regulatory requirements for safe work practices and for Personal Protective Equipment (PPE).
Allen-Bradley, Connected Components Workbench, Data Highway Plus, Kinetix, LDC-Series, LDL-Series, Micro800, Micro810, Micro830, Micro850, MicroLogix, MP-Series, PanelView, Rockwell Automation, Rockwell
Software, RSLogix, and TL-Series are trademarks of Rockwell Automation, Inc.
Trademarks not belonging to Rockwell Automation are property of their respective companies.
Summary of Changes
This manual contains new and updated information. Changes throughout this
revision are marked by change bars, as shown to the right of this paragraph.
New and Updated
Information
This table contains the changes made to this revision.
Topic
Page
Added Kinetix™ 3 system components to work with Connected Components
Workbench software
12
Added Kinetix 3 system components to figures that work with Connected
Components Workbench software
13…14
Added I/O interface diagram
33
Added information to Digital Inputs and Digital Output tables
40…44
Updated Table 30 - 2090-CFBM6DF-CBAAxx Feedback Cable
72
Added reset drive procedure
83
Added Chapter 6 Configure Drive for Communication
85
Added Chapter 7 Configure Your Drive for Communication with a Personal
Computer Running Connected Components Workbench Software
91
Added Reset Drive to Default Values by Using Ultraware Software
102
Added Kinetix 3 to MicroLogix™ and Micro800™ controller interconnect diagrams
for PTO
127
Rockwell Automation Publication 2071-UM001E-EN-P - November 2013
3
Summary of Changes
Notes:
4
Rockwell Automation Publication 2071-UM001E-EN-P - November 2013
Table of Contents
Preface
About This Publication. . . . . . . . . . . . . . . . . . . . . . . . . . . . . . . . . . . . . . . . . . . . . 9
Who Should Use This Manual . . . . . . . . . . . . . . . . . . . . . . . . . . . . . . . . . . . . . . 9
Additional Resources . . . . . . . . . . . . . . . . . . . . . . . . . . . . . . . . . . . . . . . . . . . . . 10
Chapter 1
Start
About the Kinetix 3 Drive System . . . . . . . . . . . . . . . . . . . . . . . . . . . . . . . . . 12
Catalog Number Explanation . . . . . . . . . . . . . . . . . . . . . . . . . . . . . . . . . . . . . 14
Agency Compliance . . . . . . . . . . . . . . . . . . . . . . . . . . . . . . . . . . . . . . . . . . . . . . 14
Chapter 2
Install the Kinetix 3 Drive System
System Design Guidelines. . . . . . . . . . . . . . . . . . . . . . . . . . . . . . . . . . . . . . . . .
System Mounting Requirements . . . . . . . . . . . . . . . . . . . . . . . . . . . . . . .
Fuse Selection . . . . . . . . . . . . . . . . . . . . . . . . . . . . . . . . . . . . . . . . . . . . . . . .
Fuse/Contactor Specifications. . . . . . . . . . . . . . . . . . . . . . . . . . . . . . . . .
Sizing the Enclosure . . . . . . . . . . . . . . . . . . . . . . . . . . . . . . . . . . . . . . . . . .
Power Dissipation Specifications . . . . . . . . . . . . . . . . . . . . . . . . . . . . . .
Minimum Clearance Requirements . . . . . . . . . . . . . . . . . . . . . . . . . . . .
Electrical Noise Reduction . . . . . . . . . . . . . . . . . . . . . . . . . . . . . . . . . . . . . . . .
Bonding Drives . . . . . . . . . . . . . . . . . . . . . . . . . . . . . . . . . . . . . . . . . . . . . .
Bonding Multiple Subpanels . . . . . . . . . . . . . . . . . . . . . . . . . . . . . . . . . .
Establishing Noise Zones. . . . . . . . . . . . . . . . . . . . . . . . . . . . . . . . . . . . . .
Cable Categories for Kinetix 3 Drive Components . . . . . . . . . . . . . .
Noise Reduction Guidelines for Drive Accessories. . . . . . . . . . . . . . .
Mount Your Kinetix 3 Drive . . . . . . . . . . . . . . . . . . . . . . . . . . . . . . . . . . . . . .
17
17
18
19
20
21
22
23
23
25
26
27
27
28
Chapter 3
Kinetix 3 Drive Connector Data
Kinetix 3 Drive Connectors and Indicators. . . . . . . . . . . . . . . . . . . . . . . . .
I/O (IOD) Connector Pinout . . . . . . . . . . . . . . . . . . . . . . . . . . . . . . . . .
I/O Interface Diagram . . . . . . . . . . . . . . . . . . . . . . . . . . . . . . . . . . . . . . . .
Motor Feedback (MF) Connector Pinout . . . . . . . . . . . . . . . . . . . . . .
Input Power Connector Pinout. . . . . . . . . . . . . . . . . . . . . . . . . . . . . . . .
Shunt Resistor Connector Pinout. . . . . . . . . . . . . . . . . . . . . . . . . . . . . .
Motor Power Connector Pinout. . . . . . . . . . . . . . . . . . . . . . . . . . . . . . .
Motor Feedback Specifications . . . . . . . . . . . . . . . . . . . . . . . . . . . . . . . . . . . .
Replacement Battery Specifications . . . . . . . . . . . . . . . . . . . . . . . . . . . .
Motor Feedback Specifications . . . . . . . . . . . . . . . . . . . . . . . . . . . . . . . .
Feedback Power Supply . . . . . . . . . . . . . . . . . . . . . . . . . . . . . . . . . . . . . . .
Control Signal Specifications. . . . . . . . . . . . . . . . . . . . . . . . . . . . . . . . . . . . . .
Digital Inputs . . . . . . . . . . . . . . . . . . . . . . . . . . . . . . . . . . . . . . . . . . . . . . . .
High Frequency Pulse Command . . . . . . . . . . . . . . . . . . . . . . . . . . . . . .
Digital Outputs . . . . . . . . . . . . . . . . . . . . . . . . . . . . . . . . . . . . . . . . . . . . . .
Analog Inputs . . . . . . . . . . . . . . . . . . . . . . . . . . . . . . . . . . . . . . . . . . . . . . .
Analog Outputs . . . . . . . . . . . . . . . . . . . . . . . . . . . . . . . . . . . . . . . . . . . . . .
Serial Interface Connection . . . . . . . . . . . . . . . . . . . . . . . . . . . . . . . . . . .
Rockwell Automation Publication 2071-UM001E-EN-P - November 2013
30
32
33
34
35
35
35
36
36
37
39
40
40
43
44
47
48
50
5
Table of Contents
Chapter 4
Connect the Kinetix 3 Drive
Understanding Basic Wiring Requirements. . . . . . . . . . . . . . . . . . . . . . . . .
Building Your Own Cables . . . . . . . . . . . . . . . . . . . . . . . . . . . . . . . . . . . .
Routing Power and Signal Wiring . . . . . . . . . . . . . . . . . . . . . . . . . . . . . .
Determining Your Type of Input Power . . . . . . . . . . . . . . . . . . . . . . . .
Three-phase Power Wired to Three-phase Drives . . . . . . . . . . . . . . .
Single-phase Power Wired to Single-phase Drives . . . . . . . . . . . . . . .
Isolation Transformer in Grounded Power Configurations. . . . . . .
Three-phase Power Wired to Single-phase Drives . . . . . . . . . . . . . . .
Grounding Your Kinetix 3 Drive . . . . . . . . . . . . . . . . . . . . . . . . . . . . . . . . . .
Grounding Your System to the Subpanel . . . . . . . . . . . . . . . . . . . . . . .
Power Wiring Requirements . . . . . . . . . . . . . . . . . . . . . . . . . . . . . . . . . . . . . .
Shunt Resistor Power Wiring Requirement . . . . . . . . . . . . . . . . . . . . .
Wiring Guidelines. . . . . . . . . . . . . . . . . . . . . . . . . . . . . . . . . . . . . . . . . . . . . . . .
Wiring the Kinetix 3 Drive Connectors . . . . . . . . . . . . . . . . . . . . . . . . . . . .
Wire the Input Power (IPD) and Motor Power (MP)
Connectors . . . . . . . . . . . . . . . . . . . . . . . . . . . . . . . . . . . . . . . . . . . . . . . . . .
Shunt Resistor. . . . . . . . . . . . . . . . . . . . . . . . . . . . . . . . . . . . . . . . . . . . . . . .
Apply the Motor Cable Shield Clamp . . . . . . . . . . . . . . . . . . . . . . . . . . . . . .
Feedback and I/O Cable Connections . . . . . . . . . . . . . . . . . . . . . . . . . . . . .
Flying-lead Feedback Cable Pinouts . . . . . . . . . . . . . . . . . . . . . . . . . . . .
Wiring the I/O Connector . . . . . . . . . . . . . . . . . . . . . . . . . . . . . . . . . . . .
Wiring the Feedback Connector. . . . . . . . . . . . . . . . . . . . . . . . . . . . . . . . . . .
Connecting Premolded Motor Feedback Cables. . . . . . . . . . . . . . . . .
Wiring the Feedback Breakout Board . . . . . . . . . . . . . . . . . . . . . . . . . .
53
54
54
54
55
57
57
58
59
59
61
61
62
63
63
69
70
71
72
74
75
75
76
Chapter 5
Using the Keypad Interface
Keypad Input . . . . . . . . . . . . . . . . . . . . . . . . . . . . . . . . . . . . . . . . . . . . . . . . . . . . 79
Status Display/Operation Mode . . . . . . . . . . . . . . . . . . . . . . . . . . . . . . . . . . . 81
Reset Drive to Default Value . . . . . . . . . . . . . . . . . . . . . . . . . . . . . . . . . . . . . . 83
Chapter 6
Configure Your Drive for
Communication
Apply Power to Your Kinetix 3 Drive . . . . . . . . . . . . . . . . . . . . . . . . . . . . . .
Configure Your Kinetix 3 Drive for USB Communication
with a Personal Computer . . . . . . . . . . . . . . . . . . . . . . . . . . . . . . .
Download Connected Components Workbench Software . . . . . . .
Configure Your Kinetix 3 Drive for RS-232 Communication
with a Personal Computer . . . . . . . . . . . . . . . . . . . . . . . . . . . . . . .
86
87
87
88
Chapter 7
Configure Your Drive for
Communication with a Personal
Computer Running Connected
Components Workbench Software
6
Download Connected Components Workbench Software. . . . . . . . . . . 91
Add Your Device to the Connected Components
Workbench Project . . . . . . . . . . . . . . . . . . . . . . . . . . . . . . . . . . . . . 91
Configure the Plug in Serial Port on the Micro830 or
Micro850 Controller. . . . . . . . . . . . . . . . . . . . . . . . . . . . . . . . . . . . 97
Rockwell Automation Publication 2071-UM001E-EN-P - November 2013
Table of Contents
Program the Controller for Modbus Communication
with a Kinetix 3 Drive. . . . . . . . . . . . . . . . . . . . . . . . . . . . . . . . . . . 97
Kinetix 3 Configuration Wizard . . . . . . . . . . . . . . . . . . . . . . . . . . . . . . . . . . 98
Alternate Method to Reset the Drive . . . . . . . . . . . . . . . . . . . . . . . . . 100
Chapter 8
Using Ultraware Software to
Configure the Drive
Download Ultraware Software . . . . . . . . . . . . . . . . . . . . . . . . . . . . . . . . . . .
Detect Your Kinetix 3 Drive . . . . . . . . . . . . . . . . . . . . . . . . . . . . . . . . . . . . .
Reset Drive to Default Values with Ultraware Software . . . . . . . . . . . .
Understanding the Workspace and Drive Branches . . . . . . . . . . . . . . . .
Select a Motor . . . . . . . . . . . . . . . . . . . . . . . . . . . . . . . . . . . . . . . . . . . . . . . . . .
Tune Your Motor. . . . . . . . . . . . . . . . . . . . . . . . . . . . . . . . . . . . . . . . . . . . . . .
Configure Displayed Units. . . . . . . . . . . . . . . . . . . . . . . . . . . . . . . . . . . . . . .
Test Your Motor (non-indexing move) . . . . . . . . . . . . . . . . . . . . . . . . . . .
Test Your Motor (indexing move) . . . . . . . . . . . . . . . . . . . . . . . . . . . . . . . .
101
101
102
103
104
106
107
108
109
Chapter 9
Maintain and Troubleshoot Your
Kinetix 3 Servo Drive
Safety Precautions. . . . . . . . . . . . . . . . . . . . . . . . . . . . . . . . . . . . . . . . . . . . . . .
Maintaining Your Kinetix 3 Drive . . . . . . . . . . . . . . . . . . . . . . . . . . . . . . . .
General Troubleshooting . . . . . . . . . . . . . . . . . . . . . . . . . . . . . . . . . . . . . . . .
Overtravel Condition. . . . . . . . . . . . . . . . . . . . . . . . . . . . . . . . . . . . . . . .
Fault Codes. . . . . . . . . . . . . . . . . . . . . . . . . . . . . . . . . . . . . . . . . . . . . . . . . . . . .
Warning Messages. . . . . . . . . . . . . . . . . . . . . . . . . . . . . . . . . . . . . . . . . . .
Error Displays. . . . . . . . . . . . . . . . . . . . . . . . . . . . . . . . . . . . . . . . . . . . . . .
113
114
114
114
115
115
116
Appendix A
Interconnect Diagrams
Interconnect Diagram Notes . . . . . . . . . . . . . . . . . . . . . . . . . . . . . . . . . . . . .
Power Wiring Examples . . . . . . . . . . . . . . . . . . . . . . . . . . . . . . . . . . . . . . . . .
Kinetix 3 Drive/Rotary Motor Wiring Examples. . . . . . . . . . . . . . .
Kinetix 3 Drive/Linear Motor and Actuator Wiring Examples . .
Kinetix 3 Drive and MicroLogix Controller Wiring Examples. . .
Kinetix 3 Drive and Micro830 Controller Wiring Examples . . . .
Motor Brake Currents. . . . . . . . . . . . . . . . . . . . . . . . . . . . . . . . . . . . . . . . . . .
122
123
124
125
127
128
129
Index . . . . . . . . . . . . . . . . . . . . . . . . . . . . . . . . . . . . . . . . . . . . . . . . . . . . . . . . . . .131
Rockwell Automation Publication 2071-UM001E-EN-P - November 2013
7
Table of Contents
Notes:
8
Rockwell Automation Publication 2071-UM001E-EN-P - November 2013
Preface
About This Publication
This manual provides detailed installation instructions for mounting, wiring, and
troubleshooting your Kinetix 3 drive, and system integration for your drive/
motor combination with a MicroLogix controller.
Who Should Use This Manual
This manual is intended for engineers or technicians directly involved in the
installation and wiring of the Kinetix 3 drive and programmers directly involved
in operation, field maintenance, and integration of the Kinetix 3 drive.
If you do not have a basic understanding of the Kinetix 3 drive, contact your local
Rockwell Automation sales representative for information on available training
courses.
Rockwell Automation Publication 2071-UM001E-EN-P - November 2013
9
Preface
These documents contain additional information concerning related products
from Rockwell Automation.
Additional Resources
Resource
Description
Kinetix 3 Component Servo Drive Installation Instructions, publication 2071-IN001
Information on installing your Kinetix 3 drive system.
Kinetix 3 I/O Breakout Board Installation Instructions,
publication 2071-IN002
Information on installing and wiring the Kinetix 3 I/O breakout board.
Kinetix 3 Feedback Breakout Board Installation Instructions,
publication 2071-IN003
Information on installing and wiring the Kinetix 3 feedback breakout board.
Serial Communication Cables Installation Instructions, publication 2090-IN019
Information on installing and schematics for the serial communication cables
used with Kinetix 3 drive.
MicroLogix 1100 Programmable Controllers User Manual,
publication 1763-UM001
Information on how to install, wire, and troubleshoot your controller.
MicroLogix 1400 Programmable Controllers User Manual,
publication 1766-UM001
Micro830™ and Micro850™ Programmable Controllers User Manual, publication 2080-UM002
Industrial Automation Wiring and Grounding Guidelines, publication 1770-4.1
Provides general guidelines for installing a Rockwell Automation™ industrial
system.
Kinetix 3 Component Servo Drive Serial Host Command Reference Manual, publication 2071RM001
Information on the serial communication commands, both ASCII and ModBusRTU, for interfacing a motion controller with the Kinetix 3 drive.
Micro800 and Connected Components Workbench Getting Started Guide, publication 2080-QR001
Provides information on basic Micro800™ controller and Connected Components
Workbench software functions.
Micro800 and Connected Components Workbench Application Guide, publication 2080-QR002
Provides procedures for completing basic tasks in Connected Components
Workbench software and for using Connected Components Workbench software
with component-class products.
Ultraware Software User Manual, publication 2098-UM001
Information on Ultraware software used to configure and operate Kinetix 3
drives, or when designing, testing or running C language programs or cam
tables on these drives.
System Design for Control of Electrical Noise Reference Manual,
publication GMC-RM001
Information, examples, and techniques designed to minimize system failures
caused by electrical noise.
Motion Analyzer CD, download at http://www.ab.com/motion/software/
analyzer_download.html
Drive and motor sizing with application analysis software.
Rockwell Automation Product Certification,
website http://www.rockwellautomation.com/products/certification
For declarations of conformity (DoC) currently available from
Rockwell Automation.
National Electrical Code, published by the National Fire Protection Association of Boston, MA
An article on wire sizes and types for grounding electrical equipment.
Rockwell Automation Industrial Automation Glossary, publication AG-7.1
A glossary of industrial automation terms and abbreviations.
You can view or download publications at
http://www.rockwellatuomation.com/literature. To order paper copies of
technical documentation, contact your local Allen-Bradley distributor or
Rockwell Automation sales representative.
10
Rockwell Automation Publication 2071-UM001E-EN-P - November 2013
Chapter
1
Start
Topic
Page
About the Kinetix 3 Drive System
12
Catalog Number Explanation
14
Agency Compliance
14
Rockwell Automation Publication 2071-UM001E-EN-P - November 2013
11
Chapter 1
Start
The Kinetix 3 component servo drive is designed to provide a solution for
applications with output power requirements between 0.6...9.9A rms
(50…1500 W).
About the Kinetix 3 Drive
System
Table 1 - Kinetix 3 Drive System Overview
Kinetix 3 System Component
Cat. No.
Description
Kinetix 3 component servo drive
2071-Axxx
Kinetix 3 component servo drives are available with 230V AC input power.
AC line filters
2090-XXLF-TC316 and
2090-XXLF-TC116
2090-XXLF-TC316 three-phase or 2090-XXLF-TC116 single-phase AC line filters are required to meet CE
and available for use in 230V systems.
Limited I/O adaptor board
2071-TBIO
24-pin breakout board. Use with the Kinetix 3 drives (IOD connector) or for control interface connections
it accesses 24 of the 50 pins of the I/O connector.
Full Breakout I/O Cable
2090-DAIO-D50
50-pin full breakout I/O cable with flying-leads. Use with the Kinetix 3 drives (IOD connector) or for
control interface connections it accesses 50 of the 50 pins of the I/O connector. This Full Breakout I/O
Cable is required for Pulse Train Output (PTO) drive control.
Motor feedback adaptor board
2071-TBMF
20-pin breakout board. Use with the Kinetix 3 drives (MF connector) or for motor feedback connections.
Ultraware software
2098-UWCPRG
Ultraware Version 1.80 or higher provides a method to configure Kinetix 3 drives.
Connected Component
Workbench™ software
9328
Connected Component Workbench software environment a method for configuring or programming
Micro800 controllers, PanelView™ Component terminals, Kinetix 3 drives, and other component level
products.
3.6V Battery
Customer supplied
3.6 Volt lithium battery necessary for absolute positioning with the TL-Series™ motors.
Rotary servo motors
TL-Series
TL-Series motors are available for use with the Kinetix 3 drive. Important: Other motors can be used
with a Kinetix 3 drive, as long as they include incremental encoder feedback and Hall signals).
Linear actuators
MP-Series™ and TL-Series
Compatible actuators include MP-Series direct drive 230V integrated linear stages and TL-Series electric
cylinders.
Linear motors
LDC-Series™ and LDL-Series™
Compatible linear motors include LDC-Series and LDL-Series 230V linear motors.
Cables
TL-Series motor power, feedback,
and brake cables
Motor power, feedback, and brake cables include quick connect/quick-release connectors at the motor.
Power and brake cables have flying leads on the drive end connectors that connect to servo motors.
Standard feedback cables have angled, molded connectors on the drive end and connectors that
connect to servo motors. Drive mounted connector kits are also available.
Micro830 and Micro850 controllers
2080-LC30-xxxxx
2080-LC50-xxxxx
Micro800 programmable logic controllers with USB let you do simple PLC-based motion solutions with
the Kinetix 3 drive. In addition Micro830 and Micro850 programmable logic controllers with pulse train
outputs (PTO) can be used.
MicroLogix 1100/1200/1400/1500
controllers
1763-L16xxx
1766-L32xxx
1762-L24xxx
1762-L40xxx,
1764-24xxx
1764-28xxx
The MicroLogix 1100/1200/1400/1500 controller can perform simple motion control with pulse train
outputs (PTO). The MicroLogix 1100/1400 also have the ability to control the drive with Modbus-RTU,
increasing functionality
RSLogix™ 500 software
9324-RL0300ENE
RSLogix 500 provides support for programming, commissioning, and maintaining the SLC 500 and
MicroLogix controller families.
Serial communication cables
2090-CCMPCDS-23AAxx
2090-CCMCNDS-48AAxx
2090-CCMDSDS-48AAxx
2090-CCMUSDS-48AAxx
Serial communication cables provide an interface between your system components by using RS-232 or
RS-485 protocols.
1203-USB Converter
1203-USB
The 1203-USB converter provides a Drive Serial Interface (DSI) communication between a computer and
Kinetix 3 drive.
12
Rockwell Automation Publication 2071-UM001E-EN-P - November 2013
Start
Chapter 1
Figure 1 - Micro800 Configuration - Kinetix 3 Servo Drive System
Connected Components
Workbench software on
personal computer
with a USB port.
2080-LC30-xxxxx
Micro800 Controller
USB Cable
USB Cable
(for configuration only)
Three-phase Input
Power
Line
Disconnect
Device
2090-CCMUSDS-48AAxx Cable
(for configuration only)
1203 -USB
Converter
1
2
3
4
B
A
2071-Axxxx
Kinetix 3 Servo Drive
2090-CCMCNDS-48AAxx Cable (modified)
Line Fusing
2090-DAIO-D50xx Full Breakout I/O Cable
(required for PTO drive control)
2090-XXLF-TCxxx
AC Line Filter (optional
equipment)
2071-TBMF Motor Feedback
Breakout Board
(optional equipment)
2090-CPxM6DF-16AAxx
Motor Power Cable
2090-CFBM6DF-CBAAxx
Motor Feedback Cable
MP-Series Integrated Linear Stages
MPAS-Axxxx Linear
(direct drive) stage shown
TL-Series Rotary Motors
(TLY-Axxxx motor shown)
TL-Series Electric Cylinders
(TLAR-Axxxx electric cylinder shown)
LDL-Series Linear Motors
(LDL-xxxxxxx linear motor shown)
LDC-Series Linear Motors
(LDC-Cxxxxxxx linear motor shown)
www.ab.com
IN USA
MADE
75500
LDC-M0 X XXXX
NO. XXXX
CAT. NO.
SERIAL
A
SERIES
Figure 2 - MicroLogix Controller Configuration - Kinetix 3 Servo Drive System
Ultraware Software
on personal computer
with a RS-232
serial port.
2071-Axxxx
Kinetix 3 Servo Drive
2090-CCMPCDS-23AAxx
Programming Cable
(programming only)
1766-L32xxx
MicroLogix 1400
Controller
ESC
OK
2090-CCMCNDS-48AAxx
Controller Cable
Rockwell Automation Publication 2071-UM001E-EN-P - November 2013
13
Chapter 1
Start
Figure 3 - Typical Configuration - Kinetix 3 Servo Drive System (alternate configurations)
2071-Axxxx
Kinetix 3 Servo Drive
2080-LC30-xxxxx
Micro830 Controller
1
2
3
4
B
A
2090-DANFCT-Sxx
Motor Feedback Cable
2090-CCMCNDS-48AAx
(modified)
2071-Axxxx
Kinetix 3 Servo Drives
2071-Axxxx
Kinetix 3 Servo Drive
2090-DANPT-16Sxx
Motor Power Cable
2090-CCMDSDS-48AAxx
Drive-to-Drive Cable
TL-Series Rotary Motors
(TL-Axxxx motor shown)
Catalog Number Explanation
Kinetix 3 drive catalog numbers and descriptions are listed in the table.
Table 2 - Kinetix 3 Drive Catalog Numbers
Agency Compliance
Cat. No.
Component Servo Drives
2071-AP0
Kinetix 3, 230V AC, 1 Ø, 0.6 A
2071-AP1
Kinetix 3, 230V AC, 1 Ø, 1.1 A
2071-AP2
Kinetix 3, 230V AC, 1 Ø, 1.7 A
2071-AP4
Kinetix 3, 230V AC, 1 Ø, 3.3 A
2071-AP8
Kinetix 3, 230V AC, 1 or 3 Ø, 5.0 A
2071-A10
Kinetix 3, 230V AC, 3 Ø, 7.0 A
2071-A15
Kinetix 3, 230V AC, 3 Ø, 9.9 A
If this product is installed within the European Union and has the CE mark, the
following regulations apply.
ATTENTION: Meeting CE requires a grounded system, and the method of
grounding the AC line filter and drive must match. Failure to do this renders the
filter ineffective and can cause damage to the filter.
For grounding examples, refer to Grounding Your Kinetix 3 Drive on page 59.
14
Rockwell Automation Publication 2071-UM001E-EN-P - November 2013
Start
Chapter 1
For information on electrical noise reduction, refer to the System Design for
Control of Electrical Noise Reference Manual, publication GMC-RM001.
To meet CE requirements, these requirements apply:
• Install an AC line filter (catalog number 2090-XXLF-TCxxx) as close to
the drive as possible.
• Use 2090 series motor power cables and terminate the cable shields to the
drive or subpanel.
• Use 2090 series motor feedback cables and properly terminate the
feedback cable shield. Drive-to-motor feedback cables must not exceed
30 m (98.4 ft). Drive-to-motor power cables must not exceed 30 m
(98.4 ft).
• Install the Kinetix 3 system inside an enclosure. Run input power wiring in
conduit (grounded to the enclosure) outside of the enclosure. Separate
signal and power cables.
• Segregate input power wiring and motor power cables from control wiring
and motor feedback cables. Use shielded cable for power wiring and
provide a grounded 360° clamp termination.
Refer to Appendix A on page 123 for interconnect diagrams, including input
power wiring and drive/motor interconnect diagrams.
Rockwell Automation Publication 2071-UM001E-EN-P - November 2013
15
Chapter 1
Start
Notes:
16
Rockwell Automation Publication 2071-UM001E-EN-P - November 2013
Chapter
2
Install the Kinetix 3 Drive System
Topic
Page
System Design Guidelines
17
Electrical Noise Reduction
23
Mount Your Kinetix 3 Drive
28
ATTENTION: Plan the installation of your system so that you can perform all
cutting, drilling, tapping, and welding with the system removed from the
enclosure. Because the system is of the open type construction, be careful to
keep any metal debris from falling into it. Metal debris or other foreign matter
can become lodged in the circuitry that can result in damage to components.
System Design Guidelines
Use the information in this section when designing your enclosure and planning
to mount your system components on the panel.
For online product selection and system configuration tools, including
AutoCAD (DXF) drawings of the product, refer to
http://www.ab.com/e-tools.
System Mounting Requirements
• To comply with UL and CE requirements, the Kinetix 3 system must be
enclosed in a grounded conductive enclosure offering protection as
defined in standard EN 60529 (IEC 529) to IP55 such that they are not
accessible to an operator or unskilled person. A NEMA 4X enclosure
exceeds these requirements providing protection to IP66.
• The panel you install inside the enclosure for mounting your system
components must be on a flat, rigid, vertical surface that is not be subjected
to shock, vibration, moisture, oil mist, dust, or corrosive vapors.
• Size the drive enclosure so as not to exceed the maximum ambient
temperature rating. Consider heat dissipation specifications for all drive
components.
Rockwell Automation Publication 2071-UM001E-EN-P - November 2013
17
Chapter 2
Install the Kinetix 3 Drive System
• Segregate input power wiring and motor power cables from control wiring
and motor feedback cables. Use shielded cable for power wiring and
provide a grounded 360° clamp termination.
• Use high-frequency (HF) bonding techniques to connect the enclosure,
machine frame, and motor housing, and to provide a low-impedance
return path for high-frequency (HF) energy and reduce electrical noise.
• Use 2090 series motor feedback cables or use connector kits and properly
terminate the feedback cable shield. Drive-to-motor feedback cables must
not exceed 30 m (98.4 ft). Drive-to-motor power cables must not exceed
30 m (98.4 ft).
IMPORTANT
System performance was tested at these cable length specifications. These
limitations are also a CE requirement.
Refer to the System Design for Control of Electrical Noise Reference Manual,
publication GMC-RM001, to better understand the concept of electrical noise
reduction.
Fuse Selection
The Kinetix 3 drives use internal solid-state motor short-circuit protection and,
when protected by suitable branch circuit protection, are rated for use on a
circuit capable of delivering up to 100,000 A. Fuses or circuit breakers, with
adequate withstand and interrupt ratings, as defined in NEC or applicable local
codes, are permitted.
Refer to Fuse/Contactor Specifications on page 19 for recommended fuses.
Refer to Kinetix Servo Drives Specifications Technical Data for input current and
inrush current specifications for your Kinetix 3 drive.
18
Rockwell Automation Publication 2071-UM001E-EN-P - November 2013
Install the Kinetix 3 Drive System
Chapter 2
Fuse/Contactor Specifications
Make sure the selected components are properly coordinated and meet
acceptable codes including any requirements for branch circuit protection.
The following fuse examples are recommended for use with Kinetix 3 drives.
Table 3 - Fuse and Contactor Specifications
Drive Cat. No.
AC Input Power (1) (2) (3)
Recommended Fuse
Control Power (2) (4)
Recommended Fuse
2071-AP0
2071-AP1
100-K05xy
FNQ-R-7
2071-AP2
100-K09xy
2071-AP2
FNQ -R-10
2071-AP8
2071-A10
FNQ-R-20
LPJ-20
2071- A15
FNQ-R-30
LPJ-30
(1)
(2)
(3)
(4)
(5)
Contactor (5)
FRS-R-2-1/2
FNQ-R-7-1/2
LPJ-6
100-K12xy
100-C16xy
100-C23xy
Fuses specified are Bussmann fuses.
FNQ-R fuses are described as time-delay fuses, Class CC.
LPJ fuses are described as dual-element time-delay fuses, Class J.
FRS-R fuses are described as dual-element time-delay fuses, Class RK5.
For contactors: x represents coil voltage, y represents the number of contacts.
Rockwell Automation Publication 2071-UM001E-EN-P - November 2013
19
Chapter 2
Install the Kinetix 3 Drive System
Sizing the Enclosure
This example is provided to assist you in sizing an enclosure for your
Bulletin 2071 drive system. You need heat dissipation data from all components
planned for your enclosure to calculate the enclosure size. See Power Dissipation
Specifications on page 21 for the Kinetix 3 drive power dissipation.
With no active method of heat dissipation (such as fans or air conditioning)
either of these approximate equations can be used.
Metric
Standard English
A=
0.38Q
A=
1.8T-1.1
4.08Q
T-1.1
Where T is temperature difference between inside air and
outside ambient (°C), Q is heat generated in enclosure
(Watts), and A is enclosure surface area (m2). The exterior
surface of all six sides of an enclosure is calculated as
Where T is temperature difference between inside air and
outside ambient (°F), Q is heat generated in enclosure
(Watts), and A is enclosure surface area (ft2). The exterior
surface of all six sides of an enclosure is calculated as
A = 2dw + 2dh + 2wh
A = (2dw + 2dh + 2wh) /144
Where d (depth), w (width), and h (height) are in meters.
Where d (depth), w (width), and h (height) are in inches.
If the maximum ambient rating of the Kinetix 3 system is 50 °C (122 °F) and if
the maximum environmental temperature is 30 °C (86 °F) then Q=416 and
T=20 in the equation below.
A=
0.38(416)
~ 4.5 m2
1.8(20) -1.1
In this example, the enclosure must have an exterior surface of 4.53 m2. If any
portion of the enclosure is not able to transfer heat, it do not be included in the
calculation.
Because the minimum cabinet depth to house the 230V drive (selected for this
example) is 200 mm (7.9 in.), then the cabinet needs to be approximately 2000
mm (high) x 850 mm (wide) x 200 mm (deep).
2 x (0.2 x 0.85) + 2 x (0.2 x 2.0) + 2 x (0.85 x 2.0) = 4.54m2
Because this cabinet size is considerably larger than what is necessary to house the
system components, it can be more efficient to provide a means of cooling in a
smaller cabinet. Contact your cabinet manufacturer for options available to cool
your cabinet.
20
Rockwell Automation Publication 2071-UM001E-EN-P - November 2013
Install the Kinetix 3 Drive System
Chapter 2
Power Dissipation Specifications
Use this table to size an enclosure and calculate required ventilation for your
Kinetix 3 drive system
Usage as% of Rated Power Output
(watts)
Drive Cat. No.
20%
40%
60%
80%
100%
2071-AP0
19.29
20.0
20.6
21.3
22.0
2071-AP1
20.14
21.6
23.1
24.6
26.2
2071-AP2
21.70
24.6
27.6
30.6
33.7
2071-AP4
25.59
31.9
38.4
45.2
52.2
2071-AP8
26.36
32.3
38.6
45.1
52.0
2071-A10
30.87
40.2
50.1
60.6
71.5
2071-A15
37.37
50.1
63.8
78.4
94.0
Rockwell Automation Publication 2071-UM001E-EN-P - November 2013
21
Chapter 2
Install the Kinetix 3 Drive System
Minimum Clearance Requirements
This section provides information to assist you in sizing your cabinet and
positioning your Kinetix 3 drive system components.
IMPORTANT
Mount the module in an upright position as shown. Do not mount the module
on its side.
Figure 4 illustrates minimum clearance requirements for proper airflow and
installation:
• Additional clearance is required depending on the accessory items
installed.
• Additional clearance is required for the cables and wires connected to the
front of the drive.
• An additional 150 mm (6.0 in.) is required when the drive is mounted
adjacent to noise sensitive equipment or clean wireways.
See Kinetix Servo Drives Specifications Technical Data, publication
GMC-TD003 for Kinetix 3 drive dimensions.
Figure 4 - Minimum Clearance Requirements
50.0 mm (2.0 in.) clearance
for airflow and Installation.
30 mm (1.18 in.) clearance to
side wall of enclosure.
10 mm (0.39 in.)
clearance between drives.
50.0 mm (2.0 in.) clearance
for airflow and Installation.
Refer to page 21 for power dissipation specifications.
22
Rockwell Automation Publication 2071-UM001E-EN-P - November 2013
Install the Kinetix 3 Drive System
Electrical Noise Reduction
Chapter 2
This section outlines best practices that minimize the possibility of noise-related
failures as they apply specifically to Kinetix 3 system installations. For more
information on the concept of high-frequency (HF) bonding, the ground plane
principle, and electrical noise reduction, refer to the System Design for Control
of Electrical Noise Reference Manual, publication GMC-RM001.
Bonding Drives
Bonding is the practice of connecting metal chassis, assemblies, frames, shields,
and enclosures to reduce the effects of electromagnetic interference (EMI).
Unless specified, most paints are not conductive and act as insulators. To achieve
a good bond between drive and the subpanel, surfaces need to be paint-free or
plated. Bonding metal surfaces creates a low-impedance return path for highfrequency energy
IMPORTANT
To improve the bond between the drive and subpanel, construct your subpanel
out of zinc plated (paint-free) steel.
Improper bonding of metal surfaces blocks the direct return path and lets highfrequency energy travel elsewhere in the cabinet. Excessive high-frequency energy
can effect the operation of other microprocessor controlled equipment.
Rockwell Automation Publication 2071-UM001E-EN-P - November 2013
23
Chapter 2
Install the Kinetix 3 Drive System
The illustrations that follow show details of recommended bonding practices for
painted panels, enclosures, and mounting brackets.
Figure 5 - Recommended Bonding Practices for Painted Panels
Stud-mounting the Subpanel
to the Enclosure Back Wall
Stud-mounting a Ground Bus
or Chassis to the Subpanel
Subpanel
Back Wall of
Enclosure
Mounting Bracket or
Ground Bus
Welded Stud
Subpanel
Star Washer
Nut
Flat Washer
Welded Stud
Scrape Paint
Nut
Flat Washer
Use a wire brush to remove paint from
threads to maximize ground connection.
Use plated panels or scrape paint on
front of panel.
If the mounting bracket is coated with
a non-conductive material (anodized
or painted), scrape the material around
the mounting hole.
Star Washer
Bolt-mounting a Ground Bus or Chassis to the Back-panel
Subpanel
Bolt
Tapped Hole
Ground Bus or
Mounting Bracket
Nut
Star Washer
Scrape paint on both sides of
panel and use star washers.
Star Washer
Flat Washer
Nut
Flat Washer
Star Washer
24
If the mounting bracket is coated with
a non-conductive material (anodized
or painted), scrape the material around
the mounting hole.
Rockwell Automation Publication 2071-UM001E-EN-P - November 2013
Install the Kinetix 3 Drive System
Chapter 2
Bonding Multiple Subpanels
Bonding multiple subpanels creates a common low impedance exit path for the
high frequency energy inside the cabinet. Subpanels that are not bonded together
can not share a common low impedance path. This difference in impedance can
affect networks and other devices that span multiple panels.
Figure 6 - Multiple Subpanels and Cabinet Recommendations
Wire Braid
25.4 mm (1.0 in.) by
6.35 mm (0.25 in.)
Ground bus
bonded to the
subpanel.
Remove paint
from cabinet.
Wire Braid
25.4 mm (1.0 in.) by
6.35 mm (0.25 in.)
Rockwell Automation Publication 2071-UM001E-EN-P - November 2013
25
Chapter 2
Install the Kinetix 3 Drive System
Establishing Noise Zones
When the several components such as AC line filter, contactors, circuit breaker,
and transformer are used in the Kinetix 3 system, observe these guidelines when
laying out your panel:
• The clean zone (C) is beneath the Kinetix 3 drives and includes the I/O
wiring, feedback cable, serial communication cable, and DC filter (grey
wire way).
• The dirty zone (D) is above the Kinetix 3 drives (black wire way) and
includes the circuit breakers, transformer, 24V DC power supply,
contactors, AC line filter, and motor power cables.
• The very dirty zone (VD) is limited to where the AC line (EMC) filter
VAC output connects to the Kinetix 3 drives. Shielded cable is required
only if the very dirty cables enter a wire way.
Figure 7 - Noise Zones for Installations With Bulletin 2090 AC Line Filter
Clean Wireway
Dirty Wireway
Very dirty zone EMC/drive connection
segregated (not in wireway).
2071-AP0
Kinetix 3 Drive
(2)
2071-AP4
Kinetix 3 Drive
2071-A10
Kinetix 3 Drive
D
VD
Circuit
Breaker
Optional
AC Line
Filter
24V Motor
Brake PS
XFMR
No sensitive
equipment within 150
Contactors
DC
Filter
(4)
(2)
DC
Filter
Serial
Communication
(shielded) Cable
(3)
C
I/O (1) and Feedback Cables
C
D
I/O (1),
Motor Power, and Safety Cables
Route encoder/analog/registration
shielded cables.
Route 24V DC I/O
Shielded Cable
(1) If drive system I/O cable contains dirty relay wires, route cable in dirty wireway.
(2) For tight spaces use a grounded steel shield. For examples, refer to the System Design for Control of Electrical Noise Reference
Manual, publication GMC-RM001.
(3) This is a clean 24V DC available for any device that requires it. The 24V enters the clean wireway and exits to the left.
(4) This is a dirty 24V DC available for motor brakes and contactors. The 24V enters the dirty wireway and exits to the right.
26
Rockwell Automation Publication 2071-UM001E-EN-P - November 2013
Install the Kinetix 3 Drive System
Chapter 2
Cable Categories for Kinetix 3 Drive Components
This table shows the zoning requirements of cables connecting to the Kinetix 3
drive components.
Table 4 - Kinetix 3 Drive Components
Zone
Wire/Cable
Connector
Very
Dirty
L1, L2, L3, L1C, L2C (unshielded cable)
IPD
X
U, V, W (motor power)
MP
Motor feedback
MF
Analog outputs
Others
Analog output
Serial Communication
IOD
Dirty
Method
Clean
X
Shielded
Cable
X
X
X
X
X
X
A.out
X
Comm0A
Comm0B
X
X
Noise Reduction Guidelines for Drive Accessories
Refer to this section when mounting an AC line filter or shunt resistor module
for guidelines designed to reduce system failures caused by excessive electrical
noise.
AC Line Filters
Observe these guidelines when mounting your AC line filter:
• If you use Bulletin 2090 AC line filter, mount the filter on the same panel
as the Kinetix 3 drive and as close to drive as possible.
• Good HF bonding to the panel is critical. For painted panels, refer to the
examples on page 24.
• Segregate input and output wiring as far as possible.
Motor Brake
The brake is mounted inside the motor. How you connect to the drive depends
on the motor series.
Refer to Kinetix 3 Drive/Rotary Motor Wiring Examples beginning on page 124
for the interconnect diagram of your drive/motor combination.
Rockwell Automation Publication 2071-UM001E-EN-P - November 2013
27
Chapter 2
Install the Kinetix 3 Drive System
Mount Your Kinetix 3 Drive
The procedures in this section assume you have prepared your panel and
understand how to bond your system. For installation instructions regarding
other equipment and accessories, refer to the instructions that came with each of
the accessories for their specific requirements.
ATTENTION: This drive contains electrostatic discharge (ESD) sensitive parts
and assemblies. You are required to follow static control precautions when you
install, test, service, or repair this assembly. If you do not follow ESD control
procedures, components can be damaged. If you are not familiar with static
control procedures, refer to Allen-Bradley publication 8000-4.5.2, Guarding
Against Electrostatic Damage or any other applicable ESD Protection Handbook.
Follow these steps to mount your Kinetix 3 drive.
1. Layout the position for the Kinetix 3 and accessories in the enclosure (refer
to Establishing Noise Zones on page 26 for panel layout
recommendations).
Mounting hole dimensions for the Kinetix 3 are shown in Kinetix Servo
Drives Specifications Technical Data, publication GMC-TD003.
2. Attach the Kinetix 3 drive to the cabinet, first by using the upper
mounting slots of the drive and then the lower.
The recommended mounting hardware is M4 (#6-32) steel machine screw
torqued to 1.1 N•m (9.8 lb•in). Observe bonding techniques as described
in Bonding Drives on page 23.
IMPORTANT
To improve the bond between the Kinetix 3 drive and subpanel, construct your
subpanel out of zinc plated (paint-free) steel.
3. Tighten all mounting fasteners.
28
Rockwell Automation Publication 2071-UM001E-EN-P - November 2013
Chapter
3
Kinetix 3 Drive Connector Data
Topic
Page
Kinetix 3 Drive Connectors and Indicators
30
Motor Feedback Specifications
36
Control Signal Specifications
40
Rockwell Automation Publication 2071-UM001E-EN-P - November 2013
29
Chapter 3
Kinetix 3 Drive Connector Data
Although the physical size of the higher current drives is larger, the location of
the connectors and indicators is identical.
Kinetix 3 Drive Connectors
and Indicators
Figure 8 - Kinetix 3 Drive Connector and Indicators
16
15
14
1
13
2
12
3
11
4
I/O
10
DC -
5
6
Motor Feedback
7
9
8
Item
Description
Item
Description
1
Left/right and up/down keys
9
Motor feedback (MF) connector
2
Analog output (A.out) connector
10
Input/output (IOD) connector
3
RS-485 communication termination switch
11
Serial interface (Comm0B) (down) port
4
Input power (IPD) connector
12
Serial interface (Comm0A) (up) port
5
Main power indicator
13
Enter key
6
Shunt resistor (BC) connector
14
Mode/set key
7
Motor power (MP) connector
15
7-segment status indicator
8
Ground lug(1)
16
2071-AP0 Kinetix 3 drive shown
(1) 2071-AP4 Kinetix 3 drives and larger have two ground screws.
30
Rockwell Automation Publication 2071-UM001E-EN-P - November 2013
Kinetix 3 Drive Connector Data
Chapter 3
Table 5 - Kinetix 3 Drive Connectors
Designator
Description
Connector
A.out
Analog output
4-pin connector header
IPD
AC and control power input
6-pin quick-connect terminal block
BC
Shunt power
2-pin quick-connect terminal block
MP
Motor power
3-pin quick-connect terminal block
CommOA
Serial interface up
6-pin IEEE 1394 connector
CommOB
Serial interface down
6-pin IEEE 1394 connector
IOD
I/O
50-pin mini-D connector
MF
Motor feedback
20-pin mini-D connector
Table 6 - Analog Output (A.out) Connector
A.out Pin
Description
Signal
1
Analog output #1
AOUT1
2
Analog output #1 ground
ACOM
3
Analog output #2
AOUT2
4
Analog output #2 ground
ACOM
Figure 9 - Pin Orientation for 4-pin Header (A.out) Connector
Pin 2
Pin 4
Pin 1
Pin 3
Rockwell Automation Publication 2071-UM001E-EN-P - November 2013
31
Chapter 3
Kinetix 3 Drive Connector Data
I/O (IOD) Connector Pinout(1)
IOD Pin
Description
Signal
IOD Pin
Description
Signal
1
Digital input common
24V COM
26
Digital input 8
INPUT8
2
Digital input common
24V COM
27
Digital input 9
INPUT9
3
Digital input 1 (/SV-ON)
INPUT1
28
Digital input 10
INPUT10
4
Digital input 2 (P-OT)
INPUT2
29
Buffered encoder channel A+
AM+
5
Digital input 3 (N-OT)
INPUT3
30
Buffered encoder channel A-
AM-
6
Digital input 4 (/P-CON)
INPUT4
31
Buffered encoder channel B+
BM+
7
Digital input 5 (A-RST)
INPUT5
32
Buffered encoder channel B-
BM-
8
Digital input 6 (/N-TL)
INPUT6
33
Buffered encoder channel Z+
IM+
9
Digital input 7 (/P-TL)
INPUT7
34
Buffered encoder channel Z-
IM-
10
ESTOP (default: disable)
ESTOP
35
Serial data of absolute encoder
PS+
11
Follower input A+
PLUS +
36
Serial data of absolute encoder
PS-
12
Follower input A-
PLUS -
37
Alarm output 1
Digital output4
FAULT1
OUTPUT4
13
Follower input B+
SIGN +
38
Alarm output 2
Digital output5
FAULT2
OUTPUT5
14
Follower input B-
SIGN -
39
Alarm output 3
Digital output6
FAULT3
OUTPUT6
15
High frequency pulse input A+
HF_PULS +
40
Alarm output
Digital outputs ground
FCOM
OUT COM
16
High frequency pulse input A-
HF_PULS -
41
Digital output 1 + (P_COM+)
OUTPUT1+
17
Encoder z-pulse
Z-PULSE+
42
Digital output 1 – (P_COM-)
OUTPUT1-
18
Encoder z-pulse
Z-PULSE-
43
Digital output 2 + (TG_ON+)
OUTPUT2+
19
Velocity command input+
VCMD+
44
Digital output 2 – (TG_ON-)
OUTPUT2-
20
Velocity command input-
VCMD-
45
Servo alarm +
FAULT+
21
Current command input+
ICMD+
46
Servo alarm -
FAULT-
22
Current command input-
ICMD-
47
Digital output 3 + (BK+)
OUTPUT3+
23
High frequency pulse input B+
HF_SIGN +
48
Digital output 3 – (BK-)
OUTPUT3-
24
High frequency pulse input B-
HF_SIGN -
49
O/C for pulse of 24V level
24V_PULS +
25
O/C for sign of 24V level
24V_SIGN +
50
Reserved
—
Figure 10 - Pin Orientation for 50-pin I/O (IOD) Connector
Pin 1
Pin 26
Pin 25
Pin 50
(1) The default settings for configurable digital inputs and outputs are shown in parenthesis.
32
Rockwell Automation Publication 2071-UM001E-EN-P - November 2013
Kinetix 3 Drive Connector Data
Chapter 3
I/O Interface Diagram
I/O
24V [or COM]
INPUT
OUTPUT
1
COM [or 24V]
2
37 FAULT 1 / OUTPUT 4
24V
Active Low/High
Programmable
Digital Inputs
INPUT1 (/SV-ON)
3
38
INPUT2 (P-OT)
4
39
INPUT3 (N-OT)
5
40
INPUT4 (/P-CON)
6
29
AM +
30
AM -
INPUT5 (/A-RST)
7
INPUT6 (/N-TL)
8
INPUT7 (/P-TL)
9
INPUT8
26
INPUT9
27
INPUT10
28
E-STOP
10
24V_PULS+
49
PULS +
PULS Position
Command
High Frequency
Position
Command
24V_SIGN+
_
25
SIGN -
14
HF_PULS -
16
HF_SIGN +
23
HF_SIGN -
24
22
BM -
46
41
P
42
43
P
44
P
48
Buffered
Encoder
Output
IM +
IM PS +
17 Z-PULSE +
18 Z-PULSE -
47
20
BM +
P
45
Binary Fault Code Ground
/ Digital Outputs Ground
FCOM/OUTCOM
36
P
2kΩ
FAULT 3 / OUTPUT 6
P
2kΩ
13 150Ω
15
34
35
SIGN +
HF_PULS +
32
33
P
12
21
Current Command
-10V to +10V
31
P
11 150Ω
19
Speed Command
-10V to +10V
P
Binary Fault Code Outputs
/ Digital Outputs
FAULT 2 / OUTPUT 5
PS -
FAULT +
FAULT -
Absolute Position
Serial Output
Encoder
Marker
Pulse
Fault
Output
OUTPUT1+
OUTPUT1OUTPUT2+
OUTPUT2-
24V
Programmable
Digital
Outputs
OUTPUT3+
OUTPUT3-
16-bit
A/D
12-bit
A/D
50
Rockwell Automation Publication 2071-UM001E-EN-P - November 2013
33
Chapter 3
Kinetix 3 Drive Connector Data
Motor Feedback (MF) Connector Pinout
MF Pin
Description
Signal
MF Pin
Description
Signal
1
Encoder power ground
ECOM
11
Reserved
—
2
Thermal sensor input(1)
TS
12
Reserved
—
3
A positive differential input
A+
13
Serial negative
SD-
4
A negative differential input
A-
14
Hall feedback S2
S2
5
B positive differential input
B+
15
Reserved
—
6
B negative differential input
B-
16
Hall feedback S3
S3
7
Index positive differential input
I+
17
Positive limit sensor input
LMT+
8
Index negative differential input
I-
18
BAT+ for motor side
—
9
Negative limit sensor input
LMT-
19
BAT- for motor side
—
10
Serial positive
Hall feedback S1
SD+
S1
20
Encoder +5 input power
EPWR
(1) Not applicable unless motor has integrated thermal protection.
Figure 11 - Pin Orientation for 20-pin Motor Feedback (MF) Connector
Pin 1
Pin 11
Pin 10
Pin 20
Table 7 - Serial Interface (Comm0A and CommOB) Connector
Comm0A or
CommOB Pin
Description
Signal
1
RS-232 transmit
XMT
2
RS-232 receive
RCV
3
+5V power
+5V DC
4
+5V power ground
GND
5
RS-485 +
DX+
6
RS-485 -
DX-
Figure 12 - Pin Orientation for 6-pin Serial Interface (Comm0A and CommOB) Connector
Pin 2
Pin 1
34
Rockwell Automation Publication 2071-UM001E-EN-P - November 2013
Pin 6
Pin 5
Kinetix 3 Drive Connector Data
Chapter 3
Input Power Connector Pinout
Table 8 - Input Power (IPD) Connector
IPD Pin
Description
Signal
L1
Main AC power
L1
L2
Main AC power
L2
L3
Main AC power
L3
L1C
L1C - Control power
L1C
L2C
L2C - Control power
L2C
DC
DC bus negative (not supported)
DC-
Shunt Resistor Connector Pinout
Table 9 - Shunt Resistor (BC) Connector
BC Pin
Description
Signal
B1
Shunt resistor +
DC bus positive (not supported)
B1
B2
Shunt resistor -
B2
Motor Power Connector Pinout
Table 10 - Motor Power (MP) Connector
MP Pin
Description
Signal
U
Motor power U
U
V
Motor power V
V
W
Motor power W
W
Rockwell Automation Publication 2071-UM001E-EN-P - November 2013
35
Chapter 3
Kinetix 3 Drive Connector Data
Motor Feedback
Specifications
The Kinetix 3 drive accepts motor feedback signals from these types of encoders
with these general specifications.
Table 11 - Motor Feedback General Specifications
Attribute
Motor Feedback
Feedback device support
• Generic TTL incremental
• Generic TTL incremental with Hall and
thermistor sensors
• 17-bit Serial
Power supply voltage (EPWR5V)
5.08…5.45V
Power supply current (EPWR5V)
300 mA, max
Thermostat
Single-ended, under 1.6 kΩ = no fault,
over 3.2 kΩ = fault
Replacement Battery Specifications
The 3.6V lithium battery, when installed in a Kinetix 3 drive, provides multi-turn
encoder operation to TL-Series (Bulletin TL, TLY, and TLAR) motors and
actuators.
Lithium batteries have special storage, shipping, and disposal requirements.
Review and comply with all relevant local, state, and country regulations dealing
with the handling and disposal of these materials.
Table 12 - Replacement Battery Specifications
36
Attribute
Value
International size reference
1/2AA, ER14252
Nominal capacity @ 0.5 mA, to 2V
1.2 Ah
Rated Voltage
3.6V
Max Recommended continuous current
50 mA
Rockwell Automation Publication 2071-UM001E-EN-P - November 2013
Kinetix 3 Drive Connector Data
Chapter 3
Motor Feedback Specifications
The Kinetix 3 drives support multiple types of feedback devices by using the
20-pin (MF) motor feedback connector and sharing connector pins in many
cases.
Table 13 - Motor Feedback Signals by Device Type
MF Pin
Generic TTL Incremental
with Hall
Tamagawa 17-bit Serial
1
ECOMM
ECOMM
2
TS+(1)
–
3
AM+
–
4
AM-
–
5
BM+
–
6
BM-
–
7
IM+
–
8
IM-
–
9
-LIMIT
–
10
S1
DATA+
11
–
–
12
–
–
13
–
DATA-
14
S2
–
15
–
–
16
S3
–
17
+LIMIT
–
18
–
BAT+
19
–
BAT-
20
EPWR
EPWR
(1) If thermal sensor is used.
This is the motor thermostat interface schematic. Although the thermostat signal
is shown for all feedback types, some motors do not support this feature.
Figure 13 - Motor Thermostat Interface
Kinetix 3 Drive
+5V
+5V
6.8 kΩ
1 kΩ
TS
0.01 µF
Rockwell Automation Publication 2071-UM001E-EN-P - November 2013
37
Chapter 3
Kinetix 3 Drive Connector Data
State
Resistance at TS
No Fault
1.6 kΩ
Fault
3.2 kΩ
Table 14 - Generic TTL Incremental Specifications
Attribute
Value
TTL incremental encoder support
5V, differential A quad B
Quadrature interpolation
4 counts/square wave period
Differential input voltage
(AM, BM, and IM)
0.5…2.5V
DC current draw
(AM, BM, and IM)
30 mA, max
Input signal frequency (1)
(AM, BM, and IM)
3.5 MHz, max
Edge separation (1)
(AM and BM)
50 ns min., between any two edges
Hall inputs
(S1, S2, and S3)
0.5…2.5V, Single-ended, TTL, open collector, or none
(1) Propagation time differences in cables reduce the edge separation by 0.2 ns per meter. Both the propagation time differences and
the edge separation can reduce the maximum attainable input signal frequency.
Figure 14 - Generic TTL Incremental, AM, BM and IM Signals
Kinetix 3 Drive
+5V
4.7 kΩ
AM +
BM +
or IM+
220 kΩ
AM BM or IM -
4.7 kΩ
GND
Figure 15 - Generic TTL Interface, S1, S2, or S3 Signals
+5V Kinetix 3 Drive
4.7 kΩ
S1,
S2,
or S3
1 kΩ
10 nF
38
Rockwell Automation Publication 2071-UM001E-EN-P - November 2013
Kinetix 3 Drive Connector Data
Chapter 3
Table 15 - 17-Bit Serial Specifications
Attribute
Value
Memory support
Programmed with Allen-Bradley motor data
Differential input voltage
1.0…7.0V
Data communication
2.5 Mbps, 8 data bits, no parity
Battery
3.6V, external to drive on the breakout board
Feedback Power Supply
The Kinetix 3 drive generates +5V DC for motor feedback power. Short circuit
protection and separate common mode filtering for each channel are included.
Table 16 - Motor Feedback Power Specifications
Attribute
Value
Signal
EPWR
Voltage
Current, mA
min
5.08
nominal
5.25
max
5.45
min
10
max
300
Figure 16 - Pin Orientation for 20-pin Motor Feedback (MF) Connector
Pin 1
Pin 11
Pin 10
Pin 20
Rockwell Automation Publication 2071-UM001E-EN-P - November 2013
39
Chapter 3
Kinetix 3 Drive Connector Data
Control Signal Specifications
This section provides a description of the Kinetix 3 drive I/O (IOD) connector,
analog output (A.out) connector, and serial interface (Comm0A and Comm0B)
ports.
Digital Inputs
The Kinetix 3 drive contains 10 assignable digital inputs, INPUT1…INPUT10,
sharing a common power supply, 24V COM. These functions can be associated
with an assignable digital input.
Table 17 - Digital Inputs
40
Input
Input
States
Alternate Gain Select
</G-SEL>
When two sets of gains are used, turning this input ON
switches to the second group of gains. Turning the bit OFF
returns gain settings to the first group.
Current Limit – Negative
</N-TL>
When this input is set to ON, the negative torque is limited by
parameter [Pr4.04 - Negative External Current Limit].
Current Limit – Positive
</P-TL>
When this input is set to ON, the positive torque is limited by
parameter [Pr4.03 - Positive External Current Limit].
Drive Enable
</SV-ON>
When this input is turned ON, voltage is applied to the motor
and when the input is turned OFF, voltage is cut off at the
drive.
Fault Reset
</A-RST>
When this input is turned ON, faults that can be cleared are
removed from the display of the drive.
Integrator Inhibit
</P-CON>
When this input is ON, the speed regulator is switched from
Proportional/Integral control to Proportional control only. It
can be used to suppress overshoot and complete a faster step
response.
Operation Mode Override
</C-SEL>
When this input is ON, the secondary control mode is used for
command. When this input is OFF, the primary control mode
is used for command.
Overtravel – Negative
</N-OT>
When this input is OFF, it prohibits the motor from being
commanded in the negative direction.
Overtravel – Positive
</P-OT>
When this input is OFF, it prohibits the motor from being
commanded in the forward direction.
Pause Follower
</INHIB>
The follower pulse inputs are ignored when this input is ON.
Position Strobe
</ABS-DT>
When it is set to ON, the absolute position is transmitted
through the AM and BM output signals.
Velocity Direction
</C-DIR>
Preset Select 1
</C-SP1>
Preset Select 2
</C-SP2>
Preset Select 3
</C-SP3>
The bitwise combination of the three preset inputs lets seven
non-zero speeds to be selected, and zero speed is selected
when all of the inputs are OFF. In addition the speeds, the
Velocity Direction can be used to change the direction of
rotation. The speeds are set with [Pr2.05 through Pr2.11 Preset Velocity n].
Moving Enable
</START>
When this input is OFF in the applicable modes, no motion is
commanded. When this input is ON, motion can be
commanded.
Reset Multiturn Data
</R_ABS>
When this input is ON, the encoder multi-turn data is reset to
zero. Single-turn position is still valid.
Zero Speed Clamp Enable
</Z-CLP>
When the input is ON, the analog speed command is ignored
(and set to zero instead) if the commanded speed is below
[Pr5.05 - Zero Clamp].
Position Clear
</PCLR>
When this input is ON, the position command, position
feedback, and position error are cleared.
Rockwell Automation Publication 2071-UM001E-EN-P - November 2013
Kinetix 3 Drive Connector Data
Chapter 3
Table 17 - Digital Inputs (continued)
Input
Input
States
Analog Speed Command
Enable
</A-CL>
When this input is ON, the drive uses the analog velocity
input instead of the preset.
2nd Electronic Gear Bank
Selection
</GEAR>
When the input is ON, the drive uses the second gear ratio,
defined by [Pr3.05 - 2nd Gear Ratio, Follower Counts] and by
[Pr3.06 - 2nd Gear Ratio, Master Counts].
Home Sensor
</H_SENS>
When this input is ON, it indicates that the homing sensor has
been triggered. This is an essential part of the Home to
Sensor feature.
Start Homing
</SHOME>
When activated, the system starts returning to home.
Start Indexing
</START_I>
Starts Indexing when it is set to ON.
Stop Homing
</H_STOP>
Stops Homing operation when it is set to ON.
Stop Indexing
</STOP>
When activated, index movement ends.
Pause Indexing
</PAUSE>
When activated, it decelerates until it stops and pauses the
index sequence. It decides whether to stop or to continue the
motion by constantly monitoring the input status.
Index Select 0
</I_SEL0>
Index Select 1
</I_SEL1>
The bitwise combination of these inputs selects which of the
indexes is used (0…63).
Index Select 2
</I_SEL2>
Index Select 3
</I_SEL3>
Index Select 4
</I_SEL4>
Index Select 5
</I_SEL5>
Gain Bank Select
</BANK_SEL>
Uses the 3rd and the 4th Gain Bank when this input is set to
ON.
All digital inputs can be active low or active high and depend on wiring method.
Active low, PNP, current sourcing-means connecting the input to the ground
turns on the input. Active high, NPN, current sinking - means that connecting
the input to the IO power turns on the input. This table lists specifications for
the digital inputs.
The digital inputs are optically isolated and can be setup for PNP sourcing or
NPN sinking. Electrical details are shown in Table 18, Digital Input
Specifications. The inputs can be set up for PNP sourcing or NPN sinking.
Figure 17 - Digital Inputs (PNP sourcing configuration)
+5V
3.3 KΩ
4.7 KΩ
+
24V Supply
0.01 μF
3300 Ω
Opto-coupler
INPUTS
Rockwell Automation Publication 2071-UM001E-EN-P - November 2013
Logic GND
41
Chapter 3
Kinetix 3 Drive Connector Data
Figure 18 - Digital Inputs (NPN sinking configuration)
COM
Kinetix 3
Drive
+5V
3.3 KΩ
4.7 KΩ
+
24V Supply
0.01 μF
3300 Ω
Opto-coupler
INPUTS
Logic GND
Table 18 - Digital Input Specifications
42
Parameter
Value
24V power supply
21.6…26.4V DC
On-state voltage range
14…26.4V DC
On-state current at min voltage
6.3 mA
On-state current at max voltage
7.71 mA
Off-state voltage, max
-1V
Off-state current, max
0 mA
Hardware delay, off to on
8.4 μs
Hardware delay, on to off
50.1 μs
Rockwell Automation Publication 2071-UM001E-EN-P - November 2013
Kinetix 3 Drive Connector Data
Chapter 3
High Frequency Pulse Command
Table 19 - High Frequency Pulse Command Specifications
Parameter
Description
Min
Max
On-state input voltage
Input voltage difference between the + input and the input that is detected as an On-state.
2.8V
3.7V
Off-state input voltage
Input voltage difference between the + input and the input that is detected as an Off-state.
1V
-3V
Signal frequency (high
frequency differential driver
input drive)
Input frequency of the HF_PULS or HF_SIGN inputs.
Count frequency is four times this frequency for A/B type
inputs, and equal to this frequency for Step/Direction and
Step Up/Down inputs.
—
3 MHz
Figure 19 - High Frequency Pulse Command Differential Circuit
Kinetix 3
Drive
+5V
4.7 kΩ
Controller
HF_PULS+/HF_SIGN+
+
I/O 15/23
VIN
-
220 Ω
Line Receiver
HF_PULS-/HF_SIGNI/O 16/24
4.7 kΩ
Logic Ground
Rockwell Automation Publication 2071-UM001E-EN-P - November 2013
43
Chapter 3
Kinetix 3 Drive Connector Data
Digital Outputs
There are three digital outputs, OUTPUT1…OUTPUT3 available on the IOD
connector. Outputs are optically isolated open collector/emitter and are fully
isolated from the drive circuits. Each output, OUTPUT1…OUTPUT3, can be
assigned to one of these functions.
Output
Function
States
Fault
</S_ALM>
This output is not configurable. It is ON when the drive is healthy,
and OFF when the drive has a fault condition.
Within Position Window
</P-COM (+, -)>
This output turns ON when the position error is less than [Pr5.00
- In Position Size].
Up to Speed
</TG-ON (+, -)>
This output turns ON when the motor velocity feedback is greater
than [Pr5.04 - Up to Speed].
Brake
<BK (+, -)>
This output controls the brake installed inside or outside of the
servo motor.
Within Speed Window
</V-COM (+, -)>
This output turns ON when the velocity error is less than [Pr5.03 Speed Window].
Current Limited
</T-LMT (+, -)>
This output turns to ON when torque reaches the set value of the
torque limit.
Velocity Limited
</V-LMT (+, -)>
This output turns to ON when speed reaches the set value of the
speed limit.
Within Near Position
</NEAR (+, -)>
This output turns ON when the position error is less than [Pr5.02
- Near Position Size].
Warning
</WARN (+, -)>
This output turns ON when the drive encounters a condition that
generates a warning.
Absolute Position Valid
</A_VLD>
This output turns ON when the drive has a motor with an
absolute encoder attached, and the drive has properly read the
position from the motor.
Ready
</RDY>
This output turns ON when the drive is not faulted, and can be
enabled.
In Motion
</IMO (+, -)>
This output turns ON while the axis is being actively controlled by
an index and the motor is moving.
In Dwell
</I_DW>
This output turns ON when the axis is actively controlled by an
index, but is not moving. This occurs during the stand-by time
for each index (if configured).
Axis Homed
</HOMC (+,-)>
This output turns ON after completion of the homing routine.
Index Select 0 Output
</O_ISEL0>
Index Select 1 Output
</1_ISEL0>
Use this to output the index number in use in the selected
indexing operation.
Index Select 2 Output
</2_ISEL0>
Index Select 3 Output
</3_ISEL0>
Index Select 4 Output
</4_ISEL0>
Index Select 5 Output
</5_ISEL0>
End of Sequence
</E_SEQU>
Turns to ON when the index movement is complete.
The fault outputs, FAULT1…FAULT3, can be reassigned through the parameter
setting giving you three additional digital outputs, OUTPUT4…OUTPUT6.
The drive contains four alarm outputs. The four alarm outputs include the alarm
signals FAULT+ and FAULT- and three bits of fault information,
FAULT1…FAULT3.
44
Rockwell Automation Publication 2071-UM001E-EN-P - November 2013
Kinetix 3 Drive Connector Data
Chapter 3
When the alarm signal is active there is a fault. If the three alarm outputs are
decoded they indicate the eight different fault types that are active.
Table 20 - Fault Codes
Fault
Group
0
1
2
Fault Code
Output
State
Possible Faults
FAULT3
FAULT2
FAULT1
ON
ON
ON
No Faults
OFF
E.005 IPM Fault
E.054 Current Feedback Offset Fault
E.057 PWM Hardware Fault
E.079 Shunt Circuit Over Current Fault
E.114 Motor Phase Over Current
ON
E.004 Motor Over temperature Fault
E.022 Motor Continuous Current Overload Fault
E.023 Drive Overload Fault
E.036 Drive Over temperature Fault
E.075 Shunt Over load Protection Fault
E.101 Motor Power Cable Open Fault
E.102 Motor Instantaneous Current Overload Fault
E.103 Motor Mismatch Fault
ON
ON
ON
OFF
3
ON
OFF
OFF
E.028 Encoder Data Range Fault
E.030 Encoder Cable Open Fault
E.031 Encoder Data Parameter Fault
E.083 Absolute Encoder Battery Fault
E.084 Absolute Encoder Overspeed
E.085 Absolute Multi-turn CountFault
E.105 Encoder Type Mismatch Fault
E.106 Encoder Communication Fault
4
OFF
ON
ON
E.009 Bus Undervoltage Fault
E.010 Bus Overvoltage Fault
E.037 AC Line Loss Fault
OFF
E.018 Motor Overspeed Fault
E.019 Excess Position Error Fault
E.056 Watchdog Timeout Fault
E.108 Position Command Frequency Fault
E.112 Emergency Stop
ON
E.053 User Parameter Initialization Fault
E.055 User Parameter Checksum Fault
E.058 User Parameter Range Fault
E.107 Serial Communication Fault
E.113 Indexing Position Range Overflow
OFF
E.012 Home Search Failed
E.027 Axis Not Homed
E.060 Drive Initialization Fault
E.100 Drive Setup Fault
5
6
7
OFF
OFF
OFF
ON
OFF
OFF
Digital and fault outputs are grounded through FCOM/OUT COM.
All digital outputs are active low, current sinking.
Rockwell Automation Publication 2071-UM001E-EN-P - November 2013
45
Chapter 3
Kinetix 3 Drive Connector Data
Table 21 - Digital Output Signal Specifications
Parameter
Value
Output voltage range
0…50V DC
Output current rating @ 50 °C (122 °F)
50 mA
Minimum load current
0.1 mA
Maximum on-state voltage drop @ 50 mA
1.2 mV DC
Hardware delay, off to on, max
2.36 ms
Hardware delay, on to off, max
310 ms
Figure 20 - Digital Outputs
Logic Power
200 Ω
OUTPUT1+
OUTPUT1TLP127
46
Rockwell Automation Publication 2071-UM001E-EN-P - November 2013
Kinetix 3 Drive Connector Data
Chapter 3
Analog Inputs
The Kinetix 3 drive has two single-ended analog inputs. One is dedicated as the
command input for Analog Velocity mode, and the second is dedicated as the
command input for Analog Current mode. Figure 21 shows the configuration of
the analog input.
Figure 21 - Analog Input Configuration
VCC
GND
10 nF
+12V
V_REF
-12V
VCMD
2.5V REF
GND
VCC
GND
GND
GND
+12V
T_REF
-12V
ICMD
2.5V REF
GND
GND
GND
This table provides a description of the analog input specifications.
Parameter
VCMD
Resolution
ICMD
Resolution
Description
Number of states that the input signal is divided into,
[2(to the number of bits)].
Min
Max
16 bits
—
12 bits
—
Input
Impedance
Open circuit impedance measured between the positive (+)
input and analog common.
10 kΩ
—
Input Signal
Range
Voltage applied to the input.
-10V
+10V
Rockwell Automation Publication 2071-UM001E-EN-P - November 2013
47
Chapter 3
Kinetix 3 Drive Connector Data
Analog Outputs
The Kinetix 3 drive contains two analog outputs (A.out) that can be configured
through Ultraware software to represent internal drive variables. These variables
can be assigned to an analog output:
•
•
•
•
•
•
•
•
•
•
•
•
•
•
•
•
•
•
•
•
•
•
•
•
•
Motor Feedback Position
Master Position
Follower Position
Position Error
Position Command Count Frequency
Velocity Command
Velocity Feedback
Velocity Error
Current Command
Current Feedback
U Phase Current
V Phase Current
W Phase Current
Commutation Angle
Mechanical Angle
Shunt Power Limit Ratio
Instantaneous Shunt Power
Drive Utilization
Absolute Rotations
Bus Voltage
Velocity Command Offset
Current Command Offset
Motor Temperature
Analog Command – Velocity
Analog Command – Current
Figure 22 shows the configuration of the analog outputs.
48
Rockwell Automation Publication 2071-UM001E-EN-P - November 2013
Kinetix 3 Drive Connector Data
Chapter 3
Figure 22 - Analog Output Configuration
VCC
MP
LM224
A_MON
LM224
GND
GND
IMPORTANT
Output values can vary during powerup until the specified power supply
voltage is reached.
This table provides a description of the analog output specifications.
Parameter
Description
Min
Max
Resolution
Number of states that the output signal is divided into,
2(to the number of bits).
12 Bits
—
Output Current
Current capability of the output.
-10 mA
+10 mA
Output Signal
Range
Range of the output voltage.
-10V
+10V
Rockwell Automation Publication 2071-UM001E-EN-P - November 2013
49
Chapter 3
Kinetix 3 Drive Connector Data
Serial Interface Connection
The IEEE-1394 connectors (Comm0A and Comm0B) are provided on the
Kinetix 3 drive.
This table provides the drive’s default serial port configuration. This
configuration is used for communication between a drive and personal computer
with Connected Component Workbench software.
Table 22 - USB Communication Specification
Attribute
Value
Communication Protocol
RS-485
Baud
192,000
Data bits
8
Parity
None
Stop bit
1
Operator interface bit pattern
1102
Cabling
Catalog numbers 2090-CCMUSDS with 1203-USB
Node address
248
This table provides the drive’s default serial port configuration. This
configuration is used for communication between a drive and personal computer
with Ultraware software.
Table 23 - RS-232 Serial Communication Specifications
Attribute
50
Value
Communication Protocol
RS-232
Baud
57,600
Data bits
8
Parity
None
Stop bit
1
Operator interface bit pattern
0005
Cabling
Catalog number 2090-CCMPCDS
Rockwell Automation Publication 2071-UM001E-EN-P - November 2013
Kinetix 3 Drive Connector Data
Chapter 3
This table provides the configuration is used for communication between a drive
and programmable logic controller and drive-to-drive communication. You can
change the serial communication protocol by using front panel input keys.
Table 24 - RS-485 Serial Communication Specifications
Attribute
Value
Communication Protocol
RS-485
Baud
192,000
Data bits
8
Parity
None
Stop bit
1
Operator interface bit pattern
1102
Cabling
Catalog numbers 2090-CCMCNDS and 2090-CCMDSDS
Rockwell Automation Publication 2071-UM001E-EN-P - November 2013
51
Chapter 3
Kinetix 3 Drive Connector Data
Notes:
52
Rockwell Automation Publication 2071-UM001E-EN-P - November 2013
Chapter
4
Connect the Kinetix 3 Drive
Understanding Basic Wiring
Requirements
Topic
Page
Understanding Basic Wiring Requirements
53
Grounding Your Kinetix 3 Drive
59
Power Wiring Requirements
61
Wiring Guidelines
62
Wiring the Kinetix 3 Drive Connectors
63
Apply the Motor Cable Shield Clamp
70
Feedback and I/O Cable Connections
71
Wiring the Feedback Connector
75
This section contains basic wiring information for the Kinetix 3 drive.
ATTENTION: Plan the installation of your system so that you can perform all
cutting, drilling, tapping, and welding with the system removed from the
enclosure. Because the system is of the open type construction, be careful to
keep any metal debris from falling into it. Metal debris or other foreign matter
can become lodged in the circuitry that can result in damage to components.
SHOCK HAZARD: To avoid hazard of electrical shock, perform all mounting and
wiring of the Bulletin 2071 drive prior to applying power. Once power is
applied, connector terminals can have voltage present even when not in use.
IMPORTANT
This section contains common PWM servo system wiring configurations, size,
and practices that can be used in a majority of applications. National Electrical
Code, local electrical codes, special operating temperatures, duty cycles, or
system configurations take precedence over the values and methods provided.
Rockwell Automation Publication 2071-UM001E-EN-P - November 2013
53
Chapter 4
Connect the Kinetix 3 Drive
Building Your Own Cables
IMPORTANT
Factory-made cables are designed to minimize EMI and are recommended over
hand-built cables to optimize system performance
• Connect the cable shield to the connector shells on both ends of the cable
with a complete 360° connection.
• Use twisted pair cable whenever possible. Twist differential signals with
each other and twist single-ended signals with the appropriate ground
return.
Refer to the Kinetix Motion Control Selection Guide, publication GMCSG001, for low-profile connector kit, drive-end (mating) connector kit, and
motor-end connector kit catalog numbers.
Routing Power and Signal Wiring
Be aware that when you route power and signal wiring on a machine or system,
radiated noise from nearby relays, transformers, and other electronic drives can be
induced into motor or encoder feedback signals, input/output communication,
or other sensitive low voltage signals. This can cause system faults and
communication anomalies.
Refer to Electrical Noise Reduction on page 23 for examples of routing high and
low voltage cables in wireways. Refer to the System Design for Control of
Electrical Noise Reference Manual, publication GMC-RM001, for more
information.
Determining Your Type of Input Power
On the following pages are examples of typical single-phase and three-phase
facility input power wired to single-phase and three-phase Kinetix 3 drives.
The Kinetix 3 drive is designed to operate in both grounded and ungrounded
environments. The grounded power configuration lets you ground your singlephase or three-phase power at a neutral point. The ungrounded power
configuration does not have a neutral ground point.
54
Rockwell Automation Publication 2071-UM001E-EN-P - November 2013
Connect the Kinetix 3 Drive
Chapter 4
Three-phase Power Wired to Three-phase Drives
These examples illustrate grounded three-phase power wired to three-phase
Kinetix 3 drives when phase-to-phase voltage is within drive specifications. The
ungrounded power configuration does not include the ground connection
labeled as ‘optional’ in these figures.
Figure 23 - Three-phase Power Configuration (WYE Secondary)
IPD Terminal
Transformer (WYE) Secondary
L1
L1
IPD
L1
L2
L2
L2
L3
L3
L1
L2
L3
AC Line
Filter
E
Kinetix 3 Drive
Three-phase AC
Input
L3
L1C
L2C
Grounded Neutral
(optional)
Bonded Cabinet Ground Bus
Ground Grid or
Power Distribution Ground
Feeder and branch short circuit protection is not illustrated.
Figure 24 - Three-phase Power Configuration (Delta secondary)
Transformer (Delta) Secondary
IPD Terminals
L1
L2
L1
IPD
L1
L2
L2
L2
L3
L3
L1
AC Line
Filter
E
L3
Kinetix 3 Drive
Three-phase AC Input
L1C
L3
Grounded Center-tap
(optional)
L2C
Bonded Cabinet Ground Bus
Ground Grid or
Power Distribution Ground
Feeder and branch short circuit protection is not illustrated.
Rockwell Automation Publication 2071-UM001E-EN-P - November 2013
55
Chapter 4
Connect the Kinetix 3 Drive
Figure 25 - Three-phase Power Configuration (Delta secondary)
IPD Terminals
Transformer (Delta) Secondary
L1
L1
L2
L2
AC Line
Filter
L3
L1
IPD
L1
L2
L2
L3
E
L3
L1C
L3
L2C
Corner Grounded
(optional)
Bonded Cabinet Ground Bus
Ground Grid or
Power Distribution Ground
Feeder and branch short circuit protection is not illustrated.
56
Rockwell Automation Publication 2071-UM001E-EN-P - November 2013
Kinetix 3 Drive
Three-phase AC Input
Connect the Kinetix 3 Drive
Chapter 4
Single-phase Power Wired to Single-phase Drives
These examples illustrate grounded single-phase power wired to single-phase
Kinetix 3 drives when phase-to-phase voltage is within drive specifications. The
ungrounded power configuration does not include the ground connection
labeled as ‘optional’ in these figures.
Figure 26 - Single-phase Grounded Power Configurations
Transformer Secondary
L1
IPD
L1
L2
L2
E
L3
L1
L1
AC Line
Filter
230V AC
Output
L2
L2
Kinetix 3 Drive
Single-phase
IDP Terminals
L1C
L2C
Bonded Cabinet Ground Bus
Ground Grid or
Power Distribution Ground
Transformer Secondary
L1
230V AC
Output
L1
AC Line
Filter
L2/N
L2 (Neutral)
L1
IPD
L1
L2/N
L2
E
L3
L1C
Kinetix 3 Drive
Single-phase
IDP Terminals
L2C
Bonded Cabinet Ground Bus
Ground Grid or
Power Distribution Ground
Reducing transformer output reduces motor speed. Feeder and branch short
circuit protection is not illustrated.
Isolation Transformer in Grounded Power Configurations
When using an isolation transformer, attach a chassis ground wire to the neutral
connection. This accomplishes the following:
• Prevents the system from floating and thereby avoids any high voltages that
can otherwise occur, for example due to static electricity.
• Provides a solid earth path for fault conditions.
ATTENTION: If the supply transformer is an auto transformer (not
recommended), a chassis earth ground must not be added.
A chassis earth ground must already be included elsewhere in the system, and
adding another creates a short circuit.
Rockwell Automation Publication 2071-UM001E-EN-P - November 2013
57
Chapter 4
Connect the Kinetix 3 Drive
Three-phase Power Wired to Single-phase Drives
This example illustrates grounded three-phase power wired to single-phase
Kinetix 3 drives when phase-to-phase voltage is within drive specifications. The
optional grounded neutral is omitted on ungrounded systems.
Figure 27 - Single-phase Amplifiers on Three-phase Power (WYE)
L1
L2
IPD
L1
L1 AC Line L1
(1)
L2 Filter L2
E
L2
L3
LC1
Kinetix 3 Drive
(System A)
Single-phase AC Input
IDP Terminals
LC2
Transformer
(WYE) Secondary
L1
L2
L2
L3
L3
IPD
L1
L1 AC Line L1
(1)
L2 Filter L2
E
L2
L3
LC1
Kinetix 3 Drive
(System B)
Single-phase AC Input
IDP Terminals
LC2
Grounded Neutral
(optional)
L1
L3
IPD
L1
L1 AC Line L1
(1)
L2 Filter L2
E
L2
L3
Bonded Cabinet Ground
Bus
Bonded Cabinet Ground
Bus
Ground Grid or
Power Distribution Ground
LC1
Kinetix 3 Drive
(System C)
Single-phase AC Input
IDP Terminals
LC2
Ground Grid or
Power Distribution Ground
(1) AC line filter is optional, but is required for CE compliance.
Feeder short circuit protection is not illustrated.
If a three-phase line filter is used to feed multiple single-phase drives (not
recommended), it is important that the filter include a neutral connection as
shown above. This applies if three-phase is brought directly into the filter and no
isolating transformer is present.
58
Rockwell Automation Publication 2071-UM001E-EN-P - November 2013
Connect the Kinetix 3 Drive
Grounding Your Kinetix 3
Drive
Chapter 4
All equipment and components of a machine or process system must have a
common earth ground point connected to their chassis. A grounded system
provides a safety ground path for short circuit protection.
IMPORTANT
Grounding your drives and panels minimizes shock hazard to personnel and
damage to equipment caused by short circuits, transient overvoltages, and
accidental connection of energized conductors to the equipment chassis.
For CE grounding requirements, refer to Agency Compliance in Chapter 1.
IMPORTANT
To improve the bond between the Kinetix 3 drive and subpanel, construct your
subpanel out of zinc plated (paint-free) steel.
Grounding Your System to the Subpanel
ATTENTION: The National Electrical Code contains grounding requirements,
conventions, and definitions. Follow all applicable local codes and regulations
to safely ground your system. Refer to the illustration below for details on
grounding your Kinetix 3 drive. Refer to Appendix A for the power wiring
diagram for your Kinetix 3 drive.
If the Kinetix 3 drive is mounted on a painted subpanel, ground to a bonded
cabinet ground bus by using a braided ground strap or 4.0 mm2 (12 AWG) solid
copper wire 100 mm (3.9 in.) long.
Figure 28 - Connecting the Braided Ground Strap Example
2
3
1
4
See Kinetix Servo Drives
Specifications Technical Data,
publication GMC -TD003, for Kinetix 3
drive dimensions
Item
Description
1
Mounting screw
2
Braided ground strap
3
Bonded cabinet ground bus
4
Ground grid or power distribution ground
Rockwell Automation Publication 2071-UM001E-EN-P - November 2013
59
Chapter 4
Connect the Kinetix 3 Drive
Figure 29 - Chassis Ground Configuration (multiple Kinetix 3 drives on one panel)
Always follow NEC and applicable
local codes.
1
1
1
1
3
2
4
Item
Description
1
Chassis ground
2
Bonded ground bar (optional)
3
Bonded cabinet ground bus
4
Ground grid or power distribution ground
Grounding Multiple Subpanels
To ground multiple subpanels, refer to the figure below. HF bonding is not
illustrated. For information, refer to Bonding Multiple Subpanels on page 25.
Figure 30 - Subpanels Connected to a Single Ground Point
Always follow NEC and
applicable local codes.
Bonded Ground
Bus
Ground Grid or Power
Distribution Ground
60
Rockwell Automation Publication 2071-UM001E-EN-P - November 2013
Connect the Kinetix 3 Drive
Power Wiring Requirements
Chapter 4
USe copper wire with 75 °C (167 °F) minimum rating. Phasing of main AC
power is arbitrary and earth ground connection is required for safe and proper
operation.
Refer to Power Wiring Examples on page 123 for interconnect diagrams.
Terminals
Cat. No.
Description
Pin
2071-AP0
2071-AP1
2071-AP2
2071-AP4
2071-AP8
AC Input and control
power
2071-A10
2071-A15
2071-xxx
2071-xxx
(1)
Motor power
Shunt resistor (1)
Signal
Recommended
Wire Size
mm2 (AWG)
Strip
Length
mm (in.)
Torque Value
N•m (lb•in)
IPD-L1
IPD-L2
IPD-L1C
IPD-L2C
L1
L2
L1C
L2C
N/A
Ground screw
Ground
1.25 (11)
IPD-L1
IPD-L2
(IPD-L3)
IPD-L1C
IPD-L2C
L1
L2
(L3)
L1C
L2C
N/A
Ground screw
Ground
IPD-L1
IPD-L2
IPD-L3
IPD-L1C
IPD-L2C
L1
L2
L3
L1C
L2C
Ground screw
Ground
1.25 (11)
MP-U
MP-V
MP-W
U
V
W
N/A
Ground screw
GND
1.25 (11)
BC-B1
BC-B2
B1
B2
N/A
1.25 (11)
2.5 (14)
8 (0.3)
N/A
Use for only shunt resistor connection.
ATTENTION: To avoid personal injury and/or equipment damage, make sure
installation complies with specifications regarding wire types, conductor sizes,
branch circuit protection, and disconnect devices. The National Electrical Code
(NEC) and local codes outline provisions for safely installing electrical
equipment.
To avoid personal injury and/or equipment damage, make sure motor power
connectors are used for only connection purposes. Do not use them to turn the
unit on and off.
To avoid personal injury and/or equipment damage, make sure shielded power
cables are grounded to prevent potentially high voltages on the shield.
IMPORTANT
The National Electrical Code and local electrical codes take precedence over the
values and methods provided.
Shunt Resistor Power Wiring Requirement
The B1 and B2 terminals are used to connect a shunt resistor. On the four largest
drives, the built-in shunt resistor is connected to B1 and B2. Because 2071-AP0,
2071-AP1, and 2071-AP2 models do not support shunt resistors, do not make
terminations to the B1 and B2 terminals.
Rockwell Automation Publication 2071-UM001E-EN-P - November 2013
61
Chapter 4
Connect the Kinetix 3 Drive
Wiring Guidelines
Use these guidelines as a reference when wiring the connectors on your Kinetix 3
drive.
IMPORTANT
For connector locations of the Kinetix 3 drives, refer to Kinetix 3 Drive
Connectors and Indicators on page 30.
When removing insulation from wires, refer to the table on 61 for strip lengths.
IMPORTANT
To improve system performance, run wires and cables in the wireways as
established in Establishing Noise Zones on page 26.
Follow these steps when wiring the connectors on your Kinetix 3 drive.
1. Prepare the wires for attachment to each connector plug by removing
insulation equal to the recommended strip length.
We recommended using ferrules to reduce risk of electrical shorts between
stranded wires.
Use caution not to nick, cut, or otherwise damage strands as you
remove the insulation.
IMPORTANT
2. Route the cable or wires to your Kinetix 3 drive.
3. Follow these steps to attach wires to connectors.
a. Open terminal locking clamp with connector tool.
b. Insert wire.
c. Release tool.
b
c
a
Refer to connector pinout tables in Chapter 3 or the interconnect
diagrams in Appendix A.
4. Gently pull on each wire to make sure it does not come out of its terminal;
reinsert and tighten any loose wires.
5. Insert the connector plug into the drive connector.
62
Rockwell Automation Publication 2071-UM001E-EN-P - November 2013
Connect the Kinetix 3 Drive
Wiring the Kinetix 3 Drive
Connectors
Chapter 4
This section provides examples and wiring tables to assist you in making
connections to the Kinetix 3 drive.
Wire the Input Power (IPD) and Motor Power (MP) Connectors
Figure 31 - Kinetix 3 Drive (IPD) and (MP) connector
L1
L2
L3
L1C
IPD
Kinetix 3 Drive
Top View
L2C
L1
L2
L3
L1C
L2C
DCDC-
U
V
W
MP
U
V
W
The IPD is used for input power to the drive and the control circuits. The MP
connector is used to connect output power to the motor. Use 2.5 mm2 (14 AWG)
wire for all connections. Connect ground to ground screw and torque to 1.25
N•m (11 lb•in) Follow procedure in Wiring Guidelines on page 62.
Cable Shield Terminations
Factory-supplied motor power cables for MP-Series (Bulletin MPAS), TL-Series
(Bulletin TLY and TLAR), LDC-Series, and LDL-Series motors and actuators
are shielded. The braided cable shield must terminate near the drive during
installation. Remove small portion of the cable jacket to expose the shield braid
and clamp the exposed shield to the panel.
ATTENTION: To avoid hazard of electrical shock, ensure shielded power cables
are grounded at a minimum of one point for safety.
IMPORTANT
For TL-Series motors, also connect the 152 mm (6.0 in.) termination wire to the
closest earth ground.
Refer to Pigtail Terminations on page 64 for more information.
Rockwell Automation Publication 2071-UM001E-EN-P - November 2013
63
Chapter 4
Connect the Kinetix 3 Drive
Pigtail Terminations
TL-Series motors have a short pigtail cable that connects to the motor, but is not
shielded. The preferred method for grounding the TL-Series power cable on the
motor side is to expose a section of the cable shield and clamp it directly to the
machine frame. The motor power cable also has a 150 mm (6.0 in.) shield
termination wire with a ring lug that connects to the closest earth ground. Use
this method in addition to the cable clamp. The termination wire can be
extended to the full length of the motor pigtail if necessary, but it is best to
connect the supplied wire directly to ground without lengthening.
Figure 32 - Pigtail Terminations
1
3
2
4
5
7
6
(1)
(1)
Item
Description
1
Motor power cable
2
Cable braid clamped to machine frame(1)
3
Connectors
4
Pigtail cable
5
TL-Series motor
6
150 mm (6.0 in.) termination
7
Machine frame
(1) Remove paint from machine frame to be sure of proper HF-bond between machine
frame and motor case, shield clamp, and ground stud.
Table 25 - Motor and Actuator Power Cable Compatibility
Motor/Actuator
Connector
Motor Power Cables
(with brake wires)
Motor Power Cables
(without brake wires)
Not applicable
2090-CPWM7DF-xxAFxx
(continuous-flex)
MPAS-Axxxx
2090-XXNPMF-xxSxx (standard) or
2090-CPBM4DF-xxAFxx
(continuous-flex)
2090-CPWM4DF-xxAFxx
(continuous-flex)
TL-Axxxx-B
2090-DANPT-16Sxx for power
2090-DANBT-18Sxx for brake
2090-DANPT-16Sxx
2090-CPBM6DF-16AAxx (standard)
2090-CPWM6DF-16AAxx (standard)
Motor/Actuator Cat. No.
LDC-Series (Bulletin LDC)
LDC-Cxxxxxx-xxxTx1
LDL-Series (Bulletin LDL)
LDL-xxxxxxx-xxxTx1
Circular DIN
MP-Series (Bulletin MPAS)
TL-Series (Bulletin TL)
TL-Series (Bulletin TLY)
TL-Series (Bulletin TLAR)
64
Rectangular
plastic
Circular plastic
TLY-Axxxx
TLAR-Axxxx
Rockwell Automation Publication 2071-UM001E-EN-P - November 2013
Connect the Kinetix 3 Drive
Chapter 4
This diagram shows an example of three-phase power wires for TL-Series
(Bulletin TL) motors that have no brakes. Thermal switch wires are included in
the feedback cable.
Refer to Kinetix 3 Drive/Rotary Motor Wiring Examples beginning on page 124
for interconnect diagrams.
Figure 33 - Motor Power Terminations (Bulletin TL three-phase wires only)
1
2
4
Item
Description
1
2071-AP4 Kinetix 3 drive shown
2
Motor power (MP) connector plug
3
Drive ground screw
4
Motor cable ground wire
3
Cable shield is tied to the ground wire in the cable. No further grounding is
required with motor power cable, catalog number 2090-DANPT-16Sxx.
Rockwell Automation Publication 2071-UM001E-EN-P - November 2013
65
Chapter 4
Connect the Kinetix 3 Drive
This diagram shows an example of three-phase power wires for MP-Series
(Bulletin MPAS), TL-Series (Bulletin TLY and TLAR), LDC-Series, and LDLSeries motors and actuators that have no brakes. Thermal switch wires are
included in the feedback cable.
Figure 34 - Motor Power Terminations (Bulletin TLY, TLAR, MPAS, LDC-Series, and LDL-Series
three-phase wires only)
1
3
2
4
5
Item
Description
1
2071-AP4 Kinetix 3 drive shown
2
Motor power cable
3
Ground wire
4
Ground lug - user supplied
5
Cable shield clamp
Ground and secure the motor power cable in your system following instructions
on page 70.
66
Rockwell Automation Publication 2071-UM001E-EN-P - November 2013
Connect the Kinetix 3 Drive
Chapter 4
This diagram shows an example of wiring with three-phase power wires and brake
wires by using motor power cable, catalog numbers 2090-XXNPMF-xxSxx,
2090-CPBM4DF-xxAFxx, or 2090-CPBM6DF-16AAxx cables. The brake
wires have a shield braid (shown below as gray) that folds back under the cable
clamp before the conductors are attached to the motor brake circuit. Thermal
switch wires are included in the feedback cable.
Refer to Kinetix 3 Drive/Rotary Motor Wiring Examples beginning on page 124
for interconnect diagrams.
Figure 35 - Motor Power Terminations (Bulletin TLY, TLAR, MPAS, LDC-Series, and LDL-Series
three-phase and brake wires)
6
5
7
3
2
8
To Motor
1
4
Item
Description
Item
Description
1 (1)
24V power supply
5
I/O (IOD) connector with Kinetix 3 I/O breakout board installed (2)
2 (1)
Relay and diode assembly (3)
6
2071-Axx Kinetix 3 drive
3
Minimize unshielded wires in brake circuit.
7
Motor power (MP) connector
4
Brake wires
8
Cable clamp (4)
(1) User supplied. Size as required by motor brake, See Motor Brake Currents on page 129.
(2) Configure one emitter and collector pair from the Digital Outputs, OUTPUT1… OUTPUT3, pins 41…44 or pins 47 and 48, as Brake+ and Brake - through
one of the recommended configuration methods. Wire the output as sourcing and set brake engage and disengage times for motor selected. Motor brake
is active on enable. For Digital Output specifications, refer to page 44.
(3) Diode 1N4004 rated 1.0A @ 400V DC. See Power Wiring Examples beginning on page 124.
(4) Exposed shield under clamp and place within 50…75 mm (2…3 in.) of drive, see page 70 for details.
Rockwell Automation Publication 2071-UM001E-EN-P - November 2013
67
Chapter 4
Connect the Kinetix 3 Drive
The cable shield clamp shown above is mounted to the subpanel. Ground and
secure the power cable in your system following instructions on page 70.
Cable shield and lead preparation is provided with most Allen-Bradley® cable
assemblies. Follow these guidelines if your motor power cable shield and wires
require preparation. The recommended wire size 2.5 mm2 (14 AWG).
Figure 36 - Cable Shield and Lead Preparation
7 mm (0.28 in.)
U
Outer Insulation
V
W
Motor Power Cable
Exposed Braid
25.4 mm (1.0 in.)
As required to have ground clamp within 50…75 mm
(2…3 in.) of the drive.
Attach a ring or fork lug to yellow and
green ground wire.
Refer to Kinetix 3 Drive/Rotary Motor Wiring Examples beginning on page 124
for interconnect diagrams.
Table 26 - Motor Power (MP) Connector
Servo Motor
MP Connector
MP-Series, TL-Series
MP Pin
Signal
U / Brown
1
U
V / Black
2
V
W / Blue
3
W
Green/yellow ground wire with ring lug is connected to the screw provided on
the drive. Shown Figure on page 70.
68
Rockwell Automation Publication 2071-UM001E-EN-P - November 2013
Connect the Kinetix 3 Drive
Chapter 4
Shunt Resistor
The B1 and B2 terminals are used to connect the shunt resistor. On the 2071AP4, 2071-AP8, 2071-A10, and 2071-A15 Kinetix 3 drives, the built-in shunt
resistor is pre-wired to B1 and B2 at the factory. On the 2071-AP0, 2071-AP1,
and 2071-AP2 Kinetix 3 drives, shunt resistors are not supported; no
terminations can be made to the B1 and B2 terminals for these drives.
IMPORTANT
The information supplied here is for reference only. There are no adjustments
or user serviceable parts associated with the shunt resistor.
Figure 37 - Shunt Resistor (BC) Connector
Kinetix 3 Drive
Front view is shown.
Shunt Resistor (BC)
Connector
Rockwell Automation Publication 2071-UM001E-EN-P - November 2013
69
Chapter 4
Connect the Kinetix 3 Drive
Apply the Motor Cable Shield
Clamp
This procedure assumes you have completed wiring your motor power (MP)
connector and are ready to apply the cable shield clamp.
Follow these steps to apply the motor cable shield clamp.
1. Locate a suitable position for installing the cable shield clamp within
50…75 mm (2…3 in.) of the drive.
Motor Power Ground
Shield Clamp
25
(1.0)
34.0
(1.34)
12.7
(0.50)
50…75 mm
(2…3 in.)
Dimension are in mm (in.).
50…75 mm
(2…3 in.)
If panel is painted, remove paint to
provide metal-to-metal contact.
2. Lay out and drill holes for the cable clamp.
ATTENTION: Plan the installation of your system so that you can perform all
cutting, drilling, tapping, and welding with the system removed from the
enclosure. Because the system is of the open type construction, be careful to
keep any metal debris from falling into it. Metal debris or other foreign matter
can become lodged in the circuitry that can result in damage to components.
3. Locate the position on the motor power cable that comes under the clamp
and remove about an 25.4 mm (1.0 in.) of the cable jacket to expose the
shield braid.
4. Position the exposed portion of the cable braid directly in line with the
clamp.
5. Clamp the exposed shield to the panel with the clamp and two #6-32 x 1
screws provided.
6. Repeat steps 1…5 for each Kinetix 3 drive you are installing.
70
Rockwell Automation Publication 2071-UM001E-EN-P - November 2013
Connect the Kinetix 3 Drive
Chapter 4
Factory-made cables with premolded connectors are designed to minimize
electro-magnetic interference (EMI) and are recommended over hand-built
cables to improve system performance. However, options are available for
building your own feedback and I/O cables.
Feedback and I/O Cable
Connections
Table 27 - Options for Connecting Motor Feedback and I/O
Connection Option
Cat. No.
Cable
Using This Type of Cable
Premolded connectors
N/A
Motor feedback
Refer to the table below for the premolded motor
feedback cable available for your motor.
Feedback terminal block
2071-TBMF
Feedback interface
Refer to the table below for the flying-lead
motor feedback cable available for your motor.
I/O cable
2090-DIAO-D50xx
I/O Interface
—
I/O terminal block
2071-TBIO
I/O interface
User-supplied flying-lead cable.
Table 28 - Motor/Actuator Feedback Cables for Specific Motor/Feedback Combinations
Motor/Actuator Cat. No.
Feedback Type
Feedback Cable
Premolded
MPAS-Axxxx-ALMx2C
LDC-Cxxxxxx
Incremental encoder
N/A
LDL-xxxxxxx
TLY-Axxxx-B
TLAR-Axxxxx
High-resolution encoder
TLY-Axxxx-H
Incremental encoder
TL-Axxxx-B
High-resolution encoder
Flying-lead
2090-XXNFMF-Sxx (standard)
2090-CFBM4DF-CDAFxx
(continuous-flex)
2090-XXNFMF-Sxx (standard)
2090-CFBM7DF-CDAFxx
(continuous-flex)
Pinout
page 72
N/A
2090-CFBM6DF-CBAAxx (standard)
page 72
2090-DANFCT-Sxx
2090-DANFCT-Sxx(1)
page 73
(1) Remove the premolded connector on the drive end and use Feedback Breakout Board, catalog number 2071-TBMF.
Rockwell Automation Publication 2071-UM001E-EN-P - November 2013
71
Chapter 4
Connect the Kinetix 3 Drive
Flying-lead Feedback Cable Pinouts
Table 29 - 2090-XXNFMF-Sxx or 2090-CFBMxDF-CDAFxx Feedback Cable
Motor/Actuator
Connector Pin
Motor/Actuator
Signal Name
Drive
Signal Name
Drive MF
Connector Pin
6
BAT +
BAT +
18
13
DATA +
SD +
10
14
DATA -
SD -
13
22
EPWR 5V
EPWR
20
23
ECOM / BAT (internally connected)
ECOM
BAT -
1
19
24
SHIELD
GND
11
Table 30 - 2090-CFBM6DF-CBAAxx Feedback Cable
72
Motor/Actuator
Connector Pin
Motor/Actuator Signal Drive
Name
Signal Name
Drive MF
Connector Pin
9
AM +
A+
3
10
AM -
A-
4
11
BM +
B+
5
12
BM -
B-
6
13
IM +
I+
7
14
IM -
I-
8
15
S1 +
S1
10
16
S1 -
—
—
17
S2 +
S2
14
18
S2 -
—
—
19
S3 +
S3
16
20
S3 -
—
—
22
EPWR 5V
EPWR
20
23
ECOM
ECOM
1
24
SHIELD
GND
11
Rockwell Automation Publication 2071-UM001E-EN-P - November 2013
Connect the Kinetix 3 Drive
Chapter 4
Table 31 - 2090-DANFCT-Sxx Feedback Cable
Motor
Connector Pin
Motor
Signal Name
Drive
Signal Name
Drive MF
Connector Pin
7
EPWR
EPWR
20
8
ECOM/BAT (internally connected)
ECOM
BAT-
1
19
9
SHIELD
GND
11
12
DATA +
SD +
10
13
DATA -
SD -
13
14
BAT +
BAT +
18
Rockwell Automation Publication 2071-UM001E-EN-P - November 2013
73
Chapter 4
Connect the Kinetix 3 Drive
Wiring the I/O Connector
Connect your I/O wires to the IOD connector by using catalog number
2071-TBIO, I/O Breakout Board. Refer to publication 2071-IN002.
Figure 38 - Kinetix 3 Drive (IOD connector and I/O Breakout Board)
2071-TBIO
I/O Breakout Board
I/O (IOD)
Connector
I/O interface cable, catalog number 2090-DAIO-D50xx provides access to all 50
pins of I/O.
Figure 39 - Kinetix 3 Drive (IOD connector and I/O Interface cable)
2090-DAIO-D50xx
I/O Interface Cable
I/O (IOD)
Connector
74
Rockwell Automation Publication 2071-UM001E-EN-P - November 2013
Connect the Kinetix 3 Drive
Wiring the Feedback
Connector
Chapter 4
These procedures assume you have mounted your Kinetix 3 drive, completed all
power wiring, and are ready to connect your feedback.
Connecting Premolded Motor Feedback Cables
The motor feedback cables with premolded connectors plug directly into the 20pin motor feedback (MF) connectors on the Kinetix 3 drive, no wiring is
necessary.
IMPORTANT
When using Bulletin 2090 cables with premolded connectors, tighten the
mounting screws (finger tight) to improve system performance.
Figure 40 - Kinetix 3 Drive (MF connector)
Kinetix 3 Drive, Side View
(2071-AP4 drive is shown)
Kinetix 3 Drive Front View
(2071-AP4 drive is shown)
Premolded Connector
2090-DANFCT-Sxx Cable
Motor Feedback (MF)
Connector
Rockwell Automation Publication 2071-UM001E-EN-P - November 2013
75
Chapter 4
Connect the Kinetix 3 Drive
Wiring the Feedback Breakout Board
The 2071-TBMF Feedback breakout board is suitable for terminating flying-lead
motor feedback cables. Use it with the Kinetix 3 drive and all motors with
incremental or high-resolution feedback. It has a 20-pin, male, mini D-sub
connector and is compatible with all Bulletin 2090 feedback cables.
The TLY-Axxxx-B high-resolution motors with 17-bit encoder require a 3.6V
battery, purchased separately, see Replacement Battery Specifications on page 36.
Figure 41 - Kinetix 3 Drive (MF connector)
Kinetix 3 Drive, Side View
(2071-AP4 drive is shown)
Kinetix 3 Drive Front View
(2071-AP4 drive is shown)
Motor Feedback (MF)
Connector
76
Rockwell Automation Publication 2071-UM001E-EN-P - November 2013
2071-TBMF Feedback breakout board.
Use with flying-lead feedback cable.
Connect the Kinetix 3 Drive
Chapter 4
Figure 42 - Wiring 2071-TBMF Feedback Breakout Board
1
2
3
7
4
5
6
Refer to Chapter 3 for feedback signal
descriptions.
Refer to page 124 for the motor feedback
interconnect drawing for your application.
2
Item
Description
1
2071-TBMF Kinetix 3 feedback breakout board
2
Tie wrap
3
13 mm (0.5 in.) exposed cable shield
4
Bulletin 2090 feedback cable, catalog numbers
2090-XXNFMF-Sxx, 2090-CFBMxDF-CDAFxx, 2090-CFBM6DF-CBAAxx, or 2090-DANFCT
5
Ground pad
6
3.6V battery(1)
7
Mounting screws
(1) Battery required if absolute position must be stored.
Rockwell Automation Publication 2071-UM001E-EN-P - November 2013
77
Chapter 4
Connect the Kinetix 3 Drive
Notes:
78
Rockwell Automation Publication 2071-UM001E-EN-P - November 2013
Chapter
5
Using the Keypad Interface
Keypad Input
Topic
Page
Keypad Input
79
Status Display/Operation Mode
81
Reset Drive to Default Value
83
The operator interface provides immediate access to the Kinetix 3 drive status
displays and monitoring, parameter settings, and functional commands. The
features of the Kinetix 3 drive operator interface are identified in Figure 44 and
described below.
Figure 44 - Kinetix 3 Operator Interface
1
3
2
Item
Description
1
7-segment status indicator
2
Up, down, left, and right directional keys
3
Mode/Set key
4
Enter key
4
• The 7-segment status indicator displays status, parameters, function
commands, and provides drive monitoring.
• The Control Power illuminates when the drive's control electronics are
powered by application of 200…230V power to the L1C, and L2C
Control Power pins.
• The Mode/Set, and Enter keys provide the operator with access to drive
functions. The directional keys (Up, Down, Left, and Right) edit drive
function settings. These keys let the operator monitor and change the
drive’s program.
Rockwell Automation Publication 2071-UM001E-EN-P - November 2013
79
Chapter 5
Using the Keypad Interface
The following briefly explains the Mode/Set, Enter, and directional keys and
their use.
Key
Name
Function
Example
Set
Saves the current value of the setting in memory.
To save any change:
• Press and hold Set until the display blinks.
Mode
Toggles the display between the four modes.
To advance the display through the various mode displays:
1. Press Mode to advance from the Status mode (default
display) to Set Parameter mode,
2. Press Mode again to advance to Monitor mode.
3. Press Mode again to advance to the Function mode.
4. Press Mode once more to return to the Status mode.
Important: The Status mode is the default display at
powerup.
Enter
Enter or exit a display containing the settings for the
selected mode.
Important: Before exiting the display, Set must be
pressed and held until the display blinks to save any
modified value to memory.
Up
Increments the value to a larger integer.
A non-functional key in the Status mode.
Down
Decrements the value to a smaller integer.
A non-functional key in the Status mode.
Left
Shifts the active digit to the left.
An invalid key for the Status mode.
Right
Shifts the active digit to the right.
An invalid key for the Status mode.
80
To access the settings for Pr-0.00 from the Status mode:
1. Press Mode to advance to the initial Parameter display
(PR-0.00).
2. Then press Enter to access the parameter's value (01 is
the default setting).
In any Parameter Setting, Monitor, or Function mode:
• Press and hold the UP key to scroll to the maximum
value.
In any Parameter Setting, Monitor, or Function mode:
• Press and hold the DOWN key to scroll to the minimum
value.
In the Set Parameter mode:
1. Press Left to move from least to the most significant
digit in parameters
(PR-x.xX to PR-x.Xx).
2. Press LEFT again to move to the groups digit
(PR-X.xx).
In the Set Parameter mode:
1. Press RIGHT to move from least significant digit in
parameters to the groups digit
(PR-x.xX to PR-X.xx).
2. Press RIGHT again to move to the most significant digit
in Parameters (Pr-x.Xx).
Rockwell Automation Publication 2071-UM001E-EN-P - November 2013
Using the Keypad Interface
Status Display/Operation
Mode
Chapter 5
Operation mode - When the drive is powered up, if there are no faults, this is the
default status screen. It shows the Control mode, status indicators, and whether
the drive is enabled.
Character: 5
4
1
3
2
2
1
0
3
Item
Description
1
Control Mode: Characters 4 and 5
F
S
C
SF
CF
CS
P
PF
PS
PC
I
2
Row Display: Character 3
Top Row
3
Status: Characters 0…2
rdy = Drive is disabled, but ready to be enabled.
run = Drive is enabled and motor is under control.
=
=
=
=
=
=
=
=
=
=
=
Follower
Analog Velocity Input
Analog Current Input
Analog Velocity Input/Follower
Analog Current Input /Follower
Analog Current Input/Analog Velocity Input
Preset Velocity
Preset Velocity/Follower
Present Velocity/Analog Velocity Input
Present Velocity/Analog Current Input
Indexing
= Inactive for any Current mode.
Active if Velocity mode and Velocity Error is within velocity window.
Active if Follower mode and Position Error is within following error setting.
Middle Row = Active if velocity exceeds Up To Speed parameter.
Bottom Row = Active for Hall start-up motors once the commutation angle is set.
Error Display
If the drive is faulted, the drive does not show the Operation Mode screen.
Instead the drive alternates between the Error Description and the Error
Number. For an Emergency Stop error, this is what it looks like.
Figure 45 - Error Descriptor
Figure 46 - Error Number
Parameter Edit
From this screen, scroll through the general parameter groups (before the period)
and then pick the parameter you wish to view or edit (after the period).
Rockwell Automation Publication 2071-UM001E-EN-P - November 2013
81
Chapter 5
Using the Keypad Interface
Figure 47 - Parameter Edit
Index Edit
From this screen, scroll through the indexing parameter groups (before the
period) and then pick the parameter you wish to view or edit (after the period).
Figure 48 - Index Edit
Display Mode
The Display mode displays numerical data about drive and motor functions of
twenty four parameters. Follow these steps to access the data.
1. Enter the Display mode by pressing the Mode key.
The display indicates the selected function by displaying
where nn is a display attribute number shown in Table 32.
2. By using either the Up, Down, Right, or Left keys, select a display attribute
number.
3. Press the Enter key.
The value of the attribute appears.
Table 32 - Display Mode
82
Display
Attribute
Number
Attribute
Unit
00
Velocity Feedback
rpm or mm/s
01
Velocity Command
rpm or mm/s
02
Velocity Error
rpm or mm/s
03
Current Command
0.1% of motor rated continuous torque
04
Follower Position
counts
05
Master Position
counts
06
Position Error
counts
07
Position Command Count
Frequency
0.1 kcounts/s
08
Commutation Angle
0.1o
09
Mechanical Angle
0.1o
10
Shunt Power Limit Ratio
%
11
Bus Voltage
V
12
Absolute Rotations
revolutions
Rockwell Automation Publication 2071-UM001E-EN-P - November 2013
Using the Keypad Interface
Chapter 5
Table 32 - Display Mode (continued)
Display
Attribute
Number
Attribute
Unit
13
Velocity Command Offset
mV
14
Current Command Offset
mV
15
Input and Output State
D igital Inputs 1-10
10 9 8
7 6
3 2 1
(6 5 4)
5 4 3 2 1
3 2 1
Servo Alarm
Digital Outputs 3 - 1
E-Stop:
Not active
Alarm Codes 3 - 1:
(Digital Outputs 6 - 4)
16
Error History
Up to eight alarms stored in numerical order where most recent =1,
to oldest =8, with error code number:
Most significant digit is alarm number (1–8),
Least significant six digits are the error code number referenced in the
Error Displays beginning on page 116.
For example; 1-E004 = most recent error is a Motor Overtemp
17
Firmware Revision
For Example; vErx.yy where x = version, yy = revision
18
Motor Model
–
19
Analog Velocity Command
Voltage
0.01V
20
Analog Current Command
Voltage
0.01V
21
Drive Rated Output Power
W
22
Absolute Single-Turn
–
23
Motor Position
–
Run
The Run mode is reserved for future use. Only the reset procedure in the next
section uses one parameter from this screen; otherwise, there are no useraccessible commands or information available.
Reset Drive to Default Value
Use keypad input if an Ultraware software or Connected Components
Workbench software connection is not available.
1. Use the keypad to verify that parameter Pr0.32 is set to 0x00 or 0x01.
This disables the MODBUS Run Function Control bit.
2. Use the keypad to navigate to the parameter run-12 and then press Enter.
3. At the prompt, start the reset by pressing Set, or cancel by pressing Enter.
When finished, the drive displays -donE-.
Rockwell Automation Publication 2071-UM001E-EN-P - November 2013
83
Chapter 5
Using the Keypad Interface
Notes:
84
Rockwell Automation Publication 2071-UM001E-EN-P - November 2013
Chapter
6
Configure Your Drive for Communication
Topic
Page
Apply Power to Your Kinetix 3 Drive
86
Configure Your Kinetix 3 Drive for USB Communication with a Personal Computer
87
Configure Your Kinetix 3 Drive for RS-232 Communication with a Personal Computer
88
Rockwell Automation Publication 2071-UM001E-EN-P - November 2013
85
Chapter 6
Configure Your Drive for Communication
Apply Power to Your Kinetix 3
Drive
This procedure assumes that you have completed the following:
• Wired your Kinetix 3 system
• Verified the wiring
• Are ready to begin establishing communication to the drive
To apply power to your Kinetix 3 drive, follow these steps.
1. Disconnect any load to the motor.
IMPORTANT
Be sure that the motor is free of all linkages when initially applying
power to the system.
2. Apply main and control input power to the Kinetix 3 drive, and observe
the operator interface on the front of the drive.
The drive enters a normal startup, as outlined below and shown in below.
If the Main Power Status
Indicator is
Then
ON
Go to step 3.
OFF
Check your input power connections and repeat step 2.
Startup Normal
Error Detected during Startup
3. Verify the status of the drive startup, as outlined below and shown in
above.
86
If the Six Characters on the
7-segment Display Indicator
Then
rdY in the three least significant
characters
The drive is ready.
E. in the most significant character
followed by a text string or error code
number
Refer to Error Displays on page 116 to troubleshoot the fault
condition.
IMPORTANT: If a 17-bit serial motor is not connected or a 17-bit serial
motor is installed without a battery backup, a fault condition occurs.
Rockwell Automation Publication 2071-UM001E-EN-P - November 2013
Configure Your Drive for Communication
Configure Your Kinetix 3
Drive for USB Communication
with a Personal Computer
Chapter 6
Use the 1203-USB converter to connect your drive to your personal computer if
you are using Connected Components Workbench software to configure your
drive.
Download Connected Components Workbench Software
1. Open your Internet browser.
2. Navigate to http://ab.rockwellautomation.com/ProgrammableControllers/Connected-Components-Workbench-Software.
Consult Micro800 and Connected Components Workbench Getting Started
Guide, publication 2080-QR001, for details on the download process.
To configure the Kinetix 3 drive communication port for USB communication,
follow these steps.
1. Use the keypad on the front of the drive to set the following parameters.
See Status Display/Operation Mode for keypad operation.
Parameter Name
Parameter
Setting
Drive Address
Pr0.07
248
Serial Port Configuration
Pr0.09
1102
where, 2 - 19,200 Kbps Baud Rate
0 - 8 Data Bits, No Parity, 1 Stop Bit
1 - Modbus-RTU protocol
1 - RS-485
2. Use the USB cable to connect your personal computer with the 1203-USB
converter.
3. Connect the1203-USB converter to the Kinetix 3 drive with the 2090CCMUSDS-48AAxx communication cable.
5
2
4
1
3
Rockwell Automation Publication 2071-UM001E-EN-P - November 2013
87
Chapter 6
Configure Your Drive for Communication
Item
Description
1
Kinetix 3 drive
2
1203-USB converter cable, catalog number 2090-CCMUSDS-48AAxx
3
1203-USB converter
4
USB cable
5
Personal computer with Connected Components Workbench software
For information on the serial communication cables, refer to Serial
Communication Cables Installation Instructions, publication 2090IN019.
4. Proceed with Chapter 7, Configure Your Drive for Communication with a
Personal Computer Running Connected Components Workbench
Software, on page 91.
Configure Your Kinetix 3
Drive for RS-232
Communication with a
Personal Computer
The Kinetix 3 drive communication port, Comm0A and Comm0B, can be
configured for RS-232 communication. Use RS-232 communication when you
plan to communicate with the drive by using your personal computer and
Ultraware software.
IMPORTANT
Changing between RS-232 and RS-485 Modbus-RTU requires different cabling
and serial port configurations.
The following schematic shows the cable pinouts for RS-232 communication. If
you are not using the pre-made RS-232 Serial Communication Cable, catalog
number 2090-CCMPCDS-23AAxx, use this schematic to make your own cable.
Figure 49 - RS-232 Connection with a Personal Computer
Personal Computer
Kinetix 3 Drive
Serial Port
Comm0A or Comm0B Port
1
RXD
2
1
XMT RS-232 Transmit
TXD
3
2
RCV RS-232 Receive
4
3
+5V Power
5
4
GND +5V Power Ground
6
5
DX+ RS-485 +
6
DX- RS-485-
COM
7
8
9
88
Use 2090-CCMPCDS-23AAxx Serial
Communication Cable for easy computer to drive
connection.
Rockwell Automation Publication 2071-UM001E-EN-P - November 2013
Configure Your Drive for Communication
Chapter 6
To configure the Kinetix 3 drive communication port for RS-232/ASCII
communication follow these steps.
1. Use the keypad on the front of the drive to set the following parameters.
See Status Display/Operation Mode for keypad operation.
Parameter Name
Parameter
Setting
Drive Address
Pr0.07
Required address (1 - Default)
Serial Port Configuration
Pr0.09
0005 - Default
where, 5 - 57,600 Kbps Baud Rate
0 - 8 Data Bits, No Parity, 1 Stop Bit
0 - ASCII protocol
0 - RS-232
2. Connect to your personal computer with the RS-232 serial
communication cable, catalog number 2090-CCMPCDS-23AAxx.
2
3
1
Item
Description
1
Kinetix 3 drive
2
RS-232 serial communication cable, catalog number 2090-CCMPCDS-23AA
3
Personal computer with Ultraware software
For information on the serial communication cables, refer to Serial
Communication Cables Installation Instructions,
publication 2090-IN019
3. Proceed with Chapter 8, Using Ultraware Software to Configure the
Drive, on page 101.
Rockwell Automation Publication 2071-UM001E-EN-P - November 2013
89
Chapter 6
Configure Your Drive for Communication
Notes:
90
Rockwell Automation Publication 2071-UM001E-EN-P - November 2013
Chapter
7
Configure Your Drive for Communication with a
Personal Computer Running Connected
Components Workbench Software
Download Connected
Components Workbench
Software
Topic
Page
Download Connected Components Workbench Software
91
Configure the Plug in Serial Port on the Micro830 or Micro850 Controller
97
Program the Controller for Modbus Communication with a Kinetix 3 Drive
97
Kinetix 3 Configuration Wizard
98
Use this procedure to download your Connected Components Workbench
Software.
1. Open your Internet browser.
2. Navigate to http://ab.rockwellautomation.com/ProgrammableControllers/Connected-Components-Workbench-Software.
Consult Micro800 and Connected Components Workbench Getting Started
Guide, publication 2080-QR001, for details on the download process.
Add Your Device to the
Connected Components
Workbench Project
Use this procedure to add your Kinetix 3 drive to your Connected Components
Workbench project.
1. Start the Connected Components Workbench software.
2. From the Device Toolbox, expand Drives, click Kinetix 3 and drag to it to
the Project Organizer.
Rockwell Automation Publication 2071-UM001E-EN-P - November 2013
91
Chapter 7
Configure Your Drive for Communication with a Personal Computer Running Connected Components Workbench Software
3. From the Project Organizer, double-click the Kinetix 3 icon.
4. From the Kinetix 3 pane, click the Add+ tab.
92
Rockwell Automation Publication 2071-UM001E-EN-P - November 2013
Configure Your Drive for Communication with a Personal Computer Running Connected Components Workbench Software
Chapter 7
5. Click the1203-USB USB to DSI icon, then click Add.
6. Click the 0-Kinetix 3 tab, then click Connect.
7. Expand AB_DF1, Data Highway Plus, and click 01, AB DSI.
8. Click OK.
9. From the menu bar, click the Wizards icon.
Rockwell Automation Publication 2071-UM001E-EN-P - November 2013
93
Chapter 7
Configure Your Drive for Communication with a Personal Computer Running Connected Components Workbench Software
10. From the Available Wizards dialog box, select Kinetix 3 Startup Wizard.
11. Click Reset to Factory Settings, then choose the options for Encoder
Backup Battery and Emergency Stop Input.
TIP
You can also reset drive default values from the Kinetix 3 Configuration Wizard
see page 100
12. Click Next.
94
Rockwell Automation Publication 2071-UM001E-EN-P - November 2013
Configure Your Drive for Communication with a Personal Computer Running Connected Components Workbench Software
Chapter 7
13. Choose the appropriate options for your Controller and Operation Mode.
14. Click Next.
15. Enter the First Gear Ratio.
16. Click Next.
17. Verify your motor has been identified correctly.
18. Click Next.
Your motor catalog string can be different.
Rockwell Automation Publication 2071-UM001E-EN-P - November 2013
95
Chapter 7
Configure Your Drive for Communication with a Personal Computer Running Connected Components Workbench Software
19. Click Start Autotuning.
Status displays Autotuning Now then Autotuning Successful.
20. Click Finish.
21. From the File menu, choose Save.
22. Create a project name.
96
Rockwell Automation Publication 2071-UM001E-EN-P - November 2013
Configure Your Drive for Communication with a Personal Computer Running Connected Components Workbench Software
Chapter 7
1. Under Plug-In Modules right-click the first empty slot and choose
Communication>2080-SERIALISOL.
Configure the Plug in Serial
Port on the Micro830 or
Micro850 Controller
2. Under Common Settings, from the Driver pull-down menu, choose
Modbus RTU.
If necessary, change the other properties to match the dialog box below.
3. Under Protocol Control settings, from the Media pull-down menu, choose
RS485.
4. Right-click the controller icon and choose Build.
Program the Controller for
Modbus Communication with
a Kinetix 3 Drive
Please refer to Kinetix 3 Motion Control Indexing Device Building Block Quick
Start, publication CC-QS025 and Micro800 Programmable Controllers General
Instructions Reference Manual, publication 2080-RM001 for information about
Modbus messaging and programming the Micro800 controllers and Kinetix 3
drive.
Rockwell Automation Publication 2071-UM001E-EN-P - November 2013
97
Chapter 7
Configure Your Drive for Communication with a Personal Computer Running Connected Components Workbench Software
Kinetix 3 Configuration
Wizard
This section provides a description of the Connected Components Workbench
workspace and the drive panes. Use this wizard to make advanced configuration
changes.
2
1
3
4
5
6
Item
Feature
1
Parameter group selection
2
Parameters for the associated group
3
Functions associated with the displayed parameters
4
Displays selected statuses
5
Opens the status selection dialog
6
Drive connection status
Table 33 - Connected Components Workbench Workspace Pane Uses
Pane
Use the Pane to
Kinetix 3 Properties
•
•
•
•
Configure the drive properties for an offline or an online drive
Monitor parameters of an online drive
Execute commands that save current working values as power-up values
Execute commands that restore the drives original default settings
Analog Configuration • Set Analog Velocity or Analog Current Command Input drive parameters for an online or
offline drive
• Monitor the status of the incoming Analog Command for an online drive
• Execute commands that remove Velocity and Current Input Offsets for an online drive
Preset
98
• Configure up to seven preset velocity values
• Preset parameters control drive operation when the Operating mode is set to Preset
Velocity in the Drive properties pane
• The drive uses the preset velocity value selected by the Preset Select 1, 2 and 3, as set in the
Digital Inputs group
Rockwell Automation Publication 2071-UM001E-EN-P - November 2013
Configure Your Drive for Communication with a Personal Computer Running Connected Components Workbench Software
Chapter 7
Table 33 - Connected Components Workbench Workspace Pane Uses
Pane
Use the Pane to
Follower
• Configure the Follower parameters
• Follower parameters control drive operation when the Operating mode is set to Follower in
the Drive properties pane
• The Follower page has no associated statuses
Indexing
• Configure up to 64 indexes (0…63)
• Open the Indexing Control Panel where you can do the following:
– Start and stop execution of the index command
– Start and stop homing
– Enable or disable a drive
– Monitor the execution of an index
Homing
• Configure the type of homing operation the drive performs
• Homing pane has no associated statuses
Motor
• Select a motor for the associated online or offline Kinetix 3 drive. Once you select a motor,
the status/parameters values associated with the selected motor appears in the
Parameters window
• Monitor the statuses that relate to the selected motor
Tuning
•
•
•
•
Encoders
• Configure the motor encoder
• Execute a command that resets an absolute encoder position to zero
Digital Inputs
• Assign functionality to digital inputs
• Monitor the status of digital inputs
Digital Outputs
• Assign functionality to digital outputs
• Set both active and inactive brake delays
• Monitor the status of digital outputs
Analog Outputs
• Assign drive signals to analog outputs
• The Analog Outputs page has no statuses
Configure Velocity, Position, and Current Regulator Gains
Configure and execute autotuning
Configure an alternate set of gains that can be activated by a digital input
Monitor Velocity, Position, and Current loop statuses
Rockwell Automation Publication 2071-UM001E-EN-P - November 2013
99
Chapter 7
Configure Your Drive for Communication with a Personal Computer Running Connected Components Workbench Software
Alternate Method to Reset the Drive
In addition to resetting the drive from the Startup Wizard, you can also reset the
drive from the Kinetix 3 Configuration Wizard.
Follow these steps to reset the drive from the Kinetix 3 Startup Wizard.
1. Start the Connected Components Workbench software.
2. Click the Kinetix 3 tab, then click Connect.
3. From the menu bar, click the Wizards icon.
4. From the Available Wizards dialog box, select Application
Wizard>Kinetix 3 Configuration and click Select.
5. From the rightmost section of the pane, click Reset Drive.
6. Click Yes to confirm.
100
Rockwell Automation Publication 2071-UM001E-EN-P - November 2013
Chapter
8
Using Ultraware Software to Configure the Drive
Download Ultraware
Software
Topic
Page
Detect Your Kinetix 3 Drive
101
Reset Drive to Default Values with Ultraware Software
102
Understanding the Workspace and Drive Branches
103
Select a Motor
104
Tune Your Motor
106
Configure Displayed Units
107
Test Your Motor (non-indexing move)
108
Test Your Motor (indexing move)
109
To communicate and configure your Kinetix 3 drive by using serial
communication from a personal computer, download and install Ultraware
software on your personal computer. To get the latest Ultraware software follow
these steps.
1. Start an Internet browser.
2. Navigate to http://www.ab.com/motion/software/get/
Ultraware_1_80.exe.
3. Click Run.
Detect Your Kinetix 3 Drive
This procedure assumes you have successfully applied power to your drive. These
steps are designed to make sure that your Kinetix 3 drive is communicating with
your Ultraware software.
Follow these steps to detect your Kinetix 3 drive.
1. Start your Ultraware software.
Refer to the Ultraware User Manual, publication 2098-UM001, for more
information on starting the Ultraware software.
2. Create a new file.
The software scans for online drives.
Rockwell Automation Publication 2071-UM001E-EN-P - November 2013
101
Chapter 8
Using Ultraware Software to Configure the Drive
3. Click Stop Scanning when your drive is detected or wait for the scanning
to time out.
4. Look for the Kinetix 3 icon under the On-Line Drives tree.
The Kinetix 3 icon indicates that your drive is detected.
5. Click the [+] next to the Kinetix 3 icon to expand the branch menu.
Reset Drive to Default Values
with Ultraware Software
If Your Kinetix 3 Drive
Then
Is detected and listed under the On-Line Drives
tree.
1. The software and hardware are communicating and the
system is ready.
2. Go to Select a Motor on page 104.
Is not detected.
1. Check your serial cable connections.
2. Use Recover Communication (in Ultraware) to establish a
connection.
3. Go to main step 1 of this section.
4. Verify no other program such as RSLinx is using the serial
port.
Follow these steps to reset your drive with Ultraware software.
1. Start the Ultraware software.
2. Establish a connection to the drive.
3. Navigate to the main drive dialog box.
4. Click Reset to Defaults.
102
Rockwell Automation Publication 2071-UM001E-EN-P - November 2013
Using Ultraware Software to Configure the Drive
Understanding the
Workspace and Drive
Branches
Chapter 8
This section provides a description of the Ultraware workspace and various drive
branches.
5 6
7
1
2
3
4
Item
Description
1
Click the [+] next to K3 Drive to expand the parameter group.
2
Double-click the K3 Drive icon in the Ultraware workspace to display the various drive branches.
3
Configure drive parameters for an online drive.
4
Monitor the status of an online drive.
5
Software Enable icon.
6
Disable All Drives icon.
7
Execute commands to clear faults, reset the drive, or reset the EEPROM.
Mode Configuration Branch
Click the [+] next to Mode Configuration
to select the drive’s command source.
Rockwell Automation Publication 2071-UM001E-EN-P - November 2013
103
Chapter 8
Using Ultraware Software to Configure the Drive
Table 34 - Branch Descriptions
Select a Motor
Branch
Use the Motor Branch to
Motor
• Select a motor for the associated online or offline
Kinetix 3 drive. Once you select a motor, the status
values associated with the selected motor appear in
the Status pane of this dialog box.
• Monitor the status as related to the selected motor.
• Perform diagnostics on the motor.
Tuning
• Configure Velocity and Position Regulator Gains that
are used in tuning.
• Monitor Velocity, Position, and Current loop status.
• Open dialog boxes where you can execute commands
for autotuning, manual position tuning, and manual
velocity tuning.
Encoders
• Configure the motor encoder.
Digital Inputs
• Assign functionality to digital inputs.
• Monitor the status of digital inputs.
Digital Outputs
• Assign functionality to digital outputs.
• Set both active and inactive brake delays.
• Monitor the status of digital outputs and the digital
relay.
Analog Outputs
• Assign drive signals to analog outputs.
• Monitor the status of analog outputs.
Monitor
• View a collection of statuses.
• Open the Monitor Setup dialog box where you can
select the collection of statuses to display in this dialog
box.
• Load a monitor previously saved.
• Save a monitor for later use.
Oscilloscope
• Configuring the oscilloscope by selecting the drive
signal to trace.
• Executing commands that run the oscilloscope's
tracing function continuously or in response to the
configured trigger.
• Monitoring the oscilloscope as it traces the selected
drive signal.
Faults
•
•
•
•
Service Information
• Display and monitor service information about the
drive.
• Display the firmware revision of the drive.
Set fault limits.
Monitor fault status.
Execute the Clear Faults command.
Open a dialog box where you can review the drive's
fault history.
This procedure assumes you have power applied to your drive and the drive is
detected by the Ultraware software.
Refer to the Ultraware User Manual, publication 2098-UM001, for more
information on selecting a motor.
Follow these steps to select a motor.
1. Double-click the Kinetix 3 icon under the On-Line Drives tree.
104
Rockwell Automation Publication 2071-UM001E-EN-P - November 2013
Using Ultraware Software to Configure the Drive
Chapter 8
The Kinetix 3 Drive properties dialog box appears.
Actual values depend on your application. Auto Motor Iden default value
is Enabled and remains Enabled if a motor with intelligent encoder is
detected or selected. Value changes to Disabled if a motor without
intelligent encoder is selected.
2. Check the Motor Model parameter value.
If motor is
An Allen-Bradley motor with
intelligent encoder
Not an Allen-Bradley motor with
intelligent encoder
Value (motor cat. no.)
Go To
Is recognized by the
Ultraware software
Assign Digital Inputs on page 105.
Is not recognized by the
Ultraware software
Go to Fault Codes in Chapter 9 and refer to
troubleshooting for E30.
Step 3.
3. From the Motor Model pull-down menu, choose your motor.
Assign Digital Inputs
Follow these steps to assign Digital Inputs.
1. Double-click the Digital Inputs branch.
Rockwell Automation Publication 2071-UM001E-EN-P - November 2013
105
Chapter 8
Using Ultraware Software to Configure the Drive
The Digital Inputs properties dialog box appears.
2. Verify that Input 1 value is set to Drive Enable (this is default).
The Drive Enable switch can be removed from the digital inputs, but can
lead to immediate motion upon drive powerup.
ATTENTION: To avoid fault action or damage to the drive due to improper
sequencing of input power and the Drive Enable signal, assign one of the ten
inputs as Drive Enable (Input 1 is the default setting).
3. Configure remaining digital inputs as required by your application.
4. Close the Digital Inputs properties dialog box.
Tune Your Motor
This procedure assumes your drive is detected and you have selected a motor. In
this procedure you autotunes your motor.
Follow these steps to autotune your motor.
1. Double-click the Tuning branch.
The Tuning properties dialog box appears.
106
Rockwell Automation Publication 2071-UM001E-EN-P - November 2013
Using Ultraware Software to Configure the Drive
Chapter 8
2. Click Start Autotuning.
The Autotuning warning dialog box appears.
ATTENTION: Autotuning begins even if the drive is disabled.
3. If you are ready to Autotune, Click Ok.
The default Autotune dialog box appears.
4. Click Start Autotune.
The motor responds and the tuning process is complete. Actual values
depend on your application.
5. Copy the Main Gains to alternate gains as needed, repeat, and then close
the Tuning properties dialog box.
Configure Displayed Units
The default value setting for Displayed Units is metric. English units are also an
option. For values of your own choosing, select User. User units is similar to
setting up an application conversion constant. This is useful when the application
requires the use of a transmission or other equipment. For example, if motor
encoder activity is being measured in counts and the number of revolutions
(rpm) is more meaningful, you can change counts to rpm.
1. Double-click the Kinetix 3 icon under the On-Line Drives tree.
Rockwell Automation Publication 2071-UM001E-EN-P - November 2013
107
Chapter 8
Using Ultraware Software to Configure the Drive
The Kinetix 3 Drive properties dialog box appears.
2. Click the Value field next to Display Units and choose User.
3. Click the [+] next to Motor Encoder Units.
Use these parameter settings for an incremental encoder.
Use these parameter settings for a 17-bit serial encoder.
The Indexing parameters now list the position as revs and acceleration/
deceleration as revs/sec/sec as defined above. These examples are for rotary
motors directly coupled to the machine.
Test Your Motor (nonindexing move)
This procedure assumes you have applied power to your drive, the Ultraware
software is running, the drive is detected, and you have selected a motor. In this
procedure you enable the drive and set the motor velocity to test the motor.
Refer to the Ultraware User Manual, publication 2098-UM001, for more
information on using the velocity control panel.
Follow these steps to jog the motor at a constant speed.
1. Double-click the Kinetix 3 icon.
108
Rockwell Automation Publication 2071-UM001E-EN-P - November 2013
Using Ultraware Software to Configure the Drive
Chapter 8
The drive properties dialog box appears.
2. Click Velocity Control Panel.
The velocity control panel dialog box appears.
3. Click Jog Enable.
4. In the Velocity Command box, enter an appropriate low speed.
5. Press Jog Forward.
The motor begins turning at the velocity you entered in step 4.
6. Click Disable All.
The motor stops.
7. Close the velocity control panel.
The drive is software disabled and the enable icon in the tool bar is no
longer illuminated.
Test Your Motor (indexing
move)
This procedure assumes you have applied power to your drive, the Ultraware
software is running, the drive is detected, the drive is set to user defined units of
Revs, and you have selected a motor. In this procedure you enable the drive and
make an incremental move to test the motor. The drive needs to be in indexing
mode for testing an indexing move.
Refer to the Ultraware Software User Manual, publication 2098-UM001, for
more information on using the indexing control panel.
Follow these steps to test your motor.
1. Double-click the Kinetix 3 icon.
The drive properties dialog box appears.
2. Expand the Mode Configuration branch and double-click Indexing.
Rockwell Automation Publication 2071-UM001E-EN-P - November 2013
109
Chapter 8
Using Ultraware Software to Configure the Drive
The Indexing Setup dialog box appears.
3. Expand Index 0 Setup.
4. Configure your incremental move with these values for Index 0:
• Mode = Incremental
• Distance = 1.0 Revs
• Dwell = 500 ms
• Velocity = 750 rpm
• Acceleration = 13 Rev/s2
• Deceleration = 13 Rev/s2
• Next Index = 0
• Action When Complete = Stop
In this example, the Bulletin TL motor uses a 17-bit serial encoder, with
131,072 counts per revolution. Because the user units were already defined
as 131,072 units per revolution, the distance here can be entered as 1.0
Revs. If you use a Bulletin TLY motor with an incremental encoder use
8,000 counts per revolution.
110
Rockwell Automation Publication 2071-UM001E-EN-P - November 2013
Using Ultraware Software to Configure the Drive
Chapter 8
5. Click Indexing Control Panel in the drive properties dialog box.
6. Click Enable Drive.
7. Click Software Enable to the depressed position.
8. Click Start Index.
9. Close the indexing control panel dialog box.
The drive is software disabled and the tool bar Enable icon is no longer on.
10. Close the Indexing mode dialog box.
Rockwell Automation Publication 2071-UM001E-EN-P - November 2013
111
Chapter 8
Using Ultraware Software to Configure the Drive
Notes:
112
Rockwell Automation Publication 2071-UM001E-EN-P - November 2013
Chapter
9
Maintain and Troubleshoot Your Kinetix 3 Servo
Drive
Safety Precautions
Topic
Page
Safety Precautions
113
Maintaining Your Kinetix 3 Drive
114
General Troubleshooting
114
Fault Codes
115
Observe the following safety precautions when troubleshooting your Kinetix 3
drive
SHOCK HAZARD: DC bus capacitors can retain hazardous voltages after input
power has been removed. Before working on the drive, measure the DC bus
voltage to verify it has reached a safe level or wait the full time interval listed on
the drive warning label. Failure to observe this precaution could result in severe
bodily injury or loss of life.
ATTENTION: Do not attempt to defeat or override the drive fault circuits. You
must determine the cause of a fault and correct it before you attempt to operate
the system. If you do not correct a drive or system malfunction, it could result in
personal injury and/or damage to the equipment as a result of uncontrolled
machine system operation.
SHOCK HAZARD: Test equipment (such as an oscilloscope or chart recorder)
must be properly grounded. Failure to include an earth ground connection
could result in a potentially fatal voltage on the oscilloscope chassis.
Rockwell Automation Publication 2071-UM001E-EN-P - November 2013
113
Chapter 9
Maintain and Troubleshoot Your Kinetix 3 Servo Drive
Maintaining Your Kinetix 3
Drive
The Kinetix 3 is designed to function with a minimum of maintenance.
General Troubleshooting
Refer to the Fault Codes section below to identify anomalies, potential causes,
and appropriate actions to resolve the anomalies. If anomalies persist after
attempting to troubleshoot the system, please contact your Allen-Bradley
representative for further assistance. To determine if your Kinetix 3 drive has an
error, refer to the table immediately below.
Consider these guidelines to maintain your Kinetix 3 drive:
• Clean the drive periodically, by using an OSHA approved nozzle that
provides compressed air under low pressure, less than 20 kPa (30 psi), to
blow the exterior surface and the vents clean.
• Visually inspect all cables for abrasion.
• Inspect cable connectors for proper seating and signal continuity end-toend.
If the Main Power and Control Power Status Indicators are ON
and the Status Display on the Drive is
Then
Displays ‘rdy’ in the three right-most characters.
The Kinetix 3 drive is ready.
Displays ‘Pot’ or ‘not’.
The Kinetix 3 drive encountered an Overtravel
Condition and motion restrictions are in effect.
Displays a three-digit warning message.
The Kinetix 3 drive is functional, but a drive warning
appears.
Proceed to the section Warning Messages.
Alternates between a three-digit error code and
a six-digit text message.
An Kinetix 3 drive error has occurred.
Proceed to the section Error Displays.
Overtravel Condition
Overtravel displays (see the following table) occur if the drive detects an
overtravel condition.
Overtravel Display
Possible Cause
Action/Solution
A Positive Overtravel condition is detected.
Apply motion in a negative direction to move
off of overtravel limit switch.
A Negative Overtravel condition is
detected.
Apply motion in a positive direction to move off
of overtravel limit switch.
Positive Overtravel
Negative Overtravel
114
Rockwell Automation Publication 2071-UM001E-EN-P - November 2013
Maintain and Troubleshoot Your Kinetix 3 Servo Drive
Fault Codes
Chapter 9
The following list of assigned error codes is designed to help you resolve
anomalies.
Warning Messages
Warnings are drive abnormalities that let motor control to continue. Warnings
appear on the drive's Status display by using the last three segments of the display
to show an abbreviated title.
Warning Display
Absolute Encoder Counter
Overflow
Possible Cause
Action/Solution
The Absolute Encoder has exceeded its
rotational limit.
Reset the absolute encoder.
Low battery warning, less than 3.2V is
being supplied.
Replace battery or verify external power supply.
Control power is applied to the drive while
the motor is in motion.
After verifying motor has stopped, recycle
control power.
Improper setting of analog current scale.
Verify scaling parameter corresponds to analog
signal range.
System cannot meet motion profile.
• Verify velocity loop tuning.
• Verify system sizing.
Incorrect current limit settings.
Verify current limits do not restrict current to
less than system capabilities.
Improper setting of analog velocity scale.
Verify scaling parameter corresponds to analog
signal range.
System cannot meet motion profile.
• Verify position loop tuning.
• Verify system sizing.
Inappropriate assignment of digital inputs
or outputs.
• If operated in preset mode, verify presets are
assigned.
• If operated in a normal/override mode,
verify the override function is assigned.
Motor rating larger than drive rating.
Match motor and drive sizing.
(1)
Absolute Encoder Battery
Power Up Overspeed
Over Current Command
Over Speed Command
Digital I/O Assignment
Motor Over Rated Output
Power
(1) Battery replacement causes loss of absolute position. Homing can be necessary.
Rockwell Automation Publication 2071-UM001E-EN-P - November 2013
115
Chapter 9
Maintain and Troubleshoot Your Kinetix 3 Servo Drive
Error Displays
Errors are serious abnormalities that cause loss of motor control. The Error
display alternates between a three-digit error code and a six-digit text message.
The error displays repeat until the anomaly is cleared.
Table 35 - Error Displays
Error
Code
Text
Message
Motor Overtemperature
IPM Error
Possible Cause
Action/Solution
Motor thermal switch trips due to:
• High motor ambient temperature.
• Excessive current.
• Operate within (not above) the continuous
torque rating for the ambient temperature.
• Lower ambient temperature, or increase
motor cooling.
Motor wiring error.
Check motor wiring.
Incorrect motor selection.
Verify the proper motor has been selected.
Motor power cables shorted.
Verify continuity of motor power cable and
connector.
Motor winding shorted internally.
Disconnect motor power cables from the motor.
If the motor is difficult to turn by hand, it can
need to be replaced.
Operation above continuous power rating.
• Verify ambient temperature is not too high.
• Operate within the continuous power rating.
• Reduce acceleration rates.
Drive has a bad IPM output, short circuit, or
overcurrent.
Remove all power and motors connections,
then perform a continuity check from the DC
bus to the U, V, and W motor terminals. If
continuity exists, check for wire strands
between terminals, or replace the drive.
Low AC line/AC power input.
• Verify voltage level of the incoming AC
power.
• Check AC power sources for glitches or line
drop.
• Install uninterruptible power supply (UPS)
on the AC input.
Attempted to enable drive without main
power active.
Apply main power before enabling drive.
Excessive regeneration of power (that is
when the motor is driven by an external
mechanical force, it can regenerate too
much peak energy through the drive’s
power supply and the drive faults to save
itself from an overload.)
• Verify shunt circuit.
• Adjust motion profile to stay within the
range of the regenerative resistor.
• Replace regenerative transistor.
• Replace the drive.
Excessive AC input voltage.
Verify input is within specification.
Homing is not complete within the time
defined in Homing time limit (IN-01.11) is
elapsed.
• Increase the time defined in Homing time
limit (IN-01.11).
• Set a value other than '0' in Homing Velocity
(IN-01.02) and Creep Velocity (IN-01.03).
• Check if there is any obstacle that disturbs
Homing.
• Check mechanical parts and parameter
settings for Homing.
Motor speed exceeds maximum.
• Confirm encoder wiring.
• Retune drive system.
• Verify input gain of external speed or torque
command.
Position error exceeds permitted value.
• Increase following error limit.
• Check position loop tuning.
Bus Undervoltage
Bus Overvoltage
Home Search Failed
Motor Overspeed
Excess Position Error
116
Rockwell Automation Publication 2071-UM001E-EN-P - November 2013
Maintain and Troubleshoot Your Kinetix 3 Servo Drive
Chapter 9
Table 35 - Error Displays (continued)
Error
Code
Text
Message
Possible Cause
Action/Solution
The internal filter protecting the motor
from overheating has tripped.
• Reduce acceleration rates.
• Reduce duty cycle (ON/OFF) of commanded
motion.
• Increase time permitted for motion.
• Use larger drive and motor.
• Check tuning.
The motion application requires average
drive current in excess of rated capability.
• Reduce acceleration rates.
• Reduce duty cycle (ON/OFF) of commanded
motion.
• Increase time permitted for motion.
• Use larger drive and motor.
• Check tuning.
Encoder not programmed correctly.
Replace motor.
Motor Continuous Current
Overload
Drive Overload
Encoder Data Range Error
Encoder memory corrupted.
Communication not established with an
intelligent encoder.
Encoder Cable Open
Hall error.
Encoder not programmed correctly.
Encoder Data Parameter
Error
Replace motor.
Encoder memory corrupted.
Excessive heat exists in the drive.
• Verify cooling fan operation (catalog
numbers 2071-AP8, 2071-A10, and 2071A15 only).
• Check tuning.
• Reduce acceleration rate.
• Reduce duty cycle (ON/OFF) of commanded
motion.
• Increase time permitted for motion.
• Use larger drive and motor.
Poor quality power.
• Increase Ride Through time.
Attempted to enable drive without main
power active.
• Apply main power before enabling drive.
Phase connection missing.
• Remove power and verify all physical
connections.
Fault Delay parameter is set too short.
• Increase the Fault Delay parameter setting.
Error in parameter memory storage.
• Reinitialize parameter.
• Reset drive to factory defaults.
Defective hardware.
Replace the drive.
Checksum error.
• Confirm and reset parameter.
• Reset drive to factory defaults.
Excessive electrical noise.
Verify wiring, grounding and bonding.
Defective hardware.
Replace the drive.
Defective hardware.
Replace the drive.
Drive Overtemperature
AC Line Loss
• Verify motor selection if it does not support
automatic identification.
• Verify the motor supports automatic
• identification.
• Verify encoder wiring.
User Parameter Initialization
Error
Current Feedback Offset
User Parameter Checksum
Error
Watchdog Timeout
PWM Hardware Error
Rockwell Automation Publication 2071-UM001E-EN-P - November 2013
117
Chapter 9
Maintain and Troubleshoot Your Kinetix 3 Servo Drive
Table 35 - Error Displays (continued)
Error
Code
Text
Message
Possible Cause
Action/Solution
Range of parameter is invalid.
• Enter parameter with a value or values
within range.
• Reset drive to factory defaults.
Hardware error.
Replace the drive.
Power at regenerative resistor exceeds the
permitted value.
Adjust motion profile to stay within the range of
the regenerative resistor.
Shunt resistor is disconnected or damaged.
• Verify resistor connection.
• Verify resistance of shunt resistor.
Shunt current exceeded allowable
instantaneous value.
• Verify shunt is not shorted or damaged.
• Verify load energy is not excessive during
deceleration.
Encoder Backup Battery parameter is set to
installed, but a battery is not installed.
Set Encoder Backup Battery parameter to Not
Installed.
Absolute Encoder Battery
Error
Battery voltage is sensed below 2.7V DC.
• Confirm battery voltage and connection.
• Replace battery.
• Mechanically disengage motor from system.
• Cycle power to drive and reset alarm.
Absolute Encoder Overspeed
Battery powered encoder is mechanically
rotated at high speed while drive is
powered down.
Electrical noise in the encoder.
Cycle power to drive and reset alarm.
Defective encoder.
Replace motor.
The drive operating mode and motor
selection are incompatible.
Change the operating mode and/or the motor
selection, and reset the drive.
Motor cable open.
Verify power connection between motor and
drive.
Motion profile requires a peak current for
an excessive time interval.
• Verify motor wiring.
• Adjust accel/decel time.
• Confirm motor selection.
Defective current feedback sensing.
Verify phase currents.
Dynamic braking current of the selected
motor exceeds twice the drive peak current
rating.
Install a different motor.
Motor encoder signals do not match drive
configuration.
Verify motor selection.
Defective encoder.
Replace motor.
Wiring between drive and encoder is faulty
or disconnected, or EMI (noise) disrupts
encoder signals.
• Verify encoder wiring.
Communication error between host and
drive (noise).
• Verify serial cable.
• Check for noise on serial communication
interface.
Input frequency limit exceeded.
• Verify hardware type selected in the drive
matches the physical hardware.
• Change from open collector to line drive.
• Reduce the speed command.
• Apply gearing.
User Parameter Range Error
Drive Initialization Error
Shunt Overload Protection
Shunt Overcurrent
Protection
Absolute Encoder Multi-turn
Count Error
Drive Set Up
Motor Power Cable Open
Motor Instantaneous
Current Overload
Motor Mismatch
Encoder Type Mismatch
Encoder Communication
Error
Special Communication
Error
Position Command
Frequency Error
118
Rockwell Automation Publication 2071-UM001E-EN-P - November 2013
Maintain and Troubleshoot Your Kinetix 3 Servo Drive
Chapter 9
Table 35 - Error Displays (continued)
Error
Code
Text
Message
Possible Cause
Action/Solution
Emergency stop (E-STOP) signal detected.
• Remove Emergency stop conditions.
• Clear E-STOP.
The value of a Position Parameter for
indexing is out of the range.
• Use a value within the range of
-231…+231.
• Anomaly with control or main power
circuitry if this error occurs when power
is turned on.
• Excessive current to the motor if this
error occurs during operation (current
more than 300% of the rated current to
the motor more than 10 ms).
• Check wiring and power.
• Check power and set/adjust acceleration/
decceleration time.
A user tries any indexing without Homing
operation completed.
Complete homing before indexing
Emergency Stop
Index Position Range
Overflow
Motor Phase Over Current
Axis Not Homed
Rockwell Automation Publication 2071-UM001E-EN-P - November 2013
119
Chapter 9
Maintain and Troubleshoot Your Kinetix 3 Servo Drive
Notes:
120
Rockwell Automation Publication 2071-UM001E-EN-P - November 2013
Appendix
A
Interconnect Diagrams
This appendix provides wiring examples and system block diagrams for your
Kinetix 3 drive system components.
Topic
Page
Interconnect Diagram Notes
122
Power Wiring Examples
123
Rockwell Automation Publication 2071-UM001E-EN-P - November 2013
121
Appendix A
Interconnect Diagrams
Interconnect Diagram Notes
This appendix provides wiring examples to assist you in wiring the Kinetix 3
system. The notes below apply to the wiring examples on the pages that follow.
Note
Information
1
For power wiring specifications, refer to Power Wiring Requirements on page 61.
2
For input fuse sizes, refer to Fuse/Contactor Specifications on page 19.
3
Place the AC (EMC) line filters as close to the drive as possible and do not route very dirty wires in the wireway. If routing in wireway is unavoidable, use shielded
cable with shields grounded to the drive chassis and filter case. For AC line filter specifications, refer to Kinetix Servo Drives Specifications Technical Data,
publication GMC-TD003.
4
Terminal block is required to make connections. Configure one pair from the Digital OUTPUT1… OUTPUT3, pins 41…44 or pins 47 and 48, as Brake in Ultraware
software. For Digital Output specifications, refer to page 44.
5
Contactor coil (M1) needs integrated surge suppressors for AC coil operation. Refer to Fuse/Contactor Specifications on page 19.
6
Drive Enable input must be opened when main power is removed, or a drive fault occurs. A delay of at least 1.0 second must be observed before attempting to
enable the drive after main power is restored.
7
Cable shield clamp must be used to meet CE requirements. No external connection to ground is required.
8
ATTENTION: Implementation of safety circuits and risk assessment is the responsibility of the machine builder.
Please reference international standards EN 1050 and EN 954 estimation and safety performance categories. For
more information refer to Understanding the Machinery Directive, publication SHB-900.
9
For motor cable specifications, refer to the Kinetix Motion Control Selection Guide, publication GMC-SG001.
10
Motor power cables (2090-XXNPMF-xxSxx and 2090-CPBM6DF-16AAxx) have a drain wire that must be folded back under the cable shield clamp.
11
Digital Input 1 configured as SV-ON (Enable), Digital Output 1 configured as RDY (Ready).
122
Rockwell Automation Publication 2071-UM001E-EN-P - November 2013
Interconnect Diagrams
Appendix A
You must supply input power components. The single-phase and three-phase line
filters are wired downstream of fusing and the M1 contactor.
Power Wiring Examples
Figure 50 - Kinetix 3 Drive Wiring Example (230V single-phase input power)
Refer to table on page 122 for note information.
Single-phase AC Input
230V AC RMS, 50/60 Hz
Notes 1
2071-Axx
Kinetix 3 Drive
Fuse Disconnect
or Circuit Breakers
Isolation
Transformer *
Ground
Screw
Bonded Cabinet Ground Bus *
2090-XXLFTC116xx*
AC Line Filter
(optional)
M1 *
Notes 5, 6
L1
L2
Input Fusing *
Note 2
L3
Three-phase
Motor Power
Connections
L1C
AC Line Filter*
(optional)
L1
Input (IPD)
Connector
L2C
Note 9
Isolation
Transformer *
L2
Use discrete logic or
PLC to control SV-ON
(ENABLE) to drive and
monitor RDY signal
back from drive.
2
3
41
42
Motor Power
(MP) Connector
24V IN
SV-ON
RDY +
RDY-
I/O (IOD)
Connector
Note 11
U
V
W
Ground
Screw
Refer to Attention statement (Note 8).
To
Motor
Cable
Shield
Clamp
Note 7
* Indicates User Supplied Component
Rockwell Automation Publication 2071-UM001E-EN-P - November 2013
123
Appendix A
Interconnect Diagrams
Kinetix 3 Drive/Rotary Motor Wiring Examples
These wiring diagrams apply to Kinetix 3 drives with compatible rotary motors.
Figure 51 - Kinetix 3 Drive (230V) Wiring Example with TL-Series (TLY-A) Motors
2071-Axx
Kinetix 3 Drive
2090-CPBM6DF-16AAxx
Motor Power and Brake Cable
Note 9, 10
Use 2090-CPWM6DF-16AAxx
cable for non-brake applications.
0
1
2
3
4
5
Motor Power
W
6
(MP) Connector
7
V
8
U
9 Motor Feedback
10 (MF) Connector
11
12
13
14
15
16
17
I/O (IOD)
18
Connector
19
Note 4
20
48
OUTPUT3- (BK-)
47
OUTPUT3+ (BK+)
GREEN/YELLOW
BLUE
BLACK
BROWN
Refer to table on page 122 for note information.
TLY-Axxxx-H (230V)
Servo Motors with
Incremental Feedback
2071-TBMF
Motor Feedback
Breakout Board
Three-phase
Motor Power
5
W
V
U
3
2
1
GND
Motor
Feedback
BLACK
9
MBRK-
WHITE
7
MBRK+
Motor Brake
Cable
Shield
Clamp
9
10
BLACK
WHT/BLACK
AM+
AM-
3
4
11
12
RED
WHT/RED
BM+
BM-
5
6
13
14
GREEN
WHT/GREEN
IM+
IM-
7
8
22
23
GRAY
WHT/GRAY
+5VDC
ECOM
20
1
15
17
19
WHT/BLUE
S1
10
YELLOW
WHT/YELLOW
S2
S3
14
16
SHIELD
24
Note 7
Refer to Motor Feedback Breakout
Board Installation Instruction
Publication 2071-IN003 for proper
grounding technique.
CR1
2090-CFBM6DF-CBAAxx (flying-lead)
Feedback Cable
Note 9
24V DC
24V DC COM
TLY-Axxxx-B (230V)
Servo Motors with
High-Resolution Feedback
User Supplied
24V DC
2071-TBMF
Motor Feedback
Breakout Board
with battery installed
5
3
2
1
W
V
U
GND
13
14
GREEN
WHT/GREEN
DATA+
DATA-
10
13
22
23
6
GRAY
WHT/GRAY
ORANGE
WHT/ORANGE
+5VDC
ECOM
BAT+
BATSHIELD
20
1
BAT+
BAT-
24
9
MBRK-
7
MBRK+
Refer to Motor Feedback Breakout
Board Installation Instruction
Publication
2071-IN003 for proper grounding
2090-CFBM6DF-CBAAxx (flying-lead)
Feedback Cable
Note 9
124
Rockwell Automation Publication 2071-UM001E-EN-P - November 2013
Interconnect Diagrams
Appendix A
Kinetix 3 Drive/Linear Motor and Actuator Wiring Examples
These wiring diagrams apply to Kinetix 3 drives with compatible actuators and
linear motors.
Figure 52 - Kinetix 3 Drive (230V) Wiring Example with MP-Series
(Bulletin MPAS-A) Linear Stages, LDAT-Series Linear Actuators, and LDC-Series, LDL-Series Linear
Motors
2090-XXNPMF-xxSxx (standard)
or 2090-CPBMxDF-xxAFxx
(continuous-flex)
Motor Power Cable
Note 9
Use 2090-CPWMxDF-xxAFxx
cable for continuous-flex non-brake applications.
2071-Axx
Kinetix 3 Drive
0
1
2
3
4
5
6
7
8
9
10
11
12
13
14
15
16
17
18
19
20
SHIELD
Motor Power
(MP) Connector
GREEN/YELLOW
BLUE
BLACK
BROWN
W
V
U
D
Three-phase
Motor Power
C
B
W
A
U
GND
V
Motor
Feedback
Motor Feedback
(MF) Connector
I/O (IOD)
Connector
BLACK
G
BR-
WHITE
F
BR+
Motor Brake
Note 4
OUTPUT 3- (BK-)
OUTPUT 3+ (BK+)
48
Cable
Shield
Clamp
47
CR1
Refer to table on page 122 for note information.
MPAS-Axxxx-ALMx2C
Linear Stages or
LDC-Series, LDL-Series
Linear Motor
with Incremental Feedback
Note 7
2071-TBMF
Motor Feedback
Breakout Board
1
2
BLACK
WHT/BLACK
AM+
AM-
3
4
3
4
RED
WHT/RED
BM+
BM-
5
6
5
6
GREEN
WHT/GREEN
IM+
IM-
7
8
9
10
GRAY
WHT/GRAY
+5VDC
ECOM
20
1
11
13
ORANGE
WHT/ORANGE
–
TS+
2
14
15
16
17
12
BLUE
WHT/BLUE
TSS1
YELLOW
WHT/YELLOW
S2
S3
COM
10
14
16
Refer to Motor Feedback Breakout
Board Installation Instruction
Publication
2071-IN003 for proper grounding
technique.
2090-XXNFMF-Sxx (standard) or
2090-CFBMxDF-CDAFxx (continuous-flex)
(flying-lead) Feedback Cable
Note 9
24V DC
24V DC COM
User Supplied
24V DC
Rockwell Automation Publication 2071-UM001E-EN-P - November 2013
125
Appendix A
Interconnect Diagrams
Figure 53 - Kinetix 3 Drive (230V) Wiring Example with TL-Series (TLAR) Electric Cylinders
Refer to table on page 122 for note information.
2071-Axx
Kinetix 3 Drive
0
1
2
3
4
5
6
7
8
9
10
11
12
13
14
15
16
17
18
19
20
TLAR-Axxxx (230V)
Servo Motors with
High Resolution Feedback
2090-CPBM6DF-16AAxx
Motor Power and Brake Cable
Note 9, 10
Use 2090-CPWM6DF-16AAxx
cable for non-brake applications.
Motor Power
(MP) Connector
W
V
U
Three-phase
Motor Power
GREEN/YELLOW
5
BLUE
3
2
W
BLACK
BROWN
1
U
GND
V
Motor
Feedback
Motor Feedback
(MF) Connector
I/O (IOD)
Connector
2071-TBMF
Motor Feedback
Breakout Board
with battery installed
BLACK
9
MBRK-
WHITE
7
MBRK+
Motor Brake
13
14
GREEN
WHT/GREEN
22
23
6
GRAY
WHT/GRAY
24
Note 4
OUTPUT 3- (BK-)
OUTPUT 3+(BK+)
48
47
CR1
Cable
Shield
Clamp
Note 7
24V DC
24V DC COM
User Supplied
24V DC
126
Rockwell Automation Publication 2071-UM001E-EN-P - November 2013
ORANGE
WHT/ORANGE
DATA+
DATA+5VDC
ECOM
BAT+
BATSHIELD
Refer to Motor Feedback Breakout
Board Installation Instruction
Publication
2071-IN003 for proper grounding
technique.
2090-CFBM6DF-CBAAxx (flying-lead) or 2090CFBM6DD-CCAAxx (with drive-end connector)
Feedback Cable
Note 9
10
13
20
1
BAT+
BAT-
Interconnect Diagrams
Appendix A
Kinetix 3 Drive and MicroLogix Controller Wiring Examples
The Kinetix 3 drive accepts unipolar or bipolar inputs.
Figure 54 - Kinetix 3 Drive Wiring Example to Analog Voltage Device
Kinetix 3 Drive
I/O (IOD)
Connector
Analog Voltage
Device or PLC
VCMD +
19
-10V…+10V
VCMD -
20
COM
ICMD +
21
-10V…+10V
ICMD -
22
COM
Velocity
Current
Commons must not be tied together. Use one control at a time. Choose either
velocity or current control.
Figure 55 - Kinetix 3 Drive Wiring for Pulse Train Output
MicroLogix 100 Controller Sourcing Outputs
Kinetix 3 Drive Open Collector Inputs
Kinetix 3 Drive
MicroLogix 1100
Controller
24V_PULS +
V+ 24V DC
PLUS -
0/x
24V_SIGN +
0/y
SIGN -
24 V DC V+
49
12
25
14
-
24 V DC
Supply
MicroLogix 1400 Controller Sourcing Outputs
Kinetix 3 Drive Open Collector Inputs
MicroLogix 1400
Controller
Kinetix 3 Drive
24V_PULS +
VDC 2
OUT x
OUT y
COM 2
PLUS 24V_SIGN +
SIGN -
49
12
25
14
+
24 V DC
Supply
Rockwell Automation Publication 2071-UM001E-EN-P - November 2013
127
Appendix A
Interconnect Diagrams
Kinetix 3 Drive and Micro830 Controller Wiring Examples
Figure 56 - Kinetix 3 Drive and 2080-LCxx-xxQBB Micro830 Controller
2080-LC30-xxQBB
2080-LC50-xxQBB
Micro830 Controllers +CM0
Kinetix 3 Drive
1
2
49
12
CLK+
CLK-
O-06
25
14
3
DIR+
DIREnable
O-07
7
RST
+CM1
O-00
O-03
+
+DC 24
-DC 24
–
-CM0
-CM1
–
+
24V
Power
Supply
24V
Power
Supply
1
2
Drive Enable (Pin 3) and Reset Drive (Pin 7) operates as sinking inputs when (Pin 1, 2)
connected to + of the Power Supply 2.
Drive Enable (Pin 3) and Reset Drive (Pin 7) operate as sourcing inputs when (Pin1,2)
connected to – of the Power Supply 2.
To help you configure Kinetix 3 drive parameters so the drive can communicate and be controlled
by a Micro830 or Micro850 controller, see publication CC-QS025.
Figure 57 - Kinetix 3 Drive and 2080-LCxx-xxQBB Micro830 Controller
Kinetix 3 Drive
2080-LC30-xxQVB
2080-LC50-xxQVB
Micro830 Controllers +CM0
O-00
1
2
49
12
CLK+
CLK-
O-03
O-06
25
14
3
DIR+
DIREnable
O-07
7
RST
+CM1
–
+
24V
Power
Supply
1
+DC 24
-DC 24 –
-CM0
-CM1
+
–
24V
Power
Supply
2
Drive Enable (Pin 3) and Reset Drive (Pin 7) operates as sinking inputs when (Pin 1, 2)
connected to + of the Power Supply 2.
Drive Enable (Pin 3) and Reset Drive (Pin 7) operates as sourcing inputs when (Pin1,2)
connected to – of the Power Supply 2.
To help you configure Kinetix 3 drive parameters so the drive can communicate and be controlled
by a Micro830 or Micro850 controller, see publication CC-QS025.
128
Rockwell Automation Publication 2071-UM001E-EN-P - November 2013
Interconnect Diagrams
Motor Brake Currents
Appendix A
Use these values to size the interposing relay required for your application.
Table 36 - Motor Brake Coil Currents Rated at < 1.0 A
Compatible Brake Motors/Actuators
Coil Current
TL/TLY-A110, TL/TLY-A120, and TL/TLY-A130
0.18…0.22 A
TL/TLY-A220 and TL/TLY-A230
0.33…0.41 A
TL/TLY-A2530, TL/TLY-A2540, and TL/TLY-A310
0.35…0.43 A
Rockwell Automation Publication 2071-UM001E-EN-P - November 2013
129
Appendix A
Interconnect Diagrams
Notes:
130
Rockwell Automation Publication 2071-UM001E-EN-P - November 2013
Index
Symbols
94
connector designators 31
contactor specifications
19
control power status indicator 114
Numerics
1203-USB
add device 93
17-bit serial encoder 36
230V single-phase input power 123
A
about this publication 9
add
drive 91
add device
1203-USB 93
additional resources 10
analog input 47
analog output 48
analog outputs branch 104
analog reference 47
D
digital inputs 40
digital inputs branch 104, 105
digital outputs 44
digital outputs branch 104
download
Connected Components Workbench software
91
Connected Componets Workbench software
87
drive
maintenance 114
reset
configuration wizard 100
keypad input 83
startup wizard 94
Ultraware 102
wiring IPD connector 63
wiring MP connector 63
B
bonding 24
EMI (ElectroMagnetic Interference) 23
high frequency energy 25
subpanels 25
brake currents 129
building your own cables 54
C
cable
length
CE 18
cables
building your own cables 54
maintenance 114
shield clamp 70
shield, EMC 65, 66, 67
CE compliance 14
clamp 70
clearance requirements 22
configure 87
configuring
drive detection 102
Ultraware software 101
Connected Components Workbench software
87
download 87, 91
connecting
feedback 71
motor brake 69
motor shield clamp 70
premolded feedback cables 75
E
EMC
cable shield 65, 66, 67
motor ground termination 63
motor ground termination at motor 63
EMI (ElectroMagnetic Interference)
bonding 23
enclosure
requirements 17
sizing 20
encoders branch 104
error displays 116
F
faults branch 104
feedback
cables and pinouts 71
specifications 36
feedback power supply 39
fuse 123
selection 18
specifications 19
G
general troubleshooting 114
grounded power configuration 54
grounding 59
multiple subpanels 60
system to subpanel 59
Rockwell Automation Publication 2071-UM001E-EN-P - November 2013
131
Index
H
HF bonding 23
high frequency energy 25
high frequency pulse command 43
I
I/O
interface diagram 33
specifications 40, 44, 47
input power wiring
3-phase Delta 55, 56
3-phase WYE 55
determining input power 54
grounded power configuration 54
single-phase 57
single-phase amplifiers on 3-phase power 58
installing your drive
bonding subpanels 25
fuse 18
fuse selection 18
HF bonding 23
system mounting requirements 17
interconnect diagram
230V single-phase input power 123
interconnect diagrams
notes 122
K
Kinetix 3
configuration wizard 98
I/O breakout board 36
maintenance 113
monitor mode 82
specifications
contactor ratings 19
troubleshooting
status indicators 113
L
linear motor 125
linear stage 125
M
main power status indicator 114
maintenance
cleaning the drive 114
inspecting cables 114
troubleshooting 114
Micro 800 PTO
wiring 128
Micro800 PTO
signals 128
MicroLogix
PTO wiring 127
mode configuration 103
132
mode displays
monitor 82
motor brake 27
motor brake current 129
motor branch 104
motors
brake wiring 69
feedback pinouts 72
ground termination 63
power wiring
3-phase and brake 67
3-phase only 65
TL-Series 64
selecting 104
shield clamp wiring 70
testing 108, 109
thermal specifications 37
tuning 106
mounting
hardware 28
Kinetix 3 drive 28
torque 28
N
noise 26
P
panel
requirements 17
pinouts
motor feedback connector 72
power supply, feedback 39
premolded feedback cables 75
PTO wiring 127, 128
publications, related 10
R
related publications 10
requirements
clearance 22
reset
configuration wizard 100
keypad input 83
startup wizard 94
Ultraware 102
routing power and signal wiring 54
RS-232
configuration 87
drive settings 89
wiring 89
S
selecting a motor 104
service information branch 104
shield clamp 70
Rockwell Automation Publication 2071-UM001E-EN-P - November 2013
Index
shunt resistor
wiring requirements 61
specifications
analog reference inputs 47
digital inputs 40
digital outputs 44
feedback
motor, general 36
power supply 39
fuse 19
Kinetix 3
contactor ratings 19
I/O breakout board 36
motor feedback
17-bit serial encoder 39
generic TTL 38
motor thermal 37
status display panel 114
status indicator display
fault codes 115
operational 114
warning messages 115
system mounting requirements 17
system overview 12
T
testing your axis 108, 109
TLY motor 124
training 9
troubleshooting
error displays 115
fault codes 115
status indicator display 114
status indicators 113
warning messages 115
tuning branch 104
tuning your axis 106
wiring 128
1203-USB 87
analog device 127
building your own cables 54
drive
IPD connector 63
MP connector 63
grounded power configuration 54
grounding 59
input power
determining type 54
linear actuator 125
linear motor 125
linear stage 125
Micrologix 127
MicroLogix PTO signals 127
motor brake 69
motor cable shield clamp 70
motor power 64, 65, 67
PTO device 127
requirements 53
shunt resistor 61
routing power and signal wiring 54
TLY motor 124
wiring guidelines 62
wizard
configuration 98
startup 94
U
Ultraware software 101
analog outputs branch 104
digital inputs branch 104
digital outputs branch 104
encoders branch 104
faults branch 104
mode configuration 103
motor branch 104
service information branch 104
tuning branch 104
workspace 103
USB
1203-USB wiring 87
drive configuration 87
W
warning messages 115
who should use this manual 9
Rockwell Automation Publication 2071-UM001E-EN-P - November 2013
133
Rockwell Automation Support
Rockwell Automation provides technical information on the Web to assist you in using its products.
At http://www.rockwellautomation.com/support you can find technical and application notes, sample code, and links to
software service packs. You can also visit our Support Center at https://rockwellautomation.custhelp.com/ for software
updates, support chats and forums, technical information, FAQs, and to sign up for product notification updates.
In addition, we offer multiple support programs for installation, configuration, and troubleshooting. For more
information, contact your local distributor or Rockwell Automation representative, or visit
http://www.rockwellautomation.com/services/online-phone.
Installation Assistance
If you experience a problem within the first 24 hours of installation, review the information that is contained in this
manual. You can contact Customer Support for initial help in getting your product up and running.
United States or Canada
1.440.646.3434
Outside United States or Canada
Use the Worldwide Locator at http://www.rockwellautomation.com/rockwellautomation/support/overview.page, or contact your local
Rockwell Automation representative.
New Product Satisfaction Return
Rockwell Automation tests all of its products to help ensure that they are fully operational when shipped from the
manufacturing facility. However, if your product is not functioning and needs to be returned, follow these procedures.
United States
Contact your distributor. You must provide a Customer Support case number (call the phone number above to obtain one) to your
distributor to complete the return process.
Outside United States
Please contact your local Rockwell Automation representative for the return procedure.
Documentation Feedback
Your comments will help us serve your documentation needs better. If you have any suggestions on how to improve this
document, complete this form, publication RA-DU002, available at http://www.rockwellautomation.com/literature/.
Rockwell Otomasyon Ticaret A.Ş., Kar Plaza İş Merkezi E Blok Kat:6 34752 İçerenköy, İstanbul, Tel: +90 (216) 5698400
Publication 2071-UM001E-EN-P - November 2013
Supersedes Publication 2097-UM001D-EN-P - October 2013
Copyright © 2013 Rockwell Automation, Inc. All rights reserved. Printed in the U.S.A.