1
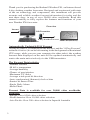
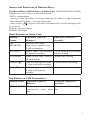
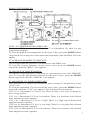
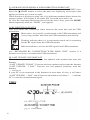
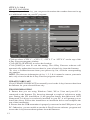
4-Day Internet
Weather Forecaster
INSTRUCTION
MANUAL
Model# 960040
Lit.# : 98-1153/02-08
Thank you for purchasing the Bushnell Weather FXi, an Internet based
4-day desktop weather forecaster. Designed and engineered with state
of the art technology and components, this instrument will provide
accurate and reliable weather forecast information for today and the
next three days, in any of over 20,000 cities worldwide. Read this
manual carefully to fully explore the features and functions of your
new Weather FXi forecaster.
Internet
Overview
USB Transmitter
4-Day
Forecast
4-Day Weather
weather Forecast
Main Unit (Receiver)
> 20,000 Cities Selection
Automatically Updated 4-DAY Forecast
As long as your PC is connected to the Internet, and the “4-Day Forecast”
software is active (it can be left running in the background with minimal
CPU usage, while you use your computer for other tasks), the weather
forecast data displayed on the unit will be updated automatically and
sent to the main unit wirelessly via the USB transmitter.
The Forecast Data includes:
-Weather forecast
-Hi & Lo temperature
-Average humidity
-Chance of precipitation
-Maximum UV index
-Average wind speed & direction
-Auto-synchronized (Internet) clock w/date
-Sunrise & Sunset Time
-Single Daily Alarm
-Moon Phase
Forecast Data is available for over 20,000 cities worldwide,
including:
-Europe: Over 9,200 cities selection
-North America: Over 10,900 cities selection
-Asia Pacific: Over 300 cities selection in Japan & Australia
Names and Functions of Buttons/Keys:
Top Rear Button (Black Bar) on Main Unit [MODE/SNOOZE/LIGHT]
Toggles the next 3 days’ forecast between:
- Hi/Lo temperature
- Average wind direction / average wind speed / chance of precipitation
- Maximum UV Index / average humidity
- Auto-scroll “ ” display function (automatically scrolls through each
set of data)
Triggers snooze alarm
Extends backlight
Back Buttons on Main Unit:
Button
Name
Function (Press &
Release)
[CLOCK]
Read time, day-of-week 12/24 Hour & day/month
& sunrise/set time
format setting
[PC
SEARCH]
[ALARM]
[WIND / ▲]
[C/F / ▼]
Receive RF (radio
frequency) signal from
USB transmitter
Function (Hold for 3
seconds)
Read alarm time; enable/ Alarm time setting
disable alarm
Select wind speed’s unit / Fast advance in setting
1 step forward in setting
Select degree units C/F /
1 step backward in
setting
Fast backward in setting
Top Button on USB Transmitter:
Button Name
Function (Press &
Release)
Function (Hold for 3
seconds)
[TRANSMIT] Transmit forecast data & Turn on/off blue light
synchronize with main bar
unit
INITIAL SETUP & SOFTWARE INSTALLATION
SETTING UP THE MAIN UNIT (RECEIVER)
BATTERY INSTALLATION:
-Slide open the battery door, install six AA batteries (alkaline or lithium)
according to the polarity indicated and close the battery door.
USB TRANSMITTER & PC PROGRAM INSTALLATION
BATTERY INSTALLATION & USB CONNECTION
-Slide open the battery door on the bottom of the USB transmitter, insert
three AAA batteries (alkaline or lithium), noting the polarity marks.
Close the battery door.
-Connect the USB transmitter to your PC via any available USB port
PC PROGRAM INSTALLATION
-Before installation, ensure that
1)Your PC is connected to the Internet. Try browsing through a couple
of websites to make sure.
2)You are using Windows 2000, XP or Vista (Windows 98 and Macs
are not supported).
3)The USB transmitter is connected properly to your PC via a USB
port (a USB hub may be used if necessary).
-Insert the provided CD into the CD-Rom drive of your PC. If it does
not automatically play, go to the Windows “Start” menu, and click “My
Computer”, then locate and double click on the icon for the CD to view
its contents (the CD contains only the install file).
-Double click the program on the CD, named “Download_194B.
exe” to launch the install window. Click INSTALL to run the 4-Day
Forecast Setup Wizard and follow the on-screen directions. Note: If the
installation program detects that Microsoft .NET Framework 2.0 driver
is not already installed on your computer, it will prompt you to install
the driver. Follow the instructions to install the driver and complete the
rest of the installation.
-After the installation is completed, double click the 4-Day Forecast
icon (
) on the Window’s desktop to open the program window and
click “SETTING” in the HOME WEATHER display Then click SET
LOCATION to enter your home city location on the 4-Day Forecast
software.
-After setting your home location, the weather forecast data for your
home city will be updated on your 4-Day Forecast program window
automatically via the Internet. You may click UPDATE FORECAST
anytime to manually update the forecast display on the program.
-You may set up to four additional cities by clicking on the respective
tab and selecting “Set Location”. Note that only your home location
will be updated on the main unit.
NOTE: Refer to the “TROUBLESHOOTING” section if you have
problem displaying the 4-day forecast information in the 4-Day
Forecast program window.
ESTABLISH RF CONNECTION WITH MAIN UNIT
-Before setting up the wireless RF (radio frequency) connection
between the USB transmitter and main unit, please ensure that you
have successfully received the forecast data in the 4-Day Forecast
program window for your home city.
-Keep the USB transmitter & main unit away as much as possible
from large metal objects & potential sources of interference such as
PC monitors, mobile phones, appliances, TV etc. It is recommended to
start with a short distance (about 2 feet or less) between the two units
for the initial RF setup. Once the RF connection is established, you
may place the main unit anywhere within the effective transmission
range from the transmitter (no greater than a maximum distance of
approximately 330 feet apart in an open area). Shorten the distance if
necessary for best reception.
-To search for RF signal from a new USB transmitter, press [PC
SEARCH] button on the main unit repeatedly until the RF icon
flashes.
-Press [TRANSMIT] button on the USB transmitter to enforce
transmitting RF weather data to the main unit
-Once the RF connection is established between the main unit & USB
transmitter, the full strength RF icon ( ) will appear on the main unit.
In the first few minutes of the RF reception, the main unit will show
data on one part of the screen and this is normal. The rest of the screen
display data will gradually appear in the next 10 minutes or more.
NOTE:
-If you have waited 1 hour or more without seeing the rest of the screen,
shorten the distance between the USB transmitter & main unit, check
the battery levels and repeat the setup procedure above.
-If it continues to fail, try removing the USB connection and all batteries
from the USB transmitter. Reinstall the batteries and then reconnect
the USB connection again. Repeat above procedure to set up the RF
connection.
4-DAY FORECAST INFORMATION
As long as your PC is connected to the Internet, and the 4-Day Forecast software
is active (it can be left running in the background with minimal CPU usage,
while you use your computer for other tasks), the 4-day forecast data displayed
on the unit will be updated automatically and sent to the main unit wirelessly via
the USB transmitter.
A) WEATHER FORECAST
4-day weather forecast with 28 different weather symbols:
Software
Icon
Main Unit
Icon
Description
Software
Icon
Main Unit
Icon
Description
MAIN UNIT’S DISPLAY
B) HI / LO TEMPERATURE FORECAST
Press the C/F button to select Celsius (C) or Fahrenheit (F) units for the
temperature displays.
To view the high & low temperature for the next 3 days, press the MODE button
(long black bar on top rear of the main unit) repeatedly until the HI & LO icons
appear.
C) AVERAGE HUMIIDTY FORECAST
The average humidity forecast is located next to the RH% icon.
To view the average humidity for the next 3 days, press the MODE button
repeatedly until the “RH%” icon appears.
D) CHANCE OF PRECIPITATION
The chance of precipitation is displayed (as a percentage) next to the “PRECIP”
icon. To view the precipitation forecast for the next 3 days, press the MODE
button repeatedly until the “PRECIP” icon appears.
E) MAXIMUM UV INDEX FORECAST
The maximum UV (ultraviolet radiation) index forecast is located next to the
“UVI” icon.
To view the maximum UV forecast for the next 3 days, press the MODE button
repeatedly until the “UVI” icon appears. The displayed levels indicate:
UVI 1 to 2: Maximum UV level is low. There is only a low level of danger to
the average person.
UVI 3 to 5: Maximum UV level is moderate. There is a moderate risk of harm
from unprotected sun exposure.
UVI 6 to 7: Maximum UV level is high. There is a high risk of harm from
unprotected sun exposure.
UVI 8 to 10: Maximum UV level is very high. There is a very high risk of harm
from unprotected sun exposure.
UVI 11 to 15: Maximum UV level is extreme. There is an extreme risk of harm
from unprotected sun exposure.
F) AVERAGE WIND SPEED & WIND DIRECTION FORECAST
The average wind speed & direction forecast is shown next to the “WIND” icon.
Press the ▲/WIND button to select the units for displaying wind speed (the
options are km/h, m/s, knots or mph).
Wind direction is displayed using one of 16 different standard abbreviations for
compass points: N for north, S for south, SW for south-west and so on.
To view the wind speed/direction forecast for the next 3 days, press the MODE
button repeatedly until the “WIND” icon appears.
G) RF RECEPTION STATUS
This icon shows the connection status between the main unit and the USB
transmitter.
Main unit is successfully synchronized to the USB transmitter and
is receiving weather data from the USB transmitter periodically.
Flashing indicates that it is in registration mode and is searching
for the RF signal from the USB transmitter.
Indicated failure to receive the RF signal from USB transmitter.
(see “ESTABLISH RF CONNECTION WITH MAIN UNIT” section if it
becomes necessary to reconnect the USB transmitter)
H) LAST UPDATE OF FORECAST
This indicates when the forecast was last updated with weather data from the
Internet.
“LAST UPDATE: TODAY”: Forecast has been updated today from the Internet
“LAST UPDATE: -1 DAY”: Forecast was last updated yesterday from the
Internet
…. and so on
If your PC is not connected to the Internet for more than 10 days, it will show
“LAST UPDATE: -- DAY” and all forecast information will show “ - - “ until the
PC is connected to the Internet again.
TIME
(E) DATE
A) NETWORK TIME (Auto-synchronized clock)
The clock on the main unit is synchronized to the Internet network time
automatically and is adjusted for optimal accuracy.
NOTE:
-If your PC is not connected to the Internet for a long period of time, the
clock display may not be accurate.
-You may set the time offset (+/- 0.5, 1, 1.5 or 2 hours) of your home city
in the PC program to adjust for daylight savings time and your time zone
if necessary, and the time on your main unit will be displayed and updated
accordingly
Hold the CLOCK button on the main unit to set your choice of 12 or 24 hour
format: press [▲] or [▼] to select and press the CLOCK button to confirm. The
“M” & “D” icons will flash, press [▲] or [▼] to select day/month or month/day
format for the calendar. Press the CLOCK button to confirm and exit.
B) SUNRISE / SUNSET TIME
To view the sunrise and sunset time in your home city, press the CLOCK button
repeatedly until the “SUNRISE” or “SUNSET” icon appears.
C) ALARM TIME
Press the ALARM button to view the alarm time and the “AL” icon will appear.
Press the ALARM button again to enable & disable the alarm. The “AL” icon
appears when alarm is enabled. Press the CLOCK button to return to the time
display.
Hold the ALARM button for 3 seconds to enter the alarm setting mode. Press
“▲”or “▼” to enter the desired Hr/ Min values and press “ALARM” to confirm
the setting. When alarm is going off, press the ALARM button to stop the alarm
for one day. Press the MODE/SNOOZE/LIGHT bar to activate the snooze
function.
D) MOON PHASE
The current moon phase is displayed automatically, based on the calendar date.
E) DATE
Press the CLOCK button repeatedly to show the time with day-of-the-week or
seconds. The calendar can be displayed in day/month or month/day format. See
section A, “NETWORK TIME” for setting directions.
DISPLAY BACKLIGHT
Press the MODE/SNOOZE/LIGHT bar for an extended time backlight.
LOW BATTERY INDICATION
A “low battery” indication is provided for the main unit & USB transmitter.
Replace the batteries and follow the setup procedure in this instruction manual
if necessary, when the batteries become weak.
Low battery indicator
For the Main Unit: indicated by the display icon: For the USB Transmitter: indicated in the software display, next to the “Last
Update” box
USB TRANSMITTER
The USB transmitter includes a blue light bar. You may disable or enable the
continuous light bar function by holding the TRANSMIT button on the USB
transmitter.
Press the TRANSMIT button to start transmitting RF weather data and set up
the RF connection with the main unit.
(See “USB TRANSMITTER & PC PROGRAM INSTALLATION” section to
set up the USB transmitter.)
NOTE: Before running the 4-Day Forecast software, ensure that your USB
transmitter is connected properly to the PC via an available USB port.
PC PROGRAM
After installation, a small system tray icon for the 4-Day Forecast software
appears in the lower right corner of the Windows desktop (see below-you may
need to click the “show hidden icons” round button “>” to see the system tray
icons), indicating the program is running and it will automatically access 4-day
forecast information via your PC’s internet connection. You can open the 4-Day
Forecast program window by double clicking this icon to view the full details.
IMPORTANT NOTE: If the system tray icon (
) disappears, the 4-Day
Forecast program is terminated and no can longer access the weather information
from the Internet. Restart the program again.
Windows System Tray
10
HOME WEATHER
SETTING
Click [SETTING…] to set the home city’s location & unit/time format. Click
[SET LOCATION] to set your home location. Click [SAVE] to save your setting
and exit. The forecast information will be updated on your 4-Day Forecast
program according to your new home location and sent to your main unit
automatically.
UPDATE FORECAST
Click [UPDATE FORECAST] to manually receive the latest 4-day forecast from
the Internet and display it in the program window.
SEND TO RECEIVER
Click [SEND TO RECEIVER] to manually send the 4-day forecast data to the
main unit via the USB transmitter.
It may take more than 10 minutes (up to 1 hour) to update all of the 4-day
forecast data on the main unit.
11
CITY 1, 2, 3 & 4
SELECT LOCATION
Along with your home city, you can preset & monitor the weather forecast for up
to 4 additional cities on your PC program.
-Click to select “CITY 1”, “CITY 2”, “CITY 3” or “CITY 4” on the top of the
4-Day Forecast program window
-Click [SET LOCATION] to select the location
-Click [SAVE] to save & exit the setting. The 4-Day Forecast software will
automatically update the forecast data for your selected city from the Internet.
-To view a weather forecast from your preset city list, click the corresponding
city number
NOTE: The forecast information of city 1, 2, 3 & 4 cannot be sent to your main
unit, only viewed with the 4-Day Forecast program software
UPDATE FORECAST
Click [UPDATE FORECAST] to manually receive the 4-day forecast data from
the Internet for your selected home city.
TROUBLESHOOTING
1. Ensure that you are using Windows 2000, XP or Vista and your PC is
connected to the Internet. Try browsing through a couple of websites to make
sure. During the CD installation, if the program detects that Microsoft .NET
Framework 2.0 driver is not already installed in your PC, it will prompt you to
install the driver. Follow the instructions to install the driver and complete the
rest of the installation.
2. Ensure that the USB transmitter is properly connected to the USB port of your
PC. Otherwise, you are unable to run the 4-Day Forecast software program and
access the 4-day forecast data updates from the Internet.
12
3. Ensure all batteries in the main unit & USB transmitter are fresh. Replace the
batteries when the low battery indicator appears on the main unit (refer to the
“LOW BATTERY INDICATION” section)
4. If the system tray icon of the 4-Day Forecast program disappears on the lower
right of your Window, your program is terminated and is no longer accessing the
4-day forecast from the Internet. Restart the program again.
5. In the first few minutes of the RF reception from USB transmitter, the main
unit will show data on one part of the screen and this is normal. The rest of the
screen display data will gradually appear in the next 10 minutes or more. If
you have waited 1 hour or more without seeing the rest of the screen, shorten
the distance between the USB transmitter & main unit and check the battery
levels. Then repeat the setup procedure in “ESTABLISH RF CONNECTION
WITH MAIN UNIT” section. If it continues to fail, try removing the USB
connection and all batteries from the USB transmitter. Reinstall the batteries
and then reconnect the USB connection again. Repeat the setup procedure in
“ESTABLISH RF CONNECTION WITH THE MAIN UNIT” section.
6. If the RF indicator is showing full strength (
) but one or more of the next
3 days’ forecast is missing on the main unit & PC program, your PC may have
been offline for several days. Connect your PC to the Internet again to receive
the latest forecast update.
7. If all forecast information appears except the UV Index, your PC may have
been offline for more than 1 day. Connect your PC to the Internet again to
receive the latest UVI forecast update.
8. If the forecast reading displayed in the 4-Day Forecast software does not
match with the main unit, press the TRANSMIT button on the USB transmitter
to re-transmit the signal again and wait for 10 minutes or more.
9. If your time on the 4-Day Forecast software window & main unit display
does not accurately match your local time, click [SETTING…] on the 4-Day
Forecast program menu and set the hour offset until the proper time is set.
10. If your city does not appear in the 20,000 city list, select the one nearest to
your home location.
11. Heavy Internet traffic may slow down the response time of the server
temporary. Try again later if you wish to update the forecast manually by the
[UPDATE FORECAST] button.
BATTERY DISPOSAL
Replace only with the same or equivalent type recommended in this manual.
Please dispose of old, defective batteries in an environmentally friendly manner
in accordance with the relevant legislation.
SPECIFICATIONS
Software: Compatible with Windows 2000, XP & Vista
(Microsoft .NET Framework 2.0 required)
USB: 1.1 or above
Transmission: Up to 100M (330 ft.) in open area
Clock: Auto-synchronized clock from Internet, Quartz back-up
Power: AA x 6 pcs for main unit , AAA x 3 pcs for USB transmitter, Alkaline or
Lithium batteries.
13
NOTES
TWO-YEAR LIMITED WARRANTY
Your Bushnell® Weather FX is warranted to be free of defects in materials and
workmanship for two years after the date of purchase. In the event of a defect under
this warranty, we will, at our option, repair or replace the product, provided that you
return the product postage prepaid. This warranty does not cover damages caused by
misuse, improper handling, installation, or maintenance provided by someone other than
a Bushnell Authorized Service Department.
Any return made under this warranty must be accompanied by the items listed below:
1) A check/money order in the amount of $10.00 to cover the cost of postage and handling
2) Name and address for product return
3) An explanation of the defect
4) Proof of Date Purchased
5) Product should be well packed in a sturdy outside shipping carton, to prevent damage in transit,
with return postage prepaid to the address listed below:
IN U.S.A. Send To:
Bushnell Outdoor Products
Attn.: Repairs
8500 Marshall Drive
Lenexa, Kansas 66214
IN CANADA Send To: Bushnell Outdoor Products
Attn.: Repairs
25A East Pearce Street, Unit 1
Richmond Hill, Ontario L4B 2M9
For products purchased outside the United States or Canada please contact your local
dealer for applicable warranty information. In Europe you may also contact Bushnell at:
Bushnell Germany GmbH
European Service Centre
Mathias-Brüggen-Str. 80
D-50827 Köln
GERMANY
Tel: +49 221 995568-0
Fax: +49 221 995568-20
This warranty gives you specific legal rights.
You may have other rights which vary from country to country.
©2008 Bushnell Outdoor Products
FCC Note:
This equipment has been tested and found to comply
with the limits for a Class B digital device, pursuant
to Part 15 of the FCC Rules. These limits are designed
to provide reasonable protection against harmful
interference in a residential installation. This equipment
generates, uses and can radiate radio frequency energy
and, if not installed and used in accordance with the
instructions, may cause harmful interference to radio
communications. However, there is no guarantee that
interference will not occur in a particular installation.
If this equipment does cause harmful interference to
radio or television reception, which can be determined
by turning the equipment off and on, the user is
encouraged to try to correct the interference by one or
more of the following measures:
·Reorient or relocate the receiving antenna.
·Increase the separation between the equipment and
receiver.
·Connect the equipment into an outlet on a circuit
different from that to which the receiver is connected.
·Consult the dealer or an experienced radio/TV
technician for help.
Shielded interface cable must be used with the
equipment in order to comply with the limits for a
digital device pursuant to Subpart B of Part 15 of FCC
Rules.
Specifications, designs, and related software are subject
to change without any notice or obligation on the part
of the manufacturer.
For further questions or additional information please contact:
Bushnell Outdoor Products
9200 Cody, Overland Park, Kansas 66214
(800) 423-3537 • www.bushnell.com
Weather data powered by
© 2008 Bushnell Outdoor Products