1
USER’S MANUAL
Revision 1.0
Introduction ............................................................................................................................... 1
Installation and Configuration ................................................................................................. 2
Starting a game......................................................................................................................... 3
Adventure Map .......................................................................................................................... 7
City management................................................................................................................... 12
The Control Banner ................................................................................................................ 18
Research Screen .................................................................................................................... 19
Progressing in the game ....................................................................................................... 21
Exploration .............................................................................................................................. 23
Quests ..................................................................................................................................... 26
Battles ..................................................................................................................................... 28
Empire screen ........................................................................................................................ 34
Seasons................................................................................................................................... 39
Military screen........................................................................................................................ 40
Academy screen..................................................................................................................... 44
City list screen ........................................................................................................................ 47
Diplomacy ............................................................................................................................... 49
The Marketplace .................................................................................................................... 51
Winning conditions ................................................................................................................ 52
Specifics factions Gameplay................................................................................................. 53
Annexes .................................................................................................................................. 62
Introduction
Welcome to Endless Legend!
This is the world called “Auriga”. It is an ancient world, steeped in history – and in blood. It could
be called many things: Rich and bountiful, ruined and tortured, magical and majestic. For its eight
great nations and many minor ones, it is also called “home.” A home full of beauty as well as
danger, and a home which seems to be slowly fading into the long dark night of the universe.
Which of the many warring leaders will rise up to control the future of Auriga, and perhaps even
save it? And what deaths will these leaders inflict, what riches will they control, and what price
will they pay to achieve this ultimate goal?
This manual provides instructions to help you play the game. If you have further questions, please
visit our forums:
http://forums.amplitude-studios.com/
Installation and Configuration
After you have purchased the game and downloaded it from Steam, simply launch it from your
Steam Library by double-clicking on Endless Legend or its desktop shortcut. The first time you
launch it, it will install the required software. The game will launch automatically once the
installation is complete.
Hardware requirements
This version runs on Windows computers, which must match the following minimal configuration:
OS: Windows Vista / 7 / 8
Core 2 Quad Q6600 2.5GHz or above
Memory: 4 GB RAM
Graphics: Nvidia GTX 260 or above, Ati Radeon 4850 or above
Hard Drive: 2 GB free hard drive space
Sound: DX 9 Compatible Audio
Starting a game
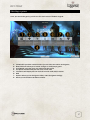
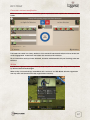
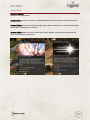
Once you launch the game, you will see the main menu of Endless Legend.
1.
2.
3.
4.
5.
6.
7.
8.
Introduction provides a tutorial where you can learn the basics of the game
New Game will allow you to create a single or multi-player game
Load Game is the list of all your saves and auto saves
The Quick load will load your last save or auto save
Join Game will display the list of all the current multi-player session
WIP
Options allows you to change the video, audio and game settings
Sends you to the Game 2 Gether website.
Introduction
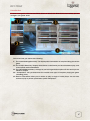
To start a new game, click the New Game button to launch the New Game menu where you can
configure your game world.
This screen lets you choose the following:
9. The ”Game Settings Summary” list displays the total number of empires taking part in this
game
10. The “Empire Summary” displays information on the faction you have selected to play, such
as its specific traits and abilities
11. The “World Map Summary” settings let you select generation options for the world you are
about to conquer
12. “Competitors” lets you determine the number and types of empires playing the game
(including yours)
13. Session information allow you to choose to play in single or multi player. You can also
choose to play in private, protected or public multiplayer.
Faction selection
You can choose the faction you want to play by clicking on “Select Empire” button on the Empire
summary or use “Competitors” slot 1. Each faction has a different background, main quest arc,
set of units, and play style. Some factions, such as the Wild Walkers and Vaulters, are rather
straightforward to play. Others, such as the Broken Lords who consume Dust instead of Food, will
require you to play very differently.
Generation options
Generation options lets you modify the parameters of the Random World Generator. For instance,
Larger World Size will result in longer games with more territory to conquer, or simply allow a
game with 8 empires to not feel too crowded.
Ready to start
Once you are ready to start, click the Start button at the bottom right of the screen. The game will
generate your world based on your parameters and seed the competing empires. Once the
generation is complete, the game starts.
Adventure Map
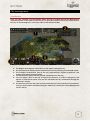
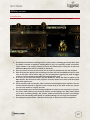
Introduction
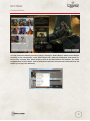
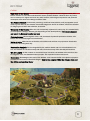
When the game starts, you will see the Adventure Map of Endless Legend, displaying your first
army and the surrounding terrain. The Adventure Map is the interface through which you are going
to explore the world, manage your armies and cities, and fight battles.
The world of Auriga is presented as a set of interconnected hexagons. Each hexagon corresponds
to a terrain type (plain, forest, etc.) which can also receive additional traits (Strategic or Luxury
Resources, Anomalies, Ruins, etc.). As hexagon tiles define the topological unit for the game,
armies and cities are also centered on these tiles.
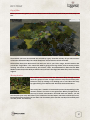
Each terrain tile can have one of seven different altitudes, from sea level to mountain top. Higher
altitude grants combat advantages. When two tiles have more than 1 unit of difference in height,
they are separated by a cliff. Moving directly from one to another across the barrier of a cliff is not
possible for land units.
Camera management
The camera system allows you to change the perspective of the Adventure Map.
You can move the view by left-clicking and dragging the Adventure Map with the mouse. You can
also scroll the map by placing your mouse on the screen borders or by using the keyboard arrows.
Zoom in and out by rotating the mouse wheel forward and backward. Alternatively, you can use
the PageUp and PageDown keys on your keyboard.
If you zoom out far enough, the 3D Adventure Map transforms to a 2D cartographic representation
which makes key points of interest more visible. Feel free to zoom from one perspective to
another in order to get the level of information you require.
Fog of War
When you start the game, you do not know much of the world beyond what your first army can
see.
Areas which you have not explored are covered by a grey, cloud-like overlay. As you move armies
around the Adventure Map, the cloud disappears and reveals the terrain beneath.
Areas which have been discovered, but which are not in your vision range, become darker and
part of the “Fog of War”. You cannot see what is going in the Fog of War, such as enemy armies
moving. You vision is determined by your armies, cities, and Watchtowers. Note that the Wild
Walkers have the special ability to detect enemy forces in the fog of war when they move in nearby
regions.
Moving Armies
You explore and interact with the Adventure Map through armies,
which are groups of units. A single unit is an army of one military unit.
Select an army by clicking on its leading unit or icon. Move the army
by right-clicking on a different tile which will be its destination.
Your army has a number of movement points corresponding to the
number of tiles it can move in one game turn. When you right-click on
the map to select a destination and hold down the button, you will
see the path your army will follow if you release the mouse button (left-click to abort the move).
Some terrain tiles cost more or less than one movement point (Forests cost 2 points and City tiles
cost 0.5 points, for instance).
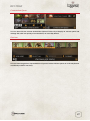
Army Management screen
When an army is selected, the game displays the Army Management interface
1. The Hero is displayed if one is assigned to the army
2. The Army Actions panel shows available actions for the army. Some may be greyed out
depending on the situation
3. The Unit List panel displays the Units attached to this Army in addition to the hero. You
can read some statistics on the Army such as current health, movement capacity, and
vision range for the fog of war.
4. At the bottom of the Unit List panel are controls that allow you to select units, retrofit them
to a more recent unit design (see Military Screen), and disband them if they cost your
empire too much Upkeep.
Using this panel you also can also split the units to create a new army. You can select individual
units by left-clicking on their label (hold the left Ctrl keyboard key to select more than one unit),
then right-click on the Adventure Map to move the newly created army to an adjacent tile. Please
note that the selected units must make a valid move (i.e. have sufficient move points, be directed
to a reachable tile, etc.).
You can also merge armies together by simply moving an army onto the destination army. You
must also make sure that the maximum unit limit is not reached, otherwise the merge will be
rejected. Please note that the limitation of number of Units per Army can be increased through
research.
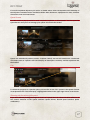
Colonization
As soon as you have found a suitable location, you should build your first city.
To do that, select an army containing a Settler unit and click on the Colonize
option in the Army action panel.
You can now see a semi-transparent representation of the city you are about to create. The game
also displays digits on top of the hexagon tiles around this potential city.
Army Action Point
Each army has one army action point. They are used when attacking another army or City. Army
action points are reinitialized at the beginning of each turn.
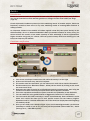
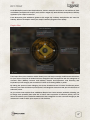
The FIDSI
These numbers represent the 5 basic outputs of a city. The higher the number, the better. These
numbers are called FIDSI, which stand for:
Food: the basic sustenance used to increase and maintain population
Industry: used to produce buildings or units
Dust: a quasi-magical substance, so precious it has become the currency of this world
Science: used to research new technologies
Influence: Used for important empire-level actions
As some terrain types are more likely to produce certain types of FIDSI, you should adapt your city
placement to make the best of its surrounding tiles. Please also note that your city zone of
influence will evolve over time and will allow you to exploit more of the tiles around it.
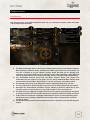
City tiles
A starting city is made of two types of City tiles:
One District tile: Gives a bonus to your city from the FIDSI on the tiles. It can be upgraded
by surrounding it with 4 or more other District tiles. Each new District is surrounded by
additional Exploitation tiles (see next point). Note that the City center is considered as a
district.
6 Exploitation tiles (in red in the picture below): Give a bonus to your city from the FIDSI
on the tiles.
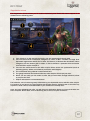
City management
Introduction
Once you have validated your Colonization action, the city is created and the City Management
interface appears on the bottom of the screen. To open this interface on any city, simply click on
the city, its surrounding tiles, or the city’s label on the Adventure Map.
1. The Region panel displays information on the region hosting this city
2. The City Info panel displays status information on the city including current FIDSI output
3. The available constructions lists all the city improvements, regional expansions, and
military units which you can produce
4. The Construction Queue lists the planned constructions for this city
5. You can assign a Hero to the city to improve its efficiency. If a Hero is assigned, it will
appear in the Governor panel. You can also automate the city construction through the
“Automate” droplist.
6. The Garrison panel lists the units currently inside the city. These units do not constitute an
army yet; they must be assembled using the “New Army” button (See “Army Management
screen, above).
Region information
The game world is created as a set of distinct regions. You can see the frontiers of these regions
as colored borders on the Adventure Map. A border with the same color as your empire color
means than you control this region through a city built inside it.
Each region can host exactly one city, never more. It you want to conquer a region which is already
claimed by another empire, you must first capture its city.
The Region panel lists critical information concerning the region in which your city is located:
Minor Faction: each region hosts a Minor Faction whose villages you will find as you
explore. You have several options to Pacify a Minor Faction (by force, a bribe or
cooperation). Once this is done, you have the ability to Assimilate it. Until then, Minor
Faction villages can be a threat and generate hostile armies.
Luxury and Strategic Resources: The region can host deposits of these critical resources.
They will generate value once you have constructed the requisite extractor on site.
Strategic Resources are critical to equip your heroes and units with powerful items; Luxury
Resources allow you to give temporary boosts to your empire. At the beginning of the
game most Luxury and Strategic Resources are hidden, and must be unlocked through
technologies and sciences in new Research Eras
Trade routes are automatic exchanges made between series of connected cities (allies,
friends and yours), leading to FIDS bonuses on Cities: those creating routes and those
crossed by them.
Approval / Growth / Upkeep
In the City Info panel you can check several important characteristics for your city:
1. Approval represents how happy the citizens of this city are. The happier they are, the more
bonuses your city will receive to its Industry and food.
2. Your workers are represented in the form of “units”, with the number next to the
population icon representing the current number of workers from your city plus any
workers from pacified minor villages in the region. The more workers you have, the more
output your city will produce.
3. Workers grows regularly, especially if you produce lots of food. The workers gauge
determines the pace at which the next worker unit will be generated, as well as the
number of turns required.
4. The Upkeep represents the maintenance cost of your city in terms of Dust (the currency in
Endless Legend). As you build more Improvements in your city, your Upkeep cost will
increase. You will have to either produce more Dust or get rid of some Improvements. If
your empire has no more Dust and your Upkeep is negative, the city managers will take
over and do whatever is necessary to pay your debt (selling armies, buildings, resources,
workers, heroes and finally cities)
You can click the “Browse” button to consult your list of City Improvements (buildings) and
Regional expansions (Mines, Watchtowers, etc.), and scrap the ones which prove too expensive.
FIDSI and workers
The FIDSI output of your city is shown on the right part of the City Info panel. You can click on the
“+/x” toggle to expand or reduce the level of detail.
In expanded mode, the panel shows how each output type (Food, Industry, Dust, Science and
Influence) is generated per turn:
The Production per worker represents how much of the FIDSI is produced for each worker
assigned to it
You can drag and drop workers from one column to the other to increase this production
effect. The units represent workers assigned to one type of FIDSI output
The City Tiles value represents the fixed amount of output produced by the City tiles and
the surrounding ring of fields
The Modifiers are special bonuses / penalties applied to this output type
The Total represents the final computed value
These total values represent what your city produces each turn.
Food will allow your city to grow and generate more workers. A part of produced Food is
used to sustain the existing population
Industry is used to produce City Improvements, regional expansions, and military Units in
your city
Dust is accumulated in your empire treasury, determining the overall balance of your
empire between income and expenditures
Science is accumulated at the empire level to advance in technological research
Influence is accumulated by your empire and used to perform high level actions:
Diplomacy, the Empire Plan, and Minor Faction assimilation.
Building Improvements
The Available Constructions panel is simple to use: Click on a building or unit option to have it
placed in the Construction queue. As you hover with the mouse point over each option, a tooltip
explains the benefits of each one as well as its construction cost. There are several different
construction options:
City Improvements are built inside your city center and do not require any specific
additional space or placement. Their only limit is their Upkeep cost which your empire
must pay; otherwise, you face bankruptcy.
Regional expansions are placed directly on the 3D map when selected. As your region can
be large, you may have to zoom out to locate the semi-transparent “ghost” representation
of the location:
o Extractors allow you to exploit and accumulate Strategic and Luxury Resources.
They can only be built on existing (and revealed) Resource deposits.
o Watchtowers increase your range of vision, and can only be built on specific
Watchtower Foundations.
o Districts allow you to expand your city by adding another city tile, which in turn
adds additional surrounding fields to your FIDSI generation. This lets you cover a
larger part of the region with your city tiles. Please note that if a District (the city
center is also considered as a district) becomes surrounded by 4 other District
tiles, its efficiency is greatly increased. Each additional District will generate
Disapproval from expansion, however.
Military Units are found in the Constructions panel as well, listed as Unit Designs created
by you (see Military Screen) or available by default. Units equipped with powerful items
may require a large number of Strategic Resources to build. Be sure to collect them
beforehand.
Construction Queue
Once a construction option has been selected it appears in the Construction panel, which is used
to track and prioritize your production. Each construction has a cost in Industry points, which is
paid gradually as the construction progresses. The number next to the clock icon represents the
number of game turns it will take to complete this construction.
Some constructions require a number of Strategic Resources; these are spent instantly when the
construction is queued. They are refunded if the construction is canceled.
If you change your mind about a queued construction, you can click on the “x” button to remove
it from the queue. You can also drag and drop on a queued element to change its priority relative
to other items.
Buying out
When you need to hurry a construction, or do not know how to spend your Dust, you can ”Buyout”
a construction to complete it on the next turn. The closer to completion the construction is, the
less Dust it will cost you.
Some factions, such as the Broken Lords, make extensive use of Dust and can even buy out
population units.
Leaving the city screen
To leave the City screen and return to the Adventure Map, as for most of the screens, you rightclick or hit the Esc keyboard key. You can also click on the terrain outside of the city’s area of
influence.
The Control Banner
On the top left of the screen, the control banner allows you to navigate between the different
major options of your empire.
1. The Empire screen displays the general status of your empire and allows you manage
assimilated Minor Factions, Resources, and Stockpiles, select an Empire Plan, and consult
the bonuses and penalties that currently apply to your empire.
2. The City List screen becomes useful when you have many cities to manage. It is a very
efficient shortcut to most city actions.
3. The Research screen allows you to research new technologies in the form of city
improvements, expansions, units, equipment and other elements that improve your
empire.
4. The Quest screen displays the current quests under way in your empire.
5. The Academy screen let you manage your Heroes.
6. The Military screen shows your active Armies and lets you to access the Unit Design
customization screen.
7. The Diplomatic screen shows your diplomatic status with other major empires, and allows
you to initiate diplomatic negotiations.
8. The Marketplace screen allows you buy and sell Heroes, Units, and Resources on the
global inter-empire market.
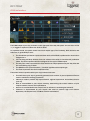
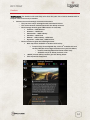
Research Screen
Introduction
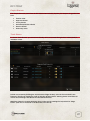
The Research Screen is where you plan the research of new sciences and technologies.
1. Research is divided into disks that represent eras (I, II, III…).
2. Research is divided into four areas: Military, Science and Industry, Empire and Expansion,
and Economy and Population.
3. Each discovery unlocks a specific item in the game, from a City Improvement to an empirewide bonus. You can hover the cursor over a research icon to get information on what it
provides. The type of research is indicated by two icons underneath its image. For
example, the city icon and the thumb icon mean that this discovery will unlock a city
building that increases the city’s Approval. To select a new research simply click on its
icon (provided it is in an unlocked era).
4. You can click the zoom buttons or use the mouse wheel to zoom in/out and get a better
picture of the Research screen and individual items to research.
5. The statistics display how much a research will cost and the current empire Science
output.
6. The current research is displayed, as well as its progress and number of turns it will take
to complete it.
7. Research field.
Selection / multi selection
It is possible to queue multiple researches, which will then be executed in order. A number
appears next to the research icon to show in which order that research will be done.
Cost
The cost of a research is based on the amount of research and the number of discoveries you
have already made. This means that as you progress in the game, each new discovery will be
more expensive in terms of Science points. If you have reached Era VI of the research screen, an
Era I discovery will be much more expensive than if you had researched it at the beginning of the
game.
Higher era discoveries are generally more powerful, but some critical Era I discoveries should not
be overlooked!
Please note that there is no cost modification based on the position of a discovery within its Era,
and no prerequisite between researches, other than unlocking the corresponding Era. Therefore
a discovery located near the center of the Era disk is no easier to research than a discovery located
on the outer edge of the Era disk.
Eras
The Research screen interface displays the currently unlocked Era at the bottom left. To unlock
the next Era, you must research a minimum number of discoveries of the preceding Era. This
requirement is symbolized by the gauges surrounding the center of the next Era disk.
Once an Era is unlocked, a notification panel will warn you of the effects of this Era plus the
technology which unlocked it.
Closing the screen
As with most screens, you can simply close this screen by clicking its title, the “X” button on the
top center of the screen, using a right-click or hitting the Esc Key.
Progressing in the game
The game is based on a turn system. When the End Turn icon in the lower right is clicked a turn
passes: Cities produce their FIDSI output, constructions progress, Research progresses, Armies
recover movement or health points, Heroes and Units can gain levels, etc. The end of turn is the
frontier between two segments of simulation within the game. However, a number of events
appear in real time during a turn: Army movement, battles, diplomatic exchanges, etc.
End Turn
1. When you are ready to pass a turn, simply click the End Turn button at the bottom right of
the screen. Computations are performed, usually with notifications telling you what
happened during the End of Turn computation.
2. You can cycle through “idle” Armies (those without a planned move)
3. You can also execute planned moves for Armies if they have remaining movement points.
4. You can display a hexagonal grid on the map
5. You can display the FIDSI values of the tiles and the hexagonal grid on the map.
6. The Season display lets you know what the current season is, and gives you an estimate
of the number of turns until the next Season begins.
7. You can also see the colors and symbols of the other empires taking part in this game.
8. The Game Menu button displays the game menu, for instance if you want to save your
game.
Notifications
When you complete a turn, you will receive notifications if a city construction was finished,
research was completed, a hero gained a new level, etc. Important notifications will automatically
pop up and open a panel. Lesser notifications will remain as icons on the right side of the screen
until you open them.
In the Options menu of the game, you can select which notifications automatically pop up and
which ones stay minimized.
Once a notification panel is open, you can chose to dismiss the notification (remove it from the
list of displayed icons) or minimize it (to open it again later). When you press the End Turn button
all notifications will be flushed, except those which prevent you from ending the turn.
Blocking notifications
Some notifications will appear when you attempt to end your turn, for example when you have
not selected any research. Others will prevent you from completing your turn until you have
resolved them. For example, a battle notification will prevent you from completing the turn until
the battle is resolved.
Exploration
Introduction
A large part of the game is dedicated to exploring the map and looking for opportunities. This is
particularly true at the beginning of a game.
As you move your army around your start point you will discover lost structures, riches, new regions
and climates, untamed Minor Factions and, eventually, other major empires.
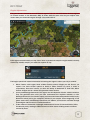
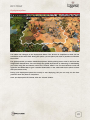
Ruins
The cataclysm which plagued Auriga has left behind it remnants of ancient civilizations. In these
ruins, you will find loot, monsters, quests, or possibly nothing at all.
To search a Ruin with an army, simply right-click with it or click on the “Search” army action in the
Army Control panel. A notification panel will display the result (and consequences!) of your search
effort.
Usually a ruin can only be searched once, although some research and special events allow you
to bypass this limit.
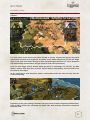
Minor Factions
Each region hosts a Minor Faction which keeps a foothold in the form of villages. Minor Factions
do not welcome invaders or Major Factions conquering their lands. As time passes, these villages
are likely to spawn roaming armies which will attack your armies and cities.
Each pacified village in a region you own, brings you 1 new population (+1 pop per pacified village
not destroyed). An assimilated Minor Faction can bring an empire-wide bonus (the bonus depends
on the number of pacified villages of the assimilated faction that you have in your empire. This
bonus is capped at 5 villages) as well as provide military Unit designs for your armies (Each
pacified village on the region will bring you a construction bonus for this particular unit).
To pacify a Minor Faction village you have 3 choices, some of which require preliminary scientific
research:
Attack: Face the army inside the village and defeat it. The village is destroyed, which
prevents it from giving your city a population bonus until it is rebuilt.
Bribe: Pay the minor faction a hefty sum of Dust, and the village will be pacified.
Parley: Start negotiations with the village, which will result in a Quest you must perform
for them. If you succeed, all of that faction’s villages in the region will be pacified.
To trigger these actions, simply right-click on the village with an army, or click on the
corresponding action in the Army Control panel.
Pacification / Assimilation
As soon as a village is pacified (destroyed, bribed, or allied with), their villages in the region
stop spawning armies. It you have a city in the region containing this village, the Minor
Faction can be assimilated into your empire.
Assimilating a faction costs you Influence points. You may have to wait a few turns until you have
the necessary points, then open the Empire Screen to manage your assimilated faction.
Assimilating a faction has many benefits:
It provides you with a new unit type, which can complement your own faction’s units
It provides beneficial trait(s) to your empire. Some traits depend on the number of pacified
villages you control; this encourages the player to pacify as many villages of this Minor
Faction as possible in all the regions of the world.
There is a limit of the number of Minor Factions you can assimilate (only 1 at the beginning of the
game), and even though this limit is increased with research, you should still be careful about
choosing the most useful Minor Faction for your empire.
A clearer perspective
If you have difficulty locating Ruins, Strategic or Luxury Resources, or Minor Faction villages, do
not forget you can zoom out to the simplified 2D view where icons representing these critical
locations can be easily seen.
Quests
Introduction
Quests are special missions which are assigned to your empire. Completing quests will give you
rewards, and can even help you win the game.
Quests are acquired from different sources: Exploring ruins, interacting with Minor Factions, and
also through your special faction Main Quest.
Main Quest
Each faction is provided with a unique quest arc, which will lead it to critical lore on the game
world and faction history, as well as result in bonuses which can help win the game.
The faction quest is divided into chapters which are unlocked after each previous chapter has
been completed. Some chapters can also offer random branches, meaning that you will have a
different experience if you replay the game.
Completing the main quest is necessary to unlock the Wonder City Improvement and achieve
the Wonder Victory.
Side quests
Side quests are secondary quests provided by random elements in the game world. Completing
these quests is still very useful, especially for the pacification of Minor Factions. It is, however,
possible to fail these quests, though they will not have a major impact on the game victory.
Objectives / Rewards
A quest goal is determined by objectives which must be completed in sequence; some quests
have only one objective. When there are several objectives, succeeding ones are usually kept
secret until they are unlocked.
For each completed objective you receive a reward whose value corresponds to the difficulty of
the objective. Rewards can be of different kinds: Dust, Resources, equipment for units, research
discoveries, and even new Heroes.
Quest Screen
You will receive a pop-up notice for new, completed, updated, or failed quests. You can open the
Quest Screen at any time to manage your quests and check their status.
Quests are classified by status (current, complete, failed), and can be browsed via a horizontal
list. Simply click on a quest in the list to display its description, summary, and the objectives and
their status.
Pin
To follow the progress of a specific quest, you can click on the “Pin” symbol in the Quests Journal
of the Quest Screen. This will display a highlighted window in the upper right corner of the screen.
Showing the location of the quest
If you have difficulty finding the target or source of a quest, there is a Show Location button in all
the various elements of the quests interface (Quest Screen, Pinned quest interface, Quest
notification).
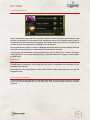
Battles
Introduction
Battles are launched when an army tries to enter a hex tile occupied by an enemy army. Battles
can also be launched on cities and their garrisons or villages and the units inside (see Siege,
page 31).
Certain diplomatic conditions prevent you from attacking armies of another empire. Check the
Diplomacy section to learn more. In any case, attacking armies of roaming Minor Factions is
always possible.
An important element of the battles in Endless Legend is that they take place directly on the
Adventure Map, not on an abstract battlefield. When you decide to attack an enemy army, you
should choose the location of the battle carefully to take advantage of terrain opportunities:
Higher elevation may grant you a bonus, cliffs can prevent enemy units from reaching you, and
forest can improve your defense.
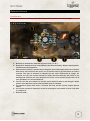
Encounter notification
When you begin a battle with an enemy army, a notification appears to explain the order of battle:
1.
2.
3.
4.
5.
6.
7.
8.
9.
Your forces are always located on the left, while the enemy is on the right
A Hero can lead each army, but is not required.
The retainer units are listed here; you can mouse over each unit to read its information.
Reinforcements (see “Resolution Phase”, below) can be chosen by clicking on the check
box next to their army.
Determine the order of arrival of your Reinforcements by selecting them, then using the
arrow to move them. The army on top will be the first to appear in combat.
This circle represents the balance of power, and thus, the probability to win the battle.
You can switch the army global behavior to Aggressive, Defensive, or Hold position.
You can control the battle manually or resolve it automatically. Auto resolution is much
faster, but it does not allow you to have precise control over the battle’s progress.
Spectator mode is a manual battle where all of the decisions (deployment and targeting)
are made by the AI
Once you are ready, click “Ready to Fight”. If you are not initiating the battle, you have the
possibility to retreat. If you do so, your army will be penalized (-50% of Max life / Action
points go to 0 / +50% Move points)
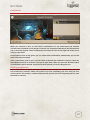
Deployment phase
The battle now changes to the Deployment Phase. The 3d view is simplified to show you the
boundaries of the battle field. During this phase, you can place your units in position to maximize
their effect.
The game provides you with a default deployment, usually placing melee units in the front and
ranged units behind them. You can change the global deployment by advancing or withdrawing
your units, using the two buttons next to the “Launch” button. You can also left-click a unit and
right-click the Battle Map to give it another destination on the valid battle hexes (those colored
with your faction color).
During your Deployment phase the enemy is also deploying, but you can only see the final
positions when the phase is completed.
Once your deployment is finished, click the “Launch” button.
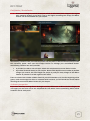
Order phase
You can now see the deployment positions of both armies, and assign orders to your units.
1. Units are sorted by Initiative. The units on the left of the Initiative bar will act first, and the
order of battle will progress from left to right.
2. Each unit shows its current order, which can be
a. Attack an enemy unit (red arrow)
b. Move to a location (white arrow)
c. Support a friendly unit (green arrow)
3. You can select any unit on the battlefield to display its statistics. If you select a friendly
unit, you can also assign another order by right-clicking the target: Enemy unit (attack),
empty hex (move), or friendly unit (support)
4. When you select a unit, you can also switch its global behavior to Aggressive, Defensive,
or Hold Position
5. You’ll see the targets that can be attacked with or without moving, and the movement
range if required. If the unit targets a position, it will show the possible targets after this
move and any additional movement required.
6. Once you are ready, click the “Ready” button
The orders you give to your units are preliminary. As units act in order of initiative, the actions you
requested can become irrelevant. If this is the case, your units will try to adapt to the most likely
alternative using their selected behavior.
Resolution phase
When the Orders phase is completed the Resolution phase starts, where units act in order of
initiative.
For each action of the current unit (either friendly or enemy), its panel will appear along with
(potentially) the panel of its target unit. The active unit is always displayed on the left, the target
units on the right. Units inflict damage on their selected target. Note that if a unit is attacked it
will automatically counter attack, using its action for that round prematurely.
Units can also trigger special abilities which give them an advantage. For example, the Wild
Walkers archers slow down their enemies, and the Broken Lord Infantry recovers health when
they destroy their target.
At the beginning of each Resolution phase, reinforcement units can enter the fray from the
reinforcement flag.
Depending on the game settings, the battle can span several rounds of Targeting and Resolution.
Once all these rounds have completed, the battle ends. Once all these phases have completed,
the battle ends.
Encounter outcome notification
When the battle ends, a new notification panel is presented that explains the outcome of the
battle.
The battle can result in a victory, defeat, or even a draw if both armies still have forces at the end
of the engagement. In that case, the battle can resume on the next turn.
XP is earned from units you have defeated, and then redistributed to all your surviving units and
the hero.
Militia
The Militia is a group of units generated by a City only when it is under Siege. They can be improved
by various research technologies.
When a City is not under Siege, dead Militia will “resurrect” at 1 HP. Militia will then regenerate
like any other unit (based on the City regeneration bonuses).
Siege
When a hostile force is on a tile next to a city tile, the army action "Siege" appears. This allows
the army to set the city under Siege. A city under Siege will be surrounded by palisades on the
Adventure Map (see image, below).
This situation has the following effects on the output and resources of the city:
Each turn, the city loses 1 Defense point per besieging unit and per level of these units.
Once the Defense is equal to 0, unit health is then affected.
Exploitation Area terrain tiles are no longer productive
All the Expansions outside the city are disabled or cannot be built due to the loss of their
connection with the city.
Pacified village workers are no longer available to the city.
Science and Dust production is divided by 2.
The besieged city suffers from a loss of Approval.
Units within a besieged city or on a city tile have their regeneration disabled.
Armies located on city tiles or in the garrison cannot leave the city except to attack the
besieger.
Heroes in both the besieging army and the besieged city gain more experience
The Siege ends when the enemy army has been destroyed or when the city is conquered.
Empire screen
Introduction
The Empire screen is the global dashboard that lets you consult your empire status and make
critical empire-wide decisions.
1. The Empire Summary offers a recap of your faction traits as well as your empire variables:
Dust (treasury), Influence points, and Approval. When you mouse over the Treasury you
can see a readout of all your Upkeep sources, which will help you to manage your
expenses. Your empire Approval is an average of your cities’ Approval; a high Approval
rate will grant bonuses to your empire and cities, while a low Approval will penalize you.
2. The Assimilated Factions panel lists the Minor Factions which your empire has
assimilated. As you progress in the game, you can unlock additional Minor Faction slots
and assimilate new peoples. Simply click on a slot to access the assimilation panel.
3. The Strategic Resources panel displays the stock of Strategic Resources you own.
4. The Luxury Resources panel displays for the same for the Luxury Resources you control.
5. Stockpiles are accumulated quantities of Food, Industry or Science, which can be as a
one-time boost to a specific city or to your entire empire in the case of Science.
6. The Empire Plan is triggered at regular intervals for all empires participating to the game.
It will grant bonuses of various kinds, based on the quantity of Influence points you invest.
7. Trade routes are automatic exchanges made between series of connected cities (allies,
friends and yours), leading to FIDS bonuses on Cities: those creating routes and those
crossed by them.
8. The Empire Bonuses panel lists all the global bonuses or penalties currently affecting your
empire
Strategic Resources
There are 6 Strategic Resources in the game, which are revealed as you unlock research Eras.
Strategic Resources are used to craft powerful weapons, armors, and accessories for your units
and your Heroes. There are several ways to obtain Strategic Resources in the game:
By extracting them in regions controlled by one of your cities
As rewards from quests
Through diplomatic exchanges
By purchasing them on the marketplace.
Luxury Resources
There are 15 Luxury Resources in the game which are also unlocked as you progress through
research eras. Luxury Resources are also accumulated in stocks and can be activated when you
reach a certain threshold (usually 20). When you activate the Resource Booster by clicking on its
symbol, you lose the activation quantity (usually 20 units of the Luxury Resource) and grant a
bonus to your empire for a limited time.
You can check the bonus effect by hovering your mouse cursor over each Luxury Resource.
Stockpiles
Stockpiles are one-shot consumables that you can build in your cities to transfer industry and
labor. Basically, instead of producing improvements or units, your city builds Stockpiles which are
accumulated at the empire level, allowing you to transfer the industrial advantage of this city to
other cities or your empire.
In the Stockpiles panel of the Empire Screen, select a stockpile and click on it to activate it. Food
and Industry stockpiles will require you to select a target city, while Science stockpiles are directly
applied to your empire’s research.
Food Stockpiles grant additional growth to the target city. Industry stockpiles do the same for
Industry. Science stockpiles make your empire research progress more rapidly.
Empire Plan
The Empire Plan is the interface which allows you to set major strategic medium-term directions
for your empire. The plan is divided into four categories that correspond to the four categories of
research disks (Military, Science and Industry, Empire and Expansion, and Economy and
Population). Each category has a number of ranks of increasing effect or power.
By sliding the apexes of each category you set the investment level in terms of Influence points.
Obviously, the total of Influence points spent in all categories cannot exceed your current stock of
Influence points.
As you unlock new research Eras, additional Empire Plan ranks become available, allowing you
to design more powerful plans (that are of course more expensive in Influence points). You can
choose to balance your investment between the four categories or raise a chosen category to the
maximum in order to drive your empire in one direction.
Empire Bonuses
The Empire Bonuses panel lists all the effects that currently impact your empire, for good or for
bad:
Faction traits
Approval effects
Luxury boosts
Assimilated faction effects
Season effects
And many more.
Trade Routes
To obtain Trade Routes, you must have friendly cities connected through either roads (land) or
maritime routes.
Roads are created by building the improvement “Right of Way” (this can be unlocked in the
Research Tree Era II). Roads are used to link two adjacent cities, allowing faster movement for
armies and enabling Trade Route bonuses between them.
Maritime routes are created between cities on the sea by building the improvement “Cargo
Docks” (this can be unlocked in the Research Tree Era III).
Seasons
Intro
In ancient times, Auriga suffered from dreadful cataclysms which almost destroyed it. The world
recovered but is now showing signs of aftershocks, hinting at another oncoming cataclysm.
The aftershocks appear in the game in the form of seasonal changes. You start the game during
a peaceful summer, and the End Turn wheel shows an estimate of the number of turns before the
season changes to winter.
Season effects
When winter arrives, you are notified of its effect in a special notification panel and by the obvious
changes in the environment. The effects are varied and can apply to movement, city output, or
even Minor Faction aggressiveness.
Some factions are used to or even adapted to winter, and will gain a distinct advantage over other
factions.
Military screen
Introduction
The Military screen is the central point where you manage your armies and unit designs
1. The Armies List details all existing armies in your empire, excluding garrisoned units. Each
line holds a number of statistics: Leading Hero (if any), Unit capacity, health, movement,
region location, and military Upkeep cost. You can double-click an army line to open the
Adventure Map which will be centered on that army.
2. Once you select an army in the armies list, its units are presented in the unit list panel
3. Each army has an upkeep cost consisting of a base cost and an additional cost for each
unit. As the base cost is rather high, you are encouraged to regroup your units in bigger
armies in order to avoid unacceptably high maintenance costs
4. If an army or unit becomes useless you can disband it, which will make it appear in the
Marketplace. Be aware that other empires could buy those same units and have them
fight back against you!
5. As you develop new unit designs, older versions of this design become obsolete. You can
use the Retrofit buttons to upgrade a unit or entire army to its “state of the art” version.
You can only retrofit in a region you own.
6. The Unit Designs panel lists all existing templates for units you can construct in your city.
The “New” button allows you to create an entirely new unit design. The “Edit” button allows
you to alter an existing design. The “Delete” button permanently removes a unit design.
Please note that existing units based on a deleted design can no longer be retrofitted.
7. The equipment panel shows a 3D vision of the unit, as well as its current equipment.
Unit Designs
When the game starts you have basic unit designs for the units you have unlocked. As the game
evolves, you can unlock new unit types and are offered the possibility to customize them.
A Unit Model is the basic shape of a unit: it determines its appearance, basic stats, unit class
(Infantry, Ranged, Cavalry, Support or Flying) and special capacities
A Unit Design represents an equipped Unit Model with weapons, armor, and accessories. This
equipment changes the stats and capacities (usually positively) of the Unit Model.
Units are the constructed version of a Unit Design that store the latest values of the statistics:
Current health, move points, and also the level and experience value for the Unit.
The Military screen shows the list of existing Unit Designs. Different Unit Designs could use the
same Unit Model. For instance, you could have a design for the Wild Walkers Unit Model equipped
with a bow (named Archer), and another one equipped with a crossbow (named CrossBowMan).
They will both appear as construction options in your cities.
If you edit your “Archer”, and replace his basic bow with a Titanium Tier 2 bow, and apply the
design, it will be renamed to “Archer2”. All your previously constructed “Archer” Units, however,
can still be retrofitted to Archer2 (provided you have the necessary Titanium) because they all
derive from the same “Archer” family. Similarly, your “Crossbowman” unit cannot be upgraded to
“Archer2” because it is not part of the same family.
Editing Unit Designs
Click the “New” button (new design) or “Edit” button (update an existing design) to open the Unit
Design Panel. If you chose to create a new design, you will first be requested to select a base Unit
Model.
The Unit Design panel allows you to outfit a Unit Design with equipment of your choice.
1. The Unit information displays general information on the unit. If you selected the creation
of a new unit design, you will have to enter a valid name for it (one which does not already
exist)
2. You see a reminder of your critical resources, as most advanced equipment requires Dust
or Strategic Resources
3. The Armory displays the unlocked equipment that your empire can craft. You have an
unlimited supply of this equipment, provided you have the Resources required and the
industrial capacity to build units based on it
a. You can filter equipment by type (weapon, armor, accessory) or see all types.
b. Equipment comes in the form of tiers. Once a higher tier version is discovered,
outdated equipment is hidden. You can however press the “Show Obsolete” toggle
to display outdated/obsolete equipment
c. If you do not own the required resource for a piece of equipment, it is hidden unless
you press the “Missing Resource” toggle
4. The equipment of your character is represented in the form of slots of different types.
Weapon slots can only receive weapons, etc. To equip an item, simply drag the item from
the Armory to the desired slot. You can also double click in the Armory to quick equip an
item. Double clicking an equipped slot in the equipment panel will remove it; in some
cases it will be replaced by default equipment so that your unit does not fight only with
bare hands or harsh language…
5. Your unit model and class will determine which weapons can be equipped on it. For
instance, ranged unit models can only be outfitted with bows and crossbows
6. Statistics give you detail on your unit efficiency, starting with these attributes:
a. Life determines the amount of damage this unit can sustain (Health Points). Most
units regain health over time
b. Speed determines the number of hexes this unit can move in one game turn. An
army’s movement points are determined by the lowest remaining movement
points of all its units
c. Attack determines your ability to inflict damage
d. Defense reduces attack odds
e. Initiative helps your unit strike first in battle
f. Damage determines the hit score of a successful attack
7. Capacities are special abilities that your unit uses automatically or triggers during battle
8. Cost determines how many Industry points this unit will cost, as well as its other resource
requirements (Strategic Resources, Dust, in some cases Population, etc.).
Once your Unit Design is ready, click the Apply button.
Academy screen
Introduction
The Academy is the screen which lets you manage your Hero and assign them to armies or cities.
It can be accessed from the Military screen or from certain notifications shortcuts.
1. Heroes are listed in the form of cards showing their basic stats. You can click a Hero card
to get more detail on them
2. The list of actions you can apply to the selected Hero:
a. Restore will heal heroes who have been injured in battle. This allows you to speed
up the recovery which might otherwise take several turns
b. Inspect opens the hero inspection panel
c. Assign / Unassign will allow you to give new missions to a Hero. Be warned that
Heroes given a new assignment will be locked in that post for a number of turns
d. Sell will remove the Hero from your empire (maybe because they cost too much
Dust in Upkeep, for example), and place them in the Marketplace for hiring.
3. The Marketplace shortcut displays Heroes available for recruitment. This is simplest way
to acquire Heroes, though some quests will allow you to acquire others.
Hero Equipment
When you inspect a Hero, you open a panel reminiscent of the Unit Design panel. You can open
this from many user interface elements: The Academy, by clicking on various Hero portraits, or
through certain notifications.
The main difference between the Hero Inspection panel and the Unit Design panel is that
equipment is applied instantly on a Hero, while Unit Design only applies to “templates” which
must be later constructed or retrofitted.
Starting heroes are equipped with a default set of items, but equipping new items will cost you
Dust as well as the required Strategic Resources. Otherwise, you will not be able to validate your
hero equipment.
You can validate a change in equipment only in a region you own.
Hero Skills
The Hero inspection also allows you to select Skills for your heroes. Skills are special abilities
earned as the Hero gains experience levels. Click on the “Skill Tree” tab of the Hero inspection
panel to display his skills.
Each time a Hero gains a level, he is awarded a Skill point which can be used to select a Skill in
the Skill Tree. Skills are unlocked hierarchically, so you must start from the root of the tree to
progress towards the leaves.
The tree is divided into 3 main branches:
The left branch is determined by your hero class (Infantry, Ranged, …)
The right branch is determined by your hero faction (Wild Walkers, Broken Lords, …)
The center branch is common to all Heroes, although some Skills are adapted to leading
armies, while others are adapted to governing a city.
Some skills can be selected multiple times, with an increasing effect each time.
City list screen
Introduction
The City List screen is a spreadsheet-like representation of your cities that allows you to easily
manage them.
Each line displays summary information related to its city:
Region name
Population and growth (turns before next population change)
Approval
Assigned Hero if any
Minor Faction
FIDSI values and workers’ FIDSI assignments
Region Resources
AI automation to automatically queue constructions in your city
Construction Queue
Garrison (units stationed in the city)
You can double-click a line to open the Adventure Map focused on the city associated with this
line. You can also click the header of each column to sort the lines in ascending / descending
order. For example if you need to construct lots of units, you can sort your cities by descending
Industry output.
Population
You can click the population icons underneath the FIDSI outputs to open a worker assignment
panel. This is the same mechanism as in the City Screen.
Construction Queue
You can also click the current Construction Queue of each city to display its current queue and
manage the order and priority of constructions, as in the City Screen
Garrison
You can click the garrison representation to open the same Garrison panel as in the City Screen
and directly create a new army.
Diplomacy
Introduction
The Diplomacy screen displays your current diplomatic status with the other major empires and
allows you to conduct negotiations with them.
Your empire stands at the bottom center, and the other empires are laid out according to your
relations. Unknown empires are located the farthest; allied empires are close to you.
“Unknown” means you have not yet met this empire, and must discover it by meeting one
of its armies or cities on the Adventure Map.
“War” means that you are engaged in an all-out war with this empire.
“Cold War” is the default status when you meet another empire. You can generally engage
each other’s troops in neutral territory, but both their territory and yours are protected
from aggression until war is declared.
“Peace” allows you to develop advanced diplomatic agreements which can mutually
benefit both empires
“Alliance” is a stronger bond between two empires which grants them mutual defenses.
Declaring war on an empire is risky, but declaring war on an empire allied with another is
even riskier.
To initiate diplomatic negotiations with an empire, simply click on the base of the figure that
represents it.
You can also hover your mouse over their portrait to select if you want to initiate diplomatic
negotiations or if you want to check their diplomatic relations with other empires.
Negotiation screen
The Negotiation Screen allows you to conduct Diplomacy and Trade with other empires. It is
divided into the following parts:
1. Your empire is on the top left, the empire you are examining on the top right
2. You can select terms of different categories to make a deal. “Treaties” are high level
diplomatic agreements which can be used, for instance, to declare War and Peace. Other
categories can be used as gifts or trade, or also to balance a particular deal and make
sure the other empire accepts it.
3. You can also select terms for the other empire. Some terms are symmetrical (such as
declaring peace), others are unilateral (resources, technologies).
4. The overall deal being offered is summarized here
5. The gauge indicates the likelihood that the other empire will accept your deal.
6. When you are ready you can make an offer, but you must have enough Influence points
to propose the deal
7. Empire information is summarized here.
The Influence cost of a deal is greatly influenced by your diplomatic score with the other empire.
For instance, if you have a very good relation with another empire, declaring war on it will be very
expensive, while it will be more affordable it your relations are already bad.
Once you have validated your offer, you will receive a notification letting you know if the deal has
been accepted. Some deals, such as declaring war, to do not require an answer…
The Marketplace
Introduction
The marketplace screen allows a player to buy and sell items on the global market of Auriga. At
the beginning of the game all features of the marketplace are locked, and you must progressively
do Research to unlock new capabilities.
1. “Salable items” represent what your empire can sell on the market. Select a category,
specify a quantity, and sell the elements on the market
2. “Exchange information” is a readout of what your empire has sold or purchased on the
market.
3. “Purchasable items” lists the content of the market at the current time. You can switch
categories to review goods of different kinds.
4. Each item has a market price and a global demand cursor. The more an item is purchased,
the more its market price will rise. If an item is not purchased after a time, it will
progressively decrease in market value.
5. Once you have selected an item to purchase, input a quantity and validate the purchase.
You must be able (obviously) to afford the cost in Dust that is required.
Some purchased items, such as Units, will be located in a target city when purchased. You can
then collect them from the garrison and assemble a new army.
Winning conditions
The game has eight different victory conditions.
Elimination Victory: Auriga is vast, but your empire is its equal. No other faction survives to pose
a challenge to you for all of the cities and all of the settlers remaining upon this world are yours.
Your domination of this world and responsibility for its future are absolute; victory is yours by
complete elimination.
Score Victory: By gaining a level of mastery in the many complex elements of an empire economy, military, sciences, etc. - you can create a civilization that is second to none. This
victory will be given to the faction with the highest score after a fixed number of turns.
Expansion Victory: This victory is obtained by controlling a maximum of the surface of Auriga.
Once a player has conquered 80% or more of the land regions of Auriga, they are victorious.
Economic Victory: Through trade and development, you can enrich your empire to the point that
all other peoples have no choice but to bow before the enormous power brought by your
unimaginable wealth. Once you have generated enough Dust during the development of your
empire, victory is yours!
Diplomatic Victory: By building alliances and friendships with other factions and empires, you
become highly valuable as a friend and simply too dangerous as an enemy. When you have
accumulated enough Diplomatic Points in the great game of world diplomacy, you become the
dominant political force of Auriga.
Wonder Victory: It is a building and an energy source and a processing center; a fusion of Dust
and matter that transcends any existing knowledge. By reactivating this long-dormant temple of
the Concrete Endless, a faction can secure the future of their planet - and at the same time be
humbled by the vast gulf of ignorance that separates them from the long-lost masters who first
built this marvel.
Scientific Victory: By researching increasingly complex scientific advances and developing
increasingly sophisticated technology, you can arrive at a point where all other empires will be
forced to acknowledge your mastery. Victory will be assured by discovering 6 technologies in the
6th Era.
Supremacy Victory: Dangerous and effective, your troops hold sway over all the centers of power
on Auriga. In addition to your own capital city, you have also conquered the capitals of all the
other empires upon the planet. Victory is yours!
Specifics factions Gameplay
Wild Walkers
The Sharing: Wild Walkers can sense their enemies through the fog of war. They can visualize
army markers on the land they have already explored.
Vaulters
Holy Resource: The Vaulters seek and study relics from the past. One of them allowed them to
teleport units from one city to another.
Vaulters can use all strategic resources as boosters:
o They can have only 1 strategic booster activated at a time
o The current booster activated becomes the affinity resource
o Each strategic booster gives FIDS bonuses on each City:
Titanium : +20% Science
Glassteel : +20% Dust
Adamantian : +20% Industry
Palladian : +20% Food
Mithrite : +15% Industry, +15% Dust
Hyperium : +15% Food, +15% Science
o Each of them also gives the following bonuses
New map action available on armies inside a City:
Teleport army to the targeted City, on the 1st available tile near
the City Hall (the cursor target must be one of your own Cities).
o Cost all remaining Movement Points of the army
o Available only if an affinity resource is set
+200% [current affinity resource] per turn during winter
-50% expansion disapproval
The Holy Resource bonus is triggered by clicking on the resource.
The army action “Teleportation” can be activated when the army is placed in a city center.
After activating Teleportation, chose your destination city
Teleportation will consume all the Units movement points
Broken Lords
1. Buy out Population from here
2. Note: Food is grayed because Broken Lords can't gather it
Arcane Heals: Broken Lords are animated by Dust, so they can use it to heal themselves
1. Heal Heroes for a certain amount of Dust
2. Heal Units for a certain amount of Dust
Necrophages
Recycling: Necrophages can feed on the dead from the battlefield and produce a Food bonus with
it. (Effect: +1 cadaver per Unit killed; +1 Food Stockpile per 8 cadavers recycled)
1. Recycling counter shows the number of unit the player has to kill to create a Food
Stockpile
The Food Stockpile created by the recycling can be activated by clicking on it on the stockpiles
box. You’ll have to choose a city which will benefit from this bonus for 1 turn (using more than 1
Stockpile at the same time will extend the duration of the effect.
Demanding Gods: Necrophages can Sacrifice a unit of population to increase the Empire Approval
by 40.
Click on the icon to Sacrifice one population. The Approval effect will last for a number of turns
equal to the number of Population points before the Sacrifice. This effect is cumulative if more
than one Population point is Sacrificed. (Can be unlocked in the Research Tree Era II)
Ardent Mages
Arcane mastery: Ardent Mages can manipulate Dust more easily than other factions, changing
them into true spellcasters.
Arcane Book: Each Arcane Pillar and Arcane Spell discovered will appear in the Arcane Book.
Arcane Pillars: Pillars are temporary magic objects that can be placed on tiles from the Empire
Arcane Book, affecting tiles around it.
Arcane Spells: Spells are cast in battle. They can be placed on tiles from the Empire Arcane
Book, affecting tiles around them.
Roving Clans
Roving Clans begin the game with the Marketplace technologies unlocked.
Peace and Prosperity: Once a peace treaty has been signed, Roving Clans can enjoy
immediate Commercial and Research agreements with their newfound partners.
Mercenary Comforts: By furnishing their sellswords with opulent digs, mouth-watering
delicacies, and extra coin, Roving Clan mercenaries are that little bit extra motivated to perform.
Make Trade Not War: The Roving Clans believe that warfare is only for desperate fools; they do
not view it as a viable option.
Insider Trading: In exchange for small "donations", traders in the Roving Clans' marketplaces
will give up information on who's buying and selling.
Cuts Both Ways: Whether another empire buys or sells, the Roving Clans traders will always
take a slice of the transaction.
Keys to the Market: Another empire getting too big for their boots? Perhaps we should ban
them from the market and see how they fare then!
Nomadic Cities: By gaining full control of the giant scarabs upon whose backs many tents of
the great caravan cities rest, the Roving Clans can move their settlements at will.
Drakken
Well Connected: Being an ancient race with ties to all the other peoples of Auriga, this empire
knows the location of every other race's capital.
Diplomatic Pressure: Masters of statecraft, this people can force Peace, Truce, or even an
Alliance on other players due to their wisdom, persuasion, and prestige.
Advanced Diarchy: Experienced at the necessary negotiation and discussion that takes place
within a government, this faction can more rapidly put complex Empire Plans into motion.
Cultists
High Seat of the Queen: Constructed around a single city that is their religious center, this
faction creates no new cities and therefore cannot produce Settlers. However their city center
can be built up to a higher level than any other faction, becoming an impressive and powerful
metropolis from which all of Auriga could be ruled.
The Power of Belief: Charismatic preaching, emotional manipulation, and propaganda are all
used to great effect by the Cultists. Converted villages are shown as models, and as the number
of villages grow so does the Influence of the Cult.
Weapons of the Enemy: When the cult successfully captures an enemy city, it is razed directly
(or: auto-queue "razing"). Booster gain depending on the destroyed city (+1 Industry booster
per pop / +1 Science booster per pop)
Persuasiveness: Silver-tongued, clever, and possessed of powerful persuasive charms, this
faction has a naturally high level of Influence.
Walls of Faith: With the zeal of fanatics, all soldiers and civilians are prepared to throw their
lives down defending their city.
Destructive Analysis: Forever disgusted by the random waste and ruin of the Endless's civil
war, the Cultists are careful to study and learn from the enemy cities that they deconstruct.
We Are Legion: As the number of converted troops increases, the Cultists learn much on how
to integrate, train, and fanaticize other peoples. This experience serves them well.
Conversion: Knowledge of the rites of the Cultists - and a fanatic belief in the Queen's purpose permits the conversion of Pacified villages. (Add to the empire FIDSI, the villages tiles and
the 6 tiles surrounding them)
Annexes
ENDLESS LEGEND END-USER LICENCE AGREEMENT
BY DOWNLOADING AND INSTALLING THIS SOFTWARE, YOU ARE CONSENTING TO BE BOUND BY AND ARE
BECOMING A PARTY TO THIS END-USER LICENCE AGREEMENT. IF YOU DO NOT AGREE TO ALL OF THE TERMS
OF THIS AGREEMENT, YOU MAY NOT INSTALL OR USE THE SOFTWARE OR ITS CONTENT INCLUDED IN THE
SETUP PROGRAM AND ITS DOCUMENTATION.
IMPORTANT - READ CAREFULLY: Amplitude Studios (“the LICENSOR”) publishes and markets this Endless
Legend video game. You, either an individual or a single entity (“You” or “the LICENSEE”), wish to purchase
and use this Endless Legend video game. To this end, the LICENSEE consents to be bound by and are
becoming a party to the Endless Legend End-User License Agreement ("EULA") which is a legal agreement
between the LICENSEE and the LICENSOR for the downloading and use of Endless Legend video game,
including: computer software, programs, its code, objects including their API's, as well as any images,
models, templates, animations, video, audio, music, text, and "plugins" incorporated into the software, and
"online" or electronic documentation ("SOFTWARE PRODUCT").
By installing, downloading, creating a back-up, or otherwise using the SOFTWARE PRODUCT, the LICENSEE
agrees to become a party to and to be bound by the terms of this EULA. If the LICENSEE does not agree to
the terms of this EULA, the LICENSEE shall not install or use the SOFTWARE PRODUCT or must destroy the
SOFTWARE PRODUCT and any copies thereof.
1. GRANT OF LICENSE.
In consideration for the payment by the LICENSEE of the purchase price of the SOFTWARE PRODUCT and
subject to the terms and conditions of this EULA, the LICENSOR grants to the LICENSEE, as of the paying of
the purchase price, a limited non-exclusive and non-transferable license to use the SOFTWARE PRODUCT.
If the LICENSOR releases and distributes Endless Legend video game subsequent versions, the LICENSOR
shall freely and at any time, alter prices, features, licensing terms, or other characteristics of the
commercial release, what the LICENSEE expressly accepts.
2. RIGHTS AND LIMITATIONS.
The LICENSEE may download, install and use the SOFTWARE PRODUCT on any computer free of charge
without restrictions. More generally, the LICENSEE shall use the SOFTWARE PRODUCT in accordance with
its destination, the documentation and the terms and conditions of this EULA.
The LICENSEE shall not:
-
Incorporate the SOFTWARE PRODUCT into any other "commercial" software product,
Display, distribute, resell, rent, loan or make available the SOFTWARE PRODUCT to a third party,
on any basis and for any reason,
Make more copies of the SOFTWARE PRODUCT than allowed by applicable law,
Grant sub-licenses, either directly or indirectly, in part or in whole to the SOFTWARE PRODUCT,
The LICENSEE understands that the source code underlying the SOFTWARE PRODUCT constitutes a trade
secret. Nevertheless, the LICENSOR allows the LICENSEE, under its sole responsibility and at its own risks,
to reverse engineer, decompile, disassemble, translate, adapt, arrange or modify the SOFTWARE PRODUCT
to create or to perform a function not originally conceived or intended by the LICENSOR and/or to create
new or altered content. The LICENSOR makes no express or implied representations or warranties
whatsoever regarding (i) the SOFTWARE PRODUCT as modified by the LICENSEE and (ii) any consequences
of any kind arising out of or relating to the SOFTWARE PRODUCT as modified by the LICENCEE.
3. PROPERTY RIGHTS.
This EULA does not operate any transfer, on whatever basis. Thus, all rights, titles and interests in and
to the SOFTWARE PRODUCT and any copy of the SOFTWARE PRODUCT made by the LICENSEE are and
remain exclusively owned by the LICENSOR. The SOFTWARE PRODUCT is protected by copyright laws,
other laws, and international treaty provisions. Therefore, the LICENSEE must treat and protect the
SOFTWARE PRODUCT like any other protected material. The LICENSEE may not remove any copyright,
trademark, proprietary rights, disclaimer or warning notice included on or embedded in any part of the
SOFTWARE PRODUCT or any copy of the SOFTWARE PRODUCT. Except as specifically provided for in
this EULA, the LICENSOR reserves all of its other rights.
4. USE RESTRICTIONS.
The LICENSEE agrees that the SOFTWARE PRODUCT will not be used, sub-licensed, transferred or
otherwise disposed of in violation of any national or international copyright laws.
5. DISCLAIMERS.
THE LICENSOR MAKES NO EXPRESS OR IMPLIED REPRESENTATIONS OR WARRANTIES
WHATSOEVER REGARDING SOFTWARE PRODUCT’S USE, PERFORMANCE, OPERATION,
APPLICATIONS PORTABILITY BETWEEN SUBSEQUENT VERSIONS, FINAL OR NOT, OR SUPPORT. BY
WAY OF EXAMPLE, BUT NOT OF LIMITATION, THE LICENSOR MAKES NO REPRESENTATIONS OR
WARRANTIES OF TITLE, NONINFRINGEMENT, MERCHANTABILITY OR FITNESS FOR A PARTICULAR
PURPOSE.
IT IS FURTHER UNDERSTOOD BY THE LICENSEE THAT NO COMMITMENT EXISTS ON THE PART OF THE
LICENSOR TO PROVIDE THE SOFTWARE PRODUCT IN A CONDITION SUITABLE FOR A SPECIFIC USE BY
THE LICENSEE. THE LICENSEE ACKNOWLEDGES THAT THE SOFTWARE PRODUCT IS DELIVERED ON
AN "AS IS" BASIS AND THAT THE USE OF THE SOFTWARE PRODUCT IS AT THE LICENSEE SOLE RISK.
THE LICENSEE ALSO AGREES THAT, TO THE EXTENT PERMITTED BY APPLICABLE LAW, IN NO EVENT
SHALL THE LICENSOR BE LIABLE FOR (i) ANY DIRECT, SPECIAL, INDIRECT, INCIDENTAL OR
CONSEQUENTIAL DAMAGES, EITHER FORCEABLE OR NOT, ARISING OUT OF OR RELATING TO THIS
SOFTWARE PRODUCT, SUCH AS, BUT NOT LIMITED TO, LOSS OF DATA, LOSS OF SALES, LOSS OF
PROFITS, INREASE IN THE COSTS AND CHARGES OR EXEMPLARY OR PUNITIVE DAMAGES, WHETHER
OR NOT FORESEEABLE AND EVEN IF ADVISED OF THE POSSIBILITY OF SUCH DAMAGES, OR (ii) ANY
OTHER CLAIM, DEMAND OR DAMAGES WHATSOEVER RESULTING FROM OR ARISING OUT OF OR
RELATING TO THIS EULA OR THE USE OR PERFORMANCE OF THE SOFTWARE PRODUCT, OR CONTENT
DISTRIBUTED THROUGH THE SOFTWARE PRODUCT.
6. APPLICABLE LAW.
This EULA shall be governed by French law unless the LICENSEE acquired the SOFTWARE PRODUCT
outside France and the mandatories provisions of the laws of the state where the LICENSEE lives are
more favorable.
By downloading the game and, subsequently, the SOFTWARE PRODUCT, you might also be
downloading Microsoft DirectX 9.0c and Microsoft Visual C++ 2008, thus you will found hereafter
reproduced the licences for those two Microsoft softwares.
MICROSOFT DirectX 9.0c
MICROSOFT SOFTWARE LICENSE TERMS
MICROSOFT DIRECTX END USER RUNTIME
These license terms are an agreement between Microsoft Corporation (or based on where you live,
one of its affiliates) and you. Please read them. They apply to the software named above, which
includes the media on which you received it, if any. The terms also apply to any Microsoft
* updates,
* supplements,
* Internet-based services, and
* support services
for this software, unless other terms accompany those items. If so, those terms apply.
BY USING THE SOFTWARE, YOU ACCEPT THESE TERMS. IF YOU DO NOT ACCEPT THEM, DO NOT USE
THE SOFTWARE.
If you comply with these license terms, you have the rights below.
1. INSTALLATION AND USE RIGHTS. You may install and use any number of copies of the software on
your devices.
2. SCOPE OF LICENSE. The software is licensed, not sold. This agreement only gives you some rights
to use the software. Microsoft reserves all other rights. Unless applicable law gives you more rights
despite this limitation, you may use the software only as expressly permitted in this agreement. In
doing so, you must comply with any technical limitations in the software that only allow you to use it
in certain ways. You may not
* work around any technical limitations in the software;
* reverse engineer, decompile or disassemble the software, except and only to the extent that
applicable law expressly permits, despite this limitation;
* make more copies of the software than specified in this agreement or allowed by applicable
law, despite this limitation;
* publish the software for others to copy;
* rent, lease or lend the software;
* transfer the software or this agreement to any third party; or
* use the software for commercial software hosting services.
3. BACKUP COPY. You may make one backup copy of the software. You may use it only to reinstall
the software.
4. DOCUMENTATION. Any person that has valid access to your computer or internal network may copy
and use the documentation for your internal, reference purposes.
5. EXPORT RESTRICTIONS. The software is subject to United States export laws and regulations. You
must comply with all domestic and international export laws and regulations that apply to the
software. These laws include restrictions on destinations, end users and end use. For additional
information, see www.microsoft.com/exporting.
6. SUPPORT SERVICES. Because this software is “as is,” we may not provide support services for it.
7. ENTIRE AGREEMENT. This agreement, and the terms for supplements, updates, Internet-based
services and support services that you use, are the entire agreement for the software and support
services.
8. APPLICABLE LAW.
a. United States. If you acquired the software in the United States, Washington state law governs the
interpretation of this agreement and applies to claims for breach of it, regardless of conflict of laws
principles. The laws of the state where you live govern all other claims, including claims under state
consumer protection laws, unfair competition laws, and in tort.
b. Outside the United States. If you acquired the software in any other country, the laws of that country
apply.
9. LEGAL EFFECT. This agreement describes certain legal rights. You may have other rights under the
laws of your country. You may also have rights with respect to the party from whom you acquired the
software. This agreement does not change your rights under the laws of your country if the laws of
your country do not permit it to do so.
10. DISCLAIMER OF WARRANTY. THE SOFTWARE IS LICENSED “AS-IS.” YOU BEAR THE RISK OF
USING IT. MICROSOFT GIVES NO EXPRESS WARRANTIES, GUARANTEES OR CONDITIONS. YOU MAY
HAVE ADDITIONAL CONSUMER RIGHTS UNDER YOUR LOCAL LAWS WHICH THIS AGREEMENT CANNOT
CHANGE. TO THE EXTENT PERMITTED UNDER YOUR LOCAL LAWS, MICROSOFT EXCLUDES THE
IMPLIED WARRANTIES OF MERCHANTABILITY, FITNESS FOR A PARTICULAR PURPOSE AND NONINFRINGEMENT.
11. LIMITATION ON AND EXCLUSION OF REMEDIES AND DAMAGES. YOU CAN RECOVER FROM
MICROSOFT AND ITS SUPPLIERS ONLY DIRECT DAMAGES UP TO U.S. $5.00. YOU CANNOT RECOVER
ANY OTHER DAMAGES, INCLUDING CONSEQUENTIAL, LOST PROFITS, SPECIAL, INDIRECT OR
INCIDENTAL DAMAGES.
This limitation applies to
* anything related to the software, services, content (including code) on third party Internet
sites, or third party programs; and
* claims for breach of contract, breach of warranty, guarantee or condition, strict liability,
negligence, or other tort to the extent permitted by applicable law.
It also applies even if Microsoft knew or should have known about the possibility of the damages. The
above limitation or exclusion may not apply to you because your country may not allow the exclusion
or limitation of incidental, consequential or other damages.
Microsoft Visual C++ 2008
MICROSOFT SOFTWARE LICENSE TERMS
MICROSOFT VISUAL C++ 2008 RUNTIME LIBRARIES
These license terms are an agreement between Microsoft Corporation (or based on where you live,
one of its affiliates) and you. Please read them. They apply to the software named above, which
includes the media on which you received it, if any. The terms also apply to any Microsoft
* updates,
* supplements,
* Internet-based services, and
* support services
for this software, unless other terms accompany those items. If so, those terms apply.
By using the software, you accept these terms. If you do not accept them, do not use the software.
If you comply with these license terms, you have the rights below.
1. INSTALLATION AND USE RIGHTS. You may install and use any number of copies of the software on
your devices.
2. SCOPE OF LICENSE. The software is licensed, not sold. This agreement only gives you some rights
to use the software. Microsoft reserves all other rights. Unless applicable law gives you more rights
despite this limitation, you may use the software only as expressly permitted in this agreement. In
doing so, you must comply with any technical limitations in the software that only allow you to use it
in certain ways. You may not
* disclose the results of any benchmark tests of the software to any third party without
Microsoft’s prior written approval;
* work around any technical limitations in the software;
* reverse engineer, decompile or disassemble the software, except and only to the extent that
applicable law expressly permits, despite this limitation;
* make more copies of the software than specified in this agreement or allowed by applicable
law, despite this limitation;
* publish the software for others to copy;
* rent, lease or lend the software;
* transfer the software or this agreement to any third party; or
* use the software for commercial software hosting services.
3. BACKUP COPY. You may make one backup copy of the software. You may use it only to reinstall
the software.
4. DOCUMENTATION. Any person that has valid access to your computer or internal network may copy
and use the documentation for your internal, reference purposes.
5. EXPORT RESTRICTIONS. The software is subject to United States export laws and regulations. You
must comply with all domestic and international export laws and regulations that apply to the
software. These laws include restrictions on destinations, end users and end use. For additional
information, see www.microsoft.com/exporting.
6. SUPPORT SERVICES. Because this software is “as is,” we may not provide support services for it.
7. ENTIRE AGREEMENT. This agreement, and the terms for supplements, updates, Internet-based
services and support services that you use, are the entire agreement for the software and support
services.
8. APPLICABLE LAW.
a. United States. If you acquired the software in the United States, Washington state law governs the
interpretation of this agreement and applies to claims for breach of it, regardless of conflict of laws
principles. The laws of the state where you live govern all other claims, including claims under state
consumer protection laws, unfair competition laws, and in tort.
b. Outside the United States. If you acquired the software in any other country, the laws of that country
apply.
9. LEGAL EFFECT. This agreement describes certain legal rights. You may have other rights under the
laws of your country. You may also have rights with respect to the party from whom you acquired the
software. This agreement does not change your rights under the laws of your country if the laws of
your country do not permit it to do so.
10. DISCLAIMER OF WARRANTY. The software is licensed “as-is.” You bear the risk of using it.
Microsoft gives no express warranties, guarantees or conditions. You may have additional consumer
rights under your local laws which this agreement cannot change. To the extent permitted under your
local laws, Microsoft excludes the implied warranties of merchantability, fitness for a particular
purpose and non-infringement.
11. LIMITATION ON AND EXCLUSION OF REMEDIES AND DAMAGES. You can recover from Microsoft
and its suppliers only direct damages up to U.S. $5.00. You cannot recover any other damages,
including consequential, lost profits, special, indirect or incidental damages.
This limitation applies to
* anything related to the software, services, content (including code) on third party Internet
sites, or third party programs; and
* claims for breach of contract, breach of warranty, guarantee or condition, strict liability,
negligence, or other tort to the extent permitted by applicable law.
It also applies even if Microsoft knew or should have known about the possibility of the damages. The
above limitation or exclusion may not apply to you because your country may not allow the exclusion
or limitation of incidental, consequential or other damages.
Bink Video
Copyright (C) 1997-(2014) by RAD Game Tools, Inc.
Unity 3D