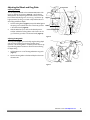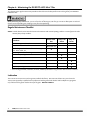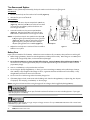
1
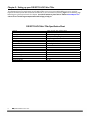
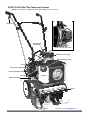
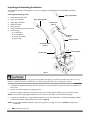
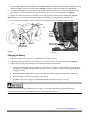
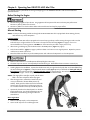
DR® ROTO-HOG™ Mini Tiller
SAFETY & OPERATING INSTRUCTIONS
DR® Power Equipment
A division of Country Home Products®
75 Meigs Road
Vergennes, VT 05491
Toll-Free phone: 1-800-DR-OWNER (376-9637)
Fax: 1-802-877-1213
Website: www.DRpower.com
Serial No. __________________
Order No. ________________
Read and understand this manual and all instructions before operating this Tiller.
Table of Contents
Chapter 1: Important Safety Considerations.......................................................................................................................... 3
Chapter 2: Setting up your DR ROTO-HOG Mini Tiller......................................................................................................... 6
Chapter 3: Operating Your DR ROTO-HOG Mini Tiller .......................................................................................................11
Chapter 4: Maintaining the DR ROTO-HOG Mini Tiller...................................................................................................... 14
Chapter 5: Troubleshooting .................................................................................................................................................. 18
Chapter 6: Parts Lists, Schematic Diagrams, and Warranty................................................................................................ 20
Conventions used in this manual
This indicates a hazardous situation, which, if not avoided, could result in death or serious injury.
This indicates a hazardous situation, which, if not avoided, could result in minor or moderate injury.
This information is important in the proper use of your machine. Failure to follow this instruction could result in damage to
your machine or property.
Tip: This is a helpful hint to guide you in getting the most out of your DR ROTO-HOG Mini Tiller.
Tools Needed: This indicates you will need a special tool to perform a maintenance function on your Tiller.
NOTE: This information may be helpful to you.
We have done our utmost to ensure that your DR ROTO-HOG Mini Tiller will be one of the most trouble-free and satisfying
pieces of equipment you have ever owned. Please let us know of any questions you may have. We want to answer them as
quickly as possible. When you do call, please have your order number, or serial number handy. For technical assistance,
please visit our website at www.DRpower.com or call Toll-Free 1-800-DR-OWNER (376-9637) and one of our Technical
Support Representatives will be happy to help you. We also hope to hear from you on how much you like your new helper.
If you are ever unsure about an action you are about to take, don’t do it, visit our website at www.DRpower.com for help or
information.
DR Power Equipment reserves the right to discontinue, change, and improve its products at any time without notice or
obligation to the purchaser. The descriptions and specifications contained in this manual were in effect at printing.
Equipment described within this manual may be optional. Some illustrations may not be applicable to your machine.
2
DR® ROTO-HOG™ Mini Tiller
Chapter 1: Important Safety Considerations
We want you to enjoy years of safe and productive use from your DR ROTO-HOG Mini Tiller. We do not want you injured, so
please take a few moments to read the following instructions for safely operating your new Tiller.
Your DR ROTO-HOG Mini Tiller carries a prominent safety label (shown below) to remind you of important information while
you are operating the machine. Take a moment to study this label before you operate the machine. Please, immediately
replace this label if it should become unreadable due to fading, or otherwise damaged during use of your DR ROTO-HOG
Mini Tiller.
Warning Label located on the Battery Box. #261871
Protecting Yourself and Those around You
Tragic accidents can occur if the operator is not alert to the presence of children. Children are often attracted to the Tiller and
the activity of tilling. Never assume that children will remain where you last saw them.
This tilling machine, can cut, and sever parts of your body if they become in contact with the moving Tines. Always take the
following precautions when operating the DR ROTO-HOG Mini Tiller:
• Only allow responsible individuals who have a thorough understanding of these instructions to operate the Tiller. Never
allow children to operate the machine.
• Always wear protective goggles or safety glasses with side shields while tilling to protect your eyes from possible foreign
objects thrown from the machine.
• Wear shoes with non-slip treads when using this machine. If you have safety shoes, we recommend wearing them. Do
not use the machine while barefoot or wearing sandals with exposed toes or heels.
• Avoid wearing loose clothing or jewelry, which can catch on the machine’s moving parts.
• We recommend wearing long pants and gloves while using this machine. Be sure the gloves fit properly and do not have
loose cuffs or drawstrings.
• Never place your hands, feet, or any part of your body near the Tines when starting the Engine or while the DR ROTOHOG Mini Tiller’s Engine is running.
• Keep children, other bystanders, and pets away from your work area at all times. Stop the Engine when another person or
pet approaches.
• Before and while pulling the machine backwards, look behind and down for small children and for secure footing.
• We recommend the use of ear protectors or earplugs rated for at least 20 dba to protect your hearing.
CONTACT US AT www.DRpower.com
3
Operating the Tiller Safely
•
•
•
•
•
•
•
•
•
•
Clear the work area of objects that might jam or wrap around the Tines such as glass, large sticks, stones, metal objects,
wire, rope, and string-like materials. Use on these objects could damage the DR ROTO-HOG Mini Tiller and/or cause
injury.
Do not touch the muffler and Engine when the machine is in use as they become very hot and can cause severe burns.
The Engine should always be off before adjusting the Wheel Height or Drag Stake.
Never, under any conditions, remove, bend, cut, fit, weld, or otherwise alter standard parts on the DR ROTO-HOG Mini
Tiller. This includes all shields and guards. Modifications to your machine could cause personal injuries and property
damage and will void your warranty.
Do not operate the machine when under the influence of alcohol, drugs, or medication.
Use the DR ROTO-HOG Mini Tiller only in daylight.
Do not hurry or take things for granted when using the DR ROTO-HOG Mini Tiller. When in doubt about the machine or
your surroundings, stop the machine and take time to look things over.
Do not use this machine around large roots and surface rocks that you cannot remove.
Do not use this machine around underground pipes and wiring.
When removing material from the Tines by hand, stop the Engine and remove the Spark Plug wire.
Safety with Gasoline-Powered Machines
Gasoline is a highly flammable liquid. Gasoline also gives off flammable vapor that is easy to ignite and cause a fire or
explosion. Never overlook the hazards of gasoline and always follow these precautions:
• Never run the DR ROTO-HOG Mini Tiller Engine in an enclosed area or without proper ventilation as the exhaust from
the Engine contains carbon monoxide, this is an odorless, tasteless, and deadly poisonous gas.
• Store all fuel and oil in containers specifically designed and approved for this purpose and keep away from heat, open
flame, and out of the reach of children.
• Mix the oil and gasoline outdoors and then fill the Fuel Tank outdoors with the Engine off; allowing the Engine to cool
completely. Do not handle gasoline if you or anyone nearby is smoking, or if you are near anything that could cause it to
ignite or explode. Replace the Fuel Tank and Fuel Container Caps securely.
• If you spill gasoline, do not attempt to start the Engine. Move the machine away from the area of the spill and avoid
creating any source of ignition until the gas vapors have dissipated. Wipe up any spilled fuel to prevent a fire hazard and
properly dispose of the waste.
• Allow the DR ROTO-HOG Mini Tiller Engine to cool completely before storing in any enclosure. Never store the machine
with fuel in the tank or with fuel in a container near an open flame or spark such as a water heater.
• Never make adjustments or repairs with the Engine running. Before making an adjustment or repair, shut off the DR
ROTO-HOG Mini Tiller Engine, wait five (5) minutes to cool, then disconnect the spark plug wire and keep the wire away
from the spark plug to prevent accidental starting.
• Never check for an ignition spark with the Spark Plug or Spark Plug wire removed. Always use an approved spark tester.
• To reduce fire hazard and keep the Engine from overheating, keep the Engine and Muffler area free of debris or any other
combustible material.
• Never operate the Engine without the Muffler. Inspect the Muffler periodically and replace if necessary.
• Never operate the Engine with the Air Filter or Cover over the Carburetor air intake removed, except for adjustment.
Removal of such parts could create a fire hazard. Do not use flammable solutions to clean Air Filter.
• Always check Fuel Lines and fittings frequently for cracks or leaks, replace if necessary.
• Replace rubber Fuel Lines and Grommets when worn or damaged, but do not use over five (5) years.
4
DR® ROTO-HOG™ Mini Tiller
Safe operation of the DR ROTO-HOG Mini Tiller is necessary to prevent or minimize the risk of minor or moderate injury.
Unsafe operation can create a number of hazards for you. Always take the following precautions when operating this machine:
• The DR ROTO-HOG Mini Tiller is a powerful tool and not a plaything. When using this machine, exercise extreme
caution at all times. The design of this machine is to till soil. Do not use it for any other purpose.
• The operator or user of the DR ROTO-HOG Mini Tiller is responsible for accidents or hazards occurring to other people,
their property, and themselves.
• In an emergency, to quickly stop the machine, simply release the Throttle Lever and shut off the Engine.
• Do not transport the DR ROTO-HOG Mini Tiller from one place to another with the Engine running.
• If the machine should make an unusual noise or vibration, shut off the DR ROTO-HOG Mini Tiller Engine. Vibration is
generally a warning of trouble. Wait five (5) minutes for the DR ROTO-HOG Mini Tiller Engine to cool, disconnect the
Spark Plug wire and then inspect the machine for clogging, damaged Tines, or loose Engine mounting bolts. Clear any
obstructions and repair and/or replace damaged parts.
• Always keep the machine in good safe operating condition. Always make certain nuts and bolts are tight and always use
the supplied self-locking hardware. Do not use substitute hardware.
• Always shut off the DR ROTO-HOG Mini Tiller Engine, wait five (5) minutes to cool, and disconnect the spark plug wire
before attempting to clear any obstructions.
• If the DR ROTO-HOG Mini Tiller Engine should stall, raise the Tines out of the soil by pushing down on the Handlebars.
Never squeeze the Throttle Lever when the Tines are already in the ground.
• Never leave the DR ROTO-HOG Mini Tiller unattended with the Engine running.
Handling the Battery Safely
ELECTRICAL HAZARD: PREVENT FIRE
•
•
•
•
•
•
•
•
Never modify the DR ROTO-HOG Mini Tiller’s electrical system. Modifications could ruin the electrical system as well as
cause a fire, resulting in serious injury.
Using the wrong type of Battery or Charger could cause a fire or explosion, resulting in serious injury. Use the 12-volt
Charger supplied with your machine.
Use the Charger only in dry locations. Avoid contact with water.
Only adults should handle the Battery. It contains sulfuric acid (an electrolyte).
Never allow children to charge the Battery. The electricity involved in charging the Battery could cause severe injury.
Examine the charger, its connectors, and the Battery for excessive wear or damage each time you charge the Battery. If
you see any excessive wear or damage, do not use the Charger or the Battery, replace them.
Never lift or carry the Battery by its cable. This can damage the Battery and possibly start a fire, resulting in serious injury.
Lift and carry the Battery only by its case.
Do not short circuit the Battery, this may cause a fire or explosion.
No list of Warnings and Cautions can be all-inclusive. If situations occur not covered by this manual, the operator must apply
common sense and operate the DR ROTO-HOG Mini Tiller in a safe manner. Visit our website at www.DRpower.com or call
1-800-DR-OWNER (376-9637) for assistance.
A Note to All Users
Under California law, and the laws of some other states, you are not permitted to operate an internal combustion Engine using
hydrocarbon fuels without an Engine Spark Arrester. This also applies to operation on US Forest Lands. We provide all DR
ROTO-HOG Mini Tillers shipped to California and Washington State with Spark Arresters. Failure of the owner/operator to
maintain this equipment in compliance with state regulations is a misdemeanor under California law and may be in violation of
other state and/or Federal regulations. Contact your local Fire Marshal, Forest Service, State Park Association, or the
appropriate State organization for specific information in your area.
CONTACT US AT www.DRpower.com
5
Chapter 2: Setting up your DR ROTO-HOG Mini Tiller
This chapter outlines a few simple steps you will need to follow to set up your new machine before you use it. It may be
helpful to familiarize yourself with the controls and features on your new machine by reviewing Figure 1 on the following page
before beginning the steps outlined in this chapter. For technical assistance, please visit our website at www.DRpower.com
and one of our Technical Support Representatives will be happy to help you.
DR ROTO-HOG Mini Tiller Specification Sheet
Engine
Fuel Tank Capacity
Fuel Type
Oil/Gas Ratio
Oil Type
Spark Plug
Spark Plug Gap
Transmission
Gear Ratio
Tilling Width
Tilling Depth
Tine Speed
Wheel Size
Machine Weight
Machine Size
Shipping Size
Shipping Weight
6
DR® ROTO-HOG™ Mini Tiller
Viper 2-Cycle, 43cc, Electric Start
36 ounces
Unleaded regular gas
50:1 (2.6 ounces per gallon)
2-Cycle Engine Oil
NGK BM6A or Champion CJ8
.028"
Centrifugal Clutch and Gear Drive
32:1
6" minimum to 10" maximum
4" maximum
250 RPM
1.375 x 7.0" diameter
42 lbs.
23"L x 20"W x 20"H
16"H x 17"W x 12"D
45 lbs.
DR ROTO-HOG Mini Tiller Controls and Features
NOTE: The model shown in Figure 1 may look slightly different from your machine.
Throttle Lever
Manual Recoil
Start Handle
Choke Lever (rear of Air Filter)
VIPER 43cc 2-Cycle Engine
Manual Venting Gas Cap
Air Filter
Electric-Starter Key Switch
Connector for Battery Charger
Primer Bulb
Fuel Tank
Battery Connection
Hood
Tines
Figure 1
CONTACT US AT www.DRpower.com
7
Unpacking and Assembling the Machine
Your DR ROTO-HOG Mini Tiller shipped in one carton, completely assembled except for the Handlebars and Battery
connection.
Parts Supplied in Shipping Carton:
•
•
•
•
•
•
•
Upper Left Handlebar
DR ROTO-HOG Mini Tiller
Upper Right Handlebar
Upper Left Handlebar
Upper Right Handlebar
Middle Handlebar
Battery Charger
Safety & Operating Instructions Manual
Hardware Bag:
- (4) T-Handle Nut
- (4) Curved Washer
- (4) Handle Clamp Bolt
- (2) Ignition Key
Curved Washer
(4 places)
T-Handle Nut
(4 places)
Middle Handlebar
Handle Clamp Bolt
(4 places)
Throttle Cable
Lower Handlebar
Figure 2
Stabilize the shipping carton on a flat ground surface before attempting to unpack and assemble the machine. Do not
place the machine on a bench or table where it can fall and cause personal injury or damage the machine.
1.
Carefully lift the DR ROTO-HOG Mini Tiller out of the carton and set the machine upright with the Tines and Wheels on a
level surface.
2.
Remove the Hardware Bag from the Shipping Carton.
3.
Remove any packing material from the machine and cut the Ties holding the Handlebar pieces to the Tiller assembly.
NOTE: Use care with the Upper Right Handlebar so as not to kink the Throttle Cable; it is pre-attached to the Engine.
4.
Using two (2) T-Handle Nuts, two (2) Handle Clamp Bolts and two (2) Curved Washers, assemble the Middle Handlebar
to the Lower Handlebar already attached to the machine (Figure 2).
NOTE: You can install the Middle Handlebar in either of two (2) positions, one high, and one low. DO NOT over tighten the THandle Nuts.
8
DR® ROTO-HOG™ Mini Tiller
5.
Attach the Upper Right and Left Handlebars to the Middle Handlebar using the remaining two (2) T-Handle Nuts, two (2)
Handle Clamp Bolts, and two (2) Curved Washers (Figure 2 on page 8). DO NOT over tighten the T-Handle Nuts.
6.
The Drag Stake shipped with its pointed end facing upwards. Remove the Detent Pin, turn the Drag Stake around and
direct the point in the downward position facing towards the Tines, and then reinsert the Detent Pin (Figure 3).
7.
Plug the white plastic connector from the Battery into the mating plastic receptacle under the Battery Box (Figure 4).
NOTE: Make sure to remove the Ignition Key from the Ignition Switch before connecting the wiring in the Battery Box.
9.
Do not discard your packaging material until you are fully satisfied with your new DR ROTO-HOG Mini Tiller.
Battery
Charger
Mating
Connector
Drag Stake Tip
pointed forward.
Detent Pin
Figure 3
Connector from
Battery plugged in.
Figure 4
Charging the Battery
1.
Make sure the white plastic connector on the Battery Box is securely connected.
2.
Plug the three-prong connector from the Charger into its mating connector on the side of the Battery Box (Figure 4).
3.
Plug the other connector from the Charger into a standard 110-120V-outlet receptacle.
•
Typically, the Battery takes between 6 and 8 hours to fully charge. The Battery is fully charged when the LED light on
the Charger turns GREEN. The Battery does not have a “memory”; so don’t worry about overcharging the Battery or
charging it too often.
•
Once the Battery is charged, pull the plug from the wall outlet and then unplug the Charger from the Battery Box.
•
Store the Charger in its plastic shipping bag in a dry location.
•
The Battery will maintain a charge in the DR ROTO-HOG Mini Tiller when the Engine is running.
• Do not try to start the Engine while the Battery is charging, this could damage the Engine Starter and the Battery.
• Do not spray water on or near the Battery Box as this may damage the components.
CONTACT US AT www.DRpower.com
9
Adding the Gasoline/Oil Mixture
•
To operate the Engine you must use 2-cycle Engine oil with unleaded regular gasoline mixed with a 50:1 ratio. Never use
straight gasoline; Engine damage will result.
•
Never mix the gasoline and oil directly in the Engine Fuel Tank. Always use only nonmetal, portable fuel containers
approved by UL or ASTM.
Fuel Mixture
GAS
OIL
RATIO
1 Gallon
2.6 Ounces
50:1
2 Gallons
5.1 Ounces
50:1
5 Gallons
13 Ounces
50:1
1.
Fill the fuel container 1/4 full with unleaded regular gasoline outside in a well ventilated area.
2.
Add the recommended amount of 2-cycle oil for the fuel you are mixing.
3.
Screw the container cap on tight and shake the container to mix the fuel and oil.
4.
Unscrew the container cap slowly to vent and add the remainder of the fuel you are mixing.
5.
Wipe up any spilled fuel or oil.
Filling the Engine Fuel Tank
Always fill the Fuel Tank outdoors or in a well-ventilated area, away from sparks, open flames, pilot lights, heat, and other
ignition sources.
1.
Clean any debris from the area around the Fuel Tank Cap and loosen it slowly, placing it on a clean dry surface.
2.
Carefully fill the Fuel Tank to avoid spilling, to approximately 1" to 1-1/2" below the bottom of the Fill Neck to allow for fuel
expansion. Be careful not to overfill and reinstall the Fuel Tank Cap.
3.
Wipe off any spilled fuel before attempting to start the Engine.
NOTE: To refill the Fuel Tank, turn the Engine OFF, and let the Engine cool at least two (2) minutes before removing the Fuel
Tank Cap.
10
DR® ROTO-HOG™ Mini Tiller
Chapter 3: Operating Your DR ROTO-HOG Mini Tiller
This chapter covers the procedures for starting and stopping your new DR ROTO-HOG Mini Tiller and discusses basic
operation features.
Before Starting the Engine
•
•
Remove all long vegetation from the site. Long vegetation will wrap around the Tines and cause poor performance.
Remove any built up debris from the Tines.
Remove any debris from the Air Cleaner Holes and around the Fuel Tank Cap for proper airflow.
Manual Starting
NOTE: You may use this starting method even though the DR ROTO-HOG Mini Tiller is equipped with Electric Starting; however,
make sure the Key is in the ON position.
Cold Engine Start:
1.
The DR ROTO-HOG Mini Tiller is equipped with a manual venting Fuel Cap. Before starting the Engine, make sure that
Fuel Tank Cap is on tight and then turn the screw in the top of the Fuel Tank Cap (Figure 1 on page 7) 2 to 3 turns
counterclockwise to its venting position. DO NOT turn the screw to the point that it stops (4 to 5 turns).
2.
When starting a cold Engine, push the Choke Lever to the RUN position (Figure 1 on page 7).
3.
Push the Primer Bulb in (Figure 1 on page 7) and then release until it returns to its original position. Repeat this process
until the Primer Hose is full of fuel.
4.
Move the Choke Lever all the way to the CHOKE position and make sure the Key Switch is in the ON position.
•
•
Make sure the machine is in a stable position before pulling the starter rope.
The starter rope can cause an unanticipated jerk towards the Engine. Please follow these instructions to avoid injury.
5.
Standing between the Handlebars, squeeze the Throttle Lever with your right hand and push down on the Handlebar lifting
the Tines off the ground (Figure 5). Grasp the Recoil Starter Handle (Figure 5) with your left hand and slowly pull until you
feel resistance, then pull the cord with a smooth accelerating motion to start the Engine. Do not let the Starter Handle snap
back against the Engine. One or two pulls usually starts the DR ROTO-HOG Mini Tiller.
NOTE: If the Engine fails to start after 5-6 pulls, push the Primer
Bulb 1 more time and pull the Starter Rope again.
6.
After the Engine starts, release the Throttle Lever and
move your left hand to the Handlebar position for
stability. Slowly push the Choke Lever to the half choke
position with your right hand until the Engine starts to
run smoother and then all the way to the RUN position.
7.
Squeeze the Throttle to the desired speed. For the best
Engine performance, you should operate the Engine at
full Throttle and avoid letting the Engine idle for an
extended time.
Warm Engine Start:
1.
Make sure the Key Switch is in the ON position.
2.
Continue with step 5 & 7 for a Cold Engine Start.
Figure 5
CONTACT US AT www.DRpower.com
11
Electric Starting
1.
Refer to the Manual Starting section for CHOKE settings and Priming depending on Engine temperature.
2.
Standing between the Handlebars, squeeze the Throttle Lever with your right hand and push down on the Handlebar
lifting the Tines off the ground (Figure 5 on page 11).
3.
Turn the Ignition Key (Figure 1 on page 7) with your left hand all the way clockwise until the Engine starts, then release.
The Key will snap back to the ON position and the Engine will continue to run.
4.
After the Engine starts, release the Throttle Lever and move your left hand to the Handlebar position for stability.
Slowly adjust the Choke Lever as required with your right hand until the Engine starts to run smoother and then all the
way to the ON position. For the best Engine performance, you should operate the Engine at full Throttle and avoid
letting the Engine idle for an extended time.
Stopping the Engine
Turn the Ignition Key to the OFF position.
NOTE: After using the Tiller and before transporting or storage, firmly tighten the Fuel Tank Cap Vent clockwise.
Never stop the Engine by moving the Choke Lever to the CHOKE position. This could cause an Engine backfire resulting in
Engine damage.
Operating Procedures
•
The Tines Drive Clutch will transfer maximum power after about two (2) hours of normal operation. During this break-in
period, Clutch slippage may occur and is normal.
•
The Tines should not rotate when the Engine is idling; if they do, contact us at www.DRpower.com for instructions.
•
Use the DR ROTO-HOG Mini Tiller without placing excessive body weight on the machine. The unit operates most
efficiently with the weight of the machine itself.
•
Use common sense when using the machine. Learn to recognize the change in sounds when it is overloaded. Turn off the
Engine immediately if the machine becomes jammed to prevent damage to the drive system.
Handling and Transporting
•
Never lift the machine while the Engine is running.
•
If fuel is present in the Tank, tighten the Fuel Tank Cap Venting Screw and transport in an open vehicle in an upright
position.
•
If you must use an enclosed vehicle for transportation, remove the fuel into an approved container; do not siphon
fuel by mouth.
•
Run the Engine to use up any fuel remaining in the Engine and tighten the Fuel Tank Cap Venting Screw.
12
DR® ROTO-HOG™ Mini Tiller
Adjusting the Wheels and Drag Stake
Vertical Guide
Adjusting the Wheels
You can adjust the Wheels on the DR ROTO-HOG Mini Tiller
to one (1) of three (3) positions (Figure 6). Use the lowest
Wheel position for transporting the machine across a smooth
level surface while the Engine is not running. Use the two (2)
higher positions for tilling in soil and to help stabilize the unit
when tilling at different depths.
Highest
1.
Pull the Locking Sleeve (Figure 6) toward the Wheel against
the Spring until it releases from one of the three (3) holes Middle
in the Vertical Guide (Figure 6).
2.
Slide the Wheel Set up or down to the desired position,
and then release the Locking Sleeve until it locks into one
(1) of the three (3) Holes in the Vertical Guide (Figure 6).
Lowest
Spring
Locking Sleeve
Figure 6
Adjusting the Drag Stake
The Drag Stake (Figure 7) is used to help regulate tilling depth
and control the machine from lurching forward during
operation. Set the Drag Stake in its lowest position of three (3)
to provide the greatest resistance to forward motion allowing
for deeper tilling.
1.
Pull the Detent Pin out of the Drag Stake Mounting Hole
(Figure 7).
2.
Position the Drag Stake to the desired depth and reinsert
the Detent Pin.
Drag Stake
Detent Pin
Figure 7
CONTACT US AT www.DRpower.com
13
Chapter 4: Maintaining the DR ROTO-HOG Mini Tiller
This chapter covers regular maintenance procedures that will ensure the best performance and long life of your DR ROTOHOG Mini Tiller.
When performing any maintenance, you must first shut off the Engine; wait five (5) minutes to allow parts to cool and
disconnect the Spark Plug wire, keeping it away from the Spark Plug.
Regular Maintenance Checklist
NOTE: Consider that the service intervals shown are the maximum under normal operating conditions. Increase frequencies under
extremely dirty or dusty conditions.
Procedure
Before Each
Use
Check the Engine Fuel Level
▲
Clean the Tines and Hood*
After each use
Check the general condition of the machine, e.g.
nuts, bolts, welds, etc.
Clean Engine Exterior & Cooling Fins
Every 8-20
Hours
▲
▲
Check Battery Voltage
▲
Clean Air Filter
▲
Check Tines for Wear
Replace Air Filter
Replace Spark Plug
Every 35
Hours
▲
▲
▲
* Cover the Engine Muffler, Carburetor, Air Filter, and Battery Box before using a hose to clean the Tines and Hood.
Lubrication
The Tines Drive Transmission Case has grease installed at the factory. We recommend that once a year to have the
Transmission opened by a qualified service professional and the grease level checked. Add a molylithium type grease
only if the level of the grease is below the top of the gears. DO NOT OVERFILL.
14
DR® ROTO-HOG™ Mini Tiller
Cleaning the Air Filter
Never twist the air filter element when cleaning, always press.
Tool & Supplies Recommended:
• Flat Head Screw Driver
• Liquid Detergent and Warm Water
• Clean Cloth
• Lightweight motor oil
1.
Before removing the Air Filter Cover, move the Choke Lever to the CHOKE position (Figure 8).
2.
To remove the Air Filter Cover, squeeze the Latch Tabs on both sides of the Cover (Figure 9).
3.
Once you release the Latch Tabs, remove the Air Filter Cover by rotating the Cover away from the Engine (Figure 10).
4.
Remove the foam Air Filter Element (Figure 11) and replace with a new oiled Element, or clean the original foam Element
by washing it in liquid detergent and warm water to remove dirt and debris. Press the Filter Element when washing; DO
NOT TWIST.
5.
Rinse the Filter Element in warm water to remove the soap and dirt.
6.
Dry the Filter Element by wrapping it in a clean cloth and pressing the Element until dry.
7.
Apply lightweight motor oil or a thin base machine oil to the entire Element and remove the excess oil.
8.
Wipe out any dirt from inside the Air Filter Housing and reinstall the foam Element, pressing it evenly in place to fully seat
it in its sealed position (Figure 12).
9.
Replace the Air Filter Cover so that it fully snaps into place and secured by the Latch Tabs. Check that the Cover is
securely attached by pulling slightly on the Cover. Reattach the Spark Plug wire.
Figure 8
Figure 9
Figure 11
Figure 12
Figure 10
CONTACT US AT www.DRpower.com
15
Tine Remove and Replace
NOTE: For ease of disassembly and assembly, block up the machine so that the Tines are off the ground.
Tine Removal:
1.
Remove the Hitch Clip Pin from each end of Tine Shaft (Figure 13).
2.
Slide the four (4) Tines off the Shaft.
Tine Installation:
1.
2.
Locate the inside Tines, they are stamped with a B and a C
(Figure 13). Slide the inside B Tine onto the Left Tine Shaft
(as viewed from Handlebars) and then slide the C Tine
onto the right Tine Shaft.
C
B
A
Front
Locate the outside Tines, they are stamped A and D
(Figure 13). Slide the outside A Tine onto the Left Tine
Shaft and then slide the D Tine onto the right Tine Shaft.
NOTE: You should now have the Tines installed in the order A, B,
C, D from right to left as viewed from the Front of the Tiller
(Figure 13). Make sure that the Hub Collars on both the
right and left pair of Tines face each other to allow for
adequate spacing between the Tine Blades (Figure 13).
3.
D
Hub Collars
Hub Collars
Hitch Clip Pin
Replace the Hitch Clip Pins at each end of the Tine Shaft to
hold the Tines in place.
Hitch Clip Pin
Figure 13
Battery Care
Proper care can extend the life of a Battery. Follow these recommendations for your Battery’s best performance and long life:
• Before charging the Battery, observe its external appearance and keep it clean and dry. Never charge or use a Battery that
shows cracks, changes shape, leaks, or otherwise obviously damaged.
•
Do not allow the Battery to run down completely before charging. Leaving the Battery discharged damages the Battery. If
the machine is not used, charge the Battery every 4 to 6 weeks. Operate the Engine for at least 45 minutes to maintain
proper Battery charge.
•
•
Store an unused Battery in a dry area that does not freeze.
•
•
Do not continue to crank the Engine when the Battery charge is low.
Do not charge an already charged Battery. In theory, you cannot overcharge our Battery with a trickle charger; however,
when a Battery is fully charged and the Charger is still on, it generates heat that could be harmful to the Battery. A fully
charged Battery will read 12V-13.2V with a voltmeter.
If the Battery begins to leak, avoid contact with the leaking acid. Place the damaged Battery in a plastic bag, then dispose
of it properly. See “Recycling a Used Battery” on the next page.
NOTE: Using the recoil starter and then running the Engine will not recharge a dead or significantly discharged Battery.
If Battery acid does contact your skin or eyes, flush with cool water for at least 15 minutes and call a physician. If you ingest
acid, call a physician immediately.
When the Battery gets old and no longer accepts a charge, remove it from your DR ROTO-HOG Mini Tiller. Never leave
a dead Battery in your machine.
16
DR® ROTO-HOG™ Mini Tiller
Recycling a Used Battery
Never attempt to dispose of your Battery in a fire; the cells may explode.
Please dispose of used Batteries responsibly, according to your local hazardous materials regulations. Never throw
away used Batteries in your household trash.
Please dispose of your used Batteries responsibly by recycling them. We have partnered with East Penn Manufacturing, one of
the leading producers of lead-acid batteries in the U.S., to recycle your Battery when it reaches the end of its life. East Penn
has nearly 100 distribution centers throughout the U.S. and Canada that will accept your Battery for recycling. East Penn will
separate and reuse everything in your old Battery: the plastic cover, the lead, and even the Battery acid using a patented
process. To find the location of the East Penn distribution center nearest you, visit http://www.dekabatteries.com.
You can also visit the Web site of Earth 911 for more information [www.earth911.org]. Once there, click the Municipal HHW
link under Hazardous Household Waste, and enter your zip code. The site lists recycling centers located near you.
For a fee, you can recycle your Batteries with the International Metals Reclamation Company. Visit them at www.inmetco.com
and click Services; or contact them at: INMETCO, PO Box 720, 245 Portersville Road, Ellwood City, PA 16117. Phone: (724)
758-2825; Fax: (724) 758-2845. To learn more about hazardous waste recycling, visit the Web site for Battery Council
International [www.batterycouncil.org] or for the Environmental Protection Agency [www.epa.gov].
End of Season and Storage
When performing any maintenance, you must first shut off the Engine; wait five (5) minutes to allow parts to cool and
disconnect the Spark Plug wire, keeping it away from the Spark Plug.
•
•
•
•
•
•
•
•
•
•
•
If your DR ROTO-HOG Mini Tiller will be idle for more than 30 days, we recommend using a fuel stabilizer. This
will prevent sediment from gumming up the carburetor. If there is dirt or moisture in the fuel or tank, remove it by
draining the tank. Completely fill the tank with a fresh fuel mixture and add the appropriate amount of stabilizer or
fuel additive. Run the Engine for a short time to allow the additive to circulate.
Remove the Spark Plug and pour about 1 ounce of motor oil into the cylinder hole. Replace the Plug and pull the
Recoil Starter Rope until you feel strong resistance. This will coat the Piston and seat the Valves to prevent
moisture buildup.
Clean or replace the Engine Air Filter Element. See page 15.
Clean dirt and debris from the Engine Cylinder Head Cooling Fins, Debris Screen, and Muffler.
Clean out residual debris from the under the Tines Hood and Tine Assemblies.
Touchup all rusted or chipped paint surfaces. Sand them lightly before painting.
Be sure all Nuts, Bolts, and Screws are securely fastened.
Inspect moving parts for damage and wear; replace if necessary.
Store the Battery in a dry area that will not freeze. If you will not use the machine over a long period, charge the
Battery every four to six weeks. See page 9.
If possible, store your DR ROTO-HOG Mini Tiller inside, but not near an open flame or spark such as found in a
water heater.
After the DR ROTO-HOG Mini Tiller has cooled, cover the machine with a suitable protective cover that does not
retain moisture. Do not use plastic as this material cannot breathe; it also allows condensation to form, which will
cause your machine to rust.
CONTACT US AT www.DRpower.com
17
Chapter 5: Troubleshooting
Most problems are easy to fix. Consult the Troubleshooting Table for common problems and their solutions. If you
continue to experience problems, visit our website at www.DRpower.com or call: 1-800-DR-OWNER (376-9637) for
support.
Troubleshooting Table
When performing any maintenance, you must first shut off the Engine; wait five (5) minutes to allow parts to cool and
disconnect the Spark Plug wire, keeping it away from the Spark Plug.
SYMPTOM
Recoil will not pull out
or is difficult to pull.
POSSIBLE CAUSE
⇒ There may be a fuel compression lock in the cylinder. Take out the Spark Plug; hold a rag
over the Spark Plug hole and pull the Recoil Cord several times to blow out any oil in the
Cylinder. Wipe off the Spark Plug and reinstall it.
⇒ The Recoil may be broken or jammed. Visit our website at www.DRpower.com for
assistance.
The Engine will not
start manually.
⇒ Check that the Spark Plug Wire is attached.
⇒ Check the fuel level. See page 10.
⇒ The fuel line hose is not positioned in the bottom of the Fuel Tank. Push the fuel line
down into the fuel in the Fuel Tank.
⇒ The fuel may be old; change it if necessary. Use a fuel stabilizer if you keep fuel longer
than one month.
⇒ Check the Throttle and Choke settings. See page 11.
⇒ The Spark Plug may be dirty or cracked; change it if necessary. If it’s wet, leave it out, hold
a rag over the Plug Hole and pull the Recoil Cord several times to blow out any fuel in the
Cylinder, then wipe off the Plug and reinsert it.
⇒ The Air Filter may be dirty; clean it following the procedure on page 15.
⇒ If your Engine still won’t start, visit our website at www.DRpower.com for assistance.
The Engine will not
start using ElectricStart.
⇒ Check all the items under the section called Electric-Starting on page 12.
⇒ Check the previous section on Manual Starting for possible causes.
⇒ Check the wire connections, especially the ground connection. This is the large black wire
leading from the Battery, and connected to the Engine.
⇒ Check the wire connections to the Solenoid. To avoid sparks, first disconnect the black
Battery ground wire. Check to be sure that all of the connections are clean and tight.
Reconnect the Battery ground wire.
⇒ Check the ground connection on the Solenoid where it bolts to the Frame. Using a
Wrench or Socket, tighten the Bolts to ensure a good connection to the Frame.
⇒ The Battery may not be charged. Check the voltage yourself or at a service station. If it is
low, charge it with the Charger provided with the Tiller. If you do not use your machine for
at least 45 minutes at a time, the Battery may need to be periodically charged. See the
Charging the Battery on page 9.
⇒ If the Battery is charged and your DR ROTO-HOG Mini Tiller still will not start, visit our
website at www.DRpower.com for assistance.
18
DR® ROTO-HOG™ Mini Tiller
When performing any maintenance, you must first shut off the Engine; wait five (5) minutes to allow parts to cool and
disconnect the Spark Plug wire, keeping it away from the Spark Plug.
SYMPTOM
The Engine lacks
power or is not
running smoothly.
POSSIBLE CAUSE
⇒ Make sure that you run the Engine at full Throttle.
⇒ Make sure that you turned the Fuel Tank Cap Vent Screw to the vent position and not too
far.
⇒ The Air Filter may be dirty; clean it following the procedure on page 15.
⇒ The Spark Plug may be dirty or cracked; change it if necessary. If it’s wet, leave it out, hold
a rag over the Plug Hole and pull the Recoil Cord several times to blow out any fuel in the
Cylinder, then wipe off the Plug and reinsert it.
⇒ The fuel may be old; change it if necessary. Use a fuel stabilizer if you keep fuel longer
than one month.
⇒ The Choke may be partially in the CHOKE position, place in the RUN position.
⇒ The Fuel Filter in the Fuel Tank may be clogged; clean or replace the filter.
⇒ If your Engine still lacks power, visit our website at www.DRpower.com for assistance.
Engine smokes.
⇒ You may have the wrong gas/oil mixture. See page 10.
⇒ The Air Filter may be dirty; clean it following the procedure on page 15.
⇒ Clean the Engine cooling fins and the carburetor housing if they are dirty.
⇒ If the Engine still smokes, visit our website at www.DRpower.com for assistance.
The Engine runs well
but the Tines won’t
move.
⇒ The Tine Drive Clutch may be faulty, visit our website at www.DRpower.com for
The Tines turn when
the Engine is idling.
⇒ Engine idle speed is too high, visit our website at www.DRpower.com for assistance.
The Engine runs well
but labors when
tilling.
⇒ Operator is being too aggressive; raise the Tines by pushing down on the Handlebars.
Excessive bounce and
difficult handling.
⇒ The area you are tilling may be too dry and hard. Moisten the ground or wait for
conditions that are more favorable.
assistance.
⇒ Broken Tine Drive Clutch Spring, replace the Spring.
⇒ Be sure to run the Engine at full Throttle.
⇒ Be sure to run the Engine at full Throttle.
⇒ If your DR ROTO-HOG Mini Tiller still bounces, visit our website at www.DRpower.com
for assistance.
The tilled soil balls up
or clumps.
⇒ The ground that you are trying to till is too moist.
CONTACT US AT www.DRpower.com
19
Chapter 6: Parts Lists, Schematic Diagrams, and Warranty
Parts List - Handlebar Assembly
NOTE: Part numbers listed are available through DR Power Equipment.
Ref#
01
02
03
04
05
06
07
08
09
10
11
12
13
14
15
16
17
18
19
20
21
22
23
24
25
26
27
Part#
26139
26140
26141
26142
26143
26144
26145
26146
26147
26148
26149
26150
26151
26152
26153
26154
26155
25196
26156
26157
26158
26159
26160
26161
26162
26163
26164
Description
Bolt, M5 x 12mm
Wire, Ground
Key (only)
Switch, Key
Bolt, Hex Head, M8 x 1.25 x 160mm
Grip, Handlebar
Nut, T-Handle
Washer
Bolt, Handle Clamp
Nut, Hex Head, M8 x 1.25
Battery Box
Cover, Battery Box
Voltage Rectifier
Solenoid
Charger Pigtail
Nut, Charger Pigtail
Cap, Charger Pigtail
Cable, Throttle
Bolt, Pan Head, M6 x 1mm x 12mm
Handlebar, Upper Right
Handlebar, Upper Left
Handlebar, Middle
Handlebar, Lower
Bolt, Phillips Truss, 10-24 x 1-1/4", HD, ZN
Trigger Assembly, Long Throw w/o Cable
Nut, Lock, Bi-Way, 1/4"-20
Bolt, 1/4"-20 x 1-1/2", PTH ZN
Not Illustrated:
26165
Battery, 12 Volt, 7 Amp
26166
Fuse Holder
26167
Fuse 10 Amp
26168
Battery Connector Set, White
25770
Battery Charger
20
DR® ROTO-HOG™ Mini Tiller
Schematic Diagram - Handlebar Assembly
081108
CONTACT US AT www.DRpower.com
21
Parts List - Transmission Assembly
NOTE: Part numbers listed are available through DR Power Equipment.
Ref# Part#
Description
01
25737
Drum, Clutch
04
26182
Shim, Tine Shaft
05
26183
Worm Spud
06
26184
Casting, Transmission, Right
07
26185
Casting, Transmission, Left
08
26186
Shaft, Drive
09
26119
Transmission Assembly
10
26096
Bushing, Drive Shaft
11
26097
Thrust Bearing Assembly
12
26098
Spacer, Bushing
13
26099
Reducer, Thrust Bearing
14
26100
Washer, Thrust
15
26101
Washer, Thrust Bearing Cage
16
26102
Nut, Jam, M8
17
26103
Bearing, Ball, 9mm
18
26104
Arm, Wheel/Drag Stake Mount
19
26105
Bushing, Tine Shaft
20
26106
Seal, Tine Shaft
21
26107
Bolt, Flange, Hex Head, M6 x 1.0 x 18mm
22
26108
Bolt, Flange, Hex Head, M6 x 1.0 x 22mm
23
26109
Bolt, Flange, Hex Head, M6 x 1.0 x 24mm
24
26110
Nut, Flanged, Hex Head, M6
25
26111
Tine Gear & Shaft Assembly
22
DR® ROTO-HOG™ Mini Tiller
Schematic Diagram - Transmission Assembly
081109
CONTACT US AT www.DRpower.com
23
Parts List - Engine Assembly
NOTE: Part numbers listed are available through DR Power Equipment.
Ref# Part#
01
02
03
04 26169
05
06
07
08
09
10
11
12
13 26170
14 25916
15 26171
16
17
18 26172
19 26173
20 13036
21
22
23
24
25 26175
26
27 26176
28-31
29
30
31
32
33
34
35
36
24
Description
Flywheel, Magneto
Nut, Flange M8
Washer, Rotor
Clutch Rotor Assembly
Spring, Clutch
Washer, Spring
Bolt, Shoulder
Pin, Locating
Mount Ring & Shroud
Recoil, Clutch
Plate, Recoil
Handle, Standard Recoil
Recoil Assembly w/Standard Handle
Ignition Coil
Shroud, Engine
Bolt, Stud, M6 x 62mm
Gasket, Muffler
Muffler
Cover, Muffler
Spark Plug
Cover, Engine Shroud
Gasket, Intake
Windpipe, Intake
Gasket, Carburetor
Carburetor
O-Ring, Carburetor
Primer Bulb
Intake Base Assembly
Choke Lever, Long
Cover, Choke
Screw, Throttle Lever
Plate, Intake Cover Adapter
Cover, Air Filter
Air Filter
Cover, Intake
Bracket, Fuel Tank
DR® ROTO-HOG™ Mini Tiller
Ref#
37
38
39
40
41
42
43
44
45
46
47
48
49
50
51
52
53
54
55
56
57
Part#
26050
26049
Description
Fuel Tank
Fuel Cap, Manual Venting
Shroud, Fuel Tank
26177 Switch, Rocker
Grommet, 2-Hole, Fuel Tank
Hose, Primer Line
Hose, Fuel Line
Bolt w/Washer, Phillips, HH
Nut, Flange, M6
26139 Bolt w/Washer, M5 x 12mm
Bolt w/Washer, Pan Head, M5 x 18mm
Bolt, M5 x 18mm, HH
Bolt w/Washer, M5 X 25mm
Bolt M5 x 50mm
Guard
Key, Flywheel
26178 Filter, Fuel
Bolt, Stud, M6 x 41mm
23651 Key, Electric Starter
Wire, Starter
Starter Motor Kit (includes Starter, Stud
Bolt, Clutch Drum & Ground Wire)
58
Washer, M5
59
Bolt, w/Washer, M5 x 25mm
60
Bolt, w/Washer, Pan Head, M5 x 18mm
61
Cover, Air Filter
62 26179 Base, Air Filter (includes items 65-69)
63 26180 Air Filter, Foam
64
Plate, Reinforcement
65
Bolt, Choke Lever
66
Washer, Choke Lever
67
Nut, Lock, Nylon, Choke Lever
68
Lever, Choke
69
Paddle, Choke
Not Illustrated:
26181 Fuel Line Hose & Filter Assembly
(includes Items 43 & 53)
Schematic Diagram - Engine Assembly
081109
CONTACT US AT www.DRpower.com
25
Parts List and Schematic Diagram - Tines and Hood Assembly
NOTE: Part numbers listed are available through DR Power Equipment.
Ref#
01
02
03
04
05
06
07
08
09
Part#
26112
26113
26114
26115
26116
26117
26118
26119
26120
10
11
12
13
26121
26122
26123
26124
14
26125
15
26126
Description
Washer, Narrow Flat, 10mm
Drag Bar
Tine “A”, Right Outside
Tine “C”, Left Inside
Tine “B”, Right Inside
Tine “D”, Left Outside
Washer, Fiber
Transmission Assembly
Bolt, Flanged Hex Head,
M6 x 1.0 x 15mm
Cap, Dust
Pin, Detent, 5/16" x 1-1/2"
Hood, Tines
Bolt, Flanged Hex Head,
M6 x 1.0 x 42mm
Nut, Center Lock Hex Head,
M10 x 1.5
Wheel
081108
26
DR® ROTO-HOG™ Mini Tiller
Ref#
16
17
18
19
20
21
22
23
24
Part#
26127
26128
26129
26130
26131
26132
26133
26134
26135
25
30
26136
26137
Description
Nut, Flanged Hex Head, M6 x 1.0
Pin, Hitch Clip, 5/8"-3/4"
Holder, Wheel
Tube, Wheel
Guide, Tube, Wheel
Tube, Wheel Lock
Spring, Wheel Lock
Bolt, Hex Head, M10 x 1.5 x 225mm
Bolt, Phillips Pan Head,
M4 x 0.7 x 10mm
Washer, Flat, M4
Nut, Flanged Hex Head, M4 x 0.7
Not Illustrated:
26138
Catalytic Converter, 43cc Engine
DR® ROTO-HOG™ Mini Tiller
2-Year Limited Warranty
Terms and Conditions
The DR® ROTO-HOG Mini Tiller is warranted for two (2) years against defects in materials or workmanship when put to ordinary
and normal consumer use; ninety (90) days for any other use. The Engine Manufacturer warrants the Engine separately.
For the purposes of all the above warranties, “ordinary and normal consumer use” refers to non-commercial residential use and
does not include misuse, accidents, or damage due to inadequate maintenance.
DR® Power Equipment certifies that the DR® ROTO-HOG Mini Tiller is fit for ordinary purposes for which a product of this type
is used. DR® Power Equipment however, limits the implied warranties of merchantability and fitness in duration to a period of
two (2) years in consumer use, ninety (90) days for any other use.
The 2-Year Limited Warranty on the DR® ROTO-HOG Mini Tiller starts on the date the machine ships from our factory. The 2Year Limited Warranty is applicable only to the original owner.
The warranty holder is responsible for the performance of the required maintenance as defined by the manufacturer's owner manuals.
The warranty holder is responsible for replacement of normally wearing parts such as the, Tines, Air Filter, and Battery.
During the warranty period, the warranty holder is responsible for the machine transportation charges, if required. During the warranty
period, warranty parts will ship by standard method at no charge to the warranty holder. Expedited shipping of warranty parts is the
responsibility of the warranty holder.
SOME STATES DO NOT ALLOW LIMITATIONS ON THE LENGTH OF IMPLIED WARRANTIES, SO THE ABOVE LIMITATIONS MAY
NOT APPLY TO YOU.
DR® Power Equipment shall not be liable under any circumstances for any incidental or consequential damages or expenses of
any kind, including, but not limited to, cost of equipment rentals, loss of profit, or cost of hiring services to perform tasks
normally performed by the DR® ROTO-HOG Mini Tiller.
SOME STATES DO NOT ALLOW THE EXCLUSION OR LIMITATION OF INCIDENTAL OR CONSEQUENTIAL DAMAGES, SO THE
ABOVE LIMITATIONS MAY NOT APPLY TO YOU.
Warranty
THIS WARRANTY GIVES YOU SPECIFIC LEGAL RIGHTS, AND YOU HAVE OTHER RIGHTS, WHICH VARY FROM STATE TO STATE.
COUNTRY HOME PRODUCTS, Inc.
MEIGS ROAD, P.O. BOX 25, VERGENNES, VERMONT 05491
1-800-DR-OWNER (376-9637) • www.dr-owner.com
©2005 CHP, Inc. 186971
Daily Checklist for the DR ROTO-HOG Mini Tiller
To help maintain your DR ROTO-HOG Mini Tiller for optimum performance, we recommend you follow
this checklist each time you use your machine.
When performing any maintenance, you must first shut off the Engine; wait five (5) minutes to allow parts to cool and
disconnect the Spark Plug wire, keeping it away from the Spark Plug.
[ ] FUEL: Fill the Fuel Tank with a fresh unleaded gasoline/2-cycle oil mixture. See page 10.
[ ] ENGINE: It is very important to keep the Engine clean. Remove dirt and other debris from the
Engine Cooling Fins. A dirty Engine retains heat and can cause damage to internal
Engine components.
[ ] HARDWARE: Check all nuts and bolts to be sure that the components are secure.
[ ] FRAME: Check all welds to be sure that the Frame is intact and secure.
[ ] TINES: Make sure that the Tine Assemblies and Hood are free of accumulated debris.
DR Power Equipment
75 MEIGS ROAD, P.O. BOX 25, VERGENNES, VERMONT 05491
www.DRpower.com
©2009 256071