1
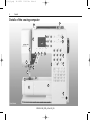
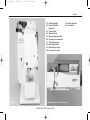
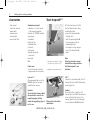
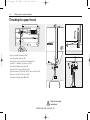
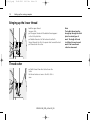
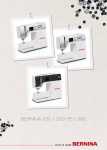
135_145_S_engl 14.3.2003 15:33 Uhr Seite U2 See appendix for differences in the activa 135 S Patchwork Edition 030529.52.04_0303_a135 a145_EN 135_145_S_engl 14.3.2003 15:33 Uhr Seite 1 In choosing BERNINA, you are assured of years of rewarding sewing. For over 100 years my family has concentrated on providing complete satisfaction to our customers. And it is my personal wish to continue this tradition of offering you Swiss precision engineering combined with state of the art ”Welcome to technology and an after sales service second to none. The new BERNINA activa 135 S and 145 S are characterized by a youthful appeal which is combined the BERNINA with a range of added value features to give you, dear Customer, more sewing pleasure than ever before. family” Enjoy modern, creative sewing with BERNINA: our wide range of accessories as well as our sewing publications brimming with imaginative ideas and practical tips all add to the joy of sewing BERNINA style. Any questions you have will be dealt with courteously and efficiently by our highly trained BERNINA dealers, who will also be glad to service your sewing computer for you. H.P. Ueltschi Owner BERNINA Sewing Machine Company Fritz Gegauf Ltd. • BERNINA Sewing Machines • CH-8266 Steckborn/Switzerland 030529.52.04_0303_a135 a145_EN 135_145_S_engl 10.04.2003 9:50 Uhr Seite 2 2 IMPORTANT SAFETY INSTRUCTIONS When using an electrical machine, basic safety precautions should always be followed, including the following. WARNING Read all instructions before using this sewing computer. To reduce the risk of burns, fire, electric shock or injury to persons: When the sewing computer is not in use, it should be disconnected from the electricity supply by removing the plug from the outlet. DANGER 1. Do not allow to be used as a toy. Close attention is necessary when the sewing computer is used by or near children and infirm persons. 2. Use this sewing computer only for its intended use as described in this manual. Use only attachments recommended by the manufacturer as contained in this manual. To reduce the risk of electric shock: 1. A sewing computer should never be left unattended when plugged in. 2. Always unplug the sewing computer from the electric outlet immediately after using and before cleaning. 3. Always unplug before replacing light bulb. Replace the bulb with the same type rated 12 volts/5 watts. 3. Never operate this sewing computer if • it has a damaged cord or plug • it is not working properly • it has been dropped or damaged • it has fallen into water Return the sewing computer to the nearest authorized BERNINA dealer or service center for examination, repair, electrical or mechanical adjustment. 4. Never operate the computer with any air openings blocked. Keep ventilation openings of the sewing computer and foot control free from accumulation of lint, dust and loose cloth. 5. Keep fingers away from all moving parts. Special care is required around the sewing needle. 030529.52.04_0303_a135 a145_EN 135_145_S_engl 10.04.2003 9:50 Uhr Seite 3 Safety instructions 6. Always use the BERNINA original needle plate. The wrong plate can cause the needle to break. 16. No responsibility will be taken for any possible damage as the result of misuse of the sewing computer. 7. Do not use bent needles. 17. This sewing computer is provided with double insulation. Use only identical replacement parts. See instructions for Servicing of double-insulated machines. 8. Do not pull or push fabric while stitching. It may deflect the needle causing it to break. 9. Turn power switch to «0» when making any adjustments in the needle area, such as threading or changing the needle, threading the bobbin or changing the presser foot. 10. Always unplug the sewing computer from the electrical outlet when removing covers, lubricating or when making any other user servicing adjustments mentioned in this instruction manual. 11. Never drop or insert any object into any opening. 12. Do not use outdoors. 13. Do not operate where aerosol (spray) products are being used or where oxygen is being administered. SERVICING DOUBLEINSULATED PRODUCTS In a double-insulated product, two systems of insulation are provided instead of grounding. No grounding means is provided on a double-insulated product nor should a means for grounding be added to the product. Servicing a double-insulated product requires extreme care and knowledge of the system and should only be done by qualified service personnel. Replacement parts for a double-insulated product must be identical to those parts in the product. A double insulated product is marked with the words «DOUBLE INSULATION» or «DOUBLE INSULATED». The symbol 14. Before disconnecting, turn all controls to the off («0») position then remove the plug from the outlet. 3 may also be marked on the product. This sewing computer is intended for household use only. 15. Do not unplug by pulling on the cord but grasp the plug. SAVE THESE INSTRUCTIONS! 030529.52.04_0303_a135 a145_EN 135_145_S_engl 4 14.3.2003 15:33 Uhr Seite 4 Details Details of the sewing computer 14 11 15 22 16 23 9 13 27 17 8 19 18 20 21 24 12 7 25 26 6 5 3 2 1 4 28 Front view 030529.52.04_0303_a135 a145_EN 135_145_S_engl 14.3.2003 15:33 Uhr Seite 5 Details 5 11 10 1 2 3 14 4 5 6 34 27 7 8 9 10 11 12 29 30 33 32 Right end 13 14 31 15 16 17 18 19 20 21 22 23 Bobbin cover Stitch plate Attachment base for special accessories Sewing table socket Presser foot Needle clamp with fixation screw Thread guide Thread take up cover Thread path Thread tension adjustment Bobbin pre-tension Reverse button /quick and continuous Screen Bobbin winder with on/off switch and thread cutter Stitch width button Needle position button Stitch length button Needle stop up/down 1/2 speed Pattern end Mirror image mem (memory) button Alphabet buttons 030529.52.04_0303_a135 a145_EN 24 25 26 27 28 29 30 31 32 33 34 Stitch selection buttons #-button clr/del-button Handwheel FHS connection Balance adjustment knob Power switch on/off Power plug socket Drop feed-dog Foot control socket Spool pin (vertical, collapsible) 135_145_S_engl 6 14.3.2003 15:33 Uhr Seite 6 Details 42 43 40 36 45 3 39 2 4 Back view 030529.52.04_0303_a135 a145_EN 37 135_145_S_engl 14.3.2003 15:33 Uhr Seite 7 Details 35 Carrying handle 36 Presser foot lifter (manual) 37 Thread cutter 38 Thread take up 39 Darning ring connection 40 Accessory box connection 41 Thread tension disc 42 Rear thread guide 43 Horizontal spool pin 44 Accessory box catch 35 42 38 45 Needle Threader 46 Lens holder 36 37 46 44 43 41 Left end Sewing computer with Accessory box Accessory box 030529.52.04_0303_a135 a145_EN 7 135_145_S_engl 8 14.3.2003 15:33 Uhr Seite 8 Setting up the sewing computer Start-stop-unit** Accessories • • • • • • foot control instruction manual power cable warranty card Accessory box presser foot lifter Standard accessories*: 4 bobbins (+ 1 in the capsule in the sewing computer) Selection of 130/705H needles Seam ripper Screwdriver Angle key Torx Screwdriver Torx Lint brush Seam guide Compensating plate 3 spool discs Foam pad Oiler B A * can vary from country to country; see presser foot selection p. 33 Fabric cover • protects from dust and dirt • compartment for accessories ** available as a special accessory With the Start-stop-unit (SSU) the start-stop-function can be controlled by hand. • press start-stop-button A = stitching starts • with the speed regulator B the sewing speed can be regulated by hand • to interrupt or stop sewing = press start-stop-button A again Note: If the foot control is connected with the sewing machine, the Start-stop-unit is out functions. Lens Set: ** We recommend the use of the BERNINA Lens Set for more comfort when sewing. CFL ** Contrary to an ordinary bulb, the CFL sewing light has a better illumination and a longer life. Caution! To avoid injury always attach the protective cover of the magnifying glass holder when the magnifying glass is not in use. Caution: Please note that a defective CFL sewing light must ONLY be replaced by an authorized technician. The sewing computer must be brought to an authorized BERNINA dealer! Please refer to the safety instructions! 030529.52.04_0303_a135 a145_EN he CFL nation FL placed he ught ler! 135_145_S_engl 14.3.2003 15:33 Uhr Seite 9 Setting up the sewing computer 9 Accessory box D F A G H E B C Free standing accessory box • pull both feet out until they click into place • stand box in chosen position • • • Storing accessories Standard accessories are supplied in a plastic bag. The box is equipped with one small and one large drawer (B and C) as well as compartments for bobbin holders D and presser feet E. (Additional compartments and drawers are available as optional extras.) • push the bobbins into the compartments provided to remove a bobbin, press the compartment holder F lightly insert the presser feet into the slot E the needle selection box can be stored in compartment G • attach the box to the sewing computer (catch A must engage); inserting the presser foot lifter into the opening H Note: first lower the presser foot lifter! Removing the accessory box • press catch A on the top of the box • remove box to the rear Attaching the accessory box to the sewing computer • close the doors • push feet back into position Available as a special accessory 030529.52.04_0303_a135 a145_EN 135_145_S_engl 10 14.3.2003 15:33 Uhr Seite 10 Setting up the sewing computer Power cable Foot control C A Power switch The power cable • plug A into sewing computer • plug B into wall socket Foot control cable • plug C into sewing computer The foot control regulates the sewing speed Sewing speed is adjusted by applying more or less pressure to the foot control. Important! (USA/Canada only) This sewing computer has a polarized plug (one blade B wider than the other). To reduce the risk of electric shock, this plug is intended to fit in a polarized outlet only one way. If the plug does not fit fully in the outlet, reverse the plug. If it still does not fit, contact a qualified electrican to install the proper outlet. Do not modify the plug in any way. Important! (USA/Canada only) Use only foot controller type SR-1 with sewing computers activa 135 S /145 S. The switch is on the handwheel side of the computer 1 the computer is switched on 0 the computer is switched off The sewing light is switched on and off with the power switch. Refer to the safety instruction! 030529.52.04_0303_a135 a145_EN Self storing cord • wind the cord on the reel • insert the plug into the groove provided When sewing • unwind the cable 135_145_S_engl 14.3.2003 15:33 Uhr Seite 11 Setting up the sewing computer 11 Sewing table Increases the sewing surface. To attach • raise the needle and presser foot • place the table over the free arm and press firmly so that it engages on the fixing cam To remove • raise the needle and presser foot • pull the table out of the fixing cam • pull in horizontal position to the left Scale • «0» corresponds to the centre needle position Seam guide • insert into the groove (underside of table) from the right or left • it can be freely adjusted over the whole width of the table Note: Remove the presser foot when attaching the seam guide! Free-Hand-System (FHS) presser foot lifter* (knee-operated) Attaching the presser foot lifter Insert into the opening in the base plate: you should be able to operate the lifter with your knee in your normal sitting position. The presser foot lifter raises and lowers the presser foot • push to the right • the presser foot is raised • the feed-dog is lowered simultaneously • the feed-dog is raised as soon as the first stitch is sewn Note: Your dealer can adjust it if necessary. 030529.52.04_0303_a135 a145_EN * Special accessory can vary from country to country 135_145_S_engl 12 14.3.2003 15:33 Uhr Seite 12 Setting up the sewing computer Winding the bobbin Winding the bobbin • turn power switch on • place empty bobbin on spindle • • • • • • following the direction of the arrow take thread through the rear guide and round the pre-tension stud wind it several times round the empty bobbin press the engaging lever against the bobbin press the foot control the motor will stop automatically when the bobbin is full remove the bobbin Note: When winding the bobbin on the vertical spool holder (p. 15), it may be necessary to adjust the speed. 030529.52.04_0303_a135 a145_EN Thread cutter • cut the thread on the thread cutter 135_145_S_engl 14.3.2003 15:33 Uhr Seite 13 Setting up the sewing computer Bobbin case A To remove the bobbin case • raise the needle • turn power switch to «0» • open the bobbin cover • grasp the latch of the bobbin case • remove case To insert the bobbin case hold the bobbin case latch • the finger on the case should point upwards • insert so that it clicks into place • Bobbin thread cutter insert the bobbin case • take the thread over cutter A • thread is cut • close the bobbin cover • Note: The bobbin thread does not have to be brought up as the loose end is just the right length to start sewing. 030529.52.04_0303_a135 a145_EN Refer to the safety instruction! 13 135_145_S_engl 14 14.3.2003 15:33 Uhr Seite 14 Setting up the sewing computer Inserting the bobbin Insert the bobbin Insert the bobbin so that the thread runs clockwise. Pull the thread counter clockwise into the slot. Pull the thread to the left under the spring until ... ... it lies in the T-shaped slit at the end of the spring. The bobbin must turn clockwise when thread is pulled. Changing the needle Removing the needle raise the needle • turn power switch to «0» • lower the presser foot • loosen the needle clamp screw • pull the needle down to remove • Inserting the needle • flat side of needle to the back • insert the needle as far as it will go • tighten the needle clamp screw 030529.52.04_0303_a135 a145_EN Refer to the safety instruction! 135_145_S_engl 14.3.2003 15:33 Uhr Seite 15 Setting up the sewing computer 15 Changing the presser foot Presser foot with shank • raise the needle and • presser foot • turn power switch to «0» • • raise the clamping lever remove the presser foot Attaching the presser foot • guide the foot upwards • over the cone • press the clamping lever down Refer to the safety instruction! Supplementary spool pin Collapsible vertical spool pin found on the back of the sewing computer behind the handwheel • essential aid for sewing with more than one thread, i.e. double needle work • raise the pin until it clicks into its vertical position • when using large reels, add the foam pad A for stability • 030529.52.04_0303_a135 a145_EN A 135_145_S_engl 16 14.3.2003 15:33 Uhr Seite 16 Setting up the sewing computer Threading the upper thread C C A C S • • • • • • • • raise the needle and presser foot turn the power switch to «0» place spool on pin and attach the appropriate spool disc – diameter of spool = disc size take thread through rear guide A then into slit of upper thread tension pull thread down to the right of the take-up cover to B then up to the left of the cover to C and down through guides D and E D B E Refer to the safety instruction! 030529.52.04_0303_a135 a145_EN D E 135_145_S_engl 14.3.2003 15:33 Uhr Seite 17 Needle Threader Needle Threader A B Thread in hook · lower the presser foot · lay the thread behind hook B and hold lightly Lever down · press lever A down and simultaneously guide the thread around hook B to the right to the needle Thread in front of needle · put the thread from the front into the guide until it catches in the hook 030529.52.04_0303_a135 a145_EN Release the lever and thread · let go of lever A and thread 17 135_145_S_engl 18 10.04.2003 9:51 Uhr Seite 18 Setting up the sewing computer Bringing up the lower thread • • • • • hold the upper thread sew one stitch pull the upper thread until the bobbin thread appears in the stitch plate hole pull bobbin thread out of the hole and insert both threads through the slit in the presser foot towards the back pull threads over the cutter Thread cutter • • pull both threads from front to back over the cutter the threads release as soon as the first stitch is sewn 030529.52.04_0303_a135 a145_EN Note: The bobbin thread must be brought up through the stitch plate for certain types of work. The length of thread is sufficient for most normal work if the lower thread cutter has been used. 135_145_S_engl 10.04.2003 9:51 Uhr Seite 19 Setting up the sewing computer Stitch plate 5/8 1 20 1/4 10 1/4 5/8 10 1 20 Stitch plate markings • the stitch plate is marked with seam guide lines in mm and inches • the millimetre markings are at the front • the inch markings are at the back • the measurements show the distance (with needle position centre) from needle to line • lines are provided to the right and left of the needle • they are very useful guide lines for precise seaming • the horizontal lines are useful for sewing corners, etc. Feed-dog Button below the handwheel Button flush with housing = sewing position Button depressed = feed-dog is lowered • for free-hand sewing (darning, embroidery, etc.) 030529.52.04_0303_a135 a145_EN 19 135_145_S_engl 20 10.04.2003 9:51 Uhr Seite 20 Setting up the sewing computer Thread tension 3 A 5 The basic setting • is indicated when the red line on the tension adjustment wheel is in line with the marking A • the tension does not need adjusting for normal sewing work • for special sewing work, the tension can be adjusted to suit the fabric The tension is factory set for the best results. Metrosene 100/2 (Arova Mettler, Switzerland) is used to set both the upper and lower thread tension. If other sewing or embroidery threads are used, the tension may need adjusting to suit the fabric and chosen stitch. For example: To reduce the tension turn to between 3 and 1 To increase the tension turn to between 5 and 10 030529.52.04_0303_a135 a145_EN Tension Needle Metallic thread approx. 3 90 Monofilament approx. 2– 4 80 135_145_S_engl 14.3.2003 15:33 Uhr Seite 21 Operating instructions General instructions Main switch to 1 • the sewing sewing computer is ready to sew 0 1 2 3 4 5 5 5.5 1 4 3 3 4 2 1 5 6 0 2 The screen shows 1 stitch width basic setting blinks constantly 2 stitch length basic setting blinks constantly 3 needle position (9 positions) 4 needle stop up/down (generally up) 5 stitch number 1 (straight stitch) 6 presser foot number 1 indicator (recommended foot for selected stitch) 030529.52.04_0303_a135 a145_EN 21 135_145_S_engl 22 14.3.2003 15:33 Uhr Seite 22 Operating instructions Stitch* selection • stitches 1–10: touch the number of your choice; stitch number and basic width and length settings appear Note: touch «0» to select stitch number 10 (standard buttonhole) • to select stitches 11–30 (activa 135 S) or 11–50 (activa 145 S): touch #-button and the appropriate number * see p. 30 for the complete stitch selection; for activa 135 S PE see appendix A1 Stitch width left button = narrow the stitch width • right button = widen the stitch width • the basic settings of the chosen stitch blink constantly • Needle position • left button = needle to the left • right button = needle to the right Stitch length • left button = shorten the stitch length • right button = increase the stitch length 030529.52.04_0303_a135 a145_EN 135_145_S_engl 14.3.2003 15:33 Uhr Seite 23 Operating instructions 23 Functions Functions are ... activated when the symbol appears on the screen. deactivated when the symbols no longer appear on the screen. Reverse sewing quick reverse: • press button • Sewing computer sews reverse until button is released (max. stitch length 3 mm) Applications: • programming buttonholes • programming darning program • switch to straight stitch securing program (stitch No. 5) • manual securing (seam begin and end) continous reverse: • press button quickly twice • the sewing computer sews the chosen stitch in reverse • press button once to cancel 1/2 speed • press the button and the sewing speed will be halved • press the button again to revert to full speed Needle stop • basic setting needle stop up • press button • arrow points down = sewing computer stops with needle down • press button again • arrow points up = sewing computer stops with needle up Note: Press key a bit longer = the needle will go automatically up or down. Stitch end • press button • sewing computer stops at the end of a single stitch or stitch combination (in Memory) Mirror image* • press button • mirror image of selected stitch will be sewn *activa 145 S only 030529.52.04_0303_a135 a145_EN 135_145_S_engl 24 14.3.2003 15:33 Uhr Seite 24 Operating instructions #-button Stitch selection button (see p. 22) clr/del (clear/delete) • press button = reverts to basic settings • other selected functions are cleared Exceptions: • needle stop down • 1/2 speed • altered basic settings for buttonholes = press «clr/del»-button twice Letters, numbers and punctuation marks (only activa 145 S) • press the alphabet button • letters appear on the screen • press the right button to scroll letters and numbers forwards (A B C ...) • press the left button to scroll letters and numbers backwards (9 8 7 ...) Alphabet contents ABCEFGHIJKLMNOPQRSTUVXYZ _-.’! ? % ( ) [ ] Ä Ö Ü Å ÆŒØÑÈÉÊÀ 0123456789 030529.52.04_0303_a135 a145_EN mem (Memory) • press the centre button to open memory (capacity of 30) • use the left and «mem + »-buttons to scroll and programme stitches, letters and numbers Altered Stitch Memory any stitch length or width alterations will be saved automatically For example: • sew altered stitch, e.g. zig-zag • select another stitch, e.g. straight stitch • return to zig-zag, your alterations are still active • Return to basic settings basic settings can be restored manually for individual stitches • all altered settings are lost when the «clr/del»-button is pressed or when the sewing computer is turned off • Application: • for all stitches and fabrics • particularly useful for switching between different applications 135_145_S_engl 14.3.2003 15:33 Uhr Seite 25 Operating instructions 25 Memory Any combination of 30 stitches, letters or numbers can be saved in Memory, which is long term. They remain saved until deleted by the user. Power failures or disconnection from the electricity Memory buttons press left button (<) to scroll contents backwards • press centre button (mem) to open and close Memory • press right button (mem + ) to scroll contents forwards supply do not affect the Memory. Alterations to the stitch length, width or needle position can be made at any time. Individual stitches, letters or numbers can be deleted or overwritten. 0 1 2 3 4 5 5.5 5 • 2 3 4 5 5.5 5 Open Memory press «mem»-button to open Memory • if the Memory is empty, the cursor and number 30 (= empty memories) blink • if the Memory is not empty, the saved stitches, letters or numbers appear on the screen; scroll forwards until the cursor and number of empty memories blink 4 3 mem 0 1 2 1 0 3 4 5 5.5 5 • 4 3 2 1 0 To program stitches see p. 25 2 Example: saved letter • saved letter (E) is shown 4 3 2 mem 1 mem 0 Example: saved stitch • saved stitch (28) is shown 030529.52.04_0303_a135 a145_EN 1 0 To program letters and numbers see p. 27 135_145_S_engl 26 14.3.2003 15:33 Uhr Seite 26 Operating instructions Delete complete Memory • press «clr/del» and «mem»button at the same time • release both buttons • leave Memory by pressing the mem button • Memory is now completely deleted 0 1 2 3 4 5 5.5 5 4 3 mem 2 1 2 0 3 4 5 5.5 5 4 3 2 mem 0 1 Programming practical and decorative stitches • open Memory (p. 25) • select stitch (p. 22) • stitch number appears on the screen (here 21) • press «mem + » to program (save) • the number of remaining empty memories (here 29) and the cursor blink 1 0 • select next stitch, press «mem+» and continue in this manner 030529.52.04_0303_a135 a145_EN Scroll backwards press left button = the programmed stitch numbers scroll backwards Scroll forwards press «mem+»-button = the programmed stitch numbers scroll forwards Begin sewing • press the foot control = the sewing computer starts automatically at the beginning of a stitch sequence • select Pattern End ( ) as well = the sewing computer stops automatically at the end of a stitch sequence Note: The following special programs cannot be saved in Memory: No. 5, Securing program Nos. 10–12, Buttonholes No.13, Button sewing-on program No. 14, Darning program No. 15, Basting stitch 135_145_S_engl 14.3.2003 15:33 Uhr Seite 27 Operating instructions 1 2 3 4 5 5.5 5 4 3 2 mem 0 1 0 Programming letters, numbers and punctuation marks (activa 145 S only) • open Memory (p. 25) • press Alphabet button • select letter or number (p. 24) • press «mem + » to program (save) • the number of remaining empty memories (here 29) and the cursor blink • select next letter/number, press «mem+» and continue in this manner • programme single words or sentences/numbers • select (_) to program spacing Note: If the stitch length and/or width of letters or numbers have been altered, the alterations will affect all of them. If you only want to alter single letters or numbers, this must be done individually. 030529.52.04_0303_a135 a145_EN 27 Corrections in Memory Changing individual stitches, letters and numbers • scroll with the right or left button to find the stitch you want to change or correct • then correct or change: stitch letter number stitch length or width needle position etc. • press «mem + » to save the change(s) Delete single stitch, letter or number • scroll to find the stitch • press «clr/del» to delete • stitch/letter/number is deleted 135_145_S_engl 28 14.3.2003 15:33 Uhr Seite 28 Operating instructions Leave Memory • press «mem»-button = contents are saved • Memory is closed 0 1 2 3 4 5 5.5 5 «mem»-symbol disappears from the screen 4 3 2 1 0 The contents of the memory remain saved even when the sewing computer is disconnected from the electricity supply. They can be recalled at any time. The contents of the memory will be lost if the sewing computer is switched off without pressing the mem button before closing the memory. 030529.52.04_0303_a135 a145_EN 135_145_S_engl 14.3.2003 15:33 Uhr Seite 29 Operating instructions 29 Balance Your sewing computer has been tested and factory set using a double layer of cretonne fabric and Metrosene 100/2 threads (Arova Mettler, Switzerland). Different fabrics, threads and stabilisers can naturally affect the stitch balance so that they are sewn too close together or not close enough. Applications: Practical stitches, e.g. Honeycomb stitch on jersey, decorative stitches, fantasy stitches, letters, buttonholes, etc. This can be remedied with Balance to suit the fabric and produce perfect results. Note: If the balance has been adjusted, return it to the normal setting once sewing is completed. Normal position Denser stitch formation (shorter stitch length) 030529.52.04_0303_a135 a145_EN Finer stitch formation (longer stitch length) 135_145_S_engl 30 14.3.2003 15:33 Uhr Seite 30 Stitches Stitches* activa 135 S activa 145 S Practical and decorative 1 2 3 4 5 6 7 8 9 10 11 12 13 14 15 16 17 18 19 Straight stitch Zig-zag Vari-overlock Running stitch Securing stitch Triple straight and zig-zag Blind stitch Double overlock Super stretch stitch Standard buttonhole Keyhole buttonhole Straight stitch buttonhole Button sewing-on program Darning program Basting stitch Sewn-out zig-zag Universal stitch Gathering stitch Honeycomb stitch activa 135 S 20–22 Quilting stitches 23–30 Decorative stitches activa 145 S 20–28 Quilting stitches 29–50 Decorative stitches *activa 135 S PE see appendix A1 030529.52.04_0303_a135 a145_EN 135_145_S_engl 14.3.2003 15:33 Uhr Seite 31 Stitches 31 Stitch selection* 1 4 7 2 5 1 Straight stitch All non-stretch fabrics. All straight stitch work 2 Zig-zag Most fabric types; all simple zig-zag such as oversewing fine fabrics. Sewing on elastic and lace 3 Vari-overlock Primarily for fine jerseys, stretch overlock seams and hems 4 Running stitch Most types of fabric. Mending, patching, reinforcing seams 5 Securing stitch All types of fabric. Secures the beginning and end of seams sewn with straight stitch 6 Triple straight and triple zig-zag Reinforced seams in tough, heavy fabrics 7 Blind stitch Most types of fabric; blind hems, shell edging on soft jerseys and fine fabrics, decorative seams 8 Double overlock All types of knit; Overlock = sew and neaten in one operation 9 Super stretch Open seam for all super-stretch fabrics 3 6 8 *activa 135 S PE see appendix A 030529.52.04_0303_a135 a145_EN 135_145_S_engl 32 14 10 14.3.2003 15:33 Uhr Seite 32 Stitches 19 11 14 Darning program Automatic darning for fine and medium weight fabrics 19 Honeycomb stitch Most types of interlock and smooth fabrics; visible seams and hems 20 Quilt/hand stitching Hand stitched effect: only the one stitch (lower thread) is visible; the other stitch (upper thread = monofilament) is invisible; increase upper thread tension to suit the fabric (6–9) 10 Standard buttonhole Fine to medium weight woven fabrics; blouses, shirts, trousers, bedlinens, etc. 11 Keyhole buttonhole Heavy weight, non stretch fabrics. Jackets, coats, trousers, leisure wear, etc. 12 Straigth stitch buttonhole Pre-stitch program for bound buttonholes (Foot No. 3A) or pocket openings (Foot No. 3, special accessory) 20 12 030529.52.04_0303_a135 a145_EN 135_145_S_engl 14.3.2003 15:33 Uhr Seite 33 Presser feet 33 Standard foot selection 3A 1 1 Reverse pattern foot Practical and decorative stitches 2 2 Overlock foot Overlock seam, hems, oversewing edges, narrow satin stitch 3A Buttonhole foot with slide Buttonhole on smooth fabrics, darning 5 20 4 Zipper foot Sewing in zips 37 9 5 Blind stitch foot Blind hems, edge stitching 9 Darning foot Freehand quilting for light to medium weight quilts; darning 20 Open Embroidery foot activa 135 S = 6 feet (1, 2, 3A, 4, 5, 9) activa 135 S PE = 7 feet (1, 3A, 4, 5, 9, 20, 37) activa 145 S = 7 feet (1, 2, 3A, 4, 5, 9, 37) 030529.52.04_0303_a135 a145_EN 37 Patchwork foot Patchwork with seam allowance 1/4” or 1/8” (≈ 6 or 3 mm) 135_145_S_engl 34 14.3.2003 15:33 Uhr Seite 34 Selected practical stitches: Straight stitch with securing program Securing program Stitch: Needle: Thread: Feed-dog: Presser foot: Securing program No. 5* size and type suitable for the fabric selected (see p. 57) cotton/polyester raised (sewing position) Reverse pattern foot No. 1 Securing program for all fabrics • secures seam begin and end • sews exactly over the previous stitches • Seam begin • sewing computer secures automatically (5 stitches forwards, 5 reverse) • continues sewing straight stitch forwards Seam end • press the reverse button = sewing computer secures automatically (5 stitches reverse, 5 forwards) • stops automatically when securing is complete * 135 S PE see appendix A2 030529.52.04_0303_a135 a145_EN 135_145_S_engl 14.3.2003 15:33 Uhr Seite 35 Selected practical stitches: Basting stitch Basting stitch Stitch: Needle: Thread: Feed-dog: Presser foot: Basting stitch No. 15 (activa 135 S PE No. 14) size and type suitable for the fabric selected (see p. 57) cotton/polyester lowered (darning position) No. 9 Basting stitch • for all work which requires a very long stitch • for basting seams, hems, quilts, etc. • easy to remove Preparation: • pin work horizontally to basting direction to prevent the layers slipping Basting • lower the feed-dog • position work under the presser foot and sew one stitch; hold threads when starting to sew • pull work from behind to the required length of the stitch • sew one stitch and repeat the procedure TIP Securing /fixing the thread • sew a few basting stitches at the beginning and end of a seam Basting • use a fine darning thread for basting as it is easier to remove 030529.52.04_0303_a135 a145_EN 35 135_145_S_engl 36 14.3.2003 15:33 Uhr Seite 36 Selected practical stitches: Blind hem Blind hem Stitch: Needle: Thread: Feed-dog: Presser foot: Blind stitch No. 7 size and type suitable for the fabric selected (see p. 57) cotton or polyester up (sewing position) Blind stitch foot No. 5 Blind hem for «invisible» hems in medium to heavy cotton, wool and blended fabrics Preparation neaten raw edges • prepare seam as for sewing by hand • place work under the presser foot (see drawing) • Sewing • the needle should just pierce the edge of the fold (same as hand sewing) • adjust the stitch width to suit the fabric • after sewing about 10 cm (4"), check both sides of fabric and adjust width again if necessary 5 Wrong side of fabric TIP Wrong side of fabric Right side of fabric 030529.52.04_0303_a135 a145_EN Fine stitch width adjustment Guide the folded edge evenly along the metal guide on the foot = even depth 135_145_S_engl 14.3.2003 15:33 Uhr Seite 37 Selected practical stitches: Darning 37 Darning program Stitch: Needle: Thread: Feed-dog: Presser foot: Darning Program No. 14 (activa 135 S PE No. 13) size and type suitable for the fabric selected (see p. 57) darning thread up (sewing position) Reverse pattern foot No. 1 Buttonhole foot No. 3A Quick darning of holes or worn areas Replacement of damaged fibres/threads Darning with Reverse pattern foot No. 1 (auto stitch counter) • insert needle in top left of damaged area • sew the first length and stop the sewing computer • press the securing button: length is programmed • complete the darn; the sewing computer stops automatically Large areas: • the darning area can be extended by moving the work under the foot • clear the programme by pressing the «clr/del»-button Darning with Buttonhole foot with slide No. 3A • use for small tears and damaged areas, not more than 3 cm (11/4”) long • use same method as with foot No. 1 TIP Reinforcement use fine fabric or interlining as a backing Preparation stretch fabric into darning ring* prevents puckering *The darning ring is available as a special accessory 030529.52.04_0303_a135 a145_EN 135_145_S_engl 38 14.3.2003 15:33 Uhr Seite 38 Selected practical stitches: Zippers Zippers Stitch: Needle: Thread: Feed-dog: Presser foot: Needle position: Straight stitch No. 1 size and type suitable for the fabric selected (see p. 57) cotton or polyester up (sewing position) Zipper foot No. 4 far right or far left 4 Preparation: • baste in zipper • fabric edges should meet over the center of the zipper Sewing • sew in the zipper, each side from bottom to top • once with needle position far right and once with needle position far left • the edge of the foot runs along the teeth of the zip • the needle inserts close to the teeth TIP To sew around zipper pull • close zipper and sew up to about 5 cm (2") away from the pull • insert needle, raise the presser foot, open the zipper, lower the foot and continue to sew Seam begin hold thread firmly when starting to sew = pull fabric slightly to the back (fewer stitches) 030529.52.04_0303_a135 a145_EN Zipper or fabric is thick or densely woven use a 90–100 needle for even stitch formation 135_145_S_engl 14.3.2003 15:33 Uhr Seite 39 Selected practical stitches: Buttonholes 39 Everything you need to know about buttonholes Thread tension thread the bobbin thread through the finger of the bobbin case = the bobbin tension is a little tighter • this gives the beads on the right side of the fabric a slightly rounded appearance • the buttonhole looks more attractive · gimp reinforces buttonholes and enhances their appearance (pages 47, 48) • Buttonholes are not only practical closures, they can also be used to decorative effect Select the buttonhole of your choice (No. 10 or 11); the following appears on the screen: 0 1 2 3 4 5 5 5.5 4 3 2 1 1 3 0 2 1 Buttonhole number 2 Buttonhole symbol 3 Presser foot number Mark the length of automatic buttonholes • mark the length of just one buttonhole • after sewing the first buttonhole, the length for all subsequent buttonholes is automatically programmed • mark only the beginning of all subsequent buttonholes Mark the length of manual buttonholes • mark the buttonhole length in the appropriate position • stitch using buttonhole foot No. 3 (optional accessory) 030529.52.04_0303_a135 a145_EN Mark the length of keyhole buttonholes • mark the bead length only • the correct length eye will be added when the buttonhole is sewn 135_145_S_engl 40 14.3.2003 15:33 Uhr Seite 40 Selected practical stitches: Buttonholes Test sewing always test sew on the fabric and stabilizer you intend to use • select the buttonhole type you intend to use • sew the buttonhole in the same direction on the fabric (with or against the grain) • cut the buttonhole open • push the button through and adjust the buttonhole length if necessary TIP • Corrections To adjust the bead width: • alter the stitch width • altered stitch widths can be deleted by pressing the «clr/del»button Altering the stitch length: • any alterations to the stitch length affect both beads (denser or less dense) • altered stitch length can be deleted by pressing the «clr/del»button Note: When all buttonholes have been sewn, return balance to the normal setting! Balance for automatic/manual buttonholes • any balance alterations to the 6-step manual and auto length buttonholes affects both beads identically because they are sewn in the same direction 030529.52.04_0303_a135 a145_EN If a buttonhole is to be sewn at right angles to a seam, we recommend the use of the buttonhole leveler. Insert the plate from behind between the fabric and the foot up to and over the thicker area. 135_145_S_engl 14.3.2003 15:33 Uhr Seite 41 Selected practical stitches: Buttonholes Automatic standard buttonhole with auto length Both beads are sewn in the same direction. Note: The automatic buttonhole foot No. 3A must lie perfectly flat on the fabric. If the foot lies on a seam, the length cannot be measured accurately. Stitch: Needle: Thread: Feed-dog: Presser foot: 3A Standard buttonhole No. 10 size and type suitable for fabric selected (see p. 57) cotton or polyester up (sewing position) Automatic buttonhole foot No. 3A Automatic standard buttonhole • insert the lower thread in the finger of the bobbin case (p. 39) • when using Buttonhole foot No. 3A, the length of the buttonhole is automatically registered by the lens on the foot = exact duplication and automatic sequence change when the maximum length has been sewn • each step of the sewing sequence blinks on the screen Note: When any automatic buttonhole is selected, presser foot No. 3 is indicated on the screen. 030529.52.04_0303_a135 a145_EN 41 135_145_S_engl 42 14.3.2003 15:33 Uhr Seite 42 Selected practical stitches: Buttonholes Programme the standard buttonhole 1 sew the first bead forwards, stop the sewing computer • press the reverse button • «auto» and presser foot No. 3A are indicated on the screen = the buttonhole length is programmed 1 2 3 4 5 Note: When all buttonholes have been sewn, return balance to the normal setting! 2 3 4 5 • the sewing computer sews reverse straight stitch automatically the first bar tack the second bead forwards the second bar tack and securing stitches sewing computer stops and returns automatically to buttonhole begin TIP Exact duplicates the auto function ensures that each buttonhole will be exactly the same length as the previous one Marking mark only the beginning of the buttonholes – a real time saver! Auto buttonhole • all subsequent buttonholes will be sewn to exactly the same length (no need to press the reverse button) • press the «clr/del»-button to delete the programme • the programmed buttonhole can be saved in the long term memory (see p. 49) Sewing speed • sew at moderate speed for best results • sew all buttonholes at the same speed for a consistent bead density Corrections see p. 40 Compensating plates for buttonholes (special accessory) If a buttonhole is to be sewn horizontally to the edge of the garment, it is worth using the compensating plates. This accessory provides an even surface for the buttonhole foot with slide which results in a perfect buttonhole (see tips p. 40). Balance • any changes to the balance affect both beads of auto length buttonholes, because both beads are sewn in the same direction 030529.52.04_0303_a135 a145_EN 135_145_S_engl 14.3.2003 15:33 Uhr Seite 43 Selected practical stitches: Buttonholes Automatic keyhole buttonhole with auto length Both beads are sewn in the same direction. Stitch: Needle: Thread: Feed-dog: Presser foot: Keyhole buttonhole No. 11 size and type suitable for the fabric selected (see p. 57) cotton or polyester up (sewing position) Automatic buttonhole foot No. 3A Automatic keyhole buttonhole insert the lower thread in the finger of the bobbin case (p. 37) • when using Buttonhole foot No. 3A, the length of the buttonhole is automatically registered by the lens on the foot = exact duplication and automatic sequence change when the maximum length has been sewn • 3A Marking the keyhole buttonhole • mark the bead length only. The correct eye length will be added when the buttonhole is sewn. • each step of the sewing sequence blinks on the screen 030529.52.04_0303_a135 a145_EN 43 135_145_S_engl 44 14.3.2003 15:33 Uhr Selected practical stitches: Buttonholes 1 2 Seite 44 3 4 5 6 Programming the buttonhole 1 sew the straight stitch forward, stop the sewing computer, • press the reverse button • auto and presser foot No. 3A are displayed on the screen = buttonhole length is programmed 2 the sewing computer automatically sews the eye 3 the first bead in reverse 4 sews second straight stitch 5 sews second bead in reverse 6 sews bartack and securing stitches • the sewing computer stops and returns automatically to buttonhole begin Auto buttonhole • all subsequent buttonholes will be sewn automatically to the same length (without pressing the reverse button) • Press the «clr/del»-button to delete the programme • the programmed buttonhole can be saved in the long term memory (see p. 49) Corrections see p. 40 Note: When all buttonholes have been sewn, return balance to the normal setting! Balance • any changes to the balance affect both beads of auto length buttonholes, because both beads are sewn in the same direction • any distortions to keyhole buttonholes can be corrected with balance 030529.52.04_0303_a135 a145_EN TIP Exact duplicates the auto function ensures that each buttonhole will be exactly the same length as the previous one Marking mark only the beginning of the buttonholes – a real time saver! Double sewn keyhole buttonholes • keyhole buttonholes can be sewn twice on thick fabrics • after sewing the first buttonhole, do not move the work • simply tap the foot control once to begin sewing again 135_145_S_engl 14.3.2003 15:33 Uhr Seite 45 Selected practical stitches: Buttonholes Manual buttonhole (all types) Manual buttonholes are particularly suitable for single buttonholes or for repairing existing buttonholes. Individual steps can be eliminated or repeated. The number of steps corresponds to the buttonhole type. Manual buttonholes cannot be saved. Stitch: Needle: Thread: Feed-dog: Presser foot: any buttonhole size and type suitable for the fabric selected (see p. 57) cotton or polyester up (sewing position) Buttonhole foot No. 3 (optional accessory) Preparation • select the desired buttonhole • screen shows: buttonhole number (10 or 11) presser foot No. 3 the buttonhole symbol (the first step blinks on the screen) • insert the lower thread in the finger of the bobbin case Always test sew buttonholes • test on the fabric and stabilizer you intend to use • sew buttonholes in the same grain direction (with or against) Note: Corrections see p. 40 030529.52.04_0303_a135 a145_EN 45 135_145_S_engl 46 14.3.2003 15:33 Uhr Seite 46 Selected practical stitches: Buttonholes Sewing a manual standard buttonhole Both beads are sewn in the same direction. The individual steps blink on the screen. 1 1 sew the first bead forward, stop the sewing computer • press the reverse button 2 sew reverse straight stitch, stop the sewing computer at the first stitch (buttonhole begin) • press the reverse button 3 sew the bartack and the second bead, stop the sewing computer • press the reverse button 4 sew the bartack and the securing stitches 2 4 3 Manual keyhole buttonhole Sew both forward and reverse beads at the same speed. The individual steps blink on the screen. 1 sew straight stitch forwards, stop the sewing computer, press the reverse button 2 sew the eye and the first bead in reverse, stop the sewing computer at the first stitch (buttonhole begin), press the reverse button 1 3 2 4 5 3 sew straight stitch forwards and stop at the keyhole, press the quick reverse button 4 sew the second bead in reverse, stop the sewing computer at the first stitch (buttonhole begin), press the reverse button 5 sew bartack and securing stitches 030529.52.04_0303_a135 a145_EN 135_145_S_engl 14.3.2003 15:33 Uhr Seite 47 Selected practical stitches: Buttonholes 47 Buttonhole with gimp 3A 3A Gimp • gimp cord reinforces buttonholes and enhances their appearance • the loop of the cord should be at the end of the buttonhole most subject to wear cord loop = where button is sewn on • position the work accordingly • gimp cord is particularly recommended for standard and stretch buttonholes Ideal cords • Perle yarn No. 8 • strong hand sewing thread • fine crochet yarn Hooking the cord in the buttonhole foot with slide No. 3A • insert the needle at the beginning of the buttonhole • raise the presser foot • guide the cord under the foot to the right • hook the cord over the pin at the back of the foot • • • bring the cords to the front of the foot pull them into the slit sew the buttonhole Sewing • sew the buttonhole in the usual manner • do not hold the cord tightly • the buttonhole will form over the cord, covering it 030529.52.04_0303_a135 a145_EN Hooking the cord onto presser foot No. 3 • insert the needle at the beginning of the buttonhole • raise the presser foot • hook the cord over the centre pin on the front of the foot 135_145_S_engl 48 • • 14.3.2003 15:33 Uhr Seite 48 Selected practical stitches: Buttonholes place both ends of the cord in the grooves on the sole of the foot and pull them to the back lower the presser foot Securing the cord • pull the cord through the buttonhole • pull cords through to back of fabric • knot or secure with stitches Cutting buttonholes open with the seam ripper • use the back of the seam ripper to nick the stitches • cut from both ends towards the middle Sewing • sew the buttonhole in the usual manner • do not hold the cord tightly • the buttonhole will form over the cord, covering it 030529.52.04_0303_a135 a145_EN Buttonhole cutter and block (special accessory) • place the fabric on the wood • place the cutter in the centre of the buttonhole • press down on the cutter with your hand or a hammer 135_145_S_engl 14.3.2003 15:33 Uhr Seite 49 Selected practical stitches: Buttonholes Programmed buttonholes Saving programmed buttonholes in long term memory after programming press the «mem+»-button • the buttonhole is now saved in long term memory • Opening saved buttonholes Programmed saved buttonholes can be opened for re-use even after the sewing computer has been disconnected. • select the buttonhole • press the «mem»-button • sew the programmed buttonhole • only one of any style buttonhole can be saved, if a new length is saved with «mem+», it overwrites the previously saved buttonhole 030529.52.04_0303_a135 a145_EN 49 135_145_S_engl 50 14.3.2003 15:33 Uhr Seite 50 Selected practical stitches: Button sewing-on program Button sewing-on program Stitch: Stitch width Needle: Thread: Feed-dog: Presser foot: Button sewing-on program No. 13 (activa 135 S PE No. 12) depends on distance between the holes size and type suitable for the fabric selected (see p. 57) cotton or polyester down (darning position) Foot No. 9 Button sew-on foot No. 18 (optional accessory) Sewing on buttons sews buttons with 2 or 4 holes • buttons being sewn on for decorative purposes only can be stitched without forming a thread shank • the length of the shank (= thread between button and fabric) can be made shorter or longer as required with foot No. 18 • Sewing on buttons with foot No. 9 • select Button Sew-on program • sew the securing stitches; hold the threads when starting to sew • check distances between holes with the handwheel and adjust stitch width if necessary • sew • sewing computer stops automatically when program is completed and is ready for the next button Beginning and ending threads • the threads are secured and can be trimmed For added security • after sewing on the button, pull the upper thread ends through to the wrong side and knot 030529.52.04_0303_a135 a145_EN 135_145_S_engl 14.3.2003 15:33 Uhr Seite 51 Selected practical stitches: Button sewing-on program Sewing on buttons with foot No. 18 • set the shank length with the screw on the foot • select Button sewing-on program and continue as with foot No. 9 (p. 50) Beginning and ending threads • the threads are secured and can be trimmed For added security • after sewing on the button, pull the upper thread ends through to the wrong side and knot or • using the upper thread ends to sew a «shank» by hand 030529.52.04_0303_a135 a145_EN TIP 4-hole button • sew the front holes • carefully move the button forward • sew the back holes • cut the diagonal joining thread 51 135_145_S_engl 52 14.3.2003 15:33 Uhr Seite 52 Selected practical stitches: Overlock seams Vari-overlock seam Stitch: Needle: Thread: Feed-dog: Presser foot: 2 Vari-overlock No. 3 size and type suitable for the fabric selected (see p. 57) cotton or polyester up (sewing position) Overlock foot No. 2 or Reverse pattern foot No. 1 Overlock foot No. 2 is specially designed for overlock stitches. The pin on the foot produces more thread in each stitch so that the elasticity of the seam is maintained. Closed seam Stretchy seam in fine, soft knits such as silk jersey and interlock. Sewing • guide the raw edge along the pin on the overlock foot • the stitch will form over the pin and over the edge of the fabric TIP Knits and jersey use a new needle to prevent damaging the loops Sewing stretch fabrics if necessary use a stretch needle (130/705H-S) = needle point slides between the fibers 030529.52.04_0303_a135 a145_EN 135_145_S_engl 14.3.2003 15:33 Uhr Seite 53 Selected practical stitches: Overlock seams 53 Double overlock seam Stitch: Needle: Thread: Feed-dog: Presser foot: 2 Double overlock No. 8 size and type suitable for the fabric selected (see p. 57) cotton or polyester up (sewing position) Overlock foot No. 2 or Reverse pattern foot No. 1 Overlock foot No. 2 is specially designed for overlock stitches. The pin on the foot produces more thread in each stitch so that the elasticity of the seam is maintained. Closed seam overlock seam in loose knits and cross seams in knits and jerseys Sewing • guide the raw edge along the pin on the overlock foot • the stitch will form over the pin and over the edge of the fabric TIP Knits and jersey use a new needle to prevent damaging the loops Sewing stretch fabrics if necessary use a stretch needle (130/705H-S) = needle point slides between the fibers 030529.52.04_0303_a135 a145_EN 135_145_S_engl 54 14.3.2003 15:33 Uhr Seite 54 Selected practical stitches: Overlock seams Ribbing with overlock seam Stitch: Needle: Thread: Feed-dog: Presser foot: 2 Vari-overlock No. 3 size and type suitable for the fabric selected (see p. 57) cotton or polyester up (sewing position) Overlock foot No. 2 or Reverse pattern foot No. 1 Overlock foot No. 2 is specially designed for overlock stitches. The pin on the foot produces more thread in each stitch so that the elasticity of the seam is maintained. Back view Ribbing with overlock seam for all fine cotton, synthetic and mixed fiber jersey Preparation • fold ribbing in half • pin and baste to opening, right side outside Sewing • sew Vari-overlock over the raw edge • guide the edge along the pin on the foot Front view TIP Needle stop down needle stays in fabric when you stop to adjust the ribbing 030529.52.04_0303_a135 a145_EN 135_145_S_engl 14.3.2003 15:33 Uhr Seite 55 Selected practical stitches: Honeycomb stitch 55 Self-facing with Honeycomb stitch Stitch: Needle: Thread: Feed-dog: Presser foot: Honeycomb No. 19 (activa 135 S PE No. 15) universal, ballpoint or stretch as needed cotton or polyester up (sewing position) Presser foot: Reverse pattern foot No.1 Ribbing with visible seam for all cotton, wool, synthetic and mixed fiber jersey Preparation press 1 cm (3/8") to wrong side Sewing • sew from the right at a foot's width from the edge • trim surplus fabric (wrong side) Balance/corrections Note: After sewing return balance to the normal setting! TIP bring stitch together open out stitch 030529.52.04_0303_a135 a145_EN Needle stop down needle stays in fabric when you stop to adjust the ribbing 135_145_S_engl 56 14.3.2003 15:33 Uhr Seite 56 Needles, Threads Important facts about sewing computer needles Sewing computer, needle and thread Your BERNINA uses needle system 130/705H. Needle and thread The most commonly sold needles are nos. 70 –120. The finer the needle, the lower the number. The table shows which needle is suitable for which threads. Needle 70 80 90 Darning thread • • • • • • • Embroidery thread Mercerised cotton thread Synthetic thread Needle appropriate for thread When sewing, the thread runs in the long groove on the needle. Needle inappropriate for thread If the needle is too fine, the groove will be too narrow for the thread and faulty stitching or thread breakage can occur. Thick threads, synthetic mercerised thread • Buttonhole thread for decorative seams (cordonnet) 100 110 –120 • • • Needle and fabric Condition of needle The needle must be in perfect condition. Problems can occur with damaged needles. bent needle 030529.52.04_0303_a135 a145_EN blunt needle hooked needle 135_145_S_engl 14.3.2003 15:33 Uhr Seite 57 Needles Special materials are easier to sew if the appropriate needle is used. Special needles are available at your BERNINA dealer. Needle table Description Needle point Suitable for Standard needle 130/705 H Normal point, slightly rounded Universal needle for woven, needle synthetic and natural fibers, e.g. linen, chiffon, batiste, organdie, wool, satin, decorative stitching, embroidery Special needles 130/705-SES Fine ball point Fine knits, especially for synthetic fibers 130/705 H-SUK Medium ball point Heavier knits in synthetic or natural fibers 130/705 H-S Medium ball point Special needle for delicate or difficult stretch fabrics 130/705 H-J Extra fine point Overalls, heavy linen, denim, canvas. Pierces dense fabrics easily 130/705 H-LR + H-LL Cutting point Natural and synthetic leather, plastic, coated and waxed fabric Double needle 130/705 H ZWI Widths: 1,6 / 2,0 / 2,5 3,0 / 4,0 Visible hems in stretch fabrics, pintucks, decorative sewing Triple needle 130/705 H DRI Widths: 2,5 / 3,0 Decorative sewing Hemstitch needle 130/705 H HO Width: 2,0 Hemstitch in loose weaves 030529.52.04_0303_a135 a145_EN 57 135_145_S_engl 58 14.3.2003 15:33 Uhr Seite 58 Needle, thread, fabric feed Feed-dog and fabric feed Feed-dog and stitch length With each stitch the feed-dog moves forward by one step. The length of this step is determined by the stitch length selected. With an extremely short stitch length, the steps are also short. The fabric moves under the foot quite slowly, even at full sewing speed. Buttonholes, satin stitch and decorative stitches are all sewn with a very short stitch length. Important Let the fabric feed evenly! Pulling or pushing will result in gaps. Holding back will result in knots. 030529.52.04_0303_a135 a145_EN 135_145_S_engl 14.3.2003 15:33 Uhr Seite 59 Needle, thread, fabric feed 59 Feed-dog and fabric feed with compensating plates 1 1 The feed-dog can work normally when the foot is level. If the foot is at an angle, e.g. when sewing over thick to thin or vice-versa, the feed-dog cannot grip and feed the fabric and the fabric hangs up. Uneven layers To solve this problem, place one, two or three compensating plates as required behind the needle under the presser foot. To correct the height in front of the foot, place one or more plates to the right of the foot close to the needle. Sew until the foot is level again and remove the plates. Thick fabrics: feed-dog and sewing corners The gap between the two rows of teeth is relatively large due to the width of the stitch plate hole. When sewing corners only a small section of the fabric is actually on the feed-dog so that it cannot grip the fabric well. 030529.52.04_0303_a135 a145_EN Correct this by placing one or more compensating plates as close as possible to the edge of the fabric. 135_145_S_engl 60 14.3.2003 15:33 Uhr Seite 60 Cleaning and maintenance Cleaning If the sewing computer is stored in a cold room, it should be brought to a warm room about one hour before use. Cleaning Clean the sewing computer after every use • turn power switch to «0» • remove presser foot and needle • open the free-arm cover • unscrew the stitch plate (with screwdriver TORX) • lift and remove it • clean the area with the brush • replace the stitch plate Cleaning the hook • turn power switch to «0» • remove the bobbin case • push the release lever to the left • push the locking lever to the left and fold down the hook race cover • remove the hook • clean the hook race with a cloth or brush, never use a sharp instrument • replace the hook, turning the handwheel if necessary so that the hook driver is on the left • close the hook race cover and secure with the locking lever, the locking pin must engage • check by turning the handwheel • insert the bobbin case 030529.52.04_0303_a135 a145_EN Cleaning the screen and the sewing computer wipe with a damp cloth • CAUTION Disconnect plug from the socket before cleaning and servicing Lubricating • squeeze 2–3 drops of oil into the hook race • run the machine for a short time without thread to prevent oil soiling your work Important! Never use alcohol, petrol, white spirit or any type of solvent to clean the sewing computer! Refer to the safety instruction! 135_145_S_engl 14.3.2003 15:33 Uhr Seite 61 Cleaning and maintenance 61 Sewing light CAUTION Disconnect plug from the socket before cleaning and servicing Note: Use bulb type 12 V 5 W. W 2.1 x 9.5 d. Replacing the bulb • turn power switch to «0» • loosen the screw • remove the cover by lifting it slightliy and detaching from the top • • • remove the bulb insert the new bulb replace cover and tighten screw Refer to the safety instruction! Replacing the Sewing Light** Contrary to an ordinary bulb, the CFL sewing light has a better illumination and a longer life. Please refer to the safety instructions! Light bulbs get hot. Allow to cool down before removal. Caution: Please note that a defective CFL sewing light must ONLY be replaced by an authorized technician. The sewing computer must be brought to an authorized BERNINA dealer! ** Available as a special accessory 030529.52.04_0303_a135 a145_EN 135_145_S_engl 62 14.3.2003 15:33 Uhr Seite 62 Faults Trouble shooting In most cases you will be able to identify and remedy faults by checking the following. Check whether: the upper and lower threads are threaded correctly • the needle is inserted correctly • the needle size is correct – check the needle/thread table p. 57 • the sewing computer is clean – brush out any thread fluff • the hook race is clean • any threads are trapped between the tension discs or under the bobbin case spring • the bobbin runs smoothly in the case or if remnants or lint need removing • Upper thread breaks • The upper thread tension is too tight. • The needles are of a poor quality. Ideally needles should be purchased from your BERNINA dealer. • The needle is bent or blunt. • Poor quality, knotted or dried out thread has been used. • Use the correct spool disc. • Stitch plate or hook tip damaged. Take your sewing computer to your BERNINA dealer. Lower thread breaks • The lower thread tension is too tight. • The bobbin is jamming in the bobbin case. Remove and replace the bobbin. • The hole in the stitch plate has been damaged by the needle. This must be repolished by an expert. • The needle is blunt or bent. Skipped stitches • Wrong needles used. Use only 130/705H system. • The needle is blunt, bent or incorrectly inserted. • Push right to the top when inserting. • Needle inserted all the way to the top. • The needle point does not suit the fabric being sewn. If necessary use a ball point for knitted fabrics and cutting point for hard leather. Needle breaks • Needle clamp screw loose. • Fabric taken out in front instead of behind presser foot. • When sewing over thick area, the fabric was pushed with the needle still in the fabric. • Poor quality thread, unevenly wound or knotted. • See pages 56 and 57 for information about needles 030529.52.04_0303_a135 a145_EN Faulty stitching • Remnants of thread between the tension discs. • Remnants of thread under the bobbin case spring. • Lower thread still threaded in the bobbin case finger. • Sewing computer threaded with foot down. • Incorrect threading. Check upper and lower threads. • Use the correct spool disc. Sewing computer fails to run or runs slowly • Plug not properly inserted. • Power switch in off position. • Sewing computer has been standing in a cold room. • Bobbin winder still switched on. 135_145_S_engl 14.3.2003 15:33 Uhr Seite 63 63 Index A D H Accessory box 8, 9 Darning program 37 Details of the sewing computer 4 –7 Double blanket stitch A3 Double overlock seam 53 Handlook quilt stitch A5 Honeycomb stitch 55 B Balance 29, 49, 55 Basting stitch 35 Blanket stitch A3 Blind hem 36 Bobbin 12 Bobbin case 13 Bobbin thread cutter 13 Bringing up the lower thread 18 Button sewing-on program 50 Buttonholes 39– 49 • Altering buttonholes 49 • Automatic keyhole buttonhole 43 • Automatic standard buttonhole 41 • Buttonhole with gimp 47 • Manual buttonhole 45 • Programmed buttonholes 49 I Inserting the bobbin 14 F Fabric cover 8 Fabric feed, Needles, Threads 56–59 Feather stitch A6 Feed-dog 18, 58 Foot control 10 Functions 23 • #-button 24 • 1/2 speed 23 • clr/del (clear/delete) 24 • Letters 24 • mem (Memory) 24 • Mirror image 23 • Needle stop 23 • Reverse sewing 23 • Stitch end 23 C Changing the needle 14 Changing the presser foot 15 CFL 8, 61 Cleaning 60 Compensating plates 59 030529.52.04_0303_a135 a145_EN K Keyhole buttonhole 43 Knits and jersey 52, 53 L Letters programming 27 Lower thread 18 Lens Set 8 M Maintenance 60, 61 Memory 25 • Balance 29 • Corrections in Memory • Leave Memory 28 • Memory buttons 25 • Open Memory 25 27 135_145_S_engl 64 • • • • 14.3.2003 15:33 Uhr Seite 64 Index Programming letters, numbers and punctuation marks 27 Programming practical and decorative stitches 26 Scroll backwards/forwards 26 Stitches 30, 31, 32 N Needle position 22 Needles, Threads, Fabric feed 56–59 Needle Threader 17 O Overlock seam 54 P Power cable 10 Presser feet 33 Presser foot lifter 11 R T Ribbing with overlock seam 54 Reverse sewing 23 Threads, Fabric feed, Needles 56–59 Thread cutter 12, 18 Thread tension 20 Threading the upper thread 16 Trouble shooting 62 S Screen shows 21 Seam guide 11 Securing program 34 Self-facing with Honeycomb stitch 55 Sewing light 61, 8 Sewing table 11 Single blanket stitch A3 Spool pin 15 Standard accessories 8 Standard buttonhole 41 Stiches 30, A1 Stipple stitch A4 Stitch length/width 22 Stitch plate 19 Stitch selection 22 Stretch fabrics 52, 53 Supplementary spool pin 15 Q Quilters securing program A2 Quilt stitch (Handlook quilt stitch) A5 030529.52.04_0303_a135 a145_EN U Upper thread 16 V Vari-overlock seam 52 W Winding the bobbin 12 Z Zippers 38 135_145_S_engl 14.3.2003 15:33 Uhr Seite 65 Contents 2 Important safety Instructions 4 Details 10 Setting up the sewing computer 21 Operating instructions 30 Stitches 33 Presser feet Selected practical stitches: 34 • Securing program 35 • Basting stitch 36 • Blind hem 37 • Darning program 38 • Zippers 39 • Buttonholes 50 • Button sewing-on program 52 • Overlock 55 • Honeycomb 56 Needle, Thread, Fabric Feed 60 Cleaning, Maintenance, Troubleshooting 63 Index A1–A6 Appendix 030529.52.04_0303_a135 a145_EN 65 135_145_S_engl 14.3.2003 15:33 Uhr Seite 66 Impressum Typesetting, Layout, DTP: Silvia Bartholdi Graphics: Müller-Melzer ID, Kreuzlingen © copyright 2003 by Fritz Gegauf AG, Steckborn 030529.52.04_0303_a135 a145_EN 03/03 EN 030 529 52 04 66 135_145_S_engl 14.3.2003 15:33 Uhr Seite A1 activa 135 S Patchwork Edition: Stitches Stitches Practical 1 Straight stitch 2 Zig-zag 3 Vari-overlock 4 Running stitch 5 Quilters securing program 6 Triple straight and zig-zag 7 Blind stitch 8 Double overlock 9 Blanket stitch 10 Standard buttonhole 11 Keyhole buttonhole 12 Button sewing-on program 13 Darning program 14 Basting stitch 15 Honeycomb stitch 16 Sewn-out zig-zag 17 Universal stitch 18 Gathering stitch Quilting stitches 19 Stipple stitch 20 Handlook Quilt stitch 21 Double blanket stitch 22 Feather stitch 23–30 Decorative stitches activa 135 S PE 1 2 3 4 5 6 7 8 9 # a 135 S 6 feet standard a 145 S 7 feet standard a 135 S PE 7 feet standard –#2 +#20 +#37 clr del 0 11 12 13 14 15 16 17 18 19 20 21 22 23 24 25 26 27 28 29 30 030529.52.04_0303_a135 a145_EN A1 135_145_S_engl A2 14.3.2003 15:33 Uhr Seite A2 activa 135 S Patchwork Edition: Straight stitch with securing program Quilters securing program Stitch: Needle: Thread: Feed-dog: Presser foot: Quilters securing program No. 5 80 Quilting, Jeans, Sharp, or Microtex cotton/polyester or Monofilament for the upper thread and cotton or polyester for the lower thread raised (sewing position) Reverse pattern foot No. 1 or Walking foot No. 50 (optional) Securing program for all fabrics • secures seam begin and end TIP • • Seam begin • sewing computer secures automatically (6 short stitches forwards) • continues sewing straight stitch forwards • Seam end • press the reverse button = sewing computer secures automatically (6 short stitches forwards) • stops automatically when securing is complete 030529.52.04_0303_a135 a145_EN when quilting, the quilt securing program can be combined for example with the handlook quilt stitch No. 20 for work which is likely to be subjected to heavy wear or laundering, use straight stitch No. 1 for securing 135_145_S_engl 14.3.2003 15:33 Uhr Seite A3 activa 135 S Patchwork Edition: Blanket stitch A3 Blanket stitch Stitch: Needle: Thread: Feed-dog: Presser foot: Needle position: Single blanket stitch No. 9 or Double blanket stitch No. 21 80 machine thread sewing Reverse pattern foot No. 1 or Open Embroidery Foot No. 20 center Preparation • cut desired applique shapes • fuse or baste as desired to a background fabric Sewing • place the fabric under the needle and position it so the wide portion of the stitch will form on the applique and the straight portion will fall just outside of it on the background fabric • stitch around entire applique shape 030529.52.04_0303_a135 a145_EN TIP • for a hand-stitched look, increase the stitch length and width when appliqueing heavy fabrics such as felt, flannel, and Ultra Suede® 135_145_S_engl A4 14.3.2003 15:33 Uhr Seite A4 activa 135 S Patchwork Edition: Stipple stitch Stipple stitch Stitch: Needle: Thread: Feed-dog: Presser foot: Needle position: Stipple stitch No. 19 80 machine thread sewing Reverse pattern foot No. 1 center Preparation prepare a «quilt sandwich» by placing a layer of batting between the quilt top and the backing fabric (fabric will be right sides out) • pin or baste layers together • Sewing • place the quilt sandwich under the needle and sew the stipple stitch as desired across the fabric. 030529.52.04_0303_a135 a145_EN Bild PE 140 Nähanleitung S. 24 oben rechts 135_145_S_engl 14.3.2003 15:33 Uhr Seite A5 activa 135 S Patchwork Edition: Handlook quilting Handlook quilt stitch Stitch: Needle: Thread: Feed-dog: Presser foot: Needle position: Tension: Balance: Hand-look quilt stitch No. 20 80 Quilting, Jeans, Sharp, or Microtex 0.044 monofilament for the upper thread and 40 or 30 weight cotton for the lower thread sewing Reverse pattern foot No. 1 or Walking foot No. 50 (optional) as desired tighten to 6– 9 adjust if necessary Preparation • prepare a «quilt sandwich» by placing a layer of batting between the quilt top and the backing fabric (fabric will be right sides out) • pin or baste layers together Sewing • place the quilt sandwich under the needle and sew the handlook quilt stitch as desired across the fabric • the bobbin thread should pull to the surface of the fabric and give the appearance of a hand-sewn running stitch 030529.52.04_0303_a135 a145_EN TIP • moderate speed for best results A5 135_145_S_engl A6 14.3.2003 15:33 Uhr Seite A6 activa 135 S Patchwork Edition: Feather stitch Feather stitch Stitch: Needle: Thread: Feed-dog: Presser foot: Needle position: Feather stitch No. 22 80 machine thread sewing Reverse pattern foot No. 1 or Open Embroidery Foot No. 20 center Use this delicate embroidery stitch to embellish fabric or to cover patchwork seams. Preparation • piece patchwork shapes as desired Sewing • place the fabric under the needle and position it so the center portion of the stitch will fall «in-the-ditch» of the seam • stitch, embellishing seams as desired TIP • 030529.52.04_0303_a135 a145_EN for variety, increase or decrease the length and width of the pre-programmed feather stitch