1
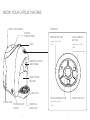
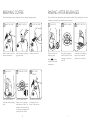
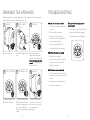
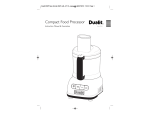
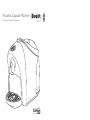
Piccolina Capsule Machine Instruction Manual & Guarantee CONTENTS SAFETY PRECAUTIONS Safety precautions 3 Intended use and disposal 5 Know your capsule machine 6 First use & after draining 8 Warm & prime machine 9 Brewing coffee 10 Rinsing after beverages 11 Out of water during brewing cycle 12 Interupted brewing cycle 13 Adjusting cup height 14 Choosing the volume 15 Choosing the temperature 16 Saving energy 17 Daily maintenance 18 Descaling the machine 19 To cancel descaling cycle 21 Draining the appliance 22 Troubleshooting 23 Guarantee 24 Unpack the box with care, keeping all the packaging materials until you are satisfied everything is present and in working order. Once satisfied remove any tags from the CAPSULE MACHINE and recycle the packaging appropriately. READ ALL THE INSTRUCTIONS outlets complying with the requirements of law. Make sure that the power supply voltage matches the rating shown on the data plate on the bottom of the appliance. CAREFULLY BEFORE USING YOUR DUALIT CAPSULE MACHINE. KEEP THESE INSTRUCTIONS SAFE FOR FUTURE REFERENCE. • To avoid the risk of fire, set the appliance on a flat, heat-resistant surface. Only use and store the appliance indoors. • Do not let the power cord dangle! Position the cord so there is no risk of tripping. • Do not allow the appliance to be used by children or persons with impaired mental, physical or sensory faculties or insufficient experience and/or skills, unless they are under the careful supervision and guidance of a person responsible for their safety. Children must be kept under supervision to prevent them from playing with the appliance. • Always close the lever. Never open the lever while the appliance is operating. Always use the appliance with the drip tray and grill in place. • The quantity of coffee dispensed can be programmed up to a maximum of 250ml. • Never place your hands inside the capsule compartment. Danger of injury! Never remove parts of the appliance. Do not insert objects into the openings. This could cause electric shocks! Any operation that is not described in this Always follow these safety precautions when using your capsule machine, for your own safety and to avoid damaging the machine. • • • Do not use the appliance if it is damaged in any way. At the first sign of defects or unusual noises or smells, turn off the appliance and unplug it. In such cases contact an Authorised Service Centre. Only use the appliance if the power cord is intact. If the cord is damaged, it should be replaced. Contact an Authorised Service Centre to prevent danger of electric shocks. Do not leave the power cord near hot surfaces, sharp edges or other sharp objects. When disconnecting the appliance, pull the plug, not the cord; otherwise it may be damaged. Only connect the appliance to power 3 INTENDED USE AND DISPOSAL instruction manual should only be performed by an Authorised Service Centre. • Clean the appliance carefully and regularly. If it is not cleaned, the build-up that forms may be hazardous to your health. Unplug the appliance and allow it to cool before cleaning. • Descale the appliance regularly, following the instructions provided. If you do not, the appliance may be damaged and may become harmful to your health. • Make sure the electrical elements, plug and cord are dry. Never submerge the appliance in water. Protect the appliance from sprays and drips. Water and electricity together constitute a risk of electrocution • • The appliance is made to brew coffee and dispense hot water. It is intended for domestic use and must be used in accordance with these instructions. Use only Caffitaly System capsules. Any other use is to be considered improper. Use of the appliance in any manner other than as directed herein could cause harm to persons and void the guarantee. The manufacturer will not be responsible for injury or damage resulting from improper use of the appliance. • The appliance has been manufactured using high quality materials that can be reused or recycled. Dispose of the appliance in a suitable waste collection centre. • When you decide to dispose of the appliance, unplug it from the power outlet. Then cut off the power cord as close to the body of the appliance as possible. • Directions for correct disposal of the product according to European Directive 2002/96/EC. At the end of its useful life, the product should not be disposed of with unsorted household waste. It should be taken to a suitable selective waste collection centre set up by the local authorities or returned to a retailer who provides this service. Separate collection of an electric household appliance avoids a possible negative impact on the environment and health arising from improper disposal and enables the materials it is If you do not expect to use the appliance for a long period of time, unplug it. SAVE THESE INSTRUCTIONS In the interest of improving products, Dualit Ltd. reserves the right to change the product specification without prior notice. 4 made of to be recovered so as to achieve significant savings of energy and resources. The crossed-out wheelie bin symbol applied on the product highlights the need to dispose of electric appliances separately. Improper disposal of the product by the user shall be subject to specific administrative sanctions as provided for under current regulations. The packaging is made from recyclable materials. Contact the relevant authorities for information regarding local legislation. • 5 The Caffitaly System plastic capsule cups are recyclable. The foil cover is not and should be removed from the capsule cup and disposed of with unsorted household waste. The used coffee grounds can be composted. KNOW YOUR CAPSULE MACHINE CONTROLS WATER TANK DOOR CAPSULE COMPARTMENT LEVER • High pressure (15 Bar) LONG ESPRESSO BUTTON • 35ml • High pressure (15 Bar) ESPRESSO BUTTON • 60ml (Temperature selector page 16) DISPENSING SPOUT (ADJUSTABLE) USED CAPSULE DRAWER DRIP TRAY FILTER COFFEE BUTTON WATER TANK INDICATOR LIGHT • Low pressure (3.5 Bar) POWER ON/OFF SWITCH 6 OVERFLOW INDICATOR • 110ml 7 FIRST USE & AFTER DRAINING 1 FILL WATER TANK WARM AND PRIME MACHINE The cup must be the correct temperature before the first use. N.B. failure to do this will x1 effect the temperature of the coffee. I O 3 WAIT 60 SECONDS 2 TURN ON 3 WAIT 60 SECONDS 2 TURN ON 1 FILL WATER TANK I O 60 60 I O 60 I O SEC SEC Fill the water tank with fresh, Plug in the appliance and turn it on. still water. The buttons and indicator light will blink simultaneously. 60 Wait 60 seconds. SEC Fill water tank with water, do not go above the max mark. Filtered water will reduce the build up of I limescale. Plug in the appliance and turn it on. 4 PLACE CUP SEC 60ml 5 RINSE MACHINE 6 EMPTY DRIP TRAY 4 PLACE CUP The buttons will blink simultaneously. Wait 60 seconds. 35ml O 35ml 60 SEC I O 60ml 35ml 60 5 WARM CUP 60 SEC 6 READY FOR USE SEC 60ml 35ml 110ml 35ml Espresso 35ml 60ml 60 60ml 35ml Small cup 110ml Mug 60ml x2 SEC 110ml Place a cup under the 110ml dispensing spout. Ensure NO capsule is inserted in the capsule compartment. Press the Long espresso button to prime. All the buttons and the indicator light will blink. At the end of this operation, empty out the water from the drip tray. 35ml 60ml Place a cup under the 110ml dispensing spout. 110ml Ensure NO capsule is inserted in the capsule compartment. Press the desired coffee button once. The selected coffee button will blink. The appliance will stop dispensing on reaching the programmed quantity and emit a beep. 9 8 Espresso Discard the water from the pre-warmed cup or mug, dry and place back under the dispensing spout. Your machine is ready. 1 60 x1 SEC BREWING COFFEE RINSING AFTER BEVERAGES I See individual capsule boxes for information on how to prepare beverage varieties. Traces of the drink O just dispensed may remain inside the machine. When switching from one drink to another or after the last use of the day rinse the machine. 60ml 35ml 1 RAISE THE LEVER 2 INSERT CAPSULE 3 CLOSE THE LEVER 2 RINSE MACHINE 1 PLACE CUP 3 EMPTY DRIP TRAY 110ml 60 x1 Raise the lever to open the capsule compartment. Insert the capsule, pressing it gently into place. SEC Place a cup under the dispensing spout. Close the lever firmly. Ensure NO capsule is inserted in the capsule compartment. x2 60ml 35ml Press the Long espresso button. Repeat 2-3 times, emptying the cup when required. 60ml 35ml At the end of this operation, empty out the water and capsules from the drip tray. 110ml 4 PLACE CUP 5 DISPENSE COFFEE 6 EJECT USED CAPSULE 110ml Espresso Espresso Small cup Long Espresso Mug Espresso Filter coffee x2 x1 60ml 35ml Place a prewarmed cup under the coffee dispensing spout. Raise the lever to eject the Press the desired coffee used capsule into the button once. The selected coffee button will blink. The drawer. Close the lever. appliance will stop dispensing on reaching the programmed quantity and emit a beep. 10 Espresso 110ml 11 OUT OF WATER DURING BREWING CYCLE 1 WHEN THE WATER RUNS OUT INTERUPTED BREWING CYCLE 3 RESUME 2 FILL THE TANK 1 LEVER IS RAISED DISPENSING 2 STOP DISPENSING 3 CLOSE LEVER x3 x1 I O The indicator light will blink Fill the tank with fresh, still RED and the appliance will water. emit 3 beeps; the water tank is empty. Press the same button as before; the appliance will resume dispensing. 60 If the lever is raised while a x1 beverage is being dispensed... 4 RESET ALARM ... the indicator light will blink RED and an intermittent beep will be emitted. The appliance will immediately stop dispensing. Close the lever. 5 BREW A NEW CUP SEC Espresso Espresso Long Espresso M Filter coffee 60ml 35ml 110ml 12 Press a button to reset the alarm. Press the button corresponding to the desired type of coffee to35ml brew a new cup. 13 60ml ADJUSTING THE CUP HEIGHT CHOOSING THE VOLUME The quantities of coffee dispensed is preprogrammed . The volume can be changed according to your personal taste and the size of the cups. 1 ADJUSTABLE CUP HEIGHT 2 LARGE CUPS 3 MOVE DISPENSING 1 INSERT CAPSULE SPOUT 3 PRESS BUTTON 2 PLACE CUP AND HOLD x1 Espresso Long espresso Filter coffee The appliance can be adjusted for the use of large cups or espresso cups. The appliance is initially set for the use of large cups. Insert the capsule, pressing it gently into place (see page10). In order to use espresso cups, you must manually move the tip of the dispensing spout Place a cup under the coffee dispensing spout depending on the type of coffee you wish to programme. x2 4 ESPRESSO CUPS 4 RELEASE BUTTON 5 FACTORY STANDARD VOLUMES 60ml 35ml Espresso x3 110ml In this way you can obtain the best results when using small espresso cups. Espresso Small cup Mug 14 On reaching the desired amount of coffee in a cup, release the button. The appliance will emit 3 beeps. Now the button is reprogrammed. The factory standard volumes are: espresso 35ml, long espresso 60ml and filter coffee 110ml. 15 Press and hold the desired coffee button. CHOOSING THE TEMPERATURE The I temperature O SAVING ENERGY of coffee dispensed can be preprogrammed according to personal taste. I THE LEVERO 1 LIFT x1 The machine features a function which automatically reduces energy consumption by around 98% after one hour has elapsed from last use. 3 CHANGE 2 PRESS BUTTON AND HOLD x1 3 WAIT 60 SECONDS 2 DEACTIVATE 1 ACTIVATE TEMPERATURE I O x1 x1 Switch the machine off and lift the lever. 4 Standard temperature x1 Press and hold down the buttons simultaneously and press the power on/off switch. Ensure both buttons are firmly pressed. The indicator light will will be illuminated RED and one beep will be emitted. x1 60 SEC The machine x1 will automatically reduce consumption one hour after the last. The buttons will blink intermitently. Press the temperature selector button untill you reach the temperature required. The machine will emit a beep. 5 ACTIVATE +1oc The appliance will warm up. Wait 60 seconds. 4 READY CHANGES +2oc To restore normal operating conditions, press any button or raise the lever. +3oc 60 SEC 60 SECI O 60ml 35ml N.B. The button illuminated denotes coffee temperature Standard setting. To scroll through options presstemperature the Long espresso button (see image 3 above). Standard temperature 16 60 SEC When the appliance is ready the buttons will be illuminated WHITE. Switch off and on to activate o c +1changes. the +1oc 110ml 60 SEC 60 SEC 17 DAILY MAINTENANCE DESCALING THE MACHINE BEFORE CLEANING, MAKE SURE THE MACHINE IS SWITCHED OFF, UNPLUGGED AND ALLOWED TO COOL. Do not wash any of the plastic accessories in a dishwasher. The machine features a programme that monitors how much water is used to dispense beverages. This provides the user with indications as to when the machine needs to be descaled. 1 REMOVE DRIP TRAY I O 2 EMPTY CAPSULE DRAWER 3 EMPTY DRIP TRAY 1 DESCALING WARNING 3 PREPARE SOLUTION 2 TURN OFF 1L I O x3 Remove the drip tray and used capsule drawer. Lift the capsule drawer, empty and rinse it out. Remove the grill. Empty the drip tray and rinse it out with fresh water. x3 4 EMPTY WATER ATTENTION! TANK When the indicator light blinks (ORANGE) and the appliance emits 3 beeps, it is advisable to carry out a descaling cycle. 60 SEC 4 PLACE CONTAINER Turn the machine off. x1 5 ACTIVATE Prepare the descaling solution following the manufacturer’s directions and pour 1 litre of solution into the tank. 6 1ST PHASE - DESCALING DESCALING CYCLE 3 SEC 35ml 60ml I O Remove the water tank. Empty and rinse out the tank. No parts are dishwasher safe. After each use clean all parts with a damp cloth. 18 Place a container (at least 110ml 250ml) under the coffee dispensing spout. It is recommended to use a 700ml container. x1 Press and hold down the buttons simultaneously and press the power on/off switch. Ensure both buttons are firmly pressed. Two people may be required to do this. 19 The Long espresso button and the indicator light (ORANGE) blink alternately. Press the button to start the descaling cycle. x1 7 DESCALING CYCLE 8 EMPTY CONTAINER 9 END OF 1ST PHASE 13 END OF 2ND PHASE 14 RINSE OUT WATER 14 END CYCLE TANK 1L 50 I O x1 MIN x1 The machine doses a small amount of the descaling solution and then pauses to allow solution to work. There are 5 dose / pause cycles. Approx. 1 every 10 minutes. 10 RINSE OUT WATER TANK x1 If the container fills up, empty it out. 11 2ND PHASE RINSE CYCLE 1L When the 1st phase of the descaling cycle is over, the Long espresso button and the indicator light (ORANGE) blink alternately. 12 EMPTY CONTAINER When the machine has purged approx. 1 litre, the Long espresso button and the indicator light (ORANGE) blink alternately. The machine will emit a beep. Carefully rinse out the water tank and fill it with fresh drinking water. TO CANCEL THE DESCALING CYCLE I Press the button to quit the cycle and prime machine. 1 EXITING DESCALING CYCLE O The cycle can be cancelled and reset. Hold down the I espresso and filter coffee button for 3 seconds. This will cancel O the descale cycle. N.B. Ensure both buttons are firmly pressed. Two people may be required to do this. I O 3 SEC x1 Carefully rinse out the water tank and fill it with fresh drinking water. The Long espresso button and the indicator light (ORANGE) blink alternately. Press the button to start the rinse cycle. 20 N.B. you will need to empty the container during this cycle. To pause, lift lever or press a button. To resume close lever and press the Long espresso button. x3 x1 21 x3 0 C DRAINING THE APPLIANCE TROUBLESHOOTING When the appliance is not used for a long time or it is only used once a week, it is necessary to drain the water. It is best to use fresh water for each use. 2 EMPTY WATER 1 TURN OFF What do I do if no coffee is brewed? 3 TURN ON • TANK I O I O I O Turn the machine off. Remove and empty the water tank. What do I do if I can’t access, drain or descale feature? The water is empty, the indicator light is on red • Press down in the centre of the button • Fill the tank with fresh water • Ensure you feel the button engage • Make sure the tank is correctly positioned. You should see bubbles in the water rising to the top • See active button zones highlighted • Press the desired coffee button • The appliance will resume brewing What if the coffee is not hot enough? Press and hold down the buttons simultaneously and press the power on/off switch. Ensure both buttons are firmly pressed. Two people may be required to do this. x1 • Preheat the cup (see pg 9) • The cup may be cold or there may be a build up of scale in the machine • Descale the machine x1 4 WAIT 30 SECONDS 5 DRAINAGE CYCLE x1 30 SEC The indicator light will blink (RED). Wait 30 seconds What if the lever cannot be lowered? 6 TURN OFF I O • The used capsule drawer may be full or there may be a capsule stuck inside the machine • Empty out the used capsule drawer • Remove the used capsule 30 SEC The indicator light will blink (RED) and the machine will carry out a drainage cycle. At the end the indicator light blinks and the appliance emits a beep. 22 Turn the machine off. The next time you turn it on you will have to carry out a new start-up procedure (see page 8). 23 GUARANTEE This appliance is of excellent quality and construction. However, if any defects in materials or workmanship do appear during the relevant Guarantee period we will, at our discretion, either repair or replace the defective parts free of charge, subject to the terms and conditions of our Guarantee shown below. This Guarantee covers both parts and labour. Carriage is not included. • Your mains electricity supply is functional Your Guarantee period is as follows: • The defect is not due to a blown fuse • If you wish to claim under this Guarantee you should: 1 years on parts This Guarantee provides benefits which are additional to, and do not affect, your statutory rights. This guarantee does not cover the cost of returning the product to the dealer from whom it was purchased or to Dualit. This Guarantee applies only to products sold and located in mainland Great Britain. It does not cover liability in respect of or replacement of plugs, cables or fuses and also does not cover defects due to: • Failure to use or maintain product in accordance with Dualit's instructions • The product being connected to an unsuitable electricity supply • Accidental damage to or abuse or misuse of the product • The product has not been modified except by Dualit or approved agent • Dismantling of or interference with the product • Theft or attempted theft of the product Send the product, postage or carriage paid, to the dealer from whom it was purchased or to Dualit direct • Ensure that the product is clean and packed carefully (preferably in its original carton) • Enclose details of your name, address and telephone number and when and where the product was purchased, together with proof of purchase (e.g. a till receipt) • Give exact details of the nature of the defect This Guarantee does not cover any other claims whatsoever, including, without limitation, any liability for incidental, indirect or consequential damage, nor does it cover any claims for conversion or modification or for the costs of repair carried out by any third party without the prior consent of Dualit. If replacement parts are fitted to the product this will not extend the period of the Guarantee. Before returning any product under this Guarantee, please check that: • • For further advise contact the Dualit customer helpline on +44 (0)1293 652 500 (09:00 to 17:00 Monday to Friday). You have followed the product instructions correctly Alternatively, email Dualit at [email protected] or visit www.dualit.com. 24 Dualit Limited County Oak Way Crawley West Sussex RH11 7ST Telephone: +44 (0) 1293 652 500 Facsimile: +44 (0) 1293 652 555 Email: info @ dualit.com Web: www.dualit.com GB0710