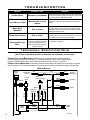
1
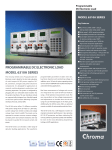
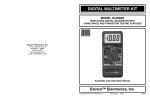
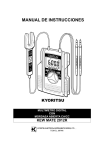
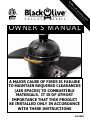
N
IO
AT tion
TR tra
IS egis
EG /r
R c om
.
TY ill
N r
A eg
R liv
R o
A ck
W b la
OWNER’S MANUAL
OW N ER ’ S M AN UAL
4001609
A major cause of fires is failure
to maintain required clearances
(air spaces) to combustible
materials. It is of utmost
importance that this product
be installed only in accordance
with these instructions
50-2615
Safety Precautions
Please read this entire manual before installation and use of
this pellet fuel-burning appliance. Failure to follow these
instructions could result in property damage, bodily injury or
even death.
Contact local building or fire officials about restrictions and installation inspection
requirements in your area
Your pellet grill lights DIFFERENTLY from other grills
You must follow the included lighting instructions (pg.8) in order to prevent damage to your grill
and achieve desired lighting results.
When opening your grill at high temperature (400OF), it is important to lift the lid slowly preventing
any hot smoke from burning your hand. Always use protective heat resistant gloves.
When handling hot ceramics or cooking surfaces, use appropriate protection to avoid burning
injuries. Always use caution when setting hot items on other surfaces.
Keep your pellets DRY
Do not use wet pellets. Keep your spare pellets in a dry environment where they won’t absorb
excess moisture.
After first use, INSPECT all fasteners for tightness
The metal band on the Black Olive is designed to keep the top of your grill secure. Due to
temperature changes causing expansion and contraction, checking the tightness of these fittings
after the first few uses is highly recommended.
DO NOT use water to clean the inside of your grill
The ceramics are porous and will absorb the water. Your grill is self-cleaning. Simply close the
lid after use, allowing any food residue to burn off and carbonize. At the beginning of your next
cook, scrape off the carbon remnants from the cooking surface with a wire brush.
Disposal of ashes
Ashes should be placed in a metal container with a tight-fitting lid. The closed container of ashes
should be placed on a non-combustible floor or on the ground, well away from all combustible
materials, pending final disposal. When the ashes are disposed of by burial in soil or otherwise
locally dispersed, they should be retained in the closed container until all cinders have thoroughly
cooled.
DO NOT use accessories not specified for use with this appliance
3
Safety Precautions
Follow these guidelines to prevent this colourless, odourless gas from poisoning you,
your family or others.
•Know the symptoms of carbon monoxide poisoning: headache, dizziness, weakness, nausea,
vomiting, sleepiness, and confusion. Carbon monoxide reduces the blood’s ability to carry
oxygen. Low blood oxygen levels can result in loss of conciousness and death.
•See a doctor if you or others develop cold or flu-like symptoms while cooking or in the vicinity
of this appliance. Carbon Monoxide poisoning, which can easily be mistaken for a cold or flu,
is often detected too late
•Alcohol consumption and drug use increases the effects of carbon monoxide poisoning
Carbon monoxide is especially toxic to mother and child during pregnancy, infants,
the elderly, smokers, and people with blood circulatory system problems, such as
anemia, or heart disease.
Save these instructions for future reference
Table of Contents
Safety Precautions .................................................................................. 3
Table of Contents ..................................................................................... 5
Specifications .......................................................................................... 6
Contents ................................................................................................. 7
Uncrating ................................................................................................ 8
Assembly . .............................................................................................. 10
Installation Instructions ........................................................................... 13
Lighting Instructions . .............................................................................. 14
Operating Instructions ............................................................................. 15
Maintenance and Service.......................................................................... 16
Black Olive Accessories .............................................................................18
Parts Diagram ..........................................................................................19
Parts List .................................................................................................21
Troubleshooting .......................................................................................23
Technical Specifications ............................................................................24
Warranty .................................................................................................25
5
SPECIFICATIONS
Grilling Area
19 3/8” ( 290 sq in )
Maximum BTU
50,000 *
Minimum BTU
5,000 *
Hopper Size
11 lbs
Ignition Time
2 minutes *
Grill Temp
Max 650 °F *
Electrical Requirements
120 Volts 3.5 Amps
Unit Dimensions
H 49” W 49.5” D 26”
Fuel: Food Grade Pellets
1/4” - 5/16” Diameter x 1” Long
* Depending on pellet type and size
49.5”
22” Dia.
49”
26”
6
Figure 1
CONTENTS
Congratulations on your purchase of the Black Olive Grill, the world’s FIRST Pellet
Kamado Grill
The following instructions will walk you step-by-step through the correct assembly
process of your new Black Olive Grill:
For your safety two people are required to lift and assemble the Black Olive Grill.
Your crated Black Olive Grill come partially assembled with the remainder of the parts in a
seperate box. Reference the Bill of Materials below to insure you have all the correct components
and fasteners.
4
Included Hardware
1
2
3
ITEM NO.
DESCRIPTION
QTY.
1
8-32 x 3/8" Screw, Black
10
2
1/4"-20 Hex Nut, Plated
4
3
1/2" Axle Push Nut
1
4
1/4" - 20 x 2.25" Base Bolt
4
Crate Contents:
• Assembled Ceramic Shell (complete with hinge, bands, handle, thermometer & vent cap)
• Stainless Steel Heat Deflector
}
• Stainless Steel Cooking Grill Support Inside Shell
Component Box Contents:
• Grill Base Assembly with Ash Pan
• Stainless Steel Shell Bottom Mount
Flange w/ Air Diffuser & Ceramic
Blanket
• Control Panel (wired to Hopper Tube Assembly)
• Cast Iron Cooking Grill
• Left Side Shelf
• Grill Cover
• Right Side Shelf with Hopper Lid
• Grill Gripper Tool
• Axle Shaft with 1 push nut installed
• Hopper Tube Assembly
• Hardware Bag
• Base Wheels (x2)
• Stainless Steel Flame Diffuser
Tools Required for Assembly (not included):
• 7/16” wrench or socket
• Rubber
mallet or hammer
• 5/16” socket or flat screwdriver
• Torx T20 screwdriver
• 3/8” socket or wrench
7
UNCRATING
step 1: Remove the crate box. Next,
using a 5/16” socket or flat screwdriver,
remove the screws in the highlighted
areas shown (see Figure 2) on both sides
of the crate. Both side cross members
can now be removed from the crate (See
Figure 3). DO NOT remove the red side
handles.
Figure 2
step 2: Remove all of the screws at the
bottom of the crate using a 5/16” socket
(see Figure 3). There are three screws
per corner. DO NOT attempt to remove
the crate yet.
8
Figure 3
UNCRATING
step 3: Remove the two screws shown
(see Figure 4) from the rear packaging
brace using a 5/16” socket. The crate can
now be removed from the pallet and shell
assembly.
note: The shell assembly is now
unsupported, be careful not to knock it
over
Figure 4
step 4: Next, remove the two bolts on the rear
packaging brace (see Figure 5) using a 3/8” socket.
The rear packaging brace can now be removed and
recycled.
note: The bolts may be re-installed after the plastic
bag and shrink wrap has been removed.
Figure 5
step 5: The shell assembly is now ready to
be installed onto the base assembly.
Figure 6
9
ASSEMBLY
step 1: Install the wheels and axle shaft
onto the grill base assembly by resting
the base assembly on its side as shown in
Figure 7. Use a rubber mallet or hammer to
install the supplied push nut onto the free
end of the axle shaft. After installing the
wheels, right the base assembly and adjust
the leveling legs until it is level.
Figure 7
step 2: With the help of a friend, lift the assembled shell onto the base assembly using the red side
handles. Make sure the bottom vent hole is at the back as shown in Figure 9. The red side handles
can now be removed (see Figure 8), using a 7/16” wrench or socket, and recycled. Remove the
plastic bag and shrink wrap. Open the shell assembly and remove the stainless steel heat deflector
and cooking grill support from the shell bottom. Next, place the stainless steel mount flange, with
attached air diffuser and ceramic blanket, inside making sure the air diffuser is in front of the vent
hole (see Figure 9). Thread the four 1/4”-20 x 2.25” base bolts through the mount flange and
ceramic blanket and into the corresponding holes on the base assembly. Tighten the bolts using a
7/16” wrench or socket.
air
diffuser
vent
hole
mount
flange
front of grill
Figure 8
10
Figure 9
ASSEMBLY
step 3: Connect the wire harness at the bottom of the hopper tube assembly to the base
assembly harness by matching the wire colours together (see Figure 10). Once the wires are
connected tuck the harness into the base assembly and leave the control panel hanging out of
the top of the hopper tube assembly. Ensure the metal harness clamp does not interfere with the
bottom of the hopper tube and the top of the auger tube. Install the hopper tube assembly onto
the side of the base assembly with four 8-32 x 3/8” black screws using a Torx T20 screwdriver.
Be sure to latch the hopper cleanout cover closed (see Figure 11).
hoPPer
cleanout
cover
Figure 10
Figure 11
step 4: Next, install the right side shelf (has a hole with the hopper lid in it) by aligning the
upper hopper on the bottom side of the shelf with the hopper screws (see Figure 12). At the
same time insure the shelf mounting holes are correctly aligned with the mounting studs on the
bottom band (see Figure 15). Use a 1/4”-20 plated hex nut on both shelf studs. Before tightening
the fasteners make sure the side shelf is properly aligned and level. Tighten the hex nuts using
a 7/16” wrench and tighten the hopper screws with a Torx T20 screwdriver (see Figure 13).
Figure 12
Figure 13
11
ASSEMBLY
step 5: Mount the control
panel underneath the front of
the right side shelf using two
8-32 x 3/8” black screws (see
Figure 14). The 4 remaining
black screws are spares.
Figure 14
step 6: Install the left side shelf on to the bottom band
mounting studs using the two remaining 1/4”-20 plated
hex nuts (see Figure 15).
note: The left side shelf can be left off to allow the grill
to fit into smaller spaces.
Figure 16
Figure 15
step 7: Install the stainless steel flame diffuser
inside the shell bottom and on top of the stainless
steel heat deflector (see Figure 17).
flame diffuser
12
step 8: Finally, re-install the cooking grill
support and place the Cast Cooking Grill on top
(see Figure 18). your black olive Grill is now
fully assembled and ready for installation!
heat deflector
Figure 17
Figure 18
INSTALLATION INSTRUCTIONS
read all instructions before installing and using the appliance
Before installing your Black Olive Grill insure that all of the fasteners have been correctly
tightened.
Your Black Olive Grill is rated for OUTDOOR USE ONLY. The grill must always be placed
outdoors, away from structures and NEVER inside or in proximity to an enclosed area.
Be aware of any local bylaws that may specify a required distance between outdoor
cookers and any structures, or that may limit outdoor flame of any type during drought or
fire hazard periods.
PULL, DON’T PUSH: When moving your grill lift on opposite side of wheels and roll. The
grill is not designed to roll over uneven terrain such as gravel, or be rolled on soft terrain.
Always make sure you have an extra pair of hands.
Make sure your Black Olive Grill has the correct clearances from any combustible materials
from the back of the unit as well as each side (see Figure 19).
Always place and use your Black Olive Grill in a SAFE and LEVEL spot. DO NOT place
the grill on slopes, uneven surfaces, or under any unprotected combustible materials within
36” from the top of the grill.
ALWAYS store your wood pellets in a dry location away from any heat-producing appliances
and other fuel containers.
DO NOT store pellets in the grill’s hopper when it is not in use if it is kept in an area of high
moisture or humidity. These conditions will cause the pellets to swell inside the grill and clog
the hopper tube (see Troubleshooting Section).
12” from back of shell
12” from
14”from
side of
side of shell
shell
(no shelf)
Figure 19
13
LIGHTING INSTRUCTIONS
ALWAYS REMOVE THE GRILL COVER BEFORE LIGHTING THE GRILL
Fuel Type: Use only food grade wood pellet fuel with a low ash content. DO NOT use pellet
fuel labeled as having additives
To Start Grill: Empty ash pan and check burn
tube bottom holes for blockage (see Figure 22).
Fill the hopper with food grade pellets (see Figure
20), then turn knob to START position. If the auger
needs to be primed, turn knob to HIGH position for
5 min, then back to START position (see Figure 21).
Note: When starting the grill in a damp environment,
set the control knob to LOW, not START, until a
fire has been established.
To Operate Pellet Grill: When a fire has been
established set the control knob to the desired
setting.
Figure 20
To Turn Off: Turn the control knob to the OFF position. The fuel will stop and the fan will stay
running until the fire is out. DO NOT unplug the grill until it has completely cooled down.
CAUTION: Improper Use Can Cause Uncontrolled Fire. This appliance is intended to
burn food grade pellets only. Never use gasoline, gasoline-type lantern fuel, kerosene, charcoal
lighter fluid, or similar liquids to start or ‘freshen up’ a fire in this appliance. Keep all such liquids
well away from the appliance when in use.
If Fire Occurs: Call fire department. DO NOT try to move appliance, smother the fire, or put
water on the fire.
Control Knob
14
Smoke Switch
Figure 21
OPERATING INSTRUCTIONS
For Your Safety, Read Safety Precautions And
Lighting Instructions Before Operating
When grilling or searing food, push the smoke switch (see Figure 21 on previous page) to GRILL
and set the control knob to the desired setting. The approximate temperature range in
‘Grill Mode’ is 250°F (LOW) to 650°F (HIGH).
When a lower consistent temperature is desired for smoking purposes push the smoke switch
to SMOKE and set the control knob to the desired setting. The approximate temperature
range in ‘Smoke Mode’ is 150°F (LOW) to 250°F (HIGH).
The length of fuel (pellets) used can greatly affect the temperature of your grill. The recommended
pellet length should be no longer than 1” (25.4cm). Longer pellets have a slower feed rate that
cause the grill to burn colder. When changing or refilling pellets be aware of the average length
and adjust your grill setting accordingly.
The temperature ranges below can be used as an approximate guide when using your grill:
Smoking 150°F - 250°F
Grilling 250°F - 500°F
Searing 500°F - 650°F
DO NOT attempt to move your Black Olive Grill when it is hot or while cooking.
DO USE CAUTION when touching exterior of grill: Exterior surfaces are HOT when in use.
Always keep children, pets, and combustible items away from your grill.
DO USE CAUTION when removing hot cooking surfaces including the cooking grate(s) or pizza
stone from your grill. Always use protective gloves and gripping tools to avoid burns. Never set
hot items on or near combustible surfaces.
DO NOT leave your grill unattended with the lid open while lit. Be aware OF FIRE HAZARDS
(dry leaves, decking and other combustible materials) that may be in proximity to the grill while
it is in use as they may present a fire hazard if any sparks are allowed to come into contact (see
Installation Instructions).
Always cover your grill with the supplied grill cover when it is not in use. DO NOT put the grill
cover back on until the outside of the grill has completely cooled down.
THE BLACK OLIVE PELLET GRILL IS SAFE AND HAZARD FREE WHEN USED AS
INTENDED AND ACCORDING TO SAFETY GUIDELINES, AND WILL PROVIDE YEARS
OF TROUBLE-FREE USE AND ENJOYMENT.
IT IS THE USERS RESPONSIBILITY TO MAINTAIN SAFE OPERATION OF THE GRILL
AND TO EXERCISE REASONABLE STANDARDS OF CARE AT ALL TIMES.
SAVE THESE INSTRUCTIONS
15
MAINTENANCE AND SERVICE
ASH PAN & BURN TUBE BOTTOM:
Occasionally, you will need to empty the ash pan and clean the burn tube
bottom underneath the grill. Failure to keep the burn tube clean and holes
unblocked can result in unwanted sooting.
1. If the grill is running, turn off and allow it to completely cool down.
2. Using protective gloves, remove the ash pan from underneath
the grill.
3. Ensure there are no live ashes and empty the ash pan.
4. Inspect the attached burn tube bottom for any clogged
holes (see Figure 22) and clean with a wire brush.
5. Re-install the ash pan underneath the grill
Burn Tube Bottom
HOPPER & AUGER TUBES:
Occasionally you should clean out the grill’s hopper
and auger tubes to prevent any debris from building up.
A cleaning should only be done when the hopper is empty. Figure 22
If the auger or hopper tube is clogged see the troubleshooting section.
1. If the grill is running, turn off and allow it to completely
cool down. Once the fan has stopped running unplug the
grill from the electrical outlet.
2. Place a container underneath the hopper cleanout to catch
any excess fuel that may spill out.
3. Unlatch and open the hopper cleanout cover located on
the right side of the grill’s base (see Figure 23).
4. Use a vacuum to clean any remaining debris out of both
the auger and hopper tubes.
5. Close and re-latch hopper cleanout cover. Plug the grill back
Figure 23
into the outlet.
FULL UNIT CLEANOUT:
To preserve the ideal grilling setup and prevent any unwanted sooting it is recommended to
complete a full unit cleanout after every 20-25lbs. of fuel burnt.
1. If the grill is running, turn off and allow it to completely cool down. Once the fan has stopped
running unplug the grill from the electrical outlet.
2. Complete steps 2-4 as outlined in the Ash Pan & Burn Tube Bottom section above.
3. Complete steps 2-4 as outlined in the Hopper & Auger Tubes section above.
4. Open the grill and, using protective gloves, remove the cooking grill as well as any accessories
that are inside i.e. pizza stone/heat deflector, double grill etc.
5. Remove the flame diffuser at the bottom of the shell (see Figure 24) and inspect the open
burn tube for any blockages or ash buildup.
6. Position a container underneath the grill directly below the burn tube and, using a brush,
sweep off any ash that has accumulated on the stainless steel heat deflector (see Figure 24
on next page) into the open burn tube.
7. Clean out the drop tube, on the side of the burn tube, by using an unfolded wire coat hanger
to free up any ash buildup that has accumulated.
8. Re-latch the hopper cleanout cover and re-install the ash pan, flame diffuser, cooking grill
and any accessories.
9. Plug the grill back into the outlet.
16
MAINTENANCE AND SERVICE
Grill Support
Stainless Steel
Heat Deflector
Flame Diffuser
Figure 24
GRILL BANDS:
Check the position and tightness of the bands at the beginning of each grilling season or annually.
If the bands are in the proper position use two 7/16” wrenches to check the tightness of each
band connector. You should not be able to easily turn the wrench while holding the nut in place.
If loose, tighten firmly.
MOLD:
If the Black Olive Grill is subjected to the elements for an extended length of time and not used,
moisture can be trapped inside the grill and areas of mold may appear on the grill’s internal
ceramics. Start the grill and let it cook on High for 30 minutes to kill any mold that has formed.
Turn the grill off and, after it has cooled, take a wire brush and scrape off any left over mold.
DO NOT USE BLEACH OR OTHER CLEANING PRODUCTS.
GASKET REPLACEMENT:
The lid gasket may degrade over time, and depending on your use, may need to be replaced
every 1-2 years. A replacement gasket can be purchased through your local Black Olive Dealer.
HEAT DEFLECTOR/PIZZA STONE: The heat deflector/pizza stone should only be cleaned in
the manner as described.
1. Allow ceramics to cool completely before cleaning or storage.
2. Scrape or wipe off food material with a brush or clean dry cloth after each use, and store
indoors in a dry location.
DO NOT place on tables or surfaces that are not heat resistant
DO NOT use to cook with on a stove top
DO NOT season with olive oil or other cooking oils
DO NOT use cleaning chemicals or soap and water
DO NOT soak in water. It will retain water, which may cause it to crack with the next use.
17
black olive accessories
bamboo side
shelves: These
cast iron Griddle
plate: This griddle plate
is perfect for breakfast
or brunch on the grill. It
gives your Black Olive
even more versatility and
allows you to cook bacon,
eggs, hashbrowns, and
even pancakes!
50-2735
shape of the rib rack
allows you to cook large
quantities of ribs, or
anything that can be
placed in the slots by
cooking them vertically
in the rack. It can also
be used upside down to
cradle large roasts.
50-2594
50-2591
stainless steel
cooking Grill: This
cooking grill has superior
corrosion resistance and
provides a second grilling
surface that can be used
when the cast grill is
placed on the lower level
of the grill support
chicken rack: An
attractive alternative
to serving your favorite
poultry from grill to table
at your next BBQ. This
stand-up rack ensures
proper flow of heat,
shortening the cooking
time, while searing and
cooking the bird from the
inside.
50-2595
rib rack: The unique
pizza stone/heat
deflector: When
used as a Pizza Stone,
this versatile piece of
cookware operates as a
heat sink, providing an
evenly-heated surface for
cooking pizza or other
baked good on your
grill. Doubling as a Heat
Deflector, it can also be
used to circulate heat
around your food for
thoroughly cooked, moist
and tender results.
multipurpose shelves
simply sit on top of the
existing shelves and
can be used as cutting
boards or prep. stations.
Made from Bamboo, they
will retain their natural
aesthetic beauty for all
your future grilling.
50-2736
double cooking
Grill: This 2-tier cooking
50-2590
grill can further increase
the cooking area when
used in conjuction with
the SS Cooking Grill,
providing three seperate
levels of grilling surface
to effectively roast, bake,
and smoke foods high in
the lid.
50-2593
do not use accessories not specified for use with this appliance
18
26
25
29
28
23
24
27
4
18
20
19
17
16
22
8
14
1B
10
1A
7
21
15
30
13
9
3
12
11
2
6
5
PARTS DIAGRAM
19
PARTS DIAGRAM
34
31
38
33
36
35
52
37
39
32
42
41
40
43
51
50
44
46
49
48
20
47
45
PARTS LIST
Item #Description
Part #
1ABlack Olive Body (Top)
50-2739
1BBlack Olive Body (Bottom)
50-2740
2Top Band Assembly
50-2741
3Bottom Band Assembly 50-2742
4Left Side Shelf
50-2744
5Right Side Shelf
50-2743
6Hopper Door
50-2699
7Bamboo Handle
50-2700
8Body (Top) Vent Cap
50-2701
9Hopper and Tube Assembly
50-2745
10Body (Top or Bottom) Gasket
50-2704
11Hinge Assembly
50-2746
12Replacement Springs
50-2706
13Control Panel w/ Decal
50-2748
14Dial-A-Fire w/ Knob
50-2708
15Smoke Switch
50-2747
16SS Flame Diffuser
50-2749
17SS Heat Deflector
50-2750
18SS Mount Flange w/ Air Diffuser
50-2751
19Ceramic Blanket 11” Dia.
50-2711
20Silicone Gasket 8” Dia.
50-2712
21SS Cooking Grill Support
50-2752
22Thermometer
50-2713
23Accessories - Cast Cooking Grill
50-2660
24Accessories - SS Cooking Grill
50-2736
25Accessories - Double Cooking Grill
50-2593
26Accessories - Heat Deflector/Pizza Stone
50-2594
27Accessories - Chicken Rack
50-2590
28Accessories - Rib Rack
50-2591
29Accessories - Bamboo Side Shelves
50-2595
30Accessories - Black Olive Grill Cover
50-2596
21
PARTS LIST
31Auger MotorEF-001
32Auger Bushing Collar
50-968
33Auger Bushing
50-1806
34Leveling Legs
50-2714
220 Degree High Limit Switch
50-2755
36Ignitor Tube
50-2715
37Ignitor
50-619
35
38Electrical Cord Strain ReliefEC-044
39
120V Electrical Power Cord 8ft.EC-042
40Auger Tube Cover
50-2717
41
50-2725
160 Degree Fan Switch
42Burn Tube
50-2753
43Auger Timer Block
50-2716
44Auger Assembly
50-2718
45Base Side Access Plate w/ Gasket
50-2729
46Spider Fan
50-2719
47Burn Tube Bottom
50-2754
48Ash Pan
50-2723
49Air Pump
50-1702
50Axel w/ Wheel Retainers
50-2757
51Black Olive Wheel End Caps (set of 2)
50-2727
52Black Olive Wheels8” Dia.
50-2756
- Black Olive Wire Harness (Lower)
50-2731
- Dial-a-Fire Cable Harness (Upper)
50-2732
50-2615
- Black Olive Owner’s Manual
22
TROUBLESHOOTING
Problem
Possible Cause
Grill is not plugged in
Hopper is empty
Drop tube is clogged
Grill Will Not Light
(No Feed)
Auger or hopper tube is
clogged
Solution
Check outlet for power and plug grill in
Refill hopper with dry food grade pellets
Conduct a proper cleanout as outlined in the Maintenance
and Service Section.
Conduct a proper cleanout as outlined in the
Maintenance and Service Section. Using a long
screwdriver, poke the clogged area until it is loose. Use
a vacuum to clean up the now unclogged debris.
Conduct a proper cleanout as outlined in the
Maintenance and Service Section and keep hopper
Auger motor not working cleanout cover open. Plug the grill back in and turn
control knob to HIGH. Check if the auger is turning. If
not, contact your local Black Olive Dealer.
Grill Will Not Light
Ignitor not working
(No Ignition)
Air pump is not running
When the grill is turned on check the base of the grill
for a vibration. If no vibration is present the pump is not
running. Unplug grill and check electrical connections on
base of grill. If air pump will still not run, contact your
local Black Olive Dealer.
Electrical problem
Unplug the grill and check connections behind
the control panel and on grill base (See Technical
Specifications). Contact your local Black Olive Dealer for
further assistance.
Faulty timer block
Turn the grill ON and listen to the auger for variations in
off-time when set to LOW and then HIGH. The correct
off time for LOW is 9 sec. and for HIGH is 0.5 sec. If
there is no change between LOW and HIGH contact
your local Black Olive Dealer.
Grill Will Start but
no Flame Control
Grill is turned off
Ash pan is open
Erratic or Sooty
Flame
Turn grill on to HIGH and check ash pan for fresh
pellets. If no pellets are found, it is a feed problem. If
pellets are present, an orange glow should be seen in
the burn tube when looking from the top of the grill.
If there is an orange glow check the ignitor air pump
and hose for leaks. If no orange glow can be seen, the
ignitor is not working (See Technical Specifications).
Contact your local Black Olive Dealer.
Turn grill back ON
Close the ash pan
Hopper is almost empty
Grill setting
Refill hopper with dry food grade pellets
Dirty burn tube bottom
Inspect and clean the burn tube bottom if needed as
outlined in the Maintenance and Service Section.
Dirty burn tube
Turn off grill and allow it to completely cool down. Open
grill and remove cooking grill(s) and flame diffuser.
Remove ash pan from underneath grill and inspect burn
tube for ash buildup. If ash buildup is found, place a
container underneath the burn tube and remove all ash
from burn tube.
Combustion blower not
working properly
Fuel BTU rating
Adjust the control knob to a lower setting
When the grill is ON you should be able to feel air
flowing through the vent on the bottom of the grill’s
base. If no air flow is present, call your local Black Olive
Dealer for further assistance.
A fuel with a high BTU rating will cause the grill flame
to soot. Be sure to use only dry food grade pellets.
23
TROUBLESHOOTING
Problem
Leaking Smoke
Possible Cause
Solution
Incorrect lid alignment
Close the lid of the grill and, using two 7/16” wrenches,
loosen the top band to adjust the lid until it aligns with
the bottom properly. Retighten the band.
Broken hinge or loose
Lid is Heavy to Open
springs
Contact your local Black Olive Dealer for replacement
springs.
Black Olive
‘Sweating’
This is normal
Under certain temperatures the grill may bead or sweat.
The grill is made of a naturally porus ceramic material
that holds moisture and, when heated, releases it both
inside and outside the grill.
Intermittent Sounds
This is normal
Intermittent sounds of squeaking or clunking coming
from the auger tube area are normal when your grill is in
use, mostly because of fuel type and length.
Univited Guests in
Grill
Insects and other vermin can
climb into exposed areas of the
grill and possibly damage the
electrical components making it
unsafe to operate.
Depending on your location, check your grill regularly for
any intruders or damage.
Technical Specifications
(All Values taken when the grill is unplugged and completely cooled down)
Correct Dial-a-fire Resistance: Remove the base side access plate and unplug both the
red and orange wires from the timer block. The resistance between the two wires should measure
between 700kΩ and 900kΩ when set to LOW and between 0Ω and 10Ω when set to HIGH.
Correct Ignitor Resistance: Remove the base side access plate and unplug both white ignitor wires from
the wire harness. The resistance between the two white ignitor wires should measure between 30Ω and 40Ω.
Wiring Diagram
Igniter
Temperature
Sensor
1M Resistor
Red
Black
White
120V
Grounded plug
Control
Knob
Black
Blower
Combustion
Black
White
Air Pump
Black
White
Ignitor
Smoke
switch
1M Resis
Orange
Green
White
Black
Black
Black
Black
White
Red
White
Ground
High Limit
Sensor
Orange
Red
Red
Black
Red
Smoke
switch
White
Auger
Timer
White
White
Yellow
Yellow
Auger
Motor
Au
Tim
Black
C-13972
24
Smoke
Igniter
Temperature
Red
Red
Red
Blower
Smoke
Black Olive Pellet Grill Warranty
Sherwood Industries Ltd prides itself in producing the highest level of quality and customer service. The Black Olive Grill
is built using only the finest material to create a durable ceramic grill/smoker. Our commitment is backed by our Exclusive
Limited Lifetime Warranty to the original purchaser. Sherwood Industries Ltd takes every precaution to utilize materials
that retard rust. Even with these safeguards the material can be compromised by various substances and conditions
beyond the manufacturer’s control.
Limited 7-Year Warranty
Under this warranty, the manufacturer covers the ceramic shell. Defective ceramic shells will be replaced upon return to the
manufacturer within seven (7) years. The manufacturer is not liable for any transportation charges, packaging costs,
export/import duties, or levied taxes. Please see the Exclusions and Restrictions section on the following page, as certain
limitations apply to this warranty.
Limited 5-Year Warranty
Under this warranty, metal components and cast iron parts are covered against defects in material and workmanship
for a period of five (5) years. Metal components covered include: hopper, stainless steel grill, hinges and cart. Please
see the Exclusions and Restrictions section on the following page, as certain limitations apply to this warranty.
Limited 3-Year Warranty
Under this warranty, all Black Olive Grill electrical components are covered for a three (3) year period. Components covered
under this warranty include: motor assemblies, feed/pellet auger components, burn chamber components, ignition system.
Please see the Exclusions and Restrictions section on the following page, as certain limitations apply to this warranty.
Warranty Statement
NEITHER THE MANUFACTURER, NOR THE SUPPLIERS TO THE PURCHASER, ACCEPTS RESPONSIBILITY, LEGAL
OR OTHERWISE, FOR THE INCIDENTAL OR CONSEQUENTIAL DAMAGE TO THE PROPERTY OR PERSONS
RESULTING FROM THE USE OF THIS PRODUCT.
THE MANUFACTURER SHALL IN NO EVENT BE LIABLE FOR ANY SPECIAL, INDIRECT, CONSEQUENTIAL OR
OTHER DAMAGES OF ANY NATURE WHATSOEVER IN EXCESS OF THE ORIGINAL PURCHASE PRICE OF THIS
PRODUCT. ALL WARRANTIES BY MANUFACTURER ARE SET FORTH HEREIN AND NO CLAIM SHALL BE MADE
AGAINST MANUFACTURER ON ANY ORAL WARRANTY OR REPRESENTATION.
Warning: An Online Purchase Will Void Your Warranty
For warranty service, please contact your local dealer. Before you call, please have the following information
available:
MODEL NUMBER _________________________________________
SERIAL NUMBER _________________________________________
PROOF OF PURCHASE (detailed receipts)
25
Black Olive Pellet Grill Warranty
Exclusions and Restrictions
1. This Limited Warranty does not apply to damage caused by abuse or use of the product for purposes other than
that for which it is designed. If damage is caused by lack of proper use, assembly, maintenance or installation,
not applicable.
2. This Limited Warranty does not cover thermometers or gaskets.
3. This Limited Warranty does not cover damage from normal wear and tear from use of the product (for example,
scratches, dents, dings and chipping) or changes in the appearance of the grill that do not affect its performance.
4. This Black Olive Grill must be operated and maintained at all times in accordance with the instructions in the
Owner’s Manual.
5. If the unit shows signs of neglect or misuse, it will not be covered under the terms of this Warranty policy.
6. Performance problems due to operator error will not be covered by the Limited Warranty policy.
7.
such is not covered under this warranty.
8.
9. Burning anything other than premium food grade pellets may void the warranty.
10. There is no written or implied performance warranty on the Black Olive Grill, as the manufacturer has no control
over the assembly, operation, cleaning and maintenance or the type of fuel burned.
11. This Limited Warranty will not apply if your product has not been assembled, operated, cleaned and maintained in
strict accordance with the manufacturer’s instructions, or placed in accordance with minimum clearances as listed
on rating label.
12.
13. High temperatures, excessive humidity, chlorine, industrial fumes, fertilizers, lawn pesticides and salt are some of
the substances that can affect metal coatings. For these reasons, the Limited Warranty DOES NOT COVER RUST
OR OXIDATION, unless there is a loss of structural integrity on the grill components.
14. If the grill is used for commercial purposes, it is excluded from the Limited Warranty. The Limited Warranty is
automatically voided if the grill’s serial number has been removed or altered in any way.
15. Labour to replace or repair items under this Limited Warranty will be covered per our warranty service fee
reimbursement schedule.
16. This Limited Warranty is applicable only to the original purchaser and it is nontransferable.
17. If for any reason any section of the Limited Warranty is declared invalid, the balance of the warranty remains in
effect and all other clauses shall remain in effect.
18. The manufacturer will be responsible for stocking parts for a maximum of seven (7) years after discontinuing
production of the item.
19. The manufacturer will not be responsible for performance issues caused by environmental conditions.
20. Damage to porcelain/painted surfaces caused by scratches, melted items, or other external scores and residues
left on these surfaces from the use of abrasive cleaners or polishes is not covered in this warranty.
21. The Black Olive Grill must be protected by the supplied BBQ Cover when the unit is not in use.
with use over time.
23. Optional accessories for the Black Olive Grill are covered against defect for a period of one (1) year from purchase.
24. Fading of the BBQ cover is a natural result of exposure to the elements and is not covered by warranty.
26
25. If the grill is exposed to high ambient temperatures for prolonged periods of time without being moved, flat spots may develop
on the grill’s wheels. Wheel flat spots are not covered by this warranty.
NOTES
27
SHERWOOD INDUSTRIES LTD
6782 OLDFIELD ROAD, VICTORIA, BRITISH COLUMBIA, V8M 2A3
www.blackolivegrill.com
December 10, 2012
C-14036