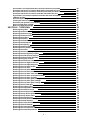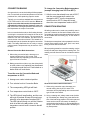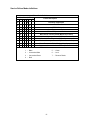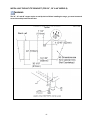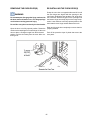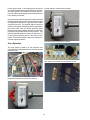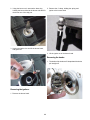
1
30, 36 & 48 INCH
DUAL FUEL
RANGES
SERVICE MANUAL
5995461133 5/2006
1
SAFE SERVICING PRACTICES - ALL APPLIANCES
To avoid personal injury and/or property damage, it is important that Safe
Servicing Practices be observed. The following are some limited examples of
safe practices:
1. DO NOT attempt a product repair if you have any doubts as to your ability to
complete it in a safe and satisfactory manner.
2. Before servicing or moving an appliance:
• Remove the power cord from the electrical outlet, trip the circuit breaker to
the OFF position, or remove the fuse.
• Turn off the gas supply and allow any residual gas to dissipate for 10 to 20
minutes.
3. Never interfere with the proper operation of any safety device.
4. USE ONLY REPLACEMENT PARTS CATALOGED FOR THIS APPLIANCE.
SUBSTITUTIONS MAY DEFEAT COMPLIANCE WITH SAFETY
STANDARDS SET FOR HOME APPLIANCES.
5. GROUNDING: The standard color coding for safety ground wires is GREEN,
or GREEN with YELLOW STRIPES. Ground leads are not to be used as current
carrying conductors. It is EXTREMELY important that the service technician
reestablish all safety grounds prior to completion of service. Failure to do so
will create a hazard.
6. Prior to returning the product to service, ensure that:
• All electrical connections are correct and secure
• All electrical leads are properly dressed and secured away from sharp
edges, high-temperature components, and moving parts
• All non-insulated electrical terminals, connectors, heaters, etc. are
adequately spaced away from all metal parts and panels
• All safety grounds (both internal and external) are correctly and securely
connected
• All panels are properly and securely reassembled
ATTENTION!!!
This service manual is intended for use by persons having electrical and mechanical
training and a level of knowledge of these subjects generally considered acceptable in the
appliance repair trade. Electrolux Major Appliances cannot be responsible, nor assume
any liability, for injury or damage of any kind arising from the use of this manual.
© 2005 Electrolux Major Appliances
2
Safe servicing practices
Service failure mode
Resistance chart
Testing the function and temperature selectors
Function selector
Temperature selector
2
8
9
10
10
10
Specifications
11
30 inch duel fuel freestanding range
Smooth glide on racks
Four burner, interlocking grates
Third element, European convictions system
Vantage flame
Sealed cooktop spill-basin
Control panel features
Cooktop
Oven cavity
Additional features
Accessories
Black knobs
Backsplash
Cut out dimensions
36 inch duel fuel freestanding range
Smooth glide on racks
Six burner, interlocking grates
Third element, European convictions system
Vantage flame
Sealed cooktop spill-basin
24" optional backsplash
Control panel features
Cooktop
Oven cavity
Additional features
Accessories
Black knobs
Backsplash
Cut out dimensions
48 inch duel fuel freestanding range
Smooth glide on racks
Six burner, interlocking grates
Third element, European convictions system
Vantage flame
Sealed cooktop spill-basin
24" optional backsplash
Control panel features
Cooktop
Large oven cavity
Small oven cavity
Additional features
Accessories
Black knobs
Backsplash
Cut out dimensions
Sample wiring diagram of the large oven section
Sample wiring diagram of the small oven section
Sample wiring diagram of the top burner section
3
11
11
11
11
11
11
12
12
12
12
12
12
12
12
14
14
14
14
14
14
14
15
15
15
15
15
15
15
15
17
17
17
17
17
17
17
18
18
18
18
18
18
18
18
18
20
21
22
Section A - OWNER’S GUIDE
23
Safety
Safety precautions
Definitions
General precautions
Liquefied petroleum (propane) gas conversion
Features overview
Model features
Cooktop features
Proper burner adjustments
Burner locations
Sealed burner configurations
Brass burner rings
Burn igniters
Control knobs
Placement of burner grates
Flame adjustment
Surface cooking
Using the griddle
Using the wok stand
To properly position the wok stand
Using the simmer plate
Setting surface controls
Operation
Before cooking
Operating the control valves
Setting the burner flame height
Energy saving tips
Getting started
Installing and removing the oven rack supports
Removing and replacing the oven racks
Arranging oven racks
Recommended rack position for broiling, baking and roasting
Baking layer cakes with 1 or 2 oven racks
Air circulation in the oven
Companion oven
Setting oven control
Selector knob function
Oven functions
Cooking instructions
Baking
Baking problems
Convection baking
Convection roasting
Broiling
Broiling times
Using the self-clean feature
Starting the oven self-clean cycle
Cleaning tips for range cooktop
Cleaning stainless steel surfaces
Cleaning knobs and knob bezels
Cleaning burner bases
Cleaning burner rings
Cleaning burner igniters
General cleaning
Oven light
4
23
23
23
23
25
26
26
27
27
27
28
28
28
28
28
29
29
30
30
31
31
31
33
33
33
33
34
35
35
35
36
36
36
37
37
37
37
37
38
38
39
40
40
41
42
43
43
44
45
45
45
46
46
47
48
To replace the oven light
Solutions to common problems
Service failure mode definitions
Sample warranty
48
49
51
52
Section B - INSTALLATION INSTRUCTIONS
Safety
Definitions
Finding information
Preparing for installation
Gas supply requirements
Gas and electric requirements table
Electrical power supply requirements
Gas and electrical rough-in
Cabinet and countertop preparation
Cutout dimensions
E36DF76EPS and E48DF76EPS overall dimensions side view
E30DF74EPS overall dimensions side view
Installing the anti-tip bracket
Gas regulator and electrical conduit location
Installing optional backguards
Removing the oven door
Reinstalling the oven door
Making the electrical connections
Grounding instructions
Connecting to a four-wire electrical system
Connecting the green appliance wire to the neutral supply wire
Connecting the green appliance wire to a grounded
supply wire or a grounded cold water pipe
Making the gas connection
Installing the range
Installing the burner components
Operation
SECTION C - THEORY OF OPERATION
53
53
53
54
54
54
54
55
55
55
57
58
59
60
63
64
65
65
66
66
66
66
67
68
68
68
69
70
Gas flow
Top burner ignition and reignition system
Oven operation
Air movement in the oven during convection bake and convection roast
Cooling blower air movement
The self-cleaning cycle
SECTION D -TROUBLEINGSHOOTING
70
73
74
76
77
78
79
Index
Electrical components will not operate
Flame too large and yellow on top burner
Flame too small on top burner
Flame goes out, when valve is turned to the low position
Top burners, not burning properly
One top burner, not burning properly
Top burner valve difficult to turn
Igniters do not spark when the burner knob is turned to the lite position
Igniters spark but burner does not ignite
Igniters continue to spark after burner is ignited
Oven does not operate in any fuction
Oven temperature off more than 10°
Oven does not operate in bake
Oven does not operate in broil
Oven does not heat in convection bake and convection fan does not run
5
79
80
80
80
80
80
81
81
81
81
81
82
83
83
84
84
Oven heats in convection bake but convection fan does not operate
Oven does not heat in convection bake but the convection fan runs
Oven does not heat in convection roast and convection fan does not run
Oven does not heat in convection roast but convection fan runs
Oven heats in convection roast but convection fan does not operate
LEDs do not light
One LED does not light
Cooling fan does not operate
Oven does not operate in self-cleaning
One oven light does not light
Both oven lights do not light
SECTION E - TEARDOWN
84
85
85
86
86
86
86
86
87
87
87
88
Removing the grates
Removing the burner caps
Removing the burner rings
Removing the burner heads
Removing the igniters
Removing the knobs
Removing the knob bezels
Removing the backsplash
Removing the spill tray
Removing the burner tube
Removing the air shutter tube
Removing the orifice
Removing the front spill tray support trim
Removing the front spill tray support
Removing the side spill tray support
Removing the burner tube assembly
Removing the igniter module
Removing the electronic oven control board
Removing the oven light transformer
Removing the oven high temp limit
Removing the oven door handle
Removing the oven door
Removing the oven door seal
Removing the oven door inner liner
Removing the oven door cams and springs
Removing the oven door air directional baffle
Removing the oven door air baffle
Removing the oven door glass package shield
Removing the oven door glass package
Removing the oven door glass package seal
Removing the air intake grill
Removing the control panel
Removing the temperature selector
Removing the interface board
Removing the function selector
Removing the top burner igniter switch
Removing the top burner valve
Removing the manifold pipe
Removing the kick panel assembly
Removing the bake element
Removing the convection filter screen
Removing the broil element
Removing the convection baffle
Removing the convection fan blade
Removing the convection element
6
88
88
88
88
89
89
90
90
90
91
91
91
91
92
92
92
93
94
94
95
95
96
96
96
97
97
97
98
98
98
98
99
99
100
100
100
100
101
101
102
102
102
103
103
103
Removing the smoke eliminator
Removing the oven sensor
Removing the rack support
Removing the oven light
Removing the oven latch assembly
Removing the pressure regulator
Removing the back cover
Removing the convection fan motor
Removing the air channel cover
Removing the air channel
Removing the cooling fan assembly
Removing the cooling fan assembly cover
Removing the remove oven rack switch
Removing the pressure regulator
Removing the side panel
Removing the side filler (36” models)
Removing the door rollers
103
104
104
104
105
105
105
106
106
107
107
107
107
108
108
109
110
7
Service Failure Mode
Failure Mode Definition
Front Panel LED
Failure Description
1 2 3 4 5 6 7
X
X
X
X
X
X
X
X
X
X
X
X
X
X
X
X
X X
X
X
X
X
X
Runaway Temperature
Incorrect Micro ID
Incorrect EEPROM Checksum
Open Temperature Probe
Shorted Temperature Probe
Max Unlock Time Exceeded (Motor Door Latch)
Max Unlock Attempts.Exceeded (Motor Door Latch)
Max Lock Time Exceeded (Motor Door Latch)
Max Lock Attempts.Exceeded (Motor Door Latch)
Motor Door Latch Failed During Clean Operation
Inter Processor Communications Failure (Motor Door Latch)
LED Definitions
1
2
3
4
-
Bake
Convection Bake
Convection Roast
Broil
5 - Clean
6 - Lock
7 - Remove Racks
Runaway Temperature.
Check the resistance of the oven temperature probe, it should be between
1050 & 1100 ohms. If good, replace electronic control board.
Incorrect micro ID.
Replace electronic control board.
Incorrect EEPROM
Chechsum.
Replace electronic control board.
Open temperature probe
Check the resistance of the oven temperature probe, it should be between
1050 &1100 ohms. If good, replace electronic control board.
Shorted temperature probe
Check the resistance of the oven temperature probe, it should be between
1050 &1100 ohms. If good, replace the electronic control board.
Max unlock Time
exceeded (motor
door latch)
Set the oven up for a clean cycle. Does the latch motor turn?
No. Check the voltage applied to the latch motor. If line to neutral,
replace latch mechanism. If zero, replace electronic control board.
Yes. Check the phase and lock switches. They should be closed with the
door locked and open with a door unlocked. If the switches check good
replace the electronic control board.
Max unlock
Attempts exceeded
(motor door latch)
Set the oven up for a clean cycle. Does the latch motor turn?
No. Check the voltage applied to the latch motor. If line to neutral,
replace latch mechanism. If zero, replace electronic control board.
Yes. Check the phase and lock switches. They should be closed
with the door locked and open with a door unlocked. If the switches check
good replace the electronic control board.
8
Max lock Time
exceeded (motor
door latch)
Set the oven up for a clean cycle. Does the latch motor turn?
No. Check the voltage applied to the latch motor. If line to neutral,
replace latch mechanism. If zero, replace electronic control board.
Yes. Check the phase and lock switches. They should be closed with
the door locked and open with a door unlocked. If the switches check
good replace the electronic control board.
Max lock
Attempts exceeded
(motor door latch)
Set the oven up for a clean cycle. Does the latch motor turn?
No. Check the voltage applied to the latch motor. If line to neutral replace
latch mechanism. If zero replace electronic control board.
Yes. Check the phase and lock switches. They should be closed with the
door locked and open with a door unlocked. If the switch check good replace
the electronic control board.
Inter processor
communications
failure (motor
door latch)
Replace electronic control Board.
Resistance chart
Oven sensor
Bake element (large oven)
Bake element (small oven)
Broil element (large oven)
Broil element (small oven)
Convection element (large oven)
Convection element (small oven)
Convection fan motor
Cooling fan motor
Oven light transformer primary
Oven light transformer secondary
locked motor
1050 to 1100 ohms
17 ohms +/-10%
27 ohms +/-10%
14 ohms +/-10%
19 ohms +/-10%
26 ohms +/-10%
26 ohms +/-10%
58 ohms +/-10%
10 ohms +/-10%
62 ohms +/-10%
1 ohms
2500 ohms +/-10%
9
Testing Function and temperature selectors
The function and temperature selectors both use a Piher N-15 10 K ohm pot. Note that the tolerance on this part
is 30%, so the measured resistance between pins 1 & 3 will be 10,000 ± 3,000 Ohms. The controller uses a
ratiometric approach to determine position so this variation does not affect the software.
Function selector
The function selector usually fails, open or intermittent. When this happens, the oven will not operate in any
function.
To test the functions selector in the field:
1. Measure the resistance between pins one and three.
If the reading is between 7000 and 13,000 ohms go to step 2.
If the reading is not between 7000 and 13,000 ohms, the function selector is defective.
2. Set the function Selector to bake and measure the resistance between pins two and three.
If the reading is between 580 and 1720 ohms, the function selector is good.
If the reading is not between 580 and 1720 ohms, the function selector is defective.
Temperature selector
The temperature selector usually fails, open or intermittent. When this happens, the oven will not operate in
any function.
To test the temperature selector in the field:
1. Measure the resistance between pins one and three.
If the reading is between 7000 and 13,000 ohms go to step 2.
If the reading is not between 7000 and 13,000 ohms, the temperature selector is defective.
2. Set the temperature selector to 300° and measure the resistance between pins two and three.
If the reading is between 2200 and 4300 ohms, the temperature selector is good.
If the reading is not between 2200 and 4300 ohms, the temperature selector is defective.
Note: It is sometimes easier to make these measurements by disconnecting plug P9 from the electronic oven control board and measuring in the harness side of the plug. When testing the function
selector at plug P9 pins four and six should read between 7000 and 13,000 ohms and pins five and six
should read 580 to 1720 ohms. When testing the temperature selector at plug P9 pins one and three
should read between 7000 and 13,000 ohms and pins two and three should read between 2200 and
4300 ohms.
10
SPECIFICATIONS
30" Dual-Fuel Freestanding Range
•
Product Weight – 260 Lbs.
•
Electrical Requirements – 240 Volts AC, 4-wire,
60 Hertz, 30 Amps Dedicated Circuit.
Four Burners, Interlocking Grates
Designed for cooking multiple dishes at varying
temperatures on a single rangetop. Interlocking grates
spread weight over a broad area providing an ultrastable
cook surface.
Third Element European Convection
System
•
Total Connected Load – 4.1 kW. (17 Amps)
•
Always consult local and /or national electric and
gas codes.
•
Range ships with 3/4" factory regulator.
By adding a third cooking element and a convection
fan, heat is distributed faster and more evenly throughout the oven. Cooking every meal to perfection has
never been easier.
•
LP conversion kit supplied.
Vantage Flame™
•
Overhead cabinetry should not exceed a 13"
maximum depth.
•
Allow 30" minimum clearance between top of
rangetop and bottom of unprotected wood or
metal overhead cabinetry.
•
Allow 10" minimum clearance from edge of
rangetop to nearest combustible wall on either
side of unit.
•
Allow 24" minimum clearance when bottom of
wood or metal overhead cabinet is protected by
not less than 1/8" flame-retardant millboard
covered with not less than No. 28 MGS sheet
steel, 0.015" stainless steel, 0.024" aluminum or
0.020" copper.
•
To reduce risk of fire when using overhead
cabinetry, install range hood that projects
horizontally a recommended minimum of 5"
beyond bottom of cabinets.
Note:
The automatic re-ignition feature allows the ignitors to
spark spontaneously should the flame go out or become
severely distorted by a draft, providing ease-of-mind
while cooking.
Sealed Cooktop Spill-Basin
Cleanup is convenient with individual black porcelaincoated areas beneath each
burner to catch spills.
Refer to Product Installation Guide for
detailed instructions on the web at
www.electroluxusa.com.
Smooth-Glide™ Oven Racks
Imagine oven racks that glide with unparalleled ease
and extend fully for effortless access to your meal. We
designed a centered easy-grip handle and a patented
ball-bearing rack system for smooth-gliding
performance with the touch of a finger.
11
30" DUAL-FUEL FREESTANDING
RANGE
12" Stainless Steel – ACCBG12-30
Stainless Steel Kick Plate – KIKPLT30
CONTROL PANEL FEATURES
SPECIFICATIONS
Electronic Oven Control
Formed Stainless Steel Platform
Large Professional Skirted Knobs with Bezel
Yes
Yes
6
COOKTOP
Sealed Power Burner™ – 17,000 BTU
Sealed Burner™ – 15,000 BTU
Sealed Precision Burner™ – 8,500 - 850 BTU
Interlocking Grates
Electronic Ignition with Auto Re-Ignition
1
2
1
3
Yes
Optional
Optional
Cutout Dimensions –
Height
Width
Depth
LP Conversion Kit
Voltage Rating
Product Weight
Shipping Weight
UPC (0-12505-)
31-3/4"
30-1/16"
24
Included
240V / 30 Amp
260 Lbs.
289 Lbs.
53956-
28 5/8”
OVEN CAVITY
26”
Capacity
3.9 Cu. Ft.
Bake Element
3400 Watt
Broil Element
4000 Watt
Convection Element
2200 Watt
Cobalt Blue Interior
Yes
3rd Element European Convection System
Yes
Self-Clean with Door Lock
Yes
Oven Light
2
Eight-Pass Bake & Broil
Yes
Smooth-Glide™ Racks
3
Conventional Rack
1
3”
Optional 12”
Optional 9”
Standard 6”
backsplash
ADDITIONAL FEATURES
6" Stainless Steel Backsplash
Full Stainless Steel Side Panels
Professional Handle
Fully Adjustable, Heavy-Duty Legs
Yes
Yes
Yes
Yes
31 3/4”
ACCESSORIES
Broil Pan and Insert
Stainless Steel Cleaner
Griddle
Wok Ring
Simmer Plate
Included
Included
Included
Included
Included
4” - 6”
adjustable legs
Black Knobs
Black Burner Knob
Black Thermostat Knob
Black Oven Selection Knob
Optional
Optional
Optional
Backsplash –
9" Stainless Steel – ACCBG09-30
Optional
12
30”
NOTE: Always consult local and / or national
electric codes. Refer to Product Installation
Guide for detailed installation instructions
on the web at www.electroluxusa.com.
High standards of quality at Electrolux
Major Appliances mean we are constantly
working to improve our products. We
reserve the right to change specifications
or discontinue models without notice.
13
36" Dual-Fuel Freestanding Range
•
Product Weight – 378 Lbs.
•
Electrical Requirements – 240 Volts AC, 4-wire,
60 Hertz, 30 Amps Dedicated Circuit.
•
Total Connected Load – 5.0 kW (24 Amps)
•
Always consult local and /or national electric and
gas codes.
•
Range ships with 3/4" factory regulator.
•
Lp conversion kit supplied.
•
Overhead cabinetry should not exceed a 13"
maximum depth.
•
Allow 30" minimum clearance between top of
rangetop and bottom of unprotected wood or
metal overhead cabinetry.
•
Allow 10" minimum clearance from edge of
rangetop to nearest combustible wall on either
side of unit.
•
Allow 24" minimum clearance when bottom of
wood or metal overhead cabinet is protected by
not less than 1/8" flame-retardant millboard
covered with not less than No. 28 MGS sheet steel,
0.015" stainless steel, 0.024" aluminum or 0.020"
copper.
•
To reduce risk of fire when using overhead
cabinetry, install range hood that projects
horizontally a recommended minimum of 5"
beyond bottom of cabinets.
Note:
spread weight over a broad area providing an ultrastable
cook surface.
Third Element European
Convection System
By adding a third cooking element and a convection
fan, heat is distributed faster and more evenly throughout the oven. Cooking every meal to perfection has
never been easier.
Vantage Flame™
The automatic re-ignition feature allows the ignitors to
spark spontaneously should the flame go out or become
severely distorted by a draft, providing ease-of-mind
while cooking.
Sealed Cooktop Spill-Basin
Cleanup is convenient with individual black
porcelain-coated areas beneath each burner to catch
spills.
24" Optional Backsplash
The optional 24" stainless steel backsplash protects your
walls from accidental cooking spills or splashes while
enhancing the professional appearance of your
Electrolux ICON™ freestanding range. The heavy-duty
9" shelf provides easy access to and convenient storage of cooking ingredients, spices and pots and pans.
Refer to Product Installation Guide for
detailed instructions or the web at
www.electroluxusa.com.
Smooth-Glide™ Oven Racks
Imagine oven racks that glide with unparalleled ease
and extend fully for effortless access to your meal. We
designed a centered easy-grip handle and a patented
ball-bearing rack system for smooth-gliding
performance with the touch of a finger.
Six Burners, Interlocking Grates
Designed for cooking multiple dishes at varying temperatures on a single rangetop. Interlocking grates
14
36" DUAL-FUEL FREESTANDING Backsplash
RANGE
CONTROL PANEL FEATURES
Electronic Oven Control
Formed Stainless Steel Platform
Large Professional Skirted Knobs with Bezel
Yes
Yes
8
Optional
Optional
Optional
SPECIFICATIONS
Cutout Dimensions
COOKTOP
Sealed Power Burner™ – 17,000 BTU
Sealed Burner™ – 15,000 BTU
Sealed Precision Burner™ – 8,500 - 850 BTU
Interlocking Grates
Electronic Ignition with Auto Re-Ignition
2
2
2
3
Yes
OVEN CAVITY
Capacity
Bake Element
Broil Element
Convection Element
Cobalt Blue Interior
3rd Element European Convection System
Self-Clean with Door Lock
Oven Light
Eight-Pass Bake & Broil
Smooth-Glide™ Racks
Conventional Rack
9" Stainless Steel – ACCBG09-36
24" Stainless Steel with 9"
Shelf – ACCBG24-36
Stainless Steel Kick Plate – KIKPLT36
Height
Width
Depth
LP Conversion Kit
Voltage Rating
Product Weight
Shipping Weight
UPC (0-12505-)
4.6 Cu. Ft.
3400 Watt
4000 Watt
2200 Watt
Yes
Yes
Yes
2
Yes
3
1
32-5/8"
36-1/16"
24"
Included
240V / 30 Amp
378 Lbs.
420 Lbs.
53957-2
31”
28 1/8”
3”
9”
19”
Optional 9”
Optional 24”
backsplash
with shelf
15 1/4”
ADDITIONAL FEATURES
Standard 3”
3" Stainless Steel Backsplash
Full Stainless Steel Side Panels
Professional Handle
Fully Adjustable, Heavy-Duty Legs
Yes
Yes
Yes
Yes
ACCESSORIES
Broil Pan and Insert
Stainless Steel Cleaner
Griddle
Wok Ring
Simmer Plate
Included
Included
Included
Included
Included
32 5/8”
Black Knobs
Black Burner Knob
Black Thermostat Knob
Black Oven Selection Knob
Optional
Optional
Optional
2 7/8” - 6”
adjustable legs
15
35 15/16”
NOTE: Always consult local and / or national
electric codes. Refer to Product
Installation Guide for detailed installation
instructions on the web at
www.electroluxusa.com.
High standards of quality at Electrolux
Major Appliances mean we are constantly
working to improve our products. We
reserve the right to change specifications
or discontinue models without notice.
16
48" Dual-Fuel Freestanding Range
•
Product Weight – 540 Lbs.
•
Electrical Requirements – 240 Volts AC, 4-wire,
60 Hertz, 50 Amps Dedicated Circuit.
•
Total Connected Load – 10.0 kW (42 Amps)
•
Always consult local and /or national electric and
gas codes.
•
Range ships with 3/4" factory regulator.
•
LP conversion kit supplied.
•
Overhead cabinetry should not exceed a 13"
maximum depth.
•
Allow 30" minimum clearance between top of
rangetop and bottom of unprotected wood or
metal overhead cabinetry.
•
Allow 10" minimum clearance from edge of
rangetop to nearest combustible wall on either
side of unit.
•
Allow 24" minimum clearance when bottom of
wood or metal overhead cabinet is protected by
not less than 1/8" flame-retardant millboard
covered with not less than No. 28 MGS sheet steel,
0.015" stainless steel, 0.024" aluminum or 0.020"
copper.
•
To reduce risk of fire when using overhead
cabinetry, install range hood that projects
horizontally a recommended minimum of 5"
beyond bottom of cabinets.
Note:
spread weight over a broad area providing an ultrastable
cook surface.
Third Element European
Convection System
By adding a third cooking element and a convection
fan, heat is distributed faster and more evenly throughout the oven. Cooking every meal to perfection has
never been easier.
Vantage Flame™
The automatic re-ignition feature allows the ignitors to
spark spontaneously should the flame go out or become
severely distorted by a draft, providing ease-of-mind
while cooking.
Sealed Cooktop Spill-Basin
Cleanup is convenient with individual black
porcelain-coated areas beneath each burner to catch
spills.
24" Optional Backsplash
The optional 24" stainless steel backsplash protects
your walls from accidental cooking spills or splashes
while enhancing the professional appearance of your
Electrolux ICON™ freestanding range. The
heavy-duty 9" shelf provides easy access to and
convenient storage of cooking ingredients, spices and
pots and pans.
Refer to Product Installation Guide for
detailed instructions or the web at
www.electroluxusa.com.
Smooth-Glide™ Oven Racks
Imagine oven racks that glide with unparalleled ease
and extend fully for effortless access to your meal. We
designed a centered easy-grip handle and a patented
ball-bearing rack system for smooth-gliding
performance with the touch of a finger.
Six Burners, Interlocking Grates
Designed for cooking multiple dishes at varying
temperatures on a single rangetop. Interlocking grates
17
48" DUAL-FUEL FREESTANDING Black Knobs
RANGE
Black Burner Knob
CONTROL PANEL FEATURES
Electronic Oven Control
Formed Stainless Steel Platform
Large Professional Skirted Knobs with Bezel
Yes
Yes
10
COOKTOP
Sealed Power Burner™ – 17,000 BTU
Sealed Burner™ – 15,000 BTU
Sealed Precision Burner™ – 8,500
Interlocking Grates
Electronic Ignition with Auto Re-Ignition
2
2
2
3
Yes
LARGE OVEN CAVITY
Capacity
Bake Element
Broil Element
Convection Element
Cobalt Blue Interior
3rd Element European Convection System
Self-Clean with Door Lock
Oven Light
Eight-Pass Bake & Broil
Smooth-Glide™ Racks
Conventional Rack
Optional
Optional
Optional
Black Thermostat Knob
Black Oven Selection Knob
4.6 Cu. Ft.
3400 Watt
4000 Watt
2200 Watt
Yes
Yes
Yes
2
Yes
3
1
Backsplash
9" Stainless Steel – ACCBG09-48
24" Stainless Steel with
9" Shelf – ACCBG24-48
Stainless Steel Kick Plate – KIKPLT48
Optional
Optional
Optional
SPECIFICATIONS
Cutout Dimensions
Height
Width
Depth
LP Conversion Kit
Voltage Rating
Product Weight
Shipping Weight
UPC (0-12505-)
32-5/8"
48-1/8"
24"
Included
240V / 50 Amp
540 Lbs.
600 Lbs.
53958-9
31”
28 1/8”
3”
9”
SMALL OVEN CAVITY
Capacity
Bake Element
Broil Element
Convection Element
Self-Clean with Door Lock
Oven Light
Heavy-Duty Oven Racks
2.6 Cu. Ft.
2100 Watt
3000 Watt
2200 Watt
Yes
1
2
19”
Optional 9”
15 1/4”
Optional 24”
backsplash
with shelf
Standard 3”
ADDITIONAL FEATURES
3" Stainless Steel Backsplash
Full Stainless Steel Side Panels
Professional Handle
Fully Adjustable, Heavy-Duty Legs
Yes
Yes
Yes
Yes
32 5/8”
ACCESSORIES
Broil Pan and Insert
Stainless Steel Cleaner
Griddle
Wok Ring
Simmer Plate
Included
Included
Included
Included
Included
2 7/8” - 6”
adjustable legs
18
47 15/16”
NOTE: Always consult local and / or national
electric codes. Refer to Product
Installation Guide for detailed installation
instructions on the web at
www.electroluxusa.com.
High standards of quality at Electrolux
Major Appliances mean we are constantly
working to improve our products. We
reserve the right to change specifications
or discontinue models without notice.
19
LOCK SW.
Com
NC
NO
SAMPLE WIRING DIAGRAM FOR OVEN SECTION 30 INCH
36 INCH AND LARGE OVEN OF THE 48 INCH MODELS.
ALWAYS REFER TO DIAGRAM WITH PRODUCT.
Sample wiring diagram of the large oven section
Always use the diagram with the product
20
4 PASS
6 PASS
LOCK SW.
NO
NC
BROIL
ELEMENT
3000 W.
240V
BAKE
ELEMENT
2100 W 240V
COM
SAMPLE WIRING DIAGRAM FOR OVEN SECTION
SMALL OVEN OF THE 48 INCH MODEL.
ALWAYS REFER TO DIAGRAM WITH PRODUCT.
Sample wiring diagram of the small oven section
Always use the diagram with the product
21
22
O
O
S1 S2 S3 S4 S5 S6
O
IGNITOR
LF
BURNER
O
IGNITOR
LR
BURNER
O
IGNITOR
CF
BURNER
O
IGNITOR
CR
BURNER
6 POINT
RE-IGNITOR
1 2 3 4 5 6 AN
IGNITOR
RF
BURNER
IGNITOR
RR
BURNER
G
W
BK
O
PR
BR
BL
Y
R
R
Y
BL
BR
PR
O
S1
S2
S3
S4
S5
S6
BK
BK
BK
BK
BK
BK
BK
W - WHITE
R - RED
Y - YELLOW
O - ORANGE
BK - BLACK
BR - BROWN
BL - BLUE
GR - GREEN
PR - PURPLE
W
BK
WIRE COLOR CODE
W
BK
L2 R
N
L1
GN
GN BK W R
LOW VOLTAGE CABLE
GROUND
STUD
G
Sample wiring diagram of the top burner section
Always use the diagram with the product
SECTION A - OWNERS GUIDE
that you know how and where to turn off power.
Also, have the installer show you the location of
the gas supply. If you smell gas, do not use the
range. Immediately turn off the gas supply at the
shut off valve, disconnect electrical power to the
unit at the fuse or junction box and contact the
gas supplier or qualified appliance technician.
Safety
IMPORTANT SAFETY INSTRUCTIONS
Safety Precautions
Do not attempt to install or operate your appliance until
you have read the safety precautions in this manual.
Safety items throughout this manual are labeled with a
Warning or Caution based on the risk type.
•
Ensure that the range is used only by those
individuals who are able to operate it properly.
•
Use the range only for cooking tasks expected
of a home appliance as outlined in this manual.
•
Properly clean and maintain as recommended
in this manual, cleaning only the parts listed.
•
Use only dry potholders to avoid steam burns
when removing hot cookware.
•
In the event that a burner flame goes out and
gas escapes, open a window or door. Wait at
least 5 minutes before attempting to use the
range.
•
Select utensils of the proper size, material and
construction for the particular type of cooking
being done. Select utensils that are large enough
to contain food without boil-overs or spillovers.
Choose pans with easily grasped handles that
will stay cool while cooking. Do not use utensils
with loose handles. Avoid using pans that are
too heavy to lift safely. Use cookware only for its
intended purpose. Certain types of glass,
ceramic, and earthenware utensils are suitable
for use only in an oven and not in cooktop
applications.
•
When cooking, set the burner controls so that
the flame heats only the bottom of the utensil
and does not extend up the sides of the utensil.
•
When deep fat frying, be certain that the pan is
large enough to contain the desired volume of
food without overflow caused by bubbling of the
fat. Never leave a deep fat fryer unattended.
Avoid deep fat frying of moist or frost-covered
foods. Foods with high water content may cause
spattering or spilling of the hot fat. Heat fat slowly
and stir together any combinations of oils and
fats prior to applying heat. Utilize a deep fat
frying thermometer to avoid heating the fat to
temperatures above the flash point.
•
Always turn pan handles to the side or back of
the cooktop. Do not turn handles towards the
room where they are easily hit. Handles should
Definitions
This is the safety alert symbol. It is used to alert
you to potential personal injury hazards. Obey all safety
messages that follow this symbol to avoid possible
injury or death.
WARNING
WARNING indicates a potentially hazardous
situation which, if not avoided, could result in death
or serious injury.
CAUTION
CAUTION indicates a potentially hazardous
situation which, if not avoided, may result in minor
or moderate injury.
CAUTION
CAUTION used without the safety alert symbol
indicates a potentially hazardous situation which,
if not avoided, may result in property damage.
IMPORTANT
Indicates installation, operation or maintenance
information which is important but not hazard
related.
General Precautions
IMPORTANT
•
Begin by ensuring proper installation and
grounding of the appliance by a qualified
technician according to the accompanying
Installation Instructions. Have the installer show
you where the fuse or junction box is located so
23
broiler pan and insert, oven racks, rack glides,
convection fan filter and any other utensils.
not extend over adjacent burners.
•
•
Always check the positions of the control knobs
to make sure the cooktop is off when you are
finished cooking.
Before performing any service, turn off the gas
supply by closing the gas shut-off valve and
turning off the electrical power supply.
IMPORTANT
•
•
•
Always light each burner prior to placing a
utensil on the burner grate. Also, turn the
control knob to the “off” position before
removing a utensil from the burner grate.
Always clean the cooktop cautiously. If using a
damp sponge or cloth, wait until the cooktop has
cooled sufficiently to prevent steam burns. Also,
some cleaners can produce harmful or
unpleasant fumes if applied to hot surfaces.
•
Clean only those parts listed in this manual.
•
Keep any ventilation filters clean to avoid grease
fires.
•
Always set utensils gently onto the grates and
center them so that they are wellbalanced.
In the event that a burner flame goes out and
gas escapes, turn off the gas control and open a
window or door. Wait at least 5 minutes before
attempting to use the cooktop.
CAUTION
•
Do not use the range for warming or heating the
room.
•
Do not leave children alone or unattended in the
area where the range is in use. Never allow
children to sit or stand on any part of the range.
Do not let children play with the range.
•
Do not store items of interest to children above
the range. Children could be burned or injured
while climbing on the appliance.
•
Do not wear loose or hanging apparel while
using the range.
•
Do not store combustible, flammable or
explosive materials in the range or in adjacent
cabinets.
•
Do not leave food or cooking utensils, etc., in
the oven during the self-clean cycle.
•
Do not attempt to repair or replace any part of
the range unless specifically recommended in
literature accompanying this appliance. All other
service should be referred to a qualified
technician.
•
Always keep the cooktop surface clean and dry.
•
This unit is designed as a cooking appliance.
Never use it for warming or heating a room.
•
Before performing any service, turn off the gas
supply by closing the gas shut-off valve and
turning off electrical power supply.
•
Use this appliance only for its intended use as
described in this manual. Do not use corrosive
chemicals or vapors in this appliance. This type
of appliance is not designed for industrial or
laboratory use.
Do not use water on grease fires. A violent steam
explosion may result. Smother any flames with
a lid, cookie sheet or flat tray. Flaming grease
can be extinguished with baking soda or a
multipurpose chemical or foam extinguisher.
•
Do not allow potholders to touch gas burners.
Do not use a towel or bulky cloth as a potholder.
•
•
•
•
Exercise caution when opening the oven door.
Let hot air or steam escape before looking or
reaching into the oven.
Position oven racks in desired locations when
the oven is cool. (If a rack must be repositioned
after the oven is already hot, be certain that the
potholder does not contact a hot heating element
in the oven.)
•
Do not use commercial oven cleaners on oven
liner protective coatings or on any part of the
oven.
•
Do not clean the door gasket, because rubbing,
moving or in any way may damage the gasket,
and eliminate the required tight door seal.
•
DO NOT TOUCH INTERIOR SURFACES OF THE
OVEN. During and after use, do not touch or let
Before Self-Cleaning the oven, remove the
24
clothing or other flammable materials contact
heating elements or interior surfaces of the oven
until they have had sufficient time to cool.
•
Do not block or obstruct the holes beneath the
control knobs. Blocking these holes may affect
burner operation and may result in a hazard.
•
When using the cooktop, do not touch the grates,
burner caps, burner bases, or any other parts in
proximity to the flame. These components may
be hot enough to cause burns.
•
If the range is near a window, do not use long
curtains as a window treatment. They can blow
over the cooktop and create a fire hazard.
•
Do not cover the burners and grates with
anything except properly selected utensils.
Decorative covers should not be used.
•
Do not heat unopened food containers such as
baby food jars and cans. Pressure buildup may
cause the container to burst and cause injury.
•
Do not use abrasive or caustic cleaners or
detergents on this appliance, as these may cause
permanent damage. Do not use aerosol
cleaners, as these may be flammable or cause
corrosion of metal parts.
•
Do not use or attempt to use this appliance in
the event of a power failure.
•
Do not slide cookware across the grates.
Sliding may damage the finish of the grates. Lift
utensils to reposition them.
•
Do not allow acids (citrus juices, tomato sauces,
etc.) to remain on the oven cell surfaces. The
porcelain finish may stain.
•
Do not touch the range top or backguard with
your bare hands during all cooking and self
cleaning modes. Venting from the oven may
cause the backguard to become hot.
The conversion must be performed by a qualified
service technician in accordance with the kit
instructions and all local codes and requirements.
Failure to follow instructions could result in serious injury or property damage. The qualified agency
performing this work assumes responsibility
for the conversion.
WARNING
Severe shock, or damage to the range may occur if
the range is not installed by a qualified installer or
electrician.
CAUTION
Any additions, changes or conversions required in
order for this appliance to satisfactorily meet the
application needs must be made by a qualified
service technician in accordance with the
manufacturer’s instructions and all codes and
requirements of the authority having jurisdiction.
Failure to follow the instructions could result in
serious injury or property damage. The qualified
agency performing this work assumes responsibility for the conversion.
LIQUIFIED PETROLEUM (PROPANE) GAS
CONVERSION
This appliance can be used with Natural Gas or
Propane Gas. It is shipped from the factory for use with
natural gas. A kit for converting to LP gas is supplied
with your range. The kit is marked “FOR LP/PROPANE
GAS CONVERSION”. Follow the installation instructions
which are inside the envelope.
25
Feature Overview
Before using your range, become familiar with the features and control panel layout. See drawering below for
a detailed control panel layout for your model.
NOTE: Upon initial power being applied to the
range, the function LED lights will flash
while the electronic control completes its
self test mode. The lights will continue
flashing until the Function Knob is moved
to some other position and back to “Off”.
At this time the range is ready for use.
NOTE: If a power outage occurs, the above noted
test sequence will take place. The function
LED lights will flash. The LED lights will
continue to flash until the Function Knob is
moved to some other position and back to
“Off”. At this time the range is re-set for use.
MODEL FEATURES
1. Control Panel
2. Broiling Element
3. Oven Door Latch
4. Convection Fan & Element
5. Bake Element
6. Oven Door
7. Oven Racks
8. Oven Rack Supports
9. Oven Rack Glides
10. Companion Oven
26
Cooktop Features
BURNER LOCATIONS
PROPER BURNER ADJUSTMENTS
All Electrolux Icon range cooktops are equipped with
sealed burners. Burner configurations vary by the model
number of your range. See drawing below for a detailed
burner layout for your model.
The color of the flame is the key to proper burner
adjustment. A good flame is clear, blue and hardly
visible in a well-lighted room. Each cone of flame should
be steady and sharply defined. Adjust or clean burner if
flame is yellow-orange. To clean burner, see
instructions under General Care & Cleaning.
27
Cooktop Features
SEALED BURNER CONFIGURATIONS
PORCELAIN
BURNER CAP
On E30DF74EPS ranges, there are a total of four burners, including one burner rated at a maximum output of
17,000 BTU/HR, two burners rated at a maximum of
15,000 BTU/HR and one burner rated at a maximum
output of 8,500 BTU/HR. The knobs are grouped in twos.
The left two knobs operate the left two burners, and the
right two knobs control the two right burners.
BURNER
BASE
On E36DF76EPS and E48DF76EPS ranges, there are
a total of six burners, including two burners rated at a
maximum output of 17,000 BTU/HR, two burners
rated at a maximum of 15,000 BTU/HR and two burners rated at a maximum output of 8,500 BTU/HR. The
knobs are positioned to correspond with the burner
layout.
BRASS BURNER RINGS
All burners are attached to the cooktop by retaining nuts.
Gaskets around the undersides of the burner bases
ensure that the burners are sealed, thereby preventing
any liquid spills from entering the cooktop chassis. All
spills remain on the surface of the cooktop. The brass
burner heads spread the flame evenly around the burner
perimeters.The burner heads must seat properly in the
burner bases to enable proper cooktop operation. To
ensure proper seating, positioning tabs have been
placed on the bottom of each burner head to slide into
corresponding notches in the fixed burner
base.
BRASS
BURNER RING
BURNER
IGNITOR
BURNER ASSEMBLY
Cooktop Features/Surface Cooking
CONTROL KNOBS
The control knobs provided with this range are designed
for ease of use and longevity. The “D” shaped design of
the knob shaft ensures proper orientation when reinstalling the knob. Located beneath each knob is a bezel ring that mounts to the range.
PLACEMENT OF BURNER GRATES
Place grates on the porcelain coated spill tray.
BURNER IGNITORS
A burner igniter is located on each gas burner base.
When a control knob is rotated more than 90 degrees
counterclockwise, the ignitor will spark and the selected
burner will ignite. Additionally, due to Vantage Flame™,
the automatic reignition feature, the igniters will spark
automatically if a flame should blow out or be severely
distorted by a draft or by a ventilation system. Burner
igniters must always be kept clean and dry to function
properly. Dirty or wet igniters will result in constant sparking, even if there is a flame present.
Be sure they are located correctly inside the stainless
steel frame.
28
IMPORTANT
Surface Cooking
Do not slide the grates on the stainless steel frame.
Doing so can damage the surface.
UTENSILS TO USE FOR BEST
PERFORMANCE
FLAME ADJUSTMENT
For most cooking, start on the highest control setting
and then turn to a lower one to complete the process.
Use the chart below as a guide for determining proper
flame size for various types of cooking. The size and
type of utensil used and the amount of food being
cooked will influence the setting needed for cooking.
For deep fat frying, use a thermometer and adjust the
surface control knob accordingly. If the fat is too cool,
the food will absorb the fat and be greasy. If the fat is
too hot, the food will brown so quickly that the center
will be undercooked. Do not attempt to deep fat fry too
much food at once as the food will neither brown nor
cook properly.
*Flame Size
Type of Cooking
High Flame
Start most foods; bring water
to a boil; pan broiling.
Medium Flame
Maintain a slow boil; thicken
sauces, gravies; steam.
Low Flame
Keep foods cooking; poach;
stew.
*These settings are based on using medium-weight
aluminum pans with lids. Settings may vary when
using other types of pans.
Never extend the flame beyond the outer edge of the
utensil. A higher flame simply wastes heat and energy,
and increases your risk of being burned by the flame.
Pans should have flat bottoms. Check for flatness by
rotating a ruler across the bottom. There should be no
gaps between the pan and ruler.
* Specialty pans such as lobster pots, griddles and
pressure cookers may be used but must conform to
the above recommended cookware requirements.
•
Flat bottom and straight sides.
•
Tight fitting lids.
•
Weight of handle does not tilt pan. Pan is well
balanced.
•
Pan sizes match the amount of food to be prepared
and the size of burner.
•
Made of material that conducts heat well.
POOR
•
29
Curved and warped pan bottoms.
•
Pan overhangs unit by more than 2.5 cm (1”).
•
Heavy handle tilts pan.
•
Flame extends beyond unit.
Note:
Do not use pans or other cookware on the griddle.
Doing so could damage the finish. With the grate in
position over the burner, set the griddle on top of the
grate positioning the notches in the griddle over the grate
fingers
Always use a utensil for its intended
purpose. Follow manufacturer’s
instructions. Some utensils were not made
to be used in the oven or on the cooktop.
USING THE GRIDDLE
The griddle is intended for direct food cooking and can
be used on both sides.
CAUTION
Always place the griddle on the grate before to turn
on the burner.
Always use potholders to remove the griddle from
the grate. Allow the griddle to cool before removing. Do not set hot griddle on surfaces that cannot
withstand high heat; such as countertops.
Be sure the griddle is positioned correctly and
stable before use to prevent hot spills and possible
burns.
Side with grill
USING THE WOK STAND
The Wok Stand provided with your cooktop is designed
to allow round-bottomed woks to be used. It is recommended that you use a 14 inch diameter (35.5cm)
or less Wok. It is recommended that you use the right
front POWER burner for model E30DF74EPS or center front POWER burner for models E36DF76EPS
and E48DF76EPS with the wok stand for best performance. If properly positioned, the Wok Stand will not
slide off the grate.
Flat Side
30
CAUTION
Always use potholders to remove the wok stand
from the grate. Allow the wok stand to cool before
removing. Do not set hot wok stand on surfaces
that cannot withstand high heat; such as
countertops.
Be sure the Wok Stand is positioned correctly and
stable before use to prevent hot spills and possible
burns.
NOT be used. The supporting ring was not designed
for proper or stable use on the Surface Burner Grates.
USING THE SIMMER PLATE
The Simmer Plate has been specfically designed for
simmering and holding food at the lowest safe temperature. It can be used for cooking sauces long periods of
time, or melting chocolate. With the grate in position
over the burner, set the simmer plate on top of the grate,
centering the plate over the grate fingers.
To Properly Position the Wok Stand:
With the grate in position over the burner, set the Wok
Stand on top of the grate positioning the center of the
Wok Stand over the center of the cooktop grate fingers.
Then place the utensil on the simmer plate.The Simmer Plate is to be used by setting the burner to its lowest setting. The Simmer Plate is intended to be used
for simmering only. The Simmer Plate must be removed
when cooking.
NOTE: The Wok cooking performance is best on
the right front or center front POWER
burner position depending on your range
model.
CAUTION
Be sure to ALWAYS use the Wok Stand if the
stability of the wok is uncertain. If cooking large
amounts of liquid food without the Wok Stand,
the wok may tip and spill over causing burns.
Flat-bottom woks with large flat bottoms may also be
used on your cooktop Surface Burner Grates without
the Wok Stand. Insure the stability of the flat-bottom
wok before cooking without the Wok Stand. If unstable,
DO NOT use the flatbottom wok without the Wok Stand.
Round-bottom woks (with a support ring) should
CAUTION
Always place the simmer plate on the grate before
turning on the burner.
Always use potholders to remove the simmer plate
from the grate. Allow the simmer plate to cool before removing. Do not set hot simmer plate on surfaces that cannot withstand high heat; such as
countertops.
Be sure the simmer plate is positioned correctly and
stable before use to prevent hot spills and possible
burns.
SETTING SURFACE CONTROLS
Your range may be equipped with any combination of
the following burners:
31
Simmer Burner: best used for simmering delicate
sauces, etc.
Standard Burner: used for most all surface cooking
needs.
Large Burner: best used when bringing large quantities
of liquid to temperature and when preparing larger
quantities of food.
Regardless of size, always select a utensil that
is suitable for the amount and type of food being
prepared. Select a burner and flame size appropriate to the pan.
Never allow flames to extend beyond the outer
edge of the pan.
Your cooktop is also equipped with 300° rotation
flame control valves. These valves provide
enhanced control of the burner flame.
Each burner lights automatically from an electric
ignitor when its control knob is turned to the
LITE position.
CAUTION
Do not place plastic items such as salt and
pepper shakers, spoon holders or plastic wrappings on top of the cooktop when it is in use.
These items could melt or ignite. Potholders,
towels or wood spoons could catch fire if placed
too close to a flame.
32
Operation
BEFORE COOKING
Ensure that the range has been installed by a qualified
individual who has tested the operation of the range in
accordance with the Installation Instructions. The
brass burner rings, burner caps, grates, knobs and spill
protectors must be in place for the cooktop to operate
properly. All range components must be clean. Be
certain that the gas and electrical power supplies to the
range are operational.
IMPORTANT
•
If the gas does not ignite within four seconds,
turn off the valve. Allow at least two minutes for
any gas to dissipate, then repeat the lighting
procedure.
•
Burner igniters must always be kept clean and
dry to function properly. Due to the VantageFlame™ reignition feature, dirty or wet ignitors
will result in constant sparking, even if there is a
flame present. Additionally, igniters will spark
automatically if the flame is distorted by a draft
or by a cooktop ventilation system. Eliminate the
draft or reduce the ventilation blower speed in
this case.
•
When the cooktop is cool and/or more than two
burners are in use, the igniters may continue to
spark if the control knob is set to the “LOW”
position. This is normal until the burner warms
up. The tendency to spark under these
conditions can be reduced by operating the
burner at a higher flame setting for a short
period of time (normally 60 seconds or less), then
adjusting the control knob down to the “LOW”
setting. The burner will also warm up faster if a
utensil is placed on the grate.
•
The flame should be steady and blue in color.
Foreign material in the gas line, especially in new
construction, may cause an orange flame
during initial operation. This will disappear with
further use.
•
The flame should burn evenly around the
perimeter of the burner. If the flame is uneven,
ensure that the brass burner ring and porcelain
burner cap are properly positioned, then check
for any foreign material in the burner ring or on
the burner cap. Remove any foreign material with
a straightened paper clip, wire, or needle. Do not
use a toothpick to remove clogs, as it could
break off. Do not damage the brass or distort
the shape of the burner ring ports.
•
Never light the burners with a match or other
open flame. If a burner does not ignite, refer to
the Troubleshooting Guide.
Read this Use and Care Manual in its entirety prior to
operating the range.
OPERATING THE CONTROL VALVES
To light a particular burner, press in on the corresponding control knob, then immediately rotate the knob counterclockwise from the “OFF” position to the “LITE
HI” position. The burner igniters will spark continuously until the gas ignites on the selected burner.
The igniters will stop sparking as soon as the burner
ignites.
Once the burner is lit, reduce the flame height if desired
by rotating the control knob further counterclockwise,
then place the utensil on the grate.
WARNING
Do not touch any burner cap, burner base, or igniter while the igniters are sparking, as an electrical shock could result.
SETTING THE BURNER FLAME HEIGHT
Setting the proper burner flame height for the desired
cooking process and selected utensil will result in superior cooking performance, while also saving time
33
and energy. Follow these recommendations for best
results:
1. Use low or medium flame heights when cooking in
utensils that are poor conductors of heat, such as
glass, ceramic, and cast iron cooking vessels.
Reduce the flame height until it covers approximately
1/3 of the utensil diameter. This will ensure even
heating within the utensil and reduce the likelihood
of burning or scorching of food.
2. Reduce the flame if it is extending beyond the
bottom of the utensil. A flame that licks along the
sides of the utensil is potentially dangerous, heats
the utensil handle and kitchen instead of the food,
and wastes energy.
3. Reduce the flame height to the minimum level
necessary to perform the desired cooking process.
Remember that food cooks just as quickly at a
gentle boil as it does at a vigorous, rolling boil.
Maintaining a higher boil than is not necessary
wastes energy, cooks away moisture, and causes a
loss in food flavor and nutrient level.
ENERGY SAVING TIPS
•
Always use utensils with flat, smooth bottoms and
tight-fitting lids to retain heat and moisture.
•
Minimize the amount of liquid or fat to reduce
cooking times.
•
Select cookware of the proper size, material and
construction for the cooking process being
performed.
•
Adjust the flame height to fit the utensil size.
•
After liquid reaches a boil, reduce the heat to
maintain a simmer rather than a rolling boil.
•
Use a timer rather than repeatedly removing the lid
to check food.
•
Thaw foods prior to cooking to reduce cooking time.
34
Getting Started
BEFORE SETTING OVEN CONTROLS
To remove the oven rack support for a self-clean
cycle, support and lift front bottom of rack support to
release front tabs. Then, rotate rack support up and
out to release rear tabs. If the rack supports are not
removed, the self-clean cycle won’t start.
Installing and Removing Oven Rack
Supports
ALWAYS INSTALL OVEN RACK SUPPORT BEFORE
TURNING ON THE OVEN (WHEN THE OVEN IS
COOL).
To install oven rack support, align and insert the 2
rear tabs of the rack supports to the rear holes in the
oven side wall.
Removing and Replacing Oven Racks
ALWAYS ARRANGE OVEN RACKS WHEN THE
OVEN IS COOL (PRIOR TO OPERATING THE OVEN).
Then align the 2 front tabs of the rack support to the
front holes in the oven side wall. Push in on rack supports to secure in wall.
Always use oven mitts when using the oven. To remove
an oven rack, pull the rack forward. Lift up the rack off
the oven rack glides. To install an oven rack, locate
the two pinholes in the small plates at the front corners
of the rack. Position the back of the rack on the rack
glides and drop the pin holes over the pins on the rack
glides.
35
RECOMMENDED RACK POSITIONS FOR
BROILING, BAKING & ROASTING
Food Rack
Position
Broiling meats, chicken or fish
5, 6 or 7
Cookies, cakes, pies & muffins
Arranging Oven Racks
3 or 4
Frozen pies, angel food cake,
yeast, bread, casseroles,
small cuts of meat or poultry
2
Turkey, roast or ham
1
Note: Always use caution when removing food.
ALWAYS ARRANGE OVEN RACKS WHEN THE
OVEN IS COOL (PRIOR TO OPERATING
THE OVEN).
Baking Layer Cakes with 1 or 2 Oven
Racks
Three chrome-plated Smooth-Glide™ oven racks and
one chrome plated conventional oven rack are provided
with your range.
For best results when baking cakes or cookies using 2
oven racks, place cookware on rack positions
2 and 7.
To bake on a single rack, place the rack in position 3.
To bake on 2 racks, place the racks in position
2 and 7. To bake on 3 racks, place the racks in position
1, 3 and 7.
36
For best results when using a single oven rack, place
cookware on rack position 3.
Setting Oven Controls
SELECTOR KNOB FUNCTIONS
Air Circulation in the Oven
For best air circulation and baking results allow 2-4”
(5-10 cm) around the cookware for proper air circulation and be sure pans and cookware do not touch each
other, the oven door, sides or back of the oven cavity.
The hot air must be able to circulate around the pans
and cookware in the oven for even heat to reach around
the food.
Read the instructions carefully before using the
oven. For satisfactory use of your oven, become familiar with the various functions of the oven as described
below.
E30DF74EPS
E36DF76EPS
COMPANION OVEN ( FOR E48DF76EPS)
The E48DF76EPS includes a companion oven, which
is a fully featured, selfcleaning, convection oven.
Following are a few notes about cooking in this oven:
•
Since the oven’s capacity is much smaller, you may
find that cook times are slightly faster. Items cook
faster in this oven as far as roasting and baking.
•
Follow the same guidelines as the large oven on
selecting baking modes for best results.
•
When broiling food, position food 4-6 inches from
broil element. Preheat the broil element for 5 to 10
minutes for best results.
•
There are 5 heights for positioning the oven racks
on the porcelain rack supports. Three chrome-plated
racks are provided for this oven.
•
A 9"x12" or 10"x14" cooking utensil is recommended
for use in this oven. This includes baking sheets and
pans for multiple rack convection baking.
NOTE: Oven racks should be removed when
using the Self-Clean feature. The porcelain
oven rack supports DO NOT need to be
removed.
E48DF76EPS
Setting Oven Controls
OVEN FUNCTIONS
All oven functions are described below:
Standard Bake-With the Standard Bake function, the
bottom heat element provides conventional baking heat.
Temperatures may be set from 170° F to 500° F. Use
Standard Bake for single rack baking or roasting.
Convection Bake-With the Convection Bake function,
a third heating element, encircling the convection fan
located in the rear of the oven chamber, acts as the
heat source. The convection fan draws air from the oven
chamber, then forces it across the hot convection heating element. The heated air is directed back onto the
oven chamber through the convection baffle. The baffle
37
distributes the heated air evenly to ensure uniform
results. Temperatures may be set from 170° F to 500°
F. Use this function for single rack baking, multiple rack
baking, roasting, and preparation of complete meals.
Convection Roast - In this combination convection/radiant function, the bake, broil and convection elements
provide the heat. As in Convection Bake, the convection fan and baffle combine to circulate the heated air
evenly throughout the oven chamber. Temperature may
be set from 170° F to 500° F. Use this function for
roasting.
Standard Broil - The high wattage, top heating element
supplies the heat when using the broil function. Broiling is performed with the oven door closed.
Self Clean - With the pyrolytic Self Clean function, the
oven reaches extreme high temperatures, thereby burning off oven soil automatically. The Self Clean time is 3
hours.
Cooking Instructions
BAKING
This cooking mode is for normal baking, roasting or
warming. The temperature control knob can be set at
any temperature from 170°F to 500°F.
To set the Bake Temperature to 350°F:
1. Arrange interior oven racks to desired positions.
2. Turn selector knob to Bake.
3. The corresponding LED light will flash.
4. Turn temperature control knob to 350°F.
5. The LED light will stop flashing and the oven will
begin to preheat.
A beep will sound once the oven temperature reaches
350°F. The LED light will remain on until the Selector
knob is turned to the off position or the temperature
control knob is turned to the off position.
To change the Bake temperature (example changing
from 350°F to 425°F):
1 After the oven has already been set at 350°F, and
the oven temperature needs to be changed to 425°F,
turn the temperature control knob to 425°F. A beep
will sound when the oven temperature reaches
425°F.
38
BAKING PROBLEMS
For best cooking results preheat the oven before baking cookies, breads, cakes, pies or pastries, etc... There is
no need to preheat the oven for roasting meats or baking casseroles. The cooking times and temperatures
needed to bake a product may vary slightly from your previous appliance.
Baking Problems and Solutions Chart
Causes
Baking Problems
Cookies and biscuits
burn on the bottom.
Cakes too dark on top
or bottom.
Cakes not done in the
center.
Cakes not level.
Foods not done when
cooking time is up.
Solutions
•
Cookies and biscuits put
into the oven before the
preheating time is
completed.
•
Allow oven to preheat to the selected
temperature before placing food in oven.
•
Oven rack overcrowded
or rack position too low.
•
Choose pan sizes that will permit (2” to 4”)
of air space on all sides when placed in the
oven.
•
Dark pan absorbs heat
too fast.
•
Use a medium-weight aluminum baking
sheet.
•
Cakes put into the oven
before preheating time is
completed.
•
Allow oven to preheat to the selected
temperature before placing food in the
oven.
•
Rack position too high or
low.
•
Use proper rack position for baking needs.
•
Oven too hot.
•
Set oven temperature 25°F lower than
recommended.
•
Oven too hot.
•
Set oven temperature 25°F lower than
recommended.
•
Incorrect pan size.
•
Use pan size suggested in recipe.
•
Pan not centered in oven.
•
Use proper rack position and place pan so
there is 2” to 4” of space on all sides of pan.
•
Range not level.
•
Place a marked glass measuring cup filled
with water on the center of the oven rack. If
the water level is uneven, refer to the
installation instructions for leveling the wall
oven.
•
Pan too close to oven
wall or rack
overcrowded.
•
Be sure to allow 2” to 4” of clearance on all
sides of each pan in the oven.
•
Pan warped.
• Do not use pans that are dented or warped.
•
Oven too cool.
•
Set oven temperature 25°F higher than
suggested and bake for the recommended
time.
•
Oven overcrowded.
•
Be sure to remove all pans from the oven
except the ones to be used for baking.
•
Oven door opened too
frequently.
•
Open oven door only after shortest
recommended baking time.
39
CONVECTION BAKING
As a general rule, convection baking will allow preparation of most foods at reduced temperatures for shorter
periods of time, while producing superior results.
Typically, you can reduce standard bake temperatures
by 25°F and cook for 10% to 25% less time. When using the convection bake mode, the temperature is
automatically reduced by the electronic oven control, so the oven cooking temperature should be set to
the temperature the recipe recommends.
In the convection bake mode, a third heating element,
encircling the convection fan located in the rear of the
chamber, acts as the heat source. The convection fan
draws air from the oven chamber, and then forces it
across the hot convection element. The heated air is
directed back into the chamber through the convection
baffle. The baffle distributes the air evenly to ensure
uniform results. Temperatures may be set from 170°F
to 500°F.
General Convection Bake Instructions
1 When using convection bake, decrease your
normal cooking time by 25% to start. Time
reductions will vary depending on the amount and
type of food to be cooked.
To change the Convection Bake temperature
(example changing from 350°F to 425°F):
1 After the oven has already been set at 350°F,
and the oven temperature needs to be
changed to 425°F, turn the temperature
control knob to 425°F. A beep will sound
when the oven temperature reaches 425°F.
CONVECTION ROASTING
All baking modes can be used to successfully roast in
your oven. However, the Convection Roast mode is recommended to produce meats that are deliciously seared
on the outside and succulently juicy on the inside in
record time.
Foods that are exceptional, when prepared in the Convection Roast mode include: beef, pork, ham, lamb,
turkey, chicken and Cornish hens.
When preparing meats for convection roasting, use the
broiler pan and insert along with the roasting rack. The
roasting rack will allow the heat to circulate around the
meat.
2 Baking pans with no sides or very low sides should
be used to bake on so heated air can be allowed
to circulate around the food. Food baked on a
darker finish will cook faster.
To set the oven for Convection Bake and
temperature to 350°F:
1 Arrange oven racks to desired position.
2 Turn selector knob to Convection Bake.
General Convection Roast Instructions
3 The corresponding LED light will flash.
1 When using convection roast, decrease your
normal cooking time by 25% to start. Time
reductions will vary depending on the amount and
type of food to be cooked.
4 Turn temperature control knob to 350°F.
5 The LED light will stop flashing, and the oven
will begin to preheat. A beep will sound once,
when the oven temperature reaches 350°F.
The LED light will remain on until the Selector
knob is turned to the off position or the
temperature control knob is turned to the off
position.
2 Using a roasting rack, always roast meats fat side
up in a shallow pan. Always use a pan that fits the
size of the food being prepared. The broiler pan and
insert can be used in most cases. No basting is
required when the fat side is up. Do not add water to
the pan. It will cause a steamed effect. Roasting is a
dry heat process.
40
3 Poultry should be placed breast side up, on a rack
in a shallow pan that fits the size of the food. Again,
the broiler pan and insert accompanying the oven
can be used. Poultry can be basted with butter,
margarine or oil before and during roasting.
4 For Convection Roasting, pans with tall sides are
not recommended. They interfere with the
circulation of heated air over the food.
5 When using a meat thermometer, insert the probe
half way into the center of the thickest portion of the
meat. (For poultry, insert the thermometer probe
between the body and leg into the thickest part of
the inner thigh). To ensure an accurate reading, the
tip of the probe should not touch the bone, fat or
gristle. Check the meat thermometer 2/3 of the way
through the recommended roasting time. After
reading the meat thermometer once, insert it a ½
inch further, then take a second reading. If the
second reading registers below the first, continue
cooking the meat.
6 Remove meats from the oven when the
thermometer registers 5°F to 10°F below the
desired temperature. The meat will continue to cook
after removal. Allow 15 to 20 minutes after roasting
in order to make carving easier.
7 Convection Roast is not recommended for meats or
poultry cooked with a cooking bag, foil tent or other
cover. Food cooked with these methods will
produce better results when using the Bake mode.
8 Roasting times will always vary according to the size,
shape and quality of meats and poultry. Less tender
cuts of meat are best prepared in the Bake mode
and may require moist cooking techniques. Follow
your favorite cookbook recipes.
9 Reduce spatter by lining the bottom of the roasting
pan with lightly crushed aluminum foil.
NOTE: THERE IS NO AUTOMATIC PREHEAT WITH
THIS MODE.
The LED light will remain on until the Selector knob is
turned to the off position or the temperature control knob
is turned to the off position.
To change the Convection Roast temperature (example changing from 350°F to 425°F):
1 After the oven has already been set at 350°F, and
the oven temperature needs to be changed to
425°F, turn the temperature control knob to 425°F.
BROILING
Broiling is a method of cooking tender cuts of meat by
direct heat under the broil element of the oven. Broiling
in the oven is accomplished with the oven door closed.
It is normal and necessary for some smoke to be present
to give the food a broiled flavor.
Preheating
Preheating is suggested when searing rare steaks. (Remove the broiler pan before preheating. Foods will stick
if placed on hot metal.) To preheat, set the control to
BROIL. Wait for the element to become red-hot, usually about 2 minutes. Preheating is not necessary when
broiling meats well-done.
To Broil
Broil one side until the food is browned; turn and cook
on the second side. Season and serve. Always pull the
rack out to the “stop” position before turning or removing food.
Broiling Tips
The broiler pan and its insert allow dripping grease to
drain and be kept away from the high heat of the broiler.
To set the oven for Convection Roast and temperature to 350°F:
1 Arrange oven racks to desired position.
2 Turn selector knob to Convection Roast.
3 The corresponding LED light will flash.
4 Turn temperature control knob to 350°F.
5 The LED light will stop flashing, and the oven will
begin to heat.
41
ing pan to a different rack position to suit for doneness.
If the food you are broiling is not listed in the table, follow the instructions provided in your cookbook and
watch the item closely.
Broiling Times
Use the following table for approximate broiling times.
Increase or decrease broiling times, or move the broilOven Broiling Recommendations
Food
Item
Rack
Position
Knob
Setting
1st side
Steak 1" thick
6 or 7
6 or 7
BROIL
BROIL
6:00
7:00
4:00
5:00
Rare
Medium
Pork Chops 3/4" thick
6 or 7
BROIL
8:00
6:00
Well
4
BROIL
20:00
10:00
Well
Chicken - Boneless
6 or 7
BROIL
8:00
6:00
Well
Fish
6 or 7
BROIL
13:00
n/a
Well
4
BROIL
5:00
n/a
Well
6 or 7
4
BROIL
BROIL
9:00
10:00
7:00
8:00
Medium
Well
Chicken - Bone In
Shrimp
Hamburger 1" thick
NOTE: DO NOT use the broiler pan without its
insert. DO NOT cover the broiler pan insert
with foil. The exposed grease could ignite.
CAUTION
Cook Time
2nd side
Doneness
use a fire extinguisher. DO NOT put water or
flour on the fire. Flour may be explosive and
water can cause a grease fire to spread and
cause personal injury.
To set the oven to broil:
Should an oven fire occur, turn off the oven. If the
fire continues, throw baking soda on the fire or use
fire extinguisher. DO NOT put water or flour on the
fire. Flour may be
explosive.
Setting Broil
The selector knob controls the Broil feature. When broiling, heat radiates downward from the oven broiler for
even coverage. The Broil feature temperature is 500°F.
The broil pan and broil pan insert used together allow
dripping grease to drain and be kept away from the high
heat of the oven broiler. DO NOT use the broil pan without the insert. DO NOT cover the broil pan insert
with foil. The exposed grease could catch fire.
WARNING
Should an oven fire occur, leave the oven
door closed and turn off the oven. If the fire
continues, throw baking soda on the fire or
1 Place the broiler pan insert on the broiler pan. Then
place the food on the broiler pan insert. DO NOT
use the broiler pan without the insert. DO NOT cover
the broiler insert with foil. The exposed grease could
ignite.
2 Arrange the interior oven rack and place the broiler
pan on the rack. Be sure to center the broiler pan
directly under the broiler element. If preheating the
broil element first, position the broiler pan with food
after step 5.
3 Turn selector knob to Broil.
4 The corresponding LED light will flash.
5 Turn temperature knob to Broil. The LED light will
remain on until the selector knob is turned to the off
position or the temperature control knob is turned to
the off position.
42
Broiler Clean-Up Tips:
To make cleaning easier, line the bottom of the broiler
pan with aluminum foil. DO NOT cover the broiler pan
insert with foil.
To prevent grease from baking on, remove the broiler
pan from the oven as soon as cooking is completed.
Use hot pads because the broiler pan is extremely hot.
Pour off grease. Soak the pan in HOT, soapy water.
The broiler pan and insert can be cleaned in your dishwasher.
Clean the broiler pan as soon as possible after each
use. If necessary, use soap-filled steel wool pads.
Heavy scouring may scratch the broiler pan insert.
USING THE OVEN SELF-CLEAN FEATURE
Adhere to the Following Cleaning Precautions:
•
Allow the oven to cool before cleaning.
•
Wear rubber gloves when cleaning any exterior parts
of the oven manually.
can cause smoke or a fire when subjected to high temperatures. DO NOT allow food spills with a high sugar
or acid content (such as tomatoes, sauerkraut, fruit
juices or pie filling) to remain on the surface as they
may leave a dull spot even after cleaning.
2. Clean any soil from the oven frame and the door
liner. These areas do not heat sufficiently during
a self-clean to burn soil off. Clean with hot soapy
water.
3. Remove the broiler pan and insert, all utensils and
any foil. These items cannot withstand high
cleaning temperatures.
4. Oven racks and oven rack supports must be
removed. If they are not removed, the
Self-Cleaning cycle cannot start and the “- Racks”
LED will begin to flash indicating that you must
remove the racks and racks glides with the supports
before starting the clean cycle. The convections
filter also needs to be removed. When the cycle has
finished and the door can be opened, replace the
oven rack glides with supports, oven racks and
convection filter.
During the Self-Cleaning cycle, the outside of the
range can become very hot to the touch. DO NOT
leave a small children unattended near the appliance.
NOTE: For model E48DF76ESP, the racks and
convection filter need to be removed from
the companion oven. Self-Clean can only be
run in the large oven or the companion oven
separately. The Self-Clean cycle can not be
run simultaneously in both ovens.
Before cleaning any part of the oven, be sure the oven
is turned off . Wait until the oven is cool.
STARTING THE OVEN SELF-CLEAN
CYCLE
CAUTION
CAUTION
The health of some birds is extremely sensitive to
the fumes given off during the Self-Clean cycle of
any range. Move birds to another well ventilated
room.
DO NOT use oven cleaners or oven protective coatings in or around any part of the Self-Cleaning oven.
DO NOT clean the oven door gasket. The gasket on
the oven door is essential for a good seal. Care should
be taken not to rub, damage or move the gasket. DO
NOT use any cleaning materials on the gasket. Doing
so could damage it. DO NOT use aluminum foil to line
the oven bottom. This may affect cooking or foil could
melt and damage the oven surface
.
Preparing the Oven for Self-Cleaning
1. Remove any excess spillovers in the oven cavity
before starting the Self-Cleaning cycle. To clean,
use hot soapy water and a cloth. Large spillovers
The selector knob controls the Self-Cleaning feature. If
you are planning to use the oven immediately after a
self-clean cycle remember to allow time for the oven to
cool down and the oven door to unlock. This normally
takes about one hour. A 3-hour self-clean cycle will
actually take about 4 hours to complete.
WARNING
During the Self-Cleaning cycle, the outside of the
appliance can become very hot to the touch. DO
NOT leave small children unattended near the
appliance; they may be burned if they touch the
hot oven door surfaces.
WARNING
DO NOT force the oven door open. This can damage the automatic door locking system. Use care
when opening the oven door after the self-cleaning
cycle. Stand to the side of the oven when opening
43
the door to allow hot air or steam to escape. The
oven may still be VERY HOT.
To start a Self-Cleaning cycle:
product. Several materials and finishes are used in the
cooktop. Each material and finish must be properly
cleaned according to the following recommendations.
Failure to follow these recommendations may result in
permanent damage to the cooktop.
1. Be sure oven is empty and the oven door is closed.
WARNING
2. Turn selector knob to Self Clean.
•
Before cleaning the cooktop, ensure that all
burners are turned off and that all components
are cool enough to safely touch.
•
After cleaning, reassemble all components
before attempting to operate the cooktop.
3. The corresponding LED will flash.
4. Turn temperature knob to Clean.
5. The LED for “Lock” will flash while transitioning from
unlock to lock. It will stop flashing when the door is
locked.
NOTE: If the “- Racks” LED is flashing when the
clean mode is initiated, the oven racks and
rack glides with supports have not been
removed. It will discontinue flashing, once
the selector knob is set back to the off
position and the racks and rack glides with
supports are removed from the oven (not
applicable to model E48DF76EPS
companion oven).
6. As soon as the controls are set to clean, the motor
driven oven door lock will begin to close
automatically. Once the door has been locked the
indicator light will stop flashing and remain on. Allow
about 30 seconds for the oven door lock to close.
Proper cleaning is necessary to maintain cooktop
performance and appearance, while also ensuring
safe operation. The cleaning effort necessary to
maintain the cooktop varies according to the type and
amount of cooking. For example, more frequent
cleaning is required if the cooktop is used often for
frying or other high temperature operations.
Clean the cooktop thoroughly prior to operating it the
first time. For initial and everyday cleaning, use a soft
cloth or sponge lightly dampened with a solution of
warm water and hand dishwashing liquid to clean all
components.
Recommendations for cleaning and care of specific
cooktop components are summarized below:
IMPORTANT
CLEANING TIPS FOR RANGE COOKTOP
No maintenance, other than the Care and Cleaning
identified in this Use & Care Manual, should be
attempted by the owner/operator. All other maintenance
and service must be performed by a qualified appliance
technician.
WARNING
To avoid electrical shock or burns, turn off all
controls and ensure the cooktop is cool before
cleaning.
IMPORTANT
Do not use harsh or abrasive cleaning agents,
waxes, polishes, or commercial cooktop cleaners
to clean the cooktop.
Read and follow the Care and Cleaning instructions to
ensure that proper cooktop operation and appearance
will be maintained throughout the lifetime of the
The grates and burner caps, unlike other porcelain
enamel appliances in your home, are exposed to
extremely high temperatures in a matter of seconds.
In addition to this extreme thermal shock, the grates
are subjected to mechanical shock when utensils
are placed on or slid across them. Finally, spillovers
introduce foods with high acidity to all of the porcelain components. Due to these severe operating
conditions, all porcelain enamel components on the
cooktop will undergo an inevitable change in appearance with use. Meticulous care and cleaning
will slow but not eliminate this natural and expected
aging process.
Treating the porcelain components with care will slow
the natural deterioration that takes place with cooktop
use. Please follow these guidelines to keep the porcelain parts looking their best:
1. Do not use utensils having rough bottoms, as this
can result in permanent damage to the top surfaces
of the porcelainized grates.
44
2. Do not drop utensils onto the grates or drag heavy
pots across the tops of the grates.
3. Set the grates into the locating dimples gently. Do
not drop the grates into place.
4. Use caution when cooking to avoid spills as much
as possible. Porcelain is acid-resistant but not acidproof, so some foods can cause permanent
damage if allowed to remain on porcelain surfaces.
Daily cleaning of the grates, burner heads, and burner
caps is best accomplished with a soft cloth or sponge
dampened in a solution of warm water and hand
dishwashing liquid. Grates are dishwasher safe. Burner
caps should not be cleaned in the dishwasher.
Stubborn stains may be removed by applying fullstrength, all purpose cleaning sprays. (If you are unable to locate these cleaning compounds, please phone
the Electrolux Customer Service Department for a referral.)
Mild abrasive cleaners or applicators, such as soapfilled steel wool pads, may be used with extreme care
on occasion to remove the most serious stains. Exercise caution – extensive use of abrasives will eventually damage the porcelain enamel surface.
CLEANING STAINLESS STEEL SURFACES
IMPORTANT
Never use the cooktop surface as a cutting board.
Do not use abrasive cleaners or applicators on the
cooktop.
Do not try to remove heavy spills with a sharp object such as a knife or metal spatula. Sharp objects
may scratch the cooktop.
A small amount of baby oil may be applied to stainless steel tops to restore the lustre.
CLEANING KNOBS AND KNOB BEZELS
The control knobs provided with this cooktop are designed for ease of use and longevity. The “D” shaped
design of the knob shaft ensures proper orientation
when reinstalling the knob and knob bezels.
The knobs are made of a composite plastic. These components should be washed regularly in warm, soapy
water. Hand dishwashing liquid is excellent for this task.
Knobs should be removed by gently pulling them straight
out and off of the valve shafts. Use caution to avoid
introduction of moisture into the control panel behind
the bezels. To replace knobs, align the “D-shaped” opening at the bottom of the knob with the “D-shaped” valve
shaft, then carefully press the knob onto the valve.
CLEANING BURNER BASES
Clean these surfaces with the provided Stainless
Steel Cleaner. Rinse and dry with a soft lint-free cloth.
IMPORTANT
If commercial available stainless steel cleaners are
used, it is important to read the labels for chlorine
compounds. Chlorine is a corrosive substance. If
these compounds are present, rinse thoroughly and
dry with a soft lint-free cloth and use stainless steel
polish.
The burner base is permanently attached to the cooktop.
The base should be wiped clean using a soft cloth or
sponge that has been lightly dampened with warm
water and hand dishwashing liquid. Thoroughly clean
and dry the igniters to prevent constant sparking of the
reignition system. Refer to the Cleaning the Burner
Igniters section for cleaning tips.
IMPORTANT
•
Turn the knobs to the “OFF” position prior to
removing them from the valve stems.
•
The cooktop should never be operated without
the knobs in place.
•
Do not soak the knobs in water or place them in
the dishwasher.
•
Do not expose the knobs to direct flame, hot
utensils, or other sources of heat.
•
Do not use abrasive or corrosive cleaners or
applicators, as these could cause permanent
damage.
Always wipe stainless steel surfaces with the grain.
CLEANING PORCELAIN GRATES
Clean the porcelain grates with a solution of mild detergent and hot water. Rinse with a soft cloth. Do not use
abrasives or commercial oven cleaners.
Stubborn stains may be removed by washing the grates
in a dishwasher, using normal dishwasher detergent.
45
CLEANING BURNER RINGS
The brass burner rings spread the flame evenly around
the burner perimeters. The burner rings must seat properly in the burner bases to enable proper cooktop
operation. To ensure proper seating, positioning tabs
have been placed on the bottom of each burner ring to
slide into corresponding notches in the fixed burner
base.
If the unit still exhibits problems after drying, please
phone the Electrolux Customer Service Department for
further assistance.
To remove the burner ring, first remove the grate, then
lift off the porcelain burner cap. The burner ring may
then be removed from the burner base. Soak the burner
ring in a warm solution of hand dishwashing liquid and
water, then rinse well with clean water. Dry the burner
thoroughly
Stubborn stains may be removed by applying a metal
polishing compound. (If you are unable to locate this
type of polishing compound, please phone the Electrolux
Customer Service Department for a referral.)
CLEANING THE BURNER IGNITERS
Under certain cooking or cleaning conditions, your
cooktop igniters may become coated with or corroded
by food deposits, splattered grease or cleaning agents.
This condition can cause erratic or continuous
sparking. Keeping the igniters clean and dry will help
to reduce this problem. To avoid unnecessary and costly
service calls, the homeowner should perform periodic
cleaning of the igniters.
To clean the igniters:
1. Be sure the burners are cool to the touch. Remove
the grate, burner cap and burner heads.
2. Clean completely around the igniter, including over
and under the edge of the metal cap and base. Use
care while cleaning here. Parts of the igniter are
porcelain and can be fragile.
3. DO NOT USE WATER when cleaning the igniters.
If a liquid must be used to clean the igniter
effectively, use only a small amount of rubbing
alcohol.
4. After cleaning, reinstall the burner ring, burner cap
and grate. Make sure the brass burner ring is
properly seated into the burner base.
5. Test the burners. If erratic clicking is still present,
make sure the igniter is completely dry.
46
GENERAL CLEANING
Cleaning Various Parts of Your appliance
Before cleaning any part of the appliance, be sure all controls are turned OFF and the appliance is COOL.
REMOVE SPILLOVERS AND HEAVY SOILING AS SOON AS POSSIBLE. REGULAR CLEANING WILL REDUCE THE NUMBER OF MAJOR CLEANINGS LATER.
Surfaces
How to Clean
Painted and Plastic
Body Parts and Decorative Trim.
Using a soft cloth, clean with mild dish detergent and water or a 50/50
solution of vinegar and water. Follow by rinsing the area with clean water;
dry and polish with a soft cloth.
Glass cleaners may be used if sprayed on a soft cloth first. DO NOT spray
liquids directly on the control pad and display area. Do not use large
amounts of water on the control panel - excess water on the control area
may cause damage to the appliance.
Do not use other liquid cleaners, abrasive cleaners, scouring pads, or
some paper towels - they will damage the finish.
Control Panel
Before cleaning the control panel, turn all controls to OFF. Glass cleaners
may be used if sprayed on a soft cloth first. DO NOT spray liquids directly
on the control pad and display area. Wipe with a soft cloth or paper towel.
DO NOT use abrasive cleaners or scouring pads. These can permanently
damage the control panel surface.
Porcelain Enamel
Broiler Pan, Broiler Pan Insert
and Cooktop Spill Tray
Gentle scouring with a soapy scouring pad will remove most spots. Rinse
with a 1:1 solution of clear water and ammonia. If necessary, cover difficult spots with an ammonia-soaked paper towel for 30 to 40 minutes.
Rinse with clean water and a damp cloth, and then scrub with a soap-filled
scouring pad. Rinse and wipe dry with aclean cloth. Remove all cleaners
or the porcelain may become damaged during future heating.
Stainless Steel, Chrome
Decorative Trim, Oven Racks,
Oven Racks Support
Clean with hot, soapy water and a dishcloth. Rinse with clean water and a
cloth. Cover stubborn spots with an ammonia-soaked paper towel for 30
to 40 minutes. Rinse. Cleaners made especially for stainless steel are
recommended. Be sure to rinse the cleaners as bluish stains may occur
during heating and cannot be removed.
Oven Racks
Oven racks and oven rack supports must be removed from the oven during the selfclean cycle for cleaning. If they are not removed, the self-clean
cycle will not start. Clean them as described above.
Oven Door
To clean oven door, wash with hot, soapy water and a clean cloth. DO
NOT immerse the door in water or clean the oven door gasket. DO NOT
use abrasive cleaners on the inside of the oven door glass.
Oven Door Gasket
The oven door gasket is located on the oven door and visible when the
door is opened. This gasket is essential for a good seal. Care should be
taken not to rub, damage or remove the gasket.
47
OVEN LIGHT
Your new range has halogen oven lights to enhance
the view into the oven. The light assembly consists of a
removable lens cover and 20-watt 120VAC halogen
bulb (OSRAM - Part Number 64428), as well as a light
fixture housing. Light bulb replacement is considered
to be a homeowner maintenance operation.
WARNING
To prevent electrical shock and/or personal injury:
Make certain that the oven and light bulb are cool
and that power to the oven has been turned off before replacing the light bulb.
Always ensure that the lens cover is in place when
using the oven. The lens cover protects the bulb
from breakage caused by high oven temperatures
or mechanical shock.
To replace the light bulb:
1. Turn off the power at the main power supply.
2. Remove rack supports in order to access the light
housing.
3. Remove the lens cover from the housing by pulling
straight out.
4. Replace halogen bulb taking care not to touch the
bulb. If you touch the halogen bulb with your finger,
body oils can shorten the bulb life.
5. To replace glass shield, reverse the procedure.
48
Solutions to Common Problems
PROBLEM
Nothing works.
POSSIBLE CAUSE
SOLUTION
Oven is not connected to electrical
power.
Have oven connected to a properly
sized electrical power supply by a
qualified technician.
Power supply is not energized.
Have an electrician check power
supply, including the house circuit
breaker, wiring and fuses.
Oven will not heat.
Oven settings are not correct.
Follow mode selection and temperature settings as specified in OVEN
OPERATION.
Foods overcooked.
Incorrect cooking time, temperature.
Adjust time, temperature or rack
position.
Oven does not Self-Clean.
Door is not closed tightly, so the
automatic door latch will not lock.
Close door tightly.
Oven control knob set incorrectly.
Follow mode selection and temperature settings specified for SELFCLEAN.
Oven light will not work.
Light bulb is burned out.
Follow REPLACING THE OVEN
LIGHT.
Door will not open.
Oven is in Self-Clean mode.
If oven is hot, door latch will release
automatically when oven
temperqature falls below 490°F at
end of cycle.
Oven will not heat after SelfClean.
Oven settings not correct.
Follow mode selection and temperature settings as specified in OVEN
OPERATION.
Igniters do not spark.
Circuit breaker is tripped.
Reset circuit breaker.
House fuse is blown.
Replace house fuse.
Power outage in local area.
Contact power company.
Gas shut-off valve is in the “off”
position.
Turn shut-off to “on” position.
Gas supply is interrupted.
Contact gas company.
Sparking but no flame ignition.
49
PROBLEM
Burners ignite but flame is
extremely large, distorted or
yellow.
POSSIBLE CAUSE
SOLUTION
Burner ring ports are clogged.
Clean burner ring ports with straightened paper clip, needle or wire.
Burner ports or burner caps are not
positioned properly.
Remove and carefully re-install
burner rings and caps.
Cooktop is being operated on the
wrong type of gas.
Ensure that the type of cooktop
matches the gas supply (natural gas
or L.P. gas)
Regulator is not installed, is faulty or
is set for the wrong type of gas.
Check installation, replace regullator,
or set regulator for proper gas.
Burner flame goes out at low
setting.
Low gas supply pressure.
Contact gas company.
Ignitors spark continuously
after flame ignition.
Power supply is not grounded.
Have power supply properly
grounded.
Power supply polarity is reversed.
Have polarity corrected.
Ignitors are wet or dirty.
Dry or clean ignitors.
50
Service Failure Mode definitions
Failure Mode Definition
Front Panel LED
Failure Description
1 2 3 4 5 6 7
X
X
X
X
X
X
X
X
X
X
X
X
X
X
X
X
X X
X
X
X
X
X
Runaway Temperature
Incorrect Micro ID
Incorrect EEPROM Checksum
Open Temperature Probe
Shorted Temperature Probe
Max Unlock Time Exceeded (Motor Door Latch)
Max Unlock Attempts.Exceeded (Motor Door Latch)
Max Lock Time Exceeded (Motor Door Latch)
Max Lock Attempts.Exceeded (Motor Door Latch)
Motor Door Latch Failed During Clean Operation
Inter Processor Communications Failure (Motor Door Latch)
LED Definitions
1
2
3
4
-
Bake
Convection Bake
Convection Roast
Broil
5 - Clean
6 - Lock
7 - Remove Racks
51
SAMPLE WARRANTY ALWAYS REFER TO WARRANTY WITH PRODUCT
RANGE WARRANTY Y our range is protected by this warranty
In the U.S.A., your appliance is warranted by Electrolux Home Products North America, a division of White Consoli-
dated Industries, Inc. We authorize no person to change or add to any of our obligations under this warranty. Our
obligations for service and parts under this warranty must be performed by us or an authorized Electrolux Home
Products North America servicer. In Canada, your appliance is warranted by Electrolux Canada Corp.
FULL ONE-YEAR
WARRANTY
WARRANTY PERIOD
THROUGH OUR AUTHORIZED
SERVICERS, WE WILL:
THE CONSUMER WILL BE RESPONSIBLE
FOR:
One year from original
purchase date.
Pay all costs for repairing or replacing
any parts of this appliance which
prove to be defective in materials or
workmanship.
Costs of service calls that are listed under
NORMAL RESPONSIBILITIES OF THE
CONSUMER. *
All of the provisions of the full and
limited warranties above and the
exclusions listed
below apply.
Costs of the technician’s travel to the home
and any costs for pick up and delivery of the
appliance required because of service.
Time periods listed
LIMITED
WARRANTY
above.
(Applicable to the
State of Alaska)
*NORMAL
RESPONSIBILITIES
OF THE CONSUMER
EXCLUSIONS
IF YOU NEED
SERVICE
USA
1•800•944•9044
Electrolux Home Products
North America
P.O. Box 212378
Augusta, GA 30917
This warranty applies only to products in ordinary household use, and the consumer is responsible
for the items listed below:
1. Proper use of the appliance in accordance with instructions provided with the product.
2. Proper installation by an authorized servicer in accordance with instructions provided with the appliance
and in accordance with all local plumbing, electrical and/or gas codes.
3. Proper connection to a grounded power supply of sufficient voltage, replacement of blown fuses, repair
of loose connections or defects in house wiring.
4. Expenses for making the appliance accessible for servicing, such as removal of trim, cupboards,
shelves,etc.,which are not a part of the appliance when it was shipped from the factory.
5. Damages to finish after installation.
6. Replacement of light bulbs and/or fluorescent tubes (on models with these features).
This warranty does not cover the following:
1. CONSEQUENTIAL OR INCIDENTAL DAMAGES SUCH AS PROPERTY DAMAGE AND INCIDENTAL
EXPENSES RESULTING FROM ANY BREACH OF THIS WRITTEN OR ANY IMPLIED WARRANTY.
NOTE: Some states do not allow the exclusion or limitation of incidental or consequential damages, so
thislimitation or exclusion may not apply to you.
2. Service calls which do not involve malfunction or defects in workmanship or material, or for appliances
not in ordinary household use. The consumer shall pay for such service calls.
3. Damages caused by services performed by servicers other than Electrolux Home Products North
America or its authorized servicers; use of parts other than genuine Electrolux Home Products parts;
obtained from persons other than such servicers; or external causes such as abuse, misuse, inad
equate power supply or acts of God.
4. Products with original serial numbers that have been removed or altered and cannot be readily
determined.
Keep your bill of sale, delivery slip, or some other appropriate payment record. The date on the bill
establishes the warranty period should service be required. If service is performed, it is in your best
interest to obtain and keep all receipts. This written warranty gives you specific legal rights. You may also
have other rights that vary from state to state. Service under this warranty must be obtained by contacting
Electrolux Home Products:
Canada
1•866•294•9911
Electrolux Home Products
North America
802, boul. L’Ange-Gardien
L’Assomption, Québec
J5W 1T6
This warranty only applies in the 50 states of the U.S.A., Puerto Rico, and
Canada.
Product features or specifications as described or illustrated are subject to
change without notice. All warranties are made by Electrolux Home
Products North America, a division of White Consolidated Industries, Inc.
In Canada, your appliance is warranted by Electrolux Canada Corp.
52
•
Improper installation, adjustment, alteration,
service, or maintenance can cause personal
injury or property damage. Refer to these
instructions and the accompanying Use & Care
Manual. For assistance or additional information,
consult a qualified installer, service agency,
manufacturer (dealer), or the gas supplier.
IMPORTANT SAFETY INSTRUCTIONS
•
For your safety:
Safety Precautions
-
Do not attempt to install or operate your appliance until
you have read the safety precautions in this manual.
Safety items throughout this manual are labeled with a
Warning or Caution based on the risk type.
Do not store or use gasoline or other flammable
vapors and liquids in the vicinity of this or any
other appliance.
-
Do not obstruct the flow of combustion and
ventilation air to the unit.
Definitions
-
This is the safety alert symbol. It is used to alert
you to potential personal injury hazards. Obey all safety
messages that follow this symbol to avoid possible
injury or death.
Keep appliance area clear and free from
combustible material, gasoline and other
flammable vapors and liquids.
-
Do not use or attempt to use this appliance in
the event of a power failure.
•
This unit is designed as a cooking appliance.
Never use it for warming or heating a room.
•
This appliance must not be used in
combination with surface (countertop)
ventilation systems. The use of an overhead
hood or downdraft is recommended for
ventilation.
•
This appliance must be installed with the gas
pressure regulator supplied with it.
•
Disconnect the electrical supply before
installing or servicing the appliance.
•
This appliance must be grounded. Connect only
to a properly grounded electrical supply. Refer
to “Electrical Requirements”.
•
Install or locate this appliance only in accordance
with these installation instructions.
•
Use this appliance only for its intended use as
described in this manual. Do not use corrosive
chemicals or vapors in this appliance. This type
of appliance is not designed for industrial or
laboratory use.
•
As with any appliance, close supervision is
necessary when used by children.
•
Do not operate this appliance if it has a
damaged electrical cord, plug, conduit or wires,
if it is not working properly, or if it has been
SECTION B - INSTALLATION
INSTRUCTIONS
Safety
WARNING
WARNING indicates a potentially hazardous
situation which, if not avoided, could result in death
or serious injury.
CAUTION
CAUTION indicates a potentially hazardous
situation which, if not avoided, may result in minor
or moderate injury.
CAUTION
CAUTION used without the safety alert symbol
indicates a potentially hazardous situation which,
if not avoided, may result in property damage.
IMPORTANT
Indicates installation, operation or maintenance
information which is important but not hazard
related.
SAFETY PRECAUTIONS
WARNING
•
Read all instructions before using the appliance.
53
damaged or dropped.
•
This appliance should be serviced only by
qualified service personnel.
•
Some products, such as whole eggs, and sealed
containers, such as closed glass jars, may
explode and should not be heated on this
cooktop.
WARNING
•
Based on safety considerations, the top burner
flame should be adjusted so it does not extend
beyond the edge of the cooking utensil.
•
If the information in this manual is not followed
exactly, a fire or explosion may result causing
property damage, personal injury, or death.
•
What to do if you smell gas:
NOTE: Owner: Read your Range Use & Care
Manual. It contains important safety
information for operating this appliance. It
also has many suggestions for getting the
best results from your Range.
Read all instructions before installing the Range.
For your safety, please read and observe all safety instructions. This guide will help you anticipate all installation connections.
QUESTIONS?
For toll-free telephone support in the U.S. and Canada:
1-877- 4ELECTROLUX (1-877-435-3287)
For online support and Internet product information:
www.electroluxusa.com.
Preparing for Installation
VERIFY PACKAGE CONTENTS
-
Do not try to light any appliance.
-
Do not touch any electrical switch, do not use
any phone in your building.
-
Immediately call the gas supplier from a
neighbor’s phone.
• Use & Care Manual
• Broiler Pan/Insert
• Anti-tip Bracket
• Grate Pack
• Griddle
• LP Conversion Kit
-
Follow the gas supplier’s instructions.
GAS SUPPLY REQUIREMENTS
-
If you cannot reach your gas supplier, call the
fire department.
Finding Information
Check your local building codes for the proper method
of installation. In the absence of local codes, this appliance should be installed in accordance with the
National Fuel Gas Code ANSI Z223.1. Be certain that
the appliance being installed is correct for the gas service being provided. Refer to the rating label located on
the kick panel and/or the table below for gas supply
requirements.
READ AND SAVE THESE INSTRUCTIONS
GAS AND ELECTRIC REQUIREMENTS TABLE
NOTE: Installer: Leave instructions with owner.
Refer to the following table for more information on gas
and electric requirements.
•
Installation of this appliance must be performed
by a qualified installer, service agency or the gas
supplier.
Model No.
E30DF74EPS
E36DF76EPS
E48DF76EPS
• Burner Rings
• Wok Ring
• Simmerplate
• Stainless Steel Cleaner
• Roasting Rack
• Burner Cap Pack
Electrical
circuit
required
240-4
Wire VAC,
60Hz, 30A
Total
connected
load
Gas type
Manifold
pressure
26.4 Amps
(6.3 Kw)
Natural
4” Water Column
5” Water Column
Liquid Propane
10” Water Column
11” Water Column
240-4
Wire VAC,
60Hz, 30A
240-4
Wire VAC,
60Hz, 50A
26.4 Amps
(6.3 Kw)
Natural
4” Water Column
5” Water Column
10” Water Column
11” Water Column
4” Water Column
5” Water Column
10” Water Column
11” Water Column
44.2 Amps
(10.4 Kw)
Liquid Propane
Natural
Liquid Propane
54
Minimum gas
supply
pressure
NOTE: This range is shipped from the factory
pre-set for use with natural gas. For LP
conversion see the accompanying LP
Conversion Kit. The electrical information
in the table is also located on the serial
number label on the range. It can be found
by opening the oven door and looking
through the inlet air cooling grill.
ELECTRICAL POWER SUPPLY REQUIREMENTS
It is the owner’s responsibility to ensure that the electrical connection of this appliance is performed by a qualified electrician. The electrical installation, including minimum supply wire size and grounding, must be in accordance with the National Electric code ANSI/NFPA 701993* (or latest revision) and local codes and ordinances.
*A copy of this standard may be obtained from:
National Fire Protection Association
1 Batterymarch Park
Quincy, Massachusetts 02269-9101
The correct voltage, frequency, and amperage must be
supplied to the appliance from a separate, grounded,
circuit that is protected by a properly sized circuit
breaker or time delay fuse.
Refer to the Gas and Electrical Requirements Table.
WARNING
If the gas or electric service provided does not meet
the product specifications, do not proceed with the
installation. Call the selling dealer, the gas supplier,
or a licensed electrician.
NOTES: The power supply must be properly
polarized. Reverse polarity will result in
continuous sparking of the electrodes,
even after flame ignition.
If there is any doubt as to whether the
power supply is properly polarized or
grounded, have it checked by a qualified
electrician.
GAS AND ELECTRICAL ROUGH-IN
locations. For replacement purposes, the
location of the existing utilities may be
utilized provided that they do not
interfere with the sides or rear of the
range. If installing the gas valve behind
the range, verify that local building codes
will permit this.
A manual shut valve must be installed in the gas piping,
external to the appliance, for the purpose of turning on
or shutting off gas to the appliance. Plan the location
of the range and the gas supply to allow access to the
valve when the unit is installed. Access to the remote
circuit breaker panel/fuse box, with the range in place,
must also be allowed for in the installation. Any openings in the wall behind the appliance and in the floor
under the appliance must be sealed.
Both the gas supply piping and shut-off valve, and the
electrical junction box/receptacle must be located so
they do not interfere with the range when it is installed.
In addition, the junction box must be located so the range
can be removed for service when the conduit supplied
with the unit is attached to the junction box. Do not
lengthen the conduit or wiring provided with the range.
All dimensions shown are based on standard American
cabinets 36 inches (914mm) high at the finished
countertop by 24 inches (610mm) deep, with a 25 inch
(635mm) overall countertop depth. When installing the
range into nonstandard cabinets, minimum clearances
shown in the diagrams on page 11 must be maintained.
Carefully check the location where the range is to be
installed. For best performance, the range should be
placed away from drafts that may be caused by doors,
windows and HVAC outlets.
CABINET AND COUNTERTOP
PREPARATION
NOTES:
•
If cabinet storage space is to be provided directly
above the range, the risk of personal injury may
be reduced by installing a ventilating hood that
projects horizontally a minimum of 5 inches
beyond the face of the cabinets.
•
The range may be installed flush to the rear wall.
We recommend installing a non-concombustible
material on the rear wall above the range and up
to the vent hood. It is not necessary to install
non-combustible materials behind the range
below the countertop height.
Locations
NOTE: The shaded areas shown in the
illustrations, denote the location of the
gas stub and the electrical junction box/
receptacle. These are suggested
55
•
The minimum distance from the sides of the
range above the countertop to combustible side
walls must be at least 10 inches.
•
The E36DF76EPS and E48DF76EPS ranges are
delivered with a 3” backguard from the factory.
9” and 24” backguards are available as options.
The E30DF74EPS range is delivered with a 6”
backguard from the factory. 9” and 12”
backguards are available as options.
•
Utilities may be located: In the lower left corner
of the adjacent right cabinet. (Recommended)
IMPORTANT
•
Contact your local building department to verify
compliance with local code interpretation.
56
Plan the installation so that the electrical connection, gas shut-off valve, and pressure regulator are accessible
from the front of the cabinet.
A
Hood
13”
(330mm)
Maximum
18” (457mm)
minumin
Top of
finished
counter
Vertical
non-combustible
Surface
30” (762mm)
B
minumin
8”
(203mm)
10” (254mm) Min.
to combustible side
wall above the renge
(both sides)
12”
(305mm)
25”
(635mm)
Cutout Dimensions
Model
“A”
“B”
E30DF74EPS
36” (914mm) Recommended
30” (762mm) Minimum
30 1/16” (764mm)
E36DF76EPS
42” (1067mm) Recommended
36” (914mm) Minimum
36 1/16” (914mm)
E48DF76EPS
54” (1372mm) Recommended
48” (1219mm) Minimum
48 1/8” (1222mm)
57
E36DF76EPS and E48DF76EPS Overall Dimensions Side View
30 3/8” (772 mm)
Handle
29 1/8” (740mm)
Front Edge of Bullnose
28 1/8” (714mm)
Face of Control Panel/Oven Door
26 1/2” (673mm)
Rear of Control Panel/Oven Door
9” (229mm)
24” (610mm)
Backguard
19”
(483mm)
3” (79mm)
15 1/4”
(387mm)
9” (229mm)
Backguard
3” (76mm)
Backguard
37” (940mm)
to
35 3/4” (908mm)
58
28 1/4”
(718 mm)
25 5/8”
(652 mm)
27 3/8”
(693.7mm)
Handle
Front Edge of Bullnose
Face of Control Panel/Oven Door
24 18”
(612.5mm)
Rear of Control Panel/Oven Door
6” (152mm) Backsplash
37” (940mm)
to
35 3/4” (908mm)
59
INSTALLING THE ANTI-TIP BRACKET (FOR 30”, 36” & 48” MODELS)
WARNING
The 30”, 36” and 48” ranges require an anti-tip device. Before installing the range, you must locate and
secure the anti-tip bracket to the floor.
60
INSTALLING THE ANTI-TIP BRACKET (FOR 30”, 36” & 48” MODELS)
WARNING
The 30”, 36” and 48” ranges require an anti-tip device. Before installing the range, you must locate and
secure the anti-tip bracket to the floor.
61
INSTALLING THE ANTI-TIP BRACKET (FOR 30”, 36” & 48” MODELS)
WARNING
The 30”, 36” and 48” ranges require an anti-tip device. Before installing the range, you must locate and
secure the anti-tip bracket to the floor.
Rear
Rear
Center
Leg
Leveler
5/16 - 18 x 2
or Equivalent
62
GAS REGULATOR AND ELECTRICAL CONDUIT LOCATION
63
Installation
INSTALLING THE 30”, 36” & 48” RANGE
OPTIONAL BACKGUARDS
Your Electrolux IconTM range was shipped with a
backguard in place. These instructions cover the installation of one of the optional backguards.
WARNING
Be sure that the range is not connected to gas or
power before proceeding.
Installing the Range Optional Backguard:
1. Remove the backguard from its box.
2. To avoid scratches, place small scraps of thin
cardboard on the rear of the side panels where the
backguard will make contact. With the assistance
of at least one other person, carefully lift the
backguard and place down on to the range top.
Special attention should be given to the lower flange
in front of the backguard, which must fit between
the stainless steel side panels.
3. Fasten the provided screws through the rear flange.
4. Connect the gas line to the regulator. Reposition and
attach the access panel or the back cover if the
entire back cover was removed.
5. You are now ready to continue with the range
installation.
NOTE: For 24” Backguards, fasten the provided
screws through the holes in the back panel
of the Backguard.
Backguard
Backguard
64
REMOVING THE OVEN DOOR(S)
WARNING
Do not attempt to disengage the hinge catches with
the door removed from the oven. The hinge springs
could release causing personal injury.
Do not lift or carry the oven door by the door handle.
Open the door to its fully opened position. Rotate the
catch over the retaining arm on each hinge. Lift the oven
door to about a 30 degree angle from the horizontal
position. Pull the door away from the oven while continuing to lift.
RE-INSTALLING THE OVEN DOOR(S)
Grasp the oven door on opposite sides and lift it until
the door hinges are aligned with the openings in the
oven frame. Holding the door at about a 30° angle from
the horizontal, slide the hinges into the openings until
the bottom hinge arms drop fully into the hinge receptacles. Lower the door to the fully opened position, and
then rotate the two hinge catches toward the oven.
Open and close the door completely to ensure that it is
properly installed.
Peel off the protective layer of plastic that covers the
door panel.
65
MAKING THE ELECTRICAL CONNECTION
WARNING
•
Models E30DF74EPS, E36DF76EPS and
E48DF76EPS must be connected to a
grounded, metallic, permanent wiring system.
Alternatively, a grounding conductor should be
connected to the grounding terminal or lead on
the appliance. Failure to do so may result in an
electric shock hazard.
•
Do not use an extension cord with this
appliance. Such use may result in fire, electrical
shock, or other personal injury.
•
Do not install a fuse in the neutral or ground
circuit. A fuse in the neutral or ground circuit
may result in an electrical shock hazard.
Grounding Instructions
This appliance must be electrically grounded. With
the range positioned directly in front of the cabinet cutout, feed the appliance conduit to the electrical junction
box. Then, depending upon local codes, utilize one of
the following techniques to connect the appliance to the
electrical power supply:
WARNING
Do not connect the green appliance wire to the neutral (white) supply wire unless local building codes
permit.
1. Separate the green and white appliance wires.
Connecting the Green Appliance Wire to the
Neutral (White) Supply Wire – Where Local Codes
Permit
2. Connect the white appliance wire to the neutral
(white) supply wire in the junction box.
1 Connect the green and white appliance wires to
the neutral (white) supply wire in the junction box.
3. Connect the black appliance wire to the black (L1)
power supply wire in the junction box.
2 Connect the black appliance wire to the black (L1)
power supply wire in the junction box.
Connecting to a Four-Wire Electrical System
4. Connect the red appliance wire to the red (L2) power
supply wire in the junction box.
5. Connect the green appliance wire to the green house
grounding wire in the junction box.
66
3 Connect the red appliance wire to the red (L2)
power supply wire in the junction box.
2 Connect the white appliance wire to the neutral
(white) supply wire in the junction box.
3 Connect the black appliance wire to the black (L1)
power supply wire in the junction box.
4 Connect the red appliance wire to the red (L2) power
supply wire in the junction box.
5 Connect the green appliance wire to a grounded
supply wire in the junction box or to a grounded cold
water pipe.
6 If connecting to a grounded cold water pipe, a
separate copper grounding wire (No. 10 minimum)
must be connected to a grounded cold water pipe
by means of a clamp and then to an external
grounding connector screw.
WARNING
Connecting the Green Appliance Wire to a Grounded
Supply Wire or a Grounded Cold Water Pipe – Where
Local Codes Permit.
•
Do not ground the appliance to a gas supply
pipe or hot water pipe.
•
Do not turn on power to the appliance until the
range is permanently grounded.
•
A grounded cold water pipe must have metal
continuity to electrical ground and must not be
interrupted by insulating materials. Any
insulating materials must be jumped with a
length of No. 4 copper wire securely clamped
to bare metal at both ends.
1 Separate the green and white appliance wires.
67
MAKING THE GAS CONNECTION
Before sliding the range into the cabinet, connect a flexible gas connector to the gas shut-off valve previously
installed on the stub out. The gas valve must be turned
off during installation. Connect the flex connector to the
pipe fitting at the right rear of the range.
WARNING
•
Do not apply excessive pressure when
tightening gas connections and fittings.
•
Do not use teflon tape or plumber’s putty on gas
flex line connections.
•
Turn all cooktop control valves to the “OFF”
position. Turn on gas supply and check all lines
and connections for leaks using a soap and
water solution. Do not use a flame to check for
leaks. After verifying that there are no gas leaks,
turn off the gas supply to the range by turning
the gas shut-off valve to the “OFF” position.
•
For LP installations, the LP gas tank must have
its own high pressure regulator. This is in
addition to the pressure regulator provided with
the range.
•
The maximum gas supply pressure to the
regulator must never exceed 1/2 pound per
square inch.
grate onto the top frame, being certain that the rubber
feet are positioned in the locating dimples.
WARNING
Never attempt to operate the cooktop section of the
range with any of the burner rings, burner caps or
grates removed.
NOTE: Prior to operating the cooktop or oven
sections of the range, please read the
accompanying Use and Care Manual
carefully. Important safety, service and
warranty information is contained within
this manual.
NOTE: The gas pressure regulator is pre-set at the
factory for natural gas to use with the
appliance. To convert the range for LP gas,
see the instructions supplied in the LP
conversion package.
INSTALLING THE RANGE
Measure from the floor to the countertop and adjust the
leveling legs as required to position the top frame at the
desired height, based on the cabinet and countertop
installation. Carefully slide the range into position in the
cutout. The rear anti-tip leg should engage the anti-tip
bracket.
INSTALLING THE BURNER COMPONENTS
Remove the brass burner rings, porcelain burner caps,
and porcelain gates from their shipping packages. Place
each burner ring onto its corresponding burner base,
being certain that the four alignment tabs slide into the
matching notches in the base. Set each porcelain burner
cap on top of its corresponding burner ring. Place each
68
Operation
•
VERIFYING THE OPERATION
NOTE: REFER TO THE USE AND CARE MANUAL
FOR DETAILED INSTRUCTIONS.
Electrolux is not responsible for service
required to correct a faulty installation.
Before beginning the test procedure, ensure that all
cooktop control valves are in the “OFF” position, and all
burner rings, burner caps, and grates are properly
positioned on the top frame. Turn on the gas supply at
the shut-off valve.
Turn on the power supply to the range. Select a temperature of 350°F by rotating the temperature control
knob to “350” and selecting “BAKE” with the oven selector knob. Rotate each knob to the “Off” position to
stop the heating process. For model E48DF76EPS, repeat this test procedure with the companion oven. Test
each top burner separately by pressing and turning one
control knob at a time counterclockwise to the “HIGH”
position. All ignitors will spark continuously, but only
the burner with gas flowing to it will ignite. (It will take
approximately 4 seconds for ignition to occur, at which
time the ignitors will stop sparking. If ignition does not
occur within 4 seconds, turn off the knob, wait for at
least 2 minutes to allow any gas to dissipate, then repeat this ignition test.) The control knob can then be
rotated counterclockwise from “HIGH” to “LOW” to adjust the flame height progressively. Repeat the ignition
test for all burners. When installed properly, the flame
will be steady and quiet. It will also have a sharp, blue
inner cone that will vary in length proportional to the
burner size.
WARNING
•
The range and shut-off valve must be
disconnected from the gas supply piping
during any pressure testing exceeding 1/2 psi
(3.5kPa).
•
The range must be isolated from the gas supply
piping by closing the shut-off valve during any
pressure testing at or below 1/2 psi (3.5 kPa).
NOTES If either the oven or cooktop does not
operate properly, follow these
troubleshooting steps:
•
Verify that power and gas are supplied to
the range.
•
Check the electrical connections and gas
supply to ensure that the installation has
been completed correctly.
If the appliance still does not work,
contact an authorized service company.
Do not attempt to repair the appliance
yourself.
69
SECTION C - THEORY OF
OPERATION
Gas flow
The conversion kit is shipped in a plastic bag in the
broiler pan. The kit contains the installation instructions,
burner orifices, bypass orifices and the burner removal
tool.
The incoming gas flow is connected to a pressure regulator, which is mounted to the rear of the range.
A pressure regulator is a device that maintains a constant fixed output pressure, by increasing or decreasing the gas flow in the range to match the output of the
burners. The pressure regulator on the range is a convertible regulator that can be set for an output pressure
of either 4 or 11 inches of water column pressure. This
allows a range to be installed on either natural or LP
gas. When the range is shipped from the factory the
range is set up to operate on natural gas The output of
the regulator is set for 4 inches of water column pressure. If the range is installed on LP gas it is necessary
to installed the conversion kit that is ship with the range.
Once the range has been converted the output pressure of the pressure regulator will be 11 inches of water
column pressure.
The pressure regulator is connected to the manifold pipe
by a half-inch aluminum tube.
The manifold pipe is used to distribute gas to the top
burner valves.
70
The top burner valves are mounted to the manifold pipe
and control gas flow to the orifice assembly.
The valves are mounted to the manifold pipe so that
the hole in the bottom of the valve is aligned with the
hole of the manifold. This allows gas to enter into the
valve. When the valve is in the off position the hollow
core, in the center of the valve, prevents gas from flowing through the valve.
When the shaft of the valve is turned, the hole in the
side of the core moves over the hole in the case of the
valve. When the shaft is turn to the high position the
two holes are completely aligned and the maximum
amount of gas is allowed to flow through the valve.
flowing through that section of the valve. In the low
position the gas flow through the valve is through the
bypass orifice, located on the side of the valve.
The output of the valve is connected to the orifice assembly by an aluminum tube.
The orifice, or hole, in the spud, serves two purposes;
first it controls the maximum amount of gas to the burner
and second it speeds the gas flow as it enters the burner
venturi.
As the shafted is rotated off a high position the holes
are misaligned and gas flow is reduced. When the shaft
is turned completely to the low position the two holes
are completely misaligned and gas is prevented from
71
When the gas leaves the orifice it passes through the
air shutter. The moment of the gas passing through
the air shutter creates a vacuum, which draws air into
the burner venturi, where the air and gas mix. For proper
combustion the ratio of this mixture should be ten parts
of air to one part of gas.
The burner ring is placed in the burner base. The slots
in the burner ring, when closed at the top by the burner
cap, form the burner ports.
The mixture leaves the venturi and enters into the burner
tube. The threaded end of the burner tube extends
through the spill tray where the burner base is placed
over it. A brass ring is threaded down on the burner
tube to hold the burner base in place.
The combustible mixture which comes up the burner
tube pressurizes the burner head, forcing the mixture
out of the burner ports. When the mixture is ignited a
sharp blue cones burns off the ports of the burner head.
72
Top burner ignition and reignition system
The burner ignition and reignition system is made up
of the ignition switches, that are mounted to the top
burner valves,
gas igniter/re-igniter module
and an igniter mounted to each burner base.
When the shaft of the valve is rotated from the off position the contacts of the igniter switch close and remain
closed as long as the burner is on. This connects L1 to
the module terminal for that burner. The module has
two jobs; first to ignite the burner and once the burner
has been ignited, to monitor the flame. When power is
applied to the module, inside the module two things
happened. First power is supplied to the step-up transformer, which in turn supplies power to the charging
circuit and second an electrical signal is generated and
applied to the igniter of the burner that is being ignited.
The output of the charging circuit is applied to all the
igniter’s. The following explanation is how a simple ignition system works. When L1 is applied to the primary
of the step-up transformer T1, the output voltage on the
secondary side of transformer is increased. Since AC
voltage is being applied to the transformer the ends of
the transformer will change polarity every half cycle. In
the drawing below, when the polarity of the transformer
secondary winding is negative at the top and positive at
the bottom current flows in the circuit form by the transformer secondary, diode D1, capacitor C1 and resistor
R1. This charges C1 negative on the top and positive
on the bottom. On the next half cycle, when the top of
the transformer secondary winding is positive and the
bottom is negative, the diode prevents current flow in
the circuit and prevents the capacitor from discharging.
At this point the capacitor also is prevented from discharging through the circuit form by the capacitor, Ib1
(igniter bank one), the range chassis, Ib2 (igniter bank
2) and R1 by the dielectric of the air between the igniter’s
and the burner heads. In this drawing the burner heads
are considered part of the range chassis. The capacitor continues to charge every half cycle until the charge
on the capacitor is high enough to break down the resistance of the air dielectric between the igniter tips and
burner heads. At that time an electric spark occurs
between all the igniter tips and the burner heads. This
allows current flow from the top of the capacitor to the
Ib1, across the electrical arc into the range chassis and
from the range chassis across the electrical arc into
Ib2, through the resistor to the other side of the capacitor discharging the capacitor.
D1
Ib1
T1
C1
RANGE
CHASSIS
R1
Ib2
This cycle continues until the burner is ignited. The
symbols Ib1 and Ib2 represents one half of the total top
73
burner igniter’s each. If the range has six top burners
Ib1 would represent three igniters and Ib2 would represent three igniters. The resistor R1is placed in the circuit to slow down the charging time and control the number of sparks per second.
function selector mounted to the console,
Once the burner has been ignited the module monitors
the flames present by sending a small electrical signal
to the igniter for that burner. A gas flame will conduct
an electrical current. The electrical signal, sent by the
module to the igniter, passes through the gas flame to
the burner head. From the burner head the signal
passes into the range chassis and returns to the module through the ground terminal on the module. This
tells the module that flame is present on the burner. If
for any reason the flame goes out, the circuit is interrupted. This tells the module to power the charging circuit and reignite the burner.
interface board mounted to the console,
Oven Operation
The oven system is made up of; the electronic oven
control board mounted between the burner box and the
top of the oven,
oven sensor mounted to the rear wall of the oven,
temperature selector mounted to the console,
74
bake element mounted to the rear wall of the oven,
convection fan motor mounted to the rear of the oven,
broil element mounted to the top of the oven,
oven high temp limit mounted between the burner box
and the top of the oven,
convection element and fan blade mounted to the rear
wall of the oven,
automatic door locking mechanism mounted between
the burner box and the top of the oven,
75
remove rack switch mounted on the rear of the oven,
dropped from the tap, and comparing the two, the control makes up for any variances in the control’s resistance.
12 3
and the cooling blower mounted between the burner
box and the oven at the rear of the range.
As the thermostat knob is turned the output from pin (2)
changes telling the control what temperature is set. The
selector operates in the same manner except there are
indents for each function.
The oven temperature sensor operates by changing
resistance also, the resistance of the sensor increases
as the temperature in the oven rises. The control board
reads the resistance of the oven sensor and compares
it with the input from the thermostat. This allows the
control board to cycle the elements in the oven to maintain the setting of the thermostat.
The control board supplies 240 VAC to the bake element, broil element, convection element and convection fan motor. 120 VAC to the lock motor and cooling
blower. The control board also supplies an output to
the interface board telling it which LED to light up.
Air movement in the oven during Convection Bake and Convection Roast.
When electrical power is applied to the range line 1 is
connected directly to the electronic oven control board
and line 2 is connected to the electronic oven control
board through the oven hi temp limit. The high temp
limit is a manual resettable bimetal fuse that opens at
250°F that protect the range in case the oven overheats.
When the oven is set for convection bake, the convection fan blade forces air across the convection element,
which heats the air. The heated air is forced through
The electronic oven control, controls the operation of
the oven. It receives input from the thermostat, selector, remove rack sw. and the oven sensor. The thermostat and selector are potentiometers. The control board
applies an electrical potential across pins(1) and (3).
The control then reads the voltage drops across pins
(1) and (3) and pins (2) and (3). By reading the total
voltage drop across the potentiometers and the voltage
76
the conviction filter into the oven. The air circulates
through the oven and is drawn back to the fan blade
through the holes in the side of the fan shield.
When the door is closed, the grill in the door matches
the grill between the oven and the burner box. Air is
drawn through this grill,
across the electronic control board, to the cooling fan
blade.
Note:
During convection bake the electronic
control automatically lowers the
temperature 25° below the temperature set
on the dial and only the conviction element
is used.
Note:
During convection roast the bake element,
broil element and the convection element
are all used.
Cooling Blower air movement
The cooling blower is used to cool the oven door and
the controls mounted between the oven and the burner
box. Air is drawn in the bottom of the oven door,
dor
through the oven door and out the grill work on the inside top of the door.
77
The air is then exhausted down a channel mounted to
the rear of the oven to the floor underneath the range.
the door is locked and to go on with the clean cycle.
With the oven door locked, electronic oven control provides line to line voltage to the bake element until the
temperature in the oven reaches 850°F. The electronic
control then cycles the bake element to maintain this
temperature, for the rest of the three-hour cycle. At the
end of three hours, the electronic control removes power
from the bake element and the oven starts to cool down.
When the temperature in the oven drops below 490°,
the electronic oven control board, applies power to the
lock motor to unlock the door.
The self-cleaning cycle.
When the oven is set to the self-cleaning cycle the electronic oven control board checks the rack removal
switch. If the contacts of the switch are closed between
common and normally open, telling the control board
that the racks have been removed, the control board
starts a self-cleaning cycle. To start the self-cleaning
cycle the control board supplies line to neutral voltage
to the motor of the door lock mechanism. The door
lock mechanism is made up of a motor, a latch and two
switches, the phase switch and the lock switch. The
lock switch is controlled by the latch and the phase
switch is controlled by a cam on the motor shaft. As the
motor shaft turns, the latch is forced to the right locking
the oven door and closing the contacts of the lock switch.
As the latch move to the right it hits the side of the slot
in the door stopping the latch movement. If the latch
does not hit the door, the lock switches will not close.
This is how the latch mechanism proves that the doors
closed and locked, before going into self-clean.
When the rotation of the motor shaft reaches one half
turn the cam closes the contacts of the phase switch.
Closing the contacts of the phase switch tells the control board to remove power from the motor. Closing the
contacts of the lock switch tells the control board that
78
SECTION D -TROUBLEINGSHOOTING
NOTE: Always check the wiring and pin/plug connectors before replacing any component.
Index
Electrical components will not operate.
80
Flame too large and yellow on top burner.
80
Flame too small on top burner.
80
Flame goes out, when valve is turned to the low position.
80
Top burners, not burning properly.
80
One top burner, not burning properly.
81
Top burner valve difficult to turn.
81
Igniters do not spark when the burner knob is turned to the lite position.
81
Igniters spark but burner does not ignite.
81
Igniters continue to spark after burner is ignited.
81
Oven does not operate in any fuction.
82
Oven temperature off more than 10°.
83
Oven does not operate in bake.
83
Oven does not operate in broil.
84
Oven does not heat in convection bake and convection fan does not run.
84
Oven heats in convection bake but convection fan does not operate.
84
Oven does not heat in convection bake but the convection fan runs.
85
Oven does not heat in convection roast and convection fan does not run.
85
Oven does not heat in convection roast but convection fan runs.
86
Oven heats in convection roast but convection fan does not operate.
86
LEDs do not light.
86
One LED does not light.
86
Cooling fan does not operate.
86
Oven does not operate in self-cleaning.
87
One oven light does not light.
87
Both oven lights do not light.
87
79
FAILURE
Electrical components will not
operate.
CHECK
CORRECTION
1. Check fuse or circuit breaker.
If defective replace the fuse or reset the
circuit breaker. If good go to step 2
2. If good check line to neutral and
line to line voltage, at the range
terminal block.
If the voltage readings are correct, there’s
a wiring problem in the range, check the
range wiring.
If the voltage readings are incorrect, defective house wiring or defective range
cable.
Flame too large and yellow on
top burner.
1. Has the range being installed on
LP gas without being converted?
Yes, install LP conversion kit.
No,
Flame too small on top
burner.
Flame goes out, when valve
is turned to the low position.
2. Check gas pressure at the top
burners under flow. The pres
sure reading should be 10
inches of water column pressure
for LP gas and 4 inches of water
column pressure for natural. Is
the pressure reading correct?
Yes, check for something blocking the air
inlet to the burners.
1. Check gas pressure at the top
burners under flow. The
pressure reading should be 10
inches of water column pressure
for LP gas and 4 inches of water
column pressure for natural. Is
the pressure correct?
Yes, incorrect orifice size or restricted orifice.
1. Has the bypass orifice been
adjusted?
Yes, clean or replace the bypass orifice.
No, check gas supply pressure, the pressure regulator or for a restriction in the
gas line.
No, the range is installed on LP and pressure regulator is set for natural. Defective regulator or low incoming gas pressure.
No, adjust the bypass orifice
Top burners, not burning
properly.
1. Are the burner rings and caps
installed correctly?
Yes, go to step 2.
No, install burner rings and caps correctly.
2. Check gas pressure at the top
burners under flow. The
pressure reading should be 10
inches of water column pressure
for LP gas and 4 inches of water
column pressure for natural. Is
the pressure correct?
80
Yes, adjust air shutters.
No, checked gas supply pressure, the
pressure regulator or for a restriction in
the gas line.
FAILURE
One top burner, not burning
properly.
CORRECTION
CHECK
1. Is the burner ring and cap
installed correctly?
Yes, go to step 2.
2. Is the orifice, aluminum tube
or top burner valve restricted?
Yes, remove the restriction or replace the
part.
No, install burner ring and cap correctly.
No, adjust the air shutter
Top burner valve difficult to
turn.
1. Can the valve stem be
depressed far enough to
unlock the valve.
Yes, replace the valve.
Igniters do not spark when the
burner knob is turned to the
lite position.
1. Does a snapping sound occur
when the valve is turn to the
lite position?
Yes, wires between module and igniters
shorted the chassis.
2. Measure the input voltage to
one of the top burner switches.
Is the reading line to neutral?
Yes, go to step 3.
3. With the valve set to the lite
position measure the output
voltage of the valve switch. Is
the reading line a neutral?
Yes, replace the spark module.
1. Is the burner ring and cap
installed correctly?
Yes, go to step 2.
2. Lite the burner with a match.
Is the flame adjusted
properly?
Yes, remove and clean the burner ring and
cap.
1. Is the flame adjusted
properly?
Yes, remove and clean the burner ring and
cap. Check ground wire to module. Replace module.
Igniters spark but burner does
not ignite.
Igniters continue to spark after burner is ignited.
No, check the distance between the console and the manifold pipe.
No, go to step 2.
No, open wire between range terminal
block, and switch.
No, replace the valve switch
No, install burner ring and cap correctly.
No, adjust burner flame.
No, adjust burner flame.
81
FAILURE
CHECK
CORRECTION
Oven does not operate in any
function.
1. Are the front panel LEDs
indicating a service failure mode?
Yes, checked service failure mode chart.
No, go to step 2
2. With the thermostat and selector
turned off, measure the voltage
drop between terminal P13 on
electronic control board and
neutral. Does the meter read line
to neutral voltage?
Yes, go to step 3.
3. Set the oven to operate and
measure the voltage drop
between terminals P1 & P13 on
electronic control board. Does the
meter ead line to line voltage?
Yes, go to step 4.
4. Remove power from the range.
Yes, go to step 5.
Disconnect plug P5 from
electronic oven control board
and measure the resistance
between pins eight and nine
(oven sensor circuit) in the
harness. Is the reading,
between 1050 and 1100 ohms?
No, check the high temp limit and wiring
between P13 and the range terminal
block.
No, check the wiring between P1 and the
range terminal block.
No, go to the back of the range and check
the oven sensor.
5. Set the temperature selector to
300°, disconnect plug P 9 from
the electronic oven control board
and measure the resistance
between pins one and three in the
harness. Is the reading is between
7000 and 13000 ohms?
Yes, go to step six.
6. Set the temperature selector to
300°, disconnect plug P 9 from
the electronic oven control board
and measure the resistance
between pins one and three in the
harness. Is the reading is between
2200 and 4300 ohms?
Yes, go to step seven.
7. Set the function selector to bake
and measure the resistance
between pins 4 and 6 of plug P9
in the harness. Is the resistance
7000 and 13000 ohms?
Yes, go to step eight.
7. Set the function selector to bake
and measure the resistance
between pins 5 and 6 of plug P9
in the harness. Is the resistance
580 and 1720 ohms?
Yes, defective electronic oven control
board.
82
No, defective temperature selector or harness.
No, defective temperature selector or harness.
No, defective function selector or harness.
No, defective function selector or harness.
FAILURE
Oven temperature off more
than 10°
Oven does not operate in
bake.
CHECK
CORRECTION
1. Remove power from the range.
Disconnect plug P5 from
electronic oven control board
and measure the resistance
between pins eight and nine
(oven sensor circuit) in the
harness. Is the reading,
between 1050 and 1100 ohms?
Yes, go to step 2.
No, go to the back of the range and check
the oven sensor.
2. Set the temperature selector to
300°, disconnect plug P 9 from
the electronic oven control board
and measure the resistance
between pins one and three in the
harness. Multiply the resistance
reading by 32.7%. Measure the
resistance between pins two and
three. Is this reading within 5% of
the first reading?
Yes, replaced the electronic oven control
board.
1. Does the oven heat in any other
function?
Yes, go to step 2.
2. Disconnect power from the
range, remove the two screws
holding the bake element to the
rear wall of the oven and pull
element into the oven.
Disconnect one wire from the
element and check the
resistance of the element it with
an ohm meter. Large ovens the
resistance should be 17 ohms
+/-10%, small ovens the
resistance should be 27 ohms
+/ -10%. Is the reading correct?
Yes, defective electronic oven control
board.
83
No, replace the temperature selector.
No, refer to oven does not operate.
No, replace the bake element.
FAILURE
CHECK
Oven does not operate in
broil.
1. Does the oven heat in any other
function?
CORRECTION
Yes, go to step 2.
No, refer to oven does not operate.
Oven does not heat in convection bake and the convection fan does not run.
Oven heats in convection
bake but convection fan does
not operate.
2. Disconnect power from the
range, remove the two screws
holding the broil element to the
rear wall of the oven, release
the wire clips and pull
element into the oven.
Disconnect one wire from the
element and check the
resistance of the element with
an ohm meter. Large ovens the
resistance should be 14 ohms
+/-10%, small ovens the
resistance should be 27 ohms
+/ -10%. Is the reading correct?
Yes, defective electronic oven control board.
1. Does the oven heat in any other
function?
Yes, go to step 2.
No, replace the broil element.
No, referred to oven does not operate.
2. Does the convection element
heat, and the fan motor run in
the convection roast function?
Yes, defective electronic oven control board.
3. Measure the voltage drop
between terminals P4 and P10
on the electronic oven control
board. Is the reading line to line
voltage?
Yes, defective convection element or wiring
between the element and control board.
Correct the problem and go to step 4.
4. Measure the voltage drop
between terminals, P11 and
P15 on the electronic oven
control board. Does the meter
read line to line voltage?
Yes, defective convection fan motor or wiring between the fan motor and control board.
1. Does a convection fan run, in
the convection roast function?
Yes, replace electronic oven control board.
No, go to step 3.
No, defective electronic oven control board.
No, defective electronic oven control board.
No, go to step 2.
2. Measure the voltage drop
between terminals, P11 and
P15 on the electronic oven
control board. Does the meter
read line to line voltage?
84
Yes, defective convection fan motor or wiring between the fan motor and control board.
No, replace electronic oven control board.
CORRECTION
FAILURE
CHECK
Oven does not heat in convection bake but the convection fan runs.
1. Does the oven heat in any other
function?
Oven does not heat in convection roast and the convection fan does not run.
Yes, go to step 2.
No, referred to oven does not operate.
2. Does the convection element
heat, in the convection roast
function?
Yes, replace electronic oven control board.
3. Measure the voltage drop
between terminals P4 and P10
on the electronic oven control
board. Is the reading, line to line
voltage?
Yes, defective convection element or wiring between the element and control board.
1. Does the oven heat in any other
function?
Yes, go to step 2.
No, go to step 3.
No, replace electronic oven control board.
No, referred to oven does not operate.
2. Does the convection element
heat, and the fan motor run in
the convection bake function?
Yes, replace electronic oven control board.
3. Measure the voltage drop
between terminals P4 and P10
on the electronic oven control
board. Is the reading line to line
voltage?
Yes, defective convection element or wiring between the element and control board.
Correct the problem and go to step 4.
4. Measure the voltage drop
between terminals, P11 and P15
on the electronic oven control
board. Does the meter read
line to line voltage?
Yes, defective convection fan motor or wiring between the fan motor and control
board.
85
No, go to step 3.
No, replace electronic oven control board.
No, replace electronic oven control board.
FAILURE
CHECK
Oven does not heat in convection roast but the convection fan runs.
1. Does the oven heat in any other
function?
CORRECTION
Yes, go to step 2.
No, referred to oven does not operate.
2. Does the convection element
heat, in the convection bake
function?
Yes, replace electronic oven control
board.
No, go to step 3.
Oven heats in convection
roast but convection fan does
not operate.
3. Measure the voltage drop
between terminals P4 and P10
on the electronic oven control
board. Is the reading line to line
voltage?
Yes, defective convection element or wiring between the element and control
board.
1. Does the convection fan run, in
the convection bake function?
Yes, replace electronic oven control
board.
No, replace electronic oven control board.
No, go to step 2.
LEDs do not light.
2. Measure the voltage drop
between terminals, P11 and P15
on the electronic oven control
board. Does the meter read
line to line voltage?
Yes, defective convection fan motor or wiring between the fan motor and control
board.
1. Check the wiring harness between
the electronic oven control board
and the interface board.
Defective harness, replace the wireing
harness between the electronic oven control board and the interface board.
No, replace electronic oven control board.
Good harness, replace the interface
board, if this does not correct the problem replace the electronic oven control
board.
One LED does not light.
1. Check the wiring harness between
the electronic oven control board
and the interface board.
Defective harness, replace the wire harness between the electronic oven control
board and the interface board.
Good harness, replace the interface
board.
Cooling fan does not operate.
1. Is the fan blade restricted?
Yes, remove the restriction.
No, go to step 2.
2. Measure the resistance between
pins one and three in the
harness of plug P5. Does the
meter read 10 ohms + /-10%?
86
Yes, defective electronic oven control
board.
No, defective cooling fan motor.
FAILURE
Oven does not operate in selfcleaning.
CHECK
1. Are the front panel LEDs
indicating a service failure mode?
CORRECTION
Yes, checked service failure mode
chart.
No, go to step 2
2. Have the oven racks and side glides
been removed?
Yes, go to 3.
No, remove the racks and side
glides.
3. Does the oven heat in the baked
function?
Yes, go to 4.
4. Does the oven door lock?
Yes, defective electronic oven control board.
No, refer to oven will not operate in
bake function.
No, go to step 5.
One oven light does not light.
5. Disconnect power from the range.
Remove plug P5 and measure the
resistance between pins five & ten in
the harness. Does the meter read zero
or infinity?
Zero, go to step 6.
6. Measure the resistance between pins
one and two in the harness of plug
P5. Does the meter read 2500 ohms
+ /-10%?
Yes, replace electronic oven control
board.
1. Check the oven light bulb.
Good bulb, defective transformer or
wiring between the transformer and
the socket.
Infinity, defective rack removal
switch or wiring to the switch.
No, defective lock motor or wiring
between the electronic oven control
board and the lock motor.
Defective bulb, replace the bulb.
Both oven lights do not light.
1. Check the oven light bulbs.
Good bulbs, go to step 2.
Defective bulbs, replace the bulbs.
2. Check the light switch.
Good switch, defective transformer
or wiring.
Defective switch, replaces the
switch.
87
SECTION E - TEARDOWN
2. The burner caps lift off.
This section will describe how to remove components
from the range. Unless stated, the procedure will be
the same on all models. Unless stated, reverse the
procedure to reinstall the component.
Always remove electrical power from
the range when working in an area where electrical
power is present.
Always turn the gas off to the range
before opening any gas piping.
Note: Not all components are in all models.
Removing the top grates:
1. The top grates lift off.
Removing the burner rings:
1. Remove the top grates and the burner caps.
2. The burner rings lift off.
Removing the burner caps:
1. Remove the top grates.
Removing the burner head:
1. Remove the top grates, burner cap and ring.
88
2. Using the burner tool, unscrew the brass ring
holding the burner head to the burner tube and lift
the burner out of the drip pan.
2. Remove the C clamp, holding the spring and
igniter to the burner head.
3. Unplug the igniter wire and lift the burner head,
and igniter off.
3. Lift the igniter out of the burner head.
Removing the knobs:
1. The shafts of the knobs are D shaped and the knobs
pull straight off.
Removing the igniters:
1. Remove the burner head.
89
Removing the knob bezels:
1. Remove the knob.
3. Remove the (4) screws holding the front of the
backsplash to the burner box and lift the backsplash
off.
2. Remove the two screws holding the bezel to the
control panel.
Removing the spill tray:
1. Remove the grates and burner heads.
2. Removed the (3) screws holding the control panel
to the front spill tray support.
Removing the backsplash:
1. Remove the grates.
2. Remove the (4) screws, two on each side, from the
rear of the range holding the backsplash to the side
panels.
3. Lift the front of the spill tray up, to clear the control
panel, and lift the spill tray out.
90
2. Using two adjustable or 9/16 inch wrenches, hold
the orifice tube with one and turn the air shutter
tube off with the other.
Removing the burner tube:
1. Remove the spill tray.
2. Using a 5/16 inch driver, removed the two screws
holding the burner tube to the burner box.
Removing the orifice:
1. Remove the spill tray and the air shutter tube.
3. Slide the burner tube off of the air shutter tube.
2. Using a 10 mm socket, remove the orifice from the
orifice assembly tube while holding the assembly
with a 9/16 inch wrench.
Removing the air shutter tube:
1. Remove the spill tray and the burner tube.
Removing the front spill tray support trim:
1. Remove the spill tray.
91
2. Remove the (4) screws holding the front spill tray
trim to the front spill tray support.
2. Remove (2) screws holding the side support to
the burner box and lift the support off.
Removing the front spill tray support:
1. Remove the spill tray and the front spill tray support
trim.
Removing burner tubing assembly:
2. Remove the (3) screws holding the support to the
burner box and lift the support out.
1. Remove the spill tray and the front spill tray
support.
2. Remove the (2) screws holding the burner tube to
the burner box.
3. Using a 5/8" wrench, disconnect the aluminum
tubing from the valve and lift the tubing assembly
out.
Removing the side spill tray support:
1. Remove the spill tray.
92
Removing igniter module:
4. Remove the screw holding a module cover to the
side of the range.
1. Disconnect power, remove the spill tray and left rear
burner tube.
2. Remove the (6) screws holding the igniter module
access panel to the burner box and remove the
panel.
5. Remove the cover and disconnect the wires to the
igniters.
6. Remove the screw holding the harness plug to the
module, disconnect the plug and lift the module out.
3. Remove the screw holding the ground wire to the
top of the oven.
93
Removing electronic oven control board:
1.Disconnect power, remove the spill tray, left front and
rear center burner tube assemblies.
5. Release the electronic oven control board from
the mounting bracket by releasing the (10) plastic
rivets holding the board to the bracket.
2. Remove the (8) screws holding the electronic oven
control board access panel to the burner box and
remove the panel.
Removing oven light transformer:
1. Disconnect power, remove the spill tray, right front
and front center burner tube assemblies.
3. Unplug the wiring harnesses and disconnect the
wiring from the electronic oven control board.
2. Remove the (8) screws holding the transformer/oven
high temp limit access panel to the burner box and
remove the panel.
4. Remove the (4) screws (two on each side),
holding the electronic oven control board
mounting bracket to the top of the oven and lift the
bracket and control board out.
94
3. Disconnect the wires from the transformer, remove
the two screws holding the transformer to the top of
the oven and lift the transformer out.
3. Disconnect the wires from the oven high temp limit,
remove the two screws holding the oven high temp
limit to the top of the oven and lift the oven high
temp limit out.
Removing oven high temp limit:
1. Disconnect power, remove the spill tray, right front
and front center burner tube assemblies.
2. Remove the (8) screws holding the transformer/oven
high temp limit access panel to the burner box and
remove the panel.
95
Removing oven door handle:
1. Open the oven door and remove the (2) plastic
caps, covering the door handle screw openings.
2. Remove the (2) screws holding the door handle to
the outer door liner.
2. The oven door seal is held to the inner liner of the
oven door by spring clips and can be pulled straight
off.
Removing the oven door:
1. Rotate the hinge locks to the door so that when the
doors is closed they will take the spring pressure off
the hinges.
Removing the oven door inner liner
assembly:
1. Remove the oven door and place it on a soft
surface.
Note:
To remove some of the screws in the
door, you will need a number 20 tora bit.
2. To remove the door inner liner assembly, from the
door outer liner assembly. Remove the (2) screws
on the bottom, one on each end, and the (2) screws
at the top of the inner liner. Then lift the inner liner
assembly out of the outer liner assembly.
2. Close the door until you feel, the hinges released
from the rollers and then lift out on the door.
Removing the oven door seal:
1. Open the oven door.
96
3. Remove the screw from the bottom of the inner liner
and lift the spring cam assembly out of the inner
liner.
Removing the oven door cams and springs:
1. Remove the inner door liner assembly.
2. Remove the (2) screws holding the spring shield to
the inner liner and lift the spring shield off.
Removing the oven door air directional
baffle:
1. Remove the inner door liner assembly.
2. Remove the (4) screws holding the air directional
baffle to the air baffle and lift the air directional baffle
off.
Removing the oven door air baffle:
1. Remove the air directional baffle.
97
2. Remove the (4) screws holding the air baffle to the
to the inner glass shield and lift the air baffle off.
Removing the oven door inner glass
package:
1. Remove the inner glass package shield and the
glass package will lift out.
Removing the oven door inner glass
package shield:
1. Remove the air baffle.
2. Remove the (4) screws holding the inner glass
package shield to the inner liner and lift the shield
off.
Removing the oven door inner glass
package seal:
1. Remove the inner glass package and the
seal will lift out.
Removing the intake air grill:
1. Open the oven door.
98
2. Remove the (4) screws holding the grill to the
front of the range.
4. Disconnect the wires from the oven light switch.
5. Using an 11/32 socket, remove the (2) nuts from
the bolts holding the control panel to the manifold
pipe and lift the control panel off.
3. Remove the (4) screws holding the grill to the
control panel and lift the grill off.
Removing the control panel:
1. Disconnect power and remove the spill tray.
2. Remove the front spill tray support, the top burner
knobs and the air intake grill.
Removing the temperature selector:
1. Disconnect power and remove the control panel.
3. Disconnect the wires from the interface board, the
functions selector and the temperature selector.
99
2. Remove the temperature selector knob.
3. Remove the two screws holding the temperature
selector to the control mounting plate, push the
control forward and to the side, and pull the control
out.
3. Remove the two screws holding the function
selector to the control mounting plate, push the
control forward and to the side, and pull the control
out.
Removing the interface board:
1. Disconnect power and remove the control panel.
2. Remove the two screws holding the interface
board to the control mounting plate, turn the board
and lift it out.
Removing the top burner igniter switch:
1. Disconnect power and remove the control panel.
2. Disconnect the wire from the switch, remove the (2)
screws holding the switch to the valve and lift the
switch off.
.out
Removing the function selector:
1. Disconnect power and remove the control panel.
2. Remove the function selector knob.
Removing the top burner valve:
1. Disconnect power, turn off the gas supply and
remove the control panel.
100
2. Remove the top burner igniter switch.
3. Remove the (8) screws holding the manifold access
panel to the burner box and remove the panel.
3. Using a 5/8" wrench, disconnect the aluminum
tubing from the rear of the valve.
4. Disconnect the aluminum tubing from the rear of
the valves or if the manifold pipe is to be replaced
remove the valves.
5. Using a 15/16" wrench disconnect the aluminum
tubing from the manifold pipe and pull the manifold
pipe out the front.
4. Using a 5/16" socket, remove the bolt clamping
the valve to the manifold pipe and lift the valve off.
Removing the kick panel assembly:
1. Remove the oven door.
Removing the manifold pipe:
1. Disconnect power, turn off the gas supply and
remove the control panel.
2. Remove the burner tubing assembly for the right
rear burner.
101
2. Remove the (3) screws holding the kick panel
assembly to the front of the range.
Removing the convection filter screen:
1. Open the oven door.
2. Lift up on the screen to disengage the tabs from
the bar.
3. Pull the kick panel forward to disengage the pins
from the side panels.
Removing the broil element:
1. Disconnect power and open the oven door.
2. Remove the (2) screws holding the broil element to
the rear wall of the oven.
Removing the bake element:
1. Disconnect power and open the oven door.
2. Remove the (2) screws holding the element to the
rear wall of the oven, pull the element into the oven
and disconnect the wires.
102
3. Disconnect the (2) wire hangers, holding element
to the ceiling of the oven.
2. Using a 17/32” socket remove the nut holding the
fan blade to the shaft, by turning it clockwise and lift
the fan blade off.
CLOCKWISE
Removing the convection element:
4. Pull the broil element into the oven and disconnect
the wires.
1. Disconnect power and remove the convection
baffle.
Removing the convection baffle:
2. Remove the (3) screws, two at the top and one at
the bottom, holding the convection element to the
rear wall of the oven. Pull the element into the oven
and disconnect the wires.
1. Open the oven door.
2. Remove the (4) screws holding the baffle to the rear
wall of the oven and lift the baffle off.
Removing the smoke eliminator:
1. Open the oven door.
Removing the convection fan blade:
1. Open the oven door and remove the convection
baffle.
103
2. Remove the (2) screws holding the smoke
eliminator to the top of the oven and drop the
eliminator into the oven.
2. Remove the (2) screws holding the oven sensor to
the rear wall of the oven and pull the sensor and the
wires out. Went reinstalling the sensor push the
wires back through the hole and pull them tight from
the rear of the oven.
Removing the oven sensor:
1. Remove the pressure regulator access panel and
disconnect the (2) sensor wires.
Removing the rack support:
1. Open the oven door.
2. Lift up and out on the bottom front corner of the
support to disengage it from the side of the oven.
Removing the oven light:
1. Open the oven door and remove the rack support.
104
2. The light cover pulls straight off and the light bulb
pulls straight out.
Removing the pressure regulator access
panel:
1. Remove the (2) screws holding the pressure
regulator access panel to the back cover.
Removing the oven door latch assembly:
1. Disconnect power and remove the air intake grill.
2. Disconnect the wiring from the phase switch, lock
switch and the latch motor.
3. Remove the (2) screws holding the latch
mechanism to the top of the oven and lift the
mechanism out.
Removing the back cover:
1. Disconnect power from the range.
105
2. Remove the (8) screws, four on each end, holding
the back cover to the side panels and lift the back
cover off.
3. Using a ¼” nut driver, remove the three screws
holding the motor to the rear of the oven and pull
the motor straight back.
Removing the rear air channel cover :
1. Disconnect power and remove the back cover.
2. Remove the (8) screws holding the cover to the air
channel and lift the cover off.
Removing the convection fan motor:
1. Disconnect power and remove the back cover.
2. Remove the convection fan blade and disconnect
the wires from the motor.
106
Removing the rear air channel:
1. Disconnect power, remove the back cover and the
rear air channel cover.
2. Remove the (7) screws holding the cooling fan cover
to the rear of the oven. Pull the assembly back and
disconnect the wires to the fan motor.
2. Remove the (5) screws holding the air channel to
the rear the oven and lift it off.
.
Removing the cooling fan assembly cover:
1. Disconnect power and the cooling fan assembly.
2. Remove the (2) screws holding the cover to the
assembly and lift the cover off.
Removing the cooling fan assembly :
1. Disconnect power, remove the back cover, the
rear air channel cover and the rear air channel.
Removing the remove oven racks switch:
1. Disconnect power and remove the back cover.
107
2. Remove the (2) screws holding the switch to the
mounting bracket. Drop to switch down and
disconnect the wires.
Removing the side panels:
1. Disconnect power and remove the spill tray and
backsplash.
2. Remove the kick panel and the (4) screws holding
the back cover to the side panel.
3. Remove the (3) screws holding the side panel to
the inside of the burner box and loosen the (2)
screws holding the spill tray support on that side.
Remove
Loosen
Removing the pressure regulator:
4. Pull out on the bottom of the side panel until the
front pins release.
1. Disconnect power, turn off the gas supply and
remove the back cover.
2. Disconnect the incoming gas line from the
pressure regulator.
3. Using a 15/16" wrench, disconnect the aluminum
tubing, while holding the regulator.
108
5. Grab the bottom rear corner of the side panel and
rotate the side panel counterclockwise until the front
edge of the side panel is parallel with the edge of the
burner box. Then, pullout on the front corner of the
side panel to disengage it from the burner box.
2. Remove the (3) screws holding the filler to the burner
box.
3. Remove the (7) screws, four in the front and three
in the rear, holding the filler to the side of the oven.
Removing the side fillers (36” model):
1. Disconnect power, remove the side panel and the
manifold disconnect panel.
109
Removing the door rollers:
1. Remove the side panel, and on the 36 inch models
remove the filler.
3. Using a 1/8” Allen wrench remove the (2) screws
holding the roller assembly to the front frame of the
oven and remove the roller assembly through the
access panel.
2. Remove the (3) screws holding the roller access
panel to the side of the oven.
110
NOTES
111
112