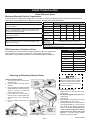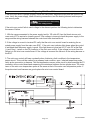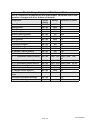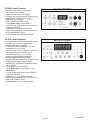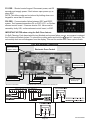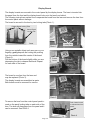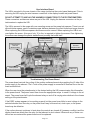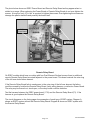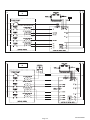
1
ELECTROLUX HOME PRODUCTS NORTH AMERICA
SERVICE UPDATE MANUAL
FOR 30” ELECTRIC
FREESTANDING RANGES
! ATTENTION !
This service manual is intended for use by persons having electrical and mechanical training
and a level of knowledge of these subjects generally considered acceptable in the appliance
repair trade. Electrolux Home Products cannot be responsible, nor assume any liability, for
injury or damage of any kind arising from the use of this manual.
Publication # 5995438461
June 2005
P/N 316439220
Table of Contents
SAFE SERVICING PRACTICES ............................... 3
SERVICE TIPS
Develop Good Work Habits .................................. 4
Service Tools and Equipment ............................... 5
CHANGES AND FEATURES OVERVIEW ................ 5
ABBREVIATIONS AND TERMS ............................... 5
MODEL NUMBERING SYSTEM ............................... 6
SERIAL NUMBERING SYSTEM ............................... 6
RANGE TECHNICAL DATA..................................7-10
Quick Reference Sheet ....................................... 7
Maximum Allowable Surface Temperatures ........ 7
Removing and Replacing Warmer Drawer ......... 7
Electric Range Component Resistance Chart ..... 8
EOC Failure / Fault Codes .................................. 9
ESEC System Failure / Fault Codes ................. 1 0
Oven Temperature Calibration ........................... 1 0
RANGE INSTALLATION INSTRUCTIONS ....... 11 - 14
Clearances and Dimensions...............................11
Important Safety Instructions ..............................11
Tools You Will Need ........................................... 12
Anti Tip Bracket Installation Instructions ............ 12
Electrical Connection Requirements ................. 12
Electrical Connection To Range ........................ 13
Power Cord Connections............................ 13 - 14
Permanent Wire Connections............................ 14
SMOOTH GLASS COOKTOP SERVICING ......15-16
Removing and Replacing Surface Elements ..... 1 5
Surface Element Terminal Connections ............ 1 6
WARMER DRAWER .......................................... 16-19
Troubleshooting Warmer Drawer Operation ...... 1 7
Servicing Warmer Drawer Components .......18-19
OVEN DOOR......................................................19-21
Removing and Replacing Oven Door ...........19-20
Replacing Oven Door Hinge .............................. 2 0
Replacing Hinge Receptacle ............................. 2 1
BODYSIDE MOUNTING ......................................... 22
LEG LEVELERS ...................................................... 22
Bake-N-Warm™ DOUBLE OVEN ......................23-27
Mini Oven Operation.......................................... 2 3
Diagnosing Mini Oven Failure ........................... 2 4
Replacing Mini Oven Element ........................... 2 5
Replacing Drawer Glide Rails............................ 2 6
Replacing Drawer Seal and Magnet Latch ........ 2 6
Mini Oven Chassis............................................. 2 7
COMPONENT TESTING .................................... 27-28
ELECTRONIC OVEN CONTROLS .................... 29-30
ES 200 CONTROL ............................................ 3 0
ES 300 CONTROL ............................................ 3 0
ES 330 CONTROL ............................................ 3 0
ES 340 CONTROL ............................................ 3 0
ES 510 CONTROL ............................................ 3 0
TROUBLESHOOTING ELECTRONIC OVEN
CONTROLS........................................................ 31-32
EOC Failure / Fault Codes ................................ 3 2
ES 510 ELECTRONIC OVEN CONTROL .......... 33-35
Troubleshooting the ES510 EOC ...................... 3 3
EOC Wire Harness Connections ....................... 3 4
ES510 EOC Relay Test Point Matrix ................. 3 5
Component Test Point Matrix ............................ 3 5
Sales Demo Mode ............................................. 3 5
ELECTRONIC SURFACE ELEMENT
CONTROL (ESEC) SYSTEM VERSION 10R .... 36-38
How The ESEC System Operates........................... 37
Troubleshooting The ESEC System .................. 37
ESEC Failure / Fault Codes .............................. 38
SERVICING THE ESEC
SYSTEM COMPONENTS ..................................38-43
Potentiometers ............................................. 38-39
Display Boards .................................................. 40
User Interface Board ......................................... 41
Troubleshooting The Power Board .................... 41
Remote Relay Board .................................... 42-43
Page 2
P/N 316439220
SAFE SERVICING PRACTICES
- ALL APPLIANCES To avoid personal injury and/or property damage, it is important that Safe Servicing
Practices be observed. The following are some limited examples of safe practices:
1. DO NOT attempt a product repair if you have any doubts as to your ability to
complete it in a safe and satisfactory manner.
2. Before servicing or moving an appliance:
• Remove the power cord from the electrical outlet, trip the circuit breaker to the
OFF position, or remove the fuse.
• Turn off the gas supply.
• Turn off the water supply.
3. Never interfere with the proper operation of any safety device.
4. USE ONLY REPLACEMENT PARTS CATALOGED FOR THIS APPLIANCE.
SUBSTITUTIONS MAY DEFEAT COMPLIANCE WITH SAFETY
STANDARDS SET FOR HOME APPLIANCES.
5. GROUNDING: The standard color coding for safety ground wires is GREEN, or
GREEN with YELLOW STRIPES. Ground leads are not to be used as current
carrying conductors. It is EXTREMELY important that the service technician
reestablish all safety grounds prior to completion of service. Failure to do so will
create a hazard.
6. Prior to returning the product to service, ensure that:
• All electrical connections are correct and secure
• All electrical leads are properly dressed and secured away from sharp edges,
high-temperature components, and moving parts
• All non-insulated electrical terminals, connectors, heaters, etc. are adequately
spaced away from all metal parts and panels
• All safety grounds (both internal and external) are correctly and securely
connected
• All panels are properly and securely reassembled
ATTENTION!!!
This service manual is intended for use by persons having electrical and
mechanical training and a level of knowledge of these subjects generally
considered acceptable in the appliance repair trade. Electrolux Home Products
cannot be responsible, nor assume any liability, for injury or damage of any kind
arising from the use of this manual.
Page 3
P/N 316439220
SERVICE TIPS - DEVELOP GOOD WORK HABITS
Consistently following a standard procedure when servicing appliances will insure that you
do not waste time searching for a complex solution to a simple problem. One of the most common
mistakes made by service technicians is failing to verify the incoming power supply to the
appliance.
Many times electronic oven controls and other components are replaced unnecessarily
because the incoming power supply was not verified. The technician assumes that the power supply
must be good because the top burners or surface elements work. Most electronic controls must
have a 120 volt power supply before they will operate. This is usually accomplished by supplying
L1 voltage and neutral or ground from the household power supply. On most electric ranges if the
neutral or ground circuit fails the top surface elements will still operate but the electonic control as well
as any other 120 volt components such as the oven lamp, self clean latch motor, and some indicator
lamps will not function.
When testing the electrical supply to an electric range the test should be performed at the
terminal block where the power cord or house wiring attaches to the range. Verify that there are 240
volts to the two outside terminals on the block and that there is 120 volts from each of the outside
terminals to the neutral terminal in the center of the terminal block. You should also check the power
supply while the range is operating or “under load”. The power supply may check good with the range
sitting idle but fail when the elements are turned on. This can be caused by a weak connection in the
customer’s house wiring, or a faulty circuit breaker or fuse.
When servicing a gas range the power supply should be checked at the wall outlet with a plug
in circuit tester or volt meter. Make sure that the outlet is properly polarized and grounded. There
are many good plug-in circuit/polarity testers available that will perform this test quickly and easily.
When testing with a volt meter remember that the narrow slot in the wall outlet is the L1 or voltage
side of the circuit and the wide slot is the neutral. The round or “D” shaped hole is the ground circuit.
A properly polarized 120 volt wall outlet will have voltage between the L1 (narrow slot) and neutral
(wide slot) as well as between L1 and ground (See Fig. 1 below). Do not assume that because the
wall outlet has a ground slot that it is grounded. Check it out! Modern electronic controls must have a
correctly polarized and grounded power supply for proper operation.
Neutral
L1
Ground
Fig. 1
Another common mistake is failure to verify all component part wire harness connections. It is
essential that all component connections be checked visually and with the appropriate circuit tester.
Many times components are assumed to be faulty because they do not operate when the failure is
caused by a loose or miswired connection. New ranges may have loose connections resulting from
shipping and handling conditions or improper installation. A good example is if the EOC on a new
range can not be programmed it could be due to a faulty temperature sensor probe connection. Most
Electronic Oven Controls will not allow programming if there is no input from the probe. Check it out
before you replace the EOC.
When the repair has been completed the product should be thoroughly tested to verify that the
service performed corrected the problem and that all of the other features and functions of the product
are in proper working order. The extra time taken to do this will create consumer confidence in your
efficiency and professionalism as well as possibly saving an expensive callback.
Page 4
P/N 316439220
SERVICE TOOLS AND EQUIPMENT
In addition to standard hand tools such as wrenches, screwdrivers, pliers, etc; the following instruments are considered to be essential equipment for technicians servicing Electrolux cooking products.
Proper testing and diagnostic procedures are not possible without these tools.
• Volt/ohmmeter - Must be capable of voltage measurement from 0 to 500 volts AC and
resistance measurements from 0 to 2 meg-ohms. This usually requires a meter that utilizes
a 9 volt battery. Either digital or analog meters are acceptable however most technicians find
analog meters easier to use.
• Clamp on amp meter - Should be capable of measuring from 0 to 60 amps.
• Temperature Meter - Should be high quality with thermocouple or electronic
“K-type” test probe. Capable of temperature readings up to 1000 degrees Fahrenheit.
Additional instruments that a technician will need to have access to at various times include the
following:
• Combustible gas leak detection meter.
• U tube manometer or equivalent testing device for measuring LP and Natural gas line
pressure on gas ranges. Measurements must be in IWC (inches water column)
• Carbon Monoxide (CO) detection meter capable of measuring from 0-1000 PPM.
• Microwave Leak Detection Meter
CHANGES AND FEATURES OVERVIEW
For 2004/2005 some important new features and design changes have been
introduced into our gas and electric freestanding ranges. Below is a list of the most
significant changes.
•
•
•
•
•
•
LARGER OVEN CAPACITY - 5.4 cu. ft. & 5.3 cu. ft.
FRONT MOUNTED LEVELING FEET FOR GREATER STABILITY
IMPROVED DOOR HINGE DESIGN FOR EASIER DOOR REMOVAL
EXPANDED EOC and ESEC FAULT CODES FOR MORE ACCURATE DIAGNOSIS
Bake -N-Warm™ Double Oven *
NEW BODY SIDE DESIGN AND SERVICE PROCEDURE.
*THESE FEATRUES NOT FOUND ON ALL MODELS
ABBREVIATIONS AND TERMS FOUND IN THIS MANUAL
EOC = ELECTRONIC OVEN CONTROL
RTD = RESISTANCE TEMPERATURE DEVICE (Temperature Sensor Probe)
GND = GROUND
LED = LIGHT EMITTING DIODE
UIB
= USER INTERFACE BOARD
ESEC = ELECTRONIC SURFACE ELEMENT CONTROL
POT = POTENTIOMETER
Mini Oven = Bake -N-Warm™ Double Oven
Mother Board = Power Board = Surface Element Control Board
Page 5
P/N 316439220
Model Numbering System for Free-Standing, Slide-in & Drop-in Ranges
P L E F M* 3 9 9 D C A
Brand Identifier
PL = Professional
GL = Gallery
F = Frigidaire
G = Gibson
K = Kelvinator
T = Tappan
W = W/West
M = Multiflex
ECN Lot Identifier
Required when ordering parts
Color Code
W = White (Zebra)
S = White-on-White
D = Almond (Zebra)
T = Almond-on-Almond
U = Bisque (Zebra)
Q = Bisque-on-Bisque
B = Black
C = Stainless Steel /Black
Range Fuel
C = Combination (Electric/Gas)
E = Electric (240/208v 60hz)
F = Electric (240v 50hz)
G = Natural Gas(Elec. Ignition)
P = Natural Gas(Standing Pilot)
L = LP Gas(Elec. Ignition)
S = LP Gas(Standing Pilot)
Year of Introduction
J = 2000
A & K = 2001
B = 2002
C = 2003
D = 2004
E = 2005
F = 2006
Product Type
D = Drop-in
F = Free Standing
S = Slide-ins
Feature Level
Low 0,1,2,
Mid 3,4,5,6
High 7,8,9
Special Feature Designator
M = Bake-N-Warm™ Double Oven (Mini Oven)
Z = Easy Care™ Stainless
*NOTE: Special Feature Designator placeholder does
not appear in all models
Oven Type
0,1,2,3 = Manual Clean(Porcelain)
4 = Continuous Clean
5 = Self Clean
6 = Self Clean
7 = Self Clean - SpeedBake
8 = Self Clean - Convection
9 = Self Clean + Feature
Nominal Size
2 = 20” & 24” wide *
3 = 30” wide
4 = 40” wide
5 = 30” wide w/5.0 cu.ft. Main Oven (When serial number
begins with VF)
6 = 30” wide w/5.4 cu.ft. Main Oven (When serial number
begins with VF)
6 = 36” wide (When serial number begins with NF)
* Note: Due to typical product configuration of compact ranges,
the Size & Oven Type placeholders will be used to denote size.
I.e. TEF240AW
Country Specific Derivatives have a designated letter code placed as first digit of model number.
Customer Specific Derivatives have a designated letter code following the Product Type digit.
Serial Numbering System
X
A
N N
N
N
N
N
N
Incremented Unit Number
Two Digit Production Week
Last Digit of Production Year
Product Identification
Manufacturing Facility
Page 6
A = Alpha
N = Numeric
X = Either Alpha or Numeric
P/N 316439220
RANGE TECHNICAL DATA
Quick Reference Sheet
Maximum Allowable Surface Temperatures
All gas and electric ranges must comply with U.L and A.N.S.I. surface temperature limits outlined in the following chart.
Note that the testing temperature is different for electric ranges produced after 08/26/2003.
SURFACE TEMPERATURE LIMITS
MATERIAL TYPE / FINISH
PAINTED
1. Product must be undamaged, correctly assembled and have the correct oven temperature.
2. All skin temperatures are based on a room temperature of 77° F (25°
C) and an oven set temperature of 400° F for gas and electric ranges
built prior to 08/26/2003. Oven set temperature should be 475° F for
electric products built after 8/26/2003.
3. Oven must be cycling at designated test temperature for one hour
before test is conducted.
4. Pyrometers, (temperature testers), must be of high quality and properly adjusted.
5. An increase or decrease of 1° F in the room ambient temperature, will
allow a 1° F increase or decrease in the maximum allowable surface
temperature of the range.
PORCELAIN
GLASS
PLASTIC
METAL
LOCATION
Side Panel
152° F
160° F
—
—
—
Oven Door
152° F
160° F
172° F
182° F
—
Warmer Drawer
Front Panel
152° F
160° F
—
—
—
Knobs & Handles
—
—
—
*167° F
**182° F
Skirt
—
—
—
*182° F
Cooktop
Lower Console
Oven Vent Area
131° F
**152° F
*152° F
NO TEMPERATURE LIMITS APPLY TO THIS AREA
* Includes plastic with metal plating not more than 0.005” thick and metal with a plastic covering not
less than 0.005” thick.
** Self-Clean Electric Range at Clean Temperature
RTD Temperature / Resistance Chart
The following chart can be used to test the resistance of the oven temperature
sensor probe. For accuracy in testing use a high quality thermometer or
temperature meter to determine actual oven temperature before reading the
RTD SCALE
TEMPERATURE °F
RESISTANCE Ω
32 ± 1.9
1000 ± 4.0
75 ± 2.5
1091 ± 5.3
250 ± 4.4
1453 ± 8.9
350 ± 5.4
1654 ± 10.8
450 ± 6.9
1852 ± 13.5
550 ± 8.2
2047 ± 15.8
650 ± 13.6
2237 ± 18.5
900 ± 13.6
2697 ± 24.4
Removing and Replacing Warmer Drawer
Electrical Shock Hazard can occur
and result in serious injury or death.
Disconnect appliance from electric
power before cleaning and servicing
the warmer drawer.
To Remove Warmer Drawer:
1. Turn power off before removing the
warmer drawer.
2. Open the drawer to the fully opened
position.
3. On the right glide you will find a shield
attached with a hex-head screw (see
figure 1). Using a 1/4” socket and
ratchet remove the shield.
4. Locate glide lever on each side of
drawer, pull up on the left glide lever
and push down on the right glide
lever.
5. Pull the drawer away from the
range.
Fig. 2
Fig. 1
Page 7
To Replace Warmer Drawer:
1. Replace shield on the right glide of the
drawer body.
2. Pull the bearing glides to the front of the
chassis glide
(see figure 2).
3. Align the glide on each side of the drawer
with the glide slots on the range.
4. Push the drawer into the range until levers
“click” (approximately 2”). Pull the drawer
open again to seat bearing glides into
position. If you do not hear the levers
“click” or the bearing glides do not feel
seated remove the drawer and repeat
steps 2-4. This will minimize possible
damage to the bearing glides.
P/N 316439220
RANGE TECHNICAL DATA
Electric Range Component Resistance Chart
NOTE: Resistance measurments are approximate. Variations due to temperature changes and other factors are normal.
Component
Bake Element
Bake Element
Bake Element
Mini Oven Element
Warmer Drawer Element
Warmer Drawer Element
Broil Element
Broil Element
Convection Element
8” Coil Surface Element
6” Coil Surface Element
6” Radiant / warmer Element
6” Radiant Surface Element
5” / 7” Expandable Radiant Element
6”/ 9” Expandable Radiant Element
6”/ 9” Expandable Radiant Element
6”/ 9” Expandable Radiant
8” Radiant Surface Element
9” Radiant Surface Element
9” / 12” Expandable Radiant Element
Voltage
Rating
208 / 242
208 / 242
208 / 242
108 / 232
108 / 232
108 / 232
208 / 242
208 / 242
108 / 232
208 / 242
208 / 242
108 / 232
208 / 242
208 / 242
208 / 242
208 / 242
208 / 242
208 / 242
208 / 242
208 / 242
2500
2600
3500
1500
700
450
4000
3000
350
2100
1250
100
1200
1800 / 1350
2500 / 1875
2500 / 1200
3000 / 1400
2200
2500
2700 / 1700
Convection Fan Motor Windings
108 / 232
-
15
Lock Motor Windings
108 / 232
-
2000
Page 8
Wattage
Resistance Ω (ohms)
23
22
16
9.6
20.5
32
14
19
40
27.5
46
144
48
Outer / Inner
Outer / Inner
Outer / Inner
Outer / Inner
26
24
Outer / Inner
128 / 42
92 / 31
44 / 48
35 / 40
52 / 33
P/N 316439220
RANGE TECHNICAL DATA
EOC Failure / Fault Codes
On freestanding gas and electric ranges manufactured beginning with the serial number date code
VF426 many of the EOC’s will have expanded three digit fault codes. These codes may also appear
in new replacement EOC’s for ranges built prior to this date. Below is a list of possible fault codes
that might appear in the EOC display window. The original two digit fault codes appear in the shaded
boxes followed by the replacement three digit codes.
For each Fault code there is a listing of the likely failure condition or cause, as well as suggested
corrective actions to be taken. Not all fault codes will appear in every model but the fault codes are
universal and have the same meaning regardless of the model that is being serviced
Note: Fault codes are not a foolproof system. Never assume that a part has failed based on a displayed
fault code. An example would be if the EOC is displaying F30 (open sensor), the failure could be caused
by a loose connection or faulty wire harness between the EOC and sensor or the sensor could simply
be unplugged.
FAULT CODE
F1
LIKELY FAILURE CONDITION/CAUSE
F10
Runaway Temperature.
F11
Shorted Keypad.
F12
Bad Micro Identification.
F13
Bad EEPROM Identification/Checksum error.
F14
Display tail missing/not connected
SUGGESTED CORRECTIVE ACTION
1. (F10 only) Check RTD Sensor Probe & replace if necessary.
If oven is overheating, disconnect power. If oven continues to
overheat when the power is reapplied, replace EOC. Severe
overheating may require the entire oven to be replaced should
damage be extensive.
2. (F11, 12 & 13) Disconnect power, wait 30 seconds and reapply
power. If fault returns upon power-up, replace EOC.
3. (F14 only) Re-seat the P12 ribbon connector tail. If fault returns replace EOC (first action); Touch Panel (second action)
F20
Communication failure between EOC and ESEC
system.
1. Test harness/connections P4 (EOC) & P11 (Surface element
control board).
2. If harness checks O.K. failure can be caused by faulty UIB,
surface element control board, or EOC.
F26
Communication failure with mini oven control.
Check harness and connectors from the EOC to mini oven
control board. Check for 15vdc to mini oven control (red & gray
wires). If harness and voltage are good replace mini oven control. If fault returns replace EOC.
F30
Open probe connection.
1. (F30 or F31) Check resistance at room temperature & compare to RTD Sensor resistance chart. If resistance does not
match the RTD chart replace RTD Sensor Probe. Check Sensor
wiring harness between EOC & Sensor Probe connector.
F31
Shorted Probe connection
F3
2. (F30 or F31) Check resistance at room temperature, if less
than 500 ohms, replace RTD Sensor Probe. Check for shorted
Sensor Probe harness between EOC & Probe connector.
F40
Cooktop Lockout error.
1. (F40 or F41) Check the wiring.
F41
2. (F40 or F41) Replace the Cooktop Lockout Control Board.
3. (F40 or F41) Replace EOC.
F9
F90
Maximum oven door unlock time exceeded.
F91
Maximum oven door unlock attempts exceeded.
F92
Maximum oven door open time exceeded.
F93
Maximum oven door lock time exceeded.
F94
Maximum oven door lock attempts exceeded.
Page 9
1. (F90, 91, 92, 93 & 94) Check the wiring between EOC & Lock
Motor Micro Switch.
2. (F90, 91, 92, 93 & 94) Replace the Motor Door Latch assembly if necessary.
3. (F90, 91, 92, 93 & 94) Check for binding of the Latch Cam,
Lock Motor Rod & Lock Motor Cam.
4. (F90, 91, 92, 93 & 94) Check to see if Lock Motor Coil is open.
If open, replace Lock Motor Assembly.
5. (F90, 91, 92, 93 & 94) Lock Motor continuously runs - if Micro
Switch is open, replace Lock Motor Assembly.
6. (F92, 93 & 94) Check oven door Light Switch - if open, replace
Switch.
7. If all situations above do not solve problem, replace EOC.
P/N 316439220
RANGE TECHNICAL DATA
ESEC System Failure / Fault Codes
Displayed
Fault
Code
Description
Suggested Corrective Action
F5 A0
Bad EEPROM checksum.
1. Reset power supply to range.
2. Replace Power Board.
F5 00
Communication break between
EOC and UIB.
1. Reset power supply to range.
2. Test ESEC wiring harness. Replace if defective
3. Replace UIB
4. Replace EOC
F5 01
Communication break between
Power board & UIB
1. Reset power supply to range.
2. Test ESEC wiring harness. Replace if defective
3. Replace UIB.
4. Replace Power Board
F5 02
UIB not communicating.
1. Defective ESEC harness. Reseat connectors. Test
harness and replace if defective.
2. Defective UIB. Replace UIB
3. Defective Power Board. Replace Power Board
F5 F0
Watchdog timer timed out - Power
Board.
1. Reset power supply to range.
2. Replace Power Board.
F5 FF
Watchdog timer timed out - UIB.
1. Reset power supply to range.
2. Replace UIB.
F7 10
F7 20
F7 30
F7 40
Potentiometer LF is open.
Potentiometer LR is open.
Potentiometer RR is open.
Potentiometer RF is open.
1. Defective potentiometer. Test and replace if
defective.
2. Replace UIB.
F7 11
F7 21
F7 31
F7 41
Potentiometer LF is shorted.
Potentiometer LR is shorted.
Potentiometer RR is shorted.
Potentiometer RF is shorted.
1. Defective potentiometer. Test and replace if
defective.
2. Replace UIB.
3. Check for moisture contamination in potentiometer.
F7 12
F7 22
F7 32
F7 42
Potentiometer for LF is wrong value.
Potentiometer for LR is wrong value.
Potentiometer for RR is wrong value.
Potentiometer for RF is wrong value.
1. Wrong value potentiometer installed. Verify correct
part .
2. Defective potentiometer. Test and replace if
defective.
3. Check for moisture contamination in potentiometer.
4. Replace UIB.
Oven Temperature Calibration
To test oven temperature set the electronic oven control for normal baking at 350°F. After the
oven has completed the preheat cycle obtain an average oven temperature after a minimum of 5
cycles. Press CANCEL or CLEAR to end bake mode. If necessary calibrate the oven temperature.
Information on adjusting the oven temperature can be found in the owners manual.
Note: Changing calibration affects all Baking modes. The adjustments made will not change the
self-cleaning temperature.
Page 10
P/N 316439220
30” ELECTRIC
ELECTRIC RANGE
RANGE INSTALLATION
INSTALLATION INSTRUCTIONS
30"
INSTRUCTIONS
(For 3 or 4 Wire, 60 Hz. Systems)
INSTALLATION AND SERVICE MUST BE PERFORMED BY A QUALIFIED INSTALLER.
IMPORTANT: SAVE FOR LOCAL ELECTRICAL INSPECTOR'S USE.
READ AND SAVE THESE INSTRUCTIONS FOR FUTURE REFERENCE.
Clearances and Dimensions
1. Provide adequate clearances between the range and adjacent combustible surfaces.
2. Location—Check location where the range will be installed. Check for proper electrical supply, and the stability
of the floor.
3. Dimensions that are shown must be used. Given dimensions provide minimum clearance. Contact surface must
be solid and level.
Fig. 1
Fig. 2
Fig. 3
*30" MINIMUM CLEARANCE BETWEEN THE TOP OF THE COOKING SURFACE AND THE BOTTOM OF AN UNPROTECTED WOOD OR
METAL CABINET; OR 24" MINIMUM WHEN BOTTOM OF WOOD OR METAL CABINET IS PROTECTED BY NOT LESS THAN 1/4" FLAME
RETARDANT MILLBOARD COVERED WITH NOT LESS THAN NO. 28 MSG SHEET STEEL, 0.015" STAINLESS STEEL, 0.024" ALUMINUM OR
0.020" COPPER. 0" CLEARANCE IS THE MINIMUM FOR THE REAR OF THE RANGE. FOLLOW ALL DIMENSION REQUIREMENTS PROVIDED
ABOVE TO PREVENT PROPERTY DAMAGE, POTENTIAL FIRE HAZARD, AND INCORRECT COUNTERTOP AND CABINET CUTS.
TO ELIMINATE THE RISK OF BURNS OR FIRE BY REACHING OVER HEATED SURFACE UNITS, CABINET STORAGE SPACE LOCATED
ABOVE THE SURFACE UNITS SHOULD BE AVOIDED. IF CABINET STORAGE IS TO BE PROVIDED, THE RISK CAN BE REDUCED BY
INSTALLING A RANGE HOOD THAT PROJECTS HORIZONTALLY A MINIMUM OF 5" BEYOND THE BOTTOM OF THE CABINETS.
IMPORTANT SAFETY INSTRUCTIONS
If the information in this manual is not followed exactly, a fire or
electrical shock may result causing property damage, personal injury or death.
Important Notes to the Installer
• Read all instructions contained in these installation instructions before
installing range.
• Remove all packing material from the oven compartments before connecting
the gas & electrical supply to the range.
• Observe all governing codes and ordinances.
• Be sure to leave these instructions with the consumer.
Important Note to the Consumer
Keep these instructions with your owner's guide for future reference.
• As when using any appliance generating heat, there are certain safety precautions you should follow. These are listed in
the Use & Care Manual, read it carefully.
• Be sure your range is installed and grounded properly by a qualified installer or service technician.
• Make sure the wall coverings around the range can withstand the heat generated by the range.
• To eliminate the need to reach over the surface elements, cabinet storage space above the elements should be avoided.
Page 11
P/N 316439220
30" ELECTRIC RANGE INSTALLATION INSTRUCTIONS
(For 3 or 4 Wire, 60 Hz. Systems)
BEFORE STARTING
Tools You Will Need
For leveling legs and Anti-Tip Bracket:
to the wall, drill pilot hole at an approximate 20° downward angle
(See Fig. 5).
If bracket is to be mounted to masonry or ceramic floors, drill a 5/
32" pilot hole 1-3/4" deep. The screws provided may be used in
wood or concrete material. Use a 5/16" nut-driver or flat head
screwdriver to secure the bracket in place (See Fig. 6).
1c. Level and Position Range - Level range by adjusting the
(4) leveling legs with a wrench. NOTE: A minimum clearance of 1/
8" is required between the bottom of the range and the leveling leg
to allow room for the bracket. Use a spirit level to check your
adjustments. Slide range back into position (See Fig. 7).
Visually check that rear leveling leg is inserted into and fully
secured by the Anti-Tip Bracket by removing lower panel or
storage drawer. For models with a Warmer Drawer or broiler
compartment, grasp the top rear edge of the range and carefully
attempt to tilt it forward.
• Adjustable wrench or channel lock pliers
• 5/16" Nutdriver or Flat Head Screwdriver
• Electric Drill & 1/8" Diameter Drill Bit
(Masonry Drill Bit if installing in concrete)
For electrical supply connection:
• 1/4" & 3/8" Socket driver or Nutdriver
Additional Materials You Will Need:
• Power Supply Cord or
• Copper Electrical Wiring & Metal Conduit
(for hard wiring)
NORMAL INSTALLATION STEPS
1. ANTI-TIP BRACKET INSTALLATION INSTRUCTIONS
- IMPORTANT SAFETY WARNING
To reduce the risk of tipping of the range, the range must be
secured to the floor by properly installed Anti-Tip Bracket and
screws packed with the range. Failure to install the anti-tip bracket
will allow the range to tip over if excessive weight is placed on an
open door or if a child climbs upon it. Serious injury might result
from spilled hot liquids or from the range itself.
Fig. 5
Fig. 6
If range is ever moved to a different location, the Anti-Tip Bracket
must also be moved and installed with the range.
Instructions are provided for installation in wood or cement
fastened to either the floor or wall. When installed to the wall,
make sure that screws completely penetrate dry wall and are
secured in wood or metal. When fastening to the floor or wall, be
sure that screws do not penetrate electrical wiring or plumbing.
1a. Locate the Bracket using the Template - (Bracket
Fig. 7
may be located on either the left or right side of the range. Use
the information below to locate
the bracket if template is not
available).
Mark the floor or wall where
left or right side of the range
will be located. If rear of range
is against the wall or no
further than 1-1/4" from wall
2. ELECTRICAL CONNECTION REQUIREMENTS - This
appliance must be properly installed and grounded by a qualified
technician in accordance with the National Electrical Code ANSI/
NFPA No. 70 -- latest edition -- and Local Electrical Code
requirements.
This appliance may be connected by means of "Permanent
Wiring" or "Power Supply Cord Kit."
Fig. 4
when installed, you may use the wall or floor mount method. If
molding is installed and does not allow the bracket to fit flush
against the wall, remove molding or mount bracket to the floor.
For wall mount, locate the bracket by placing the back edge of the
template against the rear wall and the side edge of template on
the mark made referencing the side of the range (See Fig. 4).
Place bracket on top of template and mark location of the screw
holes in wall. If rear of range is further than 1-1/4" from the wall
when installed, attach bracket to the floor. For floor mount, locate
the bracket by placing back edge of the template where the rear of
the range will be located. Mark the location of the screw holes,
shown in template.
1b. Drill Pilot Holes & Fasten Bracket - Drill a 1/8" pilot
hole where screws are to be located. If bracket is to be mounted
When installing Permanent Wiring, do not leave excess wire in
range compartment. Excess wire in the range compartment may
not allow the Rear Access Cover to be replaced properly and
could create a potential electrical hazard if wires become pinched.
Connect only as instructed under "Permanent Wire
Connections" in Step 4c. When using flexible conduit or range
cable use flex connector or range cable strain relief (Fig. 11).
2a. Models with Factory Connected Power Supply
Cord. NOTE: Some models may have a factory
installed three (3) conductor Power Supply Cord.
Mobile home installations, new branch circuit installations
(1996NEC) or areas where Local Codes do not permit grounding
through neutral require a four (4) conductor power supply cord kit
rated at 125/250 volts minimum and marked for use with ranges.
P/N 316439220
Page 12
30" ELECTRIC RANGE INSTALLATION INSTRUCTIONS
(For 3 or 4 Wire, 60 Hz. Systems)
See Range Connection Opening Size Chart (Figs. 9 & 10) for
cord kit ampere rating information. Terminals on end of wires
must be either closed loop or open-end spade lugs with upturned
ends.
2b. MODELS REQUIRING POWER SUPPLY CORD KIT.
RISK OF FIRE OR ELECTRICAL SHOCK MAY OCCUR IF AN
INCORRECT SIZE RANGE CORD KIT IS USED, THE
INSTALLATION INSTRUCTIONS ARE NOT FOLLOWED OR
STRAIN RELIEF BRACKET IS DISCARDED.
This appliance may be connected by means of a power supply
cord. Only a power supply cord kit rated at 125/250 volts
minimum, and marked for use with ranges shall be used. See Fig.
10 for cord kit ampere rating information. Cord must have either
three (3) or four (4) conductors (See Fig. 8). Terminals on end of
wires must be either closed loop or open-end spade lugs with
upturned ends. Cord must have strain relief properly installed. See
Steps 4a. for 4-Wire or 4b. for 3-Wire connections.
3. ELECTRICAL CONNECTION TO RANGE.
The Rear Access Cover must be removed (Fig 9). To remove,
loosen center screw (one screw) and remove cover. The terminal
block will then be accessible.
3 & 4 - Wire electrical wall Receptacle types &
Fig. 8
NOTE: Range is shipped from factory with 1-3/8" dia. hole as
shown. To use either 7/8" dia. hole or 1-1/8" dia. knockouts refer
to Fig. 9.
Rear
Access
Cover
Fig. 11
4A. POWER CORD CONNECTIONS
(4-Wire Connection Instructions - Refer to Fig.12)
Before wiring the range review the suggested power source
location drawing in Fig. 3. If connecting to a 4-Wire electrical
system (new branch-circuit or mobile home requires 4-Wire
connection):
1. Follow the manufacturer’s installation instructions
supplied with the strain relief and install (Also see Figs. 9,
10 & 11).
2. Insert the end connectors for Line 1, Line 2 and Neutral and
tighten securely to the terminal block.
IMPORTANT NOTE: DO NOT LOOSEN the factory
installed nut connections which secure the range wiring to the
terminal block. Electrical failure or loss of electrical
connection may occur if these 3 nuts are loosened or
removed.
3. You must disconnect the ground strap. Remove the
factory installed ground screw & plate to release the copper
ground strap from the frame of the appliance. Cut and
discard the copper ground strap & plate. KEEP the ground
screw.
4. Connect the ground wire (Green) lead with the eyelet to the
frame of the appliance with the ground screw using the same
hole in the frame where the ground screw was originally
installed (See Fig. 12).
5. Make sure all screws are tightened securely and replace the
rear access cover (See Fig. 9).
Fig. 9
Fig. 10
Fig. 12
Page 13
P/N 316439220
30" ELECTRIC RANGE INSTALLATION INSTRUCTIONS
(For 3 or 4 Wire, 60 Hz. Systems)
4B. POWER CORD CONNECTIONS
(3-Wire Connection Instructions . For existing installations ONLY
- Refer to Fig. 13).
1.
Follow the manufacturer’s installation instructions supplied with the
strain relief and install (Also see Figs. 9, 10 & 11).
2. Insert the end connectors for Line 1, Line 2 and Neutral and tighten
securely to the terminal block (See Fig. 13).
IMPORTANT NOTE: DO NOT LOOSEN the factory installed nut
connections which secure the range wiring to the terminal block.
Electrical failure or loss of electrical connection may occur if these 3
nuts are loosened or removed.
3. Make sure all connections are tightened securely and replace the rear
access cover (See Fig. 9).
Grounding Instructions (3-Wire Connections only): A ground
strap is installed on this range which connects the center terminal of the
terminal block (Neutral) to the range chassis. The ground strap is
connected to the range by the center, lowest screw (See Fig. 13). The
ground strap must not be removed unless National, State or Local
Codes do not permit use of a ground strap.
NOTE: If the ground strap is removed for any reason, a separate
ground wire must be connected to the separate ground screw attached
to the range chassis and to an adequate ground source.
Fig. 13
4c. 3 & 4-WIRE PERMANENT WIRE CONNECTIONS.
3 - Wire Permanent Connection - follow Steps 1,2 & 5 below.
4 - Wire Permanent Connection - follow Steps 1 thru 5 below.
Before wiring the range, review the suggested power source location
drawings in Fig. 3. If connecting to a 4-Wire electrical system (new branchcircuit or mobile home requires 4-Wire connection):
1.
2.
3.
4.
5.
(3 & 4 - Wire Permanent Connections) Follow the manufacturer’s
installation instructions supplied with the strain relief and install.
(3 & 4 - Wire Permanent Connections) Strip insulation away from the
ends of the permanent wiring for Line 1, Line 2, Neutral (also strip ground
wire on 4-Wire Connections). Tighten all 3 wire leads to the terminal
block (Follow wire locations shown in Fig. 14).
IMPORTANT NOTE: DO NOT LOOSEN the factory installed nut
connections which secure the range wiring to the terminal block.
Electrical failure or loss of electrical connection may occur if these 3
nuts are loosened or removed. NOTE: For 3-Wire Permanent
Connections skip Steps 3 & 4 and continue with Step 5.
(4-Wire Permanent Connection ONLY) Disconnect the ground strap.
Remove the factory installed ground screw & plate to release the factory
installed copper ground strap from frame of the appliance. Cut and
discard the copper strap from the terminal block. KEEP the ground
screw, ground plate and go to Step 4.
(4-Wire Permanent Connection ONLY) Connect the ground wire lead
(Green) to the frame of the appliance using the ground screw & plate as
shown in Fig. 15. Be sure to install using the same hole in the frame
where the ground screw was originally installed.
(3 & 4 - Wire Permanent Connections) Make sure all connections are
tightened securely and replace the rear access cover (See Fig. 9).
NOTE: Non-terminated field wire compression connections must
be set at approximately 90in./lbs.
Fig. 14
Fig. 15
5. CAREFULLY SLIDE RANGE INTO FINAL LOCATION.
Be sure to provide all the adequate clearances and dimensions
shown in Figs. 1, 2 & 3 before moving range into final location.
Carefully slide range into final position while inserting rear leveling leg
into and FULLY ENGAGING THE ANTI-TIP BRACKET (See Fig. 7).
Make sure the power cord folds into the remaining open floor area
Page 14
P/N 316439220
SMOOTH GLASS COOKTOP SERVICING
With the cooktop in the raised position the
surface heating elements, warmer zone
element and their wiring connections are
accessible. The top can be held open by using
a wood or plastic prop rod approximately 28
inches long. In the photos below a 1” diameter
wooden dowel is used. Use caution not to
damage the oven insulation blanket when
placing the prop rod.
The procedure for servicing the smooth glass
cooktop and surface elements is the same as
in previous models. The front of the cooktop
can be lifted by removing the two screws that
secure it to the range chassis.
Remove Screws
Removing and Replacing Surface Elements
1. Before removing the element be sure to note the
locations of the element mounting clips in the support channel slot. The replacement element must be
installed in the same position.
2. Carefully remove the wires from the element.
Take note of the terminal identification on the element terminal block for each wire connection.
4. Remove the mounting screw that secures the
element support channel to the cooktop.
3. Before the element can
be removed from the support
channel the locking tab on the
mounting clip must be closed
by squeezing shut with a pair of
pliers. After the repair is complete the tab can be re-opened
by using an awl or similar
instrument.
Page 15
P/N 316439220
Removing and Replacing Surface Elements (continued)
5. Carefully pull the support channel away from the
cooktop far enough to disengage the element mounting clips from the channel. Slide the element out
from between the support channel and the cooktop.
Reinstall or replace the element by reversing steps
1-5.
Clip
The element mounting clips must be removed
from the original element and mounted to the
replacement. The screw holes on the element
body are numbered to identify the clip mounting
locations.
Surface Element Terminal Connections
When replacing the surface element, the terminal positions on the new element may be different from the
original. Reconnect the wires according to the terminal identification (2A, 2B etc.) not by terminal position.
The photos below show two different terminal block styles and illustrate the difference in the terminal positions.
1b
2b
1a
2a
2a
1a
2b
1b
Warmer Drawer
The purpose of the Warmer Drawer is to keep hot cooked foods at serving temperature. Always start with hot
food. It is not recommended to heat cold food in the Warmer Drawer. All food placed in the Warmer Drawer
should be covered with a lid or aluminum foil to maintain quality.
The operation of the warmer drawer element is controlled by a separate rotary switch on the control panel.
The element cycles on and off at varying rates in relation to the selected setting causing the temperature to
increase or decrease. The actual temperature can also be affected by environmental conditions such as room
temperature, air currents, and customer use. The warmer drawer temperature is not precisely controlled and
variations from the operating temperatures listed below are normal.
WARMER DRAWER TEMPERATURE TABLE
For best results, preheat the drawer
before adding food. An empty drawer will
preheat in approximately 15 minutes.
Setting
HI
MED
LO
*Temp
Range (°F)
180-200
160-180
140-160
* Temperatures are approximate
Page 16
P/N 316439220
Warmer Drawer Theory of Operation
The circuit diagram below shows a typical wiring and control setup for a warmer drawer on an
electric or gas range. The warmer drawer is designed to operate on 120 VAC. The L1 wire on the
warmer drawer switch is connected to L1 in the power supply harness and the L2 wire on the switch
is connected to the neutral circuit in the harness. When the switch is turned on the contacts L1-H1
close connecting the L1 circuit to one side of the warmer drawer element. The contacts L2 - H2
also close completing the neutral circuit to the ½ wave diode which connects to the other side of the
element. This circuit provides approximately 60 volts AC to the element resulting in lower wattage
heat output from the element.
There is a parallel neutral circuit that provides neutral to the element through the Low Limit
Thermostat. This circuit is always closed unless the temperature of the warmer drawer has reached
the cut out point of the low limit thermostat. The purpose of this circuit is to allow the element to
operate at full wattage and bring the drawer up to minimum operating temperature more rapidly. Once
the low limit thermostat opens the circuit from H2 through the diode provides the neutral circuit to the
element.
Troubleshooting Warmer Drawer Operation
The warmer drawer can fail in a variety of ways. If the element fails to heat at all you should test the
switch contacts, element, low limit thermostat and all wiring connections and harness.
If the element heats only at low temperatures then the switch contacts L2-H2, diode, or wire harness
or connections could be open.
If the warmer drawer overheats then the fault could be a shorted diode, low limit thermostat contacts
stuck closed, element or wire harness shorted to ground. On a range that has just been installed it is
also possible that there could be a miswired connection causing the overheat condition.
If it is determined that the diode is shorted then the warmer drawer wire harness must be replaced as
an assembly.
Page 17
P/N 316439220
Servicing Warmer Drawer Components
To service the warmer drawer body, drawer guides, or the element assembly first remove the warmer drawer
by following the instructions on page 7 of this manual. Note that in order to release the latch on the right side of
the drawer it is necessary to remove the latch lever shield by removing a ¼” hex head screw (see photo below). This screw and shield must be reinstalled when the drawer is replaced. Follow the instructions to reinstall
the drawer after the repair or service is complete.
Latch Lever
Shield
¼” Hex Head Screw
!CAUTION!
ALWAYS DISCONNECT OR TURN OFF THE POWER SUPPLY TO RANGE
BEFORE REMOVING THE WARMER DRAWER
The warmer drawer element and thermostat are
mounted to a metal base pan which must be removed
in order to replace the element. To remove the base
first go to the rear of the range and remove the
screws that secure the warmer drawer base and the
warmer drawer side shields to the main back panel.
Also unplug the warmer drawer harness connector
plug and push the connector through the slot in the
back panel so that it can be removed with the element
and base assembly.
Remove the ¼” hex screws that secure the drawer
guide rail and element base pan on each side of the
drawer opening.
Harness Connector Plug
Side Shield Screws
Element Base Pan Screws
Guide Rail Screw
Remove the drawer guide rail and drawer shield together by pulling straight forward.
Drawer Guide Rail
Once both of the drawer guide rails and side shields
have been removed the base pan and element assembly can be pulled forward to remove from the
range. See photo on page 18.
Drawer Side Shield
Base Pan Screw
Page 18
P/N 316439220
With the element and base pan assembly removed the
element and thermostat are accessible for servicing. To
dismount the element from the pan remove the screws
and clips that secure it to the pan. Also remove the
screw that secures the thermostat mounting bracket.
Pull base pan forward to
remove
→→
When reinstalling the thermostat mounting bracket
always insure that the element terminal shield is
installed and properly positioned.
Mounting Screws and Clips
Thermostat Mounting Bracket
Warmer Drawer Element and
Base Pan Assy
Terminal Shield
Oven Door
The door construction has changed substantially. In previous models the hinges were mounted to the chassis.
The new construction moves the hinges to the interior of the door.
To service or replace many of the components of the oven, it is often necessary to remove the door from the
range. Below are instructions for removing and reinstalling the oven door. This information is also found in the
owners guide.
Photo A
To Remove Oven Door:
1. Fully open the oven door (horizontal with floor).
2. Pull the door hinge locks on both left and right door
hinges down from the oven frame completely towards
the oven door (See photo A). A tool such as a small
flat-blade screwdriver may be required.
3. Close the door until it contacts the hinge locks. 4.
Firmly grasp both sides of oven door along the door
sides (Do not use the oven door handle).
5. Lift the oven door hinge arms over the roller pins
located on each side of the oven frame (See Photo B
on page 19).
PULL HINGE LOCK DOWN
!CAUTION!!
The door is heavy. For safe, temporary storage, lay
the door flat with the inside of the door facing down.
Page 19
P/N 316439220
To Replace Oven Door:
1. Firmly grasp both sides of oven door along the door
sides (Do not use the oven door handle).
2. Holding the oven door at the same angle as the removal position, seat the hook of the hinge arm over the
roller pins located on each side of the oven door frame.
3. Fully open the oven door (horizontal with floor).
4. Push the door hinge locks up towards and into the
oven frame on both left and right oven door hinges to
the locked position.
5. Close the oven door.
Photo B
↑
↑
LIFT DOOR HINGE ARMS OVER ROLLER PINS
Door Hinge Replacement
Disassemble Door
1. Place the door with the handle side down on a
protected work surface. The handle should hang
off the edge of the bench or table.
2. Remove the bottom screws that secure the inner liner to the outer door panel. (Fig. 3)
3. Remove the two handle mounting screws and
remove the door handle. (Fig. 4)
4. Carefully separate the inner door panel and
hinge assembly from the outer panel. Place the
assembly with the hinge side hanging slightly off
the work surface.
5. Remove the two hinge mounting screws and
lower the hinge assembly away from the inner
door panel. (Fig. 5 & Fig. 6).
6. Install new hinge and reverse the steps to reassemble the oven door.
Bottom Screws
Fig. 3
Handle Mounting Screws
Fig. 4
Hinge Mounting Screws
Fig. 5
Fig. 6
TIP: TO EASE INSTALLATION OF NEW HINGE, INSTALL AND REMOVE THE SELF TAPPING SCREWS INTO THE SCREW HOLES IN THE NEW HINGE .
THIS WILL PRE-CUT THREADS INTO THE HINGE AND ALLOW FOR EASIER STARTING OF THE SCREWS ONCE THE HINGE IS IN POSITION.
When replacing the door hinges you must ensure that the hinge lock lever is in the fully engaged position in
order to reinstall the oven door on the range. The hinge is replaced as a complete assembly only.
HINGE LOCK
DISENGAGED
HINGE LOCK ENGAGED
The same hinge assembly design is used for many different oven doors but with different door spring pull
weights. The color of the door spring determines the pull weight. Make sure that the replacement hinge spring
color is correct for the model that is being serviced.
Page 20
P/N 316439220
Replacing Door Hinge Receptacle
The door hinges engage steel pins in the hinge receptacles which are mounted on the back side of
the front chassis. The following instructions will explain the steps necessary for the various styles of
ranges that you may encounter.
Begin by removing the oven door and warmer drawer or storage drawer as described in previous sections of this manual.
WARNING
Remove warmer drawer side shields.
(Models With Warmer Drawer)
Side Shield Screws
1. From the rear of the range remove the screws that secure
the shields to the main back panel (Fig1).
2. From the front of range remove the screws
that secure the drawer glide rail (Fig 2).
The drawer glide rail and drawer shield can be removed
together by pulling straight forward.
Remove hinge receptacle
1. Remove the two self tapping
screws that secure the receptacle to
the oven chassis frame (Fig 3).
The receptacle may fall into the bodyside leg channel but it can be easily
retrieved.
Install new receptacle
1. The new receptacle will have a
black colored roller pin. Make sure to
install the receptacle with the narrow
end of the slot at the bottom (Fig. 4).
TIP: To ease installation of new receptacle,
install and remove the self tapping screws into
the screw holes in the new receptacle . This
will pre-cut threads into the hinge and allow for
easier starting of the screws once the hinge is
in position.
Fig. 1
Guide Rail Screw
Drawer Guide Rail
Drawer Side Shield
Mounting
Screws
Fig. 2
Fig.3
New
receptacle
with black
colored pin
Fig. 5
Down
USE CAUTION TO AVOID BEING CUT
BY ANY EXPOSED SHARP EDGES.
Rear of Range
Fig. 4
2. Carefully position the receptacle behind the front
chassis and install the mounting screws (Fig. 5)
3. Reinstall warmer drawer side shields & glide rails,
warmer drawer and oven door.
Replacing Door Hinge Receptacle
Models with Bake-N-Warm™ Double Oven
To replace the hinge receptacles on range models that have a Bake-N-Warm™ Double Oven follow
the instructions found on page 26 for removing the mini oven chassis. Once the chassis is removed
the hinge receptacles can be replaced as outlined above.
Page 21
P/N 316439220
Bodyside Mounting
Changing the body side panel requires the removal of
screws along the top and rear flanges and removing
the two screws securing the front leg leveler to the
chassis.
When replacing the body side panels depending on
the model there may be two hidden fasteners that
must be addressed. The first is a screw on the inside
flange of the body side just behind the face of the
chassis as shown in the photo to the right.
← Front of range
Left Bodyside
Hidden Screw
The second hidden fastener is located further down
this same flange. The photo on the right shows a
close up of the plastic retainer which is screwed to
the side of the oven chassis. A square opening in the
side panel hooks on the underside of the fastener.
Lower the body side panel to disengage the slot from
the retainer.
Retainer
NOTE: This second fastener will not appear on all
models
Leg Levelers
A newly designed, front mounted leg leveler has been added to provide for greater stability and easier
access for adjusment. The new leveler is attached to the range two screws in the front that pass
through the lower edge of the body side and into the oven chassis, and one screw from beneath that
attaches to the body side panel.
NOTE: The front and rear leg levelers must be removed from
the original bodyside panel and mounted on the new one before
it is installed on the range.
Rear
Front
Page 22
Remove Screws
The leg leveler
assembly will
remain attached
to the bodyside
panel
P/N 316439220
Bake-N-Warm™ DOUBLE OVEN
The Bake-N-Warm Double oven, or “Mini Oven”
as it is commonly referred to, is located in the
area normally used for the storage drawer. It can
be used for baking or as a warmer drawer. See
the photo at right.
The Mini Oven is ideal for cooking foods such
as pizza, casseroles, baked potatoes and frozen
convenience foods. The mini oven temperature
range is from 170º F to 450º F in bake mode,
and from 150º F to 190º F in warmer drawer
mode.
The purpose of the Warmer Drawer feature is to
keep hot cooked foods at serving temperature.
Always start with hot food. It is not recommended to heat cold food in the Warmer Drawer.
Mini Oven Operation
The mini oven utilizes a separate solid state control board and temperature sensor probe to control
oven operation and temperature. The control board incorporates a potentiometer that the customer
rotates to the desired temperature setting. The temperature sensor probe is similar in appearance to
the sensor for the main oven and it has the same resistance/temperature values. The mini oven bake
element operates on 120 volts AC and is mounted beneath the drawer.
When the mini oven control is turned on the relay completes the circuit between P2 and P1 providing
voltage from L1 to one side of the bake element. The other side of the bake element is connected to
the neutral wiring harness of the range terminal block.
The mini oven control is powered by the main oven electronic oven control. When the main oven control is in self clean cycle or when the child safety lock has been activated the power supply to the mini
oven control is interrupted and the mini oven will not operate. If the mini oven is in use at the time that
the self clean cycle begins or the child safety lock feature is activated, the 15 volt DC power supply to
the mini oven control board will be interrupted and the mini oven will cease operation.
Special Notes for ESEC Ranges:The mini oven will not operate when the main oven is set for SelfCleaning or the Oven Control Lockout feature is active. If the mini oven is ON and a Self-Clean or
Oven Control Lockout request is attempted, the EOC will deny the request with a triple beep.
Mini Oven Control Board
P5 Connector Not Used
Yellow wire from bake
element to terminal P1
Purple wires from Sensor Probe harness to P3 connector
Gray wire / circuit ground ( - )
from EOC to pin 1 on P4 connector
Red wire / 15 vdc ( + ) from EOC to
pin 2 on P4 Connector
Black wire- L1 from
main terminal block to
terminal P2
Blue wire / communication link from
EOC to pin 5 on P4 connector (ESEC
models only)
Yellow wire to
indicator lamp
Page 23
P/N 316439220
Diagnosing Mini Oven Failure
If the mini oven fails to operate properly follow the same basic diagnostic steps that are used for any
oven. Verify the power supply, check the wiring connections, test the heating element and temperature sensor probe.
Use extreme care when testing
circuits with live voltage present.
If the mini oven control fails to send voltage to the element perform the following tests to determine
the cause of failure.
1. With the range connected to the power supply test for 120 volts AC from the black wire on mini
oven control P2 to neutral or chassis ground. If the voltage is incorrect check the power supply to the
range and the wiring harness between the control and main terminal block.
2. If the voltage is correct to terminal P2 verify that the mini oven control board is receiving the required power supply from the main oven EOC. If the mini oven indicator light glows when the control
is activated then the power supply is good. If the light does not glow test for 15 volts DC at the Red
(+) and Gray (-) wires on the P4 connector of the mini oven control. If the voltage is correct then the
failure is in the mini oven control board. If the voltage is incorrect the failure is in the wiring harness or
the EOC.
3. The mini oven control will beep constantly when it detects a fault condition in the temperature
sensor circuit. This could be caused by a runaway heat condition, open / shorted temperture probe,
faulty probe connection or harness. Test the temperature sensor probe circuit by disconnecting the P3
connector at the control board and measuring the resistance between the two purple wires. The resistance of the mini oven temperature probe is the same as that of the main oven temperature probe. If
the probe circuit and harness are good replace the mini oven control board.
Page 24
P/N 316439220
Mini Oven Component Service
Replacing Mini Oven Element
Fig. 1
Remove Drawer
1. Before drawer removal, be sure to turn OFF the
Bake-n-Warm™ Double Oven and let the drawer
area cool completely.
2. Open the drawer to the fully open position. Using a phillips-head screwdriver remove the two
drawer screws from the insides of the front oven
drawer compartment (See Fig. 1).
3. With one hand hold the drawer front in place.
Use your other hand to pull the glide away from
the oven (See Fig. 2) until the glide hook
disengages (See Fig. 3 & Fig. 4).
4. Repeat from step 3 above for the other side of
the drawer.
Fig. 2
Fig. 3
Glide Hook Disengaged
Fig. 4
Glide Hook Engaged
5. With BOTH glide hooks disengaged, carefully
lift the drawer up and away from the oven. Push both
drawer glides into lower oven cavity.
From the rear of the range remove the six screws
that secure the lower rear shield. ( Fig. 5 )
Note that the center screw in the upper edge of
the panel is concealed behind the power cord. It
may be necessary to remove the cord to access
this screw.
This screw concealed
by power cord
Fig. 5
After the shield is removed the wire terminals to
the mini oven element and light can be accessed.
( Fig. 6 )
With the drawer removed and the element wire
harness disconnected remove the eight screws
that secure the element to the base and remove
the element by pulling foward. ( Fig. 7 )
To remove the mounting screws a short / stubby
¼” nut driver or # 1 square drive screwdriver is
required.
Fig. 6
Use caution when working in this area.
There are sharp edges on the element
brackets and other areas. Protective clothing and / or gloves are recommended.
Fig. 7
Page 25
P/N 316439220
Replacing Drawer Glide Rails
The mini oven drawer glide rails (Fig. 8) clip into
the side wall of the mini oven cavity and are secured by one screw in each rail.
Fig. 8
The mounting screw is accessed through a hole in
the glide rail outer track. (Fig. 9) .
Fig. 9
Remove
Screw
Once the mounting screw is removed extend the outer track of the glide rail until it stops. Pull forward
firmly until the hooks on the back of the rail disengage from the slots in the oven cavity side wall.
( Fig. 11 & 12 )
Fig. 11
Fig. 12
Slots
Pull Forward
Glide Rail Hooks
Replacing Drawer Seal and Magnet Latch
The Mini Oven drawer is held closed by two magnetic latches, one on each side of the drawer. The
magnets engage metal strike plates that are secured to the front frame of the range chassis. The
strike plates are held to the chassis by a flat head
screw that passes through a stand off spacer and
into the chassis.
Seal
Magnet Assy
Strike Plate
It is normal for the strike plate to be moveable
when the screw is properly tightened.
Screw
The rubber drawer seal is secured to the drawer
liner by metal spring clips that are integral to the
seal. To remove the seal grasp securely at the clip
and pull away from the liner. Replace by positioning the point of the clip into the hole and pressing
in until the clip locks into place.
Page 26
Stand Off
Spacer
Spring Clip
P/N 316439220
Mini Oven Chassis
The mini oven chassis can be removed as an entire assembly. Begin by disconnecting the wire harness connections to the element and cavity light.
Remove the drawer per instructions on page 26.
Screw Access
Using a ¼” nut driver with magnetic screw holder
remove the two screws securing the mini oven
chassis to the range chassis. These screws are
accessed through the holes in the mini oven cavity
liner just below the drawer glide rail. (Photo A).
Photo A
The mini oven chassis can now be pulled forward
and removed from the range. (Photo B).
With the mini oven chassis removed the insulation
and chassis panels can be serviced.
NOTE: The mini oven chassis can not be ordered
as a complete replacement assembly.
Mini Oven
Chassis
Assembly
Photo B
COMPONENT TESTING
Many of the range component circuits can be tested at the EOC wiring harness connections with an
ohm meter. By following the wiring diagram and schematic diagram it is possible to perform continuity
tests on the bake and broil elements, lock motor windings, oven door switch and oven lamp circuits.
When testing for continuity the power supply must be turned off or disconnected and the wire harness
connector(s) for the circuit or component being tested must be unplugged from the EOC.
EXAMPLE: To test the Broil element
circuit unplug the L2 out (orange wire)
and BR (blue wire) from the EOC.
With an ohm meter test for continuity
between these two wires. If the circuit
is open then the broil element may be
defective or there could be a failure in
the wire harness or connection. Refer
to the Component Resistance Chart
on the following page for resistance
values of various components
L2 out
(orange wire)
BL to broil
element
(blue wire)
Page 27
P/N 316439220
Electric Range Component Resistance Chart
NOTE: Resistance measurments are approximate. Variations due to temperature changes and other factors are normal.
Component
Voltage
Rating
208 / 242
208 / 242
208 / 242
108 / 232
108 / 232
108 / 232
208 / 242
208 / 242
108 / 232
208 / 242
208 / 242
108 / 232
208 / 242
208 / 242
2500
2600
3500
1500
700
450
4000
3000
350
2100
1250
100
1200
1800 / 1350
6”/ 9” Expandable Radiant Element
6”/ 9” Expandable Radiant Element
6”/ 9” Expandable Radiant
8” Radiant Surface Element
9” Radiant Surface Element
9” / 12” Expandable Radiant Element
Convection Fan Motor Windings
208 / 242
208 / 242
208 / 242
208 / 242
208 / 242
208 / 242
2500 / 1875
2500 / 1200
3000 / 1400
2200
2500
2700 / 1700
108 / 232
15
Lock Motor Windings
108 / 232
2000
Bake Element
Bake Element
Bake Element
Mini Oven Element
Warmer Drawer Element
Warmer Drawer Element
Broil Element
Broil Element
Convection Element
8” Coil Surface Element
6” Coil Surface Element
6” Radiant / warmer Element
6” Radiant Surface Element
5” / 7” Expandable Radiant Element
Page 28
Wattage
Resistance Ω (ohms)
23
22
16
9.6
20.5
32
14
19
40
27.5
46
144
48
Outer / Inner
42
Outer / Inner
Outer / Inner
Outer / Inner
26
24
Outer / Inner
128 /
92 / 31
44 / 48
35 / 40
52 / 33
P/N 316439220
Electronic Oven Controls
The newest generation of Electronic Oven Controls have significant improvements to make them
easier for the consumer to operate and provide enhanced diagnostic tools for the service technician.
Below are examples of the current control configurations that can be found on freestanding electric
self cleaning ranges. The controls for non self clean ranges have not changed.
ES 200 Control Features:
ES 200 CONTROL
• Full slew up / down control
• Digital Time and Temperature Display
• Electronic Clock and Countdown Timer (12 Hour)
• Dual Radiant™ Baking (electric models)
• Variable broil (2 positions)
• Consumer selectable clean cycle
(3 hour default
- 2 hour optional)
• 12 hour energy saving shut-off with override for
continuous operation
• Selectable Fº or Cº temperature readout
• Control Lockout (disables oven and locks door)
• User Adjustable Oven Temperature Offset
ES 300 Control Features:
ES 300 CONTROL
• Automatic oven (Delay, Cook, and Off)
• Full slew up / down control
• Digital Time and Temperature Display
• Electronic Clock and Countdown Timer (12 Hour)
• Dual Radiant™ Baking (electric models)
• Variable broil (2 positions)
• Consumer selectable clean cycle
(3 hour default
- 2 hour optional)
• 12 hour energy saving shut-off with override for
continuous operation
• Selectable Fº or Cº temperature readout
• Control Lockout (disables oven and locks door)
• User Adjustable Oven Temperature Offset
ES 330 Control Features:
ES 330 CONTROL
• Automatic oven (Delay, Cook, and Off)
• Full slew up / down control
• Digital Time and Temperature Display
• Electronic Clock and Countdown Timer (12 Hour)
• Dual Radiant™ Baking (electric models)
• Variable broil (2 positions)
• Consumer selectable clean cycle
(3 hour default
- 2 hour optional)
• 12 hour energy saving shut-off with override for
continuous operation
• Selectable Fº or Cº temperature readout
• Individual Keypad for Control Lockout (disables
oven and locks door)
• Oven Light Switch in control.
• User Adjustable Oven Temperature Offset
Page 29
P/N 316439220
ES 340 Control Features:
ES 340 CONTROL
• Automatic oven (Delay, Cook, and Off)
• Full slew up / down control
• Digital Time and Temperature Display
• Electronic Clock and Countdown Timer (12 Hour)
• Dual Radiant™ Baking (electric models)
• Variable broil (2 positions)
• 2 Pre - programmed clean cycles
(2 hour Speed clean - 3 hour Clean )
• 12 hour energy saving shut-off with override for
continuous operation
• Selectable Fº or Cº temperature readout
• Control Lockout (disables oven and locks door)
• Oven Light Switch on control.
• User Adjustable Oven Temperature Offset
ES 510 Control Features:
ES 510 CONTROL
• Convection Bake and Convection Roast settings
• Automatic Convection Conversion feature
• Sabbath Mode (Star-K Certified)
• Keep Warm Feature - Maintains 170°F oven
temperature for up to 3 hours.
• Favorite Setting - User can program and store up
to 3 different bake or timed bake cycles
• Automatic oven (Delay, Cook, and Off)
• Numeric Keypad Temperature Selection
• Digital Time and Temperature Display
• Electronic Clock and Countdown Timer (12 Hour)
• Dual Radiant™ Baking (electric models)
• Variable broil - Temperature adjustable between
400°F & 550°F
• 3 Pre - programmed clean cycles
(2 hour Speed clean - 3 hour Clean - 4 hour
Maxx clean)
• 12 hour energy saving shut-off with override for
continuous operation
• Selectable Fº or Cº temperature readout
• Control Lockout (disables oven and locks door)
• Oven Light Switch on control.
• User Adjustable Oven Temperature Offset
Page 30
P/N 316439220
Troubleshooting Electronic Oven Controls
When an oven with an electronic control detects a failure condition, it usually signals the failure with
an “F” code. These “F” codes are considered by many people to be an indicator as to positively which
part in the circuit has failed (“F1” a defective control, “F3” a defective oven probe, and so on). To the
embarrassment of many servicemen who have believed this, they have installed the indicated part
only to find it did not correct the problem.
To troubleshoot an oven with an electronic oven control that is not operating:
1. Make sure electrical power is being supply to the control. Verify this by testing the voltage
at the control wiring harness.
2. Disconnect power for 30 seconds. If fault returns when power is reconnected continue with
the following steps.
3. Remove electrical power.
4, Go to the back of the control and disconnect the multi-pin plug.
5. Check the wiring diagram to determine which two pins in the plug (not on the EOC) are
connected to the oven sensor.
6. With an Ohmmeter check the resistance between the two pins in the plug that are connected
to the of sensor. At room temperature:
• If the meter reads below 900 Ohms or above 1200 Ohms, remove the sensor from the
oven an check it for resistance. If the resistance of the sensor is the same as reading
at the plug, the sensor is defective.
• If the resistance of the sensor reads between 900 & 1200, the wiring between the
control and the sensor is defective.
•If the meter reads between 900 Ohms & 1200 Ohms check the resistance between one
of the pins going to the sensor and chassis. If the meter reads infinity go to step 3. If
the meter shows continuity, remove the sensor and check from one of its pins to the
case of the sensor. If the meter reads continuity, the sensor is defective. If the meter
reads infinity, the wiring between the control and the sensor is shorted to chassis of the
range.
• From the wiring diagram, determine which wires in the plug is from the door lock switch or
switches. From the diagram determine which of the switches are open or closed when the door
in the unlocked position. With an Ohmmeter check to see if the switch that is shown open is
open and the switch that is shown closed is closed by checking the proper pins in the plug.
7. If the above checks test good and the relay on the board for the selected function is not
closing replace the control.
IMPORTANT: If the oven problem is intermittent you must do the above test when the
oven is malfunctioning.
Page 31
P/N 316439220
EOC FAILURE / FAULT CODES
On freestanding gas and electric ranges manufactured beginning with the serial number date code
VF426 many of the EOC’s will have expanded three digit fault codes. These codes may also appear
in new replacement EOC’s for ranges built prior to this date. Below is a list of possible fault codes
that might appear in the EOC display window. The original two digit fault codes appear in the shaded
boxes followed by the replacement three digit codes.
For each Fault code there is a listing of the likely failure condition or cause, as well as suggested
corrective actions to be taken. Not all fault codes will appear in every model but the fault codes are
universal and have the same meaning regardless of the model that is being serviced
Note: Fault codes are not a foolproof system. Never assume that a part has failed based on a displayed fault code. An example would be if the EOC is displaying F30 (open sensor), the failure
could be caused by a loose connection or faulty wire harness between the EOC and sensor or the
sensor could simply be unplugged.
FAULT CODE
F1
LIKELY FAILURE CONDITION/CAUSE
F10
Runaway Temperature.
F11
Shorted Keypad.
F12
Bad Micro Identification.
F13
Bad EEPROM Identification/Checksum error.
SUGGESTED CORRECTIVE ACTION
1. (F10 only) Check RTD Sensor Probe & replace if necessary.
If oven is overheating, disconnect power. If oven continues to
overheat when the power is reapplied, replace EOC. Severe
overheating may require the entire oven to be replaced should
damage be extensive.
2. (F11, 12 & 13) Disconnect power, wait 30 seconds and reapply
power. If fault returns upon power-up, replace EOC.
F14 Display tail missing/not connected
3. (F14 only) Re-seat the P12 ribbon connector tail. If fault returns replace EOC (first action); Touch Panel (second action)
F20
Communication failure between EOC and ESEC
system.
1. Test harness/connections P4 (EOC) & P11 (Surface element
control board).
2. If harness checks O.K. failure can be caused by faulty UIB,
surface element control board, or EOC.
F26
Communication failure with mini oven control.
Check harness and connectors from the EOC to mini oven
control board. Check for 15vdc to mini oven control (red & gray
wires). If harness and voltage are good replace mini oven control. If fault returns replace EOC.
F30
Open probe connection.
1. (F30 or F31) Check resistance at room temperature & compare to RTD Sensor resistance chart. If resistance does not
match the RTD chart replace RTD Sensor Probe. Check Sensor
wiring harness between EOC & Sensor Probe connector.
F31
Shorted Probe connection
F3
2. (F30 or F31) Check resistance at room temperature, if less
than 500 ohms, replace RTD Sensor Probe. Check for shorted
Sensor Probe harness between EOC & Probe connector.
F40
Cooktop Lockout error.
1. (F40 or F41) Check the wiring.
F41
2. (F40 or F41) Replace the Cooktop Lockout Control Board.
3. (F40 or F41) Replace EOC.
F9
F90
Maximum oven door unlock time exceeded.
F91
Maximum oven door unlock attempts exceeded.
F92
Maximum oven door open time exceeded.
F93
Maximum oven door lock time exceeded.
F94
Maximum oven door lock attempts exceeded.
Page 32
1. (F90, 91, 92, 93 & 94) Check the wiring between EOC & Lock
Motor Micro Switch.
2. (F90, 91, 92, 93 & 94) Replace the Motor Door Latch assembly if necessary.
3. (F90, 91, 92, 93 & 94) Check for binding of the Latch Cam,
Lock Motor Rod & Lock Motor Cam.
4. (F90, 91, 92, 93 & 94) Check to see if Lock Motor Coil is open.
If open, replace Lock Motor Assembly.
5. (F90, 91, 92, 93 & 94) Lock Motor continuously runs - if Micro
Switch is open, replace Lock Motor Assembly.
6. (F92, 93 & 94) Check oven door Light Switch - if open, replace
Switch.
7. If all situations above do not solve problem, replace EOC.
P/N 316439220
ES 510 ELECTRONIC OVEN CONTROL
The ES510 control is found on electric ranges with the ESEC 10R system. It has some unique
features and functions not found on other EOC’s. This section of the manual provides specific
service information for the ES 510 Electronic Oven Control.
The ES510 controls the bake element, broil element, oven light, latch lock motor, convection fan
motor and convection element. The EOC also communicates with the ESEC system in order to
prevent use of the cooktop surface elements while performing a self clean cycle. If the EOC detects
that a surface element is in use it will not allow the operator to program a self clean cycle or cooktop
lockout. If the oven is in a self clean cycle the EOC communicates with the ESEC and the surface
elements are locked out until the clean cycle is completed and the oven door has unlocked. The EOC
also disables the warmer drawer and cooktop warming zone during the self clean cycle.
On ranges with a Bake-N-Warm™ Double Oven (mini oven) the EOC provides the power supply
to the control board for this oven and also communicates with the control to lock out the mini oven
during a self clean cycle or to prevent programming a self clean cycle if the mini oven is in use.
Troubleshooting the ES510 EOC
The ES510 continually performs tests on it’s internal circuits as well as certain external components
and operations. When a failure occurs the EOC will emit an audible signal and display the code
associated with that particular failure.
Following are some examples of displayed Failure Fault Codes. The Failure Fault Code list found
on page 29 provides a full listing of possible fault codes, the likely cause and suggested corrective
action.
F30 ERR If the EOC detects that the oven temperature probe
circuit is OPEN during the initial power up you will not be able to
program the time of day and the EOC will display “F30 ERR” and
the alarm will sound when you attempt to set the time.
F31 If the EOC detects that the oven temperature probe circuit
is SHORTED during the initial power up the EOC will continue to
flash “12;00” in the display accompanied by an audible clicking
of the relay circuit in the EOC. You will not be able to program
the EOC or use the surface elements.
If at any time the EOC detects that the oven temperature probe
circuit resistance is less than 800Ω The EOC will display “F31”
and the alarm will sound.
If either of the above conditions is encountered, turn off the power to the range and test the oven temperature probe circuit.
F10 ERR - The EOC detects a runaway heat condition. Check
RTD Sensor Probe & replace if necessary. If oven is overheating,
disconnect power. If oven continues to overheat when the power
is reapplied, replace EOC. Severe overheating may require the
entire oven to be replaced should damage be extensive.
Page 33
P/N 316439220
F11 ERR - Shorted control keypad. Disconnect power, wait 30
seconds and reapply power. If fault returns upon power-up, replace EOC.
NOTE: This failure code can be induced by holding down on a
keypad for more than 20 seconds.
F20 ERR - Communication failure between EOC and ESEC
system. Test harness/connections P4 on EOC & P11 on Surface
element control board. If harness checks O.K. failure can be
caused by faulty UIB, surface element control board, or EOC.
IMPORTANT NOTES when using the Self-Clean feature:
If a Self-Cleaning-Cycle has started but not finished and a power failure occurs, once power is restored
the Cooktop will remain locked. To unlock the cooktop press and hold the Clock pad for 3 seconds. The
red cooktop lock icon will disappear from the display. Then set for another Self-Clean cycle to finish.
EOC Wire Harness Connections
Ribbon Connector to
Membrane Switch **
Backview of ES510
Electronic Oven Control
Surface Element
Control Board (P4)
L2 In (Red Wire)
L2 Out (Orange Wire)
L1 (Black Wire)
15 Pin (P5) connector
Mini Oven Control
Board (P10) *
BR (Blue Wire)
BK (Yellow Wire)
* Not found on all models
** Membrane switch can not be replaced as a separate part
Page 34
P/N 316439220
ES510 EOC RELAYS - CIRCUIT TEST MATRIX
The EOC relay circuits
can be tested by following the circuit test
matrix at right. Always
verify the incoming
power supply when
performing diagnosis.
L1 to
Bake
L1 to Broil
Bake/Time Bake **
X
X*
Convection Bake/Roast
X
X*
Broil
Clean
L1 to Motor Door
Latch
L1 to Convection
Fan & Element
L1 to Oven
Light(s)
L2 IN to L2 OUT
(DLB)
Door Switch
COM-NO
X
X
X
X
X
X
X
Oven Light(s)
X
Locking
X
Unlocking
X
Door Open
X
Door Closed
X
Warmer Drawer
Warming Zone
(Cooktop)
NOTE: X = Relay Contacts Closed
* = Alternates with Bake Element
The Component Test Point Matrix below provides a list of each of the components that can be tested
from the P5 harness connector on the back of the EOC. Disconnect the harness before performing a
component circuit test. A chart with the various component resistance values can be found on page
28.
COMPONENT TEST POINT MATRIX (ES 510)
COMPONENT
BROIL ELEMENT
BAKE ELEMENT
DOOR SWITCH
EOC HARNESS TEST POINT LOCATION
L2 OUT (orange wire) - BR (blue wire)
L2 OUT (orange wire) - BK (yellow wire)
P5 harness terminals 10 & 12 (gray wire - pink wire)
TEMPERATURE SENSOR PROBE
P5 harness terminals 14 & 15 (violet wire-violet wire)
LATCH MOTOR
P5 harness terminals 5 & 6 (white wire - brown wire)
OVEN LAMP(S)*
P5 harness terminals 4 & 5 (tan wire - white wire)
* Circuit will show continuity even if only one bulb is good. Check inoperative bulb(s) individually.
Sales Demo Mode
A sales demo (SD) mode is available in the ES510 control that allows the control panel functions to be
demonstrated without turning on any heating elements. To enter or exit the SD mode disconnect power
to the range. Reconnect the power and within 45 seconds touch the Bake
keypad on the EOC and hold
time
until “sd” appears in the EOC display (approximately 6 seconds). The ESEC display windows will also
display “sd” momentarily and then go blank. The time of day display will blink until the clock is set. In
the Sales Demo mode all control panel and display functions can be demonstrated but the elements
will not heat.
To exit the Sales Demo mode you must repeat the procedure used to enter the Sales Demo mode.
Disconnect the power to the range; reconnect the power and within 45 seconds touch and hold the
Bake
pad until the “sd” display disappears. You can not exit the Sales Demo mode by pressing the
time
Stop/Clear keypad or by resetting the power to the range.
Page 35
P/N 316439220
ELECTRONIC SURFACE ELEMENT CONTROL (ESEC) SYSTEM
VERSION 10R
The Electronic Surface Element Control System ,(ESEC), precisely controls the smoothtop cooking
elements at multiple settings. (The Warming Zone element is not controlled by the ESEC). For the
user, the elements are operated in the same way as with conventional controls, by pushing in and
turning the knob to the desired setting. The setting is shown in the digital display above the knob,
instead of using graphics on the control panel.
ESEC Hot Element Indicator (“HE”) - While an element surface is hot, that element’s display will
show “HE”. This is in place of the usual hot surface indicator light on ranges with conventional controls. Note that “HE” will be displayed even when the element is turned off until it has sufficiently
cooled down.
ESEC Lockout Feature ( “- -” ) - The electronic oven control’s Clean and Lock features will not operate when a surface element is ON. Conversely, the surface elements controlled by the ESEC will not
operate when an oven control Clean or Lock mode is active. When the oven control is in a Clean or
Lock mode, “- -” will appear in the ESEC displays to signify that the surface elements are locked out.
NOTE: The “HE” (hot element) display will always have priority over the “- -” display.
Previous versions of the ESEC system utilized a separate UIB / Display board assembly for each side
of the range. The ESEC 10R has only one UIB with attached wiring harnesses to connect to the four
potentiometers
ESEC System Components - The ESEC
system consists of:
A Power Board (surface element control
board mounted on the main back of the range)
B User Interface Board or UIB (circuit board
mounted just below the control panel).
C Four Potentiometers (push-to-turn control
for each element).
D Display Boards (separate assembly for
left and right side consisting of two digital displays and ribbon connector).
E ESEC Harness - Connects the UIB, Power
Board and EOC. The ESEC boards communicate with each other to control the elements and with the oven control for the lockout
modes. (See photo at right.)
F Remote Relay Board * - Controls the outer
ring of the Left Rear surface element.
D
D
C
C
E
B
E
A
F
* Remote Relay Board not found on all models.
Page 36
P/N 316439220
How The ESEC System Operates
When the user rotates the surface element control knob to the desired setting the User Interface
Board (UIB) responds by displaying the selection on the ESEC display board and communicating the
selection information to the power board. The power board then cycles the surface element on at the
appropriate percentage to the power level selected. In addition the power board communicates to the
Electronic Oven Control (EOC) that the surface element is in use so that the EOC will not be able to
disable the surface elements via the cooktop lockout feature.
It is important to note that the surface element will cycle on and off at varying rates depending on the
selected setting. The cycling of the element is more noticeable on a smoothtop range because the
heating coil is visible through the glass cooktop.
When power is first applied the EOC will display a flashing “12:00” as well as the letters “PF”. The
ESEC display boards will also display “PF” for a few seconds and then go blank (See Photo Below) .
On initial start-up or after a power outage the EOC performs a test of the ESEC system and oven
temperature probe. This test will usually last about 15 seconds during which time the EOC can not be
programmed and the surfaces elements can not be used. Attempting to use the surface elements during this time may result in an audible alarm and “ERR” displayed in the EOC .
If the ESEC system test and oven temperature probe test are good, the EOC will allow the time of
day to be programmed and the oven and surface elements can be used.
Troubleshooting The ESEC System
Whenever a failure occurs in the ESEC system there will be a fault code displayed on the LED display
boards on both sides of the control panel. Some examples are pictured below. For a complete list of
possible ESEC fault codes see the chart provided on the following page.
F5 00 - Communication break between EOC and UIB.
Reset the power the range to see if fault code will clear. If code remains check the
ESEC wiring harness and connectors. If these are good replace the UIB. If failure
returns replace the EOC.
F7 42 - Potentiometer for RF is wrong value.
Test resistance value of potentiometer. If potentiometer has been replaced verify
that the correct part number was used. Check for moisture contamination of potentiometer. If potentiometer is good and correct value replace the UIB.
F7 40 - Potentiometer for RF is open.
Test resistance value of potentiometer. Re-seat potentiometer harness connector.
If potentiometer is good replace UIB.
Page 37
P/N 316439220
ESEC Failure / Fault Codes
Displayed
Fault
Code
Description
Suggested Corrective Action
F5 A0
Bad EEPROM checksum.
1. Reset power supply to range.
2. Replace Power Board.
F5 00
Communication break between
EOC and UIB.
1. Reset power supply to range.
2. Test ESEC wiring harness. Replace if defective
3. Replace UIB
4. Replace EOC
F5 01
Communication break between
Power board & UIB
1. Reset power supply to range.
2. Test ESEC wiring harness. Replace if defective
3. Replace UIB.
4. Replace Power Board
F5 02
UIB not communicating.
1. Defective ESEC harness. Re-seat connectors. Test
harness and replace if defective.
2. Defective UIB. Replace UIB
3. Defective Power Board. Replace Power Board
F5 F0
Watchdog timer timed out - Power
Board.
1. Reset power supply to range.
2. Replace Power Board.
F5 FF
Watchdog timer timed out - UIB.
1. Reset power supply to range.
2. Replace UIB.
F7 10
F7 20
F7 30
F7 40
Potentiometer LF is open.
Potentiometer LR is open.
Potentiometer RR is open.
Potentiometer RF is open.
1. Defective potentiometer. Test and replace if
defective.
2. Replace UIB.
F7 11
F7 21
F7 31
F7 41
Potentiometer LF is shorted.
Potentiometer LR is shorted.
Potentiometer RR is shorted.
Potentiometer RF is shorted.
1. Defective potentiometer. Test and replace if
defective.
2. Replace UIB.
3. Check for moisture contamination in potentiometer.
F7 12
F7 22
F7 32
F7 42
Potentiometer for LF is wrong value.
Potentiometer for LR is wrong value.
Potentiometer for RR is wrong value.
Potentiometer for RF is wrong value.
1. Wrong value potentiometer installed. Verify correct
part .
2. Defective potentiometer. Test and replace if
defective.
3. Check for moisture contamination in potentiometer.
4. Replace UIB.
Servicing ESEC System Components
Potentiometers
There are two different potentiometers that are found
on various ranges with the ESEC10R control system.
These can be easily distinguished by the different
colored housings. The Gray colored potentiometer is
used to control single coil surface elements and the
Black colored potentiometer is used on dual or “expandable” coil elements.
Gray
20KΩ
1
G
2
Pin Terminal ID
Page 38
Black
10KΩ
1
G
2
Pin Terminal ID
P/N 316439220
The photos below show the potentiometers and the display boards mounted to the range backguard
panel. The potentiometers are held in place by a hex nut and lock washer. When replacing a potentiometer, do not over-tighten the hex nut. A torque of only 5 in.-lbs. is required to properly mount the
potentiometer. Over-tightening the hex nut will negatively affect the smooth feel of the knob turn and
can damage the potentiometer.
Hex Nut
To test the resistance value of either potentiometer make sure that the shaft is set to the off position, disconnect the wire harness and use an ohm
meter to measure the resistance between pins 1
& 2 on the potentiometer. The gray potentiometer
should have a resistance of 20KΩ (± 10%) and the
black potentiometer should have a resistance of
10KΩ (± 10%).
To test operation of the potentiometer measure the
resistance between Pin terminal G (center) and
either of the outside pin terminals as the control
shaft is being rotated slowly. There should be a
steady increase or decrease in the measured
resistance as the shaft is turned.
Each potentiometer has positive detents or “stops” that can be felt as the shaft is rotated. The drawings below illustrate the stop positions for the different potentiometers.
The Potentiometer Resistance Table gives the various resistance readings that should be found at
each of the stop positions. Resistance values are approximate and may vary by ±10%.
Potentiometer Stop Positions
Potentiometer Resistance Table
Stop
Pin
Position Terminals
Black
1-2
20 KΩ
10 KΩ
1
1-G
1 KΩ
500 Ω
2-G
19 KΩ
9.5 KΩ
1-G
19 KΩ
4.5 KΩ
2-G
1 KΩ
5.5 KΩ
1-G
N/A
5.5 KΩ
2-G
N/A
4.5 KΩ
1-G
N/A
9.5 KΩ
2-G
N/A
500 Ω
3
4
Page 39
Black
POT
Off
2
Gray
Gray
POT
P/N 316439220
Display Boards
The display boards are secured to the control panel by the display lenses. The lens is inserted into
the panel from the front and the display board locks onto the lens from behind.
The following instructions explain how to separate the board from the lens and remove the lens from
the control panel without damage.
The board is secured to the lens by two locking tabs (Photo 1) .
Display Board Locking Tabs
Control Panel
Locking Tab
Lens
Photo 1
Using a non metallic object such as a pen or your
fingertip, gently depress the locking tab pushing
from the outside toward the center of the board
(Photo 2).
Pull the bottom of the board slightly while you are
depressing the tab to release the board. Repeat
for each side of the board.
Locking Tabs
Push Tab
Toward
Center
Photo 2
The board is now free from the lens and
may be replaced (Photo 3).
The display boards are assembled as pairs.
Both boards must be removed for service.
Photo 3
To remove the lens from the control panel push inward on the panel locking tabs on each side of the
lens. The lens will disengage from the panel and it
can be removed. See Photo 4.
Push inward on tab
to release lens from
panel.
Photo 4
Page 40
P/N 316439220
User Interface Board
The UIB is mounted to the rear chassis of the range just below the control panel backguard. Prior to
removing the UIB unplug the wire harness connectors to the display boards and power board.
DO NOT ATTEMPT TO UNPLUG THE HARNESS CONNECTORS TO THE POTENTIOMETERS.
These connectors and harness wires are part of the UIB. Unplug the harness connectors at the potentiometers to replace the UIB.
The UIB is secured to the range with one mounting screw and two snap-lock spacers. There is an additional tubular spacer used to maintain proper distance between the circuit board and range chassis.
When replacing the UIB these spacers and screw must be reused. When replacing the UIB do not
over-tighten the screw. A torque of only 10 in.-lbs. is required to tighten the screws. Over-tightening
the screws can damage the plastic standoffs and possibly the board itself.
Display Board
Harness Connector
Mounting
Screw
Potentiometer
Harness
Potentiometer
Harness
(Not Removable)
(Not Removable)
Power Board
Harness Connector
Snap-Lock
Spacer
Troubleshooting The Power Board
The power board controls the cycling of the cooktop surface elements by supplying the L2 side of the
power supply to the element. The L1 side of the power supply is connected to terminal 2a on the element terminal block.
When the user turns the potentiometer to the desired setting the UIB communicates this information
to the power board. The power board then closes the appropriate relays to send L2 voltage to the element. The power board will cycle the element relay on and off at varying rates relative to the chosen
setting on the potentiometer.
If the ESEC system appears to be working properly but the power board fails to send voltage to the
selected element then the relay on the power board may be burned out, stuck open, or the power
board may be defective.
If the surface element continues to heat when the controls are turned off (runaway condition) and the
display boards are blank then the relay for that element is stuck closed. Whenever any of these conditions are encountered the power board must be replaced.
Page 41
P/N 316439220
The photo below shows an ESEC Power Board and Remote Relay Board as they appear when installed on a range. When replacing the Power Board or Remote Relay Board do not over-tighten the
screws. A torque of only 10 in.-lbs. is required to tighten the screws. Over-tightening the screws can
damage the plastic standoffs and possibly the board itself.
ESEC
Power Board
Remote Relay
Board
Remote Relay Board
On ESEC models which have a cooktop with four Dual Element Surface burners there is additional
remote Remote Relay Board mounted adjacent to the power board. This board controls the outer ring
of the left rear dual surface element.
If the Remote Relay Board fails to send power to the outer ring of the left rear element the failure
could be caused by a defective Remote Relay Board, faulty wiring harness, or defective Power Board.
The relay may be burned out, stuck open, or the relay board could be defective.
Test the harness between the ESEC power board ( P15) and the Remote Relay Board (P1). If the
harness is good replace the Remote Relay Board.
The circuit diagrams on the facing page show examples of each type of ESEC system. Diagram A
shows an ESEC system without the Remote Relay Board. Diagram B shows an ESEC system with
the Remote Relay Board.
Page 42
P/N 316439220
DIAGRAM
A
DIAGRAM
B
Page 43
P/N 316439220