1
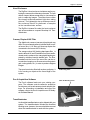
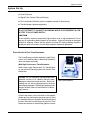
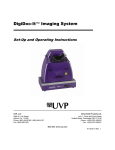
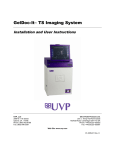
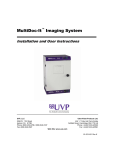
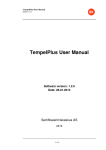
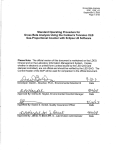
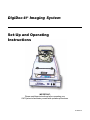
DigiDoc-It® Imaging System Set-Up and Operating Instructions IMPORTANT: Please read these instructions before operating your UVP System to familiarize yourself with operation procedures. 81-0218-01 Doc-It Imaging Systems Table of Contents Hardware Components ................................................................... 1 Set-Up Instructions .......................................................................... 3 System Operation ........................................................................... 6 Accessories .................................................................................... 8 Technical Support ............................................................................ 8 DigiDoc-It System Hardware Components The DigiDoc-It System is designed to fit over any of UVPs High Performance UV Transilluminators or for use with a Benchtop UV Transilluminator and drawer combination. The basic system combines: n n n Hood Enclosure Digital Color Camera, Filter and Diopter Doc-It Acquisition Software (refer to the separate manual for installation and user instructions) System components may include a transilluminator or drawer assembly. Transilluminator instructions are provided in a separate manual. Enclosure cap opens for access to the camera Digital Color Camera, UV filter and Diopter Carry handles for easy portability Viewport CCD Camera Hood Enclosure Viewport cover Access Door Transilluminator (optional) DigiDoc-It with optional drawer assembly accommodates a Benchtop Transilluminator. 1 DigiDoc-It Systems Hood Enclosure The DigiDoc-It hood enclosure includes a cap for protecting the camera from laboratory elements. The soft rubber viewport allows researchers to view samples prior to capturing images. The slide closure under the viewport minimizes ambient light when taking pictures. The lightweight door provides access to the enclosure interior for placement of samples on the transilluminator surface. The DigiDoc-It drawer fits under the hood enclosure and accommodates a compact Benchtop UV Transilluminator. Camera, Diopter & UV Filter The digital color camera (camera style pictured may differ from purchased camera) includes built-in optical zoom lens. A UV filter and close-up diopter are connected to the lens at UVPs factory. The orange-colored UV blocking band pass filter is used to absorb UV and IR radiation from the transilluminator and to enhance the orange/pink bands generated by ethidium bromide stained gels. The filter, threaded onto the front of the zoom lens, can be removed when imaging non-fluorescent media (protein gels, colony plates, etc.) in order to produce brighter images. The zoom lens is also fitted with a close-up diopter. It is for focusing on objects at the focus length of the system. Doc-It Acquisition Software UV Blocking Filter Clear UV Blocking Cover The Doc-It software loads onto your existing computer. The software controls cameras acquisition functions as well as enhancement and anlaysis features. For information on installation and use of the software, refer to the Doc-It Acquisition and 1D Analysis Software Manual. Transilluminator An ultraviolet transilluminator may be shipped with your system. The transilluminator includes an ultraviolet blocking cover; however, the cover should be removed when the transilluminator is used with the system. Transilluminator 2 DigiDoc-It System System Set-Up n Hood Enclosure n Digital Color Camera, Filter and Diopter n Doc-It Acquisition Software (refer to separate manual for instructions) n Transilluminator (optional equipment) DO NOT ATTEMPT TO CONNECT ANY WIRING WHILE THE EQUIPMENT IS CONNECTED TO ANY POWER SUPPLY. CAUTION Do not install the system in places with high moisture, dust or high temperature. Do not use any oil or petroleum based cleaner for the cabinet. Use only mild soap or detergent solution for cleaning. Ensure that the system is turned OFF during cleaning. Keep the equipment away from motors or other large magnetic equipment apparatus. Place the Hood Over Transilluminator The Hood Enclosure can be used with a High Performance UV Transilluminator or Benchtop Transilluminator and drawer assembly. With High Performance Transilluminator When using a High Performance UV Transilluminator, remove the UV blocking clear cover from the Transilluminator. Caution: All UVP Benchtop Transilluminators are powerful sources of UV radiation that will cause damage to unprotected eyes and skin. Before operating any unit, be sure all personnel in the area are properly protected. UV Blocking Eyewear should be worn as well. Refer to Accessories for UV Blocking Eyewear. DigiDoc-It with High Performance Transilluminator Connect the power cord to the back of the transilluminator and connect the plug to a power source. Place the transilluminator so the switch is positioned facing the user. Place the Hood Enclosure on top of the Transilluminator surface so that the filter glass is covered. 3 DigiDoc-It Systems With Benchtop Transilluminator and Drawer When using the drawer and Benchtop Transilluminator with the DigiDoc-It System, a +2 diopter is required for accurate camera focus. Your system may have a diopter attached to the camera lens if you are using the system with a larger High Performance Transilluminator and no drawer. The following instructions are for replacing the diopter. Diopter Installation Check the camera lens for an existing diopter and UV filter. If installed, remove both. The diopter shipped with the drawer has two diopters assembled at the UVP factory. Screw the diopter assembly onto the camera lens. Replace the UV filter. DigiDoc-It with drawer Drawer Installation Place the Benchtop Transilluminator into the drawer. Connect the power cord to the back of the transilluminator and push the plug through the access hole in the back of the drawer. Connect the plug to the power source. Access to the transilluminator switch is via the access port on the front of the drawer. Place the DigiDoc-it hood enclosure over the drawer. Hood Cap Camera Set-Up You may remove the camera from the hood to snap images of subjects other than gels or samples. You can easily replace the camera in the hood as follows: Insert the Camera into the Hood 1. Open the camera cap on top of the darkroom hood. 2. Position the camera on top of the darkroom hood so that the cameras lens fits into the hole on the darkroom hood. 3. Insert the knob screw through the cameras mounting bracket and turn the knob screw counter-clockwise to tighten it into the cameras tripod mounting threads. 4. Plug the cameras power cable into the input power receptacle on the camera. 5. Make sure the cables pass through the notched hole in the camera cap provided for them. 4 DigiDoc-It System 6. Close and secure the camera cap on the darkroom hood. 7. Plug the cameras power supply into a wall outlet or surge-protector receptacle. To remove the camera, reverse the steps above. Note: If you capture images using the camera outside the hood, you will need to calibrate the images manually in order to use the Doc-It Software rulers. See Changing Sample Width in the Software Manual for more details. 5 DigiDoc-It System System Operation Camera Operation If you will not be using the camera for an extended period, it is best to turn it off: To Turn the Camera Off or On 1. Open the camera cap on top of the darkroom hood. 2. Set the camera mode dial to Off to turn it off or to A/S/M to turn it on. 3. Close and secure the camera cap on the darkroom hood. If the camera is off when you start Doc-It, you will get a message stating that the application cannot find any cameras. To remedy this, turn the camera on and click Retry. When you exit Doc-It, you will be reminded to turn the camera off to save battery life. Loading Gels into the Darkroom Hood Slides are loaded into the Darkroom Hood through the Sample Loading door in the front. You can examine the slide through the Sample Viewing window. To Load a Gel into the Darkroom Hood 1. Turn off the UV Transilluminator. 1. Open the Sample Loading door in the front of the Darkroom Hood. 2. Place the sample to be imaged in the center of the light source filter glass. 3. Close the Sample Loading door in the front of the Darkroom Hood. 4. Open the camera protection hood on top of the Darkroom Hood and turn on the digital camera by turning the camera mode dial to A/S/M. Sample Loading Door 6 DigiDoc-It System 5. Close and secure the camera protection hood on the top of Darkroom Hood. 6. Turn on the light source. 7. Capture the image using appropriate software exposure settings. 8. Turn off the light source. Note: It is important to minimize the light source exposure to the sample. Turn off the light source as soon as you finish capturing the image. To View a Sample Prior to Capture 1. Open the sample viewing window on the hood by sliding the protective plate to the right. 2. After you have verified that the sample is correctly loaded, close the sample viewing window. Otherwise, light from the viewing window will interfere with the capturing process. 7 DigiDoc-It System Replacement Parts and Accessories Accessories are available for use with the DigiDoc-It Imaging Systems. Contact UVPs offices at the telephone numbers below for replacement parts for DigiDoc-It equipment. For transilluminator replacement parts, refer to the separate manual for the transilluminators included with your shipment. Thermal Printers Thermal Thermal Thermal Thermal Printer, Digital (115/230V) Paper, 4 rolls (800 images) paper, 16 rolls (3200 images) Paper, 40 rolls (8000 images) Part Numbers 89-0069-06 89-0038-01 89-0038-04 89-0038-05 Converter Plates UV to White Light Converter Plate (21x26cm) Visi-Blue Converter Plate (21x26cm) Part Numbers 38-0191-01 38-0200-01 Camera Filter Camera Filter for SYBR Green and EGFP 38-0187-01 Technical Assistance UVP offers technical support for all of its products. If you have any questions about the products use, operation or repair, please call or fax UVP Customer Service or Technical Support at the following: UVP, Inc. In the US: 2066 W. 11th Street, Upland, CA 91786 Toll free (800) 452-6788 or (909) 946-3197, fax: (909) 946-3597 [email protected] or [email protected] Ultra-Violet Products Ltd. In Europe/UK: Call +44(0)1223-420022 or fax: +44(0)1223-420561 Unit 1, Trinity Hall Farm Estate, Nuffield Road, Cambridge CB4 1TG UK [email protected] NOTE: A Returned Goods Authorization (RGA) number must be obtained from UVPs Customer Service Department prior to returning any product to UVP. 8 Doc-It is a registered trademark of UVP, Inc. DigiDoc-It are trademarks of UVP, Inc. Other products from UVP include: LabWorks Image Analysis Software BioImaging Systems Crosslinkers Hybridization Ovens Ultraviolet Lamps and Light Sources UV Viewing Cabinets UV Intensity Meters Multi-Sense Meters