1
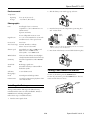
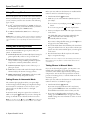
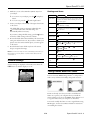
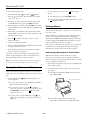
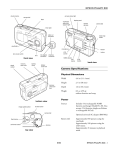
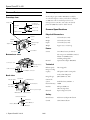
Epson PhotoPC L-410
Camera Parts
Accessory
Front/top view
An AC adapter (part number B867062) is available.
To order the adapter, contact your dealer or call Epson
at (800) 873-7766 or visit the Epson StoreSM at
www.epsonstore.com (U.S. sales only). In Canada,
please call (800) 463-7766 for dealer referral.
Manual mode
Mode dial
Continuous
shooting mode
Automatic
mode
Video mode
Camera Specifications
Setup mode
Playback mode
Physical Dimensions
Speaker
Width
2.44 inches (61.9 mm)
Flash
Height
3.64 inches (92.4 mm)
Self-timer light
Depth
1.24 inches (31.5 mm)
USB light
Weight
Approx. 5.37 oz.(152.2 g)
Shutter
button
Strap holder
Power
Lens barrier
Microphone
Sources
One CR-V3 battery (included)
Also accepts two AA alkaline, NiCad,
lithium or NiMH batteries,
including rechargeables
Bottom/rear view
External
Optional AC adapter (B867062)
Connector cover
Technical
Battery/memory
card cover
Tripod mount
USB connector
AC adapter connector
Effective pixels
4.07 megapixels
Image recording
capacity
Still picture: 2304 × 1728 pixels
Video: 640 × 480 pixels
Back view
Image file type
JPEG (EXIF 2.2), AVI
Camera file
system
DCF file format, DPOF 1.1
Print button
Internal memory
16MB
P.I.F. button
Interface
Full-speed USB 2.0
(Mass Storage Class)
Electrical
Input voltage: DC 3.4V
Viewfinder
Indicator lights
POWER button
Zoom buttons
Memory access light
MENU button Display button
Safety
Self-timer / u button
OK button
Flash / r button
Macro / l button
Delete / d button
1 - Epson PhotoPC L-410
8/04
United States
FCC Part 15 Subpart B Class B
Canada
CSA C108.8 Class B
Epson PhotoPC L-410
Environmental
2. Slide the battery cover until it pops up as shown:
Temperature
Operating
41 to 95 °F (5 to 35 °C)
Storage*
−4
to 140 °F (−20 to 60 °C)
Photographic
Lens
Focal length: f=5.6 to 16.8 mm
(equivalent to a 34 to 102 mm lens on a
35mm camera)
3. Insert the battery into the compartment, positioning the +
and - ends as shown:
Aperture: F2.8-F4.9
CR-V3
battery
Zoom: Collapsible mount 3× zoom
Digital zoom
2× or 3× zoom (maximum 9× zoom with
simultaneous use of the optical zoom)
Focus mode
Auto focus
Auto-focus range
Normal: 20 inches to infinity
Macro: 4.33 to 19.69 inches
Shutter speed
TTL auto white balance (auto/daylight/
cloudy/incandescent/fluorescent/mercury)
Sensitivity
Auto/fixed (equivalent to ISO 100/200/
400)
Viewfinder
Real-image optical view
Flash
Auto/flash off/red-eye reduction/fill-in
flash/slow synchro
Self-timer
2 seconds/10 seconds
Photography
mode
Normal/portrait/landscape/macro
LCD monitor
Note: You can use either a CR-V3 battery, like the one included
with the camera, or two AA batteries.
Auto/Flash on: 1/30 to 1/2000 second
Flash off: 1/2 to 1/2000 second
Slow synchro: 1 to 1/2000 second
White balance
AA
batteries
4. Press down on the battery cover and slide it back into place.
Turning Your Camera On and Off
To turn on the camera, press the POWER button.
To turn off your camera, press the POWER button. The lens
retracts and the lens cover closes.
1.5-inch low temperature polysilicon TFT
color LCD monitor
POWER
button
Installing the Battery
The Epson PhotoPC L-410 accepts the CR-V3 battery
included with the camera as well as AA alkaline, NiCad, or
NiMH batteries, including rechargeables.
Follow these steps to install the batteries:
1. Turn the camera upside down.
8/04
Epson PhotoPC L-410 - 2
Epson PhotoPC L-410
Before you start, make sure the batteries are installed and the
camera is turned on as described on page 2.
Using Memory Cards
1. Turn the Mode dial to
You can take pictures and save them in the camera without a
memory card. However, you can store more pictures when
you use a memory card. You can use either of the following
types of cards:
Automatic.
2. Make sure you are at least 20 inches (50 cm) away from
your subject.
❏ To zoom in on your subject, press the
button.
❏ an SD™ card (Secure Digital) up to 512MB. (To shoot at
the maximum speed, you need an SD memory card with a
recording/transfer speed of 10MB/second.)
❏ To zoom out, press the
T (telephoto)
W (wide-angle) button.
3. Center your subject in the middle of the square focus frame
on the screen.
❏ an MM card (Multimedia, MMC V 2.1 or later) up to
512MB.
The default flash setting is automatic, indicated by the
icon on the LCD screen. The flash will go off
automatically whenever necessary.
Caution: Make sure that the camera is turned off before installing or
removing a memory card. Make sure that you insert the card in the
correct orientation, or you may damage the camera as well as the
card.
If you want to change the flash setting, press the r button.
See page 4 for a list of flash settings.
4. Press and hold the shutter button halfway. The focus frame
turns green and the focus is set. If you want to reframe your
picture, move the camera until the photo you want appears
on the screen.
Taking and Viewing Photos
You can take several different types of photos with your
camera, as described below:
5. Press the shutter button all the way down. The camera
beeps as it captures the image.
❏ Automatic photos: Use automatically adjusted settings for
great snapshots. All you have to do is point and shoot.
❏ Manual photos: Fine-tune your shots by adjusting a
variety of camera settings, including resolution, exposure
compensation, sensitivity, white balance, and more.
Note: The LCD screen may turn off to save battery power after you
take a picture. Press any button or turn the Mode dial to turn the
screen back on.
❏ Continuous photos: Capture a series of shots, up to 3
photos per second.
Taking Photos in Manual Mode
If you are an advanced photographer, you may want to use
manual mode. This allows you to select the quality
(resolution), white balance, light sensitivity, and exposure
compensation. You can also select special scene modes for
portraits or landscape photos, or turn the LCD screen off to
save battery power.
❏ Videos: Record videos with sound. The length of the video
is limited only by the amount of storage you have.
❏ PRINT Image Framer® (PIF) photos: Take photos with
fun frames for holidays and special occasions.
Taking Photos in Automatic Mode
Before you start, make sure the batteries are installed and the
camera is turned on, as described on page 2.
The automatic photography mode lets you capture highresolution images without making any complicated settings.
You can use the zoom buttons to move in closer to your
subject and/or set the flash for indoor or low-light
photographs.
1. Turn the Mode dial to
If you want to turn the LCD screen off to save battery
power, press the DISP button twice. You will have to use
the viewfinder instead of the screen to frame your shot.
In automatic mode, images are captured at a resolution of
2304 × 1728 pixels ( N2304). If you want to change this
setting, use manual mode as described in the next section.
2. If you want to adjust the quality (resolution) or other
settings, press the MENU button. See page 4 for a list of
available settings. For more information, see the on-screen
User’s Guide.
Note: You can also use the
macro and/or
self-timer features in
automatic mode. For instructions, see the on-screen User’s Guide.
3 - Epson PhotoPC L-410
Manual.
8/04
Epson PhotoPC L-410
Settings and Icons
3. Make sure you are at least 20 inches (50 cm) away from
your subject.
❏ To zoom in on your subject, press the
button.
Self-timer
T (telephoto)
(2 seconds),
(10 seconds)
Focus frame
Place your subject within the focus frame. When
you press the shutter button halfway, the focus
frame turns green.
4. Center your subject in the middle of the square focus frame
on the screen.
Battery life
Displays for a few seconds to indicate battery
is full, half-full, or empty
The default flash setting is automatic, indicated by the
icon on the LCD screen. The flash will go off
automatically whenever necessary.
Zoom bar
The digital zoom indicator appears when
Scene mode
Landscape mode,
If you want to change the flash setting, press the r button.
See the list of flash settings in the next column.
Exposure
compensation
(+2.0 to -2.0)
❏ To zoom out, press the
W (wide-angle) button.
W or
T is pressed.
5. Press and hold the shutter button halfway. The focus frame
turns green and the focus is set. If you want to reframe your
picture, move the camera until the photo you want appears
on the screen.
Sensitivity
White balance
6. Press the shutter button all the way down. The camera
beeps as it captures the image.
Quality
Macro mode
Note: The LCD screen may turn off to save battery power after you
take a picture. Press any button or turn the Mode dial to turn the
screen back on.
Flash
Shooting
mode
Camera Settings
Photos left
Camera settings are displayed on the LCD screen. Press the
DISP button to turn the display on or off.
Warning
Portrait mode
(Auto, 100, 200, 400)
(Auto, Daylight, Cloudy,
Fluorescent, Mercury)
F2304,
N1600,
F1600,
N640
F640,
Incandescent,
N2304,
Macro
Auto-flash,
Flash off,
Auto red-eye
reduction, Fill-in flash,
Slow synchro
Continuous shooting mode,
Video mode
125 (for example)
Camera shake
Taking Photos With Fun Frames
You can use P.I.F. (PRINT Image Framer®) to take pictures
with a variety of frames for holidays and special occasions.
Frames are already stored in your camera, and additional
frames are copied to your computer when you install the
camera software. You can use the PRINT Image Framer Tool
to copy the frames from your computer to the camera.
You can also modify the frames or create original frames using
PIF Designer. See the Camera Basics manual for instructions
on installing the software.
8/04
Epson PhotoPC L-410 - 4
Epson PhotoPC L-410
2. To view 6 photos at once, press the
button.
To take a picture with a frame:
1. Turn the Mode dial to
Automatic or
Manual.
W (wide-angle)
❏ To select a photo, press the u d l r buttons.
2. Press the
P.I.F. button. The first frame stored in the
camera is displayed.
❏ To view the selected photo with the full screen, press the
T (telephoto) button.
3. If you want to select a frame stored on the memory card,
press the r button after pressing the
P.I.F. button.
4. Select the frame you want by using the u d buttons, then
press the OK button. The selected frame is displayed on the
LCD screen.
Printing Photos
You can print all the photos in the camera, or select the ones
you want to print.
5. Most frames are available in both horizontal and vertical
designs. Make sure you choose the right orientation for the
picture you want to take.
Images with P.I.F. frames must be printed directly from the
camera or from supported Epson printers, including the
Epson Stylus® R300 and PictureMate.™ The Epson PhotoPC
L-410 is equipped with PRINT Image Matching® to ensure
that best possible prints without a computer.
6. Press the T (telephoto) button to zoom in on your
subject if necessary.
7. Center your subject in the frame.
Before you start, make sure your printer is set up and has ink
installed. Load 4 × 6 inch Epson Premium Glossy Paper,
following the instructions that came with your printer.
8. Press and hold the shutter button halfway. The focus frame
turns green and the focus is set.
9. Press the shutter button all the way down. The camera
beeps as it captures your picture.
Connecting the Camera to Your Printer
You can now print your framed picture directly from the
camera on supported Epson printers. For instructions on
printing from the camera, see the next column.
Make sure the camera is turned off before you begin.
You can conserve battery power by using the optional AC
adapter when you print from the camera. See the User’s Guide
on your computer for instructions.
Note: You can also add or change a frame on an existing picture in
your camera. See the Camera Basics manual for instructions.
1. Locate the correct cable for your printer, as described in the
Camera Basics manual.
Playing Back Photos and Videos
2. Connect the large end of the cable to the correct port on
your printer.
You can play back your pictures and videos on the camera’s
LCD screen. You can also delete any photos you don’t want to
save.
1. Turn the Mode dial to
took is displayed.
❏ On the Epson Stylus Photo R200, shown below, the
port is labeled USB.
Playback. The last photo you
Epson Stylus Photo R200
❏ To view the next photo, press the r button. Hold the
r button down to fast-forward.
❏ To zoom in on a photo, press the T (telephoto)
button. To pan over to another part of the image, press
the u d l r buttons. Press the W (wide-angle)
button to zoom out.
❏ To play a video, press the OK button. (The
icon
appears on video images.) To stop the video, press the
l button.
5 - Epson PhotoPC L-410
❏ On the other supported printers listed in the
Camera Basics manual, the port is labeled EXT I/F.
8/04
Epson PhotoPC L-410
4. If you want to print more than one copy of each picture,
press the OK button and use the u button to select the
number of copies you want. Then press OK.
3. Open the connector cover on the side of the camera and
plug the small end of the cable into the camera’s USB port
as shown.
5. Make sure the paper type is set to 4 × 6in. Prem. Glossy.
If you want to turn off the date stamp or change other
settings, consult the next section.
Connection for the
Epson Stylus Photo R200
6. Press the
button to start printing. When printing is
complete, press the OK button.
Connection for other
supported Epson printers
Printing Selected Photos
4. Turn on the camera.
You can select individual photos to print.
Printing the Photo Displayed on the
Screen
1. Connect the camera to the printer as described in
Camera Basics and turn on the camera.
1. Connect the camera to the printer as described in the
“Printing Your Photos” section of Camera Basics and turn
on the camera.
2. Turn the Mode dial to
button.
3. Choose Select Images by using the u d buttons, then
press the OK button.
2. Turn the Mode dial to Playback and use the l r buttons
to display the photo you want to print.
3. Press the
Playback, then press the
4. Select the photos to print by using the l r buttons, then
select the number of copies by using the u d buttons.
button. The Print menu is displayed.
4. Press the OK button to select Print This Image.
5. Press the
5. If you want to print just one copy, go to step 7.
6. Make sure the paper type is set to 4 × 6in. Prem. Glossy.
To change settings, consult the next section.
6. If you want to print more than one copy, press the OK
button and use the u button to select the number of copies
you want. Then press OK.
button.
7. Press the
button to start printing. When printing is
complete, press the OK button.
7. Press the d button to select Print Settings, then press
OK.
Making Print Settings
8. Press the r button to select Paper Type, then press the
d button to select 4 × 6in.Prem.Glossy and press OK.
You can make the following settings when printing images
directly from the camera:
9. If you want to print a photo with borders, turn off the date
stamp, or change other settings, see the next column.
❏ Printing with or without borders (borderless)
10. Press the
button to start printing. When printing is
complete, press the OK button.
❏ Printing with normal or high quality
❏ Printing the date (not available with frames)
Printing All Your Saved Photos
Note: You can also set the paper type to choose 4 × 6 inch or
10 ×15 cm paper. Make sure you change this setting to
4 × 6in. Once you change it, the camera will retain this setting. The
paper size 10 × 15 cm is not available in the U.S.
You can print all photos stored in the camera or on the
memory card.
1. On the preview screen, select Print Settings by using the
u d buttons, and then press the OK button.
1. Connect the camera to the printer as described in the
“Printing Your Photos” section of Camera Basics and turn
on the camera.
2. Select the item to set by using the u d buttons, then press
the OK button.
Note: If you need to cancel printing, press the MENU button.
2. Turn the Mode dial to
button.
3. Select the setting by using the u d buttons, then press the
OK button.
Playback, then press the
3. Select Print All Images by using the u d buttons, then
press the OK button.
8/04
Epson PhotoPC L-410 - 6
Epson PhotoPC L-410
Related Documentation
CPD-18422
Epson PhotoPC L-410 Camera Basics
CPD-18421
Epson PhotoPC L-410 CD-ROM with
electronic User’s Guide
7 - Epson PhotoPC L-410
8/04