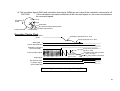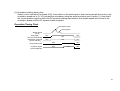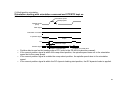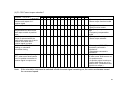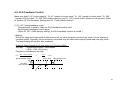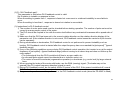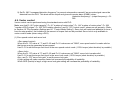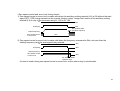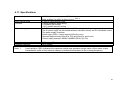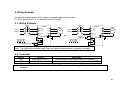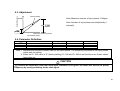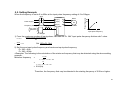
1
INSTRUCTION MANUAL
ORIENTATION CONTROL/PLG FEEDBACK
CONTROL/PULSE TRAIN UNIT
FR-A5AP
TYPE
CODE
FR-A5AP EIBUN TORISETSU
1A2H59
IB (NA) 66848-A (9803) MEE
1
Thank you for choosing the Mitsubishi transistorized inverter option unit.
This instruction manual gives handling information and precautions for use of this product. Incorrect handling might
cause an unexpected fault. Before using the equipment, please read this manual carefully to use it to its optimum.
Please forward this manual to the end user.
Safety Instructions
Do not attempt to install, operate, maintain or inspect this product until you have read through this instruction
manual and appended documents carefully and can use the equipment correctly. Do not use this product until
you have a full knowledge of the equipment, safety information and instructions.
In this manual, the safety instruction levels are classified into "WARNING" and "CAUTION".
WARNING
CAUTION
Denotes that incorrect handling may cause hazardous conditions, resulting in death or
severe injury.
Denotes that incorrect handling may cause hazardous conditions, resulting in medium or
slight injury, or may cause physical damage only.
Note that even the CAUTION level may lead to a serious consequence under some circumstances. Please follow the
instructions of both levels as they are important to personnel safety.
2
SAFETY INSTRUCTIONS
1. Electric Shock Prevention
WARNING
While power is on or when the inverter is running, do not open the front cover. You may get an electric shock.
Do not run the inverter with the front cover removed. Otherwise, you may access the exposed high-voltage
terminals and charging part and get an electric shock.
If power is off, do not remove the front cover except for wiring or periodic inspection. You may access the
charged inverter circuits and get an electric shock.
Before starting wiring or inspection, switch power off, wait for more than 10 minutes, and check for no residual
voltage with a tester or the like.
Any person who is involved in the wiring or inspection of this equipment should be fully competent to do the
work.
Always install the option unit before wiring. Otherwise, you may get an electric shock or be injured.
Operate the switches with dry hands to prevent an electric shock.
Do not subject the cables to scratches, excessive stress, heavy loads or pinching. Otherwise, you may get an
electric shock.
2. Injury Prevention
CAUTION
Apply only the voltage specified in the instruction manual to each terminal to prevent damage, etc.
Ensure that the cables are connected to the correct terminals.
Otherwise, damage, etc. may occur.
Always make sure that polarity is correct to prevent damage, etc.
While power is on or for some time after power-off, do not touch the inverter as it is hot and you may get burnt.
3
3. Additional instructions
Also note the following points to prevent an accidental failure, injury, electric shock, etc.:
(1)
Transportation and installation
CAUTION
Do not install or operate the option unit if it is damaged or has parts missing.
Do not stand or rest heavy objects on the product.
Check that the mounting orientation is correct.
Prevent screws, metal fragments, conductive bodies or oil, other flammable substance from entering the inverter.
(2)
Test operation and adjustment
CAUTION
Before starting operation, confirm and adjust the parameters. A failure to do so may cause some machines to
make unexpected motions.
(3)
Usage
WARNING
Do not modify the equipment.
4
CAUTION
When parameter clear or all parameter clear is performed, each parameter returns to the factory setting. Re-set
the required parameters before starting operation.
For prevention of damage due to static electricity, touch nearby metal before touching this product to eliminate
static electricity from your body.
(4)
Maintenance, inspection and parts replacement
CAUTION
Do not test the equipment with a megger (measure insulation resistance).
(5)
Disposal
CAUTION
Dispose of this product as general industrial waste.
(6)
General instruction
All illustrations given in this manual may have been drawn with covers or safety guards removed to provide in-depth
description. Before starting operation of the product, always return the covers and guards into original positions as
specified and operate the equipment in accordance with the manual.
5
1 PRE-OPERATION INSTRUCTIONS
1.1 Unpacking and Product Confirmation
1.2 Packing Confirmation
1.3 Structure
2 INSTALLATION
2.1 Pre-Installation Instructions
2.2 Installation Procedure
2.3 Wiring
3 ORIENTATION CONTROL
3.1 Wiring Example
3.2 Input Circuit
3.3 Terminals
3.4 Wiring Instructions
3.5 Related Parameter List
3.6 Pre-Operation Settings
3.7 Operation
3.8 Instructions
3.9 Specifications
4 PLG FEEDBACK CONTROL
4.1 Wiring Example
4.2 Input Circuit
4.3 Terminals
4.4 Wiring Instructions
4.5 Related Parameter List
4.6 Pre-Operation Settings
4.7 Control Mode Setting
4.8 PLG Feedback Control
4.9 Vector control
4.10 Additional Functions
4.11 Specifications
8
8
8
9
10
10
10
11
12
12
13
14
17
20
21
25
32
33
34
34
35
36
37
39
40
41
42
44
51
54
6
5 PULSE TRAIN INPUT
5.1 Wiring Example
5.2 Terminals
5.3 Adjustment
5.4 Parameter Definition
5.5 Setting Example
5.6 Specifications
55
55
55
56
56
57
58
7
PRE-OPERATION INSTRUCTIONS
1. PRE-OPERATION INSTRUCTIONS
1.1. Unpacking and Product Confirmation
Take the option unit out of the package, check the unit name, and confirm that the product is as you ordered and
intact.
Note:
This product may be used with the inverter manufactured during and after February, 1998.
The inverter may be used with this unit if its SERIAL number indicated on the rating plate and package plate
has the following version or later. (The SERIAL number on the package plate uses the 3 most significant
digits of the following 6-digit control number and is indicated in 6 digits including the version symbol.)
Model
FR-A520-0.4K, 0.75K
FR-A520-1.5K to 11K
FR-A520-15K to 22K
FR-A520-30K to 55K
FR-A540-0.4K to 3.7K
FR-A540-5.5K, 7.5K
FR-A540-11K to 22K
FR-A540-30K to 55K
SERIAL Number
U82
T82
U82
K82
L82
K82
L82
D82
U
8
2
Symbol Year Month Control number
SERIAL number
SERIAL is made up of 1 version symbol and
8 numeric characters as shown above.
1.2. Packing Confirmation
Make sure that the package includes the following accessories:
Instruction manual
Mounting screws M3 10
Terminal resistor jumpers (Jumpers fitted to the terminal block)
1
2
3
8
1.3. Structure
Front view
Rear view
Mounting hole
Mounting
holes
Mounting hole
Terminal block
screw size M3
PIN
PO
5V
SG PA1 PA2 PAR PB1 PB2 PBR PC1 PC2 PCR
Terminal symbol
FR-A5AP
Terminal resistor jumpers
Option fixing holes
Connector
9
I.ISTALLATION
2.INSTALLATION
2.1. Pre-Installation Instructions
(1) Make sure that the input power of the inverter is off and make sure the charge light is off.
(2) When the FR-A5AP unit is used for PLG feedback control or orientation control, a PLG (motor with PLG) and
external power supply are required.
When PLG feedback control and orientation control are used together, the PLG (motor with PLG) and external power
supply are shared between these controls.
(3) When the FR-A5AP unit is fitted, the programmed operation function is made invalid.
CAUTION
With input power on, do not install or remove the option unit. Otherwise, the inverter and option unit
may be damaged.
2.2. Installation Procedure
(1) Securely insert the connector of the option unit far into the connector of the inverter. At this time, also fit the option
fixing holes securely.
(2) Securely fix the option unit to the inverter on both sides with the accessory mounting screws. If the screw holes
do not match, the connector may not have been connected correctly. Check for loose connections.
CAUTION
When installing the inverter front cover, the cables to the inverter's control circuit terminals and option
terminals should be routed properly in the wiring space to prevent them from being caught between the
inverter and its cover.
10
2.3. Wiring
Route the cables so that they do not take up a large space in the control circuit terminal block wiring area of the
option unit.
Wire the twisted pair shielded cable after stripping its sheath to make its cables loose. Also, protect the shield cable
of the twisted pair shielded cable to ensure that it will not make contact with the conductive area.
Note: During wiring, do not leave wire off-cuts in the inverter. They can cause a fault, failure or malfunction.
Inverter
(Without cover)
Cable routing
Option unit
L
Accessory screw
(2 pcs.)
Slot 1
Shield cable
Inverter side
Slot 2 connector
Option side
connector
Slot 3
Twisted pair shielded cable
Sheath Stripping Dimensions for Shield Cable
Inverter
Capacity
0.4K to 3.7K
5.5K to 55K
Slot 1
Slot 2
Slot 3
L: 350mm
L: 270mm
L: 300mm
L: 220mm
L: 250mm
L: 170mm
I.ORIENTATION CONTROL
11
3. ORIENTATION CONTROL
This function is used with a position detector (PLG) installed to the spindle of a machine tool (or the motor) to allow a
rotary shaft to be stopped at the specified position (oriented).
Pr. 350 "stop position command selection" is factory-set to "9999" to make the orientation control function invalid.
3.1. Wiring Example
Standard motor with PLG (SF-JR)
(Note 1)
NFB
R
Power supply
Forward rotation
Reverse rotation
Orientation command
In position
Orientation fault
Output common
External stop command
Inverter
U
S
V
T
W
IM
FR-A5AP
STF
PA1
STR
PA2
X22 (Note 5) PAR (Note 4)
SD
PB1
ORA (Note 6) PB2
PBR (Note 4)
(Note
6)
ORM
PC1
PC2
PCR (Note 4)
SE
5V
SG
SD
FR-A5AX(Note 7)
X11
X10
C
R
A
N
PLG
B
P
H
K
(Note 1)E
5V 5VDC
0 power supply
(Note 2)
X1
X0
DY
12
Note: 1. When the motor with a PLG used is other than the standard motor with PLG (SF-JR), the pin numbers
are different. To reduce radiated noise, connect the shield wires of the PLG cables to the CG.
2. When orientation control is used with PLG feedback control, the PLG and 5V power supply may be
shared between these controls.
3. Couple the PLG in line with the motor with a speed ratio of 1 to 1 without any mechanical looseness.
4. Keep the accessory jumpers connected. However, when the same PLG is shared between the FR-A5AP
and another unit (e.g. NC) which is connected with a terminal resistor, the built-in terminal resistors are
not required and should be removed. (Terminal resistors: 100)
5. Assign this function to any of the input terminals using Pr. 180 to Pr. 186 "input terminal function
selection".
6. Assign this function to any of the output terminals using Pr. 190 to Pr. 195 "output terminal function
selection".
7.When the stop position command is entered from outside the inverter (externally), the FR-A5AX inboard
option is required.
3.2. Input Circuit
1k
+
-
1000pF
100
PA1
PAR
PA2
100
PB1
PBR
PB2
100
PC1
PCR
PC2
100
1k
1000pF 100
+
-
1k
1000pF
100
1k
1000pF 100
+
-
1000pF
1k
100
1000pF 100
1k
Jumpers
5V
1F
SG
13
3.3. Terminals
Symbo
l
PA1
PA2
PB1
PB2
PC1
PC2
Terminal
PLG A-phase signal input terminal
PLG A-phase inverse signal input
terminal
PLG B-phase signal input terminal
PLG B-phase inverse signal input
terminal
PAR
PLG C(Z)-phase signal input terminal
PLG C(Z)-phase inverse signal input
terminal
A-phase terminal resistor terminal
PBR
B-phase terminal resistor terminal
PCR
C(Z)-phase terminal resistor terminal
5V
DC power (positive) input terminal
SG
DC power ground terminal
Remarks
Description
For information on the
pulse signals, refer to
page 11.
A-, B- and C(Z)-phase signals are input
from the PLG
4.75 to 6VDC (Current
consumption 50mA)
Factory-connected with "PA2" by the
jumper. Remove the jumper when the
terminal resistor is not needed
Factory-connected with "PB2" by the
jumper. Remove the jumper when the
terminal resistor is not needed
Factory-connected with "PC2" by the
jumper. Remove the jumper when the
terminal resistor is not needed
PLG power supply common terminals.
Input PLG power. Connect the positive
side to 5V and the ground side to SG.
Also, connect the shield of the shield wire
to SG.
14
<Inverter I/O terminals>
Symbol
X22 (Note 1)
Terminal
Orientation command input
terminal
Common terminal
Remarks
ORA (Note 2)
In-position signal output
terminal
ORM (Note 2)
Orientation fault signal output
terminal
Open collector output.
Permissible load
24VDC, 0.1A
Open collector output.
Permissible load
24VDC, 0.1A
SE
Open collector output
common terminal
SD
Description
Used to enter an orientation signal.
Common terminal for the orientation
signal.
Switched low if the orientation has
stopped within the in-position zone while
the start and orientation signals are input.
Switched low if the orientation has not
stopped within the in-position zone while
the start and orientation signals are input.
Common terminal for the ORA and ORM
open collector output terminals. Isolated
from the common terminal of the control
circuit.
Note: 1. Assign the function of the X22 signal to any of the input terminals using Pr. 180 to Pr. 186 "input terminal
function selection".
2. Assign the functions of the ORA/ORM signal to any of the output terminals using Pr. 190 to Pr. 195
"output terminal function selection".
15
<FR-A5AX, inverter input terminals>
Symbol
X0
to
X11
FRA5AX
input
terminal
s
Inverter
input
terminal
s
Terminal
Digital signal
input terminals
DY
Data read timing
input signal
SD
Common
terminal (sink)
External
transistor
common
terminal (source)
PC
Remarks
Use a micro current switching
contact relay for the relay
contact. A transistor with the
following specifications should
be selected for the open
collector signal:
Electrical characteristics of the
transistor used;
IC 10mA
VCE 30V
Leakage current 100A max.
If IC 10mA, VCE(sat)
voltage is 3V max.
Description
Used to input digital signals through either relays or
open collector transistors.
As the command signals are entered, speed or position
commands are selected using Pr. 360.
Used when a digital signal read timing signal is
necessary. Data is only read while terminals DY-SD are
shorted. By opening terminals DY-SD, the data before
opening is retained.
Common terminal for digital signal input terminals and
data read timing signals
When connecting the transistor output (open collector
output) of a programmable controller (PC), etc., connect
the external power common (positive) to this terminal to
prevent a fault occurring due to leakage current
How to use terminal DY (when the stop position is specified from outside the inverter (externally) ).
DY
200ms or longer
Position data
Position command latch
When terminals DY-SD are open, the inverter does not import data. Therefore, if the input status of the X0-X11
signals change, the stop position data before opening of terminals DY-SD is valid.
Also, the position data is imported on the leading edge of the DY signal.
Note: Pr. 300 to Pr. 304 settings for the FR-A5AX are made invalid when the stop position is set to be specified
from outside the inverter (externally), with the FR-A5AP (orientation control option) fitted to the inverter and
when orientation control is used.
Pr. 300 to Pr. 305 of the FR-A5AX are made valid when the stop position is not set from outside the inverter.
16
3.4. Wiring Instructions
(1) Connection with the position detector (PLG).
Use twisted pair shielded cables (0.2mm2 or larger) to connect the FR-A5AP and position detector (PLG).
Cables to terminals 5V and SG should be connected in parallel or be larger in size according to the cable length
table as indicated below.
To protect the cables from noise, run them (at least 10cm) away from any source of noise (e.g. the main circuit
and power supply voltage).
Note: If the cable size is too large to connect the terminals to the terminal block or if the number of cables is
increased due to parallel connection and they cannot be contained in the wiring space, provide a junction terminal
block, for example.
(2) Cable length.
1) Cable length within 30m.
Cable Length
Within 10m
Within 20m
Within 30m
Number of Parallel Cables of 0.2mm2
Required
At least 2 cables
At least 4 cables
At least 6 cables
Larger-Size Cable
0.4mm2 or larger
0.75mm2 or larger
1.25mm2 or larger
2) Cable length of more than 30m.
Use a power supply slightly higher than 5V (approximately 5.5V) in addition to 6 or more parallel cables of
0.2mm2 or cables of 1.25mm2 or more. This allows the cable length to be increased up to 100m. Note that the
voltage applied
across terminals 5V-SG must not exceed 6V.
17
3) Connection with NC. (Or similar device)
When one position detector is shared between the FR-A5AP and NC (or another device), its output signals
should be connected as shown below. In this case, the cable length between the FR-A5AP and NC should be
as short as possible, within 5m.
Position detector
PLG
Inverter
FR-A5AP
NC
Max. 5m
(2 parallel cables)
(3) Connection of terminal resistors.
Use the jumpers across PA2-PAR, PB2-PBR and PC2-PCR to connect terminal resistors to the A, B and C(Z)phases of the PLG. Normally, keep the jumpers fitted.
However, remove the jumpers when the same PLG is shared between the FR-A5AP and the other unit (e.g. NC)
which is connected with a terminal resistor.
18
(4) Position detector (PLG).
Line driver LED type PLG
A. A signal 1000ppr to 4096ppr
B. B signal 1000ppr to 4096ppr
C(Z).C(Z)
signal 1ppr Output pulse specifications
P
a b c d
A
A
B
B
C
C
2.4 to 5.25V
H
1000ppr to 4096ppr
L
0 to 0.4V1000ppr to 4096ppr
1000ppr to 4096ppr
1000ppr to 4096ppr
1ppr
1ppr
a, b, c and d should be (1/4 1/8)P when rotation is clockwise as viewed from the shaft
end of the PLG.
<Example of PLG
available on the market>
Tamagawa Seiki:
TS1508N207,
TS5008N122,
TS5108N122
Pin Numbers of PLG Output Signals (Tamagawa Seiki, TS1508N207)
Pin Number
C
R
A
N
B
P
Output Signal
A-phase signal
A-phase inverse signal
B-phase signal
B-phase inverse signal
C(Z)-phase signal
C(Z)-phase inverse
signal
Pin Number
H
K
E
Output Signal
+5V power supply
Power supply common
Case earth
Note: When PLG feedback control and orientation control are used together, the PLG is shared between these
controls.
Use a PLG which has a pulse count of 1000 to 4096ppr (pulses per revolution).
19
3.5. Related Parameter List
Parameter
Number
350
Name
Setting Range
0, 1, 9999
0 to 30Hz
0 to 10Hz
0 to 16383 (Note)
0 to 8191
0.01Hz
0.01Hz
1
1
0 to 255
1
5
0 to 16383 (Note)
1
0
357
Stop position command
selection
Orientation speed
Creep speed
Creep select position
Position loop select
position
DC dynamic braking start
position
Internal stop position
command
In-position zone
Minimum Setting
Increments
1
0 to 255
1
5
358
359
360
Servo torque selection
PLG rotation direction
12-bit data selection
0 to 13
0, 1
0, 1, 2 to 127
1
1
1
1
1
0
361
362
363
Position shift
Position loop gain
In-position signal output
delay time
PLG stop check time
Orientation time limit
Recheck time
PLG pulse count
0 to 16383 (Note)
1 to 10
0 to 5 sec.
1
1
0.1 sec.
0
1
0.5 sec.
0 to 5 sec.
0 to 60 sec., 9999
0 to 5 sec., 9999
0 to 4096
0.1 sec.
1 sec.
0.1 sec.
1
0.5 sec.
9999
9999
1024
351
352
353
354
355
356
364
365
366
369
Factory
Setting
9999
2Hz
0.5Hz
511
96
Remarks
9999: No orientation
Set using with respect to the stop
position.
Set using with respect to the stop
position.
Set using with respect to the stop
position.
0: Speed command,
1: Position command,
2 to 127: Number of stop positions 1
9999: 120 sec. setting
9999: No check
Number of pulses before it is
multiplied by 4
Note: When the FR-DU04 is used, up to 9999 may be set. When the FR-PU04 is used, up to 16383 may be set.
20
3.6. Pre-Operation Settings
(1) Pr. 350 "stop position command selection".
For the stop position command, either the internal stop position command or the external stop position
command using external signals (12-bit data) may be selected.
Set "9999" in Pr. 350 to make orientation control invalid.
Pr. 350 Setting
0
1
9999
Description
Internal stop position command
External stop position command
Orientation control invalid (factory setting)
(2) Pr. 369 "number of PLG pulses".
Set the number of PLG pulses.
Set the number of pulses before it is multiplied by 4.
Example:Set "1024" for 1024 pulses per revolution (ppr).
(3) Pr. 359 "PLG rotation direction".
Indicates the direction in which the PLG rotates.
Pr. 359=0
CW
Pr. 359=1 (factory setting)
CCW
A
PLG
Forward rotation is clockwise rotation
when viewed from A.
Forward rotation is counterclockwise
rotation when viewed from A.
Note: When the FR-A5AP is fitted and Pr. 350 "stop position command selection" is set to make orientation control
valid, the PU (FR-DU04/FR-PU04) shows the rotation direction of the PLG.
Make the setting of Pr. 359 so that FWD is displayed when the STF signal switches on or REV displayed
when the STR signal switches on.
21
(4) Pr. 356 "internal stop position command".
Set "0" in Pr. 350 "stop position command selection" to choose the internal position command mode.
In the internal position command mode, the value set in Pr. 356 is processed as the stop position command.
When the PLG pulse count is 1024ppr, one revolution of the PLG (360 degrees) is divided into 4096 positions,
i.e. 360 degrees/4096 = 0.0879 degrees per address (see below). The stop positions (addresses) are indicated in
parentheses.
Origin (0)
Origin (0)
CW
90
(1024)
270
(3072)
180(2048)
Pr. 359=0
CCW
90
(1024)
270
(3072)
180(2048)
Pr. 359=1
(5) Pr. 360 "12-bit data selection".
When "1" is set in Pr. 350 "stop position command selection" and the FR-A5AX option is used with the FR-A5AP, set
stop positions using 12-bit data.
The value set in Pr. 360 should be the number of stop positions less 1.
<Example>
When the number of stop positions is 20 (divided at intervals of 18 degrees), 20 1 = 19. Hence, set "19".
The stop position command is entered in binary when using the FR-A5AX.
Pr. 360 Setting
0
1
2 to 127
Description
Speed command
Position command
The external stop position command may be used to set up to 128 stop positions at
regular intervals. If the external stop command entered is greater than the setting, the
stop positions are the same as those in the maximum external stop command value.
22
[Example 1]
4 stop positions
Origin (0)
270
(3 or more)
[Example 3]
120 stop positions
[Example 2]
8 stop positions
CW
90
(1)
(7 or more) Origin (0)
45(1)
315
(6)270
90(2)
Pr. 360 = "3"
CW
270
(H5A)
At intervals 90
of 3
(H1E)
135(3)
(5)225
180
(2)
Origin (0)
180(4)
Pr. 360 = "7"
180
(H3C)
Note: Values in parentheses
indicate binary data entered
from the input terminals of
the FR-A5AX. If the position
signal monitoring (Pr. 52 =
19) is selected, the data
monitored is not the number
of stop positions but is 0 to
4095 pulses.
Pr. 360 = "119"
Relationships between stop position command and 12-bit data
Pr. 350
"stop position
command selection"
0: Internal
0: Internal
1: External
1: External
Pr. 360
"12-bit data
selection"
0: Speed command
1, 2 to 127: Position
command
0: Speed command
1, 2 to 127: Position
command
Stop position
command
Internal
Internal
Internal
External (Internal when
FR-A5AX is not fitted)
Operating Status
12-bit data
Speed command
Invalid
Speed command
Position command
Speed command
12-bit data
External command (or
PU)
12-bit data
External command (or
PU)
(6) Pr. 361 "position shift".
The stop positions are those defined by the position command plus the value set in Pr. 361.
<Position shift function>
Electrically shifts the origin (the inverters reference point for the origin) without changing the origin of the
position detector (PLG) (i.e. without any physical movement).
23
(7) Pr. 363 "in-position signal output delay time".
When the motor shaft enters the in-position zone, the in-position signal is output after a delay of the time set in
Pr. 363. Also, when the motor shaft comes out of the in-position zone, the in-position signal is switched off after a
delay of the time set in Pr. 363.
(8) Pr. 364 "PLG stop check time".
When the in-position signal has not yet been output in orientation operation, the orientation fault signal is output if
orientation cannot be completed and the PLG is stopped for the period of time set in Pr. 364. When the inposition signal has been output once, the orientation fault signal is output if the orientation cannot be completed
again within the time set in Pr. 364.
(9) Pr. 365 "orientation time limit".
If orientation cannot be completed within the time set in Pr. 365, which is measured from when the current
position signal has passed the creep select position, the orientation fault signal is output.
(10) Pr. 366 "recheck time".
If the start signal is switched off with the orientation command ON after the PLG is stopped under orientation
control, the current position is checked again after the time set in Pr. 366 has elapsed and the in-position signal
or orientation fault signal is output according to the check result.
24
3.7. Operation
(1) Orientation starting during rotation.
1) The orientation command (X22) causes the motor to decelerate to the orientation speed set in Pr. 351.
2) After the orientation speed is reached, the motor decelerates to the creep speed set in Pr. 352 as soon as the
current position signal reaches the creep select position set in Pr. 353.
3) Furthermore, the position loop begins to work as soon as the current position signal reaches the position loop
select position set in Pr. 354.
4) After the position loop is selected, the motor keeps decelerating until the current position signal reaches the
DC dynamic braking start position set in Pr. 355, at which time DC dynamic braking is started to stop the
motor.
5) When the motor has stopped within the in-position zone set in Pr. 357, the in-position signal (ORA) is output
with a delay of the in-position signal output delay time set in Pr. 363. If the current position signal comes out of
the in-position zone due to external force etc., the in-position signal is switched off with a delay of the inposition signal output delay time set in Pr. 363.
6) The orientation fault signal (ORM) is output if the orientation cannot be completed within the time set in Pr. 365
after the current position signal has passed the creep select position.
7) If the orientation (once started) has been stopped by an external force etc. before the in-position zone is
reached and the in-position signal (ORA) is not yet output, the orientation fault signal (ORM) is output after the
PLG stop check time set in Pr. 364 has elapsed. If the current position signal comes out of the in-position zone
due to an external force etc. after the output of the in-position signal (ORA), the in-position signal (ORA) is
switched off after a delay of the in-position signal output delay time set in Pr. 363. If the orientation cannot be
completed within the PLG stop check time set in
Pr. 364, the orientation fault signal (ORM) is output.
8) When the start signal (STF or STR) is switched off with the orientation command on after the in-position signal
(ORA) or orientation fault signal (ORM) has been output once, the in-position signal (ORA) or orientation fault
signal (ORM) is output again after the recheck time set in Pr. 366 has elapsed.
25
9) The in-position signal (ORA) and orientation fault signal (ORM) are not output if the orientation command is off.
CAUTION
If the orientation command is switched off with the start signal on, the motor accelerates to
the command speed.
Orientation
speed
Creep selection
Position loop
Origin
Orientation
DC dynamic braking start position
Position
loop selection
Creep speed
Operation Timing Chart
Spindle speed
(PLG)
Orientation speed (set in Pr. 351)
Creep speed (set in Pr. 352)
Start signal 0
(across STF/STR-SD)
Orientation command
(across X22-SD)
Current position signal
DC dynamic
braking start position
(set in Pr. 355)
Creep select position
(set in Pr. 353)
Position loop select position
(set in Pr. 354)
Stop position command
Origin signal
DC dynamic brake
In-position signal
(across ORA-SE)
ON
ON
Note: A high level refers to a signal being ON.
26
(2) Orientation starting during stop.
Switch on the orientation command (X22), then switch on the start signal to start and accelerate the motor to the
orientation speed set in Pr. 351 and perform orientation using the same procedure as in Section (1). Note that if
the current position signal is within the DC dynamic braking start position, the spindle speed will not rise to the
orientation speed and the DC dynamic brake is applied.
Operation Timing Chart
Orientation speed
Creep speed
Spindle speed
(PLG)
Start signal
(across STF/STR-SD)
Orientation command
(across X22-SD)
DC dynamic brake
In-position signal
(across ORA-SE)
OFF
ON
OFF
OFF
ON
OFF
OFF
ON
OFF
OFF
ON
OFF
27
(3) Multi-position orientation.
Orientation starting with orientation command and STF/STR kept on
(Orientation starting in the servo-in state)
Orientation speed
Creep speed
Spindle speed
(PLG)
Start signal
Orientation command
In-position signal
Servo
torque
Servo
torque
DY
200ms or longer
Position signal
Position command latch
Position command latch
Position data is read on the leading edge of DY (refer to the FR-A5AX instruction manual).
If the current position signal is within the creep select position, the spindle speed rises not to the orientation
speed but to the creep speed.
If the current position signal is outside the creep select position, the spindle speed rises to the orientation
speed.
If the current position signal is within the DC dynamic braking start position, the DC dynamic brake is applied.
28
(4) Pr. 358 "servo torque selection"
Pr. 358 Setting
Remarks
Function
0
1
2
3
4
5
6
7
8
9
10
11
12
13
1) Selection of servo torque
function until output of inposition signal
2) Retry function selection
X
O
O
O
O
X
O
X
O
X
O
X
X
O
O:Servo torque function valid
X:Servo torque function invalid
X
X
X
X
X
X
X
O
X
X
X
O
X
X
3) Output frequency is
compensated for when motor
shaft stops outside in-position
zone.
4) DC dynamic braking or servo
torque is selected when the
motor shaft comes out of the inposition zone after the inposition signal is output.
5) Selection of DC dynamic
braking or orientation
termination timing
X
X
O
O
X
O
O
X
X
X
X
X
O
O
O
X
X
X
X
O
O
O
O
O
O
O
O
O
O:Retry function valid
X:Retry function invalid
O:Frequency compensation
valid
X:Frequency compensation
invalid
O:DC dynamic braking selected
X:Servo torque selected
O
O
O
X
X
O
O
O
O
X
X
X
X
X
6) Selection of in-position signal
OFF; when motor shaft comes
out of in-position zone after inposition signal is output once.
O
O
O
O
O
X
X
X
X
X
X
X
X
X
Note:
O:Start signal (STF, STR) or
orientation command is
switched off
X:Orientation command is
switched off
O:In-position signal is switched
off when motor shaft comes out
of in-position zone.
X:In-position signal remains on
if motor shaft comes out of inposition zone. (Orientation fault
signal is not output.)
If the orientation command is switched off with the start signal remaining on, the motor accelerates toward
the command speed.
29
1) Selection of servo torque function until the in-position signal is output.
Set Pr. 358 "servo torque selection" to determine whether servo torque is required or not. When the current
position signal is between the orientation stop position and DC dynamic braking start position, servo torque is
not generated. The shaft is held by DC dynamic braking. If the current position signal comes out of this zone
due to external force, etc., servo torque is generated to return the current position signal to within the zone.
Once the in-position signal is output, operation is performed in accordance with the setting in 4).
2) Retry function.
Set Pr. 358 "servo torque selection" to determine whether the retry function is required or not. Note that this
function cannot be used with the servo torque function. If the motor shaft is confirmed to have stopped but is
not in the in-position zone, the retry function causes the shaft to be oriented again.
This retry is made three times, including the first orientation, but no more than three times. (The orientation
fault signal is not output during retry operation.)
3) Frequency compensation function for use when the motor shaft has stopped outside the in-position zone.
When the motor shaft has been stopped by external force, etc. before entering the in-position zone, the output
frequency is increased to move the shaft to the orientation stop position. This output frequency rises gradually
to the creep speed set in Pr. 352. This function cannot be used with the retry function.
4) Selection of whether DC dynamic braking or servo torque is started when the motor shaft comes out of the inposition zone after the in-position signal has been output once.
You can select whether to start DC dynamic braking to lock the shaft or to start servo torque to return the shaft
to the orientation stop position if the motor shaft comes out of the in-position zone due to external force, etc.
after the output of the in-position signal.
5) Selection of DC dynamic braking, servo torque or orientation termination timing.
To terminate orientation, switch off the start signal (STF or STR) and then switch off the orientation command
(X22). At this time, you can select the point of switching off the in-position signal between when the start signal
is switched off or when the orientation command is switched off.
6) In-position signal OFF selection; for use when the motor shaft comes out of the in-position zone after the inposition signal is output once. You can select either the mode in which the in-position signal is switched off
when the motor shaft comes out of thein-position zone or the mode in which the in-position signal remains on
(orientation fault signal is not output) when the motor shaft comes out of the in-position zone.
30
(5) Pr. 362 "position loop gain"
When Pr. 358 "servo torque selection" value has been set to choose the servo torque function, the output
frequency provided to generate servo torque rises gradually up to the creep speed set in Pr. 352 according to the
inclination set in Pr. 362 "position loop gain". Increasing the setting will increase the operation speed but may
cause the machine to hunt.
(6) Monitoring functions
Monitoring
Position signal monitoring
Orientation status
Description
Set "19" in Pr. 52 to display the position signal on the PU
instead of the voltage (Displayed only when the FR-A5AP is
fitted.)
Set "22" in Pr. 52 to display the orientation status on the PU
instead of the output voltage. (Displayed only when the FRA5AP is fitted.)
0 - Orientation not selected (i.e. orientation mode has not
been activated) or orientation speed has not been reached.
1 - Orientation speed reached.
2 - Creep speed reached.
3 - Position loop reached.
4 - In-position.
5 - Orientation fault (pulse stop).
6 - Orientation fault (orientation time limit elapsed).
7 - Orientation fault (recheck).
8 - Positioning orientation in progress.
Servo torque will return the motor to the stop position (if enough torque can be provided) if it is moved from the
stop position. Servo torque is available in all modes vector, V/f, etc. When orientation control is selected.
31
3.8. Instructions
(1) The PLG should be coupled with the motor shaft or the spindle oriented with a speed ratio of 1 to 1 without any
mechanical looseness.
(2) The DC dynamic brake operated for positioning must be released in the shortest time (within several seconds).
Operating the brake continuously can cause the motor to generate heat and burn out.
(3) The servo lock function is not available after positioning stop. If the spindle must be held securely, prepare an
appropriate holding means such as a mechanical brake or a dowel pin.
(4) To ensure correct positioning, the PLG must be set in the proper rotation direction and the A and B phases
connected correctly.
(5) The orientation fault signal may be output if the pulse signal is not given from the PLG during orientation due to
an open cable, etc.
(6) When orientation control is exercised, orientation cannot be completed if "no DC dynamic brake operation" is set
in the DC dynamic brake adjusting (voltage, frequency, time) parameters. These parameters must be set to
operate the DC dynamic brake.
(7) To terminate orientation, the start signal (STF or STR) must be first switched off and the orientation signal (X22)
must be switched off. As soon as this orientation signal is switched off, orientation control ends. (Depending on
the setting of
Pr. 358 "servo torque selection", when the orientation signal remains on, orientation will continue even if the DC
dynamic brake is released as soon as the start signal is switched off. Hence, the orientation status monitored is
not set to 0.)
(8) When the retry function has been selected in Pr. 358 "servo torque selection", retry is made three times.
(Note: The first orientation counts as 1 retry.)
(9) For orientation control, set correct values in Pr. 350 "stop position command selection" and Pr. 360 "12-bit data
selection". If the values set are incorrect, proper orientation control will not be performed.
(10) The value set in Pr. 11 (DC dynamic brake operation time) should be any of 1 to 10. If "8888" (DC dynamic brake
external selection) is set in Pr. 11, the DC dynamic brake is not operated unless the X13 terminal signal is
switched on. For orientation control the DC dynamic brake is operated independently of the X12 signal.
(11) When orientation control is exercised, PID control is invalid.
32
3.9. Specifications
Stop position accuracy
Permissible rotation speed
Functions
Holding force after positioning
Input signals (contact input)
Output signals (open collector output)
DC power supply
1.5 degrees
Note: Depends on the load torque, load GD2, orientation speed, creep speed,
position loop select position, etc.
PLG-mounted shaft speed (6000r/min)
Note: The motor and PLG-mounted shaft must be coupled directly or via a belt
without any slip. A gear change type cannot be used.
Orientation and creep speed setting.
Stop position command selection.
DC dynamic brake start position setting.
Creep speed and position loop select position setting.
Position shift.
In-position zone.
Position signal monitoring, etc.
Note: Set the above functions from the parameter unit.
Without servo lock function (However, when "2" is set in Pr. 370 to choose vector
control, the servo lock function is valid.)
Orientation command.
Forward and reverse rotation commands.
Stop position command (open collector signal may also be entered). Maximum 12bit binary signal.
In-position signal.
Orientation fault signal.
Prepare a 5VDC power supply for the PLG.
(Usually approximately 350mA)
5V, 50mA is also required for the option.
Supply power from the NC or use a general power supply.
Example:
NEMIC LAMBDA ES15-5 (5V, 3A)
*When PLG feedback control and orientation control are used together, the 5V
power supply is shared between these controls.
33
I.PLG FEEDBACK CONTROL
4. PLG FEEDBACK CONTROL
This function is used with a speed detector (PLG) to allow the motor speed to be detected by the speed detector and
fed back to the inverter so that the output frequency of the inverter is controlled to keep the motor speed constant to
load variations. Pr. 367 "speed feedback range" is factory-set to "9999" and Pr. 370 "control mode selection" to "0",
making this function invalid.
4.1. Wiring Example
Standard motor with PLG (SF-JR)
NFB
Power supply
(Note 1)
Inverter
U
R (L1)
V
S (L2)
T (L3)
IM
W
FR-A5AP
Forward rotation
Reverse rotation
Frequency setting
potentiometer
STF
STR
SD
10
2
5
PA1
PA2
PAR
PB1
PB2
PBR
5V
SG
C
R
(Note 4)
(Note 4)
A
N
PLG
H
K
(Note 1)E
5V 5VDC
0 power supply
(Note 2)
34
Note: 1. When the motor with PLG used is other than the standard motor with PLG (SF-JR), the pin numbers are
different. To reduce radiation noise, connect the shield wires of the PLG cables to the case earth pin.
2. When PLG feedback control is used with orientation control, the PLG and 5V power supply may be shared
between these controls.
3. Couple the PLG in line with the motor with a speed ratio of 1 to 1 without any mechanical looseness.
4. Keep the accessory jumpers connected. However, when the same PLG is shared between the FR-A5AP
and the other unit (e.g. NC) which is connected with a terminal resistor, the built-in terminal resistors are
not required and should be removed. (Terminal resistors; 100)
4.2. Input Circuit
‹
1‚
+
-
1000pF
100
‹
1‚
100
1000pF 100
+
-
Jumpers
‹
1‚
1000pF
100
100
1000pF 100
PA1
PAR
PA2
‹
1‚
1F
PB1
PBR
PB2
5V
SG
35
4.3. Terminals
Symbol
PA1
PA2
PAR
Terminal
PLG A-phase signal input terminal
PLG A-phase inverse signal input
terminal
PLG B-phase signal input terminal
PLG B-phase inverse signal input
terminal
A-phase terminal resistor terminal
PBR
B-phase terminal resistor terminal
5V
SG
DC power (positive) input terminal
DC power ground terminal
PB1
PB2
Remarks
Description
For information on the
pulse signals, refer to
page 30.
A and B-phase signals are input from
the PLG.
4.75 to 6VDC
(Current consumption
50mA)
Factory-connected with "PA2" by the
jumper. Remove the jumper when the
terminal resistor is not needed.
Factory-connected with "PB2" by the
jumper. Remove the jumper when the
terminal resistor is not needed.
PLG power supply common terminals.
Input PLG power. Connect the positive
side to 5V and the ground side to SG.
Also, connect the shield of the shield
wire to SG.
36
4.4. Wiring Instructions
(1) Connection with the speed detector (PLG).
Use twisted pair shielded cables (0.2mm2 or larger) to connect the FR-A5AP and speed detector (PLG). Cables
to terminals 5V and SG should be connected in parallel or be larger in size according to the cable length table as
indicated below. To protect the cables from noise, run them (at least 10cm) away from any source of noise (e.g.
the main circuit and power supply voltage).
(2) Cable length.
1) Cable length within 30m.
Cable Length
Within 10m
Within 20m
Within 30m
Number of Parallel Cables
of 0.2mm2
At least 2 cables
At least 4 cables
At least 6 cables
Larger-Size Cable
0.4mm2 or larger
0.75mm2 or larger
1.25mm2 or larger
2) Cable length of more than 30m
Use a power supply slightly higher than 5V (approximately 5.5V) in addition to 6 or more parallel cables of
0.2mm2 or cables of 1.25mm2 or more. This allows the cable length to be increased up to 100m. Note that the
voltage applied across terminals 5V-SG must not exceed 6V.
(3) Connection of terminal resistors
Use the jumpers across PA2-PAR and PB2-PBR to connect terminal resistors to the A and B-phases of the PLG.
Normally, keep the jumpers fitted. However, remove the jumpers when the same PLG is shared between the FRA5AP and the other unit (e.g. NC) which is connected with a terminal resistor.
37
(4) Speed detector (PLG)
Line driver LED type PLG
A. A signal 1000ppr to 4096ppr
B. B signal 1000ppr to 4096ppr
Output pulse specifications
a
P
b c d
A
A
2.4 to 5.2V (High)
0 to 0.4V (Low)
B
B
a, b, c and d should be (1/4 1/8)P when rotation is clockwise as viewed from
the shaft end of the PLG.
<Example of PLG available on the market>
Tamagawa Seiki:
TS1508N207, TS5008N122, TS5108N122
Pin Numbers of PLG Output Signals (Tamagawa Seiki, TS1508N207)
Pin Number
C
R
A
N
Output Signal
A-phase signal
A-phase inverse signal
B-phase signal
B-phase inverse signal
Pin Number
H
K
E
Output Signal
+5V power supply
Power supply common
Case earth
Note: When PLG feedback control and orientation control are used together, the PLG is shared between these
controls. Use the PLG with a pulse count is 1000 to 4096ppr.
38
4.5. Related Parameter List
Parameter
Number
22
29
144
162
Setting Range
Minimum
Setting
Increments
0.1%
Factory
Setting
0, 1, 2, 3, 4
0, 2, 4, 6, 8, 10,
102, 104, 106,
108, 110
0, 1, 2
1
1
0
4
(Note 4)
(Note 4)
1
0
0 to 30Hz, 9999
0, 1
0 to 400Hz,
9999
0 to 100
0 to 4096
0, 1, 2
0, 1
0 to 200%
0 to 200%
0 to 400Hz
0 to 150
0 to 50%
0 to 50%
0 to 50%
0 to 50%
0.01Hz
1
0.01Hz
9999
1
9999
0.1
1
1
1
0.1%
0.1%
0.01Hz
1
1%
1%
1%
1%
1
1024
0
1
100%
20%
120Hz
20
0%
0%
0%
0%
Name
Torque limit level (Stall prevention
operation level) (Note 1)
Acceleration/deceleration pattern
Number of motor poles (Speed
setting switch-over) (Note 1)
285
359
367
Automatic restart after
instantaneous power failure
selection
Overspeed detection frequency
PLG rotation direction
Speed feedback range
368
369
370
371
372
373
374
375
380
381
382
383
Feedback gain
Number of PLG pulses
Control mode selection
Torque characteristic selection
Speed control P gain
Speed control I gain
Overspeed detection level
Servo lock gain
Acceleration S pattern 1
Deceleration S pattern 1
Acceleration S pattern 2
Deceleration S pattern 2
0 to 200%, 9999
150%
Control Mode
PLG feedback
Vector
control
control
(Note 3)
Note: 1. When the FR-A5AP is not fitted, the function names in parentheses are used.
2. • in the Control Mode field indicates that the corresponding function is valid.
3. Functions as the stall prevention operation level.
4. The acceleration/deceleration pattern C setting (Pr. 29 = 4) is made valid when the FR-A5AP is fitted.
39
4.6. Pre-Operation Settings
(1) Pr. 144 "number of motor poles (PLG)".
The either of the following motors may be used. Set the number of motor poles according to the motor used:
Standard motor (with PLG)
: SF-JR 0.2kW to 55kW
Constant-torque motor (with PLG): SF-JRCA 0.4kW to 55kW
Note: 1. For vector control, this parameter value is made invalid and the setting of Pr. 81 "number of motor poles"
is made valid.
2. If you set this parameter value to "0, 10 or 110" and operate the inverter, any of E.OP1 to E.OP3 occurs.
3. If you set "102, 104, 106 or 108", that value minus 100 is set as the number of poles.
(2) Pr. 369 "number of PLG pulses".
Set the number of PLG pulses.
Set the number of pulses before it is multiplied by 4.
Example:Set "1024" for 1024 pulses per revolution (ppr).
(3) Pr. 359 "PLG rotation direction".
Indicates the direction in which the PLG rotates.
Pr. 359=0
A
CW
Pr. 359=1 (factory setting)
CCW
PLG
Forward rotation is clockwise
rotation when viewed from A.
Forward rotation is counterclockwise
rotation when viewed from A.
Note: When the FR-A5AP is fitted and PLG feedback control or vector control is selected, the PU (FR-DU04/FRPU04) shows the rotation direction of the PLG. Make the setting so that FWD is displayed when the STF
signal switches on or REV displayed when the STR signal switches on.
40
4.7. Control Mode Setting
By setting the Pr. 370 "control mode selection" value, you can choose any of PLG feedback control (V/F control,
advanced magnetic flux vector control) and vector control.
Torque control and position control are not performed. (However, torque limit can be done in the vector control
mode.) When holding torque is required during a stop, choose vector control (zero speed control or servo lock).
Control Mode
Motor
V/F control
PLG
feedback
control
Advanced
magnetic
flux vector
control
Vector control (Note 1)
Standard
motor with
PLG (same
capacity)
Standard
motor with
PLG (same
capacity)
Standard
motor with
PLG (same
capacity)
Pr. 80, Pr.
81 Setting
Pr. 370
Setting
Pr. 367
Setting
9999
0 (1,2)
(Note 2)
Other than
9999
0
Other than
9999
1
2
Other than
9999
Other than
9999
Other than
9999
Zero
Speed
Control
Servo Lock Torque
Limit
Note: 1. When a speed control range of 1:1000 is required, choose vector control.
If vector control has been chosen, torque control and position control are not performed. The frequency
response of vector control is 10 to 20rad/s.
2. When Pr. 80 and Pr. 81 = "9999", PLG feedback control (V/F control) is valid if "1" or "2" is set in Pr. 370.
3. The RT terminal may be used to select between V/F control, PLG feedback control + advanced magnetic
flux vector control and vector control during a stop only.
41
4.8. PLG Feedback Control
Make sure that Pr. 80 "motor capacity", Pr. 81 "number of motor poles", Pr. 144 "number of motor poles", Pr. 369
"number of PLG pulses", Pr. 359 "PLG rotation direction" and Pr. 370 "control mode" values are set properly. (Refer
to Section 4.6 "Pre-Operation Settings and 4.7 "Control Mode Setting".)
(1) Pr. 367 "speed feedback range".
This parameter is used to make the PLG feedback function valid.
Set the speed feedback control range.
(When Pr. 367 = 9999 (factory setting), the PLG feedback function is invalid.)
<Setting>
Define the upper and lower limits in reference to the set value (frequency at which the motor is to be rotated at
constant speed). Normally, set the frequency converted from the rated motor speed (rated load) and slip (r/min).
Too large setting will result in slow response.
Example: Rated speed of a 4-pole motor is 1740r/min (60Hz)
Slip Nsp = synchronous speed - rated speed
= 1800 - 1740 = 60 (r/min)
Frequency equivalent to slip (fsp)
Nsp - number of poles
60 x 4
=
fsp =
120
Speed feedback range
= 2(Hz)
120
Driven load
Regenerative load
Set value
(Set command)
42
(2) Pr. 368 "feedback gain".
This parameter is valid when PLG feedback control is valid.
Set if rotation is instable or response is slow.
When the setting is greater than 1, response is faster but overcurrent or rotational instability is more liable to
occur.
When the setting is less than 1, response is slower but rotation is more stable.
(3) Instructions for PLG feedback control.
1) The number of motor poles used must be checked before starting operation. The number of poles set must be
correct to ensure proper control of the motor.
2) The PLG should be coupled in line with the motor shaft without any mechanical looseness with a speed ratio of
1 to 1.
3) Make sure that the PLG has been set to the correct rotation direction on the rotation direction display of the
parameter unit. If the rotation direction is not correct, PLG feedback control cannot be carried out (the inverter
can be operated).
4) During acceleration or deceleration, PLG feedback control is not performed to prevent instability such as
hunting. PLG feedback control is started after the output frequency has once reached the [set speed] [speed
feedback range].
5) If any of the following conditions occurs during PLG feedback control operation, the inverter is run at the output
frequency of [set speed] [speed feedback range] without coming to an alarm stop and does not follow up the
motor speed:
The pulse signal from the PLG is switched off due to an open cable, etc.
An accurate pulse signal cannot be detected due to induction noise, etc.
The motor is forced to accelerate (regenerative operation) or decelerate (e.g. motor lock) by large external
force.
6) When opening the brake of the motor with brake, use the RUN (running) signal. (The brake may not be
opened if the FU (output frequency detection) signal is used.)
7) During PLG feedback control, do not switch off the 5V power of the PLG. If the power is switched off, normal
PLG feedback control cannot be exercised.
8) Programmed operation cannot be performed in the PLG feedback control mode (when the FR-A5AP is fitted).
43
9) Set Pr. 285 "overspeed detection frequency" to prevent misoperation caused if an accurate signal cannot be
detected from the PLG. This shuts off the output and gives an inverter alarm (E.MB1) when;
(detection frequency) - (output frequency) > Pr.
285.
4.9. Vector control
Vector control can be performed using the standard motor with PLG.
Make sure that Pr. 80 "motor capacity", Pr. 81 "number of motor poles", Pr. 144 "number of motor poles", Pr. 369
"number of PLG pulses", Pr. 359 "PLG rotation direction" and Pr. 370 "control mode" values are set properly. (Refer
to Section 4.6 "Pre-Operation Settings and 4.7 "Control Mode Setting".) Servo lock will resist and attempts to move it
from the stop position, the limitation is the amount of torque that can be provided. Servo lock is only available in
vector control mode (when using a PLG).
(1) Zero speed control and servo lock
<Zero speed control>
When the Pr. 370 value is "1" and Pr. 80 and Pr. 81 values are not "9999", zero speed control is made valid so
that torque may be generated at zero speed.
Use Pr. 22 to set the torque limit level in the zero speed control mode. (150% torque (short duration) is possible.)
<Servo lock>
When the Pr. 370 value is "2" and Pr. 80 and Pr. 81 values are not "9999", servo lock is made valid.
Use Pr. 22 to set the torque limit level in the servo lock mode. (150% torque (short duration) is possible.)
Also, use Pr. 375 "servo lock gain" to set the servo lock gain.
A high setting will make response faster but increase the probability of instability.
When GD2 (inertia) is large, a high servo lock gain setting will increase the probability of instability.
44
<Zero speed control and servo lock timing charts>
1) Zero speed control or servo lock is made valid when the auxiliary exciting terminal (LX) is ON without the start
signal (STF, STR) being entered into the inverter (during a stop). Assign the function of the auxiliary exciting
terminal (LX) to any of the terminals using Pr. 180 to Pr. 186.
LX
ON
OFF
STF(STR)
DC dynamic brake
operation frequency
Output frequency
Zero speed control
or servo lock
OFF
2) Zero speed control or servo lock is made valid when the frequency command is 0Hz (not more than the
starting frequency) with the start signal being entered.
LX
OFF
STF(STR)
OFF
Output frequency
Zero speed control
or servo lock
OFF
DC dynamic brake
operation time
If a start is made during zero speed control or servo lock, online auto tuning is not activated.
45
3) Zero speed control or servo lock is made valid when the frequency command is not more than the DC
dynamic brake frequency during deceleration of the inverter. The position at the DC dynamic brake operation
frequency is held.
LX
STF(STR)
OFF
OFF
DC dynamic brake
operation frequency
Output frequency
Zero speed control
or servo lock
OFF
DC dynamic brake
operation time
46
(2) Pr. 22 "torque limit level"
Torque limit may be activated only when vector control is selected. The second and third functions are Pr. 48
"second torque limit level" and Pr. 144 "third torque limit level". When vector control is not selected, the stall
prevention functions are activated. Use the same parameter numbers for setting. The Pr. 22 setting may be
changed during operation. When Pr. 22 = "9999", the torque limit level may be set by entering a signal into the
No. 1 terminal. At this time, the auxiliary input override function of the No. 1 terminal is not activated.
The variable torque limit level analog signal can be limited.
Torque limit level
Pr. 22=9999
(200%)
(150%)
Pr.149
Pr.148
0V
10(5)V
Input voltage (across terminals 1-5)
(3) Pr. 371 "torque characteristic selection"
Used to change the torque characteristic according to the machine characteristics.
Pr. 371 Setting
0
1 (factory setting)
Standard Motor with PLG (e.g. SF-JR)
(Note)
Cyclic operation mode
Continuous operation mode
Note: When the cyclic operation mode is used, the inverter capacity must be made one rank higher than the motor
capacity.
47
Torque Characteristic of the Standard Motor with PLG (Example: SF-JR Standard Motor with PLG (4 poles))
With Reference to 1800r/min (60Hz) Torque
Cyclic operation mode setting
Continuous operation mode setting
[When the inverter used has a capacity one rank higher
[ When the inverter used has the same capacity as
than that of the motor and the rated voltage is input]
that of the motor and the rated voltage is input]
150
Short-duration
maximum torque
150
50%ED (Note 2)
100
2.2kW or more
(Note 3)
100
1.5kW or less
Continuous
operation torque
75
2.2kW or more
(Note 4)
30
20
30
20
0
Torque [%]
Torque [%]
1.5kW or less
Short-duration
maximum torque
900
1800
Speed [r/min]
3600 (Note 1)
0
600 15001800
3600 (Note 1)
Speed [r/min]
Note: 1. The maximum speed is 1) 0.4kW to 7.5kW: 3600r/min, 2) 11kW to 30kW: 3000r/min, 3) 37kW to 55kW: 1950r/min.
2. Continuous, repetitive operation of 50%ED can be performed in cycle time of 10 minutes. Note that the maximum
continuous operation time is 5 minutes.
3. Use the constant-torque motor (SF-JRCA with PLG) when 50%ED with 100% torque is required for 2.2kW or more
at 900r/min or less.
4. Use the constant-torque motor (SF-JRCA with PLG) when continuous 100% torque is required for 2.2kW or more at
600r/min or less.
5. To provide 150% torque from 0Hz to the rated speed of the motor the inverter should be one rank higher than the
motor.
6. Cyclic operation when the inverter and motor have the same capacity is possible but typically only 50% torque can
be produced.
7.Continuous operation when the inverter capacity is one rank higher than the motor will produce the same results as
when the inverter and motor capacity are the same (as shown above).
48
(4) Pr. 372 "speed control P gain".
Used to set the proportional gain of the speed loop.
A high setting will make the speed response faster but if the setting is too high this will cause vibrations and
noise.
(5) Pr. 373 "speed control I gain".
Used to set the integral gain of the speed loop.
A high setting will shorten restoration time at occurrence of speed variation but if the setting is too high this will
cause speed overshooting.
(6) Driving/regenerative status signal output.
When vector control is selected, the driving/regenerative status is output as a signal.
Assign the function of the output signal to any of the output terminals using Pr. 190 to Pr. 195 "output terminal
function selection".
(7) Instructions for vector control.
1) When using vector control, perform offline auto tuning in the motor rotation mode (whilst the motor is running).
2) Before starting operation, always confirm that the correct number of poles of the motor used. Proper speed
control cannot be performed if the number of motor poles is incorrect.
3) Couple the PLG in line with the motor shaft with a speed ratio of 1 to 1 without any mechanical looseness.
4) Make sure that the PLG has been set to the correct rotation direction on the rotation direction display of the
parameter unit. If the rotation direction is not correct, vector control cannot be carried out.
5) In the vector control mode, vector control is also exercised during acceleration/deceleration.
6) When opening the brake of a motor with brake, use the RY2 (operation ready 2) signal. (The brake may not be
opened if the FU (output frequency detection) signal is used.)
7) In the vector control mode, the maximum speed is 3600r/min (120Hz). If the speed is increased above that
value, it is clamped (limited to 120Hz (3600r/min) ).
8) Do not switch off the 5V power of the PLG during vector control. Proper vector control cannot be performed if
that power is switched off.
9) Proper vector control cannot be performed if the pulse signal from the PLG is lost due to an open cable, etc.
49
10) In the vector control mode, the carrier frequency is as follows:
Pr. 72 Setting
0
1
2
3
4
5
6
7
8
9
10
11
12
13
14
15
Carrier Frequency
V/F control, advanced
Vector control
magnetic flux vector
control
0.7kHz
Approximately 1kHz
1kHz
2kHz
3kHz
Approximately 3kHz
4kHz
5kHz
6kHz
7kHz
8kHz
9kHz
(Note 1)
Approximately 6kHz
10kHz
11kHz
12kHz
13kHz
14kHz
14.5kHz
Note: 1. When the capacity of the inverter is the same as that of the motor, do not set "6" or a higher value in Pr.
72 "PWM frequency selection".
When the capacity of the inverter is one rank higher than that of the motor, "6" (appoximately 6KHz) or a
higher value may be set in Pr. 72 "PWM frequency selection".
2. In the vector control mode, set the Pr. 72 "PWM frequency selection" value during a stop.
50
4.10. Additional Functions
(1) Pr. 162 "selection of automatic restart after instantaneous power failure selection".
By setting "2" in Pr. 162, automatic restart after instantaneous power failure can be made at the frequency
detected from the PLG. In the vector control mode, automatic restart is made with the PLG detection frequency
searched for, independently of the Pr. 162 setting.
Pr. 162 Setting
0 (factory setting)
1
2
Description
With frequency search
Without frequency search
PLG detection frequency search
(2) Pr. 285 "overspeed detection frequency".
If (detection frequency) (output frequency) > (Pr. 285 setting), E.MB1 occurs and the output is shut off.
When Pr. 285 = 9999, overspeed detection is not performed.
51
(3) Pr. 374 "overspeed detection level".
Used to limit the maximum speed. (0 to 400Hz)
Any speed higher than the speed set in Pr. 374 is judged as overspeed and the corresponding signal is output.
If overspeed is detected, the inverter will not come to an alarm stop.
Speed (r/min)
Speed set in Pr. 374
Pr.374
Time
Overspeed detection
output (Y29) (Note)
OFF
ON
Note: Assign the function to any of the terminals using Pr. 190 to Pr. 195 "output terminal function selection".
(4) Forward/reverse running signal output.
Whether forward or reverse rotation is being made is output as a signal according to the actual speed.
Assign the function of the output signal to any of the terminals using Pr. 190 to Pr. 195 "output terminal function
selection".
52
(5) S-shaped acceleration/deceleration C
When the FR-A5AP is fitted, S-shaped acceleration/deceleration C can be selected by setting "4" in Pr. 29
"acceleration/deceleration pattern". The S-shaped acceleration/deceleration C function allows the speeds of Sshaped acceleration/deceleration to be set in the corresponding parameters and the required parameter to be
selected by the S-shaped acceleration/deceleration C switching terminal (X20).
Assign the function of the S-shaped acceleration/deceleration C switching terminal (X20) to any of the terminals
using Pr. 180 to Pr. 186 "input terminal function selection".
Operation
S-Pattern
Switching Terminal
OFF
ON
During Acceleration
Pr.382
During Deceleration
Pr.382
Pr.380
Pr. 380 "S-shaped
acceleration 1"
Pr. 382 "S-shaped
acceleration 2"
Pr. 381 "S-shaped
deceleration 1"
Pr. 383 "S-shaped
deceleration 2"
Pr.380
Pr.381
Pr.381
Pr.383
Pr.383
S-shaped acceleration/ ON
deceleration C
OFF
switching terminal X20
Also, Pr. 380 to Pr. 383 are used to set the ratio of the S-shaped acceleration/deceleration time (Ts) to the
acceleration/deceleration time (T) in %.
S-shaped acceleration
Linear acceleration
Ts
T
Note: During acceleration/deceleration, switching cannot be made using the S-shaped acceleration/deceleration C
switching terminal (X20). When X20 is switched either ON or OFF during either acceleration or deceleration, the
effect of the switch (to select a different acceleration or deceleration shape) does not take effect until either the
acceleration or deceleration has stopped (i.e. a stable speed has been reached).
53
4.11. Specifications
Speed variation ratio
Speed control range
Functions
DC power supply
Maximum speed
Frequency response
Note: 1.
0.02% of the maximum speed (3600r/min) in vector control mode
(Note 1)
(load variation 0 to 100% at 6Hz or more).
1:1000 in vector control mode.
Speed feedback range setting.
Feedback gain setting.
PLG rotation direction setting.
A 5VDC power supply is required for the PLG and option unit.
The 5V power supply can be shared between orientation control and PLG feedback control.
This power supply is optional.
Power supply 5VDC, current capacity 400mA or more.
(Normally approximately 350mA for PLG and 50mA for option unit)
<Power supply example> NEMIC LAMBDA ES15-5 (5V 3A)
3600r/min (120Hz) in vector control mode.
10 to 20rad/s.
Load variation 100% indicates the maximum continuous operation torque value of the motor output
characteristic (refer to the relevent catalog or technical information) to the running frequency.
54
5. Wiring Example
I. PULSE TRAIN INPUT
A pulse train signal can be used to enter the speed setting of the inverter.
Pr. 384 is factory set to "0" to make this function invalid.
5.1. Wiring Example
NFB
Power
supply
Inverter
U
R (L1)
S (L2)
V
T (L3)
W
PC
Input pulses
FR-A5AP
PIN
NFB
Motor
Power
supply
IM
or
Open
collector
Input pulses input
S (L2)
V
T (L3)
W
PC
PIN
Motor
IM
FR-A5AP
PO
PO
Open collector input
Inverter
U
R (L1)
SD
SD
Note: This option unit must be wired using the open collector system to operate it properly.
5.2. Terminals
Symbol
PIN
PO
Terminal
Pulse input terminal 1
Pulse input terminal 2
Description
(Note)
Terminal used to enter a pulse train of 0 to 100kpps
(Note)
Terminal used to enter a pulse train of 0 to 100kpps
Note: Whether an input pulse is entered into PIN or PO depends on the wiring. Refer to Section 5.1 "Wiring
Example".
55
Output frequency
5.3. Adjustment
Factory setting
(60Hz)
Bias
Pr.385
Note: Maximum number of input pulses: 100kpps
Note: Number of input pulses are multiplied by 2
internally
Gain Pr.386
0
Maximum number of pulses
Input pulses (PPS)
5.4. Parameter Definition
Parameter No.
(Note 1)
384
385
386
Name
Input pulse frequency division ratio
Zero-input pulse frequency
Maximum-input pulse frequency
Setting Range
0 to 250
0 to 400Hz
0 to 400Hz
Minimum Increments
1
0.01Hz
0.01Hz
Factory Setting
0
0
60
Note: 1. Indicates the frequency division ratio for the input pulses. The frequency resolution to the input pulses
varies with the setting.
2. When the Pr. 384 value is "0" (factory setting), Pr. 385 and Pr. 386 do not function even if their values
have been set.
CAUTION
It should be noted that if the pulse train input command is not given, the motor will start at the preset
frequency by merely switching on the start signal.
56
5.5. Setting Example
NFB
Power supply
Inverter
R (L1)
U
S (L2)
Frequency setting potentiometer
e.g. pulse
generator
V
T (L3)
W
FR-A5AP
Motor
IM
0 to 60Hz
Preset frequency
When the frequency is set to 0 to 60Hz at the input pulse frequency setting of 0 to 50kpps.
Hz
60
0
50kpps
Input pulse frequency
0 to 50kpps
1) From the maximum number of input pulses, calculate the Pr. 384 "input pulse frequency division ratio" value.
Maximum number of input pulses(pps)
Pr. 384 =
400
50000
=
Set 125 in Pr. 384.
= 125
400
2) Set the zero-input pulse frequency and maximum-input pulse frequency.
Pr. 385 = 0Hz
Pr. 386 = 60Hz
<Example> The following is the calculation of the minimum frequency that may be detected using the above setting
example:
Pr. 386
Minimum frequency =
2 16.6ms Pr. 384 400
=
60
2 16.6 103 125 400
= 0.04(Hz)
Therefore, the frequency that may be detected is the starting frequency of 0.5Hz or higher.
57
Input example (Pr. 386 = 400Hz)
Input Pulse Frequency
Division Ratio (Pr. 384)
Maximum Number of Input
0 (factory setting)
20
50
100
120
200
250
Minimum Detectable
*
Pulses 1
Pulse input invalid
8kpps
20kpps
40kpps
48kpps
80kpps
100kpps
*
Frequency 2
1.5Hz
1.0Hz
0.5Hz
0.5Hz
0.5Hz
0.5Hz
How to calculate the input pulse frequency division ratio
Use the following formula to calculate the input pulse frequency division ratio in Pr. 384:
*1. Maximum number of input pulses (pps) = Pr. 384x400
Pr. 386
*2. Detectable frequency >
2 16.6ms Pr. 384 400
The detectable frequency changes with the maximum number of input pulses.
5.6. Specifications
Circuit system
Input current
Max. permissible number of pulses
Input pulse specifications
Response delay
Preset frequency resolution
Open collector system
10mA
100kpps
0 to 250 (variable frequency)
16.6ms
0.012Hz/50Hz