1
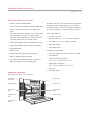
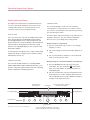
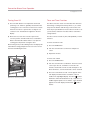
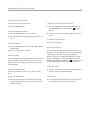
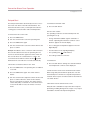
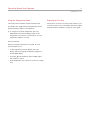
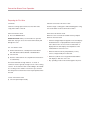
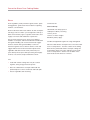
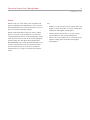
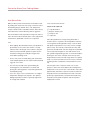
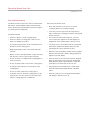
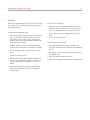
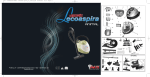
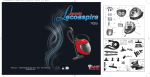
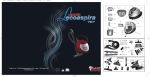
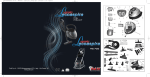
USE & CARE GUIDE
Convection Steam Oven
Contents
Important Note
Wolf Convection Steam Oven . . . . . . . . . . . . . . . . . . . 3
To ensure the safe and efficient use of Wolf equipment,
please take note of the following types of highlighted
information throughout this guide:
Safety Instructions . . . . . . . . . . . . . . . . . . . . . . . . . . . . 4
Convection Steam Oven Features . . . . . . . . . . . . . . . . 7
Convection Steam Oven Operation . . . . . . . . . . . . . . 10
Convection Steam Oven Cooking Modes . . . . . . . . . 17
Convection Steam Oven Care . . . . . . . . . . . . . . . . . . 35
Troubleshooting Guide . . . . . . . . . . . . . . . . . . . . . . . . 40
Service Information . . . . . . . . . . . . . . . . . . . . . . . . . . . 42
Wolf Warranty . . . . . . . . . . . . . . . . . . . . . . . . . . . . . . . 43
Features and specifications are subject to change at any time
without notice. Visit our website, wolfappliance.com for the
most up-to-date information.
IMPORTANT NOTE: Throughout this guide, dimensions in
parentheses are millimeters unless otherwise specified.
IMPORTANT NOTE highlights information that is
especially important.
CAUTION signals a situation where minor injury or product
damage may occur if instructions are not followed.
WARNING states a hazard that may cause serious injury or
death if precautions are not followed.
Wolf Convection Steam Oven
3
wolfappliance.com
Welcome
Congratulations on your choice of a Wolf convection
steam oven.
• Moistness and flavor are retained so no additional oil,
basting or sauces are necessary.
The legacy of the “combination oven” goes back decades,
to innovative restaurant chefs in America and Europe who
embraced the gentle combination of air movement with
superheated steam to achieve superior results in menu
offerings from breads and roasts to delicate fishes,
seafood and vegetables.
• Vitamins, texture, shape, size and color are preserved.
European home cooks wanting the highest degrees of
freshness, flavor and vitamin preservation for their families
also embraced the technology, and today the home steam
oven is a standard fixture of the residential kitchen in
many European countries.
• Meats defrost gently and evenly without any hot spots.
Now Wolf combines the benefits of convection heat and
steam heat for the most innovative home steam oven on
the market today. Virtually any dish prepared in a conventional oven, range or microwave can also be prepared in
the Wolf convection steam oven—with more control over
the finished product. The convection movement of hot air
ensures consistent heating and browning and eliminates
odor transfer while steam adds moisture at just the right
times and amounts—for the perfect end results.
• Risks of overcooking are reduced and messy boilovers eliminated.
• Breads, bagels, bakery and pastry can be proofed,
baked and crisped with steam.
• In Wolf gourmet mode, a sensor automatically adjusts
cooking time to the type and amount of food being
cooked, preventing under- or overcooking.
• Smart timer functions are like an extra pair of hands,
cooking food that’s ready to serve when you need it—
even when you're not in the kitchen to start and stop
the oven.
The more you use your Wolf convection steam oven, the
more you will reap these and many more benefits.
Enjoy greater confidence in the kitchen with more ease
and professional results than ever before. This guide has
been thoughtfully arranged to help you to learn the
features and benefits of your new oven, and to be as
enjoyable and productive as possible. Please read it, keep
it handy for reference and follow the following safety
precautions.
Safety Precautions
4
SAFETY PRECAUTIONS
IMPORTANT SAFEGUARDS
This oven was built to achieve recognized standards in
technology and safety regulations and is designed for
use in the home for preparing food. It is not intended for
use by persons with reduced physical, sensory or
mental capabilities, or lack of experience and knowledge, unless supervised or unless they have been given
instruction concerning the use of the appliance by a
person responsible for their safety. Proper use is essential to avoid damage or accidents.
When using electrical appliances, basic safety precautions should always be followed including the following:
Installation and connection to power supply must be
performed by a qualified electrician in accordance with
provided installation instructions.
Before first use, please fill the water tank and perform
related duties as outlined in the ‘Using for the first time’
section.
Please retain this guide for future reference. If you sell
the appliance or pass it on to a third party, please
ensure these instructions accompany the appliance,
together with the instructions on installation.
• Read all instructions.
• Do not touch hot surfaces. Use handles or knobs.
• To protect against electrical shock, do not immerse
cord, plugs or (state specific part or parts in
question) in water or other liquid.
• Close supervision is necessary when any appliance
is used by or near children.
• Unplug from outlet when not in use and before
cleaning. Allow to cool before putting on or taking off
parts.
• Do not operate any appliance with a damaged cord
or plug, or after the appliance malfunctions or has
been damaged in any manner. Return appliance to
the nearest authorized service facility for examination, repair or adjustment.
• The use of accessory attachments not recom-
mended by the appliance manufacturer may cause
injuries.
• Do not use outdoors.
• Do not let cord hang over edge of table or counter,
or touch hot surfaces.
•
Do not place on or near a hot gas or electric burner,
or in a heated oven.
• Extreme caution must be used when moving an
appliance containing hot oil or other hot liquids.
•
Always attach plug to appliance first, then plug cord
into the wall outlet. To disconnect, turn any control
to “off”, then remove plug from wall outlet.
• Do not use appliance for other than intended use.
• Save these instructions.
Safety Instructions
5
wolfappliance.com
SAFETY PRECAUTIONS
CHILD SAFETY
FIRE HAZARDS
• Plastic and polystyrene can be dangerous for
• Never flambé or cook food using excessive fats.
children. Keep these packaging materials away from
children.
• The appliance is designed for use by adults who are
familiar with these operating instructions. Children
are often unable to recognize the danger of electrical
appliances. Ensure proper supervision and do not
allow children to play with the appliance.
• Use the childproof locking feature outlined on
page 9.
• Never use the appliance to dry animals, textiles or
paper.
• Do not use the oven as a room heater or humidifier.
• Only use the probe supplied. Do not submerge it in
water or clean it in the dishwasher.
• Installation and operation should only occur in a
room with an ambient temperature between 41°F
and 95°F. If frost develops, residual water left in the
pumps could freeze and cause damage.
• Any repairs, modifications or manipulations to the
appliance, especially any electrically live parts,
should only be carried out by the manufacturer, its
customer service department or similarly qualified
persons. Incorrectly done repairs may cause serious
injury, damage the appliance and fittings, and affect
the functioning of the appliance.
• If the appliance is not working properly or in case a
repair is needed, follow the instructions given in the
troubleshooting guide. Please contact Wolf customer
care if necessary.
• Only original equipment manufacturer parts may be
used.
• If the appliance is visibly damaged, do not use it.
Contact Wolf customer care.
• If the appliance is not operating property, disconnect
it from the power supply immediately.
Safety Instructions
6
SAFETY PRECAUTIONS
FIRE HAZARDS
• Ensure the main cables of other electrical appliances
do not get caught in the door of the oven, which
could damage the electrical cable insulation and
create a fire hazard.
• If the main cable of the appliance is damaged it must
be replaced by a Wolf factory certified service
provider.
• Ensure there are no foreign bodies in the cooking
space before closing the appliance door.
• Never store objects in the cooking space. This could
pose a danger if the appliance were accidentally
turned on. Do not store food, temperature-sensitive
or inflammable materials (e.g. cleaning agents, oven
sprays, etc.) in the cooking space.
BURN HAZARDS
• The appliance gets very hot when in use. The oven
door, especially the glass, can also get hot. Do not
touch the oven door. Keep children away.
• The appliance will remain hot for some time after it
is turned off and will cool down slowly to room
temperature.
• Steam may escape from the cooking space when
the door is opened. Do not put your hands into the
cooking space if there is steam inside of it.
• Water in the water tank can be hot and can present a
scalding hazard.
• Keep oven vent ducts unobstructed.
• Hot steam may escape from the steam vent during
operation. Use care when opening the door to allow
steam to escape before removing or replacing food.
• Overheated fat and oil can easily catch fire. Heating
oil in the cooking space to sear meat is dangerous
and should not be done. Never try to extinguish
burning oil or fat with water. Smother fire or flame or
use dry chemical or foam-type extinguisher.
• Do not pour spirits (e.g. brandy, whisky, schnapps,
etc.) or extracts with alcohol or over hot food.
• Do not leave the appliance unsupervised when
drying herbs, bread, mushrooms, etc. If the foodstuff
dries out too much it can pose a fire hazard.
• If you notice smoke possibly coming from the appli-
ance itself or from inside the cooking space, keep
the appliance door closed. Disconnect the appliance
from the power supply.
• Do not heat unopened food containers as build-up
of pressure may cause the container to burst and
result in injury.
• Accessories get hot in the cooking space. Always
wear dry oven mitts or other dry, protective gloves or
use oven cloths.
• Do not put fingers in the door hinges, which could
cause injury if the appliance door is moved. Particular care should be taken when children are around.
• Only leave the appliance door open in the at-rest
position. An open appliance door poses a danger of
tripping or injury. Do not sit or rest on the appliance
door or use it as a storage surface.
Convection Steam Oven Features
7
wolfappliance.com
Convection Steam Oven Features
• Stainless steel with tubular handle.
• Can be installed in a standard or flush inset application.
• Stainless steel trim to match L series and E series
ovens.
• Convection with twelve cooking modes: steam, reheat,
auto steam bake, convection, convection humid,
convection steam, Wolf gourmet, slow roast, recipes,
my recipes, keep warm, descale and cleanse.
• Four-level rack guides with two adjustable oven racks.
• Large viewing window and halogen interior lighting.
The Wolf convection steam oven has been developed for
the highest levels of quality and ease of use. For best
results please take a moment to familiarize yourself with
the oven’s composition, components and accessories.
OVEN COMPONENTS
•
Two wire oven racks.
• One perforated 17 3/4" x 1" x 15" stainless steel pan.
• One solid 17 3/4" x 1" x 15" stainless steel pan.
• Water tank with lid.
• Temperature probe.
• Temperature probe.
• Recipes mode.
OPTIONAL ACCESSORIES
• Delayed start feature and descaling program.
• 30" (762) L and E series stainless steel trim—framed
and unframed.
• Agency certified for US and Canada.
• Two and five year residential warranty—exclusions
apply, see warranty at the end of this guide.
• Perforated stainless steel pans—
12 3/4" x 11/2" x 7" and 123/4" x 21/2" x 7".
• Solid stainless steel pans—
12 3/4" x 11/2" x 7" and 12 3/4" x 11/4" x 14".
• Oven rack.
• Descaling solution.
CONVECTION STEAM OVEN
Model CSO24 shown with E series unframed trim.
Control panel
and display
Control knob
WATER
LIGHT
TEMP
MODE
ON
POWER
TIME
OFF
Halogen lighting
Convection fan
Product rating
plate
Four-level rack
guides
Adjustable oven
racks
Probe receptacle
Large viewing
window
Convection Steam Oven Features
8
Display and Control Panel
The display and control panel is streamlined and easy to
use. The control knob and buttons are used to set the
cooking modes and access all of the features of your
convection steam oven for exceptional results.
DISPLAY AREA
The convection steam oven has one display window with
three separate displays providing different information.
The left digital display shows cooking temperature and
probe setpoint. The center text display is the informational
readout used for setting different modes and cooking
functions. The right digital display is the clock, timer and
delayed time display.
In the lower part of the display area, symbols representing
temperature, probe, cooking functions and time settings
will illuminate when in use.
CONTROL BUTTONS
CONTROL KNOB
The control knob (OK) is used on its own or with the
control buttons to make selections. It is used to confirm
any selection. You will always end a selection by pressing
the control knob to confirm.
The knob’s press and turn action puts every option at your
fingertips. Used on its own, the control knob provides
direct access to user settings and cooking modes.
Example using the control knob:
1) Press the control knob. Turn 5 clicks to user settings
and press to select.
2) Turn to the setting you wish to personalize and press to
select.
3) Turn to your preference and press to select. Back will
return you to the previous menu.
Example using the control knob with the control buttons:
The control knob (OK) and buttons, including WATER,
LIGHT, TEMP, MODE, TIMER, TIME and OFF allow you to
open the water tank, light the interior and select operating
modes, temperatures and timing functions.
1) Press the MODE button three times to select auto
steam bake. The auto steam bake
symbol illuminates. A recommendation for temperature flashes in
the digital display.
2) Turn the control knob to select the temperature for this
mode and press to confirm. Settings will be automatically accepted after ten seconds. Additional settings or
changes can be made at any time.
Temperature and
probe symbols
Text display
Timer, operating time, switch-off
time and clock symbols
8 :30
375 °F
Left digital display
WATER
LIGHT
TEMP
MODE
OK
TIMER
TIME
Control buttons
Control knob
Convection steam oven control panel.
Steam, reheat, auto steam bake, convection,
convection humid and convection steam symbols
OFF
Right digital display
Convection Steam Oven Features
9
wolfappliance.com
Personalization
Now let’s take a moment to personalize your oven to suit
your needs and preferences. Turn the control knob to user
settings to make your selections.
LANGUAGE
English, French or Spanish. Turn the control knob until
the desired language is displayed. Press to confirm your
selection.
WATER HARDNESS
Hard, medium or soft. The oven default is for hard water.
If you are unsure of your water hardness, you may use the
test strip provided in your use & care guide. You may
purchase additional test strips from a local home improvement center.
Follow the instructions on the test strip to determine your
water hardness then select the appropriate hardness
setting.
CHILDPROOF LOCK
To activate or deactivate childproof lock mode, turn the
oven off, then press the control knob. Turn the knob to
user settings and press to select. Turn to childproof lock
and press to select. Press to select on or off.
To use the oven by temporarily disabling the lock, simply
press and hold the OFF button while pressing MODE and
the control knob. The lock will automatically reactive ten
minutes after the oven has been off.
TIME DISPLAY
Visible or invisible. Invisible mode minimizes power
consumption while the oven is off. The time display will
disappear in approximately one minute.
TEMPERATURE UNIT
Fahrenheit (°F) or Celsius (°C).
CONTRAST
Select from low to high contrasts for the control panel
display. There are six settings, or boxes, which light up for
increasing contrast.
FORMAT
12-hour (am/pm) or 24-hour clock. In 24-hour mode the
display is dimmed between 24:00 and 6:00.
FACTORY SETTINGS
ACOUSTIC SIGNAL
Reset. Returns all user settings to the factory preset.
High, low or off.
WATER DOOR CONTROL
ILLUMINATION
Button only or automatically with door. The cooking
space can be illuminated by pressing the LIGHT button at
anytime, and will turn off automatically after 30 seconds.
Button only or automatically with message. If automatically with message is selected, the water door panel will
open automatically if the water tank empties during operation. The flap may also be opened at any time by pressing
the WATER button. Do not attempt to open the water door
manually.
Convection Steam Oven Operation
10
Selecting Operating Modes
Selecting Temperature
SELECTING OPERATING MODE
After a cooking mode is selected, the temperature can
be set.
1) Press the MODE button until the desired mode
appears.
2) Press the control knob to confirm the mode.
SELECTING COOKING SPACE TEMPERATURE
1) Press the TEMP button.
Example:
1) Press the MODE button until you reach auto steam
bake mode. ‘Auto Steam Bake—Rack 2 or 1+ 3’
appears in the text display. The recommended temperature flashes in the upper left digital display. The auto
steam bake
and temperature
symbols flash.
2) Press the control knob to confirm. ‘Auto Steam Bake—
Steam phase’ followed by ‘Auto Steam Bake—Hot air
phase’ appears in the text display.
CHANGING OPERATING MODE
1) Press the OFF button. The selected operating mode is
ended.
2) Press the MODE button to select a new operating
mode.
2) Turn the control knob to set the desired cooking space
temperature and press to select.
3) Once the mode has started, you can press the TEMP
button and turn the control knob to change the temperature. Press the control knob to select the temperature.
Convection Steam Oven Operation
11
wolfappliance.com
Turning Oven Off
Timer and Timer Functions
1) Press the OFF button. The temperature and mode
symbols go out. Steam is gradually released from the
cooking space over 1 minute to avoid a rush of steam
when the oven door is opened. The cooling fan can
continue to run. ‘Residual heat’ appears in the text
display.
The Wolf convection steam oven includes timer functions
that manage cooking start and stop times so you can be
away from the kitchen and still enjoy hot-from-the-oven
meals at pre-specified times. Please take a moment to set
your local time, and learn more about these useful timesaving features.
2) After each use, leave the oven door open in the
“at-rest” position, until the interior has cooled down.
Refer to the illustration below. When cool, wipe the
cooking space dry before closing the door.
The timer can be used at any time, independently of other
functions.
After turning off any mode utilizing steam, the display will
read ‘Water is being pumped off’. Be sure not to remove
the water tank during this time.
SETTING CURRENT TIME
1) Press the TIME button.
2) Turn the control knob to set the hour and press to
select.
3) Repeat for minutes.
SETTING THE TIMER
WATER
LIGHT
TEMP
MODE
ON
POWER
TIME
OFF
1) Press the TIMER button.
2) Turn the control knob to set duration. The timer can be
set for up to 9 hours, 59 minutes. For the first 10
minutes, the intervals are 10 seconds. Example: 5' 40.
After 10 minutes, one minute intervals can be selected.
Oven door “at-rest” position.
3) Press the control knob to start. ‘Timer’ appears in the
text display window and the countdown of time is
visible in the right digital display. The timer
symbol
illuminates. When timed duration is up, a sequence of
audible signals repeats for one minute. ‘Timer finished’
appears in the text display and the timer
symbol
flashes.
Convection Steam Oven Operation
12
Timer and Timer Functions
TURNING OFF TIMER NOTIFICATION
CHECKING / CHANGING OPERATING TIME
1) Press the TIMER button.
1) Press the TIME button. Time remaining flashes in the
right digital display. The operating time
symbol
flashes.
CHECKING / RESETTING TIMER
1) Press the TIMER button to view countdown.
2) Turn the control knob to change duration and press to
select.
TURNING TIMER OFF
1) Press the TIMER button twice. The right digital display
will flash 0'00.
2) Press the control knob to confirm.
OPERATING TIME
The operating time feature automatically turns the oven off
at the desired time. These instructions assume you have
placed food in the cooking space and selected a mode
and temperature.
2) Turn the control knob to change duration and press to
select.
TURNING OFF BEFORE TIME
1) Press the OFF button.
END OF TIME SIGNALS
The selected mode turns off automatically when the operating time is up. Notification includes a long, intermittent
audible signal emitted for 1 minute.‘Operating time
finished—Continue: select duration’ appears in the text
display. Cooking space temperature appears in the left
digital display and the operating time
symbol flashes in
the right digital display. Settings remain for 3 minutes.
EXTENDING TIME
SETTING OPERATING TIME
Preheat the cooking space if necessary before setting
time.
1) Turn the control knob to select a new duration within 3
minutes of the time ended notification.
1) Press the TIME button.
TURNING OFF
2) Turn the control knob to set the duration. Operating
mode automatically turns off when the operating time
has been reached.
1) Press the OFF button. Settings are cleared. Residual
heat temperature continues to be displayed.
Convection Steam Oven Operation
13
wolfappliance.com
Delayed Start
The delayed start feature automatically turns the convection steam oven both on and off at desired times. The
instructions below assume you have placed food in the
cooking space and selected a mode and temperature.
TURNING OFF BEFORE TIME
1) Press the OFF button.
END OF TIME SIGNAL
SETTING DELAYED START TIME
1) Press the TIME button.
The operating mode turns off automatically when the
operating time is up.
3) Press the TIME button again
• A long, intermittent audible signal is emitted for 1
minute. ‘Operating time finished—Continue: select
duration’ appears in the text display.
4) Turn the control knob to select the switch-off time and
press to confirm.
• The cooking space temperature appears in the left
digital display.
Example: At 8:00 am, select convection mode and 355°F.
Press the time button and select an operating time of 1
hour. Press the time button again and set the switch-off
time to 9:30. Press the control button to confirm. The
oven will remain off with the switch-off time
symbol
illuminated. The oven will turn on at 8:30 automatically.
• The time flashes in the right digital display.
TURNING OFF
CHECKING / CHANGING SWITCH-OFF TIME
1) Press the OFF button. Settings are cleared. Residual
heat temperature continues to be displayed.
1) Press the TIME button. The operating time is visible for
3 seconds.
USING DELAYED START WITH TEMPERATURE PROBE
2) Turn the control knob to select the operating time.
2) Press the TIME button again. The switch-off time
flashes.
3) Turn the control knob to adjust the switch-off time and
press to confirm. When the switch-off time flashes,
turn the control knob to change. The switch-off time
can be delayed by a maximum 11 hours 59 minutes in
12-hour mode and 23 hours, 59 minutes in 24-hour
mode.
• The operating time
symbol flashes.
• The settings remain for 3 minutes.
When using delayed start with the probe, the oven will
automatically turn off when the set probe temperature is
reached, which may be somewhat earlier or later than the
set switch-off time.
ADDITIONAL NOTES ON DELAYED START
Delayed start is available for recipes that do not require
preheating, including Wolf gourmet, recipes or my recipes.
Perishables should not be kept unrefrigerated.
Convection Steam Oven Operation
14
Using the Temperature Probe
The probe monitors your food’s temperature and
announces when it has reached a temperature considered
“done” and safe for consumption. Using the probe also
helps to maintain ideal tenderness.
The internal temperatures shown in the chart below are
the USDA recommendations for safe food consumption.
Your desired doneness may vary.
INTERNAL TEMPERATURE
DONENESS
INTERNAL TEMP
BEEF, LAMB AND VEAL
Rare
Medium Rare
Medium
Well Done
140°F (60°C)
145°F (65°C)
160°F (70°C)
170°F (75°C)
PORK
Well Done
170°F (75°C)
POULTRY
Well Done Breast
Well Done Thigh
Well Done Stuffing
170°F (75°C)
180°F (80°C)
165°F (75°C)
POSITIONING THE TEMPERATURE PROBE
1) Insert the probe into the thickest part of the meat so
that the tip is in the center of the meat. Bury the entire
metal shaft into the dish, or as much as is possible. To
maintain accuracy, avoid touching bone or fat with the
probe as they conduct heat faster.
2) Insert the plug end of the probe into the socket located
on the right interior oven wall behind the metal flap.
3) Ensure probe cable is neatly tucked inside of the oven
interior. Close the oven door.
SETTING THE PROBE TEMPERATURE
1) Select the operating mode and cooking space temperature.
2) With the probe positioned and plugged in, press the
TEMP button until the display reads ‘Probe Temperature’.
3) Turn the control knob to set the probe temperature
based on the desired level of doneness and press to
select. Probe temperature appears in the left digital
display when the temperature reaches 85°F or higher.
Convection Steam Oven Operation
15
wolfappliance.com
Using the Temperature Probe
Preparing for First Use
CHECKING AND CHANGING PROBE TEMPERATURE
Please take a moment to record the serial number of your
convection steam oven, the installation date and company
that performed the installation on page 42 of this guide.
The TEMP button toggles between displaying the actual
probe temperature and the set temperature.
1) To change the set probe temperature, press the
TEMP button twice until the display reads ‘Probe
Temperature’, then turn the control knob to set a new
temperature and press to select.
END OF COOKING
When the set probe temperature is reached, the oven
automatically turns off.
• ‘Probe temperature reached’ appears in the text
display, and the actual probe temperature appears in
the left digital display.
• The probe
symbol will flash and an audible signal
will sound for 1 minute.
• Probe temperature may continue to rise due to residual
heat.
Convection Steam Oven Operation
16
Preparing for First Use
CLEANING
BEFORE USING FOR THE FIRST TIME
Clean the cooking space and accessories with warm,
soapy water and a soft cloth.
Heat the empty cooking space without baking pans using
auto steam bake mode for 30 minutes at 410°F.
OPEN THE WATER TANK
EMPTYING THE WATER TANK
1) Press the WATER button.
When the oven is turned off, residual water is pumped
back into the water tank.
IMPORTANT NOTE: Always use this button to open the
water tank. Trying to access the water tank manually will
damage the oven.
FILL THE WATER TANK
1) Fill the tank with fresh, cold tap water. Never fill the
tank with demineralized, filtered or distilled water.
2) Close the lid.
3) Push the water tank into its compartment and ensure it
is seated firmly.
The water tank holds enough water for 1.5 hours of
continuous steam, typically enough for four or five cooking
sessions. In the event the tank needs refilling in the middle
of a cooking session, add no more than 2 cups of water.
This will prevent overflow when water is pumped back into
the tank.
CLOSE THE WATER TANK
1) Close the panel flap manually.
• ‘Water is being pumped off’ appears in the text display.
Residual water is not pumped back until its temperature is below 175°F. If ‘Do not remove water tank’ is
displayed in the text display, the temperature of the
residual water is still over 175°F.
• When the water has been pumped back you may
remove, empty and dry the water tank.
• When the symbols are no longer illuminated and the
text display is dark, the oven is off.
• Any operating mode can be started again at any time.
Convection Steam Oven Cooking Modes
17
wolfappliance.com
Cooking Modes
Twelve cooking modes bring the world of modern food
preparation right into your kitchen. Steam mode perfectly
poaches fish. Auto steam bake turns out breads that are
tender inside and delightfully glossy and crusty outside.
Now you can enjoy meats, casseroles, breads, appetizers,
desserts or multi-course meals with enhanced taste,
texture and appearance.
Reheat Function
QUICK LEARNING GUIDE
Auto Steam Bake
Use for breads, buns, cakes and pastries
whether fresh, par-baked or frozen.
Convection Mode
Use for baking muffins, biscuits
and roasts.
In this section you will learn about each mode, its benefits
to you, and receive suggestions to help you decide when
you would want to select that mode.
We also recommend that you take advantage of the
demonstration recipes with each mode for immediate
hands-on experience—and an end product that showcases the professional results that you can look forward to.
Now is also a good time to get into the habit of leaving the
oven door open after cooking in the “at-rest” position and
when the interior is cool wiping the cooking space dry.
This makes the cooking space clean for the next session.
COOKING MODES
MODE
Steam Function
USES
Use the steam function for foods you would
have heated in a saucepan and for all foods
that would benefit from gentle handling.
Use in place of reheating in oven,
range or microwave.
Convection Humid
Use for cakes, casseroles,
grain dishes, lasagna and meats.
Convection Steam
Use for foods you want tender
inside and roasted or crisped outside.
Wolf Gourmet
Slow Roast Mode
Recipes Mode
My Recipes
Use to prepare specified foods,
whether fresh, refrigerated or frozen.
Use to keep meats tender
by slow roasting.
Use to cook entire meals from
appetizers and entrees to desserts.
Use to store cooking instructions for
recipes you prepare frequently.
Keep Warm Mode
Use when food cannot be eaten
when it’s hot from the oven.
Cleanse Mode
Use to cleanse baby bottles and
canning jars with steam.
Convection Steam Oven Cooking Modes
18
Steam
From vegetables, poultry and fish to grains, beans, pasta
and egg dishes, gentle steam heat is ideal for capturing
nutrition, color and flavor.
Steam mode heats with steam and hot air, with a temperature range of 85°F to 210°F: just enough heat to firm up a
batch of homemade yogurt, or greater steam heat to thoroughly cook meats and side dishes to perfection.
Use the steam function for any food you would have
heated in a saucepan, and for all foods that would benefit
from gentle handling such as fish and seafood, veggies
and rices. Steam offers great flexibility. Cook meal
elements together such as chicken and rice or fish and
veggies without odor or flavor transfer. Prepare frozen
vegetables and defrost foods evenly without any hot
spots. Gently extract juices while preserving the integrity
of flavor, color, texture, shape and vitamin content.
TIPS
• Foods with similar cooking times may be cooked
together, saving energy and clean-up time.
• Place the solid stainless steel pan underneath the
perforated pan to collect condensate and food spills.
• Season vegetables after steaming.
STEAM RECIPE
Steamed Shrimp
1 lb thawed, raw shrimp, peel on
1 tablespoon old bay seasoning
1 lemon, juiced
1 lemon, cut into 6 wedges
Handful of parsley sprigs
Combine all ingredients together in a large mixing bowl.
Place the solid stainless steel pan in the convection steam
oven on rack position 1. Pour the contents of the mixing
bowl onto the perforated stainless steel pan, taking care
to spread the shrimp out evenly, and place in the steam
oven on rack position 2. Set the oven to 200°F on the
steam mode. Set the timer for 7 minutes.
Convection Steam Oven Cooking Modes
19
wolfappliance.com
Reheat
Reheat mode uses steam and hot air to rehydrate food
gently. Combining just the right balance of air convection
and rehydrating moisture, reheat mode warms one to four
pans of food evenly and without drying.
Reheat mode temperatures range from 210°F to 300°F.
Entrees, casseroles, sides and leftovers are warmed to
serving temperature without compromising quality. Frozen
meals and convenience foods can also be brought gently
and thoroughly up to their ideal serving temperatures.
Bread baked days ago can be regenerated at 300°F for an
aromatic, fresh-from-the-oven crust and moist interior.
Use the reheat function for any food you would have
reheated in the oven, range or microwave with superior
results.
TIPS
• If bakery or roast looks good on the outside, but is still
doughy or raw on the inside, try a lower cooking space
temperature and lengthen operating time.
• If regenerated food seems dry, try a lower cooking
space temperature and shorten operating time.
• If there is too much condensate on or around food, try
a higher cooking space temperature and lengthen
operating time.
Convection Steam Oven Cooking Modes
20
Auto Steam Bake
Bake just like a professional with auto steam bake mode.
By heating with steam first, then using convection heat to
finish baking, bagels, breads, buns, rolls and pastries
acquire a tender interior, a beautiful exterior and a natural
shine without the need for brushing with an egg wash.
Auto steam bake mode temperatures range from 210°F to
445°F. Use this mode for breads, buns, cakes and pastries
whether fresh, par-baked or frozen. Do not preheat.
TIPS
• After shaping, allow bread and other yeast products to
proof briefly on the counter. Ten minutes is usually
sufficient. Place the dough on the stainless steel pan,
which has been lined with parchment, put it into the
unheated cooking space and bake using the auto
steam bake operating mode.
• A nice, shiny crust is formed during auto steam bake.
Yeast and puff pastries do not need to be brushed with
egg yolk, oil or cream.
• The oven door should not be opened during the
steaming phase. The introduction of cold air will
prolong the steaming phase, oversteaming the bread
and impeding rising.
• For a nice, crispy crust on smaller items use a higher
temperature during the hot air phase. The optimum
baking temperature for buns is generally higher than
for a single loaf of bread.
AUTO STEAM BAKE RECIPE
Simple No-Knead Bread
3 1/4 cups bread flour
1/4 teaspoon instant yeast
11/4 teaspoon salt
1 3/4 cup water
Place all ingredients into a large mixing bowl. With a
wooden spoon or a spatula, stir the ingredients until they
come together. The dough will be sticky. Cover the bowl
with plastic wrap and leave out on the counter overnight
(10–12 hours). The next day or later that same day, with
generously floured hands, form the dough into a ball. With
a sheet of parchment paper on the solid stainless steel
pan, sprinkle a light dusting of flour or cornmeal and place
the dough in the center of the pan. Dust the top of the
dough with flour and cover with a large bowl, loose plastic
wrap or a cotton towel. Allow to rise for 2 hours. Slash the
risen dough with a sharp knife or razor blade across the
top.
Place the pan in the convection steam oven on rack
position 2. Select auto steam bake mode and adjust the
temperature to 425°F. Press the control knob to start. After
approximately 20 minutes, open the oven door and insert
the probe into the loaf of bread from the side so that the
probe’s tip is approximately centered in the bread. Plug
the probe into the probe receptacle and set the probe
temperature to 210°F.
Convection Steam Oven Cooking Modes
21
wolfappliance.com
Convection
A fan creates the movement of hot air created by a
heating element at the back of the oven for convection
cooking to distribute heat evenly around food for consistent results and browning. Convection also eliminates
odor transfer making it ideal for cooking desserts, meats
and vegetables all together.
Convection mode temperatures range from 85°F to 445°F.
Cooking temperatures versus traditional ovens may be 25
degrees less, and times may be about 25% faster, saving
valuable time and lowering energy costs.
Use convection mode for muffins, biscuits and roasts.
Convection mode is also ideal for speeding up cooking
time, and for cooking different types of foods together at
once to save time. For instance, add dinner rolls and
aromatic veggies like broccoli to your meat-cooking
session without any odor transference to create a
complete meal where every menu item is conveniently
cooked together, and is done at the same time.
CONVECTION RECIPE
Chocolate Chip Cookies
11/2 cups unsalted butter, softened
2 cups firmly packed brown sugar
1/2 cup white sugar
2 eggs
1 tablespoon vanilla
1 teaspoon baking soda
11/2 teaspoons salt
1 teaspoon baking powder
3 1/2 cups flour
1 tablespoon brewed coffee
2 1/2 cups chocolate chips
In mixer bowl, cream butter with sugars until smooth. Add
eggs, one at a time, scraping bowl after each egg. Add
vanilla and coffee; continue to mix on medium high speed
until mixture is light and fluffy. Sift together flour, baking
soda, baking powder and salt. Add mixture to the bowl.
Mix in chocolate chips on low speed for 10 seconds.
Scrape sides of the bowl and continue mixing until just
combined.
Line the solid stainless steel pan with parchment paper.
Place dough by 3-tablespoon mounds on the lined pan,
12 mounds per sheet. Place the pan in the convection
steam oven on rack position 2. Select convection mode
and adjust the temperature to 325°F. Bake the cookies for
approximately 13 minutes or until done.
Convection Steam Oven Cooking Modes
22
Convection Humid
In convection humid mode, a heating element at the back
of the oven produces heat and oven ventilation is sealed
so that moisture produced during cooking remains in the
oven.
Convection humid temperatures range from 85°F to 445°F.
Use convection humid for cakes, casseroles, grain dishes,
lasagna and meats.
CONVECTION HUMID RECIPE
Scallop Potatoes
6 medium potatoes, peeled and sliced
6 tablespoons of butter
11/2 cup milk
2 tablespoons corn starch
1/3 cup diced onion
1 cup diced ham
1/2 teaspoon kosher salt
1/4 teaspoon freshly ground black pepper
Mix potatoes, ham and onions and place in greased
9-inch casserole dish. Make sauce by combining milk,
butter, salt, pepper and cornstarch. Cook over medium
heat, stirring constantly until smooth and thickened.
Pour mixture over potatoes and place on a wire rack set
on rack position 2 in the convection steam oven. Select
convection humid mode and adjust the temperature to
345°F. Bake for approximately one hour and fifteen
minutes or until golden brown and bubbly.
Convection Steam Oven Cooking Modes
23
wolfappliance.com
Convection Steam
Convection steam is great for roasting vegetables, grains
or potatoes, and multiple items together, like a 12-pound
turkey with trimmings. Cook the turkey with steam, then
add vegetables or potatoes, turn off steam, and it will all
roast and be done together. You control the steam supply.
Convection steam mode temperatures range from 85°F to
445°F. Steam transfers energy to the food more efficiently
than hot air alone, which speeds up the cooking process.
Food retains its own moisture and delicate parts are more
resistant to burning.
Use convection steam for any foods you want to be tender
inside and roasted or crisped outside.
CONTROLLING THE STEAM SUPPLY
• Press the MODE button to deactivate steam. The
steam
symbol goes out.
• Press the MODE button to activate steam. The steam
symbol illuminates.
CONVECTION STEAM RECIPE
Roast Chicken with Herbs and Lemon
1 fryer hen
8 garlic cloves chopped
6 garlic cloves left whole
2 tablespoons fresh rosemary, chopped
3 tablespoons fresh thyme, chopped
1 lemon, zested
1 bunch parsley
1 small bunch of thyme
Kosher or sea salt
Freshly ground black pepper
Combine chopped garlic, rosemary, and thyme with the
zest of one lemon in a small bowl. Using your hands rub
the herb mixture all over the chicken covering evenly. Cut
the zested lemon into slices. Stuff the chicken with the
lemon slices, parsley, whole garlic cloves and bunch of
thyme. Season the chicken with salt and freshly ground
black pepper.
Place the chicken on the solid stainless steel pan and
place in the convection steam oven on rack position 1.
Select convection steam mode and adjust the temperature
to 400°F. Insert the probe into the thickest part of the
breast. Plug the probe into the probe receptacle and set
the probe temperature to 165°F.
Convection Steam Oven Cooking Modes
24
Wolf Gourmet
Wolf gourmet cooks food to perfection; simply tell it what
type of food you are putting inside of the oven. The
climate sensor knows the amount, shape and consistency
and adjusts time, temperature and humidity so no baking
instructions are required.
SELECTING AND STARTING WOLF GOURMET
Select your item and preferred level of doneness. After a
few minutes it will tell you when your dish will be ready.
Great results are achieved easily, quickly and stress-free.
2) Turn to ‘A14 Torte’ and press to select.
Use Wolf gourmet to prepare any of the following foods,
whether they come fresh from your garden, refrigerator,
freezer or pantry:
4) Press to start. ‘A14 Torte—Appliance is preheating’
appears on the text display. A single audible signal
indicates when the cooking space temperature is
reached. ‘Put food into cooking space—Press OK to
continue’ appears on the text display.
Wolf Gourmet
Code
Fresh Appetizers
A1
Frozen Appetizers
A2
Baked Dish
A3
Soufflé
A4
Baked Potatoes
A5
Frozen Potato Products
A6
Braising Meat
A7
Fresh Pizza
A8
Frozen Pizza
A9
Custard
A10
Bread
A11
Yeast Pastry with Filling
A12
Cake
A13
Torte
A14
Example: A14 Torte
1) Press the control knob to activate the text display,
select Wolf gourmet.
3) Turn to preferred level of brownness and press to
select.
5) Place torte in oven.
6) Press control knob (OK) to continue cooking.
TURNING OFF BEFORE TIME
1) Press the OFF button twice.
TIPS
• For Wolf gourmet to determine optimum cooking or
baking time, the initial cooking space must be cool and
the oven door should remain closed until the ‘h’ no
longer flashes in the digital display.
• For frozen products, instead of degree of browning,
select approximate cooking or baking time.
Convection Steam Oven Cooking Modes
25
wolfappliance.com
Slow Roast
Slow roast mode is the ultimate convenience. Insert the
probe into your prepared meat, select a slow roast setting,
tell the oven what time you want it done, and come home
to a perfectly cooked meal.
SELECTING AND STARTING SLOW ROAST
1) Press the control knob to activate the text display, turn
to slow roast and press to select.
2) Turn the knob until the cut of meat you are preparing
appears in the display, press to select. For some slow
roast selections, a choice of doneness is offered.
Select your preferred level of doneness and press to
confirm. The preset probe temperature appears in the
left digital display. To adjust this temperature, press the
TEMP button, turn the control knob to the desired
temperature and press to select.
3) The default operating time for all slow roast selections
is 3.5 hours. Any duration between 2.5 and 4.5 hours
can be selected in one minute intervals. To change the
operating time, press the TIME button. Turn the control
knob to the desired time and press to select.
4) Slow roast can be started immediately or a if desired,
a specific completion time can be chosen.
5) To select a specific completion time, press the TIME
button twice. ‘Switch-off time’ appears in the text
display. The earliest completion time appears in the
right hand digital display. Turn the control knob to
select the desired completion time and press to select.
6) Press the control knob to start slow roast. Convection
, temperature probe
and operating time
symbols illuminate.
TURNING OFF BEFORE TIME
1) Press the OFF button twice. If the OFF button is
pressed in advertently during operation, simply press
the control knob to continue operation.
TIPS
• Optimal weight of meat: 1 to 4.5 pounds.
• Optimal meat thickness: at least 1.5 inches.
• Briefly sear the meat on all sides.
• Place the meat in a glass or porcelain roasting dish.
• Properly position the probe per instructions on
page 14.
• Settings cannot be adjusted after the start.
• Cooking durations of 2.5 to 4.5 hours are possible.
Convection Steam Oven Cooking Modes
26
Recipes Mode
SELECTING AND STARTING A RECIPE
RECIPES
Use the recipes mode for an easy and fun way to cook
entire meals from appetizers and entrees to desserts. The
recipes are listed by code in the chart below and on the
following pages.
R1 Appetizers (approx. cook time—20 minutes)
The recipe collection harnesses the power of many different cooking modes. All you need to do is place your food
into the cooking space, turn the control knob to recipes,
make your selection, and choose the number of portions
or level of browning. The oven determines the rest of the
details for you and never overcooks, for delightful results.
The recipes mode is ideal if you are in a hurry, looking to
try a new recipe, or need to prepare a variety of food for a
party or social occasion.
Recipes
Code
Appetizers
R1
Fish in Puff Pastry
R2
Fish Rolls
R3
Beef Stroganoff
R4
Beef Pot Roast
R5
Pork Loin in Puff Pastry
R6
Pasta Gratin
R7
Eggplant Gratin
R8
Flan
R9
Pears in Red Wine
R10
Rolls
R11
Muffins
R12
Cake
R13
Focaccia
R14
2 rolls puff pastry
2 tablespoons olive oil
4 tablespoons fresh oregano, chopped
4 tablespoons fresh thyme, chopped
1 ounce Parmesan cheese, shredded
Lay out a sheet of puff pastry and brush lightly with olive
oil. Sprinkle the herbs and Parmesan cheese onto the
pastry evenly. Lay the second sheet of puff pastry on top
and press down lightly. Use a pastry cutter to cut the puff
pastry into strips. Twist the strips from the ends.
Cover the stainless steel pan with parchment paper and
lay the twisted puff pastry strips out evenly.
Put the solid stainless steel pan into the cold cooking
space on rack 1 (racks 1 and 3 if two pans are being
used). Start the recipe.
Convection Steam Oven Cooking Modes
27
wolfappliance.com
Recipes Mode
RECIPES
R4 Beef Stroganoff (approx. cook time—47 minutes)
R2 Fish in Puff Pastry (approx. cook time—25 minutes)
1 3/4 pounds beef chuck roast, cut into thin 2" long strips
Salt
Pepper
1 tablespoon beef bouillon
1 yellow pepper, sliced
1 red pepper, sliced
8 ounces sliced mushrooms
2 small yellow onions, sliced thin
1 roll puff pastry
1 red pepper
1 green zucchini
Flat leaf parsley
Salt
Pepper
4 small portions firm fish, 2 ounces each
Cut the pepper in half, remove the stalk, seeds and white
membranes, then cut into strips lengthways. Cut the stalk
off the top of the green zucchini and cut it into slices,
lengthways.
Cut the puff pastry into four equal-sized rectangles. Lay
the pepper and green zucchini diagonally across the
pastry pieces, sprinkle each with parsley and season with
salt and pepper. Place the fish on top. Pull the two free
corners of the pastry over the fish.
Cover the stainless steel pan with parchment paper and
place the wrapped pieces of fish on it.
Put the stainless steel pan into the cold cooking space on
rack 1. Start the recipe.
R3 Fish Rolls (approx. cook time—10 minutes)
8 sole fillets (any flat whitefish can be substituted,
such as Flounder or Turbot)
Salt
Pepper
3 1/2 ounces rocket arugula
1 ounce pine nuts, toasted
Season the sole fillets with salt and pepper. Spread the
rocket arugula and toasted pine nuts on the fish fillets.
Roll the fillets up from the pointed end, then secure them
with toothpicks. Grease the perforated stainless steel pan
with pan spray and place the fish rolls on it.
Put the perforated stainless steel pan into the cold
cooking space on rack 2. Start the recipe.
1 packet gravy powder
2 tablespoon tomato paste
2 teaspoons cornstarch
6 fluid ounces heavy cream
1 teaspoon paprika
Season the meat with salt and pepper
Place the meat in a large casserole dish and scatter the
beef bouillon, peppers, mushrooms and onions over the
top.
Place the casserole dish into the cold cooking space on
rack 2. Start the recipe. The oven will run for approximately 40 minutes. After the timer goes off, carefully
remove the dish, strain out any liquid into a small
saucepan and reserve. Place the casserole dish back into
the oven and press OK to continue.
Whisk the remaining ingredients with the liquid in the small
saucepan and bring to a boil to thicken. When the oven
timer goes off, carefully remove the casserole dish and
add the sauce. Serve alone or over egg noodles.
Convection Steam Oven Cooking Modes
28
Recipes Mode
RECIPES
R7 Pasta Gratin (approx. cook time—30 minutes)
R5 Beef Pot Roast (approx. cook time—2 hours)
10–12 ounces uncooked pasta (shells or elbow macaroni)
2 small yellow onions, sliced
8 ounces sliced mushrooms
3 ounces air dried ham, such as prosciutto
1 bunch of flat leaf parsley, chopped
2 cups vegetable stock
1 cup heavy whipping cream
Salt
Pepper
Nutmeg
5 ounces Italian cheese, grated
2 1/2 pounds beef chuck roast, cut into 3 pieces
2 carrots, peeled and quartered
1/2 small celeriac, peeled and quartered
2 small yellow onions, quartered
1 bay leaf
2 cloves
8 black pepper corns
3–4 cups vegetable stock
Place the meat, vegetables and spices in a small casserole dish. Add enough vegetable stock to cover.
Place the casserole dish into the cold cooking space on
rack 2. Start the recipe.
R6 Pork Loin in Puff Pastry (approx. cook time—30 min)
1 roll puff pastry
1 pork loin, approximately 1 pound
Salt
Pepper
TIP: Try adding chopped sundried tomatoes, or a whole
grain mustard spread on the pork loin before wrapping
with puff pastry.
Cut the pork loin in half lengthwise and season with salt
and pepper. Sear the pork loins in a large frying pan with
oil until golden brown. Let the pork loin cool.
Lay out the sheet of puff pastry and cut it in half. Place
one half of the pork loin on each sheet of puff pastry. Fold
and roll the puff pastry around the pork loin ending up with
the seam-side down. Place the pork loins on the stainless
steel pan lined with parchment paper. Place the pan into
the cold cooking space on rack 2. Start the recipe.
Place the pasta, onions, mushrooms, ham and parsley into
a greased casserole dish and mix together.
For the sauce, stir the vegetable stock and whipping cream
together and season with salt, pepper and nutmeg. Pour
the sauce over the pasta. Sprinkle with grated cheese.
Place the casserole dish into the cold cooking space on
rack 2. Start the recipe.
R8 Eggplant Gratin (approx. cook time—30 minutes)
2 medium eggplants
14 ounces canned plum tomatoes (or jar of pasta sauce)
1 clove garlic crushed
Fresh oregano, chopped
Fresh thyme, chopped
1 tablespoon olive oil
Salt
Pepper
4 ounces Italian cheese, grated
Crush the plum tomatoes in a bowl with a fork. Mix the
tomatoes with the garlic, herbs and olive oil. Season with
salt and pepper.
Remove the tops of the eggplants and cut them into 1/2"
thick slices. Spread a little tomato sauce over the base of a
greased casserole dish. Lay the eggplant slices in the dish
and cover with crushed tomatoes. Sprinkle with cheese.
Put the casserole dish into the cold cooking space on
rack 2. Start the recipe.
Convection Steam Oven Cooking Modes
29
wolfappliance.com
Recipes Mode
RECIPES
R11 Rolls (approx. cook time—33 minutes)
R9 Flan (approx. cook time—25 minutes)
3 1/4 cups flour
3 tablespoons sugar
1 packet instant yeast
1 cup warm milk
4 tablespoons butter, melted
1 teaspoon salt
1/4
1/2
cup sugar
cup orange juice
2 1/8 cup half and half or heavy cream
1/4 cup sugar
1 vanilla bean, split lengthwise
3 eggs, beaten
For the sauce, caramelize the sugar in a pan so that it
turns light brown in color. Pour the orange juice into the
pan and allow to reduce by half.
1/4
cup milk
1 tablespoon sugar
2 tablespoons butter, melted
Put the dishes on to the perforated stainless steel pan,
and place into the cold cooking space on rack 2. Start the
recipe.
In an electric stand mixer combine the flour, sugar and
yeast. Add the warm milk, melted butter and salt. Knead
with a dough hook to until the dough comes together and
away from the sides of the bowl. Knead for 5 minutes.
Turn the machine off and let the dough rest for 15 minutes.
After the rest period, knead the dough for an additional 3
minutes. Place the dough in a large container and cover
with a damp cloth and leave at room temperature until it
has doubled in volume (1–11/2 hours). Alternatively you
can place the container in the refrigerator overnight. If the
dough was placed in the refrigerator overnight allow the
dough to “wake-up” for 1–11/2 hours before proceeding.
After fully cooled, run a knife carefully around the edge of
each dish and turn the flans out on to a plate, pour the
remaining sauce from the dish over the top of the flan.
Divide the dough into 12 equal portions. Shape them into
balls and put them in a greased casserole dish. Leave to
rise another 40 minutes or until doubled in size.
Cover the bases of the flan dishes with the orange
caramel sauce.
Place the half and half (or heavy cream), sugar and vanilla
bean in a sauce pan and heat to 105°F. Take out the
vanilla bean pod. Slowly temper the beaten eggs with the
warm cream. Pour through a fine strainer into the dishes.
For the gaze, heat the milk sugar and butter together. Set
aside.
R10 Pears in Red Wine (approx. cook time—15 minutes)
6 pears
1 cup red wine
1/4 cup sugar
1 vanilla pod, split
Cut two sides off of each pear.
Mix the red wine and sugar together in the casserole dish,
then add the scraped out vanilla bean and pod. Place the
pears in the casserole dish face down.
Put the casserole dish into the cold cooking space on
rack 2. Start the recipe.
Place the casserole dish into the cold cooking space on
rack 2. Start the recipe.
After about 15 minutes, an audible signal will sound and
the cooking process is interrupted. Brush the glaze over
the rolls. Press OK to continue.
Convection Steam Oven Cooking Modes
30
Recipes Mode
RECIPES
R13 Cake (approx. cook time—1 hour)
R12 Muffins (approx. cook time—35 minutes)
1 cup softened butter
1 cup sugar
1/4 teaspoon salt
4 eggs
1 teaspoon vanilla extract
1 2/3 cup flour
For muffins:
2 cups flour
2/3 cup sugar
2 teaspoons baking powder
1/2 teaspoon baking soda
1/2 teaspoon salt
1/4 teaspoon cinnamon
2 eggs
4 ounces butter, melted
1 cup buttermilk
1 tablespoon lemon zest
1/2 teaspoon vanilla extract
1 1/2 cups blueberries
1/4 cup plain yogurt
For streusel:
1/2 cup flour
2 ounces butter, softened
1/4 cup sugar
1/4 cup walnuts, chopped
1 tablespoon lemon zest
Combine dry ingredients on low speed in an electric mixer.
In a separate mixing bowl, whisk together the wet ingredients. Add to the dry along with the blueberries and very
carefully mix them until just combined. Scoop the mixture
into 12 jumbo, double lined muffin cups, filling about 2/3 of
the way. You can also place the muffin batter in a
container with a tight fitting lid and refrigerate overnight.
For the streusel, mix all ingredients together in a bowl and
combine with hands until crumbly. Sprinkle streusel over
the top of each muffin.
Place the muffins on the stainless steel pan and place into
cold cooking space on rack 1. Start the recipe.
Grease a 9" x 5" loaf pan and set it aside.
Beat the butter, sugar and salt until light and fluffy. While
mixing, add the eggs one at a time. Add the vanilla. Mix
the flour slowly into the other ingredients. Pour the mixture
into the prepared loaf pan.
Start the recipe. The appliance preheats. When preheat is
finished. Place the loaf pan on rack. Press OK to continue.
R14 Focaccia (approx. cook time—40 minutes)
1 1/3 cup warm water
1 teaspoon sugar
1 teaspoon salt
1 tablespoon olive oil
1 packet of instant yeast
4 1/4 cup bread flour
2 teaspoons dry Italian herb mix
Extra olive oil to drizzle on top after proofing
Mix the first seven ingredients together in the bowl of an
electric mixer. Knead to a smooth dough. Leave the dough
in the bowl and cover with a damp cloth. Allow to rise at
room temperature until it has doubled in volume (about 2
hours).
Remove dough from the bowl and on a floured work
surface, roll dough into a flattened ball. Place the dough
into a sprayed 8-inch glass pie dish. Gently spread the
dough out to fill the dish. Drizzle with olive oil and poke
holes with your fingertips into the dough. Allow to rise until
doubled (about 1 hour). Sprinkle with coarse sea salt.
Put the dish into the cold cooking space on rack 1. Start
the recipe.
Convection Steam Oven Cooking Modes
31
wolfappliance.com
My Recipes
It’s easy to cook all your favorite recipes with a convection
steam oven for healthier fare that tastes better than ever,
makes meal preparation stress-free, and the cleanup a
snap.
With my recipes you can add ten of your favorite recipes,
and replace or edit them at your pleasure. Recipes may
also be copied into my recipes, and even edited as you
see fit. Keep a record of your recipes on the following
pages.
Use my recipes to store cooking instructions for recipes
you enjoy cooking or baking frequently.
COPYING A RECIPE
Any recipe that is stored can be copied and changed.
1) Press and turn the control knob to select the recipe to
be copied and press to select.
2) Turn until ‘copy’ appears in the text display and press
to select.
3) The desired (empty) storage space appears. Press to
select. A storage space that is already being used can
be overwritten.
CLEARING A RECIPE
MAKING RECIPE SETTINGS
Recipes in my recipes may be removed.
1) Press the control knob to activate the text display, turn
to my recipes and press to select.
1) Press and turn the control knob to select the recipe.
2) Turn to the first empty recipe, ‘My recipes—Recipe 1
(empty)’ appears in the text display. Press the control
knob to select and ‘change’ appears in the text display.
Press to select and ‘Step 1’ appears in the text display.
3) If using the probe, plug in the probe before entering
the settings.
4) Set the desired operating mode, cooking space
temperature, probe temperature and operating time for
step 1.
5) Turn the control knob to repeat the above sequence
and enter additional steps.
6) Press the control knob, ‘Recipe 1 (empty)—save’
appears in the text display. Press to save.
2) Turn the control knob until ‘clear’ appears in the text
display and press to select. The recipe is deleted and
the placeholder name, such as ‘Recipe 1 (empty)’,
appears in the text display.
Convection Steam Oven Cooking Modes
32
My Recipes
NOTES: MY RECIPES
Recipe:
Recipe:
Code:
Code:
Mode:
Mode:
Temperature:
Temperature:
Probe:
Probe:
Notes:
Notes:
Recipe:
Recipe:
Code:
Code:
Mode:
Mode:
Temperature:
Temperature:
Probe:
Probe:
Notes:
Notes:
Recipe:
Recipe:
Code:
Code:
Mode:
Mode:
Temperature:
Temperature:
Probe:
Probe:
Notes:
Notes:
Convection Steam Oven Cooking Modes
33
wolfappliance.com
My Recipes
NOTES: MY RECIPES
Recipe:
Recipe:
Code:
Code:
Mode:
Mode:
Temperature:
Temperature:
Probe:
Probe:
Notes:
Notes:
Recipe:
Recipe:
Code:
Code:
Mode:
Mode:
Temperature:
Temperature:
Probe:
Probe:
Notes:
Notes:
Recipe:
Recipe:
Code:
Code:
Mode:
Mode:
Temperature:
Temperature:
Probe:
Probe:
Notes:
Notes:
Convection Steam Oven Cooking Modes
34
Keep Warm
Cleanse
Sometimes great food cannot be enjoyed when it’s hot
from the oven. Instead of cooling it, putting it in the refrigerator, and then warming it again in the microwave, simply
use the keep warm mode. Food can even be plated and
multiple dinner plates can be kept warm at once, making
staggered mealtimes more convenient for you and your
family.
Cleanse mode is ideal for baby bottles and canning jars.
Using steam in a contained environment, the cleanse
process is less fussy, faster, and safer than conventional
methods.
The combination of convection and steam heat preserves
food’s taste, texture, looks and quality so every bite is as
delicious as if it were fresh from the oven.
KEEPING COOKED FOOD WARM
1) Press the control knob to activate the text display, turn
to keep warm and press to select. ‘Keep warm—start’
appears in the text display.
2) Press the control knob to start.
TIPS
• If the cooking space is already hot, open the oven door
and allow it to cool down for 3 to 4 minutes before
starting the keep warm function. This ensures food
does not overcook.
• For highest quality, select a keep warm operating time
of less than 1.5 hours.
CLEANSE
1) Press the control knob to activate the text display, turn
to cleanse and press to select.
2) Turn to the appropriate task, such as cleanse baby
bottles or prepare jam jars, and press to select.
3) Press the control knob to start.
Convection Steam Oven Care
35
wolfappliance.com
Care and Maintenance
Your Wolf convection steam oven, with its external boiler
that reduces mineral buildup, requires minimal maintenance. Observing the following tips will ensure a long life
of continued service and beauty.
AVOIDING DAMAGE
• Never use abrasive, caustic cleaning agents.
• Never use abrasive scouring pads, steel wool, etc.
which can damage the surface.
• Do not place any protective insert or aluminum foil on
the bottom of the cooking space.
• Keep the panel flap in front of the water tank unobstructed.
• Always use the control panel button to open the water
tank door. Do not try to open the door manually.
• Do not use knives or cutting wheels on baking pans or
other accessories.
• Do not use objects that can rust in the cooking space.
• Do not place items directly onto the bottom of the
cooking space.
• Do not use silver cutlery in the cooking space.
• To prevent corrosion, allow the cooking space to dry
and leave the oven door open in the at-rest position
until the cooking space has cooled down.
EMPTYING THE WATER TANK
• Allow sufficient time for the oven to cool down
completely before any cleaning or wiping.
• Leave the oven door open in the at-rest position to
help cool down the cooking space before cleaning and
prevent corrosion.
• The water in the water tank can be hot. If ‘Do not
remove water tank’ appears in the text display, the
temperature of the residual water is still over 175°F.
• For safety reasons, the residual water is not pumped
back until its temperature drops below 175°F. Any
operating mode can be started at any time.
• When the oven is turned off, residual water is pumped
back into the water tank. ‘Water is being pumped off’
appears in the text display.
• Don't let water sit. Once the water has been pumped
back, the water tank may be removed, emptied and
dried. When the water is pumped back, or after the
steam phase, the water tank can be very hot.
• Only refill the water tank with fresh, cold tap water.
Never fill it with demineralized, filtered, or distilled
water.
• When the symbols are no longer illuminated and the
text display is dark the oven is off.
Convection Steam Oven Care
36
Cleaning
Thanks to an external boiler only steam (no water) enters
the cooking space, minimizing lime scale deposits and
making clean up easy.
CLEANING THE COOKING SPACE
• After each cooking session leave the oven door open
in the at-rest position until the interior has cooled
down. When it has cooled, remove condensate or
spilled food using a soft cloth dampened with soapy
water. Dry with a soft cloth.
• Stubborn particles may be loosened by turning on
steam mode for 30 minutes at 210°C before cleaning.
• Do not spray the inside or outside of the oven with
water.
• Do not use a steam cleaner.
• Over time the cooking space acquires a golden hue.
This is a normal property of stainless steel and does
not affect operation, or the quality of cooking or
baking.
• Blue tarnish spots and condensate residue can be
easily removed with lemon juice or a mild acidic
cleaning agent.
CLEANING THE EXTERIOR
• Clean with a soft cloth dampened with water and a
little dish soap. For metallic surfaces, rub in the direction of the original polish lines. Dry with a soft cloth.
• Do not spray the inside or outside of the oven with
water.
• Do not use a steam cleaner.
CLEANING THE ACCESSORIES
• The solid and perforated stainless steel pans, wire
oven racks and rack guides can be cleaned in the dishwasher.
• Watermarks in the water tank can be removed using a
standard descaler.
• If the water tank valve drips, descale it.
• Do not clean the probe or water tank in the dishwasher.
Convection Steam Oven Care
37
wolfappliance.com
Cleaning
REMOVING THE OVEN DOOR
REPLACING THE DOOR SEAL
On occasion you may choose to completely remove the
oven door for a thorough cleaning. Please exercise
caution, as the door weighs approximately 18 lbs (8 kg).
For safety reasons, the door seal must be replaced by
Wolf factory certified service.
REPLACING A DEFECTIVE LIGHT BULB
To remove the oven door:
1) Open the oven door completely.
In the case of a defective light bulb please contact Wolf
factory certified service.
2) Flip the latches on both door hinges forward to the
open position. Refer to the illustration below.
REMOVING RACK GUIDES
3) Close the oven door to the at-rest position and lift
forward and out.
To reinstall the oven door:
1) From the front, guide both oven door hinges into the
openings.
2) Open the oven door as far as it will go and flip the
latches back to the closed position.
To remove rack guides:
1) Unscrew the knurled nuts in the front of the rack
guides in a counterclockwise direction.
2) Pull the rack guides to the side of the threaded studs
and remove from the front.
To reinstall rack guides:
1) Insert the rack guides into openings in the back wall of
the cooking space and position onto the threaded
studs.
2) Place the knurled nuts on the threaded studs and
tighten securely in a clockwise direction.
OPEN
POSITION
CLOSED
POSITION
WATER
LIGHT
TEMP
MODE
ON
POWER
TIME
OFF
RACK GUIDE
Oven door hinge latch.
KNURLED NUT
Remove rack guides.
Convection Steam Oven Care
38
Running the Descale Program
Limescale deposits are a natural result of steam creation
and will slowly build up inside of the external boiler and
water lines.
The oven removes any guesswork and tells you when it is
time to run the descale program. ‘Boiler scaled up—
please descale!’ appears in the text display. We recommend that you run the descale program whenever the
message appears. Failure to descale appropriately will
cause damage and impair function.
Descaling takes about 45 minutes.
How often the oven notifies you to run the descale
program is based on the water hardness that you specified when you personalized your settings. If you do not
specify a hardness, the default setting is Hard.
Using steam four times a week for 30 minutes, the oven
recommends descaling every 6–18 months. Refer to the
chart below.
Descaling
WATER HARDNESS
Soft
Medium
Hard
FREQUENCY
18 months
9 months
6 months
If you are unsure about the hardness of your cold tap
water, test strips may be purchased at a local home
improvement center.
Operating time remaining for steaming until the next
descaling is determined by pressing the control knob, and
turning to ‘User settings—Descaling’.
DURGOL® DESCALER
Durgol® contains highly effective decalcification acids for
a gentle yet professional level of descaling.
Only use Durgol® brand descaling solution, following
manufacturer instructions. Other descaling solutions may
not be effective or contain foam-creating additives that will
damage the oven.
Remove splashes immediately with water.
Convection Steam Oven Care
39
wolfappliance.com
Running the Descale Program
RUNNING THE DESCALE PROGRAM
For safety reasons, the descale program cannot be interrupted or stopped once it is started.
1) Press the OFF button.
2) Press the control knob to activate the text display,
turn to descale, press to select. ‘Descale—Descale
appliance’ appears in the text display.
3) Press to select. ‘Descale appliance—start’ appears.
4) Press again to confirm. ‘Add 1 pt (0.5 L) descaler—and
press OK’ appears.
5) Pour the entire contents of the descaler solution bottle
into the water tank. Position the water tank into the
water tank compartment.
6) Press the control knob to confirm. ‘Descale appliance—running’ appears in the text display. After about
30 minutes, ‘Pour away descaler—Add 2 pt (1 L) water’
appears in the text display.
7) Remove the water tank and fill with cold tap water to
cool and dilute the solution before pouring it down the
drain.
Failure to dilute the solution before discarding may
discolor sink and drain.
8) Fill the tank with cold tap water and reinsert it into the
compartment. The rinsing phase starts automatically.
‘Descale appliance—1st rinsing cycle’ appears in the
text display. After about 45 minutes ‘Pour away
water—Descaling completed’ appears in the text
display. Depending on the level of soil in the rinse
water, the oven will determine whether additional rinse
cycles are necessary. If prompted, follow the directions
on the screen for additional rinse cycles.
9) Once the rinse cycles are complete, remove, empty
and dry the water tank. If necessary, wipe the bottom
of the cooking space with a soft cloth.
Troubleshooting Guide
40
Troubleshooting
If your Wolf convection steam oven is not operating
properly, use the following troubleshooting guide before
calling Wolf factory certified service. This guide will save
you time and trouble and may help you avoid the expense
of a service call.
Oven does not operate; displays are not illuminated.
• Check the household fuse or circuit breaker to see if it
has been blown or tripped. A power outage may also
have caused a disruption in service.
• No electricity is being supplied to the oven. Have an
electrician verify that the oven is connected to a proper
electrical circuit.
Illumination is not working.
• The light bulb is defective, call Wolf factory certified
service.
‘Boiler scaled up, please descale!’ appears in the text
display.
• The boiler in the oven has mineral buildup: Run the
Descale program.
‘Appliance blocked, descaling necessary’ appears in the
text display.
• If the message does not disappear after repeating the
descaling process several times, note down the error
message in full and call Wolf factory certified service.
Resetting error message.
Various situations including an interruption in the power
supply can lead to an error message.
1) Cancel the error message by pressing the OFF button.
2) Disconnect the power supply for about 1 minute.
3) Reconnect the power supply.
Oven starts making noise during operation.
• The oven may emit switching and pumping sounds
during operation. Such sounds are normal. No action is
needed.
‘Fill water tank’ appears in the text display.
• Fill the water tank and return it to the water tank
compartment.
‘Do not remove water tank’ appears in the text display.
• For safety reasons, the water in the boiler is not
pumped off until the temperature of the water drops
below 175°F. If there is enough cold water in the water
tank, the boiler will be automatically filled. This will cool
down the water in the boiler. If there is not enough cold
water in the water tank, it will take longer to cool down
(this can take up to 30 minutes).
4) If the error message still appears contact Wolf factory
certified service.
Setting the time after a power failure.
12:00 flashes in the right digital display and the time
symbol flashes. ‘Power failure—Set time’ appears in the
text display.
1) Turn the control knob to set the hour and press to
select.
2) Repeat for minutes.
Troubleshooting Guide
41
wolfappliance.com
Troubleshooting
Tips on Saving Energy
Technical data.
The Wolf convection steam oven is built to consume
minimal energy. Observing the following tips can help you
to achieve even more energy savings.
• External dimensions: Refer to the installation guide.
• Electrical connection: Refer to identification plate 1.
• Note for testing institutes: The energy efficiency class
according to EN 50304/EN 60350 is determined using
convection humid. Placing thermocouples between the
appliance door and the seal can cause leaks and
hence erroneous measurements. The usable volume
within the meaning of EN 50304/EN 60350 is obtained
with the rack guides disassembled.
• General note: Maximum load capacity: 3 kg.
• Measurement of the temperature in the cooking space:
The temperature of the cooking space is measured
when the cooking space is empty according to an
internationally accepted standard. Own measurements
may be inaccurate and are not suitable for checking
the accuracy of the temperature.
OPERATION
• Choose convection humid mode over convection mode
when possible. Convection humid uses comparatively
less energy.
• The oven is equipped with automatic energy-saving
stand-by. To reduce power consumption to an absolute
minimum, select ‘Time display—invisible’ in the user
settings. All safety functions remain active.
• Avoid opening the oven door frequently.
• Only turn on illumination if needed.
• Use residual heat. For cooking times over 30 minutes,
turn the oven off 5 to 10 minutes before the end of
cooking time. (Exceptions include soufflé, sponge,
choux pastry and puff pastry.)
• Preheat the cooking space only when necessary.
PACKAGING
Packaging materials including cardboard, plastic film and
polystyrene that may be collected for recycling.
Service Information
42
Service Information
When requesting information, literature, replacement parts
or service, always refer to the model and serial numbers of
your Wolf convection steam oven. This information is
found on the product rating plate located on the left oven
side trim. The oven door must be open to view the rating
plate. For location of the rating plate, refer to the illustration on page 7. Record the rating plate information below
for future reference.
BEFORE CALLING FOR SERVICE
Model Number:
1) Mail in the completed Wolf product registration card.
Serial Number:
2) Register online at wolfappliance.com.
Installation Date:
3) Register by phone by calling Wolf customer care at
800-222-7820.
Wolf Factory Certified Service:
Phone:
Authorized Wolf Dealer:
Before calling Wolf factory certified service, refer to the
troubleshooting guide on pages 40–41.
PRODUCT REGISTRATION
Register your new Wolf product today so that we may
ensure your satisfaction. You may register by one of the
following options:
The model and serial numbers of your unit are printed on
the enclosed Wolf product registration card. If you provide
us with your e-mail address, we will send you exciting new
product updates and recipes as they become available,
along with information on special events.
Phone:
The information and images in this guide are the copyright property of Wolf Appliance, Inc. Neither this guide nor any information or images contained herein
may be copied or used in whole or in part without the express written permission of Wolf Appliance, Inc. ©Wolf Appliance, Inc. all rights reserved.
Wolf, Wolf & Design, Wolf Gourmet, W & Design and the color red as applied to knobs are registered trademarks and service marks of Wolf Appliance, Inc.
Sub-Zero, Sub-Zero & Design, Dual Refrigeration, Constant Care and The Living Kitchen are registered trademarks and service marks of Sub-Zero, Inc.
(collectively, the “Company Marks.”) All other trademarks or registered trademarks are property of their respective owners in the United States and other countries.
Wolf Appliance Products Limited Warranty
FOR RESIDENTIAL USE ONLY
FULL TWO YEAR WARRANTY*
For two years from the date of original installation, your Wolf Appliance product warranty covers all parts and
labor to repair or replace, under normal residential use, any part of the product that proves to be defective in
materials or workmanship. All service provided by Wolf Appliance under the above warranty must be performed
by Wolf factory certified service, unless otherwise specified by Wolf Appliance, Inc. Service will be provided
during normal business hours.
LIMITED FIVE YEAR WARRANTY
For five years from the date of original installation, Wolf Appliance will repair or replace the following parts that
prove to be defective in materials or workmanship: gas burners (excluding appearance), electric heating
elements, blower motors (ventilation hoods), electronic control boards, magnetron tubes and induction
generators. The part(s) will be repaired or replaced, free of charge, with the owner paying for all other costs
including labor. All service provided by Wolf Appliance under the above warranty must be performed by Wolf
factory certified service, unless otherwise specified by Wolf Appliance, Inc. Service will be provided during
normal business hours.
TERMS APPLICABLE TO EACH WARRANTY
The warranty applies only to products installed for normal residential use. The warranty applies only to products
installed in any one of the fifty states of the United States, the District of Columbia or the ten provinces of
Canada. This warranty does not cover any parts or labor to correct any defect caused by negligence, accident
or improper use, maintenance, installation, service or repair.
THE REMEDIES DESCRIBED ABOVE FOR EACH WARRANTY ARE THE ONLY ONES THAT WOLF APPLIANCE,
INC. WILL PROVIDE, EITHER UNDER THIS WARRANTY OR UNDER ANY WARRANTY ARISING BY OPERATION
OF LAW. WOLF APPLIANCE, INC. WILL NOT BE RESPONSIBLE FOR ANY CONSEQUENTIAL OR INCIDENTAL
DAMAGES ARISING FROM THE BREACH OF THIS WARRANTY OR ANY OTHER WARRANTY, WHETHER
EXPRESS, IMPLIED OR STATUTORY.
Some states do not allow the exclusion or limitation of incidental or consequential damages, so the above
limitation or exclusion may not apply to you. This warranty gives you specific legal rights and you may also have
other legal rights that vary from state to state.
To receive parts and/or service and the name of Wolf factory certified service nearest you, contact Wolf
Appliance, Inc., P. O. Box 44848, Madison, WI 53744; check the contact & support section of our website,
wolfappliance.com or call 800-222-7820.
*Stainless steel doors, panels, handles, product frames and interior surfaces are covered by a limited 60-day
parts and labor warranty for cosmetic defects.
*Replacement filters for ventilation hood recirculating kits are not covered by the product warranty.
WOLF APPLIANCE, INC.
P. O. BOX 44848 MADISON, WI 53744
820364 REV-A
10 /2011
WOLFAPPLIANCE.COM
800.222.7820