1
S_EA/ S
OWNER'S
MANUAL
MODEL NO.
987.799601
®
5 Horsepower
Caution:
Read and Follow
All Safety Rules
and Instructions
Before Operating
This Equipment.
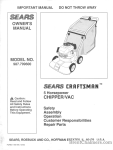
CHIPPER/VAC
with Wheel Adjusters
•
•
•
•
•
Assembly
Operation
Customer Responsibilities
Service and Adjustment
Repair Parts
Sears, Roebuck and Co., Hoffman Estates, IL 60179
FORM 1902963 (11/94)
U.S.A.
SAFETY RULES
,_
NOT CONTACT SPARK PLUG TO PREVENT ACCIDENTAL STARTING WHEN SETTING UP,
CAUTION:
ALWAYS
DISCONNECT
WIRE AND PLACE WIRE WHERE IT CANTRANSPORTING,
ADJUSTING,
OR SPARK
MAKING PLUG
REPAIRS.
_tk
IMPORTANT
YOUR UNIT IS EQUIPPED WITH A SAFETY INTERLOCK SYSTEM TO MINIMIZE INJURY. DO NOT ATTEMPT TO
DEFEAT THIS SYSTEM UNDER ANY CIRCUMSTANCES.
TRAINING:
• Read this Owner's Manual carefully before operating
this equipment. Be thoroughly familiar with the controls
and the proper use of this equipment.
• Do not wear loose-fitting clothing or jewelry that can get
drawn into the vacuum inlet or chipper chute, or that
can get caught by moving parts_
• Never allow children or untrained adults to operate this
equipment
• Do not operate this equipment unless the collection bag
or blower deflector is installed.
• Keep the area of operation clear of all persons, particularly sin!I1 children, and pets. Keep bystanders at least
25 feet away from the area of operation.
= Do not process material through chipper chute when
equipment is on uneven ground.
= Familiarize yourself with all of the safety and operating
decals on this equipment and on any of its attachments
or accessories°
• Do not run engine in an enclosed area. Engine exhaust
contains carbon monoxide gas, a deadly poison that is
odorless, colorless, and tastetess_ Do not operate this
equipment near buildings, windows, or air conditioners
o Do not allow hands or any other part of the body or
clothing inside the vacuum inlet, chipper chute, discharge opening, blower deflector, or near any moving
part° Cutting blades begin to rotate when engine starts
and slow down gradually after engine is shut off°
• Before inspecting or servicing any part of the equipment, stop the engine and make sure that all moving
parts have come to a complete stop Disconnect the
spark plug wire and secure it away from the spark plug..
Be aware that rotating blades slow down gradually after
engine is shut off_
• Do not operate this equipment if you are under the influence of alcohol, medication, or when tired or ill.
= Before starting engine, check that all screws, nuts,
bolts, and other fasteners are properly secured°
Replace any damaged or unreadable warning and operating decals_
° Wear work gloves, sturdy footwear, and hearing protection when operating this equipment.
° Use extra,care when handling gasoline and other fuels.
Gasoline and its vapors are highly flammable and
explosive.. To help prevent a fire or explosion:
a. Use an approved fuel container.
b. Never add fuel to a running or a hot engine
c. Keep matches, smoking materials, open flames, and
sparks away from the fuel tank and fuel container.
d. Fill the fuel tank outdoors and with extreme care.
Never fill fuel tank indoors.
e. Replace the caps on the fuel tank and fuel container
and clean up spilled fuel before starting engine. Gas
cap shall never be removed or fuel added while
engine is running.
° Leave 1/2 inch air space at top of fuel tank to alloN for
expansion of fuel.
o Do not store the machine or fue! container where there
PREPARATION:
° Always wear approved safety goggles (provided)
when operating this equipment. The operation of
any powered machine can result in foreign objects
being thrown by high-speed rotating parts.
is an open flame or spark, or where ignition sources
such as hot water and space heaters, furnaces, clothes
dryers, stoves, or electric motors are present.
/
,_
LOOK FOR THIS SYMBOL TO POINT OUT IMPORTANT SAFETY PRECAUTIONS.
IT MEANS - ATTENTION!!! BECOME ALERT!!! YOUR SAFETY IS INVOLVED.
J
|
OPERATION:
Do not operate the chipper if the chipper chute flap is
damaged or missing
• Before starting this equipment, make certain that the
chipper chute, vacuum inlet, discharge opening, and
blower deflector are empty. Disconnect spark plug wire
before making these check&
Keep your face and body safely away from the chipper
chute When chipping, stand on either side of chute
and keep arms perpendicular (at a 900 angle) to chute
inlet.
* Never carry passengers on this equipment. They could
fall off and be seriously injured, or they could interfere
with safe operation.
Do not overreach when feeding material into the chipper chute, Keep proper balance and footing at all
times.
• Do not allow hands or any other part of the body or
clothing inside the vacuum inlet, chipper chute, discharge opening, blower deflector, or near any moving
part.
Check collection bag frequently for deterioration or wear
and replace worn bags. Use only original equipment
replacement bags Bags manufactured by others could
present a safety hazard
• Before vacuuming, inspect the area where the equipment is to be used and remove all metal, bottles, cans,
or other foreign objects.
Before removing and installing collection bag, stop the
engine and allow al( moving parts to come to a complete stop Disconnect the spark plug wire and secure it
away from the spark plug
• Do not vacuum any burning or smoldering materials
such as cigars, cigarettes, ashes, or cinders.
• When vacuuming or chipping, be extremely careful that
pieces of metal, rocks, bottles, cans, or other foreign
objects are not included.
Empty the collection bag after each use. Decomposing
debris could generate enough heat to catch fire
° Do not use vacuum or blower on areas that have been
recently treated with fertilizers, pesticides, or herbicides..
Follow chemical manufacturer's safety instructions
regarding contact with treated areas..
• Do not vacuum flammable iiquids such as gasoline,
kerosene, diesel fue!, paint thinner, etc.
• If equipment strikes any foreign object or starts making
an unusual noise or vibration, immediately shut off
engine and allow all moving parts to come to a complete stop Disconnect the spark plug wire and secure it
away from the spark plug Then take the following
steps:
ao inspect for damage.
b, Replace or repair any damaged parts..
c. Check for and tighten any loose parts.
° If equipment jams or becomes clogged, immediately
shut off the engine and allow all moving parts to come
to a complete stop. Disconnect the spark plug wire
and secure it away from the spark plug. Use only a
wooden stick to clear away debris..
° Before adding or changing any attachments or before
switching between vacuum and blower operation stop
the engine and allow all moving parts to come to a complete stop. Disconnect the spark plug wire and secure it
away from the spark plug.
........
• Keep atl guards, covers, and shields in place and in
good working condition
• Always stand clear of discharge area when operating
equipment with blower deflector instaliedo Material exits
at a high speed from the blower deflector..
• Do not operate the chipper with the blower deflector
installed
Exercise extreme caution on slopes and avoid excessively steep slopes..
Never operate this equipment on a slippery surface.
Look behind and use care when operating in reverse.
o
Do not allow any part of the engine, especially around
the cooling fins and muffler to become clogged with
leaves, oil, grease, or any other combustible material
Watch for traffic when operating near, or when crossing
roadways.
Never leave the equipment unattended when the
engine is running.. Stop the engine, disconnect spark
plug wire, and secure it away from the spark plug
before leaving the equipment
• Use only attachments and accessories that are
approved for use with this equipment..
• Operate equipment only in daylight or in good artificial
fighL
• Do not tamper with the engine governor settings The
governor controls the maximum safe operating speed
and protects the engine and atl moving parts from damage caused by excessive speed. Request help at the
nearest Sears service location if a problem exists.
m
This equipment is provided with a safety interlock system which prevents the engine from starting unless the
collection bag or blower deflector is installed.. The system is also designed to shut off the engine if the operator attempts to remove the collection bag or blower
deflector while the engine is running.. Never attempt to
disconnect or otherwise defeat the purpose of this system if the interlock fails to operate properly, shut off
the engine and do not operate this equipment until the
system is repaired and is functioning properly.
MAINTENANCE
AND STORAGE:
• When equipment is stopped for servicing, inspection,
storage, or to change an attachment or accessory,
make sure the spark ptug wire is disconnected from the
spark plug Allow the engine to cool before making any
inspections, adjustments, etc
• Store this equipment where children will not have
access. Always disconnect the spark plug wire from the
spark plug to prevent accidental starting_
• Maintain equipment and atl attachments and accessories in safe working condition°
• Check collection bag frequently for deterioration or wear
and replace worn bags. Use only original equipment
replacement bags. Bags manufactured by ethers could
present a safety hazard.
• Never perform any maintenance while engine is running
or when spark plug wire is connected to spark plug,
except where specifically instructed to do so_
• Refer to "Off Season Storage" in this Manual for important storage instructions if equipment is to be stored for
an extended period.
• Never store this equipment with fuel in the fuel tank
inside a building where fumes may reach an open flame
or spark, or where ignition sources are present such as
hot water and space heaters, furnaces, clothes dryers,
stoves, electric motors, etco
• Allow engine to cool before storing in any enclosure.
• Store gasoline in a cool, well-ventilated area, safely
away from any spark- or flame-producing equipment.
Store gasoline in an approved container, safely out of
the reach of children.
. Use only original equipment replacement parts° Parts
manufactured by others could present a safety hazard
even though they may fit on this equipmenL
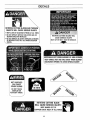
SAFETY
DECALS:
• Make certain that all safety decals on this equipment are
kept clean and in good condition. The decals are shown
on Page 35 of this Manual
CONGRATULATIONS
onyourpurchase
of a Sears
Craftsman
ChipperNac.it hasbeendesigned,
engineered and manufactured to give you the best
possible dependability and performance.
Should you experience any problems you cannot easily
remedy, please contact your nearest Sears Service
Center or Retail Store. We have competent, well-trained
technicians and the proper tools to service or repair this
machine.
Please read and keep this Manual The instructions will
help you assemble, operate, and maintain your machine
properly° Always observe the SAFETY RULES
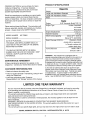
PRODUCT
SPECIFICATIONS
Chipper/Vac
Weight
65 lbs°
Length with Handlebars Extended
48 in.
Length with Handlebars Folded
Width
28 in.
22 in.
Engine
Engine
5 HP Tecumseh Model TVS ! 15
Engine Type
Vertical Crankshaft
Air-Cooled
Four Cycle
Engine Displacement
! 1.5 cu in.
Gasoline Capacity
MODEL NUMBER
987_799601
Oil (21 ounce capacity)
SERIAL NUMBER:
Spark Plug (gap O.030qn,)
DATE OF PURCHASE:
THE MODEL AND SERIAL NUMBER DECAL IS
LOCATED ON THE LEFT SIDE OF THE ENGINE
MOUNTING PLATFORM.
MAINTENANCE
AGREEMENT
A Sears maintenance agreement is available on this
chipper/vac
Contact your nearest Sears store for details.
CUSTOMER
RESPONSIBILITIES
* Read and observe the safety rules
* Foltow a regular schedule in maintaining, caring for and
using your chipper/vac,.
o Follow the instructions under "Customer
Responsibilities" and "Storage" sections of this manual.
Above 32 ° F: SAE 30
Below 32 ° F: SAE 5W30
Champion J19LM
Autolite 458, or equivalent.
In Canada, replace with
Valve Clearance
YOU SHOULD RECORD BOTH THE SERIAL
NUMBER AND THE DATE OF PURCHASE
KEEP
THEM IN A SAFE PLACE FOR FUTURE
REFERENCE.
1-1/4 qts.
resistor spark plug,
Intake: .006 in
Exhaust: .,006 in
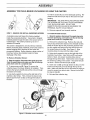
WARNING: This chipper/vac is equipped with an
internal combustion engine and should not be used on or
near any unimproved forest-covered, brush-covered or
grass-covered land unless the engine's exhaust system
is equipped with a spark arrester meeting applicable local
or state laws (if any). If a spark arrester is used, it should
be maintained in effective working order by the operator
In the state of California the above is required by law
(Section 4442 of the California Public Resources Code).
Other states may have similar laws Federal laws apply
on federal lands A spark arrester for the muffler is
available through your nearest Sears authorized service
center. See the REPAIR PARTS section of this manual.
LIMITED ONE YEAR WARRANTY
For One Year from date of purchase, when this Chipper/Vac is maintained, lubricated, and tuned up according
to the operating and maintenance instructions in the Owner's Manual, Sears will repair free of charge any
defect in material or workmanship°
This warranty excludes the collection bag, spark plug, air cleaner, and chipper blade which are expendable
parts and become worn during normal User
if this Chipper/Vac is used for commercial or rental purposes, this warranty applies for only 30 days from the
date of purchase
WARRANTY SERVICE IS AVAILABLE BY CONTACTING THE NEAREST SEARS SERVICE
CENTER/DEPARTMENT iN THE UNITED STATES.. This warranty applies only while this product is in use in
the United States..
This warranty gives you specific legal rights, and you may also have other rights which vary from state to state
SEARS, ROEBUCK AND CO. D/817WA - HOFFMAN ESTATES, IL 60179
TABLE OF CONTENTS
SAFETY
RULES ...................................................
PRODUCT
SPECIFICATIONS
WARRANTY
..........................................................
CHIPPER/VAC
ASSEMBLY
..............................
ATTACHMENTS
..........................
...........................................................
2
SERVICE
AND ADJUSTMENTS
5
STORAGE
5
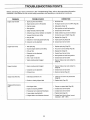
TROUBLESHOOTING
7
DECALS ..............................................................
35
8
REPAIR
PARTS - CHIPPERNAC
36
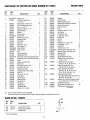
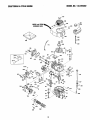
PARTS - ENGINE
...........................................................
........................................
OPERATION
.......................................................
17
REPAIR
CUSTOMER
RESPONSIBILITIES
27
PARTS ORDERING/SERVICE
.....................
........................
.......................
.................................
30
32
33
38
........... Back Cover
iNDEX
A
Air Filter .........................
Assembly .......................
28
8-16
16
30
13
24
31
Handlebars
...................
8
I
Ignition System .......................
Installing Shredder Screen
.....
29
1l
J
C
Chipper
Chute Location
17
Cutting Blade .................
30-31
Operating Tips ................
25
Operation .......................
25
Clearing Jams and Clogs .......
26
Collection Bag, Install ...........
10
Collection Bag, Remove .......
12
Control Lever, Engine ...........
17
Cooling System, Cleaning ....... 28
Customer Responsibilities .....
27
Cutting Blade, Chipper .......
30-31
Jams and Clogs ..............
!]
T
Location of Controls ................
Lubrication ..................
17
29
M
Materials to Avoid .................
Model/Serial Number ...........
21
5
0
5, 18
32
3
35
..................
................................
6
Parts List
Preparation, Safety ............
Primer .....................
........................
28
17
28
19
29
27
19-20
20
28
29
Tips & Hints
Chipper Operation ..........
25
Vacuum Hose Operation ....... 23
Walk-Behind Vacuuming ........ 22
Torque Chart .................
31
Training, Safety ....................
2
Troubleshooting ............
33-34
U
Oil ..............................
Off-Season Storage ...........
Operation, Safety ................
P
Engine
Air Filter .....................
Control Lever ...............
Cooling System ............
Fuel ...............................
Ignition
Oil ..............................
Operation ..............
Primer
Spark Arrester .............
Spark Plug .....................
Safety Rules .......................
2-4
Safety Decals ................
35
Safety Interlock ...............
8
Service, Engine ............
27-29
Service Recommendation
Checklist .........................
27
Shredder Screen ..............
t1
Spark Arrester ........................
28
Spark Plug .....................
29
Starter Rope .................
17, 20
Storage
Safety ...............................
4
Off-Season ................
32
26
L
...............
Decals ....................
19
18
It
B
Baffle Plate ...................
Blade, Chipper ...................
Blower Deflector .............
Blower Operation ................
Bolts, Torque ................
Gasoline
Adding .......................
Specifications ...................
36-40
2
!7, 20
R
Recoil Starter Rope
17, 20
Removing Shredder Screen ..... 11
Replacing Chipper Cutting
Blade ....................
30-31
..........
Unpacking .....................
8
V
Vacuum Hose
Installation .................
Operation ...................
Vacuum Inlet
Cap ............................
Vacuuming
Assembly for ...................
Handlebar Position for ........
Operation ......................
Vacuuming and Chipping
Guide .........................
14
23
17
10
8
22
21
ATTACHMENTS
This attachment was available when the chipper/vac was purchased° It is available at most Sears retail outlets and
service centers. Most Sears stores can also order repair parts for you, when you provide the model number of your
chipper/vac.
VACUUM
HOSE
The optional vacuum hose attachment allows you to
extend the reach of the machine by 10 feet to easily
reach in, around, under and behind bushes, shrubs,
trees, fences, lawn furniture, etc. If you purchased a
vacuum hose with the chipper/vac, you will find it
packaged in a separate carton°
Instructions for insta!iation and use of the vacuum hose
are presented in this Manual. See "Vacuum Hose
Operation" on Page t4.
Optional vacuum hose and baffle plate,
(Stock No. 71-85689)
ENGINE
ACCESSORIES
Engine accessories such as gas cans, engine oil, and replacement spark plugs are also available at your local Sears
service center and most Sears retail outlets.
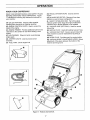
ASSEMBLY
Read these instructions in their entirety before you attempt to assemble your new chipper/vaco Your new chipper/vac
has been completely assembled at the factory, except for the items shown in Figure 1.. To ensure proper operation of
your chipper/vac, all nuts and bolts must be securely tightened when changing the configuration of the machine Use
the correct tools as necessary to ensure proper tightness.
UNPACKING
INSTRUCTIONS
(see Figure
1)
1, The following items are contained in the shipping
carton and shown in Figure 1:
(A)
(B)
(C)
(D)
A
_
B
Chipper/Vac
Safety Goggles
Blower Deflector
Collection Bag
J
2. Check for missing or damaged parts.. If any parts are
missing or damaged, contact your local Sears service
center or Sears retail outlet for assistance
IMPORTANT: MOTOR oIL AND GASOLINE MUST BE
ADDED TO THE ENGINE BEFORE THE ENGINE IS
STARTED_ THE PROCEDURES FOR ADDING
MOTOR OIL AND GASOLINE ARE ON PAGES 18
AND 19.
Figure
1: Contents of shipping carton.
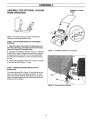
ExtendHandlebarsin
Vacuum Position
NOTE: All references to the front, rear, left and right of
the machine are determined as follows:
A
The inlet cap for the optional vacuum hose is located on
the front of the machine. The discharge opening is at
the rear The left and right sides are determined by
standing at the rear of the machine when the handlebars
are in the "vacuum" position
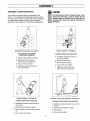
UNFOLD
THE HANDLEBARS
C
//
__P'
(see Figure 2)
\
Handlebars
Folded
1, Squeeze the handlebar end (with decal "Push in
Here") toward the center of the machine to release end
from the notch in the mounting bracket (C) and swing the
handlebars up over the machine toward the rear.
2. Position the handlebar ends in the "vacuum" notches
of the brackets (D in Figure 2 inset).
3o Unfold the handlebars until the channels on the upper
left and right handlebars are aligned with the lower
handlebars (A) If necessary, loosen knobs (B) before
unfolding handlebars.
Figure 2: Handlebar position for vacuuming.
4_ Tighten the knobs (B)
CHECK ALL NUTS AND BOLTS
TIGHTNESS
FOR
Check all nuts and bolts for tightness following assembly
and according to the schedule given in the section which
describes "Customer Responsibilities" on Page 27.
NOTE: Do not overtighten the bolts which attach the
engine mounting plate to the housing DAMAGE TO
THE HOUSING COULD RESULT
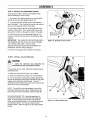
ASSEMBLY
ASSEMBLY
CONFIGURATIONS
Your machine has been partially assembled at the
factory. The remaining assembly steps should be done
on a clean, level surface, Choose the mode of operation
from the pictures below and then go to the page for
assembly of the chipper/vac in the desired configuration..
Walk-behind
vacuuming
- see Page t0
WALK-BEHIND VACUUMING
OPERATION CHECKLIST
CAUTION
To preventpersonalinjury or propertydamage, do not
connect the spark plug or start the engine until all
assembly steps are complete and you have read and
understood the safety and operating instructions in
this Manual
Blower
operation,
see Page 12
BLOWER OPERATION
CHECKLIST
v" Collection bag installed and zipped
v' Handlebars positioned toward the
front of the machine.
v' Baffle plate off (provided with
optiona] vacuum hose kit only)
v" Collection bag removed
V' Vacuum inlet cap installed
v' Handlebars positioned toward the
rear of the machine
Using the chipper,
see Page 10
CHIPPER OPERATION CHECKLIST
v' Handlebars positioned toward the rear of
the machine,
v" Collection bag installed and zipped
v" B{ower deflector and baffle plate (optional)
off
i/" Vacuum inlet cap installed.
v" Blower deflector installed.
v' Vacuum inlet cap installed..
v' Baffle plate off (provided with
optional vacuum hose kit only)
Using the vacuum hose (optional) - see Page 14
VACUUM HOSE OPERATION
v' Handlebars
machine
CHECKLIST
positioned toward the rear of the
Collection bag installed and zipped
v" Baffle plate on
v' Vacuum hose installed
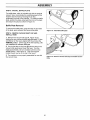
ASSEMBLY
ASSEMBLY
FOR WALK-BEHIND
VACUUMING
OR USING THE CHIPPER
4. Pull the screen (A) out of the discharge opening.. Reinstall the rods and hair pin clips on the screen for safekeeping.
IMPORTANT: THE HAIR PIN CLIPS SUPPLIED WITH
THE SCREEN ARE THE ONLY STYLE FASTENERS
THAT SHOULD BE USED° DO NOT USE
SUBSTITUTES OR FAILURE OF EQUIPMENT OR
PERSONAL INJURY COULD RESULT.
5. Remove supports from beneath machine_
STEP 1: REMOVE OR INSTALL SHREDDER
SCREEN
To Install Shredder Screen:
A shredder screen (A, Figure 3) is factoryqnstalied
inside the processing chamber, Vacuumed or chipped
material passes through the slots in the screen before it
is discharged, The screen produces up to an 8:1
reduction of material.
1o Stop the engine, disconnect the spark plug wire
from the spark plug, and make sure that all moving
parts have come to a complete stop.
2. Remove the collection bag. Remove the rods and
hair pin clips which were stored on the shredder screen.
Insert the screen (A) into the processing chamber with
the flat, angled end facing to the rear and the curve in
the screen facing to the righL See Figure 3_ Align
mounting holes in screen with the holes in deck..
The screen is designed for use only with dry materials
Before processing damp materials, remove the screen to
reduce clogging and to improve air flow inside the
processing chamber. Before chipping a large number of
branches, remove the shredder screen for faster
discharge of the chips.
3. Using sturdy supports, prop up the right side of the
machine a few inches. Insert front rod (C) up through
bottom of deck, into screen mounting hole, and out
through the top of the deck. Test that the rod is through
the screen by pulling on the screen - the screen should
not move. Secure rod with hair pin clip (D).
To Remove Shredder Screen:
1. Stop the engine, disconnect the spark plug wire
from the spark plug, and make sure that all moving
parts have come to a complete stop.
4. Insert rear rod (B) up through bottom of deck, into the
screen mounting hole, and out through the top of the
deck.. Make sure that the rod is in the screen by trying to
move the screen from side to side Secure the rod with
the hair pin clip (D)
2. To remove rear rod (B, Figure 3), remove the
collection bag or the blower deflector (if installed).. Then,
remove the hair pin clip (D) and pull the rod out through
the bottom of the deck
3. Use sturdy supports to prop up the right side of the
machine a few inches Then, remove the hair pin clip
(D) and pull the front rod (C) out through the bottom of
the deck.
5. Re-install the collection bag_
Figure 3: Shredder screen installation.
10
ASSEMBLY
STEP 3: ADJUST THE VACUUM INLET HEIGHT
CAUTION
STEP 2: INSTALL COLLECTION
The vacuum inlet height can be adjusted to six different
settings in approximately 1/2" increments. These
settings allow inlet suction to be adjusted for varying
needs, For example, when vacuuming deep layers of
leaves, adjust the vacuum inlet height at the front of the
machine to its highest setting as described below (see
Figure 5):
BAG
For walk-behind vacuuming or using the chipper, install
the collection bag as described below.
1. Stop the engine, disconnect the spark plug wire
from the spark plug, and make sure that all moving
parts have come to a complete stop,
1. Stop the engine, disconnect the spark plug wire
from the spark plug, and make sure that all moving
parts have come to a complete stop.
2. Squeeze the adjuster lever (A in Figure 5) toward the
wheel to disengage the adjuster pin from the hole in the
height adjuster bracket,
2, Make sure the bag (A in Figure 4) is zipped
3. Place the collection bag straps over the handlebars,
3. Rotate the adjuster lever toward the rear (discharge
opening) of the machine to raise the height and then
release the adjuster lever so that the adjuster pin
engages the selected hole in the bracket, Rotate the
lever in the opposite direction to lower the inlet height.
4. Line up the tabs on the bag inlet adapter (B) with the
slots in the discharge opening (C) and slide the bag inlet
adapter down all the way into the slots. Turn the
retaining knob (F) until the tab on the knob drops into the
slot on the top of the bag inlet adapter
4. Be sure that both adjuster levers are adjusted to the
same height
B
Figure 5: Vacuum Height Adjustment
Lever and Inlet Cap.
STEP 4: INSTALL VACUUM INLET CAP
Figure 4: Install
1. Postion the inlet cap (B, Figure 5) so that the bar on
the cap is aligned with the arrow at the REMOVE
position.
collection bag.
-2. Twist the cap 1/4 turn clockwise which will secure the
cap in place,
NOTE: Thei'od (D) on the inlet adapter is part of the
machine's safety interlock system Make sure that the
rod fits securely in the slot in the safety interlockswitch (E).
BAG MAINTENANCE TIP: Keep the bag clean by
occasionally washing it (by hand) with mild soap and
water A clean bag improves air flow and results in
better vacuuming performance, Do not wash the bag in
an automatic washer Do not use a cleaner which
contains bleach Allow the bag to dry thoroughly before
storing,
11
ASSEMBLY
1,1,,,
ASSEMBLY
FOR BLOWER
,,,,,,,,,,,,,,,,
=
L
= J =LJJui,,,Jiu,i,u,,,
,,,,,,,,i,
OPERATION
STEP 2: ADJUST HANDLEBARS
If the handlebars are in the vacuum position, they must
be adjusted to the "blower" position for blower operation.
1. Squeeze the handlebar end (see decal "Push in
Here") toward the center of the machine and swing the
handlebars over to the front of the machine,
2. Release the handlebars ends in the "blower" notches
(A), See Figure 7.
IMPORTANT: DO NOT USE THE CHIPPER IF THE
MACHINE IS SET UP FOR BLOWER OPERATION..
STEP 1: REMOVE 'THE COLLECTION
BAG (IF
INSTALLED)
1o Stop the engine, disconnect the spark plug wire
from the spark p/ug, and make sure that all moving
parts have come to a complete stop.
\
2_ Pull and then turn the retaining knob (F in Figure 6)
so that it clears the edge of the bag inlet adapter (B) and
the tab rests on the upper housing_ Grasp the pull strap
and slide the bag inlet adapter (B) out of the slots in the
discharge opening (C).
\
\
A
3. Hold the collection bag (A) with the inlet opening
upright so that material does not fall out, and slide the
straps off the handlebars
Figure 7: Adjust handlebars to "blower" position_
4, Unzip the collection bag and empty it by shaking the
bag gently to remove all debris
STEP 3: ADJUST THE VACUUM
INLET HEIGHT
For best results, adjust the vacuum inlet to its highest
position for operating the blower, Instructions for making
this adjustment are provided on Page 11.
Figure 6: Remove collection bag,
12
ASSEMBLY
STEP 4: REMOVE THE SHREDDER SCREEN
For maximum air flow, remove the shredder screen
before insta!iing the blower deflector
1. The screen (A) is held in place by two long rods (B
and C) and hair pin clips (D), See Figure 8,
2. To remove the rear rod (B), remove the hair pin clip
(D) and pull the rod out through the bottom of the deck°
3. Use sturdy supports to prop up the right side of the
machine a few inches,. Then, remove the hair pin clip
and pull the rod (C) out through the bottom of the deck,
4. Pull screen (A) out of the discharge opening, Reinstall the rods and hair pin clips on the screen for safekeeping_
IMPORTANT: THE HAIR PIN CLIPS SUPPLIED WITH
THE SCREEN ARE THE ONLY STYLE FASTENERS
THAT SHOULD BE USED, DO NOT USE
SUBSTITUTES OR FAILURE OF EQUIPMENT OR
PERSONAL iNJURY COULD RESULT,
Figure 8: Shredder screen removal
5. Remove the supports from beneath unit
STEP 5: INSTALL BLOWER DEFLECTOR
Position the tabs on the sides of the blower deflector (A
in Figure 9) into the slots in the discharge opening (B)
and slide the blower deflector down all the way into the
slots, Turn retaining knob (D) until the tab on the knob
drops into the slot on the blower deflector° (Reverse this
procedure when removing the blower deflector,)
NOTE: The rod (C) on the blower deflector is part of the
machine's safety interlock system, Make sure that the
rod fits securely in the slot in the safety interlock switch
(E).
D
Figure 9: Install
STEP 6: INSTALL VACUUM INLET CAP
blower deflector,.
1. Postion the inlet cap (A, Figure 10) so that the bar on
the cap is aligned with the arrow at the REMOVE
position,
2. Twist the cap 1/4 turn clockwise which will secure the
cap in place.,
IMPORTANT: THE VACUUM INLET CAP MUST BE
iNSTALLED DURING BLOWER OPERATION,
A
Figure
13
10: Vacuum Inlet Cap installed,
ASSEMBLY
ASSEMBLY FOR OPTIONAL
HOSE OPERATION
VACUUM
Handlebars in Vacuum
Position
NOTE: The optional Vacuum Hose is designed for
stationary vacuuming operation only,
STEP 1: MOVE HANDLEBARS
POSITION
TO VACUUMING
1. Stop the engine, disconnect the spark plug wire
from the spark plug, and make sure that all moving
parts have come to a complete stop,
Figure 11: Handlebar position for vacuuming.
2. Squeeze the handlebar end (A in Figure 11 inset with
decal "Push in Here") toward the center of the machine
to release end from the notch in the mounting bracket
and swing the handlebars up over the machine toward
the rear
3. Position the handlebar ends in the "vacuum" notches
of the brackets (B in Figure 11 inset) r
STEP 2: REMOVE BLOWER DEFLECTOR
INSTALLED)
(IF
Turn retaining knob (D in Figure 12) until the tab on the
knob is out of the slot in the blower deflector,, Pull the
sides of the blower deflector (A in Figure 12) out of the
slots in the discharge opening (B) and slide the blower
deflector off the machine.
A
Figure 12: Remove blower
14
deflector_
ASSEMBLY
STEP 3: REMOVE THE SHREDDER SCREEN
For maximum air flow, remove the shredder screen
before installing the vacuum hose.,
t. The screen (A) is held in place by two long rods (B
and C) and hair pin clips (D) (see Figure 13).
2. To remove the rear rod (B), remove the collection
bag (if installed). Then, remove the hair pin clip and pull
the rod out through the bottom of the deck,
A
3. Use sturdy supports to prop up the right side of the
machine a few inches Then, remove the hair pin clip
and pull the rod (C) out through the bottom of the deck,
4. Pull the screen out of the discharge opening_ Reinstall the rods and hair pin clips on the screen for safekeeping.
IMPORTANT: THE HAIR PiN CLIPS SUPPLIED WITH
THE SCREEN ARE THE ONLY STYLE FASTENERS
THAT SHOULD BE USED DO NOT USE
SUBSTITUTES OR FAILURE OF EQUIPMENT OR
PERSONAL INJURY COULD RESULT.
Figure t3:
Shredder
screen removal
5. Remove the supports from beneath the machine.
STEP 4: INSTALL COLLECTION
BAG
D
CAUTiOR
•
Check the collection bag frequently
deterioration and wear and replaceworn hags.
for
E
For using the vacuum hose, install the collection bag as
described below.
1. Make sure the bag (A in Figure 14) is zipped
2. Place the collection bag straps over the handlebars,
3. Line up the tabs on the bag inlet adapter (B) with the
slots in the discharge opening (C) and slide the bag inlet
adapter down all the way into the slots, Turn the
retaining knob (F) until the tab on the knob drops into the
slot on the top of the inlet adapter,,
NOTE: The rod (D) on the inlet adapter is part of the
machine's safety interlock system, Make sure the rod
fits securely in the slot in the safety interlock switch (E).
C
BAG MAINTENANCE TIP: Keep the bag clean by
occasionally washing it (by hand) with mild soap and
water. A ctean bag improves air flow and results in
better vacuuming performance, Do not wash the bag in
an automatic washer Do not use a cleaner which
contains bleach, Allow the bag to dry thoroughly before
storing.
Figure
15
14: Install collection bag°
ASSEMBLY
H, ,,i,llllllliH
i i
STEP 5: INSTALL BAFFLE PLATE
The baffle plate, which is included only with the optional
vacuum hose, concentrates the suctioning power of the
machine into the hose by blocking the air flow
underneath the front of the machine. To instali the baffle
plate, position the plate underneath the front of the deck
and snap it into place as shown in Figure 15.
Baffle Plate Removal
To remove the baffle plate, grasp the tabs on each side
of the plate, press outward, and remove the plate
STEP 6: REMOVE VACUUM
INSTALL HOSE
Figure 15: Install the baffle plate.
INLET CAP AND
1_ Remove the vacuum inlet cap (A, Figure 16) by
twisting the cap counterclockwise approximately I/4 turn
until the bar on the cap is aligned with the arrow at the
REMOVE position_ Lift the cap off the inlet opening. Do
not misplace the vacuum inlet cap.
2. Line up the tabs on the hose (B) with the slots in the
vacuum inlet opening and insert the hose.. Turn the
hose approximately t/4 turn clockwise until it is in the
LOCK position See Figure 16. (The hose support
handle should now be on the top of the hose.)
3. The machine is now properly assembled for use with
the vacuum hose1
Figure
hose,
16
16: Remove vacuum inlet cap and Install vacuum
OPERATION
KNOW YOUR CHIPPERiVAC
READ THIS OWNER'S MANUAL AND SAFETY RULES
BEFORE OPERATING YOUR CHIPPERNACo Figure
17 identifies the following key features and controls on
your machine:
(G) RECOIL STARTER ROPE: Used to start the
engine_
(H) BLOWER DEFLECTOR: Directs air flow when
machine is used in blower configuration.
(I) SAFETY INTERLOCK ROD: Part of the safety
interlock system which stops the engine if either the
collection bag or blower deflector is not installed.
(A) COLLECTION BAG: Used to collect material
resulting from vacuuming or chipping operation,
(B) ENGINE CONTROL LEVER: Used to control the
speed of the engine
(C) ENGINE PRIMER: Provides additional fuel from the
carburetor to the cylinder for use when starting a cold
engine,,
(D) AIR CLEANER:
engine parts,
Filters dirt which could damage
(E) CHIPPER CHUTE:
branches.
(F) FUELTANK:
(J) VACUUM HOSE (OPTIONAL): Used for remote
vacuuming
(K) BAFFLE PLATE: Used with optional vacuum hose°
(L) VACUUM INLET CAP: Covers vacuum hose inlet
when machine is used for walk-behind vacuming or
chipping,
(M) SPARK PLUG: Provides spark for engine ignition
(N) VACUUM HEIGHT ADJUSTMENT LEVER: Allows
adjustment of the space between the bottom of the
machine and the ground,
Used to process small
Stores engine fuel
!,1
!
N
N
!.
Figure 17: Features and Controls,
17
OPERATION
BEFORE
STARTING
ENGINE
STEP t: ADD OIL TO ENGINE
DAHaER
1, The machine was shipped without oil in the engine
The engine requires approximately 2t ounces of oil
RotatingCuttingBladesWill Cause
Serious Personal Injury!
2, Only use high quality detergent oil rated with the
APJ. service classification of "SF" or "SG" Select the
oil's SAE viscosity grade according to your expected
operating temperature:
Do not allow handsor any part of the bodyor clothing
inside the vacuum inlet, chipper chute, discharge
opening, or blower deflector opening when the
engine is running.
Before inspecting or servicing any part of the
machine, stop the engine and make sure that all
moving parts have come to a complete stop°
Disconnect the spark plug wire and secure it away
from the spark plug.
NOTE: Change the oi! after the first two operating
hours,. See "Changing Oil" on Page 27 in the "Customer
Responsibilities" section of this Manual.
colder-_
32°F
5W30
_ warmer
SAE 30
NOTE: Although multi-viscosity oils (5W30, 10W30,
etc), improve starting in cold weather, these multiviscosity oils will result in increased oil consumption
when used above 32°F. Check your engine oil level
more frequently to avoid possible engine damage from
running low on oil,
A
3, With the machine on level ground, remove the
dipstick (A, Figure 18) and place it on a clean surface.
4, Using a clean funnel, slowly add oil to the dipstick
hole. While adding oil, frequently reinstall dipstick (screw
dipstick down securely) to check oil level Wipe dipstick
with a clean cloth before reinserting each time Fill to the
"FULL" mark on dipstick. DO NOT OVERFILL!
5. Reinstall the dipstick securely
Figure 18: Remove dipstick to add oil to engine,
STEP 2" ADD GASOLINE TO THE FUEL TANK
Fill the fuel tank with fresh, clean, unleaded regular
automotive gasoline. (Leaded regular and un}eaded
premium grades of gasoline are acceptable substitutes.)
DAHGER
Q Do not mix oil with gasoline.
Gasoline is highly flammable and its vapors are
explosive° To prevent personal injury or property
damage:
Q Do not use gasoline left over from last season or
stored for long periods,,
WARNING: Experience indicates that alcohol blended
fuels (called gasohol or using ethanol or methanol) can
attract moisture which leads to separation and formation
of acids dufing storage. Acidic gas can damage the fuel
system of an engine while in storage
• Do not add fuel if the engine is runningor still hot
from recent operation. Allow the engine to cool for at
least three minutes°
To avoid engine problems, the fuel system should be
emptied before storage for 30 days or longer. Drain the
gas tank, start the engine and let it run until the fuel lines
and carburetor are empty Use fresh fuel next season°
See STORAGE instructions for additional information.
• Do not allow open flames, matches, or smoking in
areao
,* Do not fill the feel tank indoors. After filling.wipe
up any spills and move the machine away from
gasoline fumes beforestarting the engine.
Never use engine or carburetor cleaner products in the
fuel tank or permanent damage may occur.
18
OPERATION
To Add Gasoline
1, Stop the engine and wait for all moving parts to
come to a complete stop. Disconnect the spark plug
wire and secure it away from the spark plug, Allow
the engine and muffler to cool for at least three
minutes,
2. Clean area around fuel fill cap and remove cap (A in
Figure 19) from fuel tank_
3. Use a clean funnel to fill the fuel tank to 1/2 inch
below the bottom of the filler neck (to provide room for
fuel expansion).
4. Re-install the fuel fitl cap securely and wipe up any
spilled gasoline.
PRE-STARTING
PROCEDURES
Figure 19: Fill fuel tank.
IMPORTANT; REVIEW THE SAFETY SECTION AND
READ THIS SECTION IN ITS ENTIRETY BEFORE
STARTING THE ENGINE,
DANGER
With the spark plug wire disconnected from the spark
plug, perform the following pre-starting procedures as
required before each start-up:
[]
To Prevent PersonalInjury or Property Damage:
,, Cutting blades begin to rotate when the engine
starts and slow down gradually after the engine is
shut off. Do not allow hands or any other part of the
body or clothing inside the vacuum inlet, chipper
chute, discharge opening, blower deflector opening,
or near any moving part.
Place the machine outdoors on level ground_
[] Make sure you are wearing safety goggles (and
heavy work gloves if using the chipper),
[] Be sure that all bystanders are at least 25 feet away
from the area of operation,
,, Do not run the engine in an enclosed area° Engine
exhaust contains carbon monoxide gas, a deadly
poison that is odorless, colorless and tasteless. Do
not operate this equipment near buildings, windows,
or air conditioners.
[] Check that the chipper chute, vacuum inlet, or
discharge deflector are empty (after initial use of the
machine).
Q Check that all screws, nuts, bolts, and other fasteners
are properly secured_
O Check the oi! level in the engine
Q Re-attach the spark plug wire before starting the
engine,,
SAFETYINTERLOCK
SYSTEM
Your machine is equipped with a Safety Interlock System
which prevents the engine from starting unless the
collection bag (or blower deflector) is installed. The rod
(A, Figure 20) must be positioned as shown in slot (B) in
order to start the engine..
B
The system also stops the engine if the operator attempts
to remove the bag or blower deflector while the engine is
running When the rod is not in place, a circuit doses to
ground out the engine
If the safety interlock system fails, shut off the engine and
do not operate the machine until the system has been
repaired, Contact your local Sears service center for
repairs,
Figure 20: Safety Interlock System.
WARNING
To avoid personal injury or propertydamage, do not
operale this machine unless the safety interlock
system is functioningproperly°
19
OPERATION
GENERAL
OPERATION
Understanding how your machine works will help you achieve the best results when using the Chipper/Vac+ Read the
following explanation before using the machine and see Figure 21 which shows the internal workings of the
ChipperiVac_
A
(A)
Chipper Chute
(B)
Chipper Cutting Blade
F
(C) Shredder Screen
(D) Processing Chamber
(E)
Fan Blade (1 of 4)
(F)
Discharge Opening
Figure 21: Cutaway
view., (Blower
deflector
removed for clarity,)
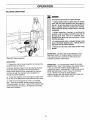
STARTING THE ENGINE
STOPPING THE ENGINE
1, Put on safety goggles and work gloves, Do not wear
loose fitting clothing or jewelry that can get caught in
moving parts.
1. Move the Engine Control Lever all the way to the left
(toward turtle position) until it stops.
2. Listen for all moving parts to come to a complete
stop There is an audible tone when the cutting blades
are slowing down.,
2. Move the Engine Control Lever (A, Figure 22) all the
way to the right (toward rabbit position) until it stops.,
3. When starting a cold engine, firmly push primer (B,
Figure 22) five (5) times before trying to start the engine
(This step is not required when starting an engine which
has already run for a few minutes)
4+Stand at the left front of the machine Place one foot
against left front wheel to stabilize the machine,
5+ Look behind you to make sure there are no obstacles
in the way. Grasp the Starter Rope Handle (C) and pull
handle quickly. Do not alfow starter rope to snap back.,
NOTE: In cool weather, repeat pfimimg step if
necessary, in warm weather, over priming may cause
- flooding so that the engine wilt not start, If the engine is
flooded, wait a few minutes before attempting to start it
and do not repeat the priming step.
6. Leave the Engine Control Lever at the FAST (rabbit)
setting. FAST is the recommended setting for all
vacuuming and chipping operations.
Figure 22: Starting and stopping the engine,
20
OPERATION
VACUUMING
CHIPPING
OPERATION
Chipping operation also takes place in the processing
chamber° Branches fed down through the chipper chute
enter the processing chamber where a hardened steel
chipper blade, mounted on the spinning flywheel, slices
the material into small chips. The chips are then
propelled out from the processing chamber through the
discharge opening into the collection bag.
Vacuuming operation begins in the processing chamber
where the blades attached to the flywheel spin at up to
3600 RPM, creating a powerful suction Material enters
the processing chamber from beneath the machine
during walk-behind vacuuming and during use of the
blower deflector_ Material enters from the hose during
use of the vacuum hose, The material is then processed
through the chamber (and screen if installed) and exits
from the discharge opening into the collection bag or is
propelled out through the bbwer deflector..
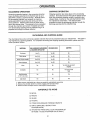
VACUUMING
OPERATION
AND CHIPPING
GUIDE
The chart below lists some commonly available materials that can be processed using your ChipperNac,
This chart is
only intended as a general guideline For complete vacuuming and chipping operating instructions, please read this
entire Operation Section.
........... L' ............
CHIPPER
WALK-BEHINDVACUUMING VACUUMHOSE
or BLOWERDEFLECTOR
MATERIAL
,, ,, ,,,, .....
, .......
,,,,
Dry leaves
Yes(1)
Yes(2)
No
Dampleaves
Yes(i ,2)
Yes(2)
No
Acorns& pine needles
Yes(2,3)
Yes(2)
No
Grassclippings
Yes(1,2)
Yes(2)
No
Vines
No
No
Yes(cut intovery short
lengths)
Cornstalks
No
No
Yes(cut off root
b&{})
Smallbranches
(1-1/2" max dia )
No
No
Yes
Lightbrush
No
No
Yes
,,,,,
,,,
,,....
,, ,,,,,..,,,,,
,, ,,,,,,,,,.........
- Adiust vacuum inlet height up or down as needed for walk-behind vacuuming
2 - Remove the shredder screen to prevent clogging and improve air flow
3 - Remove screen and adjust vacuum inlet height to lowest positiono
MATERIALS
TO AVOID
Q METAL
Q ROCKS .................
Q GLASS
Q PLASTIC
[] OTHER NON-ORGANIC
FOREIGN OBJECTS
[]
DIRT & SAND (WILL QUICKLY DULL
CHIPPER BLADE)
[]
STICKS AND TWIGS (WILL CLOG VACUUM INLET
OR HOSE - PLACE IN CHIPPER CHUTE ONLY)
2t
OPERATION
WALK-BEHIND
VACUUMING
OPERATION
DANGER
To Prevent Personal Injury or Property Damage:
• Cutting blades begin to rotate when the engine
starts and slow down gradually after the engine is
shut off. Do not allow handsor any other part of the
body or clothing inside the vacuum hose opening,
blower discharge opening, chipper chute, or near any
mowng parL
• Before inspecting, cleaning, or servicing the
machine, stop the engine and make sure that all
moving parts have come to a complete stop.
Disconnect the spark plug wire and secure it away
from the spark plug,
° To avoid personal injury or propertydamage, do not
operate this machine for vacuuming unless the
collection bag is installed.
• Review all of the rules in the Safety Section of this
Manual
Figure 23: Machine prepared for walk-behind vacuuming.
IMPORTANT
Operation
1. Prepare the unit for vacuuming by following the
assembly steps on Page 10.
Spring Operation:
Spring clean-up can be especially difficul!! Leaves
and other debris may have matted down over the
3receding months For best results when vacuuming
this type of debris: remove the screen, lower the
vacuum inlet, and walk slowly. You can even use the
machine as you would a vacuum cleaner, moving it
back and forth over particularly stubborn debris, or
loosen the debris with a few quick passes of a rake,
and then vacuum.
2. Walk slowly behind the machine to allow the machine
to draw the debris off the ground.
3. In certain conditions it may be necessary to make two
passes over the area
4. Be sure to frequently empty the collection bag. See
Step 1 on Page 12.
5, To stop the machine, move the Engine Control Lever
all the way to the left (toward turtle position) until it stops.
Fall Operation:
6. Listen for all moving parts to come to a complete
stop. There is an audible, distinct sound produced as
the cutting blades slow down. Wait for this sound to stop
before inspecting, servicing, or changing the operating
mode of the machine
Walk-Behind
Don't try to vacuum too much at one time! Optimum
performance is obtained when leaves are vacuumed
once a week, or even more often at the peak of leafdrop. Keep ahead of the leaves, tn the long run, this
is the easiest and fastest way to deal with all of your
Fall leaves-
Vacuuming
Tips and Hints
Q Avoid overfilling the vacuum inlet which can lead to
clogging, especially if the material is wet and soggy.
A steady, smaller flow of materials provides the most
effective results.
C) If possible, vacuum frequently to avoid deep piles of
leaves from accumulating on the lawn.
O Work from the outer edge of leaf piles and gradually
work inward.
13 Use the blower deflector to b!qw the leaves into long
ro;._s-before walk-behind vacuuming if the leaf cover
is sparse.
13 Mow the lawn before the leaves fail to make
vacuuming easier. Keeping your lawn a bit
shorter in the Fail will help a great deal
13 Check and empty the collection bag frequently.
Q Use care when vacuuming near plantings,
ornamentals, mulches, stone or gravel..
Q Avoid vacuuming long twigs and sticks which are
likely to jam or clog the vacuum inlet. Instead,
process twigs and sticks using the chipper chute as
described on Page 25..
IMPORTANT:
IF THE MACHINE ,JAMS OR CLOGS, IMMEDIATELY SHUT OFF
THE ENGINE AND DISCONNECT THE SPARK PLUG WIRE FROM THE SPARK
PLUG.. REFER TO PAGE 26 FOR SAFETY PRECAUTIONS AND DETAILED
INSTRUCTIONS ON HOW TO REMOVE JAMS AND CLOGS.
22
OPERATION
VACUUM
HOSE OPERATION
DANGER
To Prevent Personal Injuryor Property Damage:
* Cutting blades begin to rotate when the engine
starts and slow down gradually after the engine is
shut off. Do not allow hands or any olher part of the
body, or clothing inside the vacuum hose opening,
blower dischargeopening, chipper chute, or near any
moving part.
- Before inspecting, cleaning, or servicing the
machine, stop the engine and make sure that all
moving parts have come to a complete stop.
Disconnect the spark plug wire and secure it away
from the spark plug.
Figure 24: Using the vacuum
,, To avoid personal injury or property damage, do not
operate this machine for vacuuming unless the
collection bag is installed.
hose.
° Review all of the rules in the Safety Section of this
Manual.
NOTE: The optional Vacuum Hose is designed for
stationary vacuuming operation only,,
Tips for Using the Vacuum
OPERATION
Hose
Q When vacuuming, move the hose slowly from side to
side,
1. Prepare the unit for use of the vacuum hose by
following the assembly steps on Page 14
Q To avoid clogging, do not vacuum too much material
at once Vacuum some material, let the hose
"breathe," and then vacuum some more
2. Move the machine to the vacuuming site and park the
machine on level ground,
NOTE: To avoid damaging the hose, drape the hose to
the right side of the machine when moving the machine
between vacuuming sites° Do not allow the hose to
touch the engine°
Q Also keep the hose as straight as possible to prevent
clogging,,
Q Do not attempt to move the machine by pulling on the
hose, This could damage the hose and cause the
machine to move unsafely
3. Use the handle attached to the hose to easily
maneuver the hose around corners, underneath bushes,
etc, See Figure 24.
4. To stop the machine, move the Engine Control Lever
all the way to the left (toward turtle position) until it stops.
IMPORTANT:
IF THE MACHINE JAMS OR CLOGS,
IMMEDIATELY STOP THE ENGINE AND MAKE SURE
THAT ALL MOVING PARTS HAVE COME TO A
COMPLETE STOP. DISCONNECT THE SPARK PLUG
WiRE AND SECURE IT AWAY FROM THE SPARK
PLUG. REFER TO PAGE 26 FOR SAFETY
PRECAUTIONS AND DETAILED INSTRUCTIONS ON
HOW TO REMOVE JAMS AND CLOGS,
5. Empty the collection bag frequently when using the
vacuum hose. See Page 12 for instructions.
6. Listen for all moving parts to come to a complete
stop. There is an audible, distinct sound produced as
the cutting blades slow down. Wait for this sound to stop
before inspecting, servicing, or changing the operating
mode of the machine
23
OPERATION
BLOWER
OPERATION
DANGER
To PreventPersonal Injury or Properly Damage:
,, Cutting blades begin to rotate when the engine
starts and slow down gradually after the engine is
shut off. Do not allow hands or any other part of the
body or clothing inside the vacuum hose opening,
blower dischargeopening, chipper chute, or near any
moving part.
• Before inspecting, cleaning, or servicing the
machine, stop the engine and make sure that all
moving parts have come to a complete stop.
Disconnect the spark plug wire and secure it away
from the spark plug.
= To avoid personal injury or property damage, keep
clear of the blower discharge area.. Material exits at
high speed from the blower deflector.
o Review all of the rules in the Safety Section of this
Manual.
Figure
25:
Blower
IMPORTANT: DO NOT USE THE CHIPPER IF THE
MACHINE tS SET UP FOR BLOWER OPERATION.,
THE VACUUM INLET CAP MUST BE INSTALLED
DURING BLOWER OPERATION,,
operation.
OPERATION
'1. Prepare the unit for blower operation by following the
assembly steps on Page 12.
IMPORTANT:
IF THE MACHINE JAMS OR CLOGS,
IMMEDIATELY STOP THE ENGINE AND MAKE SURE
THAT ALL MOVING PARTS HAVE COME TO A
COMPLETE STOP° DISCONNECT THE SPARK PLUG
WIRE AND SECURE IT AWAY FROM THE SPARK
PLUG REFER TO PAGE 26 FOR SAFETY
PRECAUTIONS AND DETAILED INSTRUCTIONS ON
HOW TO REMOVE JAMS AND CLOGS,
2. Blower Operation begins in the processing chamber
where fan blades attached to the flywheel create a
suction which draws air from underneath the machine,
Air flows through the chamber and is propelled out
through the blower deflector.
3. To stop the machine, move the Engine Control Lever
all the way to the left (toward turtle position) until it stops.
4. Listen for all moving parts to come to a complete
stop. There is an audible, distinct sound produced as
the cutting blades slow down Wait for this sound to stop
before inspecting, servicing, or changing the operating
mode of the machine_
24
OPERATION
CHIPPER
OPERATION
DANGER
To PreventPersonal Injury or Property Damage:
• Cutting blades begin to rotate when the engine
starts and slow down gradually after the engine is
shut off. Do not allow hands or any other part of the
body or clothing inside the vacuum inlet, chipper
chute, dischargedeflector or near any moving part.
,, Before inspecting, cleaning, or servicing the
machine, stop the engine and make sure that all
moving parts have come to a complete stop.
Disconnectthe spark plug wire and secure it away
lrom the spark plug.
,, Do not operate the machine unless the chipper
chuteis securelyinstalled.
. To avoid a fire hazard, keep leaves, grass and
other combustib!e materials away from the engine
and muffler.
= Keep bystanders,pets, and children at least 25 feet
away from the machine.
° Review all of the safety rules in the Safety Section
of this Manual,,
Figure 26: Using the chipper.
Feed small branches into the chipper chute Branches
are processed by the chipper blade and discharged into
the collection bag
1, If the machine was previously used for vacuuming, it
is correctly assembled for using the chipper, ff the
machine was used for blower operation, it must be
adjusted to the walk-behind vacuuming position
before using the chipper. See assembly steps on
Page 10.
IMPORTANT: THE CHIPPER IS tN OPERATING
MODE WHENEVER THE ENGINE IS RUNNING_ BE
SURE TO WEAR WORK GLOVES WHEN FEEDING
MATERIAL INTO THE CHIPPER CHUTE
5, Do not reach into the chipper chute to retrieve
material that is below the flap, if the material jams or
clogs the chute, shut off the engine, disconnect the
spark piug wire, and wait for all moving parts to stop
before attempting to retrieve the material
C3 If a branch causes the engine to stai!, merely restart.
Stalling does not harm the engine.
O Empty the collection bag frequently when using the
chipper Refer to Page 12.
6. To stop the engine, move the Engine Control Lever all
the way to the left (toward turtle position) until it stops
There is an audible, distinct sound as the cutting blade
stows down, Wait for this sound to stop before
inspecting, servicing, or changing the operating mode of
the machine.
2. Stand at the side of the machine, and carefully feed
small branches and twigs (up to 1-1/2 inch in diameter)
into the chipper chute,. See Figure 26 which shows
chipper operation,
3, Guide the branch down until your hands approach the
top of the chute Note that there is a flap at the top of
the chipper chute. NEVER PUT YOUR HANDS DOWN
PAST THE CHIPPER CHUTE FLAP.
Tips for Using the Chipper
O Before chipping a large number of branches, remove
the shredder screen for faster discharge of the chips
into the collection bag.
iMPORTANT:
DO NOT OPERATE THE CHIPPER iF
THE CHIPPER FLAP IS WORN OR MISSING
4. Feed the branch slowty. If the machine
the branch upward until the engine regains
..... Continue to alternately feed and retract the
your hands approach the top of the chipper
then let go,,
labors, puil
speed
branch until
chute and
_1 Whenever possible, process branches while they are
still fresh-- green wood chips more easily than dry
wood,
IMPORTANT:
iF THE MACHINE JAMS OR CLOGS,
IMMEDIATELY STOP THE ENGINE AND MAKE SURE
THAT ALL MOVING PARTS HAVE COME TO A
COMPLETE STOP° DISCONNECT THE SPARK PLUG
WIRE AND SECURE IT AWAY FROM THE SPARK
PLUG, REFER TO PAGE 26 FOR SAFETY
PRECAUTIONS AND DETAILED iNSTRUCTIONS ON
HOW TO REMOVE JAMS AND CLOGS.
25
OPERATION
CLEARING
JAMS AND CLOGS
For all vacuuming
operations:
1. Check that the collection bag is not overfilled
2. While the bag is removed, check that the discharge
opening is not clogged°
WARNING
For walk-behind
Before inspecting,cleaning or servicingthe machine,
stop the engine and make sure that all moving parts
have come to a completestep° Disconnectthe spark
plug wire and secure it away from the spark plug,
Failure to follow this instruction could result in
personal injury,
vacuuming:
1. Check that the vacuum inlet opening is not clogged.
2. Use a stick to clear away debris.
For using the blower deflector:
1. Check that the blower deflector discharge opening is
not clogged.
2. Use a stick to clear away debris,
A clog or jam can cause the vacuuming and discharging
operations to decrease or even stop completely. If this
occurs, take the following steps:
For using the vacuum hose:
1. Check that the hose is not clogged_
2. Remove the hose and use a long stick to clear away
any debris from the vacuum inlet opening.,
1. STOP THE ENGINE IMMEDIATELY and wait for all
moving parts to stop. Disconnect the spark plug
wire and secure it away from the spark plug.
2. Check and clean, if necessary, the following areas in
the order given_
26
CUSTOMER
IMPORTANT
SERVICE
RESPONSIBiLITiES
MESSAGE
CAUTION
i
Perform the Maintenance Schedule listed in the chart
below to ensure the proper performance and long life of
your machine.
Before inspecting, cleaning
machine, stop the engine and
moving parts have come to
Disconnectthe spark plug wire
from the spark plug_
[
If you do not wish to service the machine yourself, you
can bring it to your local Sears Service Center for expert
service,
i
[=:t:::
:_]
or servicing the
make sure that all
a complete stop°
and secure it away
Failure to follow these instructions
personalinjuryor propertydamage.
can result in
MAINTENANCESCHEDULE
SERVICE
Before
EachUse I
•
CheckEngine Oit Level (Page 28)
Every5
Hours
ti"
ChangeEngineOil (Page28)
ReplaceAir Filter (Page 28)
CleanCooling System (Page 28)
Every25
Hours
Every100
Hours
T
1,2
•
4
tp
Inspect Spark Arrester (if equipped)
I
t
Inspect Spark Plug (Page28)
CleanMachine
•
Check Bolts and Nuts (Page 29)
NOTE1 NOTE2 NOTE3 NOTE4 -
CHECK
As Noted
•
•
[
"[
2
t
T
3
_
2
I
Changeoil afterfirst two hoursof newoperation,
Servicemorefrequentlyin extremelydustyor dirbj conditions.
If engineis equippedwith a sparkarrestor,cleanandinspectfor damageevery50 operatinghours
Replaceyearlyor mereoftenif usedin extremelydustyor dirty conditions
AND CHANGE
ENGINE
3. The oil level should be at the "FULL" mark on the
dipstick. If the oil level is low, add recommended oil
After checking or adding oil, install the dipstick and
tighten securely.
OIL
Q Check oil level every five operating hours and before
each use of the machine_
Q Change oil after first two hours of new operation and
every 25 operating hours thereafter, IMPORTANT:
Change oil more frequently when operating in
extremely dusty or dirty conditions,
To Check Oil Level
1. Place the machine on level ground.. Stop the engine
and make sure that all moving parts have come to a
complete stop. Disconnect the spark plug wire and
secure it away from the spark plug.
2. To avoid contaminating the engine oil with dirt, clean
the area around the dipstick (A, Figure 27). Remove the
dipstick and wipe it with a clean cloth. Screw the
dipstick fully inward and then remove it to check the oil
level,
Figure 27: Dipstick (A) and oil drain plug (B),
27
CUSTOMER
RESPONSIBILITIES
To Change the Oil
1, Change the oil while engine is still warm from recent
operation. Stop engine and make sure that all
moving parts have come to a complete stop.
Disconnect spark plug wire and secure it away from
spark plug.
2. The oil drain plug (B in Figure 27 on Page 27) is
located at the bottom of the dipstick tube,.
3. Prop up the wheels on the opposite side of the
machine so that the oil drain plug is at the lowest point
on the engine,
SLOT
4o To prevent oil from spilling on the machine, make a
V-shaped drain trough out of aluminum foil or stiff
cardboard and place the trough beneath the drain plug,
5. Remove the dipstick (A, Figure 27) to vent the
crankcase and speed up draining time
6. Remove the oil drain plug (B, Figure 27). After the oil
has drained, install the oil drain plug and tighten
securely
Figure 28: Air cleaner assembly.
CLEAN
7. Refill the engine crankcase with recommended oil
described below. After adding oil, securely replace the
dipstick (A) and clean up any spilled oil
cotder,._
32°F----------_
5W30
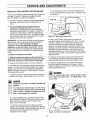
SERVICE
COOLING
SYSTEM
To ensure adequate cooling of the engine, air must
circulate freely through the air intake screen (A in Figure
29) and over the cooling fins (B)..
- warmer
After every 5 operating hours, clean the air intake screen
and the cooling fins to remove any chaff, dirt and debris.
SAE 30
THE AIR FILTER
The engine is equipped with a paper element air filter_
See Figure 28
IMPORTANT:
. NEVER RUN ENGINE WITHOUT COMPLETE AIR
FILTER ASSEMBLY INSTALLED.
* REPLACE FILTER ONCE A YEAR, OR MORE OFTEN
IF USED IN EXTREMELY DUSTY OR DIRTY
CONDITIONS.
- DO NOT ATTEMPT TO CLEAN OR OIL FILTER..
o REPLACEMENT FILTERS ARE AVAILABLE FROM
ANY SEARS ROEBUCK AND CO (OR SEARS
CANADA, INC.) SERVICE CENTER.
Figure 29: Air intake screen and cooling
fins.
INSPECT
ARRESTER
To Replace Air Filter
(IF SO EQUIPPED)
1, Stop engine and make sure that all moving parts
have come to a complete stop. Disconnect spark .
plug wire and secure it away from spark plug;
If the muffler on the engine is equipped with a spark
arrester screen assembly, remove the assembly every
50 hours of operation for cleaning and inspection.
Replace a damaged assembly,
2. Turn cover to the left (counterclockwise) and remove
cover and filter from flange Discard filter. See Figure 28.
SERVICE
3. Clean cover and flange thoroughly.
THE ENGINE
THE SPARK
SPARK
PLUG
Check the spark plug yearly or every 100 operating
hours. Replace the spark plug if the electrodes (Figure
30 on Page 29) are pitted or burned, or if the porcelain is
cracked. Use a Champion J-19LM, Autolite 458, or
equivalent In Canada, replace with a resistor spark
plug..
4. Position cover and filter against flange with tab on
cover inserted into lower left corner of slot in flange°
5. Push cover firmly against flange and turn it to the
right (clockwise) as far as it will go. Be sure retainers
are locked around flange
28
CUSTOMER
RESPONSIBILITIES
Check The Spark Plug
1, Stop the engine and make sure that all moving
parts have come to a complete stop. Disconnect the
spark plug wire and secure it away from the spark
plug.
Electrodes
2, Clean the area around the spark plug to prevent
debris from falling into the spark plug hole_
.030 Gap ...,,,
\
3, Remove and inspect the spark plug. Check the
electrode gap with a wire feeler gauge and set the gap at
_030", if necessary.
Figure 30: Spark plugo
4, install spark plug and tighten securely
CHECK
CARBURETOR
INFORMATION
AND IGNITION
BOLTS
Porcelain
AND NUTS FOR TIGHTNESS
Be sure that the bolts and nuts on your machine are
always securely tightened. With the engine shut off
and the spark plug wire disconnected,
check the bolts
and nuts before each use of the machine.. Refer to the
Parts List at the back of this Manual for replacement
hardware_ Do not overtighten bolts. See the Torque
Specifications Chart on Page 31.
SYSTEM
O The factory-adjusted carburetor settings should be
satisfactory for most conditions. If you feel that an
adjustment is needed, contact your Iocal Sears
Service Center or retail store
LUBRICATION
[] The engine is equipped with an electronic ignition
system without points and a condenser. Only spark
plug maintenance is required. If the ignition system is
not functioning properly, contact your local Sears
Service Center or retail store.
With the exception of the engine, the machine is lifetime
lubricated Do not oil or grease any part of the machine.
CAUTION
Do not tamper with the engine governor which is
factory set for proper engine speed_ Overspeeding
the engine above the factory high speed setting can
be dangerousand will void the engine warranty.
Requestauthorizedservice if the problempersists_
29
SERVICE AND ADJUSTMENTS
REPLACE
THE CHIPPER
CUTTING
d. Re-install the fuel line on the fuel tank fitting and
secure it in place with the hose clamp. Install gas cap
on fuel tank.
BLADE
Over time, the chipper cutting blade edge (A in Figure 33
on Page 31) will dul!. Sharpen or replace the blade
when the chipper no longer cuts efficiently,
FuelTank
_3 Discard a cracked or severely nicked blade because
the blade could break apart and cause personal
injury.
E3 We recommended thatyou takethebladetoa
professional sharpening service for expert
sharpening,, All grinding must be flat and uniform
along the beveled edge of the blade to maintain the
original 45 o cutting angle. Sharpen a blade that is
dull or that has only minor nicks. The blade is made
from tempered steel and is extremely hard - do not
attempt to sharpen with a hand file
Figure
31: Hose clamp and fuel line.
To Remove and Replace the Blade
4. With a 3/8" wrench, remove the three bolts that
secure the engine mounting base to the deck. One bolt
is shown in Figure 32. A second bolt is located at the
rear of the machine above the left side of the blower
opening. This second bolt also secures the short wire
leading to the safety interlock,. Remove the wire and the
Iockwasher along with this bolt. Also, disconnect the
long safety interlock wire where it attaches to the engine
above the engine muffler, A third bolt is located near the
right front wheel
1, Stop the engine and make sure that all moving
parts have come to a complete stop. Disconnect the
spark wire and secure it away from the spark plug.
5. Remove the two hair pin clips on the right side and
rear of the housing which secure the shredder screen
rods, and then remove the rods and shredder screen,
2. Remove the collection bag or the blower deflector,
6, Slide the engine forward (in direction of the spark
plug) and carefully lift engine out of chassis., Gently
place the engine on a clean floor or workbench with the
spark plug side facing up.
iMPORTANT:
Do not reuse the blade mounting screws
and locknuts. New screws and tocknuts are supplied
with a new blade Use only factory-supplied
hardware.
Do not use substitutes or failure of the
equipment or personal injury could result. See the
Parts List at the back of this Manual to order individual
replacement screws and Iocknuts if re-installing the old
blade.
3o The blade removal procedure requires removal of the
engine. To avoid a potential safety hazard from spilled
gasoline, the fuel tank must be emptied of alt gasoline
before the engine is removed, Follow Steps "a" through
"d" to empty the fuel tank,
WARNIH8
a. Place a clean pan below the fuel tank to catch the
gasoline as it drains Remove gas cap from fuel tank,
To avoid personal injury, handle chipper cutting
blade with extreme care,, The cutting edge is very
sharp°
DANSER
Gasoline and its vapors are highly flammable and
explosive.
To avoid serious personal injury, be sure area is
well ventilated and keep gasoline away from open
flame or sparks, Observe no smoking rules at atl
times_ Use an approvedfuel conlainer.
b. Using adjustable pliers, squeeze the tabs on the
hose clamp (A in Figure 31) that secures the fuel line
(B) to the fuel tank fitting. Slide the clamp a few
inches down the fuel Iine.
c. Pinch the fuel line with your fingers to prevent
gasoline from leaking and then gently pull the fuel line
off the fuel tank fitting Drain the gasoline into the pan
and then transfer the gasoline to a container
designed for fuel storage,
Figure
3O
32: Engine mounting bolts.
SERVICE AND ADJUSTMENTS
14. Install the short safety interlock wire terminal and
the lockwasher on one of the mounting bolts and install it
at the rear of the machine above the left side of the
blower opening. Connect the long interlock wire to the
terminal above the muffler. Replace the other two
mounting bolts and tighten all three bolts to 60-65 Ibs-in.
DO NOT OVERTIGHTEN BOLTS OR DAMAGE COULD
RESULT TO HOUSING
7, The chipper cutting blade (A in Figure 33) is mounted
on the upper side of the flywheel assembly (B). AVOID
CONTACT WITH THE BLADE AS IT tS EXTREMELY
SHARP! To remove the blade, first remove the flywheel
assembly as described below:
a. Rotate the flywheel assembly until the cutout (C)
in the flywheel assembly is located below the chipper
chute, To prevent the flywheel assembly from
turning, place a 1/2" or thicker wood dowel down the
chipper chute through the cutout. See Figure 33.
15. install shredder screen in housing, insert screen
rods, and secure with hair pin clips.
16. Replace the collection bag or blower deflector and
reposition the handlebars in the correct operating
position for vacuuming or blower operation°
b, Using a box end 9/16" wrench, remove the
bolt (D) and concave washer (E) Carefully slide the
assembly off the crankshaft Do not lose the key (F),
or any shims (G), NOTE: Shims (if used) may be
inside bore of flywheel assembly, See Figure 33
8. With a 3/16" hex key (Allen) wrench and 1/2" box
wrench, remove the two Iocknuts (I) and screws (H) that
secure the blade to flywheel assembly., If necessary,
first clean out the socket holes in the screw heads with a
sharp nail or awl, See Figure 33
9. Before installing a new or resharpened blade,
thoroughly clean the area where the blade seats on the
flywheel assembly (also clean the old blade, if it is being
reused).
10. Position the blade on the upper side of the flywheel
assembly, with the sharp edge of the blade on top,
Install two new screws down through the blade and add
new focknuts_ Use only factory-supplied hardware.
Do not use substitutes
or equipment failure or
personal injury could result. Tighten securely (torque
to 240 lbs-in or 20 Ibs-ft)
11. Place key (F) in the engine crankshaft and re-install
any shims (G). Align the keyway in the bore with the key
on the crankshaft and slide the flywheel assembly into
place
12. Place the concave washer (E [dished-in side of
washer faces flywheel assembly]) on the mounting bolt
(D) and install the bolt in the crankshaft. Tighten
securely (torque to 204 Ibs-in) Remove the wood dowel
from the chipper chute
Figure 33t Chipper cutting
blade removal/replacement,
13. Replace the engine in the chassis, with the spark
plug side facing the front (toward Inlet Cap)
TORQUE
BoltSize
5/16"-t4
SPECIFICATIONS
Torque(Ibs-in)
Locationof Bolt(s)
60-65]Bs-in
1 Enginemountingplateto housing
40-55Ibs-in
2 Handlepivot bracket
40-55tbs-in
3 Upperhousingto lowerhousing
5/16"-24
240 tbs-in
1. Chipperknifeto fanassembly.
3/8"-t6
180 lbs-in
1 Wheelballs
2. Handlebarsto pivot brackets.
3/8"-16
276 lbs-in
1. Enginemountingplateto engine
3/8"-24
204 lbs-in
1 Fanassemblyto engine
31
STORAGE
OFF-SEASON
d. Change the oil if it has not been changed in the
last three months, See Page 28
STORAGE
e. Lubricate the piston/cylinder area,, First, remove
the spark plug, Then, squirt approximately '1/2
ounce of clean engine oil into the spark plug hole_
Cover the spark plug hole with a rag to absorb oil
spray and then rotate the engine by pulling the
starter rope two or three times. Finalty, re-install
the spark plug.
DANGER
To Prevent Personal injuryor Property Damage:
* Never perform maintenance while engine is
runningor when spark plug wire is connectedto spark
plug, exceptwhere specifically instructedto do so.
,, Never store machine with fuel in the fuel tank
inside a building where fumes may reach an open
flame or spark, or where ignitionsourcesare present
such as hot water and space heaters, furnaces,
clothes dryers, stoves, electric motors, etc_
f. Clean the engine by removing any dirt, chaff or
other debris from its exterior.
3. Thoroughly clean the machine, collection bag, hose,
and blower deflector.
4. Check that all hardware is in place and securely
fastened. Refer to the Parts List in this Manual for
replacement hardwarer
NOTE: A yearly check-up by your local Sears Service
Center is a good way to ensure that your machine will
provide maximum performance for the next season.
5. Inspect all visible moving parts for damage,
breakage, and wear_ Repair or replace as needed (refer
to Parts List).
1. Review the "Customer Responsibilities and Storage"
safety rules in the Safety Section of this Manual
6. Touch up paint on all chipped or scratched surfaces
to prevent rust from forming.
2. To prevent engine damage (if the machine is not
used for more than 30 days) follow the steps below:
7. If possible, store machine indoors (see DANGER
statement on this page) Cover machine for protection
from dust and dirt. Use a covering (not plastic) that does
not retain moisture, Be sure the engine and muffler are
cool before covering the machine,
a. It is important to prevent gum deposits from
forming in essential fuel system parts such as the
carburetor, fuel filter, fuel hose or tank during
storage, Also, experience indicates that alcohol
blended fuels (called gasohol or using ethanol or
methanol) can attract moisture which leads to
separation and formation of acids during storage
Acidic gas can damage the fuel system of an
engine while in storage.,
b. To remove gasoline, run the engine until the tank
is empty and the engine stops.
c. If you do net want to remove gasoline, a fuel
stabilizer (such as Craftsman Fuel Stabilizer No
335500) may be added to any gasoline left in the
tank to minimize gum deposits and acids If the
tank is almost empty, mix the stabilizer with fresh
gasoline in a separate container and add some to
the tank. ALWAYS FOLLOW INSTRUCTIONS
ON THE STABILIZER CONTAINER, THEN, RUN
THE ENGINE AT LEAST 10 MINUTES AFTER
THE STABILIZER IS ADDED TO ALLOW
MIXTURE TO REACH CARBURETOR. STORE
THE MACHINE IN A SAFE PLACE SEE
DANGER ABOVE
32
TROUBLESHOOTING
POINTS
Before performing
any of the corrections
in this Troubleshooting
Chart, refer to the appropriate
information
contained
in this Manual for the correct safety precautions
and operating or maintenance
procedures.
PROBLEM
Engine Does Not Start
POSSIBLE CAUSE
1 Spark plug wire disconnected
1 Reconnectwire
2, Engine Control Lever in OFFposition
2 Put Engine Control Lever in START(Page 20)
3 Fueltank empty
3 Add gasoline (Page 19)
4 Stale gasoline
4 Drain gasoline and add fresh gasoline
5 Safety Interlock switch has failed
5 Contact Sears Service Center
6 Collection bag or blower deflector not installed
6 Install collection bag or blower deflector
7 Incorrect Control Lever setting
7 Put Controt Lever in START(Page20)
8, Dirty air filter
8 Replacefilter (Page 28)
9, Defective or incorrectly gapped spark plug
Engine Overheats
9 Inspect spark plug (Page28)
10 Contact Sears Service Center
t0 Carburetor out of adjustment
EngineRunsPoorly
CORRECTION
!
t Badspark plug
! Replacespark ptug (Page29)
2 IncorrectEngineControlLeversetting
2 Put Lever in correct setting (Page 20)
3 Dirtyair filter
3, Replacefilter (Page 28)
4 Carburetorout of adjustment
4 Contact Sears Service Center
5 Stalegasoline
5 Drain gasoiine and add fresh gasoline
6, Dirt or waterin fuel tank
6 Contact Sears Service Center
7 Enginecoolingsystemclogged
7 Clean air intake screen and cooling fins
(Page 28)
1 Enginecooling system clogged
1 Clean air intake screen and cooling fins
2 Carburetor out of adjustment
2 Contact Sears Service Center
3 Oil level is tow
3 Checkandaddoil(Page 27)
t Solidobjectjammedin unit
1 Checkfor and removeanyobstruction
(Page26)
2 Brokenor missingchipperblade
2. Replaceblade(Page30)
I LDull chipper blade
1 Sharpenor replaceblade(Page30)
2, Engine not reaching full RPM
2 ContactSearsServiceCenter
3 Excessivelyworn engine shaft bearing(s)
3, ContactSearsServiceCenter
4 Loose engine mounting bolts
4 Tightenbolts(Page29)
5, Chipper blade to anvil clearance incorrect
5: ContactSearsServiceCenter(correct
clearanceis 030"-090")
(Page 28)
Chipper Does Not Chip
ChippingPerformanceIs
Poor
33
TROUBLESHOOTING
PROBLEM
Lossof Vacuum
UnusualVibrationor Noise
POINTS
POSSIBLECAUSE
CORRECTION
1 Vacuuminletor vacuumhosec_ogged,
1 Checkfor and removeanyobstruction
(Page26)
2 Collectionbagfull
2 Removeand emptybag(Page12)
3 Dischargeopeningclogged
3 Removecollectionbagto clean
opening(Page12)
4 Processingchamberclogged
4 Checkfor andremoveany obstruction
(Page26),
5. Enginenotreachingfull RPM
5 See"EngineRunsPoorly"at beginning
of chart,
1. Solidobjectjammedin unit
1 Checkfor and removeanyobstruction
SeePage26.
2, Chipperbladelooseor damaged,
2, Tightenor replace(Page30)
3 Rotorassemblyout of baiance,
3 ContactSearsServiceCenter
4 Chipperbladetoanvilclearanceincorrect
4 ContactSearsServiceCenter(correct
clearanceis 030"-,090")
5 Enginecylindershaftor crankshaftisbent
or damaged
5 ContactSearsServiceCenter
6 Looseenginemountingbofts
6 Tightenbolts (Page29)
7, Looseor m{ssingbolts on unit,
7 Tightenor replacebolts (Page29)
8, Engineshaftbearingsdamaged
8 ContactSearsServiceCenter
34
DECALS
ROTATING
CUTTINGBLADESANDTHROWN
OBJECTS
Wit,L CAUSESERIOUSINJURY!
• KEEPCLEAROF DISCHARGEOPENINGAT ALLTIMES,
= DO NOTOPERATEWITHOUTCOLLECTIONBAG OR
BLOWERDEFLECTORINSTALLED_
ROTATINGCUTTINGBLADESWILL
CAUSESERIOUSINJURYf
INLETCAPORHOSE MUSTBEINSTALLED°
• DONOT OPERATEtF SAFETYINTERLOCKIS BROKEN
OR BECOMESDEFECTIVE.SEE OWNER/OPERATOR
_.MANUAL
__
,,,
i
DISCHARGEOPENINGTOAVOIDSERIOUSINJURY.
HOT SURFACES
CAN CAUSE
SEVERE BURNS
DO NOTTOUCH
MUFFLEROR
ADJACENTAREAS.
ROTATINGCUMNG BLADE
WILL CAUSE SERIOUS INJURY!
KEEP HANDS OUT OF
CHIPPER CHUTE INLET AT ALL TIMES.
35
n
CRAFTSMAI!5 HP CHIPPER/VACMODELNUMBER987.799601
89 "_
4O
©
57
t
12
i
I
I
t
I
8
i
I
I
o
i
65
36
REPAIRPARTS
CRAFTSMAN5 HP CHIPPER/VACMODELNUMBER987.799601
REF
No_
PART
No.
1
2
DESCRIPTION
REF
No.
QTY.
143,955002" Engine,5 HP
1762042
Thread-FormingScrew
318-16x 1"
3
1763390
FlangeScrew,5/16q3 x 1" ............ 13
1763255
Fanand ChipperDiscAssy ............... 1
1104338
Key,114x 1/4 x 2" ......................
1
1100010
Capscrew,318-24x 1-1/4" ..........
1
ConicalWasher
1
1756993
Washer ...............................
4
1185831
1763261
Inlet Housing.......................
I
l
1763262001 Divider Plate...........................
1763265
Wheeland Tire Assy ..................
4
ShoulderScrew
2
1763367
1763356
FlatWasher.........................
2
RearAxle ............................
I
1763391
1100350
Cotter Pin,tt8 x 1L ....................
2
1890234
FlatWasher,1/2" ....................
6
1763268001 Upper Handle..............................
1
1768668001 Lower Handle...........................
1
Knob .....................................
2
1763767
1731025
CurvedHeadBolt ......................
2
1107382
FlatWasher,5/16° .....................
2
1768670001 Wheeland HandlePivot (left side only) l
1763331
ShoulderScrew,3/8-16 (left side oniy) 1
Elbow....................................
1
1769062
1767422
Ignition Ground Switch..................... 1
1764197
Switch Tab............................
2
1805368
Fiat Washer,9/64 x 5116...............
4
1747138
Pop Rivet, 1t8 x 3/8 ....................
4
1764179
ChipperTubeFlap......................
1
1763257
OperatingInstructions Decal........... 1
1764189
CableTie ..................................
1
1764439
Pop Rivet, 118x3t5 ....................
2
1768720
Logo Decal...................................
1
1763288
DangerDecal...............................
1
1763289
Warning Decal ................................. 1
1763290
DangerDecal.................................. 1
1768722
Bag Decal.....................................
1
1763294
DangerDecal..............................
1
HandlebarDecal.........................
1
1768724
1900333
Madein US A Decal
1
............................
'1
...........................
4
5
6
7
8
9
11
12
13
15
16
19
20
21
22
23
24
25
26
27
28
30
33
35
38
39
40
41
42
43
44
45
46
47
49
50
51
53
Nil
*
.........................
..........................
REPAIRPARTS
PART
No.
DESCRIPTION
54
57
59
60
61
62
63
64
65
66
67
79
80
83
86
87
88
89
96
97
98
99
100
101
1756954
1763263
1761627
1763393
1763392
1186259
1737499
1100047
1893445
1107383
1733398
1764076
1756986
1764649
1186309
1734398
1728401
1765507
1769136001
1768703
1768655
1185748
1769123
1115958
200
1769635
201
1769649
205
1769633
206
1769654
207
1769637
208
209
1767298
1902079
b/"
1902963
Goggles..............................
t
Hose CapInlet .........................
1
HeightAdjusting Lever..............
2
WheelHeightAdjusting Quadrant .... 2
WheelMounting Arm ..........
2
Jam Nut,3/8-16 .......................
2
Grip ................................................... 2
Hex Screw,3/8-16 x 1-1/2"
......... 4
Flat Washer..........................
6
Flat Washer,3/8" ...............
2
ToplockNut, 318-t6 ..................
4
ScreenRod.............
2
Hair Pin....................
2
Bracket
1
FlangeScrew,1/4-20 x 5/8" ......
2
TopiockNut, 114-20 ............
3
Loctite 242 .......................
Nil
Pop Rivet,1/8 x 1/2 ...........
2
HandleSupport (right side only)...... 1
ShoulderScrew (right side only) ..... 1
RetainingKnob ................
1
WaveWasher ................
1
HandleAdjustment Decal .........
1
MachineScrew, RoundHead,
114-20x 1-1/2" ...............
1
CollectionBag Kit, (includes
Ref No's 30,35, 38, 39 & 42)
1
BladeKit (includes Ref_No's
202,203 & 204- seebelow) .....
t
UpperHousing Kit (includes
Ref No's 33,41, 43, 44, 50, 51,
53, 57, 83, 87, 98, 99, & 101) ....
1
EngineMounting PlateKit
(includes EnginePlateAssembly,and
Ref No's 40, 45 & 89) ..........
1
DeflectorKit (includes DischargeDeflector, and Ref No's 35, 38, 39 & 47)
ShredderScreenKit ...................
1
Spray PaintCan,Black,13 oz ........ Nil
ChipperNacOwner'sManual ........ 1
.........................
...................
Partnot includedwith unit. Order separatety.
Orderparts from your local SearsServiceCenter, Referto enginefor model and type number
BLADEKIT NO, 1769649
_.._203
REF
No.
PART
No.
DESCRIPTION
_._ 204
QTY_
t ;,:):.
202
203
204
1763742
1763741
"*
ToplockNut, 5/16-24 ..................
FlangeScrew,5/16-24...................
ChipperKnife ..............................
2
2
1
e&
282_-
** Not sold separately
37
QTY.
CRAFTSMAN4-CYCLE ENGINE
:
MODELNO. 143,955002
7-301
11287
MODELand SERIALIZe.
370
NUMBERSHERE
260
.262
" 292
400
29O
I_'_ 292
135
130
-7
126
276",-._. ,
120
119
277,A.,_ _=._'_
125
241_
38
CRAFTSMAN4-CYCLE ENGINE
Ref. #
Part #
36478A
26727
2
6
33734
7
36557
12
36558
12B
34695
14
28277
15
30589
16
31383A
17
31335
650548
18
19
36281
20
32600
30
36231
40
36073
40
36074
40
36075
36070
4t
41
36071
41
36072
42
36076
42
36077
42
36078
43
20381
45
30963B
32610A
48
48
27241
35992
50
29914
52
69
35261
70
36249A
72
30572
72A
28534
73 l 28833
75
27897
80
30574A
81
30590A
82
30591
83
30588A
56
650488
89
611004
90
611112
92
650815
93
650816
100
34443A
101
610118
103
650814
110
36230
119 " 36477
120
36476
125
36471
125
36472
126
29314B
126
29315C
130
6021A
135
35395
.......
1
Part Name
Cylinder (Incl, 2, 7, 20 & 125)
Dowel Pin
Breather Element
Breather Body Ass'y (lnct 6 & 12)
Breather Cover & Tube (Incl. 12B)
Breather Tube Elbow
Washer
Governor Rod (Incl. 14)
Governor Lever
Governor Lever CIamp
Screw, 8-32 x 5/16"
Extension Spring
Oil Seat
Crankshaft
Piston, Pin & Ring Set (Std)
Piston, Pin & Ring Set (.010" OS)
Piston, Pin & Ring Set (.020" OS)
Piston & Pin Ass'y (Std.) (lncl. 43)
Piston & Pin Ass'y. (.010" OS) (Inc[ 43)
Piston & Pin Ass'y (020" OS) (Incl 43)
Ring Set (Std)
Ring Set (O10" OS)
Ring Set ( 020" OS)
Piston Pin Retaining Ring
Connecting Rod Ass'y (Incl 46)
Connecting Rod Bolt
Valve Lifter
Camshaft (MCR)
Oil Pump Ass'y
Mounting Flange Gasket
Mounting Flange (lncl 72 thru 83)
Oil Drain Plug
Oil Drain Plug
Drain Plug Gasket
Oil Seal
Governor Shaft
Washer
Governor Gear Ass'y ([ncl. 61)
Governor Spool
Screw, 1/4-20 x 1-1/4"
Flywheel Key
Flywheel
Be!leviIle Washer
Flywheet Nut
Solid State Ignition
Spark Plug Cover
Screw, Torx T-15, 10-24 x 1"
Ground Wire
Cylinder Head Gasket
Cylinder Head
Exhaust Valve (Std) (lncL 151)
Exhaust Valve (1/32" OS) (]ncl 151)
intake Valve (Std) (lncL 151)
Intake Valve (1/32" OS) (Inc[ 151)
Screw, 5/16-18 x 1-1/2"
Resistor Spark Plug (RJ19LM)
MODEL HO, 143.955002
tef.
150
t51
169
172
174
178
t79
182
184
185
186
200
202
203
204
205
206
207
2O9
215
223
224
238
239
241
245
25O
260
261
262
275
-_75A
276
277
__77t,
285
287
290
292
300
301
306
306
307
309
310
313
327
370
370#
38O
39O
4OO
39
Part #
Part Name
35991
Valve Spring
31673
Valve Spring Cap
27234A
Vaive Cover Gasket
32755
Vaive Cover
30200
Screw, 10-24 x 9/16"
29752
Nut & Lock Washer, 1/4-28
30593
Retainer Clip
6201
Screw, 1/4-28 x 7/8"
26756
Carburetor To intake Pipe Gasket
31384A
intake Pipe (Incl 224)
34337
Governor Link
35727
Control Bracket (lncl, 202 thru 206)
36482
Compression Spring
31342
Compression Spring
650549
Screw, 5-40 x 7/16"
650777
Screw, 6-32 x 21/32"
Terminal
610973
Throttle Link
34336
30200
Screw, 10-24 x 9/16"
32410
Control Knob
65O451
Screw, 1/4-20 x 1"
34690A--Intake Pipe Gasket
650932
Screw, 10-32 x 49/64"
34338
Air Cleaner Gasket
35797
Air Cleaner Collar
Air Cleaner Filter
35066
35065
Air Cleaner Cover
36420A
Blower Housing
30200
Screw, 10-24 x 9/t 6"
650831
Screw, 1/4-20 x 1/2"
36456A
Muffler (Incl 277)
36424
Spark Arrestor Muffler (Optional)
33753
Locking Plate (Optional)
650986
Screw, 1/4-20 x 2-5/16"
650795
Screw, 1/4-20 x 2-1/4" (Optional)
35000A
Starter Cup
650926
Screw, 8-32 x 21/64"
34357
Fuel Line
26460_......._ Fuel Line Ciamp
35586
Fuel Tank (Incl 292 & 301)
35355
Fuef Cap
Oil Fill Tube
35647
34265
"O"-Ring
35499
"O"-Ring
650562
Screw, 10/32 x 1/2"
35648
Dipstick
34080
Spacer
35392
Starter Ptug
35169
Control Decal
........
Lubrication Decal
36261
632670
Carburetor (Incl. 184)
Rewind Starter
590732
36481*
Gasket Set (lncl items marked PK in notes)
CRAFTSMAN5 HP CHiPPER]VACMODELNUMBER987.799601
REWINDSTARTERNO. 590732 (Fig. 2)
CARBURETORNO. 632670 (Fig. 1)
[_ef.
t
2
4
5
6
7
16
25
27
28
29
30
31
35
35A
40
44
48
Part
No,
631615
631767
631184
631183
632504
650506
631775
631867
631024
632O19
631028,_
631021 ,
631022
632694
632647
632503
27110
631027
Ref.
No.
Part Name
Throttle Shaft & Lever Assembly
Throttle Return Spring
Dust Seal Washer
Dust Seal (Throttle)
Throttle Shutter
Shutter Screw
Fuel Fitting
Float Bowl
Float Shaft
Float
._FloatBowl "O" Ring
Inlet Needle, Seat & Clip (lncl, 3t)
Spring Clip
Primer Bulb/Retainer Ring
Primer Bulb Filter
High Speed Bow] Nut
Bowl Nut Washer
Welch Plug, Atmospheric Vent
Part
No.
1
2
3
4
5
6
7
8
11
590599A
590600
590696
590601
59O697
590698
590699
590618A
590695
12
13
590535
590701
HOSEKIT NO. 987.856790 (Fig. 3)
Ref.
INo, ........
U°
Part
Noo
1767377
1765866
1763291
1763281001
1756875
1763283001
1740083
tlO0123
1186389
1107381
REPAIRPARTS
Part Name
Spring Pin (lncl 4)
Washer
Retainer
Washer
Brake Spdng
Starter Dog
Dog Spring
Pulley & Rewind Spring Assyo
Starter Housing Assy
(40 degrees grommet)
Starter Rope (Length 98"x 9/64" dia)
Starter Handle
3
Part Name
Hose
Tube
Hose Adapter
Handle
Handle Grip
Inlet Cover
Worm Clamp
SLotted Head Screw, I/4-20 x 1-1/4"
Flange Whiz Locknut, 1/4-20
Washer
t
:_-g
Figure I
Figure 3
40
Figure 2
NOTES
41
NOTES
42
NOTES
43
CRRFrSMRN ®
OWNER'S
UAL
MODEL NO.
987.799601
5 Horsepower
CHIPPER/VAC
with Wheel Adjusters
Each Chipper/Vac
has its own model
engine has its own model number.
The model number for your machine
left side of the unit.
number_
Each
will be found on the
The model number for the engine will be found
engine's blower housing above the spark plug.
on the
All parts listed herein may be ordered through
Sears,
Roebuck and Co. Service Centers and most Retail Stores.
WHEN ORDERING
REPAIR PARTS, ALWAYS
FOLLOWING
INFORMATION:
IF YOU NEED
REPAIR SERVICE
OR PARTS:
• PRODUCT-
GIVE THE
"CHIPPERNAC"
• MODEL
NUMBER
, ENGINE
MODEL
- 987.799601
NUMBER
FOR REPAIR SERVICE
CALL THIS TOLL FREE
NUMBER:
° PART NUMBER
1-800-4-REPAIR
° PART DESCRIPTION
- 143.955002
(1-800-473-7247)
FOR REPLACEMENT
PARTS INFORMATION AND
ORDERING, CALL THIS
TOLL FREE NUMBER:
1-800-FON-PART
(1-800-366-7278)
Your Sears merchandise
has added value when you
consider that Sears has service units nationwide
staffed
with Sears trained technicians._professional
technicians
specifically
trained on Sears products, having the parts,
tools, and the equipment
to insure that we meet our
pledge to you, we service what we sell,
Sears, Roebuck and Co., Hoffman
FORM 1902963 (11/94)
Estates, IL 60179
U.S.A.
Printed in U,SA.