1
RF645
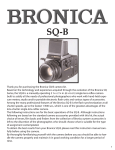
Thank you for your purchase of the Bronica RF645 medium format rangefinder camera.
Incorporating the best of Bronica's know-how and technological expertise, the Bronica
RF645 achieves a new dimension in compactness as the world's first medium format 6 x 4.5
rangefinder camera to feature interchangeable lenses, and comes with a superb line up of
lenses to take full advantage of the rangefinder camera. The RF645 employs manual film
advance lever and dual-image superimposing rangefinder focusing for maximum user control where it counts, while enhancing handling ease with Program AE, automatic shutter
cocking via a motor designed for the maximum enjoyment of photography in mind.
The features and handling procedures described in this owner's manual are based on use of
the Bronica RF645 in combination with the Zenzanon RF65mm f/4 standard lens. To obtain
best results from your new camera, please read this instruction manual carefully before use.
With proper care and handling, the unit will continue to provide pleasure and performance
for many years to come.
1
Contents
Special Features of the Bronica RF645
Nomenclature
1. Getting Started
1-1 Loading batteries
1-2 Attaching and detaching lens
1-3 Attaching strap
1-4 Attaching the proper diopters adjustment lens
2. Preparing to Shoot
2-1 Checking the battery capacity
2-2 Loading film
2-3 Setting the film speed
2-4 Exposure counter, Film memo holder,
How to remove a used roll of film
3. Shooting
3-1 Main switch
3-2 Viewfinder, Holding the camera
3-3 Shutter release button, Viewfinder display
3-4 Exposures
3-4-1 Shutter dial and lens aperture operation
3-4-2 Exposure Metering system
3-4-3 Exposure control modes
1) Program AE mode
2) Aperture-priority AE mode
3) Manual exposure control
3-4-4 Exposure compensation
3-4-5 AE lock
3-5 Focusing
3-6 Automatic parallax compensation
4.Other features
4-1 Multiple exposures
4-2 Self-timer
4-3 Electronic Flash photography
4-4 Long exposure photography
4-5 Infrared photography
4-6 Depth of Field
5. Troubleshooting
6. References
7. Specifications
8. Preliminary checklist
9. Enduring years of enjoyment through proper care and handling
Page
3, 4
5, 6
6, 7
7, 8
8
8
9
9, 10, 11
11
12, 13
12
13
13, 14
14, 15
15, 16
16
17, 18
17
17
18
18, 19
19
19, 20
20
20, 21
21
22, 23
23
23
24
25, 26, 27
28
29, 30
31, 32
32, 33
2
Special Features of the Bronica RF 645
·A medium format coupled-meter rangefinder camera.
The Bronica RF 645 is a very compact and lightweight camera with a picture area approximately 2.7 times larger than the 35mm format. The superior portability and versatility of
this model compared with other medium format cameras ushers in an entirely new world of
photographic possibilities.
·The remarkable lens shutter system
The electronically controlled #00 type lens shutter system developed for the Bronica RF 645
commands precise shutter speed control and automatic cocking, as well as aperture control
incorporated within the shutter unit. The interface between the main camera body and the
lens are conducted by means of a series of electronic contracts, resulting in high precision
operation compared with conventional systems operated by mechanical couplers. The
highly advanced lens shutter system is impressively stable and free of jolts caused by shutter shock, while it ensures synchronization with an electronic flash at any shutter speed
allowing sophisticated flash photography.
·Automatic light shielding curtain engaged during lens interchange.
A lens shutter camera with interchangeable lens capability would normally require a light
shielding curtain to be activated manually prior to detachment of the lens. The Bronica RF
645 had made such complex and awkward steps unnecessary, enabling photographers to
focus on the shooting itself. In conjunction with the lens detachment operation, the light
shielding curtain automatically covers the film aperture and locks into place. When the next
lens is mounted on the camera, the curtain automatically opens to prepare the camera for
the next shooting.
·Hi-tech magnesium alloy Thixmolding
The top cover of the Bronica RF 645, a lightweight and extremely sturdy camera, is manufactured with an advanced Thixmolding technique. This technology enables a hard and rigid
magnesium alloy to be molded into intricate and complex forms required to hold and protect internal mechanism with precision in various, at times even adverse, operating conditions.
·Rear cover design provides sophisticated controls with easy access and handling.
Switches and dials on the rear cover are grouped together on the rear cover for easy handling and to enable confirmation of settings at a glance, an extremely important feature for
use in the hands of serious photographers.
3
Special Features of the Bronica RF 645
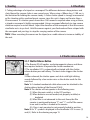
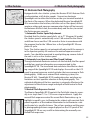
·Shooting parameters of the camera are clearly indicated on the internal viewfinder
display panel.
An oversized LCD panel is installed inside the viewfinder to display constantly updated
shooting status data such as shutter speed, lens aperture, AE lock setting, exposure compensation setting, correct exposure setting and exposure deviations of manually set exposure
values and so on.
·Easy AE lock method with continuous AE lock memory system
The AE lock feature of the Bronica RF 645 stores an exposure value into memory for an
extended time without canceling it at a shutter click. The metered and stored exposure
value can then be modified by the shutter speed and aperture combination variations, or
even by compensating the stored exposure with exposure bracketing technique.
Note: Repeated activation of the AE lock memory may be limited by the remaining
battery capacity.
Also, the AE lock memory will be automatically cancelled if the power is switched off or
camera is left unused for five minutes.
·The dedicated automatic flash unit that cross-couples with the AE setting on the
camera.
The dedicated AE flash unit, the Bronica Speedlight RF 20, specially designed for the RF645
camera body, is coupled with the camera control system. The unit utilizes the electronic
contracts of the hotshoe on the camera to transmit and receive lens aperture values, the
aperture control signals and other controls data, enabling the flash unit to compensate for
the flash illumination by a half stop within -3 to ±2 exposure compensation range.
4
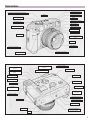
Nomenclature
Rangefinder window
Shutter speed dial lock release button
Light intake window
Hotshoe
Shutter speed dial
Finder
Exposure meter window
Film advance lever
Aperture ring
Shutter release button
Depth of field scale
Distance scale
Focusing ring
Strap lugs
Lens hood attachment
Index
Lens
Fiber thread
Rear cover lock release
Lens lock release button
Selftimer indicator
Exposure compensation
dial index
Exposure compensation
dial scale
Selftimer indicator
AE lock button
Exposure compensation dial
Multiple-exposure (ME)
button
Selftimer starting
button
Main switch
Viewfinder eyepiece
Spool holder
Rubber eyecup
Battery chamber
Film type
display window
Battery chamber
lock release
Film memo holder
Film speed setting dial
Strap lugs
Film speed dial index
Tripod socket
Spool holder
Film speed setting dial
lock release button
Lens
5
Nomenclature
Film type selection lever
Lens mounting index
(camera body)
Rangefinder
coupling roller
Printed circuit cable
Film pressure spring
Electronic contacts
(camera body)
Light shielding curtain
Flash synch terminal
Film start alignment mark
Light shielding curtain
Lens Lock pin
Lens lock release button
Rear cover
Spool holder
Film spool shaft lock
release button
Pressure plate
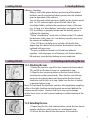
1. Getting Started
1-1 Loading Batteries
The RF645 will not function without batteries loaded.
1. Appropriate batteries
Load two CR2 type 3-volt lithium battery cells.
2. Open the battery chamber cover
Pull down on the battery chamber lock release and the cover
will swing open.
3. Insert batteries
Insert two cells of the same type of batteries in the same direction as shown in drawing, directing the plus (+) side toward the
inside chamber.
4. Close the battery chamber cover
Close the chamber cover and make sure the cover is securely
locked. A loosely locked cover may open and drop the batteries in the middle of a shooting session.
6
1. Getting Started
1-1 Loading Batteries
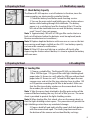
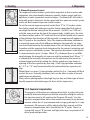
5.Battery Checking
Battery status, the proper battery positioning of the loaded
batteries, and the remaining battery power, must be checked
prior to operation of the camera.
Turn on the main switch and press lightly on the shutter speed
dial. An LCD indicator lights up on the left side of the
viewfinder field to indicate the operational status of the cam
era. As long as a "dead battery" mark does not appear on the
LCD, the battery is properly loaded and the battery power is
sufficient for shooting.
* When "dead battery" mark starts to blink on the LCD, replace
the batteries with a new set. Low battery capacity may cause
the camera to malfunction.
* If the LCD does not light up or switches off shortly after
depressing the shutter release button, the batteries must be
replaced with new ones.
* Do not use different brands or old and new batteries
together. Such improper use of batteries will shorten battery
life and may cause battery leakage or even explosion.
1. Getting Started
1-2 Attaching and detaching the lens
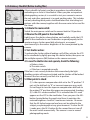
1-2-1 Attaching the Lens
1. Rotate the rear lens cap of the lens counter-clockwise about
70º, and lift it off when it comes to a mechanical stop.
2. Align the lens mounting index on the lens barrel with its
counterpart on the camera body. Place the lens into the lens
mount on the camera body, and then rotate the lens barrel
clockwise until it clicks to a stop. Make sure the lens is locked
in position before using.
Note: Do not touch the electronic contacts, the rangefinder coupling
roller, or the light shielding curtain located around and behind the
camera mount section. Contact with these may cause damage
and/or leave stains on vital systems, leading to malfunctioning of the
camera.
1-2-2 Detaching the Lens
1. Depressing the lens lock release button, rotate the lens barrel
counter-clockwise, until it comes to a mechanical stop.
2. Pull out the lens barrel from the mount of the camera.
7
1. Getting Started
1-2 Attaching and detaching the lens
Note 1: The 65mm and the 100mm viewframes in the viewfinder are automatically
switched as the respective lenses are attached.
Note 2: When mounting the 45mm lens, insert the dedicated viewfinder into the accessory
hotshoe on the camera body. Refer to the instruction manual of the 45mm lens for
more information.
Note 3: When attaching or detaching lenses, do not use excessive force to rotate or twist
the lens.
Note 4: Never attempt to detach the lens while the shutter is open in B (bulb) shooting.
Note 5: This camera employs a lens shutter, so normally the film would be improperly
exposed when changing lenses. To prevent this, a light shielding curtain is automatically drawn out by the lens detaching action, covering and protecting the film.
Do not press or touch this curtain with fingers or sharp objects.
1. Getting Started
1-3 Attaching strap
1-3 Attaching the Strap
Three camera strap lugs are provided with this camera. To carry the
camera in a horizontal position, attach the strap to the upper lugs on
both sides. To suspend the camera in a vertical position, use the
upper and lower lugs on the right side of the camera body. Follow
the procedure illustrated above to thread the strap through the lugs
and rings.
Note: Make sure the strap is properly attached to the lugs or the
camera may be accidentally dropped.
1. Getting Started
1-4 Attaching the proper diopter adjustment lens
1-4 Attaching the Proper Diopter Adjustment Lens
1. A set of nine viewfinder eyepiece lenses are prepared as optional
accessories, from -5 to ±3 diopter, including the normal eyepiece lens
of -1 diopter that comes attached to the camera.
2. Detach the rubber viewfinder cup as shown above, and slide the
standard viewfinder eyepiece lens out from the eyepiece frame.
3. Replace the proper diopter adjustment eyepiece lens by sliding it
into the eyepiece frame. Attach the rubber eyecup.
8
2. Preparing to Shoot
2-1 Check Battery Capacity
2-1 Check battery capacity
The Bronica RF 645 requires a set of batteries to function, since the
camera employs an electronically controlled shutter.
1. Check the battery level before each shooting session.
2. Turn on the main switch and lightly press the shutter release
button while looking through the viewfinder. The battery
power is at a satisfactory level for shooting if the LCD on the
left side of the viewfinder turns on and the battery warning
mark "(insert)" does not appear.
Note 1: Approximately 100 rolls of 120 type film can be shot on a
fresh set of batteries before the batteries must be replaced (under
Bronica manufacturer test conditions.)
Note 2: Replace depleted batteries with new ones as soon as the battery warning mark begins to blink on the LCD. Low battery capacity
can cause the camera to malfunction.
Note 3: If the LCD does not light up or switches off shortly after
depressing the shutter release button, it is time to replace the battery
with new ones.
2. Preparing to Shoot
2-2 Loading Film
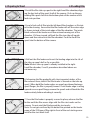
2-2 Loading Film
1. Choose a suitable film. The Bronica RF 645 can take either
120 or 220 film type. 120 type of film with light shielding back
paper takes 16 frames to a roll, while the 220 type without back
paper takes 32 frames to a roll. To load the film, open the rear
camera cover and set the film type selection lever to either 120
or 220 position according to the film to be loaded. Make sure
that the film type display window on the camera back shows
the number you set on the lever.
Note 1: Take the cover sheet attached to the film gate section of the
camera off before loading the very first roll of film you use. The cover
sheet is provided to protect the light shielding curtain.
Note 2: When loading film, first attach a lens on the camera body so
that the light shielding curtain opens. This precaution will protect the
light shielding curtain from any accidental damage.
2. Depress both left and right side film spool shaft lock buttons
with the camera back open. The shafts pop downward from
the bottom of the camera and are identified by red rings.
9
2. Preparing to Shoot
2-2 Loading Film
3. Install the film take-up spool in the right hand film chamber, aligning the key-hole of the spool shaft of the camera. Push up the protruding film spool shaft into the bottom plate of the camera until it
locks into position.
4. Load a fresh roll of film into the left hand film chambers as illustrated in the drawing. Ensure that the film leader rolls off the outer edge
as shown instead of the inside edge of the film chamber. The inside
black surface of the leader must face outward coming out of the
chamber. If it faces inward, roll back the film, turn the roll upside
down and then reload into the film chamber. Push the fresh film
spool into the bottom of the camera.
5. Roll out the film leader and insert the leading edge into the slit of
the take-up spool shaft as far as possible.
Note: When a take-up spool is already installed in the righthand film chamber, 2. and 3. procedures described above are
not necessary.
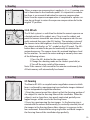
6. Advancing the film gradually with short repeated strokes of the
film advance lever, check if the film leader is skewed on the take-up
spool. When both film leader edges are evenly positioned between
spool flanges, the film is properly wound. If one leader edge is rolling
upward on one spool flange, remove the spools and roll back the film
leader entirely before reloading it correctly.
7. Once the film leader is properly secured in place, advance the film
further until the film arrows align with the film start marks on the
camera. Do not wind the film beyond the start marks.
Note: Do not get confused by the dotted line printed on the leader
paper of the 220 type of film right in front of the real starting arrow
mark for the start mark itself.
10
2. Preparing to Shoot
2-2 Loading Film
8. Close the back cover and lock it securely. Operate the film advance
lever with few strokes until it stops. At this point, the exposure counter window displays a "1".
Note: After closing the camera back, make sure both film shafts are
completely pressed back into the camera bottom.
Caution: Be careful not to pinch your finger or hand between the
back cover and the camera body as you open or shut the cover. Be
alert to prevent the skin of the hand from being pinched between
the back hinge and one of the strap plugs in the rear cover, and to
prevent the palm from being pinched between the closing cover and
the camera body. Even minor pinching pains may cause you to drop
the equipment and damage it. As an added precaution, hold the
camera in a secure location during the film loading process.
Film winding and ratcheted winding leverThe film can be advanced either in one full stroke of the film advance
lever of the Bronica RF 645 or in quick short repeated strokes. In both
cases, the shutter cannot be operated until the film is completely
advanced to the next frame. If advancing to the next frame is incomplete, and "X" mark is displayed on the viewfinder LCD.
Note: Do not operate the film advance lever too quickly. Such
forcible handling may result in skewed film surface or uneven spacing between picture frames.
2. Preparing to Shoot
2-3 Setting the film speed
2-3 Setting Film Speed
1. To set the film speed, rotate the film speed setting dial located on
the rear operational panel by pressing the film speed setting dial lock
release button positioned at the side of the dial. Adjust the speed
number on the dial to the exposure index number of the film loaded
in the camera. The film speed setting dial automatically locks as you
reduce pressure on the release button.
11
2. Preparing to Shoot
2-4 Exposure Counter
2-4 Check the number on the exposure counter
2-4-1 Exposure Counter
The exposure counter resets itself to "S" (start) position as the camera
back is opened. When the fresh film is loaded and advanced to the
first frame, the exposure counter displays "1". The counter indicates
all odd numbers with consecutive numerals and all even numbers
with dashes. After 16 pictures shot with 120 type film, the advance
lever is released from frame positioning lock and can wind continually without stopping. The exposure counter advances to 17, -, 19 and
stops only when the film's trailing paper is fully wound into the takeup film chamber. In the case of 220 type film, the rapid wind lever is
released when the film is fully used, and the exposure counter displays "E".
ISO speed 25 32 40 50 64 80 100 125 160 200 250 320 400 500 640 800 1000 1250 1600
Film speed
dial scale 25 I I
50 I I
100 I I
200 I I
DIN speed 15 16 17 18 19 20 21 22 23 24
400 I I
800 I I
1600
25 26 27 28 29 30 31 32 33
2-4-2 Film Memo Holder
It may be necessary to reconfirm the type of film being used in the
heat of a photo shooting session. To facilitate this, clip off the top or
bottom flap of the film box and insert it into the memo holder located on the rear cover of the camera. Make sure to replace the film box
flap when a new roll of film is loaded.
2-4-3 How to Remove a Used Roll of Film
1. The film advance lever will be released from the frame positioning
lock mechanism and wind continually after the 16th frame in the case
of 120 type film and the 32nd frame in the case of 220 type film, until
the trailing paper is fully wound into the take-up film chamber. At
that point, all the torque is removed from the film advance action.
2. Press the rear cover lock release of the camera upward to open the
rear cover. Press down on the film spool shaft lock release button and
push the top of the film spool lightly as illustrated and remove the
spool from the film chamber. Hold the film roll so that film's trailing
light shielding paper does not make slack, and seal the film tightly
with the adhesive paper band attached to the film trailing paper.
12
2. Preparing to Shoot
2-4 Exposure Counter
3. Remove the empty film spool from the feeding side film chamber and transfer it to the
take-up film chamber in preparation for loading of the next roll of film.
Note:
When opening the camera rear cover for film loading and removal, avoid exposing
the camera to direct sunlight. Also, handle film in the shade at all times.
3. Shooting
3-1 Main Switch
3-1 Main Switch
Turn on the main switch and take off the lens cap to prepare for shooting.
3. Shooting
3-2 Viewfinder
3-2-1 Viewfinder
1. Check whether the battery warning mark is displayed on the
LCD display to the left side in the viewfinder field. Also confirm
that the proper exposure mode, shutter speed and aperture are
set and displayed.
2. Bring your subject into focus in the focusing frame.
3. Compose a picture within the view frame.
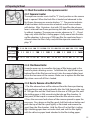
3-2-2 Holding the Camera
The Bronica RF 645 is a coupled rangefinder camera. If the view of
the rangefinder is obstructed by a hand or other object, the camera
cannot focus.
1. Holding the camera for a vertical composition: Hold the camera
normally as illustrated, and a vertical picture can be photographed.
2. Holding the camera for a horizontal composition: Hold the camera
with your right hand and turn the camera 90 degrees as illustrated,
orienting the camera grip toward the bottom. Rotate the focusing
ring with your left hand, being careful not to obstruct the rangefinder
view with your fingers or the camera strap.
13
3. Shooting
3-2 Viewfinder
3. Taking advantage of a tripod or a monopod: The difference between sharp pictures and
shots blurred by camera shake is one second away. When using a 100mm lens, 1/100 sec., is
the limitation for holding the camera steady. A faster shutter speed is strongly recommended for shooting with a medium format camera, since this unit is larger and heavier than a
35mm camera. If a shutter speed slower than 1/60 second is required when using a 65mm,
a tripod or monopod is highly recommended. Using a monopod effectively to stop camera
vibration requires a certain knack. Adjust the elevation of the monopod so that the camera
viewfinder rests at eye level. Hold the camera against your forehead and form a tripod with
the monopod and your legs to stop the swaying motion of the camera.
Note:
When mounting the camera on the tripod, use a cable release to increase stability of
the unit.
3. Shooting
3-3 Shutter release button
3-3-1 Shutter Release Button
1. The Bronica RF 645 applies an electromagnetic release, and therefore requires batteries to operate the shutter mechanism.
2. The viewfinder LCD is automatically activated with the shutter
release button pressed halfway. The next stroke triggers the shutter
itself.
3. When released, the shutter opens and shuts with light clicking
sounds followed by a low motor noise as the shutter cocks for the
next shot.
Note 1: A standard mechanical cable release can be attached to the
shutter release button of the Bronica RF 645.
Note 2: The shutter will not operate in the following cases:
(1) When the main switch is in the OFF position.
(2) When batteries are not loaded, not properly installed, or
depleted.
(3) When film is not advanced to the next frame, the film
counter is positioned between "S" and "1", a roll of film comes
to an end or no film is loaded in the camera.
(4) A lens is not mounted or not properly locked in position.
Note 3: An "X" symbol is displayed in the viewfinder LCD in cases (3)
and (4). Refer to the drawing on page 15.
14
3. Shooting
3-3 Shutter release button
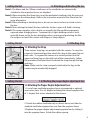
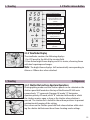
Shutter speed (half step display)
Aperture value (Program AE mode and
Aperture-priority AE mode), proper
exposure deviation with + and
- (M mode)
Shooting mode display (P: program AE,
A: aperture-priority AE, M: manual)
AE.L (exposure memory) ON display.
Shutter open status indicator
Exposure compensation display is used
when the compensation dial is set to
anything other than “0”
Speedlight ready display
Not-ready-for-shooting indicator
Battery warning: blinks when battery
power is low
3-3-2 Viewfinder Display
The viewfinder contains the following displays:
1. An LCD panel to the left of the viewing field,
2. View frame bright frame display, and in its center, a focusing frame
with dual superimposed images.
Note:
The bright frame displays shift automatically corresponding to
65mm or 100mm lens when attached.
3. Shooting
3-4 Exposures
3-4-1 Shutter Dial and Lens Aperture Operations
Photographing modes and the shutter speeds can be selected on the
shutter speed dial located on the top of the Bronica RF 645 main
camera body. "P" represents Program AE mode, "A" designates
Aperture-priority AE mode, while "B" indicates bulb mode, in which
the shutter remains open as long as the shutter release button is
pressed. The shutter dial is locked in these three positions to prevent
unintentional changing of the setting.
Press down on the shutter speed dial lock release button while rotating the shutter dial between these three shooting mode settings.
15
3. Shooting
3-4 Exposures
The numerals 1 to 500 on the shutter speed dial represent shutter
speeds or exposure times expressed in reciprocals. In other words,
"500" actually means 1/500 second and "60" is 1/60 second.
The lens aperture can be set by rotating the lens aperture ring. The
65mm lens provides an aperture range of f/4 to f/32. Between any
two f-numbers, there is an intermediate stop with the distance/aperture index line to set the aperture as required.
3-4-2 Exposure Metering System
A light metering sensor located to the side of the viewfinder objective lens measures the photographing area in five independent segments and calculates the correct exposure by a center-weighted multiple-field comparative algorithm. The metering system calculates the
correct exposure based on the lens's photographing field, the brightness level of the photographic subject, the contrast among metering
segments and miscellaneous factors to achieve the best photographic image reproduction. Refer to 6. References (Exposure
Measurement Sensitivity Patterns).
Note 1: The impact on exposure settings of any filters attached to the lens must be taken
into consideration to determine the correct exposure when compensation for the exposure
determined by the external metering system of the Bronica RF 645.
Note 2: The metering range of the Bronica RF 645 is from EV 3 to EV 18 with the 65mm
standard lens at ISO 100. EV 3 (at ISO 100) is an exposure level designated by a combination
of f/4 aperture and 2 second shutter speed. EV 18 (at ISO 100) is an exposure level designated by a combination of f/22 aperture and 1/500 sec. shutter speed.
Note 3: EV level varies when any film speed other than ISO 100 is used, or exposure compensation is applied. For more details refer to 6. References (Relationship Between Shutter
Speed, Aperture and Exposure).
16
3. Shooting
3-4 Exposures
3-4-3 Exposure Control Modes
The Bronica RF 645 provides three exposure control modes: the
Program AE mode, the Aperture-priority AE mode and the manual
exposure control mode. Any of the three exposure control modes
mentioned can be selected and set using the shutter speed dial.
1. Program AE mode
This is the preferred exposure control mode when focusing the subject without paying too much attention to detailed camera settings.
To set this mode, rotate the shutter speed dial, depressing the shutter
speed dial lock release button, to align "P" mark to an arrow on the
top cover. In this exposure control mode, correct shutter speeds and
lens apertures for the desired exposure are selected and set by the
camera's control system. The exposure level is controlled in extremely precise 1/12-stop increments. In the event that the photographic
subject is not well lit, special attention must be paid to the automatically selected shutter speed, or blurring caused by camera shake may
result. If the illumination falls outside the metering range, both the
shutter speed and lens aperture displays on the LCD flash simultaneously.
2. Aperture priority AE mode
This is an automatic exposure control mode applicable to the most
variable photographic situations. To set on the mode, rotate the shutter speed dial while pressing the shutter dial lock release button, and
align "A" mark to the arrow on the top cover. An f-number is then
manually set on the lens aperture ring. For a shallow depth of field to
obtain an out-of-focus background for portrait photography, select a
small f-number (a large lens opening). Alternatively, to photograph
the background in sharp focus for landscape photography, for example, select a large f-number (a small lens opening). The Bronica RF
645 controls the exposure level in extremely precise 1/12 stop increments. Carefully observe the automatically selected shutter speed
displayed on the LCD in the viewfinder when the subject area is comparatively dark. If a slow shutter speed that may result in camera
shake is shown, precautionary measures should be taken such as
mounting the camera on a tripod or placing the camera on a stable
deck or against the wall, to avoid picking up such vibration and consequent blurring. To compensate for an automatically determined
exposure, please refer to the articles 3-4-4 Exposure Compensation
and 3-4-5 AE Lock. If proper shutter speed cannot be selected for the
manually set f-number due to subject brightness that is out of metering range, the shutter speed display on the LCD flashes.
17
3. Shooting
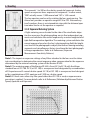
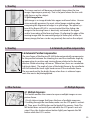
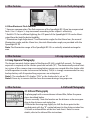
Manual exposure (2EV under)
Correct exposure
3-4 Exposures
3. Manual Exposure Control
This exposure control mode is particularly important to those serious photographers who intentionally determine specific shutter speeds and lens
apertures in order to produce creative images. The Bronica RF 645 with its
extremely precise electronic shutter speed and lens aperture control system
makes an ideal manual exposure control camera.
To set the manual exposure control mode (from "P" to "A" modes), rotate
the shutter speed dial while pressing the shutter speed dual lock release,
and align the desired setting from the numerals 1 to 500 (1 to 1/500 sec.)
with the arrow mark on the top of the camera body. Lightly press the shutter release button and an "M" mark with the set shutter speed and a numeral that indicates the deviation of the manually set exposure will appear on
the LCD panel in the viewfinder. Note: The exposure deviation indication is
a numerical expression of the difference between the manually set exposure level determined by the combination of the set shutter speed and the
f-number and the exposure level determined by the camera's metering and
correct exposure calculation system. The exposure deviation is indicated in
½ stop increments up to ±3 stops. When "0" is displayed there is no difference between the manually set exposure and the metered level. When "-1"
is indicated, the manually set exposure can be adjusted to the correct or
metered exposure level by setting the shutter speed one stop slower or
opening of the lens aperture by one stop. A half stop deviation indicated
by "-2.5" or "1.5" may be corrected by the intermediate lens aperture setting.
When there is an over ±3 stop deviation, either the 3 or -3 numeral will flash
to alert the user. Naturally, excellent shots can be taken in spite of an indicated exposure deviation.
Many serious photographers take high key, low key and other type of intentionally exposure-deviated images for their artistic expressions.
3-4-4 Exposure Compensation
The purpose of the exposure compensation dial is to adjust the automatically determined exposure level by manually setting the value in
the Aperture-priority AE mode or the Program AE mode. Turn the
exposure compensation dial on the camera rear cover to any desired
amount within the ±2 stop compensation range, graduated in ½ stop
increments. All exposures will be adjusted by that amount until the
exposure compensation dial is turned back to "0" point. There is a
strong click stop at "0" position and light click stops are present at all
other graduated positions.
18
3. Shooting
3-4 Exposures
When an exposure compensation is applied, a (+) or (-) warning symbol is illuminated in the viewfinder panel. It is important to remember there is no numerical indication for exposure compensation.
Note: Once the exposure compensation is completed in a photo session, do not forget to return the exposure compensation dial to the
original "0" position.
3-4-5 AE Lock
The AE lock system is a useful tool to obtain the correct exposure on
a limited portion of the subject area. Close in on the subject and
point the camera toward the area where the exposure must be correctly metered, then press the AE L button. The metering system of
the camera stores the brightness level of that particular portion of
the subject and displays an "AL" symbol on the LCD panel. The AE L
button does not need to be pressed continually to maintain the
metered exposure. The camera stores this metered brightness level
for five minutes. To cancel the meter reading in memory chose one
of the following actions:
1. Press the AE L button for the second time,
2. Change the shooting mode on the shutter speed dial, or
3. Turn off the main switch of the camera.
Note: If the camera is left unused for five minutes continuously, the
AE lock memory will automatically be cleared.
3. Shooting
3-5 Focusing
3-5 Focusing
The Bronica RF 645 is a coupled-meter rangefinder camera in which
focus is achieved by superimposing two viewfinder images obtained
by two independent rangefinder windows.
1. Point the camera toward the subject so that the focusing portion of
the subject fits into the focusing frame of the viewfinder. When the
subject is not in sharp focus, two poorly contrasted, partially overlapped images will be seen in the focusing frame.
2. Focus by superimposing the two images. As the focusing ring is
rotated with the camera held normally (i.e. vertically oriented), one of
the images in the focusing frame slides sideways in response to the
lens movement. Rotate the focusing ring further until both images in
the focusing frame of the viewfinder align perfectly.
19
3. Shooting
3-5 Focusing
The image contrast will become noticeably sharp when the two
images superimpose precisely. That is the point where the lens critically focuses on the subject.
3. Split image focus:
Split-image is an image divided into upper and lower halves. Human
vision naturally perceives the most critical image matching when
comparing the alignment of edges in a split image. The optical system of the Bronica RF 645 is so constructed that the sliding side
image in the focusing frame is decisively sectioned at the upper
and/or lower edge of the focusing frame. By aligning the edge of the
moving image with the connecting edge (or lower part) of the stationary image, the lens can be very precisely focused on the subject.
3. Shooting
3-6 Automatic parallax compensation
3-6 Automatic Parallax Compensation
The view frame of the Bronica RF 645 finder automatically compensates
for the parallax between the shooting lens and the viewfinder angle by
compensating its position and viewing frame relative to the focusing
distance. When mounting a 65mm or 100mm lens, focus on a moderately distant object. The angle of view of the bright frame in the viewfinder
will shift toward the lower right hand corner of the viewfinder frame.
The area enclosed by the bright frame, when focus is achieved represents the area to be photographed.
4. Other Features
4-1 Multiple Exposure
4-1 Multiple Exposures
This feature enables the camera to expose multiple images on one
picture frame.
1. Firstly, take an image that forms the base of multiple exposures.
2. Looking through the viewfinder, make sure the LCD panel is activated. Then, press the ME button on the back of the camera. Note: The
ME button does not work if pressed while the LCD panel is not activated. Press the shutter release button lightly and operate the ME
button while the LCD is active.
20
4. Other Features
4-1 Multiple Exposure
Note 1: The ME button electronically cancels out the shutter release
button lock system. Five seconds after pressing the ME button, the
canceling effect of the ME button will be cleared, the shutter button
will be locked, and the LCD will switch off once again.
Note 2: There is no exposure compensation feature in the Bronica RF
645 for multiple exposure modes. Multiple exposures therefore
results in overexposure. The photographer, in accordance with image
composition, must calculate exposures done in this way.
Note 3: Do not press the ME button during film advancing. This will
cause incorrect film winding and cause a partially overlapped picture.
Note 4: The ME button may be activated when the camera is operated without loading a roll of film. One depression on the ME button
enables the camera to operate its shutter just one time.
4. Other Features
4-2 Selftimer
4-2 Selftimer
The selftimer button on the camera back, designated by the symbol, activates a delayed shutter release, bypassing the shutter release button. The
shutter speed indicated in the LCD panel will switch to the selftimer display
where the counter begins counting down a ten second delay time. At the
same time, an LED located at the front of the camera grip begins to flash.
The LED flashing accelerates two seconds prior to the shutter release, indicating the shutter release timing. To cancel the activated selftimer operation, press the selftimer button for a second time or turn off the main switch
to achieve the same effect.
Note 1: If either program AE mode ("P") or the aperture-priority AE mode
("A") is set, the camera meters the subject's brightness immediately before
the shutter click and the exposure is controlled correctly.
Note 2: The selftimer cannot be activated when the shutter dial is set to "B",
the main switch is turned off, the battery is depleted, or the exposure counter is set between "S" and "1".
21
4. Other Features
4-3 Electronic flash photography
4-3 Electronic Flash Photography
Equipped with a lens shutter system, the Bronica RF 645 features flash
synchronization at all shutter speeds. Connect an electronic
Speedlight unit to either the hotshoe or the sync terminal located at
the front of the camera. When the dedicated Bronica Speedlight RF
20 is mounted on the hotshoe, vital data such as film speed, set lens
aperture setting and exposure compensation factor will be transmitted between the flash unit, the camera body and the lens, to control
the flash exposure correctly.
1. Automatic Shutter Speed Adjustment.
Provided that the shutter speed dial is set to "P" (Program AE mode),
the shutter speed is automatically set at 1/60 second for the 45mm
and 65mm lenses and the 1/90-second or faster in accordance with
the program line for the 100mm lens as the Speedlight RF 20 completes its cycle.
Note: The shutter speed is not automatically adjusted if the camera is
in the Aperture-priority AE mode or the manual exposure control
mode. Care should be exercised to avoid picking up camera shake if
the unit is set to a slow shutter speed.
2. Automatic Lens Aperture and Film Speed Settings
Through dedicated electronic contacts on the hotshoe, the film speed
and the lens aperture information are communicated to the
Speedlight RF 20. The transferred data calculates the effective shooting range of the Speedlight RF 20 and displays the result on the LCD
panel to prevent exposure control mistakes that are common in flash
photography. Unlike most external flash metering systems, the
Bronica RF 645 / Speedlight RF 20 combination does not place any
limitations on lens aperture selection in flash photography. This
unlimited utilization of the lens aperture is extremely effective in the
adjustment of the distance range and depth of field control in flash
photography.
3. Manual Flash Exposure Control
The Bronica Speedlight RF 20 controls the flash light intensity manually in six steps from 1/1 to 1/32 in one-stop increments. Apply this
manual flash exposure control for accent flash illumination, e.g.: to
highlight a model's eyes, to illuminate the subject with constant flash
power regardless of the ambient illumination or to illuminate a subject located at a specific distance. The set lens aperture and the proper photographing distance range displayed on the LCD panel of the
Speedlight RF 20 are very useful in determining the manually controlled flash exposures.
22
4. Other Features
4-3 Electronic flash photography
area photographed
illuminated area
4. Other Electronic Flash Features
* Exposure compensation: The flash exposure of the Speedlight RF 20 can be compensated
from -3 to +2 stop in ½-stop increments according to the subject's reflectivity.
* Backlit LCD: For insufficient lighting, the LCD panel of the Speedlight RF 20 can be illuminated from the back for better legibility.
* Illumination Angle Adjustment: Two illumination angles for the 65mm lens, the normal
illumination angle, and the 45mm lens, the wide illumination angle, are provided with the
Speedlight RF 20.
Note: The illumination range of the Speedlight RF 20 is a vertically oriented rectangular
area.
4. Other Features
4-4 Long exposure photography
4-4 Long Exposure Photography
The longest nominal shutter speed of the Bronica RF 645 is eight full seconds. If a longer
exposure is required, set the shutter speed dial on bulb ("B"). The electronically control shutter system of this camera stops consuming battery power one second after the shutter click
in bulb operation in order to conserve the battery. Still, it is strongly recommended to carry
backup battery cells if repeated long exposures are anticipated.
Note 1: The viewfinder LCD displays "BUL" as the shutter dial is set on "B".
Note 2: Never try to remove the lens from the camera during a long exposure.
4. Other Features
4-5 Infrared Photography
4-5 Infrared Photography
To photograph with a monochrome infrared film, follow the procedures described below.
1. Focus normally. Note the location on the distance scale corresponding to the distance scale index line.
2. Rotate the focusing ring slightly to shift the focus point to the
marked point with the "R" symbol adjacent to the distance index line.
3. Attach an infrared filter on the lens and shoot. Note: For more
details, refer to the infrared film instructions.
23
4. Other Features
4-6 Depth of Field
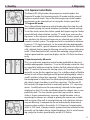
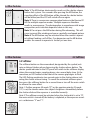
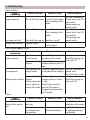
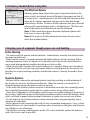
4-6 Depth of Field
Since the Bronica RF 645 is a coupled rangefinder camera compromising separate shooting and viewfinder optical systems, the sharp
focus range is not directly displayed in the viewfinder. The depth of
field must therefore be read from the depth of field scale on the lens,
or calculated from the depth of field table.
1. To read the depth of field on the lens, focus on a subject, then
read two distances on the distance scale between the pair of
depth-of-field lines corresponding to the f-number set on the
aperture ring. In the illustration, the 65mm lens is focused on a
subject at 3 meters with its aperture set at f/8. The depth of
filed range of approximately 2.5 to 4 meters is found between
the pair of f/8 lines on the depth of field scale. The subjects
within these two distances will be photographed in sharp
focus. On the depth of field table of the 65mm lens, the box
located where the horizontal line for 3 meters and the vertical
column for the f/8 intersect includes the distance range corre
sponding to the depth of field of 2.52 to 3.71 meters.
Note: The depth of field tables for lenses other than the 65mm lens is
printed on the instruction manual of each lens.
65mm
Distance(m)
1.0
1.2
1.5
2
3
5
10
oo
Distance (ft)
3.5
4
5
7
10
15
30
oo
F4
0.96 - 1.04
1.14 - 1.27
1.41 - 1.61
1.83 - 2.21
2.62 - 3.50
4.01 - 6.63
6.67 - 20.1
19.0 - oo
F4
3.35 - 3.67
3.80 - 4.22
4.68 - 5.37
6.37 - 7.78
8.73 - 11.7
12.3 - 19.3
20.6 - 55.3
63.4 - oo
F5.6
0.95 - 1.06
1.12 - 1.29
1.37 - 1.66
1.77 - 2.30
2.50 - 3.76
3.73 - 7.63
5.89 - 33.7
13.7 - oo
F5.6
3.29 - 3.74
3.73 - 4.32
4.57 - 5.53
6.15 - 8.14
8.31 - 12.6
11.4 - 21.9
18.3 - 83.8
45.6 - oo
F8
0.92 - 1.09
1.09 - 1.34
1.32 - 1.73
1.69 - 2.46
2.33 - 4.22
3.36 - 9.88
5.01 - oo
9.69 - oo
F8
3.21 - 3.85
3.62 - 4.48
4.40 - 5.80
5.85 - 8.75
7.75 - 14.2
10.4 - 27.3
15.7 - 369
32.1 - oo
F11
0.90 - 1.13
1.05 - 1.40
1.27 - 1.84
1.60 - 2.69
2.16 - 4.98
3.00 - 15.7
4.23 - oo
7.10 - oo
F11
3.12 - 4.00
3.50 - 4.69
4.21 - 6.17
5.51 - 9.66
7.15 - 16.8
9.32 - 39.5
13.4 - oo
23.4 - oo
F16
0.86 - 1.20
1.00 - 1.52
1.19 - 2.06
1.46 - 3.20
1.91 - 7.16
2.54 - 722
3.36 - oo
4.92 - oo
F16
2.97 - 4.28
3.31 - 5.09
3.94 - 6.91
5.03 - 11.7
6.34 - 24.4
7.96 - 158
10.7 - oo
16.2 - oo
F22
0.82 - 1.30
0.94 - 1.69
1.10 - 2.40
1.33 - 4.15
1.69 - 15.2
2.15 - oo
2.70 - oo
3.60 - oo
F22
2.81 - 4.68
3.11 - 5.67
3.65 - 8.09
4.55 - 15.8
5.59 - 54.4
6.79 - oo
8.65 - oo
11.9 - oo
F32
0.75 - 1.52
0.85 - 2.08
0.98 - 3.33
1.16 - 8.28
1.41 - oo
1.71 - oo
2.04 - oo
2.50 - oo
F32
2.59 - 5.54
2.83 - 7.04
3.26 - 11.4
3.94 - 37.7
4.67 - oo
5.46 - oo
6.57 - oo
8.22 - oo
24
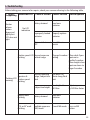
5. Troubleshooting
Before taking your camera in for repairs, check your camera referring to the following table.
What’s
happening
Shutter
release
button
depressed
lightly but
LCD does not
light.
Viewfinder LCD
Cause of trouble
Means to solve
Battery drained
Load new
batteries
Improperly loaded
batteries
Properly replace
batteries
How to operate
No LCD
indication
Main switch turned Turn ON main
OFF
switch
Shutter speed LCD Beyond exposure
flashing
control range
Aperture &
Flashing LCD
shutter speed
warning
flashing
Battery mark
flashing
“P, A, or M” mark
flashing
Change f-number When dark: Open
setting
aperture to
smaller f-number
When bright: close
aperture down to
larger f-number
Beyond metering
range, Subject too
dark
Too dark: Use
photo lamp, flash
unit
Subject too bright
Too bright: Use
ND filter
Battery drained
Load new
batteries
Camera set on
multiple exposure
(ME) mode
Adjust exposure
by ND filter factor
Cancel ME mode Press on ME
button
25
5. Troubleshooting
What’s
happening
Viewfinder LCD Cause of trouble Means to solve How to operate
AL mark
indication
Warning
indications
“X” mark
indication
Camera in AL lock Cancel AE lock
mode
mode
Camera
temporarily
inoperable, Film
not wound to next
frame
Film not loaded,
Lens not mounted
properly
Press AE L
button, Turn OFF
main switch,
Change exposure
control mode
Wind film
Wind rapid wind
lever to end
Load film,
Replace lens
correctly
Use ME button to
check film, Check
lens lock release
button
Battery exhausted
No LCD
indication
Shutter does not
click
Main switch
turned OFF
Camera
temporarily
Wind film
inoperable,
Film not wound to
next frame
“X” mark flashing
No film loaded
Load film,
Replace lens
correctly
Wind rapid wind
lever to end
Use ME button
for camera check
w/o film
Lens not mounted Replace lens
properly
correctly
ME button does
not work
No LCD
indication
Selftimer does
not work
Check if lens lock
release button is
in original
position
In-finder LCD
Press shutter
turns itself off 6
In-finder LCD not release button
sec. after shutter
activated
again to activate release button
LCD panel
depression for
saving energy
Shutter dial set on Change shutter
“B”
dial position
26
5. Troubleshooting
Exposed film is...
What’s
happening
Cause of trouble
Means to solve
Under exposed,
Shot in AE lock mode Cancel AE lock mode
after shooting in this
mode.
Over exposed
Shot in AE lock mode Cancel AE lock mode
after shooting in this
mode.
Not exposed at all
Images very blurred
Shot with lens cap on Take lens cap off
Mount camera on a
Camera shakes
sturdy tripod
How to operate
Press AE L button for
second time, Turn OFF
main switch,
Change exposure
control mode
Press AE L button for
second time, Turn OFF
main switch,
Change exposure
control mode
Flash picture appears to be...
What’s
Cause of trouble
Means to solve
How to operate
happening
Beyond exposure Cancel AE lock mode after
Under exposed
control range
shooting in this mode.
Check flash range on
Exposed on white Set Speedlight exposure flash unit LCD.
subject
compensation on plus (+)
side.
Beyond exposure Close lens aperture down Press AE L button for
Over exposed
control range
or step back from subject second time,
Turn OFF main switch
Exposed on black Set Speedlight exposure
Background streaked subject
compensation on minus Check flash range on
flash unit LCD.
Shutter speed too (-) side.
slow in aperture- Select faster speed in
priority AE mode manual (M) mode or
change to programmed
AE (P) mode.
Others
What’s
happening
Battery dries up too
fast.
Cause of trouble
Used AE lock mode
too long
Used camera under
low temperature
atmosphere.
Means to solve
Load new batteries
Load new batteries
How to operate
Cancel AE lock after
shooting in this mode
Take backup batteries
for photographing at
a cold place.
27
6. References
Exposure Measuring Range and Ev
The exposure measuring range with the RF645 is EV3 to 18 (with ISO 100 film).
For example: If EV 14 is the correct exposure with ISO 100 film, the shutter speed setting will be 1/250
sec. when f8 is set to the aperture ring. If the aperture is adjusted to, in the above case, the shutter
speed setting will become 1/125 sec.
*An EV 14 is the brightness outdoors on a bright sunny day.
ZENZANON-RF
45mm F4
ZENZANON-RF
65mm F4
ZENZANON-RF
100mm F4.5
28
7. Specifications
Camera Type
Coupled-meter rangefinder, lens shutter 6 x
4.5 format camera.
Picture Format
41.5mm x 56mm
Film
16 frames on 120 type film, 32 frames on 220
type film.
Lens
Interchangeable with Bronica bayonet
mount, 45mm f/4 Wide, 65mm f/4 Normal
and 100mm f/4.5 Tele.
Filter Size
58mm (45mm f/4), 58mm (65mm f/4), 62mm
(100mm f/4.5)
Focusing
Helical focusing system built in to each lens;
Focus ring rotations
90° on 45mm f/4 & 65mm f/4, 60° on 100mm
f/4.5.
Shutter
Bronica No. 00 type electronically controlled
lens shutter in each lens, shutter speeds; B, 1
to 1/500 sec. (on manual without intermediate speeds), 8 to 1/500 sec. (on aperture-priority AE mode, 1/12-stop increment control)
8 to 1/750 sec. (on programmed AE mode,
1/12-stop increment control.) Electronically
timed self-timer with 10 sec. delay time.
Aperture
Electro-magnet driven aperture blades with
f/4 to f/32 (45mm f/4 & 65mm f/4), f/4.5 to
f/32 (100mm f/4.5.)
29
7. Specifications
Film Advance
By rapid winding lever placed on top of camera with either 186° single stroke or ratcheted strokes, with 12° stand by angle.
Coupled.
Rangefinder
Dual-image superimposing real image optical system, with 53.5mm base line (effective
base line: 33mm)
Viewfinder
Inverse Galilean optical system with coupled
rangefinder bright frames automatically
switched between 65mm and 100mm lens
and automatically corrects parallax, finder
magnification, 0.6X, viewing field 81% at 3 m.
In-Finder Display
Shutter speeds, lens aperture, correct exposures, flash ready, exposure compensation
warning, AE L warning, multiple exposure
(ME) warning
Exposure Metering
Center-weighted area-comparative metering
system, metering range EV 3 to EV 18 (65mm
f/4, ISO 100), film speed range; ISO 25 to 1600,
exposure compensation range; ±2 to -2
EV(1/2-stop increment)
Exposure Control Modes
Manual, Aperture-priority AE and
Programmed AE modes.
Battery
2 cells of CR2, 3V Lithium type battery
Dimensions
Camera body 145.6mm wide x 107.3mm high
x 64mm thick.
Weight
Camera body 810g
30
8. Preliminary Checklist (Before loading film)
A basic checklist of points and basic procedures to confirm before
embarking on a shoot is listed below. When you plan an important
photographing session, it is essential to test your camera to ensure
the unit and other equipment is in good working order. This includes
not only checking these points described below but also taking test
pictures with the camera, together with the accessories to be used for
the shoot.
1. Activate the main switch:
Switch the main power switch on the camera back to ON position.
2. Observe the LCD panel in the viewfinder:
Lightly press the shutter release button, and carefully watch the LCD
panel in the viewfinder to see if indications respond properly to the
aperture ring or shutter speed dial adjustments, or respond
spontaneously to the various brightness of the scene pointed by the
camera.
3. Test shutter action:
To activate the shutter without loading a roll of film, activate the LCD
in the viewfinder by lightly pressing the shutter button, then press on
the multiple exposure (ME) button on the camera rear cover.
4. In case the shutter does not operate, check the following:
a. Battery status
b. The main switch
c. If the lens is mounted correctly
If the lens is not securely locked on the camera body, the lightshielding curtain will remain activated and the shutter will be locked.
Remount the lens correctly and lock it in to position.
5. Other points to check:
(1) Is the exposure compensation dial set to the "0" position? If
not, set the dial back to "0", or incorrect exposures may result.
Do not forget to turn the exposure compensation dial back to
the original "0" position after exposure compensated shooting.
(2) Is the AE L mode cancelled? If it is activated the AE L mark
appears on the LCD in the viewfinder. Once you press the AE L
button located below the rapid wind lever, it maintains the
metered brightness level for 5 continuous minutes. Be aware
that the AE-locked exposure level may not be related to the
subject you photograph at any given moment. To clear the AE
L mode, press the AE L button for the second time or turn off
the main switch momentarily. The camera is now in normal
photographing mode.
31
8. Preliminary Checklist (Before loading film)
Film Wind Lock Release
If battery power drops below the camera's operational level, or the
main switch is mistakenly turned off during a long exposure shot (B
or longer than 1 second exposure), the film wind lock mechanism will
interrupt the camera operation and prevent the film from being
advanced any further. To release the film advance lock, press the lock
release with a pointed object such as a ballpoint pen. The film wind
lock will be released and the film can then be advanced.
Note 1: When the battery power becomes depleted, replace with
fresh ones as soon as possible.
Note 2: Do not press the film advance lock release for any reason
other than outlined above.
9. Ensuring years of enjoyment through proper care and handling
Before Shooting
· This camera will not operate without batteries. Load batteries correctly and check the battery capacity before use.
· Make sure the camera is in good working order before taking it out for shooting. Before
shooting important events or subjects, it is especially wise to ensure all camera functions
are in good photographing condition by taking test shots on film.
· When carrying the camera by the strap, fastening it on a tripod or fitting it on a bracket of
a large flash unit, be sure the strap ring, tripod socket or mounting lock are the correct size,
that they are in good working condition, and that the camera is securely fastened to these
devices.
About the Batteries
· Batteries left in a camera for prolonged periods may leak, resulting in malfunctioning of
the circuitry or corrosion of internal mechanisms. When the camera is not used for an
extended period, remove the batteries prior to stowing.
· In the event that a battery leak or corrosion is discovered, no matter how seemingly minor;
have a detailed examination performed at a camera service center without delay.
· Stains, dirt or fingerprints on the battery contact may cause malfunctioning or corrosion of
the circuitry. Wipe both contacts of the battery chamber and the ends of the batteries clean
with a soft cloth or paper before loading the batteries to make sure contacts are all clean.
· Do not forget to carry backup batteries when setting out for a long photography trip or
shooting in a cold place.
· Battery power lessens proportionally with the low surrounding temperature. Carry a set of
backup batteries in a warm pocket or container when shooting in a cold place and alternate
use of different sets of batteries.
· If the battery-warning symbol appears on the LCD in the viewfinder, replace the batteries
with a fresh set as soon as possible.
32
9. Ensuring years of enjoyment through proper care and handling
Camera Cleaning
· Do not apply any solvent such as thinners and/or alcohol to clean the external parts of the
camera.
· To wipe dirt or fingerprints from the camera surface, apply a soft cloth or silicone-treated
cloth after blowing dust off the camera.
· Do not apply silicone-treated cloth to glass portions such as viewfinder windows or eyepiece lenses. Such chemically treated cloths may damage the optical coatings of the glass.
Blow the dust off the glass surfaces and wipe dirt off the glass with lens cleaning tissues or
well washed micro fiber cloth, using a lens cleaning liquid available at camera stores.
LCD (Liquid Crystal Display)
· The LCD may occasionally flicker or flare under bright ambient light. Such phenomena are
not malfunctions, but typical attributes to LCD devices.
· The LCD may darken in an extremely high atmospheric temperature over 60° C or 140° F.
The LCD appearance will return to normal when cooled to room temperature.
· The display speed of LCD may slow down in a low atmospheric temperature. This is not a
malfunction, but rather an inherent characteristic of LCD technology.
Operational Conditions of Camera
· Temperature range: -5deg. C to +40deg. C or 23deg. F to 104deg. F. Relative humidity range:
Less than 80%. If left in the direct sunlight or on the dashboard of a car, the camera may far
exceed operational temperature range, causing damage to the camera. Do not leave your
camera in conditions of heat or direct sunlight. If accidentally overheated, place your camera in a cool place until it returns to a normal room temperature before further use.
Storage and Maintenance
· Your camera is a precision instrument. It is strongly recommended that you visit a service
center or a repair station for routine checks every one to two years and for overhauls every
three to five years. The best service will be provided at Bronica/Tamron service centers.
· Store the camera in a dry, dust free, cool place. Put caps on the camera and lens openings,
cavities, accessory mounting devices or electric terminals before storing your camera and
lenses.
· Do not store your photographic equipment in cabinets or drawers containing insecticides,
disinfectant, adhesives or other chemical substances. Chemical fumes are extremely harmful to precision mechanisms, electronic devices, optical elements of cameras and photographic films.
33


![CRRFTSMRN °] - at snowblowerguide.com](http://vs1.manualzilla.com/store/data/006202620_1-711fb90bb2c79d693479b4ac54c29ad0-150x150.png)