1
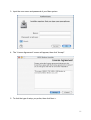
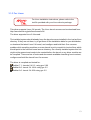
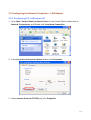
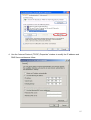
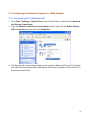
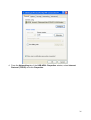
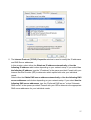
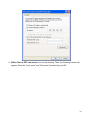
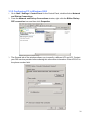
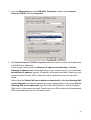
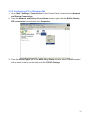
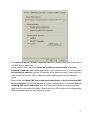
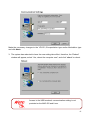
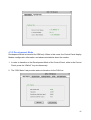
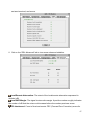
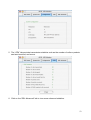
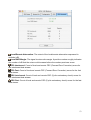
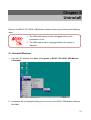
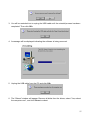
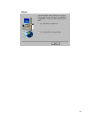
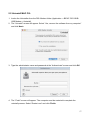
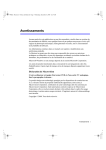
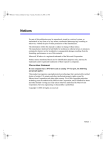
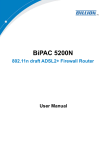
BiPAC 7001
ADSL USB Modem
User’s Manual
Chapter 1 ................................................................................................ 1
1.1 Introducing the BiPAC 7001................................................... 1
1.2 Features of the BiPAC 7001 .................................................. 1
1.3 Installing Billion ADSL USB Modem....................................... 2
Chapter 2 ................................................................................................ 3
2.1 Important note for using the BiPAC 7001............................... 3
2.2 Package Contents ................................................................. 3
2.3 The Front LEDs ..................................................................... 4
2.4 The Rear Ports ...................................................................... 4
2.5 Cabling .................................................................................. 5
Chapter 3 ................................................................................................ 6
3.1 Installing the USB Driver on PC............................................. 6
3.1.1 For Windows....................................................................... 6
3.1.2 For MAC OS 9/X: ........................................................... 10
3.1.3 For Linux:.......................................................................... 13
3.2 Configuring the Network Properties--- LAN Adapter ............ 14
3.3 Configuring the Network Properties--- WAN Adapter........... 25
3.4 Information from your ISP.................................................... 39
Chapter 4 .............................................................................................. 40
4.1 Accessing communication settings ...................................... 40
4.2 Windows DSL Status Application ......................................... 42
4.3 MAC OS 9.x Control Panel Application................................ 44
4.4 MAC OS X Control Panel Application. ................................. 49
Chapter 5 .............................................................................................. 54
5.1 Uninstall Windows: .............................................................. 54
5.2 Uninstall MAC OS:............................................................... 57
5.3 Uninstall Linux: .................................................................... 59
ii
Chapter 1
Introduction the BiPAC 7001
1.1 Introducing the BiPAC 7001
Billion’s BiPAC 7001 complies with ADSL standards and supports downstream rate of up to
8Mbps. With its user-friendly installation utility and plug-and-play USB interface, it can be
easily installed on a desktop PC or notebook PC without opening the case of the computer
or adding any network interface card (NIC). Users can enjoy ADSL services and broadband
multimedia applications such as interactive gaming, video streaming and real-time audio
much easier and faster than ever before.
1.2 Features of the BiPAC 7001
Compliant with Universal Serial Bus Specification Revision v1.1
USB bus-powered; no external power supply is required.
Compatible with T1.413 i2, G.DMT, and G.lite compliant CO DSLAM equipment
Provides an RJ-11 connector for connection to the telephone line
Hot Plug and Play for Microsoft Windows 98 (SE), 2000, Me, and XP
Supports NDIS interface for RAS and Dial-Up Networking
Support for PPP over Ethernet (PPPoE)
Software upgradable.
Supports downstream data rates up to 8Mbps and upstream data rates up to 1024 kbps
1.3 Installing Billion ADSL USB Modem
2
Chapter 2
Installing the BiPAC 7001
2.1 Important note for using the BiPAC 7001
Do not use the BiPAC 7001 in high humidity or high
temperatures.
Avoid using this product and all accessories outdoors.
Place the BiPAC 7001 on a stable surface.
13.Attention
Place the
2.2 Package Contents
BiPAC 7001 ADSL USB Modem
One installation CD with drivers and online manual
RJ-11 ADSL/telephone Cable (1.8M)
One USB Cable (1.5M)
This Quick Start Guide
3
2.3 The Front LEDs
LED
Meaning
1
ADSL :
2
DATA:
3
USB:
Lit when successfully connected to an ADSL DSLAM (“linesync”)
When this LED is flashing constantly, it indicates the Modem is
transmitting/receiving data
Lit when the USB port is connected to the PC and working properly
2.4 The Rear Ports
Port
Meaning
1
USB
Connect the supplied USB cable to this port when connecting to
the PC
2
LINE
Connect the supplied RJ-11 (“telephone”) cable to this port when
connecting to the ADSL/telephone network.
4
2.5 Cabling
Through USB Port
The product can be used as a Network Adapter on your PC. That means you do not have to
install a network adapter first on your PC before connecting the ADSL Modem/Router. Just
connect the supplied USB cable to the USB port of the ADSL USB Modem and connect the
other end to the PC.
Make sure that your ADSL USB Modem and PC are turned on. On the front of the product is
a bank of LEDs. As a first check, please verify that the ADSL, DATA and USB SYN LEDs are
lit.
So long as the cables are connected and the LEDs are lit normally, follow section “Installing
the USB Driver” below to setup this device.
Since the product cannot auto-detect whether your cable is
correct or not, please make sure you are using the right
Attention
cable to a PC or a Hub..
5
Chapter 3
Basic Installation
3.1 Installing the USB Driver on PC
1. Simply follow the instructions below which outline what you need
to do. This section is described based on Windows XP/
2000/Me/98, MAC OS 9/X and all systems will automatically
acknowledge the modem has been connected to your computer.
2. Do not plug USB cable into ADSL USB Modem before to install
the USB Driver.
3.1.1 For Windows
1. Insert the CD into your computer’s CD Rom drive. This is the hi-speed modem
installation CD, Click “setup. exe” to continue.”.
6
2. Choose service provider from the list below and then click “Next” to continue.
3. Then click “Next”.
4. Please plug USB cable into ADSL USB Modem.
7
5. Select “Yes, reboot the computer now”, than close the windows.
6. After restart the PC, window will show congratulation message and user can enjoying
Internet.
8
7. After Billion ADSL USB Modem driver is successfully installed, you will see these 2
icons on your desktop.
9
3.1.2 For MAC OS 9/X:
1. Start Windows. Then insert the installation CD into the CD-ROM drive. In next window,
click the driver installer.
2. The “Welcome” screen will appear, then, click “Next”.
10
3. Input the user name and password of your Mac system.
4. The “License Agreement” screen will appear, then click “Accept”.
5. To click the type of setup you prefer, then click Next >.
11
6. When all necessary files have been copied, select “Restart now”, than close the
windows.
12
3.1.3 For Linux:
For Linux installation instructions, please refer to the
text file provided with your Linux driver’s package.
This driver supports Linux-2.4 kernels. The Linux kernel sources can be download from:
http://www.kernel.org/pub/linux/kernel/v2.4/
The driver supports Linux-2.4 kernels.
The installed system should already have the kernel sources installed in the /usr/src/linux
directory. If they are not there, try to get them off the installation disks for your distribution,
or download the latest Linux-2.4 kernel, and configure and build that. One common
problem while compiling modules on a new kernel is not to create link /usr/src/linux which
should point to the relevent kernel source directory. On a freshly installed system this link
might not be present and needs to be created before the kernel or any driver module can
be compiled. There are lots of books and documents available describing how to extract,
configure and build the kernel from it's sources.
The driver is compiled and tested for:
RedHat 7.1 : kernels 2.4.2-2 using gcc 2.96
RedHat 8.0 : kernel 2.4.18-14 using gcc 3.2
RedHat 9.0 : kernel 2.4.20-8 using gcc 3.2
13
3.2 Configuring the Network Properties--- LAN Adapter
3.2.1 Configuring PC in Windows XP
1. Go to Start / Control Panel (in Classic View). In the Control Panel, double-click on
Network Connections, and Double-click Local Area Connection.
2. In the Local Area Connection Status window, click Properties.
3. Select Internet Protocol (TCP/IP) and click Properties
14
4. Use the “Internet Protocol (TCP/IP) Properties” window to modify the IP address and
DNS Server address as follow.
15
Change the IP address to a user defined address by selecting Use the following IP
address and typing the address in the space provided.
Change the DNS Server address to user defined addresses by selecting Use the
following DNS server address and typing the addresses in the spaces provided.
The “Advanced” button of the “Internet Protocol (TCP/IP) Properties” window may be
used to alter DNS addresses, WINS addresses and IP security settings.
5. Click OK from the Internet Protocol (TCP/IP) Properties window. Then, the Local
Area Connection Properties window will reappear. Click OK to end configuring the
network properties on your PC.
16
3.2.2 Configuring PC in Windows 2000
1. Go to Start / Control Panel (in Classic View). In the Control Panel, double-click on
Network Connections and Double-click Local Area Connection.
2. In the Local Area Connection Status window click Properties.
17
3. Select Internet Protocol (TCP/IP) and click Properties
4. Use the “Internet Protocol (TCP/IP) Properties” window to modify the IP address and
DNS Server address as follow.
Change the IP address to a user defined address by selecting Use the following IP
18
address and typing the address in the space provided.
Change the DNS Server address to user defined addresses by selecting Use the
following DNS server address and typing the addresses in the spaces provided.
The “Advanced” button of the “Internet Protocol (TCP/IP) Properties” window may
be used to alter DNS addresses, WINS addresses and IP security settings.
5. Click OK from the Internet Protocol (TCP/IP) Properties window. Then, the Local
Area Connection Properties window will reappear. Click OK to end configuring the
network properties on your PC.
19
3.2.3 Configuring PC in Windows Me
1. Go to Start / Settings / Control Panel. In the Control Panel, double-click on Network
and choose the Configuration tab.
2. Select TCP/IP ->NE2000 Compatible, or the name of your Network Interface Card (NIC)
in your PC.
3. Select the IP Address tab. In this window, select either the Obtain an IP address
automatically or Specify an IP address radio button depending on your network setup.
If you select Specify an IP address, type the “IP Address” and “Subnet Mask” in the
spaces provided. Consult with your Internet Service Provider (ISP) to determine which
option best suits your individual needs.
20
4. The “Gateway” tab allows you to add or remove gateway. Consult with your network
administrator to determine the appropriate addresses for your individual needs.
To add a new gateway, type the address in the New gateway field and click Add. The
new gateway will appear in the installed gateways list.
To remove a previously installed gateway, highlight entry to be removed in the
installed gateway list and click Remove. The gateway will no longer appear in the
installed gateways list.
5. Click OK to apply your changes and exit from the TCP/IP properties window.
6. The Network window will appear. Click OK to end the TCP/IP options modification
session.
21
3.2.4 Configuring PC in Windows 98
1. Go to Start / Settings / Control Panel. In the Control Panel, double-click on Network
and choose the Configuration tab.
2. Select TCP/IP ->NE2000 Compatible, or the name of your Network Interface Card (NIC)
in your PC.
3. Select the IP Address tab. In this window, select either the Obtain an IP address
automatically or Specify an IP address radio button depending on your network setup.
If you select Specify an IP address, type the “IP Address” and “Subnet Mask” in the
spaces provided. Consult with your Internet Service Provider (ISP) to determine which
option best suits your individual needs.
22
4. The “Gateway” tab allows you to add or remove gateway. Consult with your network
administrator to determine the appropriate addresses for your individual needs.
To add a new gateway, type the address in the New gateway field and click Add. The
new gateway will appear in the installed gateways list.
To remove a previously installed gateway, highlight entry to be removed in the
installed gateway list and click Remove. The gateway will no longer appear in the
installed gateways list.
5. Click OK to apply your changes and exit from the TCP/IP properties window.
6. The Network window will appear. Click OK to end the TCP/IP options modification
session.
23
3.2.5 Configuring PC in Linux:
To enable LAN traffic over the ethernet interface:
% ifconfig eth2 192.168.1.200 up
You may also need to modify the netmask and route for the interface. Refer to the manual
pages for ifconfig and route for more information.
To test the LAN connection is alive by pinging the remote side:
% ping 192.168.1.1
To disconnect the LAN interface:
% ifconfig eth2 down
24
3.3 Configuring the Network Properties--- WAN Adapter
3.3.1 Configuring PC in Windows XP
1. Go to Start / Settings / Control Panel. In the Control Panel, double-click on Network
and Dial-up Connections.
2. From the Network and Dial-up Connections window, right–click the Billion Dial-up
PPP connection icon and then click Properties.
3. The General tab of the windows allows you to specify a different VPI and VCI. Contact
your DSL service provider before altering this connection information. Enter VPI/VCI in
the phone number field.
25
4. From the Networking tab of the USB ADSL Properties window, select Internet
Protocol (TCP/IP) and click Properties
26
5. The Internet Protocol (TCP/IP) Properties window is used to modify the IP addresses
and DNS Server addresses.
In this window, select either the Obtain an IP address automatically or Use the
following IP address radio button depending on your network setup. If you select Use
the following IP address, type the “IP address” in the space provided. Consult with your
Internet Service Provider (ISP) to determine which option best suits your individual
needs.
Select either the Obtain DNS server address automatically or Use the following DNS
server addresses radio button depending on your network setup. If you select Use the
following DNS server addresses, type the “Preferred DNS server” or/and “Alternate
DNS server” in the spaces provided. Consult with your ISP to determine the appropriate
DNS server addresses for your individual needs.
27
6. Billion Dial-up PPP connection icon on the desktop. Then, the following window will
appear. Enter the “User name” and “Password” provided by your ISP.
28
3.3.2 Configuring PC in Windows 2000
1. Go to Start / Settings / Control Panel. In the Control Panel, double-click on Network
and Dial-up Connections.
2. From the Network and Dial-up Connections window, right–click the Billion Dial-up
PPP connection icon and then click Properties.
3. The General tab of the windows allows you to specify a different VPI and VCI. Contact
your DSL service provider before altering this connection information. Enter VPI/VCI in
the phone number field.
29
4. From the Networking tab of the USB ADSL Properties window, select Internet
Protocol (TCP/IP) and click Properties
5. The Internet Protocol (TCP/IP) Properties window is used to modify the IP addresses
and DNS Server addresses.
In this window, select either the Obtain an IP address automatically or Use the
following IP address radio button depending on your network setup. If you select Use
the following IP address, type the “IP address” in the space provided. Consult with your
Internet Service Provider (ISP) to determine which option best suits your individual
needs.
Select either the Obtain DNS server address automatically or Use the following DNS
server addresses radio button depending on your network setup. If you select Use the
following DNS server addresses, type the “Preferred DNS server” or/and “Alternate
DNS server” in the spaces provided. Consult with your ISP to determine the appropriate
DNS server addresses for your individual needs.
30
6. Billion Dial-up PPP connection icon on the desktop. Then, the following window will
appear. Enter the “User name” and “Password” provided by your ISP.
31
3.3.3 Configuring PC in Windows Me
1. Go to Start / Settings / Control Panel. In the Control Panel, double-click on Network
and Dial-up Connections.
2. From the Network and Dial-up Connections window, right–click the Billion Dial-up
PPP connection icon and then click Properties.
3. From the Server Types tab of the ADSL Easy Dialup window, select TCP/IP (marked
with a check in the box to the left) and click TCP/IP Settings
32
4. The Internet Protocol (TCP/IP) Properties window is used to modify the IP addresses
and DNS Server addresses.
In this window, select either the Obtain an IP address automatically or Use the
following IP address radio button depending on your network setup. If you select Use
the following IP address, type the “IP address” in the space provided. Consult with your
Internet Service Provider (ISP) to determine which option best suits your individual
needs.
Select either the Obtain DNS server address automatically or Use the following DNS
server addresses radio button depending on your network setup. If you select Use the
following DNS server addresses, type the “Preferred DNS server” or/and “Alternate
DNS server” in the spaces provided. Consult with your ISP to determine the appropriate
DNS server addresses for your individual needs.
33
5. Billion Dial-up PPP connection icon on the desktop. Then, the following window will
appear. Enter the “User name” and “Password” provided by your ISP.
34
3.3.4 Configuring PC in Windows 98
1. Go to Start / Settings / Control Panel. In the Control Panel, double-click on Network
and Dial-up Connections.
2. From the Network and Dial-up Connections window, right–click the Billion Dial-up
PPP connection icon and then click Properties.
3. From the Server Types tab of the ADSL Easy Dialup window, select TCP/IP (marked
with a check in the box to the left) and click TCP/IP Settings
35
4. The Internet Protocol (TCP/IP) Properties window is used to modify the IP addresses
and DNS Server addresses.
In this window, select either the Obtain an IP address automatically or Use the
following IP address radio button depending on your network setup. If you select Use
the following IP address, type the “IP address” in the space provided. Consult with your
Internet Service Provider (ISP) to determine which option best suits your individual
needs.
Select either the Obtain DNS server address automatically or Use the following DNS
server addresses radio button depending on your network setup. If you select Use the
following DNS server addresses, type the “Preferred DNS server” or/and “Alternate
DNS server” in the spaces provided. Consult with your ISP to determine the appropriate
DNS server addresses for your individual needs.
36
5. Billion Dial-up PPP connection icon on the desktop. Then, the following window will
appear. Enter the “User name” and “Password” provided by your ISP.
37
3.3.5 Configuring PC in Linux:
The PPP daemon (pppd) talks to the driver over TTY devices. Before the driver can be used,
the devices /dev/ttyG0 and /dev/cug0 need to be reated. This can be performed by
executing:
% make devnodes
38
3.4 Information from your ISP
Before configuring this device, you have to check with your ISP (Internet Service Provider)
what kind of service is provided such as PPPoE, PPPoA, RFC1483, or IPoA.
Gather the information as illustrated in the following table and keep it for reference.
PPPoE
VPI/VCI, VC-based/LLC-based multiplexing,
Username, Password, Service Name, and Domain
Name System (DNS) IP address (it can be
automatically assigned from ISP or be set fixed).
PPPoA
VPI/VCI, VC-based/LLC-based multiplexing,
Username, Password, and Domain Name System
(DNS) IP address (it can be automatically
assigned from ISP or be set fixed).
RFC1483
Bridged
VPI/VCI, VC-based/LLC-based multiplexing
RFC1483
Routed
VPI/VCI, VC-based/LLC-based multiplexing, IP
address, Subnet mask, Gateway address, and
Domain Name System (DNS) IP address (it is
fixed IP address).
IPoA
VPI/VCI, IP address, Subnet mask, Gateway
address, and Domain Name System (DNS) IP
address (it is fixed IP address).
39
Chapter 4
Configuration
4.1 Accessing communication settings
Once the Billion BiPAC 7001 ADSL USB Modem and software have been installed, the
communication settings may be easily updated by performing the following steps:
1. From your PC desktop, click Start → Programs → BiPAC-7001 ADSL USB Modem →
Configure
2. The “Communication Settings” window will be displayed.
40
Make the necessary changes to the VPI/VCI, Encapsulation type and/or Modulation type
and click Next>
3. The system has rebooted to have the new setting take effect, therefore, the “Reboot”
window will appear, select “Yes, reboot the computer now”, and click “close” to reboot.
Access to the USB modem’s communication setting is not
provided on the MAC OS and Linux.
41
4.2 Windows DSL Status Application
The Billion ADSL USB Modem control panel program provides a quick and easy way to
configure and check the performance of the modem and the ADSL connection. When open,
the monitor window updates every 2 seconds.
To access the DSL Status Application, the device driver must be
running. Also, make sure the USB cable is plugged into the
modem. .
1. There are three methods to access ADSL USB Modem DSL status application.
From the start menu by selecting Start ->Program-> BiPAC 7001 ADSL USB Modem->
DSL Status, or
From the PC desktop, double click the DSL Modem icon
in the system tray, or
From the PC desktop, double click the DSL Modem icon.
2. The DSL Status Application allows you to review the current state of the Billion ADSL
USB Modem and connection. The green indicator for Link Status signifies that a
connection has been made. This indicator blinks while a connection is being established.
3. The system information can be displayed by clicking on the arrow button
. This
42
screen displays the release number of the ADSL USB Modem driver, and the DSL Status
Application version you are currently using. (To show DSL data include Package
version, Driver version, Control Panel version and Firmware version)
43
4.3 MAC OS 9.x Control Panel Application
4.3.1 Control Panel:
The Billion ADSL USB Modem control panel program provides a quick and easy way to
configure and check the performance of the modem and the ADSL connection. When open,
the monitor window updates every 2 seconds.
To access the Control Panel, the device driver must be
installed.
1. To access the modem control Panel on a Macintosh, click on the Apple icon then select
Control Panels -> ADSL Setup.
2. The “ADSL USB Modem” window will appear, with two informational tabs:
A) The “DSL Status” tab provides status information for DSL line, such as the
upstream/downstream data rates, the modulation and whether it is operational or
not.
B) The “System info” tab provides general information about the various software/
firmware versions.
44
4.3.2 Development Mode
Development Mode is intended for OEM only. When in this mode, the Control Panel display
Modem configuration information and advanced statistics about the modem.
1. In order to transition to the Development Mode of the Control Panel, while in the Control
Panel, press the “Ctrl +1” key simultaneously.
2. The “DSL Status” tab provides status information for the DSL line.
45
Click Retrain or Disconnect a connection for testing purposes.
3. The “System info” tab provides general information about the various software/firmware
version using the same screen as the generally available Control panel previously
described.
4. Click on the “Configuration” tab to view and modify the Modulation type, VPI and VCI
values, Encapsulation Mode and ATM Modes.
If you have made any changes, click Apply.
5. The “ATM” tab provides transmission statistics such as the number of cells or packets
46
sent and received, and errors.
6. Click on the “DSL Advanced” tab to view more advanced statistics.
Local/Remote Attenuation: The extent of the local/remote attenuation expressed in
decibels (dB)
Local SNR Margin: The signal to noise ratio margin. A positive number roughly indicates
the number of dB that the noise could increase before the modem produces errors.
FEC-Interleaved: Count of local and remote FEC (Forward Error Correction) errors for
47
the interleaved data stream.
FEC-Fast: Count of local and remote FEC (Forward Error Correction) errors for the fast
data stream.
CRC-Interleaved: Count of local and remote CRC (Cyclic redundancy check) errors for
the interleaved data stream.
CRC-Fast: Count of local and remote CRC (Cyclic redundancy check) errors for the fast
data stream.
48
4.4 MAC OS X Control Panel Application.
4.4.1 Control Panel
1. Access the modem Control Panel on your Macintosh (Go
ADSL USB MODEM)
Applications
DSL MODEM
2. The “ADSL USB Modem” window will appear, with two informational tabs:
a) The “DSL Status” tab provides status information for the DSL line, such as the
upstream/downstream data rates, the modulation and whether it is operational or
not.
b) The “System info” tab provides general information about the various
software/firmware versions.
49
4.4.2 Development Mode
Development Mode is intended for OEM only. When in this mode, the Control Panel display
Modem configuration information and advanced statistics about the modem.
1. In order to transition to the Development Mode of the Control Panel, while in the Control
Panel, press the “Ctrl +1” key simultaneously
2. The “DSL Status” tab provides status information for the DSL line.
50
Click Retrain or Disconnect a connection for testing purposes.
3. The “System info” tab provides general information about the various software/firmware
version using the same screen as the generally available Control panel previously
described.
4. Click on the “Configuration” tab to view and modify the Modulation type, VPI and VCI
values, Encapsulation Mode and ATM Modes.
51
5. The “ATM” tab provides transmission statistics such as the number of cells or packets
sent and received, and errors.
6. Click on the “DSL Advanced” tab to view more advanced statistics.
52
Local/Remote Attenuation: The extent of the local/remote attenuation expressed in
decibels (dB)
Local SNR Margin: The signal to noise ratio margin. A positive number roughly indicates
the number of dB that the noise could increase before the modem produces errors.
FEC-Interleaved: Count of local and remote FEC (Forward Error Correction) errors for
the interleaved data stream.
FEC-Fast: Count of local and remote FEC (Forward Error Correction) errors for the fast
data stream.
CRC-Interleaved: Count of local and remote CRC (Cyclic redundancy check) errors for
the interleaved data stream.
CRC-Fast: Count of local and remote CRC (Cyclic redundancy check) errors for the fast
data stream.
53
Chapter 5
Uninstall
Remove the BiPAC 7001 ADSL USB Modem software drivers by performing the following
steps.
1. The USB cable should not be unplugged until you are
prompted to do so.
2. The USB cable must be unplugged before the system is
rebooted.
5.1 Uninstall Windows:
1. From your PC desktop click Start -> Programs -> BiPAC 7001 ADSL USB Modem
->Uninstall.
2. A message will be displayed asking you to remove of the ADSL USB Modem software,
click Yes>
54
3. You will be reminded into to unplug the USB cable until the uninstall process has been
completed. Then click OK>
4. A message will be displayed indicating the software is being removed.
5. Unplug the USB cable from the PC and click OK>
6. The “Reboot” window will appear. Remove all disks from the drives, select “Yes, reboot
the computer now”, and click Close to reboot.
55
56
5.2 Uninstall MAC OS:
1. Invoke the Uninstaller from the DSL Modem folder (Application -> BiPAC 7001 ADSL
USB Modem ->Uninstall)
2. The “Uninstall” screen will appear. Select “Yes, remove the software from my computer”
and click Next>
3. Type the administrator name and password at the “Authenticate” screen and click OK.
4. The “Finish” screen will appear. The computer must be restarted to complete the
uninstall process. Select “Restart now” and click Finish.
57
58
5.3 Uninstall Linux:
To unload an unused module:
% rmmod ./GSPNModem (Command to be executed from directory
monaco_linux/ModemDrv)
You may need to exit or disconnect any program current using the module before it will
unload. If the module was configured for LAN, shutdown the ethernet interface:
% ifconfig eth2 down
Note: If multiple ethernet interfaces are created then all the ethernet interfaces need to be
brought down before unloading the driver.
If the module was configured as a WAN device, you may need to disconnect
the PPP daemon (pppd) from the TTY interfaces. Do this by terminating the PPP daemon:
% killall pppd
59